

Page 1

Register your product and get support at
www.philips.com/welcome
EN User manual
24PFL5459/V7
20PFL5439/V7
Page 2

Cover 2 Blank
Page 3

Contents
1 Notice 2
2 Important 3
Product disposal Guidelines 4
Use your TV 5
3
4
Use more of your TV
5
Play photos, music and videos
o n USB storage devices
6 Troubleshooting
7 Product information
8
Consumer Guidelines
Warranty
9
9
16
18
21
23
24
EN 1
Page 4

1 Notice
Pixel characteristics
This LCD/LED product has a high number of
color pixels. Although it has effective pixels of
99.999% or more, black dots or bright points of
light (red, green or blue) may appear constantly
on the screen. This is a structural property of
the display (within common industry standards)
and is not a malfunction.
Warranty
No components are user serviceable. Do not
open or remove covers to the inside of the
product. Repairs may only be done by Philips
Service Centres and official repair shops.
Failure to do shall void any warranty, stated
or implied.
Any operation expressly prohibited in
this manual, or any adjustments and
assembly procedures not recommended
or authorised in this manual shall void the
warranty.
2 EN
Page 5

2 Important
Read and understand all instructions before you
use your TV. If damage is caused by failure to
follow instructions, the warranty does not apply.
Safety
Risk of electric shock or fire!
Never expose the TV to rain or water.
Never place liquid containers, such as
vasels, near the TV. If liquids are spilt on
or into the TV, disconnect the TV from
the power outlet immediately. Contact
Philips Consumer Care to have the TV
checked before use.
Never place the TV, remote control or
batteries near naked flames or other
heat sources, including direct sunlight. To
prevent the spread of fire, keep candles
or other flames away from the TV, remote
control and batteries at all times.
Never insert objects into the ventilation
slots or other openings on the TV.
When the TV is swivelled ensure that
no strain is exerted on the power cord.
Strain on the power cord can loosen
connections and cause arcing.
Risk of short circuit or fire!
Never expose the remote control or
batteries to rain, water or excessive heat.
Avoid force coming onto power plugs.
Loose power plugs can cause arcing or
fire.
Risk of injury or damage to the TV!
Two people are required to lift and carry
a TV that weighs more than 25 kg or 55
lbs.
When stand mounting the TV, use only
the supplied stand. Secure the stand to
the TV tightly. Place the TV on a flat, level
surface that can support the combined
weight of the TV and the stand.
When wall mounting the TV, use only a
wall mount that can support the weight of
the TV. Secure the wall mount to a wall
that can support the combined weight of
the TV and wall mount.PE Electronics
Ltd. bears no responsibility
for improper wall mounting that result in
accident, injury or damage.
Risk of injury to children!
Follow these precautions to prevent the
TV from toppling over and causing injury to
children:
Never place the TV on a surface covered
by a cloth or other material that can be
pulled away.
Ensure that no part of the TV hangs over
the edge of the surface.
Never place the TV on tall furniture (such
as a bookcase) without anchoring both
the furniture and TV to the wall or a
suitable support.
Educate children about the dangers of
climbing on furniture to reach the TV.
Risk of swallowing batteries!
The product/remote control may
contain a coin-type battery, which can be
swallowed. Keep the battery out of reach
of children at all times!
Risk of overheating!
Never install the TV in a confined space.
Always leave a space of at least 4 inches
or 10 cm around the TV for ventilation.
Ensure curtains or other objects never
cover the ventilation slots on the TV.
EN 3
Page 6

Risk of damage to the TV!
• Before you connect the TV to the power
outlet, ensure that the power voltage
matches the value printed on the back
of the TV. Never connect the TV to the
power outlet if the voltage is different.
Risk of injury, fire or power cord damage!
• Never place the TV or any objects on the
power cord.
• To easily disconnect the TV power cord
from the power outlet, ensure that you
have full access to the power cord at all
times.
• When you disconnect the power cord,
always pull the plug, never the cable.
• Disconnect the TV from the power
outlet and antenna before lightning
storms. During lightning storms, never
touch any part of the TV, power cord or
antenna cable.
Risk of hearing damage!
• Avoid using earphones or headphones at
high volumes or for prolonged periods of
time.
Low temperatures
• If the TV is transported in temperatures
below 5°C or 41°F, unpack the TV and
wait until the TV temperature matches
room temperature before connecting the
TV to the power outlet.
Screen care
• Avoid stationary images as much as
possible. Stationary images are images
that remain on-screen for extended
periods of time. Examples include:
on-screen menus, black bars and time
displays. If you must use stationary
images, reduce screen contrast and
brightness to avoid screen damage.
• Unplug the TV before cleaning.
• Clean the TV and frame with a soft,
damp cloth. Never use substances such as
alcohol, chemicals or household cleaners
on the TV.
• Risk of damage to the TV screen!
Never touch, push, rub or strike the screen
with any object.
• To avoid deformations and colour fading,
wipe off water drops as soon as possible.
Product disposal Guidelines:
For the purpose of recycling to facilitate effective utilization of resources, please
return this product to a nearby authorized collection center, registered dismantler,
recycler, service center when disposing of this product.
In case of further assistance, you may contact nearest authorized service center.
Or Please see the Company website for further information on collection centers etc.
Visit-http://www.philips.com
Toll :1860 200 0129
Visit-http://www.philips.com
Toll :1860 200 0129
4 EN
( )
Page 7

3 Use your TV
Congratulations on your purchase, and welcome to Philips. To fully benefit from the
support that Philips offers, register your TV at www.philips.com/welcome.
3.1 Name and Function of Control on Set
(24PFL5459/V7 & 20PFL5439/V7)
A) TV controls and Indicators
1) IR SENSOR
2) LED INDICATOR
OUT
1
B) Connectivity
2
VIDEO
USB 2
USB 1
L1 INR1 INV1 IN
VOL +
VOL -
CH +
CH MENU
TV/AV
STANDBY
EAR
PHONE
OUT
Note:
1) Above sketches are just for representation. Actual product may look different.
2) Connect YPbPr Audio input to R IN & L IN input terminals for Av2.
3) MHL is Supported in HDMI 1 & ARC is supported in HDMI 2.
4) For source selection by controls on TV, Press TV/AV key repeatedly till you
reach to desired source In source OSD & then press VOL+ key.
HDMI 1
MHL
HDMI 2
ARC
V2 IN
R2 IN L2 IN
Pb
Y
Pr
VGA IN
RF IN
IN
VGA
AUDIO
EN 5
Page 8

3.2 Name and Function of Control on Remote
1
2
5
10
11
12
13
14
3
SOURCE
TV
FORMAT
4
LIST
INFO
20
19
18
6
OK
7
8
ADJUST
OPTIONS
17
9
CH-
CH+
16
15
6 EN
Page 9

(Standby-On)
1
• Switches the TV ON or OFF.
The TV is not powered off completely
unless it is physically unplugged
Multimedia Control buttons
2
• Control video or music.
SOURCE
3
• Selects connected devices.
4
TV
•
Access the TV mode.
5
LIST
•
Access the Channel List.
6
7
8
9
10
11
12
(Navigation buttons)
• Navigate through menus and select
items. (Also in USB mode).
OK
• Confirm an entry or selection.
ADJUST
Access the Adjust menu to adjust settings.
•
Return to the previous menu or exit
•
a function.
CH - / CH +
•
+/-
•
Color buttons
•
(
Switch channels or navigate through
menu pages, tracks, albums or
folders.
Adjust volume.
Select tasks or options.
Previous/Next )
15
TEXT
• Not applicable for 5400 series model’s.
16
Mute or restore audio.
•
17
OPTIONS
Access the option menu to adjust settings.
•
18
INFO
•
Displays the source information with
details of input connected.
( Home )
19
• Access the home menu.
FORMAT
20
• Adjust picture format.
3.3 Remote control usage
When you use the remote control, hold it close
to the TV and point it at the remote control
sensor. Make sure that the line-of-sight between
the remote control and TV is not blocked by
furniture, walls or other objects.
~5m
o
~30
0-9 Numeric buttons
13
• Select channels.
SUBTITLE
14
• Not Applicable for 5400 series model’s.
EN 7
Page 10
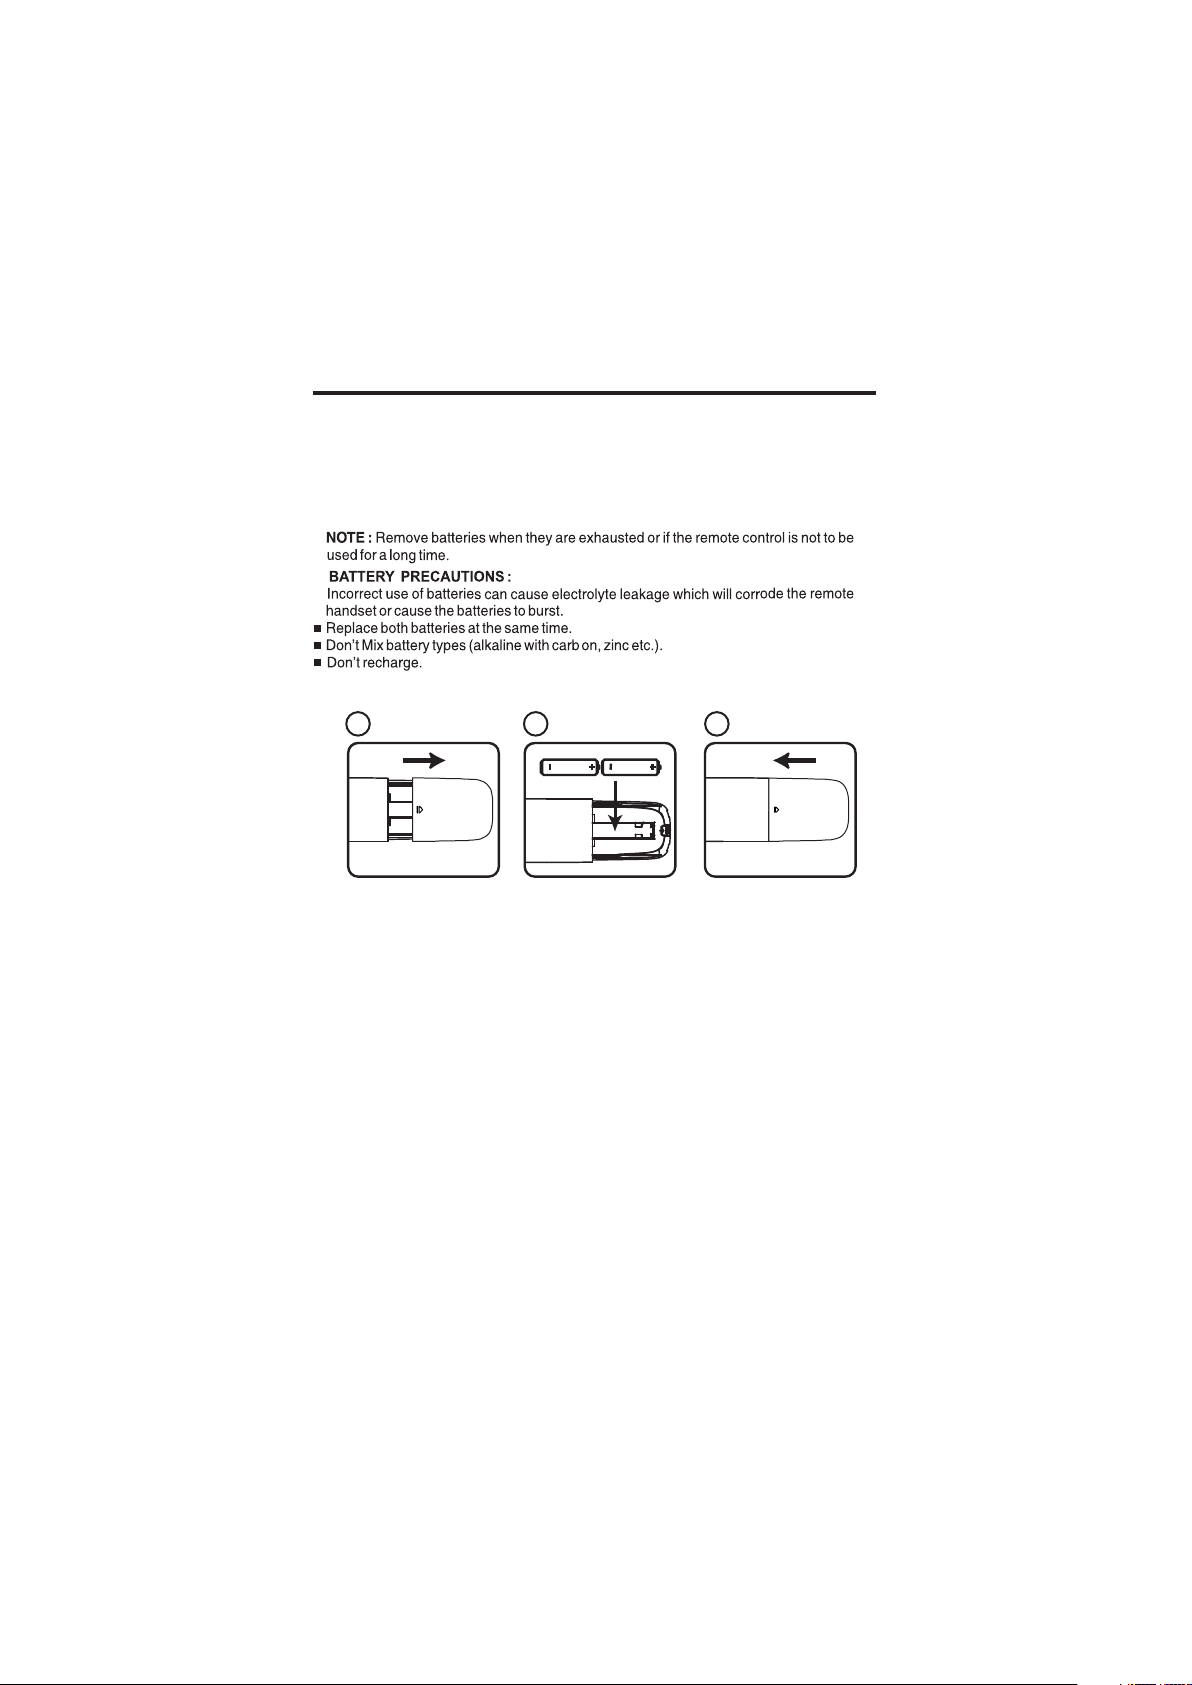
3.4 Battery Installation
1. Remove the battery compartment door.
2. Install 2 “AAA” or UM-4 (1.5V) batteries or equivalent with the correct polarity
as indicated.
3. Refix the battery compartment door.
1 2 3
8 EN
Page 11
4 Use more of
your TV
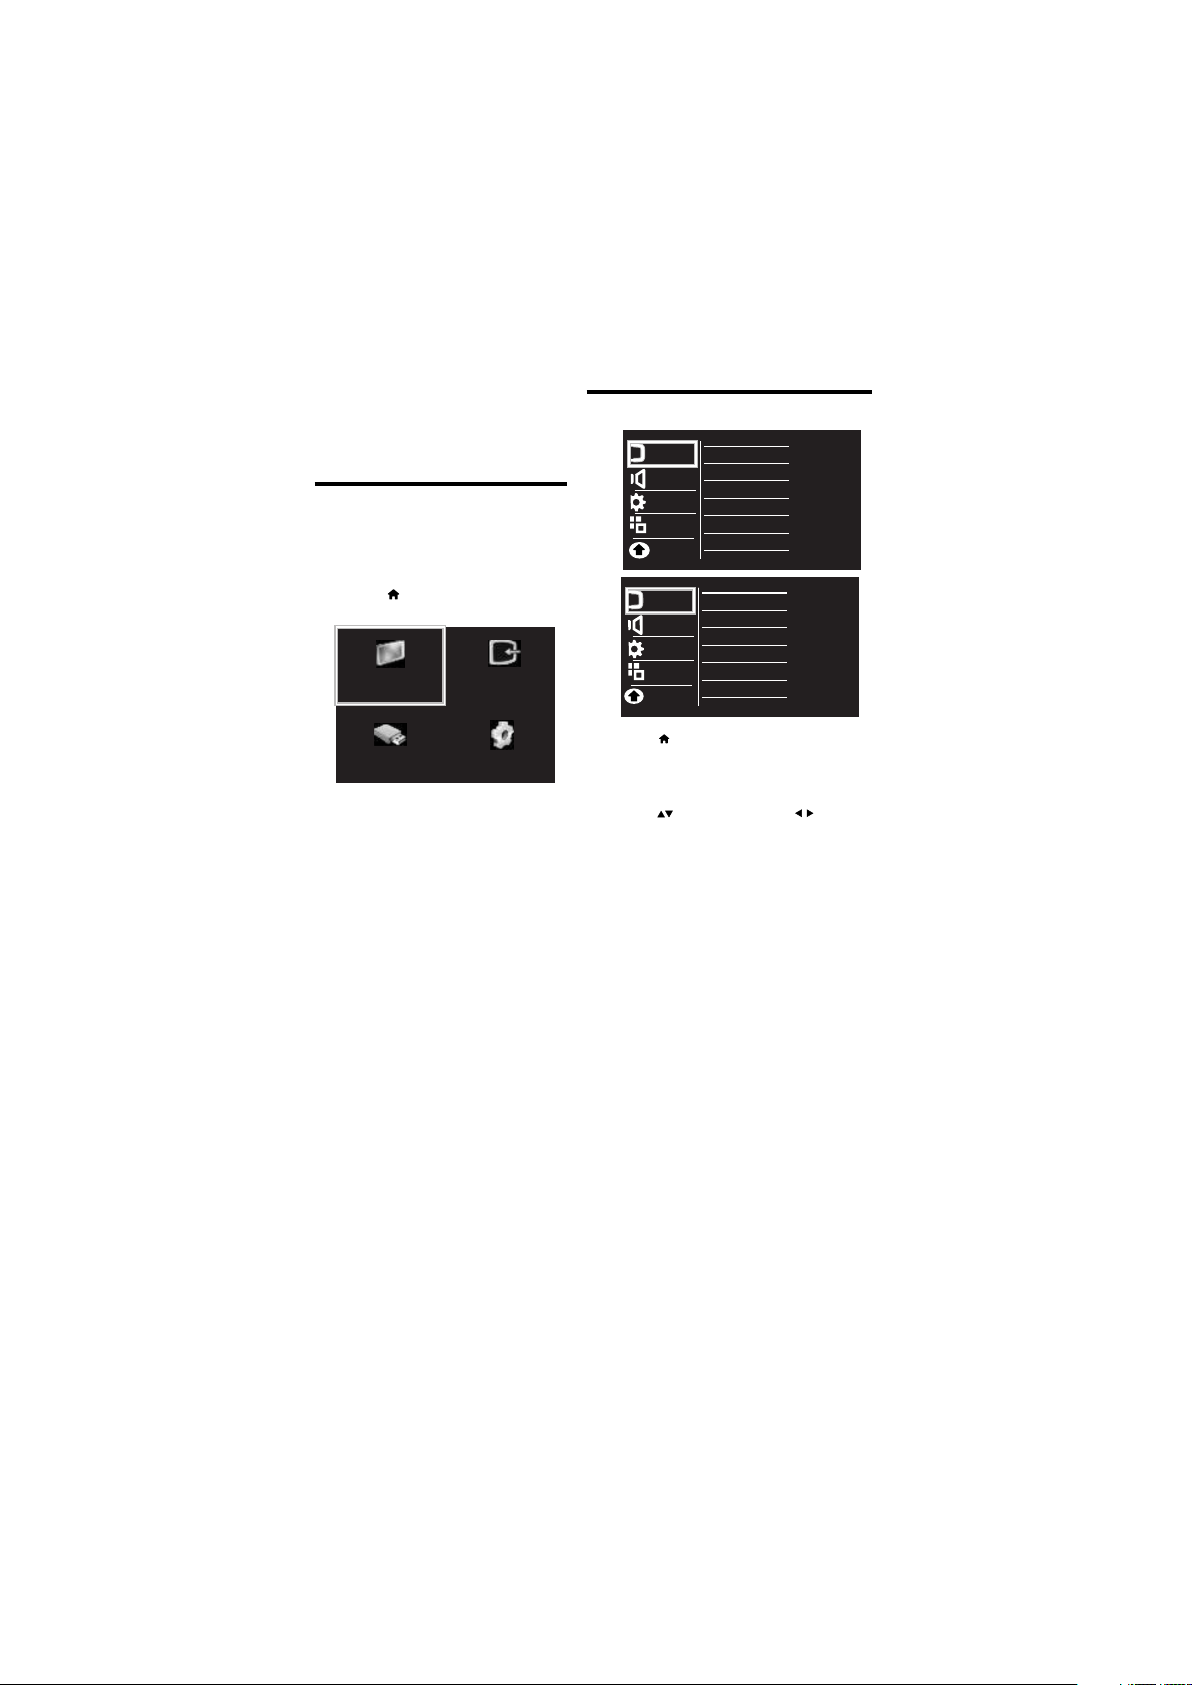
4.1 Main Menu
Menus help you to install channels, change
picture and sound settings and access other
TV features.
1
Press
» The menu screen appears.
Watch TV Device List
Browse USB Setup
2 Select one of the following, then press
OK
[Watch TV]
•
antenna is selected, switch back to
the antenna source
•
[Browse USB]:
play music and movies contained in
USB storage devices.
• [Device List]
change other source by pressing key.
•
[Setup]
picture, sound and other settings.
: If a source other than
View photos and
: Access menus to
: Access menus to change
4.2 Manually adjust picture setting
Smart Picture
Picture
Contrast
Brightness
Sound
Color
Installation
Hue
Sharpness
Features
Color Temperature
Parental
Blueback
Digital Crystal Clear
Digital Crystal Clear
Pixel Precise HD
Picture
Picture
Geometric
Geometric
Picture
Geometric
Sound
Sound
Sound
Features
Features
Installation
Installation
Installation
Features
Parental
1
Press .
2
Select [Setup] > [Picture] ,
then press OK.
3
Select one of the following settings, then
Press to move, and press to adjust.
• [Smart picture]
picture settings.
• [Contrast]
backlight areas, while the video contents
are kept unchanged.
• [Brightness]
details of dark areas.
•
[Color]
• [Sharpness]
image.
Note: Not Applicable for VGA Mode
• [Hue]
: Compensate for color variations.
(Available only for NTSC channels).
• [Color Temperature]
balance in an image.
•
[Blueback] :This function is used to ON/OFF
the blue screen at no signal condition.
: Access predefined smart
: Adjust the intensity of
: Adjust the intensity and
: Adjust color saturation.
: Adjust sharpness in the
: Adjust the color
EN 9
Page 12
[Pixel Precise HD ] :
To enhance the picture quality
[Flesh Tone] : Adust Flesh tone
•
•
[Noise Reduction]: Filter and reduce noise
in an Image
[Dynamic contrast]
•
contrast.
• [Color enhancement]
colors more vivid and improve the
details in bright colors. You can
switch this feature ON or OFF.
[Geometric] :
• [Auto Setting]:This automatically adjust
H & V-position,Phase and Clock for VGA
mode.
[H-Position]
•
position of image [Only in VGA].
[V-Position]
•
•
position of image [Only in VGA].
[Manual Clock]: If picture is not OK
•
•
with Auto Setting, then adjust by manual
clock [Only in VGA].
[Phase]: If picture is not OK with Auto
•
•
Setting, then adjust by phase.
[Only in VGA].
: Adjust the horizontal
: Adjust the vertical
: Enhance
: Make
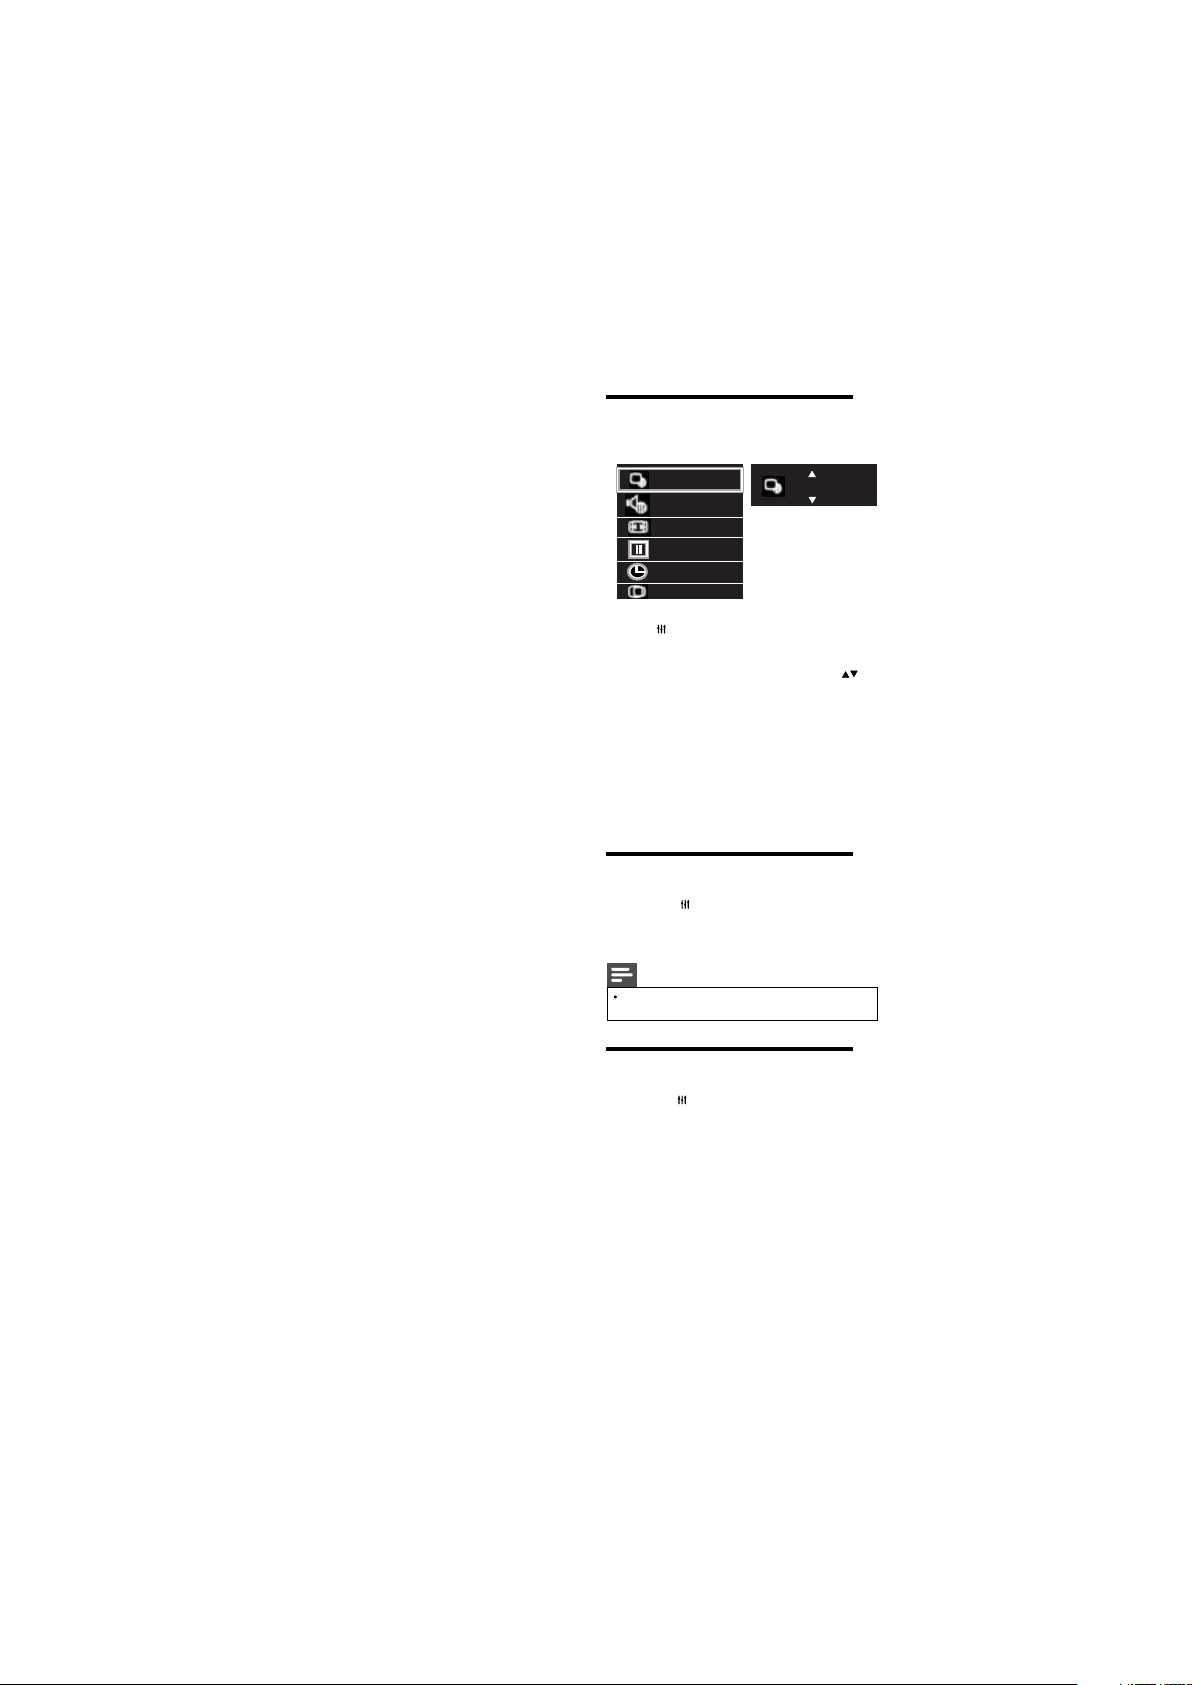
4.3 Use Smart Picture
Use smart picture to apply pre-defined
picture settings.
Smart Picture
Smart Sound
Picture Format
Freeze
Sleep Timer
Geometric
1 Press ADJUST.
2 Select [Smart Picture], then press OK.
3 Select one of the following settings, by
•
[Bright]
: Ideal settings for night time.
: Rich and dynamic settings,
[Vivid]
•
ideal for daytime.
[Sport]
•
•
•
: Ideal settings for sport.
[Cinema]
: Ideal settings for movies.
.
[Personal]
picture settings.
: Apply your customised
Vivid
4.4 Use Picture Format
1 Press
2 Select [Picture Format], then press OK
3
Depending on the format of the picture
source, some picture settings may not be available.
ADJUST
.
Select any picture format, then press OK
Note
10 EN
4.5 Use Freeze option
1 Press ADJUST.
2 Select [Freeze], then press OK
Select option as ON to freeze the
3
picture.
Page 13
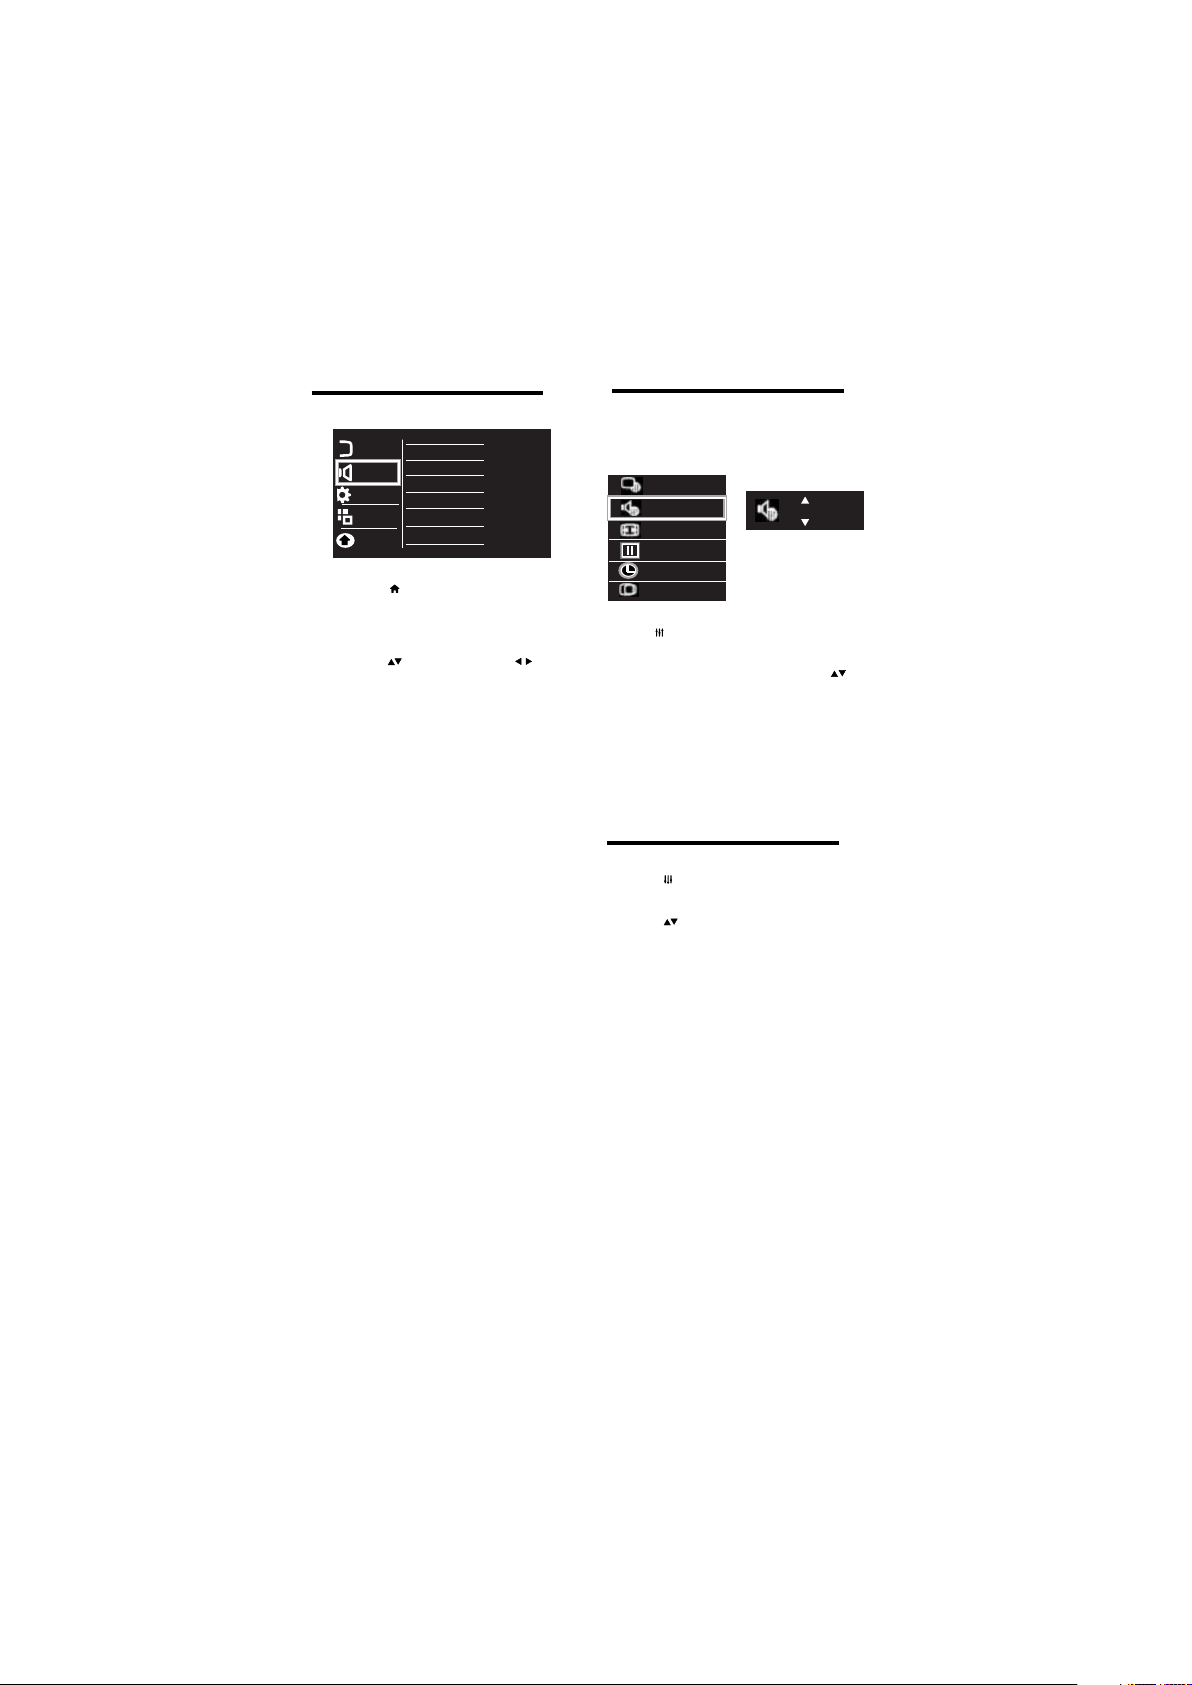
4.6 Manually adjust sound setting
Smart Sound
Picture
Equalizer
Bass
Sound
Treble
Installation
Balance
Features
Volume
Speakers
Parental
AVL
Press
1
2
3 Select one of the following settings, then
• [Smart Sound]
• [Equalizer]
•
•
• [Balance]
•
•
• [AVL] :
.
Select [Setup] >
then press
[Sound]
OK
Press to move, and press to adjust.
: Access predefined smart
sound settings.
: Adjust the equalizer ON
various frequencies.
[Bass] :
Adjust the bass level.
[Treble] :
Adjust the treble level.
: Adjust the balance of the right
and left speakers.
[Volume] : The main speaker volume can be
adjusted by varying this volume bar.
[Speakers] : The main speakers can be
made ON / OFF by this option.
Auto volume leveler
automatically reduces sudden
volume changes, for example when
switching channels.
4.7 Use Smart Sound
Use smart sound to apply pre-defined
Sound settings.
Smart Picture
Smart Sound
Picture Format
Freeze
Sleep Timer
Geometric
Press ADJUST.
1
2
Select
3
Select one of the following settings, by
[Smart sound]
sound settings.
• [Standard]
environments and types of audio.
• [Music]
• [News]
such as news.
• [Personal]
customised in the sound menu.
[Smart Sound], then press OK.
: Access predefined smart
: Settings that suit most
: Ideal settings for listening to music.
: Ideal settings for spoken audio,
: Apply the settings that were
Standard
4.8 Use Sleep Timer
Press ADJUST
1
2
Select
.
[Sleep Timer], then press OK.
Press adjust the Sleep timer OFF and ON
in step of 5,10,30,60,120 min
EN 11
Page 14
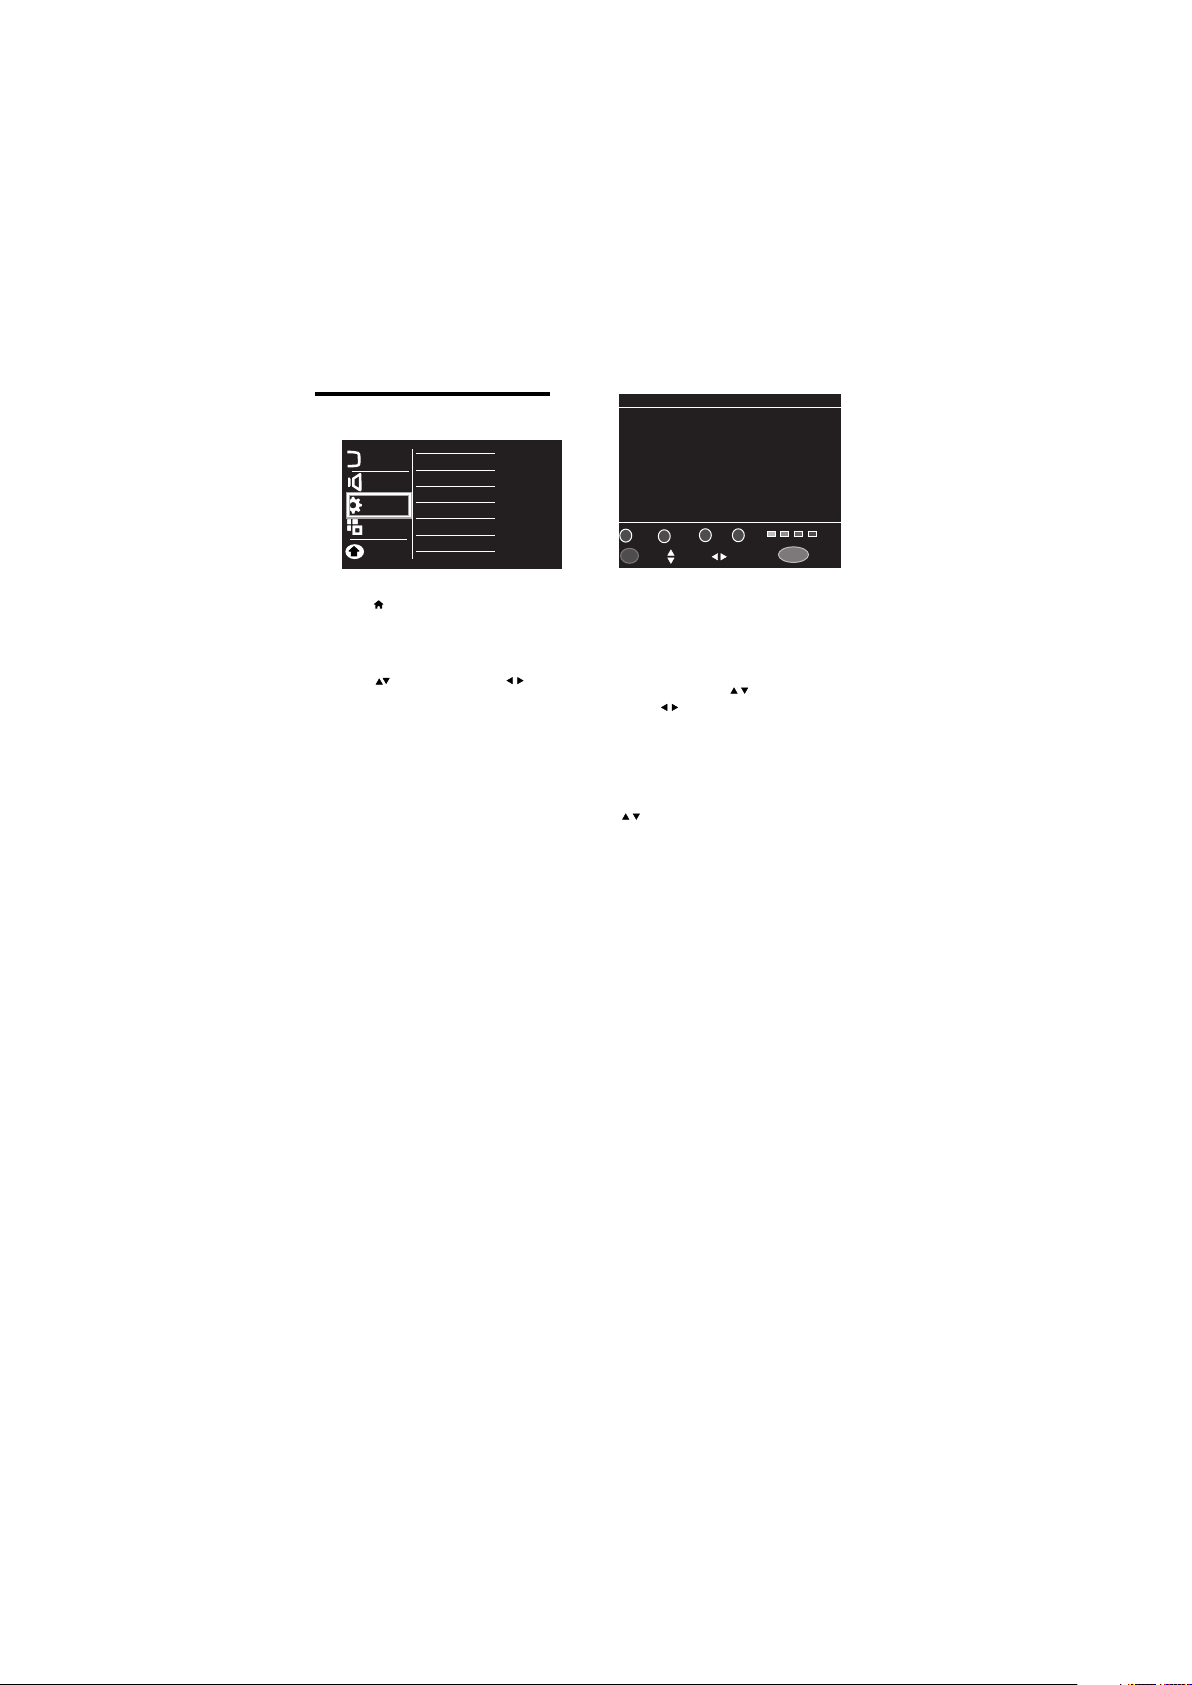
4.9 Installation Menu
Channel No.
Picture
Color System
Sound System
Sound
Auto Install
Installation
Manual Install
Program Edit
Features
Parental
Enter
Rename Move
2
Select
Program Edit
48.25MHZ
83.25MHZ
105.25MHZ
169.25MHZ
175.25MHZ
203.25MHZ
224.25MHZ
463.25MHZ
545.75MHZ
551.25MHZ
3
Prev./Next
MENU
FAV
Reutrn
Skip
4
1
2
3
4
5
6
7
8
9
10
1
Delete
OK
Press
1
2
.
Select [Setup] >
then press
OK
[Installation]
3 Select one of the following settings, then
Press to move, and press to adjust.
[Channel No.] : Display the channel number of
•
the current channel.
[Color System] : Change the color system
•
(AUTO/PAL/SECAM) setting if the picture is not
reproduced properly.
Note: For India color system is Auto or
PAL.
[Sound System]
•
: Change the sound
sound system (BG/I/DK) setting if sound
is not reproduced properly.
Note: For India sound system is BG.
•
[Auto Install]
set will start auto tuning for all available
:Select the function TV
channels.
[Manual Install]
•
searching the channels,select the function
from which tuning will start.
[Program Edit]:
•
:Select this for manually
You can Delete, Rename,
Move or Skip any programmes.
Delete
Select Delete option by Pressing 1 button, the
program will be deleted.
Rename
Move the cursor to the program, Select
Rename option by pressing 2 button to rename
the program. Press to choose the character.
Press to move the cursor.
Press OK button to Enter ,
Press Menu button to Return the Edit Menu.
Move
Move the cursor to the program, Select
Move option by pressing 3 button and press
to move the program.
Skip
Select Skip option by pressing 4 button to
skip this program.
Favourite List
User can prepare 4 independent favourite list.
To define favourite list, Move the cursor to the
desired program number & press Red/Green/
Yellow or Cyan color key in which you wish
to add program
To access favourite list press Red/Green/
Yellow/Cyancolor keys on remote.
12 EN
Page 15
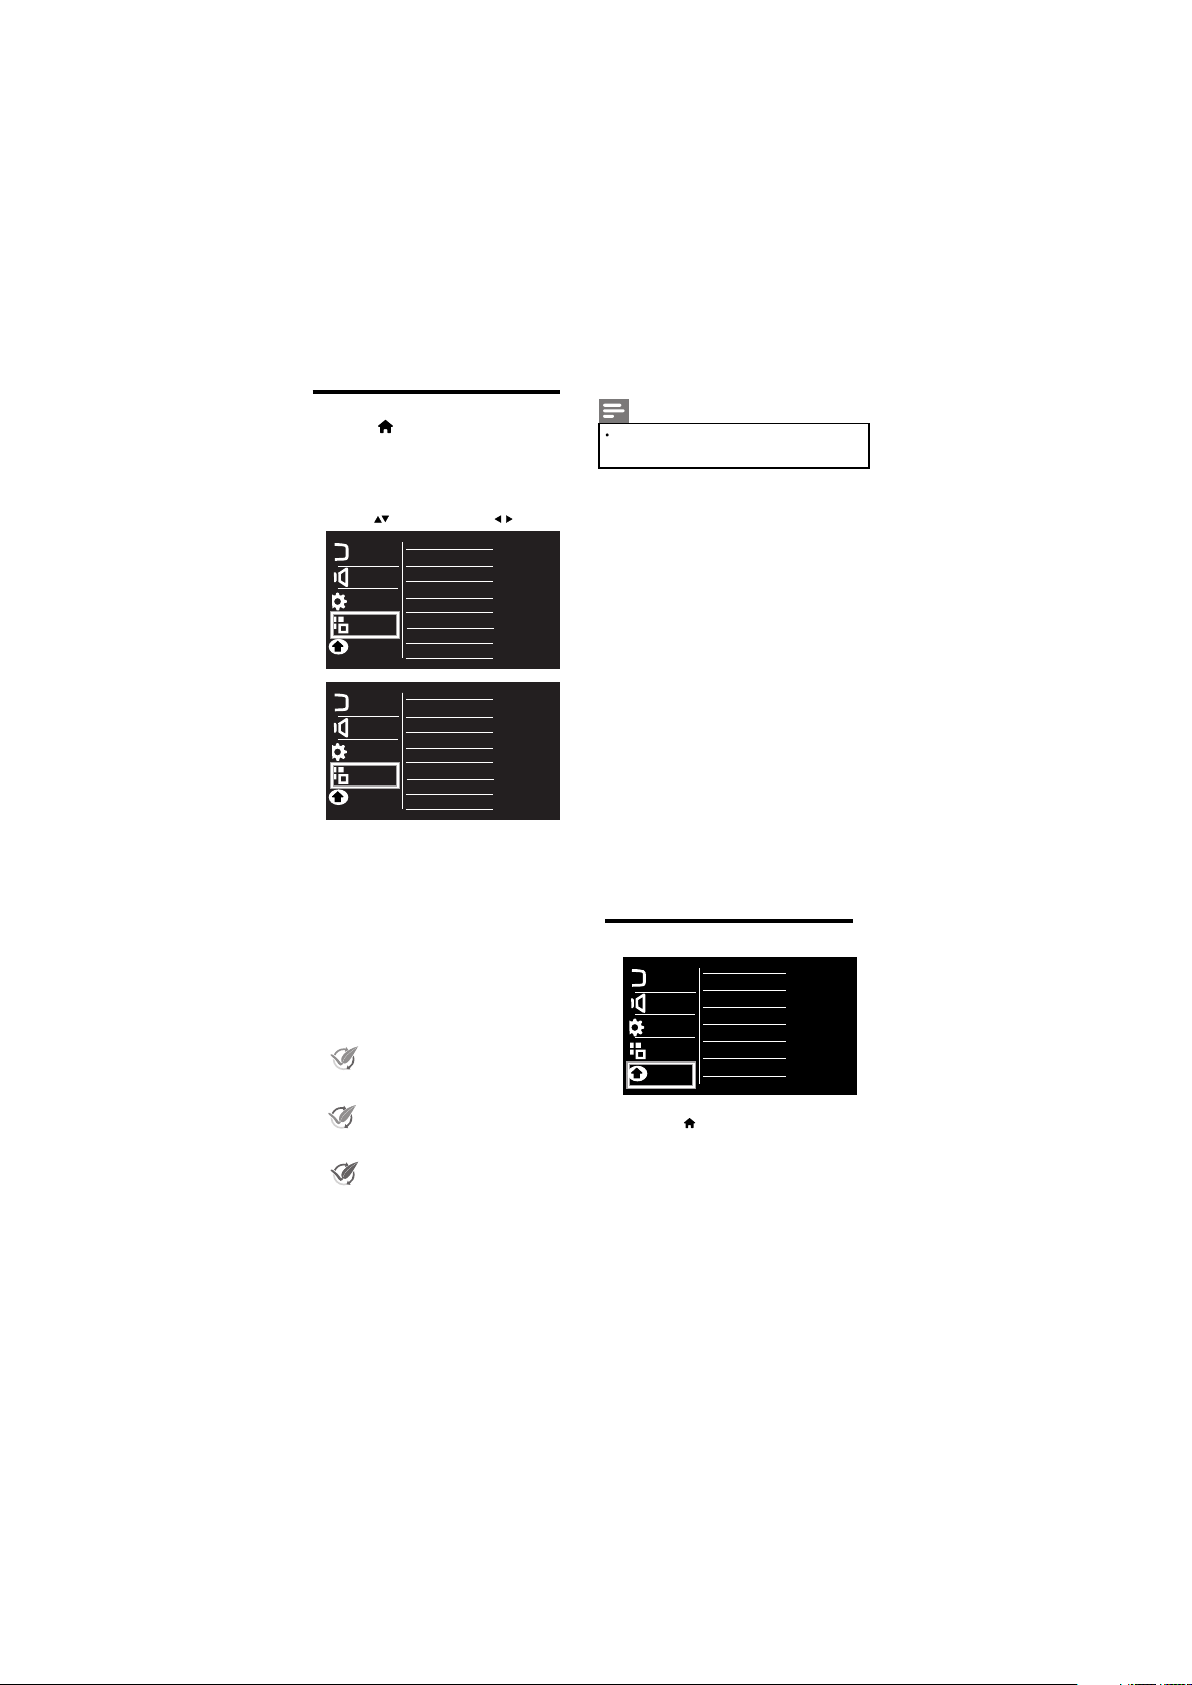
4.10 Features Menu
Press
1
2 Select [Setup] >
then press
3 Select one of the following settings.
then press OK. .
Press to move, and press to adjust.
Picture
Sound
Installation
Features
Parental
Picture
Sound
Installation
Features
Parental
[Back Light] :
•
can be varied . This function used to
adjust brightness level of panel.
[Energy Saving]:
•
the power consumed by TV, select
power saving modes Off/low/Mid/ High/
Audio only Mode.
After selection of Low/Mid/high energy
saving indication displayed on energy
meter by pressing info key of remote control
Low: After selection of energy saving
option to “Low”, approx.5% of rated
power will get saved.
Mid: After selection of energy saving
option to “Mid”, approx.10% of rated
power will get saved.
High: After selection of energy saving
option to “High”, approx 25% of rated
power will get saved.
Audio only : After selection of energy
saving to “Audio only ” panel power
switched off & only audio come
from TV sets which results in
power saved of approx 35%
[Features]
OK
Back Light
Energy Saving
EasyLink
ARC
MHL
MHL CHARGING
LED Indicator
Software Update
Reset
Reset
The backlight value
To save
Note
Press any key ( except Find, Text, subtitle
Vol +/- and Mute) to exit 'Audio only' mode
[Easy Link]: If you connect HDMI-CEC
•
compliant devices through HDMI,you
can control them at the same time with
can control them at the same time with
your TV remote control.
[ARC]
•
: This is used to control ARC feature,
If set ARC to “On” TV sound will be deactivated
& ARC enabled HT sound will be activated
[MHL]
•
: This is used to control MHL feature,
If set MHL to “On” mobile screen will be
Displayed on TV
[MHL CHARGING] :
•
If set MHL charging
To On mobile can be charged through TV
Even if TV is in standby mode.
[LED Indicator] :
•
This is used to control
LED indicator status when TV is in standbby
Mode.
If LED Indicator is “ON” LED will glow when
TV is in standby mode & vice versa.
[Software Update] :
This option is for updating the software.
[Reset]
: Reset to factory default settings.
4.11 Parental Menu
Child Lock
.
2
Picture
Sound
•
3
Installation
•
Features
• •
Parental
Press
1
Select [Setup] > [Parental]
2
then press OK
Select one of the following settings.
3
then press OK.
•
[Child Lock]: Enter the password, then
the following menus will open.
Note: Default password is “0000”
EN 13
Page 16
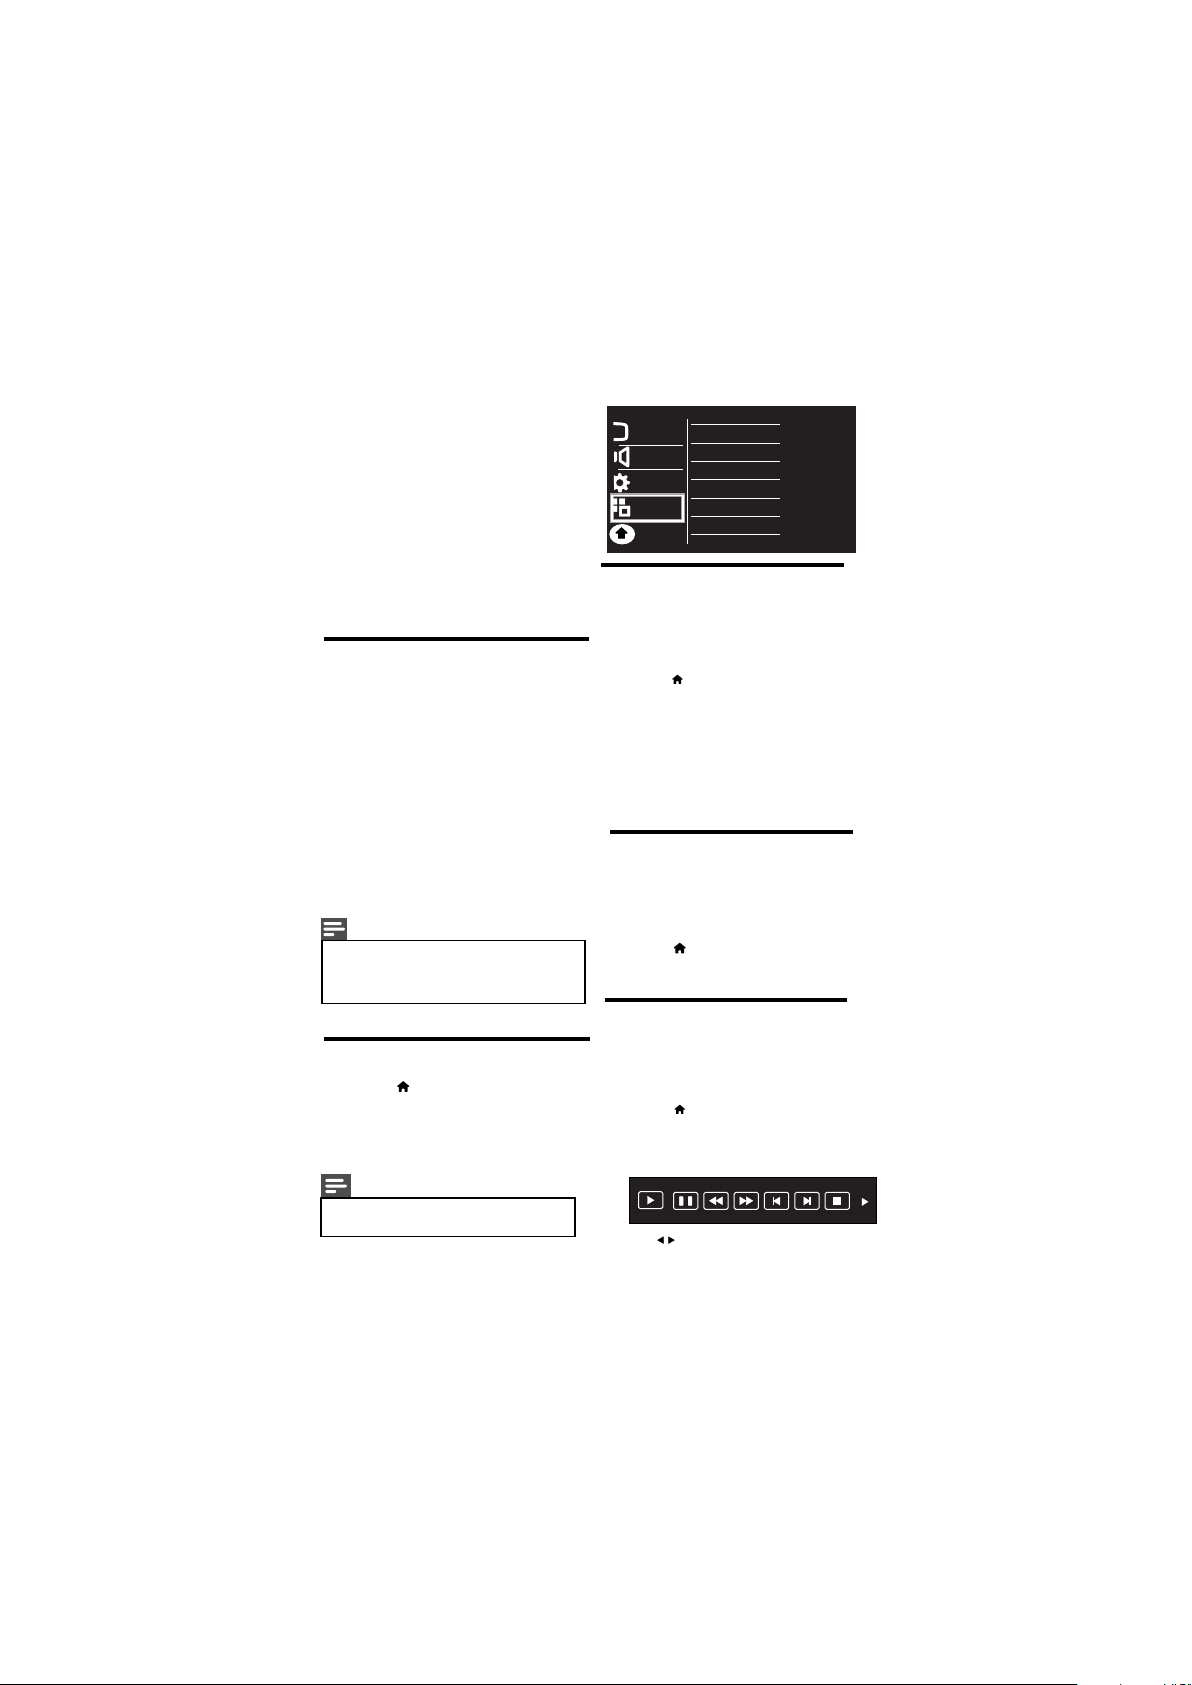
[Child Lock Switch]:Make the child lock
•
switch ON to lock the source/channel.
[Change Password]: Select this option
to change the password.
•
•
•
..
[Channel Block]: Select the channels to
to be locked and press ‘2’ to lock or
..
unlock the channels.
[Video Lock]: Select the sources
with up/down keys on remote and press
OK to set or clear lock.
[Clear All]: Reset the child lock
option to default value.
4.12 Use Philips EasyLink
Get the most out of your HDMI-Consumer
Electronic Control (CEC) compliant devices
with Philips EasyLink enhanced control
features.
If your HDMI-CEC compliant devices are
connected through HDMI, you can control
them at the same time with your TV remote
control.
To enable Philips EasyLink, you need to:
• Connect HDMI-CEC
compliant devices through HDMI
• Configure each HDMI-CEC compliant
device properly
• Switch on EasyLink
Note
• The EasyLink-compliant device must be
switched on and selected as the source.
• Philips does not guarantee 100%
interoperability with all HDMI CEC devices.
Easy Link
Picture
Auto turn off
Device Search
Sound
Device List
Installation
Device Menu
Features
Parental
4.14 Switch the device ON or OFF
When an HDMI-CEC compliant device
is connected and TV switches to standby,
the device gets turned OFF automatically.
1 Press
2 Select [Setup] > [Features] >
3 Select [On] or [Off], then press OK
[EasyLink]
[EasyLink] > [Auto turn off] >
When an HDMI-CEC compliant device
is connected and TV is switched ON, then
the device gets turned ON automatically.
4.15 Search the connected devices
Search the HDMI-CEC compliant devices
connected to your TV and list them using
Device list.
1 Press
2 Select [Setup] > [Features] >
[EasyLink] > [Device Search] >
4.13 Switch on or off EasyLink
1 Press
2 Select [Setup] > [Features] >
[EasyLink] > [EasyLink].
3 Select [On] or [Off] , then press OK
Note
• If EasyLink is OFF, all its submenus are
unavailable.
14 EN
4.16 Control the device using TV
remote
Now use a single remote to control your
CEC enabled device.
1 Press
2 Select [Setup] > [Features] >
[EasyLink] > [Device Menu]
Pause
Play
Press to select the function icon, press
OK button to confirm the function.
FR FF
Prev. Next
Stop
Page 17
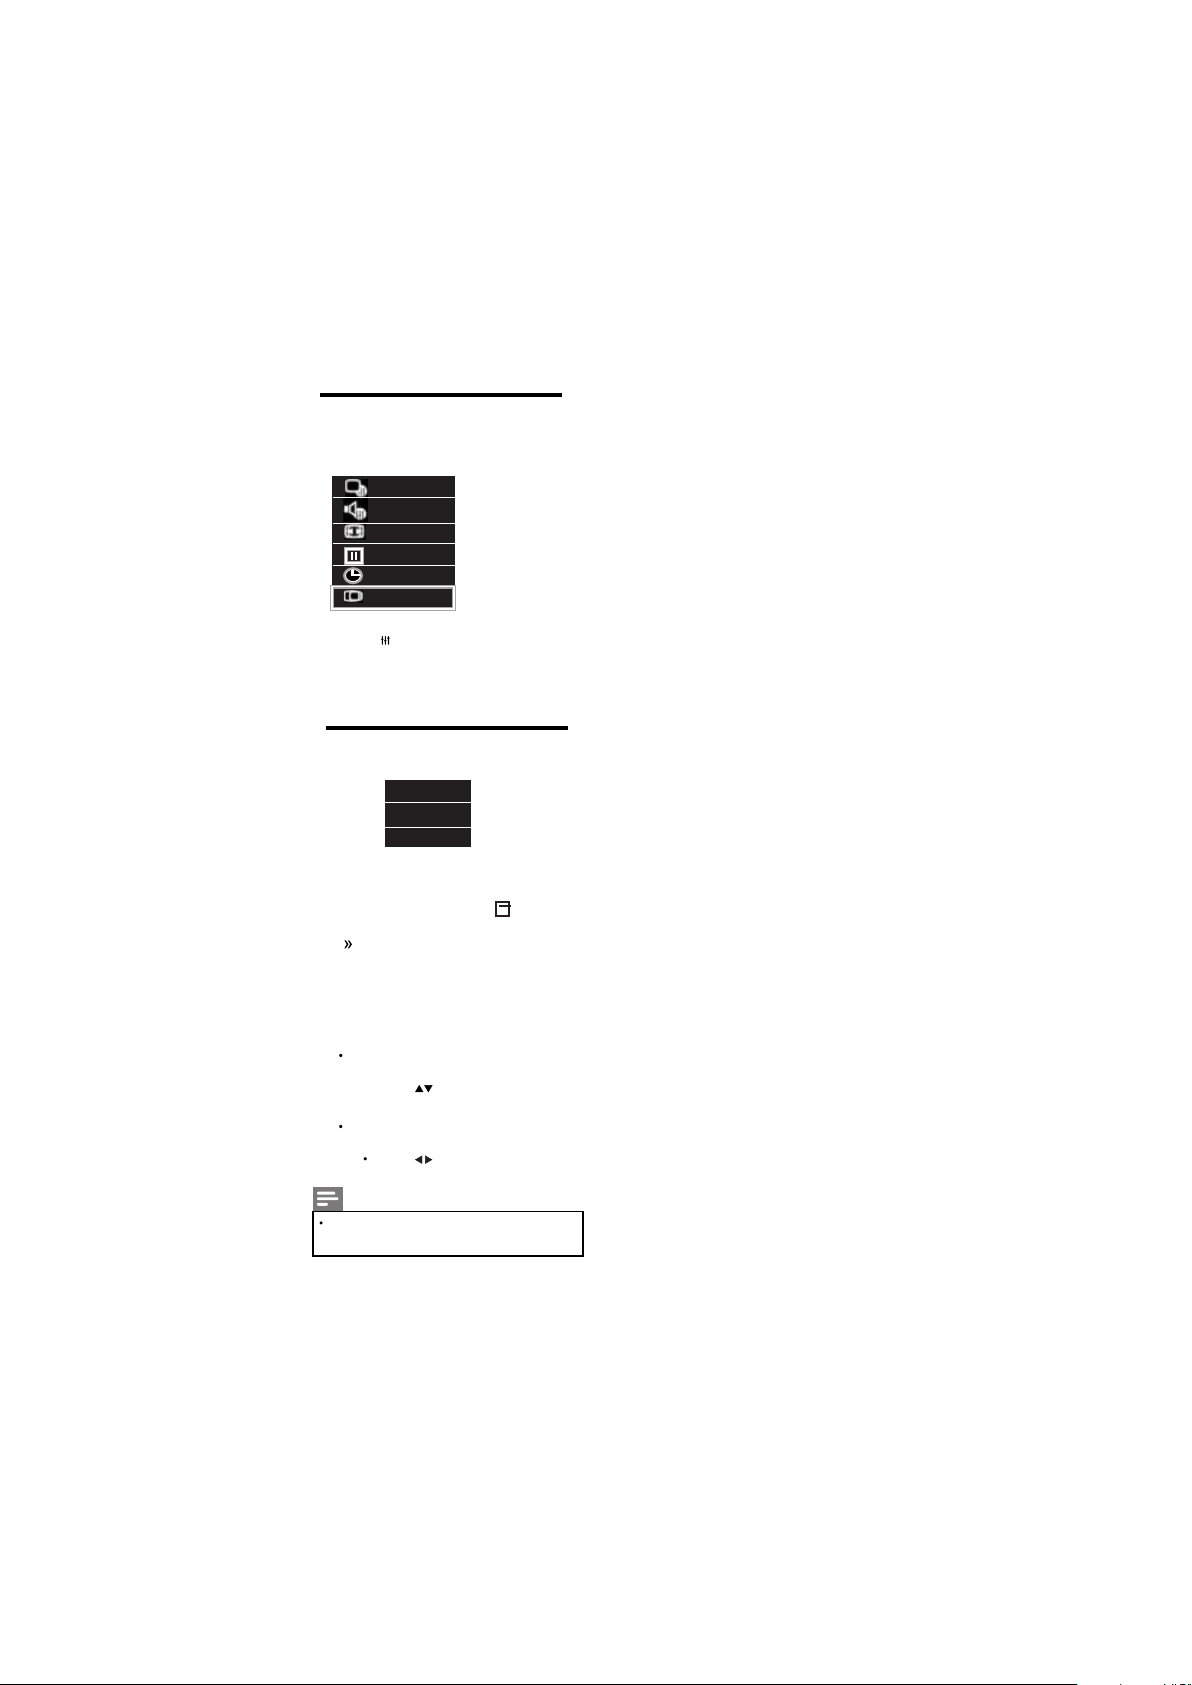
4.17 Use Geometric
Use Geometric to automatically adjust phase
and Clock for VGA mode
Smart Picture
Smart Sound
Picture Format
Freeze
Sleep Timer
Geometric
1
Press ADJUST.
Select [Geometric], then press OK.
2
This automatically adjust H & V-position,
Phase and Clock for VGA mode
4.18 Use the Options menu
Status
Energy Saving
Guide Bar
Visit options relevant to current action or
selection.
While you watch TV, press
1
OPTIONS key.
The TV options menu appears.
2 Select one of the following options, then
press OK.
• [Status]:
Note
Display information
concerning currently viewing
channel/source.
[Energy Saving]:
after pressing OK.pop ups
•
Press
refer 4.10 for more details.
[Guide Bar] :
after pressing OK.pop ups
Press to access menu bar.
refer 5.8 for more details.
Respective menu
to conserve energy.
Respective menu
Guide Bar only applicable for HDMI (CEC)
& USB Source.
EN 15
Page 18
5 Play photos, music and videos
on USB storage devices
MUSIC
PHOTO VIDEO
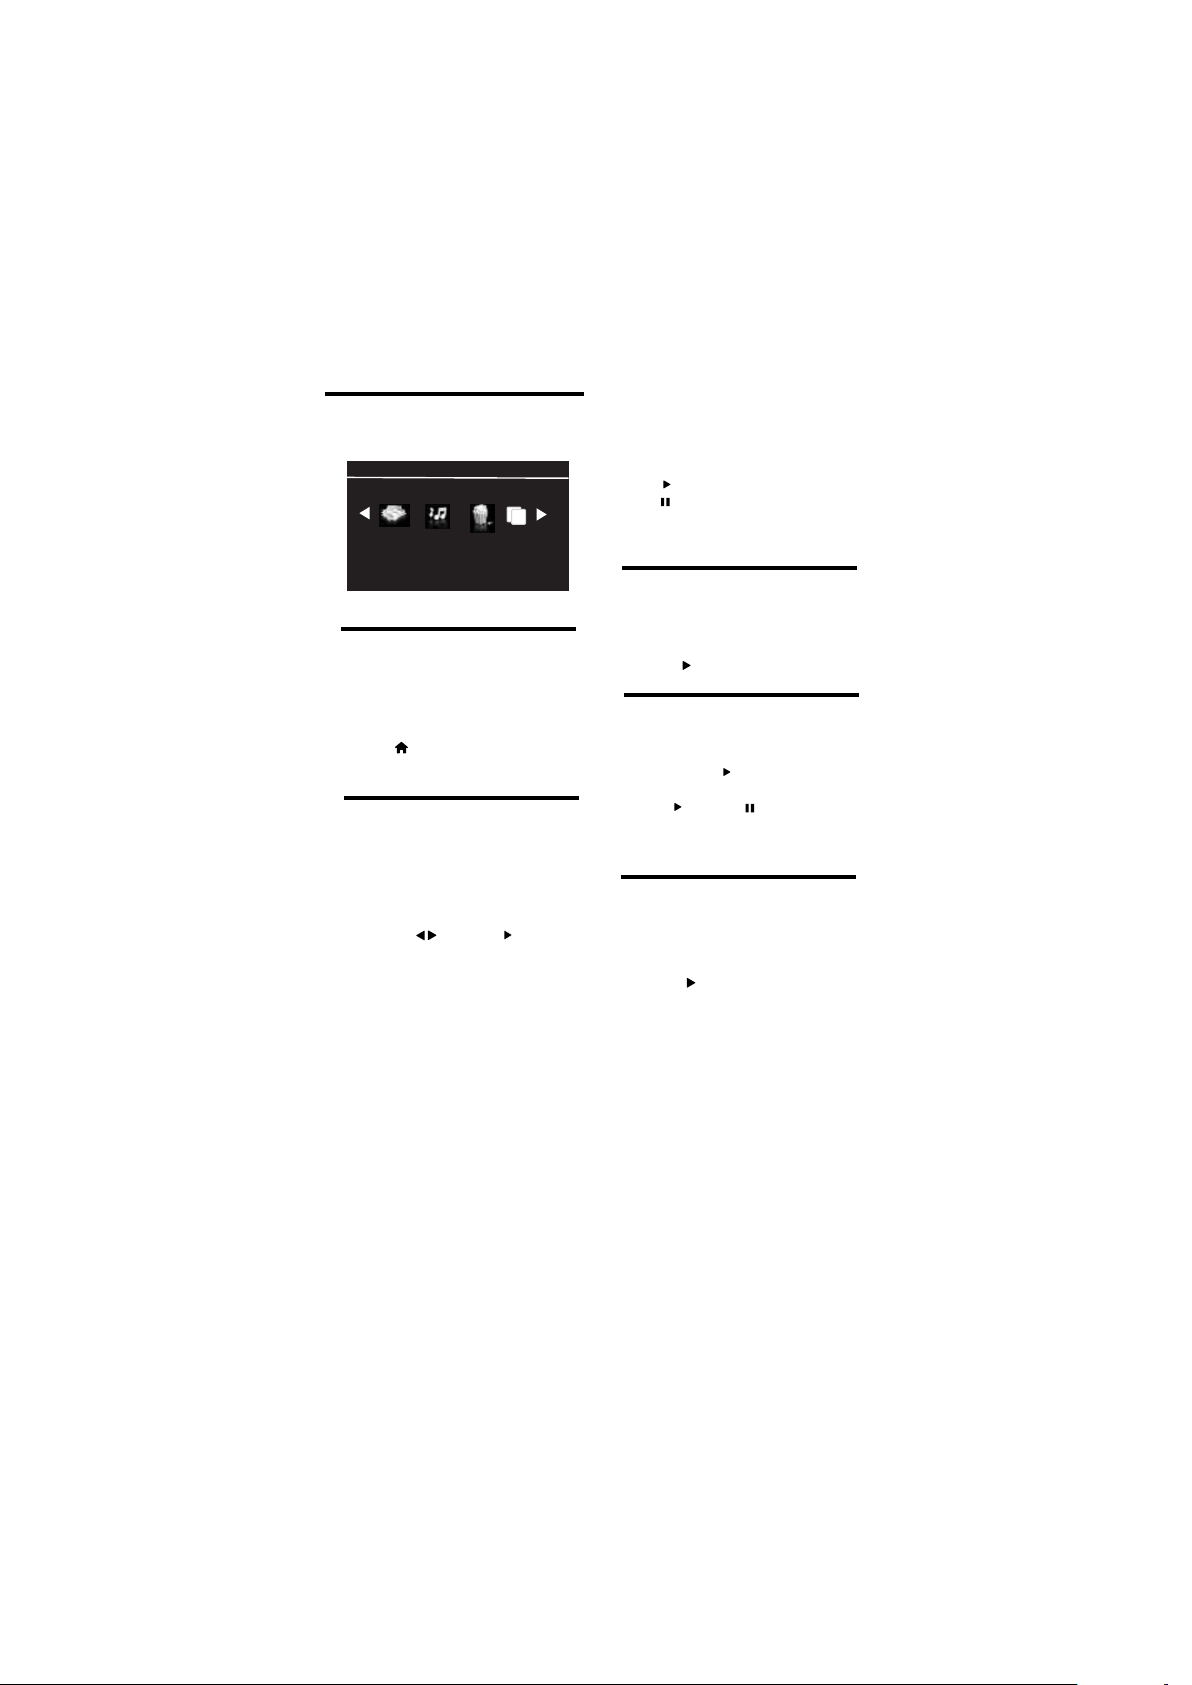
5.1 Connect a USB storage device to play
photos, music or videos stored on it.
1 Switch on the TV.
2 Connect the USB device to the USB port
on the side of your TV.
3 Press
4 Select [Browse USB], then press OK
The USB browser appears.
5.2 View photos
1 In the USB browser, select [Photo], then
press OK.
2 Select a photo or a photo album, then
OK to view the photo
• To preview the next or previous photo,
press then press to play
TEXT
ABC
5.3 View a slide show of your photos
Press the following buttons to control
play of selected photos.:
Select photos by OK key :
to play.
•
• to pause.
•
CH- or CH+
photo.
to play the previous or next
5.4 Listen to music
1 In the USB browser, select [Music], then
press OK.
2 Select a music track or album, then press
OK or to play.
5.5 Watch video
1 In the USB browser, select [Video], then
press OK.
2 Press OK or to play.
To control play, press buttons:
3
•
to play & to pause.
CH- or CH+
•
video.
to play the previous or next
5.6 Text
1 In the USB browser, select [Text], then
press OK.
2 Select a Text File, then Press
OK or to play.
16 EN
Page 19
5.7 Use the Options menu
Status
Energy Saving
Guide Bar
Visit options relevant to current action or
selection.
While you watch TV, press
1
OPTIONS key.
» The TV options menu appears.
2 Select one of the following options, then
press OK.
•
[Status]:
[Energy Saving]:
after pressing OK.pop ups
•
Press
refer 4.10 for more details.
[Guide Bar] :
after pressing OK.pop ups
Press to access menu bar.
refer 5.8 for more details.
Note
Guide Bar only applicable for HDMI (CEC)
& USB Source.
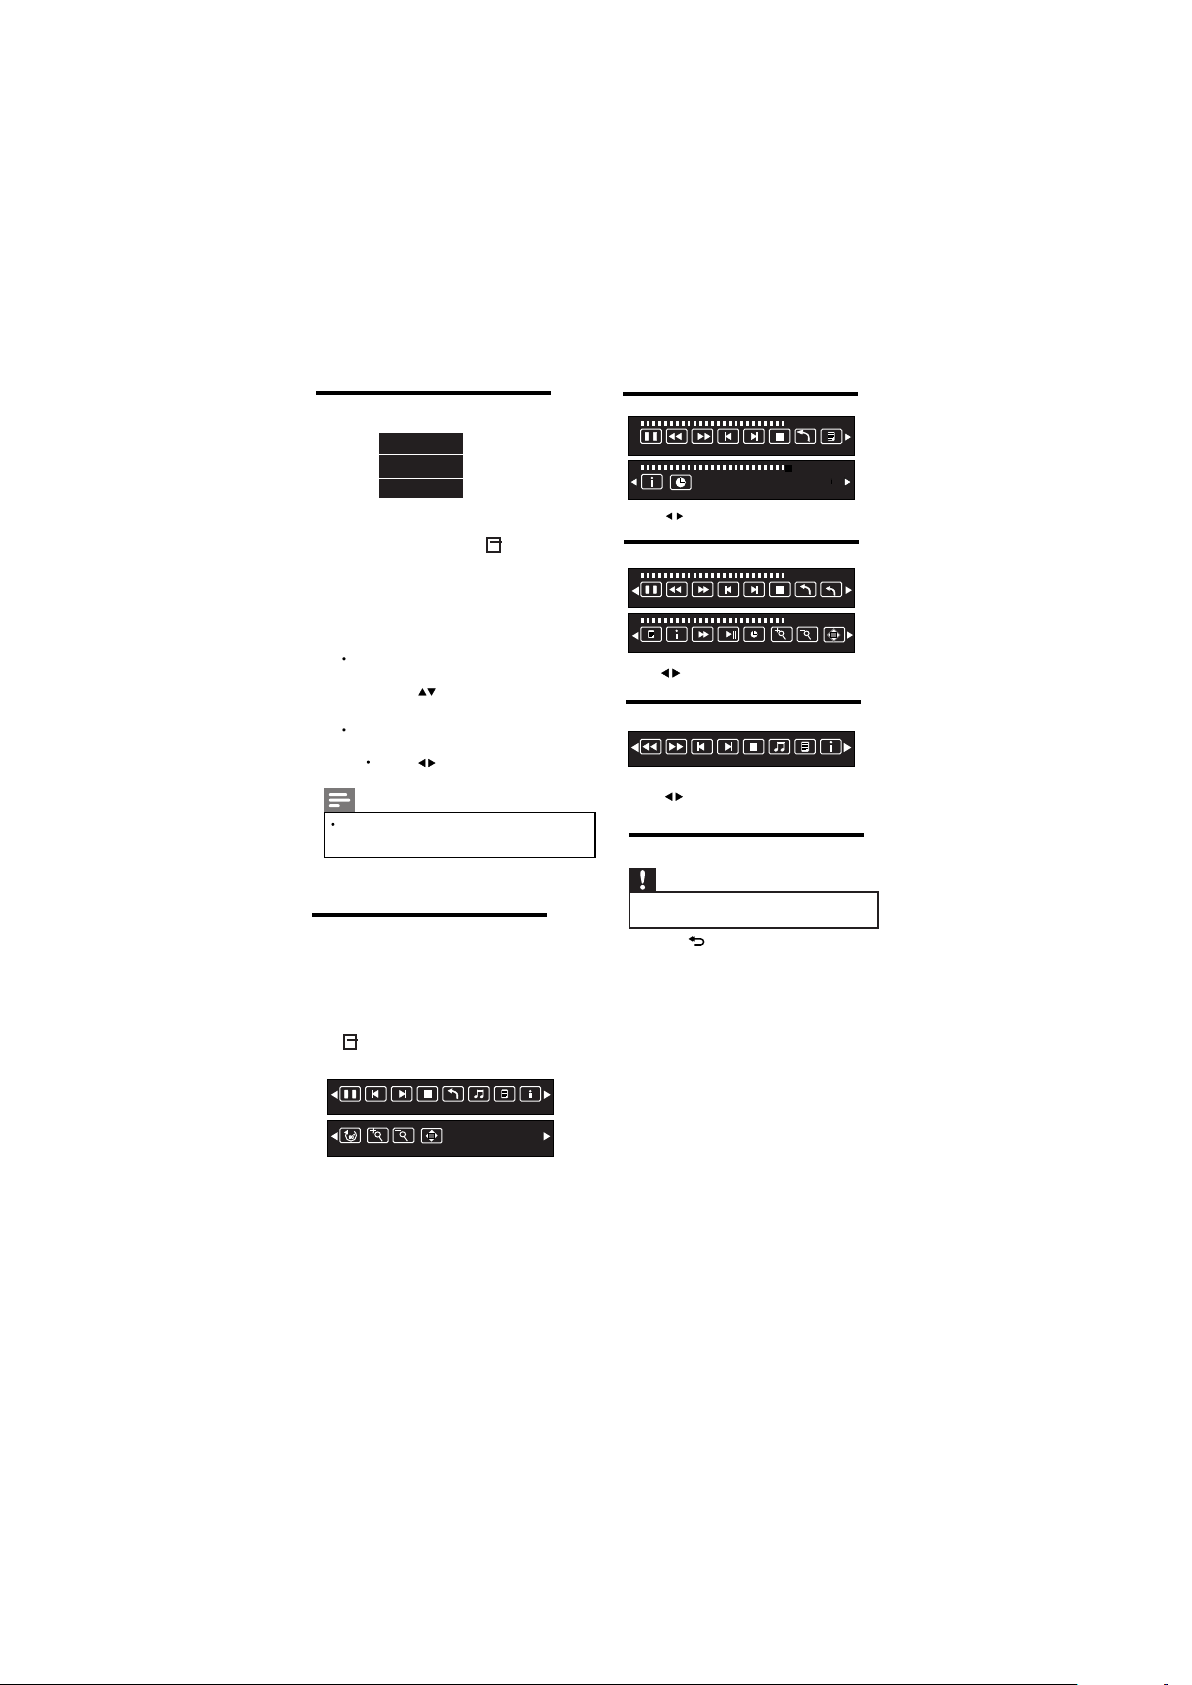
5.8 Music,Photo, video, text
mode control menu bars
You can select the multimedia functions
like play, Pause, FF, FR, Next, Previous.
Stop etc.
To use above functions press
OPTIONS key, then select ‘Guide Bar”.
Picture mode menu bar:
Not Applicable For USB
to conserve energy.
Respective menu
Music mode menu bar:
Pause FR FF Prev. Next
Info.
Goto Time
Press to select the function icon, press
OK button to confirm the function.
Video mode menu bar:
Pause FR FF Prev. Next
Playlist
Info.
Slow
Step
Press to select the function icon, press
OK button to confirm the function.
Goto Time
Stop
Stop
Zoom In
00:00:33/00:04:22
All
Playlist
00:00:33/00:04:22
00:00:33/00:04:22
All
00:00:33/00:04:22
Zoom Out
AB
Set A
Move
Text mode menu bar:
Prev Page
Next Page
Prev. Next
Press to select the function icon, press
OK button to confirm the function.
Playlist
Music
Stop
Info.
5.9 Disconnect a USB storage device
Caution
•
Follow this procedure to avoid damage to your
USB storage device.
1 Press to exit the USB browser.
2 Wait for five seconds, then disconnect
the USB storage device.
Pause Prev.
Rotate
Zoom In
Next
Zoom Out
Stop
Move
Playlist
Music
All
Info.
17 EN
Page 20

6 Troubleshooting
This section describes commonly encountered
issues and accompanying solutions.
6.2 TV channel issues
Previously installed channels do not appear in
the channel list:
Check that the correct channel list is
selected.
6.1 General TV issues
The TV does not switch on:
Disconnect the power cable from the power
outlet. Wait for one minute then reconnect it.
Check that the power cable is securely
connected.
The remote control is not working properly:
Check that the remote control batteries
are correctly inserted according to the +/orientation.
Replace the remote control batteries if they are
flat or weak.
Clean the remote control and TV sensor lens.
The standby light on the TV blinks red:
Disconnect the power cable from the power
outlet. Wait until the TV cools down before
reconnecting the power cable. If the blinking
reoccurs, contact Philips Consumer Care.
You forgot the code to unlock the TV lock feature
Enter ‘8202’.
When turning the TV on/off/to standby, you hear a
creaking sound from the TV chassis:
No action is required. The creaking sound is
normal expansion and contraction of the TV as it
cools down and warms up. This does not impact
performance.
6.3 Picture issues
The TV is on, but there is no picture:
Check that the antenna is properly
connected to the TV.
Check that the correct device is selected
as the TV source.
There is sound but no picture:
Check that the picture settings are
correctly set.
There is poor TV reception from an antenna
connection:
Check that the antenna is properly
connected to the TV.
Loudspeakers, unearthed audio devices,
neon lights, high buildings and other large
objects can influence reception quality.
If possible, try to improve the reception
quality by changing the antenna direction
or moving devices away from the TV.
If reception on only one channel is poor,
fine tune this channel.
There is poor picture quality from connected
devices:
Check that the devices are connected
properly.
Check that the picture settings are
correctly set.
The TV did not save your picture settings:
Check that the TV location is set to the
home setting. This mode offers you the
flexibility to change and save settings.
The picture does not fit the screen; it is too
big or too small:
Try using a different picture format.
The picture position is incorrect:
Picture signals from some devices may
not fit the screen correctly. Check the
signal output of the device.
18 EN
Page 21
6.4 Sound issues
There is a picture but sound quality is poor:
Note
If no audio signal is detected, the TV
automatically switches the audio output off
this does not indicate malfunction.
Check that all cables are properly connected.
Check that the volume is not set to 0.
Check that the sound is not muted.
There is a picture but the sound quality is poor:
Check that the sound settings are correctly
set.
There is a picture but sound comes from one
speaker only:
Verify that sound balance is set to the centre.
6.5 HDMI connection issues
There are problems with HDMI devices:
Note that HDCP (High-bandwidth Digital
Content Protection) support can delay the
time taken for a TV to display content from
a HDMI device.
If the TV does not recognise the HDMI
device and no picture is displayed, try
switching the source from one device to
another and back again.
If there are intermittent sound disruptions,
check that output settings from the HDMI
device are correct.
If you use an HDMI-to-DVI adapter or
HDMI-to-DVI cable, check that an additional
audio cable is connected to AV IN.
6.6 Computer connection issues
The computer display on the TV is not stable:
Check that your PC uses the supported
resolution and refresh rate.
Select the “Auto Setting” function.
1. Press
2. Select [Setup] >[Picture] >[Geometric]
[Auto Setting].
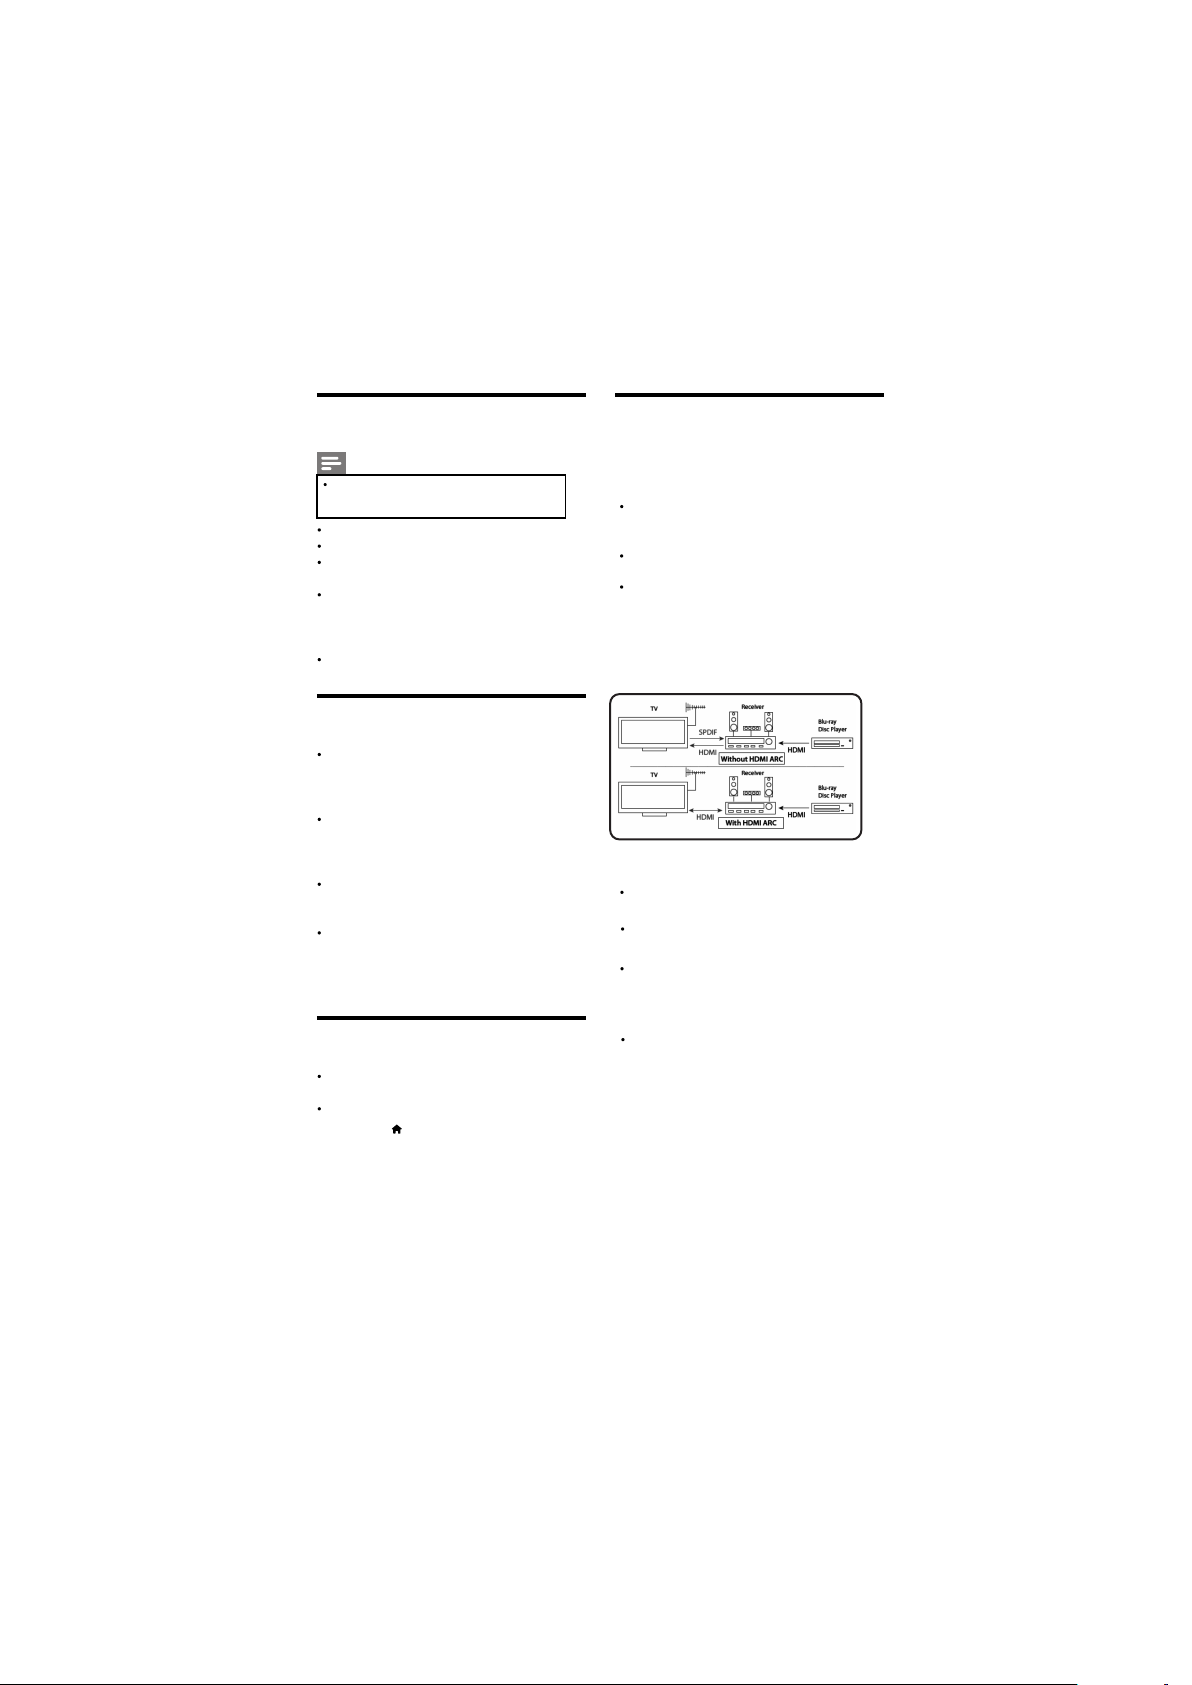
6.7 ARC
ARC enables digital sound to be output using
just an HDMI cable.
How to Use ARC
Connect ARC-enabled AV receiver through
High Speed HDMI™ Cable (HDMI 1.4 cable)
to HDMI Port 2 of TV.
In “Setting” menu of TV, set "HDMI ARC"
switch to "On".
Select/Set “ARC” mode “On” in AV receiver
(For more details refer user manual of AV
receiver).
Note:-
Connect AV receiver in “HDMI 2” Port of
TV.
When ARC is "On" TV Speaker will be
deactivated.
If you disconnect ARC Home Theater then
in Setting Menu of TV,
Set "HDMI ARC" option to "Off" to activate
TV speakers .
To use ARC feature keep “Easy link”
on.
issues
EN 19
Page 22
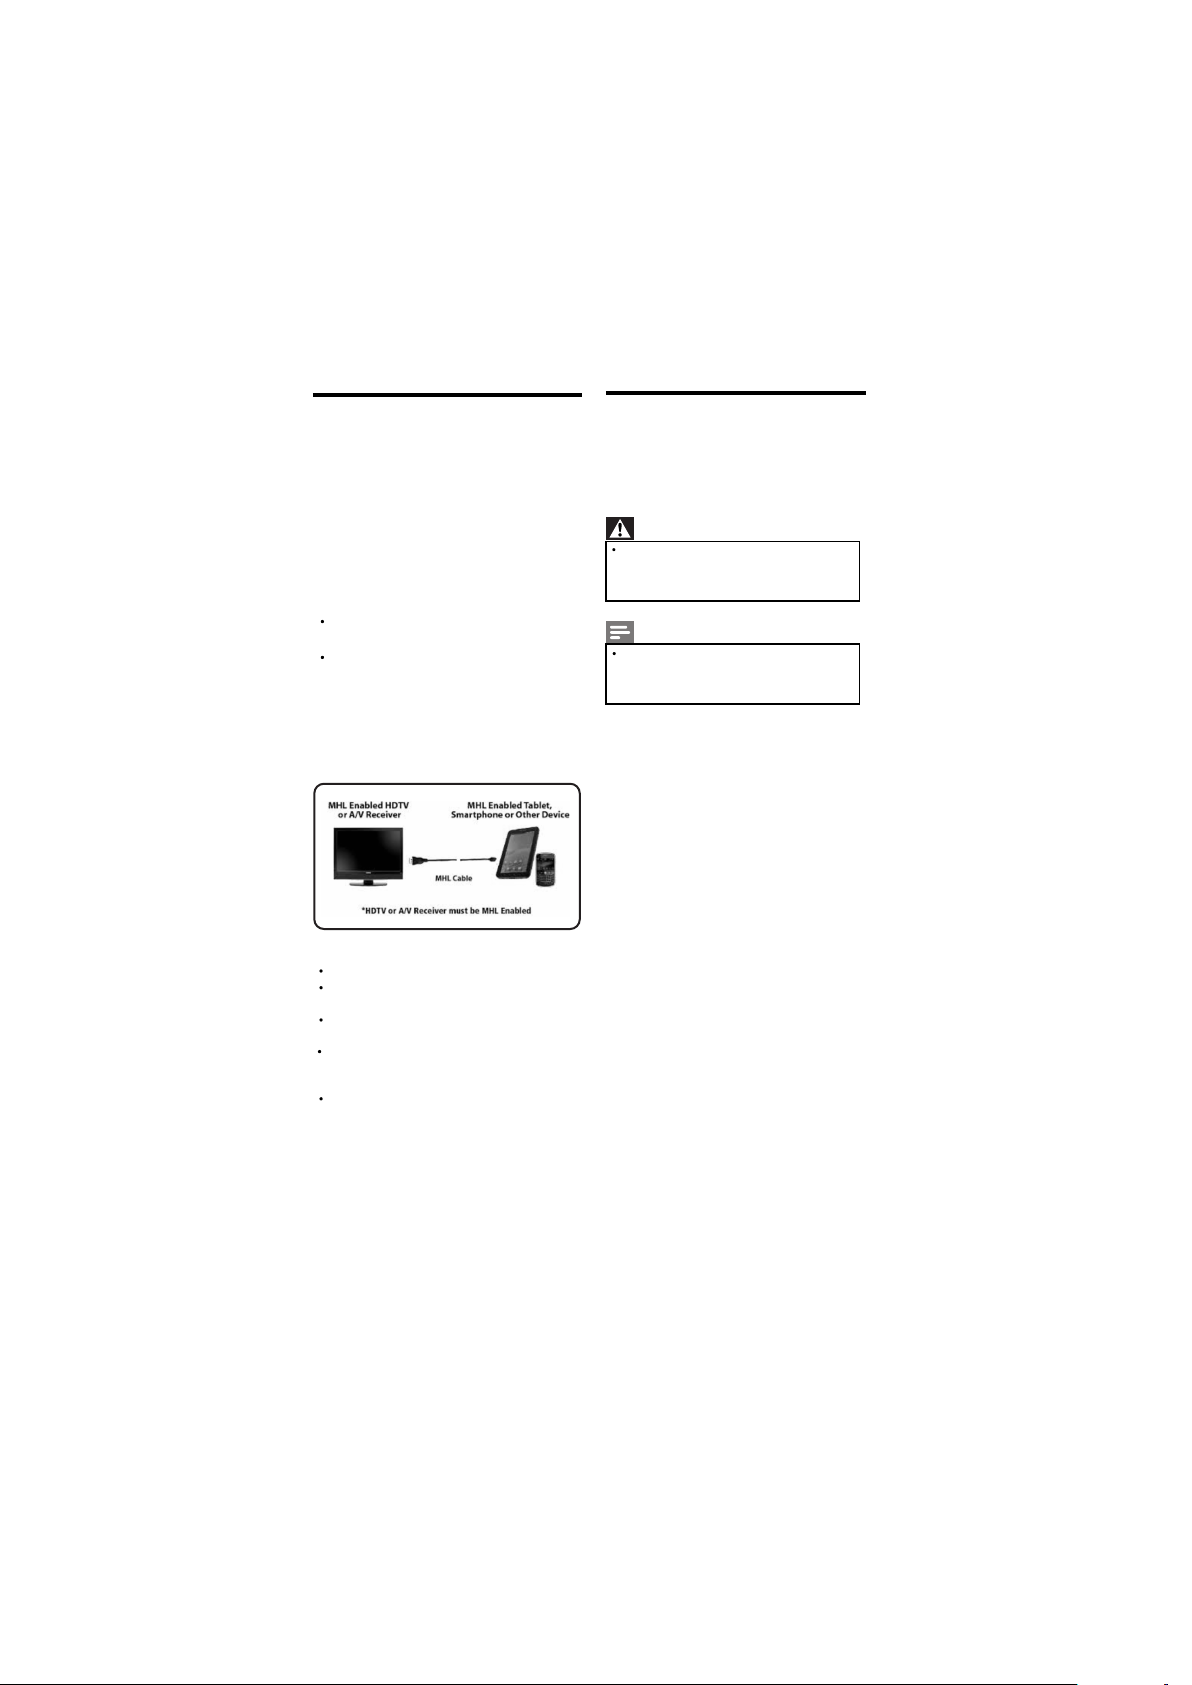
6.8 MHL
Mobile High-definition Link (MHL) is an interface
for transmitting digital audiovisual signals from
mobile phones to supported television sets.
Note that it works only for the MHL-enabled
Phones, to confirm MHL Support in your Phone
check operation manual of phone.
When Smart phone is connected through MHL
Cable Some applications can be operated by
the TV remote control.
How to Use MHL
Connect MHL enabled phone with passive
MHL cable (not supplied with set) to HDMI 1
In TV OSD Menu Go to "Settings" & Set
"MHL" option to "On" to view the phone
screen on the TV.
Note: -
MHL is supported in “HDMI 1” port of TV.
Because TV screen is wider than mobile
phone, picture quality may appear lower in TV.
Mobiles need 5 Pins MHL cable but few
mobiles needs 11 Pins MHL cable.
For better user experience /Operation ease,
user can pair Mobile with Bluetooth compatible
keyboard/mouse available in market.
Although in many handset do not need any
setting to activate MHL, additional setting may
require in some mobiles/tablets, for more
details check user manual of Mobiles/Tablets).
issues
6.9 Contact us
If you cannot resolve your problem, refer to the
FAQs for this product at www.philips.com/support.
or Contact Customer Service Center.
Warning
Do not attempt to repair the product yourself.
This may cause severe injury, irreparable
damage to your product or void your
warranty.
Note
Make a note of your TV model and serial
number before you contact Philips. These
numbers are printed on the back of the TV
and on the packaging.
EN 20
Page 23
7 Product
information
Product information is subject to change
without notice. For detailed product
information, go to www.philips.com/support.
7.1 Supported display resolutions
Computer formats (HDMI)
Resolution - refresh rate:
720 x 480p - 60Hz
720 x 576p - 50Hz
1280 x 720p - 50Hz,60Hz
1920 x 1080p -50Hz,60Hz
1920 x 1080 I- 50Hz/60Hz
Computer formats (VGA)
Resolution - refresh rate:
640 x 480 - 60Hz,72Hz,75Hz
800 x 600 - 56Hz,60Hz,72Hz,75Hz
1024 x768 - 60Hz,70Hz,75Hz
1280 x 1024 - 60Hz
Video Formats
Resolution - refresh rate:
720 x 480i - 60Hz
720 x 480p - 60Hz
720 x 576i - 50Hz
720 x 576p - 50Hz
1280 x 720p - 50Hz, 60Hz
1920 x 1080i - 50Hz, 60Hz
7.2 Tuner/Reception/
Transmission
Antenna input: 75ohm coaxial (IEC75)
TV system: PAL,B/G
Video playback: NTSC, SECAM, PAL
Tuner Bands: UHF, VHF
7.3 Remote control
Type: RC-Z8091-800
Batteries: 2 x AAA (LR03 type)
7.4 Multimedia
Supported USB storage device:
(Only FAT 16 or FAT 32 USB storage
devices are supported)
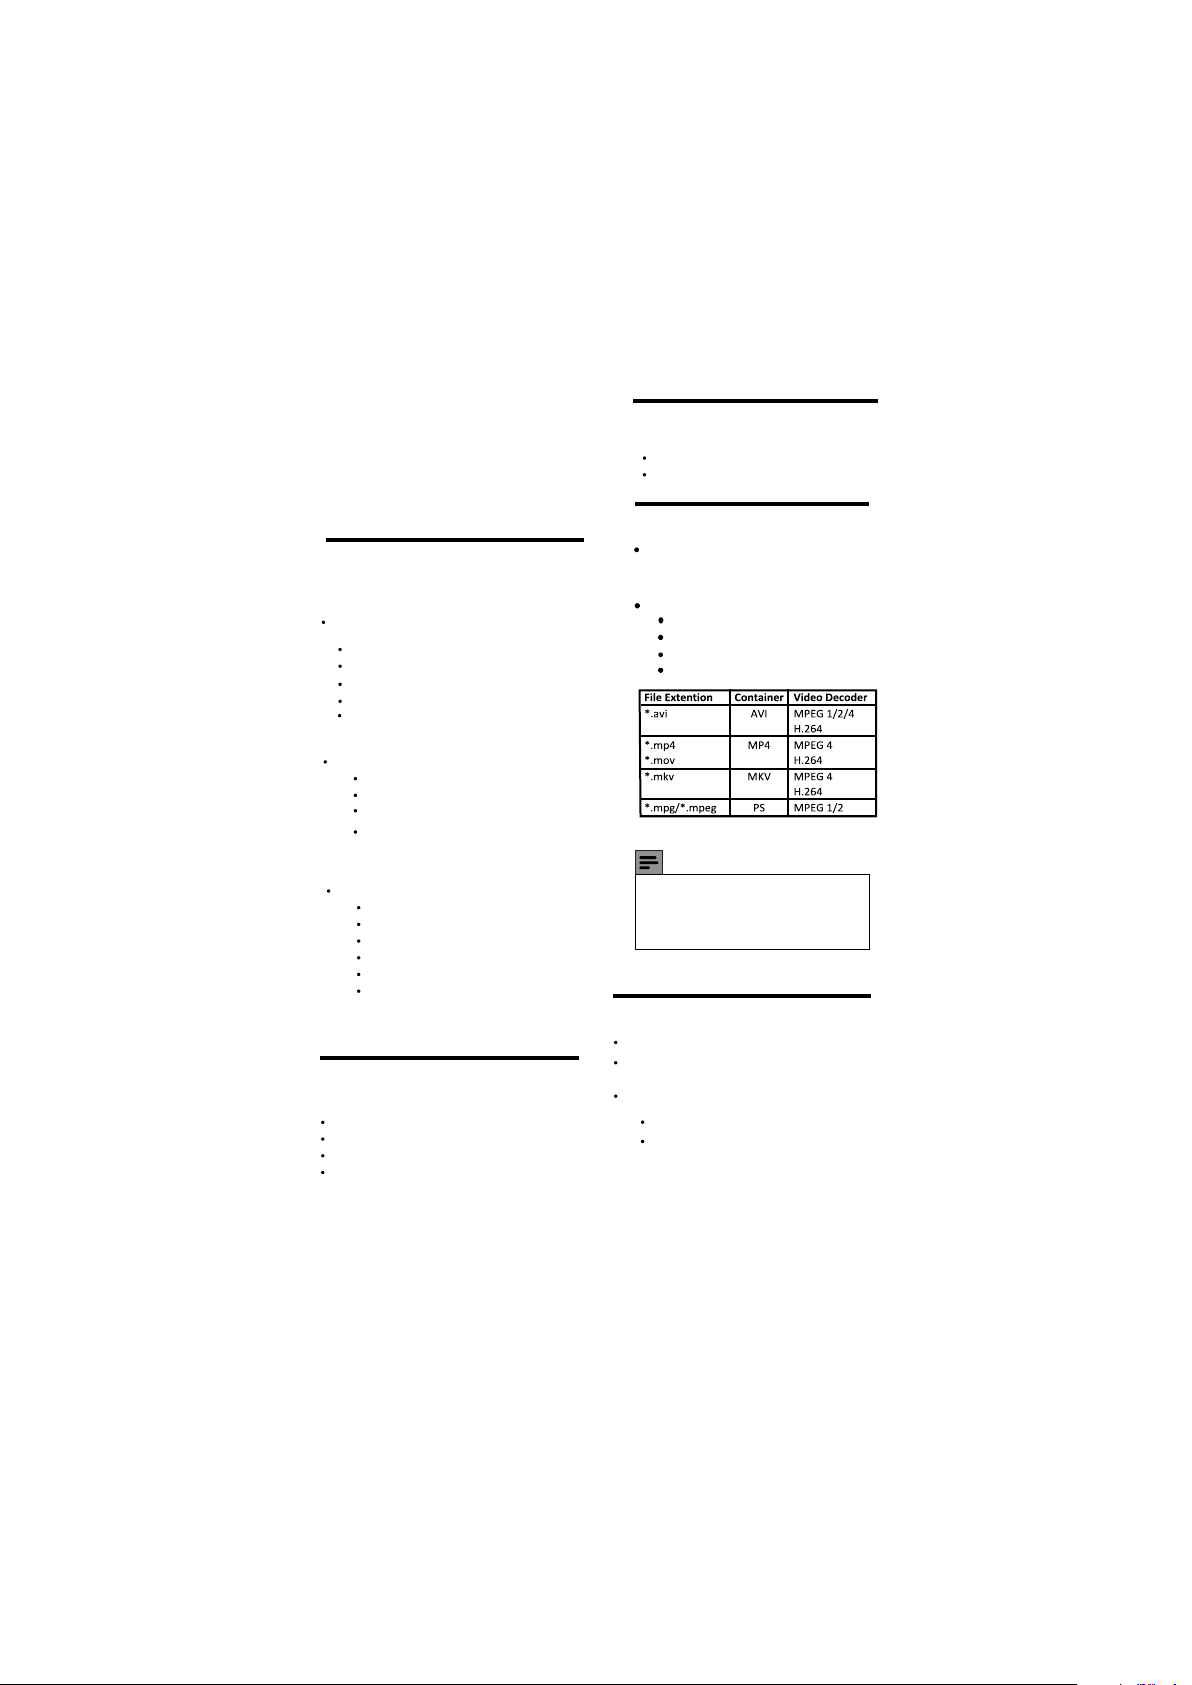
Supported storage file formats:
Images : JPEG, BMP, PNG
Audio : MP3,WMA.
Text
Video :
Note
names must not exceed 128
1)
USB
file
characters.
2) The USB features/functions may vary
from file to file depending on relative
information present in the file
7.5 Power
Mains power: AC 110-240V~ 50/60Hz
Ambient temperature: 5 to 40 degrees
Celsius
Power consumption
24PFL5459/V7 : 45W
20PFL5439/V7 : 35W
EN 21
Page 24
7.6 TV mount
To wall mount the TV, kit is provided in
accessory bag along with TV set.
Warning
Follow all instructions provided with the TV
mount. PE Electronics Ltd. bears no
responsibility for improper TV
mounting that results in accident, injury or
damage.
7.7 Product specification
Design and specifications are subject to change
without notice.
24PFL5459/V7 :
With TV stand
Dimension(WxHxD): 562 x 377 x 127 (mm)
Weight: 3.8 kg
Without TV stand
Dimension(WxHxD):562 x 329 x 49(mm)
Weight: 3.6 kg
20PFL5439/V7 :
With TV stand
Dimension(WxHxD): 458 x 317 x 127 (mm)
Weight: 2.8 kg
Without TV stand
Dimension(WxHxD): 458 x 269 x 50 (mm)
Weight: 2.6 kg
22 EN
Page 25
Consumer Guidelines
1.Kindly ensure that the dealer fills out warranty card correctly.
2.To avail the Warranty please register your product with the Philips-
• Log on to www.Philips.com
OR
• Contact Philips Consumer Care Centre
3.In the unlikely event of a defect developing in the TV set contact the Philips Customer
Care Centre for obtaining warranty service and inform of the defect observed in the
set, the type no. and serial no. of the set.
4.On your lodging a complaint, a trained technician will call on you promptly. In the
event of the technician deciding that set requires attention at the service station;the
technician would arrange to get the set picked up to be delivered to service station
for further attention. “Homecalls” by the technician would however be restricted within
municipal limits of the city/town in which the set has been registered.the
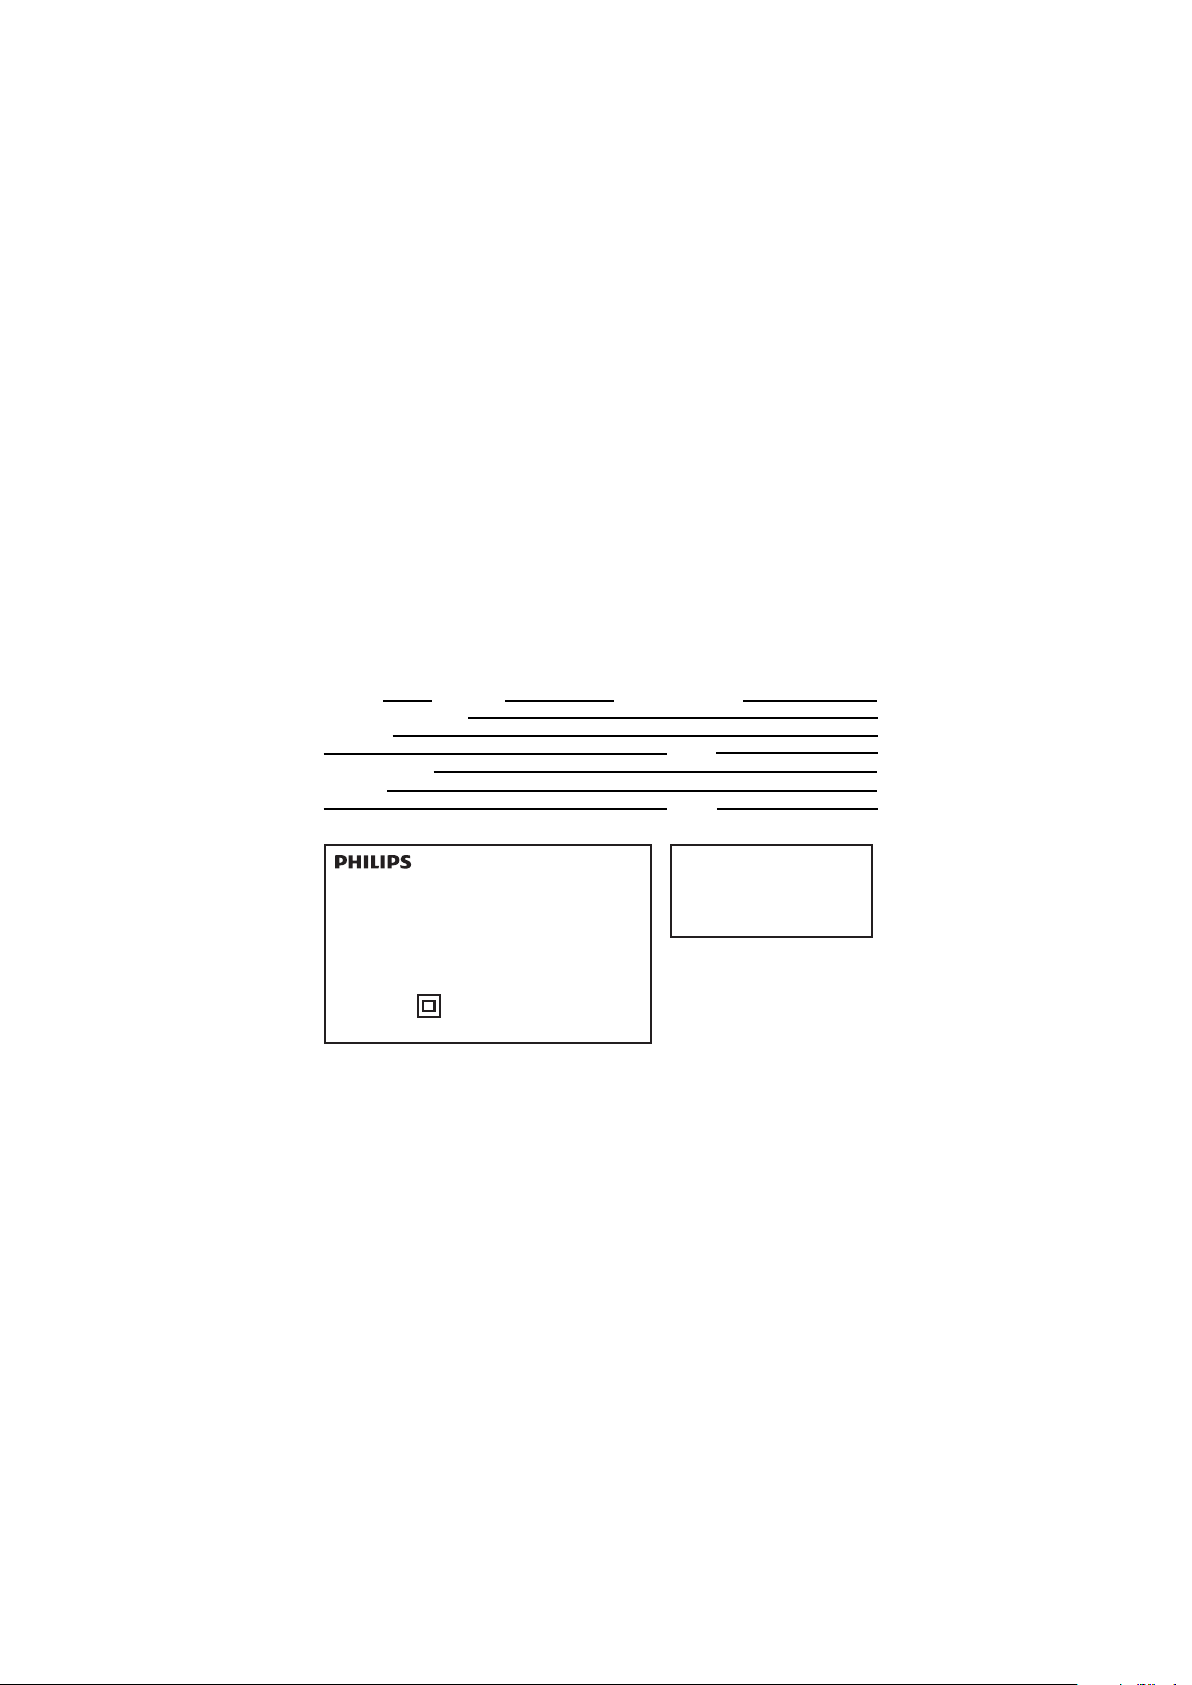
Type no. Serial No. Date of Purchase
Purchased By: Name
Address:
Sold by: Name
Address:
Tel.No.
Tel.No.
Model no.:
Serial no.:
Contact Customer Service Executive at:
Toll :- 1860 200 0129
Regd Office: PE Electronics Ltd,Auto Cars Compound,Adalat Road,Aurangabad,431005.
24PFL5459/V7
Sold by (User rubber stamp)
20PFL5439/V7
Front
EN 23
Page 26

WARRANTY
This TV receiver is covered under from whom the set has been purchased or
warranty against any defect arising out through an Authorised Service Center for
of faulty or defective material or workman warranty service. However, if the
ship for a period of 12 months from the Purchaser has to shift his residence to
date of purchase. another town on account of transfer or
other reasons, the warranty benefit will be
Should a defect develop in this set during available at the Authorised Service Center
the period of warranty, PE Electronics
Limited undertakes to get the
set repaired free of charge either
The warranty is not valid in case of any of
the following events:
The TV set is not used according to instructions given in the ‘Direction for use’
/ ‘User Manual’
Defects are caused by improper or reckless use.
Any repair work carried out by persons other than a Philips dealer or Authorised
Service Center.
Any modification or alteration of any nature made in the electrical circuitry of the set.
This Warranty Card is not completed and signed immediately on delivery of the set
by the Philips Dealer.
Fading effects and/or Ghosts (Multiple Image) in picture, if any,arising due to location
/ signal reception.
Defects due to causes beyond control like lightning, abnormal voltage, Acts of God or
while in transit to purchaser’s residence.
of that town.
(Refer Consumer Guidelines for further details)
24 EN
Back
Page 27

Cover 3 Blank
Page 28
1100109098
LCD/LED TV 24~20”
Rev.00 Rajmudra
 Loading...