

Page 1
Thank you for purchasing this television set.
This handbook hasbeen designed to help you install and operate yourTV set.
We would strongly recommend that you read it thoroughly.
We hope our technology meets entirely with your satisfaction.
Installation
Presentation of the LCD Television ..................................... 4
The remote control keys ............................................ 3
Installingyour television set .......................................... 4
Quick installation .................................................. 5
Sorting programmes ................................................ 5
Choosing a languageand country ..................................... 6
Automatic tuning .................................................. 6
EasyLinkfunction ................................................... 6
Manualtuning ..................................................... 7
Programme name .................................................. 7
Operation
Usingthe radio ..................................................... 8
Usingin PC monitor mode ........................................... 8
Adjusting the picture ............................................... 9
Adjusting the sound ................................................ 9
Featuresettings .................................................... 9
Timer function ................................................... 10
Locking the set ................................................... 10
Teletext ......................................................... 11
16:9 Formats ..................................................... 12
Video recorder or DVD keys ........................................ 13
Glossary ........................................................ 13
Peripherals
Video recorder ................................................... 14
Other equipment ................................................. 14
To select connected equipment ..................................... 14
Video camera, video games .......................................... 15
Headphones ..................................................... 15
Amplifier ......................................................... 15
Computer ....................................................... 15
Tips ........................................................... 16
Page 2
Rearofset:
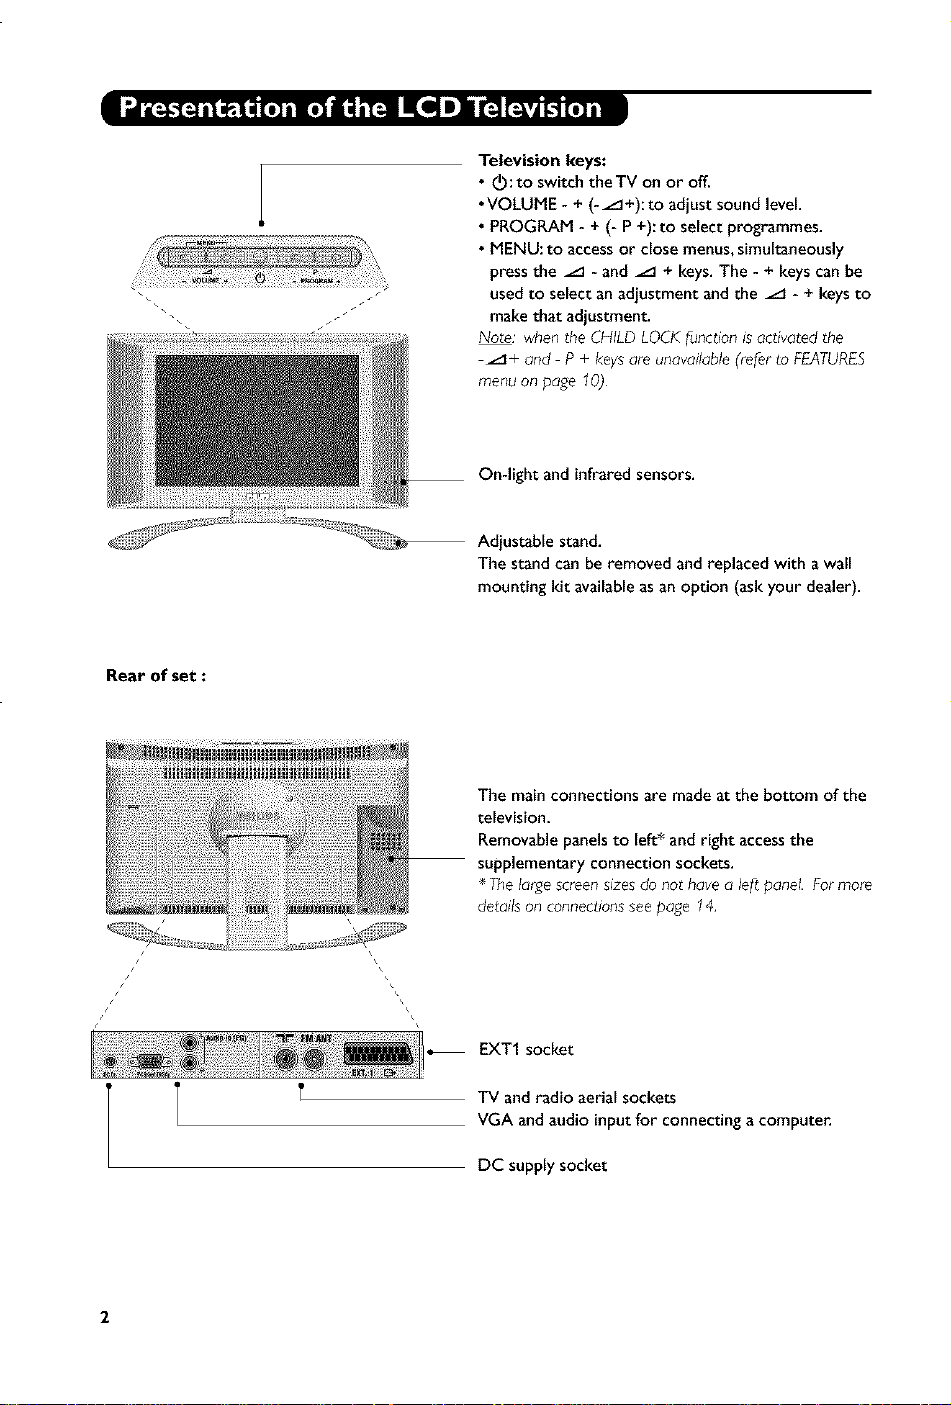
Television keys:
• _O:to switch theTV on or off.
•VOLUME - + (-_+):to adjust sound level.
• PROGRAM - + (- P+):to select programmes.
• MENU: to accessor close menus,simultaneously
pressthe _ - and _ + keys.The - + keyscan be
usedto select anadjustment and the _ - + keysto
makethat adjustment.
Note; whentheCHILDLOCKlunct_onisactivatedthe
_÷ and P÷ keysareunavailable(reler to FEATURES
menuon page 10)
On-light and infraredsensors.
Adjustable stand.
The stand can be removed and replaced with a wall
mounting kit availableasan option (askyour dealer).
The main connections are made at the bottom of the
television.
Removable panels to left* and right access the
supplementary connection sockets.
* The large screen s_zesdo not have a leJtpanel. For more
details on connections see page 14,
s /
/ /
i I
i
i
i
EXT1 socket
TV andradio aerial sockets
VGA and audio inputfor connecting a compute_
DCsupply socket
Page 3
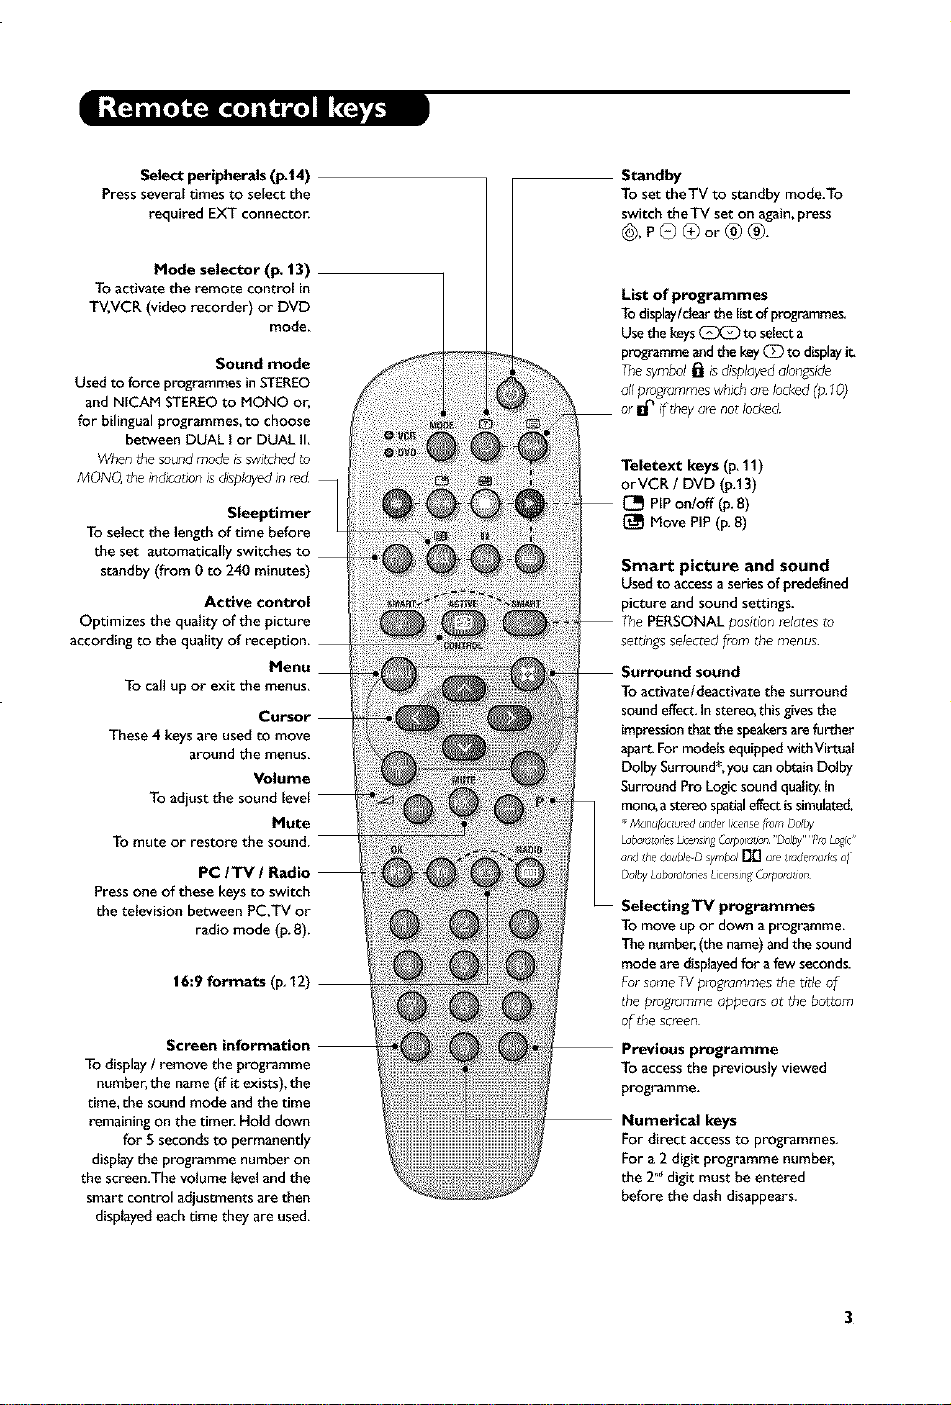
Select peripherals (p.|4)
Press several times to select the
required EXT connector.
Mode selector (p, 13)
To activate the remote control in
TV,VCR (video recorder) or DVD
mode.
Sound mode
Used to fonce programmes in STEREO
and NICAM STEREO to MONO or,
for bilingual programmes, to choose
between DUAL I or DUAL II.
When the sound mode isswitched to
MONQ the indication is @splayed_nmd
Sleeptimer
To select the lengthof time before
the set automatically switches to
standby (from 0 to 240 minutes)
Active control
Optimizes the quality of the picture
according to the quality of reception,
Menu
To call up or exit the menus,
Cursor
These 4 keysare used to move
around the menus,
Volume
To adjust the sound {eve{
Mute
To mute or restore the sound.
PC/TM / Radio
Press one of these keys to switch
the television between PC.TV or
radio mode (p. 8).
16:9 formats (p_12)
Screen information
To display/ remove the programme
number,the name(if it exists),the
time, the sound mode and the time
remaining on the timer, Hold down
for 5 secondsto permanently
displaythe programme number on
the screen.The volume levelandthe
smart control adjustments are then
dispbyed eachtime they are used.
Standby
To set theTV to standby mode,To
switch theTV set on again,press
@,P®®or®®.
List of programmes
Todisplay/cWarthe listof pmgrammes,
Usethe keys(_ to selecta
programmeandthe key(_ to displayit.
Thesymbol_ isdisplayedalongside
allprogrammeswhichalelocked(p 10)
,are notlocked
Teletext keys (p, 11)
orVCR/DVD (p.13)
[_ HP on/off (p.8)
Move PiP(p. 8)
Smart picture and sound
Used to access a series of prcdefined
picture and sound settings.
positlon _elates to
settings selected fi'om the menus
To activate/deactivate the surround
sound effect, in stereo, this givesthe
impression that the speakers are further
apart. For models equipped with Virtual
Dolby Surround*. you can obtain Dolby
Surround Pro Logic sound quaJit'/.In
mono, astereo spadal effect is simulated.
ManuldcluedunderI_¢ene [rut_Dolby
Lubc_torm_Dcen_rgOzq_ot_cn'Dclb/ PruL,_lc'
_rd ihe duuble-Dsymbol[_ a_eir_dema_k_oi
DolbyLabolotorlexLwensmg_¢poIdllon
gTV programmes
To move up or down a programme,
The number,(thename)and the sound
mode are displayedfor afew seconds.
FursomeTVplogrammes thetitle of
the programmeappears at _hebottom
of the screen
Previous programme
To access the previously viewed
programme.
Numerical keys
For direct accessto programmes,
For a 2 digit programme number,
the 2°"digit must be entered
before the dashdisappears.
3
Page 4
5 ¢m
_Scm
5 cm
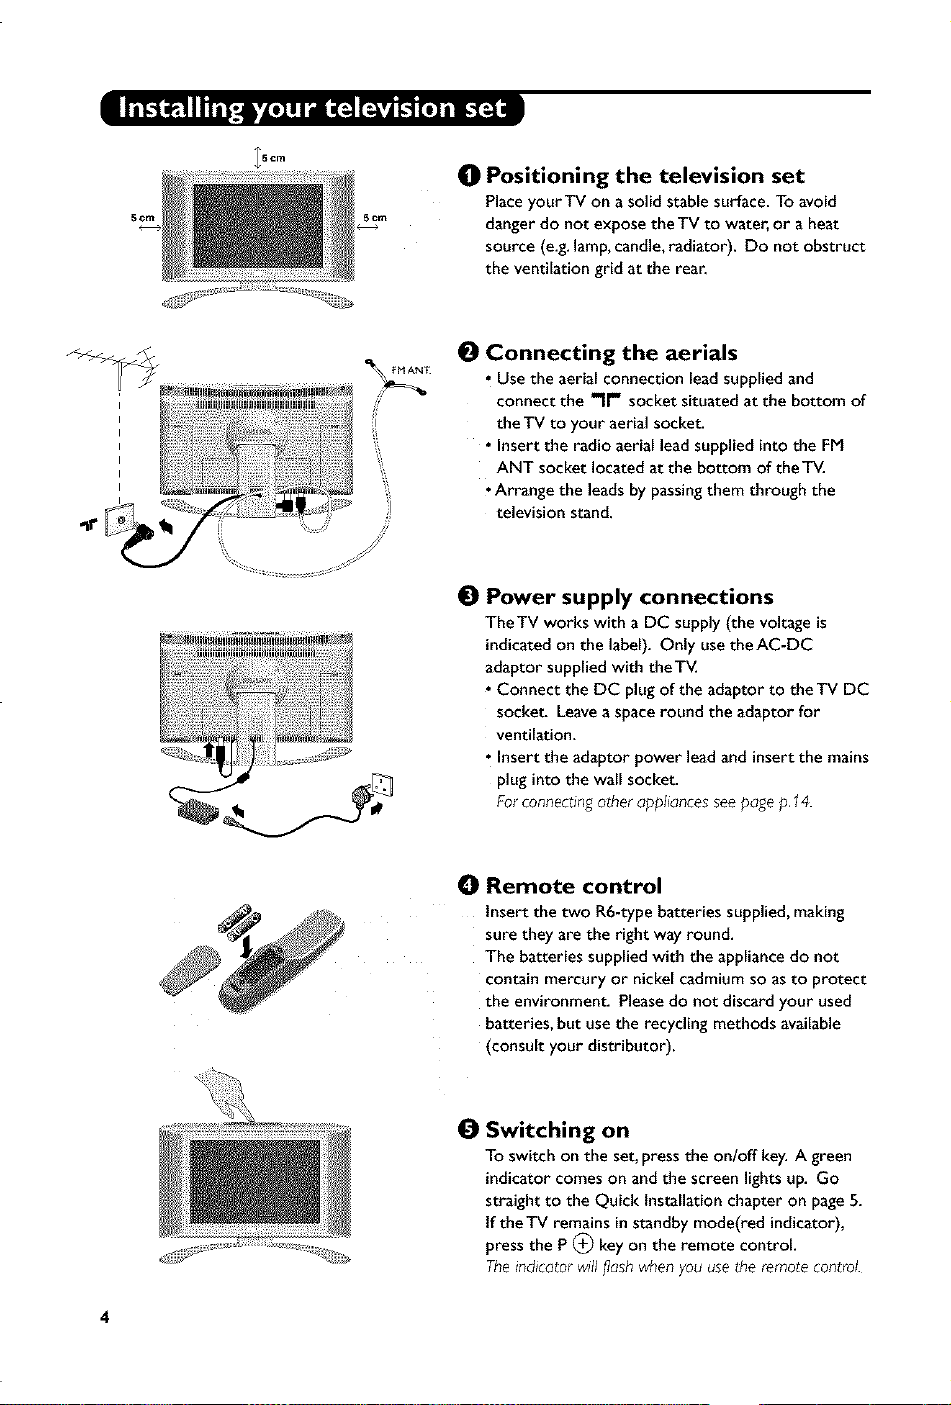
0 Positioning the television set
Placeyour TV on asolid stable surface. To avoid
danger do not expose the TV to water, or a heat
source (e.g.lamp,candle, radiator). Do not obstruct
the ventilation grid at the rear.
0 Connecting the aerials
• Use the aerial connection lead supplied and
connect the -It" socket situated at the bottom of
the TV to your aerial socket.
• Insert the radio aerial lead supplied into the FM
ANT socket located at the bottom of theT_
•Arrange the leadsby passingthem through the
television stand.
0 Power supply connections
TheTV works with a DC supply (the voltage is
indicated on the label). Only use theAC-DC
adaptor supplied with theT_L
• Connect the DC plug of the adaptor to the TV DC
socket. Leavea space round the adaptor for
ventilation.
• Insert the adaptor power lead and insert the mains
plug into the wall socket.
Forconnectingother appliancesseepagep.14.
O Remote control
Insert the two R6-type batteries supplied,making
sure they are the right way round.
The batteries supplied with the appliancedo not
contain mercury or nickel cadmium soas to protect
the environment. Pleasedo not discard your used
batteries, but usethe recycling methods available
(consult your distributor).
0 Switching on
To switch on the set, pressthe on/off key. A green
indicator comes on and the screen lights up. Go
straight to the Quick Installation chapter on page5.
tfthe TV remains in standby mode(red indicator),
pressthe P (_ key on the remote control.
Theindicatorw_ll_ashwhenyouusetheremotecontrol.
Page 5
Plug a Pla_
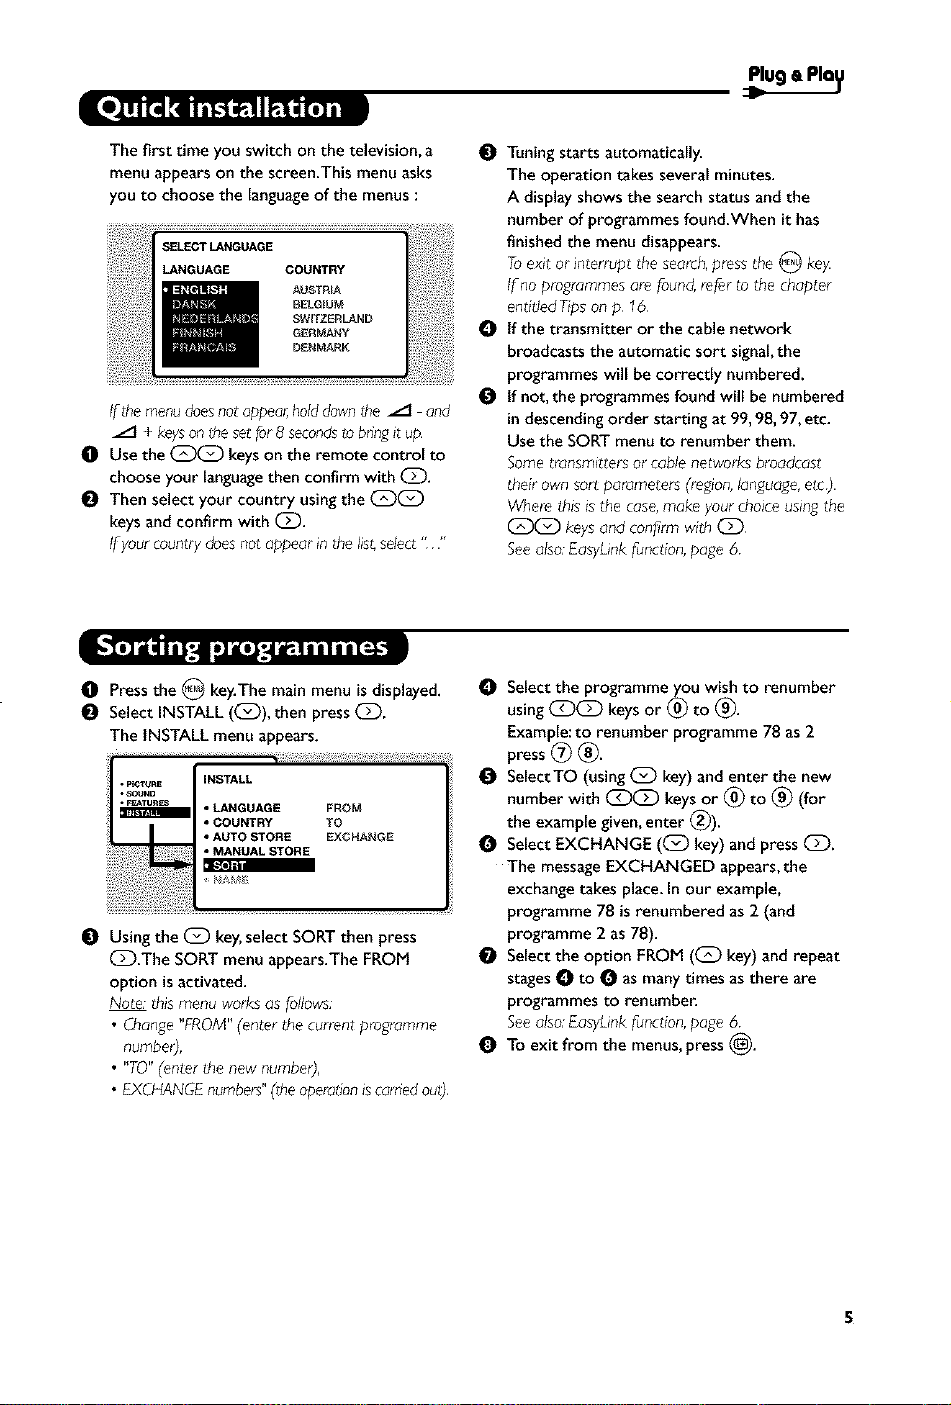
The first time you switch on the television, a
menu appears on the screen.This menu asks
you to choose the languageof the menus:
If_hemenudoesnotappea_holddownthe /t and
/t + keysonthesetfor8 secondstobringit up.
El Usethe (_(_ keyson the remote control to
choose your languagethen confirm with C_.
Then select your country usingthe C_C_)
keysand confirm with (Z).
Ifyourcountrydoesnotappearin thehst,select""
El Pressthe 0 key.The main menu is displayed.
Select INSTALL (C_)), then pressC_.
The INSTALL menu appears.
Usingthe Q key,select SORTthen press
C_.The SORT menu appears.The FROM
option isactivated.
Note:thismenuworksas follows:
• Change"FROM"(enter the currentprogramme
Tuningstarts automatically.
The operation takes several minutes.
A displayshows the search status and the
number of programmes found.When it has
finished the menu disappears.
Toexit or interrupt the search,pressthe 0 key
If noprogrammesarefound,referto the chapter
endtledTipson p 16
O tf the transmitter or the cable network
broadcasts the automatic sort signal,the
programmes will be correctly numbered.
O If not, the programmes found will be numbered
in descendingorder starting at 99,98,97, etc.
Use the SORTmenu to renumber them.
Sometransmittersor cablenetworksbroadcast
theirownsort parameters(region,language,elc_
Wherethisisthe case,makeyour choiceusingthe
(_)(_) keysand con_rmwithC_
Seealso.EasyLinkfunction,page6
O Select the programme you wish to renumber
using (_(_) keys or (_ to (_.
Example:to renumber programme 78 as2
press (_ _.
O SelectTO (using _ key) and enter the new
number with (_(_ keys or (_ to _) (for
the example given,enter (_).
Select EXCHANGE ((_) key) and pressC_.
The messageEXCHANGED appears,the
exchangetakes place.In our example,
programme 78 is renumbered as2 (and
programme 2 as78).
Select the option FROM ((_ key) and repeat
stagesO to O as manytimes as there are
programmes to renumber.
Seealso.EasyLinkfunction,page6
To exit from the menus,press(_.
• EXCHANGEnumbers"(theoperationiscarriedoul),
S
Page 6

O Press the O key to displaythe main menu.
Select INSTALL((:_)), then pressC_.
The INSTALL menu appears.
The LANGUAGE option isactivated.
• p[CTURE
• SOUND
• r_TUR_S _ ENGLISH
INSTALL
• COUNTRY DANSR
• MANUAL STORE
• AUTO STORE NEDERLANOS
• SORT
PressG to go into the LANGUAGE menu.
O Select your languagewith the (:::_(:::_)keys.
The menus will appear inthe chosen language.
Press_ to exit the LANGUAGE menu.
O Select the option COUNTRY and press (::_.
Select your country with (::_(Z) keys.
Ifyour countrydoesnot appear in the hs_select
OTHER
Q Press_ to exit the COUNTRY menu.
O To exit from the menus,press _.
This menu allows you to automatically search
for allthe programmes availableinyour region
(or on your cable network).
O First carry out operations O to _ above,then:
Press_ once to selectAUTO STORE then
press (:_.The search begins.
After severalminutes, the INSTALLmenu
reappears automatically.
If the set is connected (by the EXT2 socket)
to a video equipped with the EasyLink
function, the language,country and channels
found are automatically transmitted to the
video recorder at the time of installation.
0 tf the transmitter or the cable network
broadcasts the automatic sort signal,the
programmeswill becorrectly numbered.
O tf not, the programmes found will be
numbered in descending order starting at 99,
98,97,etc.
Use the SORTmenu to renumber them.
Sometransmittersor cablenetworksbroadcast
theirownsort parameters(regson,language,elc_.
Wher_this is the case,make yourchoiceusingthe
(_C_ keysandcon_rm with (_D
Toexit or interrupt the seamh,pressthe _ key If
rJopictureis_un4 referto the chapterentitled
Tspsanp 16
Seealso,EasyLinkfunctionbelow
To exit from the menus,press _.
A message is displayed on-screen during
loading.The list of video recorder channels is
then the same as those of the set.
The EASY LINK setting in the OPTIONS menu
must be set to ON (default setting}, see page 9
Page 7

This menu allows you to store the
programmes one by one.
O Press@
Select INSTALL (C_)), then pressQ.
The INSTALL menu appears.
Select MANUAL STORE ((_) then press C_.
The menu appears :
INSTALL
O Press_ to go to the SYSTEMmenu.
Use (Z)(_) to choose EUROPE(automatic
detection*) or manual detection withWEST
EUR(standard BG reception), EAST EUR
(standard DK reception), UK (standard I
reception) or FRANCE (standard LL').
Then press(_ to exit from the menu.
* Exceptlor France(standardLL'):selectthe
O Select SEARCH and pressC_.
The search begins.As soon as a programme is
found, the searchwill stop. tf you know the
frequency of the programme required, enter
its number directly usingthe (_ _) keysand
go to step O.
Ifnoprogramme_s_und, referto lheTspschaplet
on page 16).
O tf reception is un-satisfactory, select FINE
TUNE and hold down _ or _ key.
O Select PROG. NO (programme number) and
use the (_ (:_ or (_ to _) keysto enter
the desired number.
Select STOREand press(_).The message
STORED appears.The programme is stored.
Seealso.EasyLinkfunction,page6
O Repeatsteps O to Q for eachprogramme to
be stored.
To exit: pressthe _) key.
You may,ifyou wish,give a name to the first
40 pro_ammes (from 1 to 40).
O Press_.
O Select INSTALL ((_)),then press(:_.
The INSTALL menu appears.
Press_ 5 times to select NAME (concealed
at the bottom of the screen),then press C_.
The menu appears :
O Select the programme you wish to name using
the keys (_ _) or (_ P (_.
Note: at the time of irJstallc_tion,the programmes
are aulomatically named wherJ the identification
ssgnalis transmitted
Use the keys C_)(_ to move within the
name display area (S characters).
Use keys (_C_) to choose the characters.
Press O when the name has been entered.
The programme name is stored.
See also. EasyLink function, page 6
O Repeat steps O to O for each programme to
be named.
To exit from the menus, press (_.
Page 8

Choosing radio mode
Pressthe (_) key on the remote control to
switch theTV to radio mode. Pressthe (_)
keyto return toTV mode. tn radio modethe
number andname of the station (if available),
its frequency and the sound mode are
indicated on the screen.
Toenter the nameof the stationsusethe NAME
Selecting programmes
Use the (_ _) or (_) P(_ keysto select the
FM stations (from 1 to 40).
List of radio stations
Pressthe _ keyto display / hide the list of
radio stations. Then usethe cursor to select a
station.
Using the radio menus
Use the O key to accessthe specific radio
settings.
Searching radio stations
Ifyou haveused the quick installation allthe
availableFM stations will bestored. To start a
new search usethe INSTALL menu :AUTO
STORE(for a complete search) or MANUAL
STORE(for a station by station search). The
SORT and NAME menuslet you classifyor
name the radio stations. These menuswork in
exactly the sameway as theTV menus.
Screen saver
In the FEATURESmenu you canactivate / close
the screen saver.The time, the frequency of
the station and its name (if available)move
acrossthe screen.
PC Mode
YourTV can be used asa computer monito_
The PIPfunction lets you displaya
superimposed imageto watch the TV channels
at the same time.
Youmust frst of all connectthe computer and
a(_usttheresolution(seep.15)
Choosing PC mode
Pressthe (_ keyon the remote control to
switch theTV to PC mode.Pressthe (_ key
to return toTV mode.
If thereis noPCsignal/ormore than f_veseconds,
the TVaulomaticallygoesintostandbymode.
Using PIP
While in PC mode you can call upa window
forTV channels.
O Press the I_ keyto displaythe PIPscreen.
The television imageisreproduced ina small
superimposed window.
Pressthe _ keyagain to reduce the size of
the window then makeit disappear.
Use the _ key if you want to hide the
window. You can also shift it progressively by
using the cursor.
O Use the (_ (_) or (_ P (_ keys to changethe
programmes of the PIPscreen or the _ key
if you want to display apicture from an
appliance connected to the TV (e.g.video
recorder, DVD).
Using the PC menus
Pressthe_ keyto accessthe specificsettingsof
the PC monitor mode. Usethe cursor to adjust
them (the settingsare automaticallysaved):
• AUDIO SELECTION: to choose the sound
reproduced on theTV (PC or TV/Radio).
For example,you canlisten to the radio while
you usethe computer.
Note:youmustchooseTVorradiomodehe,re
goingintoPCmode Youcannothstento theradio
whenthePIPscreenisd_splayed
• BRIGHTNESS/ CONTRAST:to adjustthe
brightnessandcontrast.
• ADJUSTCOLOUR:to adjustthe colours (cold,
normal or warm).
• VIDEONOISE:eliminatesthe horizontal (PHASE)
andvertical (CLOCK) interfering lines.
• ADJUSTPOSITION: to adjust the horizontal and
vertical placingof the image.
• AUTOADJUST: position issetautomatically.
• PIPCONTROLS: to adjust the sizeand position
of the PIPscreen.
• MODESELECT: to come backtoTV or radio
mode.
• RESETTOFACTORYSETTING:to return to the
factory settings(default settings).
• VIEWFORMAT:to choose between large screen
or the original format of the PC screens.
Page 9

O PressO then(_).
ThePICTUREmenuappears:
PICTURE
Use C_)(_) keys to select a setting and
(_C_ keys to adjust.
Note. the menu is d scroll down menu.
settings hidden at _he bottom of the screen
0 Once the necessary adjustments have been
made, select the option STORE and press (_D
to store them.
To exit from the menus, press (_).
Description of the settings:
• BRIGHTNESS:alters the brightness of the
image.
• COLOUR:alters the colour intensity.
• CONTRAST:alters the variation between
light and dark tones.
• SHARPNESS:altersthe crispnessof the image.
• STORE:stores the picture settings.
• COLOURTEMR:adjusts the colour
temperature ofthe picture.Three options
are available here:COOL (blue white),
NORMAL (balanced)or WARM(red white).
• CONTRAST+ :To activate / de-activate the
automatic contrast adjustment system (the
dark areas are made darker whilst
maintaining the detail).
PressO, select the SOUND option ((_)) and
pressCD.The SOUND menu appears :
Use (_C_) keys to select asetting andkeys
(_CD to adjust.
Once the necessaryadjustments havebeen
made,select the option STOREand press G
to store them.
To exit from the menus,press_.
PressO, select FEATURES((_) and press
Q_.You can adjust:
TIMER,PARENTAL.CONll and CHILD LOCK :
see next page
MODESELECT=to switch the TV in radio,TV or
PC mode.
EASYLINK(onlyavailableon ce_lainversions): tf
the set is connected (by the EXT2 socket) to
Description of the settings:
• EQUALIZER:to adjust the sound tone (from
bass:120 Hz to treble: 10 kHz).
• BALANCE:to balancethe sound between the
left and right speakers.
• DELTAVOLUME(volume difference):allows
you to compensatefor the volume differences
between the different programmes or the
EXT sockets.This setting is availablefor
programmes 1 - 40 andthe EXT sockets. Use
the (_ P (_) keys to compare the level of
different programmes.
• STORE:stores the sound settings.
• AVL:automatic volume control used to avoid
suddenincreasesinvolume,particularly when
changingprogrammesor duringadvertisements
a video equipped with the EasyLinkfunction,
the language,country andchannels found are
automatically transmitted to the video
recorder at the time of installation,if your
video recorder isnot equipped with this
function, setto OFF.
To quit the menus,press_.
9
Page 10

This menu allows you to use yourTV as an
alarm dock.
O Press @,
Select FEATURES(@) and press @ twice.
The TIMER menu appears :
PressG to enter andexit the sub-menus
and use keys(Z)(_:) to ad}ust:
TIME:enter current time.
Note: the time isupdatedautomaticallyeach tiroe
the set isswil_hedon usingteletext inlormation
takenlrom programme1.Il programme1 does
nat haveteletext,the update will not lake place
O STARTTIME:enterthe start time.
STOPTIME:enter the stop time.
PROG.NO.: enter the number of the
programme for the wake-up alarm. For models
equipped with a radio, you can select an FM
station by using the (_:)(Z) keys(the (_
keysare only usedto selectTV programs).
ACTIVATE:youcan set the alarm to be
activated:
• ONCEONLYfor a one-off alarm,
• DAILYfor adaily alarm or
• STOPto cancel.
Press(_ to set theTV to standby,it will
automatically switch on at the time
programmed, tfyou leavethe TV switched on,
it will only changeprogramme at the time
indicated.
Thecombinationof the CHILDLOCKand TIMER
functionsmay be usedto limit the lengthaf time
yourtelevisionisin use,for example,byyour
children
You can bar accessto certain programmes or
completely lock the set by locking the keys.
Lockin_programmes
0 Press_.
il¸
ili .T.O
ROTAT,ON
Select (C_) and pressC:).
Select PARENTALCON]:((_)) and press(Z).
Enter your confidential accesscode.The first
time, enter the code 0711 then confirm by
re-entering 0711.The menu appears.
Press_ to go into the menu.
Use keysC_(Z) to select the required
programme and confirm with (Z).The symbol
isdisplayedalongside the programmes or
sockets that havebeen locked.
Press(_ to exit.
To watch a programme which hasbeen locked
you will now need to enter the confidential
code;otherwise the screen will remain blank.
TheINSTALLmenu accessisalsolocked
Caution:in the caseofencryptedprogrammes
whichusean externaldecoder,it is necessaryto
lock the correspondingEXT socket
To unlock all programmes
Repeat stages0 to _ above,then select
CLEARALLand press C_).
To change the confidential code
Repeat stages0 to _ above,then:
Select CHANGECODEand enter your own 4-
digit number.
Confirm by entering it again.
Your new code will bestored.
Press_ to exit from the menus.
Ifyouhave forgottenyourconfidentialcode,enter
the universalcode 0711 twice.
Lockin_the keys
Press_,select FEATURES(C_) andpress C_.
Select CHILD LOCK ((_)) andpress (_ to set
the lock to ON.
Switch off the set andput the remote control
out of sight.The set cannot be used(it canonly
be switched on usingthe remote control).
To cancel:switch CHILD LOCK to OFF.
10
Page 11

Teletext isan informationsystem broadcast by certain channelswhich can be consultedlike a
newspaper,it alsooffers accessto subtitles for viewers with hearing problems or who are not familiar
with the transmission language(cable networks, satellite channels,etc.).
C Press : C You will obtain: )
f ®'
@ @ ®
®@@
®® ®
@ @
_) Teletext This isusedto callteletext, changeto transparent mode and
_)/?_ Selecting Enter the number of the page required using the @ to _
(_ p (_) apage or @ P _:) keys.Example:page120, enter @ @ @.
(_ Contents This returns you to the contentspage(usually page 100),
Q Q selection of containssub-pagesl/3,2/3and3/3).lfthisisthecase, the
!
CZ) a page pageand then return to normal size.
(_) teletext mode.The active page is displayedon the left and the
Q information
O Favourite Insteadof the standardcoloured at the bottom
O will become the default every time tetetext is selected.
onloff then exit-The summaryappearswith a list of items that can be
Direct Coloured areas are displayed at the bottom of the screen.
accessto The 4 coloured keysare used to access the items or
the items corresponding pages.
Direct Certain pagescontain sub-pages(for example, page120
sub-pages page number is displayed in green, preceded by the symbol
Enlarge This allows you to display the top or bottom part of the
Double page To activate or deactivate the double page teletext display
(onlyavailable following page isdisplayedon the right, Press_) if you want
on certain to hold a page(i,e.the contents page).Theactive page is then
versions) displayedon the right.To return to normal mode, press _).
Hidden To displayor hide the concealedinformation (gamessolutions),
pages of the screen,you can store 4 favourite pageson the first
accessed,Eachitem hasa corresponding 3 digit pagenumhe_
If the channelselectedduesnot b_oadcastteletext,the indscat;on
I00 will be d_splayedand the soeen will remain blank (m th_s
case,exit teletext and selectanotherchannel)
The number isdisplayed top left,the counter turns and
then the pageisdisplayed.Repeat this operation to view
another page.
tf the counter continuestu sea_ch,th_smeansthat the page _s
not transmitted Selectanother numbe_
Thecolou_edareasflashwhen the item or the page_snotyet
available
I_, • or • I_. Usethe keys CDCD to directly access
the sub-pagesof your choice,
displayedareas
40 channelswhich canthen be accessedusing the coloured
keys (red,green,yellow, Blue).Once set,these favourite pages
O Pressthe O key to changeto favourite pages mode.
Displaythe teletext page that you want to store,
Press@ then the coloured keyof your choice.
The page is stored.
Repeatsteps _ and _ for the other coloured keys,
Now when you consult teletext, your favourite pages
will appear in colour at the bottom of the screen,
To temporaly retrieve the standard items, press O"
11
Page 12

Thepicturesyoureceivemaybetransmittedin16:9format(widescreen)or4:3format
(conventionalscreen).4:3picturessometimeshaveablackbandatthetopandbottomof the screen
(letterbox format).This function allows you to optimise the picture displayon screen.
If your television is equipped with a 4:3 screen.
Pressthe (_ key (or (_(_) to select the different modes:
4:3
The picture is reproduced in 4:3 format.
EXPAND 4:3
The picture is enlarged vertically.This mode isusedto cancellthe black bandswhen
watching a programme in letterbox format.
COMPRESS 16:9
The picture iscompressed vertically into 16:9 format.
If your television is equipped with a 16:9 screen.
Pressthe (_ key (or (_(_) to select the different modes:
ThisTVsetis alsoequippedwith automaticswitchingwhichwill selectthecorrect screen
lormat,providedthespecifics_gnalsare transmittedwith theprogrammes
4:3
The picture is reproduced in 4:3format and a black band is displayedon either side
ofthe picture.
ZOOM 14:9
The picture is enlarged to 14:9 format, a thin black band remains on both sidesof
the picture.
........................ •
ZOOM 16:9
The picture is enlarged to 16:9 format.This mode isrecommended when displaying
......................... ,
..........................
pictures which haveblack bandsat the top and bottom (letterbox format).
SUBTITLE ZOOM
This mode is used to display4:3 pictures usingthe full surface of the screen leaving
the sub-titles visible.
12
SUPERWIDE
This mode is used to display4:3 pictures usingthe full surface of the screen by
enlarging the sides of the picture.
WIDE SCREEN
This mode restores the correct proportions of imagestransmitted in 16:9.
Note, Ifyoudisplaya 4:3 pictureirl thldmode,_twill be erllargedhorizontally,
FULL SCREEN
This mode displaysimagesin full screen.
Page 13

Most of the audio and video equipment from our range of products
can be operated with the remote control of theT_L
Theremote controliscompatible with allvsdeorecordersusingtheRCS
standardandall DVDsusingthe RC6standard
O Pressthe MODE keyto select the required mode :VOR (video
recorder) or DVD.The remote control indicatorlights up to display
the selected mode. It switches off automatically after 20 seconds if
left idle.The remote control automatically returns toTV mode.
The following keysare operational, dependingon the equipment :
(_ standby,
• recording,
41_ fast rewind,
0, oQ' , stop
O @ It, play,
O Q Q II pause
@ @ _(_ VCR timer,
@ @ @ (_ DVD :subtitlinglanguage
IH_ fast forward,
cursor navigation and adiustments,
OK validation,
(_ digit keys,
_) P _ programme selection,
(_ audio selection.
(_ OSD menu,
menu,
EasyLink: Digital link between the set and the video recorder which allows adirect transfer of
certain information suchas channelsettingor programming.
PIP (Picture in Picture): Superimposed window that displaysasmall picture in the main picture.
In PC mode youcan displayan imagefrom theTV or other appliance (e.g.DVD or video recorder)
in asmall window.
RGB signals :These are the three video signals,RedGreen Blue,which makeup the picture.
Usingthese signalsimproves picture quality.
S-VHS signals : These are 2 separateY/C video signalsfrom the S-VHS and Hi-8 recording standards.
The luminance signalsY (black and white) and chrominance signalsC (colour) are recorded
separately on the tape.This provides better picture quality than with standard video (VHS and 8
mm) where theY/C signalsare combined to provide only one video signal.
NICAM sound : Process by which digital sound can betransmitted.
System : Television pictures are not broadcast inthe same way in all countries.There are different
standards:BG, DK, 1,and L L'.The SYSTEMsetting (p. 6) is used to select these different standards.
This is not to be confusedwith PAL or SECAMcolour coding. Palis used in the majority of
European countries, Secamin France,the CISand the majority of African countries.
The United Statesand Japanusea different system called NTSC.The inputs EXT1 and EXT2 are
usedto read NTSC coded recordings.
|6:9 : Refersto the ratio between the length and height of the screen.
Wide screentelevisions havearation of 16/9, conventional screenTV sets havea ration of 4/3.
13
Page 14

Depending on the version theTV is equipped with one or two EXT1 and EXT2 sockets.
A specialadaptor is supplied to connect to EXT1 and can route the leads to the back.
TheEXT1 sockethasaudio,CVBS/RGBinputsand audio,CVBSoutputs
TheEXT2 socket(_favailable)has audio,CVBS/SVHSinputsandaudio,CVBSoutputs.
EXT 1
Video recorder
VCR
Other equipment
Video recorder (or DVD recorder)
Carry out the connections shown opposite, using a good
quality euroconnector cable. Ifyour video recorder hasthe
Easylinkfunction, usethe EXT2 socket.
Ifyour videorecorderdoesnothavea euroconnectorsocket,the
onlyconnectionpassibleisvsathe aerialcableYouwill therefore
needto tune in yourwdeorecorder'stests_gnaland assignit
Video recorder with decoder
Connect the decoder to the second euroconnector socket of
the video recorder.You will then be able to record scrambled
transmissions.
Satellite receiver, decoder, DVD, games, etc.
ForTV setswith 2 SCART connectors, preferably connectthe
equipment deliveringRGB signals(digital decoders,DVD
players,gamesconsoles,etc.) to EXT1 and the equipment
delivering S-VHSsignals(S-VHSand Hi-SVCRs) to EXT2.
14
Page 15

Camcorder, video games
_r_EO
_UIIItl
The AV andS-VIDEO connections are located under the
left panel or, for large screen sizes,under the right panel.
Makethe connections asshown opposite.With the _ key,
select EXTS.
Foramonophonicd_vice,connectthe audsosignal to the
AUDIOL input.Thesoundautomaticallycomesout of thelefL
andright speakersof the set
Headphones
Amplifier
Computer
w00teF
_ A.dio
@,
When head _hones are connected, the sound on the TV set will
be cur.The (_ P (_ keys are used to adjust the volume level.
The headphone impedance must be between 32 and 600 Ohms.
To connect a Hi-fi unit use an audio connection cord and
connect the L and R Audio out of the TV to an Audio in L
and R from the Hi-fi unit. If you have an active speaker
connect the Subwoofer out of the TV to the Subwoofer in
of the speaker.
in
Connect the monitor output of your computer to the PC
input(VGA) of theTM Connect the sound output Audio out
L and R of the computer to the input Audioin (PC) Land R
of the TV.
Formoreir -ormationonusingPCmodeseepage 8.
Configure the computer on 1024 x 768, 60 Hz for optimum
resolution.
Attention:if you useanother resolution,the PIP/unctionmaynot
worl_In thiscasea warningmessageis d_splayedon the screen.
Here is the list of the different display resolutions available
on your TV:
640 x 350,70 Hz 720 x 40C
640 x 350,85 Hz 720x 40C
640 x 480,60 Hz 800 x 60C
640 x 480,67 Hz 800 x 60C
640 x 480,72 Hz 800 x 60C
640 x 480,75 Hz 800 x 60C
640 x 480,85 Hz 800 x 60C
832x 624
70Hz 1024 x 768, 60 Hz
85Hz 1024 x 768,70 Hz
56Hz 1024 x 768, 75 Hz
60Hz 1024 x 768, 85 Hz
72Hz 1152 x 864,75 Hz
75Hz 1280 x 960, 60 Hz
85Hz 1280 x 1024,60 Hz
75Hz 1280 x1024, 75 Hz
15
Page 16

Poor reception the proximity of mountains or high buildings may be responsible for ghost
_ictures, echoing or shadows, in this case, try manually adjusting your picture: see
'fine tuning" (p.7) or modify the orientation of the outside aerial Does your
lntenna enable you to receive broadcasts in this frequency range (UHF orVHF
:_and)?
No picture -lave you connected the aerial socket properly? Have you chosen the right
_ystem? (p. 7). Poorly connected euroconnector cables or aerial sockets are often
:he cause of picture or sound problems (sometimes the connectors can become
talf disconnected if the TV set is moved or turned). Check all connections.
Peripheral _'ou have not selected the right socket with the _ key: S-VHS2 instead of EXT2.
equipment gives a ro play a video cassette, check that it has been recorded under the same
black and white _tandard (PAL, SECAM, NTSC) which can be replayed by the video recorder.
)ieture
No sound f on certain channelsyou receivea picture but no sound, this means that you do not have
_e correctTV system. Modify the SYSTEM setting (p. 7).
the amplifier connected to the TV does not deliver any sound? Check that you
_ave not confused the audio output with the audio input.
PC and PIP modes _heck that you have configured the computer on a compatible display resolution
don't work ? '_seep. 15).
T'ou can't get the radio sound in PC mode? When P{P is active the sound is
:oreed toTV. You must de-activate PIP,go into radio mode and then come back
:o PC mode.
Remote control rheTV set does not react to the remote control; the indicator on the set no
onger flashes when you use the remote control? Replace the batteries.
Standby When you switch theTV set on it remains in standby mode and the indication
_OCKED is displayed when you usethe keys on theTV set?The CHILD LOCK
_unction is switched on (p. 10).
fthe set receives no signal for t5 rains, it automatically goes into standby mode.
[o save power, your set isfitted with components that give it avery low power
:onsumption when in standby mode (less than 1 W).
Cleaning the set Dnly use a clean, soft and lint-free cloth to clean the screen and the casing of your
_et.Do not use alcohol-based or solvent-based products.
Recycling i'he materials used in your set are either reusable or can be recycled.
i'o minimise environmental waste, specialist companies collect used appliances
md dismantle them after retrieving any materials that can be used again (ask your
Jealer for further details).
Still no results? 9isconnect the mains plug of the TV for 30 seconds then reconnect it.
f your TV set breaks down, never attempt to repair it yourself: contact your
Jealer's after-sales service.
16
 Loading...