

Philips 24HFL2819D, 28HFL2819D, 23HFL2819D, 20HFL2819D, 32HFL2819D Installation Manual

Register your product and get support at
www.philips.com/welcome
Installation Manual for
xxHFL2819D/10
Status: Release
Version 1.3
Date: October 2014
Author: Marian Pufulete

Contents
1. Requirements before starting the installation .......................................................................................................... 2
2. Find out the state of the TV ...................................................................................................................................... 3
3. Re-install TV .............................................................................................................................................................. 5
4. Installation wizard ..................................................................................................................................................... 7
5. Picture ....................................................................................................................................................................................................... 11
6. Sound ......................................................................................................................................................................................................... 12
7. Settings ..................................................................................................................................................................................................... 13
8. Channel list .............................................................................................................................................................. 18
9. Media Browser ...................................................................................................................................................................................... 20
10. Professional Settings .......................................................................................................................................................................... 21
11. Welcome Logo ....................................................................................................................................................................................... 26
12. Clone........................................................................................................................................................................ 27
13. Feature settings .................................................................................................................................................................................... 28
14. CSM (Consumer Setup menu) .......................................................................................................................................................... 29
Appendix 1 ...................................................................................................................................................................... 30
Channel List Editor ....................................................................................................................................................................................... 30
Interface description and usage ............................................................................................................................................................. 31
Main window .................................................................................................................................................................. 31
Editing channel list ....................................................................................................................................................................................... 33
Limitations and constraints ...................................................................................................................................................................... 35
Import channel list to TV............................................................................................................................................................................ 36
1

1. Requirements before starting the installation
Before starting the installation, make sure that you have everything you need at hand.
Master remote control 22AV8573 or Guest remote control 22AV1407A
And
USB stick
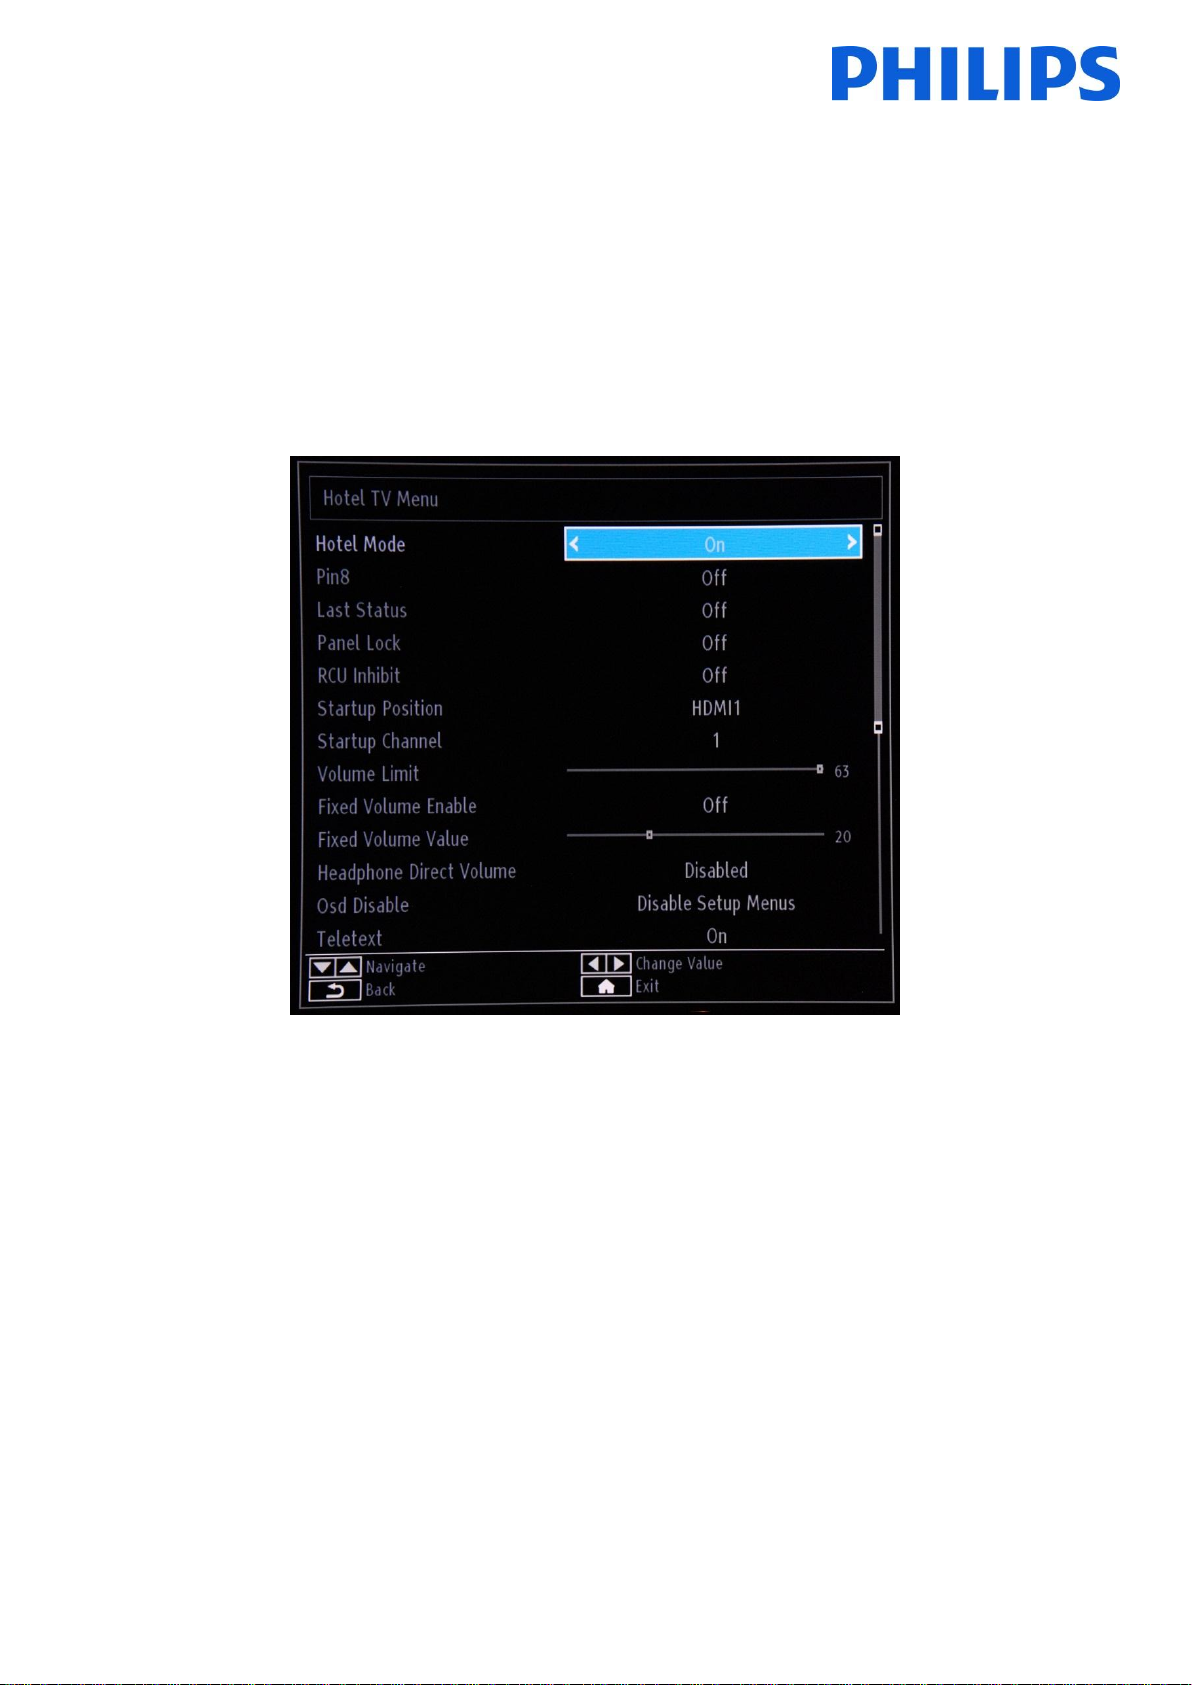
To enter the Hotel TV menu using the guest remote (22AV1407A):
For all HFL2809 models you can use the guest remote and the key sequence 3,1,9,7,5,3,MUTE to access the Hotel
Mode. The key sequence will not work if High Security Mode is enabled.
To enter the Hotel TV menu using the master remote control (22AV8573):
• Press the RC5 Setup key;
• Press the Home/Menu key;
Note:
The Home/Menu key on the master remote control (22AV8573) will activate only the hotel menu, navigation in this
menu must be done with the guest remote (22AV1107A).
Exit Hotel TV Menu
Leaving the Hotel TV Menu after making the required settings, can be done using the master Remote Control
(22AV8573) or with the TV included standard Remote Control.
To exit the Hotel TV menu with master remote control:
• Press the RC5 Setup key;
• Press the Home/Menu key;
To exit the Hotel TV menu with standard RC:
- Press the Menu key or
- Press the Return key
Note: On the bottom part of the screen the TV will display which buttons can help you to navigate and change the
options.
2
Hotel TV menu is ON
Hotel TV menu is OFF
2. Find out the state of the TV
It is important to know if a TV is in ‘virgin mode’ (out of the box) or installed before.
If you can see this screen below, you know that the TV is in ‘virgin mode’ and you can install the set. See chapter 4 of
this manual.
If you power on the set and then press the ‘Home’ button on the guest remote, you will see this screen appear, if the
TV already has been installed or the wizard was already skipped.
3
You can start the installation wizard again by reinstalling the TV as explained in chapter 3 of this manual. To be able
to modify any settings on the TV you must disable the Hotel TV mode.
Disable the Hotel TV mode
To access the setup menu you should press the ‘RC5 SETUP’ key and then press the ‘Home/Menu’ button if you are
using the 22AV8573.
To access the Hotel TV menu using the guest remote you need to input the key sequence 3,1,9,7,5,3,MUTE .
You can use the guest remote to select with the up or down arrow buttons and change values with the left or right
arrow buttons. Set the Hotel TV Mode to OFF.
Press “MENU” or “Return” button to exit this menu.
Note: Setting Hotel mode to OFF will disable all features from the Menu.
4

3. Re-install TV
If you want to start an installation from scratch you can always re-install the TV. First step is to set the Hotel Mode
to OFF and exit using the MENU or Return button on the guest remote.
Note: It is not required to use a save button, once you exit the menu, you will save the settings from the Hotel TV Menu
Press the MENU button on the guest remote to access the full menu of the TV. The following menu should be
displayed. Select the option “Install and Retune” (highlighted below)
Press “OK” to access the submenu.
Select the last option available “First time installation” and press “OK”. The TV asks for confirmation by showing the
following screen:
5
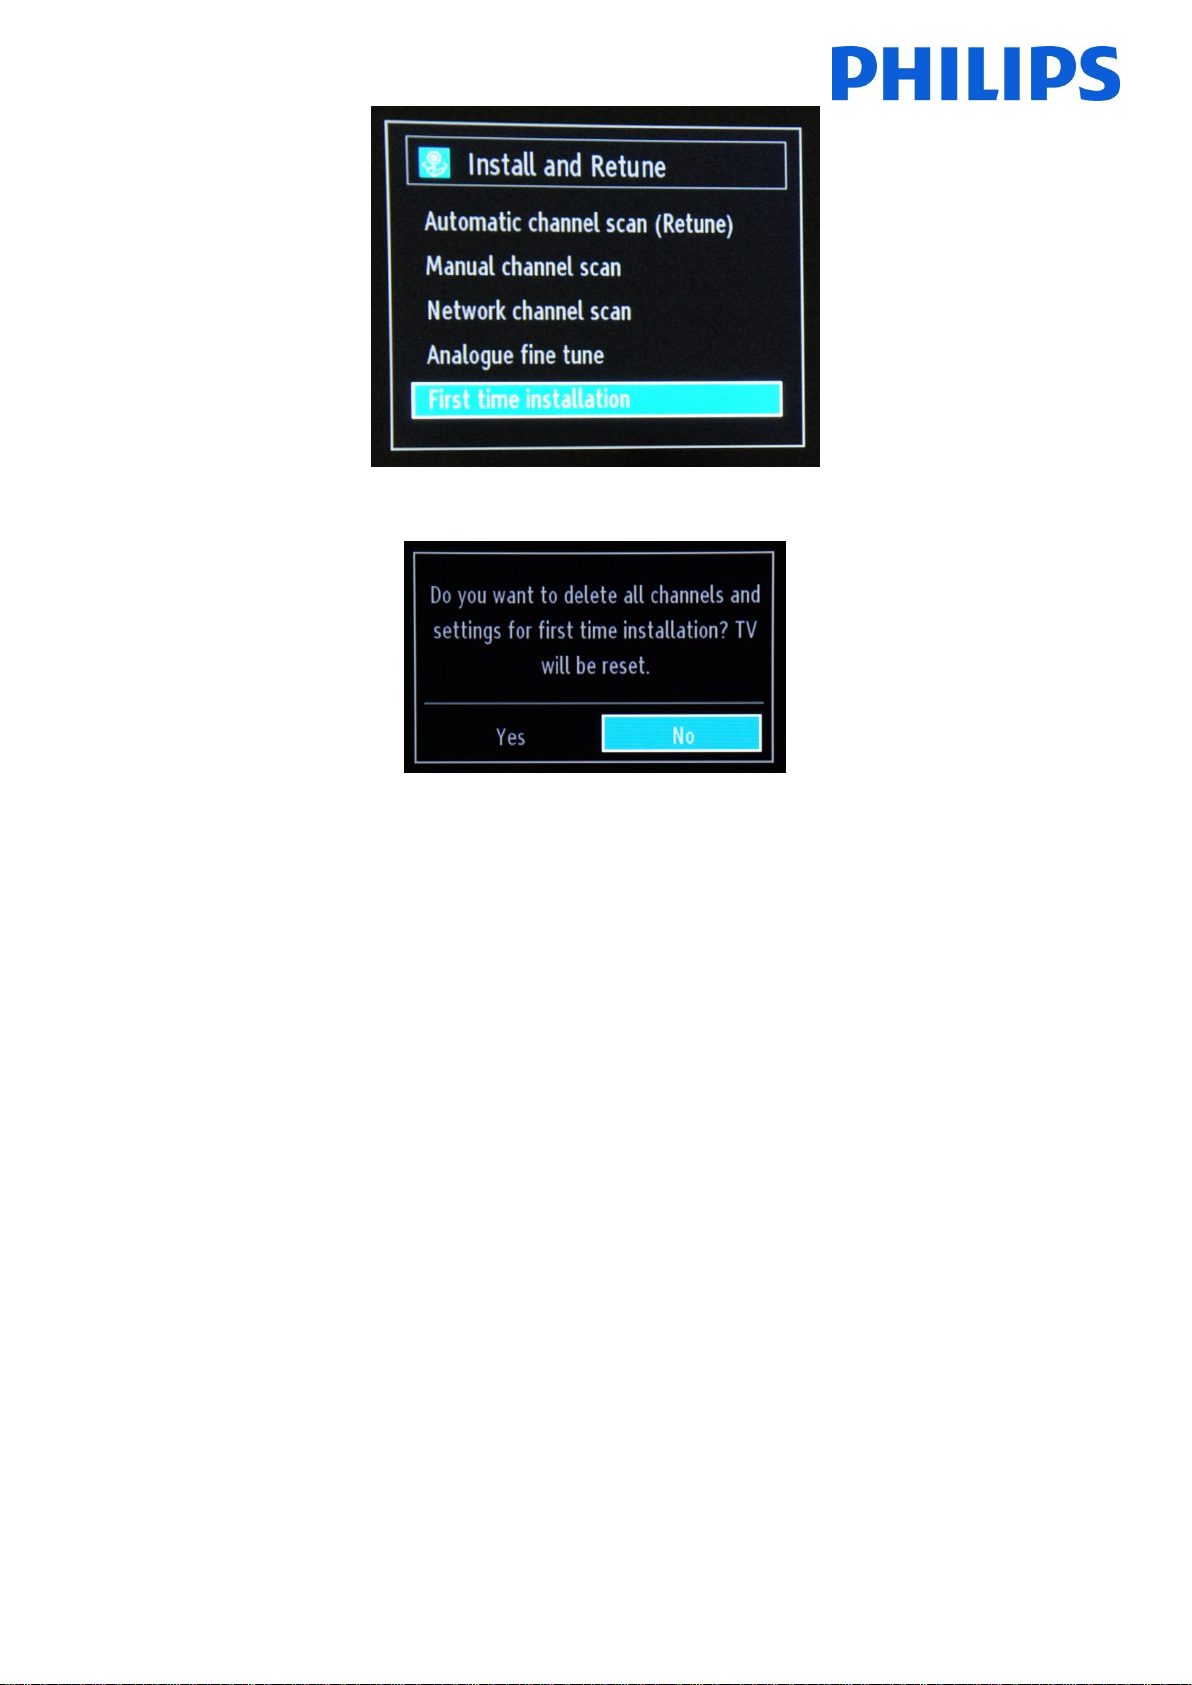
If you are sure that you want to re-install the TV, select “Yes” and press OK.
TV will reboot itself and show the “virgin state” screens with a welcome message.
Note: All settings will be reset to default values except Hotel menu values. Those values will remain the same. To reset the Hotel
TV menu use the Reset to Default Values option present in that menu.
6
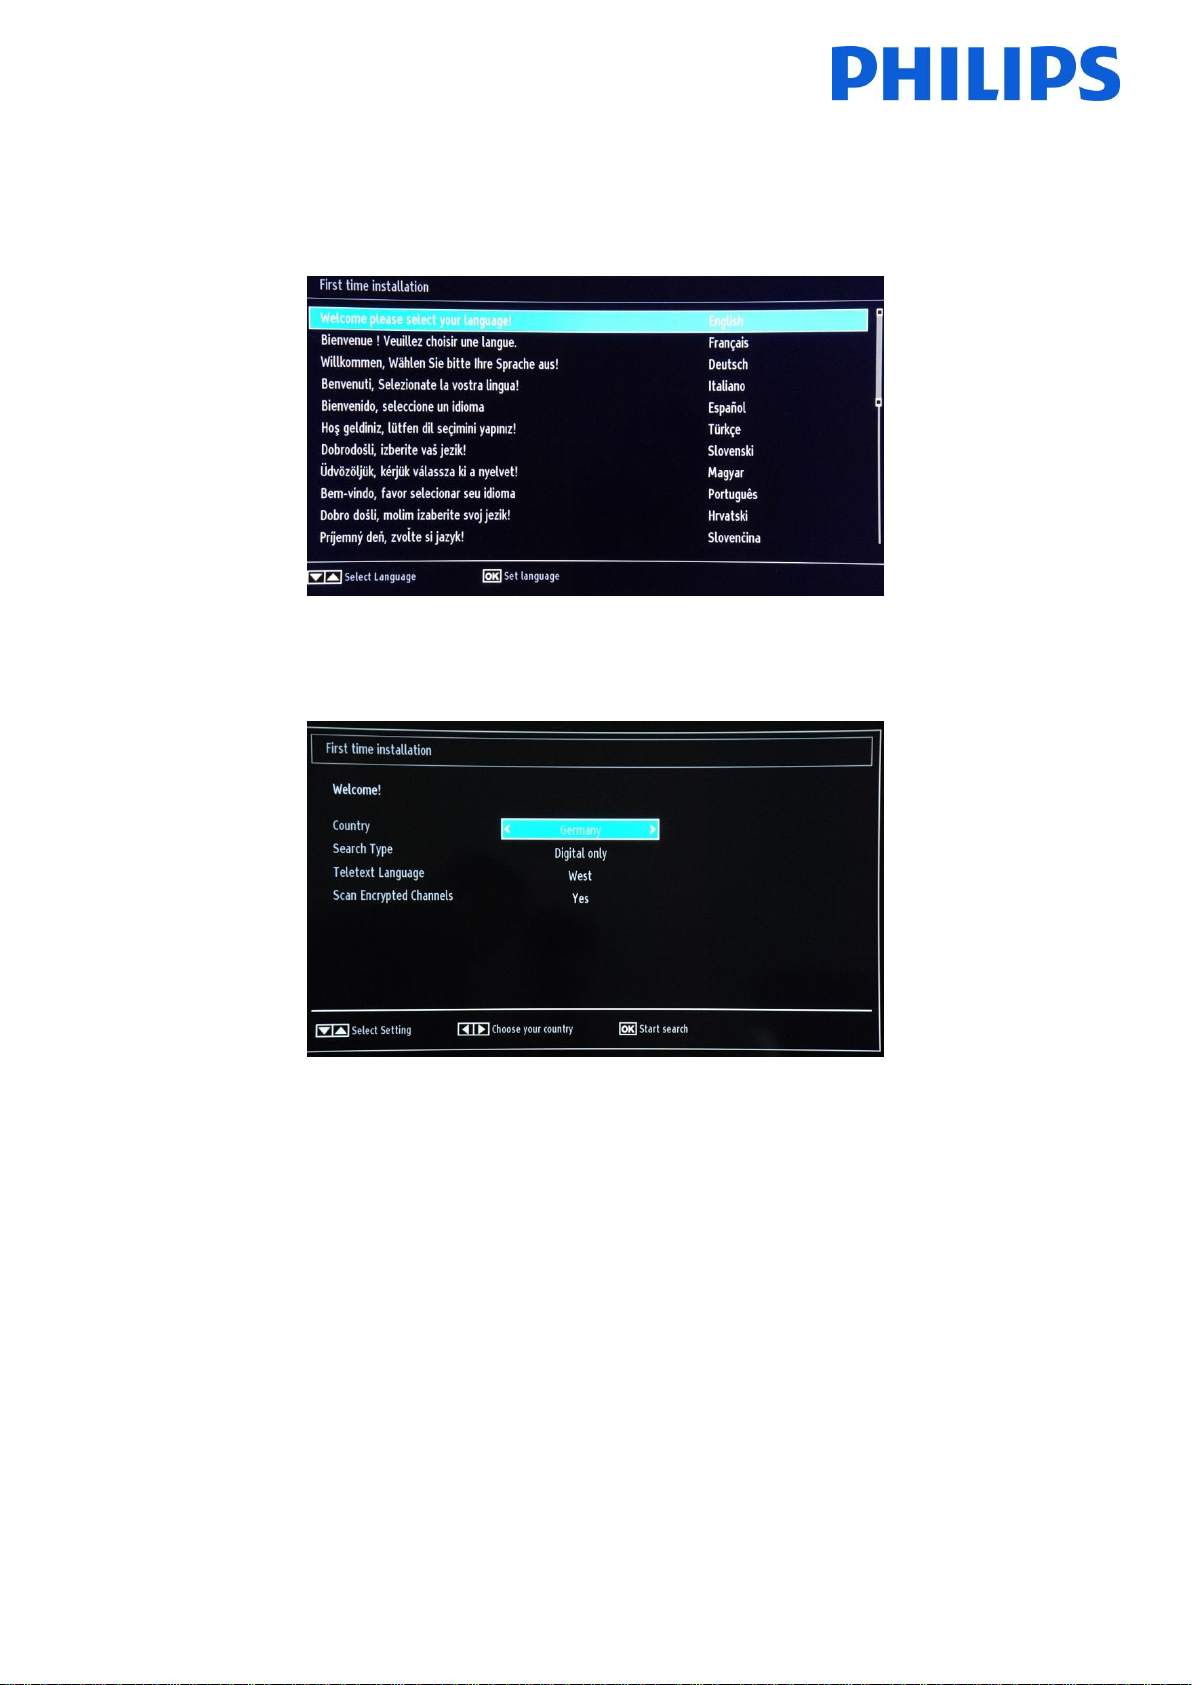
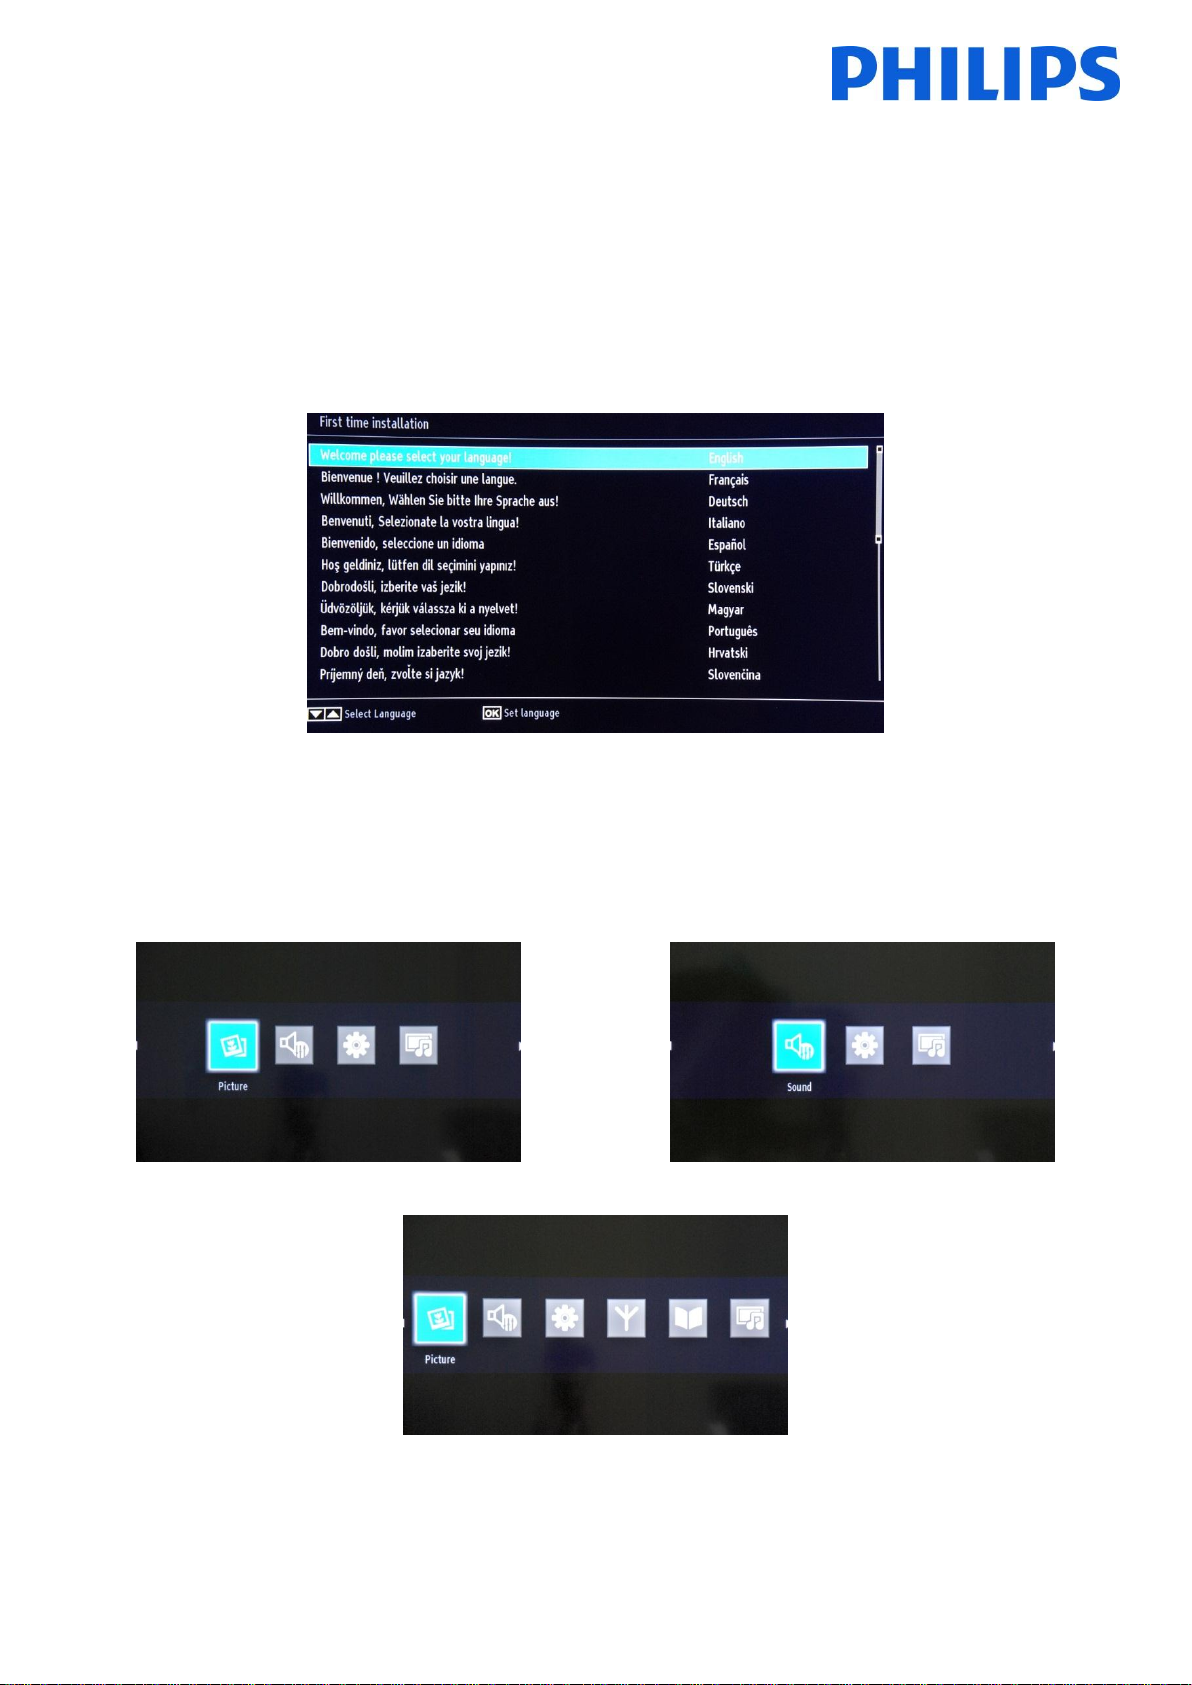
4. Installation wizard
When you turn on the TV for the first time, or you have reinstalled the TV, you should see the following screen. The
installation wizard, from whom this screen is a part, will guide you through all the menus for a basic TV installation.
Please select your language and press “OK” to start the installation of the TV set.
The first step is to select the country, which will enable country cable providers, time setting and channel list presets.
The next step is to select what type of TV channel search that you want to perform:
- Digital only: TV will search only for digital channels
- Full: The TV will search for digital and analog channels
- Analogue TV only: The TV will search only for analogue channels
Note: On the bottom part of the screen the TV will display which buttons can help you to navigate and change the
options.
Once you have set up the channel search, you can press “OK” to go to next step of the installation.
7
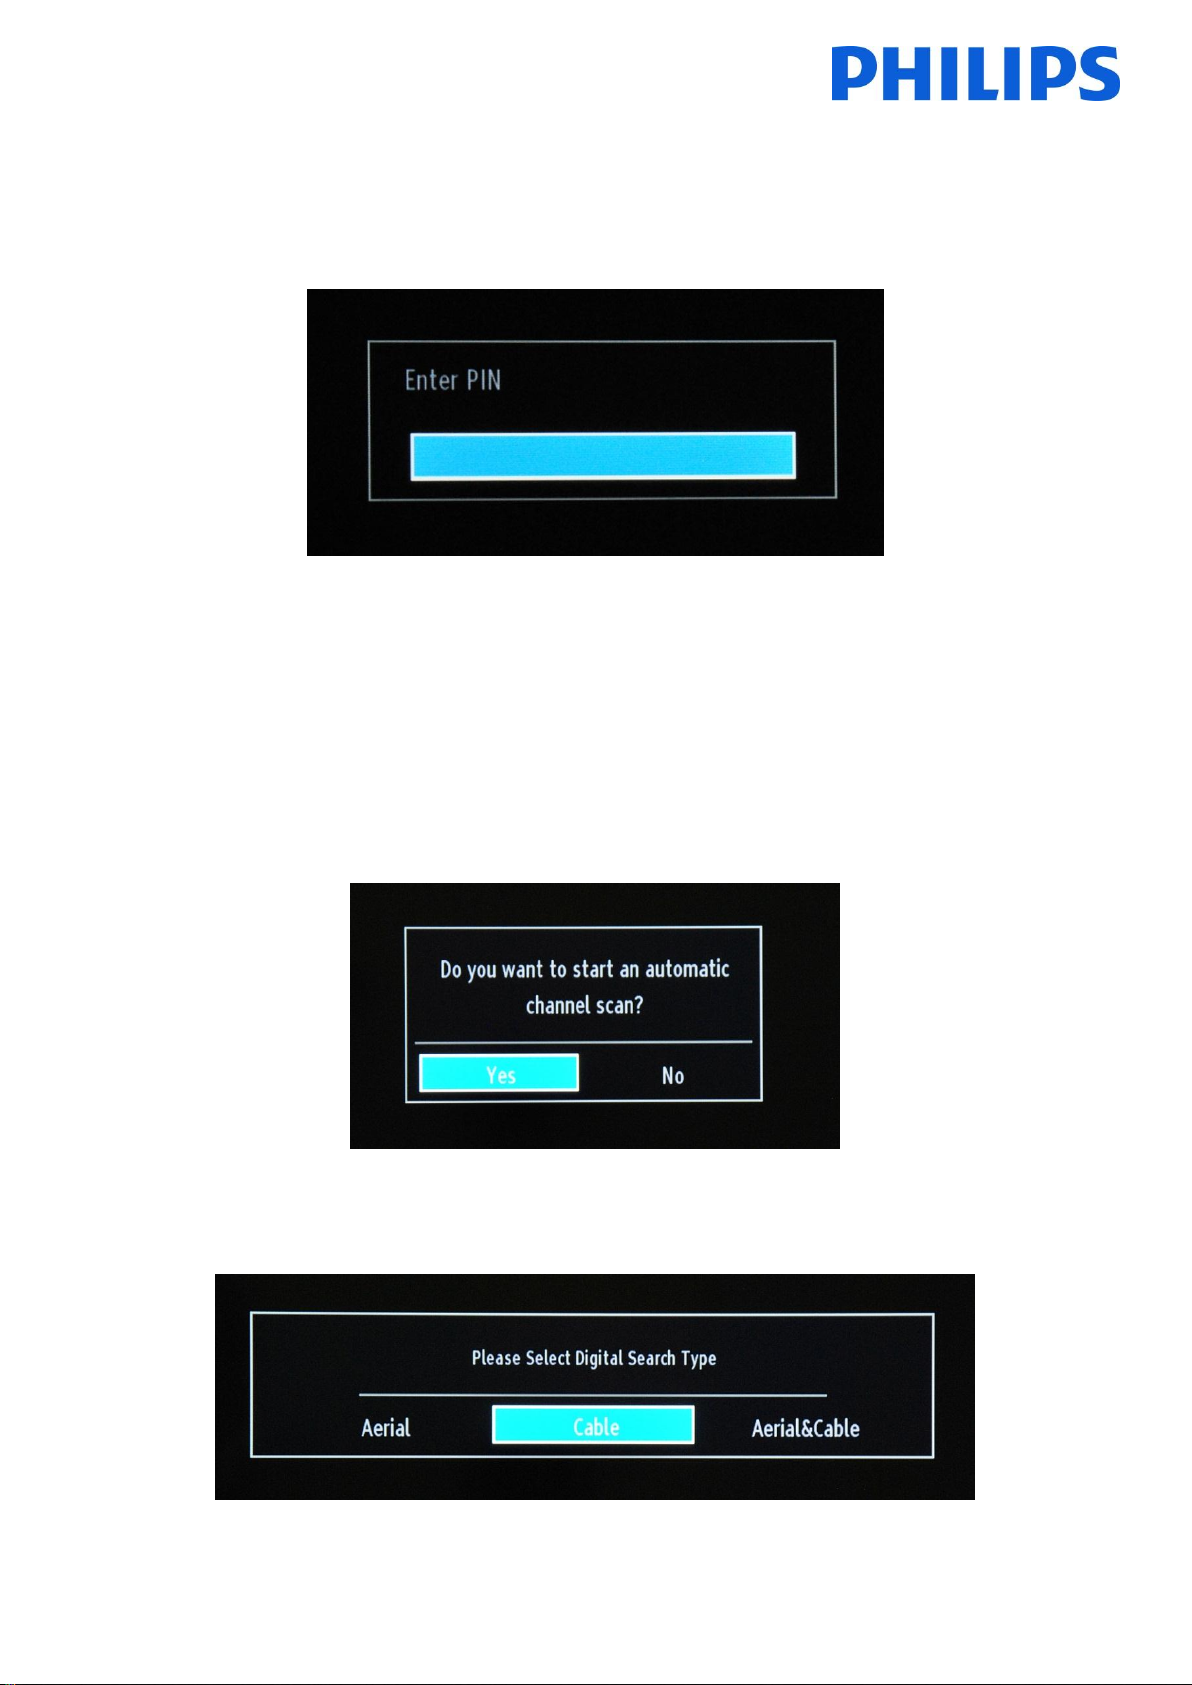
Depending on country you might need to follow an additional step, setting up a pin code. This pin code will be used
for blocking TV channels and settings.
In some cases due the country regulations, you have to provide a pin code formed from four digits. This pin code will
be required in case you want to modify the settings of the TV. Selected PIN code cannot be 0000. Enter a PIN code
and confirm it by entering it once more. Press the OK button to continue. If the two PIN codes match, your PIN code
will be set.
WARNING:
When you are required to enter a PIN code for any menu operation, you should use the PIN that you have previously
defined during the first time installation.
Press “OK” to continue to the next screen, which will ask if you want to start an automatic channel scan.
Select “Yes” and press “OK” to continue.
The next screen is asking about what the type of channels that will be installed.
8
Aerial Installation
If you select the AERIAL option in the Search Type screen, the TV set will search for digital terrestrial TV (DVB-T)
broadcasts.
NOTE: You can press the “MENU” button to cancel.
After all the available stations are stored, the Channel List will be displayed on the screen. If you like to sort the
channels according to the LCN (*), please select “Yes” and then press OK.
Press the “MENU” button to quit the channel list and watch TV.
(*) LCN is the Logical Channel Number system that organizes available broadcasts in accordance with a recognizable channel sequence (if
available).
Cable Installation
If you want to install DVB-C channels, select the “CABLE” option and press the “OK” button on the remote control to
continue. To continue, please select “YES” and press “OK”. To cancel the operation, select “NO” and press “OK”.
Aerial & Cable installation
Using this option TV will search for all available TV channels DVB-C + DVB-T plus Analog and install them on a single
list.
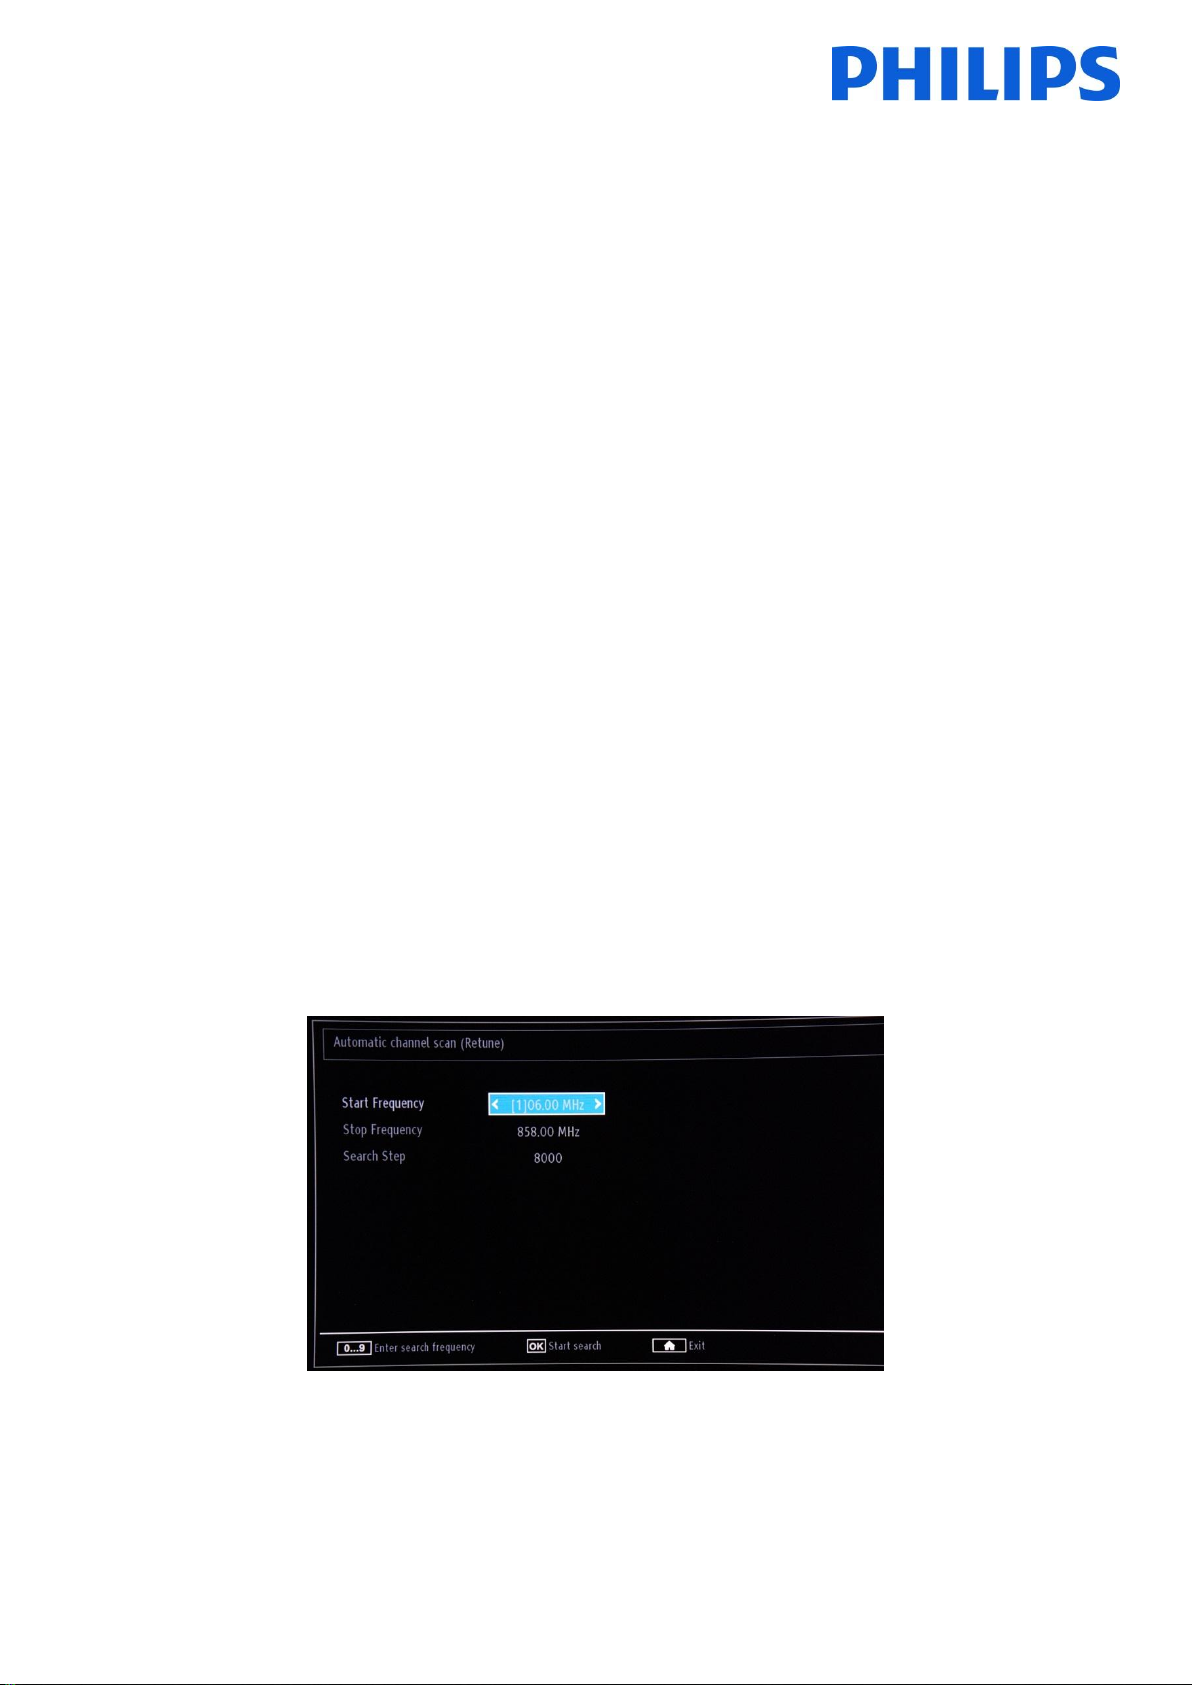
You can select frequency ranges from this screen. For highlighting lines, use the “▼“or “▲” buttons. You can enter
the frequency range manually by using the numeric buttons on the remote control. Set the Start and Stop Frequency
as desired by using the numeric buttons on the remote control. After this operation, you can set the Search Step as
8000 KHz or 1000 KHz.
If you select 1000 KHz the search will take longer, since the TV needs to check more frequencies. Depending on your
Country selection in the first time installation, A 250 KHz search step option might be available on the Network
Channel Scan screen. Note that if you perform the search with 250 KHz option, the search process could take longer.
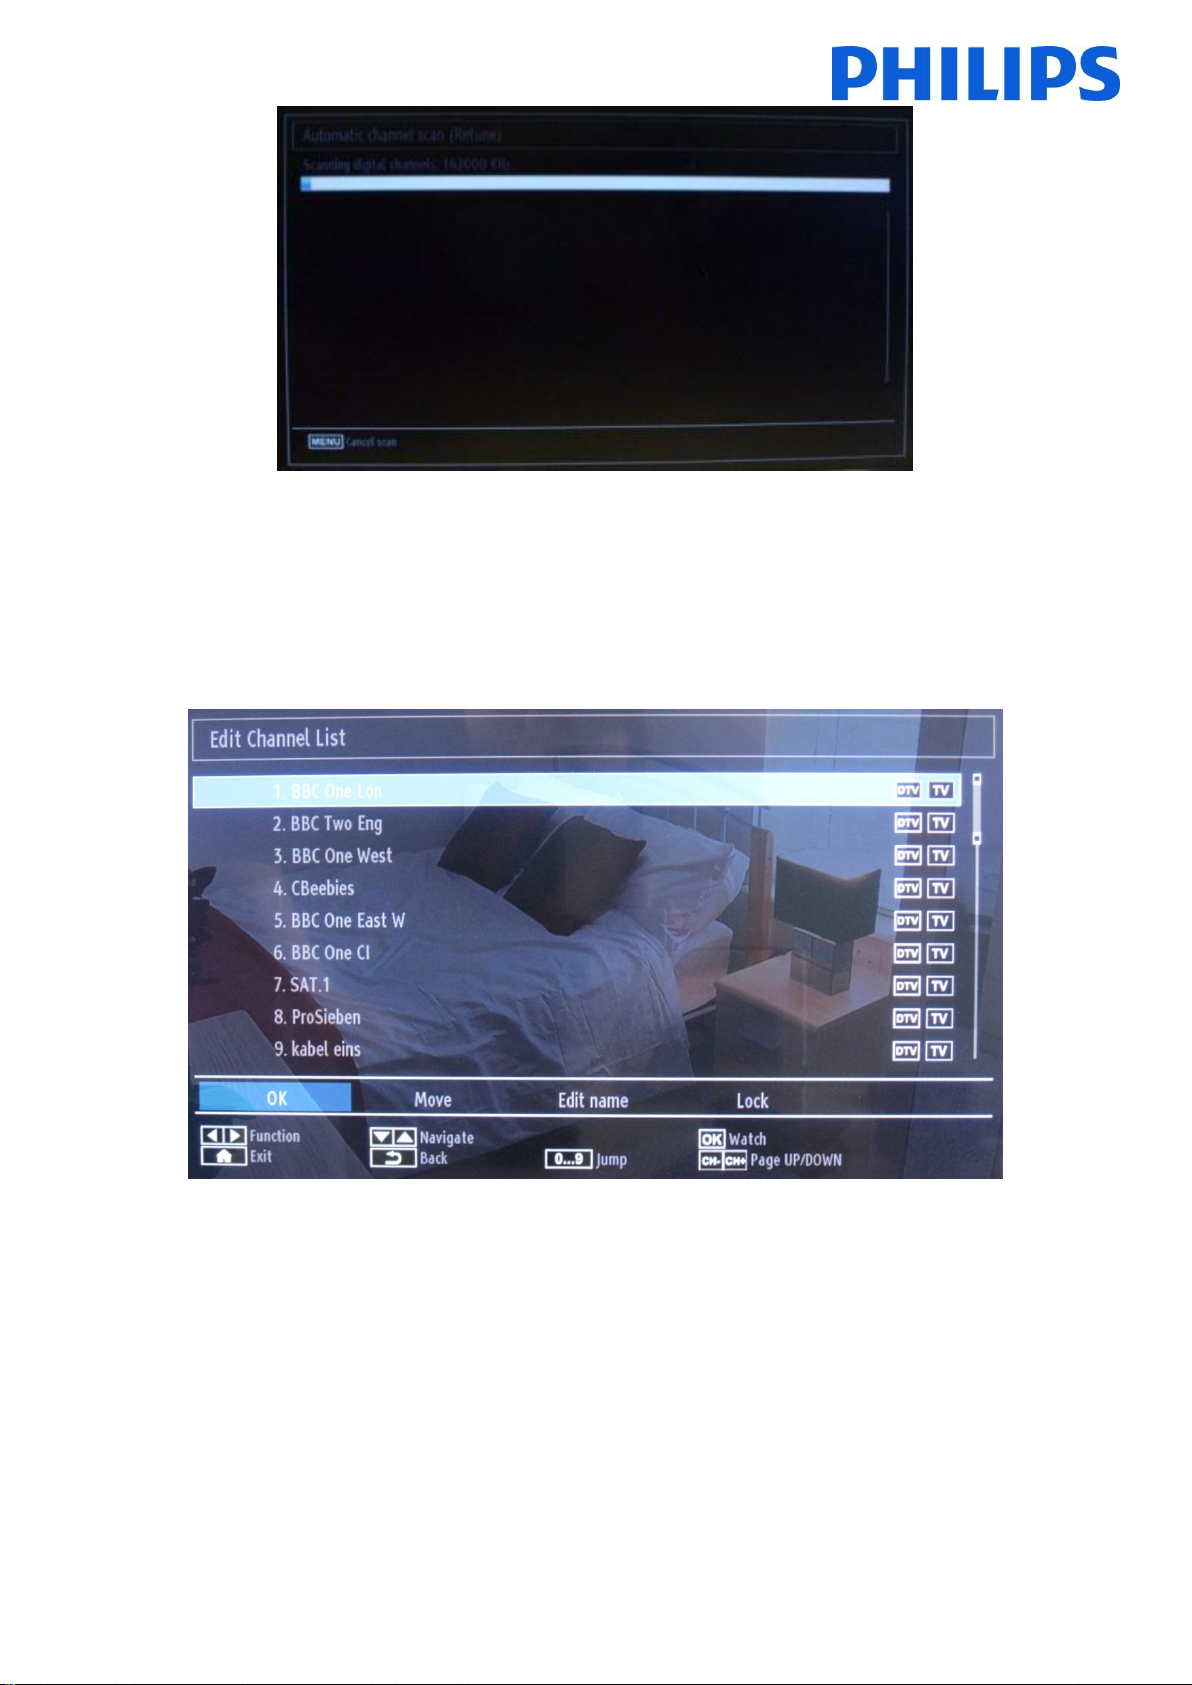
Press “OK” to start the installation process. During this progress the bar will fill and found channels will be added to
the list.
9
Note: If option Aerial & Cable option is selected, when DVB-T channel search is complete, you need to define the start
frequency, end frequency and step for DVB-C channels. If you don’t know those values, use the default ones and press
“OK” to start the search.
When the automatic channel installation is complete, the following summary appears.
Here you can move, edit or lock channels. The information bar displayed on the bottom part of the screen will guide
you through the option that you are using.
Now you can press “MENU” to exit the installation page or you can press the “OK” button to watch TV.
10
Pressing the MENU button will bring the MENU with all options active.
5. Picture
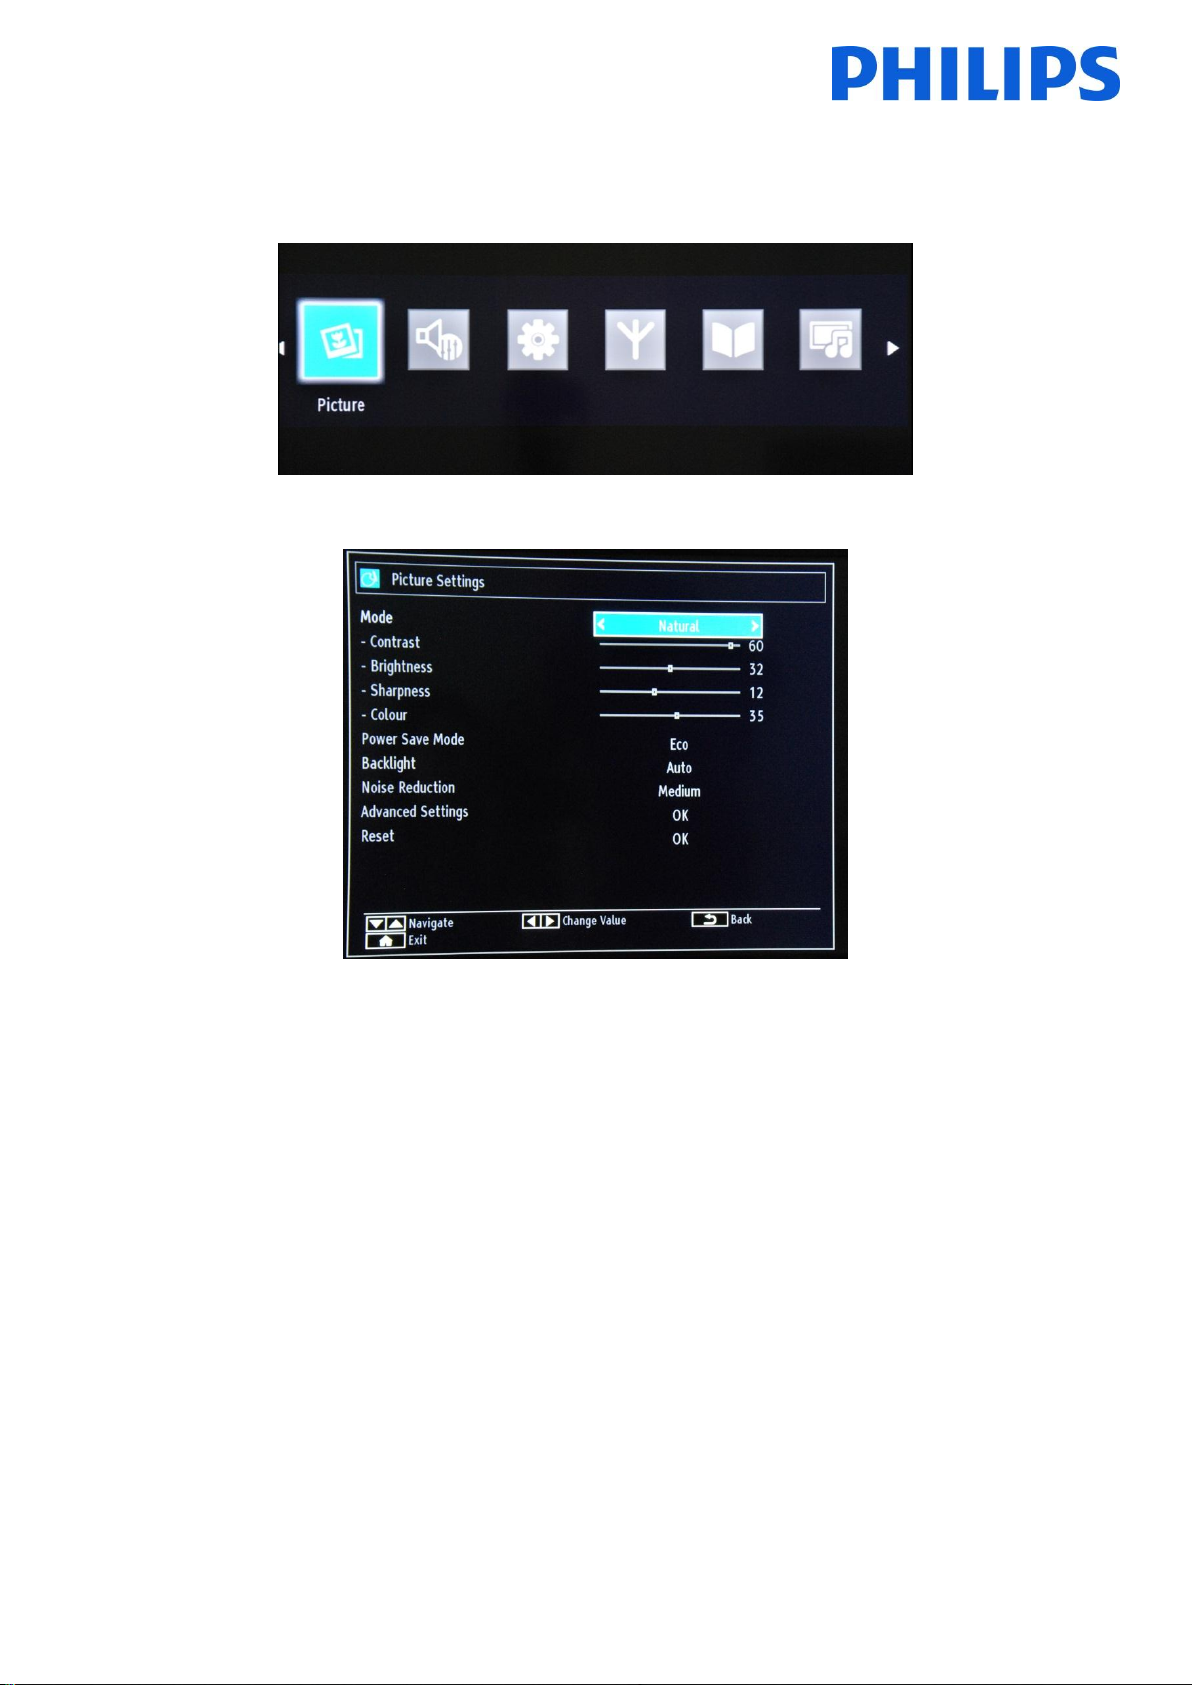
Accessing the picture submenu will bring the following menu on the screen:
The option which can be set:
- Mode: Can be set to one of these options: Cinema, Game, Dynamic and Natural.
- Contrast: Sets the difference between the brightest and darkest of the screen.
- Brightness: Sets the brightness value for the screen.
- Sharpness: Sets the sharpness value for the objects displayed on the screen.
- Color: Sets the color value, adjusting the colors.
- Power Save Mode: To set Power Save Mode to ON or OFF
- Backlight: This setting controls the backlight level and it can be set to Auto, Minimum and Maximum.
Backlight function will be inactive if Power Save Mode is set to ON. Backlight cannot be activated in VGA,
Media Browser mode or while the picture mode is set to Game.
- Noise Reduction: If the broadcast signal is weak and the picture is noisy, use the Noise Reduction setting to
reduce the noise amount. Noise Reduction can be set to one of these options: Low, Medium, High or Off.
- Advanced settings: Press “OK” and you will access the advanced options for the Picture menu.
- Reset: This option will reset all values for image to default.
Pressing the Return button will return you to the main menu. Pressing the MENU button will exit you from the
MENU.
11
 Loading...