

Philips 235B2, 235BL2 User Manual
235BL2
235B2
www.philips.com/welcome
EN User manual 1
Customer care and warranty 39
Troubleshooting & FAQs 51

Table of Contents
1. Important ......................................................... 1
1.1 Safety precautions and maintenance ...............1
1.2 Notational Descriptions .........................................2
1.3 Disposal of product and packing material.... 3
2. Setting up the monitor .................................. 4
2.1 Installation .......................................................................4
2.2 Operating the monitor ...........................................5
2.3 Remove Base Stand and Base ............................. 8
3. Product information ...................................... 10
3.1 SmartImage ....................................................................10
3.2 SmartContrast .............................................................11
3.3 SmartSaturate ..............................................................12
3.4 SmartSharpness ..........................................................12
3.5 Philips SmartControl Premium ..........................13
3.6 SmartDesktop Guide ...............................................21
3.7 PowerSensor .................................................................26
3.8 Philips' Flat Panel Monitors Pixel Defect
Policy ..................................................................................27
4 Technical Specifications ................................. 29
4.1 Resolution & Preset Modes..................................32
4.2 Automatic PowerSaving ..........................................32
5 Regulatory Information ................................. 33
6 Customer care and warranty ......................39
7 Troubleshooting & FAQs .............................. 51
7.1 Troubleshooting .......................................................... 51
7.2 SmartControl Premium FAQs ............................ 53
7.3 General FAQs .............................................................. 55

1. Important
This electronic user’s guide is intended for anyone
who uses the Philips monitor. Take time to read
this user manual before you use your monitor.
It contains important information and notes
regarding operating your monitor.
The Philips guarantee applies provided the
product is handled properly for its intended use,
in accordance with its operating instructions and
upon presentation of the original invoice or cash
receipt, indicating the date of purchase, dealer’s
name and model and production number of the
product.
1.1 Safety precautions and maintenance
Warnings
Use of controls, adjustments or procedures other
than those specified in this documentation may
result in exposure to shock, electrical hazards
and/or mechanical hazards.
Read and follow these instructions when
connecting and using your computer monitor.
Operation
Keep the monitor out of direct sunlight and •
away from stoves or any other heat source.
Remove any object that could fall into •
ventilation holes or prevent proper cooling of
the monitor’s electronics.
Do not block the ventilation holes on the •
cabinet.
When positioning the monitor, make sure the •
power plug and outlet are easily accessible.
If turning off the monitor by detaching the •
power cable or DC power cord, wait for 6
seconds before attaching the power cable or
DC power cord for normal operation.
Please use approved power cord provided •
by Philips all the time. If your power cord is •
missing, please contact with your local service
center. (Please refer to Customer Care
Consumer Information Center)
Do not subject the monitor to severe •
vibration or high impact conditions during
operation.
Do not knock or drop the monitor during •
operation or transportation.
Maintenance
To protect your monitor from possible •
damage, do not put excessive pressure on the
monitor panel. When moving your monitor,
grasp the frame to lift; do not lift the monitor
by placing your hand or fingers on the monitor
panel.
Unplug the monitor if you are not going to •
use it for an extensive period of time.
Unplug the monitor if you need to clean it •
with a slightly damp cloth. The screen may be
wiped with a dry cloth when the power is
off. However, never use organic solvent, such
as, alcohol, or ammonia-based liquids to clean
your monitor.
To avoid the risk of shock or permanent •
damage to the set, do not expose the monitor
to dust, rain, water, or excessive moisture
environment.
If your monitor gets wet, wipe it with dry cloth •
as soon as possible.
If foreign substance or water gets in your •
monitor, please turn the power off immediately
and disconnect the power cord. Then, remove
the foreign substance or water, and send it to
the maintenance center.
Do not store or use the monitor in locations •
exposed to heat, direct sunlight or extreme
cold.
In order to maintain the best performance of •
your monitor and use it for a longer lifetime,
please use the monitor in a location that falls
within the following temperature and humidity
ranges.
o
Temperature: 0-40°C 32-95°F
o
Humidity: 20-80% RH
1
IMPORTANT: Always activate a moving screen •
saver program when you leave your monitor
unattended. Always activate a periodic screen
refresh application if your monitor will display
unchanging static content. Uninterrupted
display of still or static images over an
extended period may
cause “burn in”, also known as “after-imaging”
or “ghost imaging”, on your screen.
"Burn-in", "after-imaging", or "ghost imaging" •
is a well-known phenomenon in monitor
panel technology. In most cases, the “burned
in” or “after-imaging” or “ghost imaging” will
disappear gradually over a period of time after
the power has been switched off.
Warning
Severe” burn-in” or “after-image” or “ghost image”
symptoms will not disappear and cannot be
repaired. The damage mentioned above is not
covered under your warranty.
Service
The casing cover should be opened only by •
qualified service personnel.
If there is any need for any document for •
repair or integration, please contact with
your local service center. (please refer to the
chapter of "Consumer Information Center")
For transportation information, please refer to •
"Technical Specifications".
Do not leave your monitor in a car/trunk •
under direct sun light.
1.2 Notational Descriptions
The following subsections describe notational
conventions used in this document.
Notes, Cautions and Warnings
Throughout this guide, blocks of text may be
accompanied by an icon and printed in bold or
italic type. These blocks contain notes, cautions or
warnings. They are used as follows:
Note
This icon indicates important information and tips
that help you make better use of your computer
system.
Caution
This icon indicates information that tells you how
to avoid either potential damage to hardware or
loss of data.
Warning
This icon indicates the potential for bodily harm
and tells you how to avoid the problem.
Some warnings may appear in alternate formats
and may not be accompanied by an icon. In such
cases, the specific presentation of the warning is
mandated by the relevant regulatory authority.
Note
Consult a service technician if the monitor does
not operate normally, or you are not sure what
procedure to take when the operating instructions
given in this manual have been followed.
2

1.3 Disposal of product and packing material
Waste Electrical and Electronic EquipmentWEEE
This marking on the product or on its packaging
illustrates that, under European Directive 2002/96/
EC governing used electrical and electronic
appliances, this product may not be disposed
of with normal household waste. You are
responsible for disposal of this equipment through
a designated waste electrical and electronic
equipment collection. To determine the locations
for dropping off such waste electrical and
electronic, contact your local government office,
the waste disposal organization that serves your
household or the store at which you purchased
the product.
Your new monitor contains materials that can be
recycled and reused. Specialized companies can
recycle your product to increase the amount of
reusable materials and to minimize the amount to
be disposed of.
All redundant packing material has been omitted.
We have done our utmost to make the packaging
easily separable into mono materials.
Recycling Information for Customers
Your display is manufactured with high quality
materials and components which can be recycled
and reused.
To learn more about our recycling program please
visit www.philips.com/about/sustainability/recycling.
Please find out about the local regulations on how
to dispose of your old monitor and packing from
your sales representative.
3
2. Setting up the monitor
2.1 Installation
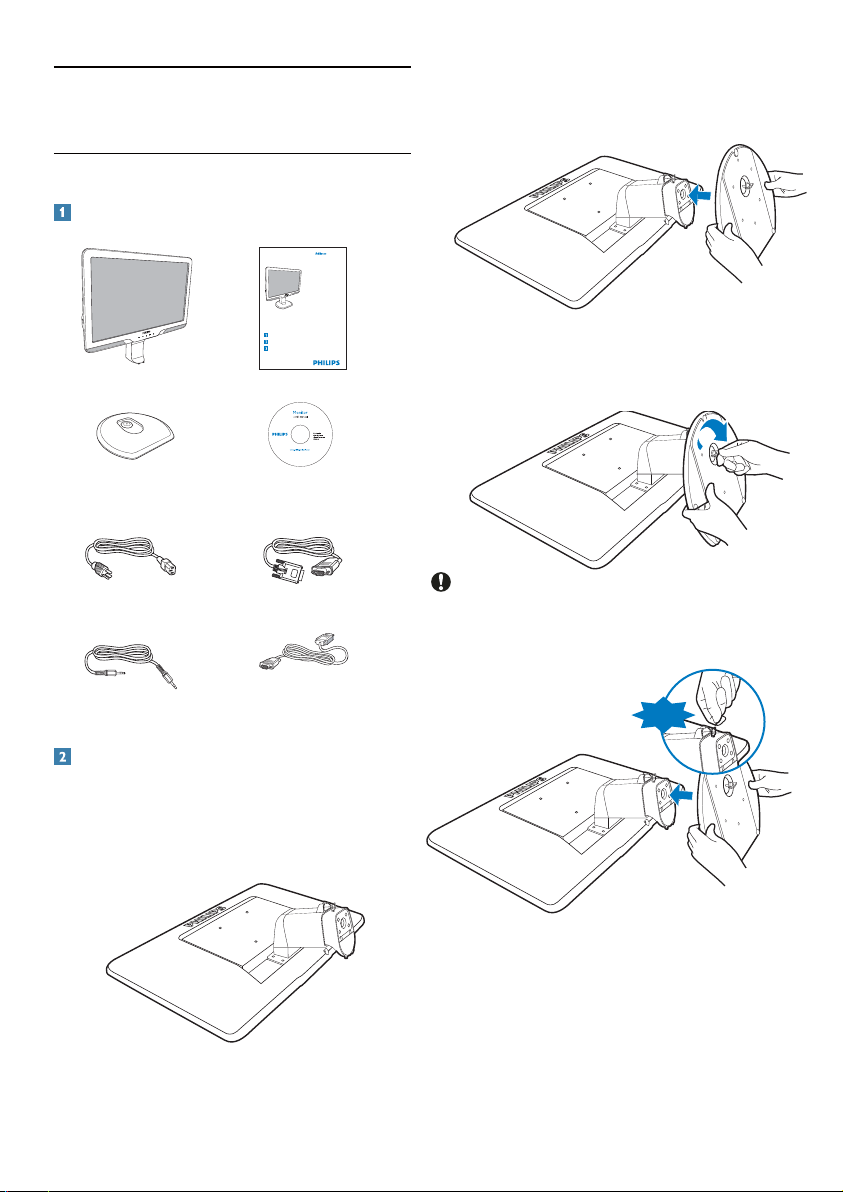
Package contents
Quick start guide
Guide de démarrage rapide / Guía rápida / Kurzanleitung / Guida rapida /
ᖿ䗳ܹ䮼ᣛ / ɒɜɢɞɤɟ ɤɟɪɿɜɧɢɰɬɜɨ ɞɥɹ ɩɨɱɚɬɤɭ ɟɤɫɩɥɭɚɬɚɰɿʀ /
Ʉɪɚɬɤɨɟ ɪɭɤɨɜɨɞɫɬɜɨ ɩɨ ɡɚɩɭɫɤɭ
Installation / Installation / Instalación / Installation / Installazione / ᅝ㺙 / ȱɧɫɬɚɥɹɰɿɹ
/ ɍɫɬɚɧɨɜɤɚ
Connect / Connectivité / Conectividad / Verbindungsfähigkeit / Connettività /
䖲ᗻ / ɉɿɞɤɥɸɱɢɬɢɫɹ / ɉɨɞɤɥɸɱɢɬɶɫɹ
Adjust ergonomic / Réglages ergonomiques / Ajustes ergonómicos / Ergonomische /
Einstellmöglichkeiten / Regolazioni ergonomiche / ҎԧᎹᄺ䇗ᭈ /
Ɋɟɝɭɥɸɜɚɬɢ ɟɪɝɨɧɨɦɿɱɧɟ / ɇɚɫɬɪɨɣɤɚ ɷɪɝɨɧɨɦɢɤɢ
Monitor
Base stand
Quick start guide
©
2
0
1
0
K
o
n
i
n
k
l
i
j
k
e
P
h
i
l
i
p
s
E
l
e
c
t
r
o
n
i
c
s
,
N
.
V
.
A
l
l
Philips and the Philips’ Shield Emblem are registered trademarks of
r
i
g
Koninklijke Philips Electronics N.V. and are used under license from
h
t
Koninklijke Philips Electronics N.V.
s
r
e
s
e
r
v
e
d
.
U
n
a
u
t
h
o
r
i
z
e
d
d
u
p
l
i
c
a
EDFU CD
Hold the monitor base stand with both hands 2.
and firmly insert the base stand into the base
column.
235B2/235BL2
Attach the monitor base stand to the base 3.
column then fasten base stand.
1
0
0
.
1
0
6
V
0
.
B
5
B
5
2
2
2
M
n
o
i
s
r
e
V
.
a
n
i
h
C
n
i
d
e
t
n
i
r
p
d
n
a
e
d
a
M
.
s
w
a
l
e
l
b
a
c
i
l
p
p
a
f
o
n
o
t
i
i
t
o
a
n
l
o
i
i
v
s
a
Power cord VGA signal cable (optional)
Audio cable
DVI cable (optional)
Install base stand
1. Place the monitor face down a smooth surface
taking care to avoid scratching or damaging
the screen.
Caution
Do not release the height adjustment pin lock
from the base column before the base stand is
firmly fixed.
DON’T
4
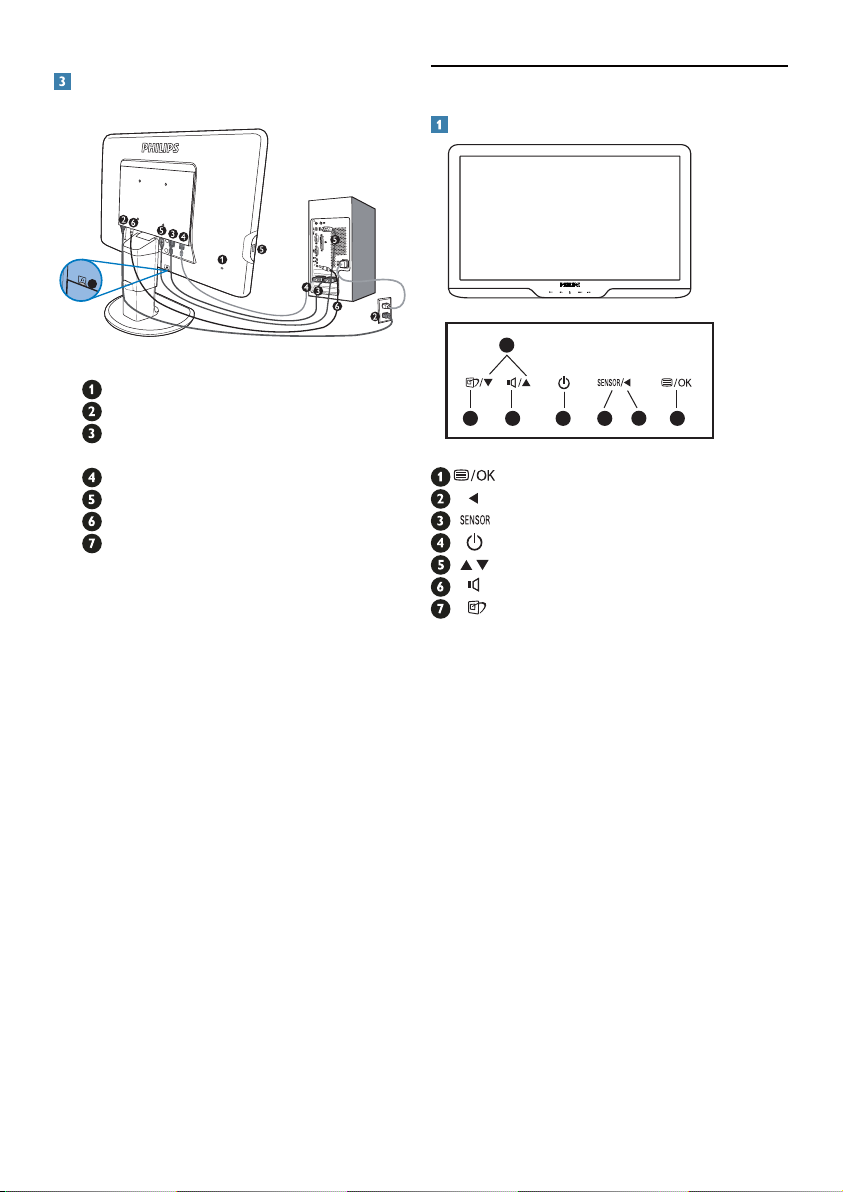
Connecting to your PC
7
Kensington anti-thief lock
AC power input
DVI-D input (available for selecting
model)
VGA input
USB upstream and downstream
Audio input
Earphone jack
Connect to PC
1. Connect the power cord to the back of
the montior firmly.
2. Turn off your computer and unplug its
power cable.
3. Connect the monitor signal cable to the
video connector on the back of your
computer.
4. Connect the PC audio cable to the audio
connector on the back of your computer.
5. Plug the power cord of your computer
and your monitor into a nearby outlet.
6. Connect the USB upstream port on
the monitor and the USB port on your
computer with a USB cable. The USB
downstream port is now ready for any
USB device to plug in.
7. Turn on your computer and monitor. If
the monitor displays an image, installation
is complete.
2.2 Operating the monitor
Front view product description
5
4
67
13
2
: To access OSD menu.
: Return to previous OSD level.
: PowerSensor.
: To switch monitor’s power on and off.
: To adjust the OSD menu.
: To adjust volume of the display.
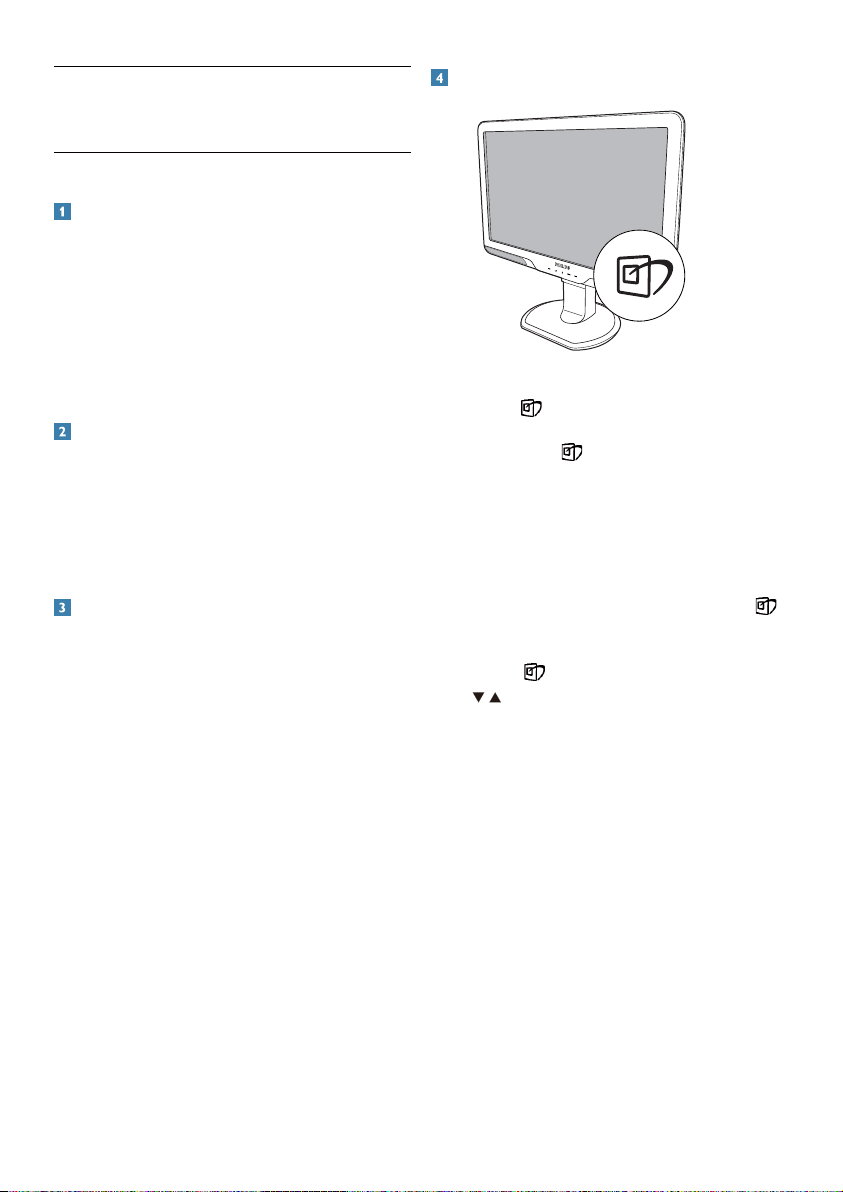
: SmartImage. There are 6 modes to be
selected: Office, Photo, Movie, Game,
Economy and Off.
5
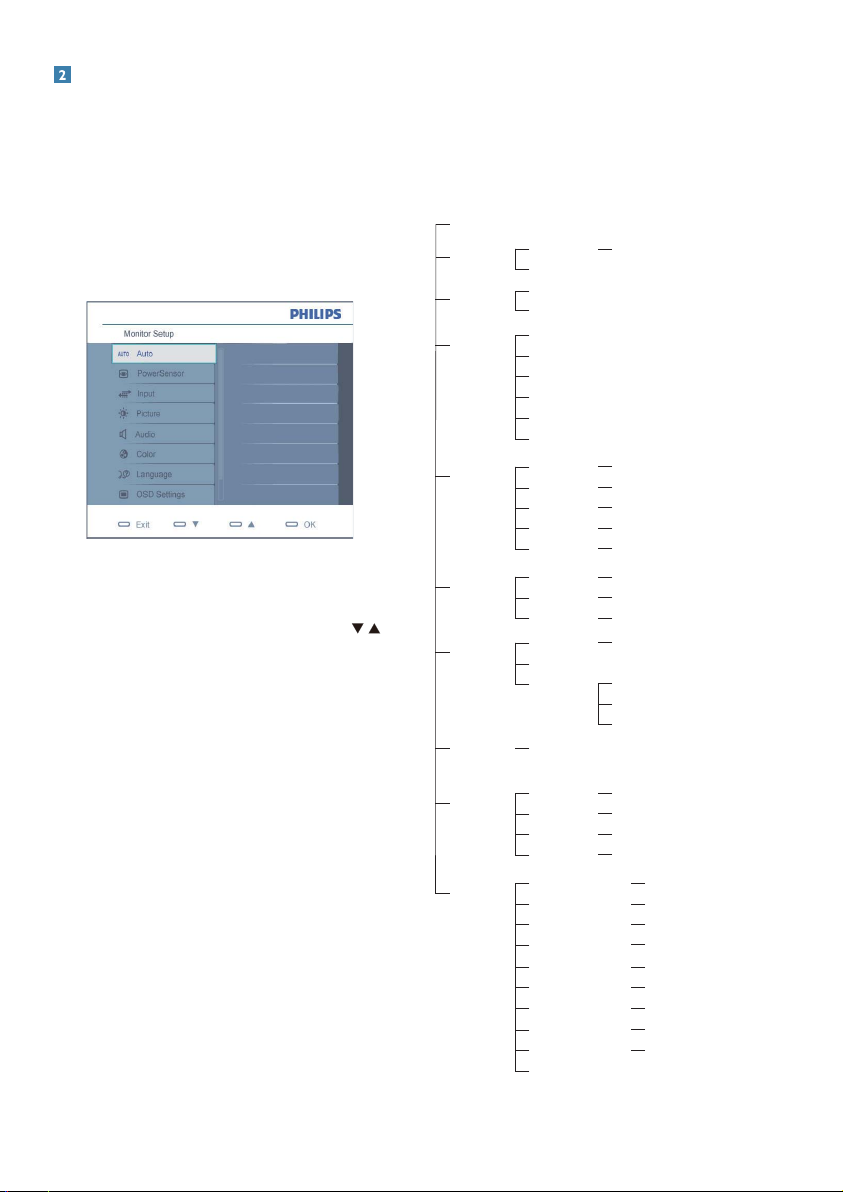
Description of the On Screen Display
What is On-Screen Display (OSD)?
On-Screen Display (OSD) is a feature in all Philips
monitors. It allows an end user to adjust screen
performance or select functions of the monitors
directly through an on-screen instruction window.
A user friendly on screen display interface is
shown as below:
Basic and simple instruction on the control keys
In the OSD shown above users can press
buttons at the front bezel of the monitor to move
the cursor, OK to confirm the choice or change.
The OSD Menu
Below is an overall view of the structure of the
On-Screen Display. You can use this as a reference
when you want to work your way around the
different adjustments later on.
Main menu
Auto
PowerSensor
Input
SmartImage
Picture
Audio
Color
Language
OSD Setting
Setup
Sub menu
On
Off
VGA
DVI (available for selective models)
Office
Photo
Movie
Game
Economy
Off
Picture Format
Brightness
Contrast
SmartContrast
Gamma
Volume
Stand Alone
Mute
Color Temp.
sRGB
User Define
English, Español, Français, Deutsch, Italiano,
Português,
Horizontal
Vertical
Transparency
OSD Time out
Power LED
Pixel Orbiting
Over Scan
H. Position
V. Position
Phase
Clock
Resolution Notification
Reset
Information
0, 1, 2, 3, 4 (available for selective models)
Wide screen,4:3
0~100
0~100
On, Off
1.8, 2.0, 2.2, 2.4, 2.6
0~100
On, Off
On, Off
5000K,6500K,7500K,8200K,9300K,11500K
Red: 0~100
Green: 0~100
Blue: 0~100
⇷⚭ྃ࿄
Русский,
0~100
0~100
Off, 1, 2, 3, 4
5, 10, 20, 30, 60
0, 1, 2, 3, 4
On, Off
On, Off
0~100
0~100
0~100
0~100
On, Off
Yes, No
6
Resolution notification
This monitor is designed for optimal performance
at its native resolution, 1920x1080@60Hz.
When the monitor is powered on at a different
resolution, an alert is displayed on screen: Use
1920x1080@60Hz for best results.
Display of the native resolution alert can be
switched off from Setup in the OSD (On Screen
Display) menu.
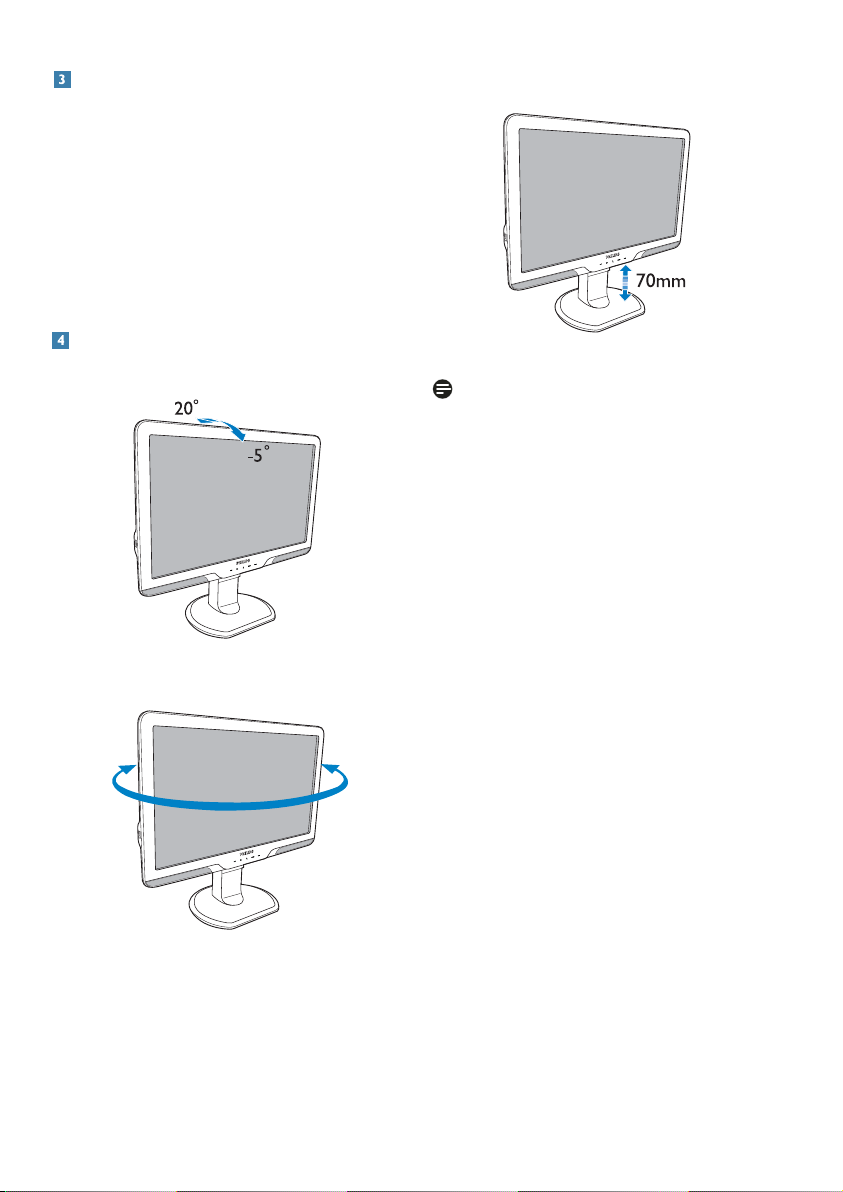
Physical Function
Tilt
Height adjustment
Note
Remove the height adjustment pin lock before
adjusting the height.
Insert the height adjustment pin lock before lifting
the monitor.
Swivel
-65˚
+65˚
7
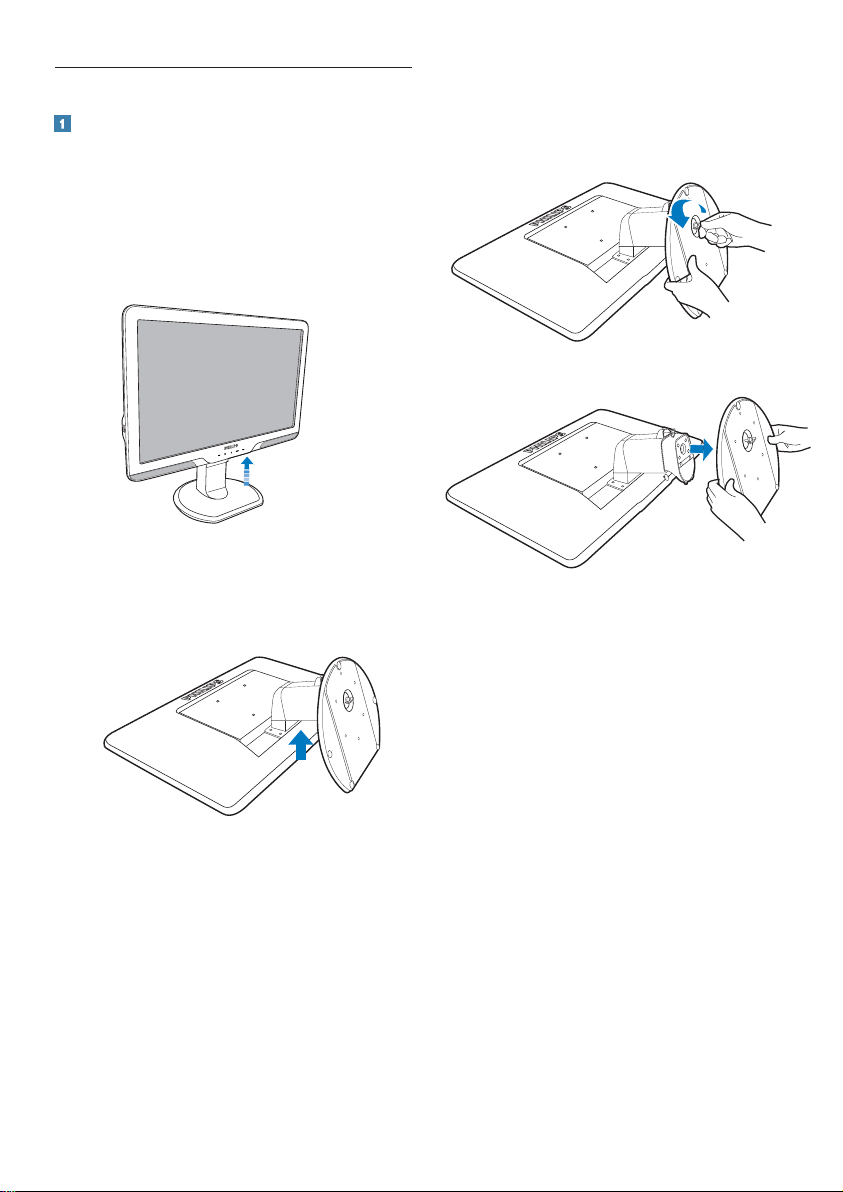
2.3 Remove Base Stand and Base
Remove the Base Stand
Before you start disassembling the monitor base,
please follow the instructions below to avoid
damage or injury.
Extend the monitor base to its maximum 1.
height.
2. Place the monitor face down on a smooth
surface, taking care to avoid scratching or
damaging the screen. Then lift the monitor
stand.
Release the lock of base stand then pull the 3.
base stand away from the base column.
8
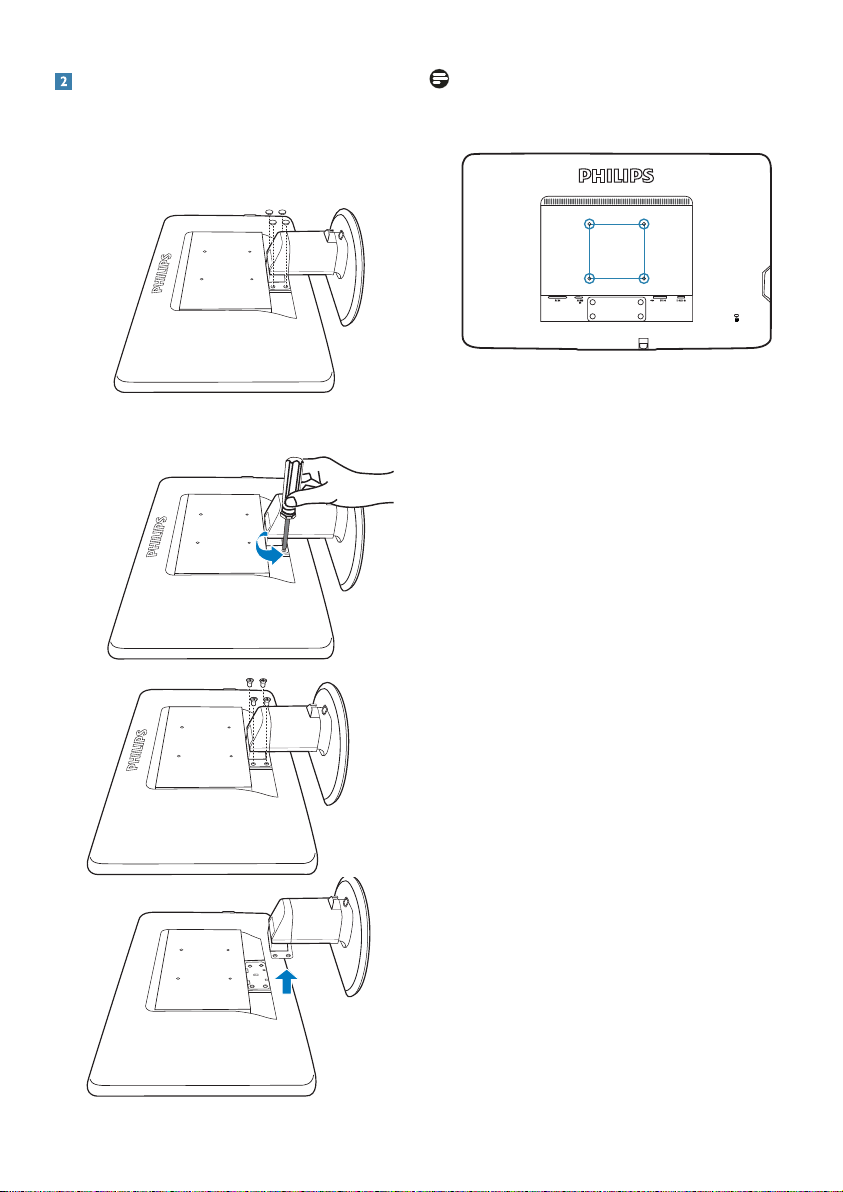
Remove the Base
Condition:
For VESA standard mounting applications•
Remove the 4 screw covers.1.
Remove the 4 screws and then remove the 2.
base from the monitor.
Note
This monitor accepts a 100mm x 100mm
VESA-Compliant mounting interface.
100mm
100mm
9
3. Product information
3.1 SmartImage
What is it?
SmartImage provides presets that optimize
display for different types of content, dynamically
adjusting brightness, contrast, color and sharpness
in real time. Whether you're working with text
applications, displaying images or watching a
video, Philips SmartImage delivers great optimized
monitor performance.
Why do I need it?
You want a monitor that delivers optimized display
all your favorite types of content, SmartImage
software dynamically adjust brightness, contrast,
color and sharpness in real time to enhance your
monitor viewing experience.
How does it work?
SmartImage is an exclusive, leading edge Philips
technology that analyzes the content displayed
on your screen. Based on a scenario you select,
SmartImage dynamically enhances the contrast,
color saturation and sharpness of images to
enhance the contents being displayed - all in real
time with the press of a single button.
How to enable SmartImage?
Press to 1.
display;
Keep pressing 2.
Photo, Movie, Game, Economy and Off;
The SmartImage on screen display will remain 3.
on screen for 5 seconds or you can also
press”OK” to make confirmation.
When SmartImage is enabled, the sRGB 4.
scheme is disabled automatically. To use sRGB
you need to disable SmartImage with the
button at the front bezel of your monitor.
Except using
press
confirm selection and close the SmartImage OSD.
launch the SmartImage on screen
to toggle between Office,
key to scroll down, you can also
buttons to choose and press “OK” to
10
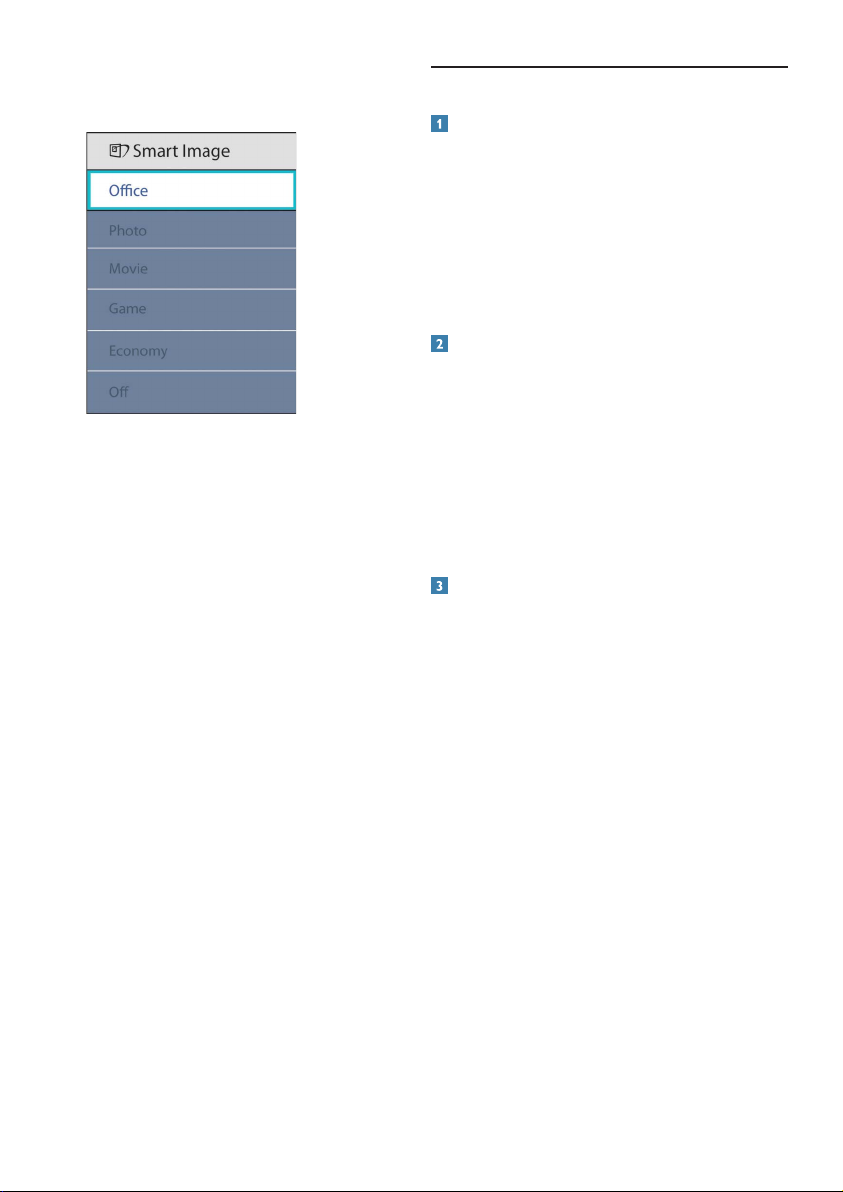
There are six modes to be selected: Office, Photo,
Movie, Game, Economy and Off.
Office:• Enhances text and dampens brightness
to increase readability and reduce eye strain.
This mode significantly enhances readability
and productivity when you're working with
spreadsheets, PDF files, scanned articles or
other general office applications.
Photo: • This profile combines color saturation,
dynamic contrast and sharpness enhancement
to display photos and other images with
outstanding clarity in vibrant colors - all
without artifacts and faded colors.
Movie:• Ramped up luminance, deepened
color saturation, dynamic contrast and razor
sharpness displays every details in darker
areas of your videos without color washout in
brighter areas maintaining a dynamic natural
values for the ultimate video display
Game:• Turn on over drive circuit for best
response time, reduce jaggy edges for fast
moving objects on screen, enhance contrast
ratio for bright and dark scheme, this profile
delivers the best gaming experience for
gamers.
Economy:• Under this profile, brightness,
contrast are adjusted and backlighting finetuned for just right display of everyday office
applications and lower power consumption.
Off:• No optimization by SmartImage.
3.2 SmartContrast
What is it?
Unique technology that dynamically analyzes
displayed content and automatically optimizes a
monitor's contrast ratio for maximum visual clarity
and viewing enjoyment, stepping up backlighting
for clearer, crisper and brighter images or dimming
backlighting for clear display of images on dark
backgrounds.
Why do I need it?
You want the very best visual clarity and viewing
comfort for every type of content. SmartContrast
dynamically controls contrast and adjusts
backlighting for clear, crisp, bright gaming and
video images or displays clear, readable text for
office work. By reducing your monitor's power
consumption, you save on energy costs and
extend the lifetime of your monitor.
How does it work?
When you activate SmartContrast, it will analyse
the content you are displaying in real time to
adjust colors and control backlight intensity. This
function will dynamically enhance contrast for a
great entertainment experience when viewing
videos or playing games.
11

3.3 SmartSaturate
3.4 SmartSharpness
What is it?
Smart technology that controls color saturation,
the degree to which one on screen color is
blended in neighboring colors, to deliver rich and
vibrant images for more entertainment fun when
you are viewing videos.
Why do I need it?
You want rich, vibrant images for more
entertainment fun when viewing photos or
videos.
How does it work?
SmartSaturate dynamically controls color
saturation, the degree to which on-screen color
is blended in neighboring colors, to deliver rich,
vibrant display for more entertainment fun when
you are viewing images or videos in your display's
Movie or Game mode. It is turned off for top
quality display of office application and in the
Economy mode to reduce power consumption.
What is it?
Smart technology that enhances sharpness when
you need it for ultimate display performance and
more entertainment fun when you are viewing
videos or photos.
Why do I need it?
You want the ultimate in sharpness for more
entertainment fun when viewing photos or videos.
How does it work?
Smart technology enhances sharpness when you
need it for ultimate display performance and more
entertainment fun when you are viewing videos or
photos in the Movie or Game mode. It is turned
off for top quality display of office applications
and in the Economy mode to reduce power
consumptions.
12
3.5 Philips SmartControl Premium
The new SmartControl Premium software
by Phillips allows you to control your monitor
via an easy to use on-screen graphic interface.
Complicated adjustments are a thing of the past
as this user friendly software guides you through
fine-tuning resolution, Color calibration,
Clock/Phase adjustments, RGB White point
adjustment, etc.
Equipped with latest technology in core algorithm
for fast processing and response, this Windows
7 compliant eye catching animated Icon based
software is ready to enhance your experience
with Philips monitors!
Installation
Follow the instruction and complete the •
installation.
You can launch after installation is completed. •
If you want to launch later, you can either click •
the shortcut on desktop or toolbar.
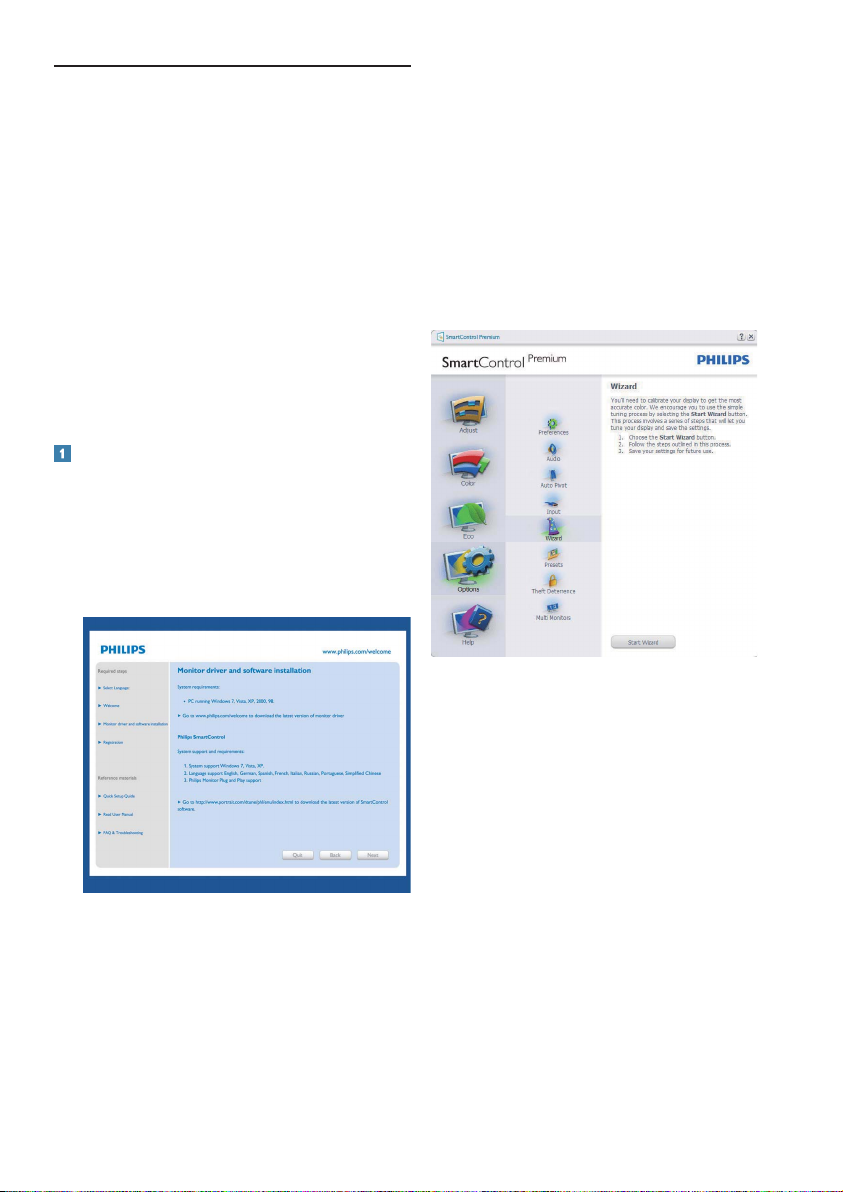
First launch -Wizard
The first time after installation of SmartControl •
Premium, it will automatically go to Wizard for
first time launch.
The wizard will guide you through adjustment •
your monitor performance step by step.
You can go to Plug-in menu to launch wizard •
later on as well.
You can adjust more options without wizard •
by Standard pane.
13
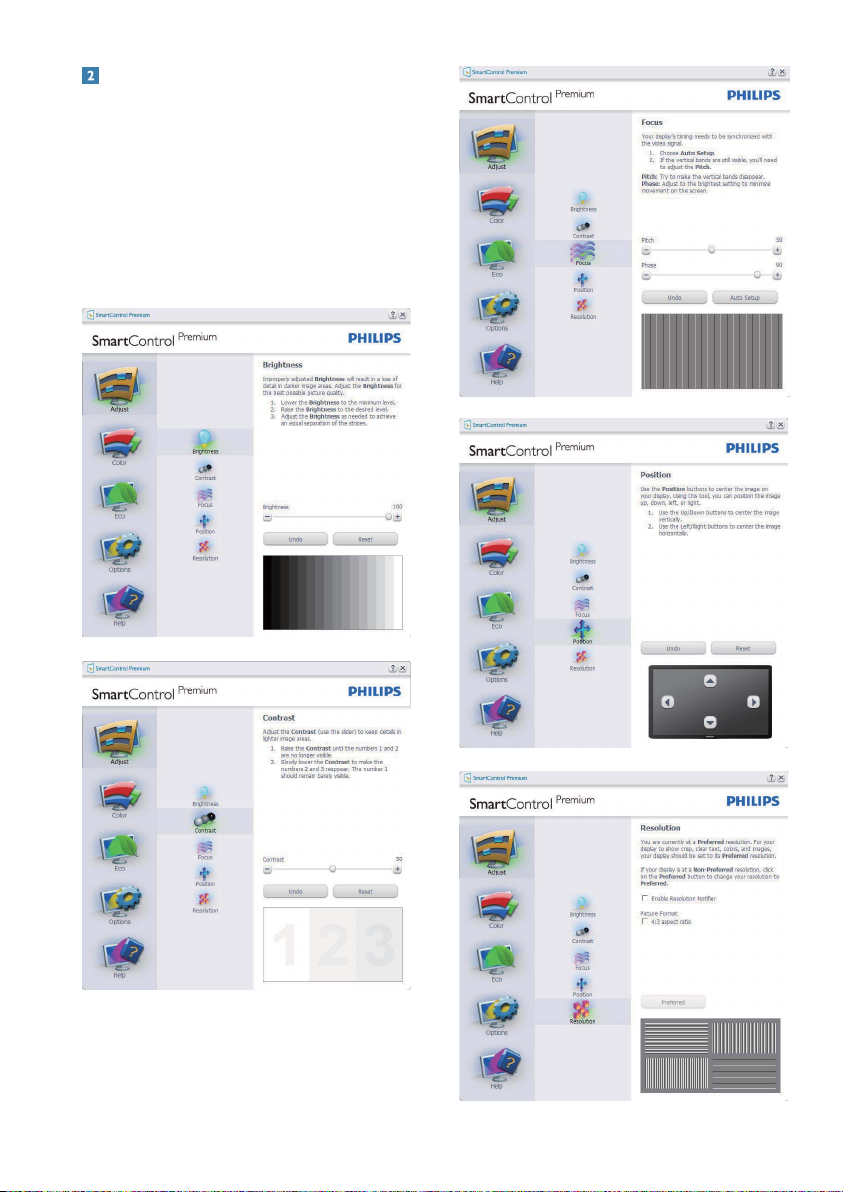
Start with Standard pane:
Adjust menu:
Adjust Menu allow you to adjust Brightness, •
Contrast, Focus, Position and Resolution.
You can follow the instruction and do the •
adjustment.
Cancel prompts user if you want to cancel •
installation.
14
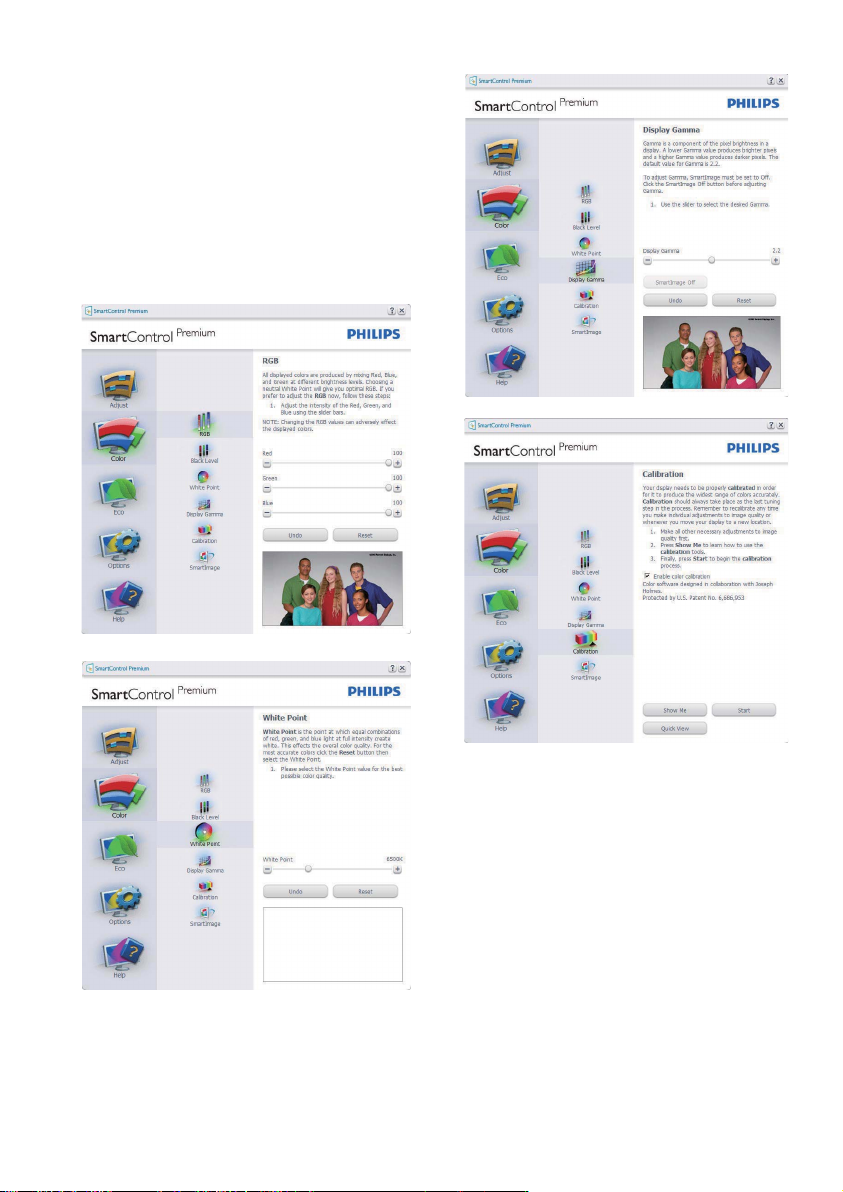
Color menu:
Color Menu allow you to adjust RGB, Black •
Level, White Point, Color Calibration, and
SmartImage (Please refer to SmartImage
section).
You can follow the instruction and do the •
adjustment.
Refer to below table for sub-menu item base •
on your input.
Example for Color Calibration•
"Show Me" starts color calibration tutorial. 1.
Start - starts the 6-step color calibration 2.
sequence.
Quick View loads the before/after images. 3.
To return to Color home pane, click the 4.
Cancel button.
Enable color calibration - by default is on. If 5.
unchecked, does not allow for color calibration
to happen, dimes out start and quick view
buttons.
Must have patent info in calibration screen.6.
15
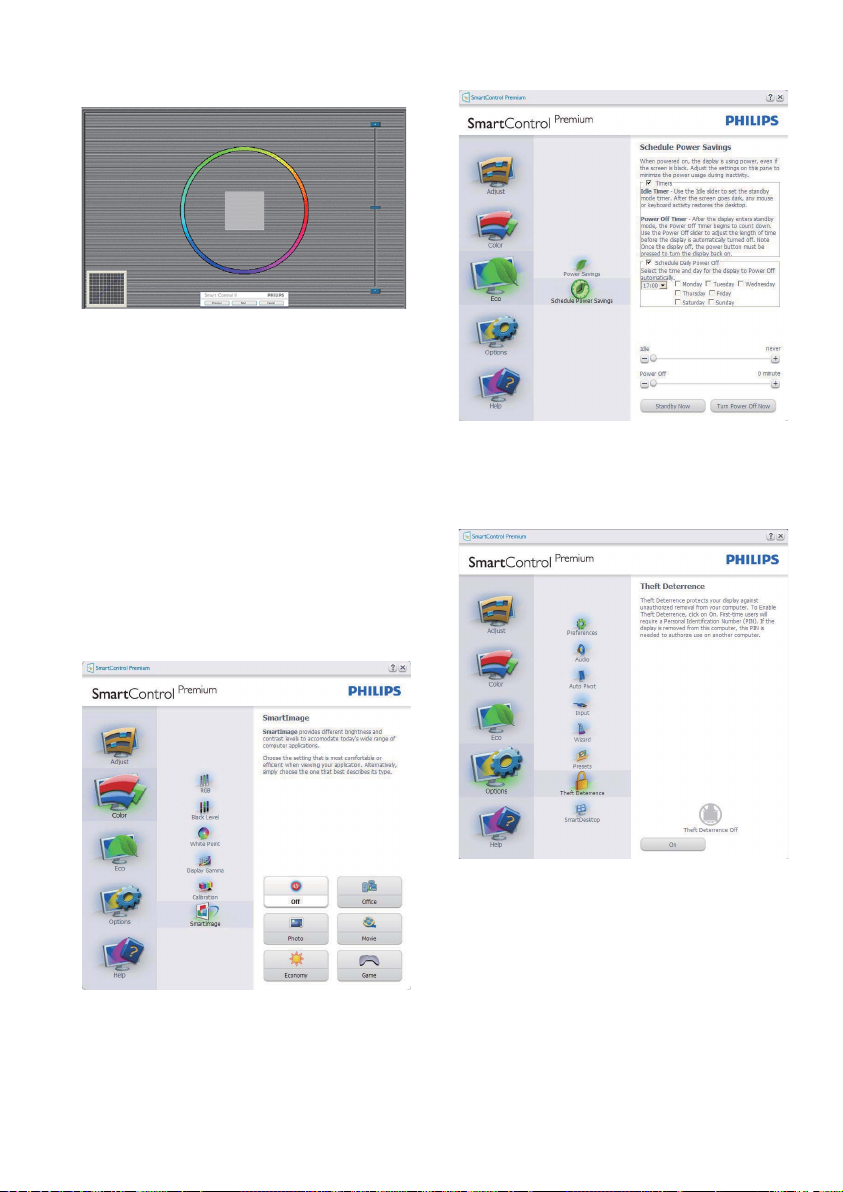
First color Calibration Screen:
Previous button is disabled until the second •
color screen.
Next goes to the succeeding target (6-targets). •
Final next goes File>Presets pane. •
Cancel closes the UI and returns to the plug •
in page.
SmartImage
Allows user to change setting for better display
setting based on content.
When Entertainment is set, SmartContrast and
SmartResponse are enabled.
ECO
Theft Deterrence Pane will only be active when
selecting Theft Deterrence Mode from the dropdown Plug Ins menu.
16
 Loading...