

Page 1

21PT3952
L92000 3139 125 28591
Page 2
INSTALLATION
5 cm
5 cm
5 cm
22
2
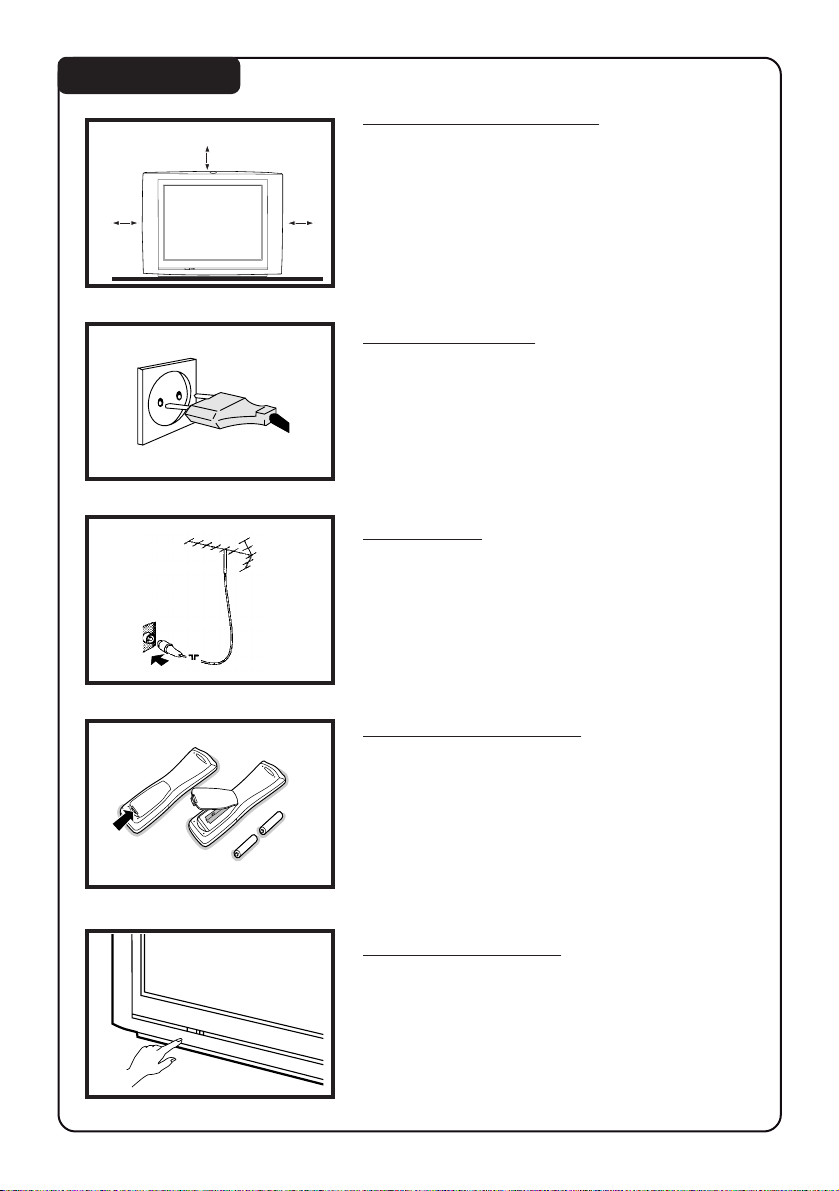
Positioning of the TV set
• Place TV set on a solid base (e.g. a TV/
Video cabinet)
• Leave at least 5 cm around each side of TV
set for ventilation to avoid over-heating.
• Do not place TV set near a radiator or
other sources of heat.
• Do not place TV set where it can be
exposed to rain or excessive moisture.
Mains Connection
• For correct mains voltage, refer to type
sticker at the rear of the TV set.
• Consult your dealer if mains supply is
different.
Note : This diagram is not representative
of the actual plug and socket.
Connections
• Connect the aerial plug to the antenna
¬¬
socket
¬ on the backcover.
¬¬
• Insert the mains plug into a wall socket.
Use of Remote Control
• Insert correct type of batteries into the
compartment.
• Ensure the batteries are placed in the right
direction.
Switching on the set
• Press the mains power button to switch
on/off the TV.
• If the set is on standby mode (indicator is
red), press STANDBY button on the
remote control to switch on set.
Page 3
USEFUL TIPS
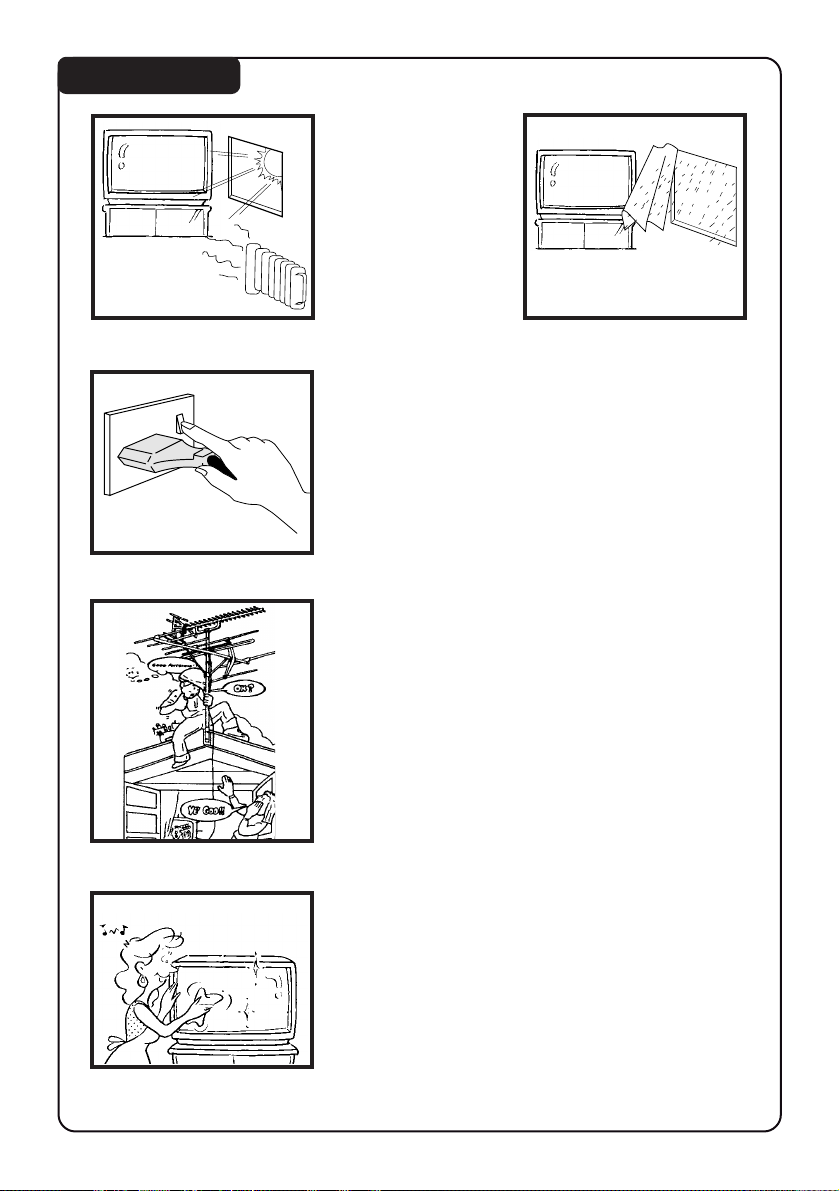
• Avoid heat and
direct sunlight.
• Avoid direct
exposure to rain
or water.
• DO NOT leave your TV on standby for a
prolonged period.
• Switch off your TV if not in use.
• This will allow the TV to be demagnetised,
giving good picture.
• Never repair the TV yourself – get a skilled
personnel!
33
3
• Clean the TV’s screen with a slightly damp
soft cloth ONLY WHEN NECESSARY.
Note : Do not use abrasive solvent as it can
damage the screen’s coating.
Page 4
CONNECTING PERIPHERAL EQUIPMENT
44
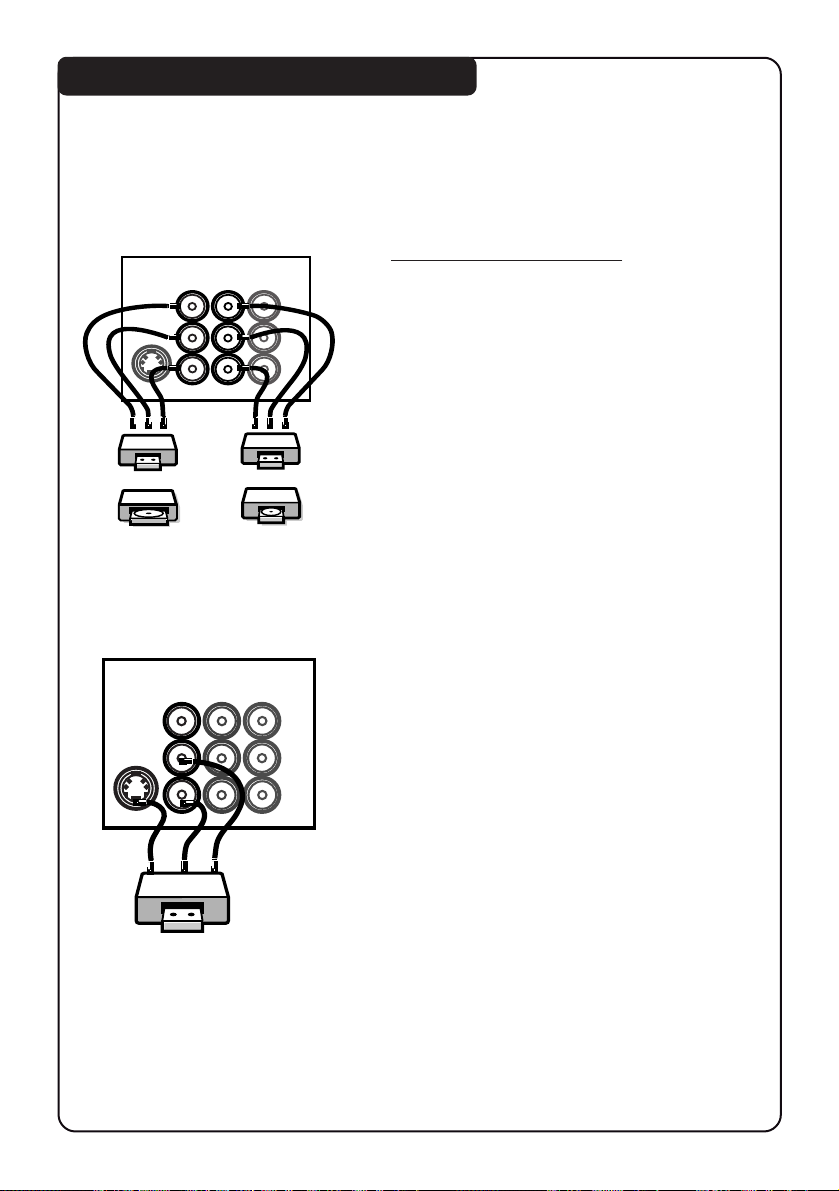
Equipment such as VCR, Laser disc player, VCD, DVD etc. can be connected to
the video and audio (AV) sockets at the rear of the TV. Switch off mains power
of the TV and equipment before making any connection.
4
AV 2
in
S-VIDEO
VCR
OR
Laser disc player
AV 2
in
S-VIDEO
AV 1
Monitor
in
VCD/DVD
AV 1
Monitor
out
in
out
OR
VIDEO
L
AUDIO
R
VIDEO
L
AUDIO
R
VCR
Connection for playback
1. Connecting to AV sockets
You may choose to connect to AV1 in or
AV2 in sockets or both.
• Connect the corresponding sockets of
the equipment to that of the TV.
• To playback programme, select the first
AV channel (if connection is made to
sockets at AV1 in) or the second AV
channel (if connection is made to
sockets at AV2).
Note : For mono equipment, connect to
the AV1 in or AV2 in and “L” sockets
only.
2. Connecting to S-Video socket
If you have a S-Video equipment,
connect to the S-Video socket for better
picture quality.
• Connect the corresponding socket of the
equipment to that of the TV.
• To view playback programmes, select
the AV2 channel.
Note : Do not connect Video “in” socket
of the TV if S-Video socket is used.
VCR
Page 5
CONNECTING PERIPHERAL EQUIPMENT
55
5
S-VIDEO
S-VIDEO
AV 1
AV 2
in
Monitor
out
in
VIDEO
L
AUDIO
R
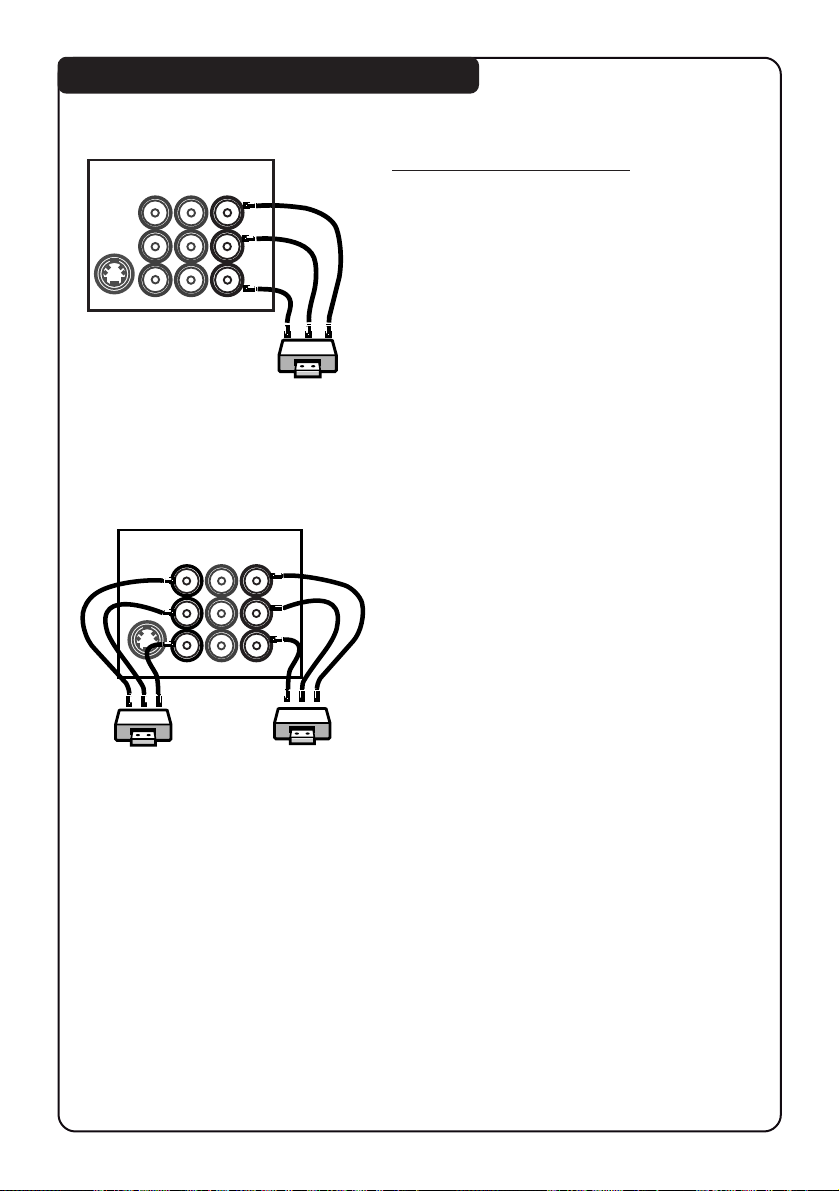
Connection for recording
1. From the TV channel you are watching
• Connect the corresponding sockets of
the VCR to the Monitor “out” sockets
at the rear of the TV.
VCR
AV 1
AV 2
Monitor
out
in
in
VIDEO
L
AUDIO
R
2. From one VCR to another VCR
• Connect the sockets of the VCR which
you wish to record from to the
corresponding sockets at either AV1 or
AV2.
• Connect the sockets of the receiving
VCR to the Monitor “out” sockets at
the rear of the TV.
VCR 1
VCR 2
Page 6
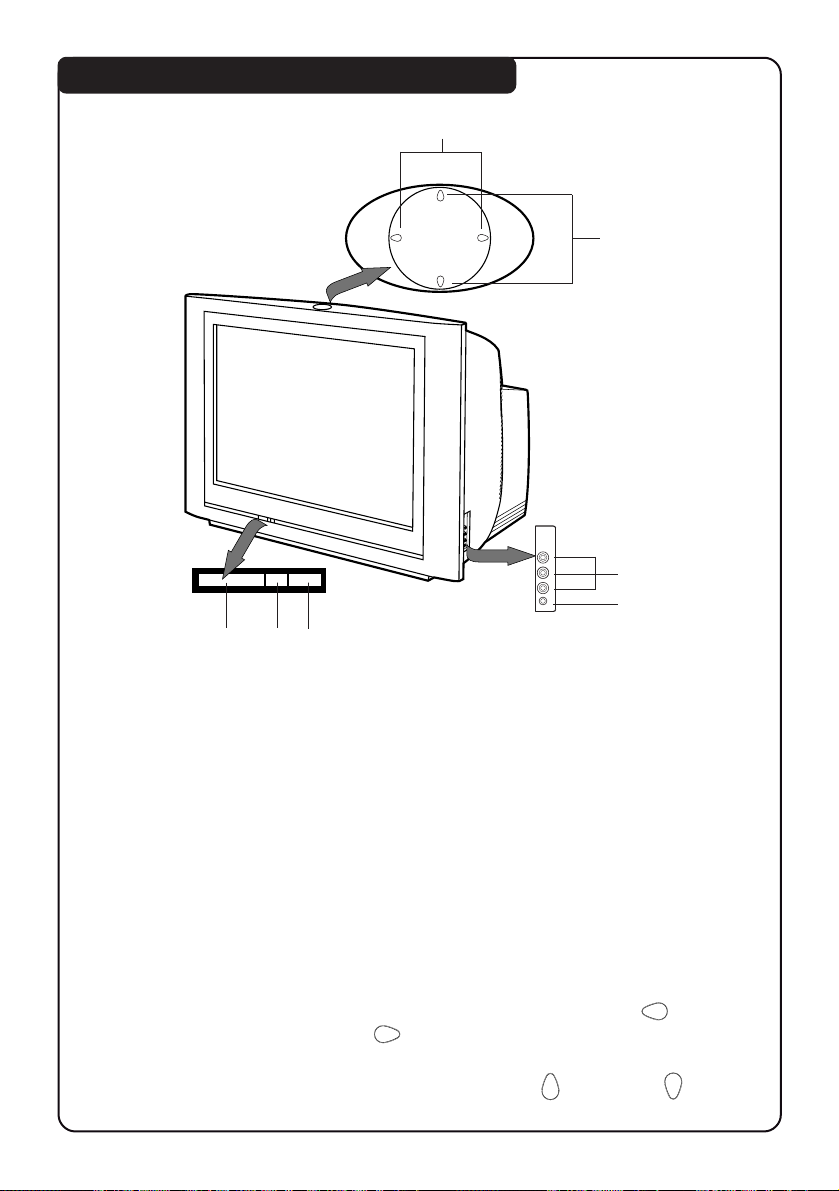
FUNCTIONS OF TV CONTROLS/SOCKETS
6
P
V
V
P
13
2
66
6
7
In
VIDEO
L
AUDIO
R
L
5
4
1 Mains Power button Switch mains power on or off.
2 Standby light indicator Indicate red light when standby mode is
activated.
3 Remote sensor Aim remote control handset at remote sensor
when operating the TV.
4 Headphone socket Connect headphone jack to socket for personal
listening.
5 AV “in” sockets Connect to Video “out” and Audio “out”
sockets of VCR, laser disc player, etc.
6 Volume adjustment Adjust sound volume louder/softer. Pressing
these two buttons together will call up the
main menu. Press these two buttons again will
exit menu. Works as cursor left (
(
) in a menu.
) or right
7 Channel adjustment Select channel in ascending/descending order.
Works as cursor up ( ) or down ( ) in a
menu.
Page 7
FUNCTIONS OF REMOTE CONTROL
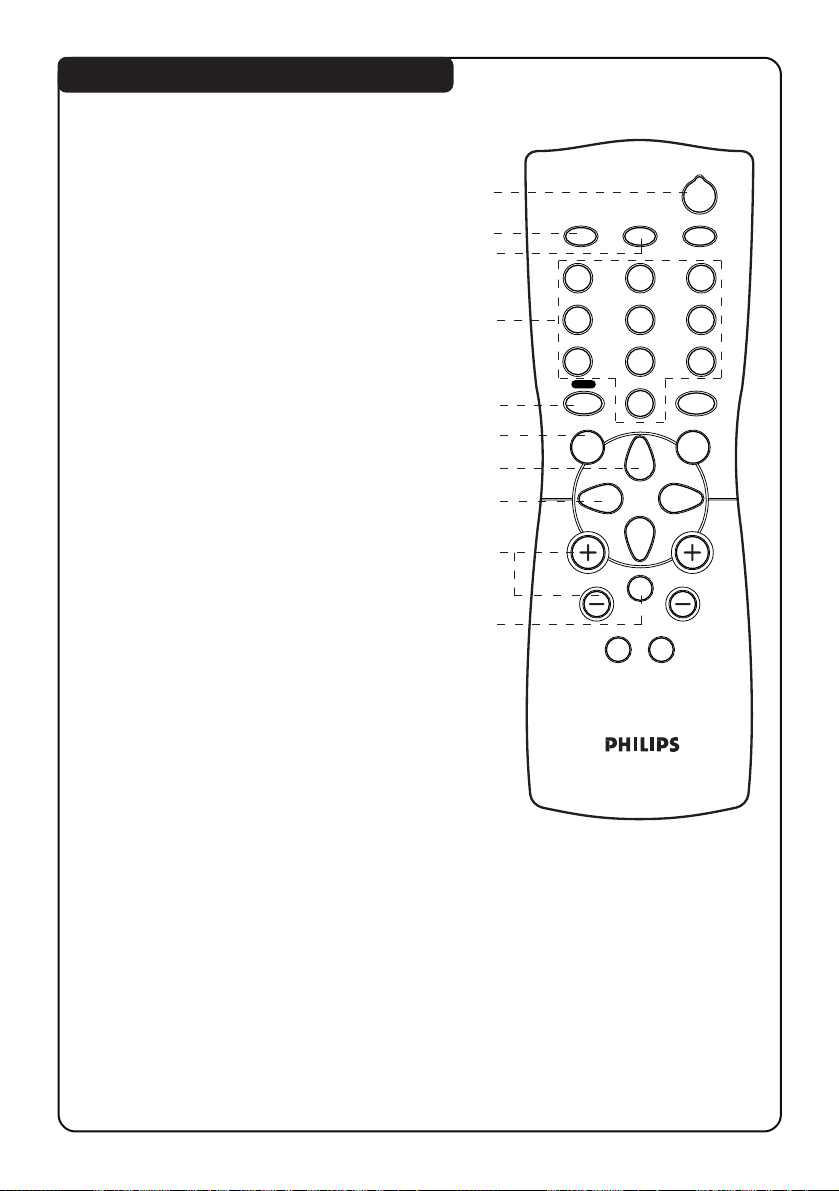
1. STANDBY
Switch off set temporarily to standby
mode. (The red light indicator lights
up when set is on standby mode). To
switch on set, press STANDBY or any
DIGIT button.
2. AV
Selects the AV channels.
77
7
1
2
SLEEPOSDAV
2
3
12
3
3. OSD (On-Screen Display)
– Displays channel number and
sound transmission mode.
– Allows you to exit menu from screen.
4. DIGIT (0 - 9)
Allows you select a channel. For a
2-digit channel number, the second
digit must be entered before the “ – “
sign disappears.
5. SURF / ALTERNATE CHANNEL
– When surf mode is activated
through the main menu, it allows you
to select up to a maximum of 8 channels and view quickly the selected channels.
– It also allows you to alternate between
the last viewed channel and the present
channel if alternate channel mode is
activated.
6. MENU
To display or exit menu from screen.
7. CURSOR UP
Allows you to select the next item on
the menu.
4
5
6
7
8
9
10
A
4
7
SURF
A/CH
MENU
5
8
0
H
SMART SMART
`
±
SAP
INC.
SURR.
6
9
CH
8. CURSOR LEFT
Allows you to access the sub-menus
and adjust the settings.
9. VOLUME + / –
Increases / decreases volume.
10. MUTE
Mutes sound. To restore sound, press
button again.
Page 8
FUNCTIONS OF REMOTE CONTROL
2
12
4
7
SURF
A/CH
MENU
5
8
0
SLEEPOSDAV
SAP
INC.
SURR.
3
6
9
11
12
13
14
15
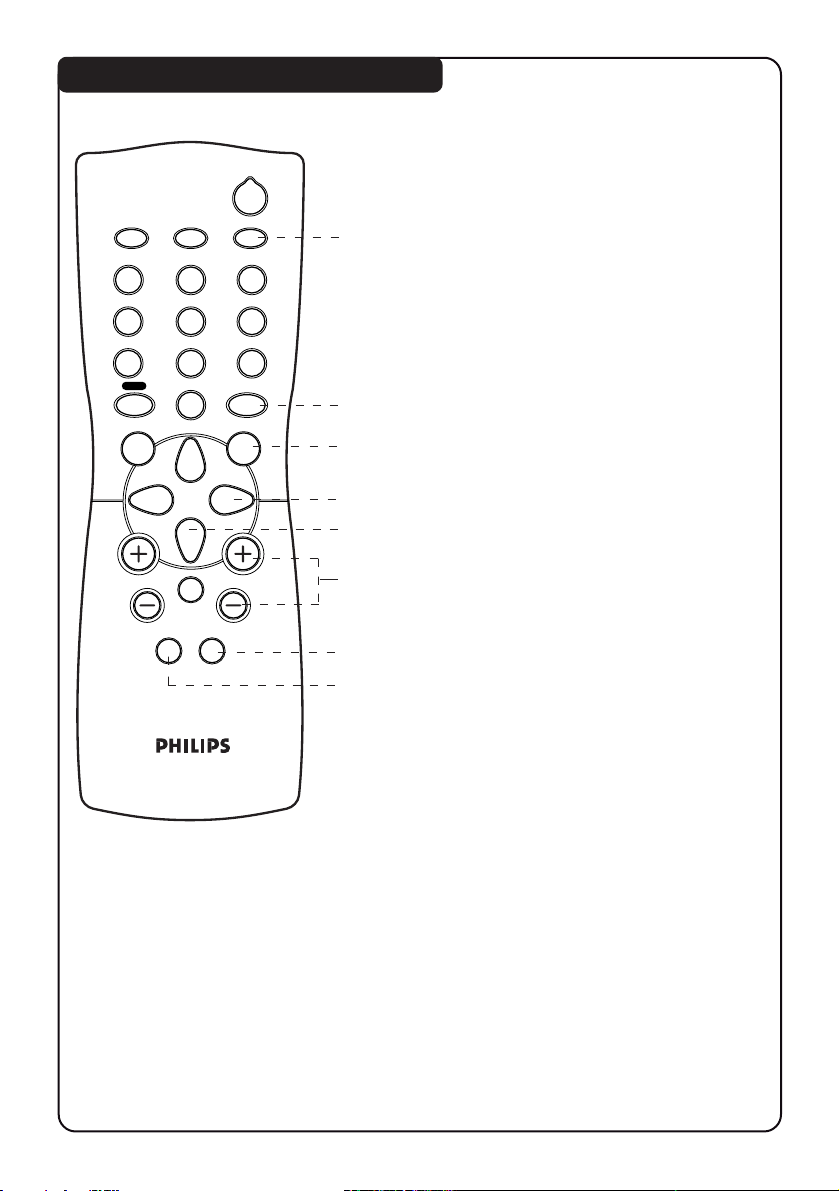
11. SLEEPTIMER
Allows you to select a time period
after which the set will switch to
standby mode automatically. You
can set the timer from OFF mode
up to a maximum of 240 minutes.
12. SAP
Allows you to switch to stereo,
SAP (Second Audio programme) or
mono sound. You can select up to 2
different languages in simultaneous
transmission when the programme
is transmitted in SAP mode.
13. INCREDIBLE SURROUND
Allows you to select incredible
surround sound (enhanced stereo
sound) when transmission is stereo
mode.
88
8
A
H
SMART SMART
`
±
CH
16
17
18
14. CURSOR RIGHT
Allows you to access the sub-menus
and adjust the settings.
15. CURSOR DOWN
Allows you to select the next item
on the menu.
16. CHANNEL + / –
Allows you to select channel in
ascending or descending order.
17. SMART PICTURE
Allows you to access 4 different
types of picture settings.
18. SMART SOUND
Allows you to access 4 different
types of sound settings.
Page 9
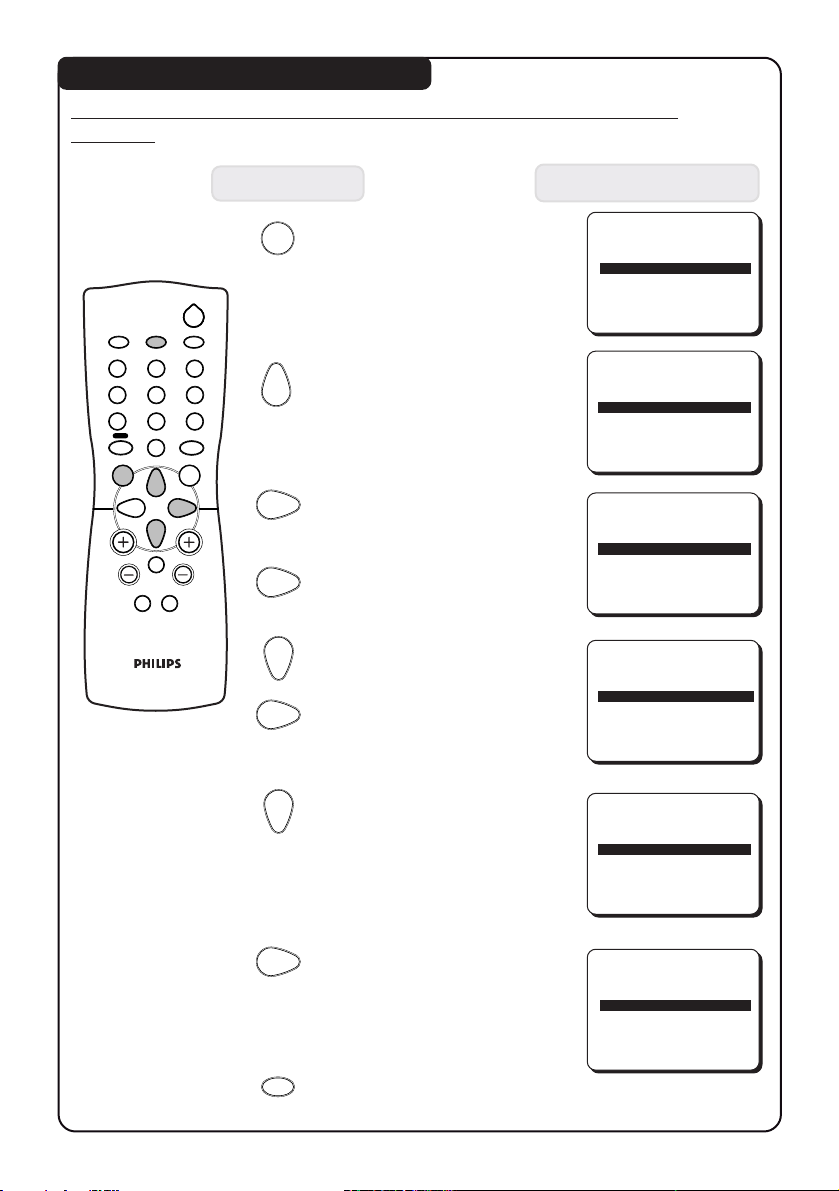
INSTALLATION OF THE TV CHANNELS
Selecting the language, tuner type and automatic tuning of the
channels
Press button Result on TV Screen
99
9
12
4
7
SURF
A/CH
MENU
A
SMART SMART
±
MENU
2
SLEEPOSDAV
3
6
5
8
9
SAP
0
INC.
SURR.
1. Enter main menu.
2. Select INSTALLATION.
BLUE MUTE OFF
INSTALLATION
BRIGHTNESS
COLOUR
CONTRAST
SURF A/CH
BLUE MUTE OFF
INSTALLATION
BRIGHTNESS
COLOUR
IIIII
IIII
IIIII
IIII
IIIIIIII
❙ ❙ ❙ ❙ ❙ ❙ ❙ ❙
28
❙ ❙ ❙ ❙ ❙ ❙ ❙ ❙ ❙ ❙
18
❙ ❙ ❙ ❙ ❙ ❙
38
❙ ❙ ❙ ❙ ❙ ❙ ❙ ❙
28
❙ ❙ ❙ ❙ ❙ ❙ ❙ ❙ ❙
18
ÉÉ
É
ÉÉ
ÉÉ
É
ÉÉ
3. Enter INSTALLATION
menu. LANGUAGE
CH
H
4. Select your desired
option is highlighted.
`
language.
LANGUAGE ENGLISH
TUNER ANTENNA
AUTO INSTALL É
5. Select TUNER.
LANGUAGE ENGLISH
6. Select CABLE or ANTENNA.
7. Select AUTO INSTALL.
TUNER ANTENNA
AUTO INSTALL
SKIP
LANGUAGE ENGLISH
TUNER ANTENNA
AUTO INSTALL
SKIP
MANUAL É
ÉÉ
É
ÉÉ
ÉÉ
É
ÉÉ
ÉÉ
É
ÉÉ
ÉÉ
É
ÉÉ
8. Start automatic tuning.
After tuning is completed,
the INSTALLATION menu
will appear.
OSD
9. Exit menu from screen.
AUTO INST
❙ ❙ ❙ ❙ ❙ ❙ ❙ ❙
IIIII
28
Page 10
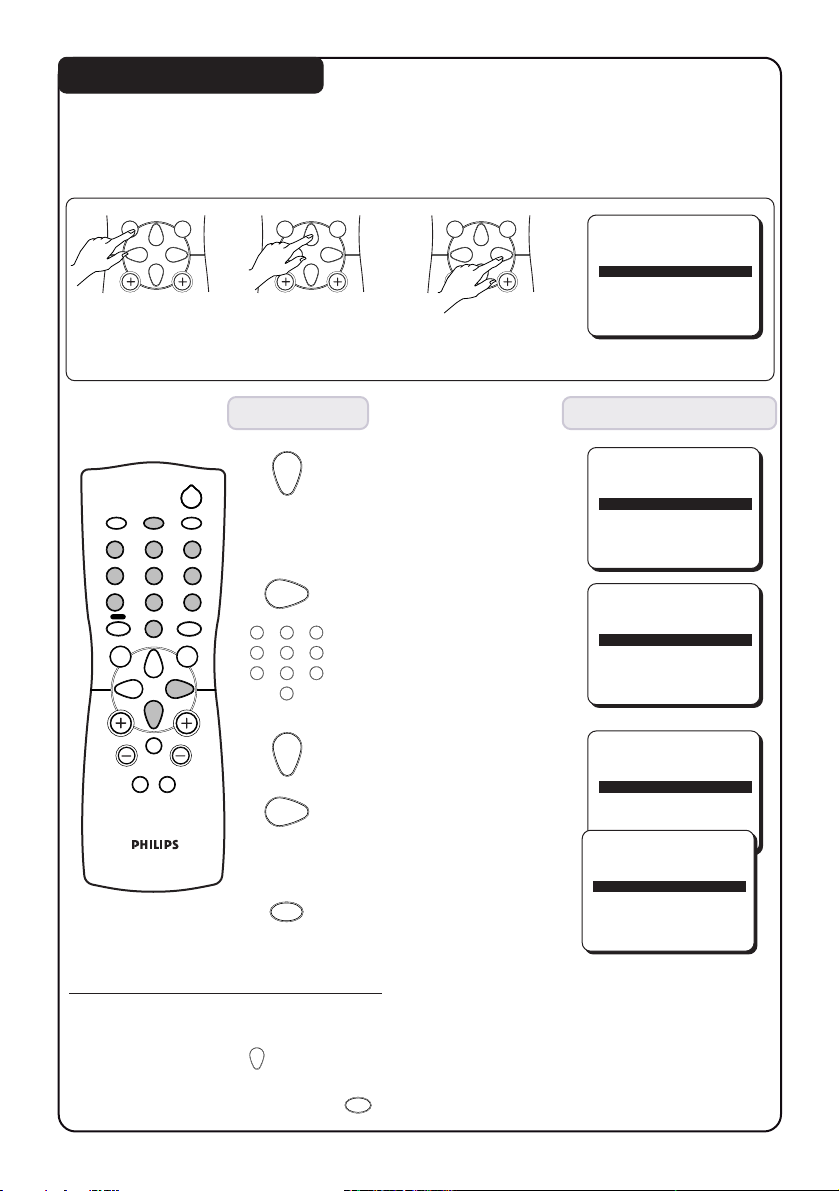
SKIPPING OF CHANNELS
This feature allows you to skip channels which have bad or weak TV signal or
channels that you do not watch often. Note : Once a channel is skipped, you
cannot have access to it by the CH (Channel) + or – button. you can only have
access to the channel by the DIGIT (0 - 9) buttons.
1010
10
INC.
MENU
SURR.
INC.
MENU
SURR.
INC.
MENU
SURR.
➠➠➠
1. Enter main 2. Select 3. Enter
menu. INSTALLATION. installation mode.
Press button Result on TV Screen
4. Press button repeatedly
until SKIP is selected.
5. Enter skip menu.
6. Key in the channel to
be skipped.
7. Select SKIP.
8. Select YES to skip
channel.
12
4
7
SURF
A/CH
MENU
A
H
SMART SMART
±
2
SLEEPOSDAV
3
6
5
8
9
SAP
0
INC.
SURR.
`
12
3
4
6
5
8
9
7
0
CH
LANGUAGE ENGLISH
TUNER ANTENNA
AUTO INSTALL
TUNER ANTENNA
AUTO INSTALL
SKIP
MANUAL
EXTERNAL
CHANNEL 3
SKIP NO
CHANNEL 3
SKIP NO
ÉÉ
É
ÉÉ
ÉÉ
É
ÉÉ
ÉÉ
É
ÉÉ
ÉÉ
É
ÉÉ
ÉÉ
É
ÉÉ
OSD
9. Exit menu from screen.
How to restore skipped channels
1. Repeat steps 1 to 5 as in “Skipping of Channels”.
2. Key in the channel to be restored by the DIGIT (0- 9) button.
3. Select SKIP by the
4. Select NO to restore channel.
5. Exit menu from screen by the
button.
OSD
button.
CHANNEL 3
SKIP YES
CHANNEL DELETED
Page 11
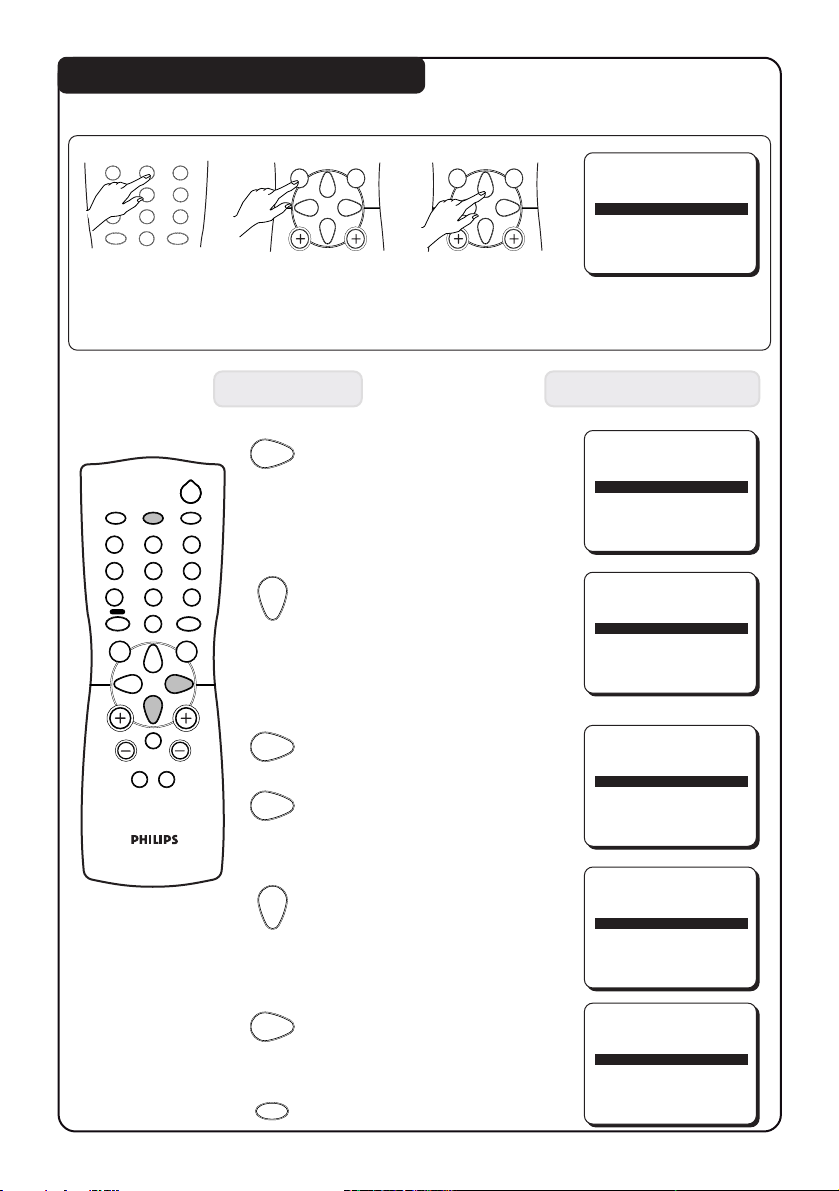
FINE TUNING OF TV CHANNELS
MENU
INC.
SURR.
1111
11
This feature allows you to adjust the picture reception in area of weak reception.
12
4
5
8
7
SMART
±
0
3
➠➠➠
6
9
SMART
`
MENU
INC.
SURR.
1. Select the 2. Enter main 3. Select
channel you menu. INSTALLATION.
want to fine-tune.
Press button Result on TV Screen
4. Enter installation mode.
2
SLEEPOSDAV
12
4
7
SURF
A/CH
MENU
A
5
8
0
H
SMART SMART
±
3
6
9
SAP
INC.
SURR.
CH
`
5. Press button repeatedly
until MANUAL is selected.
6. Enter fine tune menu.
7. Start fine-tuning until
desired picture and sound
is obtained.
SURF A/CH
BLUE MUTE OFF
INSTALLATION É
BRIGHTNESS
COLOUR
LANGUAGE ENGLISH
TUNER ANTENNA
AUTO INSTALL
AUTO INSTALL
SKIP
MANUAL
EXTERNAL
FINE TUNE
STORE
IIII
❙ ❙ ❙ ❙ ❙ ❙ ❙ ❙II❙ ❙ ❙ ❙ ❙ ❙ ❙ ❙ ❙
❙ ❙ ❙ ❙ ❙ ❙ ❙ ❙
IIIII
28
❙ ❙ ❙ ❙ ❙ ❙ ❙ ❙ ❙
18
ÉÉ
É
ÉÉ
ÉÉ
É
ÉÉ
ÉÉ
É
ÉÉ
ÉÉ
É
ÉÉ
8
ÉÉ
É
ÉÉ
π
8. Select STORE.
FINE TUNE
STORE
❙ ❙ ❙ ❙ ❙ ❙ ❙ ❙II❙ ❙ ❙ ❙ ❙ ❙ ❙ ❙ ❙
8
ÉÉ
É
ÉÉ
9. Store last fine-tuned status.
FINE TUNE
STORED
OSD
10. Exit menu from screen.
❙ ❙ ❙ ❙ ❙ ❙ ❙ ❙II❙ ❙ ❙ ❙ ❙ ❙ ❙ ❙ ❙
8
ÉÉ
É
ÉÉ
Page 12
MENU
INC.
SURR.
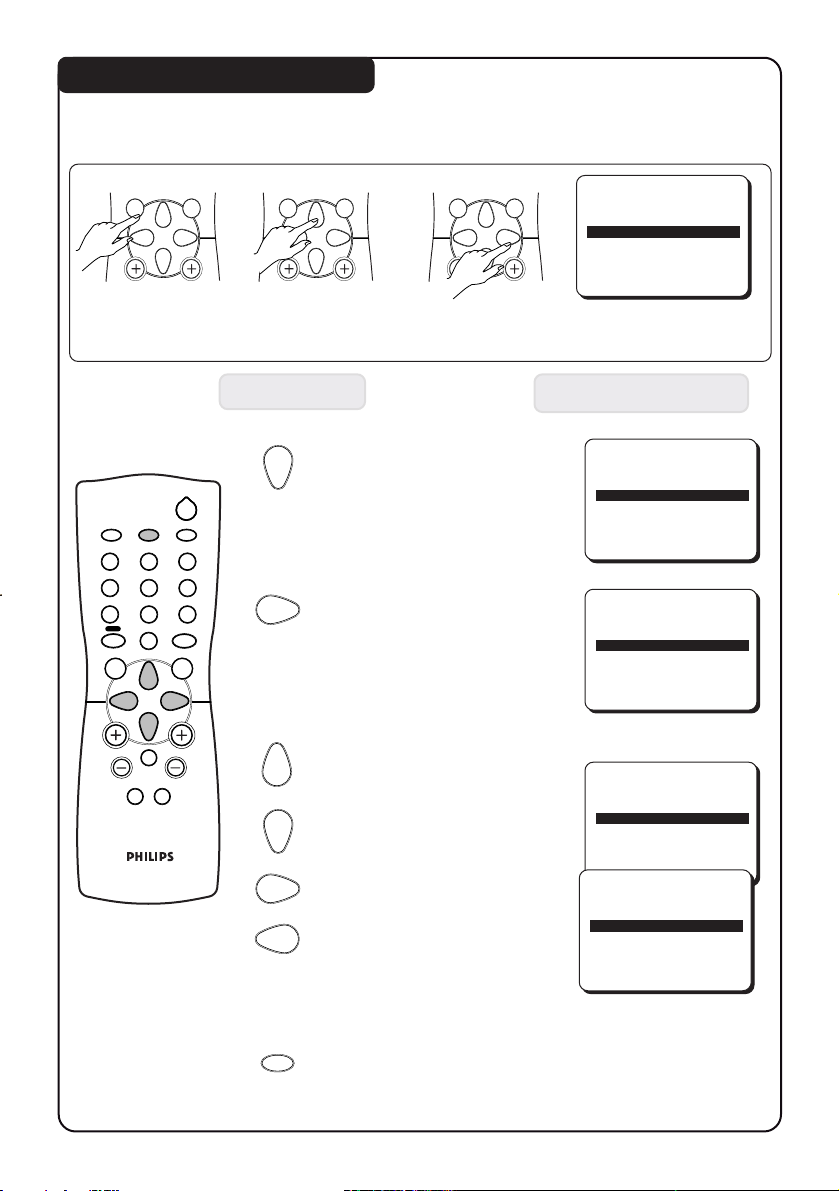
NAMING OF AV CHANNELS
1212
12
This feature allows you to name your AV channels according to a pre-set name
list : AV, EXT, GAM, DVD, VCD, VCR or LD.
INC.
MENU
SURR.
INC.
MENU
SURR.
➠➠➠
1. Enter main 2. Select 3.Enter installation
menu. INSTALLATION. mode.
Press button Result on TV Screen
4.Press button repeatedly until
EXTERNAL is selected.
2
SLEEPOSDAV
12
4
7
SURF
A/CH
MENU
A
5
8
0
H
SMART SMART
±
3
6
9
SAP
INC.
SURR.
CH
`
5.Enter EXTERNAL menu.
6.Select EXT1 or EXT2.
OR
LANGUAGE ENGLISH
TUNER ANTENNA
AUTO INSTALL
SKIP
MANUAL
EXTERNAL
EXT 1 VCD
EXT 2 VCR
EXT 1 VCD
EXT 2 VCR
ÉÉ
É
ÉÉ
ÉÉ
É
ÉÉ
ÉÉ
É
ÉÉ
ÉÉ
É
ÉÉ
7.Cycle through the various
OR
pre-set name list – (AV, EXT,
GAME, DVD, VCD, VCR and
EXT 1 VCD
EXT 2 VCR
LD) and select name for the
AV channel.
OSD
8.Exit menu from screen.
Page 13
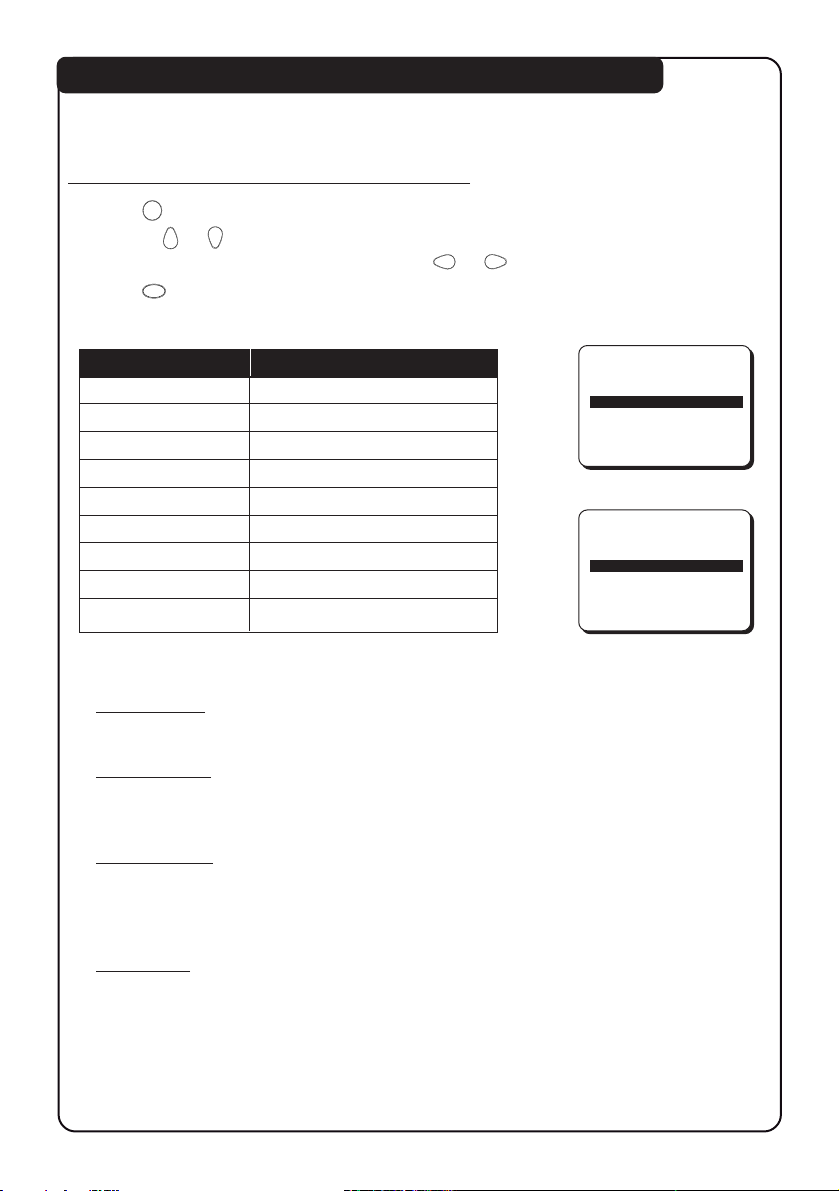
SELECTING/ADJUSTING PICTURE AND SOUND SETTING
1313
13
The picture and sound menu allow you to make adjustments to the picture and
volume level.
How to do picture and sound adjustments
1. Press
2. Use the
3. Do the adjustments or activation by the
4. Press
MENU
button to enter main menu.
or button to select the items in the menu.
or button.
OSD
button to exit menu from screen.
Picture menu items Selection
Brightness Increase/decrease level
Colour Increase/decrease intensity
BRIGHTNESS
COLOUR
CONTRAST
SHARPNESS
HUE
IIII
IIIII
IIIIIIII
IIIIIIII
❙ ❙ ❙ ❙ ❙ ❙I❙ ❙ ❙ ❙ ❙ ❙
❙ ❙ ❙ ❙ ❙ ❙ ❙ ❙
28
❙ ❙ ❙ ❙ ❙ ❙ ❙ ❙ ❙
18
❙ ❙ ❙ ❙ ❙ ❙
38
❙ ❙ ❙ ❙ ❙ ❙
38
21
Contrast Increase/decrease level
Sharpness Increase/decrease level
➠
Hue Increase/decrease intensity
Colour Temp Choice of 3 settings
Contrast Plus On/Off
Noise Reduce On/Off
HUE
COL TEMP NORMAL
CONTRAST PLUS ON
NOISE REDUCE OFF
4:3 EXPAND OFF
❙ ❙ ❙ ❙ ❙ ❙I❙ ❙ ❙ ❙ ❙ ❙
21
4:3 Expand On/Off
Colour Temp
Allows you a choice of 3 picture settings namely, NORMAL, WARM or COOL.
Contrast Plus
This feature allows you to optimise the total contrast for improved picture
clarity.
Noise Reduce
Noise Reduce feature helps you to reduce the “noise” (little dots on the
picture) from weak signal broadcast. Activating this feature makes a picture
disturbed by “noise” clearer and sharper.
4:3 Expand
4:3 Expand feature allows you to adjust picture with black bar on the top and
bottom to fill up more of the screen. It allows you to optimise the picture
display on the screen.
Page 14
... SELECTING / ADJUSTING PICTURE AND SOUND SETTING
1414
14
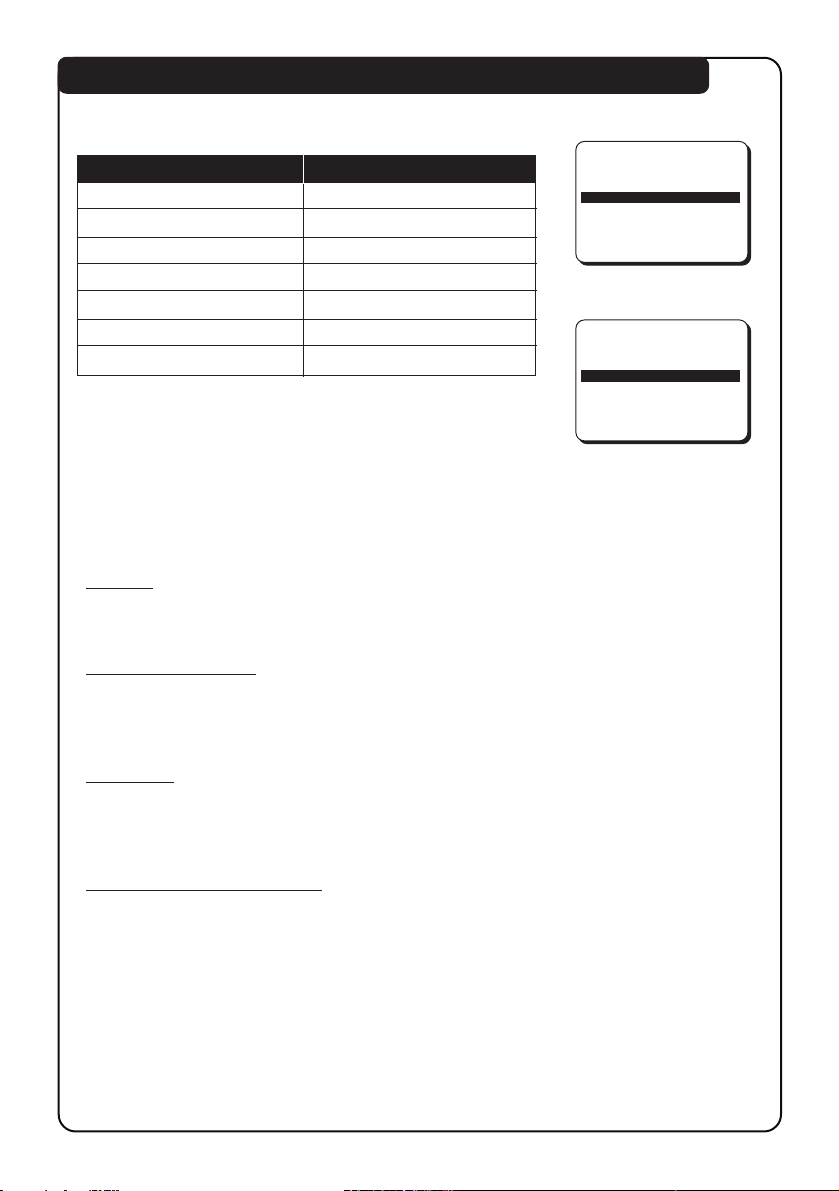
Sound menu items Selection
Volume Increase/decrease level
Balance Adjust balance level
VOLUME
BALANCE
TREBLE
BASS
INCR SURROUND ON
IIIII
❙ ❙ ❙ ❙ ❙ ❙I❙ ❙ ❙ ❙ ❙ ❙
IIIII
IIIII
❙ ❙ ❙ ❙ ❙ ❙ ❙
28
1
❙ ❙ ❙ ❙ ❙ ❙ ❙
28
❙ ❙ ❙ ❙ ❙ ❙ ❙
29
Treble Increase/decrease level
Bass Increase/decrease level
➠
Incredible Surround On/Off
Ultra bass On/Off
AVL On/Off
TREBLE
BASS
INCR SURROUND ON
ULTRA BASS ON
AVL ON
IIIII
IIIII
❙ ❙ ❙ ❙ ❙ ❙ ❙
28
❙ ❙ ❙ ❙ ❙ ❙ ❙
29
Balance
Select this feature to allow you to adjust the balance of the right and left
speakers’ sound output.
Incredible Surround
You can hear an incredible sound with extra depth and an unbelievable threedimensional effect that surrounds you completely without the need for
additional surround speakers.
Ultra Bass
Select this feature to enhance the bass quality of small loudspeakers. Nonaudible low-frequency signals are replaced by harmonics, making them
audible giving the impression that low-frequency signal is present.
AVL (Auto Volume Leveller)
Variation in signal conditions can result in a sudden change in volume during
commercial breaks or channel switching. Activating the Auto Volume Leveller
feature enables the volume level to remain at a standard volume level.
Page 15
ACTIVATING THE CHILD LOCK
1515
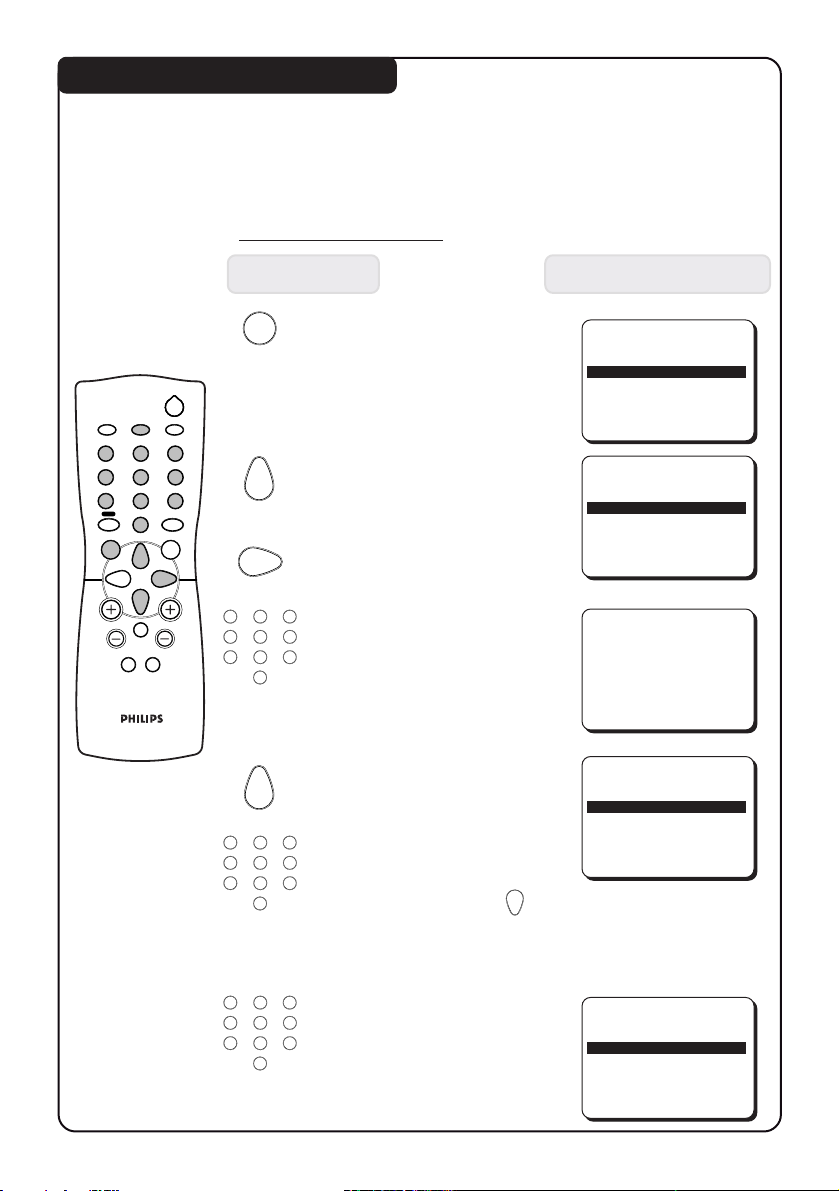
Lock feature allows you to lock channels which you want to prevent others or
your children from watching programmes you deem undesirable.
You can choose to lock up all the channels (inclusive of the 2 AV channels) or
individual channel (up to a maximum of 5 channels).
How to lock channels
Press button Result on TV Screen
15
12
4
7
SURF
A/CH
MENU
A
SMART SMART
±
MENU
2
SLEEPOSDAV
3
6
5
8
9
SAP
0
INC.
SURR.
1. Enter main menu.
2. Select CHILD LOCK.
3. Enter CHILD LOCK
BLUE MUTE OFF
INSTALLATION
BRIGHTNESS
COLOUR
CONTRAST
AVL OFF
SLEEPTIMER OFF
CHILD LOCK
CLOCK
SURF A/CH
IIIII
❙ ❙ ❙ ❙ ❙ ❙ ❙ ❙ ❙ ❙
IIII
IIIIIIII
❙ ❙ ❙ ❙ ❙ ❙ ❙
28
18
❙ ❙ ❙ ❙ ❙ ❙
38
ÉÉ
É
ÉÉ
ÉÉ
É
ÉÉ
BB
B
BB
mode.
12
3
CH
H
`
4
5
8
7
0
4. Key in access code twice
6
9
to enter child lock menu.
Note : Universal access
code is 0711.
ACCESS CODE
XXX-
5. Select CHANGE CODE.
12
4
5
8
7
0
Key in your preferred
code (4-digit) if you want
3
6
9
to change to a new
code. If you do not want
to change code, select
CHANNEL by the
CHANGE CODE XXX-
CHANNEL 2
LOCK NO
button and proceed
to step 7 to lock your
desired channels.
12
4
5
8
7
0
3
6. Key in the new code the
6
9
second time to confirm
change.
CONFIRM CODE XXX-
CHANNEL 2
LOCK NO
Page 16
... ACTIVATING THE CHILD LOCK
Press button Result on TV Screen
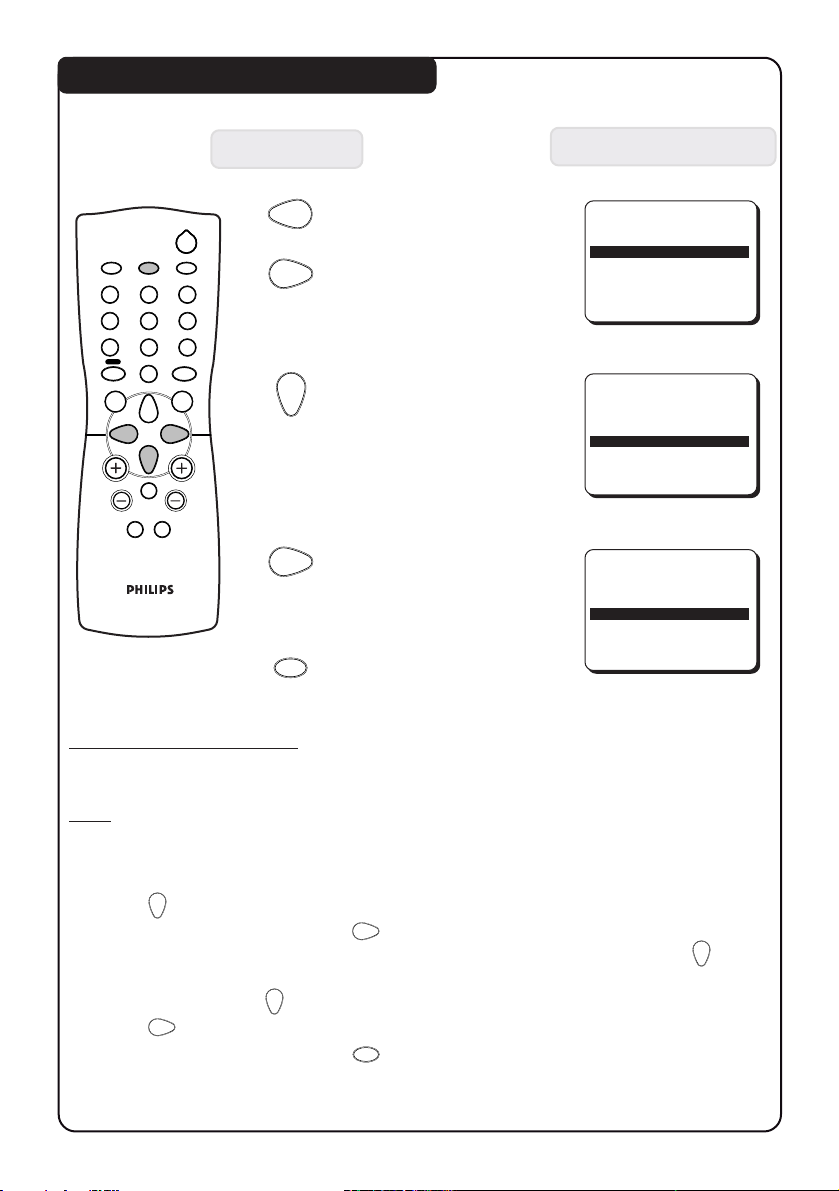
7. Select ALL if you
choose to lock all the
channels. You can also
choose to lock
individual channel (up
to a maximum of 5).
8. Select LOCK.
9. Select YES to activate
lock mode.
10. Exit menu from screen.
12
4
7
SURF
A/CH
MENU
A
SMART SMART
±
2
SLEEPOSDAV
3
6
5
8
9
SAP
0
INC.
SURR.
CH
H
`
OR
OSD
1616
16
CHANGE CODE XXXX
CHANNEL ALL
LOCK NO
CLEAR ALL
CHANGE CODE XXXX
CHANNEL ALL
LOCK NO
CLEAR ALL
CHANGE CODE XXXX
CHANNEL ALL
LOCK YES
CLEAR ALL
BB
B
BB
BB
B
BB
BB
B
BB
How to unlock channels
If you access any locked channel, a message “ACCESS CODE” will appear. To
bypass the lock mode, key in your personal access code.
Note : If you forget your personal access code, key in the universal code 0711
twice.
1. Repeat step 1 to 4 as in “How to lock channels”.
2. Press
unlock all the channels. Press
3. If you want only to unlock individual channel, select CHANNEL by the
button and key in the channel you want to unlock by the DIGIT 0 -9 button.
4. Select LOCK by the
5. Press
6. Exit menu from screen by the
button repeatedly until CLEAR ALL is selected if you want to
button to activate unlock mode.
button.
button to select NO to activate unlock mode.
OSD
button.
Page 17
ACTIVATING THE CLOCK
1717
17
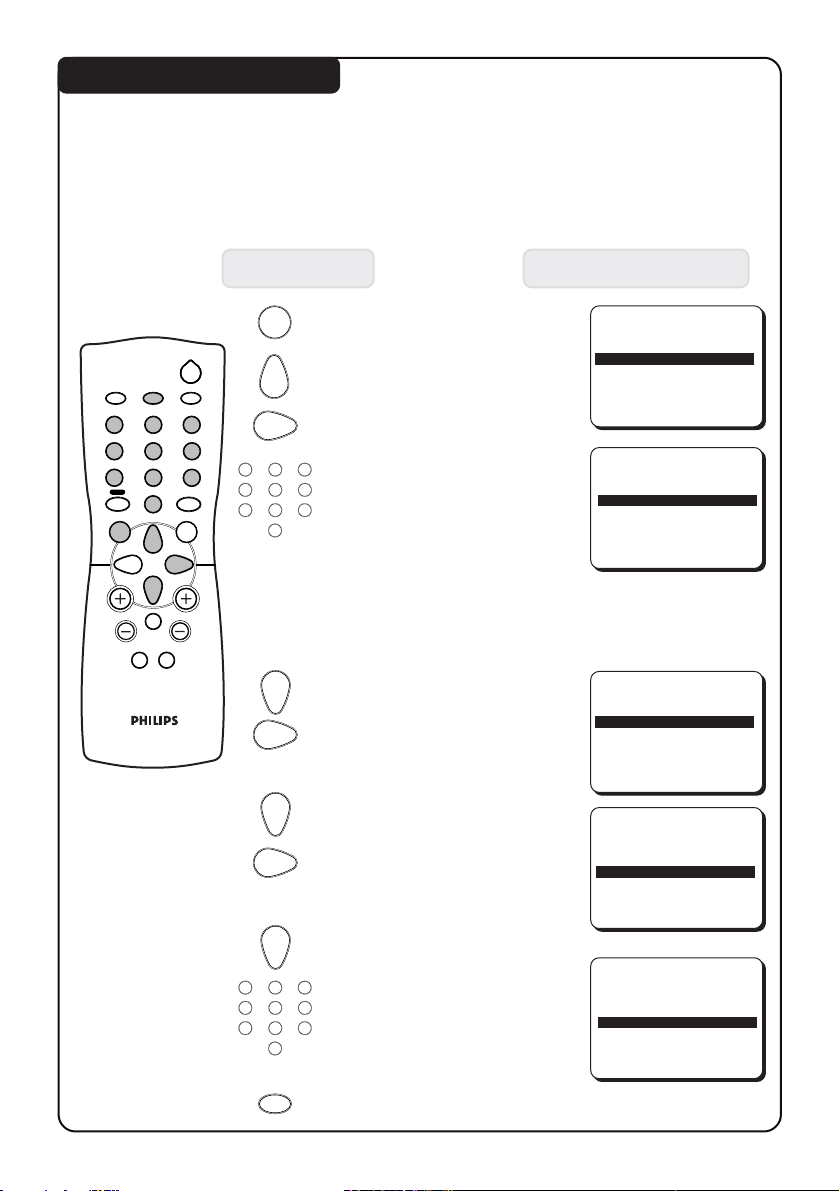
The Clock feature allows you to set the clock to switch to another channel at a
specified time while you are watching another channel or when the TV is on
standby mode.
Note : For the clock to function, the set must not be switched off. Once the set is
switched off, the clock is disabled.
Press button Result on TV Screen
12
4
7
SURF
A/CH
MENU
A
SMART SMART
±
MENU
2
SLEEPOSDAV
3
6
5
8
0
SURR.
12
9
4
SAP
7
INC.
1. Enter main menu.
2. Select CLOCK.
3. Enter CLOCK menu.
3
4. Set clock. Key in the
6
5
8
0
time you want the clock
9
to start functioning. For
example, if the time is
SLEEPTIMER OFF
CHILD LOCK
CLOCK
SURF A/CH
BLUE MUTE OFF
TIME 10:30
TIMER ACTIVE OFF
CHANNEL 2
É
ÉÉ
ÉÉ
BB
B
BB
10 : 30, key digit 1 and 0
in the hour column
followed by digit 3 and
CH
H
`
0 in the minute column.
5. Select TIMER ACTIVE.
TIME 10:30
6. Select ON to activate
clock.
TIMER ACTIVE ON
CHANNEL 2
AT --:--
7. Select CHANNEL.
8. Select the channel you
want to switch to.
TIME 10:30
TIMER ACTIVE ON
CHANNEL 8
AT --:--
12
4
5
8
7
0
OSD
9. Select AT.
3
10. Key in the time you
6
want the channel to be
9
switched on.
11. Exit from menu.
TIMER ACTIVE ON
CHANNEL 8
AT 11:00
Page 18
ACTIVATING THE SLEEPTIMER / BLUE MUTE
1818
18
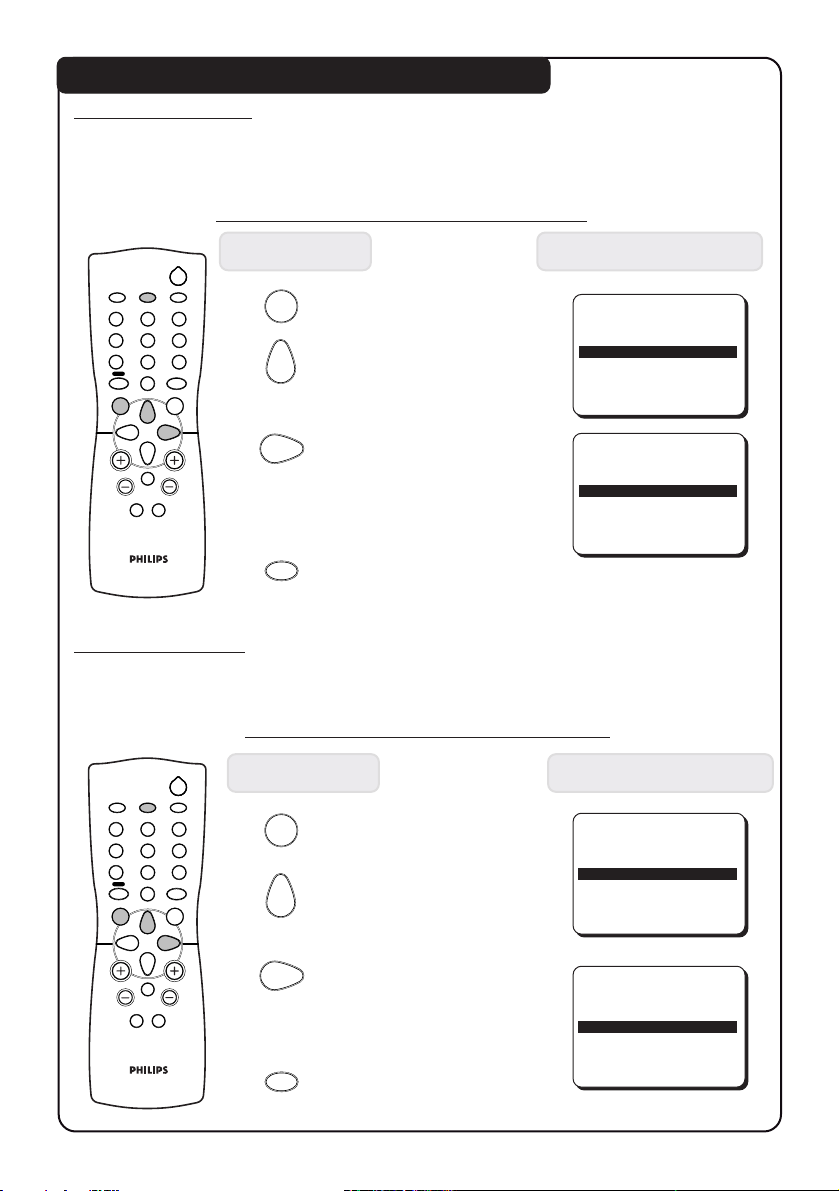
Sleeptimer feature
This feature allows you to select a time period after which the set will switch to
standby mode automatically. You can set the timer from OFF up to a maximum
of 240 minutes.
How to activate the Sleeptimer feature
Press button Result on TV Screen
2
12
4
5
8
7
SURF
A/CH
0
MENU
SLEEPOSDAV
3
6
9
SAP
INC.
SURR.
1. Enter main menu.
MENU
2. Select SLEEPTIMER.
ULTRA BASS ON
AVL ON
SLEEPTIMER OFF
CHILD LOCK
CLOCK
ÉÉ
É
ÉÉ
BB
B
BB
3. Press button repeatedly
H
SMART SMART
±
CH
`
OSD
A
to cycle through the time
periods and select the
desired time period.
ULTRA BASS ON
AVL ON
SLEEPTIMER 15
CHILD LOCK
CLOCK
4. Exit menu from screen.
Blue Mute feature
The TV screen will turn blue when the Blue Mute feature is activated via the
main menu. It indicates that there is no signal.
How to activate the Blue Mute feature
Press button Result on TV Screen
1. Enter main menu.
MENU
2. Select BLUE MUTE.
3. Select ON to activate
Blue Mute feature.
OSD
4. Exit menu from screen.
CLOCK
SURF A/CH
BLUE MUTE OFF
INSTALLATION
BRIGHTNESS
CLOCK
SURF A/CH
BLUE MUTE ON
INSTALLATION
BRIGHTNESS
IIIII
IIIII
❙ ❙ ❙ ❙ ❙ ❙ ❙
❙ ❙ ❙ ❙ ❙ ❙ ❙
12
4
7
SURF
A/CH
MENU
A
SMART SMART
±
2
SLEEPOSDAV
3
6
5
8
9
SAP
0
INC.
SURR.
CH
H
`
28
28
ÉÉ
É
ÉÉ
BB
B
BB
BB
B
BB
ÉÉ
É
ÉÉ
BB
B
BB
ÉÉ
É
ÉÉ
Page 19
USING THE SURF FEATURE
1919
19
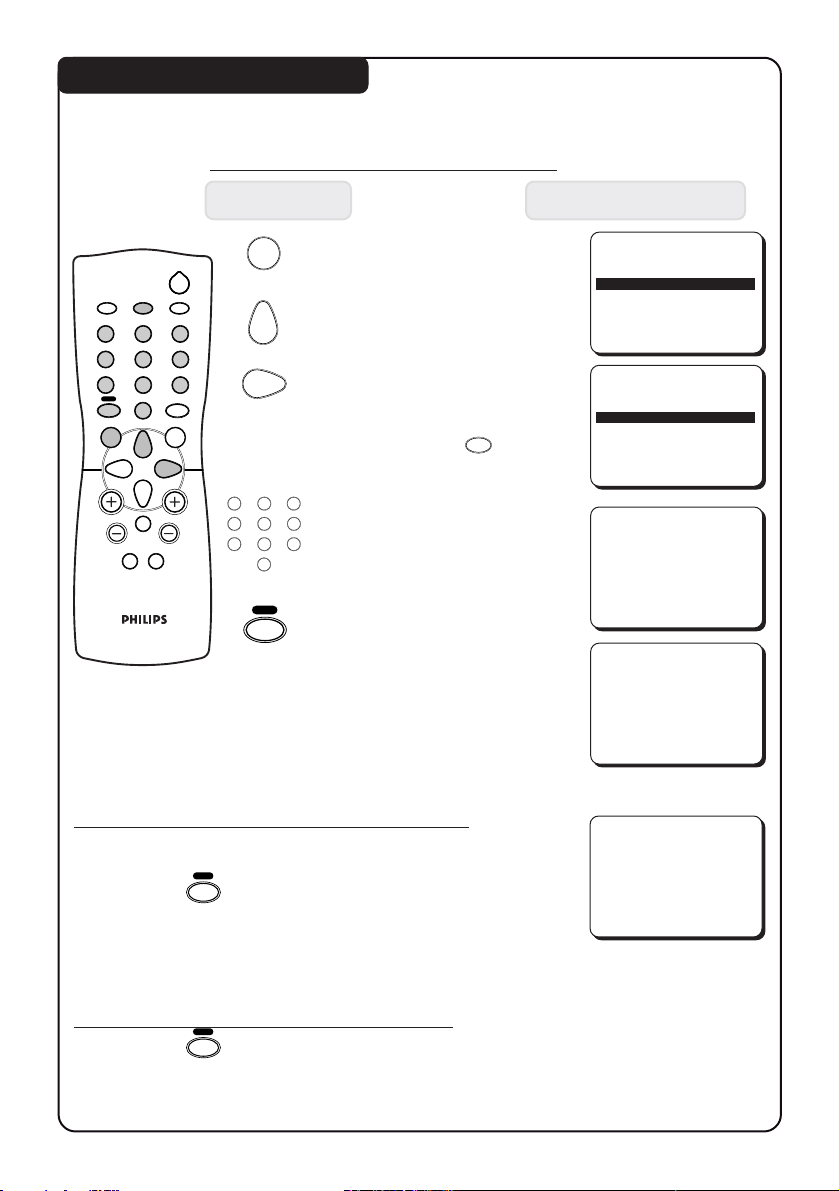
This feature allows you to create a surf list. You can select up to a maximum of 8
channels and view quickly the selected channels by the control handset.
How to add a channel to the surf list
Press button Result on TV Screen
MENU
2
SLEEPOSDAV
1. Enter main menu.
2. Select SURF.
12
4
7
SURF
A/CH
MENU
A
5
8
0
H
SMART SMART
±
3
6
9
SAP
INC.
SURR.
12
CH
4
`
7
3. Select SURF option.
After selection of surf
option, exit menu from
screen by the
3
4. Key in the channel
6
5
8
0
SURF
A/CH
number you want to add
9
to the surf list.
5. Press button while the
channel number is still
OSD
button.
visible. “ADDED” will
appear indicating that the
selected channel has been
added. Repeat steps 4 and
5 to add more channels to
the surf list.
How to delete a channel from the surf list
1. Select the channel you want to delete from the surf
list by the DIGIT (0 - 9) button.
2. Press the
still visible. “DELETED” will appear indicating that the
selected channel has been deleted.
3. Repeat the above step 1 to 2 if you want to delete
more channels from the surf list.
SURF
button while the channel number is
A/CH
CHILD LOCK
CLOCK
SURF A/CH
BLUE MUTE OFF
INSTALLATION
CHILD LOCK
CLOCK
SURF SURF
BLUE MUTE OFF
INSTALLATION
8
8
ADDED
8
DELETED
ÉÉ
É
ÉÉ
BB
B
BB
BB
B
BB
ÉÉ
É
ÉÉ
BB
B
BB
BB
B
BB
How to view channels from the Surf list
1. Press the
SURF
button repeatedly to cycle through
A/CH
the channels and select the channel you want to view.
Page 20
USING THE ALTERNATE CHANNEL FEATURE
2020
20
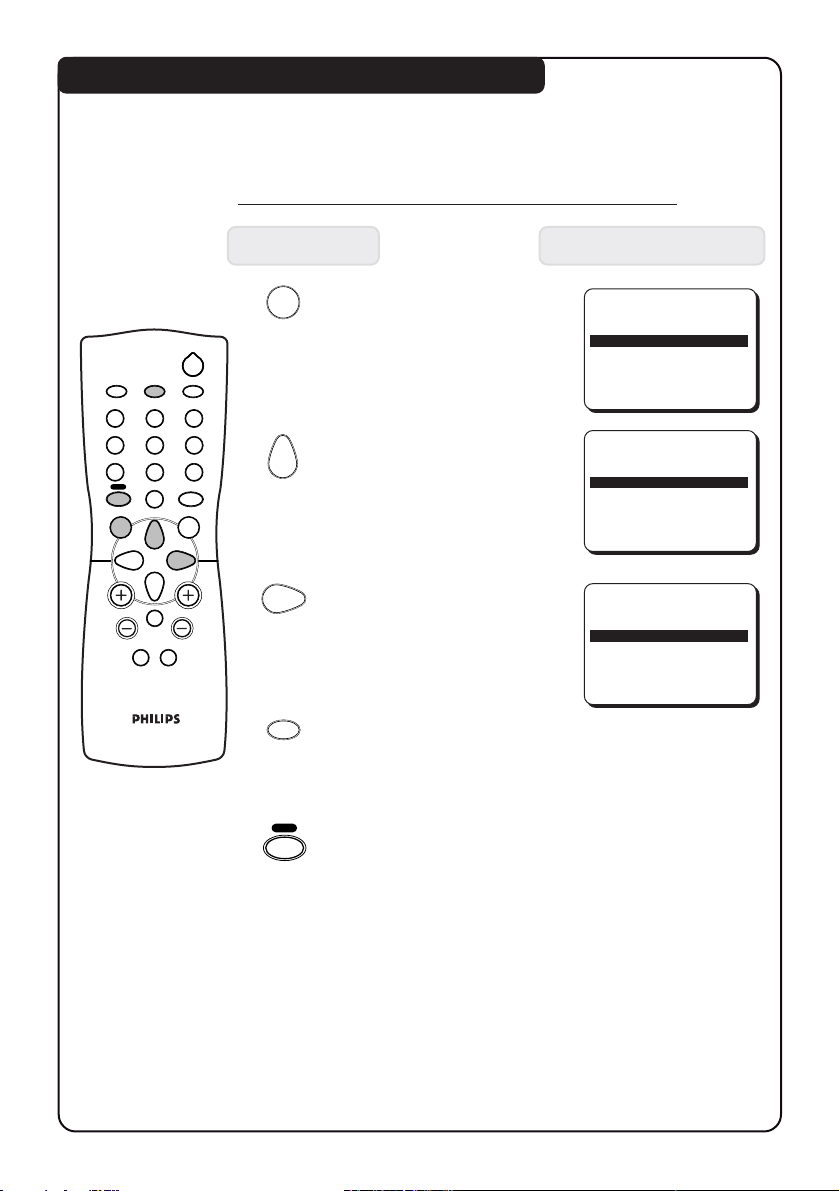
When you are viewing a channel and decide to view the previous channel, use
this feature to alternate between the two channels.
How to activate the Alternate Channel feature
Press button Result on TV Screen
1. Enter main menu.
MENU
2
SLEEPOSDAV
BLUE MUTE OFF
INSTALLATION
BRIGHTNESS
COLOUR
CONTRAST
IIIII
IIII
IIIIIIII
❙ ❙ ❙ ❙ ❙ ❙ ❙
❙ ❙ ❙ ❙ ❙ ❙ ❙ ❙ ❙ ❙
28
❙ ❙ ❙ ❙ ❙ ❙
38
18
ÉÉ
É
ÉÉ
12
4
7
SURF
A/CH
MENU
A
H
SMART SMART
±
3
6
5
8
9
SAP
0
INC.
SURR.
CH
`
2. Select SURF.
3. Select A/CH (Alternate
Channel) option.
OSD
CHILD LOCK
CLOCK
SURF SURF
BLUE MUTE OFF
INSTALLATION
CHILD LOCK
CLOCK
SURF A/CH
BLUE MUTE OFF
INSTALLATION
ÉÉ
É
ÉÉ
BB
B
BB
BB
B
BB
ÉÉ
É
ÉÉ
BB
B
BB
BB
B
BB
4. Exit menu from screen.
SURF
5. Alternate between the
A/CH
present channel and
the previous channel.
Page 21
SMART PICTURE AND SOUND
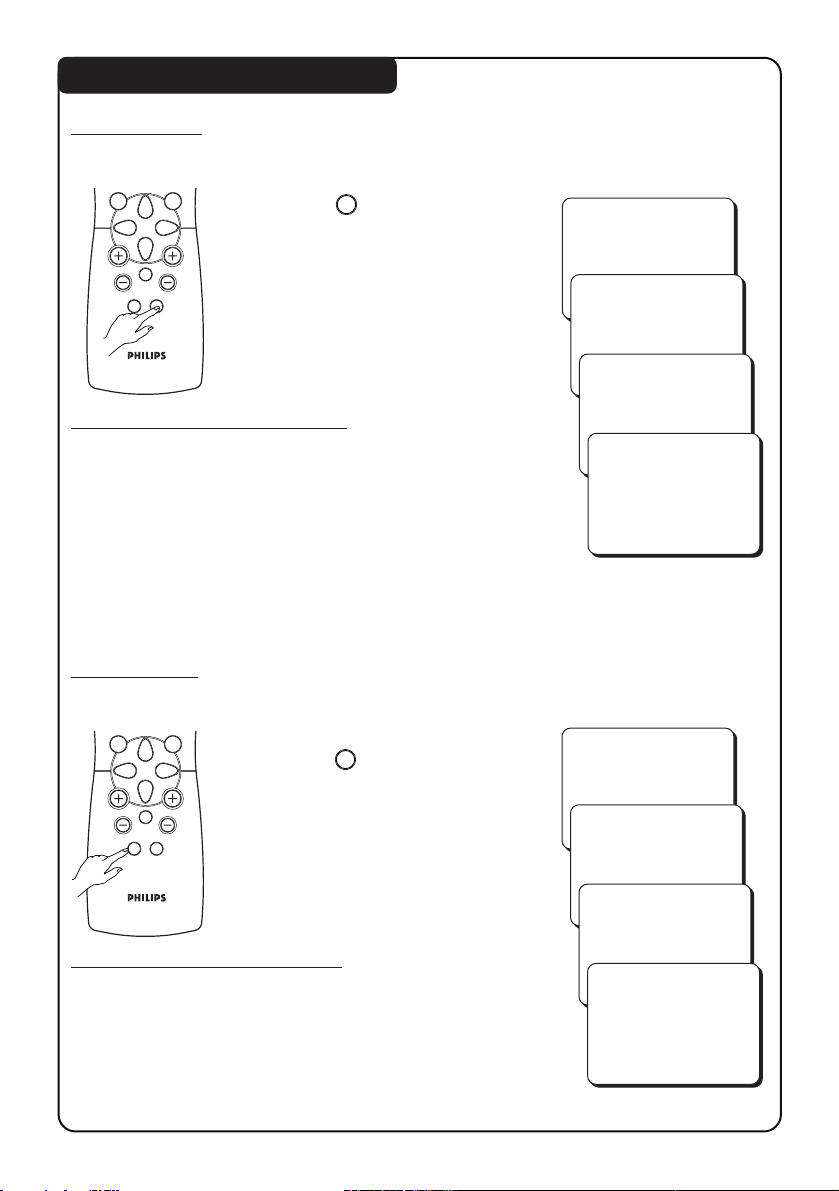
Smart Picture
Smart Picture offers you a choice of 4 settings – RICH, NATURAL, SOFT and
PERSONAL.
MENU
A
H
SMART SMART
`
±
INC.
SURR.
CH
• Press
SMART
`
button repeatedly
to cycle through the 4
settings to select your
desired picture setting.
RICH
NATURAL
2121
21
Definition of Picture Settings
SOFT
RICH : Emphasizes very vibrant colours.
(Suitable for AV mode in brightly-lit
condition)
PERSONAL
NATURAL : Emphasizes natural and original colours.
SOFT : Emphasizes warm colours.
(Suitable for dimly-lit room condition and
gives cinema-like effect when light is
switched off)
PERSONAL : Settings are set to your preference.
Smart Sound
Smart Sound offers you a choice of 4 settings – THEATRE, MUSIC, VOICE and
PERSONAL.
INC.
MENU
SURR.
H
SMART SMART
±
CH
`
A
• Press
SMART
button repeatedly
±
to cycle through the 4
settings to select your
desired sound setting.
THEATRE
MUSIC
VOICE
Definition of Sound Settings
THEATRE : Emphasizes sensation to action and a
wider sound ambience.
MUSIC : Emphasizes bass frequency making
the music dynamic.
VOICE : Emphasizes treble frequency making
speech clearer.
PERSONAL : Settings are set to your preference.
PERSONAL
Page 22
GENERAL INFORMATION / BEFORE CALLING SERVICE
2222
22
Safety
Disconnect mains plug when :
– the red light below the TV screen is flashing continuously.
– a bright white line is displayed across the TV screen.
– cleaning the TV screen. Never use abrasive cleaning agents. Use a slight damp
chamois leather or soft cloth.
– there is a lightning storm.
– the set is left unattended for a prolonged period of time.
Before calling Service
Make these simple checks before calling for service. Some of these symptoms can
easily be rectified if you know what to do.
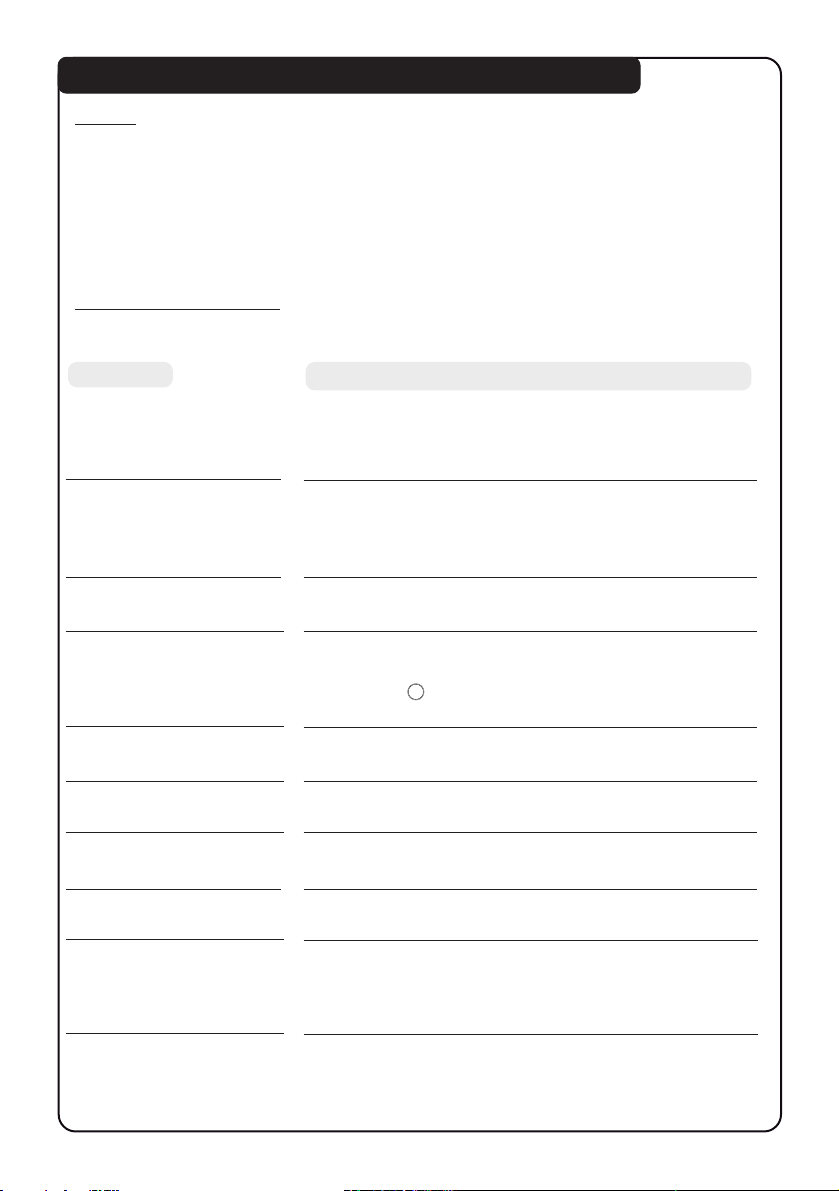
Symptom What you should do
Colour patch • Switch off the TV by the mains power button.
(uneveness) Wait for 20 minutes before switching on again.
• Check the TV is not placed too near speakers or
magnetic objects
No power • Check the TV’s AC power cord is plugged into the
mains socket. If there is still no power, disconnect
plug. Wait for 60 seconds and re-insert plug. Switch
on the TV again.
No picture • Check the antenna connection at the rear of the TV.
• Possible TV station problem. Try another channel.
Good picture but • Try increasing the volume.
no sound • Check that the sound is not muted. If it is muted,
H
press the
sound.
Good sound but poor • Try increasing the contrast and brightness setting.
colour or no picture
Snowish picture and • Check antenna connection at the rear of the TV.
noise
Horizontal dotted lines • Possible electrical interference e.g. hairdryer,
vacuum cleaner, etc. Switch off appliances.
Double images or • Possible poor positioning of antenna. Using a
“Ghost” images highly directional antenna may improve reception.
TV not responding to • Check life span of batteries of remote control
remote control handset handset.
• Aim remote control handset directly at remote
control sensor lens on the TV.
Message • Key in your personal access code to unlock channel.
“ACCESS CODE” If you have forgotten your code, key in the universal
shown on TV. Cannot code 0711 twice. For more details, refer to section on
access to locked channel. “How to unlock channels”.
button on the remote control to restore
Page 23
SPECIFICATIONS
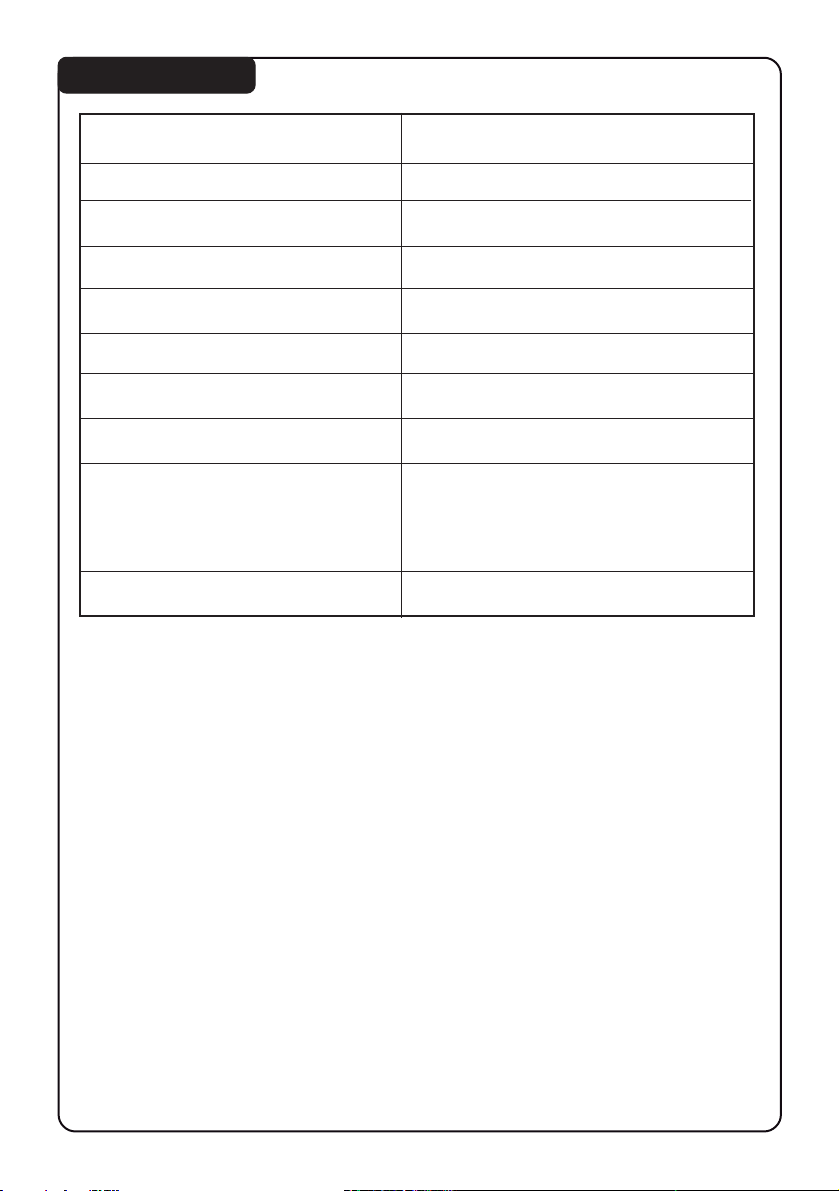
Picture tube size 54 cm
Picture tube visible area 51 cm
Audio Output 2 x 5 W
Tuning System PLL
TV System NTSC M
Operating voltage 110V ~, 60 Hz
Nominal Power Consumption 55 W
Maximum power Consumption 104 W
Set dimensions
Width 600 mm
Height 487 mm
Depth 454 mm
Nett weight of set 26 kg
2323
23
 Loading...