

Philips 21PT2324/69R, 21PT2324/69S, 21PT2324/79R User Manual
Colour television
Operating instruction
21PT2324
cover pg 1-2_21PT2324 02/17/04, 10:52 AM1
IMPORTANT
Before you begin:
Make sure your package includes the following items:TV and mains cord,
remote control, Instruction manual, antenna cable (optional) and Coaxial
cable (optional).
Attention:
1. Read your manual first – your Philips TV comes with a well-designed
remote control and onscreen display to ensure your TV is easy to
operate.
2. The tips provided in this manual will save you time and money as
charges for TV installation and adjustments of customer controls are
not covered under the warranty.
3. For information outside of this manual, such as sales locations and
other Philips products, please visit www.philips.com which will
automatically link you to your local Philips website.
4. Please refer to the ‘Troubleshooting Tips’on page 11 before calling for
service.
5. In case of a need to call for service, we recommend you to call from
your room where your TV is located and have on hand your remote
control, warranty card, TV model and serial number.
6 Do not discard packaging materials:
• without thorough inspection for parts and that accessories that may be
packed separately inside the carton.
• during the warranty period should you need to exchange the set.
Recycling:
The materials used in your set are either reusable or can be recycled.
To minimise environmental waste, specialist companies collect used
appliances and dismantle them after retrieving any materials that can be
used again (ask your dealer for further details).
Disclaimer: Graphics in this manual are for illustration purpose and may not represent the
actual product
cover pg 1-2_21PT2324 02/17/04, 10:52 AM2

Ta b le of Contents
Installation
Installing your television set . . . . . . . . . . . . . . . . . . . . . . . . . . . . . . . . . . . . . . . . . . . .3
The keys on the TV set . . .. . . . . . . . . . . . . . . . . . . . . . . . . . . . . . . . . . . . . . . . . . . . . .3
Remote control keys . . . . . . . . . . . . . . . . . . . . . . . . . . . . . . . . . . . . . . . . . . . . . . . . . . 4
Language . . . . . . . . . . . . . . . . . . . . . . . . . . . . . . . . . . . . . . . . . . . . . . . . . . . . . . . . . . . . . . .5
Auto Store . . . . . . . . . . . . . . . . . . . . . . . . . . . . . . . . . . . . . . . . . . . . . . . . . . . . . . . . . . . . 5
Manual Store . . . . . . . . . . . . . . . . . . . . . . . . . . . . . . . . . . . . . . . . . . . . . . . . . . . . . . . . . . 6
Channel Edit . . . . . . . . . . . . . . . . . . . . . . . . . . . . . . . . . . . . . . . . . . . . . . . . . . . . . . . . . . 6
Operation
Picture settings . . . . . . . . . . . . . . . . . . . . . . . . . . . . . . . . . . . . . . . . . . . . . . . . . . . . . . . .7
Sound settings. . . . . . . . . . . . . . . . . . . . . . . . . . . . . . . . . . . . . . . . . . . . . . . . . . . . . . . . . .7
Feature settings . . . . . . . . . . . . . . . . . . . . . . . . . . . . . . . . . . . . . . . . . . . . . . . . . . . . . . . 7
Format . . . . . . . . . . . . . . . . . . . . . . . . . . . . . . . . . . . . . . . . . . . . . . . . . . . . . . . . . . . . . . . . 8
Signal Strength . . . . . . . . . . . . . . . . . . . . . . . . . . . . . . . . . . . . . . . . . . . . . . . . . . .. . . . . . 8
Active Control . . . . . . . . . . . . . . . . . . . . . . . . . . . . . . . . . . . . . . . . . . . . . . . . . . . . . . . . 9
Personal Zapping . . . . . . . . . . . . . . . . . . . . . . . . . . . . . . . . . . . . . . . . . . . . . . . . . . . . . . 9
Peripherals
Video recorder . . . . . . . . . . . . . . . . . . . . . . . . . . . . . . . . . . . . . . . . . . . . . . . . . . . . . . 10
Side connections . . . . . . . . . . . . . . . . . . . . . . . . . . . . . . . . . . . . . . . . . . . . . . . . . . . . .10
Practical information
Tips . . . . . . . . . . . . . . . . . . . . . . . . . . . . . . . . . . . . . . . . . . . . . . . . . . . . . . . . . . . . . . . . . . 11
Glossary . . . . . . . . . . . . . . . . . . . . . . . . . . . . . . . . . . . . . . . . . . . . . . . . . . . . . . . . . . . . . 1 2
Specification . . . . . . . . . . . . . . . . . . . . . . . . . . . . . . . . . . . . . . . . . . . . . . . . . . . . . . . . . .13
General Operating manual-21PT2324 1
p1-2_21PT2324 02/20/04, 4:41 PM1
Safety information
• Disconnect mains plug when :
– the indicator light below the TV screen is flashing continuously.
–a bright white line is displayed across the screen.
– there is a lightning storm.
– the set is left unattended for a prolonged period of time.
• cleaning the TV screen. Never use abrasive cleaning agents. Use a slight damp chamois
leather or soft cloth.
• No naked flame sources, such as lighted candles, should be placed on top of the TV or in
the vicinity.
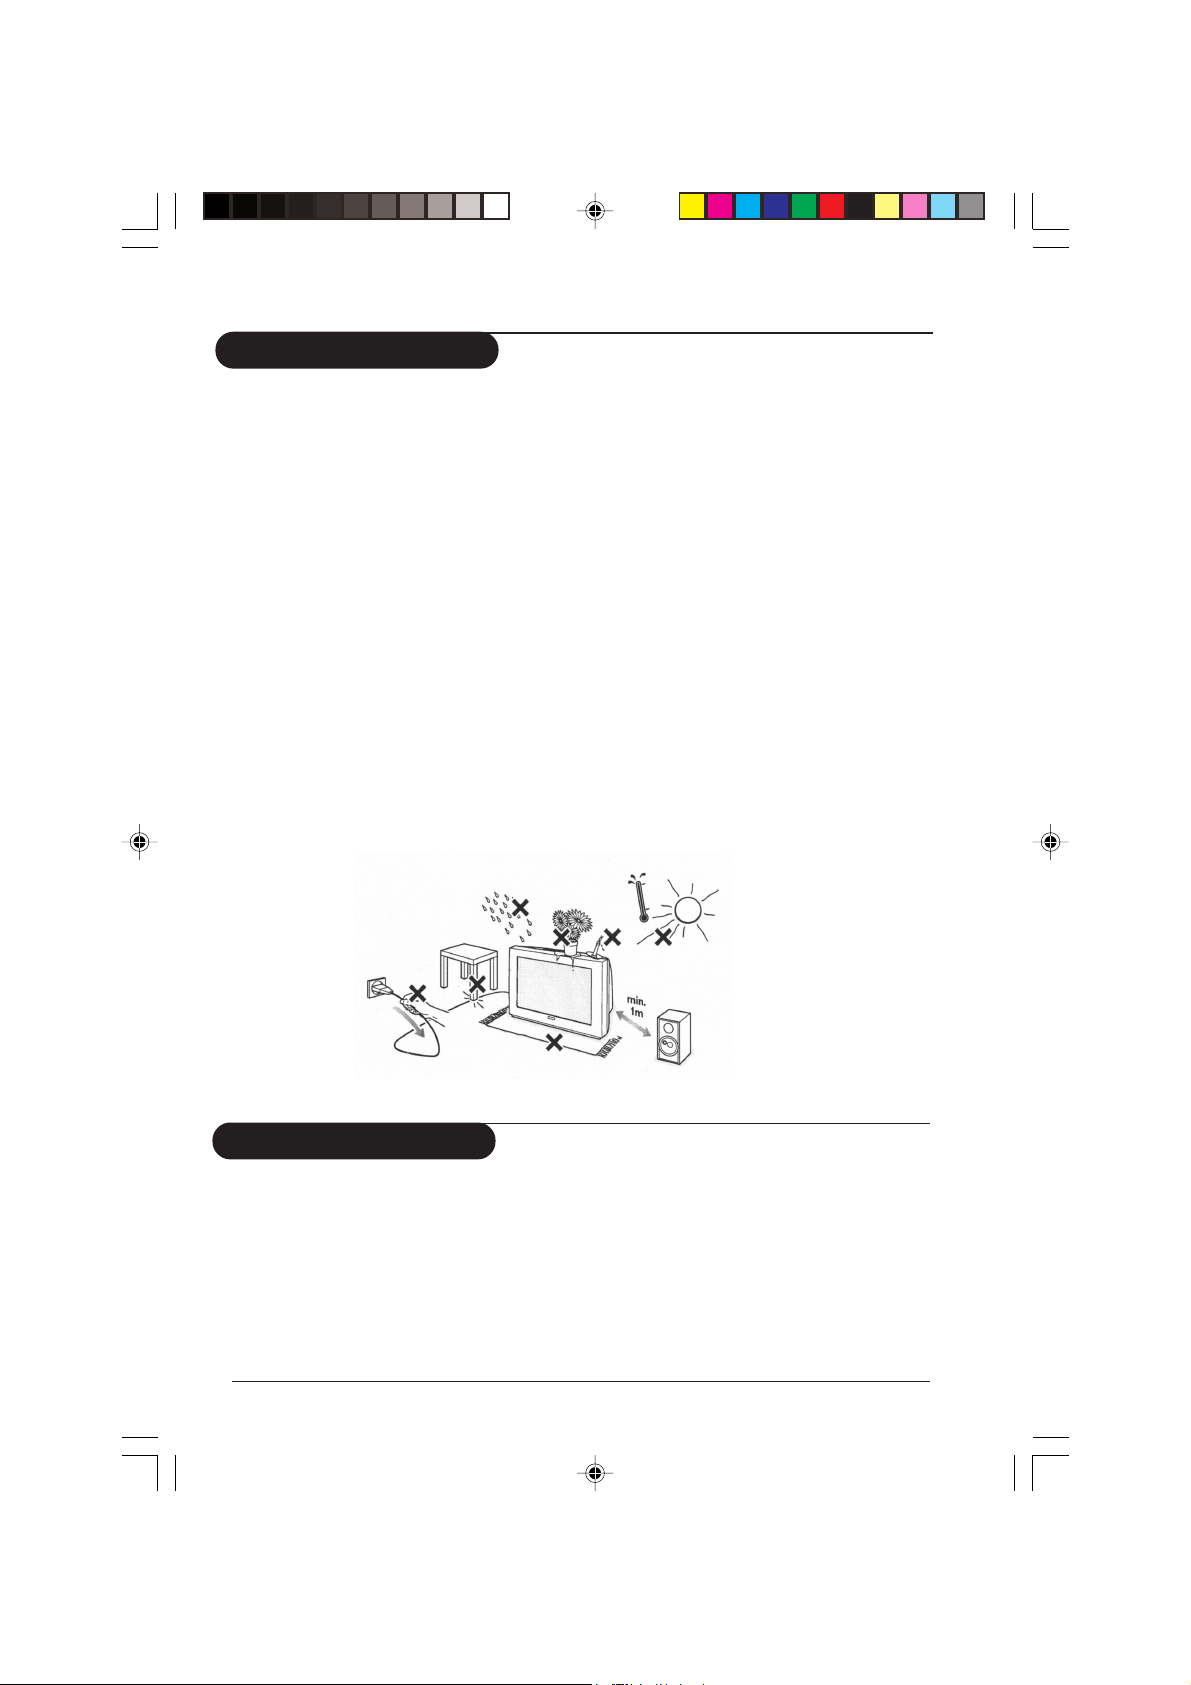
• Do not place your TV set under direct sunlight or heat.
• Leave at least 10 cm around each side of TV set to allow for proper ventilation.
•Avoid placing your set (e.g. near the window) where it is likely to be exposed to rain
or water.
• No objects filled with liquids should be placed on top the TV so as to avoid dripping
or splashing of liquids on the set.
Useful information
• Do not leave your set on standby mode for a prolonged period of time. Switch off set
to allow it to be demagnetised. A demagnetised set supports good picture quality.
• Do not shift or move the set around when it is switched on. Uneveness in colour in
some parts of the screen may occur.
•Never attempt to repair a defective TV yourself. Always consult a skilled service
personnel.
2 Operating manual-21PT2324 General
p1-2_21PT2324 02/17/04, 11:06 AM2
Installing your television set
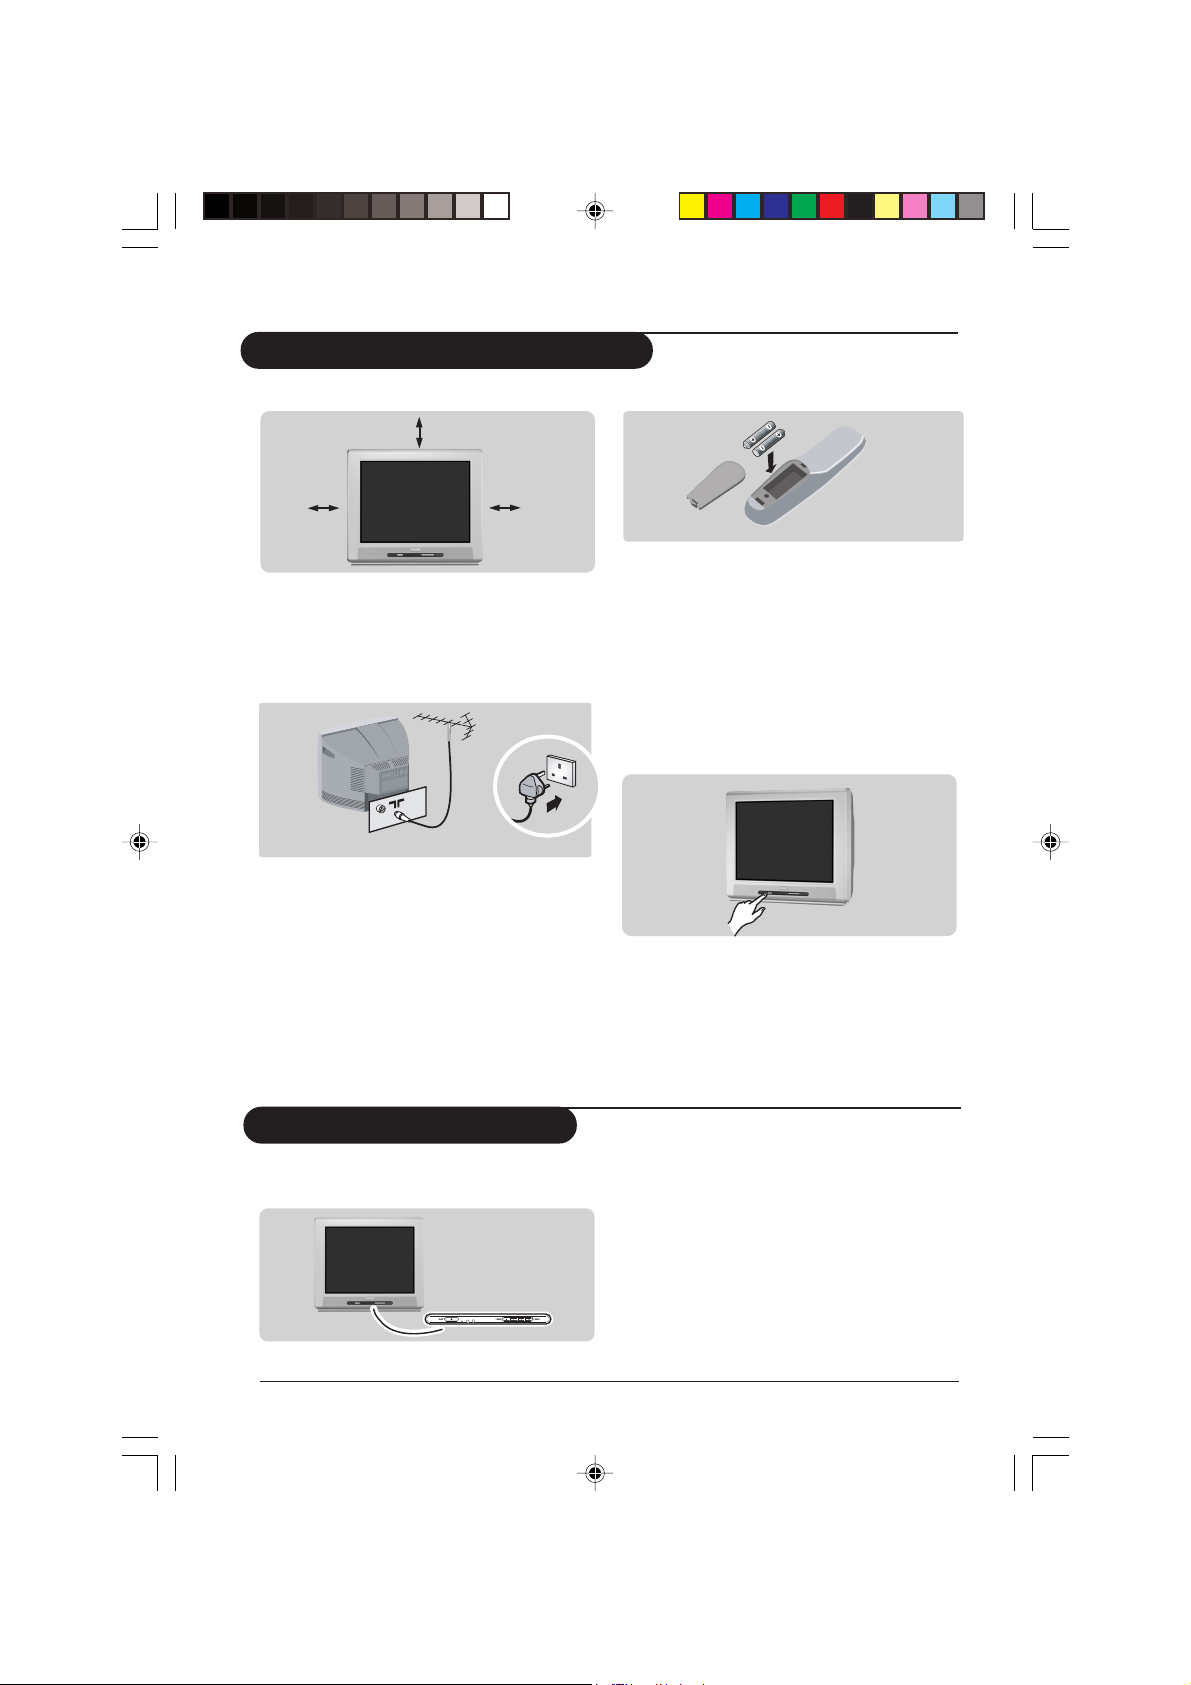
Positioning the television set
10 cm
10 cm10 cm
Place your TV on a solid, stable surface,
leaving a space of at least 10 cm around the
appliance.
Connections
• Insert the aerial plug into the x socket at
the rear of the set.
If you are using an indoor aerial, reception
may be difficult in certain conditions. You
can improve reception by rotating the
aerial. If the reception remains poor, you
will need to use an external aerial.
• Insert the mains plug into a wall socket.
Diagram may differ from the actual plug.
Remote control
Insert the two R6-type batteries (supplied)
making sure that they are the right way
round.
The batteries supplied with this appliance do
not contain mercury or nickel cadmium.
If you have access to a recycling facility, please do
not discard your used batteries (if in doubt,
consult your dealer).
Switching on
To switch on the set, press the on/off key.
A red indicator means that the television is on
standby mode. Refer to the next page on ‘Remote
Control keys’ for the various keys that you could
use to switch on the set An indicator light will
flash when it is receiving signal from the remote
control.
The keys on the TV set
The television set has 4 keys which are
located at the front.
Installation Operating manual-21PT2324 3
p3-6_21PT2324 04/14/04, 3:36 PM3
The VOLUME – or + key is used to adjust the
sound levels. The CHANNEL ^ or v key is
used to select channels.
To access or exit the main menu,
press down the VOLUME – and + keys,
simultaneously.
To select an item in the main menu,
press the CHANNEL ^ or v key.
To select an adjustment, press down the
VOLUME – or + key.
 Loading...