

Page 1
Introduction
Thanks for purchasing this television set;it is equipped with the latest technologies and a logic that
a u t o m a t i c a l ly memorises your picture settings.The use of the Smart Controls allows you to find back the
F a c t o ry settings.For more details on these functionalities,please re fer to page 6 of your Instruction for use.
For a quick start up of your new TV, we advise you to read the Easy installation guide card first.
Installation
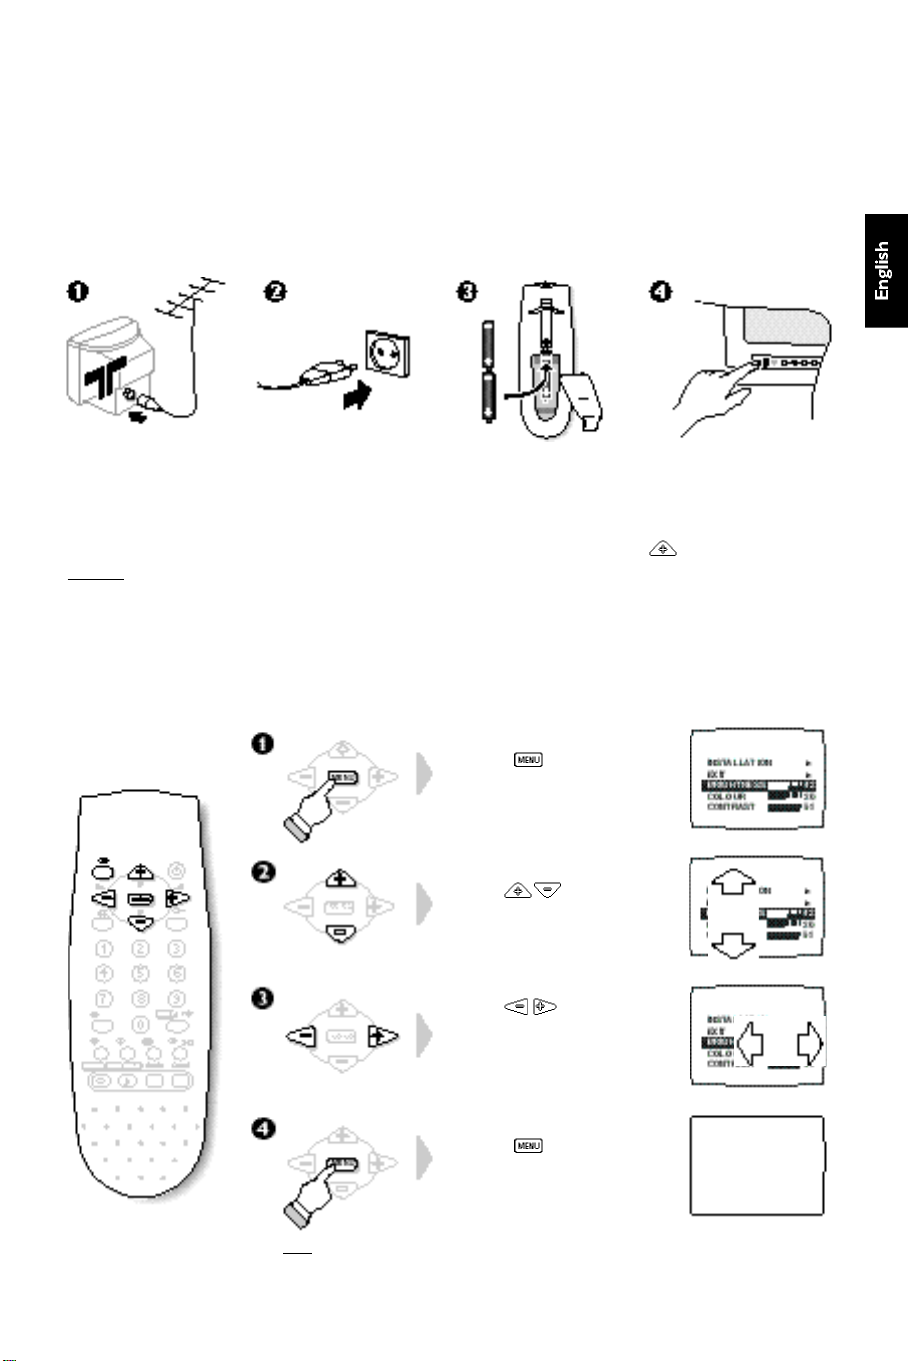
Insert the aerial plug
in to the socket M
at the rear of the set.
Remark: When you switch on the TV set for the first time,
the INSTALLATION menu automaticaly appears on the screen.
Insert the mains plug
into a wall socket
(220-240V/50Hz).
Insert the 2 LR03-type
batteries (supplied)
making sure they are
the right way around.
Using the menus
The menus are displayed on the television screen.They are used to tune in the
channels and to access all settings.They are used in the following way:
Press the key to display
the main menu.
Use the keys to
select an adjustment.
Use the keys to adjust
or access a sub-menu.
Press the on/off key to
switch on the television.
If the television remains in
standby mode,press the
P key on the remote
control.
Press the key to exit
from the menu.
N.B.:The main menu automatically disappears after 30 seconds
if no action is taken.The / key also allows you to exit the menus.
1
Page 2
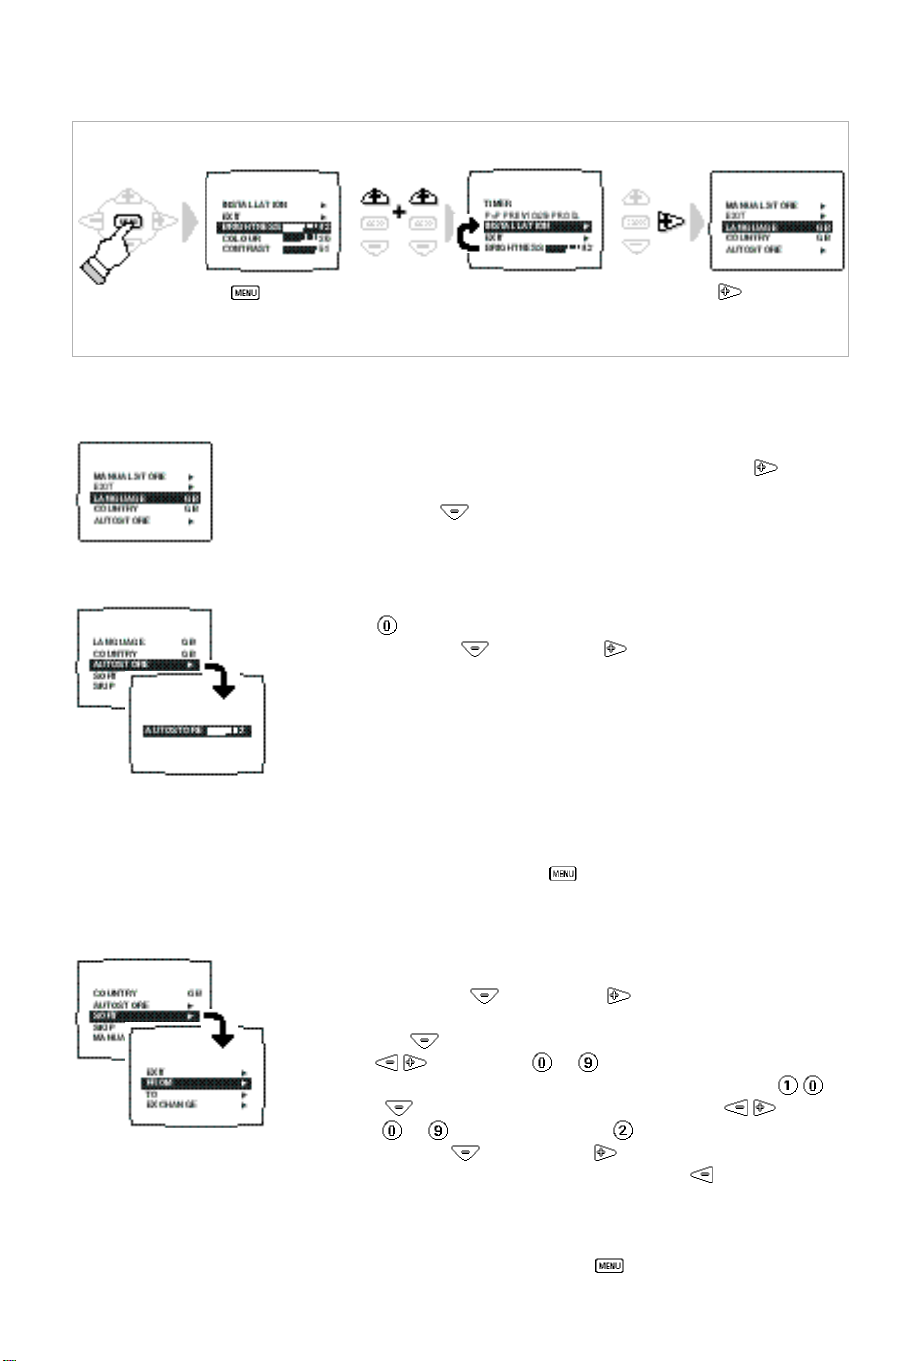
Tuning-in the TV channels
To call-up the Installation menu
æ Press the key.
N.B.:If the INSTALLATION menu is not displayed the childlock function is enabled (page 8).
 Select INSTALLATION.
ê Press the key.
Selecting the menu language and the country
From the INSTALLATION menu:
æ Select LANGUAGE and choose the language you wish to use ( key).
The text for all the menus will appear in the language you have chosen.
 Select COUNTRY ( key) and choose the country (GB for Great Britain).
Automatic store
From the INSTALLATION menu (once the COUNTRY has been selected):
æ Press the key.
 Select AUTOSTORE ( key) and press .
The TV set searches and stores all the programmes it finds.The search
operation takes a few minutes.When the search is complete,the
INSTALLATION menu reappears automatically.
The programmes found will be numbered in ascending order starting from
1, 2, 3, 4, .... Use the SORT menu to re-number the programmes correctly.
The search starts from the programme number displayed on the screen.
If the transmitter emits the automatic sort signal,the programmes are correctly numbered.
If some programme have no sound,check that you have the correct SYSTEM (see
MANUAL STORE p. 3 ) . If no programme is fo u n d ,r e fer to the chapter entitled «Tips» (p.8 ) .
To exit or interrupt the search,press the ke y.
The INSTALLATION menu
appears on the screen.
Programme sort
2
This menu allows you to re-number the programmes in the order you prefer.
From the INSTALLATION menu:
æ Select SORT using the key and press .
The SORT menu is displayed.
 Select FROM ( key) and choose the programme to be re-numbered
using the or using keys to .
If,for example,you want to re-number programme 10 as 2:Type: .
ê Select TO ( key) and enter the new number using the keys or
using keys to (in our example,type ).
® Select EXCHANGE ( key) and press .
The message OK appears and the exchange is made ( can be used to
cancel).In our example programme 10 is re-numbered as programme 2
(and programme 2 is re-numbered as programme 10).
Repeat this operation for as many programmes as you wish to re - nu m b e r.
† To exit from the SORT menu,press the key several times.
Page 3
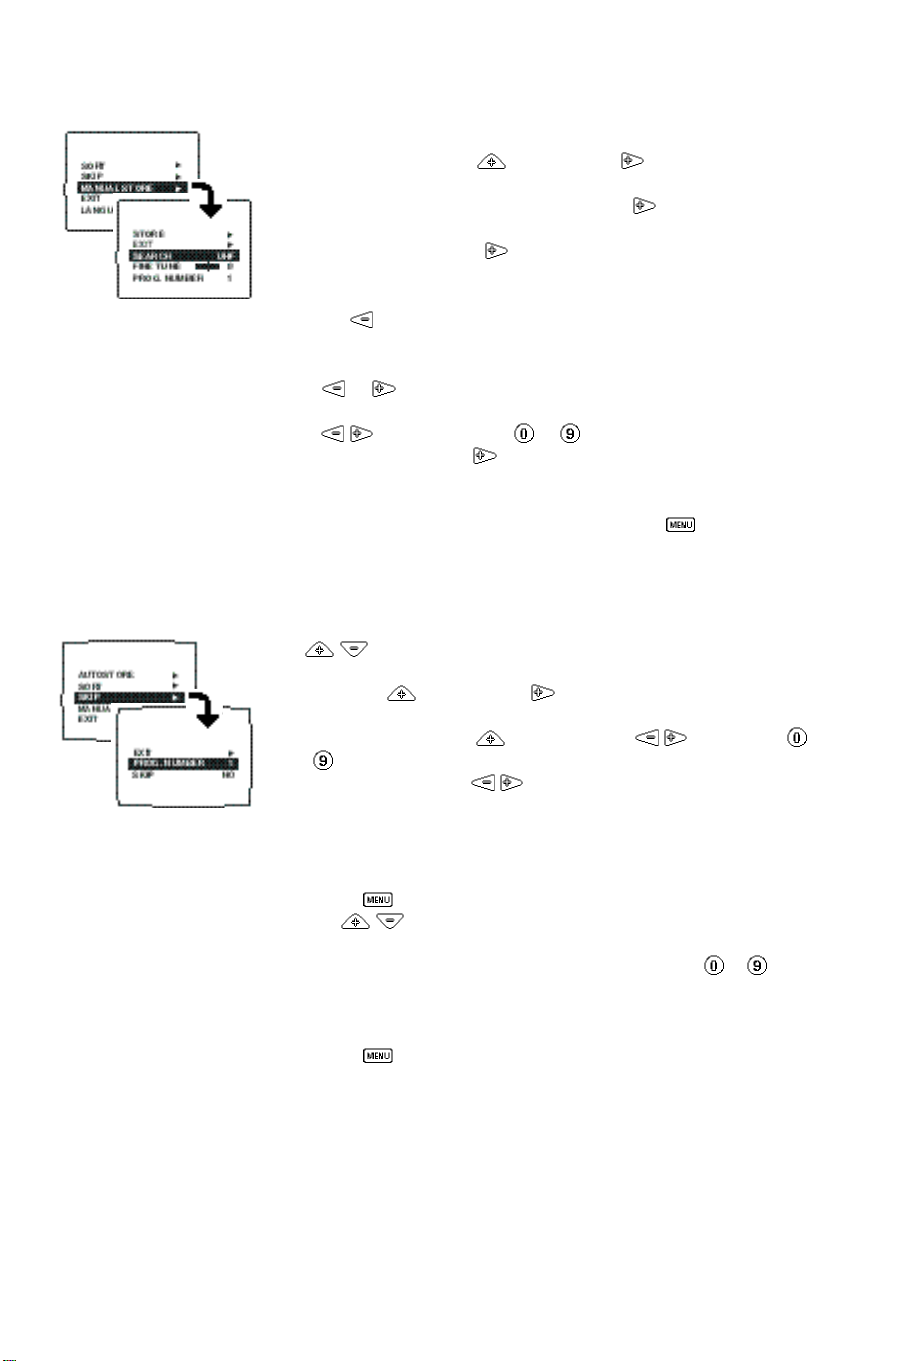
Manual store
This menu allows you to store each programme manually.
From the INSTALLATION menu:
æ Select MANUAL STORE ( key) and press .
 Select SYSTEM (according to model).Use the key to select
ê Select SEARCH and press .The search begins.
® If the reception is not satisfactory,select FINE TUNE and hold down
† Select PROG. NUMBER and enter the required programme number using
Ú Select STORE and press .
º Repeat steps ê to Ú for each programme to be stored.
î To exit from the MANUAL STORE menu, press the key several times.
Skip the programmes
This menu allows you to skip programmes which can be accessed using
the P keys on the remote control.
From the INSTALLATION menu:
æ Select SKIP ( key) and press .
 Select PROG. NUMBER ( key) and use the keys or keys
ê Select SKIP and use the keys to choose YES to skip the
® Repeat steps  and ê for as many programmes as you wish to skip.
† Press the key 3 times to exit from the INSTALLATION menu.
The MANUAL STORE menu appears.
the standard reception,EUR. W (standard BG) or EUR. E (DK).
As soon as a programme is found,the search will stop.
The frequency band is displayed (VHF1,VHF3 or UHF).
Use the key to select the frequency band.
If no programme is found,refer to the «Tips» chapter (page 8).
key or to adjust.
the keys or using keys to .
The message OK appears.The programme is stored.
The SKIP menu appears
to to select the programme you wish to skip.
programme or NO so that it remains accessible
Only the programmes found during the search are set to NO (all other
programmes are set to YES by default).
The P keys on the remote control can now be used to access
those programmes and EXT sockets which are set to NO in the list.
The programmes skipped can always be accessed using keys to .
To exit from the menus ...
Press the key several times.
3
Page 4

The remote control keys
Selecting TV programmes
Use the P and keys to move up or down a
p ro g r a m m e.To sequentially display all of the pro g r a m m e s
hold the key down for 3 seconds.P ress again to cancel.
For some programmes equiped with teletex t ,the title of the
p r o g ramme appears briefly at the bottom of the screen.
N . B. :P r o g rammes which have been skipped or
l o c ked are not accessible (refer to SKIP and
CHILDLOCK menus, pages 3 and 7).
Screen information
To briefly display the programme
number and the sound mode
(stereo models).
Volume
Use keys and
to adjust the volume.
Mute key
To disable or enable the sound.
Numerical keys
For direct access to programmes.
For a 2 figure programme number,
the second figure must be entered
before the dash disappears.
Switch teletext on/off
To call-up or exit from teletext.
Teletext features
Refer to next page.
Smart controls
Press the key to obtain the
following picture settings:RICH,SOFT,
NATURALand return to MANUAL.
Press the key to obtain the
following sound settings:THEATRE,
MUSIC,SPEECH and NORMAL (or
MANUAL for stereo models).
Menu
To call-up or exit from the menus.
Use the keys for selection
and the keys for adjustment.
Standby
To set the TV to standby mode.The
red indicator lights up.To switch the
TV set on again,press P ,P
or keys to .
Select EXT sockets
This key is used to select EXT(1)
(rear socket),EXT2 (front socket:on
certain versions) and to return to
the TV programme.
Surf ƒ
Use this key to return to the
previous programme or to display
the surf list (page 6).
Sound mode (stereo models)
Pressing this key allows you to
switch from STEREO to MONO
sound or to choose between
language f and language g in the
event of bilingual transmissions.
Game
This key is used for the direct
selection of the front (on certain
versions) and rear EXT sockets with
a picture preset that is adapted to
game consoles.
Timer
This key provides direct access to
the TIMER menu (page 7).
To exit from this menu,press the
key twice.
The keys on the TV set
4
The TV set has 4 keys (on some models these are located behind a flap).
The VOLUME - + keys are used to adjust sound levels.
The PROGRAMME - + keys are used to select the required programmes.
To access the menus,hold down the VOLUME - and VOLUME + keys.
The PROGRAMME - + keys may then be used to select an adjustment
and the VOLUME - + keys to make that adjustment.
To exit from the menus,select the EXIT item (by using the
PROGRAMME - + keys) and press the VOLUME + key.
Page 5

Using teletext
Teletext is an information system,broadcast by certain TV channels,which can be
consulted in the same way as a newspaper.It also provides subtitles.
Press:
Time display
Switch teletext
on/off
Selecting a
teletext page
Direct access to
a subject
Result:
When the teletext is switched off,press this key
to display the time in the top right-hand corner
of the screen.
The time is not displayed if the channel selected does
not broadcast teletext.
To call-up or exit from teletext.The main index page
p resents a list of subjects to which you have access.
Each subject has a corresponding 3 digit page nu m b e r.
I
f the selected TV channel does not broadcast teletext,
1 0 0 is displayed and the screen remains black (if this is the
c a s e,switch off teletext and choose another TV channel).
Use keys to to enter the page number
required.E.g.page 120,type .The number
is displayed in the top left-hand corner of the
screen,the page counter starts searching and then
the page selected is displayed.Keys P and
allow you to access previous or following pages.
If > xxx < flashes briefly or the counter continues
searching,this means that the selected page is not
broadcast.If this is the case, choose another number.
C o l o u red zones are displayed at the bottom of
the scre e n .The 4 keys with coloured borders allow
access to the subjects or their corresponding pages.
The coloured zones flash when the page or the subject
is not yet available.
Enlarging a
page
Direct selection
of a sub-page
Stop the
sequence of
sub-pages
Reveal
Press this key to display the upper part,the lower
part and then to return to the normal page size.
C e rtain pages have sub-pages which fo l l ow on
a u t o m a t i c a l ly.To access a sub-page dire c t ly,p ress
the Ò key.The page number is replaced by 4 dashes.
Type the number of the sub-page re q u i red using
4 nu m b e r s ,e. g .type 0002 to consult sub-page 2.
The number of the current page re ap p e a r s ,the page
counter searches and then the sub-page is displaye d .
Pressing this key enables and disables the sequence
of sub-pages.The message I appears in the top
left-hand corner of the screen.
Use this key to reveal/conceal hidden information
(solutions to games).
5
Page 6

Other menu adjustments
Picture adjustment
Display the Picture menu.You can now access the adjustments for
BRIGHTNESS, COLOUR, CONTRAST, SHARPNESS and
COL. TEMP.:which adjusts the colour temperature of the picture;COOL
(blue white),NORMAL (balanced) or WARM (red white).
CONTRAST PLUS:which enables clarity of the contrast.
Sound adjustment
D i s p l ay the Sound menu .You can now set the V O L U M E,and make the
fo l l owing adjustments for stereo equipment:BALANCE, TREBLE, BASS a n d :
SPATIAL:this function enhances the stereo effect,giving the impression
that the speakers are positioned further apart.
VOLUME LIMITER:this function is used for automatic level control in
order to avoid sudden increases in volume (particularly when changing
channels or during advertisements).
Storing adjustments
Storing is automatic:once an adjustment is made using the menus,
it is stored automatically (this happens after 1 minute if no action is taken
or as soon as an other programme is selected).
E X T s o c kets and for programmes 0 to 1 1 a re stored individually :a diffe re n t
adjustment is possible for each of these programmes (except for the vo l u m e ) .
The adjustments for programmes 1 2 to 9 9 a re stored in the same way.
To restore the fa c t o ry picture adjustments,set the smart controls on NATURAL and
modify one of the Picture menu items (this will automatically store the settings).
 Select. ê Adjust.æ Display menu.
The adjustments for the
Surf function
This menu is used to select the function to be attributed to the ƒ fi
key on the remote control.Display the menu,then:
æ Select P<P and choose PREVIOUS PROG.or SURF LIST.
 Press the key to exit the menu.
PREVIOUS PROG.mode :the ƒ fi key on the remote control is used
to access the last programme watched.
SURF LIST mode :the ƒ fi key is used to display a list of favourite
programmes (maximum of 8).To store this list:
æ Display one of your favourite programmes (e.g.number 4).
 Before the number disappears,press the ƒ fi key.
The SURF LIST message appears.The programme is stored.
ê Repeat operations æ and  for each programme to be stored
(e.g.programme No.9, 1 and 12).
® Use the ƒ fi key to access you favourite programmes directly
(in our example Nos.4,9, 1 and 12).
To reset the surf list, set the P<P menu to PREVIOUS PROG and then
to SURF LIST.
6
Page 7

Timer
This menu allows you to program the TV to automatically switch on with
the programme of your choice.
æ Display the menu,select TIMER and then press .
The TIMER menu appears.
 Select SET CLOCK and enter the time using keys to .
N.B.:Every time the TV is switched on the clock is automatically updated on the
basis of the teletext information in programme No.1.
If the TV set does not feature teletext, this update will not occur.
ê Select START TIME and enter the time at which you wish the TV to
switch on.
® Select PROGRAMME and enter the programme number required.
† Select TIMER ACTIVE and set to ON.(OFF to disable).
Ú Press twice on the key to exit from the menu.
If you now switch the TV set to standby ( key),it will automatically
switch on at the time programmed.
To cancel: Switch TIMER ACTIVE back to OFF.
N.B.:The programming will not function correctly if you use the on/off key on
the front of the TV to switch off the TV set.
Sleeptimer
Display the menu,select SLEEPTIMER and use the key to enter
the length of time after which the TV will switch to standby mode
(up to 120 mins).
Press the / key on the remote control to display the length of time remaining.
Childlock
This menu allows you to lock the TV set and to disable access to certain
or all of the programmes.
N.B.:When a programme is locked, the search function is no longer possible
(the INSTALLATION menu is no longer accessible).
æ Display the menu,select CHILDLOCK and press .
The CHILDLOCK menu appears.
 Select PROGRAMME and enter the number of the programme you wish
to lock.To lock all programmes, select ALL using the key (above
programme No.0) .
ê Select LOCK and then YES.The screen turns black.Repeat operations
 and ê for each programme to be locked (maximum of 5).
® Select CODE and enter your confidential 4 digit code.
† Select CONFIRM CODE and enter the same code number again.
The LOCK menu is replaced by a CODE menu.
The TV set is now locked.The locked programmes are no longer visible:a
black screen appears with a LOCKED message.
To cancel: Select CODE and enter your confidential number.
The CHILDLOCK menu reappears.Now repeat operations  to ê by
selecting LOCK and then NO.
Ú Press the key to exit from the menu.
N.B.:The childlock will not function with EXT sockets that receive an RGB signal
(most game consoles).
Should you forget your confidential code, enter the universal code 8888.
7
Page 8

Connecting peripheral equipment
Rear connection
You can connect any equipment that has a euroconnector socket to your TV set
(video recorder, decoder, etc.).
For further information on connecting a video recorder,refer to its user manual.
Front connections
When the headphones are connected,the sound on the TV set is automatically
muted.Press keys a and to adjust the volume.
Some models have
There is 1 video input + 1 sound input (mono models) or 2 (L) and (R) sound
inputs for stereo models.For a mono sound camcorder, connect the audio signal to
the AUDIO L input. Use the
loudspeakers of the television.
To select the connected equipment
Use the X key on the remote control to select the EXT(1) (rear socket) or
EXT2 (front socket:on certain models).
Most equipment (decoder,video recorder) carries out the switching itself.
When a peripheral device provides RGB signals (game,satellite receiver, ...),it has priority
over the TV programmes.The peripheral device has to be switched off if you want to watch
the TV channels.If you wish to avoid this inconvenience,configure the peripheral equipment
to provide composite video signals (CVBS PAL/SECAM) instead of RGB signals (refer to the
peripherasl user manual).
AUDIO / VIDEO
f-g
connections on the front of the TV set
key to reproduce the sound on the left and right
Tips
Installation
To avoid any dangerous situations and operating faults,do not place anything on the
TV set and leave a space of at least 5 cm around the appliance.
Impossible to call up the INSTALLATION menu?
The CHILDLOCK function is enabled (refer to page 5).To rapidly unlock all
programmes,call up the CHILDLOCK menu and enter your confidential code.
Set the PROGRAMME item to ALL. Set the LOCK item to YES and then to NO.
All the programmes are now unlocked.
Poor reception or no picture
The proximity of mountains or high buildings may be responsible for ghost pictures,
echoing or shadows.If this is the case, modify the orientation of the outside aerial
and check that the TV channel is tuned in correctly (refer to FINE TUNE page 3).
Does your antenna enable you to receive broadcasts in this frequency range? Have
you chosen the correct system (page 3)?
Are your aerial and euroconnector sockets correctly connected?
If the peripheral equipment connected to the EXT1 is on switch it off.
Standby
To save electricity it is advisable to switch the TV set off using the on/off key on the
front of the set.If the set receives no signal for 15 mins,it automatically switches to
standby mode.
Still no results?
If you have a problem with your TV set,never attempt to repair it yourself:contact
your dealer’s after-sales service.
Recycling directive
Your TV set uses materials which are reusable or which can be recycled.
To minimise the amount of waste in the environment,specialist companies recover
used sets for dismantling and collection of reusable materials (consult your dealer).
.
8
 Loading...