

Page 1

3138 155 24541
English
中文
Page 2

symbols
This “bolt of lightning” indicates
The “exclamation point” calls attention
to features for which you should read
the enclosed literature closely to
WARNING
with liquids, such as vases, should not be placed
wide blade of plug to wide slot, fully insert.
ATTENTION
triques
fi che dans la borne correspondante de la prise
RETURN YOUR PRODUCT REGISTRATION CARD TODAY
TO
GET THE VERY MOST FROM YOUR PURCHASE.
guarantees that your date of pur-
warranty service
the rare case of a
guarantees that you’ll receive all of
the privileges to which you’re entitled,
Thank you for your confi dence in PHILIPS. You’ve selected
We’ll do everything in our power to keep you happy with
your purchase for many years to come.
As a member of the PHILIPS “family,” you’re entitled to
and outstanding service networks in the industry. What’s
venient home
All of this is our way of saying welcome - and thanks for
Warranty Registration
Visit our World Wide Web Site at http://www.usasupport.philips.com
Page 3
amplifi ers) that produce he at.
grounding-type plug. A polarized plug has two blades with
for replacement of the obsolete outlet.
table specifi ed by the manufacturer, or sold with
the apparatus. When a cart is used, use caution
when moving the car t/apparatus combination to avoid
way, such as power-supply cord or plug is damaged, liquid
apparatus has been exposed to rain or moisture, does not
This product may contain lead and mercury. Disposal of
these m aterials may be regulated due to environmental
- The appliance should be
A. The power supply cord or the plug has been damaged;
appliance;
Tilt /Stability
- All televisions must comply with
and stability properties of its cabinet design.
which could ultimately over turn the product.
Wall or Ceiling Mounting
- The appliance should be
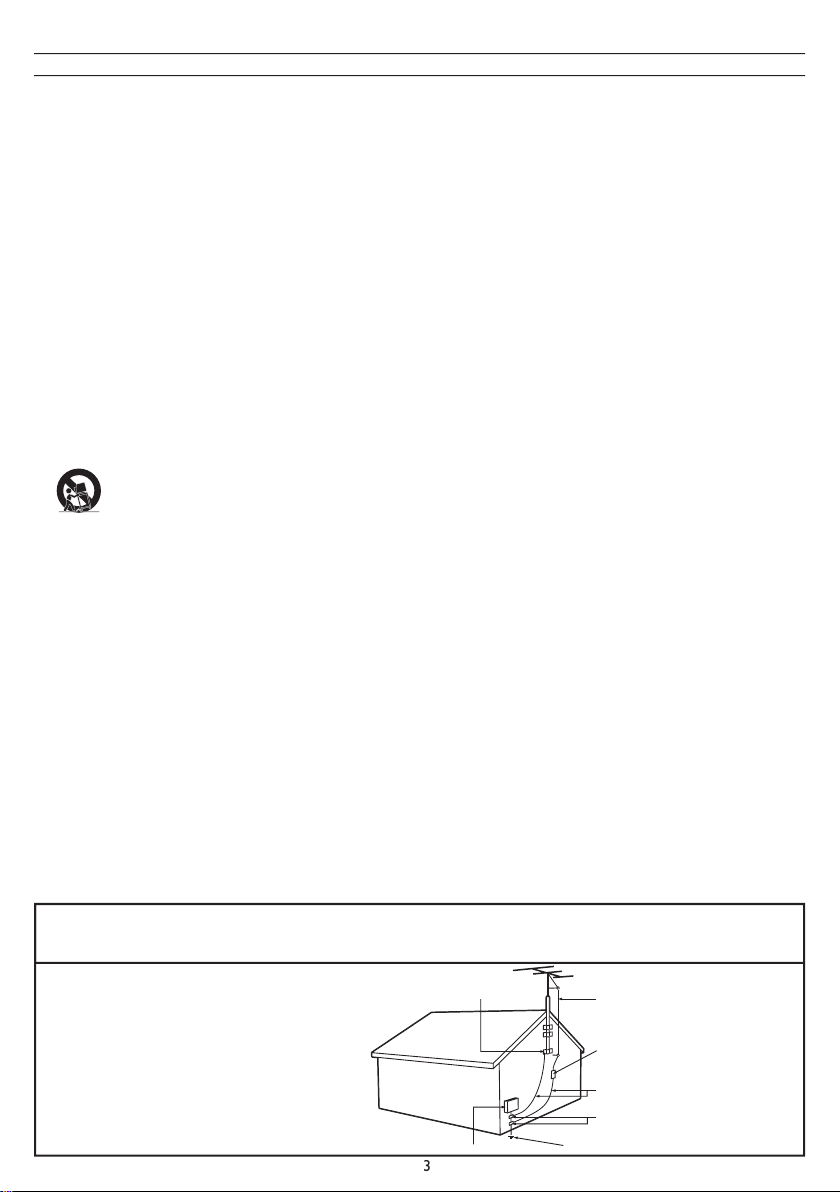
- An outdoor antenna should be located
away from power lines.
- If an outside antenna is
grounded so as to provide some prote ction against voltage
grounding of the mast and supporting structure, grounding
grounding connectors, location of antenna-discharge unit,
the grounding electrode. See Figure below.
- Care should be taken so
that objects do not fall and liquids are not spilled into the
- To prevent bat tery leakage
that may result in bodily injur y, propert y damage , or
alkaline, etc.).
time.
4.
ANTENNA LEADIN WIRE
ANTENNA DISCHARGEUNIT (NEC SECTION810-20 )
GROUNDING CONDUCTORS(NEC SECTION 810-21)
GROUND CLAMPS
POWER SERVICEGROUNDING ELECTRODE SYSTEM (NECART 250, PART H)
GROUND CLAMP
ELECTRIC SERVICEEQUIPMENT
Page 4

PRECAUTION
ADDITIONAL S AFETY PR ECAUTIONS
screw of the stand to t he set. Improper tightening of screw may render the set unsafe.
in stallation may render the set unsafe.
— cleaning the T V scr een, never use abrasive clean ing agent s.
— there is a lightning storm.
— the set is left unat tended for a prolonged pe riod of time.
material li ke chamois. DO NOT USE acetone, tol uene or alcohol to clean the surface of t he sc reen . The se chemicals
will cause damage to the surface.
screen when left expo sed for some time.
and electrically parts. Af ter condensation fades, spots or blemishes wil l be present on the LCD screen.
the VESA cover.
LCD TV.
cadmium. If possible , when dis posi ng of batteries, use recycl ing means available in your ar ea.
ar ea for companies that will recover used televisions for dismantling and collect ion of reusable materials, or contact
your dealer for TV rec ycling tips.
Page 5
CONTENTS
NOTE: This manual covers different versions
and models. Not all features described in this
manual will match those of your LCD TV. This
is normal and does not require you contacting
your dealer or requesting service.
Your new LCD TV and its packaging contain materials
that can be recycled and reused. Specialized companies
to be properly disposed.
Your product also uses batteries that should not be
thrown away when depleted, but should be handed in
When you replace your existing equipment, please fi nd
END-OF-LIFE DISPOSAL
Welcome/Registration of Your TV
TIONS
Table of
t
Auto Program (Setting Up Channels)
. . . .
. .
. . .
. . . . . .
Timer Menu Controls
TV Picture Menu Controls
TV
Picture Control
. . . . . . . .
Auto Lock
Auto Lock Access Code
Auto Lock Program
Teletext
PC PIP (Picture In Picture)
Trouble Shooting Tips
TV.
Audio/Video In Jacks
LCD TV.
Automatic Channel Programming
Auto Program):
time).
AutoLock
(VHF/UHF) or
twin-speaker system, allowing reception of TV programs
Page 6
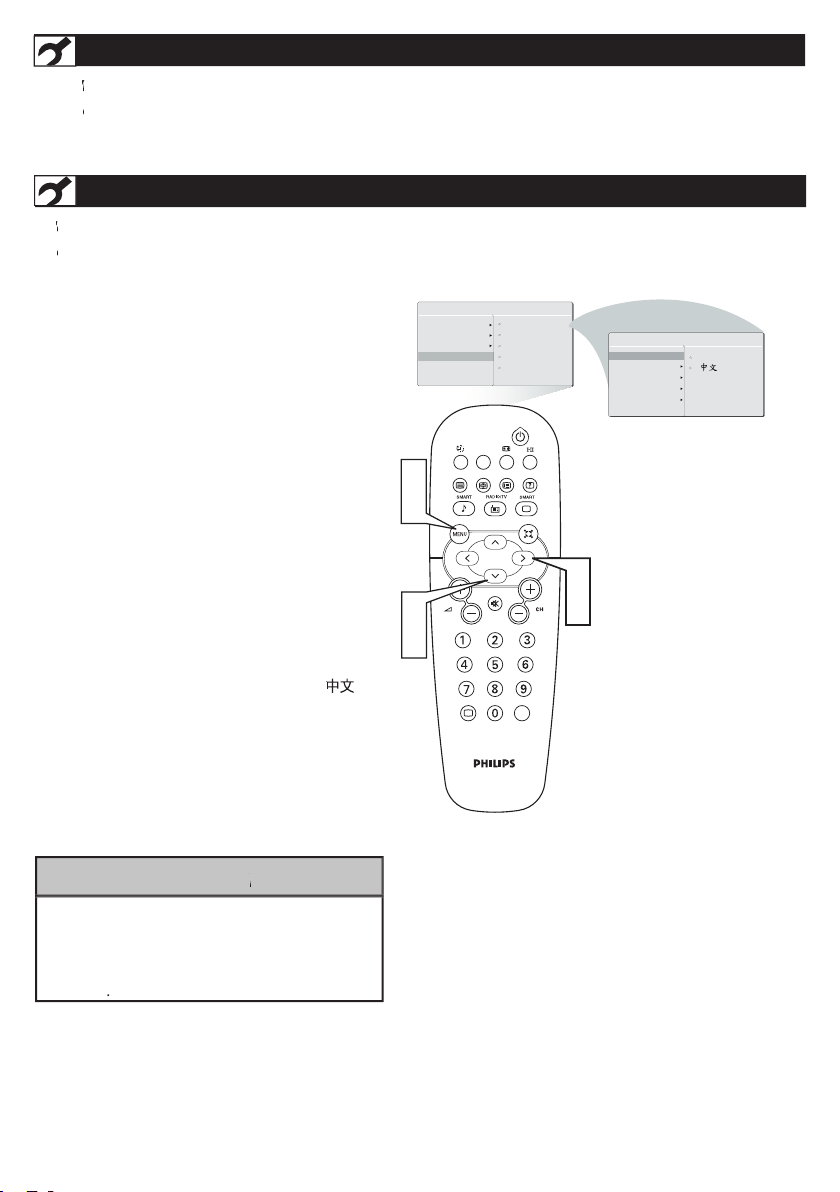
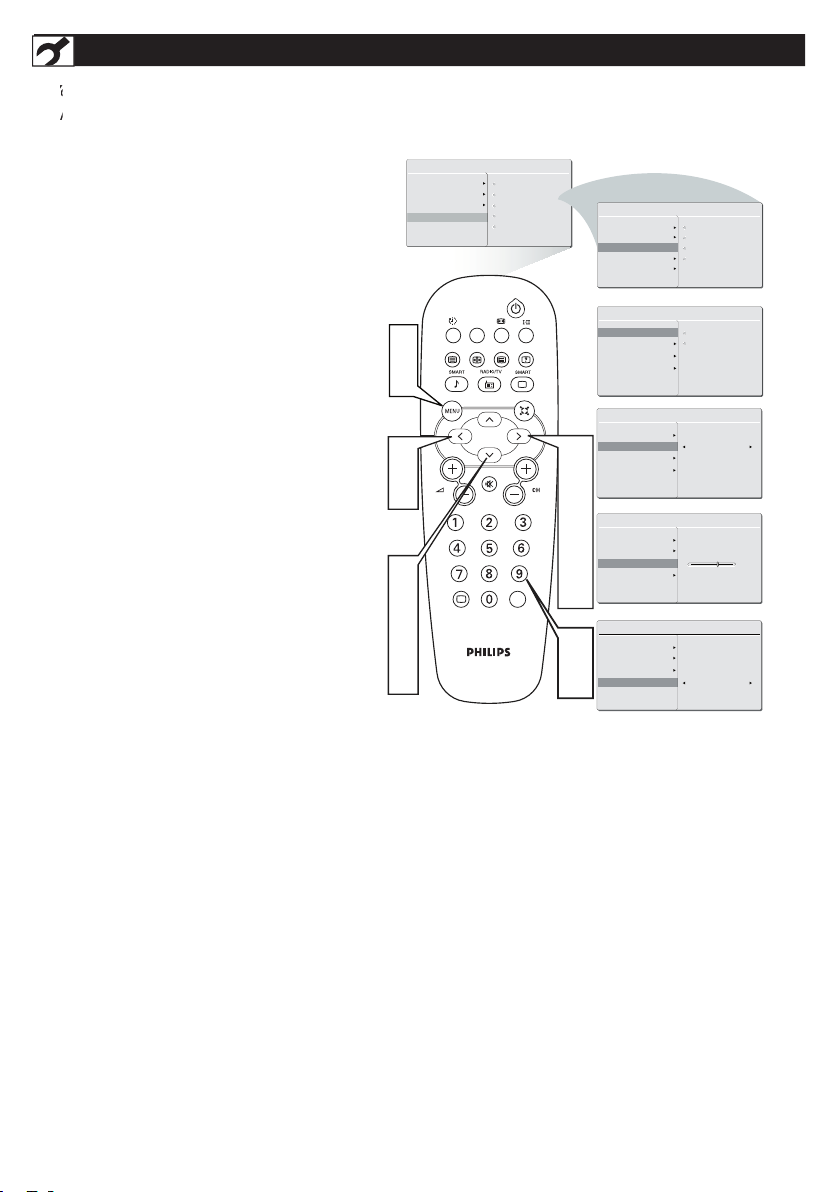
present . The LANGUAGE control enables you to set
the TV’s onscreen menu to be shown in E nglish or
the INSTALL menu.
to select English or Simplifi ed Chinese
)
then press the CURSOR RIGHT to confi rm.
1
2
3
4
5
or Simplifi ed Chinese text.
features
MA IN CO NTR OL S
IN STA LL
EN GLI SH
AUTO PROGRAM
LANGUAGE
MANUAL STORE
CHANNEL SETTING
FACTORY RESET
PICTURE
AUDIO
FEATURES
INSTALL
AUTO PROGRAM
LANGUAGE
MANUAL STORE
CHANNEL SETTING
FACTORY RESET
A/CH
AV
i
+
1
5
2
4
3
4
INSTALLATION
hen operate I NSTAL L function, t he access code window will ap pear on the screen. Press default code (0711)
hen operate I NSTAL L function, t he access code window will ap pear on the screen. Press default code (0711)
LANGUAGE SETTINGS
Page 7
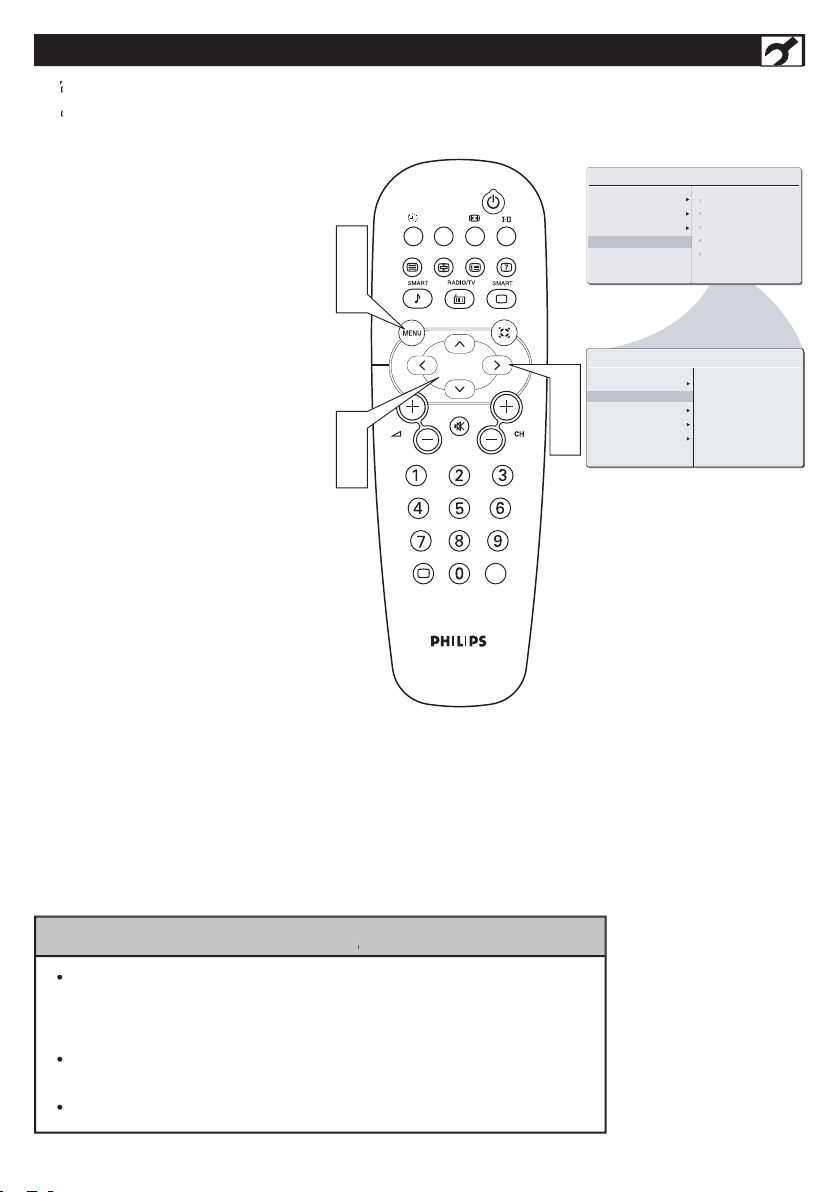
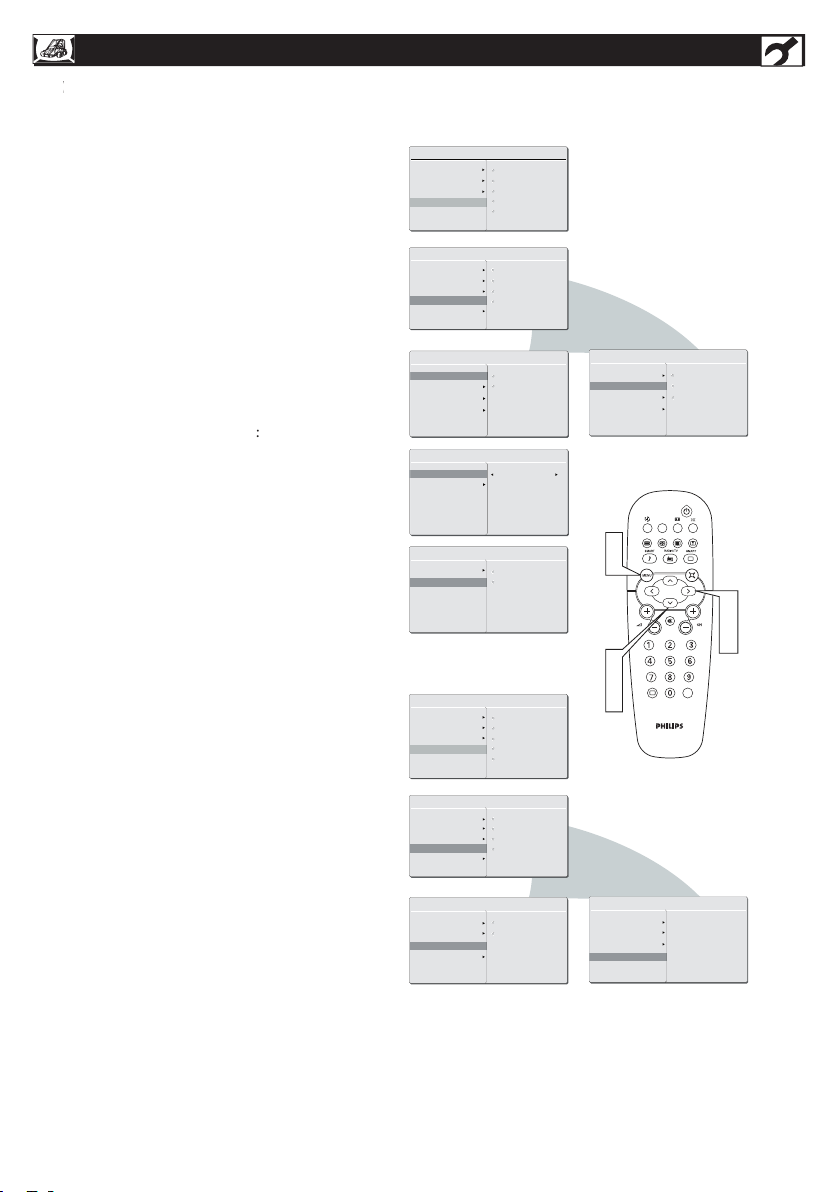
AUTO PROGRAM (SETTING UP CHANNELS)
set itself for local
pressing the CH (+) or CH (-) button.
to enter the INSTALL menu.
AUTO STORE has fi nished.
1
2
3
4
5
6
IN S TA LL
START
?
AUTO PROGRAM
LANGUAGE
MANUAL STORE
CHANNEL SETTING
FACTORY RESET
AUTO PROGRAM
LANGUAGE
MANUAL STORE
CHANNEL SETTING
FACTORY RESET
A/CH
AV
i
+
1
6
2
4
3
5
PICTURE
AUDIO
FEATURES
INSTALL
MAIN CONTROLA
program function to set up the TV for the broadcast or cable channels available in
your area. If you do not run the auto program function to set up the channels ,
your television may not operate properly.
After you’ve run
Auto Program, check out the results. Press the CH(+) or the
CH(-) button and see which channels you can select.
Page 8
MANUAL STORE OF TV CHANNEL
Manual tuning allows you to store each
programme manually.
the
After the channel frequence confi rmed, selec
t
the FINETU
/ LEFT to adjust.
function. Press CURSOR RIGHT to confi rm
1
2
3
4
6
7
5
8
MA IN C ON T RO LS
P IC TU RE
AU DI O
FE AT UR ES
IN ST AL L
LA NG UA GE
AU TO P RO G RA M
MA NU AL S T OR E
FA CT OR Y R ES ET
CH AN NE L S ET TI NG
MA NU AL S T OR E
MA NU AL S T OR E
P RO G. N O
FI NE TU NE
ST OR E
XX X. XX M H Z
ST AR T ?
MA NU AL S T OR E
MA NU AL S T OR E
FI NE TU NE
ST OR E
2
MA NU AL S T OR E
MA NU AL S T OR E
FI NE TU NE
ST OR E
60
MA NU AL S T OR E
MA NU AL S T OR E
FI NE TU NE
ST OR E
ST OR ED
IN ST AL L
LA NG UA GE
AU TO P RO G RA M
MA NU AL S T OR E
MA NU AL S T OR E
FA CT OR Y R ES ET
PR OG . NO
FI NE TU NE
ST OR E
CH AN NE L S ET TI NG
P RO G. N O
P RO G. N O
P RO G. N O
A/CH
AV
i
+
1
8
5
6
2
4
6
7
2
3
5
6
7
3
5
Page 9
MA IN C ON T RO LS
P IC TU RE
AU DI O
FE AT UR ES
IN ST AL L
LA NG UA GE
AU TO P RO G RA M
MA NU AL S T OR E
FA CT OR Y R ES ET
CH AN NE L S ET TI NG
CH AN NE L E DI T
CH AN NE L
SK IP PE D
CH AN NE L S ET TI NG
CH AN NE L E DI T
CH AN NE L S WA P
IN ST AL L
LA NG UA GE
AU TO P RO G RA M
MA NU AL S T OR E
CH AN NE L E DI T
FA CT OR Y R ES ET
CH AN NE L S WA P
NA ME E DI T
CH AN NE L S OR T
CH AN NE L S ET TI NG
NA ME E DI T
CH AN NE L S OR T
CH AN NE L E DI T
CH AN NE L
SK IP PE D
CH AN NE L
SK IP PE D
2
CH AN NE L S ET TI NG
CH AN NE L E DI T
CH AN NE L S WA P
NA ME E DI T
CH AN NE L S OR T
FR OM
TO
EX CH AN GE
MA IN C ON T RO LS
P IC TU RE
AU DI O
FE AT UR ES
IN ST AL L
LA NG UA GE
AU TO P RO G RA M
MA NU AL S T OR E
FA CT OR Y R ES ET
CH AN NE L S ET TI NG
IN ST AL L
LA NG UA GE
AU TO P RO G RA M
MA NU AL S T OR E
CH AN NE L E DI T
FA CT OR Y R ES ET
CH AN NE L S WA P
NA ME E DI T
CH AN NE L S OR T
CH AN NE L S ET TI NG
CH AN NE L S ET TI NG
CH AN NE L E DI T
CH AN NE L S WA P
NA ME E DI T
CH AN NE L S OR T
CH AN NE L
NA ME
CH AN NE L S ET TI NG
CH AN NE L E DI T
CH AN NE L S WA P
NA ME E DI T
CH AN NE L S OR T SO RT
A
B
C
D
AC TI VE
SK IP PE D
A/CH
AV
i
+
1
5
2
3
4
2
3
4
to select
to select the channel that you
want
to
/
to select ACTIVE (to add)
to
CHANNEL SETTING
hannel setti ng to set all channel related
1
2
3
4
A
5
B
D
C
Page 10

FACTORY RESET
to highlight the FACTORY
the menu from the screen.
1
2
3
4
5
MA IN C O NT RO LS
P IC TU R E
AU DI O
FE AT UR E S
IN ST AL L
LA NG UA G E
AU TO P R OG RA M
CH AN NE L S ET TI NG
FA CT OR Y R ES ET
IN ST AL L
LA NG UA G E
AU TO P R OG RA M
CH AN NE L S ET TI NG
FA CT OR Y R ES ET
MA NU AL ST OR E
MA NU AL ST OR E
A/CH
AV
i
+
1
5
2
3
4
2
3
NO
YE S
Page 11

UNFOLD THE BASE
the steps and diagrams as shown to
the diagram.
1
2
3
force
the base.
When unfolding the base, place the TV on
1
2
3
Page 12

20” : 100x10 0 mm
INSTALLING LCD TV ON THE WALL
Vesa Complied Mounting
The stand of your LCD TV complies with VESA standard, if you intend to install the LCD TV on the wall, please con-
The manufacture accepts no liability for installations not performed by professional technician.
Note:
-The surface for mounting area must be fl at and larger then the pedestal.
-The wall must support a pull force of 10 kg for each screw.
WARNING !
* Correct assembly is essential. The maximum allowed wight of the LCD Display
is 8.5 kg / 18.7
* The assembly materials (not supplied) are only suitable for attachment to solid wood,
brick or concrete walls.
* For wood walls: Drill each hole 3.6 mm in diameter and 20 mm in depth.
* To avoid possible injury, do not mount it above a sofa or bed.
The manufacturer accepts no liability for improper installations or installations not performed in accordance
with these instructions.
20” :190 mm
Page 13

5
1
- V o lu m e + - Ch an n el +
Me n u
4
3
2
A/CH
AV
i
+
7
8
6
– to decrease the sound level.
–
to select channels.
the
the remote control.
the (+) and (-) ends of the batteries line up as
BASIC TV AND REMOTE CONTROL OPERATIONS
BATTERY INSTALLATION
TELEVISION AND REMOTE CONTROL
1
2
3
4
6
7
8
5
Page 14

REMOTE CONTROL
text keys
the 4 settings; Personal, Voice,
the onscreen menu.
Volume button
button
to toggle among the three
Mono,
Picture button
Virtual Surround button
Adds greater depth and
TV sound.
Select fro
and adjust items on the TV’s on screen
AV
button
A/CH
AV
i
+
Page 15

to show the onscreen menu.
the SLEE
repeated
1
2
S LE EP 24 0 MI N.
S LE EP 15 M IN .
S LE EP OF F
A/CH
AV
i
+
1
2
turned off. Once the set is turned off, the Timer
TIMER MENU CONTROLS
Page 16

When PICTURE menu is highlighted,
to choose
the item you want to adjust: Smart
the menu from the screen.
the picture become richer in
TV PICTURE MENU CONTROLS
1
2
3
4
5
6
MA IN C O NT RO LS
PI CT U RE
AU DI O
FE AT UR E S
IN ST AL L
SM AR T P IC TU RE
BR IG HT N ES S
CO LO R
CO NT RA S T
SH AR PN E SS
PI CT UR E
SM AR T P IC TU RE
BR IG HT N ES S
CO LO R
CO NT RA S T
SH AR PN E SS
PI CT UR E
SM AR T P IC TU RE
BR IG HT N ES S
CO LO R
CO NT RA S T
SH AR PN E SS
60
PI CT UR E
SM AR T P IC TU RE
BR IG HT N ES S
CO LO R
CO NT RA S T
SH AR PN E SS
60
PI CT UR E
SM AR T P IC TU RE
BR IG HT N ES S
CO LO R
CO NT RA S T
SH AR PN E SS
60
PI CT UR E
SM AR T P IC TU RE
BR IG HT N ES S
CO LO R
CO NT RA S T
SH AR PN E SS
60
PE RS ON A L
RI CH
NA TU RA L
SO FT
MU LT IM E DI A
A/CH
AV
i
+
1
6
4
3
5
2
4
Any adjustment of Brightness
Page 17

TV SOUND MENU CONTROLS
the AUDIO menu.
the item you want to
tings, Stereo, Incredible Surround, AVL.
Treble,
V
Surround
AVL
(Auto Volume Leveler): When On, AVL
will level out the sound being heard when
the menu from the screen.
1
2
3
4
5
6
7
MA IN C ON T RO LS
PI CT UR E
AU DI O
FE AT UR ES
IN ST AL L
SM AR T SO U ND
SE TT IN GS
VIR TUA L S URR OUN D
AV L
AU DI O
SM AR T SO U ND
SE TT IN GS
AV L
AU DI O
SM AR T SO U ND
SE TT IN GS
AV L
TR EB LE
BA SS
BA LA NC E
AU DI O
SM AR T SO U ND
SE TT IN GS
AV L
AU DI O
SM AR T SO U ND
SE TT IN GS
AV L
PE RS ON AL
VO IC E
MU SI C
TH EA TR E
OF F
OF F
ON
VIR TUA L S URR OUN D
VIR TUA L S URR OUN D
VIR TUA L S URR OUN D
VIR TUA L S URR OUN D
A/CH
AV
i
+
1
7
5
2
4
6
3
5
ON
Any adjustment of Treble and Bass will be
Page 18

SMART PICTURE CONTROL
hether you’re watching a movie or a video game ,
hether you’re watching a movie or a video game,
your LCD TV has video control preset t hat will
match with your current program source or content.
conditions
that you may have in your home. The
controls have been preset at the factory to easily
sharpness,
pic ture mode you can create your own preferred video
set tings.
The settings of the Personal Smart picture mode
mar t
presets and a personal mode that you set
preferences through the on -
screen
sound so as to enhance the particular
program you ar e
1
2
The settings of the Personal Smart sound mode can
be adjusted in sound control within the onscreen
menu. The Personal mode is the only mode which
can be adjusted by the user via the onscreen sound
control menu.
PERSONAL
RICH
MULTIMEDIA
SOFT
NATURAL
A/CH
AV
i
+
1
2
PERSONAL
VOICE
MUSIC
THEATRE
A/CH
AV
i
+
1
2
button on the remote
appears on the screen.
button repeatedly to
toggle among the four setting: Personal, Voice, Music,
1
2
SMART SOUND CONTROL
Page 19

AUTO LOCK
he AUTO Lock feature allow yo u to lock channels, and prevent your chi ldre n fro m wat ching unsuitable content of
he AUTO Lock feature allow you to lock channels, and prevent your chi ldren fro m wat ching unsuitable content of
programmes.
AUTO Lock offers various BLOCKING controls from which to choose:
Access Code
- An Access Code must be set to prevent children from unblocking questionable or censored programming set by
their parents.
- Select the TV ch annel you want to lock.
Code
- To change your access code or overwriting.
To unlock all locked channels and programming.
for example) or you have forgotten
the code, you can always get in by
to b lock programs and understand the rating
terms for cer tain broadcas ts. First, set an access code.
the FEATURES menu
AUTO LOCK.
the code you just entered. Enter your same new
the menu from the screen.
1
2
3
4
5
6
MA IN C ON T RO L
P IC TU RE
AU DI O
FE AT UR ES
IN ST AL L
PI CT UR E F OR MA T
AU TO L OC K
CO LO R TE M P
PI CT UR E A LI GN ME NT
FE AT UR ES
LO CK P RO G RA M
CH AN G CO D E
CL EA R AL L
A/CH
AV
i
+
1
6
2
3
2
4
5
CH AN GE C O DE
YE S
LO CK P RO G RA M
CH AN G CO D E
CL EA R AL L
SO UR CE L I ST
PI CT UR E F OR MA T
AU TO L OC K
CO LO R TE M P
PI CT UR E A LI GN ME NT
SO UR CE L I ST
AUTO LOCK ACCESS CODE
Page 20

AUTO LOCK PROGRAM
A
set (see the previous pa ge), you are ready to
select the channe ls or inpu ts you want to b lock out
the FEATURES menu, then press CURSOR
AUTO LOCK, then press the CURSOR
your access code.
from the screen.
1
2
3
4
5
6
You can block additional channels by using
Number buttons to jump to another channel.
AU TO L OC K
LO CK P RO G RA M
CH AN GE C O DE
CL EA R AL L
18
AU TO LO CK
AC CE S S CO DE -- --
MA IN C ON T RO L
P IC TU RE
AU DI O
FE AT UR ES
IN ST AL L
PI CT UR E F OR MA T
AU TO L OC K
FE AT URE S
PI CT UR E F OR MA T
AU TO L OC K
LO CK P RO G RA M
CH AN G CO D E
CL EA R AL L
CO LO R TE M P
CO LO R TE M P
PI CT UR E A LI GN ME NT
PI CT UR E A LI GN ME NT
A/CH
AV
i
+
1
6
2
3
2
3
5
5
4
SO UR CE L I ST
SO UR CE L I ST
Page 21

the type of program you are watching.
AND 4:3, or
USING THE PICTURE FORMAT
then press CURSOR RIGHT to enter
your choice.
1
2
3
4
5
4:3
EXPAND 4:3
COMPRESS 16:9
MA IN C ON T RO L
P IC TU RE
AU DI O
FE AT UR ES
IN ST AL L
PI CT UR E A LI GN ME NT
AU TO L OC K
FE AT UR ES
PI CT UR E F OR MA T
AU TO L OC K
CO LO R TE M P
PI CT UR E F OR MA T
CO LO R TE M P
PI CT UR E A LI GN ME NT
EX PA ND 4 : 3
CO MP RE SS 16 :9
4: 3
A/CH
AV
i
+
1
5
2
3
4
2
3
4
SO UR CE L I ST
SO UR CE L I ST
to toggle among the three screen format
16:9
And the picture format function will not be accessible.
will not be accessible.
Page 22

TELETEXT
language ( cable networks, satellite channels, etc.).
Teletext call
This is used to call or exit teletext mode. The summary appears with a list of
not broadcast teletext, the indication 100 will be
The number is displayed top left, the counter turns and then the page is
This returns you to the contents page (usually page 100).
To display or hide the concealed information (games solutions).
This allows you to display the top or bottom part of the page and then return
to normal size.
Page 23

PC PICTURE CONTROLS
his TV can also be used as a PC Monitor. A
PC
standby mode. The PC Picture controls allow you to
When the PICTURE menu is highlighted, Press
the CURSOR RIGHT button to enter the
the item that you would like to adjust.
temperature
of the picture. Select from
Auto Adjust
th
the ve
the
Vertical-
th
the item.
the menu from the screen.
1
2
3
4
5
PI CT UR E
CO LO R TE M P
BR IG HT NE S S
CO NT RA ST
AU TO A DJ U ST
MA NU AL A D JU ST
60
PI CT UR E
CO LO R TE M P
BR IG HT NE S S
CO NT RA ST
60
AU TO A DJ U ST
MA NU AL A D JU ST
PI CT UR E
CO LO R TE M P
BR IG HT NE S S
CO NT RA ST
AU TO A DJ U ST
MA NU AL A D JU ST
PI CT UR E
CO LO R TE M P
BR IG HT NE S S
CO NT RA ST
AU TO A DJ U ST
MA NU AL A D JU ST
PH AS E
CL OC K
HO RI ZO NT A L
VE RT IC AL
MA IN C ON T RO LS
PI CT UR E
AU DI O
FE AT UR ES
IN ST AL L
CO LO R TE M P
BR IG HT NE S S
CO NT RA ST
AU TO A DJ U ST
MA NU AL A D JU ST
PI CT UR E
CO LO R TE M P
BR IG HT NE S S
CO NT RA ST
AU TO A DJ U ST
MA NU AL A D JU ST
NO RM AL
WA RM
CO OL
YE S
i
+
To adjust other items repeat steps 3 and 4.
Page 24

PC AUDIO CONTROLS
his TV can also be used as a PC Monitor. A
his TV can also be used as a PC Monitor. A
into standby mode. The AUDIO controls all ow you
to adjus t the sound.
factory-set controls and a personal control.
The 4 factory-set controls
(Personal, Voice,
enhance the particular
Treble,
Virtual
AVL
AVL will level out the sound being heard
when sudden changes in volume occur
you would like to adjust.
1
2
3
4
5
6
MA IN C ON T RO LS
PI CT UR E
AU DI O
FE AT UR ES
IN ST AL L
SM AR T SO U ND
SE TT IN GS
AV L
AU DI O
AU DI O
TR EB LE
BA SS
BA LA NC E
AU DI O
AU DI O
PE RS ON AL
VO IC E
MU SI C
TH EA TR E
ON
OFF
VIR TUAL SUR ROUN D
SM AR T SO U ND
SE TT IN GS
AV L
VIR TUAL SUR ROUN D
SM AR T SO U ND
SE TT IN GS
AV L
VIR TUAL SUR ROUN D
SM AR T SO U ND
SE TT IN GS
AV L
VIR TUAL SUR ROUN D
SM AR T SO U ND
SE TT IN GS
AV L
VIR TUAL SUR ROUN D
A/CH
AV
i
+
2
3
2
5
5
1
6
4
ON
OFF
To adjust other items repeat
Page 25

USING PC PIP (PICTURE IN PICTURE) FEATURE
monitor.
the FEATURES menu.
the item that you would like to adjust.
can choose your preferred size of small,
large, or PBP (Picture Beside Picture).
Video
AV, S-Video or HD.
Audio
position of PIP.
1
2
3
4
5
MA IN C O NT RO LS
PI CT U RE
AU DI O
FE AT UR E S
IN ST AL L
PI P
FE AT UR E S
SE LE CT IT EM
SO UR CE LI ST
FE AT UR E S
PI P
SO UR CE LI ST
A/CH
AV
i
+
2
5
3
4
1
SI ZE
VI DE O
AU DI O
DI SP LA Y
PI P
SO UR CE LI ST
Page 26

SETTING UP THE PC MODE (PERSONAL COMPUTER MONITOR)
V. Frequency (Hz)
VGA VESA 60
Page 27

TROUBLE SHOOTING TIPS
seconds, then reinsert the plug into the outlet and
push the
button again.
strip, if one is being used.
secured to the TV’s ANT75Ω plug?
available channels.
AV
button on the remote to make
sure the correct signal source is selected.
functioning properly.
present or
the TV will turn off.
VOLUME
buttons.
button on the remote control.
equipment, check the audio jack connections.
simultaneously. If they are, disconnect the S-Video
socket. AV signal automatically overrides the S-Video
signal if both sockets are connected simultaneously.
the S-Video
socket.
the signal coming from the cable box will be
produced in
only.
Stereo.
remote. Be sure the (+) and (-) ends of the batteries
line up as marked inside the battery compartment.
sensor window on the TV.
seconds,then reinsert the plug into the outlet and
push the
button again.
strip, if one is being used.
switch.
mode.
Sensor Window on the TV. See page 2 of the Quick
Use Guidefor details.
Above 13
control) into the TV’s memory.
Page 28

CARE AND CLEANING
WARNING
concerning stationary images on the TV
TV with
less likely to damage the picture tube.
These are usually in the same location on the TV screen.
where temperatures
anything abrasive.
Use even, easy, vertical strokes when cleaning.
permanently.
Page 29

INDEX
Auto Program
. . . . . . . . . . . . . . . . . . . . . . . . . . . .
. . . . . . . . . . . . . . . . . . . . . . . . . .
. . . . . . . . . . . . . . . . . . . . . . .
.
4
. . . . . . . . . . . . . . . . . . . . . . . . . . . . . . . . . .
. . . . . . . . . . . . . . . . . . . . . . .
. . . . . . . . . . . . . . . . . . . . . . . . . . . . . . .
. . . . . . . . . . . . . . . . . . . . . . . . . . . . . . . . .
. . . . . . . . . . . . . . . . . . . . . . . . . . . . . . . .
. . . . . . . . . . . . . . . . . . . . . . . . . . . . . . . . . . . . . . .
. . . . . . . . . . . . . . . . . . . . . . . . . . . . . . . . . . .
. . . . . . . . . . . . . . . . . . . . . . . . . . . .
. . . . . . . . . . . . . . .
. . . . . . . . . . . . . . . . . . . . . . . .
. . . . . . . . . . .
. . . . . . . .
. . . . . . . . . . .
4, 1
. . . . .
. . . . . . .
. . . . . . . . . . . . . . . . . . . .
14, 17, 18,2
Table of Contents
. . . . . . . . . . . . . . . . . . . . . . . . . . . . . . . .
Teletext
Tint
. . . . . . . . . . . . . . . . . . . . . . . . . . . . . . . . . . . . . . . . .
Treble
. . . . . . . . . . . . . . . . . . . . . . .
. . . . . . . . . . . . .
.
. .5,
Troubleshooting
. . . . . . . . . . . . . . . . . . . . . . . . . . . . . . . .
.
TV Operation (Basic)
. . . . . . . . . . . . . . . . . . . . . . . .
. .
W
Welcome
. . . . . . . . . . . . . . . . . . . . . . . . . . . . . . . . . . . . . . .
 Loading...