

Page 1
Philips Consumer Electronics
Technical Service Data
Service and Quality
Service Publications Dept.
One Philips Drive
P.O. Box 14810
Knoxville, TN 37914
Manual 7553
Model no.: 20LJ26
First Publish: 12-15-97
Rev. Date: 11-22-2005
Print Date: 22/11/2005
Parts List
REFER TO SAFETY GUIDELINES
SAFETY NOTICE: ANY PERSON ATTEMPTING TO SERVICE THIS CHASSIS MUST FAMILIARIZE
HIMSELF WITH THE CHASSIS AND BE AWARE OF THE NECESSARY SAFETY PRECAUTIONS
TO BE USED WHEN SERVICING ELECTRONIC EQUIPMENT CONTAINING HIGH VOLTAGES.
CAUTION: USE A SEPARATE ISOLATION TRANSFORMER FOR THIS UNIT WHEN SERVICING
© Philips Electronics North America Corporation Visit our World Wide Web Site at http://www.forceonline.com
Page 2

20LJ26 - Manual no. 7553 Page: 1
CRT's
A 13" CRT 370KSB22
B 13" CRT 370KSB22
C 13" CRT A34JLL40X69. . . . . . . . . . 4835 131 27113
D 13" CRT A34JLL40X69. . . . . . . . . . 4835 310 57301
E 13" CRT A34EEC36X101 . . . . . . . . . 4835 310 57302
F 19" CRT A48JLL40X40. . . . . . . . . . 4835 131 27103
G 19" CRT A48ACB02X. . . . . . . . . . . 4835 131 27109
H 19" CRT A48AFN36X. . . . . . . . . . . 4835 131 27128
I 19" CRT A48AFN86X. . . . . . . . . . . 4835 131 27143
J 19" CRT A48K2L70X. . . . . . . . . . . 4835 131 27141
K 19" CRT A48KRD89X. . . . . . . . . . . 4835 131 27139
L 19" CRT A48AFN36X. . . . . . . . . . . 4835 131 27142
M 19" CRT A48AFN86X. . . . . . . . . . . 4835 131 27143
N 20" CRT A51AFJ32X. . . . . . . . . . . 4835 131 27055
0 20" CRT A51JAR76X. . . . . . . . . . . 4835 131 27116
P 20" CRT A51JAR70X. . . . . . . . . . . 4835 131 27121
Q 20" CRT A51JAR72X. . . . . . . . . . . 4835 131 27132
R 20" CRT A51K2R50X. . . . . . . . . . . 4835 131 27129
S 25" CRT A63AFW36X. . . . . . . . . . . 4835 131 27127
T 25" CRT A63AFW35X. . . . . . . . . . . 4835 131 27126
U 25" CRT A63AFW86X. . . . . . . . . . . 4835 131 27131
V 27" CRT A68AGN32X. . . . . . . . . . . 4835 131 27123
W 27" CRT A68AGN82X. . . . . . . . . . . 4835 131 27138
X 27" CRT A68KRQ88X. . . . . . . . . . . 4835 131 27119
X6 MAIN CHASSIS
CAPACITORS
C206 0.01uF., 10%, 50V, Ceramic . . . . . . 4835 122 47098
C208 4.7uF., 50V, Electrolytic. . . . . . . 4835 124 47506
C209 100pF., 10%, 50V, Ceramic, Tubular . . 4835 122 17032
C210 270pF., 10%, 50V, Ceramic. . . . . . . 4835 122 47008
C211 0.047uF., +80-20%, 50V, Ceramic. . . . 4835 122 47083
C214 680pF., 10%, 50V, Ceramic. . . . . . . 4835 122 47187
C215 0.047uF., +80-20%, 50V, Ceramic. . . . 4835 122 47083
C217 1000pF., 10%, 50V, Ceramic . . . . . . 4835 122 47004
C222 47pF., 5%, 50V, Ceramic (Stereo Models) 4835 122 47051
C222 5600pF., 10%, 50V, Ceramic (Mono Models 4835 122 47011
C223 1uF., 50V, Electrolytic. . . . . . . . 4835 121 47406
C231 2200uF., 16V, Electrolytic . . . . . . 4835 124 47585
C232 10uF., 50V, Electrolytic . . . . . . . 4835 124 47499
C234 6800pF.,10%,25V,Ceramic,Tubular (Mono M
odels) . . . . . . . . . . . . . . . . 4835 122 17023
C235 0.12uF., 10%, 63V, Polyester . . . . . 4835 121 47149
C238 0.12uF., 10%, 63V, Polyester (Stereo Mo
dels). . . . . . . . . . . . . . . . . 4835 121 47149
C239 1000uF., 16V, Electrolytic (Stereo Mode
ls). . . . . . . . . . . . . . . . . . 4835 124 47497
C242 10uF., 50V, Electrolytic (Stereo Models 4835 124 47499
C246 2.2uF., 50v, Electrolytic. . . . . . . 4835 124 47502
C250 4700pF., 10%, 50V, Ceramic . . . . . . 4835 122 47104
C251 0.1uF., 10%, 100V, Polyester . . . . . 4822 121 41608
C252 0.1uF., 10%, 100V, Polyester . . . . . 4822 121 41608
C253 0.022uF., +80-20%, 50V, Ceramic. . . . 4835 122 47013
C254 0.47uF., 50V, Electrolytic . . . . . . 4835 124 47508
C255 10uF., 50V, Electrolytic . . . . . . . 4835 124 47499
C256 1uF., 50V, Electrolytic. . . . . . . . 4835 121 47406
C257 4700pF., 10%, 50W, Ceramic . . . . . . 4835 122 47104
C258 0.1uF., 10%, 100V, Polyester . . . . . 4822 121 41608
C262 2.2uF., 50V, Electrolytic (Stereo Model
s). . . . . . . . . . . . . . . . . . . 4835 124 47502
C266 2.2uF., 50V, Electrolytic (Stereo Model
s). . . . . . . . . . . . . . . . . . . 4835 124 47502
C268 4.7uF., 50V, Electrolytic (Stereo Model
s). . . . . . . . . . . . . . . . . . . 4835 124 47506
C270 4.7uF., 50V, Electrolytic (Stereo Model
s). . . . . . . . . . . . . . . . . . . 4835 124 47506
C271 0.22uF., 10%, 63V, Polyester (Stereo Mo
dels). . . . . . . . . . . . . . . . . 4835 121 47002
C272 .47uF., 10%, 63V, Polyethylene (Stereo
Models). . . . . . . . . . . . . . . . 4822 121 41757
C273 0.22uF., 10%, 63V, Polyester (Stereo Mo
dels). . . . . . . . . . . . . . . . . 4835 121 47002
C275 luF., 50V, Electrolytic (Mono Models). 4835 121 47406
C278 0.047uF., +80-20%, 50V, Ceramic. . . . 4835 122 47083
C279 4.7uF., 50V, Electrolytic (Stereo Model
s). . . . . . . . . . . . . . . . . . . 4835 124 47506
C280 10uF., 50V, Electrolytic (Stereo Models 4835 124 47499
C281 10uF., 50V, Electrolytic (Stereo Models 4835 124 47499
C282 100uF., 10V, Electrolytic (Stereo Model
s). . . . . . . . . . . . . . . . . . . 4835 124 47532
C283 4.7uF., 50V, Electrolytic (Stereo Model
s). . . . . . . . . . . . . . . . . . . 4835 124 47506
C284 0.1uF., 10%, 100V, Polyester (Stereo Mo
dels). . . . . . . . . . . . . . . . . 4822 121 41608
C285 10uF., 50V, Electrolytic (Stereo Models 4835 124 47499
C286 0.047uF., 10%, 100V, Polyester . . . . 4835 121 47005
C287 1uF., 50V, Electrolytic (Stereo Models) 4835 121 47406
C288 1uF., 50V, Electrolytic (Stereo Models) 4835 121 47406
C289 10uF., 50V, Electrolytic (Stereo Models 4835 124 47095
C290 10uF., 50V, Electrolytic (Stereo Models 4835 124 47095
C291 1000pF., 10%, 50V, Ceramic (Stereo Mode
ls). . . . . . . . . . . . . . . . . . 4835 122 47004
S = Safety Part Be sure to use exact replacement part.
C293 2.2uF., 50V, Electrolytic (Stereo Model
s). . . . . . . . . . . . . . . . . . . 4835 124 47502
C294 10uF., 50V, Electrolytic (Stereo Models 4835 124 47499
C295 4.7uF., 5OV, Electrolytic (Stereo Model
s). . . . . . . . . . . . . . . . . . . 4835 124 47506
C298 2.2uF., 5OV, Electrolytic (Stereo Model
s). . . . . . . . . . . . . . . . . . . 4835 124 47502
C306 1000pF., 10%, 50V, Ceramic . . . . . . 4835 122 47004
C307 0.047uF., +80-20%, 50V, Ceramic. . . . 4835 122 47083
C310 100pF., 10%, 50V, Ceramic. . . . . . . 4835 122 47045
C311 100pF., 10%, 50V, Ceramic. . . . . . . 4835 122 47045
C312 1000pF., 10%, 50V, Ceramic . . . . . . 4835 122 47004
C314 0.022uF., +80-20%, 50V, Ceramic. . . . 4835 122 47013
C315 0.022uF., +80-20%, 50V, Ceramic. . . . 4835 122 47013
C320 47pF.,5%,50V,Cer(13",19 Models W/Clock) 4835 122 47051
C322 47pF.,5%,50V,Ceramic(13",19 Models" W/C
lock). . . . . . . . . . . . . . . . . 4835 122 47051
C323 100pF., 10%, 50V, Ceramic, Tubular . . 4835 122 17032
C330 1uF., 50V, Electrolytic (Mono Models). 4835 121 47406
C334 1uF., 50V, Electrolytic (Mono Models). 4835 121 47406
C340 100pF., 10%, 50V, Ceramic, Tubular . . 4835 122 17032
C341 100pF., 10%, 50V, Ceramic, Tubular . . 4835 122 17032
C342 100pF., 10%, 50V, Ceramic, Tubular . . 4835 122 17032
C343 100pF., 10%, 50V, Ceramic, Tubular . . 4835 122 17032
C344 0.01uF., 10%, 25V, Ceramic, Tubular. . 4835 122 17026
C345 0.01uF., 10%, 25V, Ceramic, Tubular. . 4835 122 17026
C346 0.01uF., 10%, 25V, Ceramic, Tubular. . 4835 122 17026
C347 .01 uF., 10%, 25V, Ceramic, Tubular. . 4835 122 17026
C348 .01 uF., 10%, 25V, Ceramic, Tubular. . 4835 122 17026
C349 .01 uF., 10%, 25V, Ceramic, Tubular. . 4835 122 17026
C350 47uF., 16V, Electrolytic . . . . . . . 4835 124 47567
C355 2.2uF., 50V, Electrolytic. . . . . . . 4835 124 47502
C357 39pF., 5%, 50V, Ceramic. . . . . . . . 4835 122 47021
C358 27pF., 5%, 50V, Ceramic. . . . . . . . 4835 122 47018
C360 470uF., 16V, Electrolytic. . . . . . . 4835 121 47387
C361 22uF., 50V, Electrolytic . . . . . . . 4835 124 47503
C362 1000pF., 10%, 50V, Ceramic . . . . . . 4835 122 47004
C365 100uF., 10V, Electrolytic. . . . . . . 4835 124 47532
C370 0.01 uF., 10%, 50V, Ceramic. . . . . . 4835 122 47098
C371 100uF., 25V, Electrolytic. . . . . . . 4835 124 47501
C377 1000pF., 10%, 50V, Ceramic . . . . . . 4835 122 47004
C379 2.2uF., 50V, Electrolytic. . . . . . . 4835 124 47502
C382 220pF., 10%, 50V, Ceramic. . . . . . . 4835 122 47006
C383 1uF., 50V, Electrolytic. . . . . . . . 4835 121 47406
C385 470pF., 10%,50V, Ceramic . . . . . . . 4835 122 47009
S C400 0.22uF.,20%,250Vac, Metal Film(Canada O
nly) . . . . . . . . . . . . . . . . . 4835 122 97047
C401 1000pF.,10%,500V,Ceramic(Not Canada Mod
els) . . . . . . . . . . . . . . . . . 4835 122 47384
C402 1000pF.,10%,500V,Ceramic(Not Canada Mod
els) . . . . . . . . . . . . . . . . . 4835 122 47384
C403 1000pF.,10%,500V,Ceramic(Not Canada Mod
els) . . . . . . . . . . . . . . . . . 4835 122 47384
C404 1000pF.,10%,500V,Ceramic(Not Canada Mod
els) . . . . . . . . . . . . . . . . . 4835 122 47384
S C405 680uF.,200V,Electrolytic(25", 27" Model
s). . . . . . . . . . . . . . . . . . . 4835 124 47064
S C405 470uF.,200V,Electrolytic(19" Models) . 4835 124 47097
S C405 33OuF., 20OV, Electrolytic(13" Models) 4835 124 47297
C406 100uF., 10V, Electrolytic. . . . . . . 4835 124 47532
S C407 0.33uF.,20%,250Vac,Metal Film(Not Canad
a). . . . . . . . . . . . . . . . . . . 4835 121 47463
C408 1000pF., 10%, 500V, Ceramic. . . . . . 4835 122 47384
C413 47uF., 16V, Electrolytic . . . . . . . 4835 124 47567
C415 100uF., 10V, Electrolytic. . . . . . . 4835 124 47532
C417 1000pF., 10%, 500V, Ceramic. . . . . . 4835 122 47384
C419 2200uF., 16V, Electrolytic . . . . . . 4835 124 47585
C421 0.015uF., 10%,400V,Polyester(Canada Onl
y). . . . . . . . . . . . . . . . . . . 4835 121 47203
C422 0.015uF., 10%,400V,Polyester(Canada Onl
y). . . . . . . . . . . . . . . . . . . 4835 121 47203
C423 0.015uF., 10%,400V,Polyester(Canada Onl
y). . . . . . . . . . . . . . . . . . . 4835 121 47203
C424 0.015uF., 10%,400V,Polyester(Canada Onl
y). . . . . . . . . . . . . . . . . . . 4835 121 47203
C431 1uF., 250V, Electrolytic . . . . . . . 4835 124 47121
C432 100uF., 200V, Electrolytic . . . . . . 4835 124 47255
C433 1000pF., 10%, 500V, Ceramic. . . . . . 4835 122 47384
C445 1000pF., 10%, 500V, Ceramic. . . . . . 4835 122 47384
C447 1000uF., 35V, Electrolytic . . . . . . 4835 124 47498
C460 1000pF., 10%, 500V, Ceramic. . . . . . 4835 122 47384
C461 1uF., 20V, Electrolytic. . . . . . . . 4835 124 47121
C463 .1uF., 10%, 250V, Polyester. . . . . . 4835 121 47278
C464 330uF., 10V, Electrolytic. . . . . . . 4835 124 47603
C465 .33uF., 63V, Polyester . . . . . . . . 4835 121 47117
C466 1000pF., 10%, 50V, Ceramic . . . . . . 4835 122 47004
C470 47uF., 16V, Electrolytic . . . . . . . 4835 124 47567
C475 1000pF., 10%, 500V, Ceramic. . . . . . 4835 122 47384
C500 .01uF., 10%, 50V, Ceramic. . . . . . . 4835 122 47098
C502 470pF., 10%, 500V, Ceramic . . . . . . 4835 122 47211
C503 1000pF., 10%, 500V, Ceramic. . . . . . 4835 122 47384
C504 .1uF., 10%, 250V, Polyester. . . . . . 4835 121 47278
Page 3

20LJ26 (continued) Page: 2
S C505 4700pF., 5%, 1500V, Polypro(19" Using T
502) . . . . . . . . . . . . . . . . . 4835 121 47026
S C505 3900pF.,5%,1500,Polypro(13" +19" Using
T501). . . . . . . . . . . . . . . . . 4835 121 47242
S C505 9100pF., 5%, 1500V, Polypro(25", 27" Mo
dels). . . . . . . . . . . . . . . . . 4835 121 47197
S C505 5600pF.,5%,1500V,Poly(19"using CRT's F,
J,G & K) . . . . . . . . . . . . . . . 4835 121 47101
S C506 270pF.,10%,2kV,Ceramic(19" Mdls using C
RT J). . . . . . . . . . . . . . . . . 4835 122 47075
S C506 330pF.,2kV,20%,Cer(13"+19" using CRT G) 4835 122 47058
S C506 820pF.,10%,2kV,Cer(19" using H,I,K,L &
M). . . . . . . . . . . . . . . . . . . 4835 122 57004
S C506 560pF.,10%,2kV,Ceramic (19" Mdls using
T501). . . . . . . . . . . . . . . . . 4835 122 57007
S C506 680pF., 10%, 2kV, Ceramic (25", 27" Mod
els) . . . . . . . . . . . . . . . . . 4835 122 47037
C507 0,33uF., 200V, Polypropylene (19" using
CRT J) . . . . . . . . . . . . . . . . 4835 121 47555
C507 0.47uF.,5%,200V,Poly(25" & 19" using CR
T K) . . . . . . . . . . . . . . . . . 4835 121 47256
C507 0.43uF., 5%, 200V, Polypropylene (27" M
odels) . . . . . . . . . . . . . . . . 4835 121 47047
C507 0.51uF.,5%,200V,Polypro(19" using CRT's
F & G) . . . . . . . . . . . . . . . . 4835 121 47046
C507 0.36uF.,5%,200V,Polypro(13"+19"CRT's H,
I,J,L&M) . . . . . . . . . . . . . . . 4835 121 47126
C511 39pF., 5%, 1kV, Ceramic. . . . . . . . 4835 122 47224
C512 10uF., 50V, Electrolytic . . . . . . . 4835 124 47499
S C529 10uF., 50V, Electrolytic . . . . . . . 4835 124 47499
C530 10uF., 50V, Electrolytic . . . . . . . 4835 124 47499
C548 0.01uF., 5%, 50V, Polyester. . . . . . 4835 121 47461
C549 1uF., 10%, 63V, Polyester. . . . . . . 4835 121 47427
C550 100uF., 35V, Electrolytic. . . . . . . 4835 124 47584
C552 0.12uF., 10%, 63V, Polyester . . . . . 4835 121 47149
C553 4.7pF., 10%, 500V, Ceramic . . . . . . 4835 122 47452
C554 470uF., 16V, Electrolytic. . . . . . . 4835 121 47387
C556 22uF., 50V, Electrolytic, (13", 19" Mod
els) . . . . . . . . . . . . . . . . . 4835 124 47505
C556 33uF., 50V, (25", 27" Models). . . . . 4835 124 47505
C558 1000uF., 25V, Electrolytic . . . . . . 4835 124 47583
C563 0.12uF., 10%, 63V, Polyester . . . . . 4835 121 47149
C616 4.7uF., 50V, Electrolytic. . . . . . . 4835 124 47506
C617 2.2uF., 50V, Electrolytic. . . . . . . 4835 124 47502
C618 4.7uF., 50V, Electrolytic. . . . . . . 4835 124 47506
C620 100pF., 10%, 50V, Ceramic. . . . . . . 4835 122 47045
C621 2.2uF., 50V, Electrolytic. . . . . . . 4835 124 47502
C633 270pF., 10%, 50V, Ceramic. . . . . . . 4835 122 47008
C634 270pF., 10%, 50V, Ceramic. . . . . . . 4835 122 47008
C635 270pF., 10%, 50V, Ceramic. . . . . . . 4835 122 47008
C661 0.22uF., 50V, Electrolytic . . . . . . 4835 124 47565
C663 0.033uF., 10%, 400V, Polyester . . . . 4835 121 47035
C668 2.2uF., 50V, Electrolytic. . . . . . . 4835 124 47502
C672 0.01uF., 10%, 50V, Ceramic . . . . . . 4835 122 47098
C674 0.01uF., 10%, 50V, Ceramic . . . . . . 4835 122 47098
C675 0.01uF., 10%, 50V, Ceramic . . . . . . 4835 122 47098
C682 0.1uF., 50V, Electrolytic. . . . . . . 4835 124 47595
RESISTORS
R203 10k, 5%, 1/4W, Metal Film. . . . . . . 4835 116 57321
R204 16k, 5%, 1/4W, Metal Film (19" Models) 4835 116 57492
R204 10k, 5%, 1/4W, Metal Film (25", 27" Mod
els) . . . . . . . . . . . . . . . . . 4835 116 57321
R204 18k, 5%, 1/4W, Metal Film (13" Models) 4835 116 57323
R206 50k, Control Adj. RF AGC . . . . . . . 4835 100 17064
R209 430 ohm, 5%, 1/4W, Metal Film. . . . . 4835 116 57496
R212 120 ohm, 5%, 1/4W, Metal Film. . . . . 4835 116 57489
R213 1.2k, 5%, 1/4W, Metal Film . . . . . . 4835 116 57396
R214 150 ohm, 5%, 1/4W, Metal Film. . . . . 4835 116 57399
R216 150 ohm, 5%, 1/4W, Metal Film. . . . . 4835 116 57399
R217 220 ohm, 5%, 1/4W, Metal Film. . . . . 4835 116 57324
R218 1 @8k, 5%, 1/4W, Metal Film. . . . . . 4835 116 57406
R219 20k, 5%, 1/4W, Metal Film. . . . . . . 4835 116 57468
R222 12k, 5%, 1/4W, Metal Film. . . . . . . 4835 116 57397
R224 10k, 5%, 1/4W, Metal Film. . . . . . . 4835 116 57321
R230 20k, 5%, 1/4W, Metal Film (Stereo Model
s). . . . . . . . . . . . . . . . . . . 4835 116 57468
R230 18k, 5%, 1/4W, Metal Film (Mono Models) 4835 116 57323
S R231 27 ohm, 5%, 3W, Metal Film (Mono Models 4835 116 67159
S R231 6.8 ohm, 5%, 3W, Metal Film (Stereo Mod
els) . . . . . . . . . . . . . . . . . 4835 116 67088
R232 4.7k, 5%, 1/4W, Metal Film . . . . . . 4835 116 57427
R233 1.5k, 5%, 1/4W, Metal Film (Stereo Mode
ls). . . . . . . . . . . . . . . . . . 4835 116 57401
R233 4.7k, 5%, 1/4W, Metal Film (Mono Models 4835 116 57427
S R239 5.6 ohm, 5%, 3W, Metal Film (Stereo Mod
els) . . . . . . . . . . . . . . . . . 4835 116 67191
R241 20k, 5%, 1/4W, Metal Film. . . . . . . 4835 116 57468
R242 1.5k, 5%, 1/4W, Metal Film . . . . . . 4835 116 57401
R243 4.7k, 5%,1/4W, Metal Film. . . . . . . 4835 116 57427
R246 470k, 5%, 1/4W, Metal Film . . . . . . 4835 116 57498
R250 100k, 5%,1/4W, Metal Film. . . . . . . 4835 116 57395
R251 390 ohm, 5%,1/4W, Metal Film . . . . . 4835 116 57424
S = Safety Part Be sure to use exact replacement part.
R252 1 Meg, 5%,1/4W, Metal Film . . . . . . 4835 116 57322
R254 1 Ok, 5%,1/4W, Metal Film. . . . . . . 4835 116 57321
R255 1 00 ohm, 5%,1/4W, Metal Film. . . . . 4835 116 57318
R256 16k, 5%, 1/4W, Metal Film. . . . . . . 4835 116 57492
R264 51k, 5%, 1/4W, Metal Film. . . . . . . 4835 116 57499
R273 2.2k, 5%, 1/4W, Metal Film (Stereo Mode
ls). . . . . . . . . . . . . . . . . . 4835 116 57411
S R282 56 ohm. 5%, 2W, Metal Film (Stereo Mode
ls). . . . . . . . . . . . . . . . . . 4835 116 67187
R286 160 ohm, 2%, 1/8W, Carbon Film (Stereo
Models). . . . . . . . . . . . . . . . 4835 110 67219
R287 8.2k, 2%, 1/8W, Carbon Film (Stereo Mod
els) . . . . . . . . . . . . . . . . . 4835 110 67232
R301 15k, 5%, 1/4W, Metal Film. . . . . . . 4835 116 57402
R302 75k, 5%, 1/4W, Metal Film. . . . . . . 4835 116 57479
R303 10k, 5%, 1/4W, Metal Film. . . . . . . 4835 116 57321
R304 5.6k, 5%, 1/4W, Metal Film . . . . . . 4835 116 57434
S R305 10 ohm, 5%, 1/4W, Metal Film . . . . . 4835 116 57362
R306 43k, 5%, 1/4W, Metal Film. . . . . . . 4835 116 57531
R307 3.3k, 5%, 1/4W, Metal Film . . . . . . 4835 116 57422
R308 1k, 5%, 1/4W, Metal Film . . . . . . . 4835 116 57319
R309 10k, 1%, 1/8W, Metal Film. . . . . . . 4835 116 57481
R310 2.2k, 5%, 1/4W, Metal Film . . . . . . 4835 116 57411
R311 330 ohm, 5%, 1/4W, Metal Film. . . . . 4835 116 57421
R312 330 ohm, 5%, 1/4W, Metal Film. . . . . 4835 116 57421
R314 0 ohm, 1/8W, Jumper, Carbon Film . . . 4835 110 67173
R318 330 ohm, 5%, 1/4W, Metal Film. . . . . 4835 116 57421
R319 4.7k, 5%, 1/4W, Metal Film . . . . . . 4835 116 57427
R320 330 ohm, 5%, 1/4W, Metal Film. . . . . 4835 116 57421
R323 10k, 5%, 1/4W, Metal Film. . . . . . . 4835 116 57321
R324 100k, 5%, 1/4W, Metal Film (Not in 13"
Models). . . . . . . . . . . . . . . . 4835 116 57395
R324 47k, 5%, 1/4W, Metal Film (13" Models) 4835 116 57428
R325 2.2k, 5%, 1/4W, Metal Film . . . . . . 4835 116 57411
R328 22k, 5%, 1/4W, Metal Film. . . . . . . 4835 116 57412
R330 4.7k, 5%, 1/4W, Metal Film . . . . . . 4835 116 57427
R331 16k, 5%, 1/4W, Metal Film (Mono Models) 4835 116 57492
R332 100k, 5%, 1/4W, Metal Film (Mono Models 4835 116 57395
R333 220k, 5%, 1/4W, Metal Film . . . . . . 4835 116 57325
R334 82k, 5%, 1/4W, Metal Film (Mono Models) 4835 116 57506
R335 120k, 5%, 1/4W, Metal Film . . . . . . 4835 116 57398
R336 100k, 5%, 1/4W, Metal Film (13", 19" Mo
dels). . . . . . . . . . . . . . . . . 4835 116 57395
R342 120k, 5%, 1/4W, Metal Film . . . . . . 4835 116 57398
R343 10k, 5%, 1/4W, Metal Film. . . . . . . 4835 116 57321
R344 100k, 5%, 1/4W, Metal Film . . . . . . 4835 116 57395
R347 16k, 5%, 1/4W, Metal Film (Mono Models) 4835 116 57492
R348 1k, 5%, 1/4W, Metal Film . . . . . . . 4835 116 57319
R349 10k, 5%, 1/4W, Metal Film. . . . . . . 4835 116 57321
S R350 47 ohm, 5%, 1/3W, Metal Film . . . . . 4835 116 57069
R351 27k, 5%, 1/4W, Metal Film. . . . . . . 4835 116 57416
R352 22k, 5%, 1/4W, Metal Film. . . . . . . 4835 116 57412
R353 22k, 5%, 1/4W, Metal Film. . . . . . . 4835 116 57412
R354 22k, 5%, 1/4W, Metal Film. . . . . . . 4835 116 57412
R355 33k, 5%, 1/4W, Metal Film. . . . . . . 4835 116 57423
R356 22k, 5%, 1/4W, Metal Film. . . . . . . 4835 116 57412
R357 22k, 5%, 1/4W, Metal Film (Mono Models) 4835 116 57412
R358 22k, 5%, 1/4W, Metal Film. . . . . . . 4835 116 57412
S R359 33 ohm, 5%, 1/3W, Metal Film . . . . . 4835 116 57159
R360 15k, 5%, 1/2W, Metal Film. . . . . . . 4835 116 57275
R361 15k, 5%, 1/2W, Metal Film. . . . . . . 4835 116 57275
R362 10k, 5%, 1/4W, Metal Film. . . . . . . 4835 116 57321
R363 10k, 5%, 1/4W, Metal Film. . . . . . . 4835 116 57321
R364 10k, 5%, 1/4W, Metal Film. . . . . . . 4835 116 57321
R365 10k, 5%, 1/4W, Metal Film. . . . . . . 4835 116 57321
R366 22k, 5%, 1/4W, Metal Film. . . . . . . 4835 116 57412
R367 3.3k, 5%, 1/4W, Metal Film . . . . . . 4835 116 57422
R368 3.3k, 5%, 1/4W, Metal Film . . . . . . 4835 116 57422
R371 3.3k, 5%, 1/4W, Metal Film . . . . . . 4835 116 57422
R372 3.3k, 5%, 1/4W, Metal Film . . . . . . 4835 116 57422
R373 3.3k, 5%, 1/4W, Metal Film . . . . . . 4835 116 57422
R374 3.3k, 5%, 1/4W, Metal Film . . . . . . 4835 116 57422
R375 3.3k, 5%, 1/4W, Metal Film . . . . . . 4835 116 57422
R376 1 Meg, 5%, 1/4W, Metal Film. . . . . . 4835 116 57322
R379 10k, 5%, 1/4W, Metal Film. . . . . . . 4835 116 57321
R380 100k, 5%, 1/4W, Metal Film . . . . . . 4835 116 57395
R381 100k, 5%, 1/4W, Metal Film . . . . . . 4835 116 57395
R382 1.8 Meg, 5%, 1/4W, Metal Film. . . . . 4835 116 57605
R383 220 ohm, 5%, 1/4W, Metal Film. . . . . 4835 116 57324
R384 1k, 5%, 1/4W, Metal Film . . . . . . . 4835 116 57319
S R400 Thermistor, FTC (13",19",25" Models) . 4835 116 47001
S R401 4.7 Meg, 5%, 1/2W, Metal Film. . . . . 4835 116 57009
R402 27k, 5%, 1/2W, Carbon Film . . . . . . 4835 110 47136
S R403 1.5 ohm, 10%, 10W, Wire Wound. . . . . 4835 112 37024
R404 1k, 5%, 1/4W, Metal Film . . . . . . . 4835 116 57319
R405 220k, 5%, 1/2W, Metal Film . . . . . . 4835 116 57018
R406 47k, 5%, 1/2W, Carbon Film . . . . . . 4835 110 47042
R408 100 ohm, 5%, 1/4W, Metal Film. . . . . 4835 116 57318
R409 120k, 5%, 1/4W, Metal Film . . . . . . 4835 116 57398
S R410 Thermistor, Degauss (27" Model). . . . 4835 116 57193
S R411 100 ohm, 5%, 1/3W, Metal Film. . . . . 4835 116 87002
R413 5.6k, 5%, 1/4W, Metal Film . . . . . . 4835 116 57434
Page 4

20LJ26 (continued) Page: 3
R415 270 ohm, 5%, 1/4W, Metal Film. . . . . 4835 116 57414
R416 100 ohm, 5%, 1/4W, Metal Film. . . . . 4835 116 57318
S R417 6.8 ohm, 5%, 1/4W, Metal Film. . . . . 4835 116 57559
R418 100k, 5%, 1/4W, Metal Film . . . . . . 4835 116 57395
S R419 1 ohm, 5%, 1/3W, Metal Film. . . . . . 4822 111 30483
S R420 0.51 ohm, 5%, 1/2W, Metal Film . . . . 4835 116 67001
S R421 1 ohm, 5%, 1/3W, Metal Film (Stereo Mod
els) . . . . . . . . . . . . . . . . . 4822 111 30483
R422 4.7k, 5%, 1/2W, Carbon Film. . . . . . 4835 110 47052
R423 4.7k, 5%, 1/2W, Carbon Film. . . . . . 4835 110 47052
R424 220k, 5%, 1/2W, Metal Film . . . . . . 4835 116 57018
R431 47 ohm, 5%, 1/2W, Carbon Film. . . . . 4835 110 47041
R432 1k, 5%, 1/2W, Metal Film . . . . . . . 4835 116 57582
R436 470k, 5%, 1/4W, Metal Film . . . . . . 4835 116 57498
R437 4.7 ohm, 5%, 1/2W, Carbon Film . . . . 4835 110 47046
R438 680k, 5%, 1/2W, Metal Film . . . . . . 4835 116 57518
S R441 36 ohm, 5%, 10W, Wire Wound (19" Models 4835 112 37022
S R441 75 ohm, 5%, 10W, Wire Wound (13" Models 4835 112 37023
S R442 36 ohm, 5%, 10W, Wire Wound (19" Models 4835 112 37022
S R442 75 ohm, 5%, 10W, Wire Wound (13" Models 4835 112 37023
S R443 36 ohm, 5%, 10W, Wire Wound (19" Models 4835 112 37022
S R445 1 ohm, 5%, 1/3W, Metal Film. . . . . . 4822 111 30483
R448 47 ohm, 5%, 30W, Wire Wound (25", 27" M
odels) . . . . . . . . . . . . . . . . 4835 112 37021
S R459 100 ohm, 5%, 2W, Metal Film. . . . . . 4835 116 57132
S R460 2.2 ohm, 5%, 1/3W, Metal Film. . . . . 4822 111 30492
R461 1k, 5%, 1/4W, Metal Film . . . . . . . 4835 116 57319
S R462 680 ohm, 5%, 1/4W, Metal Film. . . . . 4835 116 57477
R463 330k, 1%, 1/8W, Metal Film . . . . . . 4835 116 57558
S R464 68 ohm, 5%, 1W, Metal Film . . . . . . 4835 116 57279
R465 100 ohm, 5%, 1/4W, Metal Film. . . . . 4835 116 57318
S R466 47 ohm, 5%, 1/3W, Metal Film (Not in 13
"). . . . . . . . . . . . . . . . . . . 4835 116 57069
S R468 1 ohm, 5%, 1/3W, Metal Film. . . . . . 4822 111 30483
S R469 8.2 ohm, 5%, 1/3W, Metal Film (Stereo M
odels) . . . . . . . . . . . . . . . . 4822 111 30506
S R470 6.8 ohm, 5%, 1/4W, Metal Film. . . . . 4835 116 57559
S R475 0.51 ohm, 5%, 1/2W, Metal Film . . . . 4835 116 67001
R491 1.8k, 5%, 1/4W, Metal Film (Stereo Mode
ls). . . . . . . . . . . . . . . . . . 4835 116 57406
R500 470k, 5%, 1/4W, Metal Film . . . . . . 4835 116 57498
R501 200 ohm, 5%, 1/4W, Metal Film. . . . . 4835 116 57408
R502 2k, 5%, 1/4W, Metal Film (13", 19" Mode
ls). . . . . . . . . . . . . . . . . . 4835 116 57409
R502 3k, 5%, 1/4W, Metal Film (25", 27" Mode
ls). . . . . . . . . . . . . . . . . . 4835 116 57418
R503 5.1k, 5%, 1/2W, Carbon Film. . . . . . 4835 110 47188
S R504 7.5k, 5%, 2W, Metal Film (19" Mdls w/CR
T's G&K) . . . . . . . . . . . . . . . 4835 116 57286
S R504 3.6k, 5%, 2W, Metal Film (25", 27" Mode
ls). . . . . . . . . . . . . . . . . . 4835 116 57155
S R504 11k,5%,2W,MF(13"+19"using T502 not w/CR
T's G&K) . . . . . . . . . . . . . . . 4835 116 67167
S R504 10k, 5%, 2W, Metal Film (13" + 19" usin
g T505). . . . . . . . . . . . . . . . 4835 116 57179
R505 0.47 ohm, 5%, 1/2W, Metal Film . . . . 4835 116 57139
S R507 680 ohm, 5%, 2W, Metal Film (27" Model) 4835 116 57161
S R507 1k, 5%, 2W, Metal Film (25" Models). . 4835 116 57057
R508 560 ohm, 5%, 1/4W, Metal Film. . . . . 4835 116 57326
R509 430 ohm, 5%, 1/4W, Metal Film. . . . . 4835 116 57496
R510 39k. 5%, 1/4W, Metal Film. . . . . . . 4835 116 57475
R511 300k, 5%, 1/2W, Metal Film . . . . . . 4835 116 57211
R512 300k, 5%, 1/2W, Metal Film . . . . . . 4835 116 57211
R513 3.3k, 5%, 1/4W, Metal Film . . . . . . 4835 116 57422
S R515 20 ohm, 5%, 1/3W, Metal Film (Used with
T504). . . . . . . . . . . . . . . . . 4835 116 57065
S R515 43 ohm, 5%, 1/3W, Metal Film (Used with
T505). . . . . . . . . . . . . . . . . 4835 116 57613
R517 27k, 5%, 1/4W, Metal Film. . . . . . . 4835 116 57416
R519 1k, 5%, 1/4W, Metal Film . . . . . . . 4835 116 57319
R520 50k, Control Adj., Horz. Centering . . 4835 100 17064
R521 10k, 5%, 1/4W, Metal Film (25", 27" Mod
els) . . . . . . . . . . . . . . . . . 4835 116 57321
R522 10k, 5%, 1/4W, Metal Film (25", 27" Mod
els) . . . . . . . . . . . . . . . . . 4835 116 57321
R523 30k, 5%, 1/4W, Metal Film (25", 27" Mod
els) . . . . . . . . . . . . . . . . . 4835 116 57494
S R524 10k, 5%, 2W, Metal Film (13" + 19" usin
g T505). . . . . . . . . . . . . . . . 4835 116 57179
S R524 3.6k, 5%, 2W, Metal Film (25", 27" Mode
ls). . . . . . . . . . . . . . . . . . 4835 116 57155
S R524 11 k, 5%, 2W, Metal Film (13"+19" using
T504 . . . . . . . . . . . . . . . . . 4835 116 67167
S R524 7.5k,5%,2W,MF(For Mdls which use CRT's
G & K) . . . . . . . . . . . . . . . . 4835 116 57286
S R525 10k, 5%, 1/4W, Metal Film (25", 27" Mod
els) . . . . . . . . . . . . . . . . . 4835 116 57321
R528 100k, 5%, 1/4W, Metal Film (25", 27" Mo
dels). . . . . . . . . . . . . . . . . 4835 116 57395
S R529 100k, 5%, 1/4W, Metal Film . . . . . . 4835 116 57321
S R530 1 ohm, 5%, 1/3W, Metal Film. . . . . . 4822 111 30483
S R533 442 ohm, 1%, 1/4W, Metal Film (Not in 1
3"). . . . . . . . . . . . . . . . . . 4835 116 57601
S = Safety Part Be sure to use exact replacement part.
S R533 0.36 ohm, 1%, 1/4W, Metal Film (13" Mod
els) . . . . . . . . . . . . . . . . . 4835 116 57555
S R534 3k, 1%, 1/4W, Metal Film . . . . . . . 4835 116 57553
S R536 10k, 5%, 1/4W, Metal Film (13", 19" Mod
els) . . . . . . . . . . . . . . . . . 4835 116 57321
R537 1k, 5%, 1/4W, Metal Film . . . . . . . 4835 116 57319
R538 4.7k, 5%, 1/4W, Metal Film . . . . . . 4835 116 57427
R539 24k, 5%, 1/4W, Metal Film (13" Models) 4835 116 57471
S R540 3.9k, 5%, 1/4W, Metal Film (13", 19" Mo
dels). . . . . . . . . . . . . . . . . 4835 116 57425
R543 1 Meg, 5%, 1/4W, Metal Film (25", 27" M
odels) . . . . . . . . . . . . . . . . 4835 116 57322
R543 1.3 Meg, 5%, 1/4W, Metal Film (13",19"
Models). . . . . . . . . . . . . . . . 4835 116 57604
R544 47k, 5%, 1/4W, Metal Film (13",19" Mode
ls). . . . . . . . . . . . . . . . . . 4835 116 57428
R544 51k, 2%, 1/8W, Carbon Film (25", 27" Mo
dels). . . . . . . . . . . . . . . . . 4835 110 67237
S R545 680 ohm, 5%, 1W, Metal Film. . . . . . 4835 116 67144
R552 6.2k, 2%, 1/8W, Carbon Film (13" Models 4835 110 67093
R552 5.1k, 2%, 1/8W, Carbon Film (19" Models 4835 110 67225
R552 3.6k, 2%, 1/8W, Carbon Film (25", 27" M
odels) . . . . . . . . . . . . . . . . 4835 110 67208
S R555 330 ohm, 5%, 1W, Metal Film (13", 19" M
odels) . . . . . . . . . . . . . . . . 4835 116 57382
S R555 220 ohm, 5%, 1W, Metal Film (25", 27" M
odels) . . . . . . . . . . . . . . . . 4835 116 57603
R556 160 ohm, 2%, 1/8W, Carbon Film (19" Mod
els) . . . . . . . . . . . . . . . . . 4835 110 67219
R556 200 ohm, 2%, 1/8W, Carbon Film (13" Mod
els) . . . . . . . . . . . . . . . . . 4835 110 67222
R556 24 ohm, 2%, 1/8W, Carbon Film (27" Mode
l). . . . . . . . . . . . . . . . . . . 4835 110 67247
R556 8.2 ohm, 5%, 1/8W, Carbon Film (25" Mod
els) . . . . . . . . . . . . . . . . . 4835 110 67121
R557 1 Meg, Control Adj., Vertical Size . . 4835 100 17062
R558 6.8k, Control Adj., Vertical Center. . 4835 100 17067
R559 910 ohm, 2%, 1/8W, Carbon Film (13", 19
"). . . . . . . . . . . . . . . . . . . 4835 110 67238
R559 1.5k, 2%, 1/8W, Carbon Film (25", 27" M
odels) . . . . . . . . . . . . . . . . 4835 110 67168
R560 0.75 ohm, 5%, 1/2W, Metal Film (25", 27
"). . . . . . . . . . . . . . . . . . . 4835 116 67092
R560 1.3 ohm, 5%, 1/2W, Metal Film (13", 19"
Models). . . . . . . . . . . . . . . . 4835 116 57024
R561 470 ohm, 5%, 1W, Metal Film. . . . . . 4835 116 57074
R562 0 ohm, 1/8W, Jumper, Carbon Film . . . 4835 110 67173
R563 2.2 ohm, 5%, 1/4W, Metal Film. . . . . 4835 116 57469
R564 10 Meg, 5%, 1/4W, Metal Film . . . . . 4835 116 57241
R568 1.2k, 2%, 1/8W, Carbon Film (13" Models 4835 110 67218
R568 1.3k, 2%, 1/8W, Carbon Film (19" Models 4835 110 67166
R568 5.6k, 2%, 1/8W, Carbon Film (25", 27" M
odels) . . . . . . . . . . . . . . . . 4835 110 67229
R569 15k, 5%, 1/4W, Carbon Comp. (13" Models 4835 110 57353
R569 3.3k, 5%, 1/4W, Carbon Comp.(25", 27" M
odels) . . . . . . . . . . . . . . . . 4835 110 57354
R569 6.8k, 5%, 1/4W, Carbon Comp. (19" Model
s). . . . . . . . . . . . . . . . . . . 4835 110 57355
R630 1k, 5%, 1/4W, Metal Film . . . . . . . 4835 116 57319
R631 1k, 5%, 1/4W, Metal Film . . . . . . . 4835 116 57319
R632 1k, 5%, 1/4W, Metal Film . . . . . . . 4835 116 57319
R633 100 ohm, 5%, 1/4W, Metal Film. . . . . 4835 116 57318
R634 100 ohm, 5%, 1/4W, Metal Film. . . . . 4835 116 57318
R635 100 ohm, 5%, 1/4W, Metal Film. . . . . 4835 116 57318
R636 330 ohm, 5%, 1/4W, Metal Film. . . . . 4835 116 57421
R637 330 ohm, 5%, 1/4W, Metal Film. . . . . 4835 116 57421
R638 330 ohm, 5%, 1/4W, Metal Film. . . . . 4835 116 57421
R639 820 ohm, 5%, 1/4W, Metal Film. . . . . 4835 116 57439
R642 2k, Control Adj., Blue Drive Adj.. . . 4835 100 17073
R643 2k, Control Adj., Green Drive Adj. . . 4835 100 17073
R645 1 Meg, 5%, 1/4W, Metal Film. . . . . . 4835 116 57322
R648 5k, Control Adj., Blue Cutoff Adj. . . 4835 100 17074
R649 5k, Control Adj., Green Cutoff Adj.. . 4835 100 17074
R650 5k, Control Adj., Red Cutoff Adj.. . . 4835 100 17074
R651 3.6k, 5%, 1/4W, Metal Film . . . . . . 4835 116 57474
R652 3.6k, 5%, 1/4W, Metal Film . . . . . . 4835 116 57474
R653 3.6k, 5%, 1/4W, Metal Film . . . . . . 4835 116 57474
R654 150 ohm, 5%, 1/4W, Metal Film. . . . . 4835 116 57399
R655 150 ohm, 5%, 1/4W, Metal Film. . . . . 4835 116 57399
R656 150 ohm, 5%, 1/4W, Metal Film. . . . . 4835 116 57399
R662 5.6k, 5%, 1/4W, Metal Film (13", 19" Mo
dels). . . . . . . . . . . . . . . . . 4835 116 57434
R662 1k, 5%, 1/4W, Metal Film (25", 27" Mode
ls). . . . . . . . . . . . . . . . . . 4835 116 57319
R663 10k, 5%, 1/4W, Carbon Film (13", 19" Mo
dels). . . . . . . . . . . . . . . . . 4835 110 57015
R663 1k, 5%, 1/4W, Carbon Film (25", 27" Mod
els) . . . . . . . . . . . . . . . . . 4835 110 57018
R671 0 ohm, 1/8W, Jumper, Carbon Film . . . 4835 110 67173
R672 10k, 5%, 1/4W, Metal Film. . . . . . . 4835 116 57321
R673 10k, 5%, 1/4W, Metal Film. . . . . . . 4835 116 57321
R674 10k, 5%, 1/4W, Metal Film. . . . . . . 4835 116 57321
Page 5

20LJ26 (continued) Page: 4
R675 10k, 5%, 1/4W, Metal Film. . . . . . . 4835 116 57321
R676 16k, 5%, 1/4W, Metal Film. . . . . . . 4835 116 57492
R677 100k, 5%, 1/4W, Metal Film . . . . . . 4835 116 57395
R678 330k, 1%, 1/8W, Metal Film (13", 19" Mo
dels). . . . . . . . . . . . . . . . . 4835 116 57558
R678 820k, 5%, 1/4W, Metal Film (25", 27" Mo
dels). . . . . . . . . . . . . . . . . 4835 116 57507
R679 22k, 5%, 1/4W, Metal Film. . . . . . . 4835 116 57412
R681 20k, 5%, 1/4W, Metal Film. . . . . . . 4835 116 57468
R682 30k, 5%, 1/4W, Metal Film. . . . . . . 4835 116 57494
R685 18k, 5%, 1/4W, Metal Film. . . . . . . 4835 116 57323
R686 18k, 5%, 1/4W, Metal Film. . . . . . . 4835 116 57323
R687 18k, 5%, 1/4W, Metal Film. . . . . . . 4835 116 57323
R688 270k, 5%, 1/4W, Metal Film . . . . . . 4835 116 57417
IC'S & TRANSISTORS
IC200 IC TDA9852 (Stereo Models) . . . . . . 4835 209 88386
IC230 IC TDA7052/N2, Audio Amp . . . . . . . 4835 209 47005
IC240 IC TDA7052/N2, Audio Amp (Stereo Models 4835 209 47005
IC270 IC, Signal Processor . . . . . . . . . 4835 209 88379
IC341 IC, Data Slicer. . . . . . . . . . . . 4835 209 88189
IC345 Microprocessor (Canada Models) . . . . 4835 209 17556
IC345 16K Microprocessor (Non Canada Models) 4835 209 17557
IC345 20K Microprocessor (Non Canada Models) 4835 209 17559
IC346 IC, Memory . . . . . . . . . . . . . . 4835 209 88108
IC410 IC, Regulator. . . . . . . . . . . . . 4835 209 47056
IC530 IC, Shutdown Switch. . . . . . . . . . 4835 209 87838
IC550 IC, Vertical (13", 19" Models) . . . . 4835 209 88188
IC550 IC, Vertical (25", 27" Models) . . . . 4835 209 88003
Q324 Transistor, NPN, Vertical Pulse. . . . 4835 130 47064
Q381 Transistor, NPN, Video Buffer. . . . . 4835 130 47064
Q382 Transistor, PNP, Video Buffer. . . . . 4835 130 47058
Q400 Transistor, NPN, 129V Source (13", 19"
Models). . . . . . . . . . . . . . . . 4835 130 47072
Q400 Transistor, 129V Source (25", 27" Mode
ls). . . . . . . . . . . . . . . . . . 4835 130 48059
Q402 Transistor, NPN, On/Off Switch . . . . 4835 130 47059
Q403 Transistor, NPN, 8V Stand By Switch. . 4835 130 47892
Q404 Transistor, NPN, 8V Stand By Switch Pro
tector . . . . . . . . . . . . . . . . 4835 130 47064
Q410 Transistor, NPN, 5V Stand By Switch Reg
ulator . . . . . . . . . . . . . . . . 4835 130 47051
Q420 Transistor, NPN, Start Up Swtich . . . 4835 130 47059
Q461 Transistor, NPN, 5V Tuner Source . . . 4835 130 47051
Q462 Transistor, NPN, 8V Source . . . . . . 4835 130 47892
Q464 Transistor, NPN, 8V Regulator. . . . . 4835 130 47064
Q501 Transistor, NPN, Horizontal Driver (13"
, 19") . . . . . . . . . . . . . . . . 4822 130 41782
Q501 Transistor, NPN, Horizontal Driver (25"
, 27") . . . . . . . . . . . . . . . . 4835 130 47892
S Q502 Transistor, NPN, Horizontal Output . . 4835 130 47897
Q510 Transistor, NPN. . . . . . . . . . . . 4835 130 47064
Q521 Transistor, NPN (25", 27" Models). . . 4835 130 47064
S Q530 Transistor, PNP (13", 19" Models). . . 4835 130 47126
Q630 Transistor, NPN. . . . . . . . . . . . 4835 130 47064
Q631 Transistor, NPN. . . . . . . . . . . . 4835 130 47064
Q632 Transistor, NPN. . . . . . . . . . . . 4835 130 47064
Q661 Transistor, NPN. . . . . . . . . . . . 4835 130 47051
COILS & TRANSFORMERS
L210 Adjustable LC Coil, 91.50. . . . . . . 4835 150 57067
L212 Peaking Coil, 4.76uH. 5% . . . . . . . 4835 157 67011
L214 Peaking Coil, 1 OuH., 5% . . . . . . . 4835 150 57006
L315 Peaking Coil, 2.7uH. 5%. . . . . . . . 4835 157 67006
L316 Peaking Coil, 1.8OuH. 5% . . . . . . . 4835 157 67033
L317 Peaking Coil, 1.8OuH. 5% . . . . . . . 4835 157 67033
L318 Peaking Coil, 1.8OuH. 5% . . . . . . . 4835 157 67033
L341 Peaking Coil, 3.9uH. 5%. . . . . . . . 4835 157 67007
L348 Peaking Coil, 2.7uH. 5%. . . . . . . . 4835 157 67006
L351 Peaking Coil, 3.9uH. 5%. . . . . . . . 4835 157 67007
L352 Peaking Coil, 3.9uH. 5%. . . . . . . . 4835 157 67007
L353 Peaking Coil, 3.9uH. 5%. . . . . . . . 4835 157 67007
L357 Peaking Coil, 8.2uH., 2% . . . . . . . 4835 150 57068
L382 Peaking Coil, 22uH.. . . . . . . . . . 4835 150 57007
L400 Line Choke (Canada Models Only). . . . 4835 157 57077
L417 Peaking Coil, 2.7uH. 5%. . . . . . . . 4835 157 67006
L418 Peaking Coil, 2.7uH. 5%. . . . . . . . 4835 157 67006
L501 Peaking Coil, 2.7uH. 5%. . . . . . . . 4835 157 67006
S L517 Linearity Coil (27" Models). . . . . . 4835 150 57034
S L517 Linearity Coil (25" and 27" Models). . 4835 150 57002
L630 Peaking Coil, 2.2uH. 5%. . . . . . . . 4835 157 67005
S T501 Flyback Transformr(13"+19" Using 39OOpF
,C505) . . . . . . . . . . . . . . . . 4835 140 67133
S T502 Flyback Transformer (19" Using CRT's G
& K) . . . . . . . . . . . . . . . . . 4835 140 67134
S T502 Flyback Transformer (25" Model). . . . 4835 140 67126
S T502 Flyback Transformer (19" Using 47OOpF,
C505). . . . . . . . . . . . . . . . . 4835 140 67154
S T502 Flyback Transformer (19" Orig. part ma
rked 364093-4) . . . . . . . . . . . . 4835 140 67161
S T503 Flyback Maxislot (27" Models). . . . . 4835 140 67142
T504 Transformer, Horz. Driver (using, 20ohm
, R515). . . . . . . . . . . . . . . . 4835 142 47021
T505 Transformer, Horz. Driver (using, 43ohm
, R515). . . . . . . . . . . . . . . . 4835 148 27047
S = Safety Part Be sure to use exact replacement part.
DIODES
D224 Diode, Silicon . . . . . . . . . . . . 4835 130 37048
D225 Diode, Silicon . . . . . . . . . . . . 4835 130 37048
D280 Diode, Silicon (Stereo Models) . . . . 4835 130 37048
D345 Diode, Silicon . . . . . . . . . . . . 4835 130 37048
D346 Diode, Silicon . . . . . . . . . . . . 4835 130 37048
D401 Diode, Silicon . . . . . . . . . . . . 4835 130 37829
D402 Diode, Silicon . . . . . . . . . . . . 4835 130 37829
D403 Diode, Silicon . . . . . . . . . . . . 4835 130 37829
D404 Diode, Silicon . . . . . . . . . . . . 4835 130 37829
D405 Diode, Fast, Soft Recovery . . . . . . 4835 130 37094
D406 Diode, Silicon . . . . . . . . . . . . 4835 130 37048
D409 Diode, Fast, Soft Recovery . . . . . . 4835 130 37094
D410 Diode, Silicon . . . . . . . . . . . . 4822 130 41275
D411 Diode, Silicon . . . . . . . . . . . . 4822 130 41275
D413 Diode, Silicon . . . . . . . . . . . . 4835 130 37048
D415 Diode, Silicon . . . . . . . . . . . . 4835 130 37048
D416 Diode, Silicon . . . . . . . . . . . . 4835 130 37048
D420 Diode, Silicon . . . . . . . . . . . . 4835 130 37048
D421 Diode, Silicon . . . . . . . . . . . . 4835 130 37048
D445 Diode, Silicon (25", 27" Models) . . . 4835 130 37052
D445 Diode, Fast, Soft Recovery (13", 19" Mo
dels). . . . . . . . . . . . . . . . . 4835 130 37094
D460 Diode, Fast, Soft Recovery . . . . . . 4835 130 37094
D475 Diode, Silicon . . . . . . . . . . . . 4835 130 37052
D491 LED, Green(19",25" Jack Panel Mdls & AL
L 27") . . . . . . . . . . . . . . . . 4835 130 87001
D492 LED, Green (13" Jack Panel Models) . . 4835 130 87001
D508 Diode, Silicon . . . . . . . . . . . . 4835 130 37048
D509 Diode, Silicon . . . . . . . . . . . . 4835 130 37048
D510 Diode, Silicon . . . . . . . . . . . . 4835 130 37048
D511 Diode, Silicon . . . . . . . . . . . . 4835 130 37052
D519 Diode, Silicon . . . . . . . . . . . . 4835 130 37048
S D530 Diode, Silicon . . . . . . . . . . . . 4835 130 37048
D550 Diode, Fast, Soft Recovery . . . . . . 4835 130 37094
D629 Diode, Silicon . . . . . . . . . . . . 4835 130 37048
D630 Diode, Silicon . . . . . . . . . . . . 4835 130 37058
D661 Diode, Fast, Soft Recovery . . . . . . 4835 130 37094
Z282 Zener Diode, 8.2V (Stereo Models). . . 4822 130 34382
Z361 Zener Diode, 33V . . . . . . . . . . . 4835 130 37502
Z402 Zener Diode, 33V . . . . . . . . . . . 4835 130 37003
Z405 Zener Diode, 16V . . . . . . . . . . . 4835 130 37501
Z406 Zener Diode, 6.2V. . . . . . . . . . . 4835 130 37121
Z415 Zener Diode, 5.1 V . . . . . . . . . . 4835 130 37119
Z461 Zener Doide, 5.6V. . . . . . . . . . . 4835 130 37068
Z462 Zener Diode, 10V . . . . . . . . . . . 4835 130 37203
Z512 Zener Diode, 7.5V. . . . . . . . . . . 4835 130 37016
S Z530 Zener Diode, 4.3V (13", 19" Models). . 4835 130 37015
Z540 Zener Diode, 5.1V. . . . . . . . . . . 4835 130 37119
Z541 Zener Diode, 5.1V. . . . . . . . . . . 4835 130 37119
MISCELLANEOUS
S F400 Fuse, 2A . . . . . . . . . . . . . . . 4835 253 97122
S F401 Fuse, Pico, 2.5A . . . . . . . . . . . 4835 253 97031
HS410 Heatsink, Reg.(25", 27" Models). . . . 0073 615 00001
HS410 Heatsink, (13", 19" Models). . . . . . 0073 590 30001
HS502 Solder Lug (25", 27" Models) . . . . . 0020 100 70001
HS502 Support f/Horiz. Reg.. . . . . . . . . 4835 432 17643
HS502 Heatsink, (25", 27" Models). . . . . . 0073 586 10004
HS550 Solder Lug (25", 27" Models) . . . . . 0020 100 70001
HS550 Support f/Vert. Reg. . . . . . . . . . 4835 256 97278
HS550 Heatsink, (13", 19" Models). . . . . . 0073 590 40002
HS551 Heatsink-I.C. (25", 27" Models). . . . 0073 597 80008
IR91 Mini IR Receiver . . . . . . . . . . . 4835 219 47281
J2 3 Pin Connector
J4 2 Pin Connector
J7 2 Pin Connector, White (Mono Models) . 0018 169 30002
J27 4 Pin Board Connector (Stereo Models). 0018 169 30004
J40 7 Pin Connector
J401 Contact Pins . . . . . . . . . . . . . 4835 265 97017
J410 Contact Pins (25", 27" Models) . . . . 4835 265 97017
J500 Contact Pins . . . . . . . . . . . . . 4835 265 97017
J501 Contact Pins . . . . . . . . . . . . . 4835 265 97017
J550 Contact Pins . . . . . . . . . . . . . 4835 265 97017
S K400 Relay, Degauss (Not in 13" Models) . . 4835 277 27073
N401 Neon Lamp. . . . . . . . . . . . . . . 4835 134 27001
S79 Key Switch . . . . . . . . . . . . . . 4835 276 57004
SH200 IC Shield (Stereo Models). . . . . . . 0073 590 60002
SH341 Shield VIC . . . . . . . . . . . . . . 0073 595 90002
SH345 IC Shield. . . . . . . . . . . . . . . 0073 590 60003
T300 Cable Tuner (Not in 13" Models). . . . 4835 210 47058
T300 UV Tuner (13" Models). . . . . . . . . 4835 210 47072
V275 1uF.,50V,Elect (Used in EMX694,EMX695,E
MX69 . . . . . . . . . . . . . . . . . 4835 121 47406
V505 Buss Wire (Used with T505) . . . . . . 0046 012 60001
V505 .47 ohm, 5%,1/2W, Metal Film (Used with
T505). . . . . . . . . . . . . . . . . 4835 116 57139
V547 Buss Wire (Used in EMX694, EMX695, EMX6 0046 012 60001
V620 Peaking Coil, 2.2uH. 5%. . . . . . . . 4835 157 67005
Y200 Filter SAW, Video. . . . . . . . . . . 4835 153 97022
Y209 Ceramic Resonator, 503.5kHz. (Stereo Mo
dels). . . . . . . . . . . . . . . . . 4835 153 97042
Y220 Ceramic Filter 4.5MHz. (Mono Models) . 4835 158 97009
Page 6

20LJ26 (continued) Page: 5
Y220 Ceramic Filter 4.5MHz. (Stereo Models) 4835 153 57004
Y221 Ceramic Filter, Trap, 4.5MHz.. . . . . 4835 154 17001
Y320 Ceramic Resonator, 12MHz. (Non Clock Mo
dels). . . . . . . . . . . . . . . . . 4835 157 57129
Y321 Crystal, 12.288MHz. (13", 19" Models W/
Clock) . . . . . . . . . . . . . . . . 4835 242 77251
Y620 Crystal, 3.579MHz. . . . . . . . . . . 4835 242 77215
Plastic Mount for R448 (25", 27" Models 4835 402 57062
Silicon Pad for IC410. . . . . . . . . 4835 255 47004
Spring Clip for IC410. . . . . . . . . 4835 290 47003
Spring Clip for IC550 (25", 27" Models) 4835 290 47003
Silicon Insulator for 0400 . . . . . . 4835 255 47003
Spring Clip for Q400 . . . . . . . . . 4835 290 47008
Spring Clip for Q502 . . . . . . . . . 4835 290 47003
APT143 CRT BOARD (13",19" & 20" ONLY)
CAPACITORS
S C2 0.01uF., 10%, 630V, Metalized Film . . 4835 121 47335
C3 1uF., 50V, Electrolytic. . . . . . . . 4835 121 47406
RESISTORS
S R1 3.6 ohm, 5%,1/2W, Metal Film (13" with
CRT F) . . . . . . . . . . . . . . . . 4835 116 67182
S R1 1.1 ohm, 5%,1/2W, Metal Film (13" Mono
Only). . . . . . . . . . . . . . . . . 4835 116 67158
S R1 1.2 ohm, 5%,1/2W, Metal Film (13" Stere
o). . . . . . . . . . . . . . . . . . . 4835 116 67077
S R1 3 ohm,5%,1/2W,MF(All Other 19" CRT's). 4835 116 57025
S R3 3.6 ohm, 5%, 1/2W, Metal Film (19" Mode
ls Only) . . . . . . . . . . . . . . . 4835 116 67182
S R3 1.1 ohm, 5%, 1/2W, Metal Film (13" Mode
ls Only) . . . . . . . . . . . . . . . 4835 116 67158
R4 1.5k, 20%, 1/2W, Carbon Comp.. . . . . 4835 110 47034
R5 1.5k, 20%, 1/2W, Carbon Comp.. . . . . 4835 110 47034
S R6 100 ohm, 5%, 1/4W, Metal Film. . . . . 4835 116 57318
R7 51 ohm, 5%, 1/4W, Metal Film . . . . . 4835 116 57501
R8 51 ohm, 5%, 1/4W, Metal Film . . . . . 4835 116 57501
R9 51 ohm, 5%, 1/4W, Metal Film . . . . . 4835 116 57501
S R10 15k, 5%, 3W, Metal Film. . . . . . . . 4835 116 67018
S R11 15k, 5%, 3W, Metal Film. . . . . . . . 4835 116 67018
S R12 15k, 5%, 3W, Metal Film. . . . . . . . 4835 116 67018
R13 1.5k, 20%, 1/2W, Carbon Comp.. . . . . 4835 110 47034
R14 1.5k, 20%, 1/2W, Carbon Comp.. . . . . 4835 110 47034
R15 1.5k, 20%, 1/2W, Carbon Comp.. . . . . 4835 110 47034
TRANSISTORS
Q1 Transistor, NPN. . . . . . . . . . . . 4835 130 47059
Q2 Transistor, NPN. . . . . . . . . . . . 4835 130 47059
Q3 Transistor, NPN. . . . . . . . . . . . 4835 130 47059
COILS
L1 Peaking Coil, 100uH., 10% (13", 19") . 4835 157 57047
MISCELLANEOUS
S CRT1 CRT Socket . . . . . . . . . . . . . . 4835 265 97331
J3 Contact Pins . . . . . . . . . . . . . 4835 265 97017
J21 Cable Assembly (13" Models). . . . . . 0046 232 20003
J22 4 Pin Cable Assembly (13" Models). . . 0046 216 40005
J22 4 Pin Cable Assembly (19" Models). . . 0046 216 40008
J27 4 Pin Board Connector (Stereo Models). 0018 169 30004
P500 Cable Assembly . . . . . . . . . . . . 4835 265 97017
P501 Cable Assembly . . . . . . . . . . . . 4835 265 97017
P550 Cable Assembly . . . . . . . . . . . . 4835 265 97017
APT144 CRT BOARD (25" & 25" ONLY)
CAPACITORS
C21 1000pF., 10%, 500V, Ceramic. . . . . . 4835 122 47384
S C22 0.01uF., 20%, 2kV, Ceramic . . . . . . 4835 122 57002
C23 0.022uF., 10%, 400V, Polyester . . . . 4835 121 47201
C24 100pF., 10%, 500V, Ceramic . . . . . . 4835 122 47028
C28 1000pF., 10%, 50V, Ceramic . . . . . . 4835 122 47004
RESISTORS
S R22 100 ohm, 5%, 1/2W, Metal Film. . . . . 4835 116 67089
S R21 3.3 ohm,5%,3W,Metal Film(19" Using CRT
K). . . . . . . . . . . . . . . . . . . 4835 116 57627
S R21 3 ohm,5%,3W,Metal Film(19" Using CRT G) 4835 116 67189
S R23 8.2 ohm, 5%, 2W, Metal Film (27" Models
Only). . . . . . . . . . . . . . . . . 4835 116 57635
S R23 9.1 ohm, 5%, 2W, Metal Film (25" Models 4835 116 67188
R24 1.5k, 20%, 1/2W, Carbon Comp.. . . . . 4835 110 47034
R25 1.5k, 20%, 1/2W, Carbon Comp.. . . . . 4835 110 47034
S R26 1 00 ohm, 5%, 1/3W, Metal Film . . . . 4835 116 87002
R27 51 ohm, 5%, 1/4W, Metal Film . . . . . 4835 116 57501
R28 51 ohm, 5%, 1/4W, Metal Film . . . . . 4835 116 57501
R29 51 ohm, 5%, 1/4W, Metal Film . . . . . 4835 116 57501
S R50 15k, 5%, 3W, Metal Film. . . . . . . . 4835 116 67018
S R51 15k, 5%, 3W, Metal Film. . . . . . . . 4835 116 67018
S R52 15k, 5%, 3W, Metal Film. . . . . . . . 4835 116 67018
R53 1.5k, 20%, 1/2W, Carbon Comp.. . . . . 4835 110 47034
R54 1.5k, 20%, 1/2W, Carbon Comp.. . . . . 4835 110 47034
R55 1.5k, 20%, 1/2W, Carbon Comp.. . . . . 4835 110 47034
TRANSISTORS
Q21 Transistor, NPN. . . . . . . . . . . . 4835 130 47796
Q22 Transistor, NPN. . . . . . . . . . . . 4835 130 47796
Q23 Transistor, NPN. . . . . . . . . . . . 4835 130 47796
COILS
S = Safety Part Be sure to use exact replacement part.
L1 Peaking Coil, 100uH., 5% . . . . . . . 4835 157 57141
MISCELLANEOUS
S CRT21 CRT Socket . . . . . . . . . . . . . . 4835 265 97332
J51 Cable Assembly (25", 27" Models) . . . 0046 232 20006
J52 4 Pin Cable Assembly (25", 27" Models) 0046 216 40008
J53 3 Pin Connector (25", 27" Models). . . 0018 222 20203
J410 Cable Assembly (25", 27" Models) . . . 0046 170 20007
P500 Cable Assembly . . . . . . . . . . . . 4835 265 97017
P501 Cable Assembly . . . . . . . . . . . . 4835 265 97017
P550 Cable Assembly . . . . . . . . . . . . 4835 265 97017
AVJ183A001 AUDIO/VIDEO JACK PANELS
Complete Panel . . . . . . . . . . . . 4835 219 57546
CAPACITORS
C30 220uF., 16V, Electrolytic. . . . . . . 4835 124 47494
C31 2200pF., 10%, 500V, Ceramic. . . . . . 4835 122 47057
C32 220uF., 16V, Electrolytic. . . . . . . 4835 124 47494
S C33 4700pF., 20%, 250Vac, Ceramic. . . . . 4835 122 97023
C41 47uF., 16V, Electrolytic . . . . . . . 4835 124 47567
C42 1000uF., 16V, Electrolytic . . . . . . 4835 124 47497
C43 220uF., 16V, Electrolytic. . . . . . . 4835 124 47494
C45 100uF., 25V, Electrolytic. . . . . . . 4835 124 47501
C46 82pF., 5%, 50V, Ceramic. . . . . . . . 4835 122 87038
C61 1uF., 50V, Electrolytic. . . . . . . . 4835 121 47406
C62 1uF., 50V, Electrolytic. . . . . . . . 4835 121 47406
C63 220uF., 16V, Electrolytic. . . . . . . 4835 124 47494
C81 1uF., 50V, Electrolytic. . . . . . . . 4835 121 47406
C82 1uF., 50V, Electrolytic. . . . . . . . 4835 121 47406
C83 220uF., 16V, Electrolytic. . . . . . . 4835 124 47494
RESISTORS
R15 100 ohm, 5%, 1/2W, Carbon Film . . . . 4835 111 57006
R16 100 ohm, 5%, 1/2W, Carbon Film . . . . 4835 111 57006
R17 200 ohm, 5%, 1/2W, Carbon Film . . . . 4835 110 47182
R18 200 ohm, 5%, 1/2W, Carbon Film . . . . 4835 110 47182
S R30 51 ohm, 5%, 1/2W, Metal Film . . . . . 4835 116 67086
S R31 4.7 Meg, 5%, 1/2W, Metal Film. . . . . 4835 116 57009
R40 1k, Control Adj. . . . . . . . . . . . 4835 100 17014
R41 75 ohm, 5%, 1/4W, Metal Film . . . . . 4835 111 37042
R42 4.7k, 5%, 1/10W, Metal Film. . . . . . 4835 111 37444
R43 20k, 5%, 1/10W, Metal Film . . . . . . 4835 111 37313
R44 200 ohm, 5%, 1/10W, Metal Film . . . . 4835 111 37233
R45 15k, 5%, 1/10W, Metal Film 9 . . . . . 4835 111 37006
R46 82 ohm, 5%, 1/10W, Metal Film. . . . . 4835 111 37278
R47 15k, 5%, l/l0W,MetaIFilrn. . . . . . . 4835 111 37006
R48 1k, 5%, 1/10W,MetalFilm. . . . . . . . 4835 111 37433
S R49 82 ohm, 5%, 1/3, Metal Film. . . . . . 4822 111 30533
R50 300 ohm, 5%, 1/4W, Carbon Film . . . . 4835 110 57221
R51 51 ohm, 5%, 1/4W, Metal Film . . . . . 4835 111 37138
R52 150 ohm, 5%, 1/10W, Metal Film . . . . 4835 111 37334
R53 150 ohm, 5%, 1/4W, Metal Film. . . . . 4835 116 57399
R54 1k, 5%, 1/10W, Metal Film e. . . . . . 4835 111 37433
R60 500 ohm, Control Adj.. . . . . . . . . 4835 100 17063
R61 47k, 5%,/4W, Metal Film o. . . . . . . 4835 111 37038
R62 3.3k, 5%,1/10W, Metal Film . . . . . . 4835 111 37247
R63 30k, 5%, 1/10W, Metal Film . . . . . . 4835 111 37246
R64 150 ohm, 5%, 1/10W, Metal Film . . . . 4835 111 37334
R65 4.7k, 5%, l/l0W, MetaI FiIm. . . . . . 4835 111 37444
S R66 100 ohm, 5%, 1/10W, Metal Film . . . . 4835 111 37432
R67 2.2k, 5%, 1/10W, Metal Film. . . . . . 4835 111 37234
R68 10k, 5%, 1/10W, Metal Film . . . . . . 4835 111 37216
R69 lk, 5%, 1/10W,MetalFilm. . . . . . . . 4835 111 37433
R70 l8k, 5%, 1/10W, Metal Film . . . . . . 4835 111 37232
R71 3k, 5%, l/l0W,MetaIFiIm. . . . . . . . 4835 111 37245
R80 500 ohm, Control Adj.. . . . . . . . . 4835 100 17063
R81 47k, 5%, 1/4W, Metal Film. . . . . . . 4835 111 37038
R82 3.3k, 5%, 1/l0W,Metal Film . . . . . . 4835 111 37247
R83 30k, 5%, l/10W, Metal Film . . . . . . 4835 111 37246
R84 150ohm, 5%, 1/10W, Metal Film. . . . . 4835 111 37334
R85 4.7k, 5%, 1/10W, Metal Film. . . . . . 4835 111 37444
S R86 100 ohm, 5%, 1/10W, Metal Film . . . . 4835 111 37432
R87 2.2k, 5%, l/10W, Metal Film. . . . . . 4835 111 37234
R88 10k, 5%, l/10W, Metal Film . . . . . . 4835 111 37216
R89 1k, 5%, l/l0W, Metal Fi1m. . . . . . . 4835 111 37433
R90 l8k, 5%, 1/10W, Metal Film . . . . . . 4835 111 37232
R91 3k, 5%, 1/10W, Metal Film. . . . . . . 4835 111 37245
MISCELLANEOUS
D30 Diode, Silicon . . . . . . . . . . . . 4835 130 37052
D41 Diode, Silicon . . . . . . . . . . . . 4835 130 37066
D61 Diode, Silicon . . . . . . . . . . . . 4835 130 37066
D81 Diode, Silicon . . . . . . . . . . . . 4835 130 37066
S IC41 Optical Coupler. . . . . . . . . . . . 4835 130 97058
S IC61 Optical Coupler. . . . . . . . . . . . 4835 130 47903
S IC81 Optical Coupler. . . . . . . . . . . . 4835 130 47903
J5 3 Pin Board Connector. . . . . . . . . 0018 169 30003
J9 2 Pin Connector, White . . . . . . . . 0018 169 30002
J45 Phono Jack Assembly. . . . . . . . . . 0018 225 80001
J80 4 Pin Board Connector. . . . . . . . . 0018 169 30004
J85 4 Pin Connector, Red . . . . . . . . . 0018 223 40004
S L30 Isolation Transformer, 15kHz.. . . . . 4835 148 27042
P40 7 Pin Connector. . . . . . . . . . . . 0018 220 38007
Q41 Transistor, NPN. . . . . . . . . . . . 4835 130 47094
Q42 Transistor, NPN. . . . . . . . . . . . 4835 130 47094
Page 7

20LJ26 (continued) Page: 6
Q43 Transistor, NPN. . . . . . . . . . . . 4835 130 47751
Q44 Transistor, NPN. . . . . . . . . . . . 4835 130 47094
Q61 Transistor, NPN. . . . . . . . . . . . 4835 130 47094
Q62 Transistor, NPN. . . . . . . . . . . . 4835 130 47094
Q63 Transistor, NPN. . . . . . . . . . . . 4835 130 47094
Q81 Transistor, NPN. . . . . . . . . . . . 4835 130 47094
Q82 Transistor, NPN. . . . . . . . . . . . 4835 130 47094
Q83 Transistor, NPN. . . . . . . . . . . . 4835 130 47094
S S15 Switch Slide Dpdt. . . . . . . . . . . 4835 276 17248
S T15 Audio Transformer. . . . . . . . . . . 4835 148 87282
S T16 Audio Transformer. . . . . . . . . . . 4835 148 87282
Z30 Zener Diode, 12V . . . . . . . . . . . 4835 130 37423
AVJ179A001 & AVJ180A001 AUDIO/VIDEO JACK PANELS
Complete Panel . . . . . . . . . . . . 4835 219 57537
CAPACITORS
C30 220uF., 16V, Electrolytic. . . . . . . 4835 124 47494
S C31 2200pF., 10%, 500V, Ceramic. . . . . . 4835 122 47057
C32 220uF., 16V, Electrolytic. . . . . . . 4835 124 47494
S C33 4700pF., 20%, 250Vac, Ceramic. . . . . 4835 122 97023
C41 47uF., 16V, Electrolytic . . . . . . . 4835 124 47567
C42 1000uF., 16V, Electrolytic . . . . . . 4835 124 47497
C43 220uF., 16V, Electrolytic. . . . . . . 4835 124 47494
C45 100uF., 25V, Electrolytic. . . . . . . 4835 124 47501
C46 82pF., 5%, 50V, Cerarnic . . . . . . . 4835 122 87038
C61 1uF., 50V, Electrolytic. . . . . . . . 4835 121 47406
C62 1uF., 50V, Electrolytic. . . . . . . . 4835 121 47406
C63 220uF., 16V, Electrolytic. . . . . . . 4835 124 47494
C81 luF., 50V, Electrolytic (AVJ180 Only). 4835 121 47406
C82 1uF., 50V, Electrolytic (AVJ180 Only). 4835 121 47406
C83 220uF., 16V, Electrolytic (AVJ180 Only) 4835 124 47494
RESISTORS
S R30 51 ohm, 5%, 1/2W, Metal Film . . . . . 4835 116 67086
S R31 4.7 Meg, 5%, 1/2W, Metal Film. . . . . 4835 116 57009
R40 1k, Control Adj. . . . . . . . . . . . 4835 100 17014
R41 75 ohm, 5%, 1/4W, Metal Film . . . . . 4835 111 37042
R42 4.7k, 5%, 1/10W, Metal Film. . . . . . 4835 111 37444
R43 20k, 5%, 1/10W, Metal Film . . . . . . 4835 111 37313
R44 200 ohm, 5%, 1/10W, Metal Film . . . . 4835 111 37233
R45 15k, 5%, 1/10W, Metal Film . . . . . . 4835 111 37006
R46 82 ohm, 5%, 1/10W, Metal Film. . . . . 4835 111 37278
R47 15k, 5%, 1/10W, Metal Film . . . . . . 4835 111 37006
R48 1k, 5%, 1/10W, Metal Film. . . . . . . 4835 111 37433
S R49 82 ohm, 5%, 1/4W, Metal Film . . . . . 4835 111 37126
R50 300 ohm, 5%, 1/4W, Carbon Film . . . . 4835 110 57221
R51 51 ohm, 5%, 1/4W, Metal Film . . . . . 4835 111 37138
R52 150 ohm, 5%, 1/10W, Metal Film . . . . 4835 111 37334
R53 150 ohm, 5%, 1/10W, Metal Film . . . . 4835 111 37334
R54 1k, 5%, 1/10W, Metal Film. . . . . . . 4835 111 37433
R60 500 ohm, Control Adj.. . . . . . . . . 4835 100 17063
R61 47k, 5%,1/4W, Metal Film . . . . . . . 4835 111 37038
R62 3.3k, 5%, 1/10W, Metal Film. . . . . . 4835 111 37247
R63 30k, 5%, 1/10W, Metal Film . . . . . . 4835 111 37246
R64 150 ohm, 5%, 1/10W, Metal Film . . . . 4835 111 37334
R65 4.7k, 5%, 1/10W, Metal Film. . . . . . 4835 111 37444
S R66 100 ohm, 5%, 1/10W, Metal Film . . . . 4835 111 37432
R67 2.2k,5%,1/10W,Metal Film . . . . . . . 4835 111 37234
R68 10k, 5%, 1/10W, Metal Film . . . . . . 4835 111 37216
R69 1k, 5%, 1/10W, Metal Film. . . . . . . 4835 111 37433
R70 18k, 5%, 1/10W, Metal Film . . . . . . 4835 111 37232
R71 3k, 5%, 1/10W, Metal Film. . . . . . . 4835 111 37245
R80 500 ohm, Control Adj.(AVJ180 Only) . . 4835 100 17063
R81 47k, 5%, 1/4W, Metal Film (AVJ180 Only) 4835 111 37038
R82 3.3k, 5%, 1/10W, Metal Film (AVJ180 Onl
y). . . . . . . . . . . . . . . . . . . 4835 111 37247
R83 30k, 5%, 1/10W, Metal Film (AVJ180 Only 4835 111 37246
R84 150 ohm, 5%, 1/10W, Metal Film (AVJ180
Only). . . . . . . . . . . . . . . . . 4835 111 37334
R85 4.7k, 5%, 1/10W, Metal Film (AVJ180 Onl
y). . . . . . . . . . . . . . . . . . . 4835 111 37444
R86 100 ohm, 5%, 1/10W, Metal Film (AVJ180
Only). . . . . . . . . . . . . . . . . 4835 111 37432
R87 2.2k, 5%, 1/10W, Metal Film (AVJ180 Onl
y). . . . . . . . . . . . . . . . . . . 4835 111 37234
R88 10k, 5%, 1/10W, Metal Film (AVJ180 Only 4835 111 37216
R89 1k, 5%, 1/10W, Metal Film (AVJ180 Only) 4835 111 37433
R90 18k, 5%, 1/10W, Metal Film (AVJ180 Only 4835 111 37232
MISCELLANEOUS
D30 Diode, Silicon . . . . . . . . . . . . 4835 130 37052
D41 Diode, Silicone. . . . . . . . . . . . 4835 130 37066
D61 Diode, Silicon . . . . . . . . . . . . 4835 130 37066
D81 Diode, Silicone (AVJ180 Only). . . . . 4835 130 37066
S IC41 Optical Couple . . . . . . . . . . . . 4835 130 97058
S IC61 Optical Coupler. . . . . . . . . . . . 4835 130 47903
S IC81 OpticalCoupler (AVJ1800nly). . . . . . 4835 130 47903
J5 3 Pin Board Connector (AVJ180 Only). . 0018 169 30003
J9 2 Pin Connector, White . . . . . . . . 0018 169 30002
J45 3 Pin Phono Assembly (AVJ180 Only) . . 0018 220 40423
J45 3 Pin Phono Assembly (AVJ179 Only) . . 0018 220 40420
S L30 Isolation Transformer, 15kHz.. . . . . 4835 148 27042
P40 7 Pin Connector. . . . . . . . . . . . 0018 220 38007
Q41 Transistor, NPN. . . . . . . . . . . . 4835 130 47094
S = Safety Part Be sure to use exact replacement part.
Q42 Transistor, NPN. . . . . . . . . . . . 4835 130 47094
Q43 Transistor, NPN. . . . . . . . . . . . 4835 130 47751
Q44 Transistor, NPN. . . . . . . . . . . . 4835 130 47094
Q61 Transistor, NPN. . . . . . . . . . . . 4835 130 47094
Q62 Transistor, NPN. . . . . . . . . . . . 4835 130 47094
Q63 Transistor, NPN. . . . . . . . . . . . 4835 130 47094
Q81 Transistor, NPN (AVJ180 Only). . . . . 4835 130 47094
Q82 Transistor, NPN (AVJ180 Only). . . . . 4835 130 47094
Q83 Transistor, NPN (AVJ180 Only). . . . . 4835 130 47094
R91 3k, 5%, 1/10W, Metal Film (AVJ180 Only) 4835 111 37245
Z30 Zener Diode, 12V . . . . . . . . . . . 4835 130 37423
A10438B002 DATA TERMINAL INTERFACE
Complete Panel . . . . . . . . . . . . 4835 219 57352
RESISTORS
R22 68 ohm, 5%, 1/4W, Carbon Film. . . . . 4835 110 57248
R23 100 ohm, 5%, 1/4W, Carbon Film . . . . 4835 110 57247
R25 47k, 5%, 1/4W, Carbon Film . . . . . . 4835 110 57095
R26 43k, 5%, 1/4W, Carbon Film . . . . . . 4835 110 57277
R27 43k, 5%, 1/4W, Carbon Film . . . . . . 4835 110 57277
R28 43k, 5%, 1/4W, Carbon Film . . . . . . 4835 110 57277
R29 100 ohm, 5%, 1/4W, Carbon Film . . . . 4835 110 57247
R31 47k, 5%, 1/4W, Carbon Film . . . . . . 4835 110 57095
R32 10k, 5%, 1/4W, Carbon Film . . . . . . 4835 110 57015
R33 200 ohm, 5%, 1/4W, Carbon Film . . . . 4835 110 57203
R34 43k, 5%, 1/4W, Carbon Film . . . . . . 4835 110 57277
R36 200 ohm, 5%, 1/4W, Carbon Film . . . . 4835 110 57203
MISCELLANEOUS
S C20 1000uF., 16Vdc, Electrolytic . . . . . 4835 124 47271
S IC20 Opto Isolator, PS2021 L. . . . . . . . 4835 130 37057
S IC22 Opto Isolator, PS2021 L. . . . . . . . 4835 130 37057
S IC24 Opto Isolator, PS2021 L. . . . . . . . 4835 130 37057
S IC26 Opto Isolator, PS2021 L. . . . . . . . 4835 130 37057
Q24 Transistor, PNP. . . . . . . . . . . . 4835 130 47053
J32 Phone Jack, RJ6. . . . . . . . . . . . 0018 221 20006
J34 4 Pin, Header Connector. . . . . . . . 0018 169 30004
J35 2 Pin, Header Connector. . . . . . . . 0018 169 30002
J36 3 Pin, Header Connector. . . . . . . . 0018 169 30003
Page 8

Contents
X6 CHASSIS SERVICE ADJUSTMENTS
Caution: The X6 Chassis incorporates a "HOT" ground system. Always use a separate isolation
transformer when applying power to the exposed chassis.
IMPORTANT NOTES 2
FOCUS 2
R.F. AGC DELAY 2
VCO ADJUSTMENT 2
VERTICAL SIZE AND VERTICAL CENTERING 2
HORIZONTAL CENTERING ADJUSTMENT 2
ADJUSTING THE PICTURE 2
DEGAUSSING THE RECEIVER 2
CONVERGENCE AND PURITY ADJUSTMENT PROCEDURE 2
STEREO ALIGNMENT (FOR STEREO MODELS ONLY) 5
AUDIO/VIDEO JACK PANEL ALIGNMENT 5
SERVICE TEST MODE PROCEDURES 6
CLOCK CALIBRATION 7
PRACTICAL SERVICE PRECAUTIONS
Page 9

IMPORTANT NOTES
Unless otherwise Specified:
1. All service adjustments are "HOT" voltagewise. For maximum safety, ensure the use of properly insulated tools.
2. Refer to the X6 Chassis Layout Diagram (Figure 1)for quick location of test points or service adjustment controls.
3. Grid locations (Ex. D-2) next to control reference numbers refer to the Printed Circuit Board Illustrations.
FOCUS
1. Tune in a local station and adjust the Focus Control(located on Flyback) for best picture details at high light condition.
R.F. AGC DELAY
1. Tune to a weak station, or loosely couple the antenna to observe a snowy picture.
2. Set the R.F. AGC delay (R206, E-1) to its fully clockwise (CW) position.
3. Slowly turn R206 counterclockwise (CCW) to a point slightly beyond the point of minimum snow.
NOTE: Do not turn the control any further as it may result in an overloaded picture on the face of the
CRT(caused by a strong station signal).
VCO ADJUSTMENT
1. Ensure the set is in the Antenna mode (not Cable) and tune the receiver to a good local air signal.
2. Temporally place a jumper from pin 5 (Coincidence) of IC270 (D-2) to ground.
3. Connect a DC voltmeter (input impedance 10 Megohms or more) to Test Point 2 (AFT D-1).
4. Adjust L210 (D-2) to 2.5Vdc exactly.
5. Remove the jumper from pin 5 of IC270 to ground.
VERTICAL SIZE AND VERTICAL CENTERING
1. Apply a Crosshatch pattern to the antenna input terminal.
2. Adjust the Vertical Size Control (R557 J-2) to obtain a slight underscan of the raster at the top and bottom portions
of the screen.
3. If the raster is not centered, adjust the Vertical Centering Control (R558 J-2) to center the raster properly on the screen.
4. Adjust the Vertical Size Control (R557) to obtain a slight overscan at the top and bottom of the screen(approximately 8%
overscan total).
HORIZONTAL CENTERING ADJUSTMENT
1. Apply a crosshatch pattern to the antenna terminal.
2. Adjust the Horizontal Centering Control (R520 D-1) to obtain proper horizontal centering of the crosshatch pattern at the
left and right of the screen.
ADJUSTING THE PICTURE
NOTE: The Color Purity and Convergence Adjustments described below should be performed onlyafter installation of a new
CRT or Deflection Yoke Assembly; otherwise, it will not be necessary to remove the rubber wedges. Minor corrections for
purity and convergence can be acomplished through the use of the Purity and Convergence Assembly located on the neck of
the CRT.
DEGAUSSING THE RECEIVER
1. Position the TV receiver so that the screen faces the direction it will be facing, while in use.
2. Before the set is turned on, thoroughly degauss the entire receiver.
a. Move a Degaussing Coil in a circular motion slowly around the sides and the front face plate of the receiver.
b. Withdraw the Degaussing Coil at least six feet before disconnecting it from its power source.
CONVERGENCE AND PURITY ADJUSTMENT PROCEDURE
PRE CONVERGENCE PROCEDURE:
(Perform the DEGAUSS PROCEDURE first.)
1. Place the multi-pole Purity and Convergence Assembly with the 2-Y pole Purity Rings directly in the gap between the G2
and G3 (Focus) Grids. (As shown in graphic ).
2. Connect a Center Cross pattern or a Crosshatch pattern to the antenna terminals.
3. Set the Green Cutoff control (R649) to its fully clockwise (CW) position.
4. Set the Green Drive control (R643) to its fully counterclockwise (CCW) position.
5. Loosen the Yoke Clamp screws, pull the Yoke back and remove the three Yoke wedges.
6. Slide the Yoke all the way forward so that it rests against the bell of the CRT.
7. Tighten the Yoke Clamp screw so that the Yoke doesn't drop away from the bell of the CRT.
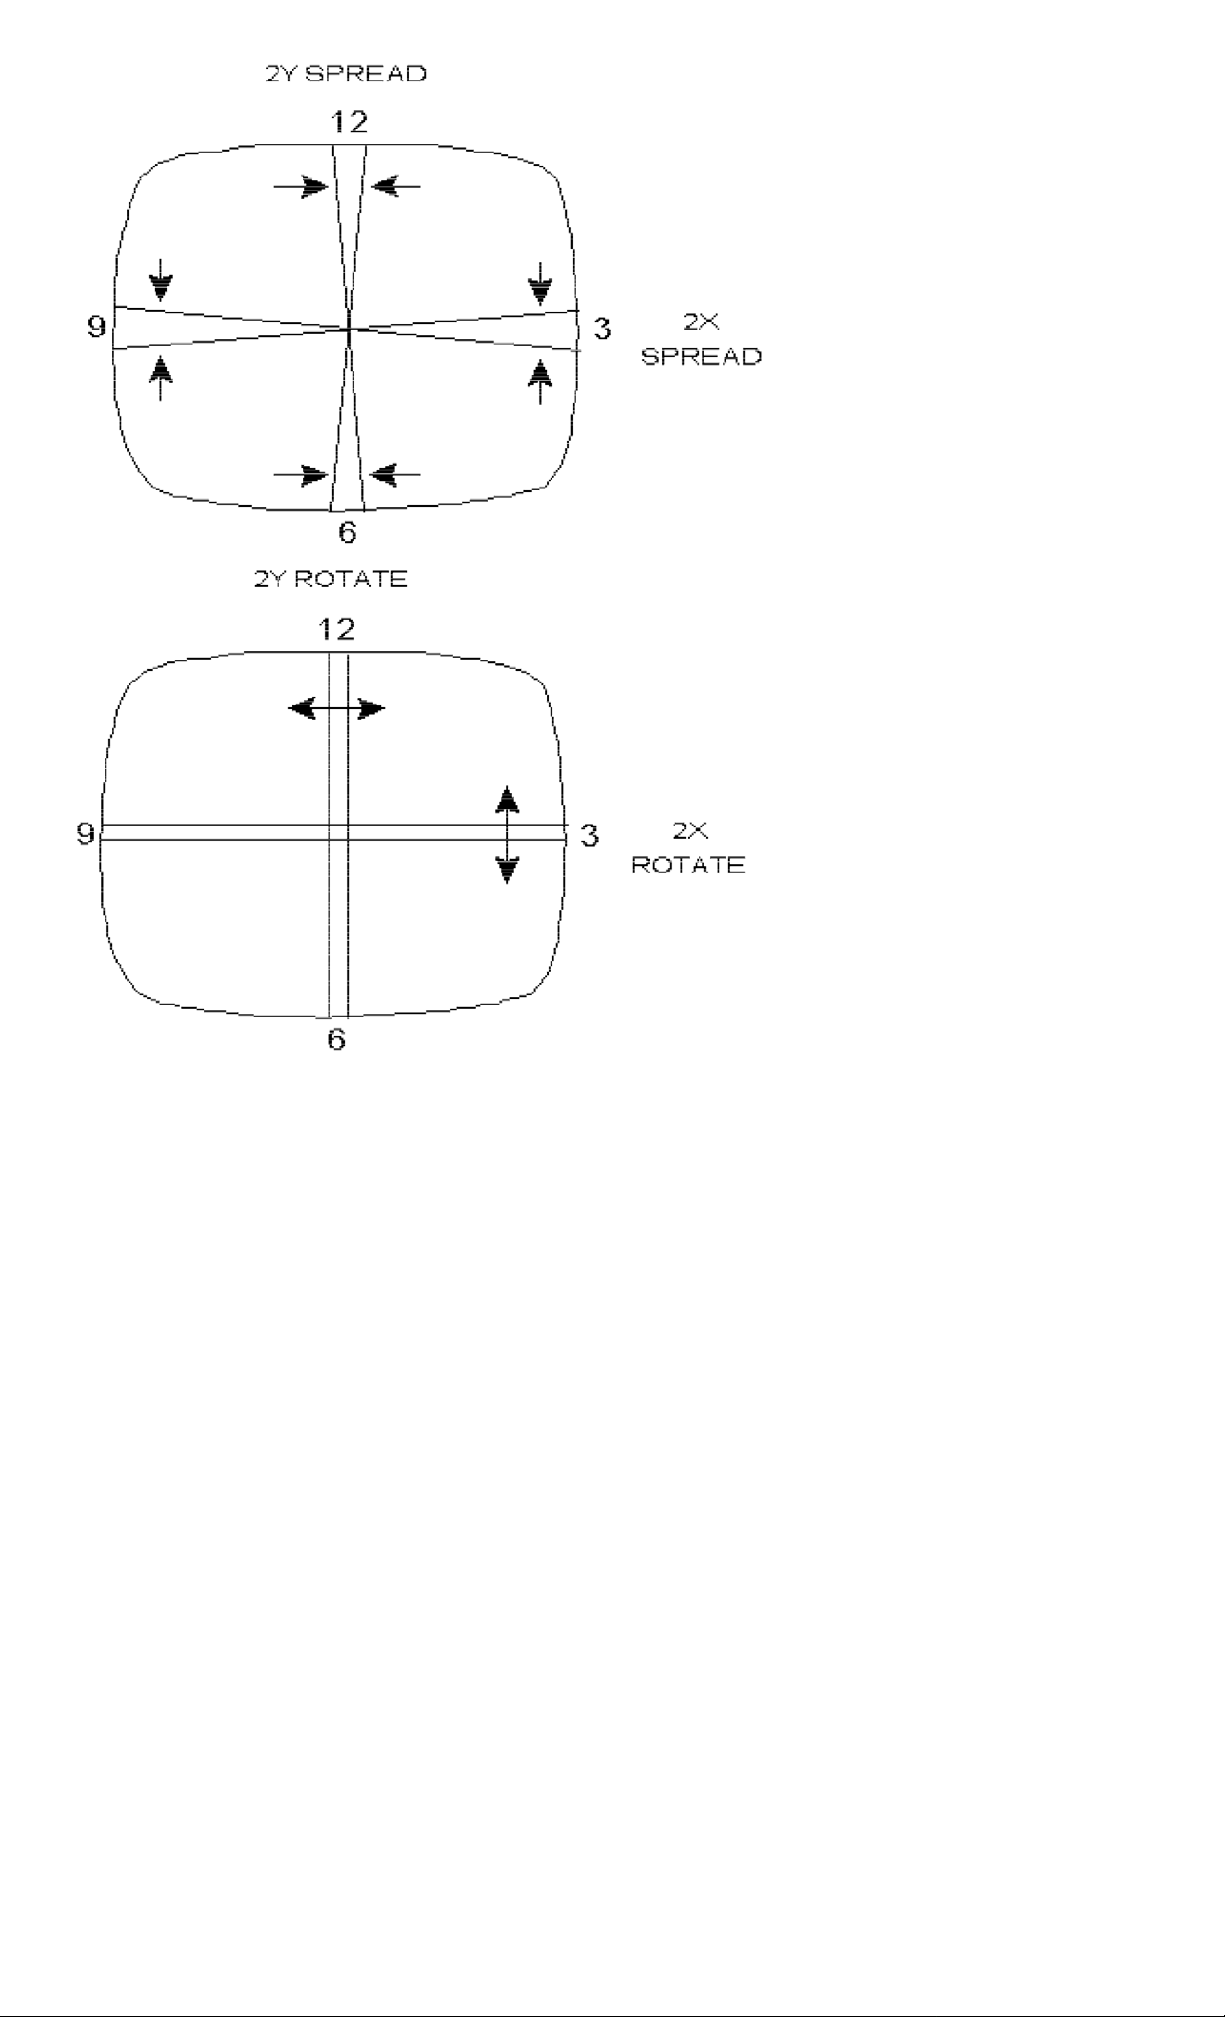
8. Slowly spread and, if necessary, rotate the 2-Y pole purity rings so that the red and blue lines are at least parallel and
preferably coincide at the 6:00 and 12:00 o'clock position. (Refer to graphic) .
Page 10
Proceed to COLOR PURITY ADJUSTMENT
COLOR PURITY ADJUSTMENT
1. Connect a White Screen signal to the Antenna terminals.
2. Set the Red Cutoff (R650) and Blue Cutoff (R648) controls fully clockwise (CW).
Then set the Blue Drive (R642) fully counterclockwise (CCW).
3. Set the Green Cutoff control (R649) fully counterclockwise (CCW) and the Green Drive control (R643) Fully clockwise
(CW).
4. Slowly spread the 2-X Pole Purity Rings to center the Green portion of the screen leaving the same amount of Red on the
left side as there is blue on the right.
5. Loosen the Yoke Clamp screws and slide the Yoke back to the point of best Green Purity.
6. Tighten the Yoke Clamp screw slightly so that the Yoke can still be moved with some friction.
7. Proceed to STATIC CENTER CONVERGENCE .
STATIC CENTER CONVERGENCE
1. Connect a Center Cross pattern or a Crosshatch pattern to the Antenna terminals to ensure that the yoke is not tilted.
Rotate the yoke, if necessary, to obtain a level raster.
2. Set the Green Cutoff control (R649)to its fully clockwise (CW) position.
3. Set the Green Drive control (R643)to its fully counterclockwise (CCW) position.
4. Set the Red Cutoff (R650) and Blue Cutoff (R648) controls to their midrange positions. Then set the Blue Drive (R642)
control fully clockwise (CW).
5. Slowly spread and, if necessary, rotate the 4-Pole Magnetic Rings to converge Red and Blue lines at the center of the
screen.
6. Set the Green Drive control (R643) to its maximum clockwise (CW) position.
7. Adjust the Green Cutoff control (R649) to bring its Gun back up to approximately the same intensity as the Red and Blue
Guns.
8. Slowly spread and, if necessary, rotate the 6-Pole Magnetic Rings to converge Red/Blue on Green lines at the center of
the screen.
9. Repeat steps 5 through 8 for optimum performance.
Proceed to DYNAMIC EDGE CONVERGENCE
Page 11

DYNAMIC EDGE CONVERGENCE
Note: To secure the correct position of the Deflection Yoke, three rubber wedges are used. They are ultimately to be placed
as shown in Figure 4c or 5c.
1. Apply a crosshatch pattern signal to the Antenna terminals and set the Green Drive control (R643) to its fully counterclockwise (CCW) position.
2. Set the Green Cutoff control (R649) to its fully clockwise (CW) position.
3. Tilt the Yoke up and down to converge the Red and Blue vertical lines at the 6 and 12 o'clock positions, and the Red and
Blue horizontal lines at the 3 and 9 o'clock (Refer to graphic ).
When the correct position has been found, place a rubber wedge between the Yoke and the CRT. If the Yoke is tilted UP,
place wedge 1 as shown in Figure D; if it is tilted DOWN, place wedge 1 as shown in Figure A .
4. Tilt the Yolk to the left and right to find the point of best possible convergence of the Red and Blue lines at the edges, top
and bottom of the screen as seen in Figure 7 . When the correct position is located, place wedges 2 and 3 as seen in Figure
B or E .
5. Now, remove wedge 1 and place it in the final position as shown in Figure C or F .
6. Set the Green Drive control (R643) to its fully clockwise (CW) position.
7. Adjust the Green Cutoff control (R649) to bring its Gun back up to approximately the same intensity as the Red and Blue
Guns.
8. Proceed to the WHITE BALANCE ADJUSTMENT .
Page 12

WHITE BALANCE ADJUSTMENT
1. Turn the set on.
2. Using the on screen Customer Menu, set the Color, Brightness, Picture and Sharpness controls to Minimum.
Select Antenna Input and disconnect the antenna input.
3. Set G2 Control (on flyback transformer) to minimum (counterclockwise).
4. Set Green and Blue Drive Controls to mid-range. Red Drive is fixed at mid-range.
5. Set all three Cutoff controls to their fully clockwise positions.
6. Turn the set off with the Remote Transmitter (do not unplug set).
7. Disconnect the vertical yoke plug (P/J550).
8. Turn the set on.
9. Adjust G2 (Screen) clockwise until a line just becomes visible. This line will be the color of the dominant gun.
10. Adjust the other two cutoff controls to achieve a low-level white line.
11. Turn the set off with the Remote Transmitter.
12. Reconnect the yoke plug (P/J550).
13. Turn the set On.
14. Set on screen Customer Controls back to original position (or activate the reset fuction/personal preference).
15. If necessary, adjust Green and Blue Drive Controls to achieve a white raster.
16. Connect a television signal (CATV or Air) to the antenna input.
17. Adjust G2 to attain the best black level with the ptcture diplayed.
STEREO ALIGNMENT (FOR STEREO MODELS ONLY)
Note: The following procedure was performed with a Sencore VG91 Universal Video Generator and must be done while the
set is in the Service Mode.
1. Enter the Service Mode by pressing 06-25-96-Menu on the Remote Transmitter, and scan to channel 3.
Do not mute sound during the following adjustments.
Input Level Adjust
1. Set the VG91 to 300Hz, L+R, No Pilot (Mono), Channel 3. Video Pattern = Raster, R-G-B raster colors off.
2. Connect the RF output of the generator to the Television Antenna Input, adjust the VG91 level to remove any snow from
the raster.
3. Enter 81 with the remote for Input Level.
4. Adjust Input Level to 1.4Vp-p on scope at Test Point 52 (Pin 10 of IC200) using the +/- controls on the remote.
Wide Band Adjustment
1. Change VG91 to L (only), normal (100%) pilot.
2. Enter 83 with remote for Wide Band/ Spectrum adjustments.
3. Adjust Wide Band for a Null reading on the oscilloscope at Test Point 53 (Pin 33 of IC200) using the menu +/- buttons on
the Remote Transmitter.
Spectrum
1. Change VG91 setting to 3kHz.
2. Adjust Spectrun for Null on scope at Test Point 53 (Pin 33, IC200) using menu up/down buttons on remote.
3. Repeat Wide Band & Spectrum Adjustments again.
AUDIO/VIDEO JACK PANEL ALIGNMENT
Video Alignment
1. Connect an oscilloscope to Test Point 52 (or pin 2 of P40).
2. Apply a composite video signal of 1 Vp-p to the Aux Video Input.
NOTE: Leader model LCG-396 has a composite video signal output with a preset level of 1Vp-p.
3. Turn the set on and adjust the following.
For AVJ180 and AVJ183 - Turn R40 fully clockwise, then adjust R40 for 1Vp-p at TP52. Make sure the adjustment is on the
correct slope of the response curve, this will be the first point to reach 1Vp-p going from the clockwise stop.
Audio Alignment
1. Connect an audio signal source (Example: B&K 3011) to the Right/Mono input to the jack panel.
With the signal source connected adjust the signal to 5OOmVrms (check at J45).
2. Connect an oscilloscope to Test Point 53 and adjust R60 to 1.5Vp-p.
3. Move the audio source to the Left audio input.
4. Connect an oscilloscope to Test Point 54 and adjust R80 to 1.5Vp-p.
Page 13
SERVICE TEST MODE PROCEDURES
1. Press the following transmitter keys without allowing the on screen display to time out between entries.
NOTE: The transmitter supplied with the set may not perform this task properly, if the word "MENU" appears on
screen at the end of the following sequence. A UR14, T251, or other similar transmitter with channel and volume keys
separate from the menu keys must be acquired.
0-6-2-5-9-6-Menu
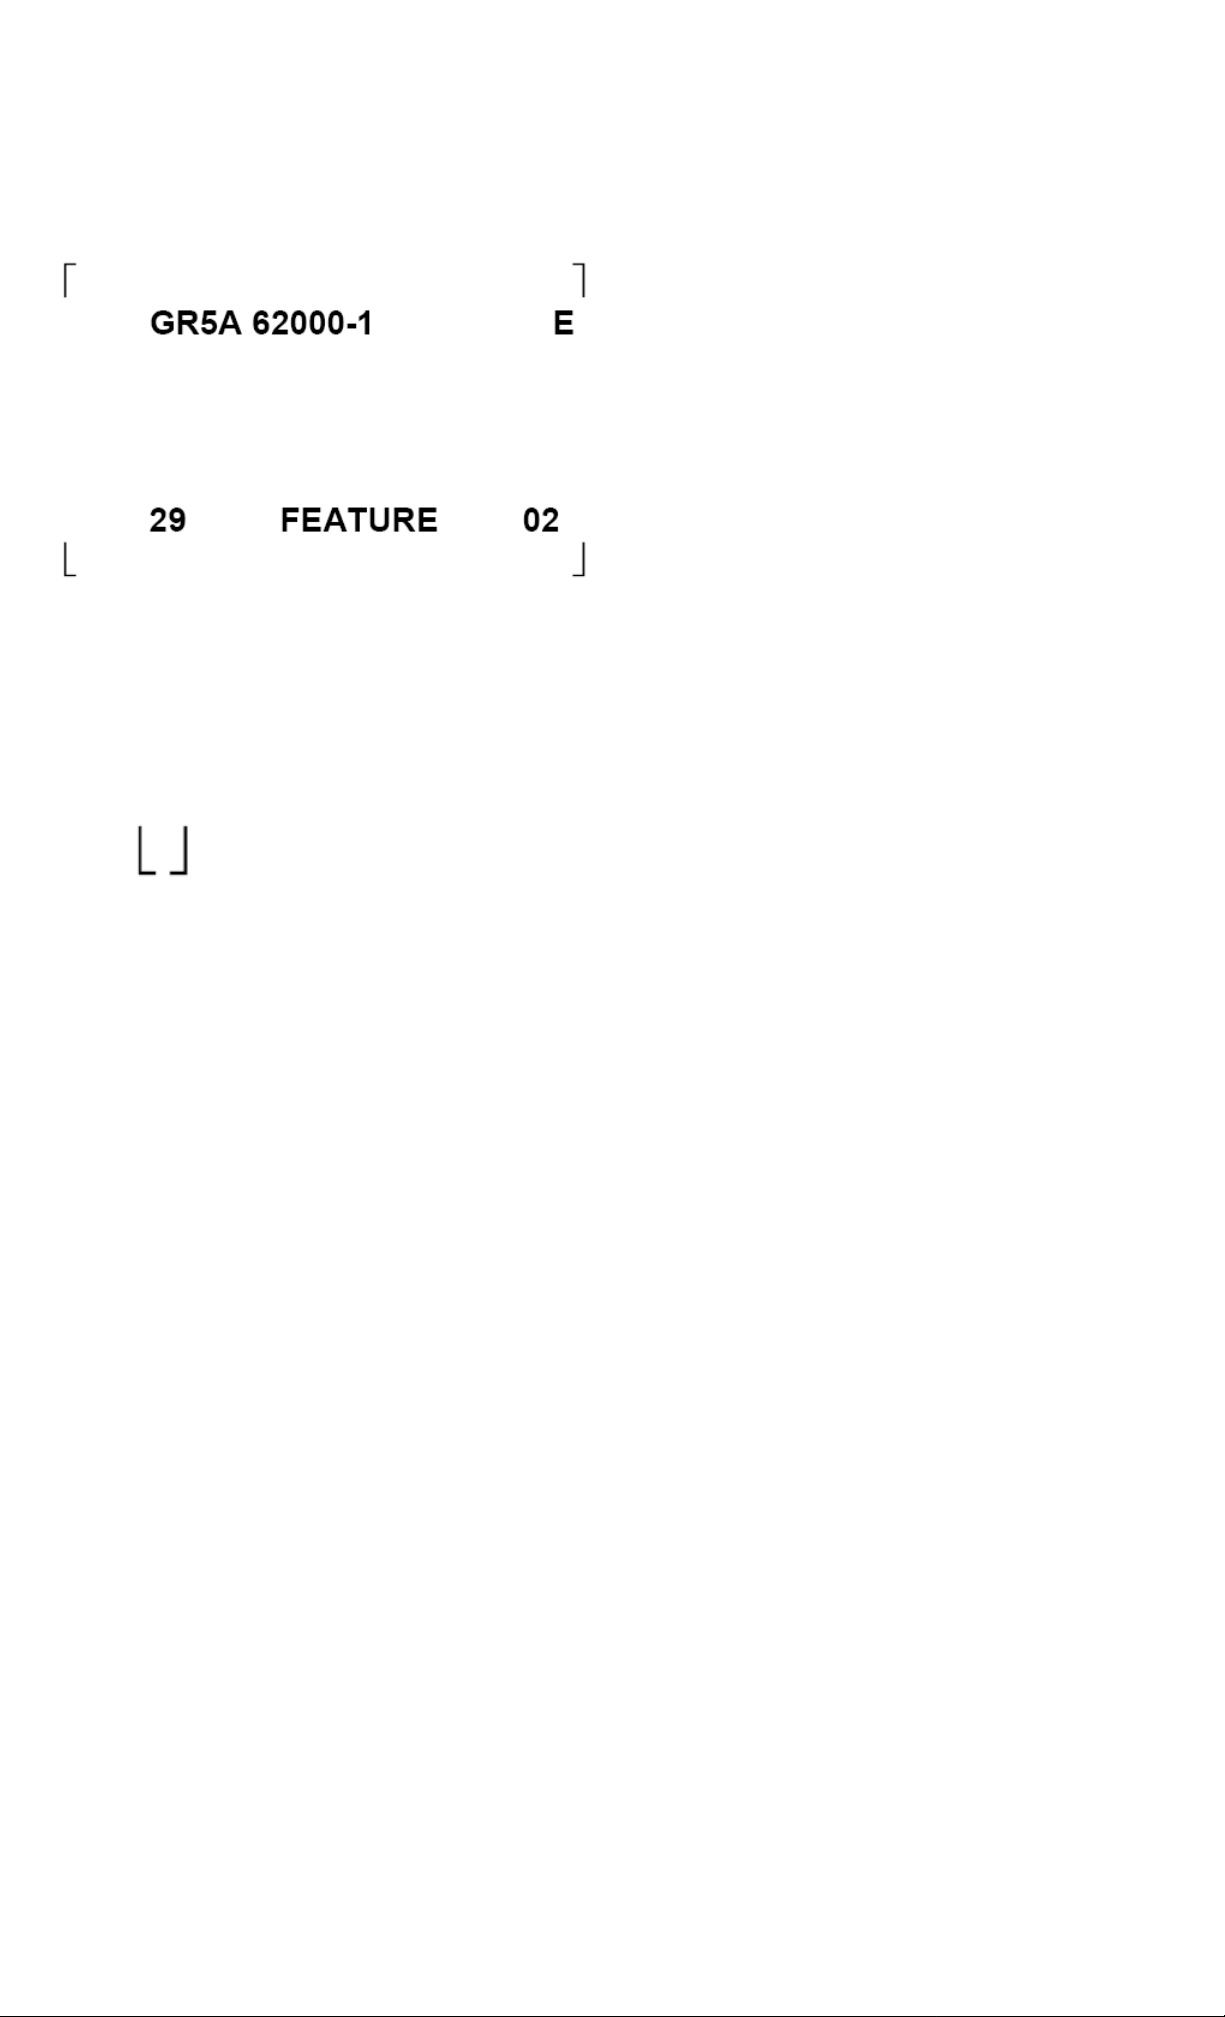
2. The Following is an example of what will be displayed on the screen and an explanation of the characters shown.
Top Line
62000-1 = Microprocessor part number
E = Error Codes will be displayed here if a communication error exists (i/.e.A = tuner error)
Error Codes:
A = Tuner not responding.
B = Memory
D = Automatic Volume Limiter (Smart Sound)
Bottom Line
= Corner Marks
29 = Current Channel
FEATURE = Indicates Current Register
02 = Current register value in Hexadecimal format.
By pressing the STATUS/EXIT button on the transmitter, the run timer will be displayed in the upper left corner, also in
Hexadecimal.
To select another register, press the menu button on the transmitter until the desired register is displayed, or each register
may be accessed directly by entering the register number.
NOTE: SETS WITH VOLUME LIMITER
1. ENTER THE FOLLOWING NUMBERS WITHOUT LETTING THE ON-SCREEN DISPLAY TIMEOUT.
07-20-91-"MENU"
2. USE THE "+/-" KEYS TO SET THE VOLUME LIMIT.
3. PRESS THE "STATUS" KEY TO SAVE THE VOLUME LIMIT. (WHEN THE "STATUS" KEY IS DEPRESSED, THE BAR
GRAPH WILL APPEAR TO DROP TO ZERO BEFORE DISAPPEARING-THIS IS NORMAL).
NOTE: THIS PROCEDURE IS NOT DONE IN SERVICE MODE.
REGISTER VAL.(HEX) - Notes –
*81 INPUT LEVEL 7
*83 W-BAND/SPECT 10 10 mid-range
*84 CALIBRATION 80 mid-range
*88 DEMO OPTION - mid-range
90 FEATURE SEE CHASSIS FEATURE CHART
91 BRIGHTNESS 1F mid-range
92 PICTURE 1F mid-range
93 COLOR 1F mid-range
94 TINT 1F mid-range
95 SHARPNESS 1F mid-range
96 OSD 14 mid-range
99 VOLINC 08 mid-range
Cannot enter by pressing menu button. Cannot exit without pressing another register number.
NOTE: DO NOT enter register 82. This is a factory stereo alignment, if register 82 is adjusted a full stereo alignment will be
required.
Page 14

Smart Picture Registers
To enter the Smart Picture Registers, press the smart picture button on the remote. To scroll through the registers, depress
the smart picture button again. To change the value, depress the "+" and "-" keys on the remote transmitter.
The following registers are accessible:
REGISTER VAL.(HEX)
SPORTS PICTURE 2F
SPORTS COLOR 27
SPORTS SHARPNSS 1F
MOVIES PICTURE 1F
MOVIES COLOR 1F
MOVIES SHARPNEWW 1F
WEAK PICTURE 0F
WEAK COLOR 10
WEAK SHARPNESS 0F
GAMES PICTURE 17
GAMES COLOR 1F
GAMES SHARPNESS 1F
To exit Smart Picture Registers, press the STATUS/EXIT button on the remote transmitter. This will return you to the
service test mode.
To Exit the Field Service Mode:
To exit the field service mode depress the PWR button on the local keyboard or remove the AC power from the set.
NOTE: Data may only be saved to the memory when exiting the mode through the PWR button on the local keyboard. All
video controls shall be saved locally to the customer set up registers in the EEPROM. Customer stalus/setup and favorite
station information will not be altered by exiting the field service mode.
CLOCK CALIBRATION
The microcomputer's crystal oscillator frequency of approx. 12MHz is applied to a divider program (within the micro) in order
to supply a frequency of 2403.846153846Hz. The 12MHz oscillator frequency cannot be adjusted or measured (it is internal
to the IC), however, a correction factor may be input in to the divider program in order to adjust for a slow or fast clock
reading.
This correction factor is selected in the Service Mode by changing the value held in register 17. The data within this register
can range from00 (none) to 7F max. (for a fast clock) or FF (for a slow clock). Models are shipped from the factory with a
default value of 00 or 80 for NO correction.
The more practical method is to simply question the customer on the number of minutes per month the clock is off (assuming
the time error has been checked against a known accurate time source). Calculate using the formula below:
Minutes of error per month X 2 = Sec. of error per day. Is it losing (slow) or gaining (fast)?
Enter the Service Mode and look at register 17. If it is 00 or 80 the task is easy. Look up (use Table) the seconds of correction
needed, fast or slow, and enter its "calibration byte" in for the data held by register 17.
Click here if clock is fast to see appropriate table.
Page 15
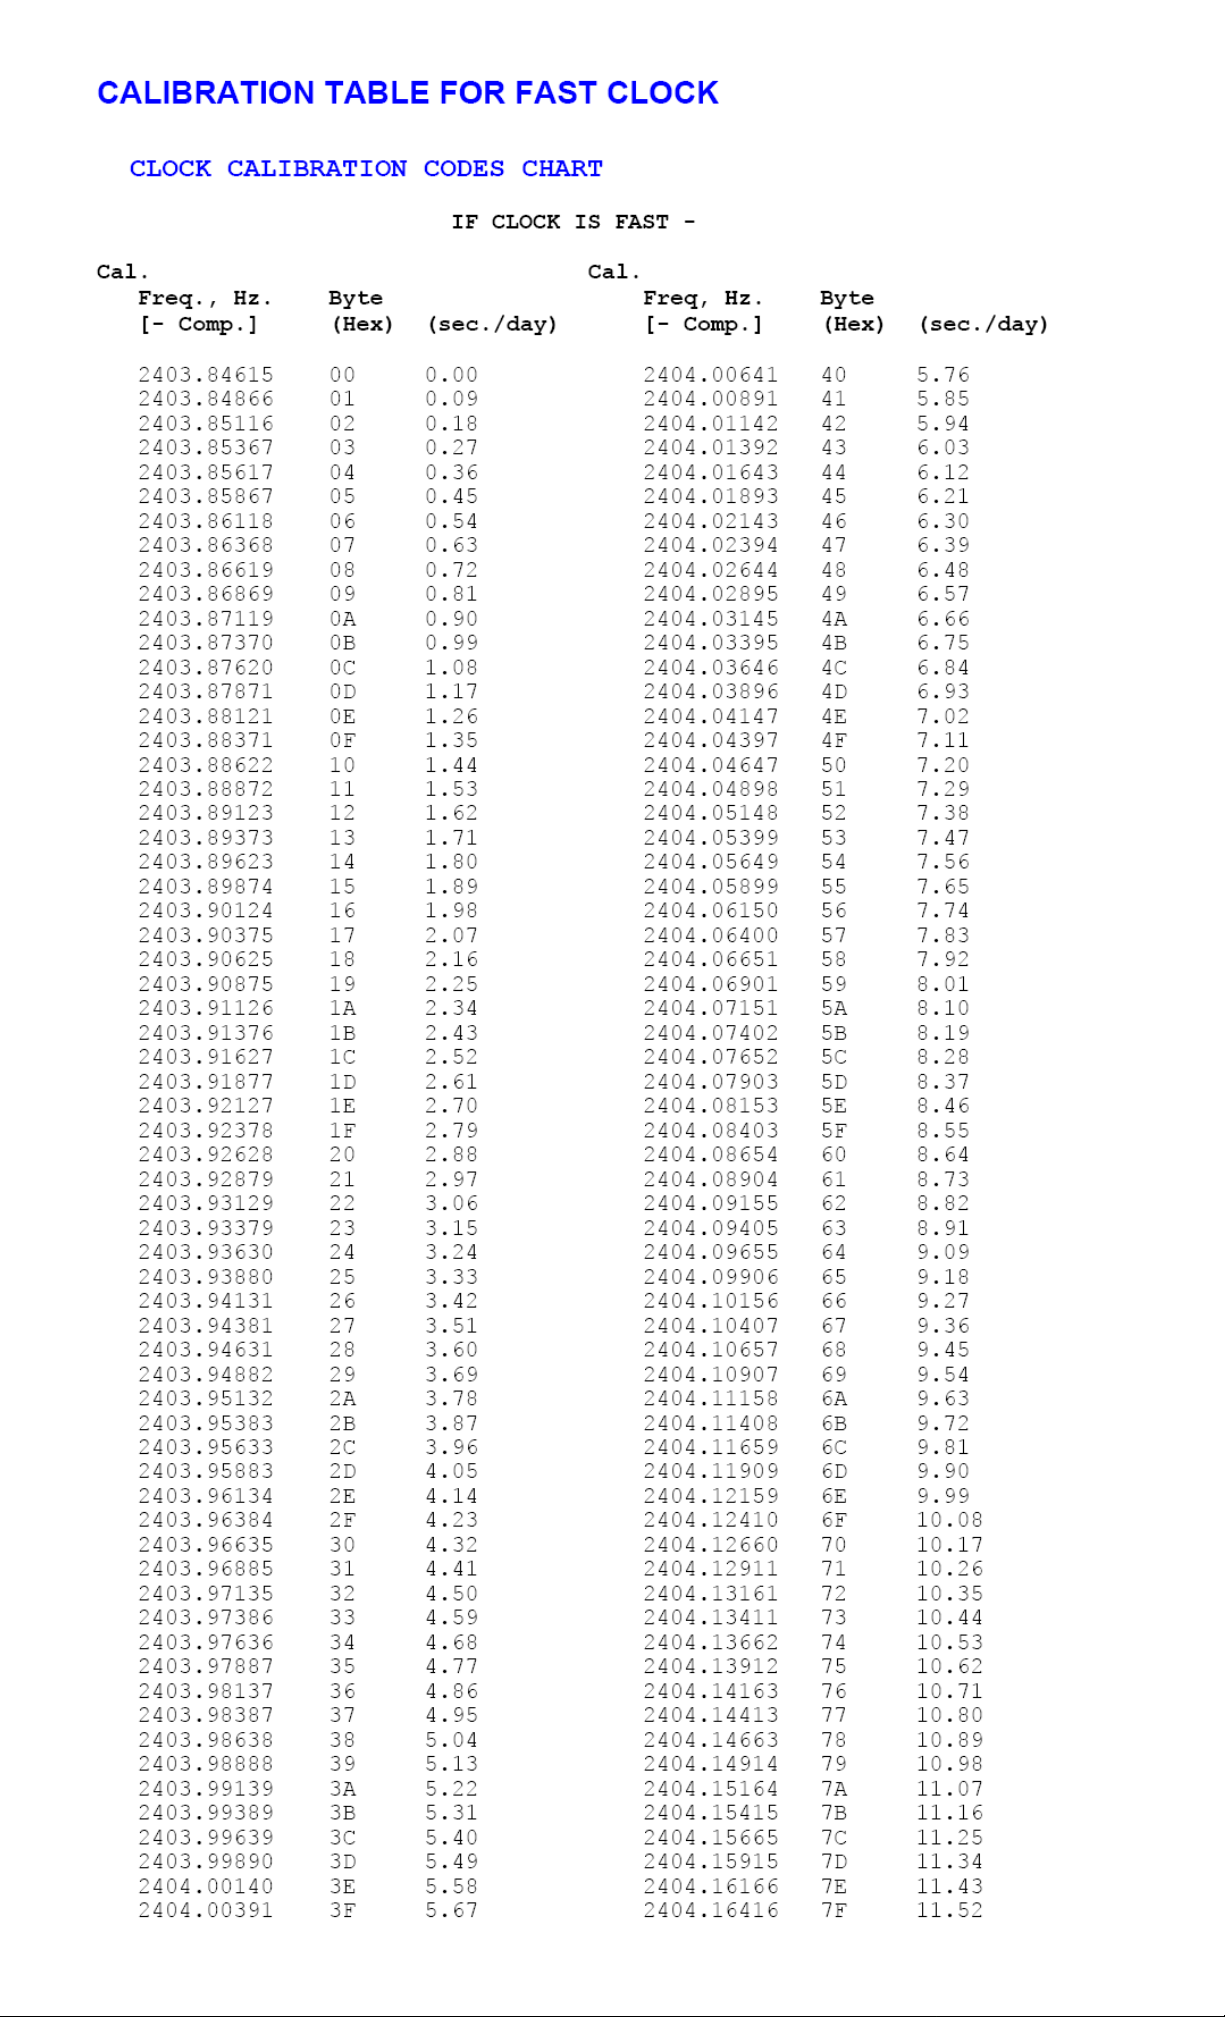
Page 16
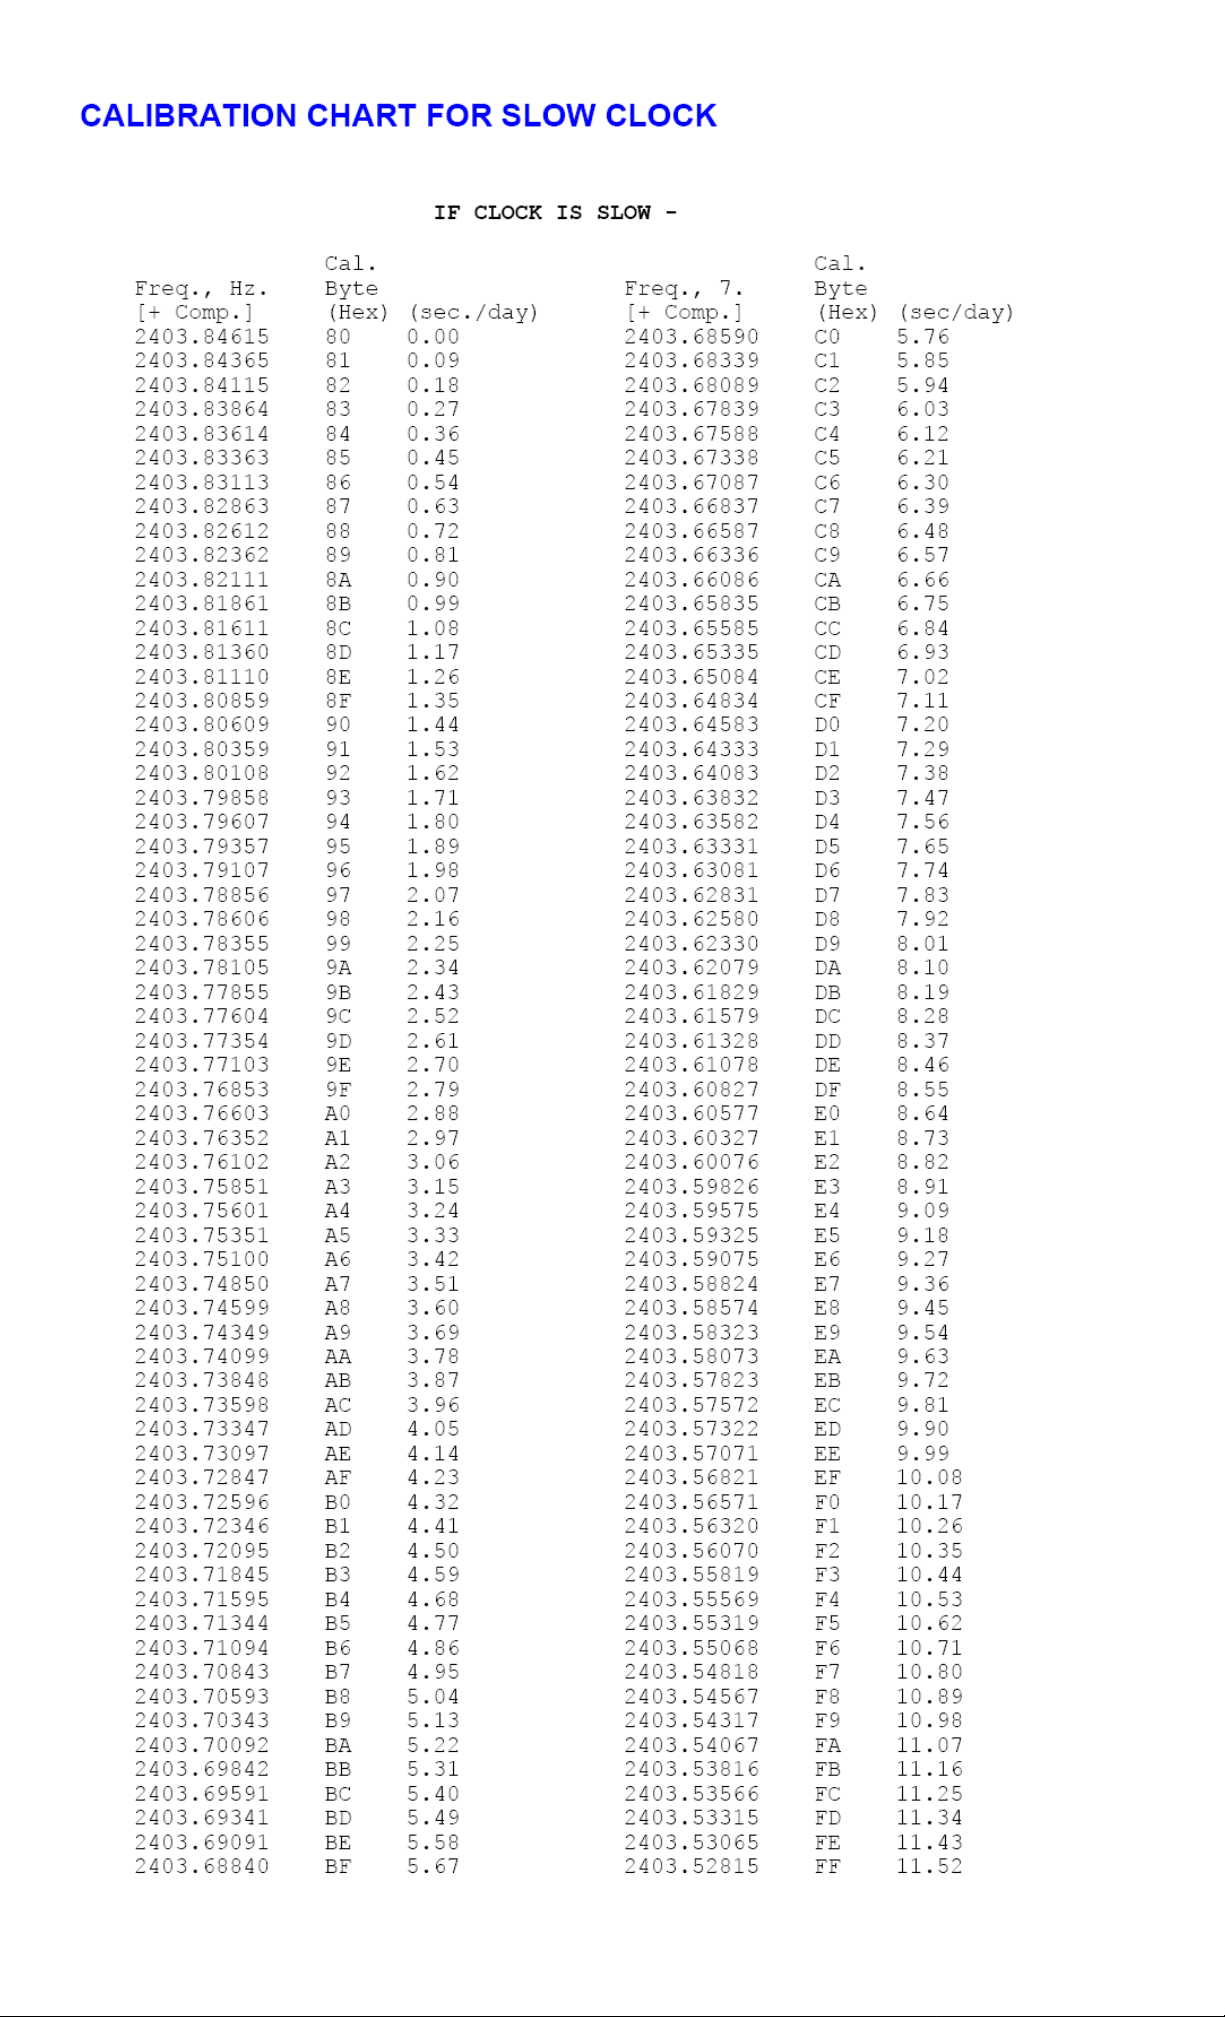
Click here if clock is slow to see appropriate table.
Page 17

Normal Example:
4 minutes fast a month X 2 = 8 seconds a day fast.
The Chart says if the clock is 8 seconds a day fast without correction, then use 59. Change register 17 from 00 to 59. If there
is a calibration byte in register 17 other than 00 or 80 then the job gets a bit more complex.
Note: Modifying the value held in this register does not change the oscillator frequency
Complex Example #1
Using the error from the "normal example", 8 seconds fast a day, you find the register 17 the data value of 16. Look up 16
and you find that there is already a correction for 2 seconds fast a day. You need 8 seconds fast more correction (2 + 8 = 10)
or a total of 10 seconds fast correction which is 6E. Enter 6E for the data held by register 17.
Complex Example #2:
If the clock is 8 seconds fast a day and you find register 17 holds the data value of 96 you have 2 seconds a day correction in
the wrong direction (slow). You need to "back up" 8 seconds. First, if you back up to 80 (no correction) you have used 2 of the
8 seconds leaving 6. Then go 6 seconds in the fast column, from no correction to 6 seconds (43). Enter 43 for the data held
by register 17.
PRACTICAL SERVICE PRECAUTIONS
It makes sense to avoid exposure to electrical shock. While some sources are expected to have a possible dangerous
impact, others of quite high potential are of limited current and are sometimes held in less regard.
Always respect voltages. While some may not be dangerous in themselves, they can cause unexpected reactions, reactions
that are best avoided. Before reaching into the powered color TV set, it is best to test the high voltage insulation. It's easy to
do and is just a good service precaution.
Before powering up the TV with the back off (or on a test fixture), attach a clip lead to the CRT DAG ground and to a
screwdriver blade whose handle is well insulated. After the TV is powered on and high voltage has developed, probe the
anode lead with the blade starting at the case of the High Voltage Transformer (flyback-IFT). Move the blade to within two
inches of the connector of the CRT.
If there is an arc, you found it the easy way, without getting a shock! If there is an arc to the screwdriver blade, replace the
High Voltage Transformer (or the lead, if removable) whichever is causing the problem.
Page 18

Page: 1 of 3 Chassis: 19X6
Contents of Known Faults for: 19X6
1. - Chassis frame part # for 25" and 27"
2. - Dead
3. - Dead, Q502 shorted, possible repeat failure
4. - Intermittent loss of sync
5. - Model 19PR17 extra remote
6. - Model PL6125 dark blob/circle in center of video
7. - Model PX6119 width problem
8. - No memory after power loss
9. - R505 and V505 information
10. - Snowy video
11. - Vertical size will not adjust correctly
No. 1 ****************************
Manual Number: 7553
Chassis frame part # for 25" and 27"
Information: The chassis frame for the 25X6 and 27X6 (147192-0008) has been assigned a
Service Code. The Service Code number will be loaded into the system within the first week of
June. Parts will be available shortly after the number becomes active. Service Code 4835 432
17953
No. 2 ****************************
Manual Number: 7553
Dead
Symptom: Dead set, open F401, suspect 130 volt regulator shorted.
Cause: Metal scrap or Heat Sink burr behind regulator IC, possibily enbedded in mica or Sil-Pad
insulator.
Cure: Replace Regulator IC using 4835 310 57401 Kit. Kit contains replacement Sil-Pad for all
applications.
No. 3 ****************************
Manual Number: 7553
Dead, Q502 shorted, possible repeat failure
Symptom: Dead set, Q502 shorted, possible repeat failure.
Check: R505 for correct value (.47 ohm). A very small number may have 4.7 ohm in R505.
Note: If Q502 is shorted you can not check R505 in circuit. With Q502 removed (or good) R505
should measure about .4 ohms in-circuit. Also, check R501 (200 ohms) and R502 (2K-13/19"
and 3K 25/27").
No. 4 ****************************
Page 19

Page: 2 of 3 Chassis: 19X6
Manual Number: 7553
Intermittent loss of sync
Symptom: Intermittent loss of sync, most evident by loss of horizontal sync.
Cause: Y620, 3.58 crystal may be locking to either the 3rd harmonic or 3rd overtone.
Cure: Replace Y620 - 4835 242 77215
No. 5 ****************************
Manual Number: 7553
Model 19PR17 extra remote
Information: The model, 19PR17, uses an extra remote packed for special promotions. All
versions are packed with T216EG-MA01, (4835 219 17641). C521 versions are packed with
extra RG9168-GN01, (4835 219 17689). C621, C622, C625 are packed with extra
T216JG-MA01, (4835 219 17642).
No. 6 ****************************
Manual Number: 7553
Model PL6125 dark blob/circle in center of video
Symptom: A dark round blob or circle in the center of the picture.
Cure: Insure that R505 is a 0.47 ohm 5%,Watt Metal Film, P/N 4835 116 57139 and that R501
is a 200 Ohm 5%, 1/4W Metal Film P/N 4835 116 57408.
No. 7 ****************************
Manual Number: 7553
Model PX6119 width problem
To correct marginal width in a PX6119 equiped with a EMX633-A004 chassis replace C507 with
4835 121 47126, .36 uf (360nf).
No. 8 ****************************
Manual Number: 7553
No memory after power loss
The following models have no memory when they are unplugged (or power lost):
13" CT1301, PR1301, XR1301
19" CT1901, PR1901, XR1901, HD1917
25" CT2501, TR2501, XR2501, HD2517
Items lost: Last channel viewed
Favorite station memory
Control settings
This is by design intent, they are designed and manufactured to be a leader model. There is no
Page 20

Page: 3 of 3 Chassis: 19X6
smart sound or smart picture even if the display appears. These units all use a 20 button remote.
This remote has NO Smart button. Use of a different (21 button) remote will put the Smart
functions on the screen but they will not work and will disappear when the set is unplugged. ALL
memory functions (controls-stations-functions) are forgott en when the AC power is lost.
No. 9 ****************************
Manual Number: 7553
R505 and V505 information
Information: The location marked R505 or V505 may be a resistor or a jumper wire. This is
based on the Horizontal driver transformer. There are 2 outlines on the PCB for the driver
transformer, T504 and T505. T504 is the larger outline and uses R505. T505 is the smaller size
and uses V505, a wire, in place of R505. When R505 is used, ONLY a .47 ohm resistor is
correct.
No. 10 ****************************
Manual Number: 7553
Snowy video
SYMPTOM: Very snowy picture at 0 db signal level input.
CAUSE: No positive AGC voltage on tuner. R222 is open.
CURE: Replace R222, 12K - 1/4 w - MF resistor. Use 4835 116 57397.
No. 11 ****************************
Manual Number: 7553
Vertical size will not adjust correctly
CHASSIS AFFECTED: 13X6, 19X6, 20X6
SYMPTOM: Inability to adjust vertical correctly, may show only when "hot".
CURE: Replace R559 with 910 ohm, 1/8 watt, CF, 4835 110 67238.
NOTE: This applies to all 13X6 and 20X6. In 19X6 this applies to all EXCEPT EMX683/684/685.
Page 21
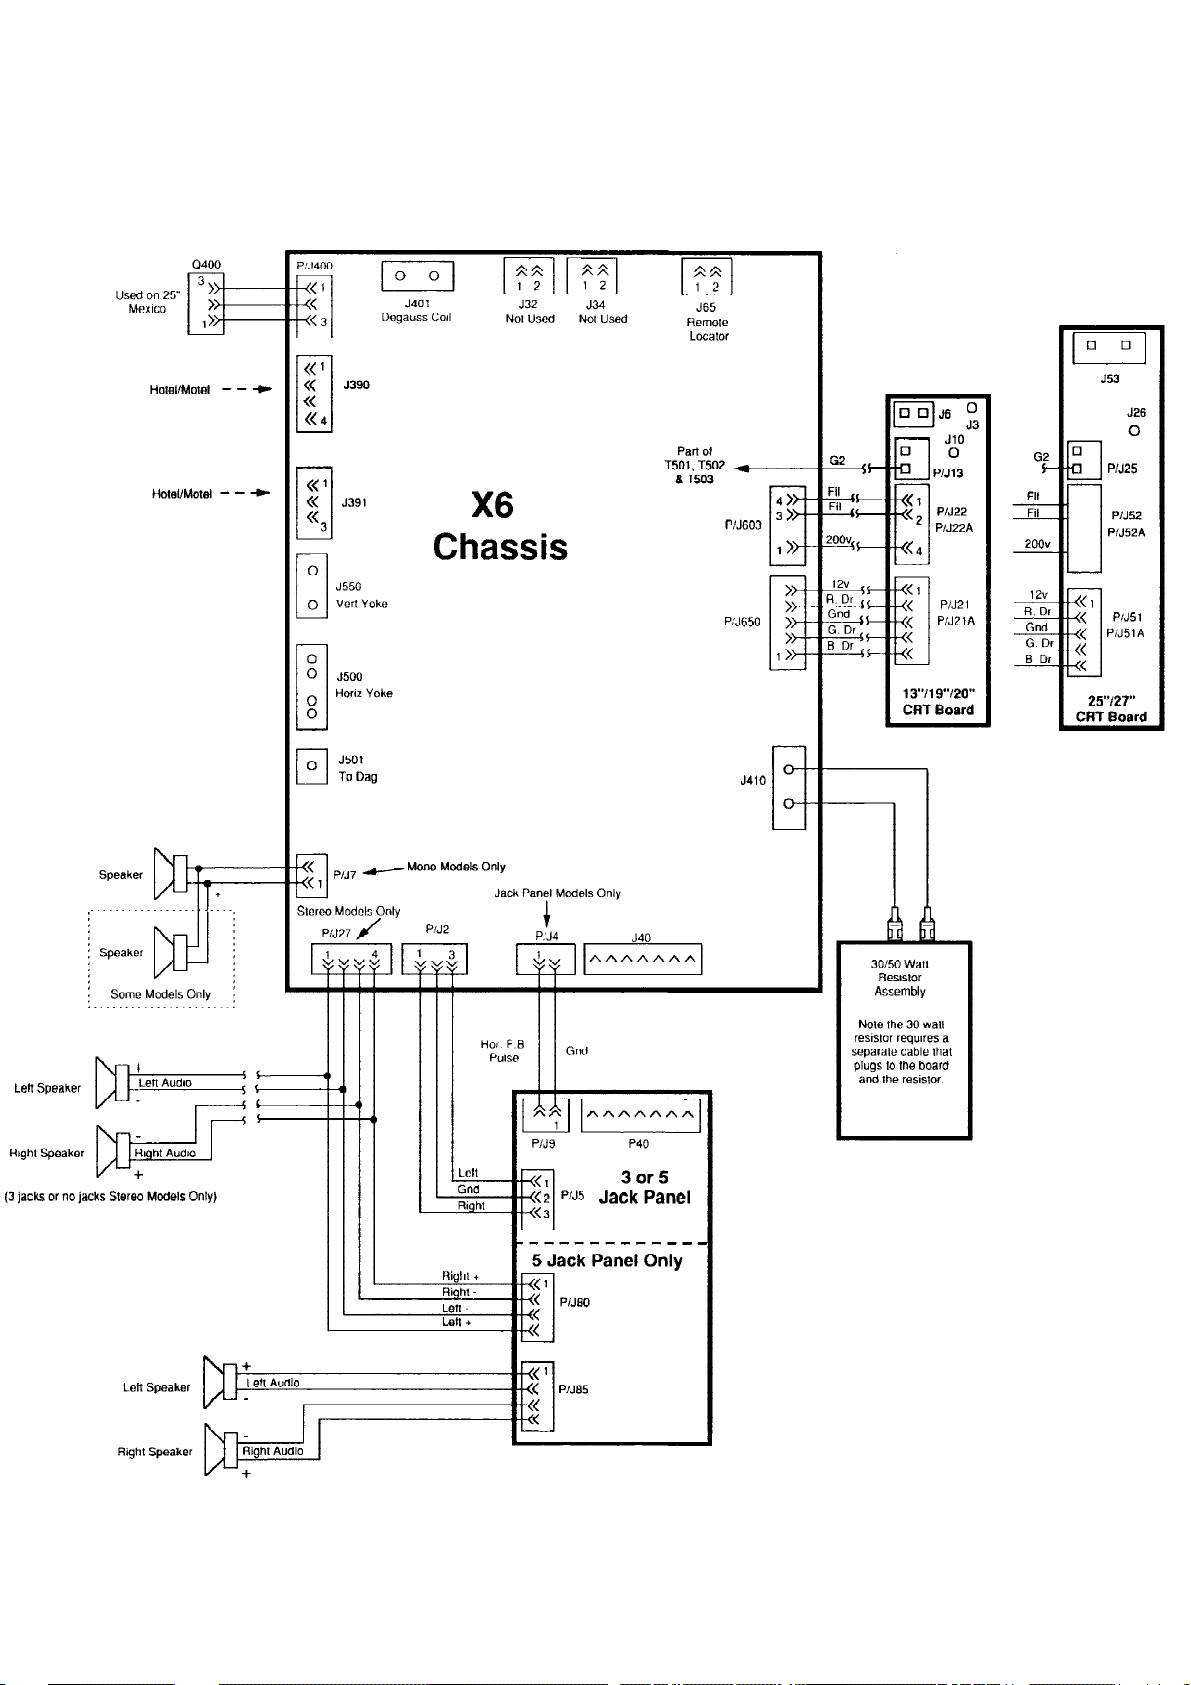
20LJ26(7553) - X6 CHASSIS WIRING DIAGRAM Page: 1 of 19
Page 22
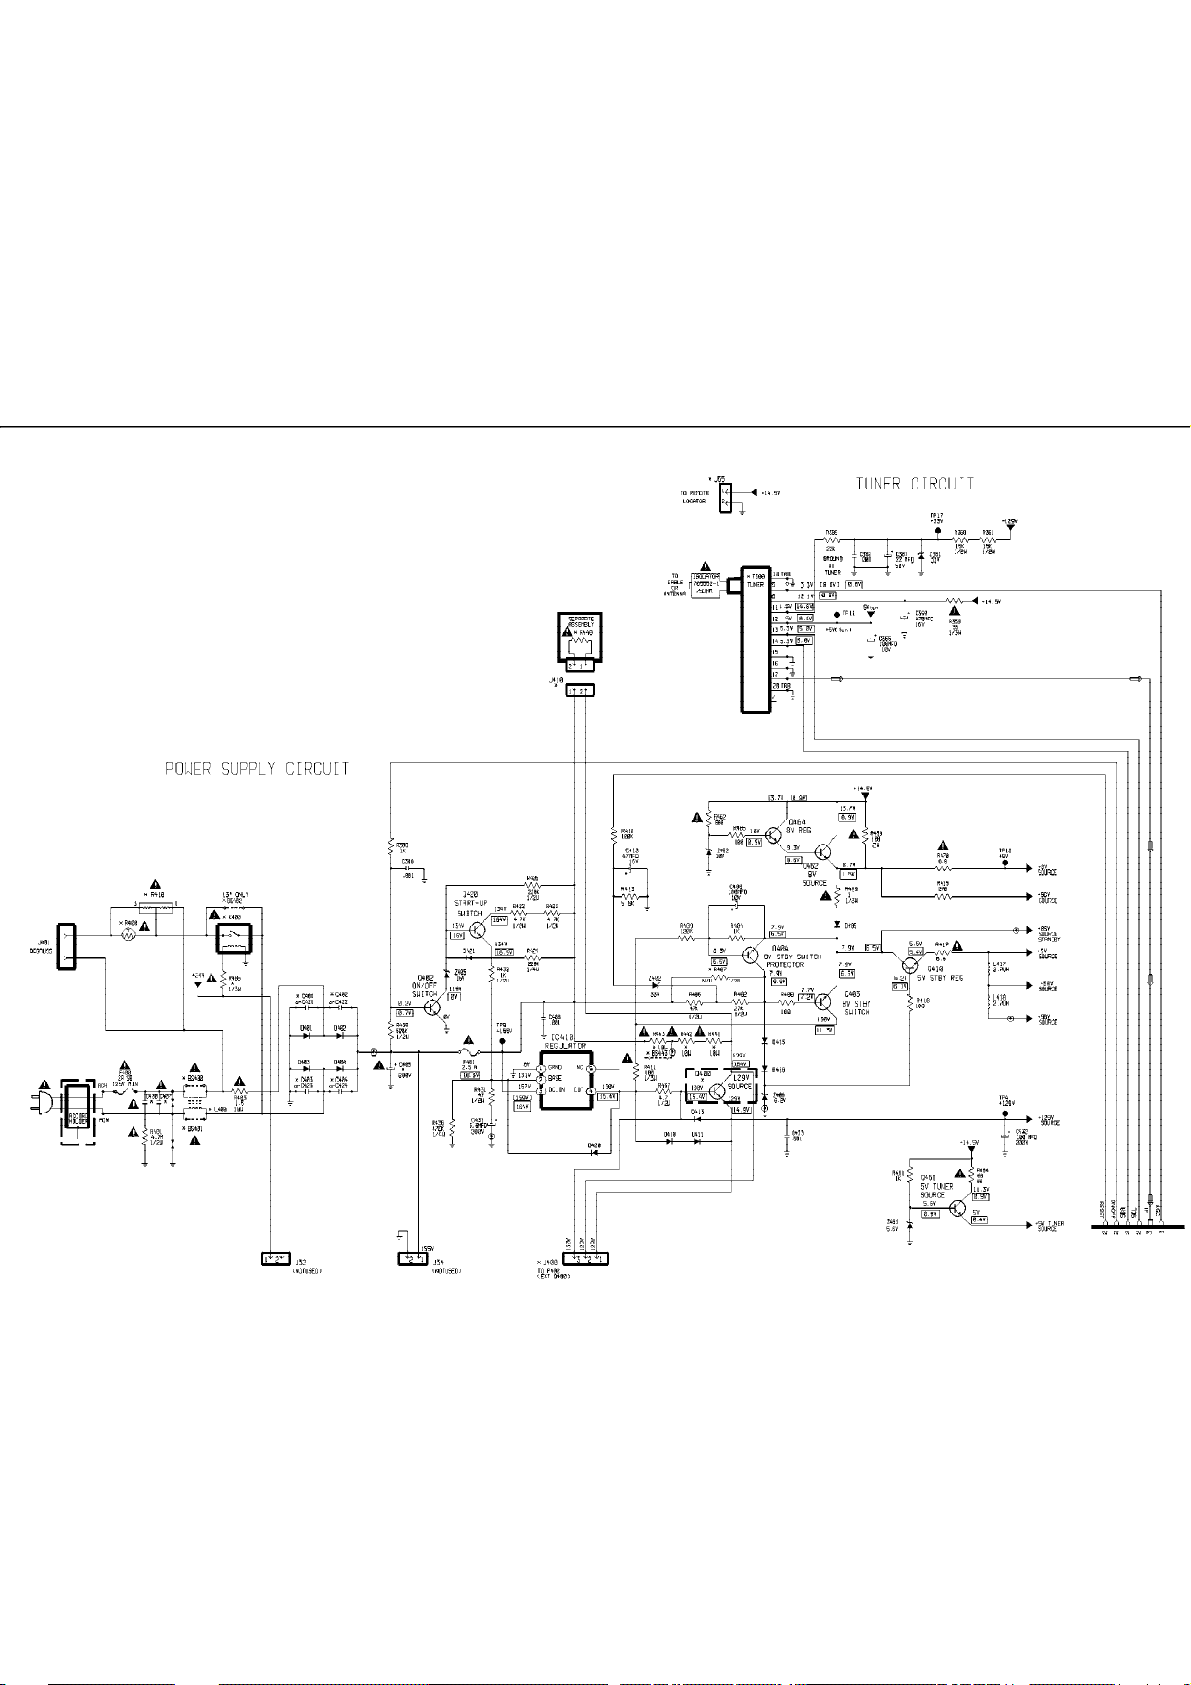
20LJ26(7553) - MAIN SCHEMATIC - SECTION 1 Page: 2 of 19
Page 23
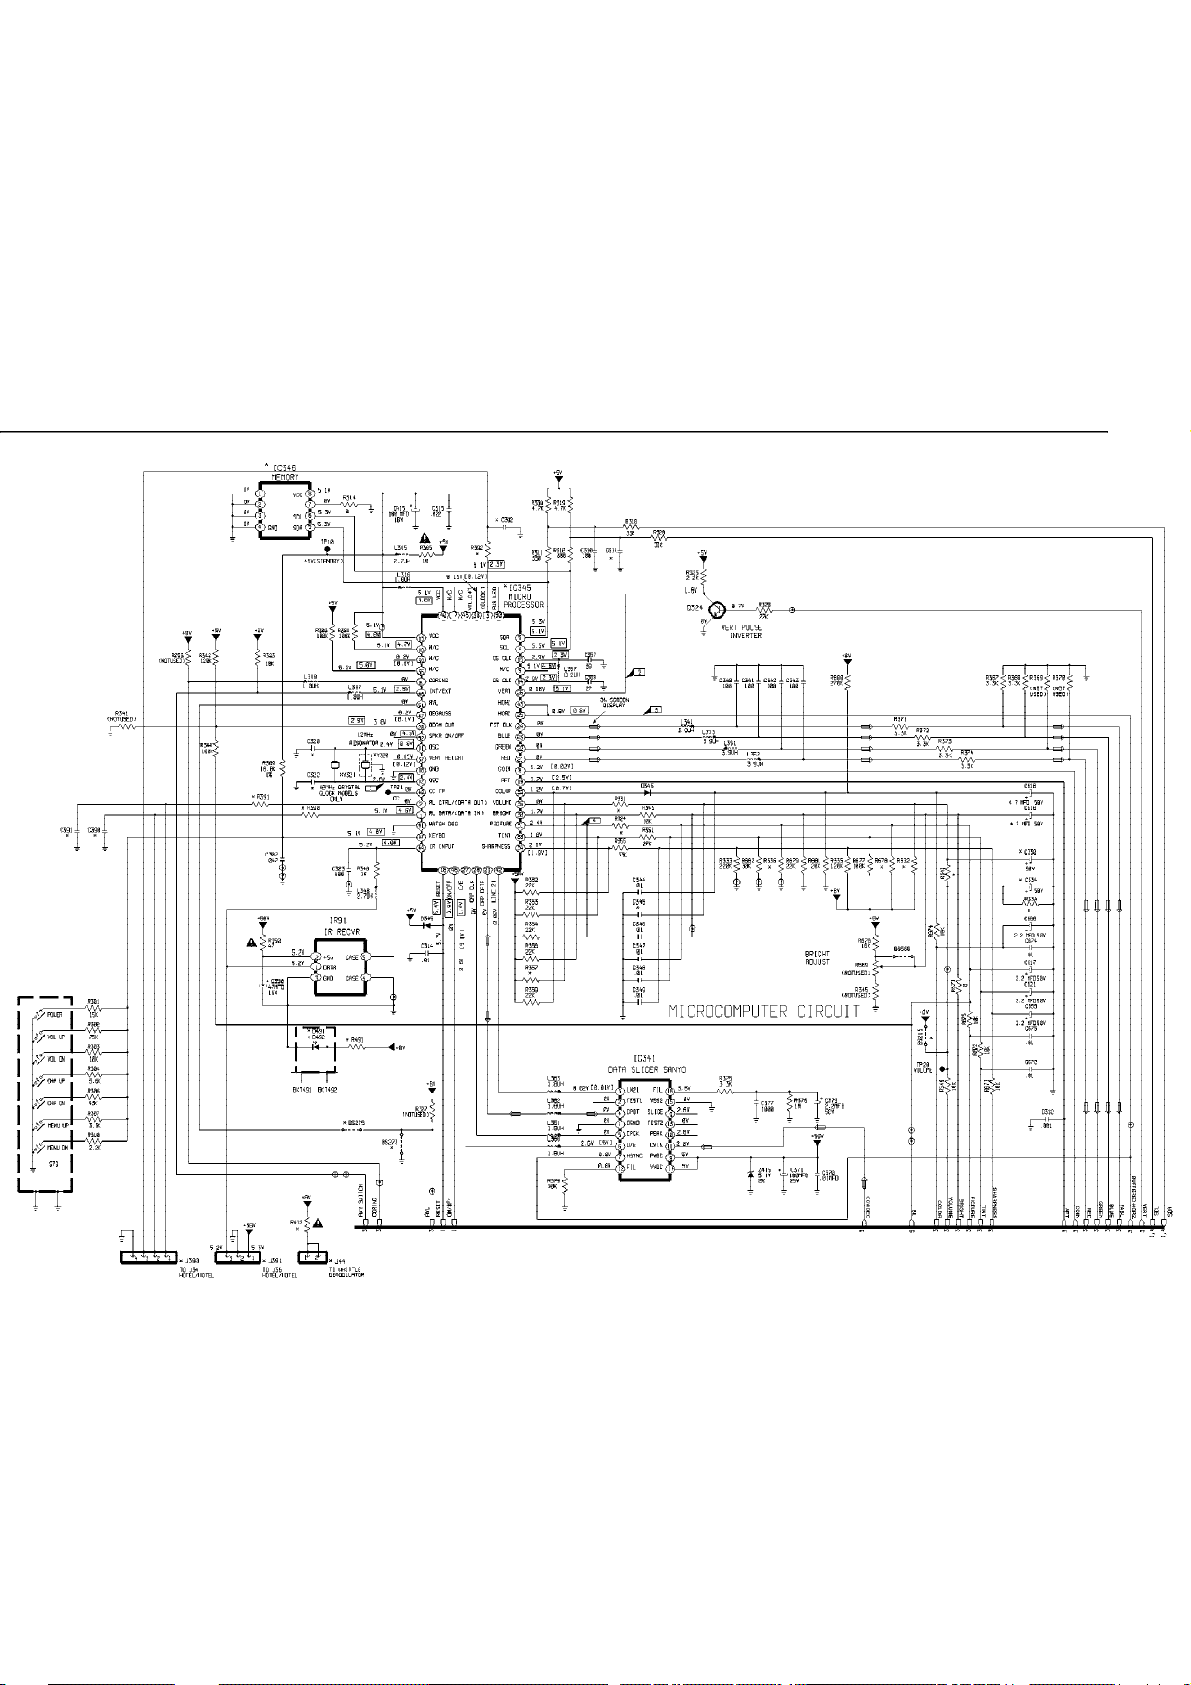
20LJ26(7553) - MAIN SCHEMATIC - SECTION 2 Page: 3 of 19
Page 24
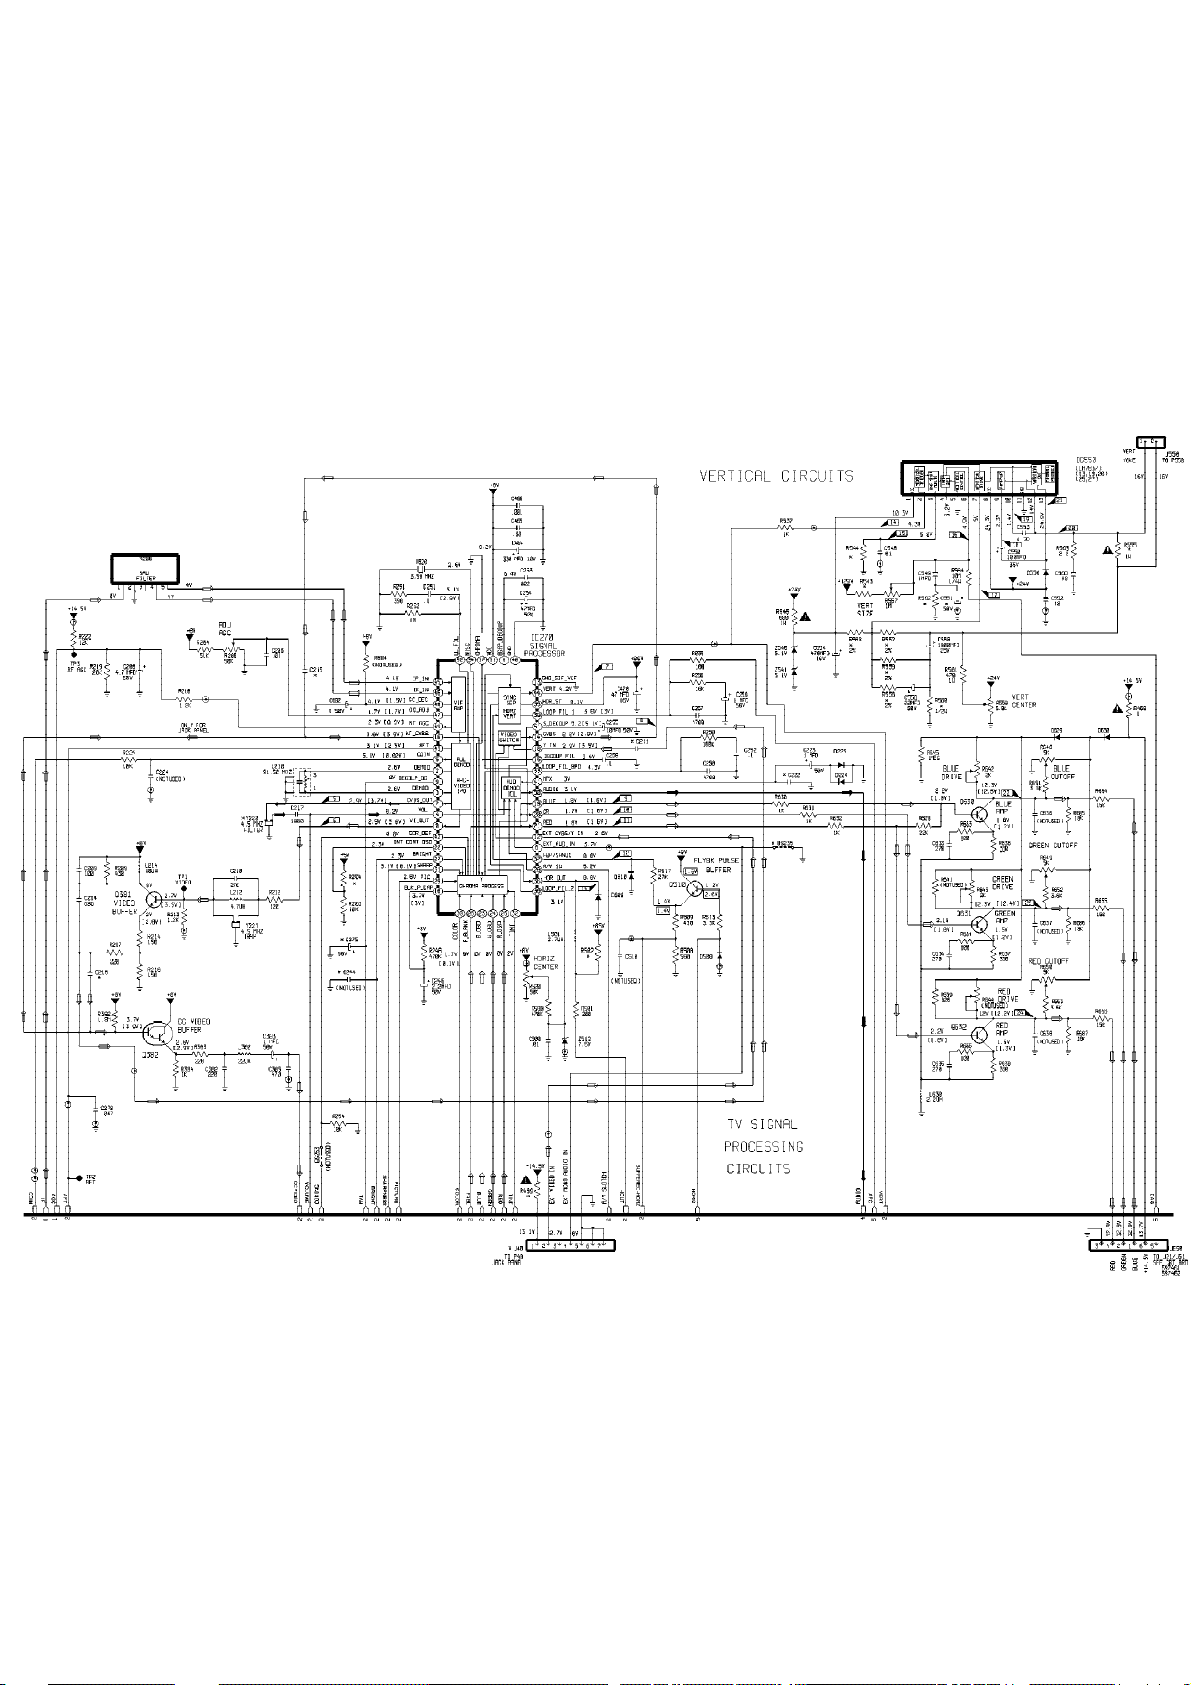
20LJ26(7553) - MAIN SCHEMATIC - SECTION 3 Page: 4 of 19
Page 25
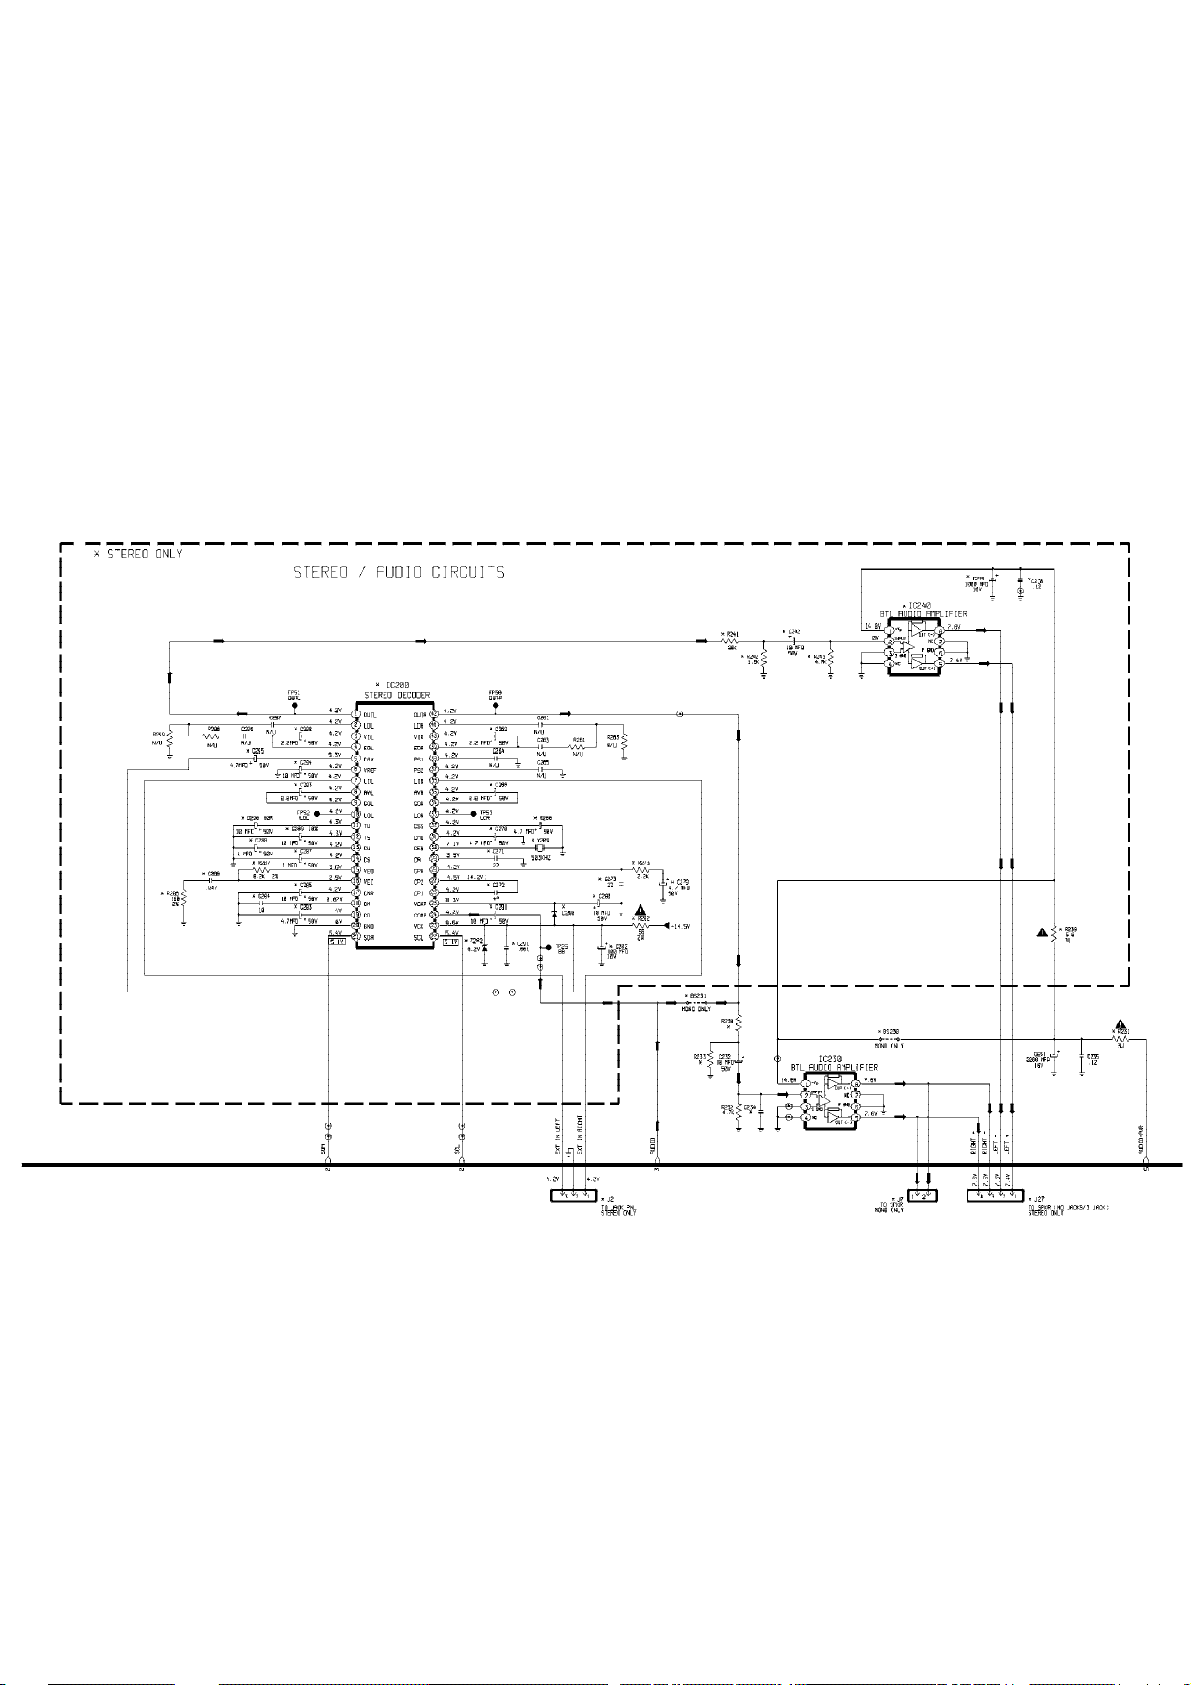
20LJ26(7553) - MAIN SCHEMATIC - SECTION 4 Page: 5 of 19
Page 26
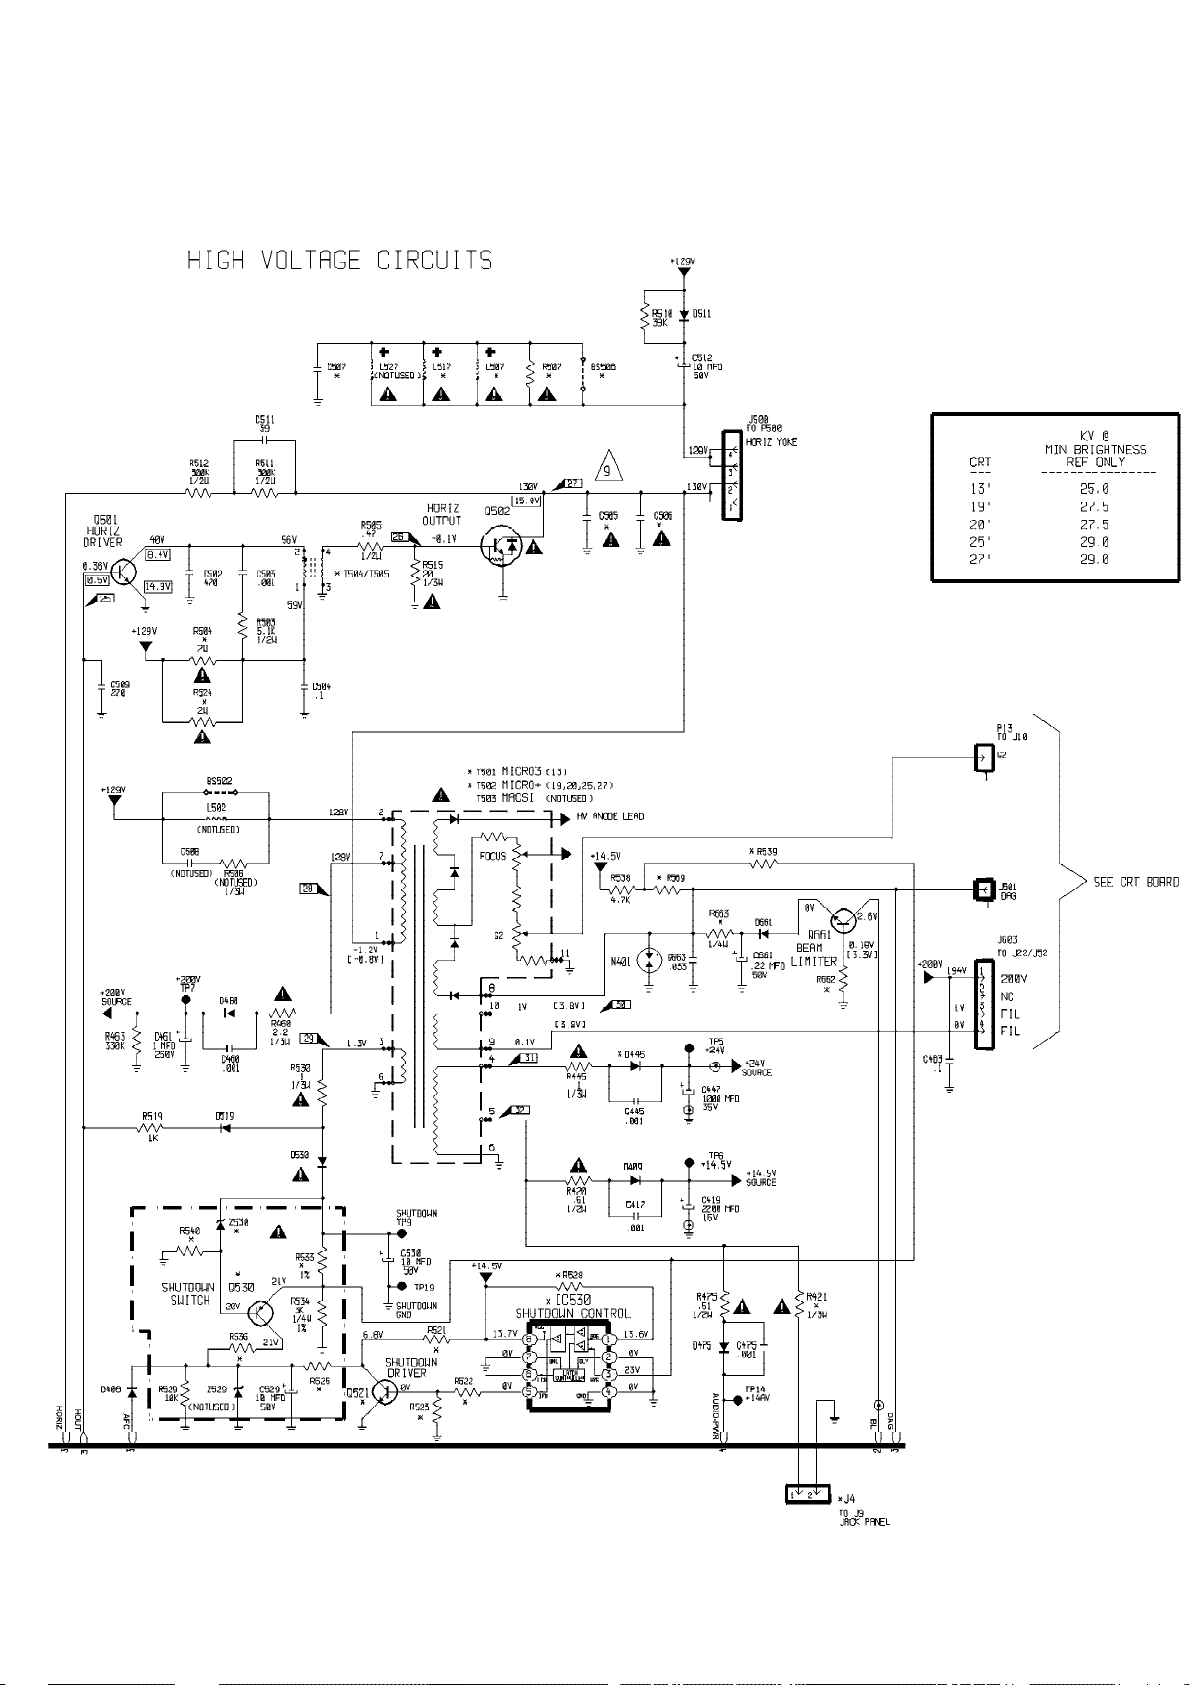
20LJ26(7553) - MAIN SCHEMATIC - SECTION 5 Page: 6 of 19
Page 27
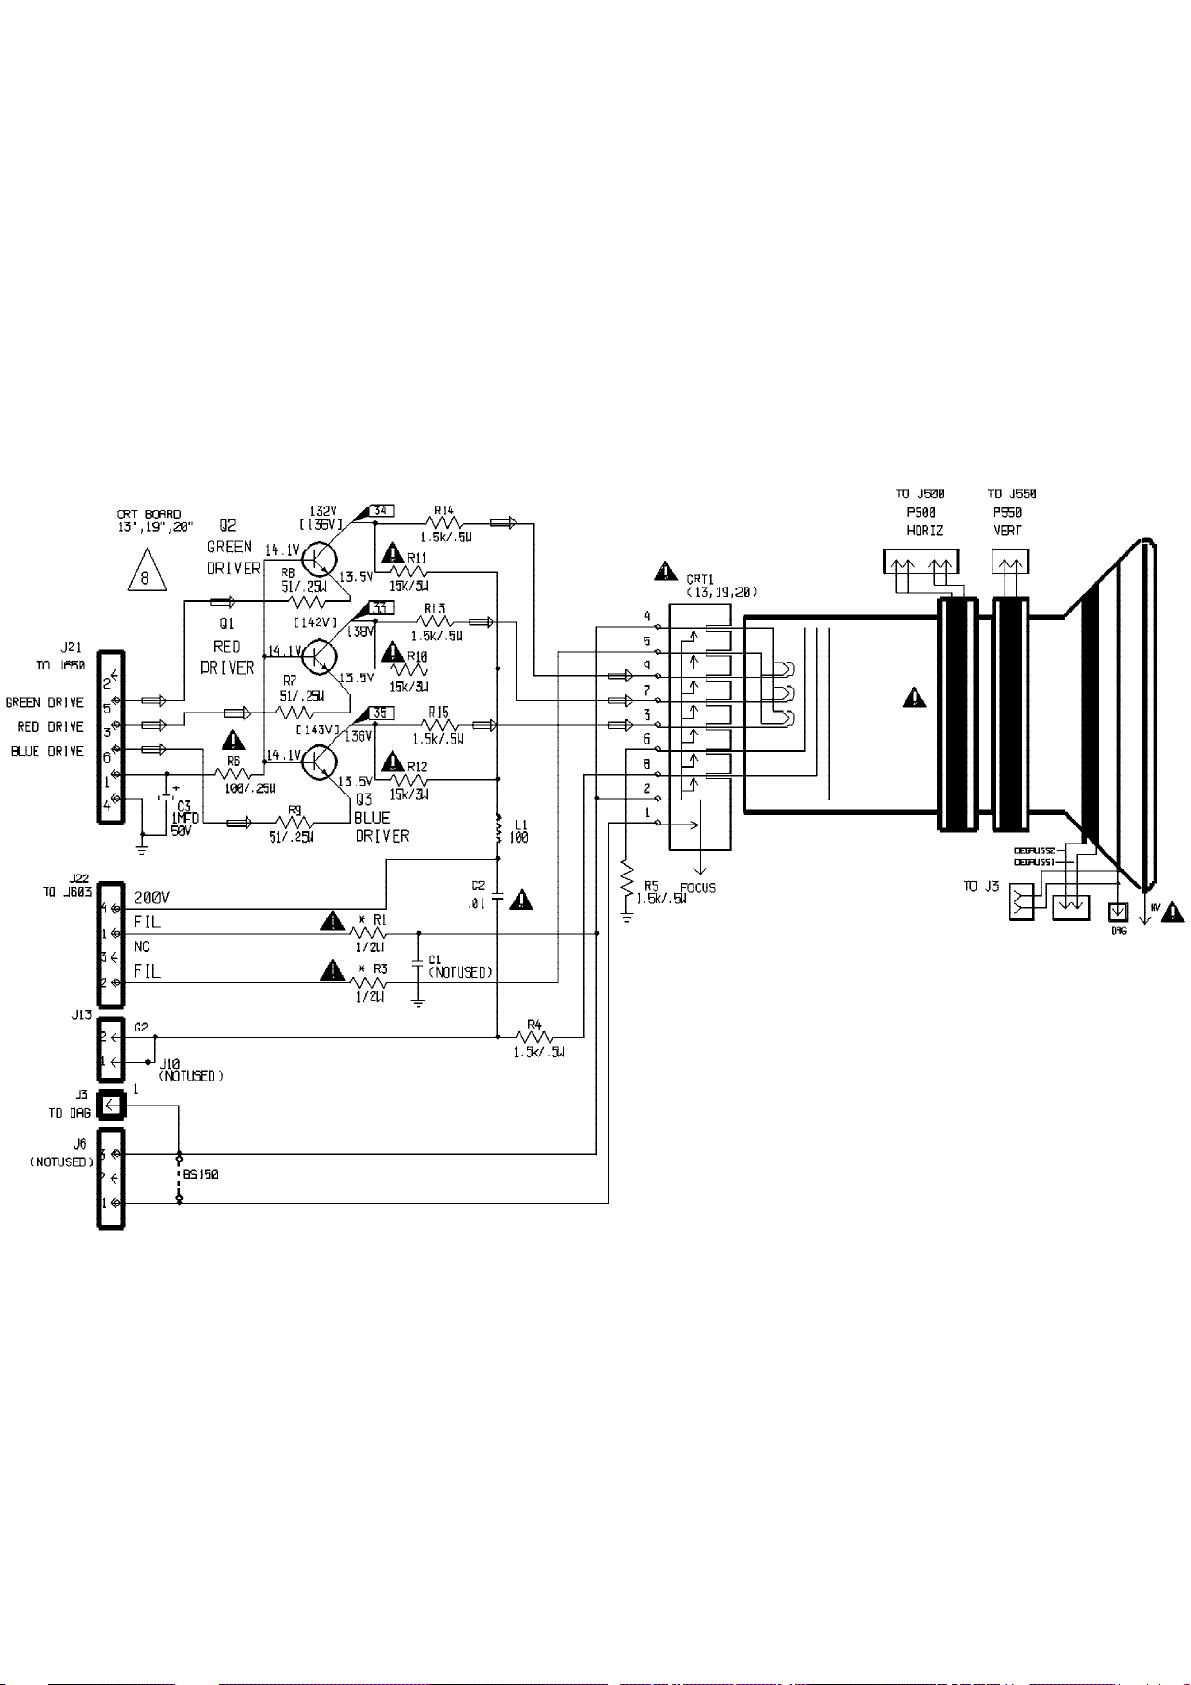
20LJ26(7553) - 13, 19, 20" CRT SCHEMATIC Page: 7 of 19
Page 28
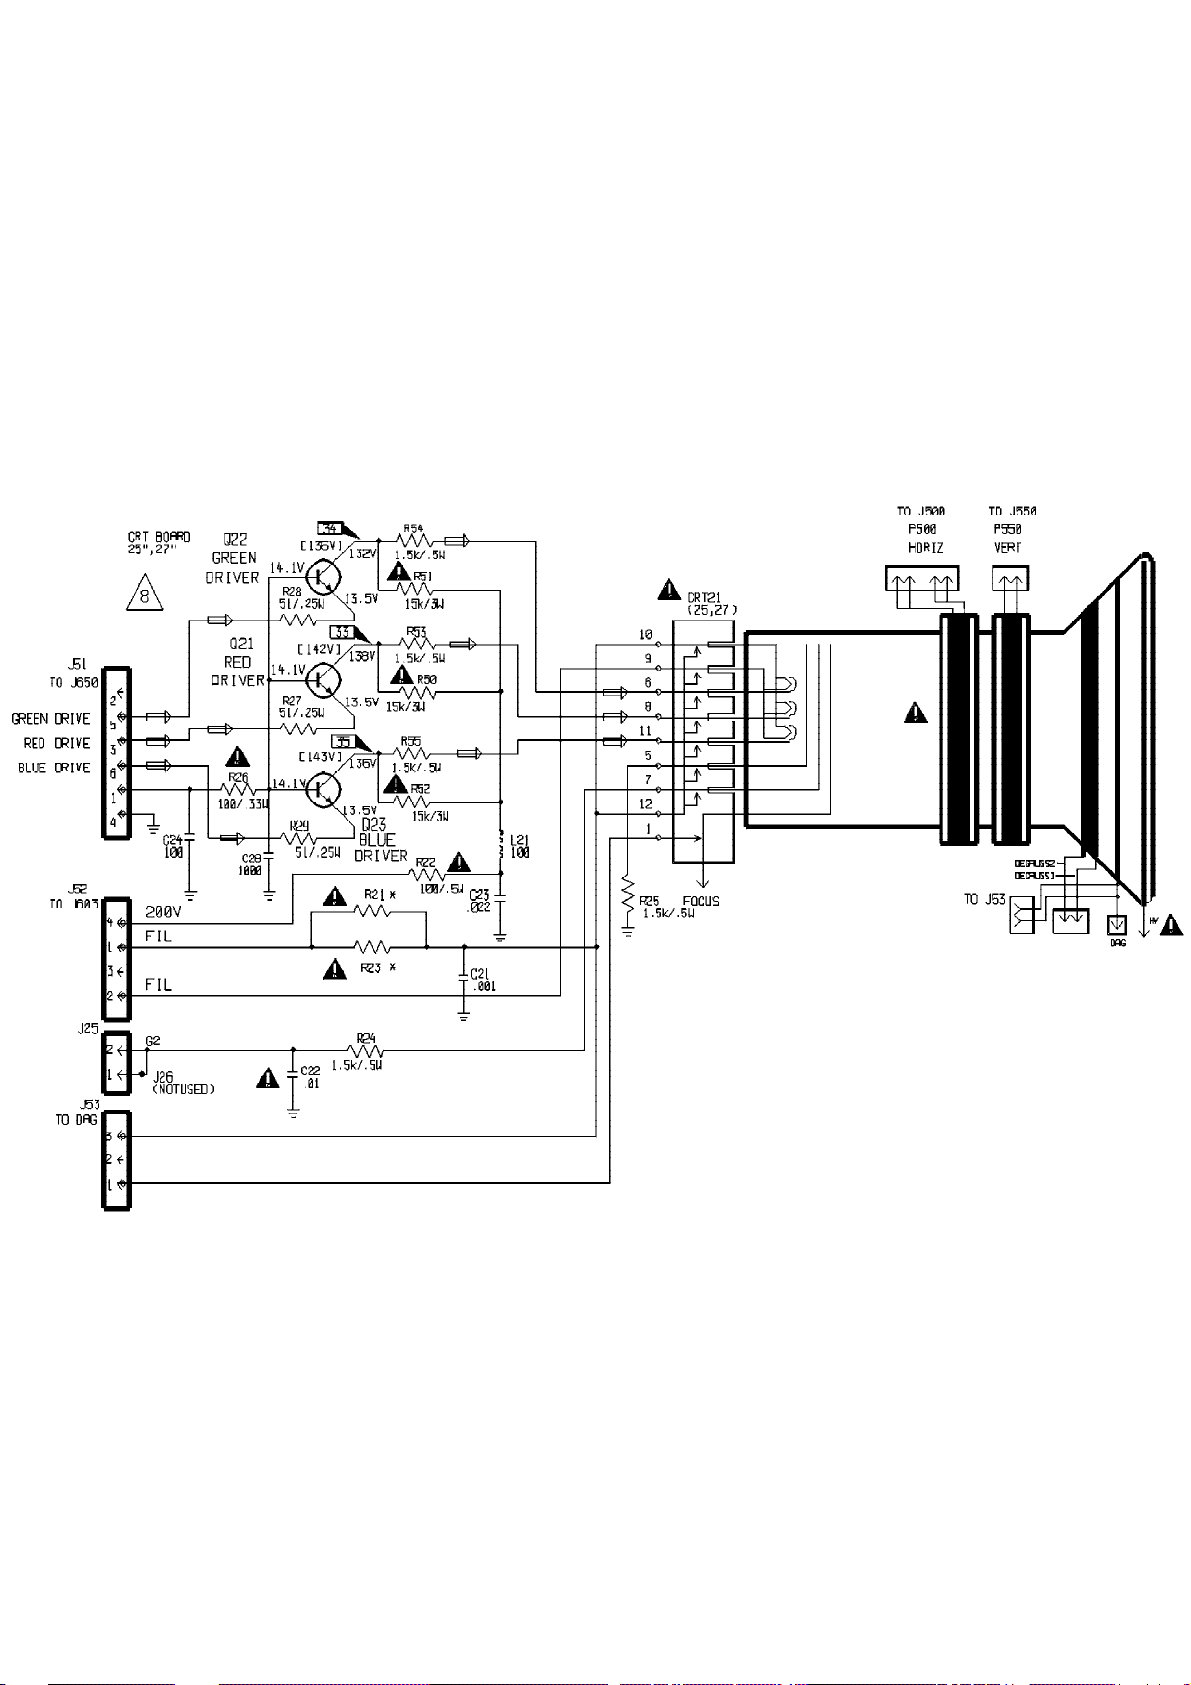
20LJ26(7553) - 25, 27" CRT SCHEMATIC Page: 8 of 19
Page 29
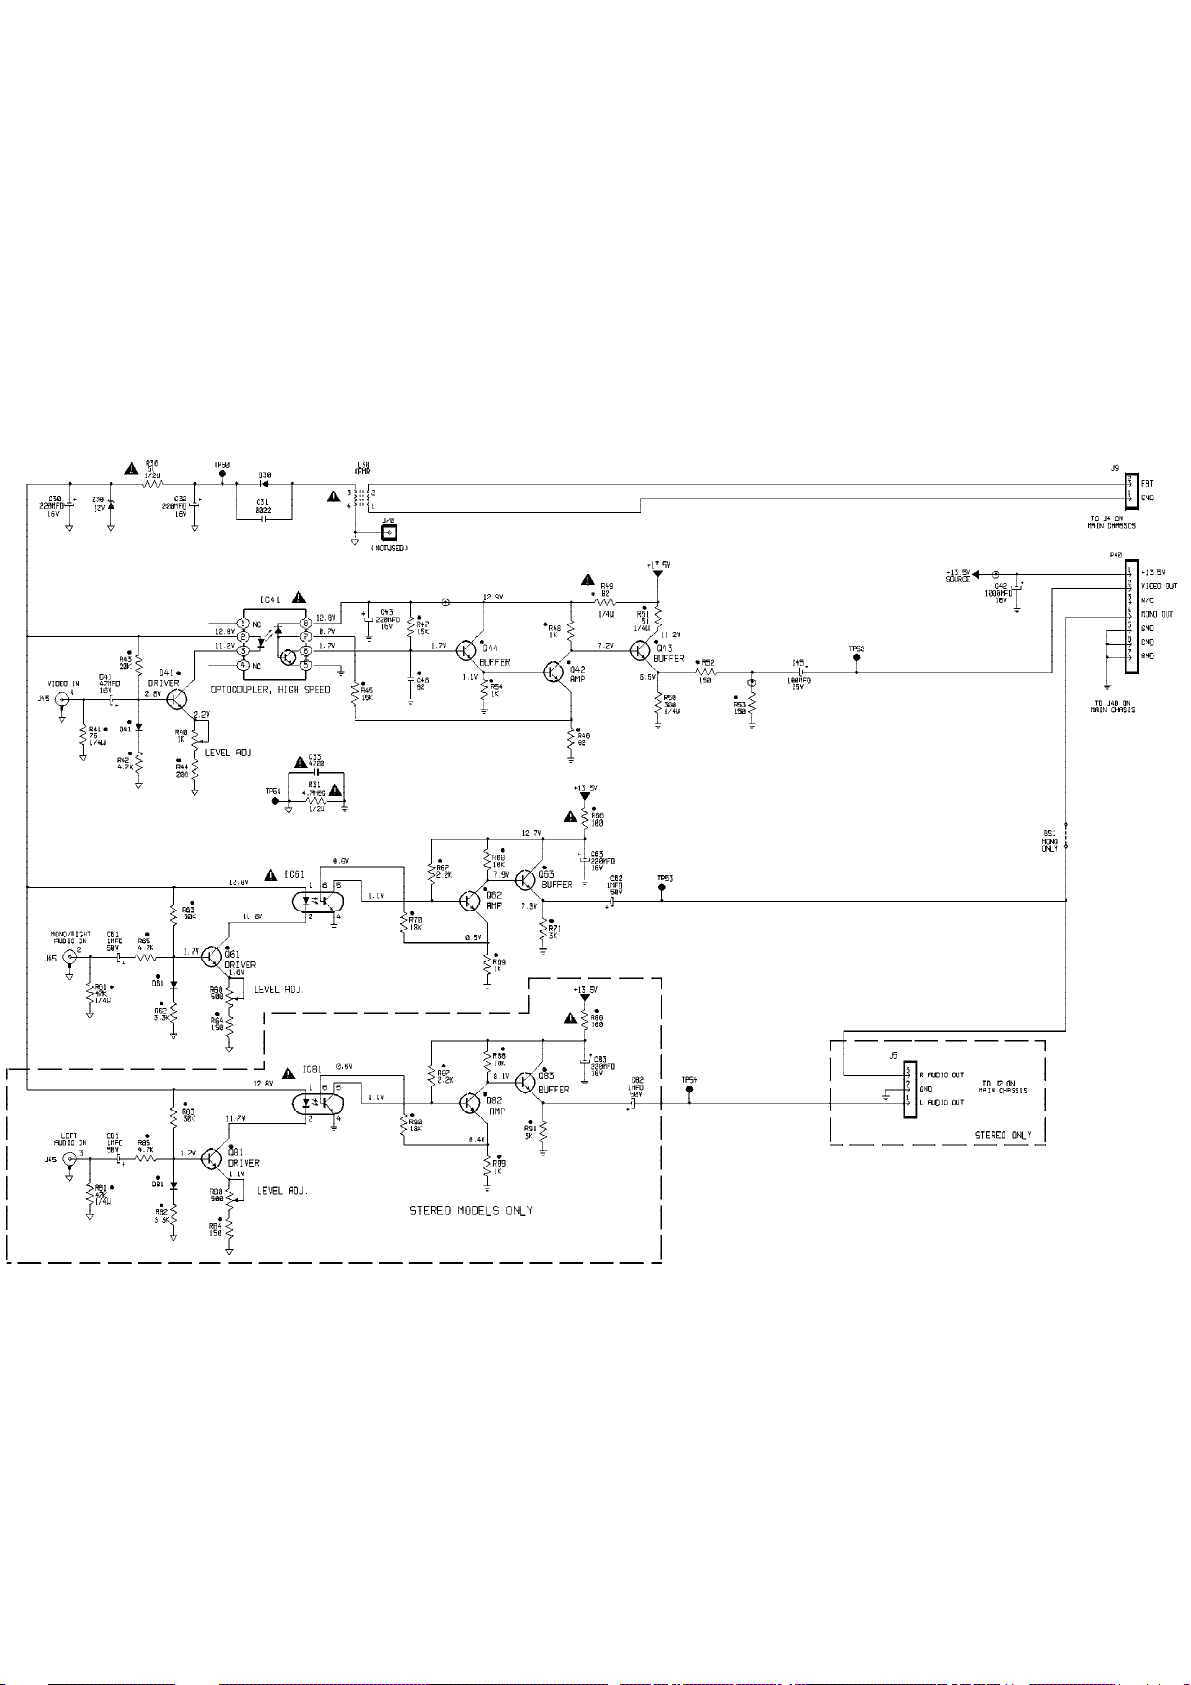
20LJ26(7553) - JACK PANEL SCHEMATIC (AVJ183) Page: 9 of 19
Page 30
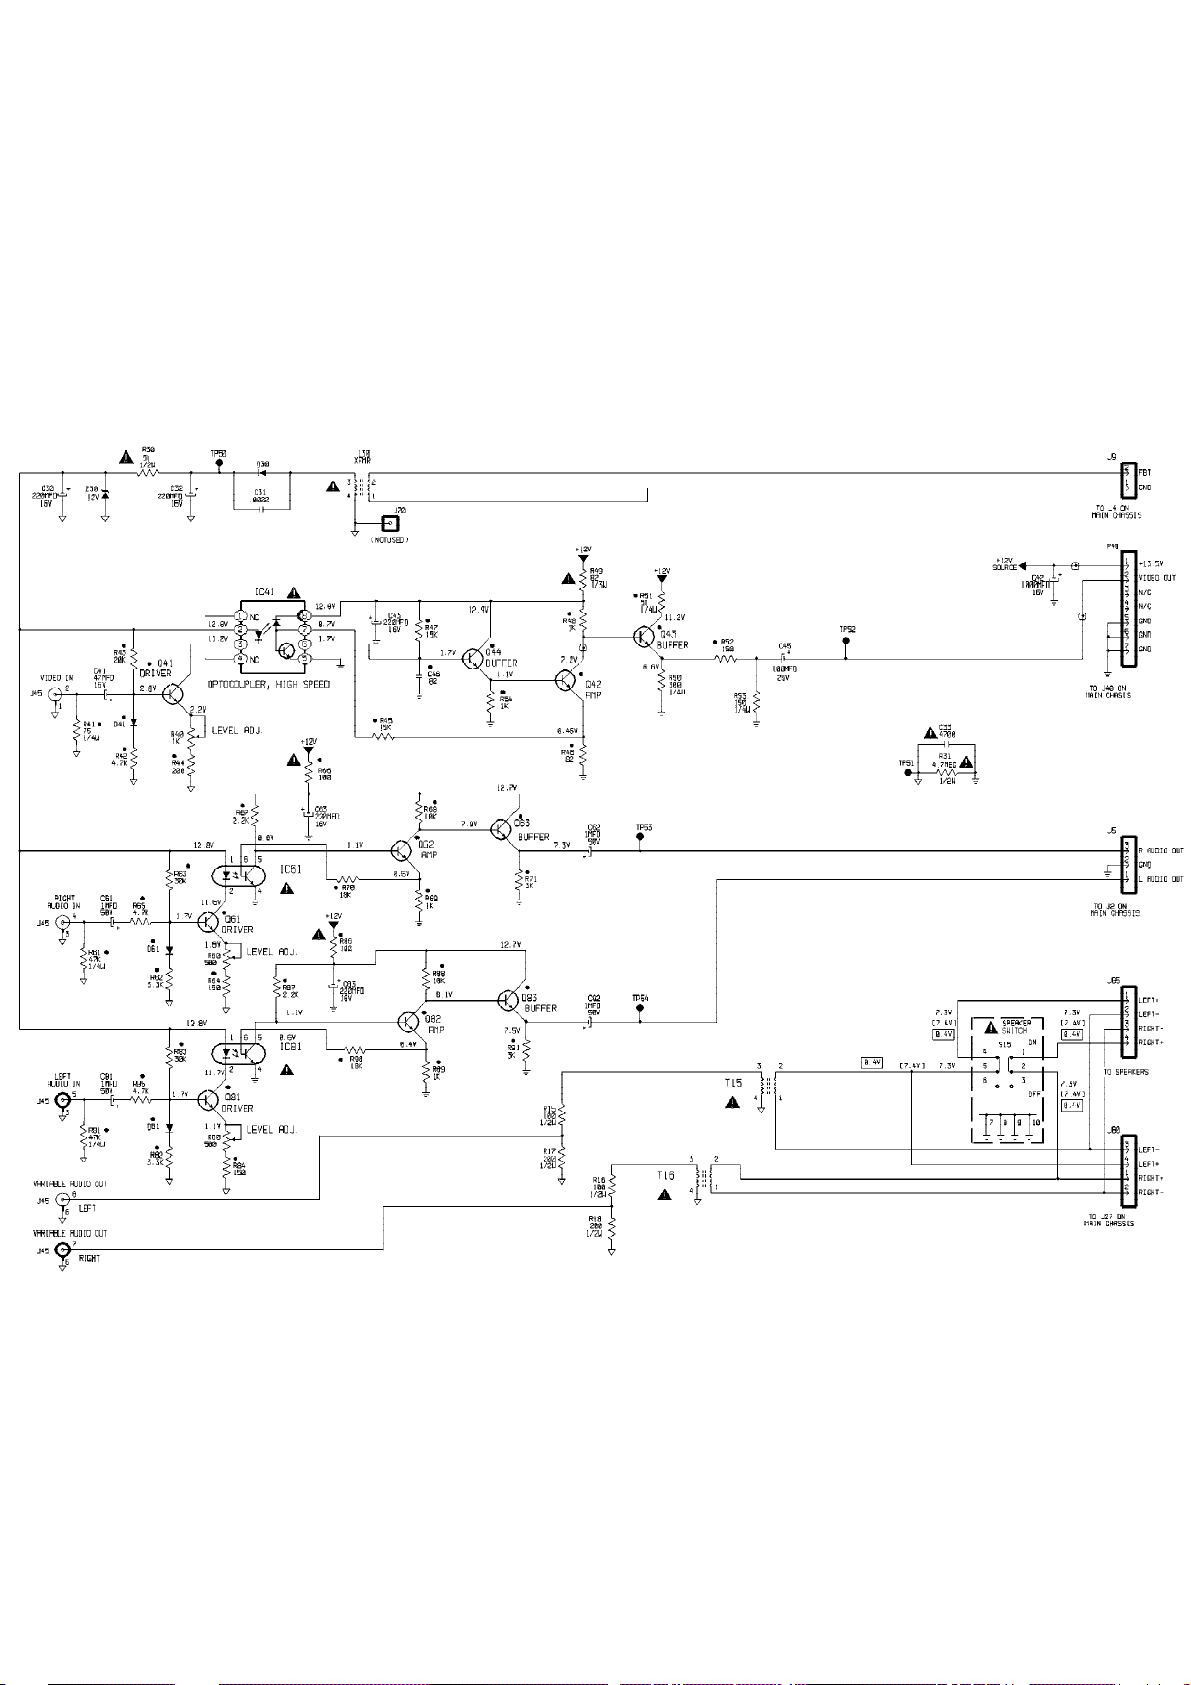
20LJ26(7553) - JACK PANEL SCHEMATIC (AVJ179 & 180) Page: 10 of 19
Page 31
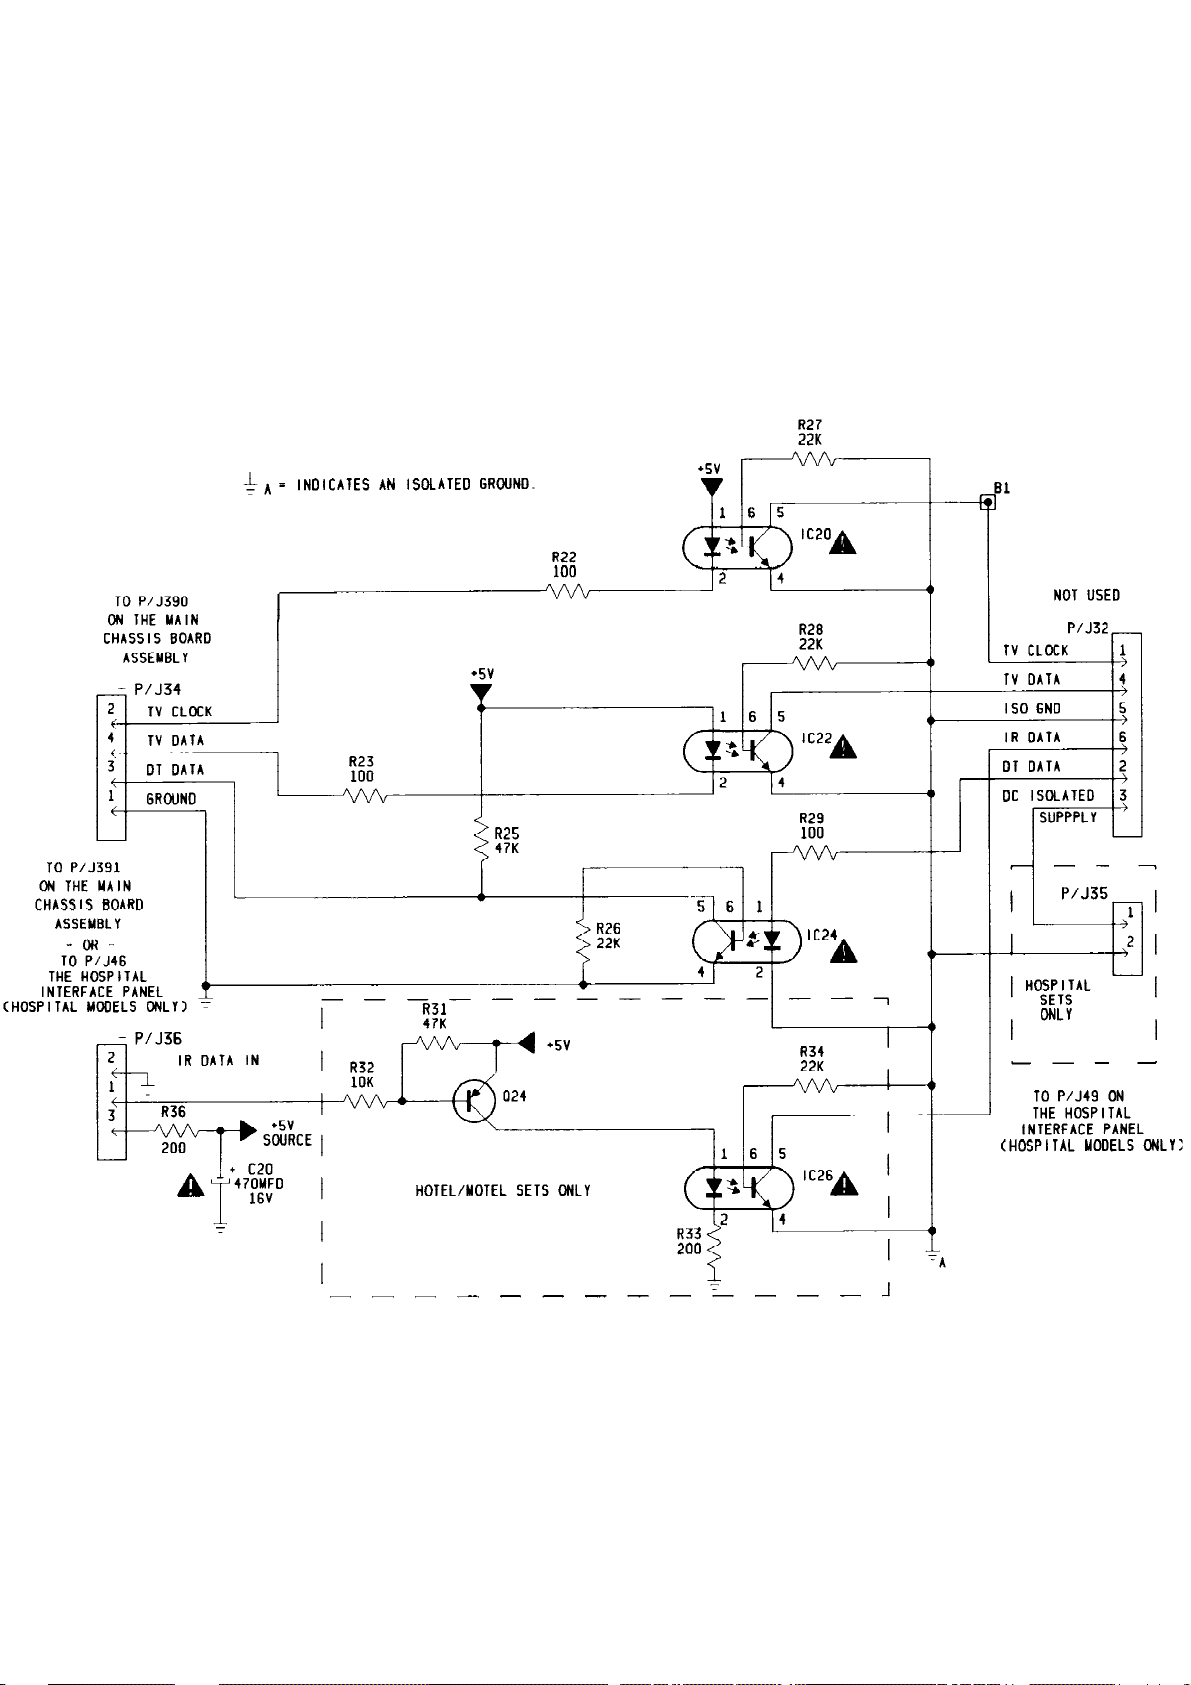
20LJ26(7553) - DATA TERMINAL INTERFACE SCHEMATIC Page: 11 of 19
Page 32
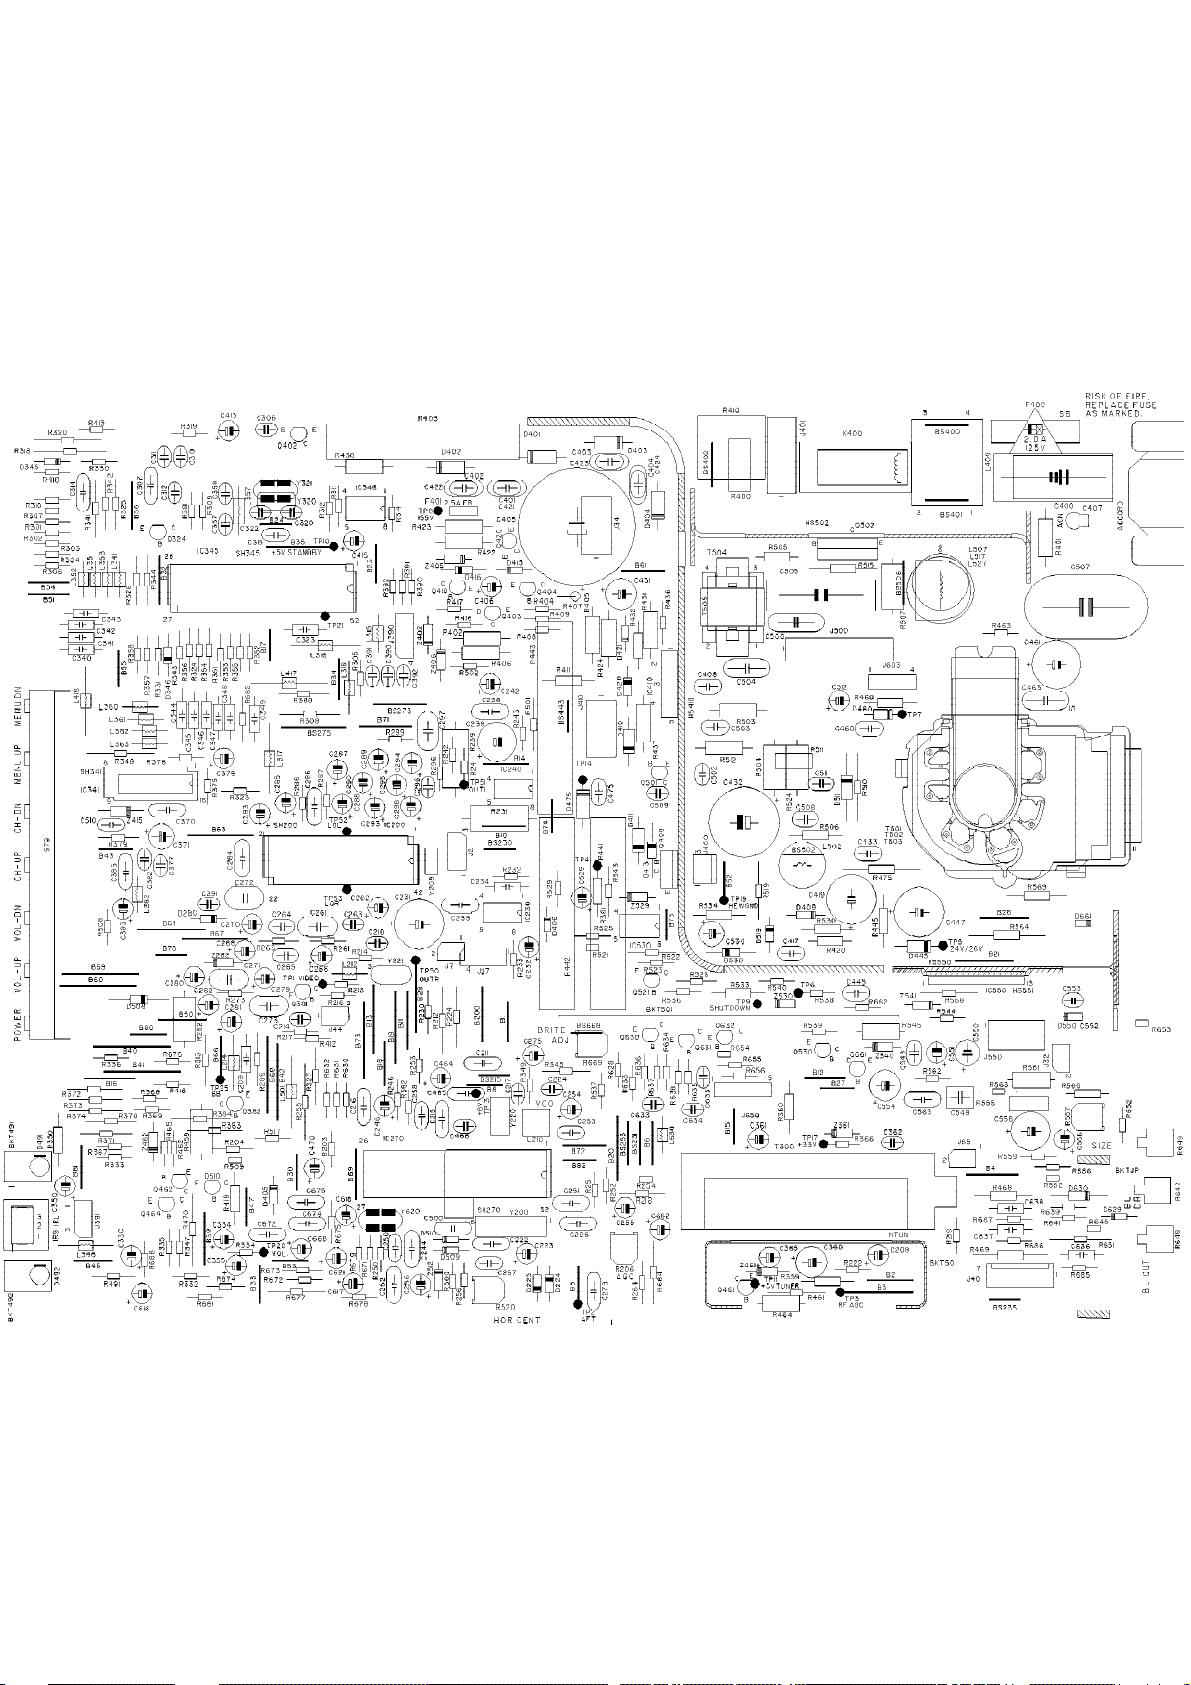
20LJ26(7553) - MAIN CBA Page: 12 of 19
Page 33
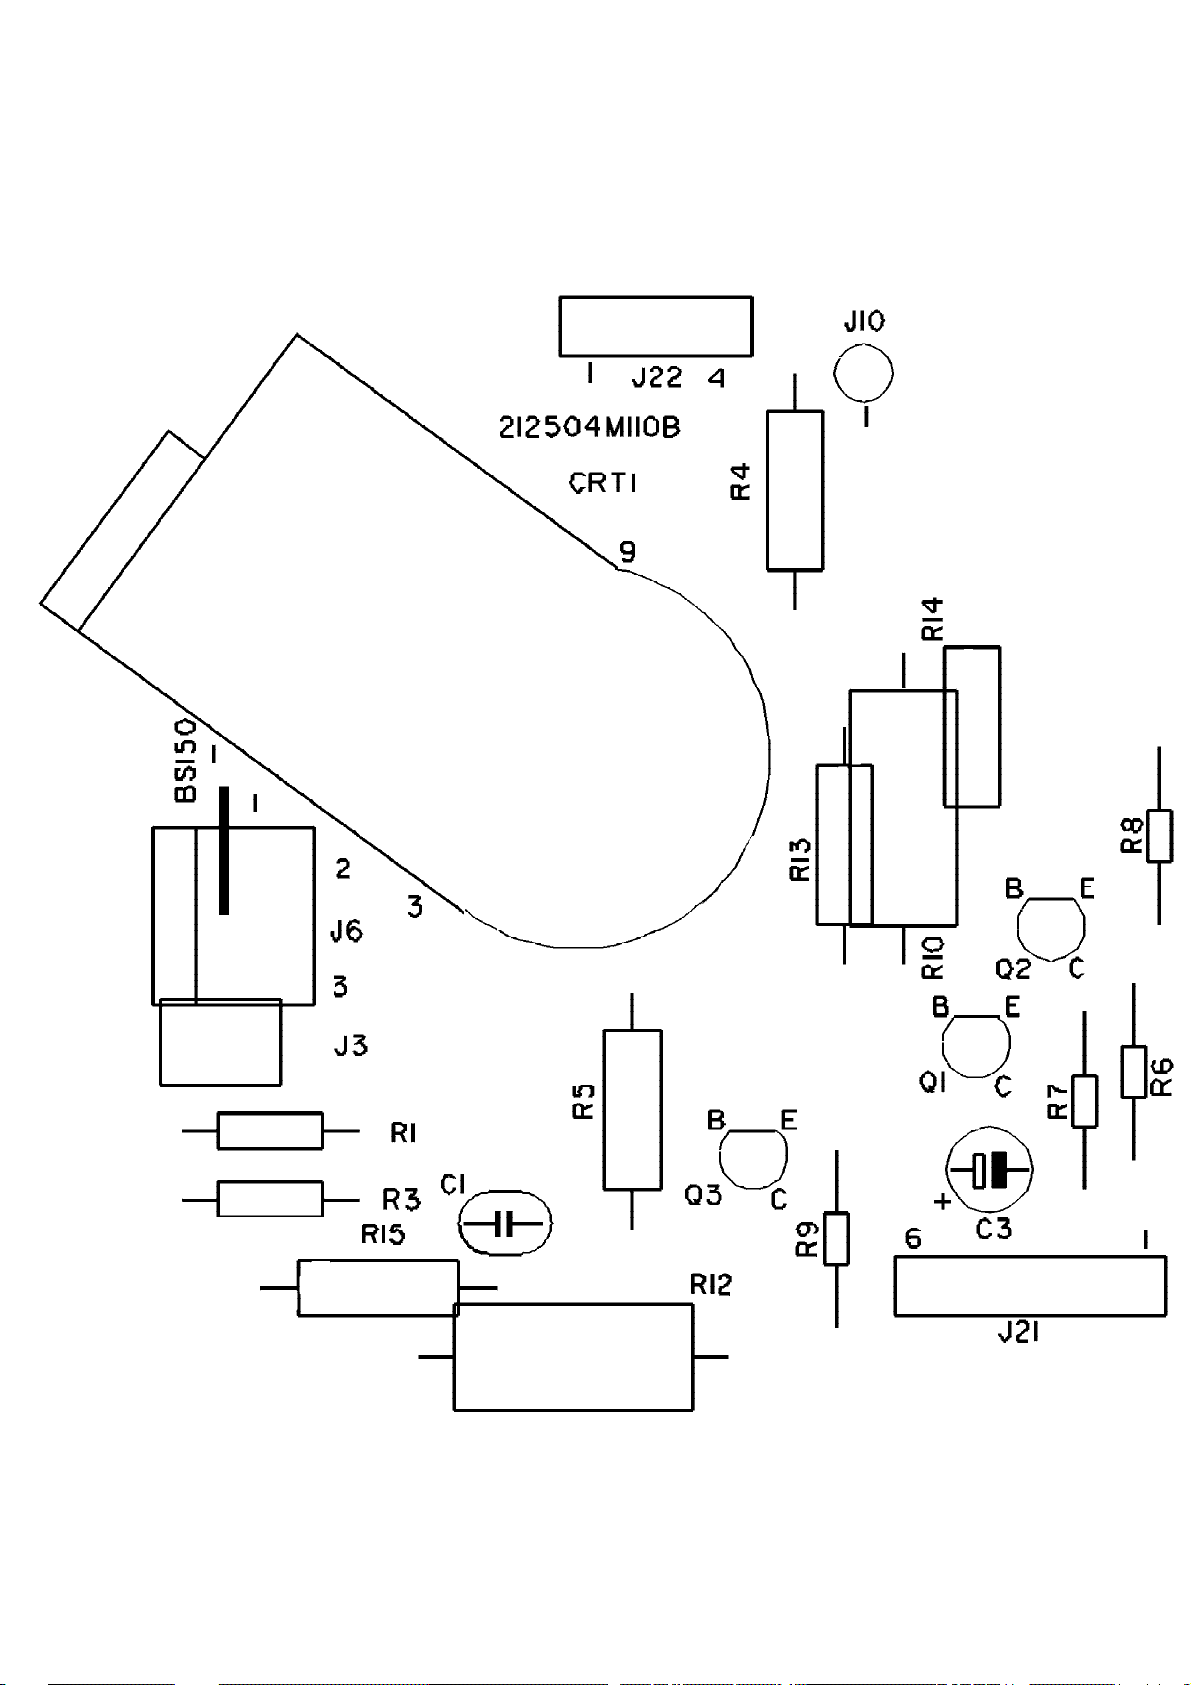
20LJ26(7553) - 13, 19, 20" CRT CBA Page: 13 of 19
Page 34
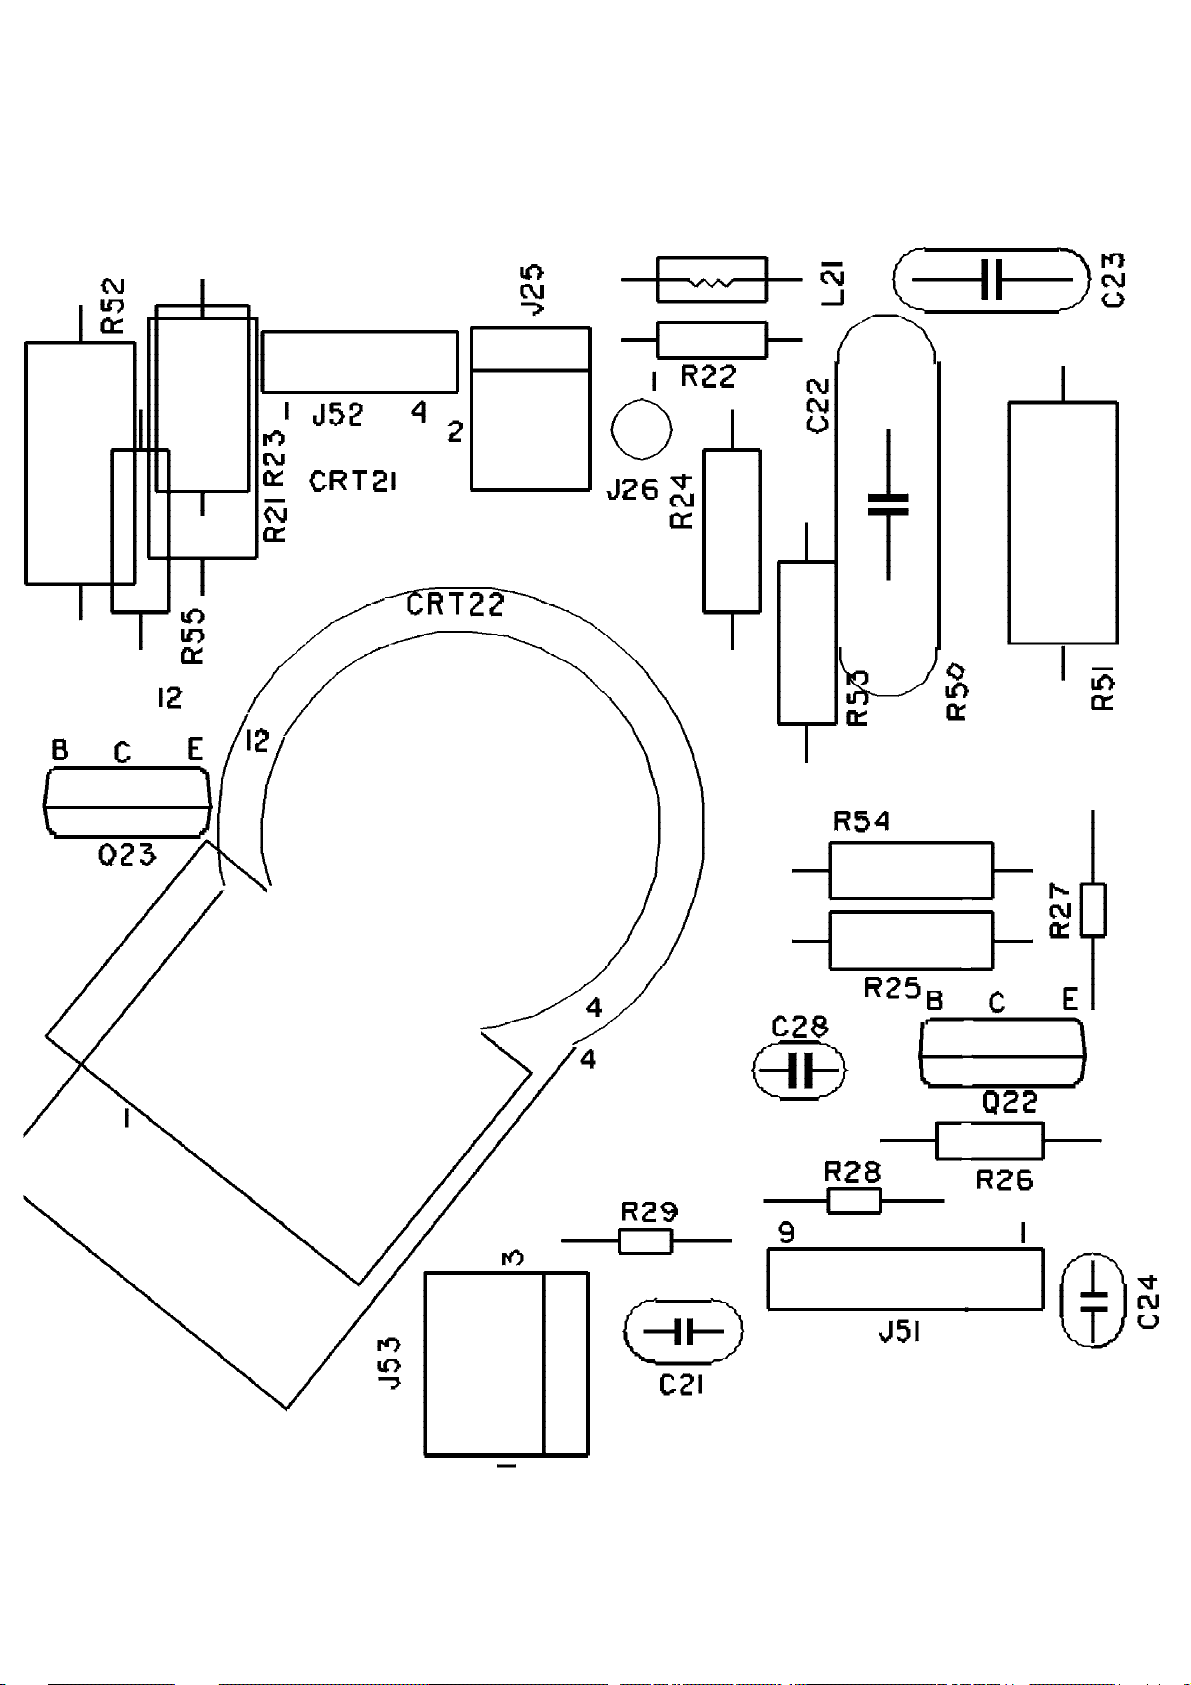
20LJ26(7553) - 25, 27" CRT CBA Page: 14 of 19
Page 35
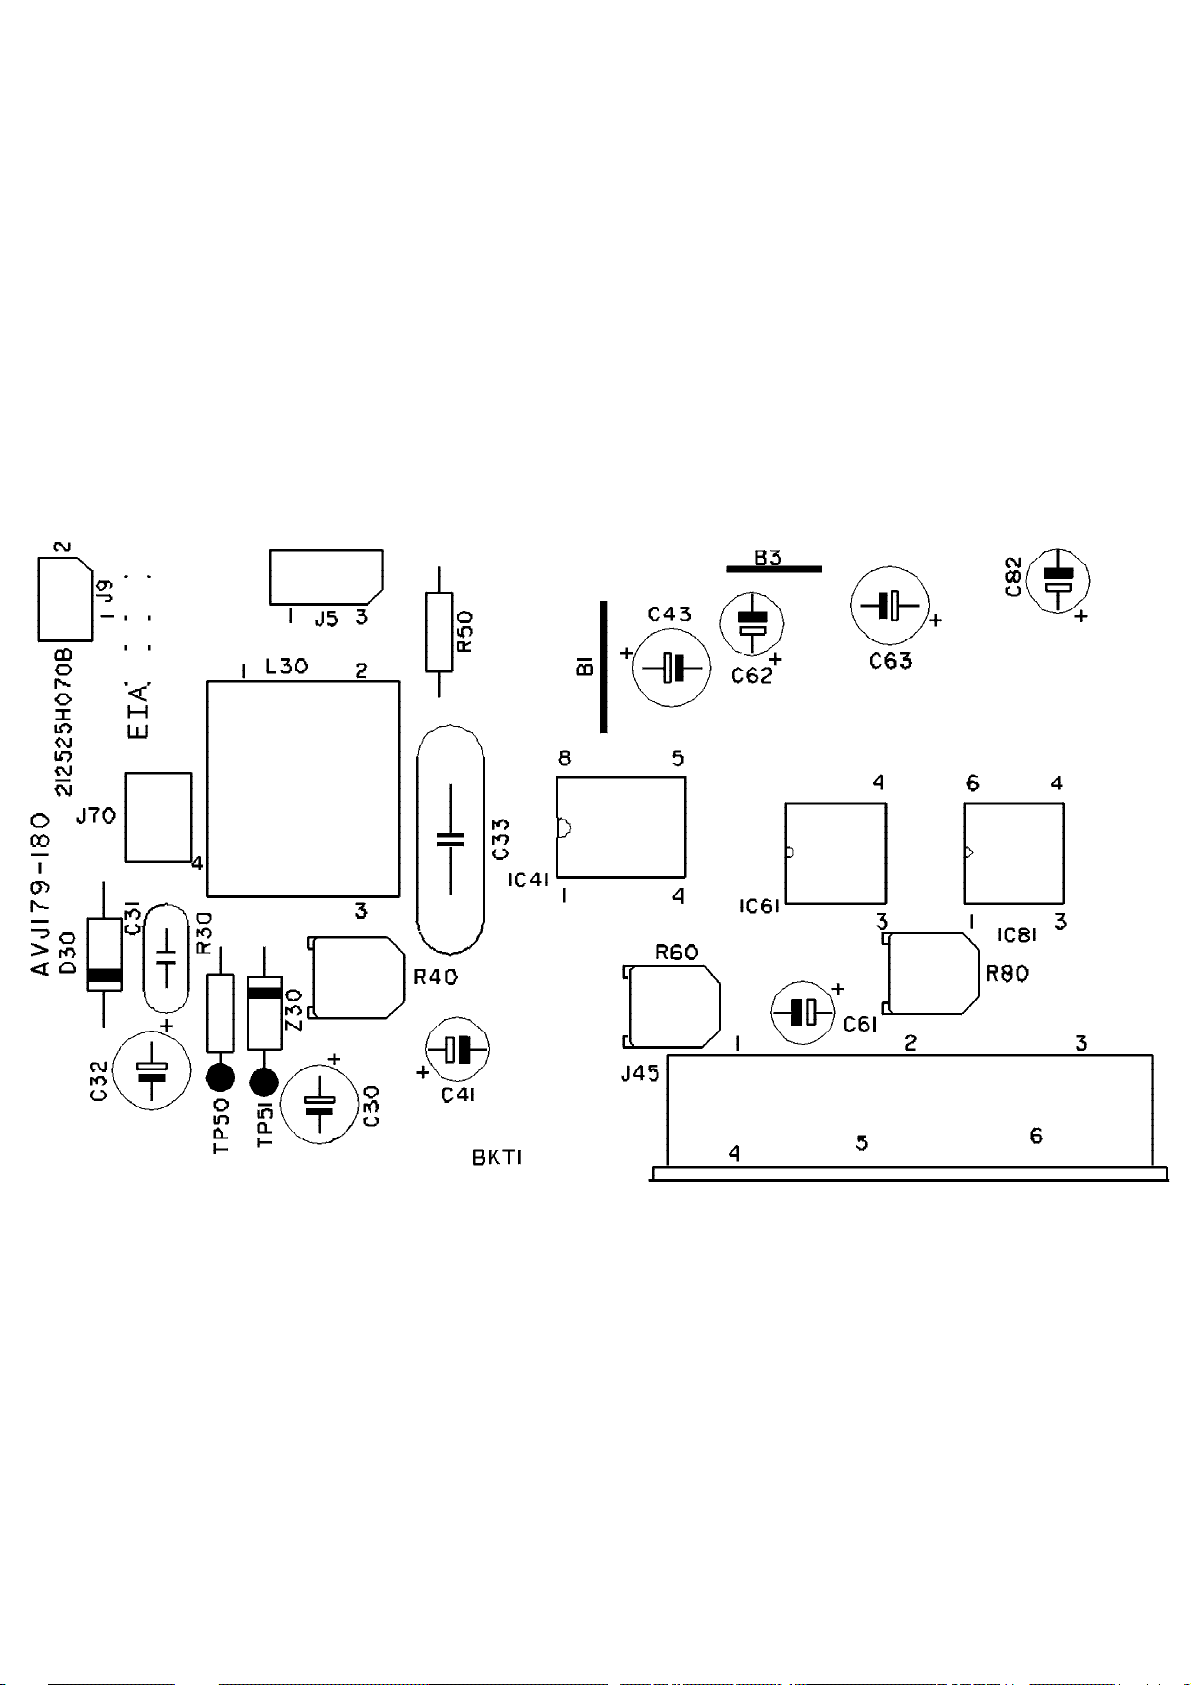
20LJ26(7553) - AVJ183 JACK PANEL CBA (TOP) Page: 15 of 19
Page 36
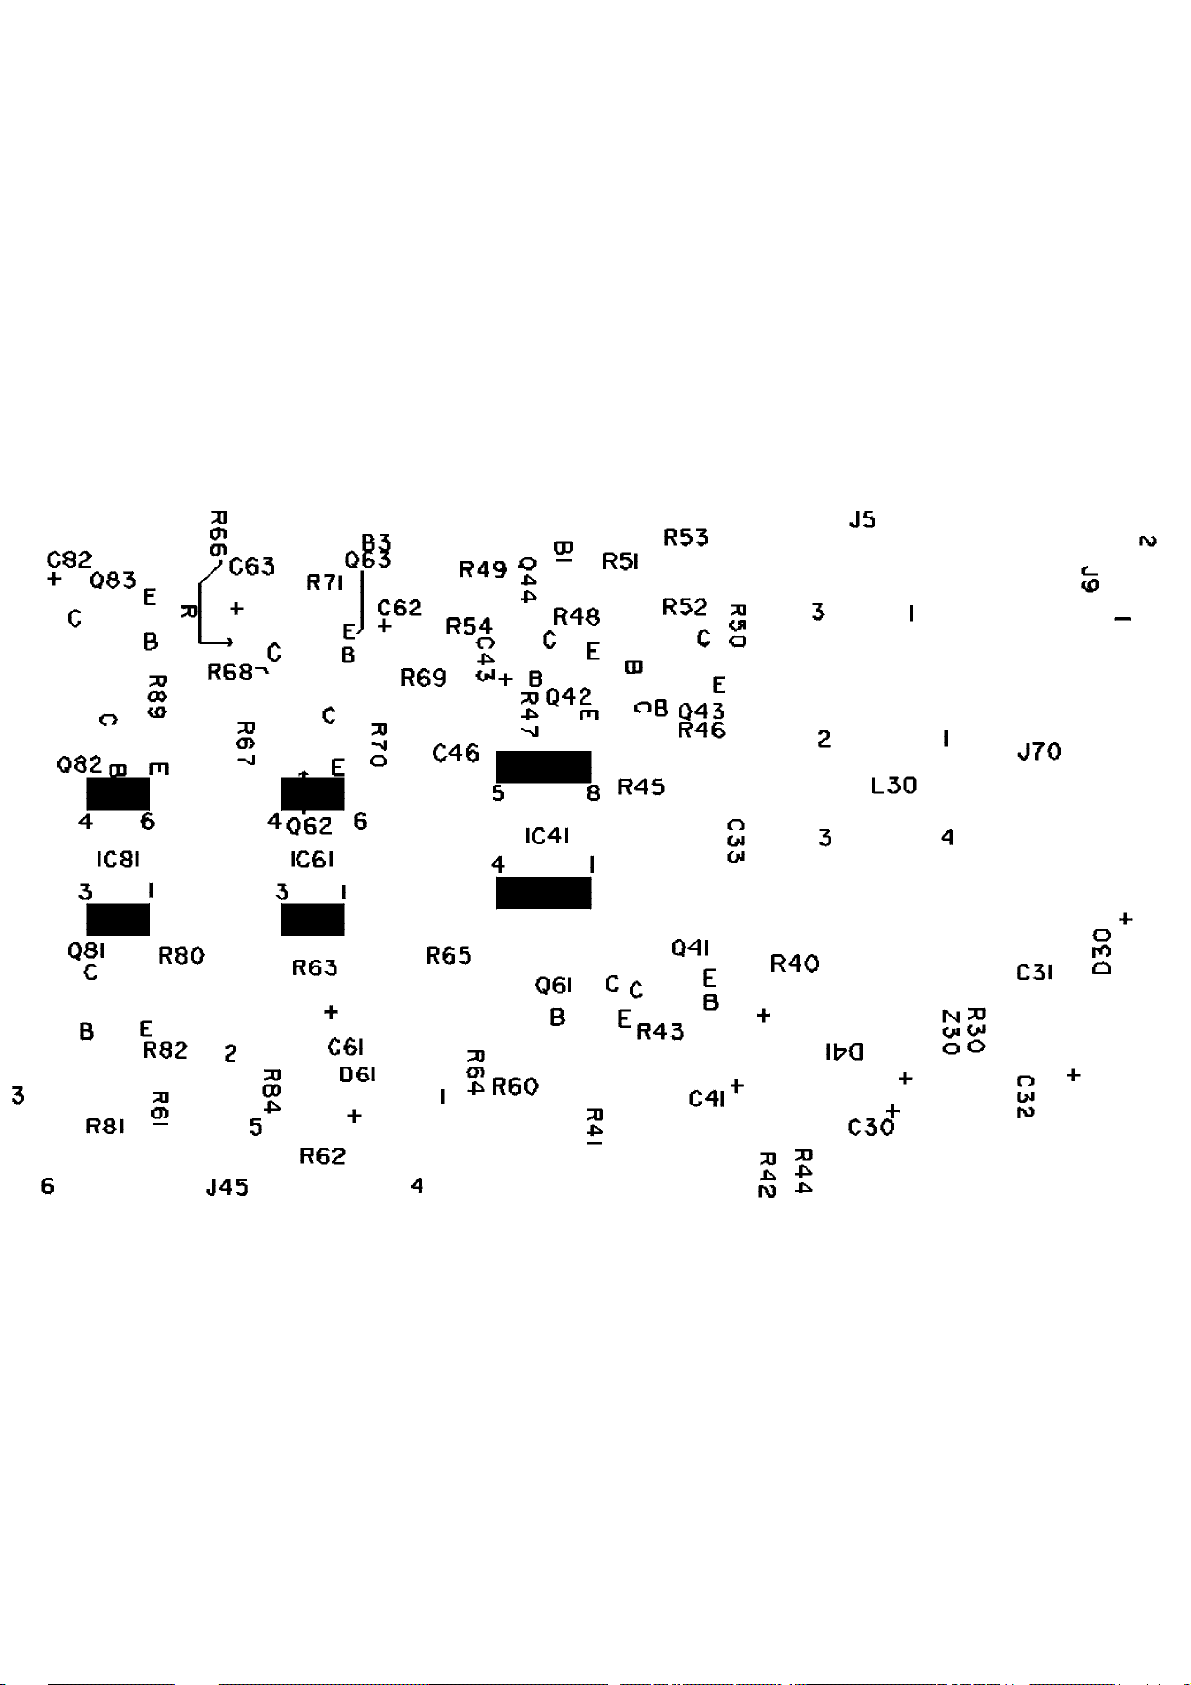
20LJ26(7553) - AVJ 183 JACK PANEL CBA (BOTTOM) Page: 16 of 19
Page 37
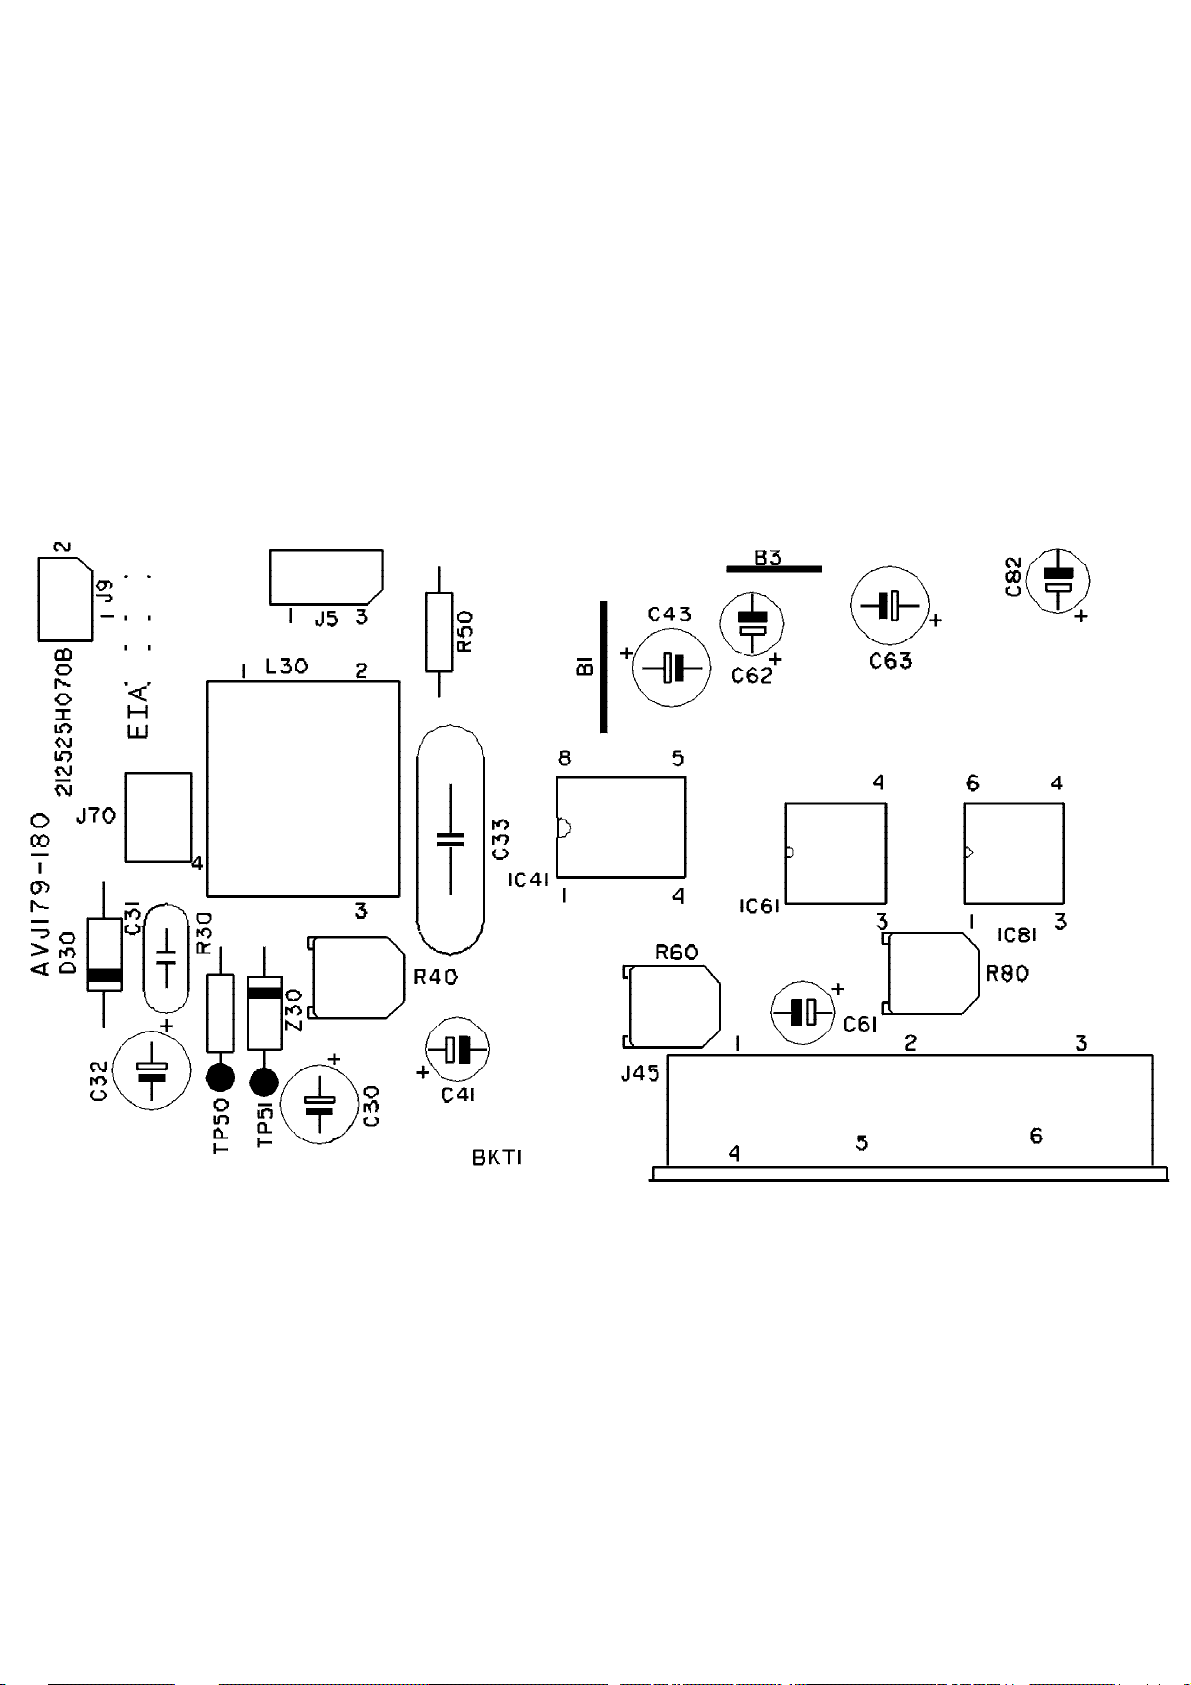
20LJ26(7553) - AVJ179&180 JACK PANEL CBA (TOP) Page: 17 of 19
Page 38
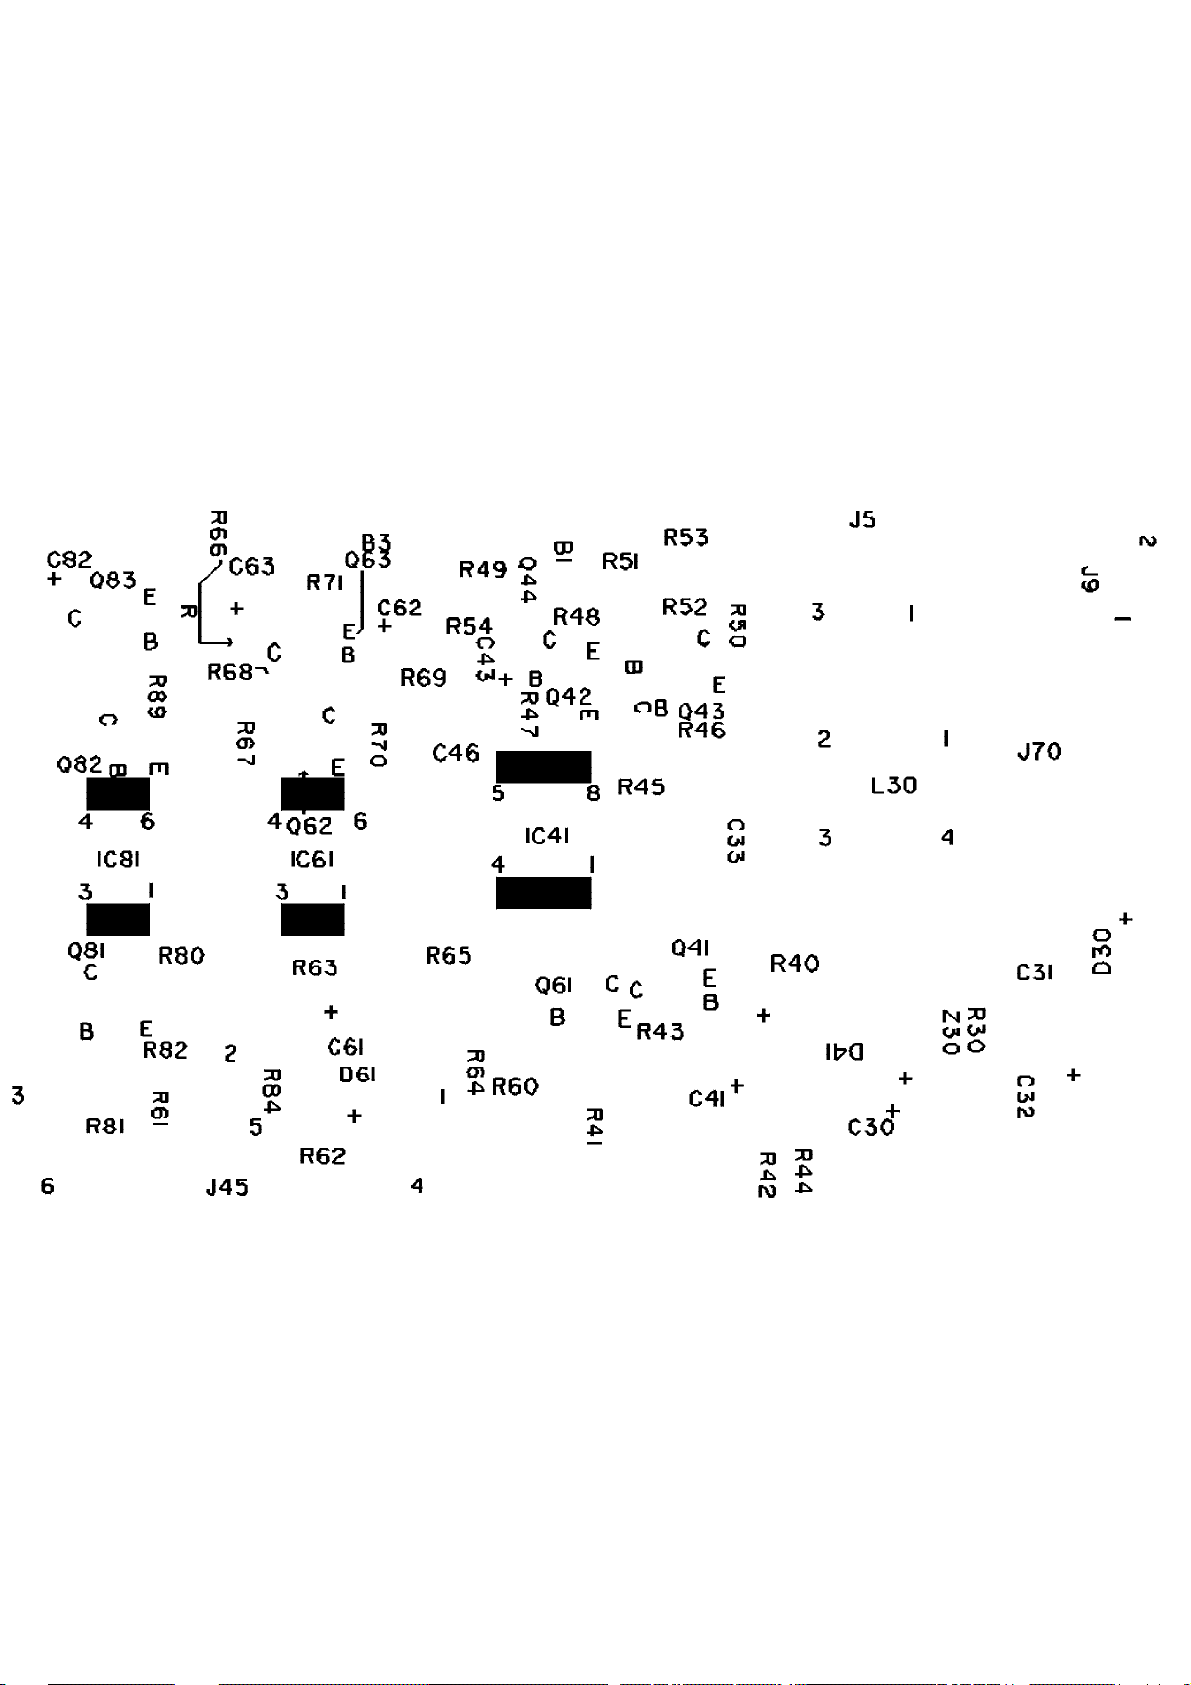
20LJ26(7553) - AVJ179&180 JACK PANEL CBA (BOTTOM) Page: 18 of 19
Page 39
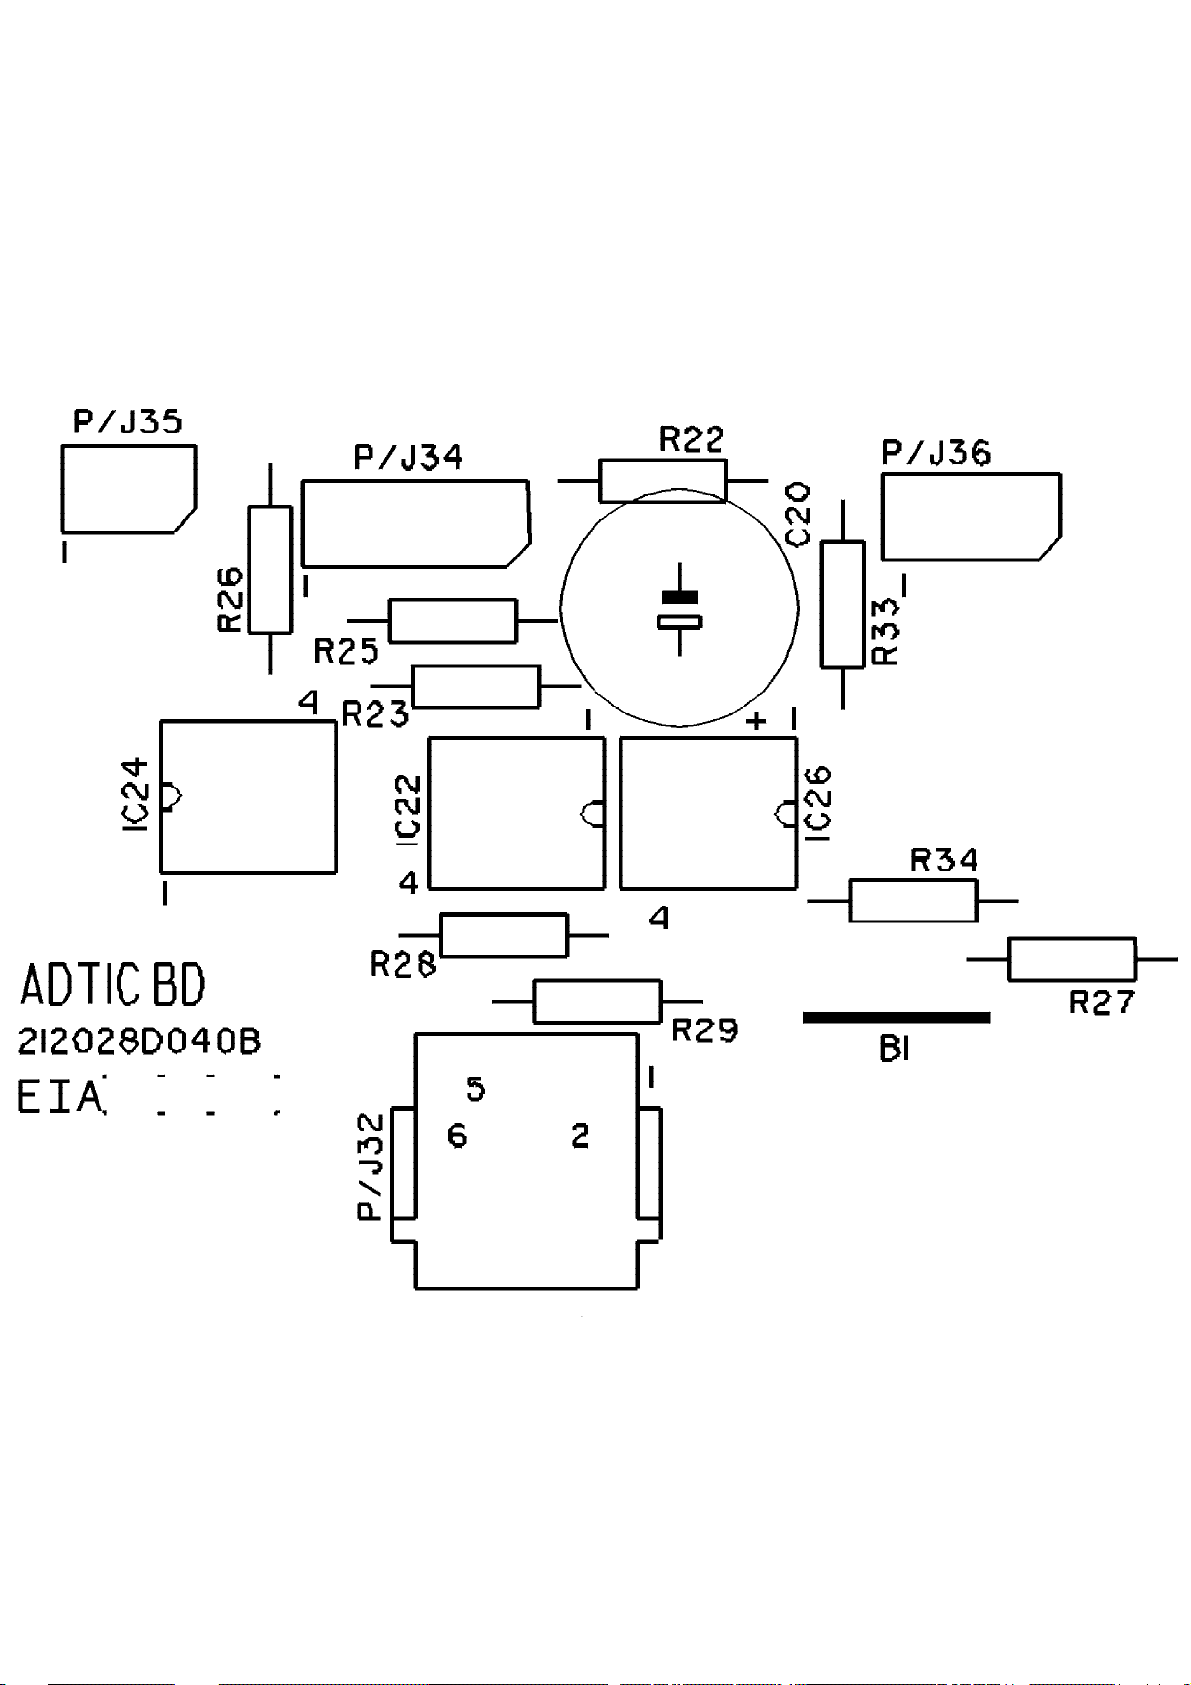
20LJ26(7553) - DATA TERMINAL INTERFACE CBA Page: 19 of 19
 Loading...