

Page 1
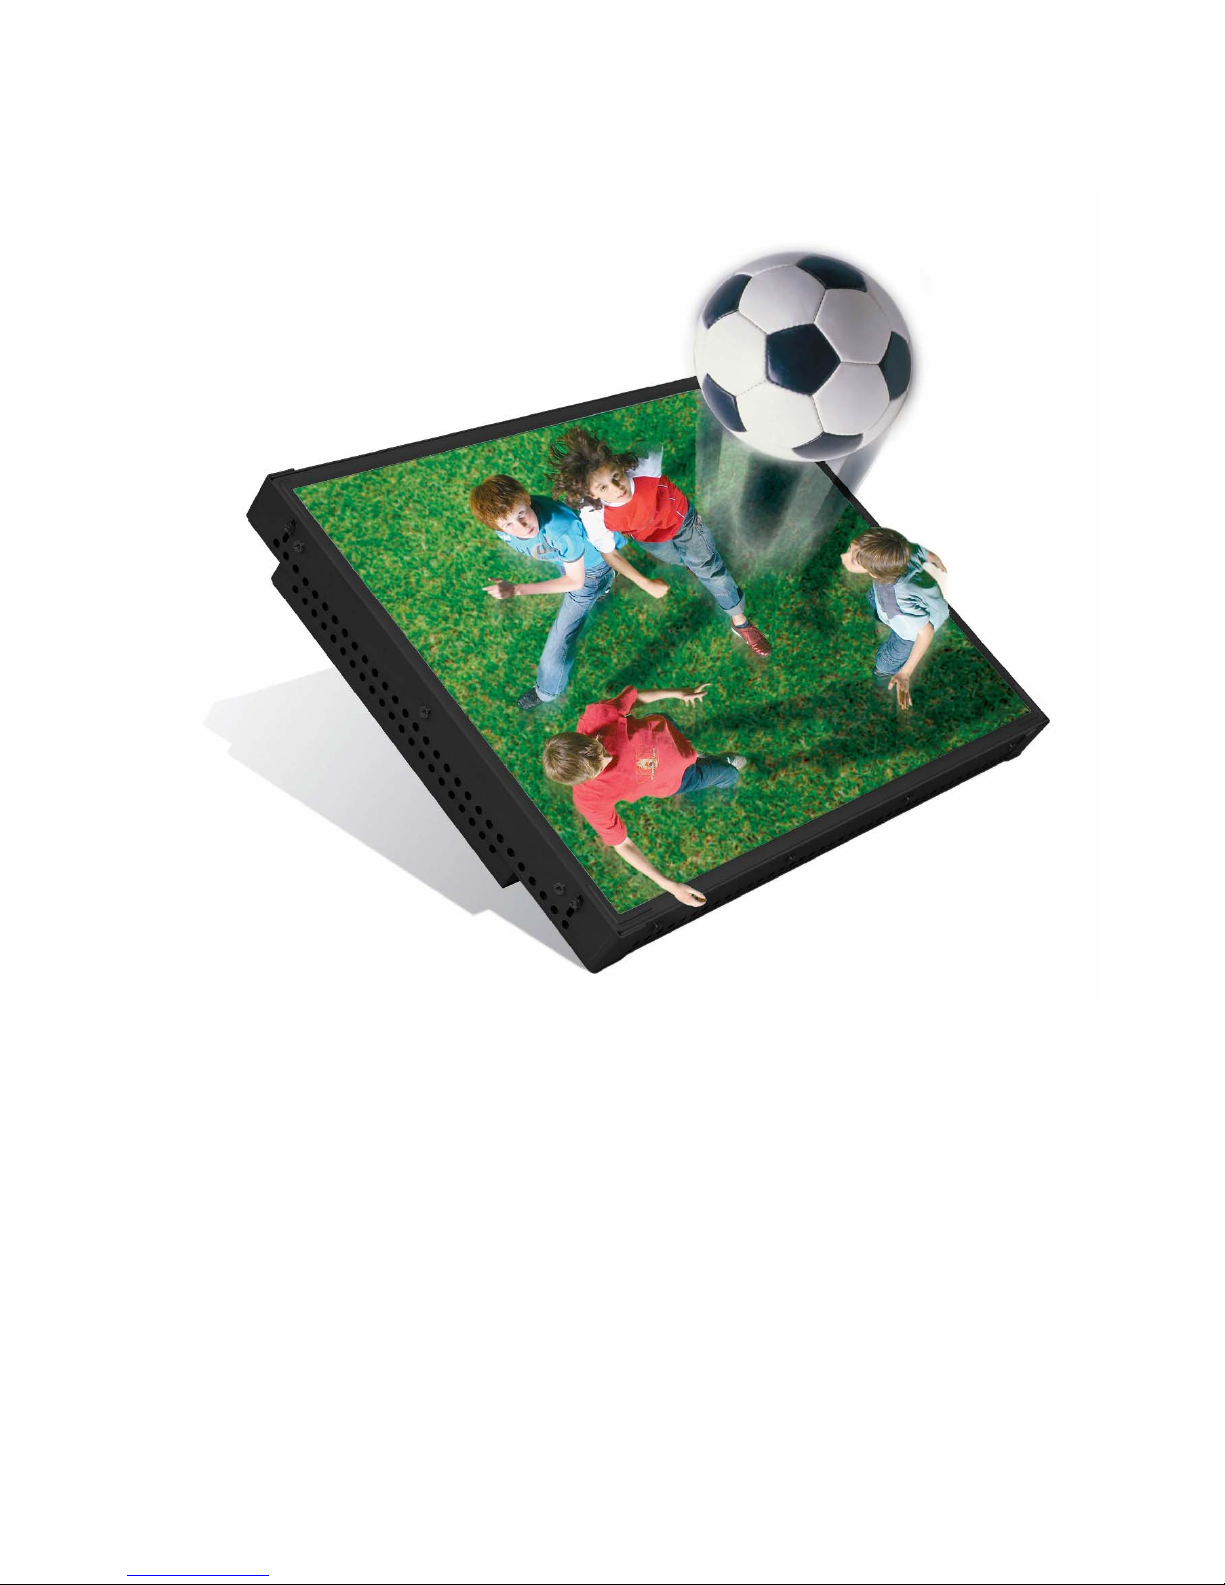
20-inch 3D-Intelligent Display
20-3D2W01/00
20-3D2W04/00
User Manual
Philips 3D Solutions
Page 2

Electrical Safety Warnings
Warning this is a class A product. In a domestic
environment this product may cause radio interference
in which case the user may be required to take
adequate measures.
This display is supplied with a 3-wire power cord.
Under no circumstances should the earth wire be
disconnected.
To prevent possibility of shock hazard do not
expose the display to moisture.
Only qualified service personnel should open
the casing cover.
Page 3

Safety precautions
1. Read these instructions.
2. Keep these instructions.
3. Heed all warnings.
4. Follow all instructions.
5. Do not use this apparatus near water.
6. Clean only with dry cloth.
7. Do not block any ventilation openings. Install in accordance with
manufacturer’s instructions.
8. Do not install near any heat sources such as radiators, heat registers,
stoves, or other apparatus (including amplifiers) that produce heat.
9. Do not defeat the safety purpose of the polarized or grounding-type
plug. A polarized plug has two blades with one wider than the other. A
grounding type plug has two blades and a third grounding prong. The
wide blade or third prong are provided for your safety. If the provided
plug does not fit into your outlet, consult an electrician for
replacement of the obsolete outlet.
10. Protect the power cord from being walked on or pinched particularly
at plugs, convenience receptacles, and the point where they exit from
the apparatus.
11. Only use attachments/accessories specified by the manufacturer.
12. Use only with the cart, stand, tripod, bracket, or table specified by the
manufacturer, or sold with the apparatus. When a cart is used, use
caution when moving the cart/apparatus combination to avoid injury
from tip-over.
13. Unplug this apparatus during lightning storms or when unused for
long periods of time.
14. Refer all servicing to qualified service personnel. Servicing is required
when the apparatus has been damaged in any way, such as powersupply cord or plug is damaged, liquid has been spilled or objects
have fallen into the apparatus, the apparatus has been exposed to
rain or moisture, does not operate normally, or has been dropped.
Page 4
Document Information
Info Content
Title 20 inch 3D Display, User Manual (9922 159 12 051 090401)
Date 01 April 2009
Security The attached material and the information contained herein are
proprietary to Philips 3D Solutions. Copying, reproduction, adaptation,
modification or dissemination in whole or part is not permitted without
written permission from Philips 3D Solutions.
Contact www.philips.com/3dsolutions
Page 5

20” Display User Manual
3D Solutions
Table of Contents
1 Introduction ............................................................................................................................................................................. 6
2 Product features ................................................................................................................................................................... 7
2.1 Global product features ........................................................................................................................................... 7
2.2 Technical aspects and details ............................................................................................................................... 8
2.3 Video input .................................................................................................................................................................... 9
3 Scope of supply, Set up and mounting ..................................................................................................................... 10
3.1 Scope of Supply ....................................................................................................................................................... 10
3.2 Safety precautions ................................................................................................................................................... 10
3.3 Installation locations ............................................................................................................................................... 11
3.4 Positioning the display ........................................................................................................................................... 11
3.5 Fitting the table stand ............................................................................................................................................. 11
3.6 Fitting the Cosmetic front ...................................................................................................................................... 12
3.7 Connecting the display .......................................................................................................................................... 12
4 Cleaning instructions ........................................................................................................................................................ 13
4.1 Cleaning models 20-3D2W01/00 and 20-3D2W04/00 ............................................................................. 13
5 Software installation .......................................................................................................................................................... 14
5.1 Minimum PC requirements .................................................................................................................................. 14
5.2 Prepare PC ................................................................................................................................................................. 14
6 Approbations ........................................................................................................................................................................ 15
6.1 CE .................................................................................................................................................................................. 15
6.2 USA and Canada ..................................................................................................................................................... 15
6.3 CB Certificate ............................................................................................................................................................ 15
6.4 Australia ....................................................................................................................................................................... 15
7 Environmental ..................................................................................................................................................................... 16
8 Interfaces ............................................................................................................................................................................... 17
8.1 DVI-in ............................................................................................................................................................................ 17
9 Trademarks, Copyrights and disclaimer ................................................................................................................... 18
10 References ........................................................................................................................................................................... 19
11 Technical drawings ........................................................................................................................................................... 20
©2009 Philips Electronics Nederland B.V. 5 of 22
01 April 2009
Page 6

20” 3D Display User Manual
3D Solutions
1 Introduction
The 20-inch 3D display is another innovation by Philips 3D Solutions further widening the
application scope of advanced 3D display experience. The 20-inch 3D display is specifically
designed for a wide range of applications such as digital signage applications in kiosks and
many more.
The 3D display offers state-of-the-art lenticular lens design creating a variety of distinct
autostereoscopic views. By this the viewer will benefit from the multi-user experience along
with a large comfort zone. The display is featuring superior lens design and 3D rendering
relying on proven, highly optimized and accurate manufacturing processes.
The display’s 2D-plus-depth rendering interface allows maximum flexibility. The 20-inch
display provides full compatibility with all other 3D displays in the product range of Philips 3D
Solutions. No matter what sort of Philips 3D Solutions display is used, the content does not
need regeneration again. What’s more, the rendering hardware sits inside the display, allowing
for maximum optimisation of the optical system by embedded processing. By this, system
integrators are leveraging their investment and they can deploy their 3D content solutions in a
much wider range of applications.
The Display Control Tool can be used to change the depth offset, the depth range, the
contrast and the brightness.
Philips 3D Solutions offers two models for different application use cases, a generic integration
model (frame mount) and a dedicated desktop model:
Product Type number Description
Integration model 20-3D2W01/00
Frame mount
20-3D2W01/00
Desktop model 20-3D2W04/00
Table stand
Accessories box
A digital version of the 3D Display User Manual can be downloaded from our website:
www.philips.com/3dsolutions
.
01 April 2009
6 of 22 ©2009 Philips Electronics Nederland B.V.
Page 7

20” Display User Manual
2 Product features
2.1 Global product features
Multi-view Lenticular Display
o No need for special 3D glasses
o Multiple users experience 3D at the same time
o 9 view autostereoscopic 3D display
o Non-switchable lenticular technology
o Optimal viewing distance: 80 cm
o Full brightness, full contrast
o 2D-plus-depth input in 3D mode
o Protective sheet at the front side of the display
Advanced display signal processing engine
o Flexible 3D data interface based on 2D-plus-depth
o Integrated 3D display processing hardware
o 2D-plus-depth converted to 9 different views and interwoven into a 3D image
o Rendering algorithm is tuned for lenticular optical behaviour
o Two modes:
• 3D rendering mode
• 2D transparent mode with picture quality improvement filter
Connectivity
o Display control via DDC/CI channel; no additional RS232 cable needed
o AC switch
3D Solutions
©2009 Philips Electronics Nederland B.V. 7 of 22
01 April 2009
Page 8

20” 3D Display User Manual
3D Solutions
2.2 Technical aspects and details
Group Item 20-3D #
LCD panel Type TFT LCD
Resolution 1600 x RGB x 1200
Pixel pitch 0.255 mm x 0.255 mm
Effective viewing area 408.0 mm x 306.0 mm
Size 20.1’’
Contrast Ratio 800:1
Aspect Ratio 4:3
Brightness 240 cd/m
Response time 8 ms
Refresh rate 60 fps
Display colours 16.7 M (8 bits RGB)
White chromaticity Wx: 0.313 Wy: 0.329 (at 6500°K)
Physical Weight of frame mount 7.1 kg
2
Dimensions of frame mount (WxHxD) 435 x 337 x 82 mm
Package dimensions (WxHxD) 531 x 435 x 184 mm
Mounting – Frame mount:
– Desktop:
Power Consumption 50 W
Power Consumption standby 2.5 W
Temperature operating
Relative humidity 20 % to 80 %
System MTBF 50K hrs
Mounting angle
Interface Video Connector DVI-D single link
Voltage 100 V 60Hz / 230 V 50 Hz
14x M4 mounting points on the 4 sides
VESA MIS-D 100x100 on backside
0 – 35 °C
0 – 68° from vertical
01 April 2009
8 of 22 ©2009 Philips Electronics Nederland B.V.
Page 9
20” Display User Manual
3D Solutions
2.3 Video input
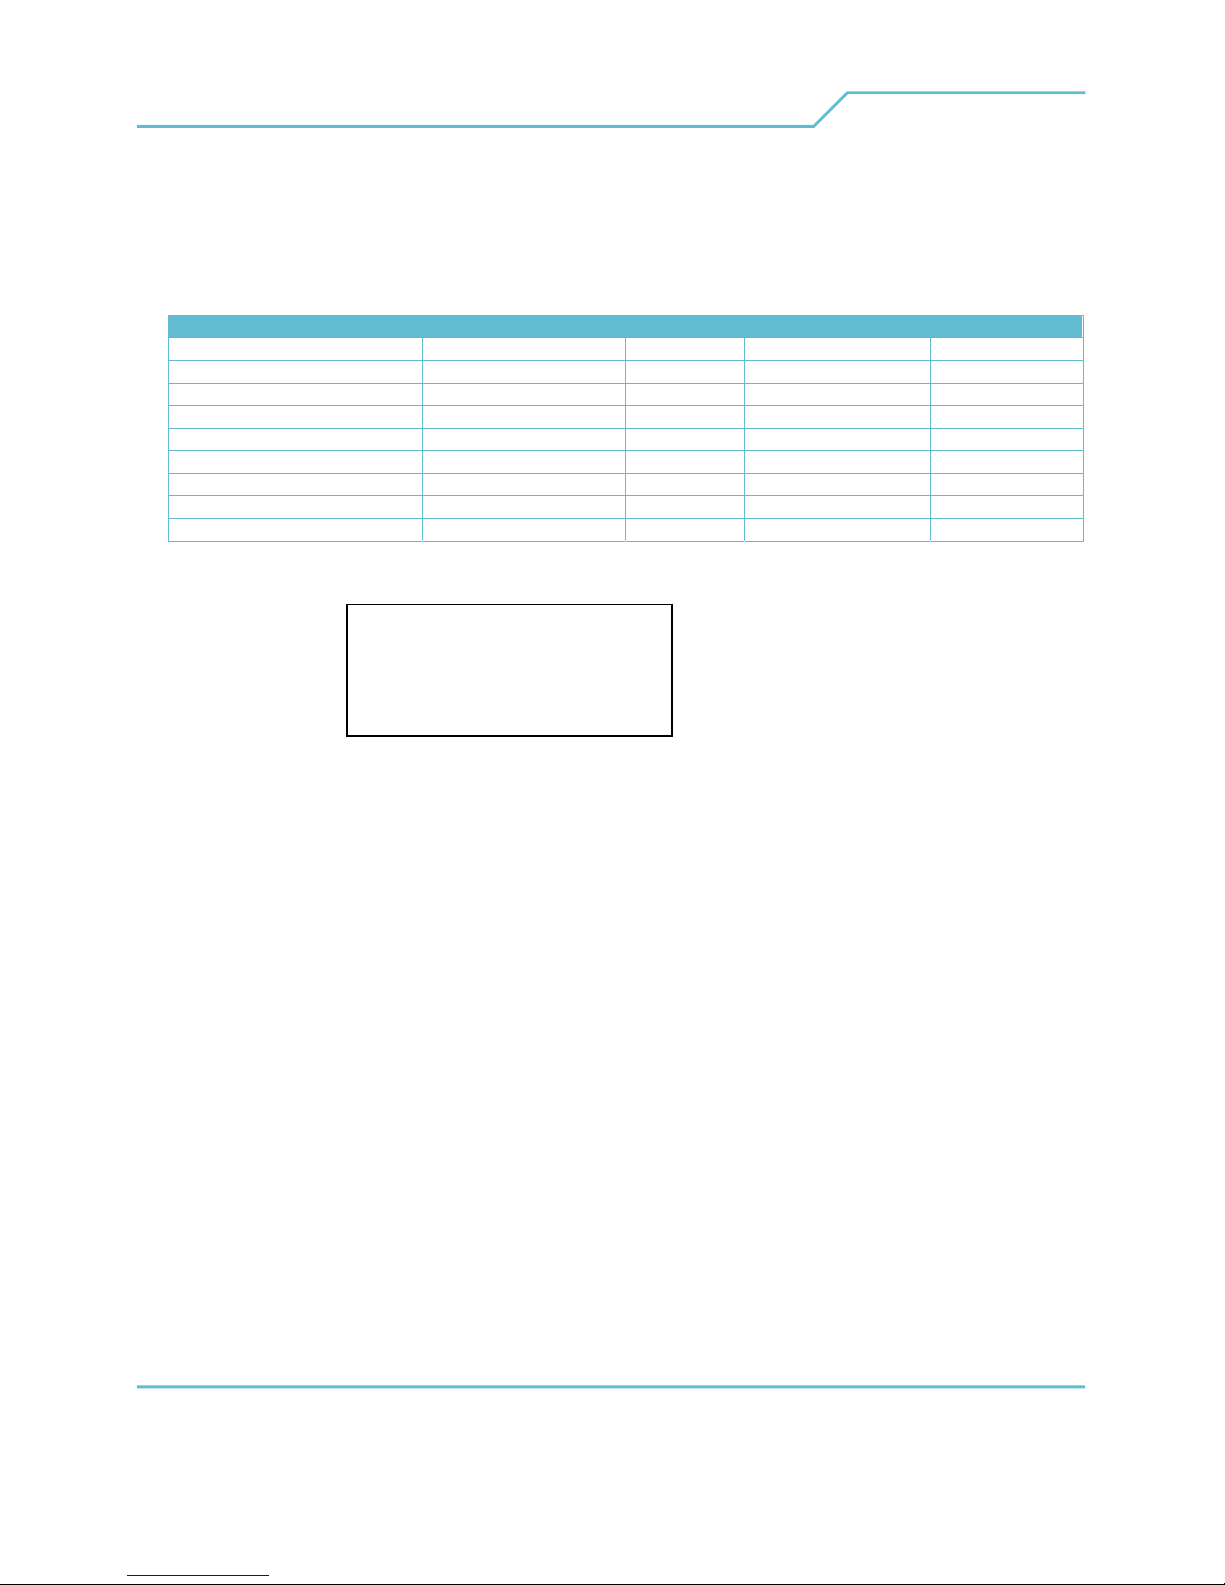
Philips 3D Solutions is not responsible for a poor performance due to a not optimal signal input
according to display timing recommendations in the table below:
Advanced Timing
Horizontal pixels
Front porch 40 Sync width 40
Back porch 132 Active lines 1600
Sync polarity +
Vertical lines
Front porch 4 Sync width 4
Back porch 32 Refresh rate 60 Hz
Sync polarity + Active pixels 1200
Pixel clock 135 MHz
Signals must comply with the following DVI standard:
Digital Visual Interface DVI
Digital Display Working
Group
Revision 1.0; April 02, 1999
©2009 Philips Electronics Nederland B.V. 9 of 22
01 April 2009
Page 10

3D Solutions
20” 3D Display User Manual
3 Scope of supply, Set up and mounting
3.1 Scope of Supply
The contents of the boxes:
o Frame mount 3D 20-inch display box:
Assembled intelligent display model: 20-3D2W01/00
Safety instruction on paper
o Table stand box:
Table stand
4x screws
o Accessories box:
Cosmetic front
4x screws
DVI cable
3 Main cords (USA, EU and UK)
Printed version of the Display user manual (this manual)
CD ROM with:
• Display Control Tool
• 3DS Media Player
• User manuals of the software tools
• 3D Sample content
The desktop model (20-3D2W04/00) consists of the frame mount box (20-3D2W01/00), table
stand box and accessories box.
3.2 Safety precautions
Read and follow these instructions when connecting and using your computer display. These
instructions are additions to the safety instructions on the start of this manual.
o Unplug the display if you are not going to use it for an extensive period of time.
o Unplug the display if you need to clean it with a slightly damp cloth. The screen may be
wiped with a dry cloth when the power is off. See cleaning instructions in chapter 4 for
more information.
o Consult a service technician if the display does not operate normally when you have
followed the instructions in this manual.
o Keep the display out of direct sunlight and away from stoves or any other heat source.
o Remove any object that could fall into the vents or prevent proper cooling of the
display’s electronics.
o Keep the display dry. To avoid electric shock, do not expose it to rain or excessive
moisture.
o If turning off the display by detaching power cable, wait for 6 seconds before attaching
the power cable for normal operation.
01 April 2009
10 of 22 ©2009 Philips Electronics Nederland B.V.
Page 11

20” Display User Manual
o When positioning the display, make sure the power plug and outlet are easily
accessible.
o IMPORTANT: Always display alternating content with your application. If a still image in
high contrast remains on the screen for an extended period of time, it may leave an
‘after-image’ or ‘ghost image’ on the front of the screen. This is a well-known
phenomenon that is caused by the shortcomings inherent in the LCD technology. Be
aware that the after-image symptom cannot be repaired and is not covered under
warranty.
3.3 Installation locations
o Avoid exposure to heat and extreme cold.
o Do not store or use the product in locations exposed to heat, direct sunlight or extreme
cold.
o
Avoid moving the product between locations with large temperature differences.
Choose a site that falls within the following temperature and humidity ranges.
• Temperature: 0-35°C
• Humidity: 20-80% RH
o Do not subject the product to severe vibration or high impact conditions. Do not place
the product inside a car or boot.
o Take care not to mishandle this product by either knocking or dropping during
operation or transportation.
o Do not store or use the product in locations where there is a high level of humidity or in
dusty environments. Do not allow water or other liquids to spill on or into the product.
3D Solutions
3.4 Positioning the display
The display can be integrated (see chapter 11 for drawings), placed on a table stand or wallmounted. With the desktop model the table stand is supplied; for wall mounting VESA mount
points are provided on the frame mount. See the VESA 100x100 standard for the way of
mounting.
For the best results, choose a position where light does not fall directly on the screen, and at
some distance away from radiators or other sources of heat. Leave a space of at least 10 cm
all around the display for ventilation, making sure that curtains, cupboards etc. cannot obstruct
the airflow through the ventilation apertures. The display is designed for use in public areas
only and should never be operated or stored in excessively hot or humid atmospheres.
3.5 Fitting the table stand
Use only the table stand provided with the set, making sure that the fixings are properly
tightened. Avoid using other table stands as they have not been tested in combination with the
weight of the display.
01 April 2009
©2009 Philips Electronics Nederland B.V. 11 of 22
Page 12
20” 3D Display User Manual
3D Solutions
Note: When the display faces or shifts downwards after attaching it on the table stand, 2
screws in the table stand needs to be tightened further. One screw in the table stand can be
found from the top side and the other screw from the bottom side.
3.6 Fitting the Cosmetic front
The accessories box contains a cosmetic front plus 4 screws. Place the cosmetic front over
the display and fix the 4 screws in the holes (2 holes on the left and right side each). Only use
screws that are supplied with the accessories box.
3.7 Connecting the display
NEVER (dis)connect DVI when your PC or display is on.
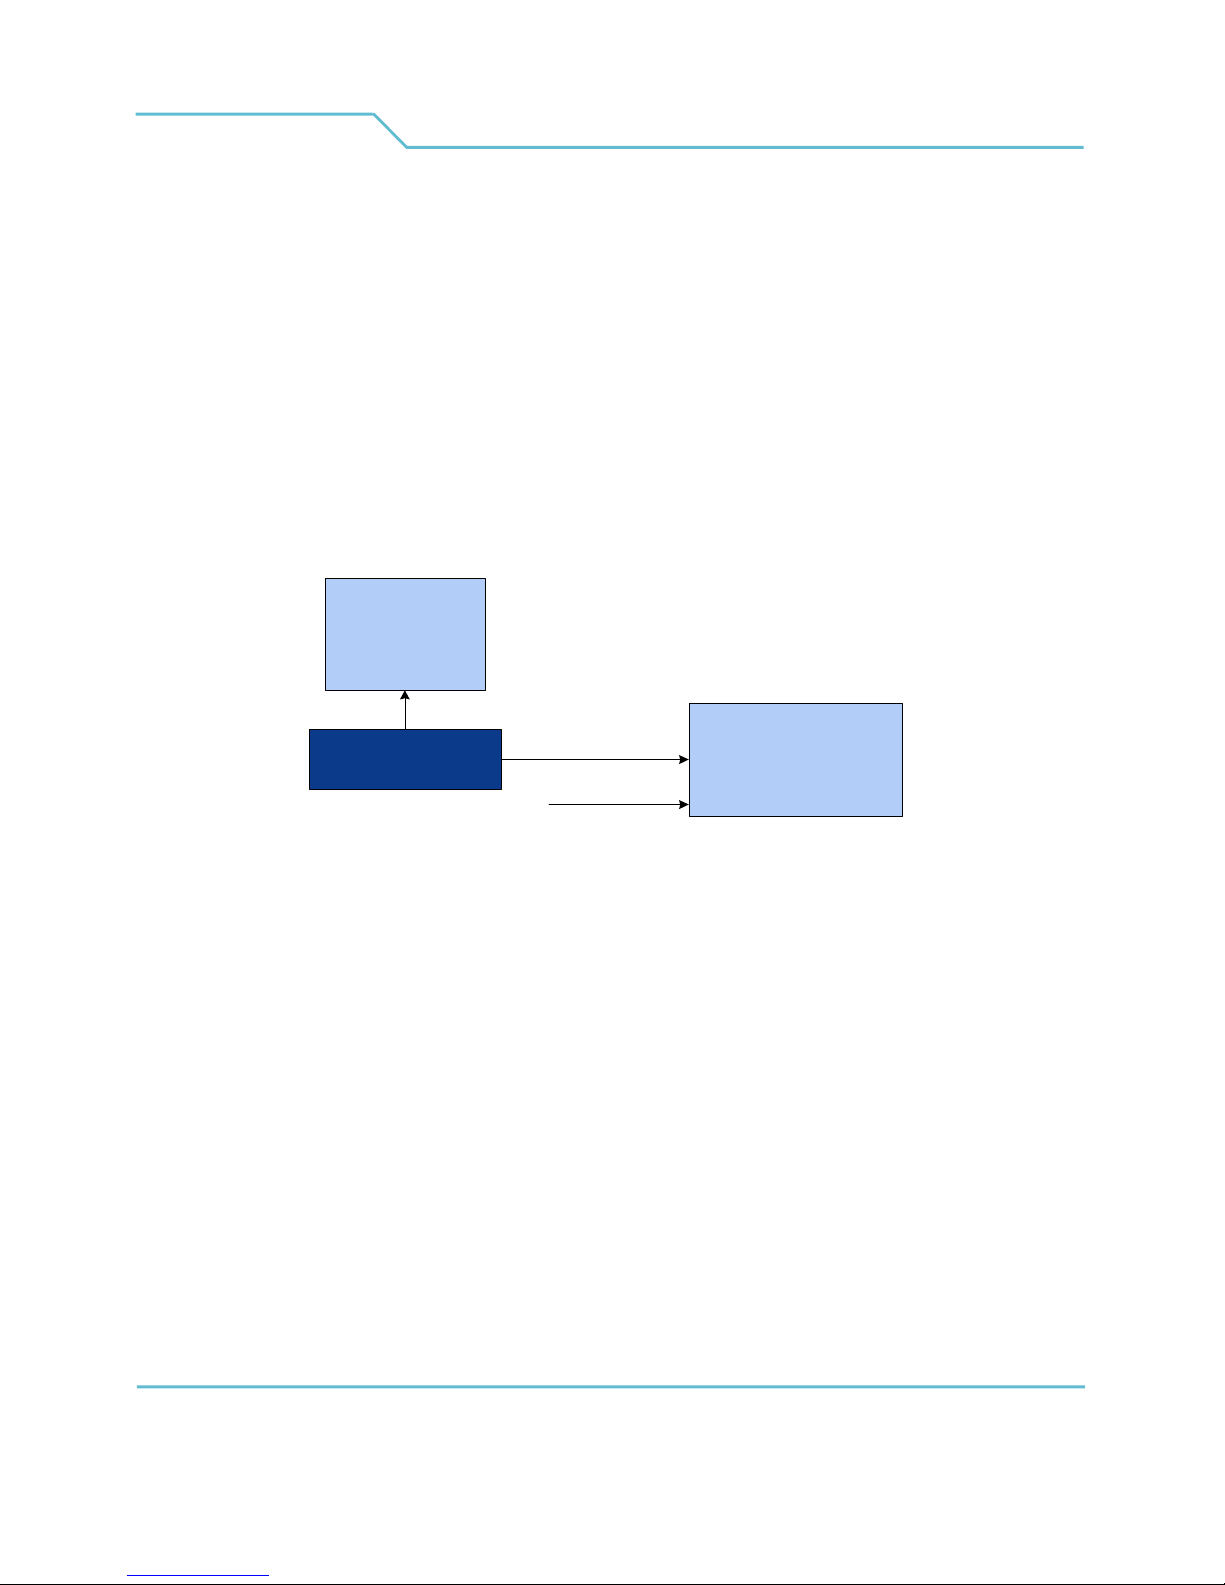
2D monitor
(optional)
DVI cable
PC
DVI cable
Power cord
3D Display
A second 2D display may be connected to the PC. Only use a DVI cable and graphics card
that is compliant with the DVI standard (see reference to DVI standard in section 10).
Make sure the PC and Display are switched off!
1. Connect the PC via the DVI cable to the DVI connecter.
2. Connect the power cord.
01 April 2009
12 of 22 ©2009 Philips Electronics Nederland B.V.
Page 13
20” Display User Manual
3D Solutions
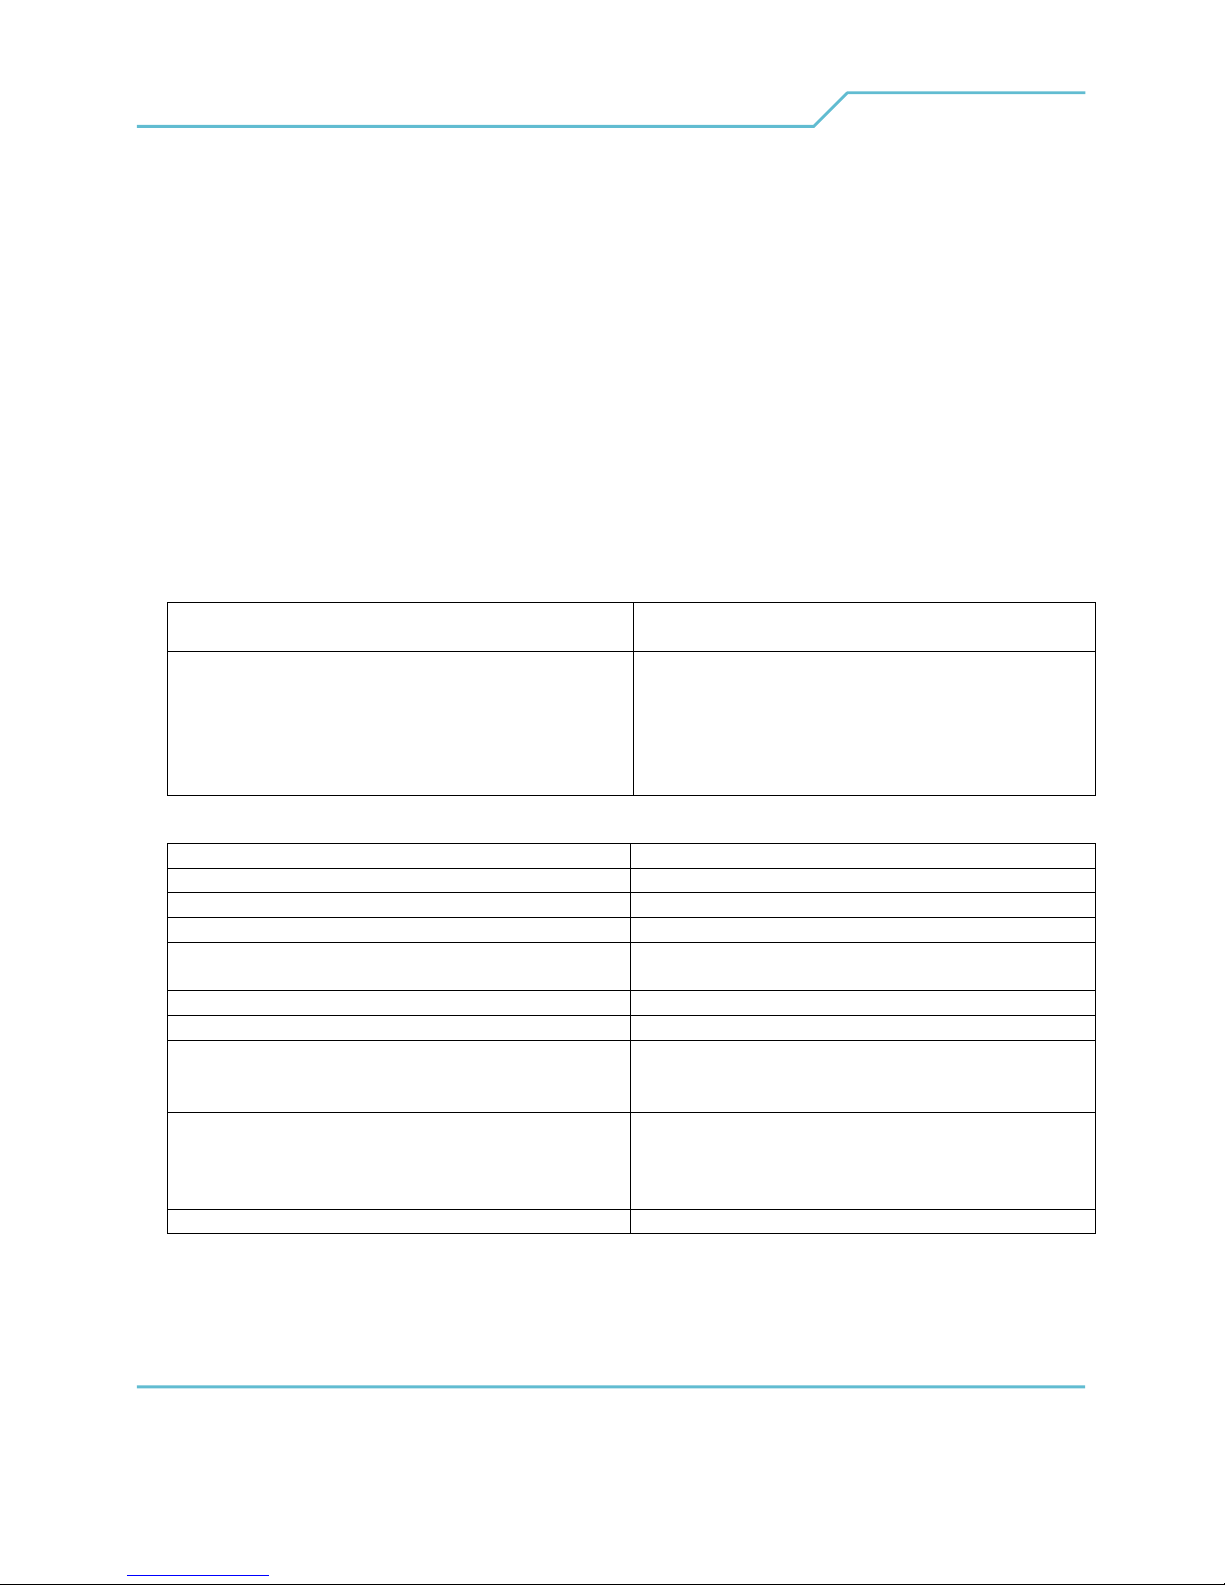
4 Cleaning instructions
CAUTION: Using the wrong instructions might damage (parts of) the intelligent display.
Note that isopropyl alcohol causes damage.
4.1 Cleaning models 20-3D2W01/00 and 20-3D2W04/00
Before cleaning the display, disconnect the power cord and DVI cable.
It is preferable to clean the front of the display with the cleaning products listed in the table
below.
To clean we recommend:
cleaning materials e.g. soft cotton cloth
window leather
Aqueous solution, neutral and weakly alkaline
window cleaner without additives of abrasive
substances:
Permitted portion of ammonia < 5 Vol-%, as
well as water soluble organic solvents < 5
Vol-%.
Do not use for cleaning:
alkaline lyes e.g. durd soap, certain textile detergents
lyes e.g. toilet cleaner
acids e.g. hydrochloric acid, vinegar, lemon
decalcification agent e.g. citric acid
degreasing agent e.g. acetone, methylene chloride,
Strong ammonia detergents e.g. Toilet cleaner
chlorine or Hypochloride detergents e.g. Chavel water, Domestos
solvents e.g. Ethyl alcohol, Isopropyl alcohol,
coarse millinery e.g. abrasive, steel wool, sponge with
Other Electrolube ASC, REF ASC250ml
As an alternative, clean the front of the display with a solution of soft soap (e.g. liquid hand
soap) and tepid water, using a soft cloth or sponge.
The rest of the display can be cleaned with a dry cloth.
©2009 Philips Electronics Nederland B.V. 13 of 22
e.g. Flux
Ajax
trichloroethylene, petrol
alcohol, acetone, trichloroethylene,
benzene, hexane, petrol
abrasives, blades cloth with thread
made of steel, hard cloth or paper
tissue
01 April 2009
Page 14

3D Solutions
20” 3D Display User Manual
5 Software installation
This chapter contains the prerequisites for the PC hardware and the operating system for the
software. First check if your PC complies with the requirements that are given in the next
sections. Then follow the installation instructions, where you are guided step by step through
the software installation procedure.
5.1 Minimum PC requirements
The PC must comply with the following requirements:
o Intel Pentium 4 (≥ 3 GHz), Intel Core2Duo (≥ 1. 86 GHz) or faster
o ≥ 512 MB RAM
o 7200 rpm hard disk with 8 Mbyte cache (minimal sustained throughput 10 MB/s)
o CD/DVD ROM player
o Graphics card based on NVIDIA 6800 or 7800 chipsets
o Microsoft Windows XP SP2
5.2 Prepare PC
Make sure that the following software is installed on the PC before connecting the 3D Display
to the PC:
o Windows XP, upgraded to Service Pack 2
o NVIDIA Display driver
01 April 2009
14 of 22 ©2009 Philips Electronics Nederland B.V.
Page 15

20” Display User Manual
6 Approbations
6.1 CE
EN 60950-1:2001
EN 55022: 1998-09; cor 1: 1999-08; A1: 2000-10; A2: 2003-01; cor 2: 2003-07
EN 55024: 1998-09; A1: 2001-10; A2: 2003-01
EN 61000-3-2: 2000-12
EN 61000-3-3: 1995-01; A1: 2001-06
6.2 USA and Canada
cETLus listing
UL 60950
Can/CSA 60950
FCC part 15B: 2004-10 Class A
ANSI C63.4: 2001; 2003
3D Solutions
6.3 CB Certificate
IEC 60950-1: 2001 (1st edition)
IEC 61000-3-2: 2000-08; A1: 2001-08; A2: 2004-10
IEC 61000-3-3: 1994-12; A1: 2001-01
6.4 Australia
C-tick
01 April 2009
©2009 Philips Electronics Nederland B.V. 15 of 22
Page 16

20” 3D Display User Manual
3D Solutions
7 Environmental
Condition Operating Shipping / storage
Temperature
Humidity 20 % - 80 %
Air pressure 600 – 1100 mBar 300 – 1100 mBar
The display is designed for indoor usage only.
0 °C to 35 °C -20 °C to 60 °C
0% - 95 %
No condensation
No condensation
01 April 2009
16 of 22 ©2009 Philips Electronics Nederland B.V.
Page 17
20” Display User Manual
3D Solutions
8 Interfaces
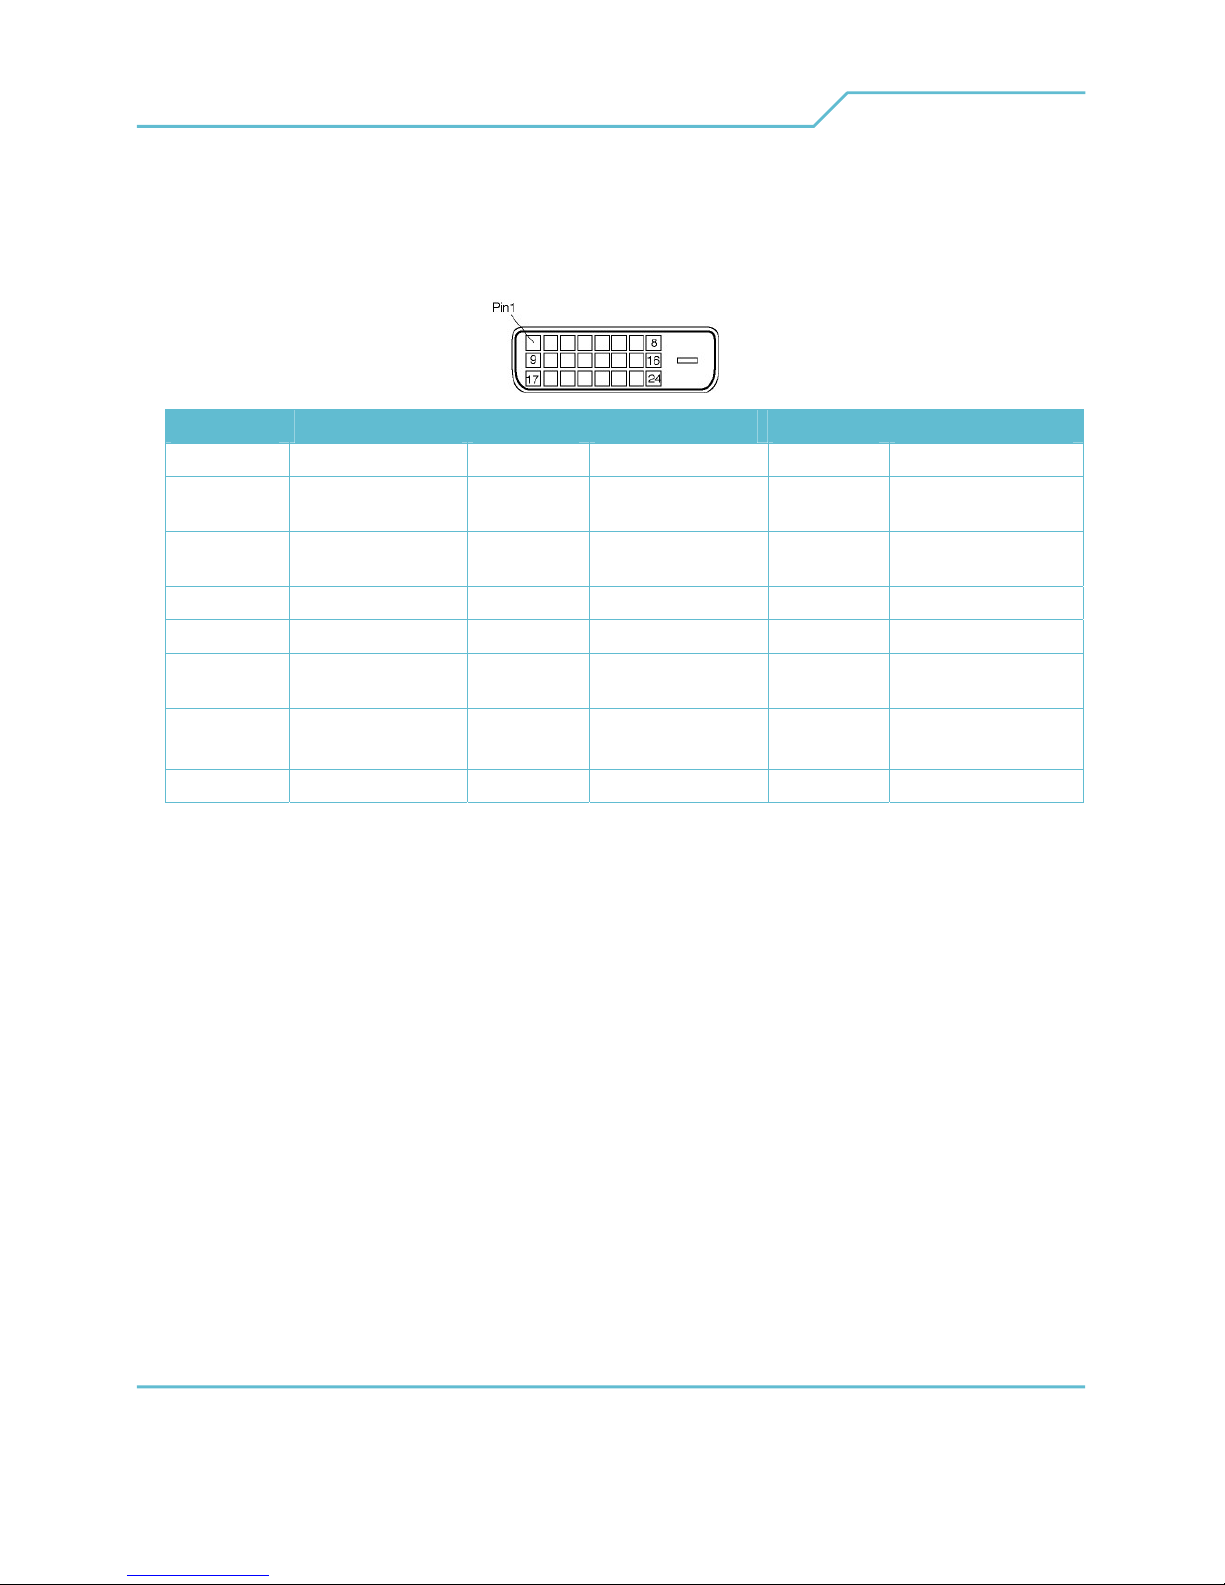
8.1 DVI-in
Pin Signal Pin Signal Pin Signal
1 T.M.D.S. Data2- 9 T.M.D.S. Data1- 17 T.M.D.S. Data0-
2 T.M.D.S. Data2+ 10 T.M.D.S.
Data1+
3 T.M.D.S.
Data2/4 Shield
4 No connect 12 No connect 20 No connect
5 No connect 13 No connect 21 No connect
6 DDC Clock 14
7 DDC Data 15 Ground
8 No connect 16 Hot Plug Detect 24 T.M.D.S. Clock-
11 T.M.D.S.
Data1/3 Shield
+5V Power
(for +5V)
The DDC Clock and the DDC data are used by the Display Control Tool to control depth and
colour settings in the display.
18
19 T.M.D.S.Data0/5
22 T.M.D.S. Clock
23
T.M.D.S. Data0+
Shield
Shield
T.M.D.S. Clock+
©2009 Philips Electronics Nederland B.V. 17 of 22
01 April 2009
Page 18

3D Solutions
20” 3D Display User Manual
9 Trademarks, Copyrights and disclaimer
Specifications are subject to change without notice.
Trademarks are the property of Koninklijke Philips Electronics N.V. or their respective owners.
2009 © Koninklijke Philips Electronics N.V. All rights reserved.
01 April 2009
18 of 22 ©2009 Philips Electronics Nederland B.V.
Page 19

20” Display User Manual
10 References
The next references are not normative but informative.
Description
VESA Display data channel standard;
Version 3; December 15, 1997
VESA Display data channel command interface (DDC/CI) standard;
Version 1; August 14, 1998
Digital Visual Interface DVI;
Digital Display Working Group;
Revision 1.0; April 02, 1999
VESA enhanced extended display identification data standard;
Release A, Revision 1;
February 9, 2000
ITU-R BT.709.4; Parameter values for HDTV standards for production and international
programme exchange;
VESA Flat Display Mounting Interface Standard (FDMI);
Version 1, Revision 1;
January 16, 2006;
3D Solutions
©2009 Philips Electronics Nederland B.V. 19 of 22
01 April 2009
Page 20
3D Solutions
20” 3D Display User Manual
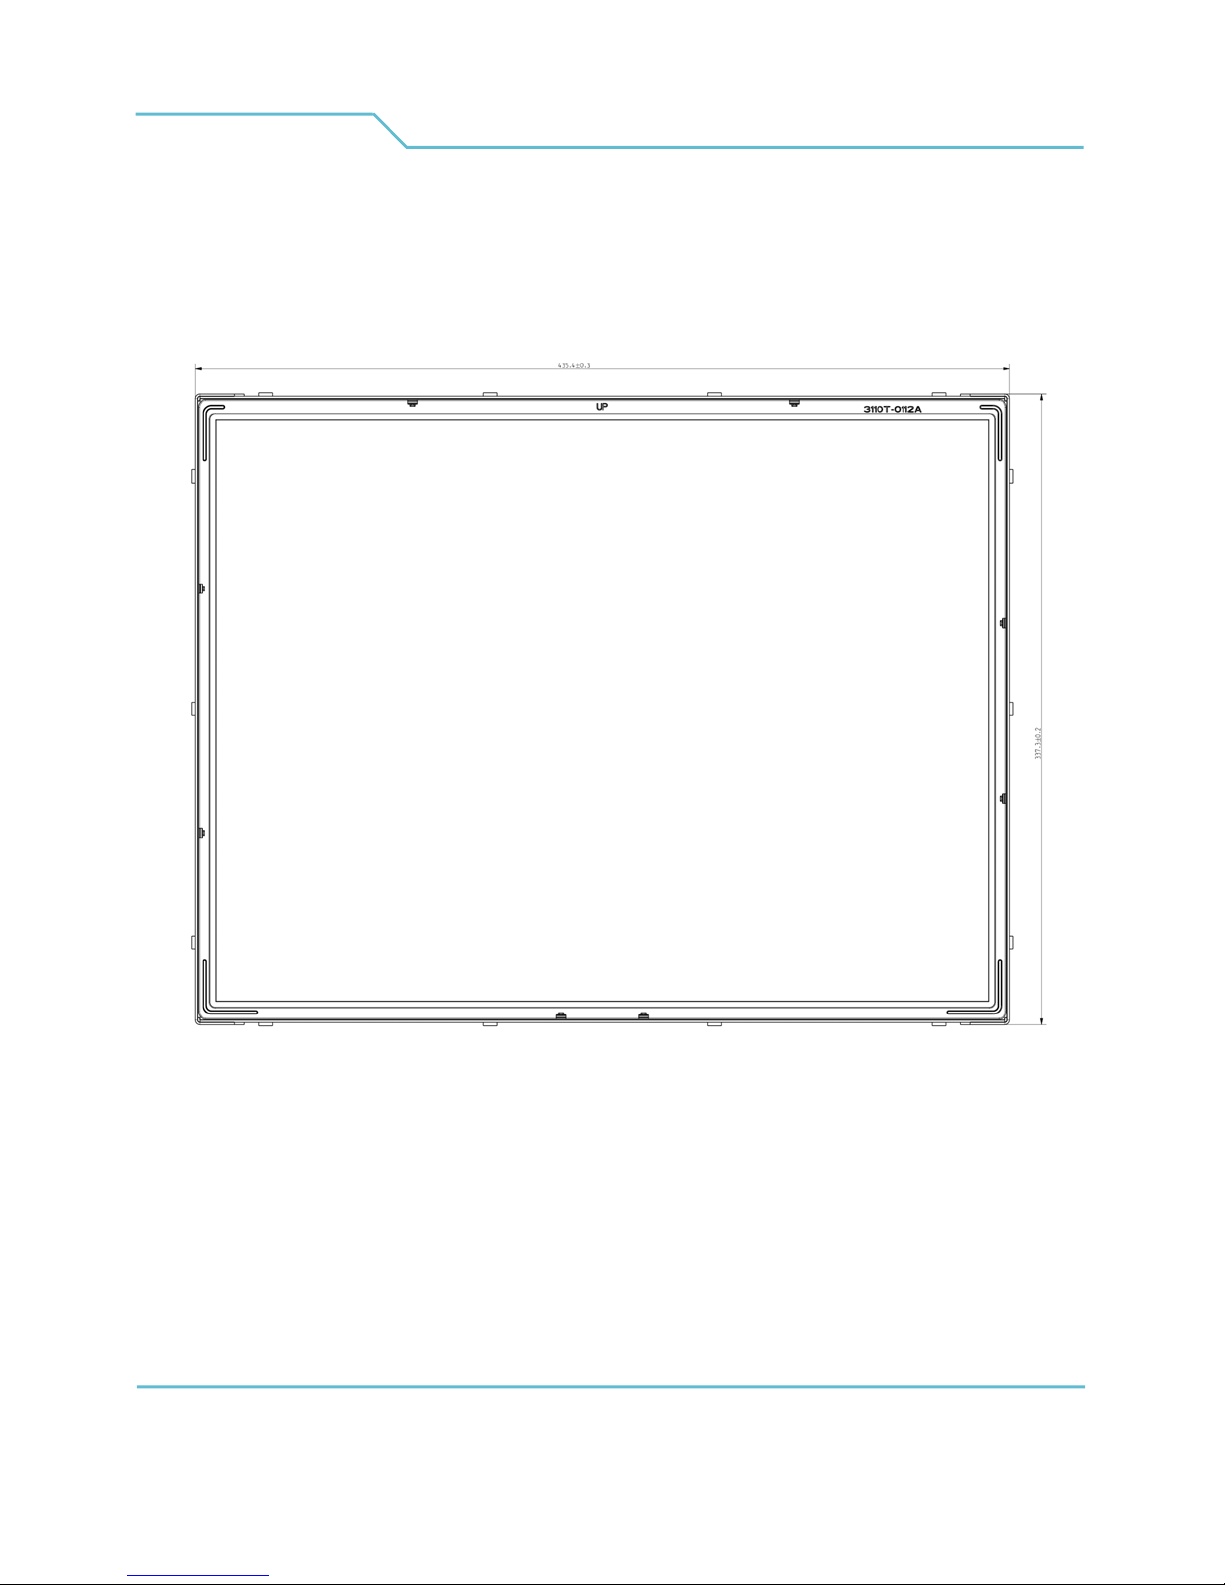
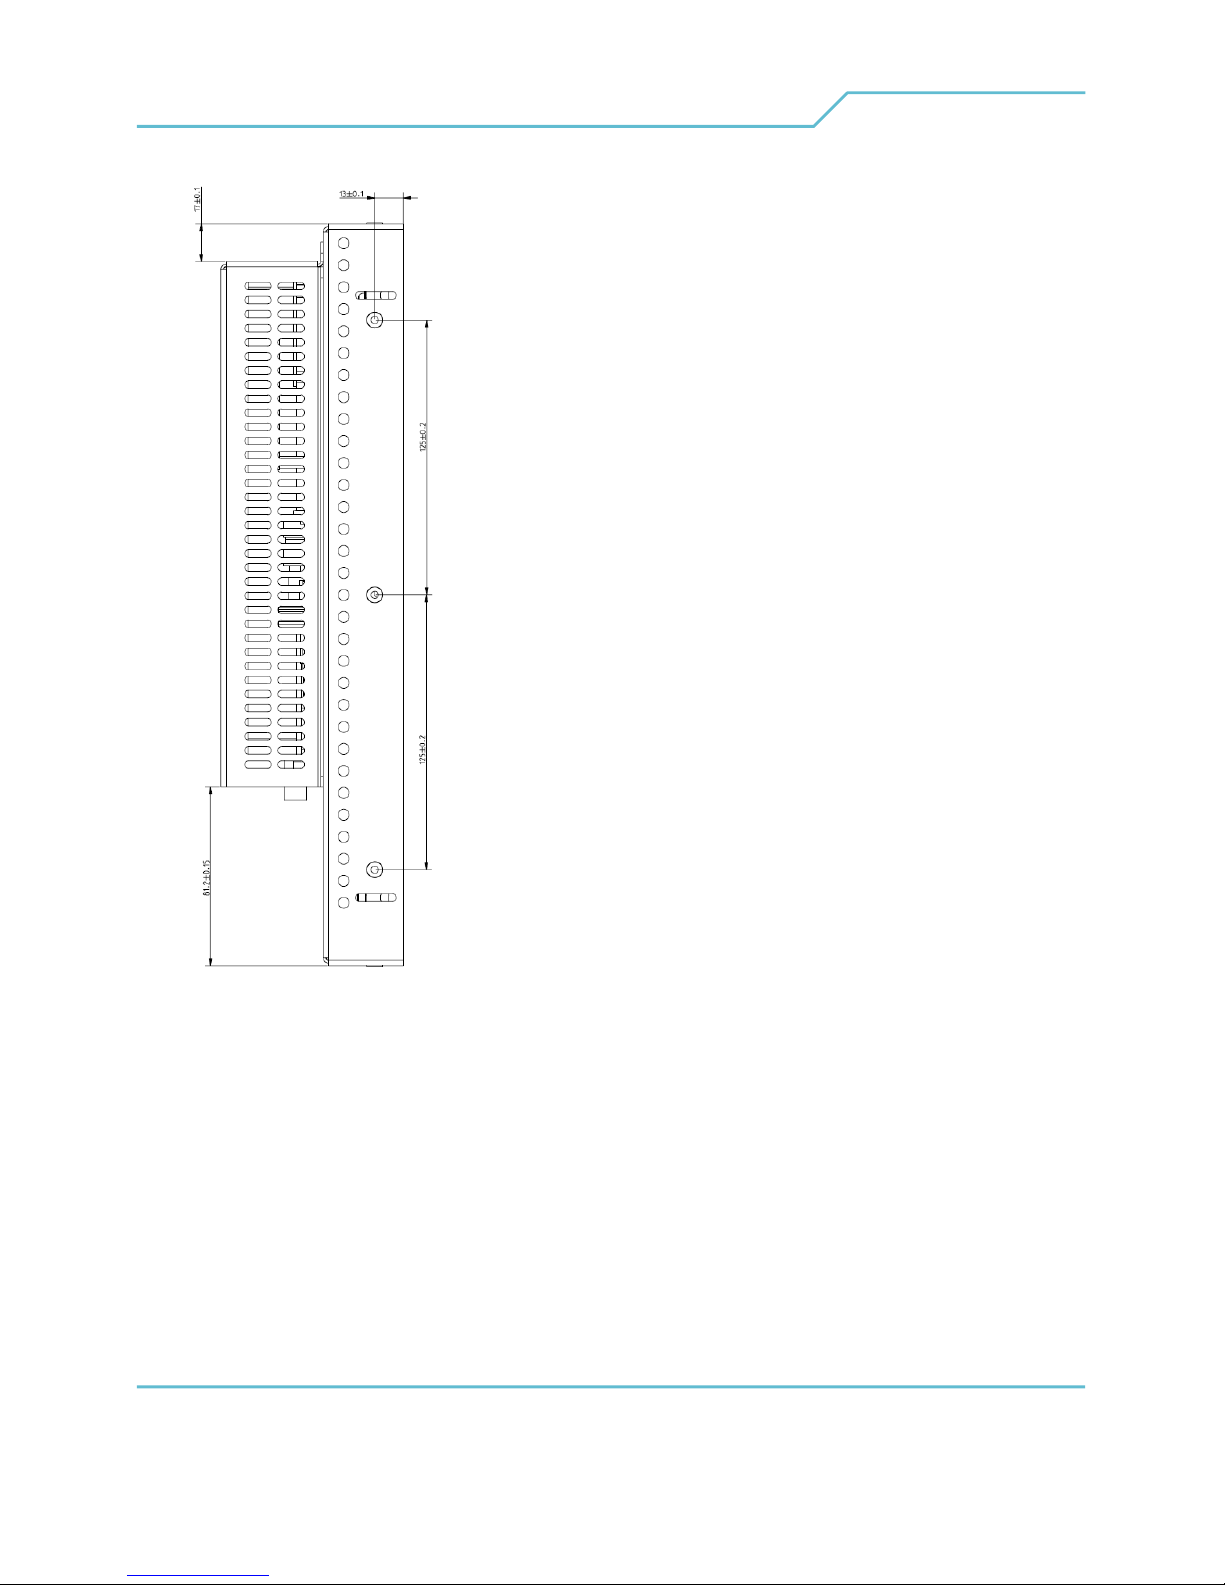
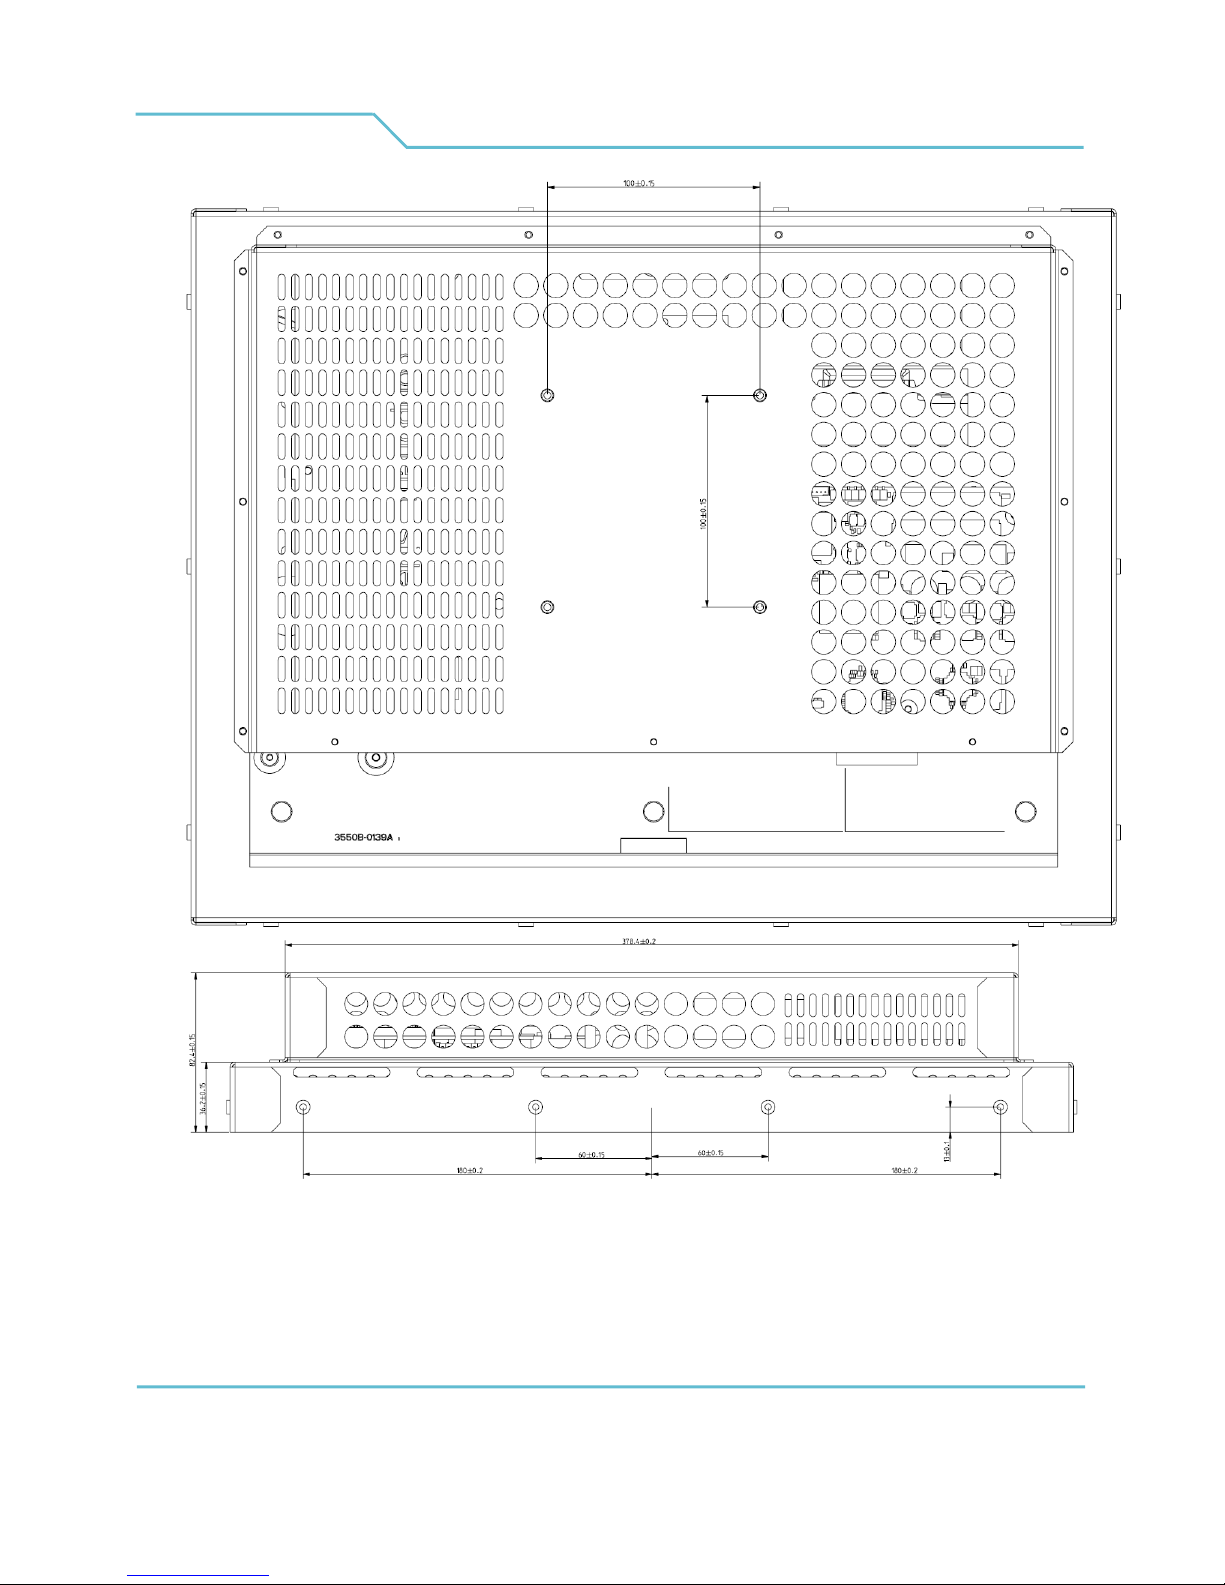
11 Technical drawings
For integration purposes the following drawings are added for your convenience.
01 April 2009
20 of 22 ©2009 Philips Electronics Nederland B.V.
Page 21
20” Display User Manual
3D Solutions
01 April 2009
©2009 Philips Electronics Nederland B.V. 21 of 22
Page 22
3D Solutions
20” 3D Display User Manual
01 April 2009
22 of 22 ©2009 Philips Electronics Nederland B.V.
 Loading...