

Page 1

E
N
1
Table of Contents
GETTING
STARTED
INTRODUCTION. . . . . . . . . . . . . . . . . . . . . . . . . . . . . . . . . . 2
S
AFETY
. . . . . . . . . . . . . . . . . . . . . . . . . . . . . . . . . . . . . . . 2
I
NSTALLATION LOCATION . . . . . . . . . . . . . . . . . . . . . . . . . . . 3
C
ORRECT HANDLING . . . . . . . . . . . . . . . . . . . . . . . . . . . . . . 3
A
CCESSORIES . . . . . . . . . . . . . . . . . . . . . . . . . . . . . . . . . . 3
C
ONNECTION TO PC. . . . . . . . . . . . . . . . . . . . . . . . . . . . . 4-6
D
ESCRIPTION OF C
ONTROLS . . . . . . . . . . . . . . . . . . . . . . . 7-9
A
UDIO FUNCTION C
ONTROL. . . . . . . . . . . . . . . . . . . . . . . . . 10
H
OW TO U
SE THE OSD [CONTROL LEVEL STRUCTURE
] . . . 11-23
S
ETTING UP
GUIDE. . . . . . . . . . . . . . . . . . . . . . . . . . FOLDOUT
HOW TO USE THE ON SCREEN DISPLAY (OSD)
OSD TIMER . . . . . . . . . . . . . . . . . . . . . . . . . . . . . . . . . . 12
F
IRST WINDOW
BRIGHTNESS . . . . . . . . . . . . . . . . . . . . . . . . . . . . . . . . . . 13
C
ONTRAST . . . . . . . . . . . . . . . . . . . . . . . . . . . . . . . . . . . 13
V
OLUME . . . . . . . . . . . . . . . . . . . . . . . . . . . . . . . . . . . . . 14
S
TARTING
CLOCK
& PHASE A
DJUSTMENTS(NON OSD). . . . . . 14
C
LOCK ADJUSTMENT. . . . . . . . . . . . . . . . . . . . . . . . . . . . . 15
P
HASE
ADJUSTMENT. . . . . . . . . . . . . . . . . . . . . . . . . . . . . 15
S
ECOND
WINDOW
VERTICAL POSITION . . . . . . . . . . . . . . . . . . . . . . . . . . . . . 16
H
ORIZONTAL POSITION . . . . . . . . . . . . . . . . . . . . . . . . . . . 16
D
ISPLAY
SIZE . . . . . . . . . . . . . . . . . . . . . . . . . . . . . . . . . 17
E
XPAND MODE OPTIMIZATION. . . . . . . . . . . . . . . . . . . . . . . 17
T
HIRD WINDOW
5500°K, 6500°K OR 9300°K COLOR TEMPERATURE . . . . . 18
U
SER
PRESETS . . . . . . . . . . . . . . . . . . . . . . . . . . . . . . . . 19
F
OURTH WINDOW
LANGUAGE . . . . . . . . . . . . . . . . . . . . . . . . . . . . . . . . . . . 20
OSD C
ONTROLS . . . . . . . . . . . . . . . . . . . . . . . . . . . . . . . 20
V
IDEO I
NPUT PRIORITY . . . . . . . . . . . . . . . . . . . . . . . . . . . 21
P
OWER S
AVING . . . . . . . . . . . . . . . . . . . . . . . . . . . . . . . . 21
R
OTARY DEFAULT . . . . . . . . . . . . . . . . . . . . . . . . . . . . . . . 22
E
XIT OR RESET . . . . . . . . . . . . . . . . . . . . . . . . . . . . . . . . 23
ADDITIONAL INFORMATION
OSD WARNING SIGNAL. . . . . . . . . . . . . . . . . . . . . . . . 24-25
P
IN A
SSIGNMENT . . . . . . . . . . . . . . . . . . . . . . . . . . . . . . . 25
B
NC CONNECTOR . . . . . . . . . . . . . . . . . . . . . . . . . . . . . . . 25
P
OWER SAVING & ACCEPTABLE RESOLUTION MODE . . . . . . . . 26
S
PECIFICATIONS
. . . . . . . . . . . . . . . . . . . . . . . . . . . . . . . . 26
W
HAT TO DO IF SOMETHING ISN’T WORKING . . . . . . . . . . . . 27
I
NDEX. . . . . . . . . . . . . . . . . . . . . . . . . . . . . . . . . . . . . . . 28
G
LOSSARY
. . . . . . . . . . . . . . . . . . . . . . . . . . . . . . . . . . . 29
W
ARRANTY . . . . . . . . . . . . . . . . . . . . . . . . . . . INSIDE COVER
FRENCH (FRANCAIS) . . . . . . . . . . . . . . . . . . . . . . . . .29
S
PANISH
(ESPAÑOL) . . . . . . . . . . . . . . . . . . . . . . . . .57
Other language versions
BECAUSE OF CONTINUOUS PRODUCT IMPROVEMENTS,
THE INFORMATION MENTIONED IN THIS DOCUMENT IS SUBJECT TO CHANGE WITHOUT NOTICE
.
appendix
E
NGLISH
I
NFORMATION FORUSERS IN THE
U.S.. . . . . . . . . . . . . . . . . . . . . . . . . . . . . A1
FCC D
ECLARATION
. . . . . . . . . . . . . . . . . . . . . . . . . . . . . . . . . . . . . . . . A2
E
NERGYDECLARATION
. . . . . . . . . . . . . . . . . . . . . . . . . . . . . . . . . . . . . . . A3
TCO’99 . . . . . . . . . . . . . . . . . . . . . . . . . . . . . . . . . . . . . . . . . . . . A4-A5
I
NFORMATIONS FOR
UK
ONLY
. . . . . . . . . . . . . . . . . . . . . . . . . . . . . . . . . . A6
F
RANÇAIS
FCC D
ECLARATION
. . . . . . . . . . . . . . . . . . . . . . . . . . . . . . . . . . . . . . . . A7
D
EUTSCH
GS / A
CHTUNG
. . . . . . . . . . . . . . . . . . . . . . . . . . . . . . . . . . . . . . . . . . . A8
181AS
18L8025Q
Page 2

2
E
N
Introduction and Safety
Safety precautions and maintenance
• Unplug the monitor, if you are not going to use it for an
extensive period of time.
• Unplug the monitor, if you need to clean it with a slightly
damp cloth. Wiping the screen with a dry cloth is possible
when the power is off. However, never use alcohol,
solvents, or ammonia-based liquids.
• Consult a service technician if the monitor does not
operate normally when following the instructions in this
manual.
• The casing cover should be opened only by qualified
service personnel.
• Keep the monitor out of direct sunlight and away from
stoves or any other heat source.
• Remove any object that could fall into the vents or
prevent proper cooling of the monitor’s electronics.
• Do not block the ventilation holes on the cabinet.
• Keep the monitor dry. To avoid electric shock, do not
expose it to rain or excessive moisture.
• When positioning the monitor, make sure the power plug
and outlet are easily accessible.
• If turning off the monitor by detaching power cable or DC
power cord, wait for 6 seconds, then attach the power
cable or DC power cord for normal operation.
End-of-life disposal
Your new monitor contains materials that can be recycled
and reused. Specialized companies can recycle your
product to increase the amount of reusable materials and
to minimize the amount to be disposed of.
Please find out about the local regulations on how to
dispose of your old monitor.
E
NERGY STAR is a U.S.registered mark.
IBM and IBM PC are registered trademarks of International Business Machines Corporation.
Apple, Macintosh, Quadra, Performa, Power PC and Centris are registered trademarks of Apple Computer, Inc.
Contact us at our web site: HTTP://www.pcstuff.philips.com
Introduction
The Philips Brilliance181AS Flat Panel Monitor satisfies the
need of high-end corporate and professional users. This
monitor is for those who are seeking advanced design, a
small footprint, high quality picture and ergonomic
features in a monitor that takes minimal desk space. Its
innovative technology delivers outstanding viewing angle
and picture quality, zero emissions, and low-energy
consumption.
Features
EXCELLENT DISPLA Y QUALITY
• 18.1 inch viewable area display - comparable to the
viewable screen size of a 19-inch CRT monitor, with even
better picture clarity and geometry.
• Full compatibility with all standard video cards and all
common VESA modes up to 1280 x 1024 resolution with
30 to 82 kHz horizontal scanning.
• State of the art image processing for optimal full screen
image expansion at resolutions for DOS, VGA 640 x 480,
SVGA 800 x 600, XGA 1024 x 768 and SXGA 1280 x 1024.
• Two separate video inputs with automatic priority setting
and one touch input selction.
E
RGONOMIC DESIGN
• To protect the LCD panel against wear and scratches, an
optional protective cover can be ordered separately. Please
ask your dealer.
• Detachable pedestal for swing arm or wall mount
applications. A special hinge design on the monitor
ensures full tilt and rotation adjustability even on the
simplest mount.
• Easy OSD with five (5) language text.
• Mouse controlled operation via USB device with
CustoMax™ software.
• TCO ‘99 approved
O
THERS
• 1+1W stereo front-firing audio and microphone
• USB Bay for connection to the optional powered hub with
four (4) downstream ports
• Anti-theft Kensington
®
lock socket and OSD lock to
prevent tampering; especially useful at point-of-sale and
customer interaction sites.
Note: Your monitor operates according to the VESA DDC level 1/2B. Only computers and
software that support the same guidelines and operate at the same or a higher level can
make use of this feature. If your computer does not support the relevant guidelines, you can
still use your monitor and computer. However, you may need to manually specify the
appropriate resolution in the software or computer.
As an
ENERGY S
TAR
®
Partner,
PHILIPShas determined that this
product meets the
ENERGY STAR
®
guidelines for energy efficiency.
Page 3
3
E
N
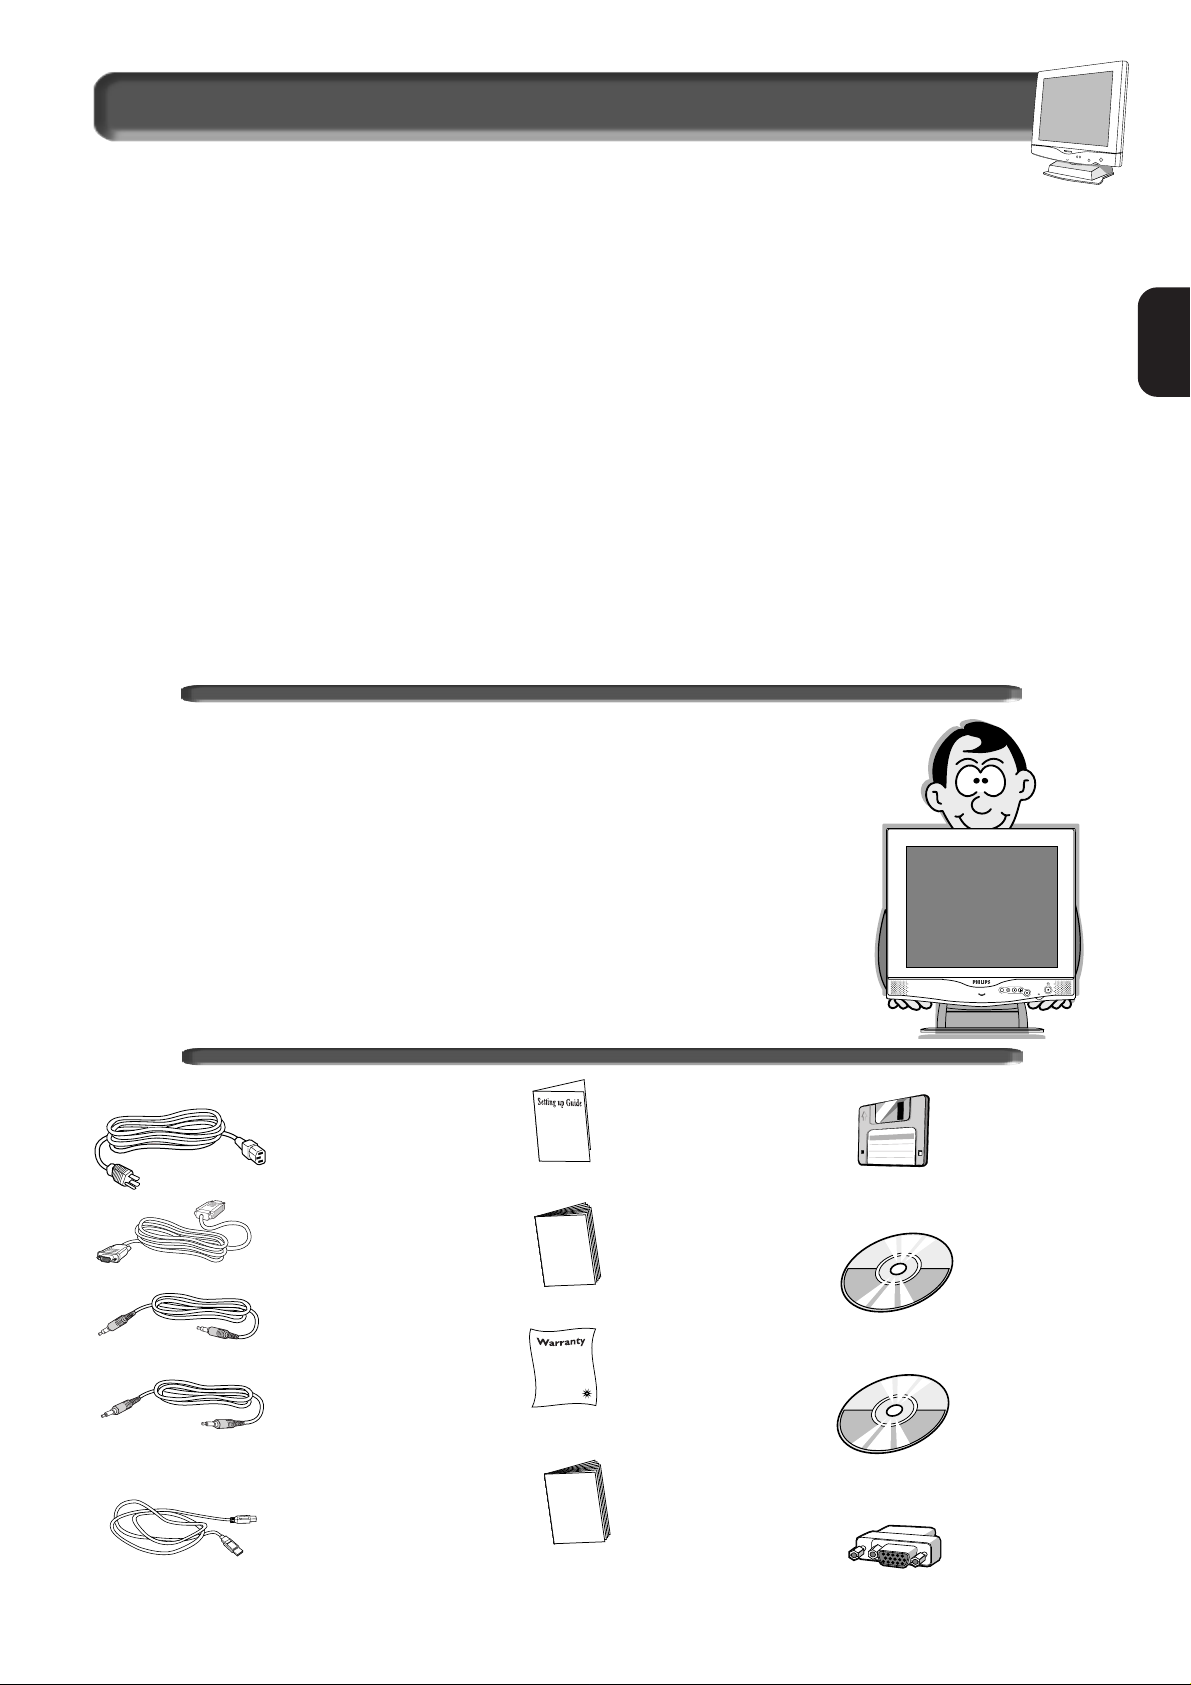
Accessories
1. Power cable
2.Signal cable
3. Audio in
cable (Blue)
Microphone
out cable (Red)
(connect to
sound card)
4. USB cable
5. Quick Setup Guide
6. User
manual
7. Warranty
card
8. CustoMax
User’s
manual
9. Windows
disk drive
10. CD-ROM
(User
manual )
11. CustoMax
(for USB
control)
12. Macintosh
adapter
(optional)
Installation Locations
A
VOID HEAT AND EXTREME COLD
• Do not store or use the LCD monitor in locations
exposed to heat, direct sunlight, or extreme cold.
• Avoid moving the LCD monitor between locations
with large temperature differences. Choose a site
falling within the following temperature and humidity
ranges.
Temperature: 5-35°C 41-95°F
Humidity: 20-80% RH
• Do not subject the LCD monitor to severe vibration
or high impact conditions. Do not place the LCD
monitor inside a car trunk.
• Take care not to mishandle this product by either
knocking or dropping during operation or
transportation.
• Do not store or use the LCD monitor in locations
exposed to high humidity or a dusty environment.
Also do not allow water or other liquids to spill on or
into the LCD monitor.
Installation L oc ations & A cces sories
VIDEO 1-2
Correct handling of the monitor
1. When handling the monitor, grip the bottom firmly with both hands and
ensure that the front panel faces outward before lifting. Please refer to the
diagram on the right.
2.Handling the monitor with care prevents scratching and damage. If the
monitor becomes damaged, immediately disconnect the power from the
unit and have it checked by a qualified service person before using it again.
3. To prevent fire or electrical shock, do not drop the monitor.
4. When moving the monitor, be sure to unplug all power cords in order to
avoid injury or damage to the equipment.
Where to buy extra accessories : “ Please contact your local Philips dealer”.
Page 4

4
E
N
CD Installation
When prompted by the Operating System for the LCD Monitor drivers, insert CD and select the CD-ROM
drive as the disk containing the drivers.
Windows 98
Windows 98 will auto-detect the new monitor and set-up the correct parameters. If it does not auto-detect
the new monitor, use Manual Install.
To manually install or update the driver, click on START, SETTINGS, CONTROL PANEL, DISPLAY, SETTINGS
tab, ADVANCED, MONITOR tab, CHANGE. This will start the “Update Device Driver Wizard”. Follow the
prompts to install the driver.
Windows 95
Click on START, SETTINGS, CONTROL PANEL, DISPLAY, SETTINGS tab, ADVANCED PROPERTIES
MONITOR tab, CHANGE, HAVE DISK. Install the CD-ROM.
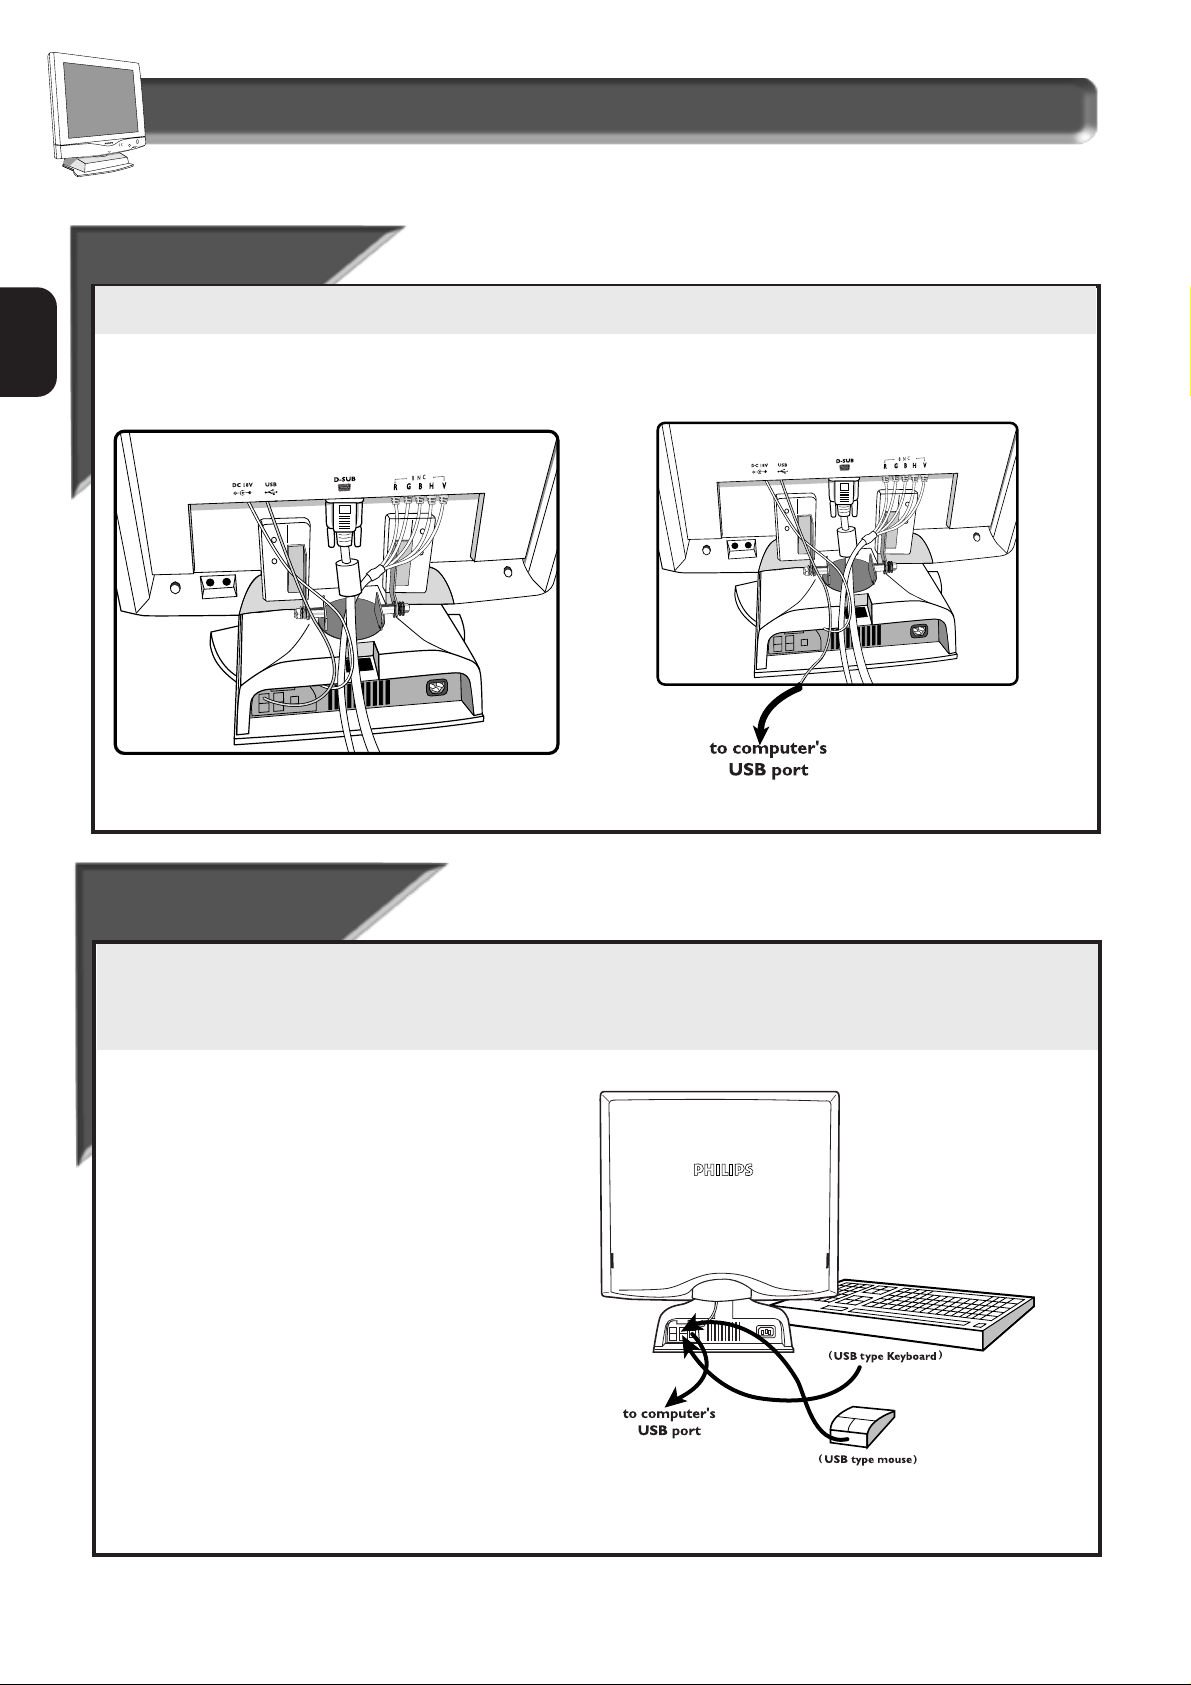
Connection to PC
VIDEO
SETTINGS
Before connecting your LCD Monitor to the PC, make sure that the computer’s video settings (resolution
and frequency) are in accordance with those below.
Page 5

5
E
N
Connection to PC
Connection to PC
Connection to PC
Refer to the owner’s manuals included with your earphones and microphone for a detailed guide to setting up these items.
5
5
To remove the back
cover,use a coin to
disengage the clips on
each side.
Remove the plastic
ring from the hinge.
Plug in the video cable
to the D-sub or BNC
(optional)connector.
Cover the cables with the plastic ring and put
it back on the hinge.
Replace back cover of the
monitor.
. Connect the power cord to the monitor.
. Plug power cord into a grounded power outlet.
. Connect the monitor cable to the computer.
1
2
3
4
5
6
7
Microphone out
(red connector)
Audio in speaker
(blue connector)
Follow the steps below to connect your LCD Monitor to PC.
Blue connector for
audio in (speaker)
Red connector for
microphone out
Connect the audio cables
to the audio jacks.
5-BNC cable
(optional)
video
cable
c
b
a
Page 6
6
E
N
Connection to PC
USB Control
USB Control
(INCL
(INCL
UDED)
UDED)
Philips 181AS comes with special software, CustoMax™, to control the monitor from your PC via a USB connection.
To install the USBcable for this control function.
181AS LCD monitor is equipped with an optional USB Hub also.
Refer to the “Setting Up Your Philips Flat Panel Monitor” foldout for a more detailed guide to set up your monitor.
USB HUB
USB HUB
INST
INST
ALL
ALLAA
TION
TION
(SOLD SEP
(SOLD SEPARARAA
TEL
TELY)Y)
USB (Universal Serial Bus) is an innovation in connecting your IBM-compatible computer to your monitor. By using the optional USB HUB,
you will be able to connect optional USB type keyboards, mice, printers, and other peripherals to your monitor instead of having to connect
them to your computer. This will give you greater flexibility in setting up your system. Plus, you will have true plug-and-play capability.
Philips provides for the optional USB Hub so you will be ready to take advantage of this advancement in computer development.
For an IBM-compatible Computer:
1. Turn off the computer.
2. Insert the (optional) USB Hub to the monitor .
3. Connect the USB cable to the monitor’s USB Hub and
the computer. (Computer must have USB port.)
4. Connect USB type mouse or USB type keyboard (or both) to
the monitor’s USB Hub.
5. Turn on the monitor. Then turn on the computer.
6. With the installation of the correct software, you will be able
to connect USB peripherals to the monitor’s USB Hub.
Note:
1. If the USB device was halt down, please replug the USB
cable , then the HOST will make self-test and enable the
device function automatically.
2.USB Hub and cables sold separately. The length of USB
cable should be less than 3 meters. The USB Bay is located
in the base at the back of the monitor .
3. Please refer to the USB Hub’s manual and installation guide
for more details.
Refer to the “Setting Up your Philips flat panel monitor” foldout for a more detailed guide to set up your monitor .
You may connect the monitor directly or connect to the optional
USB hub to the PC down stream port.
181AS LCD monitor is an USB device also.
Page 7
7
E
N
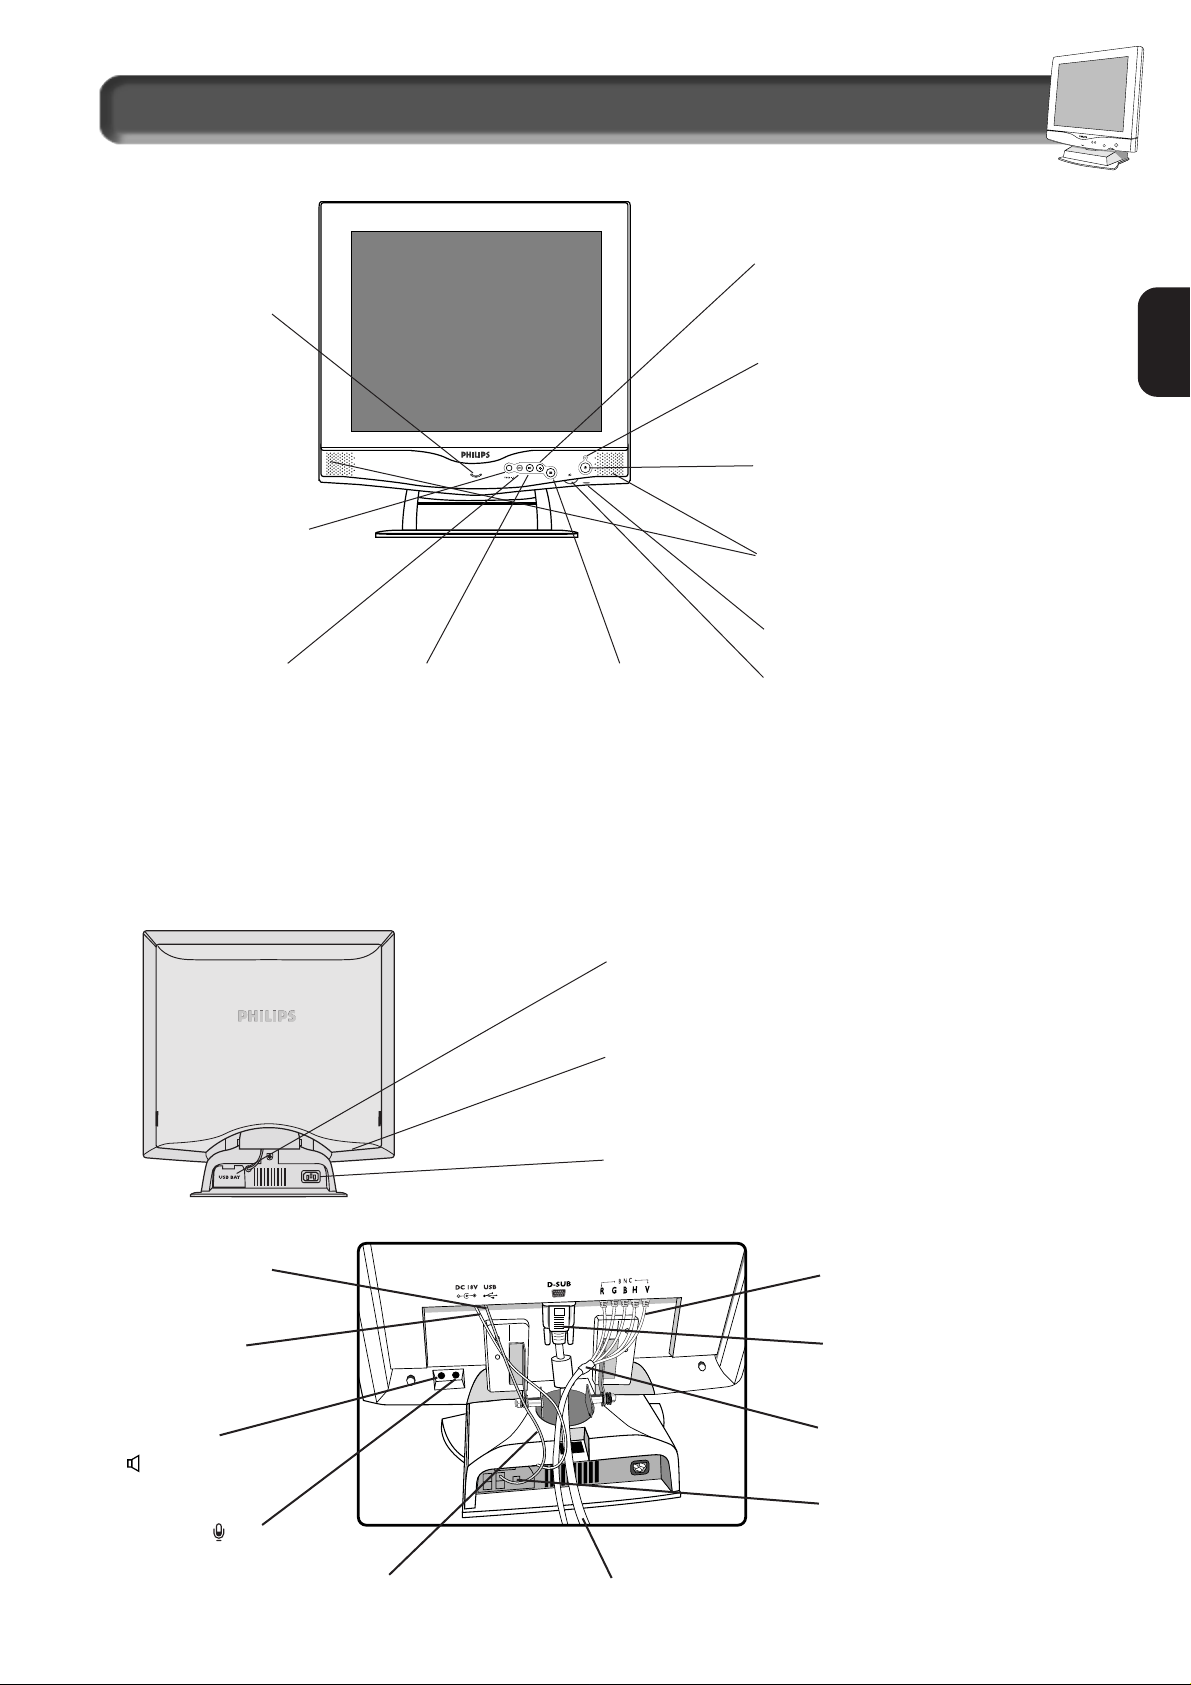
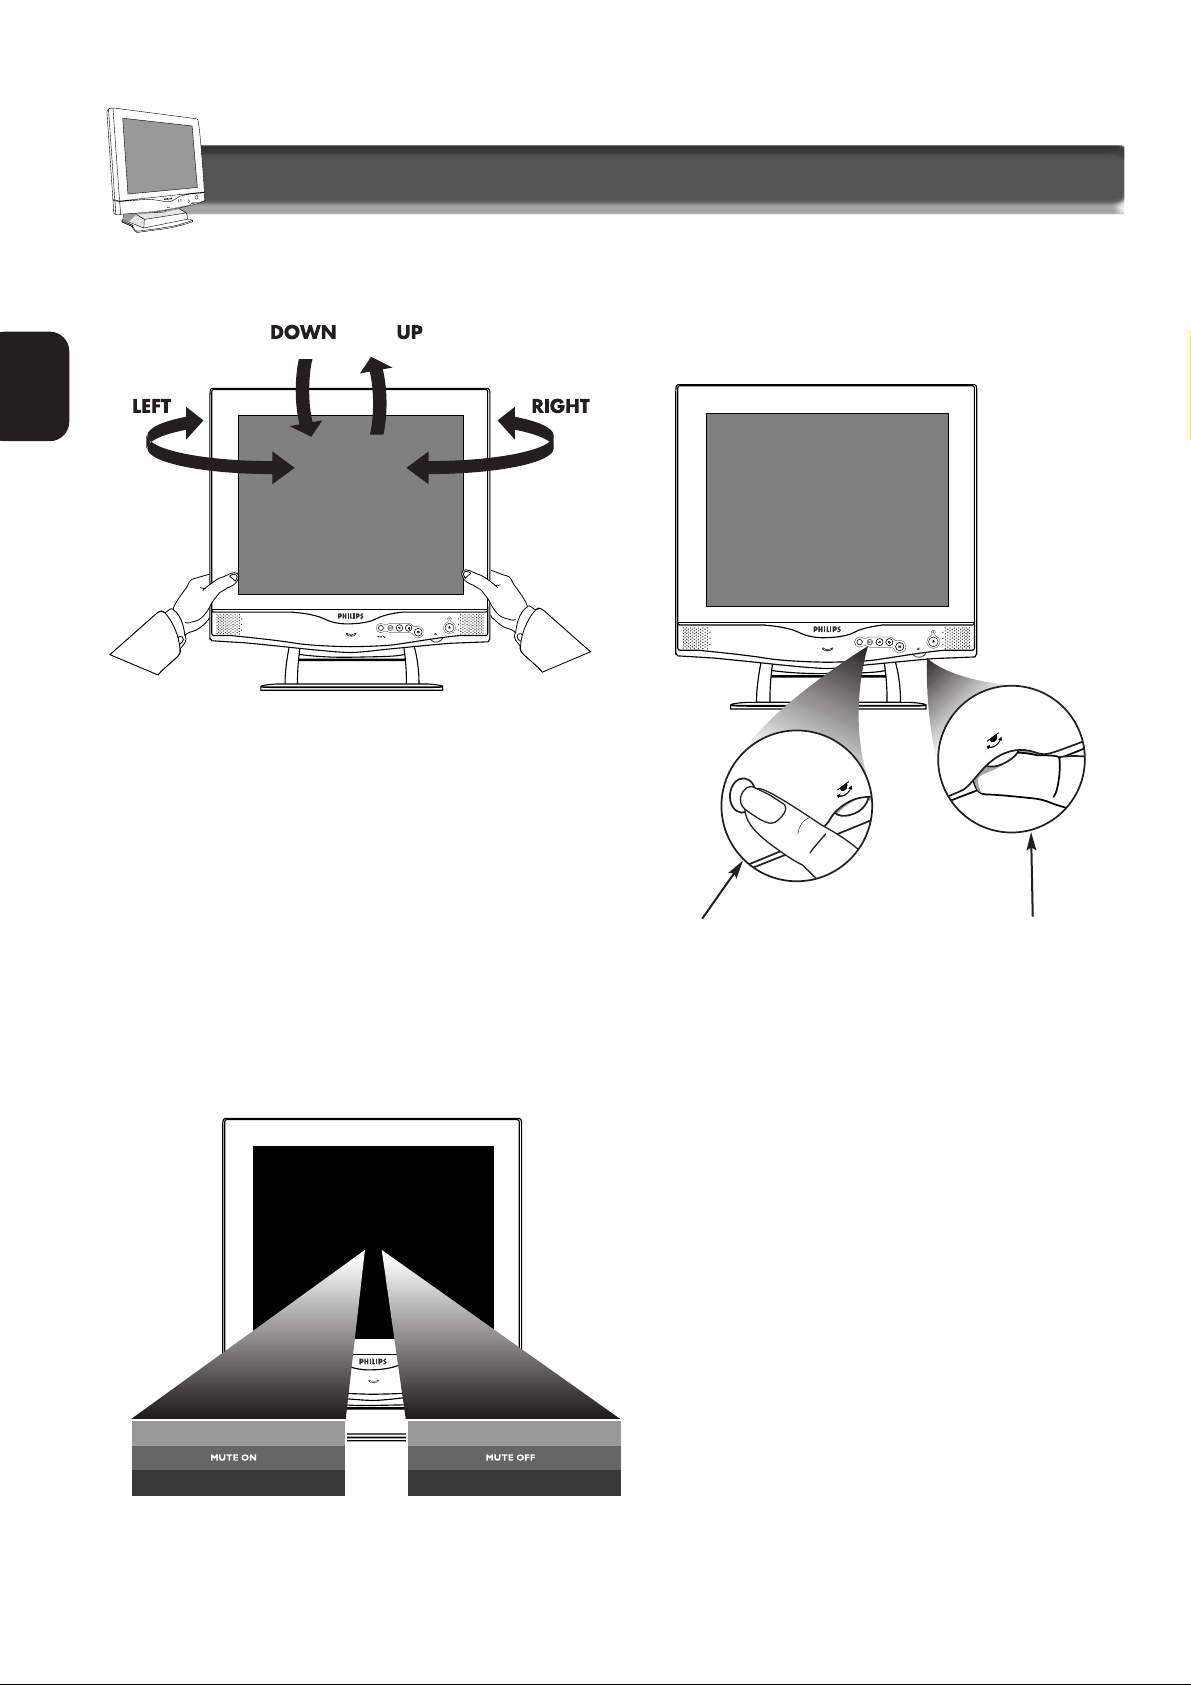
Description of Controls & Connectors
FRONT
VIEW
Power Button – T urns the monitor
On or Off.
Speakers – T ransmit sounds from
your computer or amplifier.
On Screen Display
(OSD) button –
Brings up the On
Screen Display and
helps you navigate
through it.
Rotary Knob – Helps guide you
through the On Screen Display.
When not used with the OSD button,
can also adjust the volume. See
page 14.
USB Bay –Slot for plugging in USB Hub. Optional
hardware that allows true Plug-and-Play.
See page 6 for installation details.
Power Plug – Plug the AC power cord in here.
See “Setting up” foldout for details.
Built-in Microphone
– Allows you to
“speak” into your
computer.
LED – Light Emitting Diode turns
green when the monitor is on.
AUTO Adjust Button –
Press this button for
optimal picture display.
Clock, Phase, Vertical
position and Horizontal
position are adjusted
automatically.
REAR V
IEW
Kensington Lock Socket – A special feature to
lock your monitor for anti-theft.
Video 1-2 – Allows you
to switch between two
video inputs (D-SUB,
BNC seletion.
e.g.Connect D-SUB and
5-BNC video cable to the
monitor from different
PC at the same time.
Then press”Video1-2”
button for interchange of
Video Display.
Mute Button – Mutes
the sound from the
speakers and the
earphones. Press to
turn mute on or off. See
next page for details.
Brightness Button – Press this button
and use the rotary knob to adjust the
brightness of the screen.
Earphone jack
Power Plug – Plug the AC power cord in here.
See “Setting up” foldout for details.
BNC – R, G, B, H and V input.
D-Sub connector
USB port
Audio in
connector
( Speaker)
Microphone out
connector
USB connector
DC power cord
5-BNC cable (optional)
Video cable
USB cable
Page 8
8
Description of Controls
Pedestal - With the built-in pedestal, you can tilt
and swivel the monitor to the most comfortable
viewing angle. For best viewing, always place the
monitor at eye level. This pedestal can be separated
from the main LCD monitor body for mechanical
arm or wall-mount applications (as specified within
manufacturer’s recommendations).
NOTE: DO NOT REMOVE WITHOUT FIRST READING “REMOVING
INSTRUCTIONS” FOUND IN THE GUIDE BUNDLED WITH THE ACCESSORIES.
Using the Mute Button - To turn the mute On or Off press the mute
button. For Audio model only.
Using Rotary Knob
for AUDIO
- Turn rotary knob to
adjust audio level.
NOTE: THE ROTARY KNOB IS
ALSO USED FOR
OSD
OPERATION WHEN THE OSD
BUTTON IS PRESSED.
Using the Auto Button -
Press this button for optimal
picture dispaly.
Clock,Phase, Vertical position
and Horizontal position are
adjusted automatically.
Using the OSD Button - To use the OSD
function, please refer to details starting on page 12.
E
N
Page 9
9
The fourth window features: Language, OSD
Controls, Video Input Priority, Power Saving, and
Rotary Default. Details on adjusting these features
are on pages 20-23.
Note: Language allows you to change the On
Screen Display from English to French,
Spanish, German, or Italian. See Page 20 for
more details.
Description of Controls
On Screen Display - Your monitor is preset at the factory for normal operation. However, you can adjust
it by using the On Screen Display Button and the Rotary Knob as described on Page 7. Below is a brief
description of the four windows of the On Screen Display function.
The first window highlighted after the OSD has been selected. By default, the
select block will be on “Brightness”. It has five features: Brightness, Contrast,
Volume, Phase Adjustment and Clock Adjustment. Details on adjusting these
feutures are on pages 13-15.
This is the second window
highlighted after the OSD has been
selected. The four features are:
Vertical Position, Horizontal
Position, Display Size and Expand
Mode Optimization. More details
on adjusting these features are on
pages 16-17.
The third window highlighted is the adjustment of
the Color Temperature. Select the color temperature
you prefer or make your own with User Setting 1 or
2. Details are on pages 18-19
OSD Button
E
N
Page 10

10
E
N
AUDIO FUNCTION CONTROL
Microphone c
Microphone c
able (red)
able (red)
connection
connection
Microphone (Voice in)
FRONT VIEW
(monitor)
Plug the red
Microphone
connector into
the Microphone
out port of your
monitor.
Microphone out
cable(red)
Monitor
AAudio c
udio c
able(bL
able(bL
ue)
ue)
connection
connection
Rear view of monitor
Speaker(sound output)
PC
Front view of monitor
REAR VIEW
(monitor)
Plug the other end
of Microphone
connector into the
sound input port
of your computer.
To Monitor To PC
Plug the blue
Audio connector
into the sound
output port of
your computer.
Plug the other
end of Audio
connector into
the Audio in
port of your
monitor.
To PC To Monitor
Audio in cable(blue)
or
to Earphone jack
Note: To use the supplied audio cable
or an equivalent cable of less than
3m.
Note: To use the supplied
audio cable or an equivalent
cable of less than 3m.
Page 11

11
E
N
How to Use the On Screen Displa y (OSD)
OSD Menu control level structure
Page 12

12
E
N
How to Use the On Screen Displa y (OSD)
OSD Controls
OSD Controls
2
2
Press the OSD button.
Press the OSD button to
bring up T
IMER screen.
Turn the R
OTARY knob
until the OSD
C
ONTROLS icon is
highlighted.
1
1
OSD TIMER
3
3
Press the OSD
button to bring up
O
SD CONTROLS screen.
Press the OSD button to confirm the
selection and return to E
XIT window.
7
7
OSD SWITCHES OFF AUTOMATICALLY AFTER 5 SECONDS (DEFAULT IS
5 SECONDS). WITH OSD CONTROLS, you can set the amount
of time it takes for the On Screen Display to time out or change
the vertical and horizontal position of the OSD on the monitor
screen.
4
4
Turn the ROTARY knob to
select : 05, 10, 25
seconds, or O
FF .
5
5
6
6
OSD control icon
Rotary Knob
OSD button
8
8
Press the OSD button.
VIDEO 1-2
VIDEO 1-2
Turn the Rotary Knob to
select Yes to save changes
or No to discard changes.
Then, press the OSD button
to confirm your choice and
exit the OSD.
Page 13

13
E
N
How to Use the On Screen Displa y (OSD)
Brightnes
Brightnesss
4
2
2
5
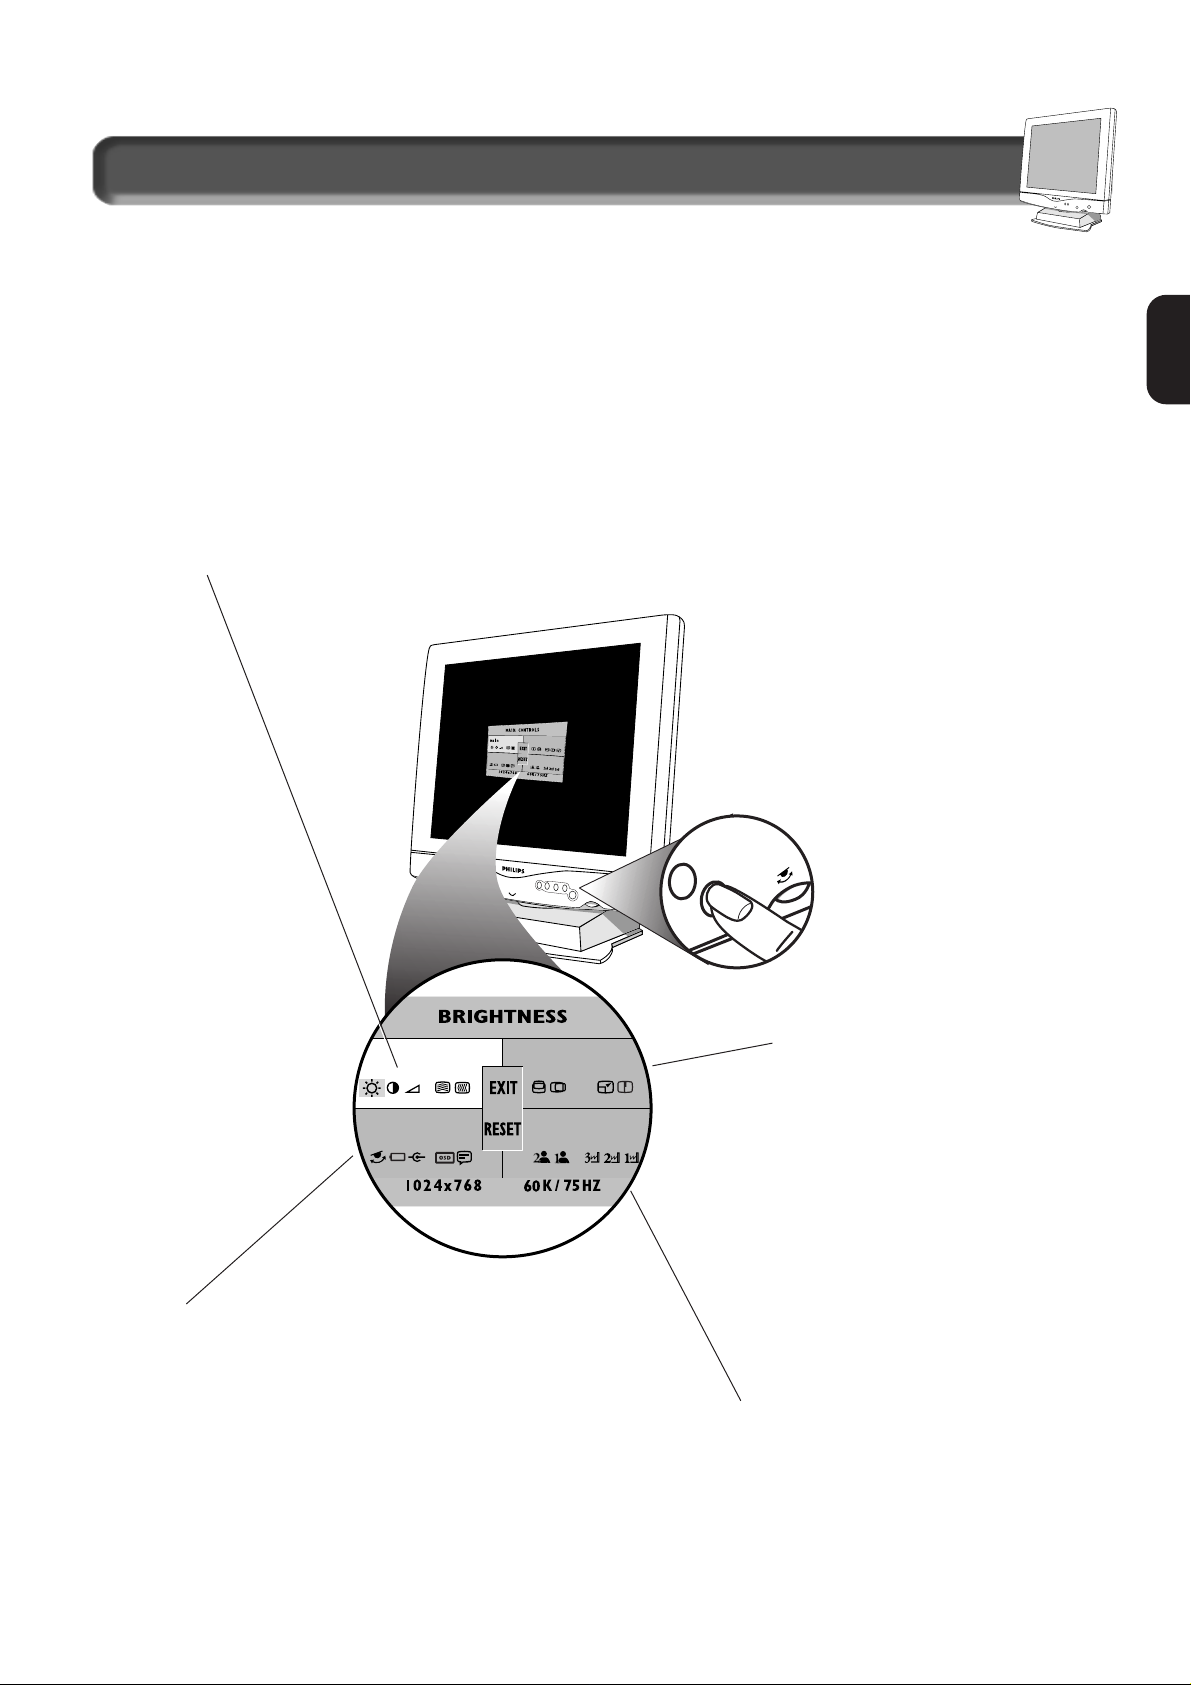
To adjust your screen’s brightness, follow the steps below.
Brightness is the overall intensity of the light coming from
the screen.
Smart Help
After returning to Exit . . .
. . .to continue to Contrast, turn the Rotary Knob clockwise
until the C
ONTRAST icon is highlighted. Next, follow steps 3 - 5
under C
ONTRAST.
. . . to exit completely,press the OSD button and choose either
S
AVE or Don’t SAVE in setting mode, then push OSD button to
exit OSD. (See page 23 for other exit options.)
1
Press the OSD button.
By default, the
B
RIGHTNESS icon is
highlighted.
Turn the Rotary Knob
to adjust the
brightness.
Contr
Contr
ast
ast
To adjust your screen’s contrast, follow the steps below.
Contrast is the difference between the brightest and
darkest areas on the screen.
Smart Help
After returning to Exit . . .
. . . to continue to Volume, turn the Rotary Knob clockwise
until the V
OLUME icon is highlighted. Next, follow steps 3 - 5
under V
OLUME (on the next page).
. . . to exit completely,press the OSD button and choose either
S
AVE or Don’t SAVE in setting mode, then push OSD button to exit
OSD. (See page 23 for other exit options.)
2
2
Press the OSD button.
3
Press the OSD
button to bring
up C
ONTRAST
screen.
4
Turn the Rotary Knob to
adjust the contrast.
Turn the Rotary
Knob clockwise
until the C
ONTRAST
icon is highlighted.
1
First window
Press the OSD button to
return to E
XIT window.
5
Press the OSD
button to return to
E
XIT window.
Press the
OSD button
to bring up
B
RIGHTNESS
screen.
3
Page 14

14
E
N
How to Use the On Screen Displa y (OSD)
VVololume
ume
To adjust your monitor’s audio volume, follow the steps
below. The volume control adjusts the sound from the
two front-cabinet speakers or the earphone jack.
Smart Help
After returning to Exit . . .
. . . to continue to Clock Adjustment, turn the R
OTARY knob
clockwise until the CLOCK ADJUSTMENT icon is highlighted. Next,
follow steps 3-5 under C
LOCK ADJUSTMENT.
. . . to exit completely,press the OSD button and choose either
S
AVE or Don’t SAVE in setting mode, then push OSD button to exit
OSD. (See page 23 for other exit options.)
2
2
Press the OSD button.
3
Press the OSD
button to bring
up V
OLUME
screen.
4
Turn the ROTARY knob
to adjust the volume.
Turn the R
OTARY
knob clockwise
until the V
OLUME
icon is
highlighted.
1
First window
Press the OSDbutton to
return to EXIT window .
5
ST
ST
AR
AR
TING CL
TING CL
OCK&
OCK&
PHA
PHA
SE A
SE A
djustments
djustments
Due to different video signal input from the video card of PC, it is
necessary to adjust the CLOCK and PHASE phenomenon for the
optimal video display of LCD monitor. To start CLOCK and PHASE
Adjustment, simply follow these
steps:
Step 1 : Click on the Start
button (Win95, Win98 or
Win NT and move your
mouse pointer to highlight
the word”Shut Down...”. as
shown in Fig.1.A.
Fig.1.A
Fig.1.B
Step 2 : The menu of “ Shut
Down Windows “ is as
shown in Fig.1.B
Step 3 : With the Shut Down
Window still up on the
screen, follow the CLOCK
and PHASE Adjustment
instructions on page 15 for
the optimal video display.
Page 15

15
E
N
Clock
Clock
AAdjustment
djustment
Clock Adjustment reduces the vertical flicker of the image
on the screen to a minimum.
2
2
Press the OSD button.
3
Press the OSD
button to bring
up the C
LOCK
ADJUSTMENT
screen.
4
Turn the ROTARY knob
until the image on the
monitor does not flicker.
(Vertical flicker)
Turn the R
OTARY
knob clockwise
until the C
LOCK
ADJUSTMENT icon
is highlighted.
1
Press the OSD button to
return to E
XIT window .
5
How to Use the On Screen Displa y (OSD)
First window
Phase
Phase
AAdjustment
djustment
Phase Adjustment reduces the horizontal flicker of the image
on the screen to a minimum.
Smart Help
After returning to Exit . . .
. . . to continue to the Phase Adjustment, turn the R
OTARY knob
clockwise until the P
HASE ADJUSTMENT icon is highlighted. Next,
press the OSD button. Follow steps 3-5 under PHASE ADJUSTMENT .
. . to exit completely,press the OSD button and choose either
S
AVE or Don’t SAVE in setting mode, then push OSD button to exit
OSD. (See page 23 for other exit options.)
2
2
Press the OSD
button.
3
Press the OSD
button to bring
up P
HASE
ADJUSTMENT
screen.
4
Turn the ROTARY knob
to adjust the Phase
Adjustment.
Turn the R
OTARY
knob clockwise
until the P
HASE
ADJUSTMENT icon
is highlighted.
1
Press the OSD button to
return to E
XIT window .
5
Smart Help
After returning to Exit . . .
. . . to continue to the Vertical Position, turn the R
OTARY knob
until the V
ERTICAL POSITION icon in the second window is
highlighted. Next, follow steps 3-5 under V
ERTICAL POSITION(on
the next page).
. . . to exit completely,press the OSD button and choose either
S
AVE or Don’t SAVE in setting mode, then push OSD button to exit
OSD. (See page 23 for other exit options.)
Page 16

16
E
N
How to Use the On Screen Displa y (OSD)
Smart Help
After returning to Exit . . .
. . . to continue to Display Size, turn the R
OTARY knob until
D
ISPLAY SIZE is highlighted. Next, follow steps 3-5 under DISPLAY
SIZE.
. . . to exit completely,press the OSD button and choose either
S
AVE or Don’t SAVE in setting mode, then push OSD button to exit
OSD. (See page 23 for other exit options.)
2
2
Press the OSD button.
3
Press the OSD
button to bring up
the H
ORIZONTAL
POSITION screen.
Turn the ROTARY
knob until the
H
ORIZONTAL POSITION
icon is highlighted.
1
Horizont
Horizont
al
al
Posit
Posit
ion
ion
VVerertic
tic
al
al
Posit
Posit
ion
ion
Vertical Position adjusts the image on your screen either
up or down. Use this feature if the image does not appear
centered.
Smart Help
After returning to Exit . . .
. . . to continue to the Horizontal Position, turn the R
OTARY
knob until the HORIZONTAL POSITION icon is highlighted. Next,
follow steps 3-5 under H
ORIZONTAL POSITION.
. . . to exit completely,press the OSD button and choose either
S
AVE or Don’t SAVE in setting mode, then push OSD button to exit
OSD. (See page 23 for other exit options.)
Press the OSD button.
1
2
2
Turn the R
OTARY
knob until the
V
ERTICAL POSITION
icon is highlighted.
Second window
Horizontal Position shifts the image on your screen either
to the left or right. Use this feature if the image does not
appear centered.
3
Press the OSD
button to bring up
the V
ERTICAL
POSITION screen.
4
Turn the ROTARY knob
until the image is
vertically balanced.
Press the
OSD
button to
return to E
XIT
window.
5
Press the
OSD
button to
return to E
XIT
window.
5
Turn the ROTARY knob
until the image is
horizontally balanced.
4
Page 17

17
E
N
How to Use the On Screen Displa y (OSD)
Second window
Smart Help
After returning to Exit . . .
. . . to continue to Color Temperature,turn the R
OTARY knob
until one of the C
OLOR TEMPERATURE icons is highlighted. Next,
follow steps 3-5 under C
OLOR TEMPERATURE.
. . . to exit completely,press the OSD button and choose either
S
AVE or Don’t SAVE in setting mode, then push OSD button to exit
OSD. (See page 23 for other exit options.)
2
2
Press the OSD button.
3
Press the OSD
button to bring up
the E
XPAND
MODE
screen.
Turn the ROTARY
knob until the
E
XPAND MODE icon is
highlighted.
1
Exp
Exp
and Mode
and Mode
Optimiza
Optimiza
tion
tion
Displa
Displa
y Size
y Size
Display Size allows you to adjust picture size when the
input video mode is under 1280 x 1024. It has 3 options,
full screen, real mode, and user’s setting.
Smart Help
After returning to Exit . . .
. . . to continue to the Expand Mode Optimization, turn the
R
OTARY knob until the EXPAND MODE OPTIMIZATION icon is
highlighted. Next, follow steps 3-5 under E
XPAND MODE.
. . . to exit completely,press the OSD button and choose either
S
AVE or Don’t SAVE in setting mode, then push OSD button to exit
OSD. (See page 23 for other exit options.)
Press the OSD button.
1
2
2
Turn the R
OTARY
knob until the
D
ISPLAY SIZE icon is
highlighted.
Expand Mode Optimization is available when the input
video mode nuder 1280 x 1024. It helps you to select the
best display quality for text - or graphic - oriented applications.
3
Press the OSD
button to bring up
the D
ISPLAY SIZE
screen.
4
Turn the ROTARY knob to
select FULL SCREEN, REAL
MODE, OR USER SETTING.
Press the
OSD
button to
return to E
XIT
window.
5
Press the OSD
button to return to
E
XIT window.
5
Turn the ROTARY knob to
adjust the monitor to be
T
EXT or GRAPHIC mode.
4
Page 18

18
E
N
Third window
How to Use the On Screen Displa y (OSD)
5500
5500°°
K, 6500
K, 6500°°
K or 9300
K or 9300°°
K Color
K Color
TTemper
emperaa
ture(Video displa
ture(Video displa
y change)
y change)
Your monitor has three preset options for color temperatures from which you can choose : 6500° K option for
Desktop Publishing (DTP), 9300° K option for Computer Aided Design (CAD) work, or 5500° K option for photo
retouch. When you select an option, the monitor automatically adjusts itself for that color temperature. the default setting for color
temperatures is 6500° K.
Smart Help
After returning to Exit . . .
. . . to continue to User Presets, turn the R
OTARY knob until one of the USER PRESET icons is highlighted. Next, follow steps 3- 8 under USER
PRESETS on the next page.
. . . to exit completely,press the OSD button and choose either S
AVE or Don’t SAVE in setting mode, then push OSD button to exit OSD.
(See page 23 for other exit options.)
Press the OSD button.
Press the OSD
button to return
to the
E
XIT window.
1
2
2
Turn the R
OTARY
knob until one of
the
COLOR
TEMPERATURE
icons is
highlighted.
3
3
Turn the ROTARY knob
until 9300°K, 6500°K or
5500°K is highlighted.
Press the
OSD button to
confirm the
selection.
4
4
5500°K : Dark color
6500°K : Dim color
9300°K : Bright color
Press the OSD button to bring up
SAVE screen.
Turn the Rotary Knob to select
Yes to save changes or No to
discard changes. Then, press the
OSD button to confirm your
choice and Exit the OSD.
5
5
6
6
Page 19

19
E
N
How to Use the On Screen Displa y (OSD)
User Presets
User Presets
Fllow the steps below to set a custom color temperature. You can make individual adjustments for each color.
Smart Help
After returning to Exit . . .
. . . to continue to User Preset 2, repeat steps 3 through 7, selecting U
SER PRESET 2.
. . . to continue to Language, turn the R
OTARY knob until LANGUAGE ICON is highlighted. Next, press the ON SCREEN DISPLAY button. Now, follow
steps e - 5 under LANGUAGE on the next page.
. . .to exit the On Screen Display completely, press the OSD button and choose either S
AVE or Don’t SAVE in setting mode, then push OSD
button to exit OSD. (See page 23 for other exit options.)
Press the OSD button.
3
To exit USER PRESET 1 , press the OSD button.
Next, press the OSD button again to return to E
XIT
window.
1
2
2
Turn the R
OTARY
knob until one of the
U
SER PRESET icons is highlighted.
Third window
4
If necessary,
turn the R
OTARY
knob until
of the U
SER
PRESETS is
highlighted.
Next, press the
OSD button to
confirm the
selection.
First, RED will be highlighted.
Next, to adjust the red,
press the OSD button again.
Then, turn the R
OTARY knob to
increase or decrease the red.
5
When done with red, press the
OSD button. G
REEN will be
highlighted. Then, turn the
R
OTARY knob to increase or
decrease the green.
When done with green, press
the OSD button. B
LUE will be
highlighted. Then, turn the
R
OTARY knob to increase or
decrease the blue.
7
You will now be back at the EXIT
window. See S
MART H
ELP below
for options.
8
6
Press the OSD button to
bring up SAVE screen.
Turn the Rotary Knob to select
Yes to save changes or No to
discard changes. Then, press the
OSD button to confirm your
choice and Exit the OSD.
9
9
: Adjustment of the colors red,green and blue.
: Adjustment of the colors red,green and blue.
Page 20

20
E
N
How to Use the On Screen Displa y (OSD)
LLangu
angu
age
age
2
2
The O
N SCREEN DISPLAY shows its settings in one of five
languages. The default is English, but you can also select
French, Spanish, German, or Italian.
Smart Help
1
1
Press the OSD button.
Turn the R
OTARY
knob until the
L
ANGUAGE icon is
highlighted.
OSD Controls
OSD Controls
Smart Help
After returning to EXIT . . .
. . . to continue to V
IDEO INPUT PRIORITY, turn the ROTARY knob
until the V
IDEO INPUT PRIORITY icon is highlighted. Next, follow
steps 3-5 under V
IDEO INPUT PRIORITY (on the next page).
. . . to exit completely, press the OSD button and choose either
S
AVE or Don’t SAVE in setting mode, then push OSD button to exit
OSD. (See page 23 for other exit options.)
2
2
Press the OSD button.
Press the OSD button to
bring up T
IMER screen.
Turn the R
OTARY
knob until the OSD
C
ONTROLS
icon is
highlighted.
1
1
Fourth window
3
3
4
4
Press the ON
SCREEN D
ISPLAY
button to bring
up L
ANGUAGE
screen.
Turn the R
OTARY knob
until the desired
language is selected.
3
3
Press the OSD
button to bring up
O
SD CONTROLS screen.
Press the OSD button to confirm the
selection and return to E
XIT window.
7
7
Press the
OSD
button to
return to E
XIT
window.
5
WITH OSD CONTROLS, you can set the amount of time it
takes for the On Screen Display to time out or change the
vertical and horizontal position of the OSD on the monitor
screen. Besides, you can also view P
RODUCT INFORMATION,
including the serial number and hours of operation for your
reference.
4
4
Turn the ROTARY knob to
select : 05, 10, 25
seconds, or O
FF .
5
5
Then, see SMART HELP below
for option.
6
6
After returning to EXIT . . .
. . . to continue to OSD C
ONTROLS, turn the ROTARY knob until the
OSD C
ONTROLS icon is highlighted. Next,follow steps 3-5 under
OSD CONTROLS.
. . . to exit completely, press the OSD button and choose either
S
AVE or Don’t SAVE in setting mode, then push OSD button to
exit OSD. (See page 23 for other exit options.)
To continue to
select V
ERTICAL or
H
ORIZONTAL
POSITION of the
OSD, or to see the
P
RODUCT
INFORMATION, repeat
same steps
Page 21

21
E
N
How to Use the On Screen Displa y (OSD)
Video Inp
Video Inp
ut
ut
Priority
Priority
THE
VIDEO INPUT PRIORITY setting defines which video source
is displayed by default on the screen when two video
sources are available to the monitor.
Smart Help
2
2
Press the OSD button.
Turn the R
OTARY
knob until the
V
IDEO INPUT
PRIORITY icon is
highlighted.
1
1
Fourth window
Power Sa
Power Sa
ving
ving
POWER SAVING helps save energy when the monitor is on
but not being used. After a preset time, the screen will go
blank. To select P
OWER SAVING, follow the steps below.
Smart Help
After returning to EXIT . . .
. . . to continue to Rotary Default, turn the R
OTARY knob until the
R
OTARY DEFAUL T icon is highlighted. Next, follow the steps 3-5
under R
OTARY DEFAUL T (on the next page).
. . . to exit completely, press the OSD button and choose either
S
AVE or Don’t SAVE in setting mode, then push OSD button to exit
OSD. (See page 23 for other exit options.)
2
2
Press the OSD button.
3
3
Press the OSD
button to bring up
P
OWER SAVING
screen.
Turn the R
OTARY
knob until the
P
OWER SAVING icon
is highlighted.
1
1
Press the
OSD button
to return to E
XIT
window.
5
5
3
3
Press the OSD
button to bring up
V
IDEO INPUT PRIORITY
screen.
Turn the ROTARY
knob to select
BNC OR VGA
D-SUB.
4
4
Press the
OSD button
to return to E
XIT
window.
5
5
After returning to E
XIT . . .
. . . to continue to P
OWER SAVING, turn the ROTARY knob until
P
OWER SAVING is highlighted. Next, follow steps 3-5 under POWER
S
AVING.
. . . to exit completely, press the OSD button and choose either
S
AVE or Don’t SAVE in setting mode, then push OSD button to exit
OSD. (See page 23 for other exit options.)
Turn the ROTARY
knob to select
P
OWER SAVING
ON or OFF.
4
4
Page 22

E
N
22
RRototarary Def
y Def
aul
aultt
ROTARY DEFAULT allows you to pick which feature the
R
OTARY knob defaults to when used without first pressing
the OSD button. The normal default is Volume. To select your
Rotary Default, follow the steps below.
Smart Help
After returning to EXIT . . .
. . . to continue to another window, turn the R
OTARY knob until
that window is highlighted. Next, follow the instructions for that
window.
. . . to exit completely, press the OSD button and choose either
S
AVE or Don’t SAVE in setting mode, then push OSD button to exit
OSD. (See page 23 for other exit options.)
2
2
Press the OSD button.
3
3
Turn the ROTARY
knob until the
R
OTARY
D
EFAUL T
icon is highlighted.
1
1
Press the
OSD button
to return to E
XIT
window.
5
5
Turn the R
OTARY
knob to select
B
RIGHTNESS,
C
ONTRAST, or
VOLUME.
4
4
How to Use the On Screen Displa y (OSD)
Fourth window
Press the OSD button
to bring up R
OTARY
DEFAULT screen.
Page 23

23
E
N
E
E
XIT
XIT
Choosing EXIT allows you to exit the OSD screen and save or
discard changes you mode to the monitor settings.
When you are at the first
level control window. For
example the B
RIGHTNESS
icon is highlighted.
1
1
Exit or Reset
RReset
eset
Choosing RESET returns all the settings for the current video mode
to factory presets.
How to Use the On Screen Displa y (OSD)
Turn the ROTARY knob
until E
XIT is highlighted.
Next, press the OSD
button.
2
2
Turn the Rotary Knob to
select Y
ES to save
changes or No to discard
changes. Then, press the
OSD button to confirm
your choice and exit the
OSD.
3
3
Turn the Rotary knob to
select R
ESET ALL SETTINGS,
Y
ES
or NO
. Press the OSD
button to
EXIT.
3
3
When you are at the first
level control window.
For example the
B
RIGHTNESS icon is
highlighted.
1
1
Tu rn the ROTARY knob
until R
ESET
is highlighted.
Next, press the OSD
button.
2
2
Page 24

24
E
N
OSD
OSD
WWarning Signal
arning Signal
Additional Information
Warning signals display information and alerts about the status of the monitor.
• NO VIDEO INPUT •
This screen is displayed when there is no video signal input. Please
check that the signal cable is properly connected to the Video card or
PC.
• CANNOT DISPLA Y THIS VIDEO MODE •
This screen warns when the input from the computer is not a standard
video mode or out of the monitor’s scanning range. Please change the
display mode of the operating software in the computer (i.e.
Windows) to 1280 x 1024 @ 60 Hz for best display
results.
• ENTERING SLEEP MODE •
This screen appears when the monitor is about to enter the sleep
mode. Please press any key on the keyboard or click the mouse to
wake up the monitor and computer.
• USE 1280 X 1024 FOR BEST RESULT •
This message appears at the bottom of the OSD window when the
video mode input is not the recommended 1280 x 1024. Other modes
may result in some picture distortion. Please adjust the video mode to
1280 x 1024 @ 60 Hz for best display quality.
Page 25

25
E
N
Pin As
Pin As
signment
signment
The 15-pin D-sub connector (male) of the signal cable:
Pin No. Assignment
BNC Connector
BNC Connector
25
OSD
OSD
WWarning Signal
arning Signal
Additional Information
• THIS IS THE BEST PICTURE SHAPE •
This screen appears when the picture size is extended to the edge of
viewable area with the same video aspect ratio. The picture size can be
futher enlarged to full screen size with a distorted aspect ratio if you
continuously turn the size control.This applies when the user attempts
to stretch 4:3 aspect resolutions (640x480, 800x600,1024x768 or
others) to totally fill the screen.
• WAIT FOR AUTOMATIC ADJUSTMENT •
This screen appears when you touch the AUTO button. It will
disappear when the monitor is properly adjusted.
• SECOND VIDEO IS NOT AVAILABLE •
This screen appears when there is no second video source input.
Pressing the VIDEO 1-2 BUTTONS on the front of LCD monitor can switch
the video input signal between the D-sub and BNC connectors. This
message appears if one of the signals is not available.
The 5 BNC connectors are positioned as follows:
R: Red video input
G: Green video input
B: Blue video input
H: Horizontal sync
V: Vertical sync
Pin Assignment
BNC
R G B H V
1 Red video input
2 Green video input
3 Blue video input
4 Identical output
- connected to pin 10
5 Self test
6 Red video ground
7 Green video ground
8 Blue video ground
9 No pin
10 Logic ground
11 Identical output
- connected to pin 10
12 Serial data line (SDA)
13 H. Sync / H+V
14 V . Sync (VCLK for DDC)
15 Data clock line (SCL)
Page 26

26
E
N
Additional information
AAutoma
utoma
tic Power Sa
tic Power Sa
ving
ving
If you have a VESA DPMS compliant display card or software installed in your
PC, the monitor can automatically reduce its power consumption when not in
use. If input from a keyboard, mouse, or other device is detected, the PC &
monitor automatically “wake up.” The table below shows the power
consumption and signalling of the automatic power-saving feature.
MODE RESOLUTION H. FREQ
. V. FREQ. STANDARD
(KHZ)(HZ)
1* 640 x 350 31.5 70 IBM VGA 10h
2* 720 x 400 31.5 70 IBM VGA 3h
3* 640 x 480 37.5 75 VESA
4 640 x 480 37.9 72 VESA
5 640 x 480 35.0 67 VESA
6* 640 x 480 31.5 60 VESA
7* 800 x 600 35.2 56 VESA
8* 800 x 600 46.9 75 VESA
9* 800 x 600 37.9 60 VESA
10* 832 x 624 49.7 75 MAC
11 800 x 600 48.1 72 VESA
12* 1024 x 768 60.0 75 VESA
13* 1024 x 768 48.4 60 VESA
14 1024 x 768 56.5 70 VESA
15 1024 x 768 61.1 76 IBM XGA-2
16 1152 x 864 67.5 75 VESA
17 1152 x 864 63.9 70 non-VESA
18* 1152 x 870 68.7 75 MAC
19 1152 x 900 61.8 66 SUN Mode IV
20* 1152 x 900 71.8 76 SUN Mode II
21 1280 x 960 60.0 60 VESA
22 1280 x 960 75.0 75 non-VESA
23 1280 x 1024 76.0 72 DOS/V
24* 1280 x 1024 64.0 60 VESA
25* 1280 x 1024 80.0 75 VESA
26* 1280 x 1024 81.1 76 SUN Mode I
27 1280 x 1024 71.7 67 SUN Mode V
AAccept
ccept
able
able
RResol
esol
ution Modes
ution Modes
Power Management Definition
VESA mode Video H-sync V-sync Power Power LED
used saving(%) color
ON Active Yes Yes < 60W 0% Green
Stand-by Blanked No Yes < 5 W 88.8% Amber
Suspend Blanked Yes No < 5 W 88.8% Amber
OFF Blanked No No < 5 W 88.8% Amber
• Above power consumptions exclude USB watts.
• This monitor is
ENERGY STAR
®
compliant .
As an
ENERGY STAR
®
Partner,
PHILIPS has determined that this
product meets the
ENERGY STAR
®
guidelines for energy efficiency.
The proper operation of the function requires a computer with VESA
DPMS power management capabilities.
Specific
Specificaa
tions
tions
DISPLAY : 18.1-inch (46 cm)
Type : Flat panel active matrix-TFT LCD
VIEWABLE IMAGE SIZE (VIS) : 18.1-inch diagonal (46 cm)
SURFACE TREATMENT : Anti-glare coating
WEIGHT (UNPACKED) : 8.5kgs
MAXIMUM DIMENSIONS
Height : 476 mm
Depth : 181 mm
Width : 451 mm
M
AXIMUM GRAPHICS
R
ESOLUTION
: 1280 x 1024 at 75 Hz Refresh Rate
T
EXT MODE
: 720 x 400
D
OT PITCH : 0.28 mm
H
ORIZONTAL FREQUENCY : 30 to 82 kHz
VERTICAL FREQUENCY : 56 to 76 Hz
ENVIRONMENTAL
REQUIREMENTS TEMPERATURE
Operating Temperature : 41 to 95°F 5 to 35°C
Storage Temperature : -13 to 140°F -25 to 60°C
HUMIDITY (NON-CONDENSING)
Operating : Max. 80%
Non-operating : Max. 95%
POWER SOURCE : 100-240VAC±10%,50-60Hz(90-
264VAC)
POWER CONSUMPTION : < 48 watt (typical value, excluding USB)
INPUT TERMINAL : 15-pin D-type connector with cable
or 5 BNC connector
Power Cable : Non-shield
Pedestal
Tilt : 0° - 30°
Swivel : ±40°
The table below shows the 27 video modes that can
be displayed with this monitor.
* Factory preset mode.
Page 27

27
E
N
Additional Information
What to Do if Something isn't Working
TTroubleshooting
roubleshooting
This page presents problems that can be corrected by the user. If the problem still exists after these possible solutions, contact your
nearest Philips dealer.
No Picture • Make sure the Power cable is plugged to the wall and back of the monitor .
(Power LED not lit) • Make sure the DC power cord has been attached to the DC Jack.
• First, power button in front of the monitor should be in the OFF position, then press it to ON position again.
No Picture • Make sure the computer is turned on.
(Power LED is Amber • Make sure the signal cable is properly connected to your computer.
or Yellow in color) • Check to see if the monitor cable has bent pins.
• The Energy Saving Feature may be activated. See pages 2 and 26 for more detail.
Screen says • Make sure the monitor cable is properly connected to your computer . See Setting Up foldout.
• Check to see if the monitor cable has bent pins.
• Make sure the computer is turned on.
AUTO button not working • The A
UTO
FUNCTION is designed for use on standard Macintosh or IBM-compatible PC running Microsoft
properly Windows.
• It may not work properly if using non-standard PCs or video card.
Imaging Problems
Display position is • Push the AUTO button.
incorrect • Adjust the image position using the H
ORIZONTAL POSITION &/or VERTICAL POSITION in the SECOND WINDOW.
See page 16.
Image vibrates on the • Check that the signal cable is properly connected to the graphics board or PC.
screen
Vertical flicker • Push the AUTO button.
appears • Eliminate the vertical bars using the C
LOCK ADJUSTMENT in the FIRST WINDOW.
See Page 14 & 15 for details.
Horizontal flicker • Push the A
UTO button.
appears • Eliminate the horizontal bars using the P
HASE ADJUSTMENT in the FIRST WINDOW.
See Page 14 & 15 for details.
The screen is too bright • Adjust the contrast and brightness using the FIRST WINDOW. See Page 13 for details.
or too dark (The backlight of the LCD monitor has a fixed life span. When the screen becomes dark or begins to flicker ,
please contact your dealer.)
An after-image • If an image remains in the screen for an extended period of time, it may be imprinted in the screen and leave
appears an after-image. This usually disappears after a few hours.
An after-image remains • This is characteristic of liquid crystal and is not caused by a malfunction or deterioration of the
after the power has been liquid crystal. The after-image will disappear after a set amount of time.
turned off
Green, red, blue, dark,
and white dots remains • The remaining dots are normal charactericstic of the liquid crystal used in today’s technology.
on the screen
Page 28

28
EE
N
Additional Information
Index
Index
Accessories . . . . . . . . . . . . . .3
Audio-in Cable . . . . . . . .3,5,10
Audio Controls . . . . .5, 7-8,10
Automatic Power Saving . . .26
BNC Connector . . . . . . . . . .25
Brightness . . . . . . . . . . .7,9,13
Built-in microphone . . . . . . .7
Clock Adjustment . . . . . . . .15
Color Temperature . . . . . . .18
Contrast . . . . . . . . . . . . . . . .13
Correct handling . . . . . . . . .3,5
Description of controls . . .7-9
Display Size . . . . . . . . . . . . .17
End-of -life disposal . . . . . . .2
Exit . . . . . . . . . . . . . . . . . . .23
Expand Mode Optimization .17
Features . . . . . . . . . . . . . . . . .2
Glossary . . . . . . . . . . . . . . .28
Horizontal Position . . . . . . .16
Kensington Lock . . . . . . . . . .7
Installation location . . . . . . . .3
Language . . . . . . . . . . . . . .20
Microphone Cable . . . . .3,5,10
Mute . . . . . . . . . . . . . . . . . . .8
On Screen Display . . . . . . . . .9
OSD button . . . . . . . . . . . .7,9
OSD Controls . . . . . . . . .12,20
OSD Control Level Structure . .
. . . . . . . . . . . . . . . . . . . . . .11
OSD Warning Signals . .24-25
Pedestal . . . . . . . . . . . . . . . . .8
Phase Adjustment . . . . . . . .15
Pin Assignment . . . . . . . . . .25
Power button .Set Up Guide, 7
Power plug . . .Set Up Guide, 7
Power Saving . . . . . . . . . . .21
Reset . . . . . . . . . . . . . . . . . .23
Resolution Modes . . . . . . . .26
Rotary Default . . . . . . . . . . .22
Rotary knob . . . . . . . . . . . .7-8
Safety precautions . . . . . . . .2
Speakers . . . . . . . . . . . . . . . .7
Specifications . . . . . . . . . . .26
Tr oubleshooting . . . . . . . . . 27
. . . . . . . . . . . . . .Set Up Guide
USB hub Installtion . . . . . . . .6
USB Control . . . . . . . . . . . . .6
User Presets . . . . . . . . . . . .19
Vertical Position . . . . . . . . .16
Video Input Priority . . . . . . .21
Video Settings . . . . . . . . . . . .4
Volume . . . . . . . . . . . . . . . .14
Windows ‘95/’98 . . . . . . . . .4,
. . . . . . . . . . . . . .Set Up Guide
Glos
Glosssararyy
Here are a few definitions that may help you.
D-Sub Your monitor comes with a D-Sub cable.
USB Universal Serial Bus. A way to connect your
computer, monitor, and peripherals for true Plug-andPlay functions.
BNC connection
A bayonet-locking connector slim coaxial cables.
The connection is used in some monitors with high
horizontal scanning frequencies. It provides optimum
shielding between the video input singal lines to give
the best possible video performance.
Color temperature
A way of describing the color of a radiating source in
terms of the temperature (in degrees Kelvin) of a
black body radiating with the same dominant
frequency as the source.
Energy Star Computers Programme
An energy conservation programme launched by the
US Environmental Protection Agency (EPA) with the
primary aim of promoting the manufacture and
marketing of energy-efficient office automation
equipment. Companies joining this programme must
be willing to commit themselves to manufacturing
one or more products capable of going into a low power state (< 30 W) either after a period of inactivity
or after a predetermined time selected by the user.
Vertical Refresh Rate
Expressed in Hz, it is the number of frames(complete
pictures) written to the screen every second.
LCD
Liquid Crystal Display. An alphanumeric display using
the unique properties of liquid crystal to form
characters. The latest flat-panel displays comprise a
matrix of hundreds or thousands of individual LCD
cells that generate text and colorful graphics on a
screen. They consume little power though they do
require external lighting to make them legible to the
user.
 Loading...