

Page 1

Table of Contents
GETTING STARTED
INTRODUCTION . . . . . . . . . . . . . . . . . . . . . . . . . . . . . . . . . . . . 1
S
AFETY. . . . . . . . . . . . . . . . . . . . . . . . . . . . . . . . . . . . . . . . . 1
D
ESCRIPTION OF CONTROLS . . . . . . . . . . . . . . . . . . . . . . . . . . 2-3
S
ETTING UP GUIDE . . . . . . . . . . . . . . . . . . . . . . . . . . . . . FOLDOUT
HOW TO USE THE ON SCREEN DISPLAY
FRONT PANEL CONTROLS
CONTRAST. . . . . . . . . . . . . . . . . . . . . . . . . . . . . . . . . . . . . 4
B
RIGHTNESS. . . . . . . . . . . . . . . . . . . . . . . . . . . . . . . . . . . . 4
M
AIN MENU
DEGAUSS . . . . . . . . . . . . . . . . . . . . . . . . . . . . . . . . . . . . . 5
M
ONITOR STATUS . . . . . . . . . . . . . . . . . . . . . . . . . . . . . . . . 5
M
AIN MENU / ADVANCED CONTROLS WINDOW
POWER SAVING . . . . . . . . . . . . . . . . . . . . . . . . . . . . . . . . . 6
L
ANGUAGE . . . . . . . . . . . . . . . . . . . . . . . . . . . . . . . . . . . . 6
DDC1 / 2B . . . . . . . . . . . . . . . . . . . . . . . . . . . . . . . . . . . 7
OSD T
IMER . . . . . . . . . . . . . . . . . . . . . . . . . . . . . . . . . . . 7
M
OIRE. . . . . . . . . . . . . . . . . . . . . . . . . . . . . . . . . . . . . . . 8
S
YNC INPUT SELECT . . . . . . . . . . . . . . . . . . . . . . . . . . . . . . 8
M
AIN MENU / COLOR TEMPERATURE WINDOW
9300˚ K . . . . . . . . . . . . . . . . . . . . . . . . . . . . . . . . . . . . . 9
6500˚ K . . . . . . . . . . . . . . . . . . . . . . . . . . . . . . . . . . . . 9
U
SER 1 . . . . . . . . . . . . . . . . . . . . . . . . . . . . . . . . . . . . . 10
U
SER 2 . . . . . . . . . . . . . . . . . . . . . . . . . . . . . . . . . . . . . 10
M
AIN MENU / GEOMETRY WINDOW
ROTATION . . . . . . . . . . . . . . . . . . . . . . . . . . . . . . . . . . . . 11
P
INCUSHION . . . . . . . . . . . . . . . . . . . . . . . . . . . . . . . . . . 11
T
RAPEZOID . . . . . . . . . . . . . . . . . . . . . . . . . . . . . . . . . . . 11
B
ALANCED PINCUSHION . . . . . . . . . . . . . . . . . . . . . . . . . . . 11
P
ARALLELOGRAM . . . . . . . . . . . . . . . . . . . . . . . . . . . . . . . 11
M
AIN MENU / SIZE & POSITION WINDOW
ZOOM . . . . . . . . . . . . . . . . . . . . . . . . . . . . . . . . . . . . . . 12
H
ORIZONTAL POSITION . . . . . . . . . . . . . . . . . . . . . . . . . . . . 12
H
ORIZONTAL SIZE . . . . . . . . . . . . . . . . . . . . . . . . . . . . . . . 12
V
ERTICAL POSITION . . . . . . . . . . . . . . . . . . . . . . . . . . . . . . 13
V
ERTICAL SIZE . . . . . . . . . . . . . . . . . . . . . . . . . . . . . . . . . 13
M
AIN MENU / SAVE & CANCEL. . . . . . . . . . . . . . . . . . . . . . . . . 14
M
AIN MENU / EXIT OSD & RESET . . . . . . . . . . . . . . . . . . . . . . 14
ADDITIONAL INFORMATION
AUDIO & USB SET UPS . . . . . . . . . . . . . . . . . . . . . . . . . . . . . 15
P
OWER SAVING FEATURE . . . . . . . . . . . . . . . . . . . . . . . . . . . . . 16
G
LOSSARY . . . . . . . . . . . . . . . . . . . . . . . . . . . . . . . . . . . . . . 16
P
IN ASSIGNMENT . . . . . . . . . . . . . . . . . . . . . . . . . . . . . . . . . . 17
S
PECIFICATIONS. . . . . . . . . . . . . . . . . . . . . . . . . . . . . . . . . . . 17
I
NDEX . . . . . . . . . . . . . . . . . . . . . . . . . . . . . . . . . . . . . . . . . 17
T
ROUBLESHOOTING. . . . . . . . . . . . . . . . . . . . . . . . . . . . . . . . . 18
W
ARRANTY . . . . . . . . . . . . . . . . . . . . . . . . . . . . . . . . . . . . . 59
107S
17C2622E
(17C2322E03/17C2322E23/17C2322E73)
Other language versions
FRENCH (FRANCAIS). . . . . . . . . . . . . . . . . . . . . . . . . . . . . 20 SPANISH (ESPAÑOL) . . . . . . . . . . . . . . . . . . . . . . . . . . . . . 40
appendix
ENGLISH INFORMATION FOR USERS IN THE U.S. . . . . . . . . . . . . . . . . . . . . . . . . . . . A1
D
ECLARATION FCC . . . . . . . . . . . . . . . . . . . . . . . . . . . . . . . . . . . . . . A2
D
EUTSCH HINWEIS / GS /ACHTUNG . . . . . . . . . . . . . . . . . . . . . . . . . . . . . . . . . A3
F
RANCAIS DECLARATION FCC . . . . . . . . . . . . . . . . . . . . . . . . . . . . . . . . . . . . . . . A4
BECAUSE OF CONTINUOUS PRODUCT IMPROVEMENTS,
THE INFORMATION MENTIONED IN THIS DOCUMENT IS SUBJECT TO CHANGE WITHOUT NOTICE.
Page 2

1
Introduction and Safety
Safety precautions and maintenance
• Unplug the monitor, if you are not going to use it for an
extended period of time.
• Unplug the monitor, if you need to clean it with a slightly
damp cloth.Wiping the screen with a dry cloth is okay when
the power is disconnected. However, never use alcohol or
ammonia-based liquids.
• Consult a service technician if the monitor does not operate
normally when following the instructions in this manual.
• The back cover should be removed only by qualified service
personnel.
• Keep the monitor out of direct sunlight and away from stoves
or any other heat source.
• The top of the monitor is not a shelf. Remove any object that
could fall into the vents or prevent proper cooling of the
monitor’s electronics.
• Keep the monitor dry.To avoid electric shock, do not expose
it to rain or excessive moisture.
• Keep the monitor away from magnetic objects, such as
speakers, electric motors, transformers, etc.
• When positioning the monitor, make sure the power plug and
outlet are easily accessible.
End-of-life disposal
Your new monitor contains materials that can be recycled and
reused. Specialized companies can recycle your product to
increase the amount of reusable materials and to minimize the
amount to be disposed of.
Please find out about the local regulations on how to dispose
of your old monitor.
ENERGY STAR is a U.S. registered mark.
IBM, IBM PC, and Power PC are registered trademarks of International Business Machines Corporation.
Apple, Macintosh, Quadra,Performa, and Centris are registered trademarks of Apple Computer, Inc.
Contact us at our web site: http://www.monitors.be.philips.com
Introduction
The Philips 107S color monitor displays sharp and brilliant
images of text and graphics with a maximum resolution of
1280x1024 pixels. It is optimal for Windows, CAD / CAM / CAE,
desktop publishing, spread sheets, multi-media, and any other
application that demands a large screen size and high
resolutions.
The monitor automatically scans horizontal frequencies from
30KHz to 70KHz, and vertical frequencies from 50Hz to 140Hz.
With microprocessor-based digital-controlled circuitry and On
Screen Display (OSD) controls, the monitor can automatically
adjust itself to the video card’s scanning frequency and can
display an image with the precise parameters you desire.
Features
• An anti-glare, anti-static, anti-reflection, high-contrast screen
coating eliminates any bad effects caused by room light
reflecting on and dust attracted to the screen’s surface.
• With the Color Adjustment feature, you can easily choose
different preset color temperatures or set your own
customized color parameters.
• The Image Tilt Adjustment feature corrects a rotated image.
This adjustment compensates for the distortions caused by
elements such as the Earth’s magnetic field.
• The full-size feature expands the image on the monitor to fill
the screen when used in factory preset modes.
• Optional USB Connector at the back of the monitor is
prepared for the Universal Serial Bus hub. You can easily and
flexibly connect USB-designed devices – such as a mouse or
keyboard – to the monitor for true Plug-and-Play function. The
USB hub is an accessory that may be purchased from you
local Philips dealer.
• Green Design – including automatic power saving function
(NUTEK) and low-emission MPRII compliance.
• DDC1 / DDC2B allows communication between the monitor
and the PC for optimal video configuration.
• Moire Cancellation eliminates diffraction, a fringe pattern in
the picture.
NOTE: Your monitor operates according to the VESA-standard DDC
level 1 / 2B. Only computers that support the same guidelines and
operate at an equal or higher level can use this feature. If your
computer does not support the relevant guidelines, you can still use
your monitor and computer. However, you may need to manually
specify the appropriate resolution in the computer.
As an ENERGY STAR
®
Partner, PHILIPS has
determined that this product
meets the ENERGY STAR
®
guidelines for energy
efficiency.
Page 3
2
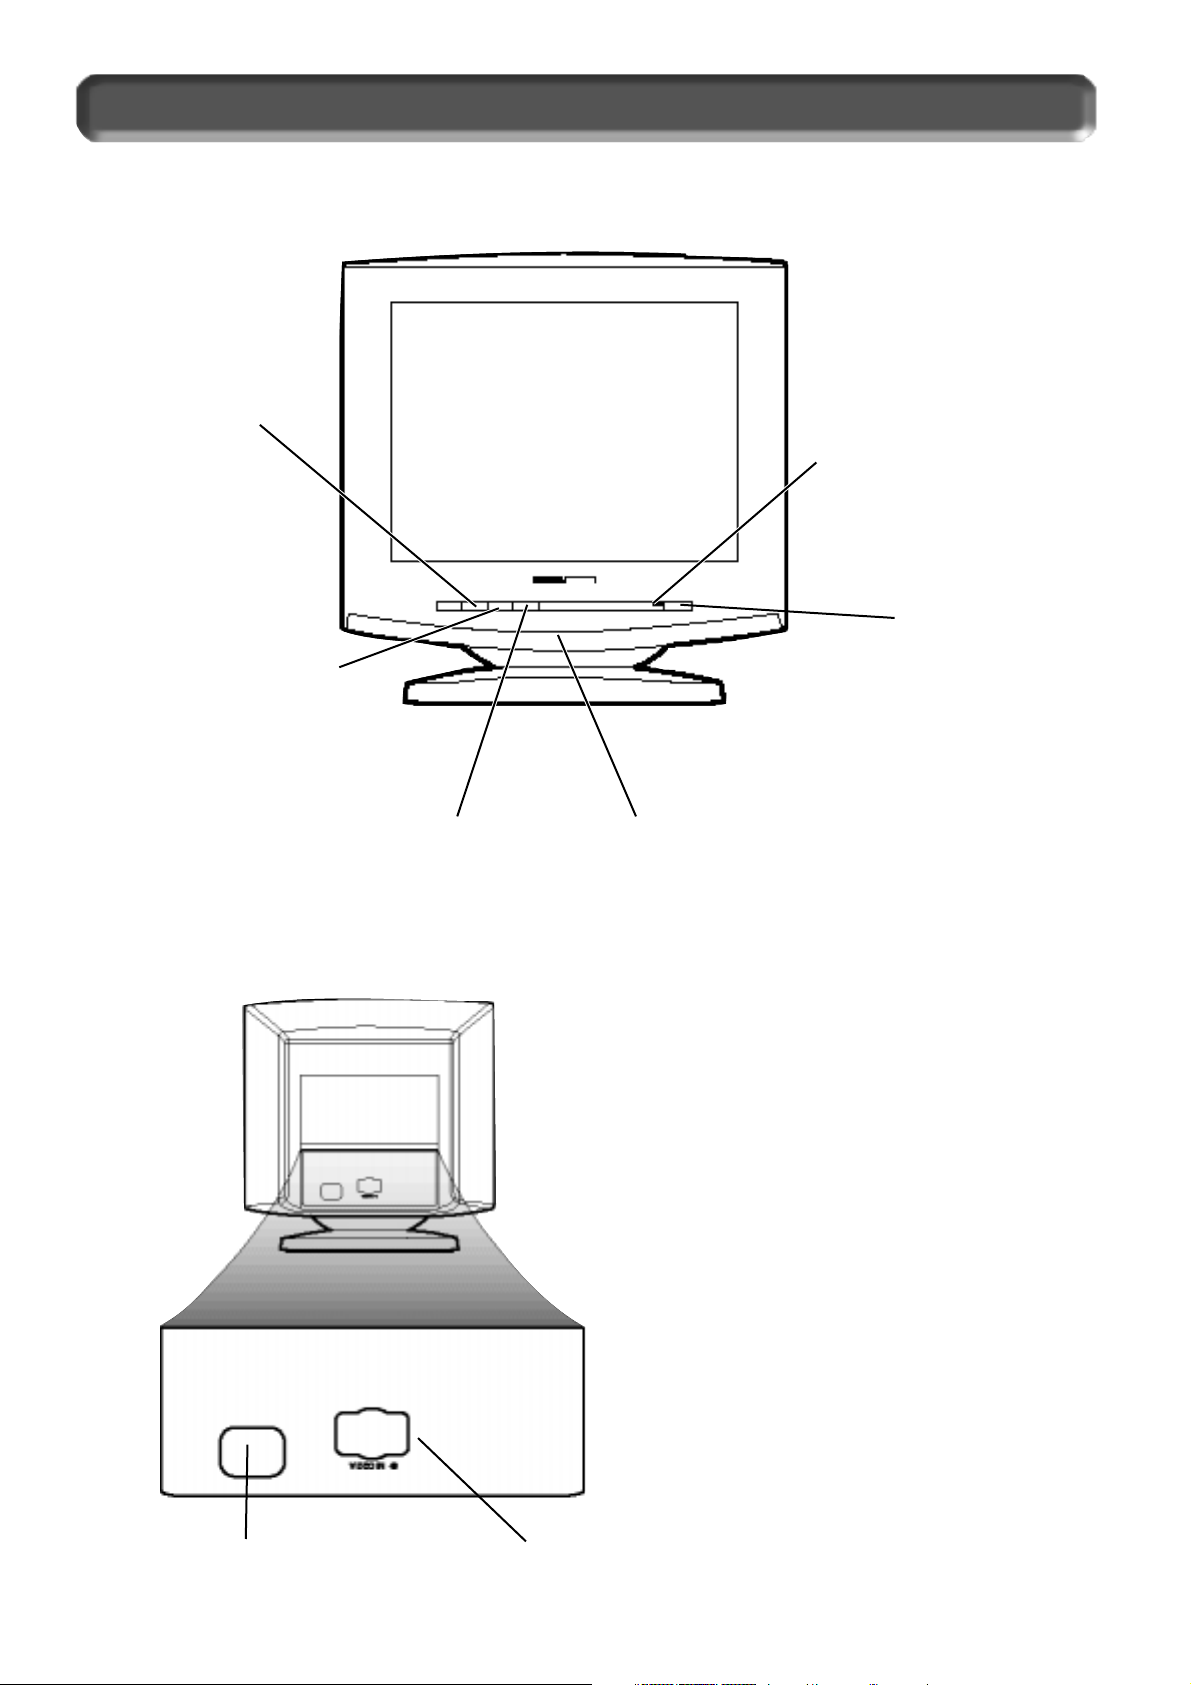
Description of Controls
POWER
Button –
Turns the
electricity
On and
Off.
B
RIGHTNESS Button –
Press the button to
adjust the screen’s
brightness.
CONTRAST Button – Press this
button to adjust the screen’s
contrast.
O
N SCREEN DISPLAY (OSD) Button –
Brings up the On Screen Display and
helps you navigate through it.
R
OTARY Knob – Helps guide you through the On
Screen Display and also adjusts settings such as
Volume, Brightness, and Contrast.
V
IDEO IN Jack – One end of the cable is already connected here. The other
end connects to the computer. See foldout for details.
P
OWER Plug – Plug the power cord in
here. See foldout for details.
LED – Light Emitting Diode
turns green when the
monitor is on and at full
power.
Page 4

3
GEOMETRY CONTROLS – This
menu item has five features:
P
INCUSHION, BALANCED PINCUSHION,
T
RAPEZOID, PARALLELOGRAM,and
R
OTATION. To adjust these
features, turn to page 11.
S
IZE & POSITION – This menu item helps you maximize the position of your
screen. It has five features: Z
OOM, HORIZONTAL POSITION, HORIZONTAL SIZE, VERTICAL
POSITION, and VERTICAL SIZE.To adjust these features, turn to pages 12 - 13.
Description of Controls
COLOR TEMPERATURE –
Select the
temperature setting
for the best color for
your work. You can
even customize your
color settings. There
are four selections:
9300˚ K, 6500˚ K, U
SER
1, and USER 2. For
details, turn to pages
9-10.
O
N SCREEN DISPLAY – Your monitor is preset at the factory. However, you can adjust it using the ON SCREEN DISPLAY button
and the R
OTARY knob described on page 2. The way to do so is through the On Screen Display (OSD). Below is a brief
description of the seven On Screen Display windows.
A
DVANCED CONTROLS – This menu
item has six features: P
OWER
SAVING, LANGUAGE,
DDC1 / 2B, OSD T
IMER,MOIRE, and
S
YNC INPUT SELECT. To adjust these
features, turn to pages 6-8.
Note: L
ANGUAGE
allows you to
change the On Screen Display
from English to French, Spanish,
German, or Italian. See page 6
for details.
PEDESTAL – With the built-in pedestal,
you can tilt and swivel the monitor to
the most comfortable viewing angle.
To best use your monitor, always
place it at eye level.
90
0
90
0
5
0
13
0
MONITOR STATUS –
Lists the current
vertical and
horizontal scanning
frequencies and
tells you the serial
number of the
monitor. For details,
see page 5.
USING THE FRONT PANEL
BUTTONS
– Select one
of the four front
panel buttons, then
use the Rotary knob
to make the
adjustment or select
an additional
feature. To adjust a
particular feature,
see the page for that
feature.
For
example, Contrast is
on page 4.
FRONT PANEL BUTTONS / ROTARY KNOB
PEDESTAL
DEGAUSS –
Demagnetizes
your screen. If
color splotches
or impurities
appear on your
screen, you
may want to
try this. For
details, see
page 5.
Page 5

4
How to Use the On Screen Display (OSD)
Contr
Contr
ast
ast
Smart Help
To continue to Brightness,
press the BRIGHTNESS button on the front
of the monitor.Next, follow steps 2 - 3 under B
RIGHTNESS.
If you do not press the C
ONTRAST
button a second time,
the
Contrast window will “time out” (disappear) after five seconds.You
can change this time. See page 7 for time out options.
1
1
Brightnes
Brightnesss
To adjust your screen’s contrast, follow the steps below.
Contrast is the difference between the light and dark areas on
the screen. A 100% contrast level is recommended.
Smart Help
If you do not press the B
RIGHTNESS
button a second time,
the
Contrast window will “time out” (disappear) after five seconds.You
can change this time. See page 7 for time out options.
1
1
Front Panel Controls
To adjust your screen’s brightness, follow the steps below.
Brightness is the overall intensity of the light coming from the
screen. A 50% brightness level is recommended.
The Brightness
window appears.
2
2
Turn the
R
OTARY knob
(lower
center) to
adjust the
brightness.
When
finished,
press the
B
RIGHTNESS
button
again. The
Brightness
screen
disappears.
3
3
2
2
Turn the
R
OTARY knob
(lower
center) to
adjust the
contrast.
When
finished,
press the
C
ONTRAST
button
again. The
Contrast
screen
disappears.
3
3
The Contrast
window appears.
Press the Contrast button
(center button) on the
front of the monitor.
Press the Brightness
button (furthest left) on
the front of the monitor.
Page 6
5
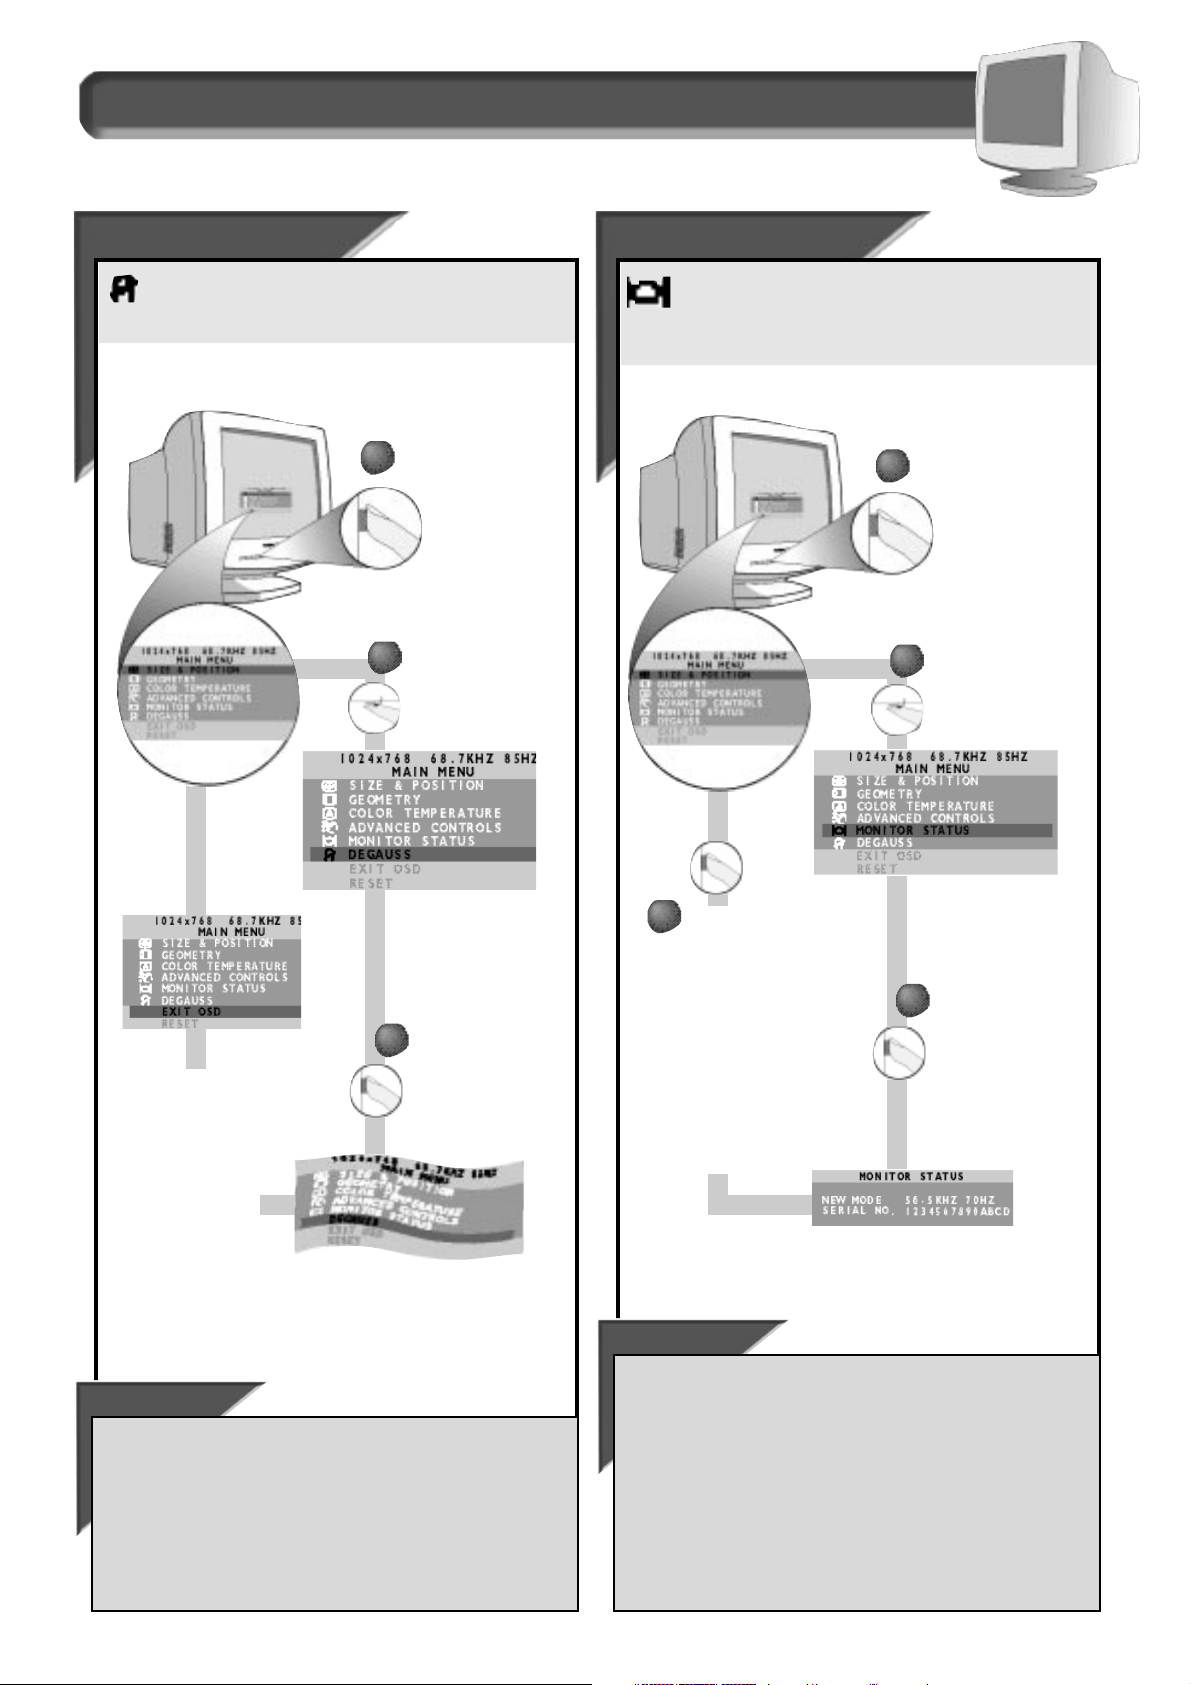
How to Use the On Screen Display (OSD)
Deg
Deg
aus
ausss
Degaussing removes electromagnetic build up that may distort
the color on your screen. To degauss your screen, follow the
steps below.
Smart Help
After returning to the Main Menu . . .
. . . to continue to M
ONITORSTATUS
,
turn the ROTARY knob until MONITOR
STATUS is highlighted. Next, follow steps 2 - 3 under MONITOR STATUS in
the next column.
. . . to exit completely,
press the OSD button.
Press the ON SCREEN
DISPLAY button.
3
3
Press the ON SCREEN
DISPLAY
button to degauss
your screen.
Turn the ROTARY
knob until DEGAUSS
is highlighted.
1
1
Monitor St
Monitor Staa
tus
tus
Monitor Status tells you the vertical and horizontal scanning
frequencies that your computer is using to operate your
monitor. It also tells you the serial number of your monitor.
Note: This
screen is for review only.
Smart Help
After returning to the Main Menu . . .
. . . to continue to A
DVANCEDCONTROLS
,
turn the ROTARY knob until
A
DVANCED CONTROLS is highlighted. Next, follow steps 2 - 3 under
A
DVANCED CONTROLS on the next page.
. . . to exit completely,
press the OSD button.
Note: Neither the scanning frequencies nor the serial number
can be changed at this screen. The scanning frequencies are
established by your computer. They also appear at the top of the
Main Menu screen. The serial number is entered at the factory.
Press the ON SCREEN
DISPLAY button.
3
3
Press the ON SCREEN
DISPLAY button to bring
up the M
ONITOR STATUS
screen.
Press the ON
SCREEN
DISPLAY
button to exit
the Monitor
Status
screen and
return to the
Main Menu.
E
XIT OSD will
be
highlighted.
1
1
2
2
Turn the ROTARY
knob until MONITOR
STATUS is
highlighted.
Main Menu windows
For a moment, the
screen will be
distorted. Then it
will return to
normal. You will be
at Main Menu. E
XIT
OSD will be
highlighted.
4
4
2
2
Page 7

6
How to Use the On Screen Display (OSD)
Power Sa
Power Sa
ving
ving
POWER SAVING helps save energy when the monitor is on but not
being used. After a preset time, the monitor will go blank if not
being used. “P
OWER SAVING ON” is the default setting. To turn POWER
SAVING OFF, follow the steps below.
Smart Help
To make other changes in the ADVANCED CONTROLS window . . .
. . .
after returning to A
DVANCEDCONTROLS
window [but before pressing
the O
NSCREENDISPLAY
(OSD) button in
STEP
4],
turn the ROTARY knob
until another feature – for example, L
ANGUAGE – is highlighted. Next,
follow steps 2 - 6 under L
ANGUAGE.
. . .after you have exited completely,
press the OSD button and
follow the steps under that feature, for example, L
ANGUAGE.
Press the ON SCREEN
DISPLAY button.
3
3
Press the ON SCREEN
DISPLAY button to
change to P
OWER
SAVING OFF.
4
4
Press the ON SCREEN
DISPLAY button again to
save your selection.
Press the
O
N SCREEN
DISPLAY button
to exit the Main
Menu.
5
5
1
1
2
2
Turn the ROTARY
knob until the
A
DVANCED CONTROLS
window is
highlighted. Next,
press the O
N SCREEN
DISPLAY button.
Advanced Controls window
LLangu
angu
age
age
The On Screen Display shows its settings in one of five
languages. The default is English, but you can select French,
Spanish, German, or Italian. To select L
ANGUAGE, follow the steps below.
Smart Help
Press the ON SCREEN
DISPLAY button.
3
3
Press the ON SCREEN
DISPLAY button to
bring up L
ANGUAGE
screen.
4
4
Turn the ROTARY knob until the desired
language is selected. Then,press the
O
N SCREEN DISPLAY button.
Note: a
checkmark appears beside the
current selection.
Press the
O
N SCREEN
DISPLAY button to
exit the Main
Menu.
6
6
1
1
Turn the ROTARY knob
until the A
DVANCED
CONTROLS window is
highlighted. Next,
press the O
N SCREEN
DISPLAY button. Then,
turn the R
OTARY knob
until L
ANGUAGE is
highlighted.
To make other changes in the ADVANCED CONTROLS window . . .
. . .
after returning to A
DVANCEDCONTROLS
window [but before pressing
the O
NSCREENDISPLAY
(OSD) button in
STEP
5],
turn the ROTARY knob
until another feature – for example, DDC1 / 2B – is highlighted. Next,
turn to the next page and follow steps 2 - 5 under DDC1 / 2B.
. . . after you have exited completely,
press the OSD button and
follow the steps under that feature, for example, DDC1 / 2B.
2
2
Press
the O
N SCREEN
DISPLAY button
again to save
your selection.
5
5
Page 8

7
Advanced Controls window
How to Use the On Screen Display (OSD)
DDC1 / 2B
DDC1 / 2B
Many newer computers have DDC technology that this monitor
takes advantage of to provide you better picture quality.
“DDC1
/ 2B O
N
”
is the default setting.
If your computer’s video card is not
DDC compatible, you may experience interference,“noise,” or no color
on your monitor.If so, try turning this feature off.
Smart Help
Press the ON SCREEN
DISPLAY button.
3
3
Press the ON SCREEN
DISPLAY button to
change to DDC1 /
2B O
FF.
1
1
Turn the ROTARY knob
until the A
DVANCED
CONTROLS window is
highlighted. Next,
press the O
N SCREEN
DISPLAY button. Then,
turn the R
OTARY knob
until DDC1 / 2B O
N is
highlighted.
To make other changes in the ADVANCED CONTROLS window . . .
. . .
after returning to A
DVANCEDCONTROLS
window [but before pressing
the O
NSCREENDISPLAY
(OSD) button in
STEP
4],
turn the ROTARY knob
until another feature – for example, OSD T
IMER – is highlighted. Next,
follow steps 2 - 6 under OSD T
IMER.
. . .after you have exited completely,
press the OSD button and
follow the steps under that feature, for example, OSD T
IMER.
2
2
OSD Timer
OSD Timer
With OSD TIMER you can set the time for the On Screen Display
to time out. Your choices range from 5 to 50 seconds.To select
OSD T
IMER, follow the steps below.
Note: Ten seconds is the default
setting.
Smart Help
Press the ON SCREEN
DISPLAY button.
3
3
Press the ON SCREEN
DISPLAY button to
bring up OSD T
IMER
screen.
4
4
Turn the ROTARY knob until the
desired time out period is
selected. Then,press the O
N
SCREEN DISPLAY button.
Note: a
checkmark appears beside the
current OSD
TIMER
period.
Press the
O
N SCREEN
DISPLAY button to
exit the Main
Menu.
6
6
1
1
Turn the ROTARY knob
until the A
DVANCED
CONTROLS window is
highlighted. Next,
press the O
N SCREEN
DISPLAY button. Then,
turn the R
OTARY knob
until OSD T
IMER is
highlighted.
To make other changes in the ADVANCED CONTROLS window . . .
. . .
after returning to A
DVANCEDCONTROLS
window [but before pressing
the O
NSCREENDISPLAY
(OSD) button in
STEP
5],
turn the ROTARY knob
until another feature – for example, M
OIRE – is highlighted. Next, turn
to the next page and follow steps 2 - 6 under M
OIRE.
. . .after you have exited completely,
press the OSD button and
follow the steps under that feature, for example, M
OIRE.
2
2
Press the ON
SCREEN DISPLAY
button again to
save your
selection.
5
5
4
4
Press the ON SCREEN DISPLAY
button again to save your
selection.
Press the
O
N SCREEN
DISPLAY button
to exit the Main
Menu.
5
5
Page 9

8
How to Use the On Screen Display (OSD)
Advanced Controls window
Moire
Moire
Moire is a fringe pattern arising from the interference between
two superimposed line patterns. To adjust your Moire, follow
the steps below.
Note: Use only if necessary. Activating Moire can
affect sharpness.
Smart Help
Press the ON SCREEN
DISPLAY button.
3
3
Press the ON SCREEN
DISPLAY button twice to
bring up M
OIRE screen
and highlight
H(
ORIZONTAL) MOIRE.
4
4
Turn the ROTARY knob until the
desired H
ORIZONTAL MOIRE is
selected. Then,press the O
N
SCREEN DISPLAY button.
Once you
have made
the adjustments, press
the O
N SCREEN DISPLAY
button once to save your
changes, then again to
exit the Advanced
Controls window, and a
third time to exit the Main
Menu.
6
6
1
1
Turn the ROTARY knob
until the A
DVANCED
CONTROLS window is
highlighted. Next,
press the O
N SCREEN
DISPLAY button. Then,
turn the R
OTARY knob
until M
OIRE is
highlighted.
To make other changes in the ADVANCED CONTROLS window . . .
. . .
after returning to A
DVANCEDCONTROLS
window [but before pressing
the O
NSCREENDISPLAY
(OSD) button a third time in
STEP
6],
turn the
R
OTARY knob until another feature – for example, SYNC INPUT SELECT – is
highlighted. Next, follow steps 2 - 6 under S
YNC INPUT SELECT.
. . .after you have exited completely,
press the OSD button and follow
the steps under that feature, for example, S
YNC INPUT SELECT.
2
2
To adjust
the V
ERTICAL MOIRE, turn
the Rotary knob until
V(
ERTICAL) MOIRE is
highlighted. Then,press
the O
N SCREEN DISPLAY
button again and repeat
step 4.
5
5
Sync Inp
Sync Inp
ut Select
ut Select
SYNC INPUT SELECT synchronizes your monitor with the video
card in your computer. In most cases you will not need to use
this feature. To adjust your S
YNC INPUT SELECT, follow the steps below.
Note: Use only if necessary. If your screen has a greenish cast to it that
cannot be adjusted for with the Color Temperature controls on pages
10 and 11, then try this.
Smart Help
Press the ON SCREEN
DISPLAY button.
3
3
Press the ON SCREEN
DISPLAY button to
bring up S
YNC INPUT
SELECT screen.
Turn the R
OTARY knob until either
TTL S
YNC or SYNC ON GREEN is
selected. Then,press the O
N SCREEN
DISPLAY button.
Note: a checkmark
appears beside the current S
YNC
I
NPUT
selected.
Press the
O
N SCREEN
DISPLAY button to
exit the Main
Menu.
6
6
1
1
Turn the ROTARY knob
until the A
DVANCED
CONTROLS window is
highlighted. Next,
press the O
N SCREEN
DISPLAY button. Then,
turn the R
OTARY knob
until S
YNC INPUT SELECT
is highlighted.
To make other changes in the Main Menu window . . .
. . .
after returning to
THE
Main Menu [but before pressing the ONS
CREEN
D
ISPLAY
(OSD) button in
STEP
6],
turn the ROTARY knob until another
feature – for example, C
OLOR TEMPERATURE – is highlighted. Next, press
the OSD button, turn to the next page and follow steps 2 - 7 under
C
OLOR TEMPERATURE.
. . .after you have exited completely,
press the OSD button and use the
R
OTARY knob to select that feature, for example, COLOR TEMPERATURE.
2
2
Press
the O
N SCREEN
DISPLAY button
again to save
your selection.
5
5
4
4
Page 10

9
How to Use the On Screen Display (OSD)
Color Temperature window
9300˚ K / 6500˚ K
9300˚ K / 6500˚ K
Your monitor has two preset options you select: 9300˚ K or 6500˚ K. Computer Aided Design (CAD) usually works best with the 9300˚ K setting.
Desktop Publishing (DTP) usually works best with the 6500˚ K setting. The screen will change as you scroll between these two settings. Select
the one that works best for you, or set up your own setting under U
SER 1 or USER 2 on the next page.
Smart Help
After returning to Main Menu . . .
. . .to continue to U
SER
1 or U
SER
2,
turn the ROTARY knob until COLOR TEMPERATURE is highlighted. Next, follow steps 2 - 7 under COLOR TEMPERATURE on the
next page.
. . .to select the other preset setting (9300˚ K or 6500˚ K),
press the OSD button and repeat steps 2 -5.
Press the ON SCREEN
DISPLAY button.
1
1
Turn the ROTARY knob
until the C
OLOR
TEMPERATURE window
is highlighted. Then
press the O
N SCREEN
DISPLAY button.
Press the ON SCREEN DISPLAY button. A
checkmark appears by your selection. Press the O
N SCREEN
DISPLAY button a second time to save your selection.
Turn the ROTARY knob until 9300˚ K or
6500˚ K is highlighted.
Note: a checkmark
appears beside the current selection.
2
2
3
3
4
4
After the preset setting
is saved, the on screen
display automatically
returns to the Main
Menu. To exit, press the O
N
SCREEN DISPLAY button.
5
5
Page 11

10
How to Use the On Screen Display (OSD)
Color Temperature window
User 1 / User 2
User 1 / User 2
USER 1 and USER 2 allow you to individually set the mixture of red, green, and blue that establishes the color balance on your monitor’s screen.
You can set up to two presets,then select between them for different tasks. You can only use one preset at a time
Smart Help
After returning to COLOR TEMPERATURE . . .
. . . to continue to U
SER
2,
turn the ROTARY knob until User 2 is highlighted. Then,press the ON SCREEN DISPLAY button and follow steps 4 - 7.
. . . to continue to the Main Menu,
press the ON SCREEN DISPLAY button once more after completing step 7 above. Now, to select another window from
the Main Menu – for example, G
EOMETRY – turn to the next page and follow steps 2a - 5c.
. . .to exit the ONS
CREENDISPLAY
completely,
press the ON SCREEN DISPLAY button twice more after completing step 7 above.
Press the ON SCREEN
DISPLAY button.
Turn the ROTARY knob until the COLOR TEMPERATURE
window is highlighted. Next, press the ON SCREEN
DISPLAY button.
Turn the Rotary
knob until User
1 is highlighted.
Note: a
checkmark
appears beside
the current
selection.
First, press the ON SCREEN
DISPLAY button. RED will be
highlighted.
Next, to adjust the red, press
the ON SCREEN DISPLAY button
again. Then,turn the R
OTARY
knob to increase or decrease
the red.
1
1
2
2
3
3
4
4
When done with red, press the
O
N SCREEN DISPLAY button.
G
REEN will be highlighted.
Next, to adjust the green,
press the O
N SCREEN DISPLAY
button again. Then,turn the
R
OTARY knob to increase or
decrease the green.
5
5
When done with the blue, press
the On Screen Display button to
save the changes. Next, see S
MART
HELP below for options.
When done with green, press
the O
N SCREEN DISPLAY button.
B
LUE will be highlighted.
Next, to adjust the blue, press
the O
N SCREEN DISPLAY button
again. Then,turn the R
OTARY
knob to increase or decrease
the blue.
6
6
7
7
Page 12

11
How to Use the On Screen Display (OSD)
Geometry window
RRototaation, Pincushion, T
tion, Pincushion, Trr
apezoid,
apezoid,
Balanced Pincushion, P
Balanced Pincushion, Parar
allelogr
allelogramam
Follow the steps below to adjust any of the five preset options (ROTATION, PINCUSHION, TRAPEZOID, BALANCED PINCUSHION,
or P
ARALLELOGRAM). You can make individual adjustments to each of the preset options.
Note: use these features only
when the picture is not square.
Smart Help
To exit GEOMETRY CONTROLS . . .
. . .but continue to another window,
press the ON SCREEN DISPLAY button when “SAVE” is highlighted. Next,turn the ROTARY knob until the desired window
– for example – S
IZE & POSITION – is highlighted. Now, turn to SIZE & POSITION On the next page and follow the instructions, starting with step 2.
. . . completely,
press the ON SCREEN DISPLAY button twice. The On Screen Display disappears. All changes will be saved.
To make changes to one item, follow the steps for that item.Then, follow
“
To exit GEOMETRY CONTROLS . . . .”
To return to factory presets, see “To Reset the OSD” on page 14.
Press the ON SCREEN
DISPLAY button.
Turn the ROTARY knob until the GEOMETRY window is
highlighted. Next, press the O
N SCREEN DISPLAY button. Then, if
necessary, turn the R
OTARY knob until ROTATION icon is
highlighted.
Press the ON
SCREEN DISPLAY
button. Then,turn
the R
OTARY knob to
adjust the
rotation.
To select
P
INCUSHION, turn the
R
OTARY knob until
P
INCUSHION is
highlighted. Next,
press the O
N SCREEN
DISPLAY button.
Turn the ROTARY knob
(lower center) to adjust the
pincushion.
Turn the ROTARY knob to
adjust the trapezoid.
When done, press the
O
N SCREEN DISPLAY button.
This will save the
change and return the
screen to G
EOMETRY
window.
To select BALANCED PINCUSHION or
P
ARALLELOGRAM, turn the ROTARY
knob until BALANCED PINCUSHION or
P
ARALLELOGRAM icon is
highlighted. Next, press the O
N
SCREEN DISPLAY button. Then
follow steps 4b and 4c to make
the appropriate changes.
When done, press
the O
N SCREEN
DISPLAY button to
save the change
and return to
G
EOMETRY window.
When done,
press the O
N
SCREEN DISPLAY
button. This will
save the change
and return the
screen to
G
EOMETRY
window.
To select TRAPEZOID,
turn the R
OTARY
knob until TRAPEZOID
I
con is highlighted.
Next, press the O
N
SCREEN DISPLAY
button.
1
1
2a
2a
2b
2b
2c
2c
3c
3c
3a
3a
3b
3b
5b
5b
4c
4c
4a
4a
5a
5a
5c
5c
4b
4b
Page 13

12
How to Use the On Screen Display (OSD)
Zoom
Zoom
ZOOM allows you to adjust the image on your screen, both
enlarging it and reducing its overall size. To zoom your screen
in or out, follow the steps below.
Press the ON SCREEN
DISPLAY button.
Turn the R
OTARY knob
until S
IZE & POSITION
window is
highlighted. Next,
press the O
N SCREEN
DISPLAY button.
Size & Position window
Press the ON
SCREEN DISPLAY
button to add your
change and return to
the Main Menu.
Press again to exit.
See below for other
options.
Press the ON
SCREEN DISPLAY
button to bring up
Z
OOM screen.
Turn the ROTARY knob to
adjust the zoom.
Note: the
screen expands or contracts as
you adjust the R
OTARY
knob.
When you
are done,
press the O
N
SCREEN DISPLAY
button.
Smart Help
To make other changes in the SIZE & POSITION window . . .
. . . after returning to the S
IZE
& P
OSITION
window [but before press the
On Screen Display (OSD) button in step 6],
turn the ROTARY knob until
another feature – for example, H
ORIZONTAL POSITION – is highlighted.
Next, follow steps 2 - 6 under H
ORIZONTAL POSITION.
. . .after you have exited completely,
press the OSD button and follow
the steps under that feature, for example, H
ORIZONTAL POSITION.
3
3
4
4
2
2
1
1
5
5
6
6
Horizont
Horizont
al
al
Position
Position
HORIZONTAL POSITION shifts the image on your screen either to the
left or right. Use this feature if your image does not appear
centered.
Press the ON SCREEN
DISPLAY button.
Turn the R
OTARY knob
until S
IZE & POSITION
window is
highlighted. Next,
press the O
N SCREEN
DISPLAY button. Then,
turn the R
OTARY knob
until H
ORIZONTAL
POSITION is
highlighted.
Press the ON
SCREEN DISPLAY
button to add your
change and return to
the Main Menu.
Press again to exit.
See below for other
options.
Press the ON
SCREEN DISPLAY
button to bring up
H
ORIZONTAL POSITION
screen.
Turn the ROTARY knob to
adjust the horizontal
position.
Note: the screen shifts
left or right as you turn the
R
OTARY
knob.
When you
are done,
press the O
N
SCREEN DISPLAY
button.
Smart Help
To make other changes in the SIZE & POSITION window . . .
. . . after returning to the S
IZE
& P
OSITION
window [but before press the
On Screen Display (OSD) button in step 6],
turn the ROTARY knob until
another feature – for example, H
ORIZONTAL SIZE – is highlighted. Next,
follow steps 2 - 6 under H
ORIZONTAL SIZE.
. . .after you have exited completely,
press the OSD button and follow
the steps under that feature, for example, H
ORIZONTAL SIZE.
3
3
4
4
2
2
1
1
5
5
6
6
Page 14

13
How to Use the On Screen Display (OSD)
Size & Position window
Horizont
Horizont
al
al
Size
Size
HORIZONTAL SIZE expands or contracts the image on your screen,
pushing it out toward the left and right sides or pulling it in
toward the center.
Press the ON SCREEN
DISPLAY button.
Turn the R
OTARY knob
until S
IZE & POSITION
window is
highlighted. Next,
press the O
N SCREEN
DISPLAY button. Then,
turn the R
OTARY knob
until H
ORIZONTAL SIZE is
highlighted.
Press the ON
SCREEN DISPLAY
button to add your
change and return to
the Main Menu.
Press again to exit.
See below for other
options.
Press the ON
SCREEN DISPLAY
button to bring up
the H
ORIZONTAL SIZE
screen.
Turn the ROTARY knob to
adjust the horizontal size.
Note: the screen expands or
contracts as you turn the R
OTARY
knob.
When you
are done,
press the O
N
SCREEN DISPLAY
button.
Smart Help
To make other changes in the SIZE & POSITION window . . .
. . . after returning to the S
IZE
& P
OSITION
window [but before press the
On Screen Display (OSD) button in step 6],
turn the ROTARY knob until
another feature – for example, V
ERTICAL POSITION – is highlighted. Next,
follow steps 2 - 6 under V
ERTICAL POSITION.
. . .after you have exited completely,
press the OSD button and follow
the steps under that feature, for example, V
ERTICAL POSITION.
3
3
4
4
2
2
1
1
5
5
6
6
VVerertic
tic
al Position
al Position
VVerertic
tic
al Size
al Size
VERTICAL POSITION adjusts the image on your screen
either up or down. Use this feature if your image does
not appear centered. V
ERTICAL SIZE expands or contracts the image on
your screen, pushing it out toward the top and bottom of pulling it in
toward the center.
Press the ON SCREEN
DISPLAY button.
Turn the R
OTARY knob
until S
IZE & POSITION
window is highlighted.
Next, press the O
N
SCREEN DISPLAY button.
Then, turn the R
OTARY
knob until VERTICAL
POSITION or VERTICAL SIZE
is highlighted.
Press the ON
SCREEN DISPLAY
button to add your
change and return to
the Main Menu.
Press again to exit.
See below for other
options.
Press the ON SCREEN
DISPLAY button to bring
up the V
ERTICAL
POSITION or VERTICAL
SIZE screen.
When you
are done,
press the O
N
SCREEN DISPLAY
button.
Smart Help
To make other changes in the Main Menu . . .
. . . after returning to the Main Menu [but before press the On Screen
Display (OSD) button a second time in step 6],
turn the ROTARY knob
until another feature is highlighted. Next, turn to the page for that
feature and follow the steps.
. . . after you have exited completely,
press the OSD button and follow
the steps under that feature.
3
3
2
2
1
1
5
5
6
6
Turn the ROTARY knob until
the image is vertically
balanced or the vertical size you
want.
4
4
Page 15

14
Save, Cancel, EXIT OSD, AND RESET
How to Use the On Screen Display (OSD)
SaSave & R
ve & Recec
all
all
FFrom a window
rom a window
There are three ways to save your changes: by pressing the Front
Panel Button, by selecting S
AVE from the On Screen Display, or by
letting the On Screen Display time out. Each method saves the
changes you have made in a particular window.
For example, to make a change in the brightness, press the
B
RIGHTNESS button on the front panel, make your change, then press
the B
RIGHTNESS button again. (See page 4 for details.) You can also let
the display time out and the change will be saved. Note: Brightness,
and Contrast do not have a S
AVE
menu selection.
To cancel a change made in the
Brightness and Contrast windows
individually,you must reenter each window and change the setting.
Exit OSD & R
Exit OSD & R
eset
eset
from the OSD
from the OSD
Exiting from the On Screen Display removes the On Screen Display
from the monitor screen. Resetting from the On Screen Display returns
everything in all the windows to factory presets.
When you have finished work in any of the windows of the Main
Menu, you will return to the Main Menu and E
XIT OSD will be
highlighted. To exit, simply
press the O
N SCREEN DISPLAY
button.
You can, however,use the
R
OTARY knob and scroll to
another menu item, for
example, A
DVANCED CONTROLS.
When A
DVANCED CONTROLS is highlighted, press the ON SCREEN
DISPLAY button and that window will replace the Main Menu.
You can now make changes in
that window. When done, you
will, again, return to the Main
Menu and E
XIT OSD will be
highlighted
Reset Entire On Screen Display
To Exit the entire On Screen Display
1
1
In some windows (SIZE & POSITION and GEOMETRY), you can save
all your changes at once. In the S
IZE & POSITION window, you can
make changes to each of the five items. When you are done,
highlight the S
AVE item and press the ON SCREEN DISPLAY button. (See
pages 12 - 13 for details.) You can also let the display time out and
the change will be saved.
To cancel a change made in
the S
IZE
& P
OSITION
window,
you can select C
ANCEL
from
the On Screen Display.If you
have made a change to only
one item – for example, Z
OOM
– then only Z
OOM
will be changed back
to the previous setting. If more than one item has been changed, but
not saved individually, then all the items changed will be returned to
their previous settings. For example,if you made changes to Z
OOM
,
H
ORIZONTALSIZE
, and V
ERTICALPOSITION
and did not save them
individually,all three will be changed back when you select Cancel.
2
2
In some windows (ADVANCED CONTROLS AND COLOR TEMPERATURE),
only individual saves are possible. For example,in the C
OLOR
TEMPERATURE window, if you select USER 1 and make changes (See
page 10 for details.), you must either save or cancel those changes
before moving on. While you could wait for the U
SER 1 window
(below) to time out, it is not recommended. Since you have not
formally saved this change as your selection, the next time you go
into the C
OLOR TEMPERATURE window,the screen will change to
selection (U
SER 1, USER 2, 9300˚ K,or 6500˚ K) last stored by using
S
AVE. A checkmark
appears beside that
selection.
To cancel a change made
in C
OLORTEMPERATURE
(or
A
DVANCEDCONTROLS
), select C
ANCEL
from the on screen display.Only
the last item changed will be changed back. All other items will
remain unchanged.
3
3
1
1
Selecting RESET from
the Main Menu resets
all
the changes you have made
in
all
the windows of the
Main Menu. For example, if
the language (See L
ANGUAGE,
page 6.) has been changed,
it is taken back to English.
Use this feature only when you want to return all your
changes back to their original settings.
1
1
Exiting Brightnes
Exiting Brightnesss
& Contr
& Contr
ast
ast
If you push the BRIGHTNESS, or CONTRAST button to exit (See steps 3 on
pages 4.) and find yourself in the Main Menu, follow the steps below.
Turn the R
OTARY
knob until Exit OSD is
selected, then press
the On Screen Display
button.
1
1
Always exit the BRIGHTNESS, or CONTRAST On Screen Displays by
pressing the B
RIGHTNESS, or CONTRAST button (steps 3 on pages 4 ).
2
2
Page 16

15
ADDITIONAL HOOK UP OPTIONS
USB
USB
Connections
Connections
(Optional)
(Optional)
AAudio
udio
(P(Pasass through)
s through)
(Optional)
(Optional)
A
UDIO IN JACK - Connect the
supplied audio cable to send
sound from a computer or
amplifier to speakers.
A
UDIO OUT JACK - Plug in
earphones or speakers here.
Page 17

16
Additional Information
Power saving feature / Glossary
Glos
Glosssararyy
Here are a few definitions that may help you.
Brightness Refers to how light or dark the overall screen is.
Color A term used to refer to the color balance, uniformity,and saturation settings on your monitor screen. Color (even white,
Temperature gray,and black) on your screen is achieved by blending (or balancing) three primary colors: red,green, and blue.As you
increase or decrease any one of these colors, the color temperature changes. For example, at 9300˚ K,you are using more
blue in your color temperature; therefore, your screen will be saturated with more blue and should appear uniformly “bluer”
from one side of the screen to the other.At 6500˚ K, you are using more red in your mixture.True color balance is achieved
when a gray object shows no traces of either red, green, or blue, regardless of the brightness of the image.
Contrast Refers to the sharpness of objects on the screen and the ability to easily distinguish one from the other.
Degauss The process by which metal parts of the screen are demagnetized in order to reduce screen distortion and color impurity.
DDC (Display Data Channel) is a signaling standard established to help the performance of personal computers. In order to
use this function, your computer must be designed for DDC.There are several types of DDC. Most computer monitors
are designed for DDC1 and DDC2 Level B (DDC1 /2B).
Geometry A set of controls that allows you to adjust the alignment of the picture on the monitor screen. The goal is to “square up”
the picture. This is done by adjusting such items as balanced pincushion,pincushion, parallelogram, rotation, and
trapezoid.
Moire A fringe pattern caused by the interference between two superimposed line patterns.
Noise Term used to refer to interference with the monitor’s picture.
USB Universal Serial Bus. A way to connect your IBM-compatible computer, monitor, and peripherals for true Plug-and-Play
functions. This is an emerging technology.
AAutoma
utoma
tic Power Sa
tic Power Sa
vings &
vings &
Preset R
Preset R
esol
esol
ution Modes
ution Modes
If you have VESA's DPMS compliance display card or software installed in your PC, the monitor can automatically reduce its power consumption
when not in use. If input from a keyboard, mouse, or other device is detected, the monitor automatically “wakes up.” The table at left shows the
power consumption and signalling of this automatic power-saving feature. To turn this feature on and off, see page 6.The table at right shows the 8
factory preset resolution modes. The maximum number of modes is 12.This leaves room for additions.
Power Management Definition
VESA's mode Video H-sync V-sync Power Power LED
used saving(%) color
ON Active Yes Yes < 110W 0% Green
Stand-by Blanked No Yes < 15W 86% Yellow
Suspend Blanked Yes No < 15W 86% Yellow
OFF Blanked No No < 5W 95.6% Amber
This monitor is Energy Star compliant and power management compatible.
AS AN ENERGY STAR PARTNER, PHILIPS HAS DETERMINED THAT THIS
PRODUCT MEETS THE ENERGY STAR GUIDELINES FOR ENERGY EFFICIENCY.
The proper operation of the function requires a computer with VESA DPMS
power management capabilities. When used with a computer equipped with
VESA DPMS, the monitor is Energy Star compliant.
MODE RESOLUTION H. FREQ. V. FREQ. STANDARD
(KHZ) (HZ)
1 720 x 400 31.5 70 VGA
2 640 x 480 31.5 60 VGA
3 640 x 480 43.3 85 VESA/85
4 800 x 600 46.9 75 VESA/75
5 800 x 600 53.7 85 VESA/85
6 1024 x 768 60 75 VESA/75
7 1024 x 768 68.7 85 VESA/85
8 1280 x 1024 63.9 60 VESA
Factory Preset Resolution Modes
Page 18

17
Additional information
Coming to Terms with this Book
Pin As
Pin As
signment
signment
The 15-pin D-sub connector (male) of the signal cable:
1 Red video input
2 Green video input
3 Blue video input
4 Identical output
- connected to pin 10
5 Self test
6 Red video ground
7 Green video ground
8 Blue video ground
9 No pin
10 Logic ground
11 Identical output
- connected to pin 10
12 Serial data line (SDA)
13 H. Sync / H+V
14 V. Sync (VCLK for DDC)
15 Data clock line (SCL)
Pin No. Assignment
Specific
Specificaa
tions
tions
GENERAL
CRT
Screen size :17" flat & square
Viewable Image Size (VIS) :16.0"
Focusing method :Dynamic focus
Dot pitch :0.23 mm (horizontal)
Phosphor :P22 or equivalent, medium short
persistence
Screen treatment :Anit-glare, anti-static
Display area
Factory preset :306 mm (H) x 230 mm (V)
Maximum usable :323 mm (H) x 242 mm (V)
Scanning frequency
Horizontal (line) :30-70kHz (AutoScan)
Vertical (frame) :50-140 Hz (AutoScan)
Input power :100 - 240 V AC,50 - 60 Hz
Power consumption :80 Watt (typical)
Thermal dissipation :341.3 BTU normal,
375.4 BTU maximum
Input signal
Sync :Separate sync. TTL
Composite sync. TTL level
Sync on green video
Pedestal
Tilt :5° forward, 13° backward
Swivel :90° left, 90° right
Physical
Unit dimension (WxHxD) :420x424x452mm
(16.41”x16.69”x17.79”)
Net weight :16.0 kg (35.2 lbs)
Operating conditions
Temperature :0° C - 40° C
Humidity :10% - 90%
Storage conditions
Temperature :-25° C - 65° C
Humidity :5% - 95%
Specifications subject to change without notification.
Index
Index
6500˚ K . . . . . . . . . . . . . . . . . . . . . . . . . . . . . . . . . . . . . . . . . . . . . .9
9300˚ K . . . . . . . . . . . . . . . . . . . . . . . . . . . . . . . . . . . . . . . . . . . . . .9
Automatic Power Saving . . . . . . . . . . . . . . . . . . . . . . . . . . . . . . . . .6
Balanced Pincushion . . . . . . . . . . . . . . . . . . . . . . . . . . . . . . . . . . .11
Brightness . . . . . . . . . . . . . . . . . . . . . . . . . . . . . . . . . . . . . . . . . . . .4
Cancel . . . . . . . . . . . . . . . . . . . . . . . . . . . . . . . . . . . . . . . . . . . . . .14
Color Temperature . . . . . . . . . . . . . . . . . . . . . . . . . . . . . . . . .3, 9 -10
Contrast . . . . . . . . . . . . . . . . . . . . . . . . . . . . . . . . . . . . . . . . . . . . . .4
DDC1 / 2B . . . . . . . . . . . . . . . . . . . . . . . . . . . . . . . . . . . . . . . . . . . .7
Degauss . . . . . . . . . . . . . . . . . . . . . . . . . . . . . . . . . . . . . . . . . . . . .5
Description of controls . . . . . . . . . . . . . . . . . . . . . . . . . . . . . . . . .2, 3
DTP . . . . . . . . . . . . . . . . . . . . . . . . . . . . . . . . . . . . . . . . . . . . . . . . .9
End-of-life disposal . . . . . . . . . . . . . . . . . . . . . . . . . . . . . . . . . . . . .1
Exit OSD . . . . . . . . . . . . . . . . . . . . . . . . . . . . . . . . . . . . . . . . . . . .14
Features . . . . . . . . . . . . . . . . . . . . . . . . . . . . . . . . . . . . . . . . . . . . .1
Geometry Controls . . . . . . . . . . . . . . . . . . . . . . . . . . . . . . . . . . .3, 11
Glossary . . . . . . . . . . . . . . . . . . . . . . . . . . . . . . . . . . . . . . . . . . . . .16
Hook Ups . . . . . . . . . . . . . . . . . . . . . . . . . . . . . . . . .Set Up Guide, 15
Horizontal Position . . . . . . . . . . . . . . . . . . . . . . . . . . . . . . . . . . . . .12
Horizontal Size . . . . . . . . . . . . . . . . . . . . . . . . . . . . . . . . . . . . . . . .13
Language . . . . . . . . . . . . . . . . . . . . . . . . . . . . . . . . . . . . . . . . . . . .6
LED . . . . . . . . . . . . . . . . . . . . . . . . . . . . . . . . . . . . . . . . . . . . . . . . .2
Main Controls . . . . . . . . . . . . . . . . . . . . . . . . . . . . . . . . . . . . . .3, 3-4
Maintenance . . . . . . . . . . . . . . . . . . . . . . . . . . . . . . . . . . . . . . . . . .1
Moire . . . . . . . . . . . . . . . . . . . . . . . . . . . . . . . . . . . . . . . . . . . . . . . .8
Monitor cable plug . . . . . . . . . . . . . . . . . . . . . . . . . . . . . . . . . . . . . .2
Monitor Status . . . . . . . . . . . . . . . . . . . . . . . . . . . . . . . . . . . . . . . . .5
On Screen Display . . . . . . . . . . . . . . . . . . . . . . . . . . . . . . . . . . . . . .2
OSD button . . . . . . . . . . . . . . . . . . . . . . . . . . . . . . . . . . . . . . . . . . .2
Parallelogram . . . . . . . . . . . . . . . . . . . . . . . . . . . . . . . . . . . . . . . .11
Pedestal . . . . . . . . . . . . . . . . . . . . . . . . . . . . . . . . . . . . . . . . . . . . . .2
Pin Assignment . . . . . . . . . . . . . . . . . . . . . . . . . . . . . . . . . . . . . . .17
Pincushion . . . . . . . . . . . . . . . . . . . . . . . . . . . . . . . . . . . . . . . . . . .11
Power button . . . . . . . . . . . . . . . . . . . . . . . . . . . . . . Set Up Guide, 2
Power plug . . . . . . . . . . . . . . . . . . . . . . . . . . . . . . . .Set Up Guide, 2
Power Saving . . . . . . . . . . . . . . . . . . . . . . . . . . . . . . . . . . . . . . . . . .6
Reset . . . . . . . . . . . . . . . . . . . . . . . . . . . . . . . . . . . . . . . . . . . . . . .14
Resolution Modes . . . . . . . . . . . . . . . . . . . . . . . . . . . . . . . . . . . . .16
Rotary knob . . . . . . . . . . . . . . . . . . . . . . . . . . . . . . . . . . . . . . . . . . .2
Rotation . . . . . . . . . . . . . . . . . . . . . . . . . . . . . . . . . . . . . . . . . . . . .11
Safety precautions . . . . . . . . . . . . . . . . . . . . . . . . . . . . . . . . . . . . . .1
Save . . . . . . . . . . . . . . . . . . . . . . . . . . . . . . . . . . . . . . . . . . . . . . .14
Size & Position . . . . . . . . . . . . . . . . . . . . . . . . . . . . . . . . . .3, 12 - 13
Specifications . . . . . . . . . . . . . . . . . . . . . . . . . . . . . . . . . . . . . . . .17
Sync Input Select . . . . . . . . . . . . . . . . . . . . . . . . . . . . . . . . . . . . . . .8
Trapezoid . . . . . . . . . . . . . . . . . . . . . . . . . . . . . . . . . . . . . . . . . . . .11
Troubleshooting . . . . . . . . . . . . . . . . . . . . . . . . . . . Set Up Guide, 18
USB hub . . . . . . . . . . . . . . . . . . . . . . . . . . . . . . . . . . . . . . . . . . .2, 15
USB set up . . . . . . . . . . . . . . . . . . . . . . . . . . . . . . . . . . . . . . . . . . .15
User 1, User 2 . . . . . . . . . . . . . . . . . . . . . . . . . . . . . . . . . . . . . . . .10
Vertical Position . . . . . . . . . . . . . . . . . . . . . . . . . . . . . . . . . . . . . . .13
Vertical Size . . . . . . . . . . . . . . . . . . . . . . . . . . . . . . . . . . . . . . . . . 13
Video Input . . . . . . . . . . . . . . . . . . . . . . . . . . . . . . . . . . . . . . . . . . .12
Warranty . . . . . . . . . . . . . . . . . . . . . . . . . . . . . . . . . . . . . . . . . . . .19
Zoom . . . . . . . . . . . . . . . . . . . . . . . . . . . . . . . . . . . . . . . . . . . . . . .12
Page 19

18
Additional Information
What to do if Something isn’t Working
TTroubleshooting
roubleshooting
Having trouble? Something not working? Before calling for help, try these suggestions.
H
AVING THIS PROBLEM? CHECK THESE ITEMS
No Picture Make sure the Power cable is plugged in the wall and back of the monitor.
(Power LED not lit) Power button on top of the monitor should be in the ON position.
Disconnect the monitor from the power outlet for about one minute.
No Picture Make sure the computer is turned on.
(Power LED is Amber Make sure the monitor cable is properly connected to your computer.
or Yellow) Check to see if the monitor cable has bent pins.
The Energy Saving Feature may be activated. See pages 6 and 16 for details.
No Picture Make sure the Brightness and Contrast controls are set correctly. See page 4 for details
(Power LED is Green) Make sure the monitor cable is properly connected to your computer.
Check to see if the monitor cable has bent pins.
Make sure the computer Power button is on.
Screen shows Make sure the monitor cable is properly connected to your computer. See Setting Up Guide.
Check to see if the monitor cable has bent pins.
Make sure the computer is turned on
when you turn on
the monitor.
No Color or intermittent If you are using a non-VESA-DDC standard video card, turn the DDC1 / 2B feature Off. See page 7.
Black-and-White
Color appears blotchy The picture may need degaussing. See page 5 for details.
Remove any nearby magnetic objects.
Face the monitor East for best picture quality.
Missing one or Check user settings of Color Temperature. See pages 9 and 10 for details.
more colors Make sure the monitor cable is properly connected to your computer.
Check to see if the monitor cable has bent pins.
Adjust Sync Input Select. See page 8 for details.
Dim Picture Adjust the Brightness and Contrast controls. See page 4 for details.
Check your video card and the manual instructions for it. It may be a non-VESA-DDC Standard card.
Adjust Sync Input Select. See page 8 for details.
Picture is too large Adjust the Horizontal and/or Vertical Size. See pages 12 and 13 for details.
or too small Adjust the Zoom. See page 12 for details.
Edges of the picture The geometry controls require adjusting. See page 11 for details.
are not square
Picture has a double Eliminate the use of a video extension cable and/or video switch box.
image Face the monitor East for best picture quality.
Picture is not sharp Check to make sure Moire is switched off. See page 8.
Adjust Sync Input Select. See page 8 for details.
Unstable Picture Increase your refresh rate. Consult your computer manual for details.
Windows ’95 cannot Select “Super VGA” under S
TANDARD DISPLAY TYPES, or contact your video card manufacturer
find your video card for the right drivers.
For further assistance, contact Philips at (800) 835-3506 or (423) 475-0280.
NO SYNC INPUT
NO SYNC INPUT
NO SYNC INPUT
NO SYNC INPUT
Page 20

19
 Loading...