

Page 1
E
N
1
This "exclamation point" calls attention to a feature for which
you should read the enclosed literature carefully to prevent operating
and maintenance problems.
This "bolt of lightning" indicates that uninsulated material
within your unit may cause an electrical shock. For the safety
of everyone, do not remove product covering.
CAUTION
ATTENTION
RISK OF ELECTRICAL SHOCK
DO NOT OPEN
RISQUE DE CHOC ELECTRIQUE
NE PAS OUVRIR
CAUTION TO REDUCE THE RISK OF ELECTRICAL SHOCK DO NOT REMOVE COVER(OR BACK)
NO USER SERVICEABLE PARTS INSIDE REFER SERVICING TO QUALIFIED SERVICE PERSONNEL
For Customer Use:
Enter below the Serial No. which is located on the
back of the cabinet. Retain this information for
future reference.
Model No. 17C13A2E
Serial No.
17C13A2E
AutoScan Color Monitor
English Operating Instructions ................. 2 - 19
Français Mode d'emploi …………… 20 - 37
Appendix
English Declaration FCC ........ A1
Information for Users in the U.S. ...... A3
Warranty/address A5 ... A6
Deutsch Hinweis/GS/ACHTUNG ........ A4
Français Declaration FCC ........ A2
Page 2
E
N
2
Introduction
The colour monitor displays sharp images of text and graphics with a
maximum resolution up to 1280x1024 pixels. It is optimal for Windows,
CAD / CAM / CAE, desktop publishing, spread sheets, multi-media,
and any other application which demands large screen size and high
resolutions.
This monitor automatically scans horizontal frequencies from 30KHz to
69KHz, and vertical frequencies from 50Hz to 120Hz. With
microprocessor based digital controlled circuit, the monitor can
automatically adjust itself to the video card’s scanning frequency and
displays an image with precise parameters you desire. The wide range
of scanning frequency supports variety of operating platforms, such as
IBM PC and compatibles.
Feature Highlights
• On-Screen-Display function provides more informations when the
user operates the control functions. This feature provides userfriendliness and ease-of-use when operating the monitor.
• Anti-Glare and Anti-Static screen coating eliminate any bad effects
caused by the screen surface such as reflection of the room lights
and dust attraction.
• Green Design including automatic power saving function (NUTEK)
and low emission MPRII compliance shows our commitment in
environmental care.
• DDC1/DDC2B allows communication between the monitor and PC
system for optimal video configuration.
Page 3

E
N
3
Note: If you experienced your monitor display is changing from color
to mono, it's possible that you are using a non-VESA-DDC-standard
video card. Please consult with your local PHILIPS dealer for more
information.
As an Energy Star Partner, MAGNAVOX, has determined that this
product meets the Energy Star guidelines for energy efficiency.
IBM, IBM PC and Power PC are registered trademarks of International
Business Machines Corporation.
Page 4

E
N
4
Safety precautions and maintenance
◆ Disconnect the monitor from the mains supply if the monitor is not
to be used for an extended period of time.
◆ Do not attempt to remove the back cover, as you will be exposed to
a shock hazard. The back cover should only be removed by qualified
service personnel.
◆ Do not place objects on top of the monitor cabinet, which could fall
into vents or which could cover them and prevent proper cooling of
the monitor ’s electronic devices.
Do not expose the monitor to rain or excessive moisture to avoid the
risk of shock or permanent damage to the set.
◆ Do not use alcohol or ammonia based liquid to clean the monitor. If
necessary, clean with a slightly damp cloth. Disconnect the monitor
from the mains supply before cleaning.
◆ Consult a service technician if the monitor does not operate normally
when operating instructions of this manual are followed.
Package
Your package includes the following items:
• The monitor (integrated with tilt / swivel pedestal)
• Power cord
• Interface cable (flying-in)
• MAC adapter
◆
End of life disposal
Your new set contains materials which can be recycled and reused.
Specialized companies can recycle your product to increase the amount
of reusable materials and to minimize the amount of materials to be
disposed of.
Please inform yourself on local regulations on disposal of your old set.
Page 5
E
N
5
Installation
Important: Please refer to the user’s manuals of your computer and
video adapter to make sure these equipments are properly installed
and configured before installing the monitor.
Positioning / Ventilation
◆ Avoid exposing the monitor to direct sunlight, stoves or any other
heat sources.
◆ To prevent overheating, make sure that the ventilation openings of
the monitor are not covered.
◆ Keep moisture and dust away.
◆ Keep away from any magnetic objects, such as speakers, electric
motors, transformers, ...etc.
◆ When positioning this monitor, make sure that the mains plug and
socket are easily accessible.
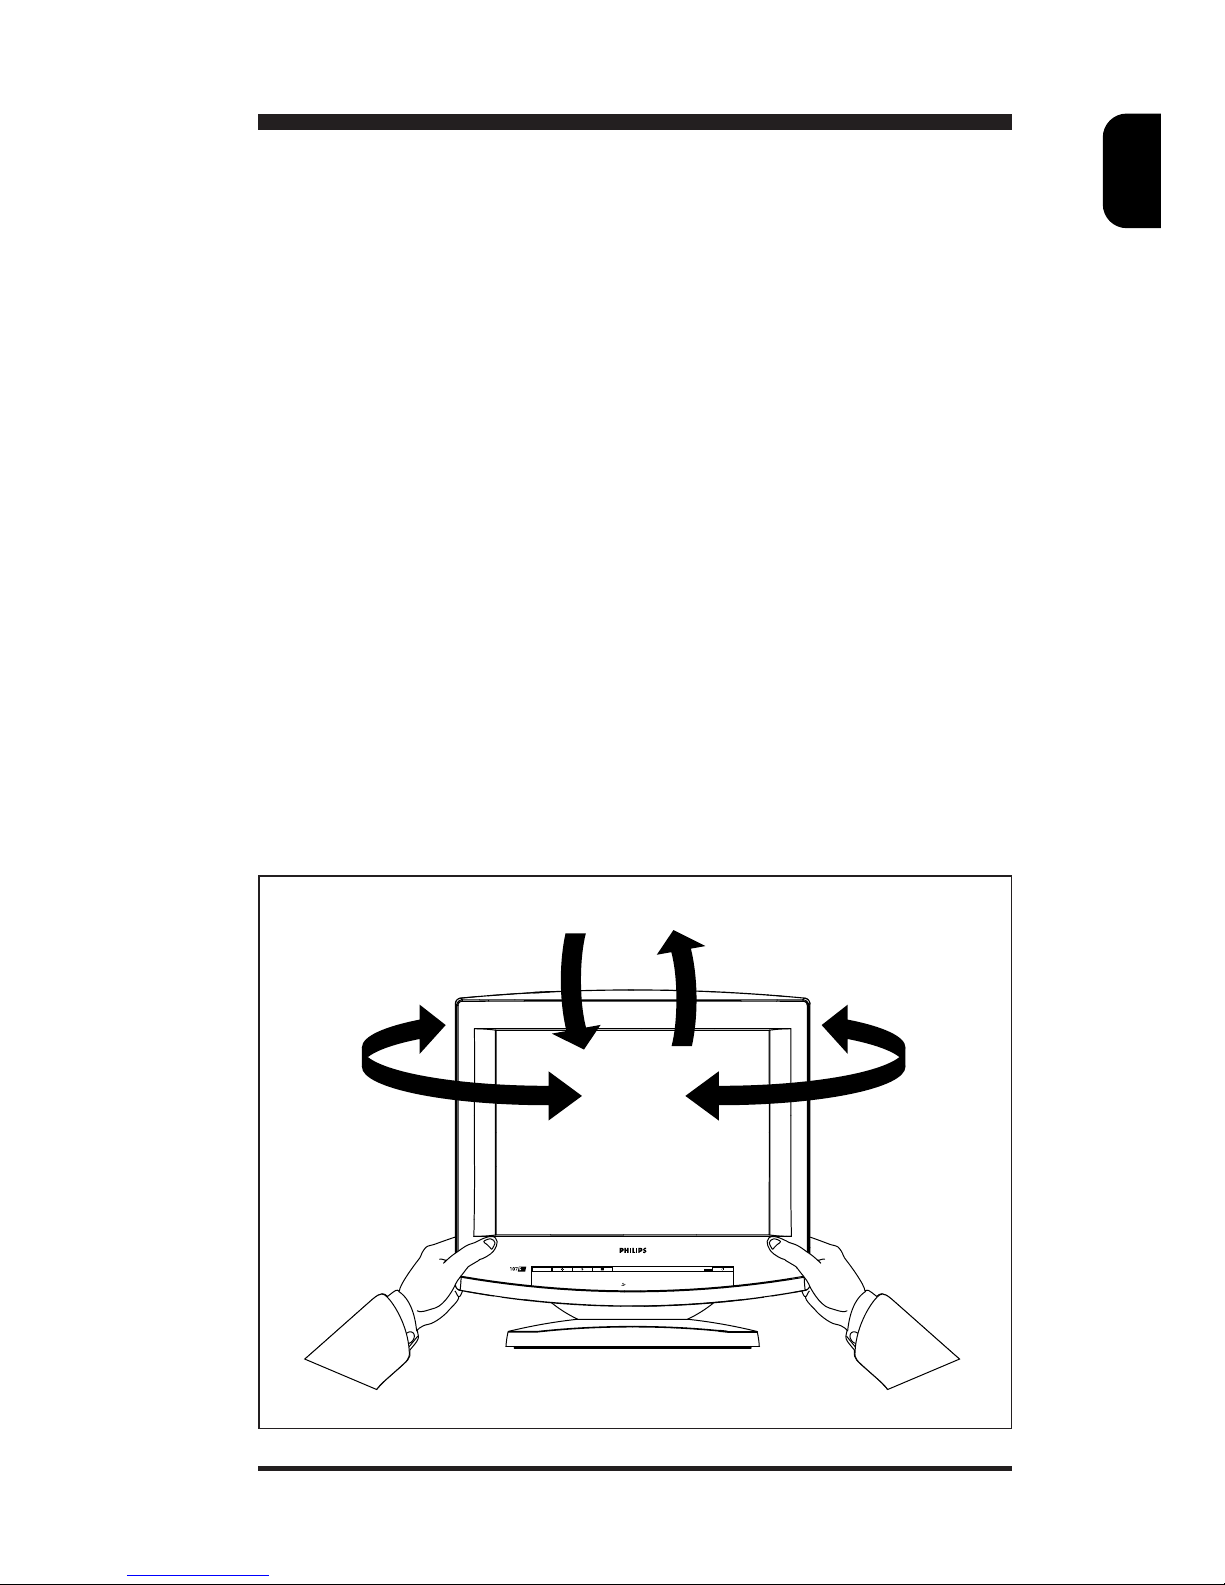
Pedestal
With the built-in pedestal you can tilt and / or swivel the monitor for a
most comfortable viewing angle.
Page 6
E
N
6
Connection
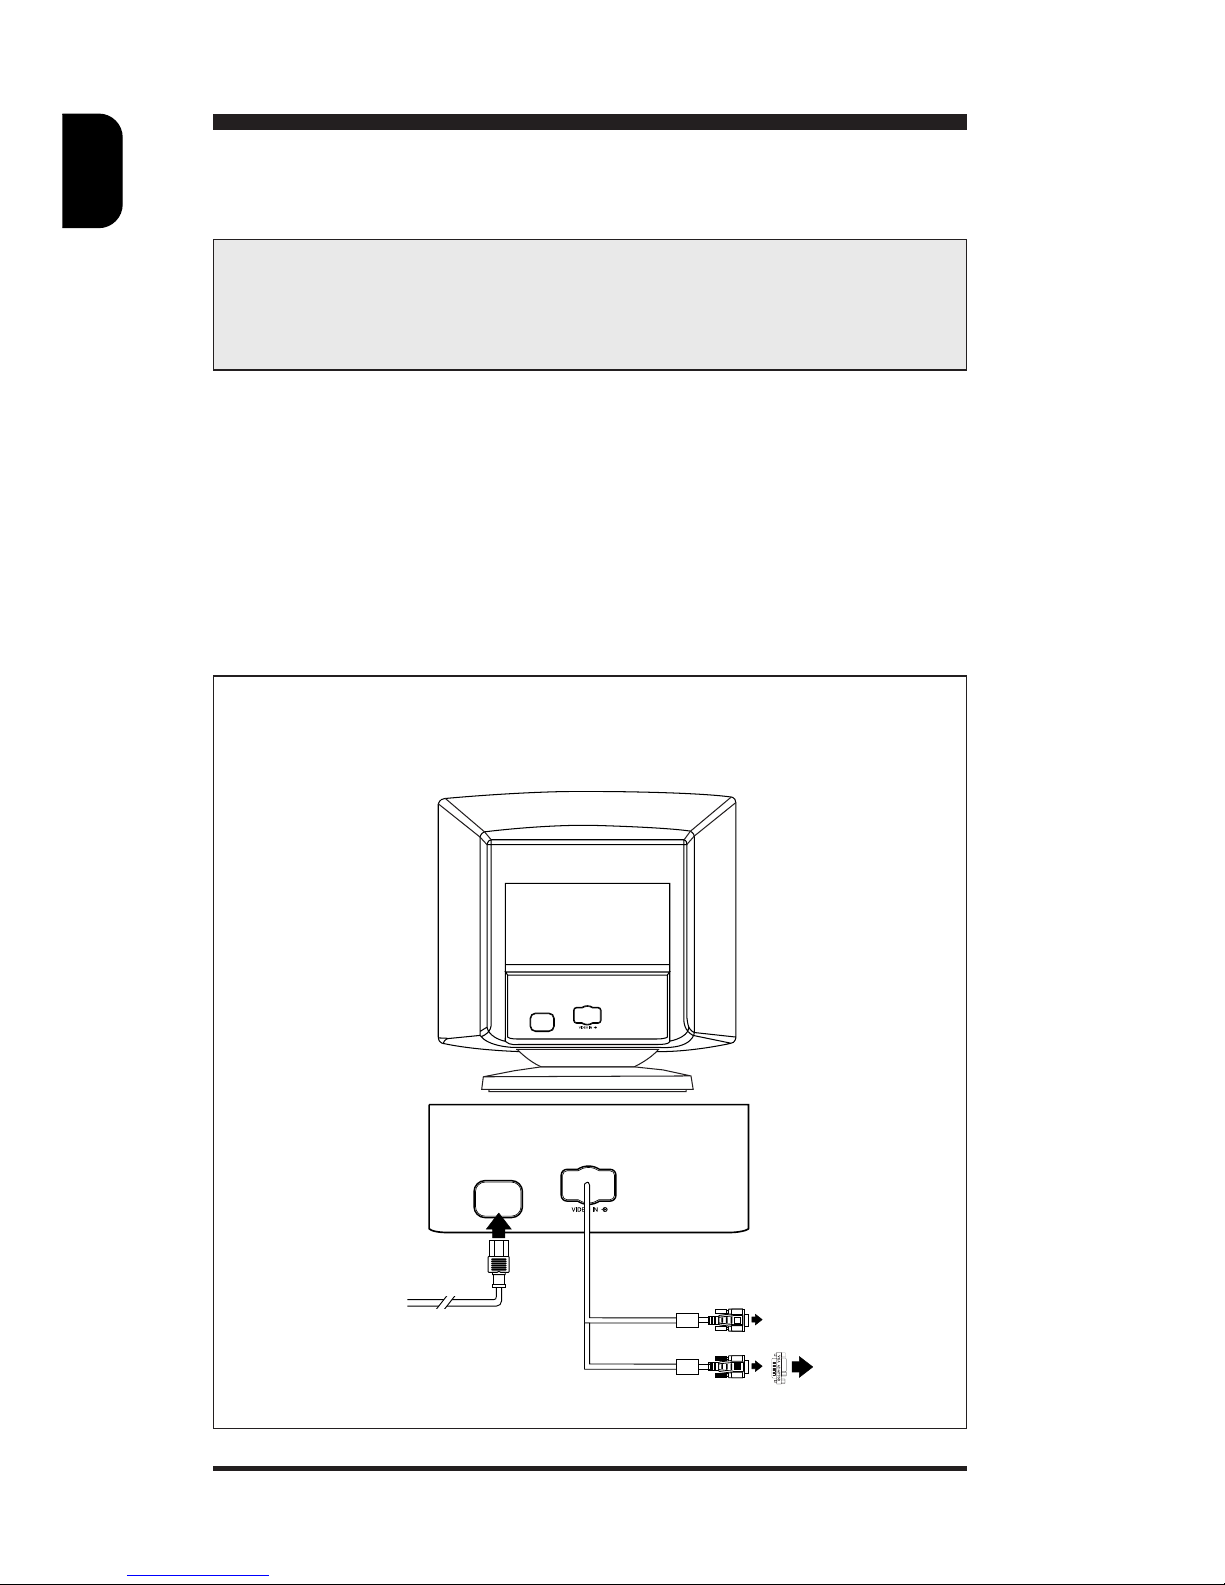
• Connect the monitor to the computer using the supplied interface
cables. Connection with computer system other than IBM PC or
Apple computers may need different type of adapters. Please consult
your computer supplier for these adapters. Connect the power cord
to a wall outlet after the interface cable is properly connected.
Important: Please make sure the AC power to your computer is
“OFF” before connecting or disconnecting any display
peripheral. Failure to do so may cause serious personal injury
as well as permanent damage to your computer equipments.
1) IBM PC connection
2) Apple's connection
3) Mains connection
Monitor rear view
1
2
3
Page 7
E
N
7
Control locations and functions
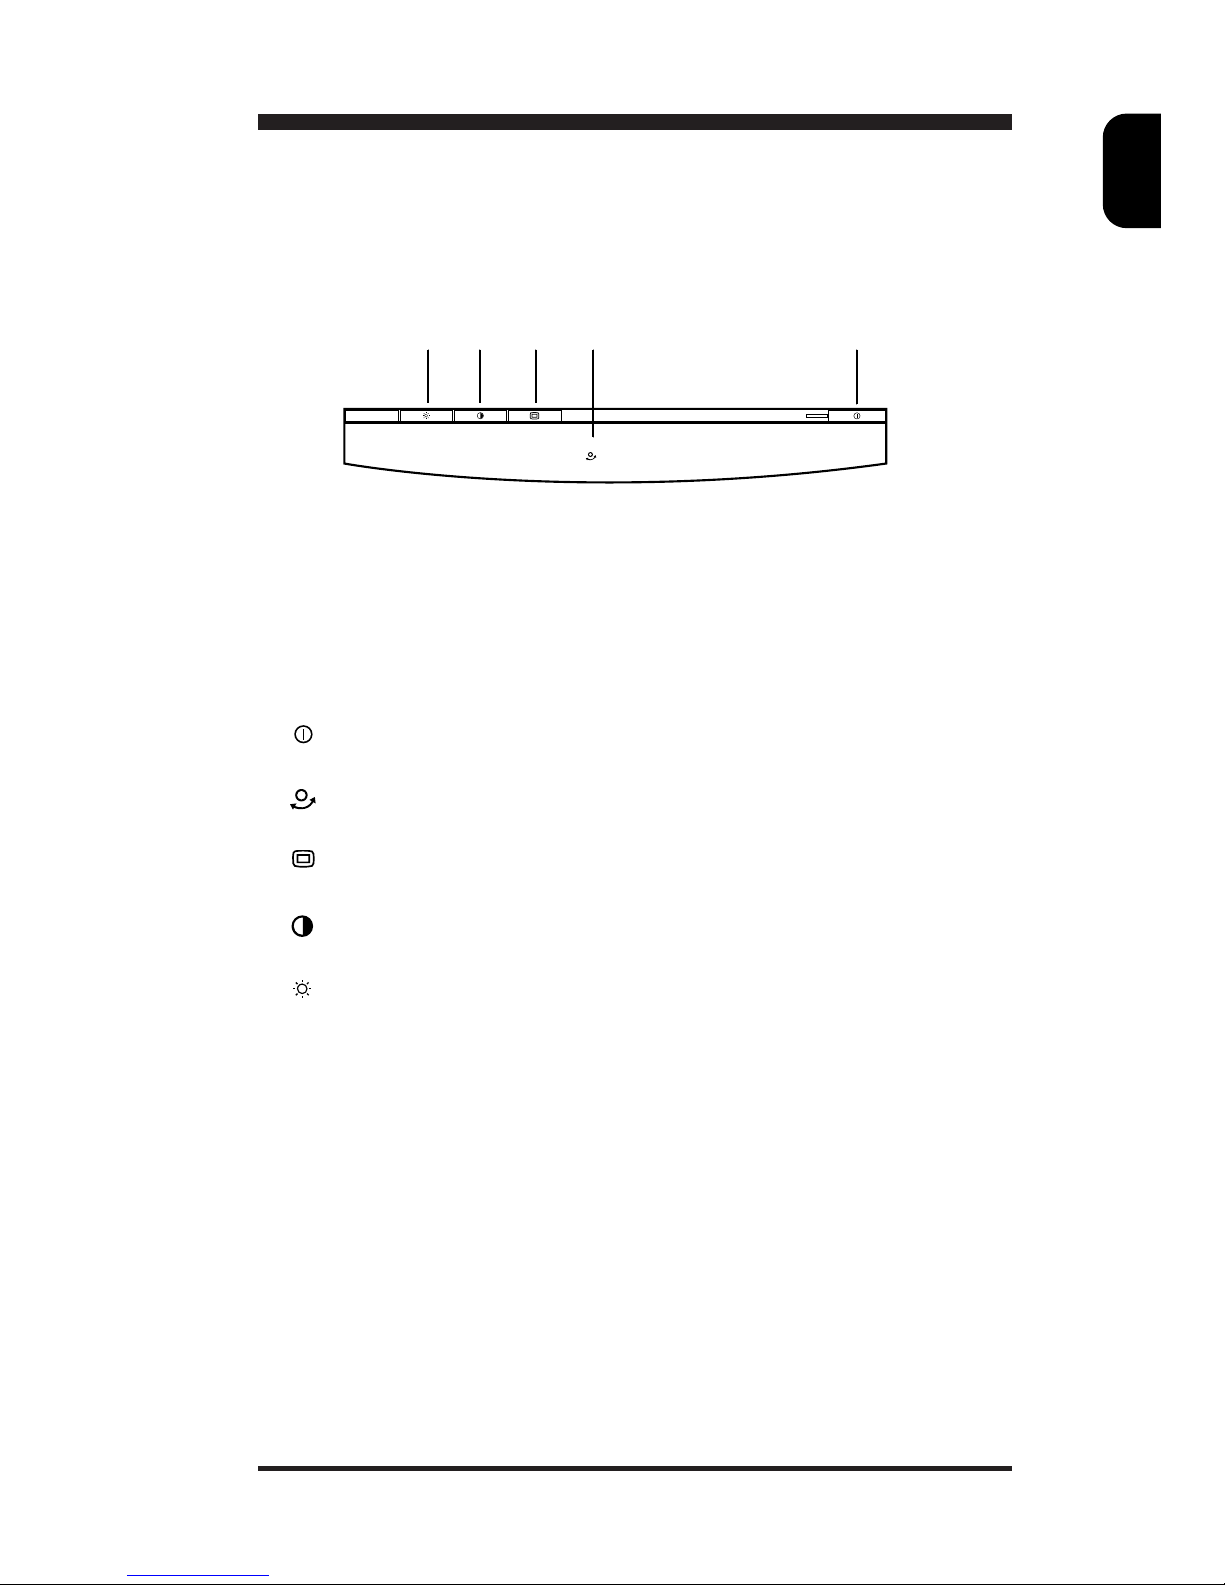
Monitor control panel
Descriptions of knobs and keypads on front control panel
➀ • Press this knob to switch ON and OFF of monitor ’s power.
➁ • OSD rotary control knob.
➂ • Active OSD menu.
√ • Adjust contrast of the display.
➄ • Adjust brightness of the display.
➀
➂➄
➁
➃
Page 8
E
N
8
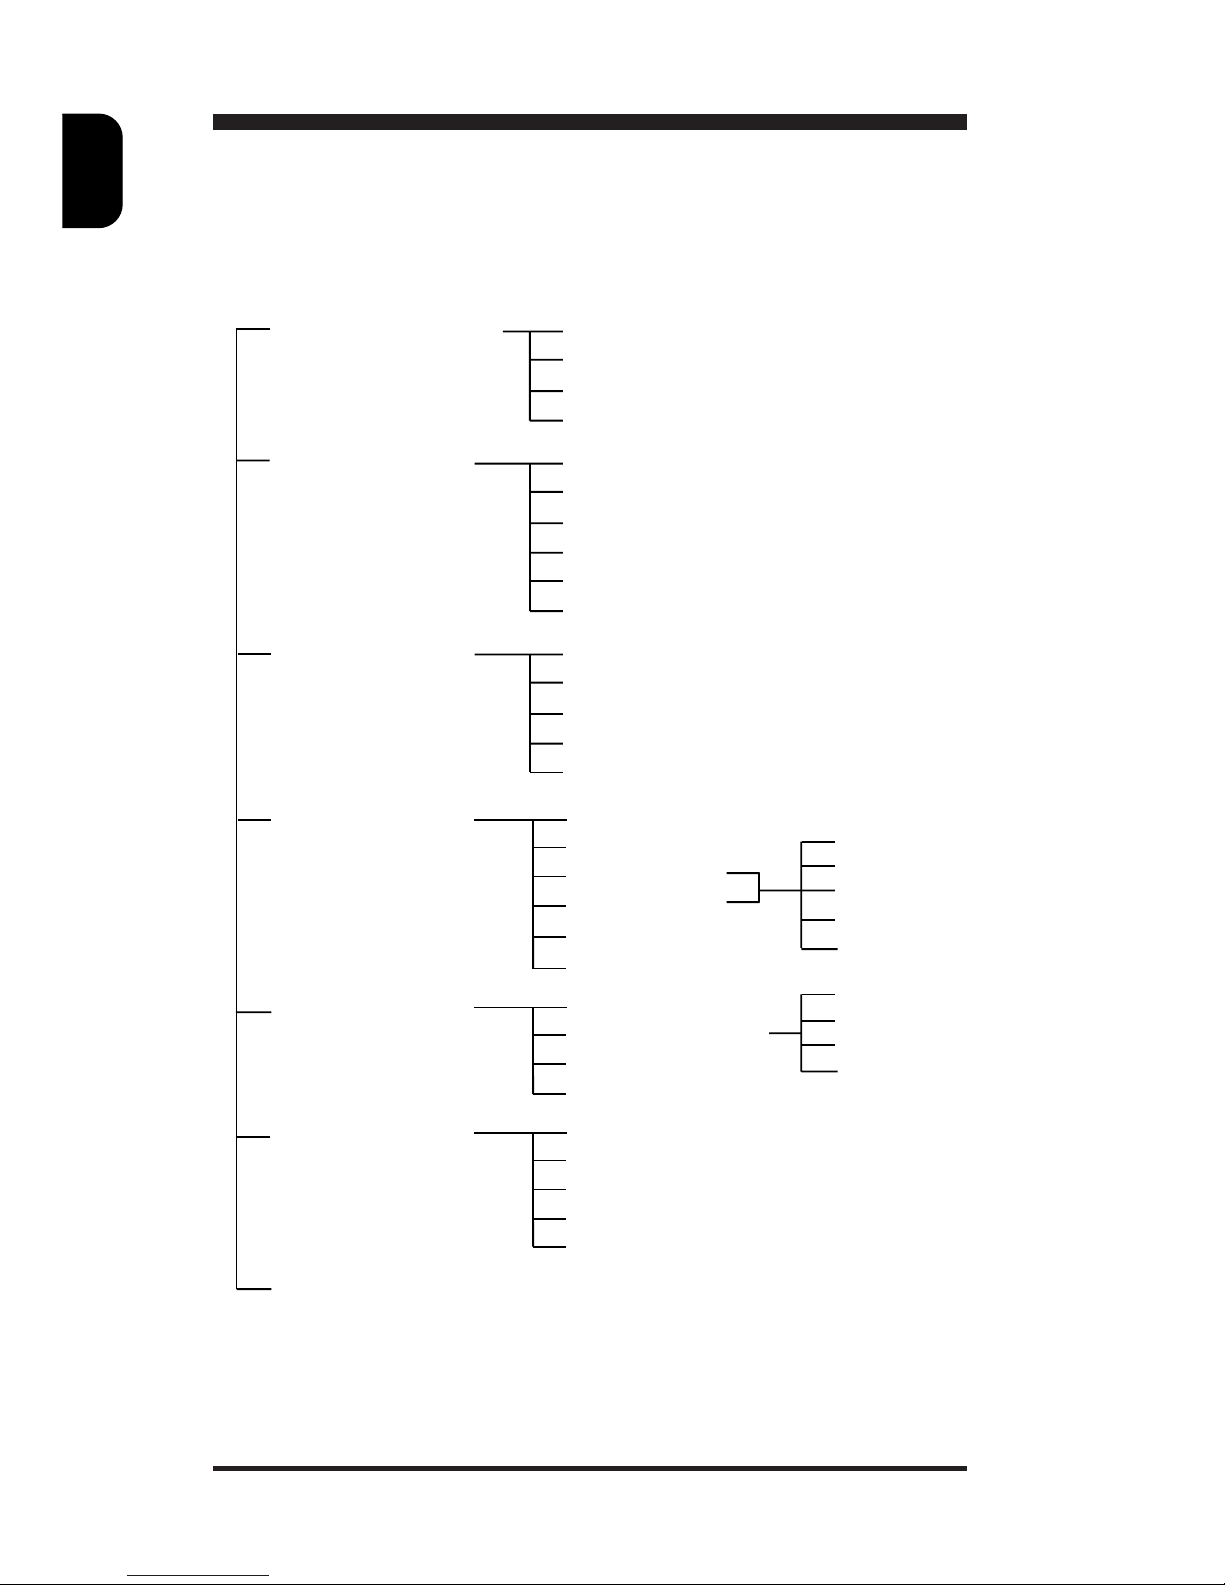
OSD menu tree structure
First Level Second Level Third Level
SIZE & POSITION
HORIZONTAL POSITION
HORIZONTAL SIZE
VERTICAL POSITION
VERTICAL SIZE
CANCEL
GEOMETRY
COLOR TEMPERATURE
SPECIAL
EXIT
USER COLOR #1
6500K
9300K
USER COLOR #2
RED
GREEN
BLUE
SAVE
CANCEL
DEGAUSSING
MOIRE CANCELLATION
SAVE
CANCEL
RECALL FACTORY
PRESETS
RECALL BRIGHTNESS & CONTRAST
RECALL SIZE & POSITION
RECALL GEOMETRY
SAVE
CANCEL
SAVE
BRIGHTNESS & CONTRAST
BRIGHTNESS
CONTRAST
SAVE
CANCEL
TRAPEZOID
PINCUSHION
TILT
SAVE
CANCEL
SAVE
CANCEL
H
V
SAVE
CANCEL
Page 9
E
N
9
On-Screen-Display
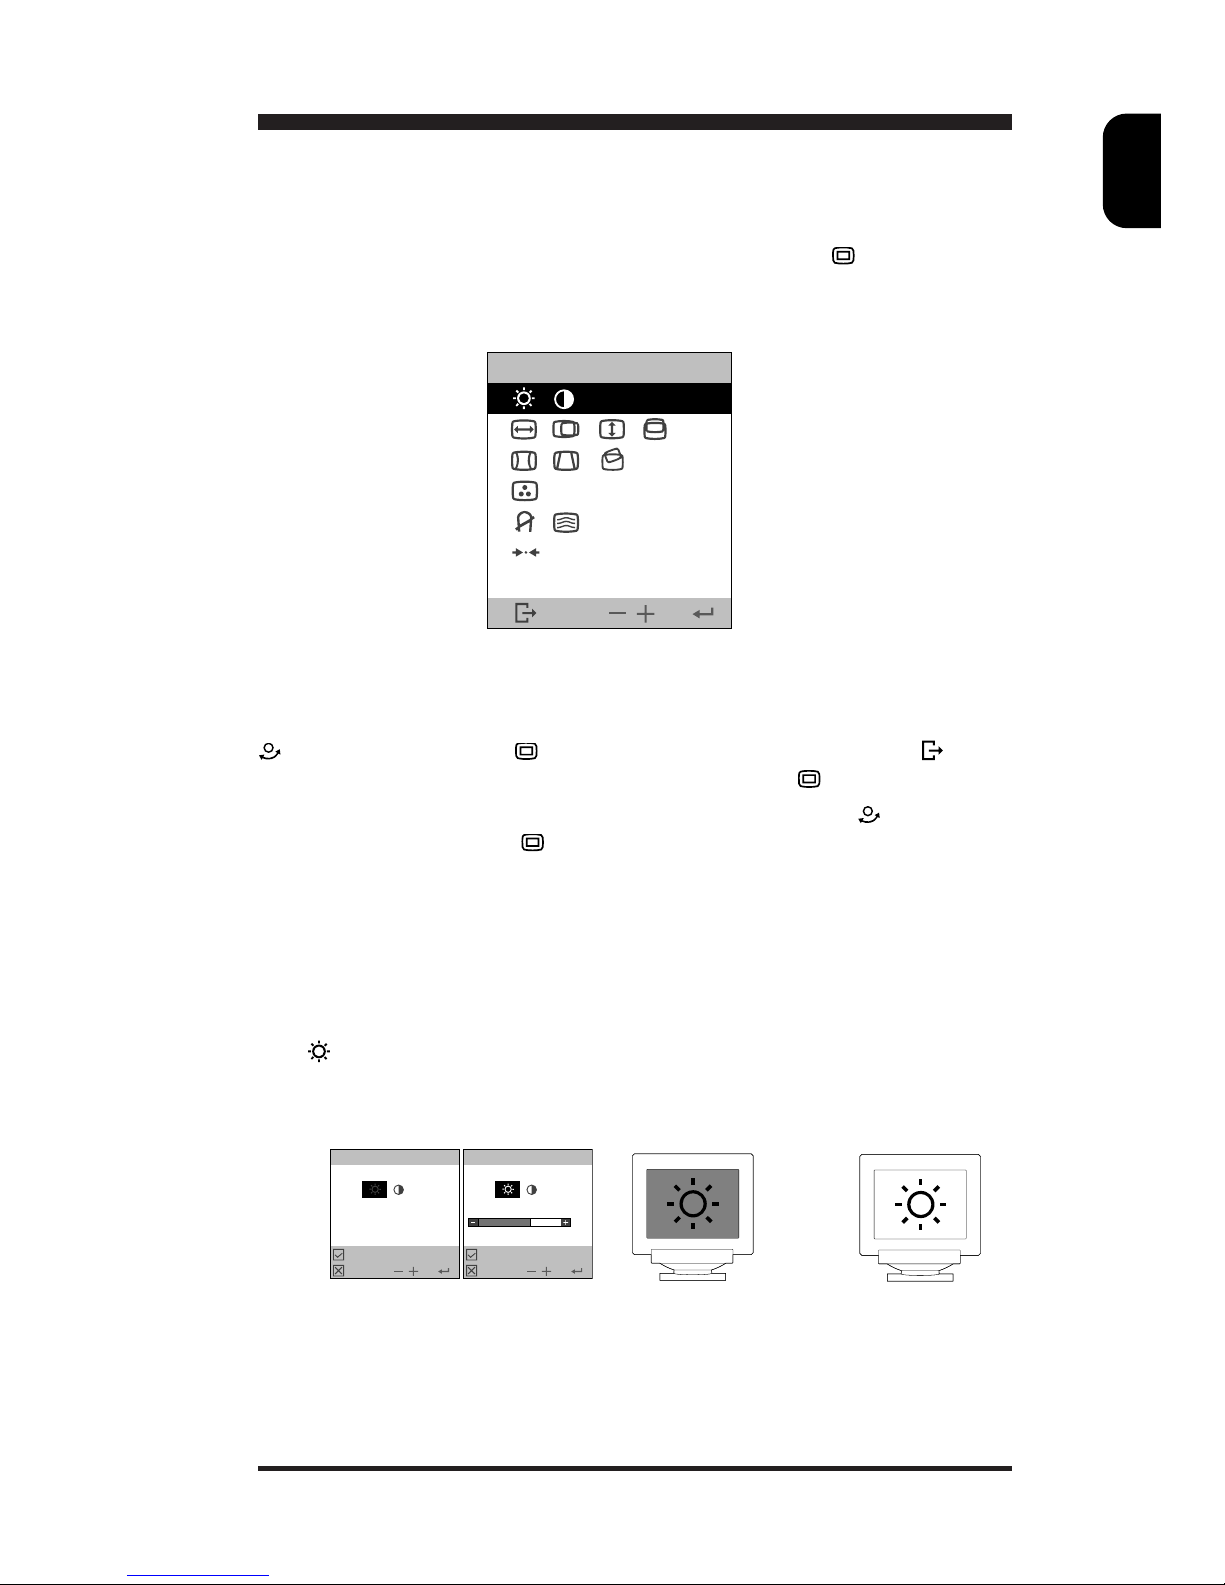
Activating the On-Screen-Display
The monitor controls are accessed by pressing button
to enable OSD
(On-Screen-Display). The main menu will be displayed as follows.
Each Sub-Menu (1-6) is selected by highlighting it via the rotary control
and pressing button to confirm. To exit OSD, highlight at the
bottom of the main menu and press select button
.
While operating Sub-Menu, please use rotary control
to select or
adjust and press button to confirm.
Note: If adjustment or selection of any OSD menu is not made for more
than 20 seconds, the current setup will be saved and the OSD will
disappear automatically.
Sub Menu-1: BRIGHTNESS & CONTRAST
● Brightness : Adjusts background brightness
1
63%
1
1280 x 768 68.7k 85Hz
1
2
3
4
5
6
Page 10
E
N
10
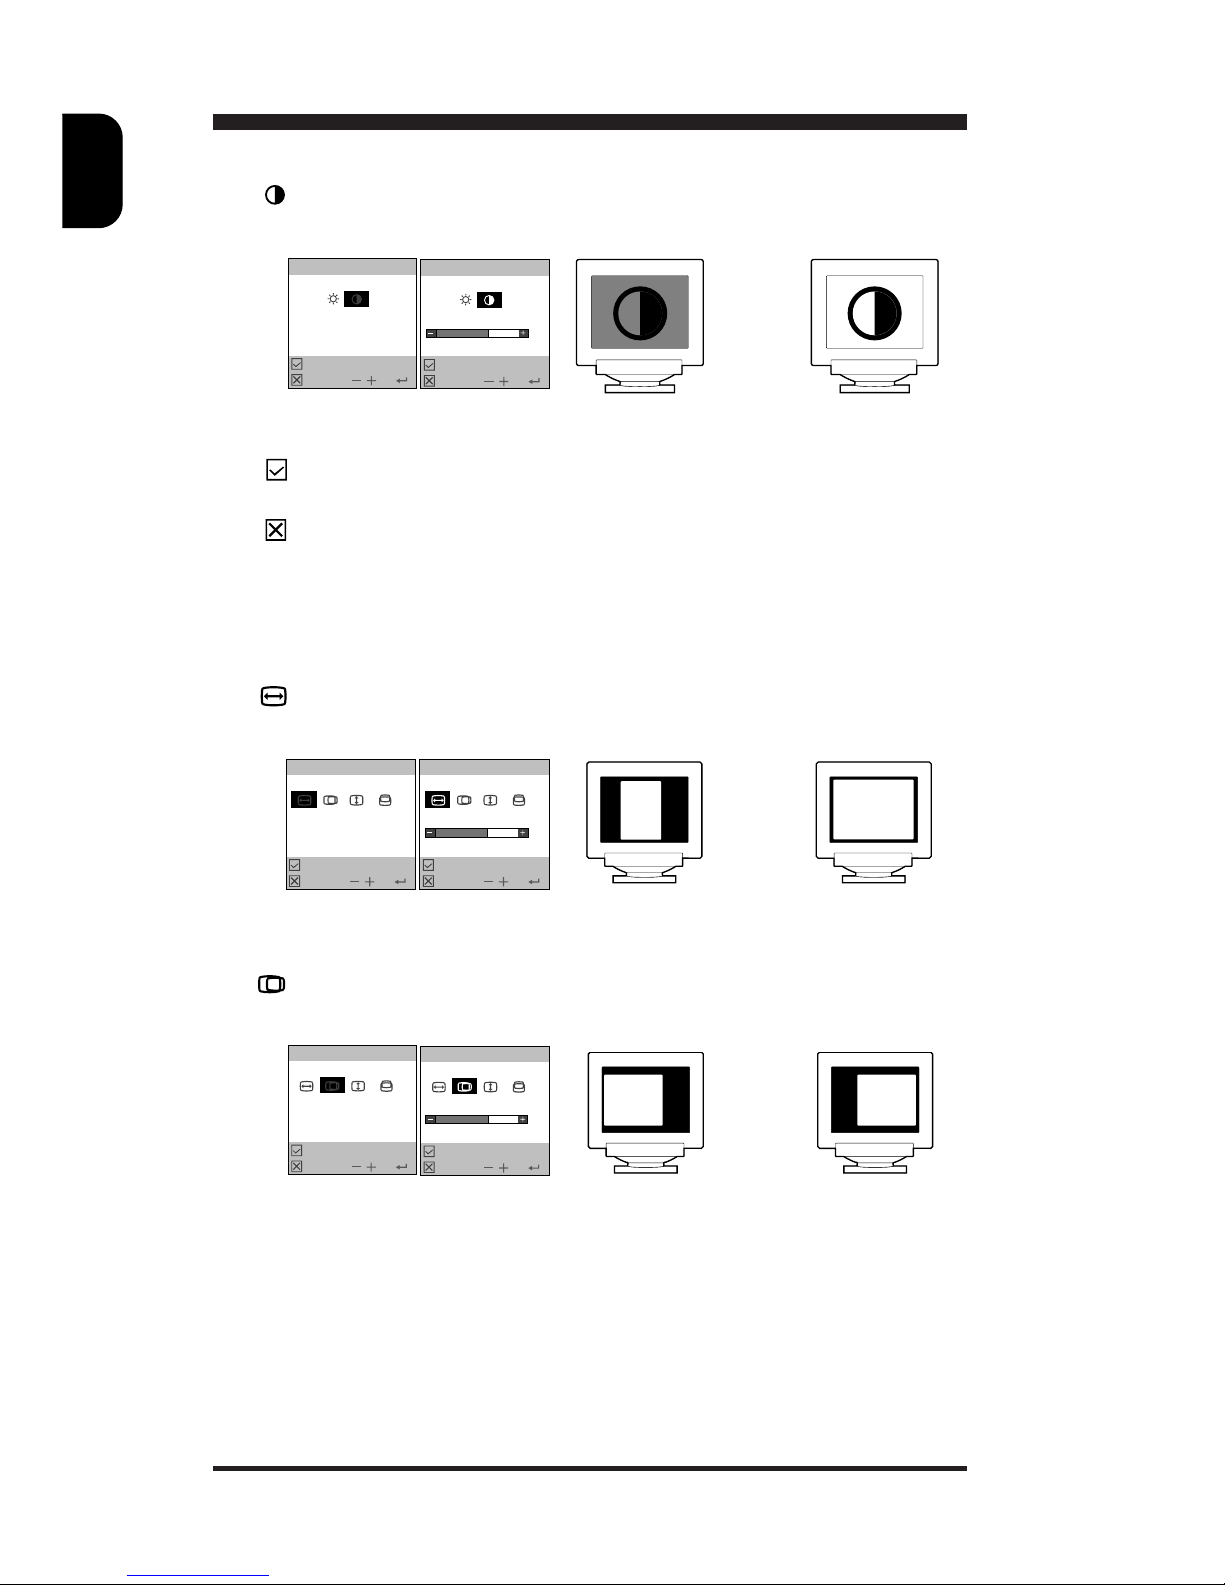
● Contrast : Adjusts contrast between for eground and backgr ound.
1
63%
1
● Save : Save user adjustment and return to main menu.
● Cancel : Abandon setup and return to main menu.
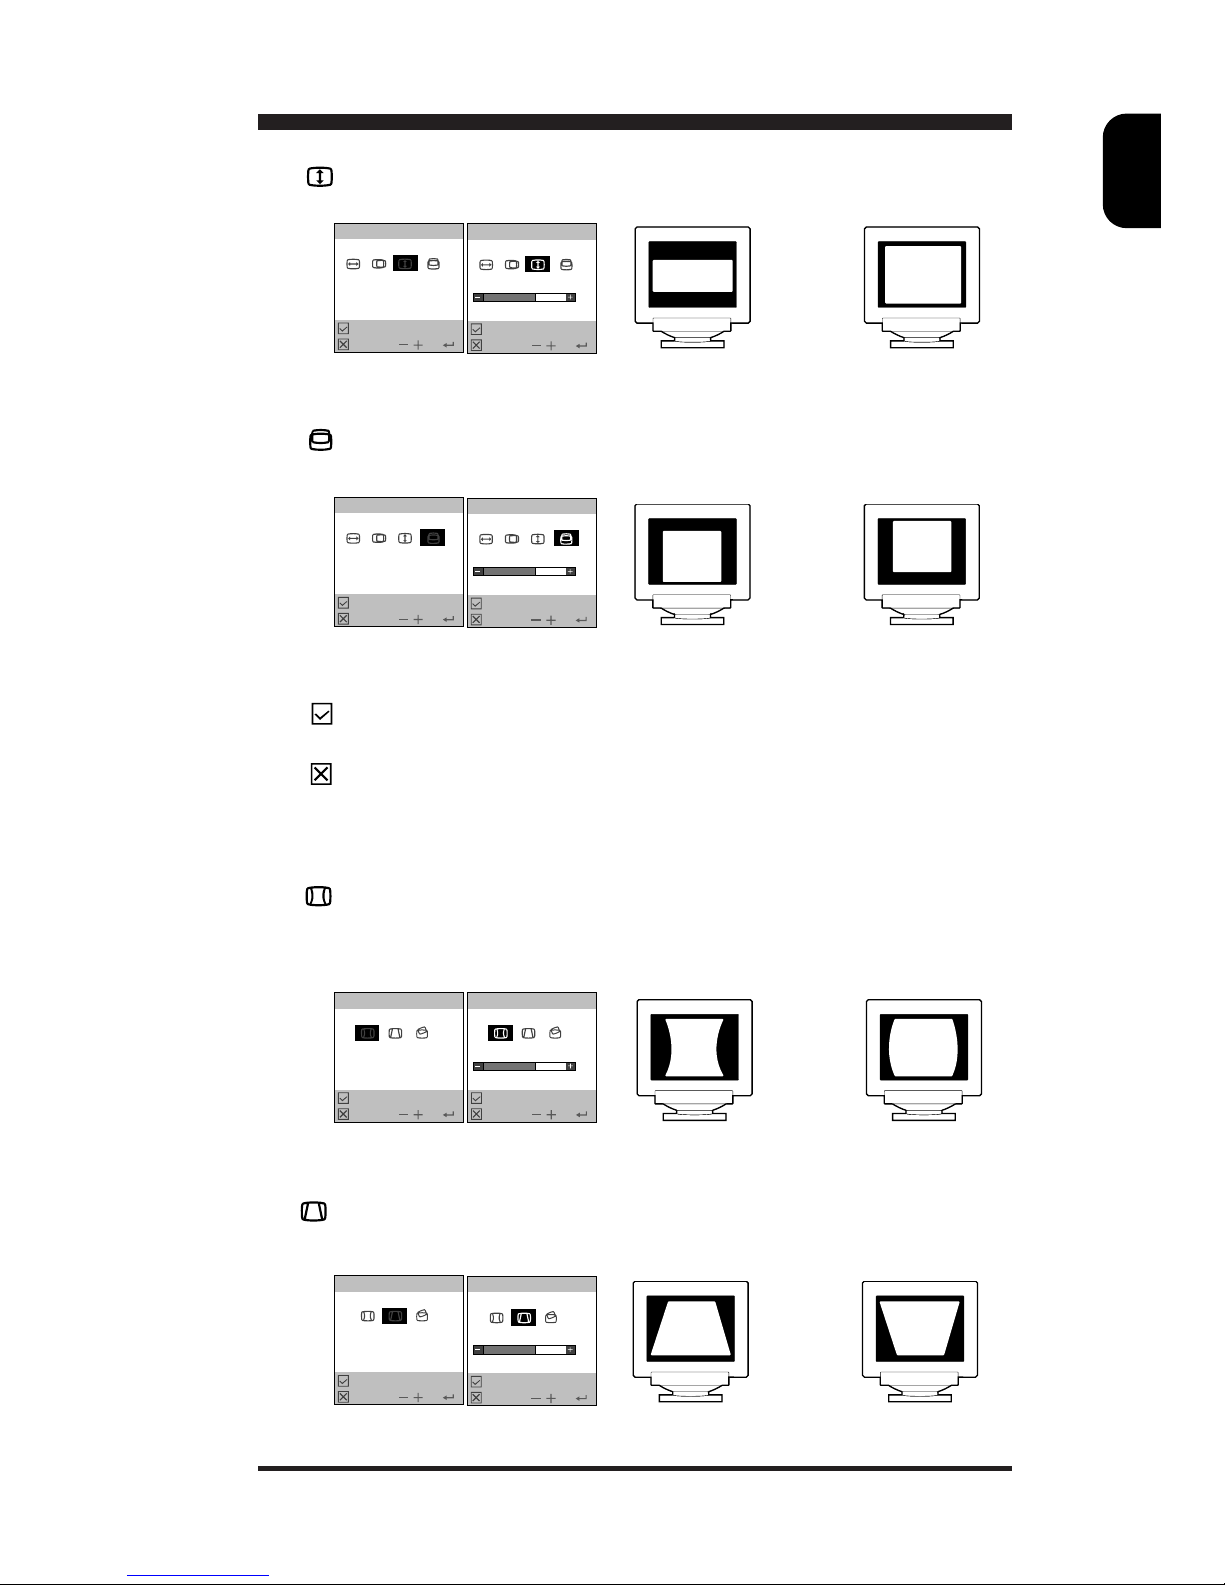
Sub Menu-2: SIZE & POSITION
● Horizontal Size : Adjusts image width
2
63%
2
● Horizontal Position : Moves image left or right
2
63%
2
A
A
A
A
Page 11
E
N
11
● Vertical Size : Adjusts image height
2
63%
2
● Vertical Position : Moves image up or down
2
63%
2
● Save : Save user adjustment and return to main menu.
● Cancel : Abandon setup and return to main menu.
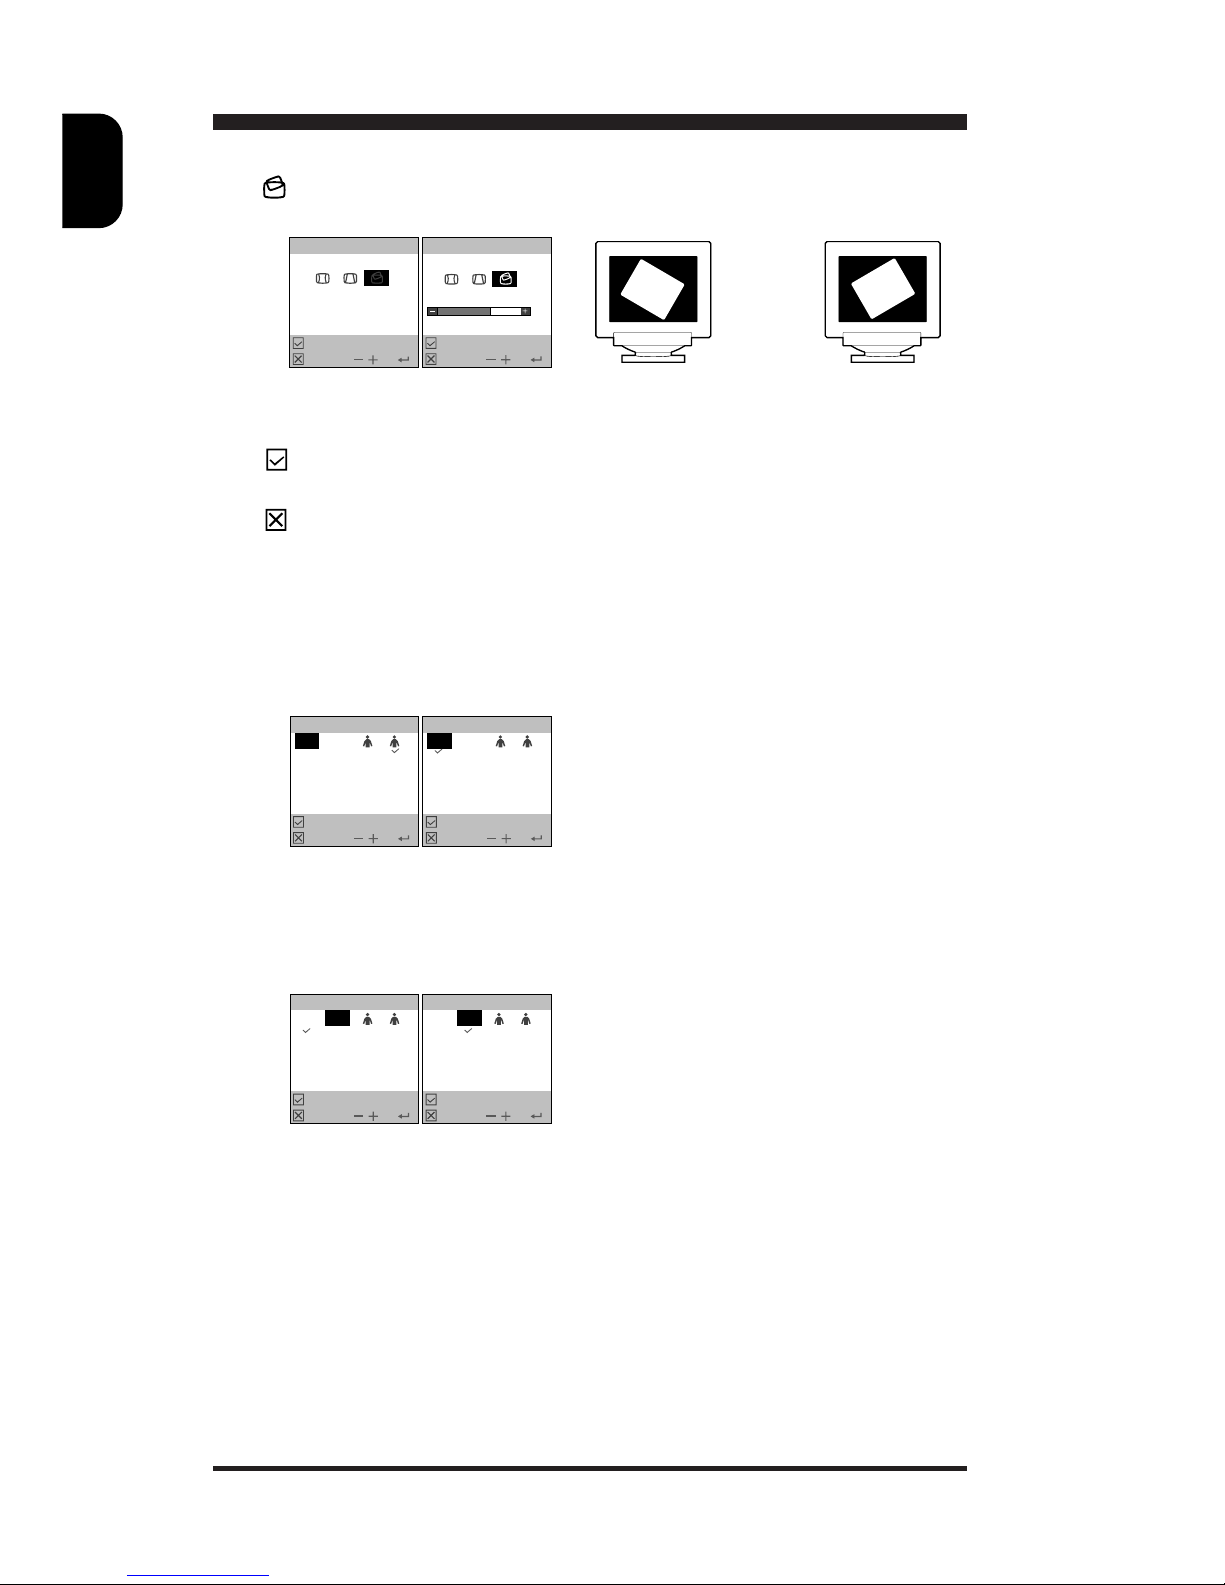
Sub Menu-3: GEOMETRY
● Pincushion : Adjusts the amount of curvature on the vertical
edges.
● Trapezoid : Equalizes the length of the top and bottom edges.
3
63%
3
3
63%
3
A A
A
A
A
A
AA
Page 12
E
N
12
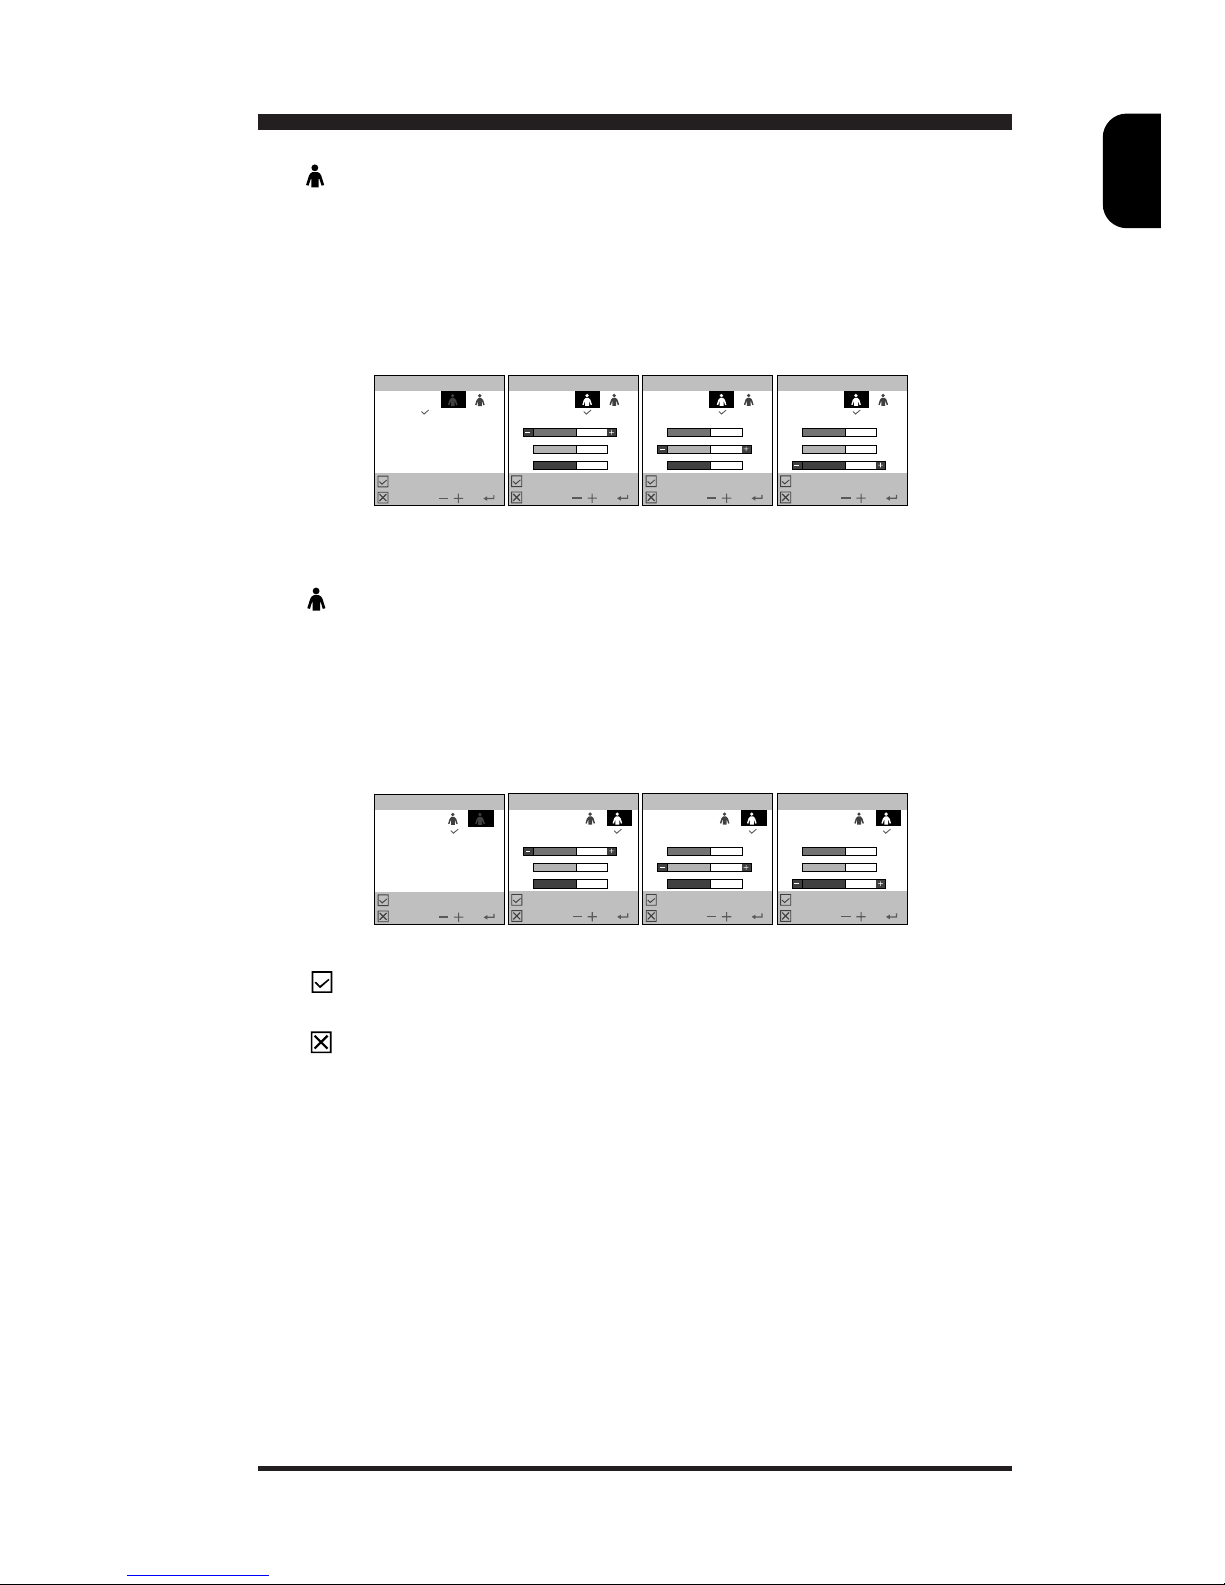
● Tilt : Tilts the image clockwise or counter-clockwise.
3
63%
3
● Save : Save user adjustment and return to main menu.
● Cancel : Abandon setup and return to main menu.
Sub Menu-4: COLOR TEMPERATURE
● 9300°K : Factory preset color temperature of 9300°K.
4
9300ºK 6500ºK
1 2
4
9300ºK 6500ºK
1 2
● 6500°K : Factory preset color temperature of 6500°K.
4
9300ºK 6500ºK
4
9300ºK 6500ºK
1 2 1 2
A
A
Page 13
E
N
13
● User 1 : User set 1 for color temperature then select R, G or B
for adjustment.
R : Adjusts red intensity.
G : Adjusts green intensity.
B : Adjusts blue intensity.
1
4
R
G
B
63%
63%
63%
9300ºK 6500ºK
4
9300ºK 6500ºK
1 2
1 2
4
R
G
B
63%
63%
63%
9300ºK 6500ºK
1 2
4
R
G
B
63%
63%
63%
9300ºK 6500ºK
1 2
● User 2 : User set 2 for color temperature then select R, G or B
for adjustment.
R : Adjusts red intensity.
G : Adjusts green intensity.
B : Adjusts blue intensity.
2
4
R
G
B
63%
63%
63%
9300ºK 6500ºK
4
9300ºK 6500ºK
1 2
1 2
4
R
G
B
63%
63%
63%
9300ºK 6500ºK
1 2
4
R
G
B
63%
63%
63%
9300ºK 6500ºK
1 2
● Save : Save user adjustment and return to main menu.
● Cancel : Abandon setup and return to main menu.
Page 14
E
N
14
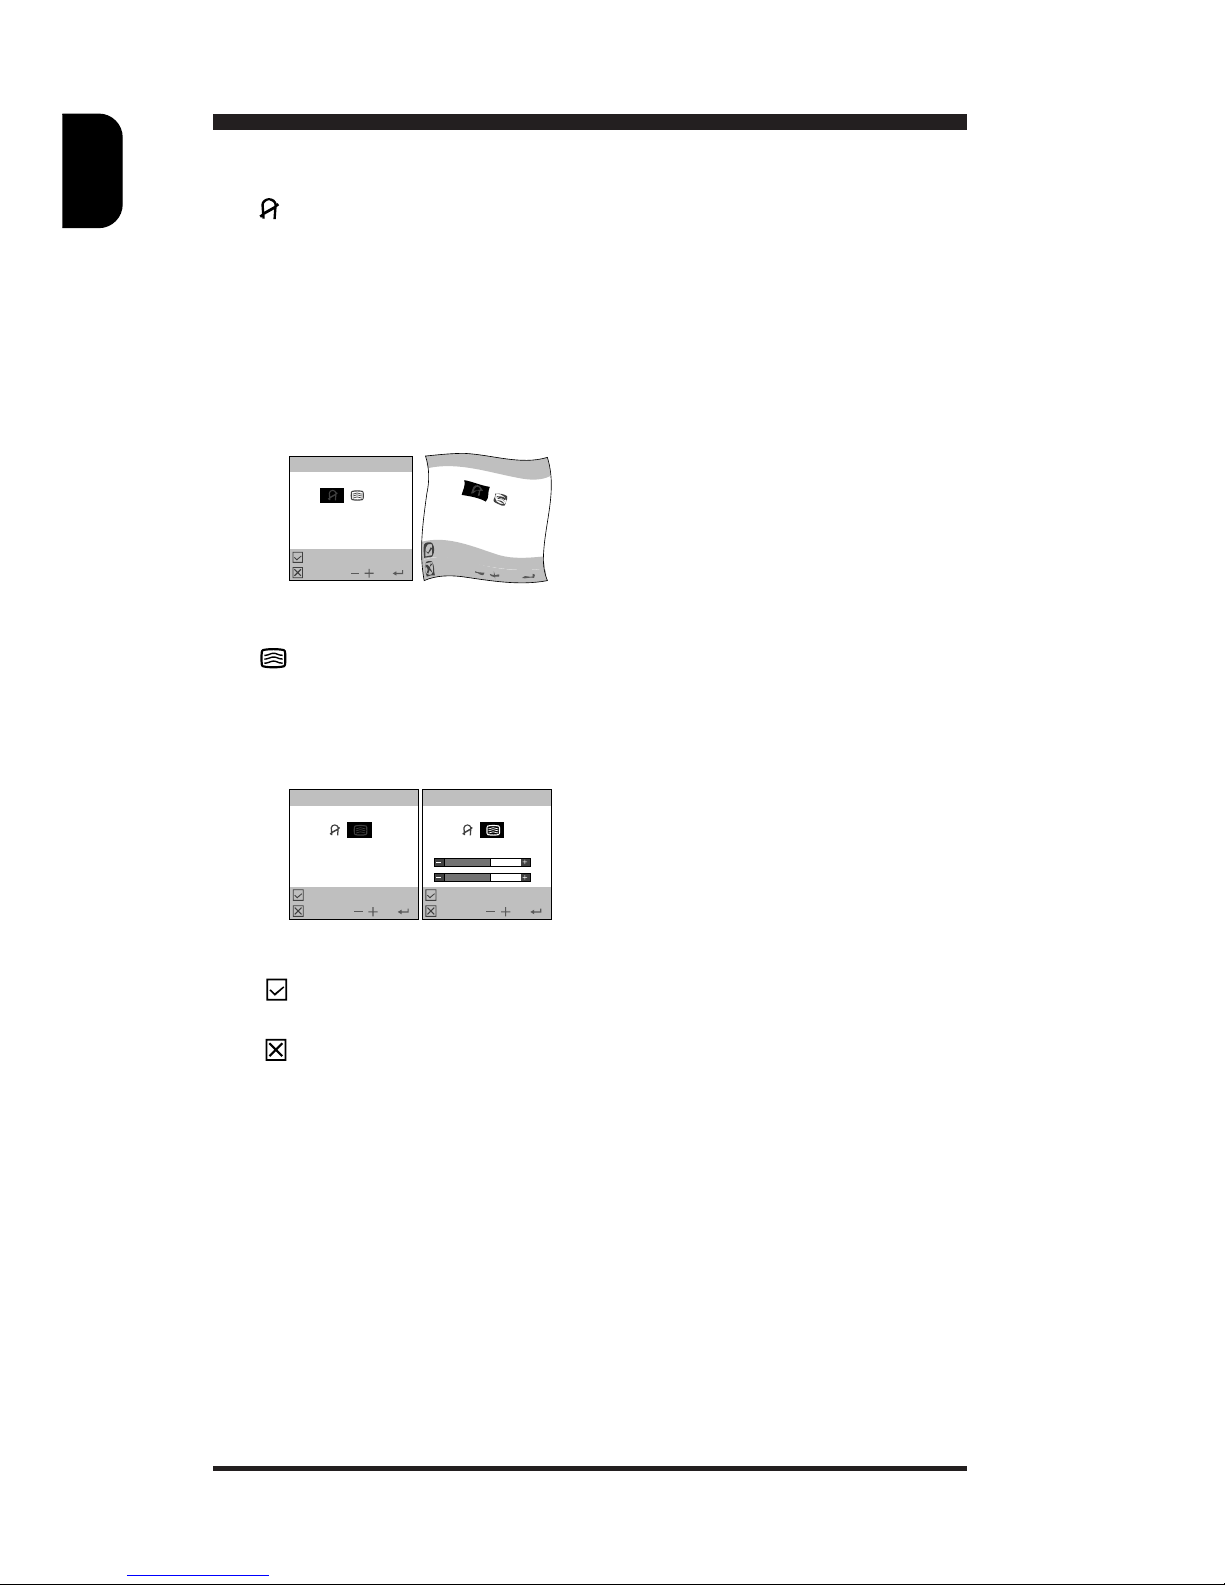
Sub Menu-5: SPECIAL
● Manual Degauss : Discoloration of the image can be caused
by gradual magnetization of the monitor
components. This is particularly likely to
occur when the monitor is moved or rotated.
The monitor may "buzz" momentarily when
the user control is selected and the image
will change color and wobble for a few
seconds. These effects are normal.
5 5
● Moire Cancellation : Moire effect may be found in some display
modes. If this is the case, please use "Moire
Cancellation" function to reduce Moire
effect.
● Save : Save user adjustment and return to main menu.
● Cancel : Abandon setup and return to main menu.
5 5
63%H
63%V
Page 15
E
N
15
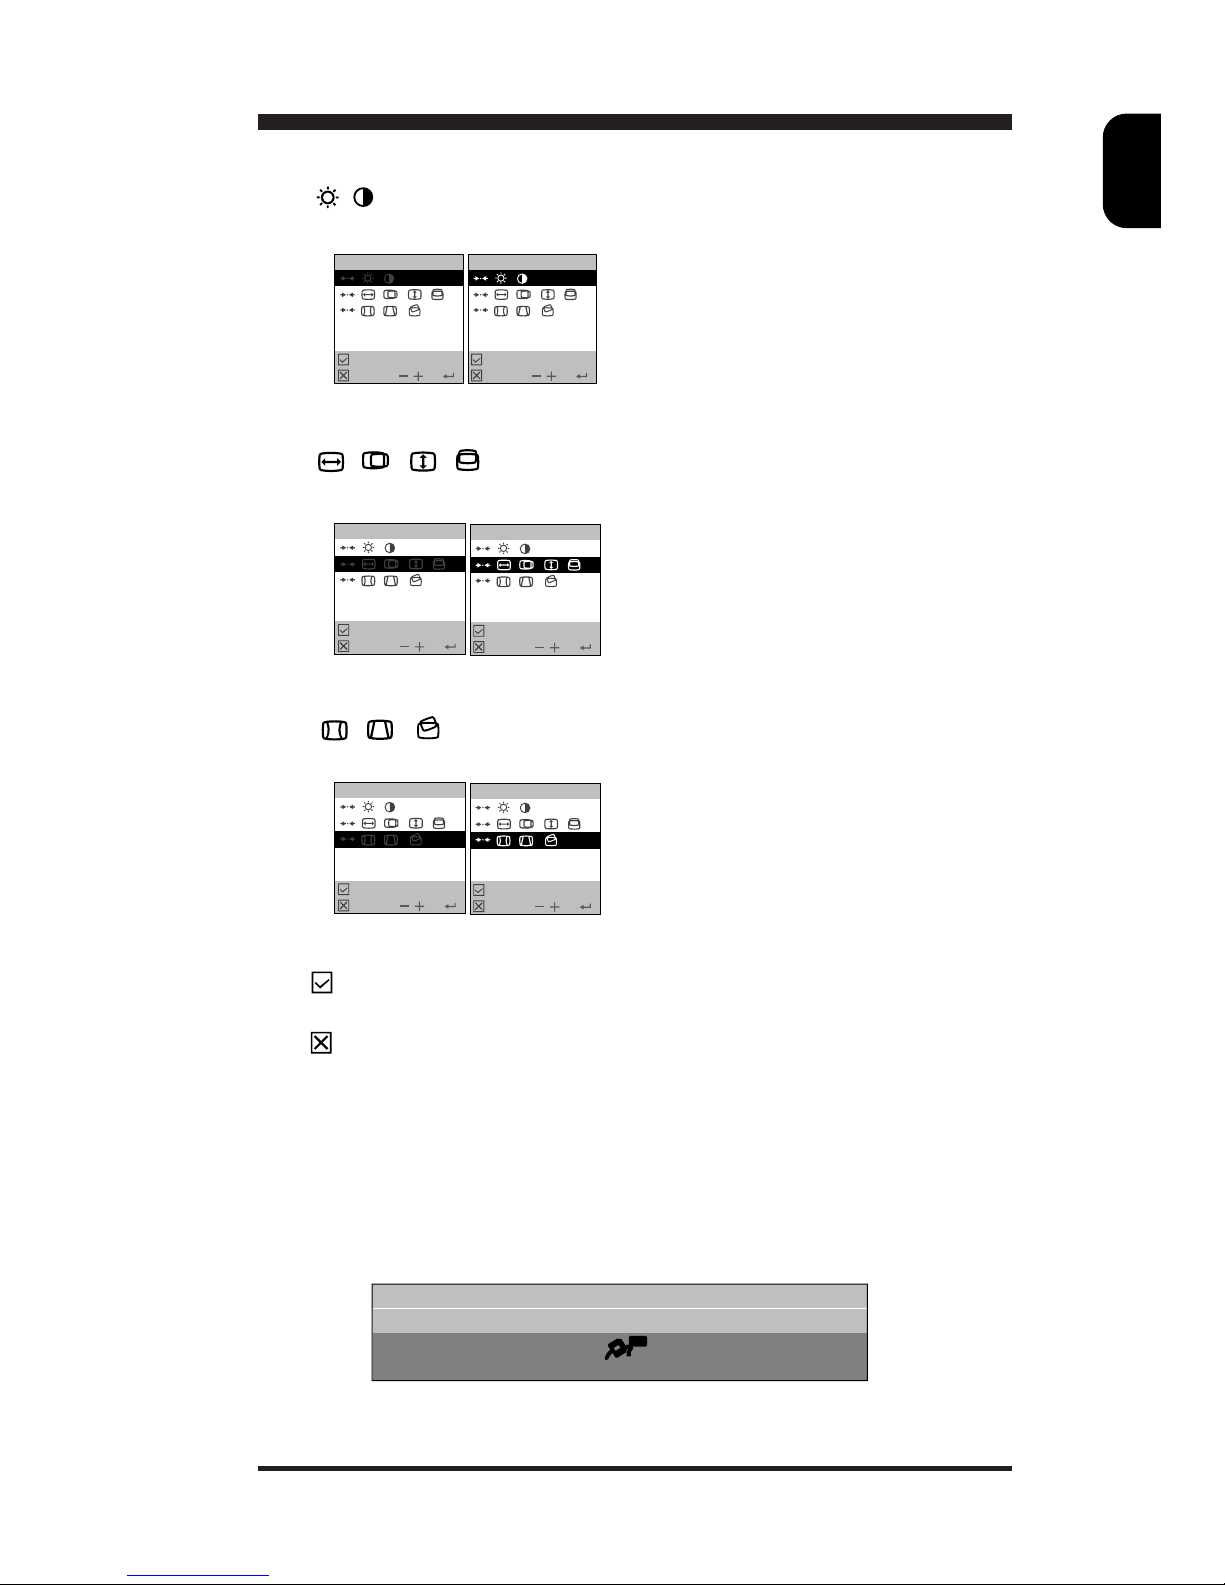
Sub Menu-6: RECALL FACTORY PRESETS
● Recall : Recall brightness and contrast presets.
77
● Recall : Recall size and phase presets.
7
7
● Recall : Recall geometry preset.
7
7
● Save : Save user adjustment and return to main menu.
● Cancel : Abandon setup and return to main menu.
* Whenever the signal cable is disconnected, the screen will appear a
message as below:
CHE CK S I GNAL CAB LE
Page 16
E
N
16
Frequence Sync polarity
Mode Resolution H(KHz) V(Hz) H V
M01 VGA 640x400 31.5 70 – +
M02 VGA 640x480 31.5 60 ––
M03 VGA 640x480 37.5 75 – –
M04 VESA 640x480 43.3 85 ––
M05 SVGA 800x600 37.8 60 + +
M06 SVGA 800x600 46.9 75 + +
M07 VESA 800x600 53.7 85 + +
M08 VESA 1024x768 48.4 60 ––
M09 VESA 1024x768 60.0 75 + +
M10 VESA 1024x768 68.7 85 + +
M11 VESA 1280x1024 64.0 60 + +
* Does not support sync-on-green.
Data Storage
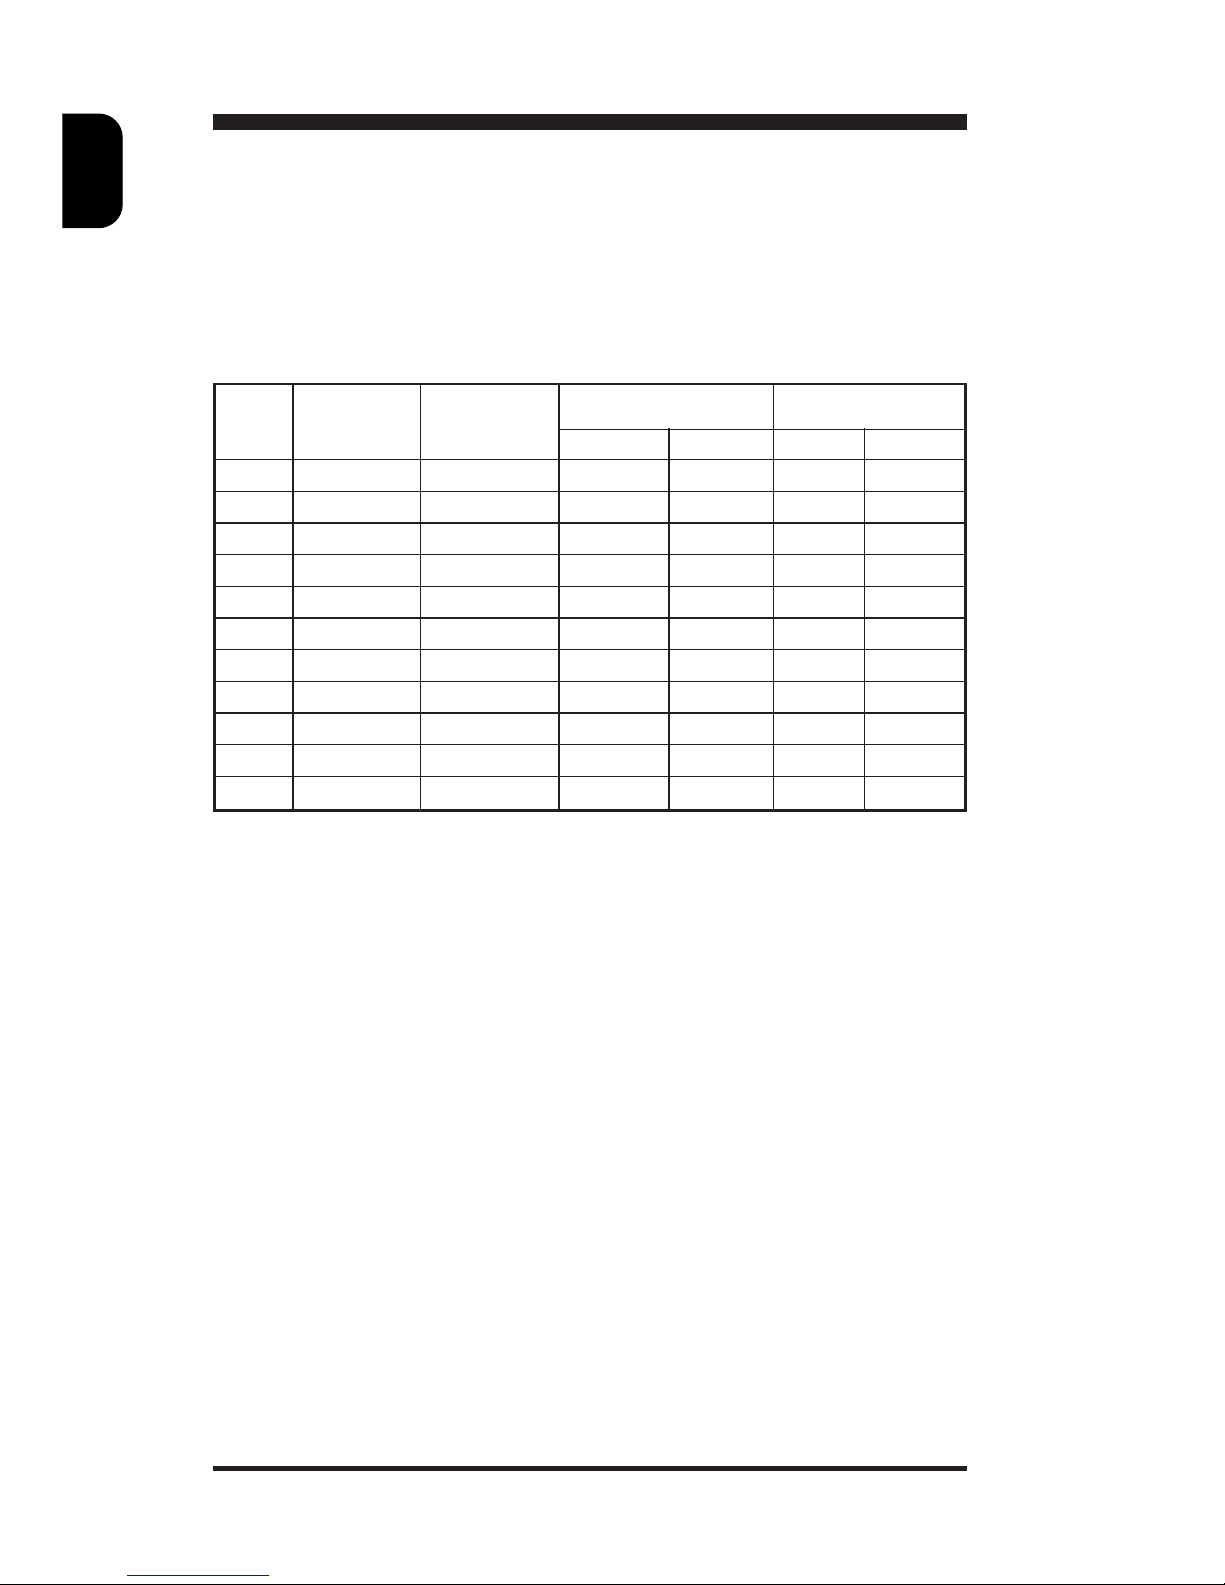
(A) Factory preset mode:
This monitor has 11 factory-preset modes as indicated in the following
table:
(B) User mode
In addition to factory preset modes, the monitor can also provides
additional 11 User-defined modes.
If the input video signal is different from our factory-preset modes,the
new timing data will be automatically stored. However, the displayed
parameters may need to be adjusted. User can adjust the parameters
via OSD, as preceding procedures which already described on
"Adjustment via On-Screen-Display" section.
(C) New mode
The monitor is reversed for 4 new modes in case non-standard video
modes are used.
Page 17
E
N
17
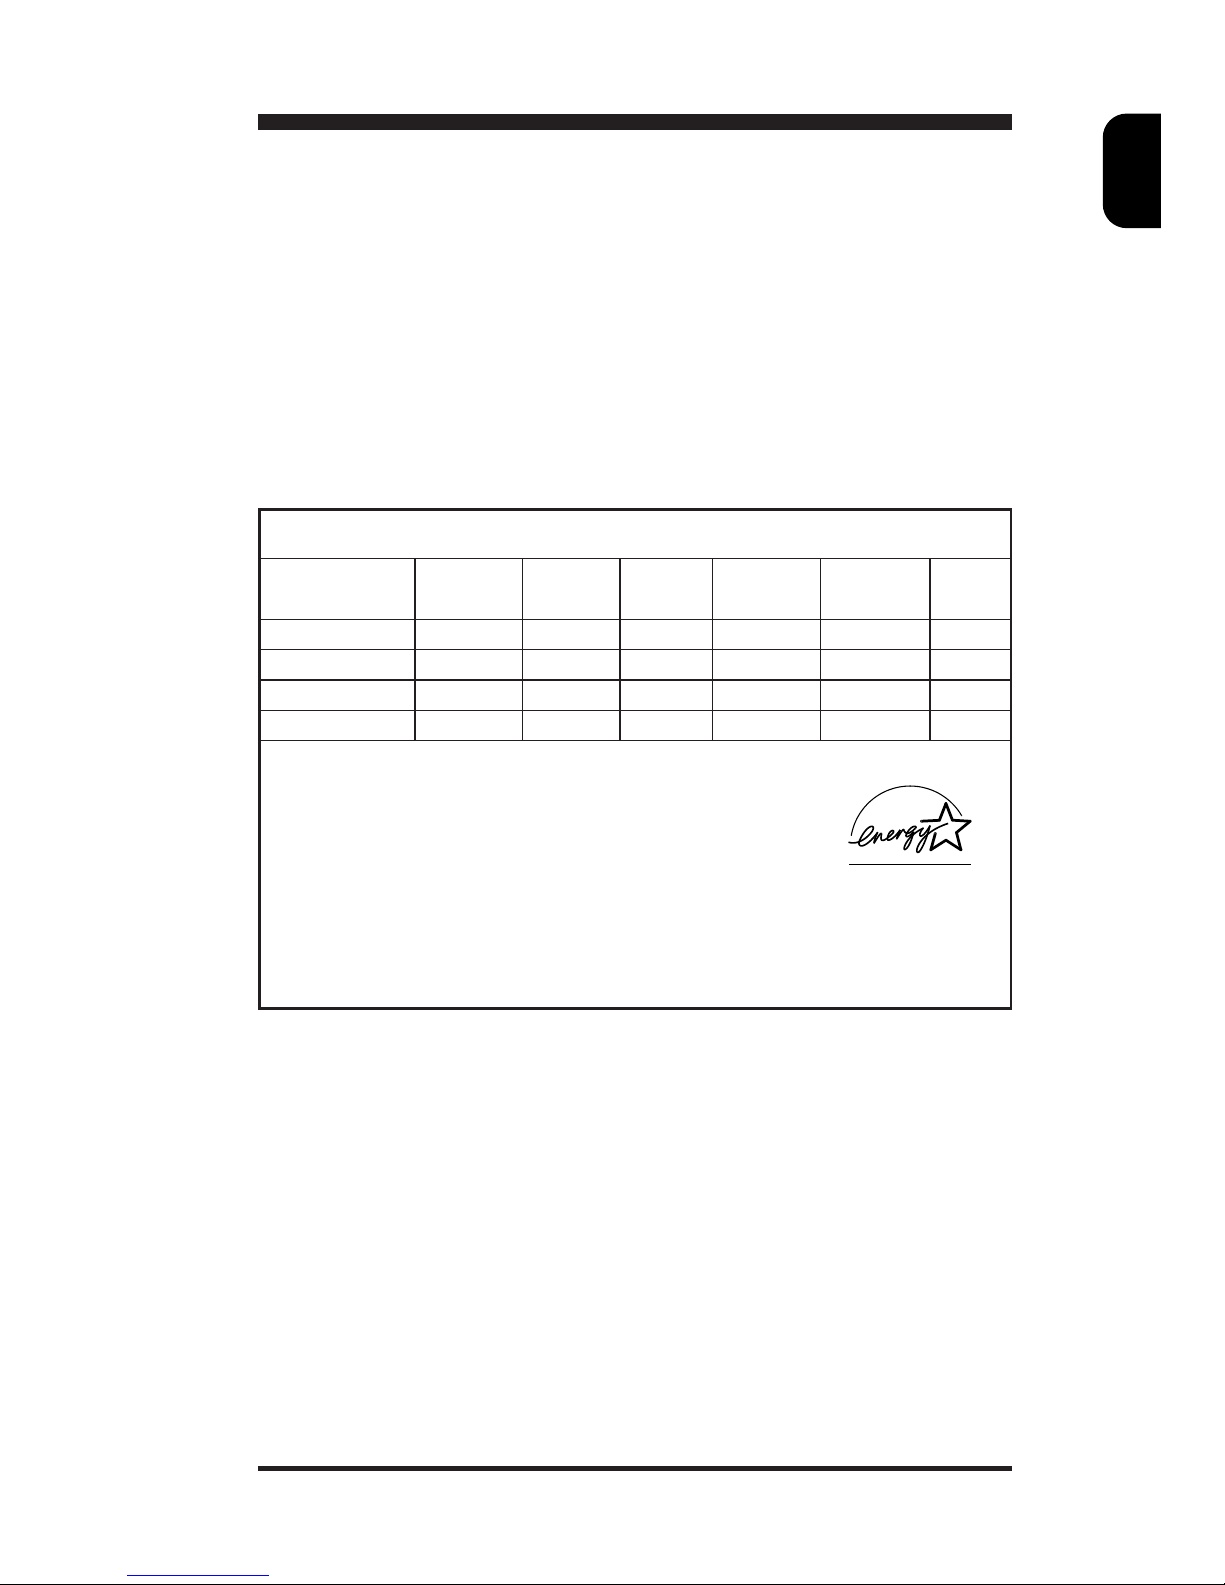
Automatic Power Saving
If you have VESA's DPMS compliance display card or software installed
in your PC, the monitor can automatically reduce its power consumption
when not in use. And if an input from keyboard, mouse or other input
devices is detected, the monitor will automatically “wake up”. The
following table shows the power consumption and signalling of this
automatic power saving feature:
Power Management Definition
VESA's mode Video H-sync V-sync Pow er Power LED
used saving(%) color
ON Active Yes Yes < 100W 0% Green
Stand-by Blanked No Yes < 15W 85% Yellow
Suspend Blanked Yes No < 15W 85% Yellow
OFF Blanked No No < 8W 92% Amber
This monitor is Energy Star compliant and TCO'92 power
management compatible.
AS AN ENERGY STAR PARTNER, MAGNAVOX, HAS
DETERMINED THAT THIS PRODUCT MEETS THE ENERGY
STAR GUIDELINES FOR ENERGY EFFICIENCY.
Page 18

E
N
18
Specification*
(I) General
CRT
Screen size : 17" (43.2 cm) flat & square
Dot pitch : 0.28 mm
Phosphor : P22 or equivalent, medium short
persistence
Screen treatment : Anti-glare, anti-static
Display area
Factory preset : 306 mm (H) x 230 mm (V)
Maximum usable : 323 mm (H) x 242 mm (V)
Scanning frequency
Horizontal (line) : 30-69 kHz (AutoScan)
Vertical (frame) : 50-120 Hz (AutoScan)
Input power : 100-240 VAC, 50-60 Hz
Power consumption : 100 Watt normal, 110 Watt maximum
Input signal
Video : 0.7 Vpp, 75 Ohm inpedence
Sync : Separate sync. TTL level
Composite sync. TTL level
Pedestal
Tilt : 5° forward, 13° backward
Swivel : 90° leftward, 90° rightward
Physical
Unit dimension (WxHxD) : 420 x 424 x 452 (mm)
Net weight : 18.5 kg
Operating condition
Temperature : 0° C - 40° C
Humidity : 20% - 80%
Storage condition
Temperature : -25° C - 70° C
Humidity : 10% - 95%
White Color Coordinates:
Red: x= 0.625 Blue: x= 0.150
y= 0.340 y= 0.065
Green: x= 0.285
y= 0.605
* Because of a policy of continuous product improvement, the above specifications
are subjected to change without notice.
Page 19
E
N
19
1 Red video input 9 No pin
2 Green video input 10 Self-test
3 Blue video input 11 Ground
4 Ground 12 Serial data line (SDA)
5 Identical output 13 H. Sync / H+V
- Connected to pin 10 14 V. Sync (VCLK for DDC)
6 Red video ground 15 Data clock line (SDA)
7 Green video ground
8 Blue video ground
Pin No. Assignment Pin No. Assignment
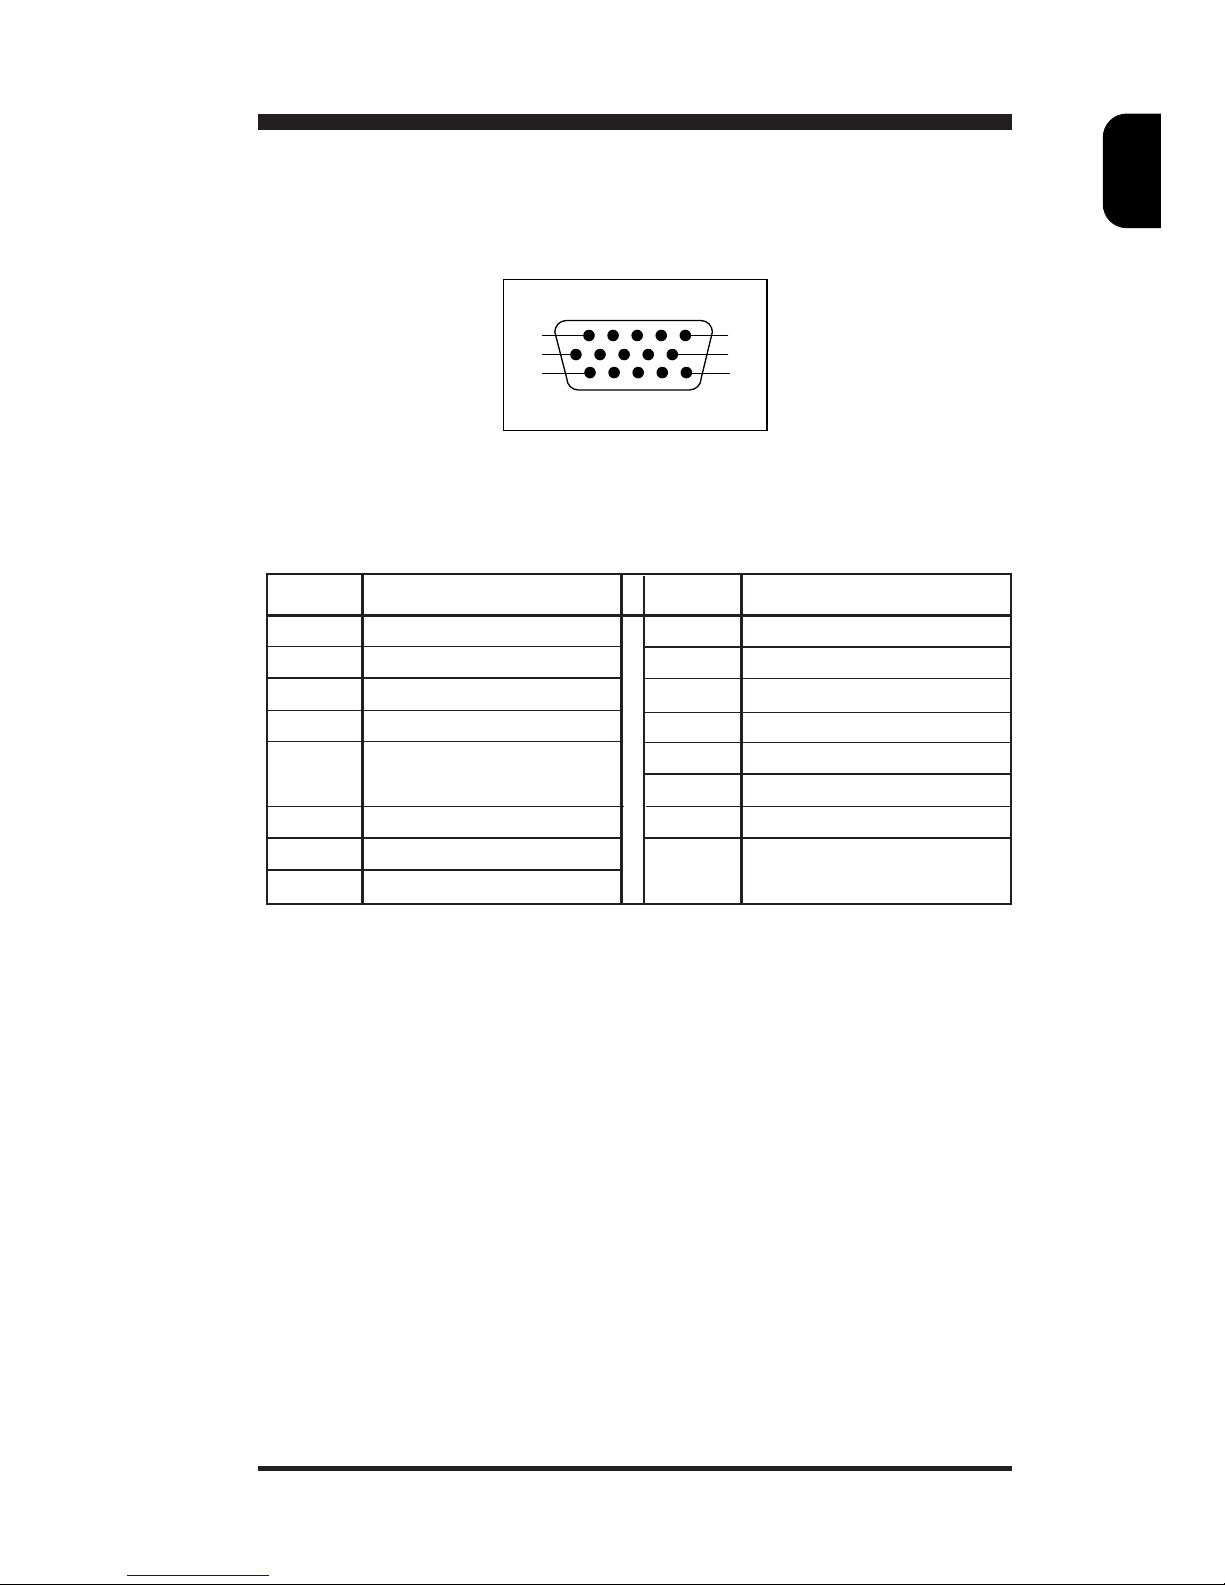
(II) Pin assignment:
The 15-pin D-sub connector (male) of the signal cable (IBM systems):
5
15
1
6
11
10
 Loading...