

Page 1

1
Introduction
Sommaire
Vous venez d’acquérir ce téléviseur, merci de votre confiance.
Nous vous conseillons de lire attentivement les instructions qui suivent pour
mieux comprendre les possibilités offertes par votre téléviseur.
Nous espérons que notre technologie vous donnera entière satisfaction.
Installation
Présentation du téléviseur LCD . . . . . . . . . . . . . . . . . . . . . . . . . . . . . . . . . . . . . . .2
Les touches de la télécommande . . . . . . . . . . . . . . . . . . . . . . . . . . . . . . . . . . . . . . 3
Installation du téléviseur . . . . . . . . . . . . . . . . . . . . . . . . . . . . . . . . . . . . . . . . . . . . . 4
Installation rapide des chaînes . . . . . . . . . . . . . . . . . . . . . . . . . . . . . . . . . . . . . . . . .5
Classement des programmes . . . . . . . . . . . . . . . . . . . . . . . . . . . . . . . . . . . . . . . . . 5
Choix de la langue et du pays . . . . . . . . . . . . . . . . . . . . . . . . . . . . . . . . . . . . . . . . .6
Mémorisation automatique . . . . . . . . . . . . . . . . . . . . . . . . . . . . . . . . . . . . . . . . . . 6
Fonction EasyLink . . . . . . . . . . . . . . . . . . . . . . . . . . . . . . . . . . . . . . . . . . . . . . . . . .6
Mémorisation manuelle . . . . . . . . . . . . . . . . . . . . . . . . . . . . . . . . . . . . . . . . . . . . . 7
Nom de programme . . . . . . . . . . . . . . . . . . . . . . . . . . . . . . . . . . . . . . . . . . . . . . . .7
Utilisation
Utilisation de la radio . . . . . . . . . . . . . . . . . . . . . . . . . . . . . . . . . . . . . . . . . . . . . . . .8
Utilisation en mode moniteur PC . . . . . . . . . . . . . . . . . . . . . . . . . . . . . . . . . . . . . .8
Réglages de l’image . . . . . . . . . . . . . . . . . . . . . . . . . . . . . . . . . . . . . . . . . . . . . . . . .9
Réglages du son . . . . . . . . . . . . . . . . . . . . . . . . . . . . . . . . . . . . . . . . . . . . . . . . . . . .9
Réglage des options . . . . . . . . . . . . . . . . . . . . . . . . . . . . . . . . . . . . . . . . . . . . . . . . .9
Fonction réveil . . . . . . . . . . . . . . . . . . . . . . . . . . . . . . . . . . . . . . . . . . . . . . . . . . . .10
Verrouillage du téléviseur . . . . . . . . . . . . . . . . . . . . . . . . . . . . . . . . . . . . . . . . . . .10
Télétexte . . . . . . . . . . . . . . . . . . . . . . . . . . . . . . . . . . . . . . . . . . . . . . . . . . . . . . . .11
Formats 16:9 . . . . . . . . . . . . . . . . . . . . . . . . . . . . . . . . . . . . . . . . . . . . . . . . . . . . .12
Touches magnétoscope et DVD . . . . . . . . . . . . . . . . . . . . . . . . . . . . . . . . . . . . . .13
Glossaire . . . . . . . . . . . . . . . . . . . . . . . . . . . . . . . . . . . . . . . . . . . . . . . . . . . . . . . .13
Raccordements
Magnétoscope . . . . . . . . . . . . . . . . . . . . . . . . . . . . . . . . . . . . . . . . . . . . . . . . . . . . 14
Autres appareils . . . . . . . . . . . . . . . . . . . . . . . . . . . . . . . . . . . . . . . . . . . . . . . . . . 14
Pour sélectionner les appareils connectés . . . . . . . . . . . . . . . . . . . . . . . . . . . . . .14
Camescope, jeux video . . . . . . . . . . . . . . . . . . . . . . . . . . . . . . . . . . . . . . . . . . . . . 15
Casque . . . . . . . . . . . . . . . . . . . . . . . . . . . . . . . . . . . . . . . . . . . . . . . . . . . . . . . . . 15
Amplificateur . . . . . . . . . . . . . . . . . . . . . . . . . . . . . . . . . . . . . . . . . . . . . . . . . . . . .15
Ordinateur . . . . . . . . . . . . . . . . . . . . . . . . . . . . . . . . . . . . . . . . . . . . . . . . . . . . . . .15
Conseils . . . . . . . . . . . . . . . . . . . . . . . . . . . . . . . . . . . . . . . . . . . . . . . . . . . . . . . 16
w
Nettoyage du téléviseur
Le nettoyage de l’écran et du coffret doit être effectué uniquement avec un
chiffon propre, doux et non pelucheux. Ne pas utiliser de produit à base
d’alcool ou de solvant.
Français
Nederlands
DeutschItaliano
∂∂ÏÏÏÏËËÓÓÈÈÎο¿
English
Dansk
NorskSvenskaSuomiEspañolPor tuguês
Page 2

2
Présentation du téléviseur LCD
Les touches du téléviseur :
• . : pour allumer ou éteindre le téléviseur.
• VOLUME - + (-”+) : pour régler le niveau sonore.
• PROGRAM - + (- P +) :pour sélectionner les
programmes.
• MENU : pour appeler ou quitter les menus, appuyez
simultanément sur les 2 touches ” - et ” +.
Ensuite, les touches P - + permettent de sélectionner
un réglage et les touches ” - + de régler.
Remar
que: lorsque la fonction VERROU TV est en service,
les touches -”+ et - P + sont inactives (voir menu
OPTIONS , page 10).
Voyant de mise en marche et capteurs infrarouges.
Pied inclinable.
Le pied peut être démonté et remplacé par un kit de
fixation mural disponible en option (renseignez-vous
auprès de votre revendeur).
Face arrière :
Les raccordements principaux s’effectuent par le
dessous du téléviseur.
Des volets amovibles gauche* et droit permettent
d’accéder à des prises de connexions supplémentaires.
* Les grandes tailles d’écran n’ont pas de volet gauche.
Pour plus de détails sur les raccordements, voir page 14.
Prise péritel EXT1
Prises d’antennes TV et radio
Entrée VGA et audio pour le raccordement d’un
ordinateur.
Prise d’alimentation DC
MENU
VOLUME
-
”
+
P
.
PROGRAM
-
+
DC in PC input (VGA)
L
Audio in (PC)
R
:
FM ANT
EXT. 1
Ø
Page 3

12
MODE
MUTE
RADIO
VCR
DVD
SMARTSMART ACTIVE
CONTROL
MENU
PC TV
OK
P
564
879
0
·¢Ê∆Æ
∫
ù
¤Ó
`
Ÿı
Å
Ë
Á
∏
3
--
++
.
ª
-
[
”
Y
ª
3
Les touches de la télécommande
Sélection des prises EXT (p.14)
Appuyez plusieurs fois pour
sélectionner l’appareil connecté.
Touches télétexte (p. 11)
ou VCR / DVD (p.13)
œ Appel du PIP (p. 8)
π Déplacement du PIP (p. 8)
Minuterie
Pour sélectionner une durée de
mise en veille automatique
(de 0 à 240 minutes).
Active Control
Optimise la qualité de l’image en
fonction du signal reçu.
Mode son
Permet de forcer les émissions
STÉRÉO
et NICAM STÉRÉO en MONO
ou pour les émissions bilingues de
choisir entre
DUAL I ou DUAL II.
L’indication MONO est rouge lorsqu’il
s’agit d’une position forcée.
Menu
Pour appeler ou quitter les menus.
Curseur
Ces 4 touches permettent de
naviguer dans les menus.
Volume
Pour ajuster le niveau sonore
PC / TV / Radio
Appuyez sur une de ces touches
pour commuter le téléviseur en
mode PC,TV ou radio (p. 8).
Formats 16:9 (p.12)
Coupure son
Pour supprimer ou rétablir le son.
Info.d’écran / n° permanent
Pour afficher / effacer le numéro
de programme, le nom (s’il existe),
l’heure, le mode son, et le temps
restant de la minuterie.Appuyez
pendant 5 secondes pour activer
l’affichage permanent du numéro.
Le niveau du volume et des
préréglages image et son
s’affiche
ensuite à chaque utilisation.
Veille
Permet de mettre en veille le
téléviseur. Pour l’allumer, appuyez
sur b,P @#ou 09.
ı Liste des programmes
Pour afficher / effacer la liste des
programmes. Utilisez ensuite les
touches îÏ pour sélectionner
un programme et la touche ¬
pour l’afficher.
Le symbole + apparaît devant les
programmes qui sont verrouillés (p.10)
ou
? : s’ils sont déverrouillés.
Préréglages image et son
Permet d’accéder à une série de
préréglages de l’image et du son.
La position PERSONNEL correspond
aux réglages effectués dans les menus.
Son Surround
Pour activer / désactiver l’effet
d’élargissement du son. En stéréo,les
haut-parleurs paraissent plus espacés.
Pour les versions équipés du Virtual
Dolby Surround *,vous obtenez les
effets sonores arrières du Dolby
Surround Pro Logic.En mono, on
obtient un effet spatial pseudo stéréo.
*
"Dolby" et le symbole double-D £ sont des marques
de Dolby Laboratories Licensing Corporation. Fabriqué
sous licence de Dolby Laboratories Licensing Corporation.
Sélection des programmes
Pour accéder au programme
inférieur ou supérieur.
Le numéro,(le nom) et le mode
son s’affichent quelques instants.
Pour certains programmes le titre de
l’émission apparaît en bas de l’écran.
Programme précédent
Pour accéder au programme
précédemment visualisé.
Touches numériques
Accès direct aux programmes.
Pour un programme à 2 chiffres,il
faut ajouter le 2ème chiffre avant
que le trait ne disparaisse.
Sélecteur de mode (p. 13)
Pour activer la télécommande en
mode TV, VCR (magnétoscope) ou
DVD.
Page 4

4
& Positionnement du téléviseur
Placez votre téléviseur sur une surface solide et
stable. Pour prévenir toute situation dangereuse, ne
pas exposer le téléviseur à des projections d’eau, à
une source de chaleur (lampe, bougie, radiateur, ...)
et ne pas obstruer les grilles de ventilation situées à
l’arrière.
é Raccordements des antennes
• Utilisez le cordon de liaison d’antenne fourni et
raccordez la prise
: située en dessous du
téléviseur à votre prise d’antenne.
• Branchez le fil d'antenne radio fournie à la prise
FM ANT située en dessous du téléviseur.
• Rangez les fils en les passant à travers le pied du
téléviseur.
“ Raccordements de l’alimentation
Le téléviseur fonctionne à partir d’une alimentation
continue fournie (la valeur de la tension est indiquée
sur l’étiquette). Utilisez uniquement l’adaptateur ACDC livré avec le téléviseur.
• Raccordez la fiche DC de l’adaptateur à la fiche
DC du téléviseur. Laissez un espace libre autour de
l’adaptateur pour la ventilation.
• Branchez le cordon d’alimentation de l’adaptateur
et introduisez la prise de courant sur le secteur
(220-240 V / 50 Hz).
Pour le raccordement d’autres appareils, voir p.14.
‘ Télécommande
Introduisez les 2 piles de type R6 fournies en
respectant les polarités.
Les piles livrées avec l’appareil ne contiennent ni mercure ni
cadmium nickel, dans un souci de préserver
l’environnement.Veillez à ne pas jeter vos piles usagées
mais à utiliser les moyens de recyclage mis à votre
disposition (consultez votre revendeur).
( Mise en marche
Pour allumer le téléviseur, appuyez sur la touche
marche arrêt. Un voyant s’allume en vert et l’écran
s’illumine.Allez directement au chapitre
installation rapide, page 5.
Si le téléviseur reste en veille (voyant rouge),
appuyez sur la touche P
# de la télécommande.
Le voyant clignote lorsque vous utilisez la télécommande.
Installation du téléviseur
5 cm
5 cm
5 cm
FM ANT.
MENU
”
P
++
--
.
VOLUME
PROGRAM
Page 5
5
Installation rapide des chaînes
Classement des programmes
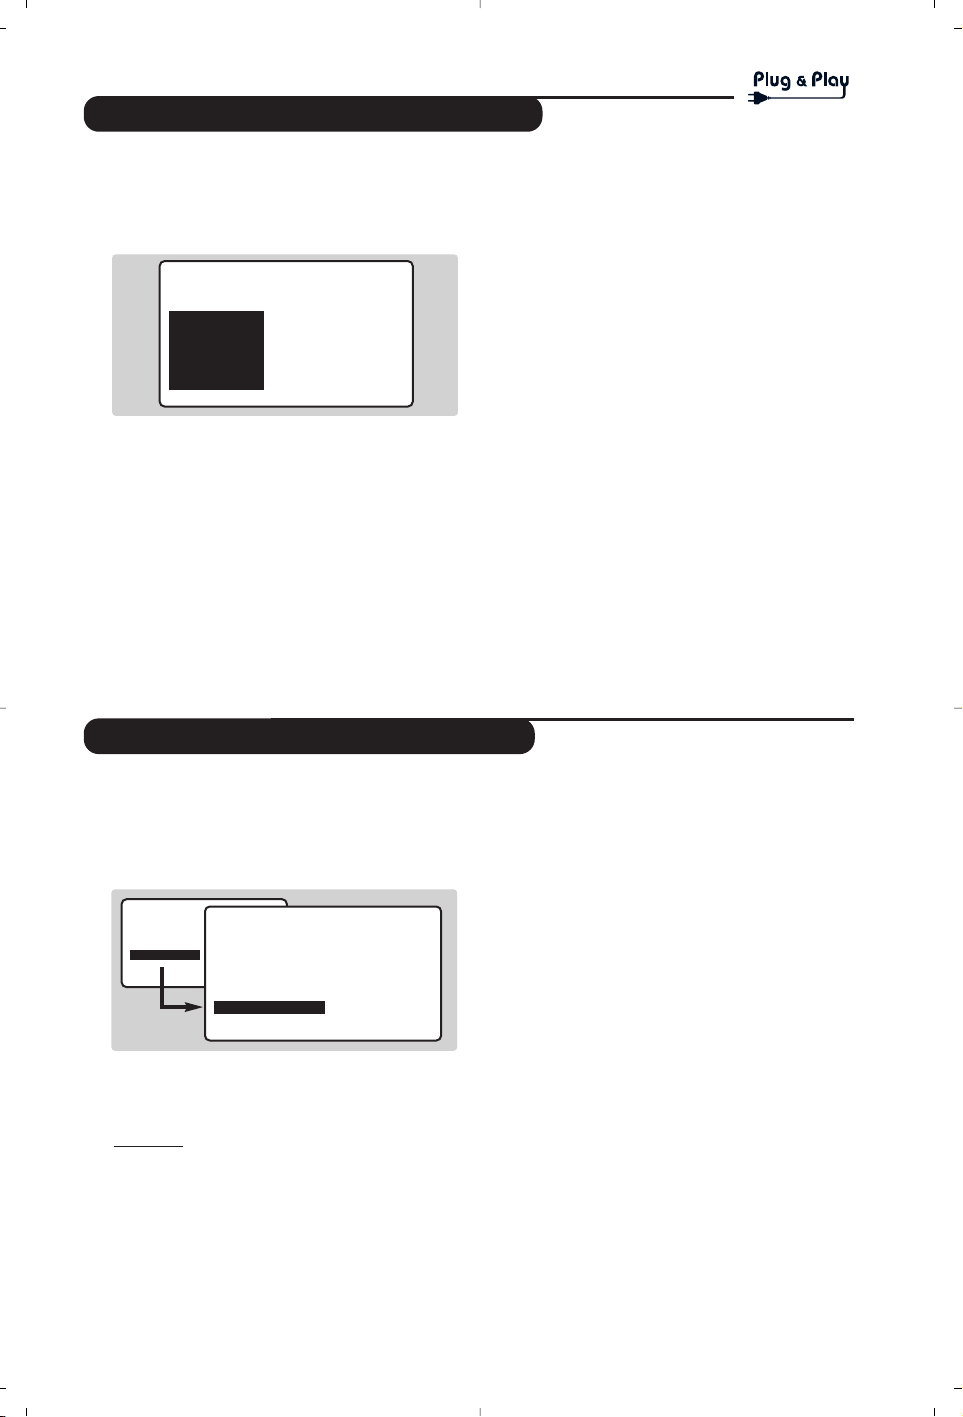
La première fois que vous allumez le téléviseur,
un menu apparaît à l’écran.
Ce menu vous invite à choisir la langue des
menus :
Si le menu n’apparaît pas, maintenez appuyées
pendant 8 secondes les touches ”- et ”+ du
téléviseur, pour le faire apparaître.
& Utilisez les touches
îÏ de la
télécommande pour choisir votre langue, puis
validez avec
¬.
é Sélectionnez ensuite votre pays avec les
touches
îÏ puis validez avec ¬.
Si votre pays n’apparaît pas dans la liste,
sélectionnez le choix AUTRE.
“ La recherche démarre automatiquement.Tous
les programmes TV et stations radio
disponibles sont mémorisés. L’opération prend
quelques minutes. L’affichage montre la
progression de la recherche et le nombre de
programme trouvés. A la fin, le menu disparaît.
Pour sortir ou interrompre la recherche, appuyez
sur
H. Si aucun programme n’est trouvé, reportez
vous au chapitre conseils p. 16.
‘ Si l’émetteur ou le réseau câblé transmet le
signal de classement automatique, les
programmes seront correctement numérotés.
L’installation est alors terminée.
( En l’absence de signal de classement, les
programmes trouvés seront numérotés en ordre
décroissant à partir du numéro 99,98, 97,...
Vous devez utiliser le menu CLASSEMENT
pour les renuméroter.
Certains émetteurs ou réseaux câblés diffusent leurs
propres paramètres de classement (région, langage, ...).
Dans ce cas, vous devez indiquer votre choix avec les
touches îÏ puis valider avec ¬.
Voir aussi : Fonction EasyLink, page 6.
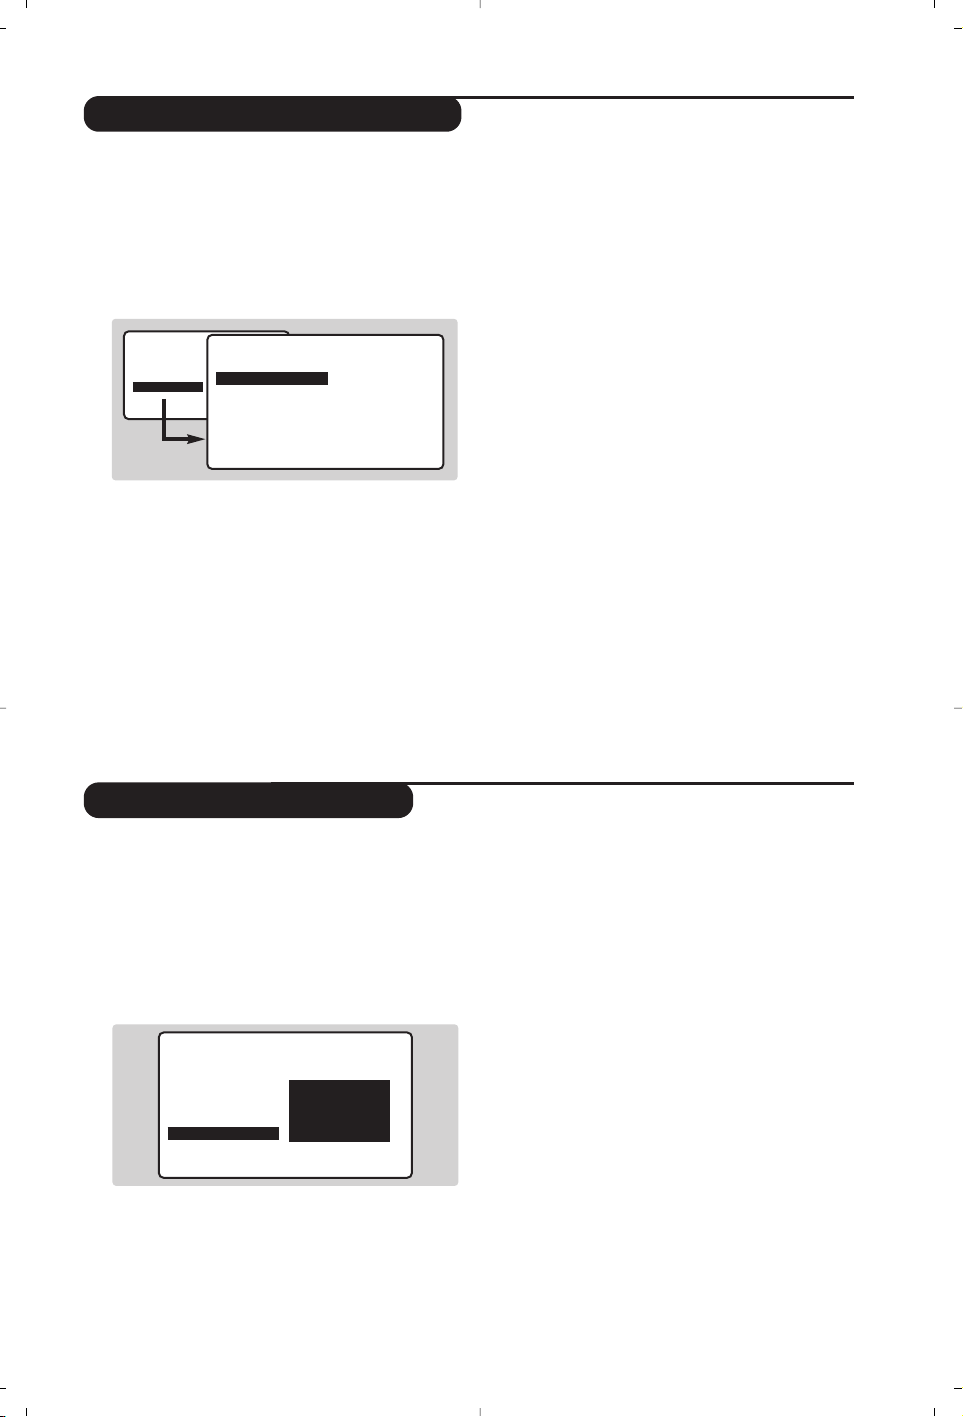
& Appuyez sur la touche H. Le menu principal
s’affiche à l’écran.
é Sélectionner INSTALLATION (
Ï) et
appuyez sur
¬. Le menu INSTALLATION
apparaît :
“ Sélectionner CLASSEMENT à l’aide de la
touche
Ï et appuyez sur ¬. Le menu
CLASSEMENT apparaît. Le choix DE est actif.
Remar
que: ce menu fonctionne selon la logique
suivante :
•“à partir DE” (entrez le n°du programme actuel),
•“pour aller A” (entrez le nouveau numéro),
•“ÉCHANGER les numéros” (l’opération est effectuée).
‘ Sélectionnez le programme que vous
souhaitez renuméroter en utilisant les touches
Ȭ ou 0 à 9.
Exemple: vous voulez faire un échange DE
programme 78 A programme 2:tapez
78.
( Sélectionnez A (touche
Ï) et entrez le
nouveau numéro souhaité avec les touches
Ȭ ou 0 à 9 (dans notre exemple
tapez
2).
§ Sélectionnez ÉCHANGE (touche
Ï) et
appuyez sur
¬.L’indication ÉCHANGÉ
apparaît, l’échange s’effectue. Dans notre
exemple le programme 78 est renuméroté en
n° 2 (et le n° 2 en 78).
è Sélectionnez DE (touche
î) et
recommencez les étapes ‘ à § autant de fois
qu’il y a de programmes à renuméroter.
Voir aussi : Fonction EasyLink, page 6.
! Pour quitter les menus,appuyez sur la
touche
d.
SELECT LANGAGE
LANGAGE
•
FRANÇAIS
DEUTSCH
E††HNIKA
ITALIA
NORSK
PAYS
ALLEMAGNE
DANEMARK
ESPAGNE
FINLANDE
FRANCE
• IMAGE
• SON
• OPTIONS
• INSTALLATION
INSTALLATION
• LANGAGE
• PAYS
• MÉMO. AUTO.
• MÉMO. MANUEL.
• CLASSEMENT
• NOM DU PROG.
DE
A
ECHANGER
Page 6

6
Choix de la langue et du pays
Mémorisation automatique
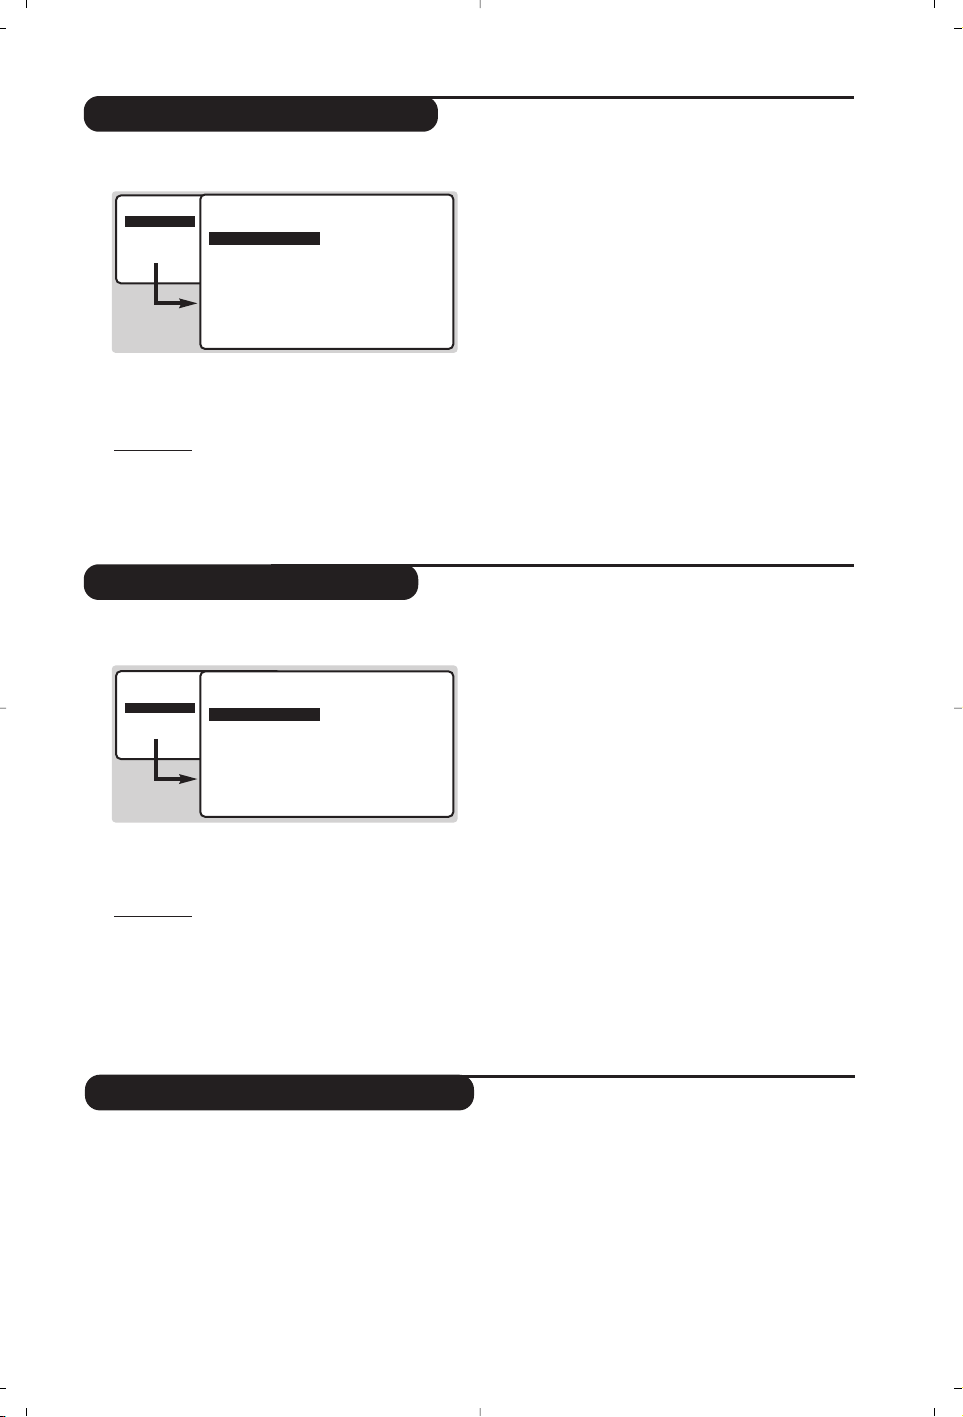
& Appuyez sur la touche H pour afficher le
menu principal.
é Sélectionner
INSTALLATION (Ï) et appuyez
sur
¬. Le menu INSTALLATION apparaît.
Le choix
LANGAGE est actif.
“ Appuyez sur
¬ pour entrer dans le menu
LANGAGE.
‘ Choisissez votre langue avec les touches îÏ.
Les menus apparaîtront dans la langue choisie.
( Appuyez sur
È pour sortir du menu
LANGAGE.
§ Sélectionner
PAYS (Ï) et appuyez sur ¬.
è Choisissez votre pays avec les touches
îÏ
Si votre pays n’apparaît pas dans la liste,
sélectionnez le choix AUTRE.
! Appuyez sur
È pour sortir du menu PAYS .
ç Pour quitter les menus,appuyez sur
d.
Voir aussi : Fonction EasyLink, ci-dessous.
Ce menu permet de lancer une recherche
automatique de tous les programmes
disponibles dans votre région (ou sur votre
réseau câblé).
& Effectuez d’abord les opérations & à !
ci-dessus, puis :
é Sélectionner
MÉMO AUTO (Ï) et appuyez
sur
¬. La recherche commence.
Au bout de quelques minutes, le menu
INSTALLATION réapparaît automatiquement.
“ Si l’émetteur ou le réseau câblé transmet le
signal de classement automatique, les
programmes seront correctement numérotés.
L’installation est terminée.
‘ Si ce n’est pas le cas, les programmes trouvés
seront numérotés en ordre décroissant à
partir du numéro 99, 98, 97, ...Vous devez alors
utiliser le menu
CLASSEMENT pour les
renuméroter (voir page 4).
Certains émetteurs ou réseaux câblés diffusent leurs
propres paramètres de classement (région, langage, ...).
Dans ce cas, vous devez indiquer votre choix avec les
touches
îÏ puis valider avec ¬.Pour sortir ou
interrompre la recherche, appuyez sur
H. Si aucune
image n’est trouvée, voir conseils (p. 16).
Voir aussi :
Fonction EasyLink, ci-dessous.
.
( Pour quitter les menus,appuyez sur d.
• IMAGE
• SON
• OPTIONS
• INSTALLATION
INSTALLATION
• LANGAGE
• PAYS
• MÉMO. AUTO.
• MÉMO. MANUEL.
• CLASSEMENT
•
NOM DU PROG.
FRANÇAIS
DEUTSCH
ITALIA
INSTALLATION
• LANGAGE
• PAYS
• MÉMO. AUTO.
• MÉMO. MANUEL.
• CLASSEMENT
• NOM DU PROG.
RECHERCHE
ATTENDEZ SVP
PROG. TROUVÉS 2
215.18 MHZ
Si le téléviseur est connecté (par la prise EXT2)
à un magnétoscope équipé de la fonction
EasyLink, la langue, le pays et les chaînes
trouvées sont transmises automatiquement au
magnétoscope lors de l’installation. Un message
apparaît à l’écran pendant le chargement.La liste
des chaînes du magnétoscope devient la même
que celle du téléviseur.
Le réglage EASY LINK du menu OPTION doit être
sur MARCHE (réglage par défaut), voir page 9.
Fonction EasyLink
(disponible uniquement sur certaines versions)
Page 7
7
Mémorisation manuelle
Nom de programme
Ce menu permet de mémoriser les
programmes un par un.
& Appuyez sur la touche
H.
é Sélectionner
INSTALLATION (Ï) et appuyez
sur
¬. Le menu INSTALLATION apparaît.
“ Sélectionner
MÉMO MANUELLE (Ï) et
appuyez sur
¬. Le menu apparaît :
‘ Appuyez sur
¬ pour entrer dans le menu
SYSTÈME. Utilisez îÏ pour choisir EUROPE
(détection automatique*) ou détection manuelle
avec :
WEST EUR (norme BG), EAST EUR (norme
DK), UK (norme I) ou
FRANCE (norme LL’).
Appuyez ensuite sur
È pour sortir du menu.
* Sauf pour la France (norme LL’), il faut
sélectionner impérativement le choix FRANCE.
( Sélectionnez
RECHERCHE et appuyez sur ¬.
La recherche commence. Dès qu’un
programme est trouvé,le défilement s’arrête.
Allez au chapitre è.
Si vous connaissez la fréquence du programme
désiré, composez directement son numéro
avec les touches
09.
Si aucune image n’est trouvée, voir conseils (p. 16).
§ Si la réception n’est pas satisfaisante,
sélectionnez
AJUST. FIN et maintenez appuyée
la touche
È ou ¬.
è Sélectionnez
NO DE PROG. et utilisez les
touches
Ȭou 0 à 9 pour entrer le
numéro souhaité.
! Sélectionnez
MÉMORISATION et appuyez sur
¬.L’indication MÉMORISÉ apparaît
brièvement. Le programme est mémorisé.
Voir aussi : Fonction EasyLink, page 6.
ç Répétez les chapitres ( à ! autant de fois
qu’il y a de programmes à mémoriser.
Pour quitter:appuyez sur la touche
d.
Vous pouvez, si vous le souhaitez, donner un
nom aux 40 premiers programmes (de 1 à 40).
& Appuyez sur la touche
H.
é Sélectionner
INSTALLATION
(
Ï) et appuyez
sur
¬. Le menu INSTALLATION apparaît.
“ Appuyez 5 fois sur
Ï pour sélectionner
NOM DE PROG. (caché en bas de l’écran) et
appuyez sur
¬. Le menu apparaît :
‘ Sélectionnez le programme que vous
souhaitez nommer en utilisant les touches
09ou @ P #.
Remarque: lors de l’installation, les programmes
sont nommés automatiquement lorsque le signal
d’identification est transmis.
( Utilisez les touches
Ȭpour vous
déplacer dans la zone d’affichage du nom
(5 caractères).
§ Utilisez les touches
îÏpour choisir les
caractères.
è Appuyez sur
H lorsque le nom est entré.
Le nom de programme est mémorisé.
Voir aussi : Fonction EasyLink, page 6.
! Recommencez les étapes ‘ à è pour chaque
programme à nommer.
ç Pour quitter les menus,appuyez sur
d.
INSTALLATION
• LANGAGE
• PAYS
• MÉMO. AUTO.
• MÉMO. MANUEL.
• CLASSEMENT
• NOM DU PROG. TF1_
• IMAGE
• SON
• OPTIONS
• INSTALLATION
INSTALLATION
MÉMO. MANUEL.
• SYSTÈME
• RECHERCHE
• NO. DE PROG
• AJUST. FIN
• MÉMORISER
EUROPE
WEST EUR
EAST EUR
UK
FRANCE
Page 8

8
Utilisation de la radio
Utilisation en mode moniteur PC
Choix du mode radio
Appuyez sur la touche
Z de la télécommande
pour commuter le téléviseur en mode radio.
Appuyez sur la touche
X pour revenir en
mode tv.En mode radio, le numéro,le nom de
la station (si disponible), sa fréquence et le
mode son s’affichent à l’écran.
Pour entrer le nom des stations utilisez le menu
NOM DU PROG. (p.7)
Sélection des programmes
Utilisez les touches
09ou @ P # pour
sélectionner les stations FM (de 1 à 40).
Liste des stations radio
Appuyez sur la touche ı pour afficher/effacer la
liste des stations radio.
Utilisez ensuite le
curseur pour sélectionner une station.
Utilisation des menus radio
Utilisez la touche H pour accéder aux
réglages spécifiques à la radio.
Recherche des stations radio
Si vous avez utilisé l’installation rapide, toutes
les stations FM disponibles ont été mémorisées.
Pour lancer une nouvelle recherche, utilisez le
menu
INSTALLATION : MÉMO.AUTO (pour une
recherche complète) ou
MÉMO.MANUEL
(pour
une recherche station par station).Les menus
CLASSEMENT et NOM DE PROG. vous
permettront de classer ou nommer les stations
radio. Le fonctionnement de ces menus est
identique a celui des menus TV.
Économiseur d’écran
Dans le menu
OPTIONS vous pouvez
activer/désactiver l’économiseur d’écran.
L’heure, la fréquence de la station et le nom (si
disponible) défilent à l’écran.
Mode PC
Votre téléviseur peut être utilisé comme un
moniteur d’ordinateur. La fonction PIP vous
permettra d’afficher en même temps un écran
d’incrustation d’image pour regarder les chaînes tv.
Vous devez d’abord effectuer les raccordements de
l’ordinateur et ajuster la résolution (voir p.15).
Choix du mode PC
Appuyez sur la touche Vde la télécommande
pour commuter le téléviseur en mode PC.
Appuyez sur
X
pour revenir en mode tv.
En cas d’absence de signal PC pendant plus de 5
secondes, le téléviseur passe automatiquement en veille.
Utilisation du PIP
En mode PC, vous pouvez afficher une fenêtre
permettant de visualiser les chaînes tv.
& Appuyez sur la touche
œ pour afficher l’écran
PIP. L’image de la télévision est reproduite dans
une petite fenêtre d’incrustation.
é Appuyez de nouveau sur
œ pour réduire la
taille de la fenêtre puis la faire disparaître.
“ Utilisez la touche
π si vous souhaitez
déplacer la fenêtre.Vous pouvez également la
déplacer progressivement en utilisant le curseur.
‘ Utilisez les touches
09ou @ P # pour
changer les programmes de l’écran PIP ou la
touche
n si vous souhaitez afficher l’image
d’un appareil connecté au téléviseur
(magnétoscope, DVD, ...).
Utilisation des menus PC
Appuyez sur la touche
H pour accéder aux
réglages spécifiques au mode moniteur PC.
Utilisez le curseur pour régler (les réglages
sont mémorisés automatiquement) :
•
SÉLECTION AUDIO: pour choisir le son qui est
reproduit sur le téléviseur (PC ou TV / Radio).
Vous pouvez par exemple écouter la radio
pendant que vous utilisez l’ordinateur.
Remar
que : il faut choisir le mode TV ou radio
avant de passer en mode PC. Lorsque l’écran PIP
est affiché, vous ne pouvez pas écouter la radio.
•
LUMIÈRE / CONTRASTE : pour régler la lumière
et le contraste.
•
RÉGLER LA COULEUR : pour régler la teinte
des couleurs (froide, normale ou chaude).
• BRUIT VIDEO :permet d’éliminer les lignes parasites
horizontales (
PHASE) et verticales (HORLOGE).
• AJUSTEMENT POSITION: pour ajuster le
positionnement horizontal et vertical de l’image.
•
AJUSTEMENT AUTO :le positionnement est
réglé automatiquement.
•
CONTRÔLE PIP : pour ajuster la taille et la
position de l’écran PIP.
•
SÉLECTION MODE : pour revenir en mode TV
ou radio.
•
REVENIR RÉGLAGES USINE : pour revenir aux
réglages d’usine (réglages par défaut).
• FORMAT D’ÉCRAN : pour choisir entre écran
large ou le format original des écrans PC.
Page 9

9
Réglages de l’image
Réglages du son
& Appuyez sur la touche H puis sur ¬.
Le menu
IMAGE apparaît :
é Utilisez les touches
îÏ pour sélectionner
un réglage et les touches
Ȭ pour régler.
Remarque : il s’agit d’un menu déroulant.
Maintenez appuyée la touche Ï pour accéder
aux réglages masqués en bas de l’écran.
“ Une fois les réglages effectués, sélectionnez le
choix
MÉMORISER et appuyer sur ¬ pour les
enregistrer.
‘ Pour quitter les menus,appuyez sur
d.
Description des réglages :
•
LUMIÈRE: agit sur la luminosité de l’image.
•
COULEUR: agit sur l’intensité de la couleur.
•
CONTRASTE
: agit sur la différence entre les tons
clairs et les tons foncés.
•
DÉFINITION: agit sur la netteté de l’image.
•
MÉMORISER: pour mémoriser les réglages de
l’image.
•
TEMP.COULEUR: agit sur le rendu des couleurs.
Vous avez 3 possibilités:
FROIDE (plus bleue),
NORMALE (équilibrée) ou
CHAUDE (plus rouge).
•
CONTRASTE + : pour activer / désactiver les
circuits de réglage automatique du contraste de
l’image (ramène en permanence la partie la plus
sombre de l’image au noir).
• IMAGE
• SON
• OPTIONS
• INSTALLATION
IMAGE
• LUMIÈRE
• COULEUR
• CONTRASTE
• DÉFINITION
• MÉMORISER
• TEMP. COULEUR
• CONTRASTE+
--I------ 39
& Appuyez sur H, sélectionner SON (Ï) et
appuyez sur
¬. Le menu
SON apparaît :
é Utilisez les touches
îÏ pour sélectionner
un réglage et les touches
Ȭ pour régler.
“ Une fois les réglages effectués, sélectionnez le
choix
MÉMORISER et appuyer sur ¬ pour les
enregistrer.
‘ Pour quitter les menus,appuyez sur
d.
Description des réglages:
•
EGALISEUR: pour régler la tonalité du son (de
grave:120 Hz à aigus: 10 kHz).
•
BALANCE : pour équilibrer le son sur les haut-
parleurs gauche et droit.
•
DELTA VOLUME
(différence de volume):permet
de compenser les écarts de volume qui existent
entre les différents programmes ou les prises
EXT. Ce réglage est opérationnel pour les
programmes 1 à 40 et les prises EXT. Utilisez les
touches
@ P # pour comparer le niveau des
différents programmes.
• MÉMORISER: pour mémoriser les réglages du son
• AVL (Automatic Volume Leveler): contrôle
automatique du volume qui permet de limiter les
augmentations du son, en particulier lors des
changements de programmes ou des publicités.
• IMAGE
• SON
• OPTIONS
• INSTALLATION
SON
• EGALISEUR
•
BALANCE
• DELTA VOLUME
• MÉMORISER
• AVL
120 HZ
500 HZ
1500 HZ
5 KHZ
10 KHZ
Réglages des options
& Appuyez sur H, sélectionner OPTIONS (Ï)
et appuyez sur
¬.Vous pouvez régler :
é
TIMER, VERROU TV,VERROU ENFANT:voir page
suivante.
“
SELECT. MODE: pour commuter le téléviseur
en mode radio,TV ou PC.
‘ EASY LINK (disponible uniquement sur certaines
versions) : Si le téléviseur est connecté (par la
prise EXT2) à un magnétoscope équipé de la
fonction EasyLink,la langue, le pays et les chaînes
trouvées sont transmises automatiquement au
magnétoscope lors de l’installation. Si votre
magnétoscope n’est pas équipé de cette
fonction, positionnez ce réglage sur
ARRÊT.
( Pour quitter les menus,appuyez sur
d.
Page 10

10
Fonction réveil
Verrouillage du téléviseur
Ce menu vous permet d’utiliser le téléviseur
comme un réveil.
& Appuyez sur la touche
H.
é Sélectionner
OPTIONS (Ï) et appuyez 2 fois
sur
¬. Le menu
TIMER apparaît :
“ Appuyez sur ¬ pour entrer et sortir de
chaque sous-menu et utilisez les touches
îÏ pour régler :
‘
HEURE
: entrez l’heure courante.
Remar
que : l’heure est mise à jour automatiquement,
à chaque mise en marche, à partir des informations
télétexte du programme n° 1. Si celui-ci n’a pas de
télétexte, la mise à jour n’aura pas lieu.
(
HEURE DÉBUT: entrez l’heure de début.
§
HEURE FIN: entrez l’heure de mise en veille.
è
NO.DE PROG: entrez le numéro du programme
désiré pour le réveil. Pour les modèles équipés
de la radio, vous pouvez sélectionner une
station FM en utilisant les touches
Ȭ (les
touches
09 permettent uniquement de
sélectionner les programmes tv).
!
PROG.ACTIVÉE
:vous pouvez régler :
•
UNE FOIS pour un réveil unique,
•
QUOTIDIEN
pour tous les jour,
•
ARRÊT pour annuler.
ç Appuyez sur
b pour mettre en veille le
téléviseur. Il s’allumera automatiquement à
l’heure programmée. Si vous laissez le
téléviseur allumé, il changera uniquement de
programme à l’heure indiquée (et se mettra en
veille à l’
HEURE
HEURE de FIN).
La combinaison des fonctions VERROU TV et
TIMER permet de limiter la durée d’utilisation du
téléviseur, à vos enfants par exemple.
Vous pouvez verrouiller certains programmes
ou interdire complètement l’utilisation du
téléviseur en verrouillant les touches.
Verrouillage des programmes
& Appuyez sur la touche H.
é Sélectionner OPTIONS (Ï) et appuyez sur ¬.
“ Sélectionner
VERROU ENFANT (
Ï) et
appuyez sur
¬.
‘ Vous devez entrer votre code confidentiel
d’accès. La première fois, tapez 2 fois le code
0711. Le menu apparaît.
( Appuyez sur
¬ pour entrer
dans le menu.
§
Utilisez les touches îÏ pour sélectionner le
programme souhaité et validez avec
¬
.Le
symbole
+ s’affiche devant les programmes ou
les prises qui sont verrouillés.
è Appuyez sur la touche d pour quitter.
Désormais, pour visualiser un programme
verrouillé, vous devez entrer le code
confidentiel, sinon l’écran restera noir.
L’accès au menu INSTALLATION est également
verrouillé. Attention, dans le cas des programmes
cryptés qui utilisent un décodeur extérieur, il faut
verrouiller la prise EXT correspondante.
Pour déverrouiller tous les programmes
Reproduisez les étapes & à ‘, puis sélectionnez
TOUT EFFACER et appuyez sur ¬.
Pour changer le code confidentiel
Reproduisez les étapes & à ‘,puis:
( Sélectionnez
CHANGER CODE et entrez votre
propre numéro à 4 chiffres.
§ Confirmez en le tapant une deuxième fois.
Votre nouveau code est mémorisé.
è Appuyez sur
d pour quitter les menus.
Si vous avez oublié votre code confidentiel, entrez
le code universel 0711 deux fois.
Verrouillage des touches
& Appuyez sur H, sélectionner OPTIONS (Ï)
et appuyez sur
¬.
é Sélectionner
VERROU TV (Ï) et appuyez
sur
¬ pour mettre sur MARCHE.
“ Éteignez le téléviseur et cachez la
télécommande. Le téléviseur devient inutilisable
(seule la télécommande permet de l’allumer).
‘ Pour annuler: positionnez VERROU TV surARRÊT.
• IMAGE
• SON
• OPTIONS
• INSTALLATION
OPTION
TIMER
• HEURE
• HEURE DÉBUT
• HEURE FIN
• NO. DE PROG
• PROG. ACTIVE
10:56
• IMAGE
• SON
• OPTION
• INSTALLATION
OPTION
• TIMER
• SELECT. MODE
• VERROU TV
• VERROU ENFANT
• EASY LINK
CODE D’ACCÈS
- - - -
Page 11

11
Télétexte
Appuyez sur :
Vous obtenez :
Le télétexte est un système d'informations, diffusé par certaines chaînes, qui se consulte comme un
journal. Il permet aussi d'accéder aux sous-titrages pour les personnes malentendantes ou peu
familiarisées avec la langue de transmission (réseaux câblés,chaînes satellites,...).
Marche/arrêt
télétexte
Sélection
d’une page
Permet d’appeler le télétexte, de passer en mode transparent
puis de quitter. La première fois,le sommaire apparaît avec la
liste des rubriques auxquelles vous pouvez accéder.Chaque
rubrique est repérée par un numéro de page à 3 chiffres.
Si la chaîne sélectionnée ne diffuse pas le télétexte, l'indication
100 s'affiche et l'écran reste noir (dans ce cas, quittez le
télétexte et choisissez une autre chaîne).
Composer le numéro de la page désiré avec les touches
0 à 9 ou @ P #.Exemple: page 120, tapez 120.
Le numéro s’affiche en haut à gauche, le compteur tourne,
puis la page est affichée. Renouvelez l'opération pour
consulter une autre page.
Si le compteur continue à chercher, c’est que la page n'est pas
transmise. Choisissez un autre numéro.
Sommaire
Accès
direct aux
rubriques
Pour revenir au sommaire (généralement la page 100).
Des zones colorées sont affichées en bas de l’écran.
Les 4 touches colorées permettent d’accéder aux
rubriques ou aux pages correspondantes.
Les zones colorées clignotent lorsque la rubrique ou la page
n’est pas encore disponible.
Sélection
directe des
sous-pages
Certaines pages contiennent des sous-pages (exemple, la
page 120 contient les sous-pages 1/3, 2/3 et 3/3). Dans ce
cas, le numéro de page s’affiche en vert, précédé d’un
symbole
Æ, Í ou ÍÆ. Utilisez les touches Ȭ pour
accéder directement aux sous-pages de votre choix.
Agrandissement
d'une page
Double page
télétexte
(disponible
uniquement sur
certaines versions)
Pour afficher la partie supérieure, inférieure, puis revenir à
la dimension normale.
Pour activer ou désactiver l’affichage du télétexte en double
page. La page active est affichée à gauche et la page suivante
à droite.Appuyez sur la
touche ssi vous voulez figer un
page (par exemple le sommaire).La page active devient celle de
droite. Pour revenir en mode normal,appuyez sur e.
Informations
cachées
Pages
préférées
Pour faire apparaître ou disparaître les informations
cachées (solutions de jeux).
Pour les programmes télétexte 0 à 40,vous pouvez mémoriser
4 pages préférées qui seront ensuite directement accessibles
avec les touches colorées (rouge, verte, jaune,bleue).
& Appuyez sur la touche H pour passer en mode pages
préférées.
é Affichez la page télétexte que vous souhaitez mémoriser.
“ Appuyez sur la touche
d
puis sur la touche colorée
de votre choix.La page est mémorisée.
‘ Renouvelez les étapes é et “ pour les autres touches
colorées.
( À présent, dès que vous consultez le télétexte, vos pages
préférées apparaissent en couleur en bas de l’écran. Pour
retrouver les rubriques habituelles,appuyez sur H.
Pour tout effacer, appuyez sur
d pendant 5 secondes.
Ÿ
MODE
VCR
Y
DVD
ª
Å
∆
Ó
`
ù
SMART SMART
ACTIVE
-
CONTROL
MENU
+ +
MUTE
”
[
- -
%
OK
∏
PC TV
12
564
879
Ë
0
.
ı
∫
¤
ª
0
P
9
RADIO
P
3
Á
Ë
Å
ù
Y
MENU
Ë
Page 12

12
Formats 16:9
Les images que vous recevez peuvent être transmises au format 16:9 (écran large) ou 4:3 (écran
traditionnel). Les images 4:3 ont parfois une bande noire en haut et en bas (format cinémascope).
Cette fonction permet d’éliminer les bandes noires et d’optimiser l’affichage des images sur l’écran.
Si votre téléviseur est équipé d’un écran 4:3
Si votre téléviseur est équipé d’un écran 16:9
Appuyez sur la touche p (ou
Ȭ
) pour sélectionner les différents modes :
Le téléviseur est équipé d’une commutation automatique qui décode le signal spécifique
émis par certains programmes et sélectionne automatiquement le bon format d’écran.
4:3
L’image est reproduite au format 4:3,une bande noire apparaît de chaque côté de
l’image.
ZOOM 14:9
L’image est agrandie au format 14:9, une petite bande noire subsiste de chaque côté
de l’image.
ZOOM 16:9
L’image est agrandie au format 16:9. Ce mode est recommandé pour visualiser les
images avec bande noire en haut et en bas (format cinémascope).
16:9 SOUS-TITRES
Ce mode permet de visualiser les images 4:3 sur toute la surface de l’écran en
laissant visibles les sous-titres.
SUPER 4:3
Ce mode permet de visualiser les images 4:3 sur toute la surface de l’écran en
élargissant les côtés de l’image.
16:9
Ce mode permet de restituer les bonnes proportions des images transmises en 16:9.
Si vous visualisez une image 4:3 comme représentée ici, elle sera élargie sur le plan horizontal.
PLEIN ÉCRAN
Ce mode permet d’afficher les images en plein écran.
Appuyez sur la touche
p (ou
îÏ
) pour sélectionner les différents modes :
4:3
L’image est reproduite au format 4:3
EXTENSION 4:3
L’image est élargie verticalement.
Ce mode permet de supprimer les bandes noires
des images au format cinémascope.
COMPRESS 16:9
L’image est comprimée verticalement au format 16:9.
Page 13

13
Touches magnétoscope et DVD
Glossaire
La télécommande permet de piloter les fonctions principales des
magnétoscopes ou des DVD de notre gamme de produit.
La télécommande est compatible avec tous les magnétoscopes utilisant le
standard RC5 et tous les DVD utilisant le standard RC6.
& Appuyez sur la touche
MODE pour sélectionner le mode désiré :
VCR (magnétoscope) ou DVD. Le voyant de la télécommande s’allume
pour montrer le mode sélectionné. Il s’éteint automatiquement après
20 secondes sans action (retour au mode TV).
é En fonction de l’équipement, les touches suivantes sont
opérationnelles :
b veille,
· enregistrement,
¢ retour rapide,
Ê stop,
Æ lecture,
∫ avance rapide,
∆ pause,
% timer magnétoscope,
c DVD: langue de sous-titrage ,
H appel menu,
curseur navigation et réglages,
OK validation,
09 touches numériques,
@
P# sélection des programmes,
e choix du langage.
d menu OSD
EasyLink : Liaison numérique entre le téléviseur et le magnétoscope permettant un transfert direct
de certaines informations comme le réglage des chaînes ou la programmation du magnétoscope.
PIP (Picture in Picture) :Fenêtre d’incrustation d’image permettant d’afficher une petite image dans
l’image principale. En mode PC, vous pouvez afficher dans un petit écran l’image en provenance du
téléviseur ou d’un autre appareil (DVD, Magnétoscope, ...).
Signaux RVB : Il s’agit de 3 signaux vidéo Rouge,Vert, Bleu qui composent l’image. L’utilisation de ces
signaux permet d’obtenir une meilleure qualité d’image.
Signaux S-VHS : Il s’agit de 2 signaux vidéo séparés Y/C issus des standards d’enregistrement S-VHS
et Hi-8. Les signaux de luminance Y (noir et blanc) et de chrominance C (couleur) sont enregistrés
séparément sur la bande. On obtient ainsi une meilleur qualité qu’avec la vidéo standard (VHS et
8 mm) où les signaux Y/C sont mélangés pour ne former qu’un seul signal vidéo.
Son NICAM : Procédé permettant de transmettre le son en qualité numérique.
Système : La transmission des images n’est pas faite de la même façon dans tous les pays.Il existe
différentes normes : BG, DK, I, et L L’. Le réglage SYSTÈME (p. 6) permet de sélectionner ces
différentes normes. Ne pas confondre avec le codage couleur PAL ou SECAM.Le Pal est utilisé
dans la plupart des pays d’Europe, le Secam en France, en Russie et dans la plupart des pays
d’Afrique. Les États Unis et le Japon utilisent un autre système appelé NTSC. Les entrées EXT1 et
EXT2 permettent de lire les enregistrements codés en NTSC.
16:9 : Désigne les proportions largeur / hauteur de l’écran. Les téléviseurs à écran large ont des
proportions 16/9 et les écrans traditionnels: 4/3.
Ÿ
MODE
VCR
Y
DVD
Å
ª
`
SMART SMART
MENU
+ +
”
OK
PC TV
∆
ù
ACTIVE
-
CONTROL
MUTE
[
- -
%
∏
12
564
879
0
Ë
.
ı
Æ∫Ê¢·
¤Ó
ª
P
RADIO
3
Á
Page 14

MODE
VCR
DVD
·¢Ê Æ
∫
Ó
ı
Ω∆
.
Z
¤
14
Raccordement d’autres appareils
Selon les versions, le téléviseur est équipé de 1 ou 2 prises péritel EXT1 et EXT2.
Un adaptateur spécial est livré pour brancher sur la prise EXT1 et permettre de dériver
les fils sur l’arrière.
La prise EXT1 possède les entrées/sorties audio vidéo et les entrées RVB.
La prise EXT2* (si disponible) possède les entrées/sorties audio vidéo et les entrées S-VHS.
Magnétoscope (ou DVD enregistrable)
Effectuez les raccordements ci-contre. Utilisez un cordon de
liaison péritel de bonne qualité. Si votre magnétoscope est
équipé de la fonction Easylink, utilisez la prise EXT2.
Si votre magnétoscope ne possède pas de prise péritel, seule la
liaison par le câble antenne est possible.Vous devez accorder le
programme numéro 0 du téléviseur sur le signal de test du
magnétoscope (voir mémo. manuelle p. 7).Ensuite pour reproduire
l’image du magnétoscope, appuyez sur
0.
Magnétoscope avec Décodeur
Connectez le décodeur sur la deuxième prise péritel du
magnétoscope.Vous pourrez ainsi enregistrer les émissions
cryptées.
Magnétoscope
Récepteur satellite, décodeur,DVD, jeux,...
Effectuez les raccordements ci-contre.Pour les téléviseurs
équipés de 2 prises péritel, connectez de préférence à EXT1 les
équipements délivrant les signaux RVB (décodeur numérique,
lecteurs DVD,jeux, ...) et à EXT2 les équipements délivrant les
signaux S-VHS (magnétoscopes S-VHS et Hi-8, ...).
Pour sélectionner les appareils connectés
Appuyez sur la touche npour sélectionner EXT1 et sur les
versions à 2 prises péritel : EXT2 et S-VHS2 (signaux S-VHS de
la prise EXT2) et EXT3.
La plupart des appareils réalisent eux-mêmes la commutation
(décodeur, magnétoscope, ...).
Autres appareils
*
:
FM ANT
EXT 1
DC in PC input
L
Audio in
(PC)
R
Sub
woofer
out
*
L
Audio
EXT 2
R
out
:
FM ANT
VCR
Sub
woofer
out
*
L
R
Audio
out
Page 15

15
Les prises de connexion
AV et S-VIDEO sont situées sous
le volet gauche ou, pour les grandes tailles d’écran, sous le
volet droit.Effectuez les raccordements ci-contre.
Avec la touche
n
, sélectionner EXT3.
Pour un appareil monophonique, connectez le signal son sur
l’entrée AUDIO L. Le son est reproduit automatiquement sur les
haut-parleurs gauche et droit du téléviseur.
Lorsque le casque est connecté, le son du téléviseur est coupé.
Les touches @ ” # permettent de régler le volume.
L'impédance du casque doit être comprise entre 32 et 600 ohms.
Camescope, jeux video
Casque
O
Pour le raccordement à une chaîne Hi-fi,utilisez un cordon
de liaison audio et connectez les sorties
Audio out L et R
du téléviseur à une entrée Audio in L et R de la chaîne Hi-fi.
Si vous possédez un caisson de graves actif, connectez la
sortie
Subwoofer out du téléviseur à l’entrée Subwoofer in
du caisson.
Connectez la sortie moniteur de votre ordinateur à l’entrée
PC input (VGA) du téléviseur.Connectez la sortie son Audio
out L
et R de l’ordinateur à l’entrée Audio in (PC) L et R du
téléviseur.
Pour plus d’informations sur l’utilisation en mode PC, voir page 8.
La résolution optimale de l’écran est obtenue en configurant
l’ordinateur sur 1024 x 768, 60 Hz.
Attention
: si vous utilisez une autre résolution, il est possible que la
fonction PIP ne soit pas opérationnelle. Dans ce cas, un message
d’avertissement s’affiche à l’écran.
Voici la liste des différentes résolutions d’affichage disponibles
sur votre téléviseur :
640 x 350, 70 Hz 720 x 400,70 Hz 1024 x 768,60 Hz
640 x 350, 85 Hz 720 x 400,85 Hz 1024 x 768,70 Hz
640 x 480, 60 Hz 800 x 600,56 Hz 1024 x 768,75 Hz
640 x 480, 67 Hz 800 x 600,60 Hz 1024 x 768,85 Hz
640 x 480, 72 Hz 800 x 600,72 Hz 1152 x 864,75 Hz
640 x 480, 75 Hz 800 x 600,75 Hz 1280 x 960,60 Hz
640 x 480, 85 Hz 800 x 600,85 Hz 1280 x 1024,60 Hz
832 x 624, 75 Hz 1280 x 1024,75 Hz
Amplificateur
Ordinateur
L
R
S-VIDE
VIDEO
AUDIO
Sub
woofer
out
*
L
R
Audio
out
Sub
woofer
out
*
LR
Audio
out
PC input
Sub
woofer
in
Audio
in
Audio in (PC)
L
R
Page 16

16
Conseils
Mauvaise réception
Absence d'image
L’équipement
périphérique
délivre une image
en noir et blanc
Absence de son
Le mode PC ou le
PIP ne fonctionne
pas ?
La télécommande
ne fonctionne plus ?
Veille
Nettoyage du
téléviseur
Directive pour le
recyclage
Toujours pas de
résultats ?
La proximité de montagnes ou de hauts immeubles peut être la cause d'image
dédoublée, d'écho ou d'ombres. Dans ce cas, essayez d’ajuster manuellement
l’accord de l’image: voir AJUST. FIN (p.7) ou modifiez l'orientation de l'antenne
extérieure.
Vérifiez également que votre antenne permet de recevoir les émissions dans
cette bande de fréquences (bande UHF ou VHF) ?
Avez-vous bien branché l'antenne ?
Avez-vous choisi le bon système ? (p.7)
Une prise péritel ou une prise d'antenne mal connectée est souvent la cause de
problèmes d'image ou de son (il arrive que les prises se déconnectent
légèrement lorsque l'on déplace ou que l'on tourne le téléviseur).Vérifiez toutes
les connexions.
Vous n’avez pas sélectionné la bonne prise avec la touche n: S-VHS2 au lieu de
EXT2.
Pour la lecture d’une cassette vidéo, vérifiez qu’elle est enregistré au même
standard (PAL, SECAM, NTSC) que ce que peut lire le magnétoscope.
Si certains programmes sont dépourvus de son, mais pas d’image, c’est que vous
n’avez pas le bon système TV. Modifiez le réglage SYSTÈME (p. 7).
L’amplificateur connecté au téléviseur ne délivre pas de son ? Vérifiez que vous
n’avez pas confondu la sortie audio avec l’entrée audio.
Vérifiez que vous avez bien configuré l’ordinateur sur un résolution d’affichage
compatible (voir p.15).
En mode PC, vous n’arrivez pas à obtenir le son de la radio ? Lorsque le PIP est
en service, le son est forcé sur tv.Vous devez désactivez le PIP, passez en mode
radio puis revenir en mode PC.
Le voyant du téléviseur ne clignote plus lorsque vous utilisez la télécommande ?
Remplacez les piles.
Lorsque vous allumez le téléviseur, il reste en veille et l’indication VERROUILLÉ
s'affiche dès que vous utilisez les touches du téléviseur ? La fonction VERROU TV
est en service (p. 10).
Si le téléviseur ne reçoit pas de signal pendant 15 mn, il passe automatiquement
en veille.
Pour faire des économies d’énergie, votre téléviseur est équipé de composants
permettant une très faible consommation en veille (inférieure à 1 W).
Le nettoyage de l’écran et du coffret doit être effectué uniquement avec un
chiffon propre, doux et non pelucheux. Ne pas utiliser de produit à base d’alcool
ou de solvant.
Votre téléviseur utilise des matériaux réutilisables ou qui peuvent être recyclés.
Pour minimiser les déchets dans l'environnement,des entreprises spécialisées
récupèrent les appareils usagés pour les démonter et concentrer les matières
réutilisables (renseignez-vous auprès de votre revendeur).
Débranchez la prise secteur du téléviseur pendant 30 secondes puis rebranchez
la à nouveau.
En cas de panne, n’essayez jamais de réparer vous même le téléviseur, mais
consultez le service après vente.
Page 17

1
Inleiding
Inhoudsopgave
Hartelijk dank voor de aankoop van dit televisietoestel.Deze handleiding is
bedoeld om u te helpen bij de installatie en bediening van uw TV toestel.
We raden u ten sterkste aan de handleiding zorgvuldig door te nemen.
We hopen dat onze technologie u alle reden tot tevredenheid geeft.
Installatie
Voorstell van de LCD-televisie . . . . . . . . . . . . . . . . . . . . . . . . . . . . . . . . . . . . . . . .2
Toetsen van de afstandsbediening . . . . . . . . . . . . . . . . . . . . . . . . . . . . . . . . . . . . .3
Installeren van het televisietoestel . . . . . . . . . . . . . . . . . . . . . . . . . . . . . . . . . . . . .4
Snelle installatie van de zenders . . . . . . . . . . . . . . . . . . . . . . . . . . . . . . . . . . . . . . .5
Sorteren van de programma's . . . . . . . . . . . . . . . . . . . . . . . . . . . . . . . . . . . . . . . .5
Keuze van het land en de taal . . . . . . . . . . . . . . . . . . . . . . . . . . . . . . . . . . . . . . . . .6
Automatisch vastleggen in het geheugen . . . . . . . . . . . . . . . . . . . . . . . . . . . . . . . .6
Functie EasyLink . . . . . . . . . . . . . . . . . . . . . . . . . . . . . . . . . . . . . . . . . . . . . . . . . . . .6
Handmatig vastleggen in het geheugen . . . . . . . . . . . . . . . . . . . . . . . . . . . . . . . . . .7
Programmanaam . . . . . . . . . . . . . . . . . . . . . . . . . . . . . . . . . . . . . . . . . . . . . . . . . . .7
Gebruik
Gebruik van de radio . . . . . . . . . . . . . . . . . . . . . . . . . . . . . . . . . . . . . . . . . . . . . . . .8
Gebruik van de modus PC-scherm . . . . . . . . . . . . . . . . . . . . . . . . . . . . . . . . . . . . .8
Instellen van het beeld . . . . . . . . . . . . . . . . . . . . . . . . . . . . . . . . . . . . . . . . . . . . . .9
Instellen van het geluid . . . . . . . . . . . . . . . . . . . . . . . . . . . . . . . . . . . . . . . . . . . . . .9
Instellen van de diversen . . . . . . . . . . . . . . . . . . . . . . . . . . . . . . . . . . . . . . . . . . . . .9
Wekfunctie . . . . . . . . . . . . . . . . . . . . . . . . . . . . . . . . . . . . . . . . . . . . . . . . . . . . . .10
Vergrendeling van de televisie . . . . . . . . . . . . . . . . . . . . . . . . . . . . . . . . . . . . . . .10
Teletekst . . . . . . . . . . . . . . . . . . . . . . . . . . . . . . . . . . . . . . . . . . . . . . . . . . . . . . . .11
16:9 Formaten . . . . . . . . . . . . . . . . . . . . . . . . . . . . . . . . . . . . . . . . . . . . . . . . . . . .12
Toetsen VCR of DVD . . . . . . . . . . . . . . . . . . . . . . . . . . . . . . . . . . . . . . . . . . . . . . .13
Verklaring technische termen . . . . . . . . . . . . . . . . . . . . . . . . . . . . . . . . . . . . . . . .13
Extra apparatuur
Videorecorder . . . . . . . . . . . . . . . . . . . . . . . . . . . . . . . . . . . . . . . . . . . . . . . . . . .14
Andere apparaten . . . . . . . . . . . . . . . . . . . . . . . . . . . . . . . . . . . . . . . . . . . . . . . . .14
Het selecteren van aangesloten apparatuur . . . . . . . . . . . . . . . . . . . . . . . . . . . . .14
Camera, videospelletjes . . . . . . . . . . . . . . . . . . . . . . . . . . . . . . . . . . . . . . . . . . . . .15
Hoofdtelefoon . . . . . . . . . . . . . . . . . . . . . . . . . . . . . . . . . . . . . . . . . . . . . . . . . . . .15
Versterker . . . . . . . . . . . . . . . . . . . . . . . . . . . . . . . . . . . . . . . . . . . . . . . . . . . . . . .15
Computer . . . . . . . . . . . . . . . . . . . . . . . . . . . . . . . . . . . . . . . . . . . . . . . . . . . . . . .15
Tips . . . . . . . . . . . . . . . . . . . . . . . . . . . . . . . . . . . . . . . . . . . . . . . . . . . . . . . . . . .16
w
Schoonmaken
Het scherm en de kast van uw TV mogen alleen worden schoongemaakt met
een zacht en niet-pluizend doekje. Gebruik nooit een schoonmaakmiddel op
basis van alcohol of oplosmiddel.
Nederlands
Page 18

2
Voorstell van de LCD-televisie
De toesten van de tv :
• . : om de tv aan of uit te zetten.
• VOLUME - + (-”+) : voor het regelen van het
geluidsvolume.
• PROGRAM - + (- P +) :voor het selecteren van de
programma’s.
• MENU : om een menu op te roepen of te verlaten,
drukt u tegelijk op ” - en ” +. Daarna kunt u
met de toetsen P - + een optie selecteren en met
” - + de optie regelen.
Opmerking: wanneer de KINDERSLOT functie actief is, zijn
de toetsen
-”+ en - P + uitgeschakeld (zie menu
DIVERSEN, pagina 10).
Verklikkerlampje toesel aan en infrarood ontvangers.
Kantelbare voet.
De voet kan worden gedemonteerd en vervangen door
een wandbevestigingskit (optie – vraag inlichtingen bij uw
verkoper).
Achterzijde :
De belangrijkste aansluitingen zitten onderaan de TV.
Onder de afneembare plaatjes links * en rechts zitten
extra aansluitingen.
* Toestellen met grote schermen hebben links geen plaatje.
Zie pagina 14 voor meer details over de aansluitingen.
SCART EXT1
Stekker voor TV- en radioantenne
VGA en audio ingang voor het aansluiten van een
computer.
DC voedingsstekker
MENU
VOLUME
-
”
+
P
.
PROGRAM
-
+
DC in PC input (VGA)
L
Audio in (PC)
R
:
FM ANT
EXT. 1
Ø
Page 19

3
12
MODE
MUTE
RADIO
VCR
DVD
SMARTSMART ACTIVE
CONTROL
MENU
PC TV
OK
P
564
879
0
·¢Ê∆Æ
∫
ù
¤Ó
`
Ÿı
Å
Ë
Á
∏
3
--
++
.
ª
-
[
”
Y
ª
Toetsen van de afstandsbediening
Keuze van de EXT-aansluitingen
(p.14)
Druk verscheidene keren om het
aangesloten apparaat te selecteren.
Teletext-toetsen (p. 11)
of VCR / DVD (p.13)
œ Oproepen van PIP (p. 8)
πVerplaatsen van PIP (p. 8)
Sleeptimer
Voor het instellen van de tijdsduur
waarna automatisch naar de
wachtstand wordt overgeschakeld
(van 0 tot 120 minuten).
Active Control
Optimaliseert de kwaliteit van het beeld
in functie van het ontvangstniveau.
Geluidsmodus
Om van STEREO en NICAM
STEREO
naar MONO te schakelen
of te kiezen tussen TAAL I of TAAL II
.
De MONO aanduiding is blauw indien er
geen andere mogelijkheid is.
Menu :
Om de menu’s
op te roepen of te verlaten.
Cursor
Deze 4 toetsen worden gebruikt om
te kiezen binnen de menu’s.
Volume
Voor het regelen van het geluidsniveau
PC / TV / Radio
Druk op een van deze toetsen om
de tv in de modus PC,TV of radio
te zetten (p. 8).
16:9 Formaten (p.12)
Afzetten van het geluid
Om het geluid aan of uit te zetten.
Scherm informatie
Om het programmanummer, de
naam (zo die bestaat), de tijd, de
geluidsmode en de resterende tijd
op de timer in beeld te brengen of
te verwijderen.Door de toets 5
seconden lang ingedrukt te houden
blijft het programmanummer
permanent op het scherm.
Wachtstand (Stand-by)
Om de TV in de wachtstand te zetten.
Druk op b,P @#of 09, om de
TV weer aan te zetten.
Programmalijst
Om de programmalijst af te beelden
of te wissen. Dan kunt u met de
toetsen îÏ een programma
uitkiezen en het met behulp van de
toets L afbeelden.
Het symbool + verschijnt voor de
programma’s die geblokkeerd zijn (p.10)
of ? als ze gedeblokkeerd zijn.
Voorinstellingen van beeld en geluid
Geeft toegang tot een aantal
instellingen van beeld en geluid.
De stand PERSOONLIJK komt overeen met
de gekozen instellingen in de menu’s.
Surround Geluid
Om het bijzondere stereo-effect te
activeren of te deactiveren.
Bij stereo geeft dit de indruk dat de
luidsprekers verder uit elkaar staan.
Bij de versies die uitgerust zijn met
de Virtual Dolby Surround*,hoort u
op de achtergrond de geluidseffecten
van de Dolby Surround Pro Logic.
Bij mono wordt een ruimtelijk
stereo-effect nagebootst.
Kiezen van TV programma’s
Om een programma lager of hoger te
kiezen. Nummer,(naam) en
geluidsmode verschijnen voor een paar
seconden in beeld.
Voor sommige programma’s voorzien
van teletekst, verschijnt de titel van het
programma onderaan het scherm.
Vorig programma
Om terug te schakelen naar het
eerder bekeken programma.
Cijfertoetsen
Om direct een programma te kiezen.
Voor een programmanummer van
twee cijfers moet het tweede cijfer
worden ingevoerd voor het streepje
verdwijnt.
Keuzetoets (p. 13)
Om de afstandsbediening in te
stellen op TV,VCR (videorecorder)
of DVD.
* Geproduceerd onder licentle van: Dolby Laboratories Licensing Corporation. DOLBY, het dubbel D
symbool £ en PRO LOGIC zijn handelsmerken van:Dolby Laboratories Licensing Corporation.
Page 20

4
&
Plaatsen van de tv
Plaats uw toestel op een stevig en stabiel vlak. Stel
het toestel nooit bloot aan waterspatten,
warmtebronnen (lamp,kaars, radiator, ...) en houd de
ventilatieroosters achteraan het toestel vrij.
é
Aansluiten van de antennes
• Gebruik de bijgeleverde antennekabel en verbind
de stekker
: onderaan het toestel met uw
antennestekker.
• Sluit de bijleverde radioantenne aan op de stekker
FM ANT onderaan het toestel.
• Voer de kabels door de voet van het toestel.
“
Aansluiten van de voeding
De tv werkt op een bijgeleverde
gelijkstroomvoeding (de spanning is vermeld op het
etiket). Gebruik alleen de AC-DC adapter die bij de
tv is geleverd.
• Sluit de DC stekker van de adapter aan op de DC
stekker van de tv. Laat voldoende ruimte rond de
adapter voor de ventilatie.
• Sluit het netsnoer van de adapter aan en steek het
in het stopcontact (220-240 V / 50 Hz).
Zie pagina 14 voor het aansluiten van andere apparaten.
‘
Afstandsbediening
Plaats de twee R6-batterijen (bijgeleverd) op de
juiste manier in de afstandsbediening.
Om het milieu te helpen beschermen, bevatten
de bij dit televisietoestel geleverde batterijen
geen kwik of nikkel cadmium. Gooi gebruikte
batterijen niet weg maar maak gebruik van de
recycleermogelijkheden ter uwer beschikking
(raadpleeg uw verkoper).
(
Inschakelen
Druk op de aan/uit toets om de televisie aan te
zetten. Een rood indicatielampje gaat branden en het
scherm licht op.Ga rechtstreeks naar het hoofdstuk
Snelle installatie op de pagina 5.Als de televisie in
stand-by blijft (rood lampje) drukt u op de toets P
#
van de afstandsbediening.
Het indicatielampje knippert wanneer u de
afstandsbediening gebruikt.
Installeren van het televisietoestel
Niet
weggooien,
maar inleveren
als KCA.
NL
5 cm
5 cm
5 cm
FM ANT.
MENU
”
P
++
--
.
VOLUME
PROGRAM
Page 21

5
Snelle installatie van de zenders
Sorteren van de programma's
Wanneer u de televisie voor het eerst aanzet,
verschijnt er een menu op het scherm.In dit menu
kunt u de taal voor de volgende menu's kiezen:
Indien het menu niet verschijnt, houd dan de
toetsen
” - en ” + van de televisie 8
seconden ingedrukt om het te laten verschijnen.
& Selecteer met de toetsen
îÏ van de
afstandsbediening uw taal en bevestig uw
keuze met
¬.
é Selecteer vervolgens uw land met behulp van de
toetsen
îÏ en bevestig uw keuze met ¬.
Indien uw land niet op de lijst voorkomt, selecteer
dan ANDER.
“ Het zoeken start nu automatisch.
Dit alles duurt enkele minuten.
Op het scherm ziet u hoe het zoeken vordert
en hoeveel programma's er gevonden zijn. Na
afloop verdwijnt dit menu.
Druk op de
H toets, om het zoeken te stoppen
of te onderbreken. Zie het hoofdstuk Tips op
pagina 24 als er geen programma wordt gevonden.
‘
Als de kabel of het kabelnetwerk het
automatische sorteersignaal uitzendt, worden de
programma’s op de juiste manier genummerd.
( Indien dit niet het geval is, worden de
gevonden programma’s aflopend genummerd
vanaf nummer 99, 98, 97, enz.
U dient het SORTEREN menu te gebruiken
om ze te hernummeren.
Sommige zenders of kabelnetwerken zenden hun
eigen sorteerparameters uit (regio, taal, enz.). In
dat geval moet u uw keuze aangeven met de
îÏ toetsen en bevestigen met ¬.
Zie ook : Functie EasyLink, pagina 6.
& Druk op toets H. Het hoofdmenu verschijnt
op het scherm.
é Selecteer INSTALLATIE (
Ï) en druk op ¬.
Het INSTALLATIE menu verschijnt:
“ Selecteer SORTEREN met behulp van toets
Ï en druk op ¬. Het menu SORTEREN
verschijnt. De optie VAN is actief.
Opmer
king: dit menu werkt op de volgende manier:
•
"VAN" (voer het huidige programmanummer in)
• "NAAR" (voer het nieuwe
programmanummer in)
•
OMWISSELEN (de instructie wordt uitgevoerd)
‘ Selecteer met behulp van van de Ȭ
toetsen 0 tot 9 het programma dat u wilt
hernummeren. Bijvoorbeeld: u wilt veranderen
VAN programma 78 NAAR programma 2,
voer dan
78in.
( Selecteer NAAR (toets
Ï) en voer het
gewenste nieuwe nummer in met de
Ȭ
toetsen 0 tot 9 (in ons voorbeeld moet u
nu
2 invoeren).
§ Selecteer OMWISSELEN (toets
Ï) en druk
op
¬. De aanduiding VERWISSELD verschijnt
en de instructie wordt uitgevoerd.Volgens ons
voorbeeld wordt programmanummer 78 nu
veranderd in 2 (en andersom).
è Selecteer VAN (toets
î) en herhaal de
stappen ‘ t/m § net zo vaak als u
programma's wilt hernummeren.
Zie ook : Functie EasyLink, pag 6.
! Druk op toets
d om de menu's te verlaten.
SELECT LANGUAGE
LANGUAGE
DANSK
•
NEDERLANDS
FINNISH
FRANCAIS
DEUTSCH
LAND
OOSTENRIJK
BELGIE
ZWITSTERLAND
DUITSLAND
DENEMARKEN
• BEELD
• GELUID
• DIVERSEN
• INSTALLATIE
INSTALLATIE
• TAAL
• LAND
• AUTOMATISCH
• HANDMATIG
• SORTEREN
• NAAM
VAN
NAAR
OMWISSELEN
Page 22

6
Keuze van het land en de taal
Automatisch vastleggen in het geheugen
& Druk op toets H om het hoofdmenu op te
roepen.
é Selecteer INSTALLATIE (
Ï) en druk op ¬.
Het INSTALLATIE menu verschijnt.
De taalkeuze is actief
“ Druk nu op
¬ om het TAAL menu te openen.
‘ Selecteer uw taal met behulp van de toetsen
îÏ. De menu's verschijnen nu in de taal
die u heeft gekozen.
( Druk op
È om het TAAL menu te verlaten.
§ Selecteer LAND (
Ï) en druk op ¬.
è Selecteer uw land met behulp van de toetsen
îÏ.
Indien uw land niet op de lijst voorkomt, selecteer
dan ANDER.
! Druk op
È om het LAND menu te verlaten.
ç Druk op
d om de menu's te verlaten.
Zie ook : Functie EasyLink, hieronder.
Met dit menu start u het automatisch zoeken
naar de programma's die u in uw regio (of via
uw kabel) kunt ontvangen.
& Volg eerst de stappen & t/m ! zoals
hierboven.
é Selecteer vervolgens AUTOMATISCH
VASTLEGGEN (
Ï) en druk op ¬. Het
zoeken begint. Na enkele minuten verschijnt
automatisch het INSTALLATIE menu.
“ Als de kabel of het kabelnetwerk het
automatische sorteersignaal uitzendt, worden de
programma’s op de juiste manier genummerd.
‘ Indien dit niet het geval is, worden de
gevonden programma’s aflopend genummerd
vanaf nummer 99, 98, 97, enz.
U dient het SORTEREN menu te gebruiken
om ze te hernummeren.
Sommige zenders of kabelnetwerken zenden hun
eigen sorteerparameters uit (regio, taal, enz.). In
dat geval moet u uw keuze aangeven met de
îÏ toetsen en bevestigen met ¬.
Druk op de
H toets, om het zoeken te stoppen
of te onderbreken. Zie het hoofdstuk Tips op p. 24
als u geen beeld krijgt.
Zie ook : Functie EasyLink, hieronder.
( Druk op
d om de menu's te verlaten.
• BEELD
• GELUID
• DIVERSEN
• INSTALLATIE
INSTALLATIE
• TAAL
• LAND
• AUTOMATISCH
• HANDMATIG
• SORTEREN
• NAAM
NEDERLANDS
FINNISH
FRANCAIS
INSTALLATIE
• TAAL
• LAND
• AUTOMATISCH
• HANDMATIG
• SORTEREN
• NAAM
ZOEKEN
EVEN WACHTEN
PROGRAMNR. 2
215.18 MHZ
Als het televisietoestel aangesloten is (via de
uitgang EXT2) op een videorecorder die
uitgerust is met de functie EasyLink, worden de
taal, het land en de zender die gevonden werden,
bij de installatie automatisch doorgegeven aan de
videorecorder.Tijdens het laden verschijnt een
boodschap op het scherm. De lijst met zenders
van de videorecorder wordt dezelfde als die van
het televisietoestel.
De instelling EASY LINK van het menu OPTIE moet
AAN staan (standaard instelling), zie pagina 9.
Functie EasyLink
(Niet op alle versies beschikbaar.)
Page 23

7
Handmatig vastleggen in het geheugen
Programmanaam
Met dit menu kunt u de programma's één
voor één vastleggen.
& Druk op toets
H.
é Selecteer
INSTALLATIE (Ï) en druk op ¬.
Het
INSTALLATIE menu verschijnt.
“ Selecteer
HANDMATIG VASTLEGGEN (Ï) en
druk op
¬. Het menu verschijnt:
‘ Druk op ¬ om het SYSTEEM menu te openen.
Druk op
îÏ om EUROPE te selecteren
(automatisch zoeken*) of selecteer handmatig
met:
WEST EUR (BG norm), EAST EUR (DK
norm), UK (I norm) of FRANCE (LL norm). Druk
vervolgens op
È om het menu te verlaten.
* Met uitzondering van Frankrijk (LL norm),
selecteer FRANKRIJK
( Kies
ZOEKEN en druk op ¬. Het zoeken
begint. Zodra een programma is gevonden,
stopt het zoeken. Ga naar stap è.Als u de
frequentie van het gewenste programma weet,
kunt u het nummer ervan direct invoeren met
behulp van de toetsen
0 tot 9.
Als geen programma wordt gevonden, zie het
hoofdstuk Tips op pagina 16.
§ Als de ontvangst niet bevredigend is, kies
FIJNAFST en hou de toets È of ¬ ingedrukt.
è Kies
PROGRAMNR en gebruik de
Ȭ of de
toetsen
0 tot 9 om het gewenste nummer
in te voeren.
! Kies
VASTLEGGEN en druk op ¬.De
mededeling
VASTGELEGD verschijnt.Het
programma is vastgelegd.
Zie ook : Functie EasyLink, pagina 6.
ç Herhaal de stappen ( tot ! voor elk vast te
leggen programma.
Om het menu te verlaten: druk op de d toets.
Desgewenst kunt u de eerste 40 programma's
(1 t/m 40) een naam geven.
& Druk op toets
H.
é Selecteer
INSTALLATIE (Ï) en druk op ¬.
Het
INSTALLATIE menu verschijnt.
“
Druk 5 maal op Ï om NAAM PROGRAMMEREN
te selecteren (niet zichtbaar onderaan het scherm)
en druk op
¬.Het menu verschijnt.
‘ Selecteer het programma dat u een naam wilt
geven met behulp van de toetsen
09of
@ P #.
Opmer
king: tijdens de installatie krijgen de
programma's automatisch een naam wanneer het
identificatiesignaal wordt doorgezonden.
( Gebruik de toetsen
Ȭ om in de zone
voor de naam van de ene naar de andere
letterpositie te gaan (5 letters).
§ Gebruik de toetsen
îÏ om de letters te
selecteren.
è Druk op
H als u de naam heeft ingevoerd.
De naam is nu in het geheugen vastgelegd.
Zie ook : Functie EasyLink, pagina 6.
! Herhaal stappen ‘ t/m è voor elk
programma dat u een naam wilt geven.
ç Druk op
d om de menu's te verlaten.
• BEELD
• GELUID
• DIVERSEN
• INSTALLATIE
INSTALLATIE
HANDMATIG
• SYSTEEM
• ZOEKEN
• PROGRAMNR.
• FYNAFST.
• VASTELEGGEN
EUROPE
WEST EUR
EAST EUR
UK
FRANCE
INSTALLATIE
• TAAL
• LAND
• AUTOMATISCH
• HANDMATIG
• SORTEREN
• NAAM ZDF_
Page 24

8
Gebruik van de radio
Gebruik van de modus PC-scherm
De radiomodus kiezen
Druk op de toets
Z van de afstandsbediening
om de tv in radiomodus te zetten. Druk op de
toets
X om opnieuw de TV-modus te kiezen.
In radiomodus worden het nummer en de
naam van het station (indien beschikbaar), de
frequentie en de geluidsmodus op het scherm
weergegeven.
Om de naam van een station in te voeren, gebruikt
u het menu NAAM Prog. (p. 7)
Programma selecteren
Selecteer een FM-station met de toetsen
09 of @ P # (van 1 tot 40).
Lijst met radiostations
Druk op de toets
ı om de lijst met
radiostations weer te geven/te verbergen.
Selecteer een station met de cursortoets.
De radiomenu’s gebruiken
Met de toets
H krijgt u toegang tot de
instelfuncties van de radio.
Radiostations zoeken
Als u de snelle installatie hebt gebruikt, zijn alle
beschikbare FM-stations opgeslagen in het
geheugen. Om een nieuw station te zoeken
gebruikt u het menu
INSTALLATIE: AUTOMATISCH
(om volledig te zoeken) of
HANDMATIG (om per
station te zoeken). Met de menu’s
SORTEREN en
NAAM Kunt u de radiostations sorteren of een
naam geven. Deze menu’s werken op dezelfde
manier als de TV-menu’s.
Screensaver
In het menu DIVERSEN kunt u de screensaver aan- of
uitzetten. De tijd, de frequentie en de naam van het
station (indien beschikbaar) rollen over het scherm.
PC-modus
Uw tv kan ook worden gebruikt als
computerscherm. Met de functie PIP kunt u
tegelijk op een verkleind scherm naar TV kijken.
U moet eerst de computer aansluiten en de
resolutie aanpassen (zie pagina 15).
PC-modus kiezen
Druk op de toets
V van de afstandsbediening
om de PC-modus te kiezen. Druk op de toets
X om de TV-modus te kiezen.
Wanneer de televisie gedurende minstens 5
seconden geen PC-signaal ontvangt, gaat het
toestel automatisch in stand-by.
PIP gebruiken
In PC-modus kunt u een venster weergeven
waarin u de tv-zenders kunt bekijken.
& Druk op de toets
œ om het PIP-scherm
weer te geven.Het tv-beeld wordt in een klein
venster weergegeven.
é Druk nog eens op
œ om het venster te
verkleinen of te verbergen.
“ Druk op de toets
π om het venster te
verplaatsen. U kunt het scherm ook slepen met
behulp van de cursor.
‘ Druk op de toetsen
09of @ P # om
een ander programma te kiezen in het PIPscherm of op de toets
n wanneer u het beeld
van een op de tv aangesloten toestel wil
weergeven (videorecorder, DVD, ...).
Gebruiken van de PC-menu’s
Druk op de toets H om toegang te krijgen tot de
specifieke instellingen in de PC-modus.Gebruik de
cursor voor het regelen van (de instellingen worden
automatisch opgeslagen):
•
AUDIO SELECTION:
om te kiezen welk geluid wordt
weergegeven op het toestel (PC of TV / Radio). U
kunt bijvoorbeeld naar de radio luisteren terwijl u
de computer gebruikt.
Opmer
king : u moet de modus TV of radio voor u de PCmodus kiest.Wanneer het PIP-scherm wordt
weergegeven, kunt u niet naar de radio luisteren.
•
BRIGHTNESS / CONTRAST: om de helderheid en het
contrast te regelen.
•
ADJUST COLOUR: voor het instellen van de kleuren
(koud,normaal of warm).
•
VIDEO NOISE: voor het verwijderen van horizontale
(PHASE) en verticale (CLOCK) stoorlijnen.
•
ADJUST POSITION : voor het horizontaal en
verticaal instellen van de beeldpositie.
•
AUTO ADJUST : de positie wordt automatisch
ingesteld.
•
PIP CONTROLS : voor het instellen van het formaat
en de positie van het PIP-scherm.
•
MODE SELECT: om terug te keren naar TV of radio
modus.
•
RESET TO FACTORY SETTING : om terug te keren
naar de fabrieksinstellingen (standaard instellingen).
•
VIEW FORMAT: om te schakelen tussen vergrote of
standaard weergave van de PC-schermen.
Page 25
Instellen van het beeld
Instellen van het geluid
& Druk op H en vervolgens op ¬.
Het
BEELD menu verschijnt.
é Gebruik de toetsen
îÏ om een instelling te
selecteren en de toetsen
Ȭ om de
instelling af te regelen.
Opmer
king: dit is een afrolmenu. Houd toets Ï
ingedrukt om de niet-zichtbare opties onderaan het
scherm zichtbaar te maken.
“ Als u het beeld heeft ingesteld, selecteer dan de
optie
VASTLEGGEN en druk op ¬ om de
instelling vast te leggen.
‘ Druk op
d om de menu's te verlaten.
Omschrijving van de instellingen:
•
HELDERHEID: om de helderheid van het beeld in te
stellen.
•
KLEUR: om de kleurintensiteit in te stellen.
•
CONTRAST: om het verschil tussen de lichte en de
donkere kleuren in te stellen.
• SCHERPTE:
om de scherpte van het beeld in te stellen.
• VASTLEGGEN: om de voorgaande instellingen in
het geheugen vast te leggen.
•
TINT (kleurtoon): stelt de kleurweergave van het
beeld in. Er zijn hier drie opties:
KOEL (blauwwit),
NORMAAL (uitgebalanceerd) of WARM (roodwit).
• CONTRAST +: Om de automatische
contrastinstelling van het beeld in- of uit te
schakelen (het toestel stelt het donkerste
gedeelte van het beeld voortdurend in op zwart)
& Druk op H,selecteer GELUID (Ï) en druk
vervolgens op
¬.Het menu GELUID verschijnt.
é Gebruik de toetsen îÏ om een instelling te
selecteren en de toetsen
Ȭ om de
instelling af te regelen.
Opmer
king: het AVL menu is niet zichtbaar
onderaan het scherm. Houd toets
Ï ingedrukt om
het zichtbaar te maken.
“ Als u het geluid heeft ingesteld, selecteer dan
de optie
VASTLEGGEN en druk op ¬ om de
instelling vast te leggen.
‘ Druk op d om de menu's te verlaten.
Omschrijving van de instellingen:
•
EQUALIZER: om de frequenties in te stellen (van
lage tonen: 120 Hz tot hoge tonen: 10 kHz).
•
BALANS: om het geluid evenwichtig over de
linker en rechter luidsprekers te verdelen.
• DELTA VO L
(volumeverschil):stelt u in staat om de
volumeverschillen,die tussen de verschillende
programma’s of EXT aansluitingen kunnen bestaan, te
compenseren.Deze instelling is voor de programma’s
1 t/m 40 en de EXT aansluitingen beschikbaar.
Gebruik de toetsen
@ P # om het niveau van
de verschillende programma’s te vergelijken.
• VASTLEGGEN: om de voorgaande instellingen in
het geheugen vast te leggen.
• MAX.VOLUME : controleert automatisch het
volumeniveau om te grote niveauverschillen te
vermijden, in het bijzonder wanneer u van
programma verandert of tijdens reclameonderbrekingen.
• BEELD
• GELUID
• DIVERSEN
• INSTALLATIE
BILD
• HELDERHEID
• KLEUR
• CONTRAST
• SCHERPTE
• VASTLEGGEN
• KLEURTEMP.
• CONTRAST+
--I------ 39
• BEELD
• GELUID
• DIVERSEN
• INSTALLATIE
TON
• EQUALIZER
• BALANS
• DELTA VOL
• VASTLEGGEN
• MAX. VOLUME
120 HZ
500 HZ
1500 HZ
5 KHZ
10 KHZ
Instellen van de diversen
& Druk op H, selecteer DIVERSEN (Ï) en
druk op
¬.U kan het volgende instellen:
é
TIMER, KINDERSLOT
en OUDERCONTROLE :
zie volgende pagina
“
MODE SELECT : om het toestel in radio, TV of
PC-modus te zetten.
‘
EASYLINK (Niet op alle versies beschikbaar).:Als
het televisietoestel aangesloten is (via de
uitgang EXT2) op een videorecorder die
uitgerust is met de functie EasyLink, worden
de taal, het land en de zender die gevonden
werden, bij de installatie automatisch
doorgegeven aan de videorecorder.Als uw
videorecorder niet uitgerust is met deze
functie, zet u deze regeling
UIT.
( Om de menu’s te verlaten, druk op
d.
9
Page 26

10
Wekfunctie
Vergrendeling van de televisie
Met dit menu kunt u de televisie als wekker
gebruiken.
& Druk op toets
H.
é Selecteer
DIVERSEN (Ï) en druk 2 keer op
¬. Hierna verschijnt het
TIMER menu.
“ Druk nu op ¬ om elk submenu te openen en
te sluiten en gebruik de toetsen
îÏ voor
de volgende instellingen:
‘ TIJD: voer de tijd in.
Opmer
king: telkens wanneer u de televisie aanzet,
wordt de tijd automatisch aangepast. Dit gebeurt op
basis van de teletekstinformatie van programma 1.
Indien dit geen teletekst heeft, kan de tijd niet worden
aangepast.
(
STARTTIJD: voer het begintijdstip in.
§
STOPTIJD:
voer het eindtijdstip in.
è
PROGRAMMANUMMER:
voer het nummer in van
het programma dat u voor de wekfunctie wilt
gebruiken.Voor de modellen die uitgerust zijn
met radio kunt u een FM-station kiezen met
behulp van de toetsen
Ȭ (met de toetsen
09 kunt u ook tv-programma’s selecteren).
! AAN: hier kunt u het volgende instellen:
•
EEN KEER: om éénmaal te wekken.
•
DAGELIJKS:
om dagelijks te wekken.
•
STOP: om de wekfunctie ongedaan te maken.
ç Druk op
b om de TV in de wachtstand te
zetten. Op de geprogrammeerde tijd gaat de TV
vanzelf aan. Laat u de TV aan staan, dan zal die
alleen op de aangegeven tijd van programma
wisselen. De combinatie van SLOT en TIMER functies
kan worden gebruikt om de tijdsduur te beperken dat
de TV aan staat, bijvoorbeeld, voor uw kinderen. In de
EENMAAL instelling kan de starttijd of de stoptijd
worden geprogrammeerd (maar niet allebei).
Door de toetsen te vergrendelen kunt u bepaalde
programma's uitsluiten of het gebruik van de
televisie volledig onmogelijk maken.
Vergrendeling van programma's
& Druk op toets H.
é Selecteer
DIVERSEN en druk op ¬.
“ Selecteer OUDERCONTROLE
(
Ï) en druk op ¬.
‘ U dient nu uw geheime toegangscode in te
voeren.Voer de eerste keer 2 maal de code 0711
in. Hierna verschijnt het menu.
( Druk op ¬ om het menu te openen.
§ Gebruik de toetsen
îÏ om het programma
te selecteren dat u wilt vergrendelen.Bevestig
uw keuze met
¬.Een + voor de programma's
geeft aan dat deze vergrendeld zijn.
è Druk op
d om het menu te verlaten.Van nu af
aan zult u uw geheime toegangscode moeten
invoeren voor u een vergrendeld programma
kunt bekijken, anders blijft het scherm zwart.
Belangr
ijk: voor gecodeerde programma's die u met
behulp van een externe decoder kunt bekijken, dient u
de corresponderende EXT aansluiting te vergrendelen
Om alle programma's te ontgrendelen:
Herhaal de stappen & t/m ‘.Vervolgens:
Selecteer
CODE WIS ALLES en druk op ¬.
Om uw toegangscode te veranderen.
Herhaal de stappen & t/m ‘ en vervolgens:
( Selecteer
WIJZIG CODE en voer uw eigen code
van 4 cijfers in.
§ Voer hem een tweede keer in om te bevestigen.
Uw nieuwe code is nu vastgelegd.
è Druk op
d om de menu's te verlaten.
Als u uw geheimcode vergeet, dient u de universele
code 0711 twee maal in te voeren.
Vergrendeling van de toetsen
& Druk op H, selecteer DIVERSEN (Ï) en druk
op
¬.
é Selecteer
KINDERSLOT (Ï) en druk op ¬
om AAN te selecteren.
“ Zet de televisie uit en verberg de afstandsbediening.
De televisie is nu onbruikbaar en kan alleen met de
afstandsbediening worden aangezet.
‘ Om de vergrendeling ongedaan te maken:zet
KINDERSLOT op UIT.
• BEELD
• GELUID
• DIVERSEN
• INSTALLATIE
DIVERSEN
TIMER
• TIJD
• STARTTIJD
• STOPTTIJD
• PROGAMNR
• AAN
10:56
• BEELD
• GELUID
• DIVERSEN
• INSTALLATIE
DIVERSEN
• TIMER
• KINDERSLOT
•
OUDERCONTROLE
• ROTATIE
TOEGANGS CODE
- - - -
Page 27

Teletekst
Druk op:
U krijgt:
Teletekst is een informatiesysteem dat door bepaalde tv-kanalen wordt uitgezonden en als een krant kan worden
geraadpleegd. Het voorziet ook in ondertiteling voor slechthorenden of voor mensen die weinig vertrouwd zijn
met de taal waarin een bepaald programma wordt uitgezonden (kabelnetwerken, satellietkanalen, …).
Te letekst
aanzetten
Een pagina
kiezen
Om teletekst op te roepen,over te gaan op de transparante modus
en vervolgens teletekst uit te zetten.De pagina met de hoofdindex
geeft een lijst van rubrieken die kunnen worden geraadpleegd.
Iedere rubriek heeft een paginanummer van drie cijfers.
Als het gekozen kanaal geen teletekst uitzendt, dan verschijnt de
aanduiding 100 en het scherm blijft donker (verlaat in dit geval teletekst
en kies een ander kanaal).
Vorm het nummer van de gewenste pagina met de toetsen 0 tot
9 of @ P #.Bijvoorbeeld: voor pagina 120, voer 120in.
Het nummer verschijnt in de linkerbovenhoek van het scherm, de
paginateller begint te zoeken en vervolgens verschijnt de pagina.
Herhaal de procedure om een andere pagina te raadplegen.
Als de teller blijft zoeken, betekent dit dat de gekozen pagina niet wordt
uitgezonden. Kies in dit geval een ander nummer.
Inhoud
Rechtstreekse
keuze van de
subpagina’s
Om terug te keren naar de inhoud (gewoonlijk pagina 100).
Onderaan de pagina staan gekleurde velden.Met de 4 gekleurde
toetsen kunnen de ermee overeenkomende rubrieken of
pagina’s worden opgeroepen.
De gekleurde velden knipperen wanneer de pagina of de rubriek nog
niet beschikbaar is.
Rechtstreekse
keuze van de
sub-pagina’s
Bepaalde pagina’s bevatten sub-pagina’s (bijvoorbeeld pagina 120
bevat de sub-pagina’s 1/3, 2/3 en 3/3).In dat geval wordt het
paginanummer in het groen afgebeeld,voorafgegaan door een
symbool Æ,Í of ÍÆ. Gebruik de toetsen Ȭ voor
rechtstreekse toegang tot de sub-pagina’s van uw keuze.
Een pagina
vergroten
Dubbele pagina
teletekst
(Niet op alle
versies
beschikbaar.)
Om het bovenste of het onderste deel van de pagina weer te geven
en vervolgens naar de normale paginagrootte terug te keren.
Om het afbeelden van twee pagina’s van teletekst tegelijk te activeren
of te desactiveren.De actieve pagina staat links en de volgende pagina
staat rechts.Druk op de toets
s
als u een pagina wilt bevriezen
(bijvoorbeeld de samenvatting).De actieve pagina wordt de
rechterpagina.Om terug te keren naar normale weergave, druk op
e.
Verborgen
informatie
Favoriete
pagina’s
Om verborgen informatie te doen verschijnen of verdwijnen
(oplossingen van spelletjes).
Voor de teletekstprogramma’s 0 tot 40 kunt u 4 favoriete
pagina’s vastleggen die vervolgens kunnen worden opgeroepen
met de gekleurde toetsen (rood,groen, geel, blauw).
& Druk op de toets H om naar de modus favoriete pagina’s
te gaan.
é Geef de teletekstpagina weer die u wilt vastleggen.
“ Druk op de toets
d
en daarna op de gekleurde toets van
uw keuze. De pagina wordt vastgelegd.
‘ Herhaal de stappen é en “ voor de andere gekleurde toetsen.
(Van nu af aan verschijnen uw favoriete pagina’s onderaan het
scherm zodra u teletekst oproept. Om de gewone rubrieken
terug te vinden, druk op H.
Houd d5 seconden lang ingedrukt om dit ongedaan te maken.
11
Ÿ
MODE
VCR
Y
DVD
ª
Å
∆
Ó
`
ù
SMART SMART
ACTIVE
-
CONTROL
MENU
+ +
MUTE
”
[
- -
%
OK
∏
PC TV
12
564
879
Ë
0
.
ı
∫
¤
ª
0
P
9
RADIO
P
3
Á
Ë
Å
ù
Y
MENU
Ë
Page 28

12
16:9 Formaten
De beelden die u ontvangt kunnen in het 16:9 (breedbeeld) of 4:3 (traditioneel beeld) formaat
worden uitgezonden. Soms hebben 4:3 beelden een zwarte balk boven en onder in het beeld
(letterbox uitzendingen). Met de 16:9 functie kunt u de zwarte balken laten verdwijnen en de
(letterbox) uitzending beeldvullend weergeven.
Indien uw televisietoestel is uitgerust met een 4:3 scherm.
Indien uw televisietoestel is uitgerust met een 16:9 scherm.
Druk op de toets p (of Ȭ) om een ander beeldformaat te kiezen :
Het televisietoestel is voorzien van een automatische beeldformaat-selectie. Hierdoor
wordt het door sommige zenders specifiek uitgezonden signaal gedecodeerd en
automatisch het juiste beeldformaat geselecteerd.
4:3
Het beeld wordt in het 4:3 formaat weergegeven, met brede zwarte stroken links
en rechts van het beeld.
ZOOM 14:9
Het beeld wordt naar het 14:9 formaat vergroot, met dunne zwarte stroken links
en rechts van het beeld.
ZOOM 16:9
Het beeld wordt naar het 16:9 formaat vergroot. Dit formaat is geschikt voor
letterbox-uitzendingen (met zwarte balken boven en onder in het beeld).
ONDERTITEL ZOOM
In dit formaat worden 4:3 beelden horizontaal en verticaal vergroot zodat het
beeldvullend wordt weergegeven.
SUPERZOOM
Met dit formaat worden 4:3 beelden beeldvullend weergegeven door het 4:3
beeld horizontaal te vergroten.Eventuele ondertitels blijven zichtbaar.
BREEDBEELD
Met deze modus stelt u de goede verhoudingen in van beelden die in 16:9
worden verzonden.
P
as op: in dit formaat worden 4:3 beelden vervormd weergegeven.
FULL SCREEN
Met deze modus geeft u de beelden in full screen weer.
Druk op de toets
p (of îÏ) om een ander beeldformaat te kiezen :
4:3
Het beeld wordt in formaat 4:3 weergegeven
VERBREED 4:3
Het beeld wordt verticaal vergroot. Met deze methode worden de zwarte balken
vermeden bij het bekijken van een programma in letterbox formaat.
COMPRESSIE 16:9
Het beeld wordt verticaal ingedrukt tot een 16:9 formaat.
Page 29
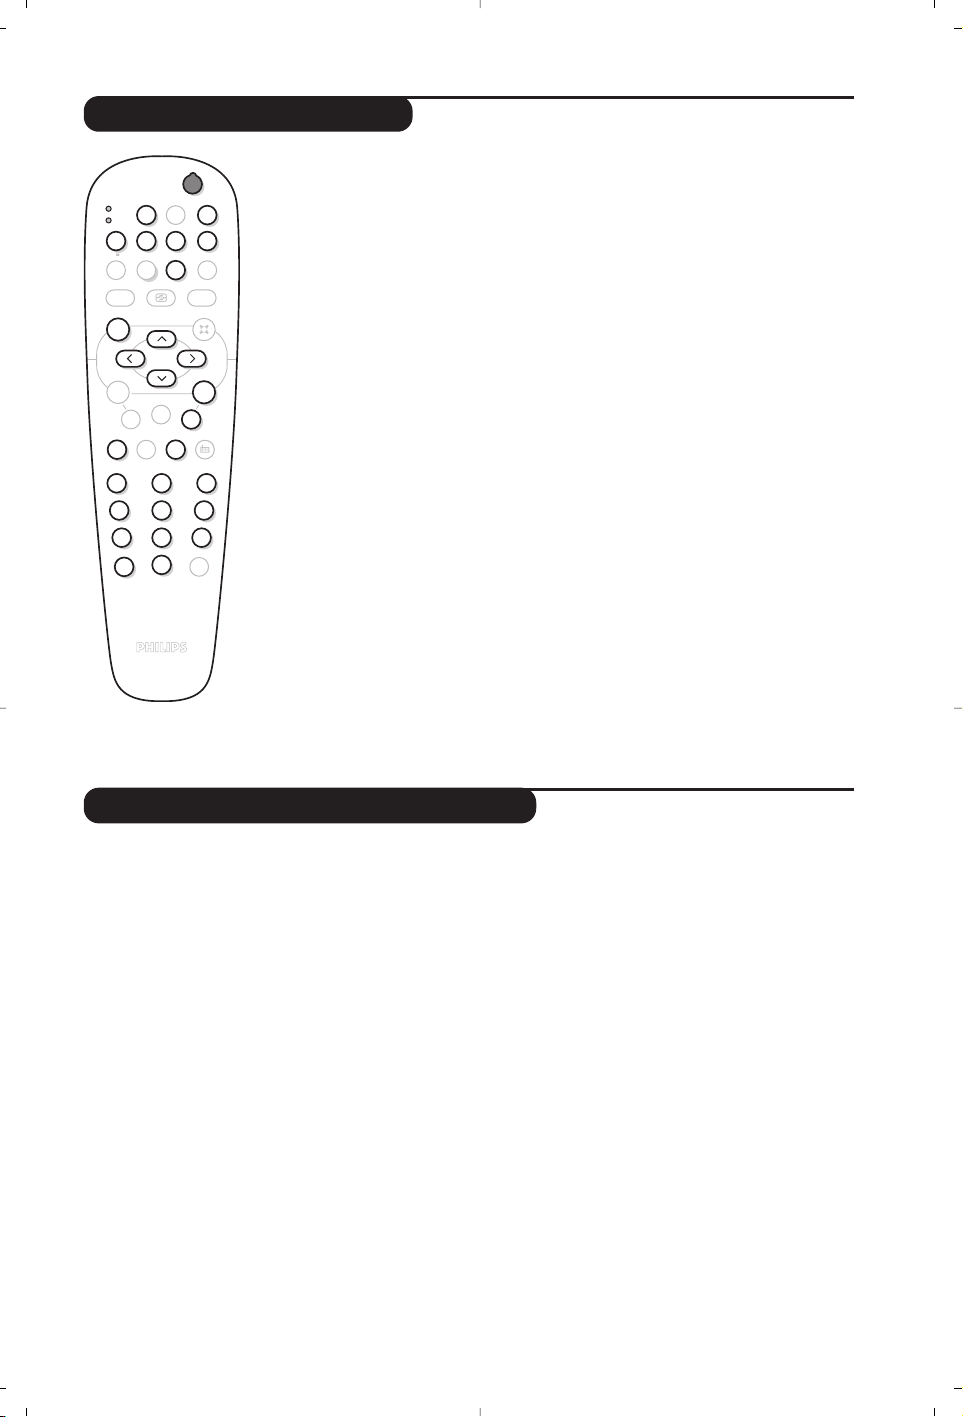
13
Toetsen VCR of DVD
Verklaring technische termen
Met de afstandsbediening van de TV kunt u de meeste beeldapparatuur
uit ons productassortiment bedienen.
De afstandsbediening is compatibel met alle videorecorders van de RC5-standaard en
van alle DVD’s die de RC6-standaard gebruiken.
& Druk op de toets MODE om de gewenste modus te selecteren: VCR
(videorecorder) of DVD.Het controlelampje van de afstandsbediening licht
op
om aan te tonen welke modus werd geselecteerd. Dit gebeurt automatisch
wanneer er 20 seconden lang niets gebeurt (terug naar TV-modus).
é Afhankelijk van de uitrusting kunnen de volgende toetsen worden gebruikt:
b wachtstand,
· opname,
¢ snel terugspoelen,
Ê stop,
Æ lezen,
∫ snel voortspoelen,
∆ pauze
% videorecorder programmering,
c DVD :Taal van de ondertiteling
H oproepen menu,
cursor navigatie en instellingen,
OK bevestigen,
09 cijfertoetsen,
@
P# keuze van de programma’s,
e keuze van taal,
d OSD- menu.
EasyLink : Numerische link tussen het televisietoestel en de videorecorder die rechtstreekse overdracht van
bepaalde informatie toelaat zoals bijvoorbeeld de instelling van de zenders of de programmatie van de
videorecorder met de gids NexTView.
PIP (Picture in Picture):beeldvenster waarmee een klein beeld wordt weergegeven op het hoofdscherm.
In PC-modus kunt u in een klein scherm het beeld van uw TV of een ander toestel (DVD,
videorecorder, ...) weergeven.
RGB-signalen : dit zijn de 3 videosignalen (rood, groen, blauw) van het beeldsignaal.Met deze signalen
wordt een betere beeldkwaliteit verkregen.
S-VHS signalen : Dit zijn twee gescheiden Y/C videosignalen van de S-VHS en Hi-8 opnamestandaards.
De luminantiesignalen Y (zwart en wit) en chrominantiesignalen C (kleur) worden apart op de
videoband opgenomen. Dit geeft een betere beeldkwaliteit dan met gewone video (VHS en 8 mm)
waarbij de Y/C signalen worden gecombineerd tot één videosignaal.
NICAM geluid : Proces waarmee digitaal geluid kan worden uitgezonden.
Systeem : Televisiebeelden worden niet in alle landen op dezelfde manier uitgezonden. Er zijn
verschillende standaards: BG, DK,I, en LL’. Met de SYSTEEM instelling (p.6) kunnen deze
verschillende standaards worden gekozen. Dit moet niet worden verward met PAL of SECAM
kleurcodering. Pal wordt in de meeste Europese landen gebruikt, Secam in Frankrijk, in het GOS en in
de meeste Afrikaanse landen. De Verenigde Staten en Japan gebruiken een ander systeem, NTSC
genaamd. De EXT1 en EXT2 ingangen kunnen opnames met NTSC kleurcodering weergeven.
16:9 :Verwijst naar de verhouding tussen de breedte en hoogte van het scherm. Breedbeeldtelevisies
hebben een verhouding van 16:9, de traditionele televisietoestellen hebben een 4:3 scherm.
Ÿ
MODE
VCR
Y
DVD
Å
ª
`
SMART SMART
MENU
+ +
”
OK
PC TV
∆
ù
ACTIVE
-
CONTROL
MUTE
[
- -
%
∏
12
564
879
0
Ë
.
ı
Æ∫Ê¢·
¤Ó
ª
P
RADIO
3
Á
Page 30
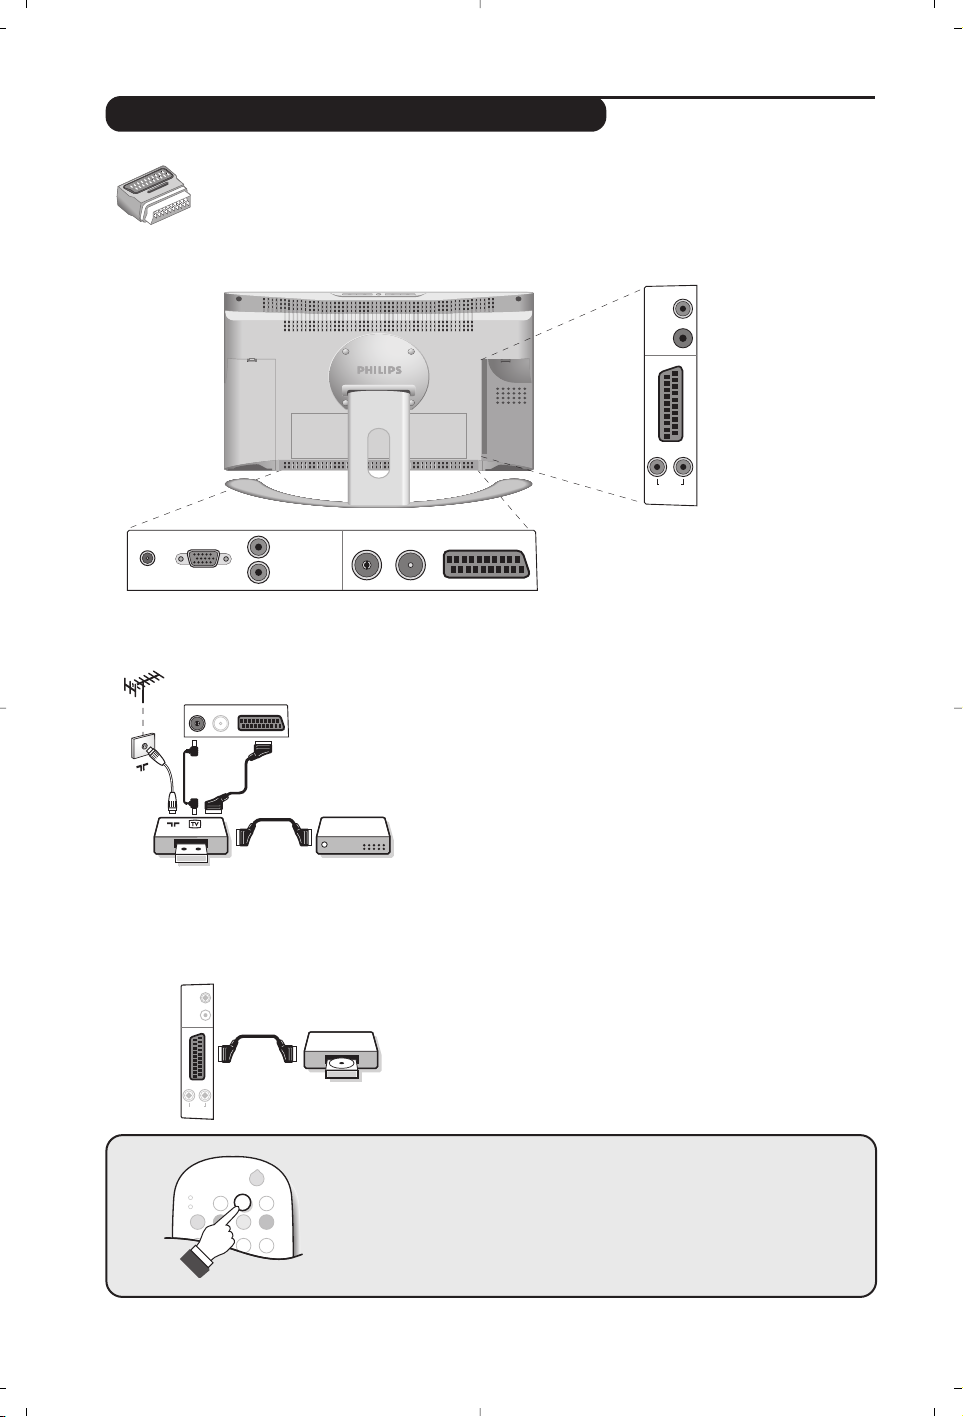
14
MODE
VCR
DVD
·¢Ê Æ
∫
Ó
ı
Ω∆
.
Z
¤
Aansluiten van extra apparatuur
Afhankelijk van de uitvoering is de televisie uitgerust met 1 of 2 SCART-aansluitingen EXT1
en EXT2. Een speciale adapter is bijgeleverd voor aansluitingen op EXT1 en om de draden
achteraan te leggen.
De aansluiting EXT1 heeft de in- en uitgangen voor audio en video en de RVB-ingangen.
De aansluiting EXT2 (indien beschikbaar) heeft de in- en uitgangen voor audio en video en de S-VHS-ingangen.
Videorecorder (of DVD recorder)
Sluit de recorder aan zoals hiernaast is weergegeven. Gebruik
een euroconnector kabel van goede kwaliteit.Wanneer uw
videorecorder is uitgerust met Easylink, gebruikt u de
aansluiting EXT2
Als uw videorecorder geen euroconnector aansluiting heeft, is de
verbinding alleen mogelijk via de antennekabel. U dient dan af te
stemmen op het testsignaal van uw videorecorder en dit
programmanummer 0 toe te kennen (zie handmatig vastleggen,p. 6).
Om het beeld van de videorecorder weer te geven, druk op
0.
Videorecorder met decoder
Sluit de decoder aan op de tweede euroconnector aansluiting
van de videorecorder. U kunt dan ook gecodeerde uitzendingen
opnemen.
Videorecorder
Satellietontvanger, decoder, DVD, etc.
Voor televisietoestellen uitgerust met 2 externe aansluitingen
sluit u op EXT1 bij voorkeur de apparatuur aan die RVBsignalen produceert (digitale decoder, DVD, spelletjes, …) en
op EXT2 de apparatuur die S-VHS-signalen produceert (SVHS- en Hi-8-videorecorders, ...).
Het selecteren van aangesloten apparatuur
Druk op de toets n om EXT1 te selecteren en op de uitvoeringen
met 2 externe aansluitingen:
EXT2 en S-VHS2 (S-VHS-signalen van
de EXT2-aansluiting) en
EXT3.
De meeste apparaten (decoder,videorecorder) schakelen zelf om.
Andere apparaten
*
:
FM ANT
EXT 1
DC in PC input
L
Audio in
(PC)
R
Sub
woofer
out
*
L
Audio
EXT 2
R
out
:
FM ANT
VCR
Sub
woofer
out
*
L
R
Audio
out
Page 31

15
De
AV en S-VIDEO aansluitingen zitten onder het linker
plaatje of, bij de grote schermen, onder het rechter plaatje.
Maak de aansluitingen zoals hiernaast is weergegeven.Met
de toets
n, kies EXT3.
Bij een monotoestel sluit u het geluidssignaal aan op de ingang
AUDIO L. Het geluid komt automatisch uit de linker- en
rechterluidsprekers van het televiesietoestel.
Wanneer de hoofdtelefoon aangesloten is,wordt het geluid
van het televisietoestel uitgezet. Met de toetsen
@”#
kunt u het volume regelen.
De impedantie van de hoofdtelefoon moet tussen 32 en 600 ohm
liggen.
Camera, videospelletjes
Hoofdtelefoon
O
U kunt het toestel aansluiten op een Hi-fi keten met de
audiokabel. Sluit de
Audio out L en R van de TV aan op een
Audio in L en R ingang van de Hi-fi keten.Wanneer u
beschikt over een actieve basluidspreker sluit u de
Subwoofer out uitgang van de televisie aan op de
Subwoofer in ingang van de luidspreker.
Sluit de schermuitgang van uw computer aan op de
PC input
(VGA) ingang van de TV. Sluit de Audio out L en R uitgangen
van de computer aan op de
Audio in (PC) L en R ingang van
de televisie.
Meer informatie over het gebruik van de PC-modus vindt u op
pagina 8.
De optimale schermresolutie configureert u op de PC met
de instelling 1024 x 768, 60 Hz.
Opgelet:
wanneer u een andere resolutie gebruikt, kan het
gebeuren dat de PIP-functie niet werkt. U ziet dan een
waarschuwing op het scherm.
Hier vindt u een lijst met de verschillende resoluties de
beschikbaar zijn op uw televisie:
640 x 350, 70 Hz 720 x 400,70 Hz 1024 x 768,60 Hz
640 x 350, 85 Hz 720 x 400,85 Hz 1024 x 768,70 Hz
640 x 480, 60 Hz 800 x 600,56 Hz 1024 x 768,75 Hz
640 x 480, 67 Hz 800 x 600,60 Hz 1024 x 768,85 Hz
640 x 480, 72 Hz 800 x 600,72 Hz 1152 x 864,75 Hz
640 x 480, 75 Hz 800 x 600,75 Hz 1280 x 960,60 Hz
640 x 480, 85 Hz 800 x 600,85 Hz 1280 x 1024,60 Hz
832 x 624, 75 Hz 1280 x 1024,75 Hz
Versterker
Computer
L
R
S-VIDE
VIDEO
AUDIO
Sub
woofer
out
*
L
R
Audio
out
Sub
woofer
out
*
LR
Audio
out
PC input
Sub
woofer
in
Audio
in
Audio in (PC)
L
R
Page 32

16
Tips
Slechte ontvangst
Geen beeld
Extra apparatuur
geeft zwart-wit
beeld
Geen geluid
De PC-modus of
PIP-functie werkt
niet
De
afstandsbediening
werkt niet meer ?
Stand-by
Schoonmaken
Aanwijzing voor
hergebruik
Nog steeds geen
resultaten?
Dubbele beelden, echobeelden of schaduwen kunnen het gevolg zijn van de
nabijheid van bergen of hoge gebouwen. Probeer in zo’n geval het beeld
handmatig bij te stellen: zie “fijnafstemming” (p. 7) of verander de oriëntatie van
de buitenantenne. Is uw antenne geschikt voor ontvangst van uitzendingen in dit
frequentiebereik (UHF of VHF band)?
Is de antenne op de juiste manier aangesloten? Hebt u het juiste systeem
gekozen? (p.7) Slecht aangesloten euroconnector kabels of antenne aansluitingen
zijn vaak de oorzaak van problemen met beeld of geluid (soms gaan de
aansluitingen gedeeltelijk los als het TV toestel wordt verplaatst of gedraaid.
Controleer alle aansluitingen.
U hebt niet de juiste aansluiting gekozen met de n toets:S-VHS2 in plaats van
EXT2. Controleer bij het afspelen van een videocassette dat deze onder dezelfde
standaard (PAL, SECAM, NTSC) is opgenomen als door de videorecorder kan
worden herkend.
Als u op bepaalde kanalen wel beeld ontvangt, maar geen geluid, betekent dit dat
u niet het juiste TV systeem hebt.Wijzig de SYSTEEM instelling (p. 7).
De versterker die is aangesloten op de televisie geeft geen geluid.Controleer of
u de audio ingang en uitgang niet hebt verwisseld.
Controleer of uw computer is ingesteld op een compatibele resolutie (zie pagina 15).
U krijgt in PC-modus geen radiogeluid ?
Wanneer PIP actief is,krijgt u automatisch het TV-geluid. U moet PIP uitzetten, de
radio-modus kiezen en nadien de PC-modus kiezen.
Reageert het TV toestel niet op de afstandsbediening of knippert het
indicatielampje aan het toestel niet meer wanneer u de afstandsbediening
gebruikt ? Vervang de batterijen.
Blijft het TV toestel in de stand-by wanneer u het toestel aanzet, en verschijnt de
aanduiding VERGRENDELD wanneer u de toetsen van het TV toestel gebruikt?
De KINDERSLOT functie staat ingeschakeld (zie p. 10).
Als het toestel gedurende 15 minuten geen signaal ontvangt, gaat het automatisch
in de wachtstand. Om energie te sparen bestaat uw TV uit onderdelen die in de
wachtstand slechts zeer weinig stroom verbruiken (minder dan 1W).
Het scherm en de kast van uw TV mogen alleen worden schoongemaakt met een
zacht en niet-pluizend doekje. Gebruik nooit een schoonmaakmiddel op basis van
alcohol of oplosmiddel.
Uw TV toestel bevat materialen die opnieuw gebruikt of gerecycleerd kunnen
worden. Om de hoeveelheid afval in het milieu te beperken, halen
gespecialiseerde ondernemingen gebruikte toestellen op om ze uit elkaar te
halen en materiaal dat geschikt is voor hergebruik te verzamelen (neem contact
op met uw verkoper).
Tr ek de stekker van de TV gedurende minstens 30 seconden uit. Steek nadien de
stekker opnieuw in het stopcontact.
Als uw TV toestel defect is, probeer het dan nooit zelf te repareren: neem
contact op met de serviceafdeling van uw verkoper.
Page 33

1
Einleitung
Inhaltsverzeichnis
Wir danken Ihnen für Ihr Vertrauen,daß Sie uns durch den Kauf dieses
Fernsehgerätes entgegenbringen. Diese Bedienungsanleitung soll Ihnen bei der
Installierung und der Bedienung Ihres Fernsehgerätes behilflich sein.
Wir bitten Sie, diese Anleitung sorgfältig durchzulesen.
Wir hoffen, daß unsere Technologie Ihren Erwartungen gerecht wird.
Installation
LCD-Fernsehgerät . . . . . . . . . . . . . . . . . . . . . . . . . . . . . . . . . . . . . . . . . . . . . . . . . .2
Die Tasten der Fernbedienung . . . . . . . . . . . . . . . . . . . . . . . . . . . . . . . . . . . . . . . .3
Installation des Fernsehgerätes . . . . . . . . . . . . . . . . . . . . . . . . . . . . . . . . . . . . . . .4
Schnellinstallation der Programme . . . . . . . . . . . . . . . . . . . . . . . . . . . . . . . . . . . . .5
Sortieren der Programme . . . . . . . . . . . . . . . . . . . . . . . . . . . . . . . . . . . . . . . . . . .5
Sprache und Land auswählen . . . . . . . . . . . . . . . . . . . . . . . . . . . . . . . . . . . . . . . . .6
Automatisches Speichern . . . . . . . . . . . . . . . . . . . . . . . . . . . . . . . . . . . . . . . . . . . .6
Funktion EasyLink . . . . . . . . . . . . . . . . . . . . . . . . . . . . . . . . . . . . . . . . . . . . . . . . . .6
Manuelles Speichern . . . . . . . . . . . . . . . . . . . . . . . . . . . . . . . . . . . . . . . . . . . . . . . .7
Name des Programms . . . . . . . . . . . . . . . . . . . . . . . . . . . . . . . . . . . . . . . . . . . . . .7
Bedienung
Radiofunktion . . . . . . . . . . . . . . . . . . . . . . . . . . . . . . . . . . . . . . . . . . . . . . . . . . . . . .8
Verwendung als PC-Monitor . . . . . . . . . . . . . . . . . . . . . . . . . . . . . . . . . . . . . . . . . .8
Bildeinstellungen . . . . . . . . . . . . . . . . . . . . . . . . . . . . . . . . . . . . . . . . . . . . . . . . . . .9
Toneinstellungen . . . . . . . . . . . . . . . . . . . . . . . . . . . . . . . . . . . . . . . . . . . . . . . . . . .9
Einstellungen von Sonderfunktionen . . . . . . . . . . . . . . . . . . . . . . . . . . . . . . . . . . . .9
Weckfunktion . . . . . . . . . . . . . . . . . . . . . . . . . . . . . . . . . . . . . . . . . . . . . . . . . . . .10
Sperren des Fernsehgerätes . . . . . . . . . . . . . . . . . . . . . . . . . . . . . . . . . . . . . . . . .10
Videotext . . . . . . . . . . . . . . . . . . . . . . . . . . . . . . . . . . . . . . . . . . . . . . . . . . . . . . .11
Bildformate 16:9 . . . . . . . . . . . . . . . . . . . . . . . . . . . . . . . . . . . . . . . . . . . . . . . . . .12
Tasten für VCR oder DVD-Spieler . . . . . . . . . . . . . . . . . . . . . . . . . . . . . . . . . . . .13
Glossar . . . . . . . . . . . . . . . . . . . . . . . . . . . . . . . . . . . . . . . . . . . . . . . . . . . . . . . . .13
Peripherie-Geräte
Anschluß von anderen Geräten . . . . . . . . . . . . . . . . . . . . . . . . . . . . . . . . . . . . . . .14
Videorecorder . . . . . . . . . . . . . . . . . . . . . . . . . . . . . . . . . . . . . . . . . . . . . . . . . . .14
Weitere Geräte . . . . . . . . . . . . . . . . . . . . . . . . . . . . . . . . . . . . . . . . . . . . . . . . . .14
Wahl der angeschlossenen Geräte . . . . . . . . . . . . . . . . . . . . . . . . . . . . . . . . . . . .14
Videokamera,Videospiele . . . . . . . . . . . . . . . . . . . . . . . . . . . . . . . . . . . . . . . . . . .15
Kopfhörer . . . . . . . . . . . . . . . . . . . . . . . . . . . . . . . . . . . . . . . . . . . . . . . . . . . . . . . .15
Verstärker . . . . . . . . . . . . . . . . . . . . . . . . . . . . . . . . . . . . . . . . . . . . . . . . . . . . . . .15
Computer . . . . . . . . . . . . . . . . . . . . . . . . . . . . . . . . . . . . . . . . . . . . . . . . . . . . . . .15
Tips . . . . . . . . . . . . . . . . . . . . . . . . . . . . . . . . . . . . . . . . . . . . . . . . . . . . . . . . . . . .16
w
Reinigung des Fernsehgerätes
Bildschirm und Gehäuse dürfen nur mit einem sauberen,weichen und
fusselfreien Tuch gereinigt werden. Kein Produkt auf Alkohol- oder
Lösungsmittelbasis verwenden.
Deutsch
Page 34

2
LCD-Fernsehgerät
Die Tasten des Fernsehgeräts
• . : Ein-/Ausschalten des Fernsehgeräts.
• VOLUME - + (-”+) : Einstellen der Lautstärke.
• PROGRAM - + (- P +) :Auswahl der Programme.
• MENU : Um die Menüs aufzurufen oder zu schließen,
drücken Sie gleichzeitig die beiden Tasten ” - und
” +. Mit den Tasten P - + können Sie eine
Einstellung auswählen, und mit den Tasten ” - +
können Sie Änderungen an der ausgewählten
Einstellung vornehmen.
Hinweis
:Wenn die Kindersicherung aktiviert ist, haben die
Tasten
-”+ und - P + keine Funktion (siehe S. 10, Menü
SONDERFUNK).
Kontrolllampe und Infrarotempfänger.
Verstellbarer Standfuß.
Der Standfuß kann abgenommen und durch das optional
erhältliche Montageset für die Anbringung an der Wand
ersetzt werden (Informationen erhalten Sie bei Ihrem
Händler).
Rückseite:
Die wichtigsten Anschlüsse befinden sich auf der
Unterseite des Geräts.
Hinter den abnehmbaren Blenden auf der linken* und
der rechten Seite befinden sich weitere
Anschlussmöglichkeiten.
* Bei Großgeräten ist keine linke Blende vorhanden.
Genaue Hinweise zu den einzelnen Anschlüssen finden Sie
auf Seite 14.
SCART-Buchse EXT1
Buchsen für Fernseh- und Radioantenne
VGA-Eingang und Audioanschluss für Computer
Anschluss für Netzadapter
MENU
-
”
VOLUME
+
P
.
PROGRAM
-
+
DC in PC input (VGA)
L
Audio in (PC)
R
:
FM ANT
EXT. 1
Ø
Page 35

3
12
MODE
MUTE
RADIO
VCR
DVD
SMARTSMART ACTIVE
CONTROL
MENU
PC TV
OK
P
564
879
0
·¢Ê∆Æ
∫
ù
¤Ó
`
Ÿı
Å
Ë
Á
∏
3
--
++
.
ª
-
[
”
Y
ª
Die Tasten der Fernbedienung
Wahl der EXT-Anschlüsse (S. 14)
Drücken Sie diese Taste mehrmals, um
das angeschlossene Gerät auszuwählen.
Tasten für Videotext (S. 11)
bzw.Videorecorder/DVD-Player (S.13)
œ PIP aufrufen (S. 8)
π PIP verschieben (S. 8)
Automatische Abschaltung
Zur Auswahl der Zeitspanne, nach
welcher das Fernsehgerät automatisch
in den Bereitschaftsmodus schaltet
(von 0 bis 240 Minuten).
Active Control
Stellt die Bildqualität je nach
Empfangsniveau optimal ein.
Tonmodus
Ermöglicht die Ausgabe von
STEREO
-
bzw.
NICAM STEREO
-Sendungen in
MONO
bzw.für zweisprachige
Sendungen die Auswahl zwischen
TON I
und
TON II
.
Bei Umschaltung auf Mono
erscheint die Angabe MONO in rot.
Menü
Zum Aufrufen bzw.Verlassen der Menüs.
Richtungstasten
Mit diesen vier Tasten können Sie sich
innerhalb der Menüs bewegen.
Lautstärke
Zum Einstellen der Lautstärke.
PC/TV/Radio
Mit diesen Tasten wechseln Sie
zwischen PC-,TV- und Radiomodus
(S. 8).
Bildformate 16:9 (S. 12)
Stummtaste
Zum vorübergehenden Abschalten
bzw.Wiedereinschalten des Tons.
Bildschirmanzeigen
Zum Anzeigen/Ausblenden der
Programmnummer,des
Programmnamens (falls vorhanden),
der Soundmodi und der noch
verbleibenden Einschaltdauer. Halten
Sie die Taste 5 Sekunden lang
gedrückt, um die Programmnummer
permanent anzuzeigen.
Bereitschaftsposition
Zum Umschalten in die Bereitschaftsposition. Um das Fernsehgerät erneut
einzuschalten, drücken Sie die Taste b,
P @#oder
09.
Programmliste
Anzeigen / Löschen der
Programmliste. Mit den Tasten îÏ
können Sie ein Programm auswählen,
mit der Taste
¬ können Sie ein
Programm anzeigen.
Vor gesperrten Programmen (S. 10)
erscheint das Symbol
+ bzw. ? wenn
die Programme nicht gesperrt sind.
Bild- und Ton-Voreinstellungen
Bietet Zugriff auf eine Reihe von
Vo reinstellungen für Bild und Ton.
Die Position PERSÖNLICH entspricht den in
den Menüs vorgenommenen Einstellungen.
Surround-Ton
Zum Aktivieren / Deaktivieren des
Raumklangeffektes. In Stereo vermittelt
der Raumeffekt den Eindruck, daß die
Lautsprecher weiter auseinander stehen.
Bei Versionen, die mit Virtual Dolby
Surround* ausgerüstet sind,erhalten Sie
die von hinten kommenden Toneffekte des
Dolby Surround Pro Logic.In Mono wird
ein Stereo-Raumklangeffekt simuliert.
Wahl der Sender
Mit diesen Tasten können die Sender
ausgewählt werden.Nach Auswahl des
Senders werden für einige Sekunden die
Nummer, (der Name) und der
Soundmode angezeigt.
Bei Sendern mit Videotext wird am unteren
Bildschirmrand der Name des Senders angezeigt.
Vorhergehendes Programm
Drücken Sie diese Taste, um zum zuvor
angezeigten Sender zurückzukehren.
Zifferntasten
Zur direkten Eingabe einer
Programmnummer. Bei zweistelligen
Programmnummern muß die zweite
Zahl eingegeben werden,bevor die
Linie erlischt.
Modus-Wahlschalter (S.13)
Zum Aktivieren der Fernbedienung
im Modus TV,VCR (Videorecorder)
oder DVD
* Hergestellt unter Lizenz von Dolby Laboratories Licensing Corporation. DOLBY,das doppel D
symbol £ und PRO LOGIC sind Warenzeichen der Dolby Laboratories Licensing Corporation.
Page 36

4
& Aufstellen des Fernsehgeräts
Stellen Sie das Fernsehgerät auf eine stabile Unterlage.
Um Gefahren zu vermeiden,achten Sie darauf, dass
das Fernsehgerät nicht in Kontakt mit Wasser kommt.
Außerdem dürfen sich keine Wärme abstrahlenden
Gegenstände (z. B. Lampen, Kerzen, Heizkörper) in
unmittelbarer Nähe des Geräts befinden.Achten Sie
darauf, dass die Lüftungsschlitze auf der Rückseite
immer frei bleiben.
é Antennenanschluss
• Schließen Sie das mitgelieferte Antennenkabel an der
Buchse
: auf der Unterseite des Fernsehgeräts
und an den Antennenstecker an.
• Schließen Sie das Radio-Antennenkabel an die Buchse
FM ANT auf der Unterseite des Fernsehers an.
• Führen Sie die Kabel durch den Standfuß des
Fernsehgeräts hindurch.
“ Netzanschluss
Das Fernsehgerät wird mit der auf dem Etikett
angegebenen Gleichspannung betrieben.Verwenden
Sie ausschließlich den im Lieferumfang des Geräts
enthaltenen Netzadapter.
• Schließen Sie den Adapter an die DC IN-Buchse des
Fernsehgeräts an. Lassen Sie zur Belüftung
ausreichend Platz um den Adapter frei.
• Schließen Sie das Netzkabel an den Adapter an, und
stecken Sie den Netzstecker in eine Steckdose (220
- 240 V/50 Hz).
Hinweise zum Anschluss weiterer Geräte finden Sie auf S. 14.
‘ Fernbedienung
Legen Sie die zwei mitgelieferten R6-Batterien
(Mignon) ein, und beachten Sie dabei die Polarität.
Aus Gründen des Umweltschutzes enthalten die
mitgelieferten Batterien kein Quecksilber, Cadmium oder
Nickel.Werfen Sie leere Batterien nicht weg, sondern
entsorgen Sie sie vorschriftsgemäß (erkundigen Sie sich
hierzu bei Ihrem Fachhändler).
( Einschalten
Mit der Taste EIN/AUS wird das Fernsehgerät eingeschaltet.
Die grüne Kontrolllampe leuchtet auf, und der Bildschirm
wird hell. Fahren Sie direkt mit der Schnellinstallation
auf Seite 5 fort. Sollte das Fernsehgerät im
Bereitschaftsmodus bleiben (rote Kontrollampe), drücken
Sie die Taste P
# auf der Fernbedienung.
Wenn Sie die Fernbedienung verwenden, blinkt die
Kontrolllampe.
Installation des Fernsehgerätes
5 cm
5 cm
5 cm
FM ANT.
MENU
”
P
++
--
.
VOLUME
PROGRAM
Page 37

5
Schnellinstallation der Programme
Sortieren der Programme
Erscheint nach dem ersten Einschalten das Menü
WÄHLEN SPRACHE,verfahren Sie wie hier
beschrieben. Erscheint dieses Menü nach dem
ersten Einschalten nicht, sollten Sie die Funktion
Automatisches Speichern ausführen (Seite 5).
Wird dieses Menü nicht angezeigt, halten Sie die Tasten
”- und ”+ des Fernsehgerätes 8 Sekunden lang
gedrückt. Das Menü wird hierauf angezeigt.
& Wählen Sie die gewünschte Sprache mit den
Tasten
îÏ der Fernbedienung,bestätigen
Sie mit
¬.
é Wählen Sie Ihr Heimatland mit den Tasten
îÏ, bestätigen Sie mit ¬.Wird Ihr
Heimatland nicht in der Liste genannt, wählen Sie
ANDERE
“ Die Suche wird automatisch gestartet. Dieser
Vorgang dauert einige Minuten. Der Suchstatus
sowie die Anzahl der gefundenen Programme
wird am Bildschirm angezeigt. Nach Abschluß
der Suche wird das Menü ausgeblendet.
Um die Suche zu unterbrechen bzw.zu verlassen, drücken
Sie die Taste
H.Wird kein Programm gefunden,schlagen
Sie im Kapitel "Hinweise", Seite 16 nach.
‘ Wenn der Sender oder das Kabelnetz das
automatische Sortiersignal sendet, werden die
Programme in der richtigen Reihenfolge
durchnumeriert.
( Andernfalls werden die gefundenen Programme
in absteigender Reihenfolge ab der Nummer 99
durchnumeriert. Um die Programme neu zu
numerieren,verwenden Sie das Menü
SORTIEREN.
Einige Sender bzw. Kabelnetze verfügen über ihre
eigenen Sortierparameter (Region, Sprache, usw.).
Nutzen Sie in diesem Fall für Ihre Wahl die Tasten
îÏ und bestätigen Sie diese mit der Taste ¬.
Siehe auch: Funktion EasyLink, Seite 6.
& Drücken Sie die Taste H. Das Hauptmenü
erscheint auf dem Bildschirm.
é
Drücken sie ¬,um EINSTELLUNG zu wählen.
Hierauf erscheint das Menü EINSTELLUNG:
“ Wählen Sie SORTIEREN mit der Taste Ï
drücken Sie ¬.Hierauf erscheint das Menü
SORTIEREN. Die Auswahl VON ist aktiviert.
Hinweis:
Dieses Menü funktioniert gemäß
folgender Logik:
•
"VON" (geben Sie die aktuelle Programmnummer ein)
• "NACH" (geben Sie die neue Nummer ein)
• "Nummern TAUSCHEN" (die Änderung erfolgt)
‘
Wählen Sie das neue zu numerierende Programm
mit den Tasten
Ȭ bzw. 0 bis 9.
Beispiel : Sie wollen dem Programm 78 (VON)
die Nummer 2 (NACH) zuweisen:Drücken
Sie 78.
( Wählen Sie NACH (Taste
Ï) und geben Sie
mit den Tasten
Ȭ bzw. 0 bis 9 die
gewünschte neue Nummer ein (Geben Sie für
unser Beispiel
2 ein).
§ Wählen Sie nun TAUSCHEN (Taste
Ï) und
drücken Sie
¬.Am Bildschirm wird
GETAUSCHT angezeigt und die Änderung
erfolgt. In unserem Beispiel wurde dem
Programm 78 die Nummer 2 zugeordnet (und
dem Programm 2 die Nummer 78).
è Wählen Sie NACH (Taste
î) und
wiederholen Sie die Schritte ‘ bis § bis Sie
alle Programme neu numeriert haben.
Siehe auch: Funktion EasyLink, Seite 6.
! Mit der Taste
d verlassen Sie die Menüs.
WÄHLEN SPRACHE
SPRACHE
FRANÇAIS
• DEUTSCH
E††HNIKA
ITALIANO
NORSK
LAND
ÖSTERREICH
BELGIEN
SCHWEIZ
DEUTSCHLAND
DÄNEMARK
• BILD
• TON
• SONDERFUNK.
• EINSTELLUNG
EINTELLUNG
• SPRACHE
• LAND
• AUTO. PROG.
• MANUELL PROG
• SORTIEREN
• NAME
VON
NACH
TAUSCHEN
Page 38

6
Sprache und Land auswählen
Automatisches Speichern
& Drücken Sie die Taste H.Das Hauptmenü
erscheint auf dem Bildschirm.
é Drücken sie
¬,um EINSTELLUNG (Ï) zu
wählen.Hierauf erscheint das Menü EINSTELLUNG.
Die Auswahl SPRACHE ist aktiviert.
“ Drücken Sie
¬,um in das Menü SPRACHE zu
gelangen.
‘ Wählen Sie die gewünschte Sprache mit den
Tasten
îÏ. Die Menüs erscheinen nun in der
ausgewählten Sprache.
( Drücken Sie auf
È um das Menü SPRACHE zu
verlassen.
§
Wählen Sie LAND (Ï) und drücken Sie auf ¬.
è Wählen Sie Ihr Heimatland mit den Tasten îÏ.
Wird Ihr Heimatland nicht in der Liste genannt,
wählen Sie ANDERE
! Drücken Sie auf
È um das Menü LAND zu
verlassen.
ç Mit der Taste
d verlassen Sie die Menüs.
Siehe auch: Funktion EasyLink, siehe unten.
Mit diesem Menü starten Sie die automatische
Suche nach allen in Ihrer Region (bzw. auf
Ihrem Kabelnetz) verfügbaren Programme.
& Führen Sie zuerst die zuvor beschriebenen
Schritte & bis ! aus, dann:
é Wählen Sie AUTO PROG.(
Ï) und drücken
Sie
¬. Die Suche beginnt.
Nach einigen Minuten wird das Menü
EINSTELLUNG automatisch wieder am
Bildschirm angezeigt.
“ Wenn der Sender oder das Kabelnetz das
automatische Sortiersignal sendet, werden die
Programme in der richtigen Reihenfolge
durchnumeriert.
‘ Andernfalls werden die gefundenen
Programme in absteigender Reihenfolge ab der
Nummer 99 durchnumeriert. Um die
Programme neu zu numerieren,verwenden Sie
das Menü SORTIEREN.
Einige Sender bzw. Kabelnetze verfügen über ihre
eigenen Sortierparameter (Region, Sprache, usw.).
Nutzen Sie in diesem Fall für Ihre Wahl die Tasten
î Ï und bestätigen Sie diese mit der Taste ¬.
Um die Suche zu unterbrechen bzw. zu verlassen,
drücken Sie die Taste
H.Wird kein Sender
gefunden, siehe Kapitel „Tips“ auf Seite 16.
Siehe auch: Funktion EasyLink, siehe unten.
( Mit der Taste d verlassen Sie die Menüs.
• BILD
• TON
• SONDERFUNK.
• EINSTELLUNG
EINTELLUNG
• SPRACHE
• LAND
• AUTO. PROG.
• MANUELL PROG
• SORTIEREN
• NAME
DEUTSCH
E††HNIKA
ITALIANO
EINTELLUNG
• SPRACHE
• LAND
• AUTO. PROG.
• MANUELL PROG
• SORTIEREN
• NAME
SUCHEN
BITTE WARTEN
PROGRAMMNR 2
215.18 MHZ
Ist das Fernsehgerät (über die EXT2-Buchse)
an einen Videorecorder mit der Funktion
EasyLink angeschlossen, werden die Sprache,
das Land und die gefundenen Sender bei der
Installation automatisch an den Videorecorder
übertragen.Während des Ladens wird eine
Nachricht am Bildschirm angezeigt. Die Liste
der Sender des Videorecorders stimmt nun
mit der des Fernsehgerätes überein.
Im Menü SONDERFUNK muß EASY LINK auf EIN
stehen (Standardeinstellung), siehe Seite 9.
Funktion EasyLink
(nur bei bestimmten Modellen verfügbar)
Page 39

7
Manuelles Speichern
Name des Programms
Mit diesem Menü können alle Programme
einzeln gespeichert werden.
& Drücken Sie die Taste
H.
é Wählen Sie EINSTELLUNG (
Ï) und drücken
Sie
¬.Das Menü EINSTELLUNG wird am
Bildschirm angezeigt.
“
Wählen Sie MANUELL PROG.(Ï) und drücken
Sie ¬. Hierauf wird das Menü angezeigt:
‘ Drücken Sie
¬, um SYSTEM zu wählen.
Mit den Tasten
îÏ wählen Sie EUROPE
(automatische Suche*), oder suchen Sie
manuell mit den Empfangsnormen:
WEST EUR (BG), EAST EUR (DK), UK (I) oder
FRANCE (LL’). Mit der Taste
È verlassen Sie
das Menü.
* Mit Ausnahme von Frankreich (Empfangsnorm
LL'); wählen Sie für Frankreich FRANCE.
( Wählen Sie anschließend die Einstellung
SUCHEN und drücken Sie
¬. Die Suche
beginnt. Sobald ein Sender gefunden wird, wird
der Suchvorgang unterbrochen.Gehen Sie zum
è.Kapitel über.Wenn Ihnen die Frequenz des
gesuchten Senders bekannt ist, können Sie die
entsprechende Nummer mit Hilfe der Tasten
09direkt eingeben.
Wird kein Sender gefunden, siehe Kapitel “Tips” auf
Seite 16.
§ Wenn der Empfang nicht zufriedenstellend ist,
wählen Sie die Option FEINABST. und halten
Sie die Taste
È bzw.¬ gedrückt.
è Wählen Sie PROGRAMNR.und geben Sie mit
Hilfe der Taste
Ȭ bzw. 0 bis 9 die
gewünschte Programmnummer ein.
! Wählen Sie die Einstellung SPEICHERN und
drücken Sie die Taste
¬. Die Meldung
SPEICHERN wird angezeigt. Das Programm ist
gespeichert.
Siehe auch: Funktion EasyLink, Seite 6.
ç Wiederholen Sie die Schritte ( bis ! so oft,
wie Sender gespeichert werden sollen.
Zum Verlassen des Menüs drücken Sie die
Taste
d.
Sie können den ersten 40 Programmen (von
1 bis 40) einen Namen geben.
& Drücken Sie die Taste
H.
é
Wählen Sie EINSTELLUNG (Ï) und drücken
Sie
¬.Das Menü EINSTELLUNG wird
angezeigt.
“ Drücken Sie 5 mal auf Ï,um NAME
auszuwählen (am unteren Bildschirmrand
versteckt) und drücken Sie
¬. Hierauf wird
das Menü
¬ angezeigt:
‘ Wählen Sie mit den Tasten
09bzw.
@ P # das Programm aus,dem Sie einen
Namen zuweisen möchten.
Hinweis: bei der Installierung werden den
Programmen automatisch Namen zugewiesen,
wenn das Erkennungssignal gesendet wird.
( Mit den Tasten
Ȭ können Sie sich im
Anzeigebereich des Namens bewegen (5
Zeichen).
§ Mit den Tasten îÏ wählen Sie die Zeichen.
è Wenn die Namenseingabe beendet ist,
drücken Sie
H.
Der Name des Programms ist nun gespeichert.
Siehe auch: Funktion EasyLink, Seite 6.
! Wiederholen Sie die Schritte ‘ bis è bis Sie
allen Programmen einen Namen zugewiesen
haben.
ç Mit der Taste
d verlassen Sie die Menüs.
• BILD
• TON
• SONDERFUNK.
• EINSTELLUNG
EINTELLUNG
MANUELL PROG
• SYSTEM
• SUCHEN
• PROGRAMMNR
• FEINABST.
• SPEICHERN
EUROPE
WEST EUR
EAST EUR
UK
FRANCE
EINTELLUNG
• SPRACHE
• LAND
• AUTO. PROG.
• MANUELL PROG
• SORTIEREN
• NAME ZDF_
Page 40

Radiofunktion
Verwendung als PC-Monitor
Auswählen des Radiomodus
Drücken Sie die Taste Z der Fernbedienung,
um in den Radiomodus zu wechseln. Mit der
Taste
X gelangen Sie zum TV-Modus zurück. Im
Radiomodus werden die Nummer, der
Sendername (falls verfügbar), die Frequenz und
der Tonmodus auf dem Bildschirm angezeigt.
Die Namen der Radiosender können Sie über das Menü
NAME eingeben. (S. 7)
Programmauswahl
Mit den Tasten
09bzw.@ P # wechseln Sie
zwischen den einzelnen UKW-Sendern (1 bis 40).
Liste der Radiosender
Drücken Sie die Taste ı, um eine Liste der
Radiosender ein- bzw.auszublenden. Mit den Pfeiltasten
wählen Sie den gewünschten Radiosender aus.
Verwenden des Radiomenüs
Drücken Sie die Taste
H um die
Steuerungselemente für das Radio aufzurufen.
Suche der Radiosender
Wenn Sie die Schnellinstallation vorgenommen
haben, sind alle verfügbaren
UKW-Sender
gespeichert. Eine neue Suche starten Sie, indem Sie
das Menü
EINSTELLUNG : AUTO. PROG.
(für eine
vollständige Suche) oder
MANUELL PROG (für eine
Suche einzelner Sender) wählen. Über die Menüs
SORTIEREN
und NAME können Sie die Radiosender
sortieren und umbenennen. Die Funktionsweise
dieser Menüs entspricht denen der TV-Menüs.
Bildschirmschoner
Im Menü
SONDERFUNK haben Sie die Möglichkeit,
den Bildschirmschoner zu aktivieren bzw.
deaktivieren.Auf dem Bildschirm läuft ein Textband
mit Uhrzeit, Frequenz und Sendername (falls
verfügbar) durch.
PC-Modus
Das Fernsehgerät kann als Computermonitor
verwendet werden. Mit der PIP-Funktion können
Sie gleichzeitig einen Teil des Bildschirms zum
Einblenden des Fernsehprogramms nutzen.
Vorher müssen Sie den Computer an den Monitor
anschließen und die richtige Auflösung einstellen (siehe S.15).
Auswählen des PC-Modus
Drücken Sie die Taste V der Fernbedienung, um
in den PC-Modus zu wechseln. Mit der Taste
X
gelangen Sie zum TV-Modus zurück.
Wenn länger als 5 Sekunden lang kein PC-Signal
empfangen wird, schaltet der Fernseher automatisch
in den Bereitschaftsmodus.
Verwendung der PIP-Funktion
Im PC-Modus können Sie in einem separaten Fenster
auf dem Bildschirm das Fernsehprogramm einblenden.
& Drücken Sie die Taste œ, um das Bild im Bild
(PIP) aufzurufen. Das Fernsehbild wird in einem
kleinen Fenster auf dem Bildschirm angezeigt.
é Drücken Sie erneut die Taste œ,um die Größe des
eingeblendeten Fensters zu reduzieren.Bei erneutem
Drücken wird das Fenster wieder ausgeblendet.
“ Drücken Sie die Taste
π,wenn das Fenster an eine
andere Position verschoben werden soll. Sie können
die Position auch mit Hilfe der Pfeiltasten ändern.
‘ Mit den Tasten
09und @ P # schalten Sie
zwischen den Programmen um, die im PIP-Fenster
angezeigt werden. Drücken Sie die Taste
n,wenn
das Bild eines an den Fernseher angeschlossenen
Geräts (Video, DVD usw.) angezeigt werden soll.
Verwenden des PC-Menüs
Drücken Sie die Taste
H,um die
Steuerungselemente für den PC-Monitor aufzurufen.
Nehmen Sie mit den Pfeiltasten Einstellungen vor
(die Einstellungen werden automatisch gespeichert):
•
AUDIO ANWAHL
:Auswahl des Tonsignals für den
Fernseher (PC oder TV/Radio). Sie können
beispielsweise Radio hören,während Sie das
Gerät als Computermonitor nutzen.
Hinweis:
Vor der Auswahl des PC-Modus muss der TV- bzw.
Radiomodus ausgewählt werden. Bei Anzeige des PIPFensters ist keine Radiowiedergabe möglich.
•
HELLIGKEIT & KONTRAST: Einstellung der Helligkeit
und des Kontrasts.
•
FARBEINSTELLUNG: Einstellung der Farbtemperatur
(kalt/bläulicher Weißton,normal oder warm/rötlicher
Weißton).
•
BILDRAUSCHEN: Zur Entfernung störender horizontaler
(PHASENLAGE) und vertikaler (TAKT) Linien.
•
POSITION EINSTELLUNGEN: Einstellung der
horizontalen und vertikalen Position des Bilds.
• AUTOM. EINSTELLUNGEN: Die Position des Bilds
wird automatisch eingestellt.
•
PIP EINSTELLUNGEN: Einstellung der Größe und
Position des Bilds im Bild (PIP).
•
MODE-ANWAHL: Rückkehr in den TV- bzw.
Radiomodus.
•
WERKSEINSTELL.AUFRUFEN: Zurücksetzen auf
die werkseitigen Standardeinstellungen.
•
BILDFORMATE: Auswahl zwischen Großbildschirm
und dem ursprünglichen PC-Bildschirm-Format.
8
Page 41

Bildeinstellungen
&
Drücken sie die Taste Hund dann die Taste ¬.
Das Menü BILD wird hierauf angezeigt:
é Mit den Tasten
îÏ wählen Sie die gewünschte
Einstellung und mit den Tasten
Ȭ nehmen
Sie die Einstellung vor. Hinweis: dieses Menü wird
aufgeklappt. Halten Sie die Taste
Ï gedrückt, um zu
den am unteren Bildschirmrand maskierten
Einstellungen Zugang zu haben.
“ Nachdem die Einstellungen vorgenommen
wurden, wählen Sie
SPEICHERN und drücken Sie
¬,um die Einstellungen zu speichern.
‘ Mit der Taste
d verlassen Sie die Menüs.
Beschreibung der Einstellungen:
• HELLIGKEIT:zur Einstellung der Helligkeit des Bildes.
• FARBSÄTTIGUNG:zur Einstellung der Farbintensität.
• KONTRAST: zur Einstellung des Unterschiedes
zwischen den hellen und dunklen Tönen.
• SCHÄRFE: zur Einstellung der Bildschärfe.
•
SPEICHERN: zum Speichern der Bildeinstellung.
•
FARBTON: zur Einstellung der Farbwiedergabe
des Bildes. Es stehen drei Optionen zur Auswahl:
KALT (bläulicher Weißton), NORMAL
(ausgewogener Weißton) oder WARM (rötlicher
Weißton).
• KONTRAST +: Aktivieren bzw.Aufheben der
automatischen Einstellung des Bildkontrastes
(die dunkelsten Teile des Bildes sind immer
schwarz).
& Drücken sie die Taste H,wählen Sie TON (Ï)
und drücken Sie
¬. Das Menü TON wird
hierauf angezeigt:
é Mit den Tasten
îÏ wählen Sie die
gewünschte Einstellung und mit den Tasten
Ȭ nehmen Sie die Einstellung vor.
“ Nachdem die Einstellungen vorgenommen
wurden, wählen Sie
SPEICHERN und drücken Sie
¬, um die Einstellungen zu speichern.
‘ Mit der Taste
d verlassen Sie die Menüs.
Beschreibung der Einstellungen:
•
EQUALIZER: Zur Einstellung des Klangcharakters
(von den Tiefen (120 Hz) bis zu den Höhen (10 kHz).
• BALANCE: zum Ausgleich des Tons auf dem
linken und rechten Lautsprecher
• PROG.LAUT
(Lautstärkeanpassung): Gleicht die
Lautstärkeunterschiede zwischen verschiedenen
Programmen oder externen Geräten aus. Diese
Einstellung kann für die Programme 1 bis 40 und
die externen Geräte verwendet werden.
Verwenden
Sie die Tasten
@ P #,um die Lautstärke der
verschiedenen Programme zu vergleichen.
• SPEICHERN: zum Speichern der Toneinstellungen
•
LAUTST.BEGR. (Automatic Volume Leveller): Regelt
automatisch die Lautstärke, so daß starke
Lautstärkeunterschiede bei Programmwechsel oder
bei Einblendungen von Werbespots begrenzt werden.
Toneinstellungen
• BILD
• TON
• SONDERFUNK.
• EINSTELLUNG
BILD
• HELLIGKEIT
• FARBSÄTTIGUNG
• KONTRAST
• SCHÄRFE
• SPEICHERN
• FARBTON
• KONTRAST+
--I------ 39
• BILD
• TON
• SONDERFUNK.
• EINSTELLUNG
TON
• EQUALIZER
• BALANCE
• PROG. LAUT
• SPEICHERN
• LAUTST. BERGR.
120 HZ
500 HZ
1500 HZ
5 KHZ
10 KHZ
Einstellungen von Sonderfunktionen
& Drücken Sie die Taste H,wählen Sie das Menü
SONDERFUNK (Ï), und drücken Sie
anschließend die Taste
¬. Sie können folgende
Einstellungen vornehmen:
é
TIMER, KINDERSICHER und PROG. SPERREN:
siehe nächste Seite
“
MODE-ANWAHL:Wechsel zwischen dem
Radio-,
TV- und PC-Modus.
‘
EASYLINK (nur bei bestimmten Modellen verfügbar):
Ist das Fernsehgerät (über die EXT2-Buchse)
an einen Videorecorder mit der Funktion
EasyLink angeschlossen, werden die Sprache,
das Land und die gefundenen Sender bei der
Installation automatisch an den Videorecorder
übertragen. Sie die Taste
¬, um auf EIN zu
stellen. Besitzten Sie einen Videorecorder ohne
NexTViewLink, stellen Sie auf
AUS.
( Drücken Sie die Taste
d, um die Menüs zu
verlassen.
9
Page 42

10
Mit dieser Funktion können Sie Ihr
Fernsehgerät wie einen Wecker verwenden.
& Drücken Sie die Taste
H.
é Wählen Sie
SONDERFUNK (Ï) und drücken
Sie 2 mal auf
¬. Hierauf wird das Menü
TIMER angezeigt :
“ Mit der Taste
¬ haben Sie Zugang zu den
verschiedenen Untermenüs bzw. können diese
verlassen, mit den Tasten
îÏ können Sie
folgende Einstellungen vornehmen:
‘
ZEIT: geben Sie die aktuelle Uhrzeit ein.
Hinweis:
die Uhrzeit wird automatisch über die
Videotextangaben des 1. Programms aktualisiert,
wenn das Fernsehgerät eingeschaltet wird.Wenn
dieses Programm nicht über Videotext verfügt,
erfolgt keine Aktualisierung.
(
START:
geben Sie die Einschaltzeit des
Fernsehgerätes ein
§
ENDE: geben Sie die Zeit ein, wenn das Fernsehgerät
in den Bereitschaftsmodus umschaltet.
è PROGRAMMNR:
Geben Sie die für das Wecken
gewünschte Programmnummer ein.Bei Modellen
mit
Radio können Sie mit den Tasten Ȭ
einen UKW-Sender auswählen (mit den Tasten
09
können nur Fernsehprogramme ausgewählt
werden).
! AKTIV: Sie können folgende Einstellungen
vornehmen:
•
EINMAL:
wenn Sie nur einmal geweckt werden
wollen
• TÄGLICH:
wenn Sie täglich geweckt werden wollen
• STOP:
wenn Sie nicht mehr geweckt werden wollen.
ç
Drücken Sie b , um das Fernsehgerät in die
Bereitschaftsposition zu schalten.Nun schaltet sich
das Fernsehgerät automatisch zur
programmierten Uhrzeit ein. Wenn Sie das
Fernsehgerät eingeschaltet lassen,erfolgt zur
angegebenen Uhrzeit nur der Programmwechsel.
Die Kombination von KINDERSICHER und TIMER
dient dazu, die Einschaltdauer ihres Fernsehgerätes
z.B. für Ihre Kinder zu begrenzen.
Weckfunktion
Sperren des Fernsehgerätes
Mit dieser Funktion können Sie die Verwendung des
Fernsehgeräts teilweise oder ganz unterbinden,
indem Sie die Tasten sperren.
Sperren der Programme
& Drücken Sie die Taste H.
é Wählen Sie
SONDERFUNK (Ï) und drücken Sie ¬.
“ Wählen Sie
PROG.SPERREN (Ï) und drücken Sie ¬.
‘ Geben Sie nun Ihren geheimen Zugangscode ein.
Beim ersten Mal müssen Sie den Code 0711
eingeben. Hierauf wird das Menü angezeigt.
( Mit der Taste
¬ haben Sie Zugang zum Menü.
§ Geben Sie mit den Tasten
îÏ die Nummer des
Programms ein,das Sie sperren möchten, und
bestätigen Sie mit
¬.Vor den gesperrten
Programmen bzw. Geräten erscheint das Symbol
+.
è Mit der Taste
d verlassen Sie das Menü.
Um ein gesperrtes Programm anschauen zu können,
muß nun zuvor der Geheimcode eingegeben
werden.Andernfalls bleibt der Bildschirm schwarz.
Achtung, bei verschlüsselten Programmen, die über einen
externen Decoder angeschaut werden, muß das
entsprechende externe Gerät gesperrt werden.
Aufheben der Sperre bei allen Programmen:
Gehen Sie die Schritte & bis ‘ durch,wählen Sie
ALLE LÖSCHEN und drücken Sie ¬.
Um den Geheimcode zu ändern
Gehen Sie die Schritte & bis ‘ durch und:
( Wählen Sie CODE ÄNDERN und geben Sie eine
beliebige vierstellige Zahl ein.
§ Geben Sie diese zur Bestätigung erneut ein.
è Mit
d verlassen Sie die Menüs.
Wenn Sie Ihren Geheimcode vergessen haben sollten,
geben Sie den Universalcode 0711 zweimal ein.
Sperren der Tasten
& Drücken Sie H,wählen Sie
SONDERFUNK (
Ï)
und drücken Sie
¬.
é Wählen Sie
KINDERSICHER (
Ï).
“ Stellen Sie auf
EIN,indem Sie die Taste
¬ drücken.
‘ Schalten Sie das Fernsehgerät aus und verstecken Sie
die Fernbedienung.Das Fernsehgerät kann nun ohne
die Fernbedienung nicht mehr eingeschaltet werden.
( Um die Sperre aufzuheben, stellen Sie
KINDERSICHER
auf AUS.
• BILD
• TON
• SONDERFUNK.
• EINSTELLUNG
SONDERFUNK
TIMER
• ZEIT
• START
• ENDE
• PROGAMMNR
• AKTIV
10:56
• BILD
• TON
• SONDERFUNK.
• EINSTELLUNG
SONDERFUNK
• TIMER
• KINDERSICHER
• PROG. SPERREN
• BILDLAGE
ZUGANGS CODE
- - - -
Page 43

12
MODE
MUTE
VCR
DVD
SMART SMART
RADIO
ACTIVE
CONTROL
MENU
OK
PC TV
P
564
879
0
`
¤
Ó
ù
Ÿ
Å
%
∆
ı
∫
Ë
Á
∏
3
- -
+ +
.
ª
-
[
”
Y
ª
Ë
MENU
Y
Å
ù
Ë
P
9
0
Videotext
Taste:
Funktion:
Videotext ist ein Informationssystem, das von einigen Sendern ausgestrahlt wird und wie eine Zeitung gelesen
werden kann. Dieses System ermöglicht auch den Zugang zu Untertiteln für Schwerhörige oder Personen,
die mit der Sprache des übertragenen Programms (über Kabel, Satellit usw.) nur wenig vertraut sind.
Aufruf
Videotext
Wahl einer
Seite
Zum Aufrufen des Videotexts, zum Wechsel in den “transparenten
Modus” und zum Verlassen des Videotexts.Das Inhaltsverzeichnis
mit der Liste der Themen, auf die Sie zugreifen können, wird
angezeigt. Jedes Thema weist eine dreistellige Seitenzahl auf.
Wenn ein Sender keinen Videotext ausstrahlt,erscheint unter der
Anzeige 100 ein schwarzer Bildschirm (verlassen Sie in diesem Fall
den Videotext und wählen Sie einen anderen Sender).
Geben Sie die gewünschte Seitenzahl mit den Tasten 0 bis 9 bzw.@ P
# ein. Geben Sie z. B.für Seite 120 Folgendes ein: 120. Die Nummer
erscheint oben links, und die Seite wird angezeigt, sobald sie gefunden
wurde.Wiederholen Sie diese Schritte, um eine andere Seite aufzurufen.
Wenn der Seitenzähler weitersucht, wird die Seite nicht übertragen. Geben
Sie eine andere Seitennummer ein.
Inhaltsverzeichnis
Direkter
Zugang zu
den Themen
Zur Rückkehr zum Inhaltsverzeichnis (in der Regel Seite 100).
Bei Sendern mit TOP-Videotext (Table of Pages) wird eine Übersicht
der verfügbaren Rubriken und Seiten angezeigt.
Am unteren Bildschirmrand werden farbige Bereiche angezeigt.
Mit den 4 farbigen Tasten können Sie die entsprechenden Seiten
bzw.Themen aufrufen. Die farbigen Bereiche blinken, wenn ein Thema
bzw. eine Seite nicht verfügbar ist.
Direktauswahl
von
Unterseiten
Manche Seiten enthalten Unterseiten (so enthält zum Beispiel
Seite 120 die Unterseiten 1/3, 2/3 und 3/3). In diesem Fall wird die
Seitennummer in grün angezeigt.Vor der Seitennummer erscheint
das Symbol Æ, Í oder ÍÆ. Mit den Tasten
Ȭ können Sie
direkt auf die Unterseiten Ihrer Wahl zugreifen.
Vergrößern
einer Seite
Doppelseitiger
Videotext
(nur bei bestimmten
Modellen verfügbar)
Zum Anzeigen des
oberen bzw.unteren Teils einer Seite, bei
anschließender Rückkehr zur normalen Größe.
Aktivieren oder Aufheben der doppelseitigen Videotextanzeige.
Die aktivierte Seite wird links angezeigt, die Folgeseite rechts.
Mit der Taste s können Sie eine Seite anhalten (zum Beispiel
das Inhaltsverzeichnis). Nun ist die rechte Seite aktiviert. Um
zum normalen Betrieb zurückzukehren,drücken Sie auf
e.
Versteckte
Informationen
Vorzugsseiten
Zum Anzeigen oder Ausblenden von versteckten Informationen
(Lösungen von Spielen)
Für die Videotextprogramme 0 bis 40 können Sie 4
Vorzugsseiten speichern und diese direkt über die farbigen
Tasten (rot,grün, gelb,blau) aufrufen.
& Drücken Sie die Taste H, um in den Vorzugsseitenmodus zu
wechseln.
é Rufen Sie die Videotextseite auf, die Sie speichern möchten.
“ Drücken Sie die Taste d und dann die farbige Taste Ihrer Wahl.
Die Seite wird gespeichert.
‘ Gehen Sie für die anderen farbigen Tasten erneut die Schritte
é und “ durch.
( Sobald Sie nun den Videotext aufrufen, werden Ihre Vorzugsseiten
am unteren Bildschirmrand farbig angezeigt. Um wieder die
üblichen Rubriken anzuzeigen,drücken Sie die Taste H
.
Um diese Einstellungen zu löschen, drücken Sie 5 Sekunden lang die Taste d.
11
Page 44

12
Bildformate 16:9
Die Bilder, die Sie empfangen, können im Bildformat 16:9 (breiter Bildschirm) oder 4:3
(koventioneller Bildschirm) übertragen werden. Die Bilder 4:3 haben manchmal oben und unten
einen schwarzen Streifen (Letterboxformat).Mit dieser Funktion können die schwarzen Streifen
entfernt und die Darstellung der Bilder auf dem Bildschirm optimiert werden.
Falls Ihr Fernsehgerät mit einem Bildschirm im 4:3 Format ausgestattet ist
Falls Ihr Fernsehgerät mit einem Bildschirm im 16:9 Format ausgestattet ist
Die Taste p (oder Ȭ) drücken,um die verschiedenen Funktionsarten zu wählen:
Der Fernseher ist mit einer automatischen Umschaltung ausgestattet, die das von einigen
Programmen gesendete Kenn- Signal dekodiert und das richtige Bildschirmformat wählt.
4:3
Das Bild wird im Format 4:3 wiedergegeben, ein schwarzer Streifen erscheint an
jeder Seite des Bildes.
ZOOM 14:9
Das Bild ist auf das Format 14:9 vergrößert, ein kleiner schwarzer Streifen bleibt an
jeder Seite des Bildes.
ZOOM 16:9
Das Bild ist auf das Format 16:9 vergrößert. Diese Funktionsart wird empfohlen, um
ein Letterboxbild mit schwarzen Streifen oben und unten im Vollformat zu zeigen.
16:9 UNTERTITEL
Mit dieser Funktionsart können die Bilder 4:3 auf der ganzen Bildschirmfläche
gesehen werden, indem die Untertitel sichtbar bleiben.
SUPER ZOOM
Mit dieser Funktionsart können die Bilder im Format 4:3 auf der ganzen
Bildschirmfläche gesehen werden, indem beide Seiten des Bildes verbreitert werden.
BREITBILD
In diesem Modus bleibt das Seitenverhältnis von Bildern im 16:9-Format erhalten.
Achtung:
Wenn Sie ein Bild 4:3 ansehen, wird es horizontal verbreitert.
FULL SCREEN
In diesem Modus wird das Bild auf dem kompletten Bildschirm angezeigt.
Die Taste p (oder îÏ) drücken,um die verschiedenen Funktionsarten zu wählen:
4:3
Das Bild wird im 4:3 Format wiedergegeben
ERWEITERT 4:3
Das Bild wird vertikal vergrößert. Dieser Modus wird angewendet zur Vermeidung
von schwarzen Balken bei Sendungen im Letterbox Format.
16:9 FORMAT
Die Bildhöhe wird gestaucht auf das Format 16:9.
Page 45

13
Tasten für VCR oder DVD-Spieler
Glossar
Die meisten Audio- und Videogeräte unserer Produktreihe können mit
der Fernbedienung Ihres Fernsehgerätes gesteuert werden.
Die Fernbedienung ist mit allen Videorecordern kompatibel, die den Standardcode
RC5 verwenden, und mit allen DVD-Spielern nach dem Standardcode RC6.
& Drücken Sie die Taste MODE, um den gewünschten Modus auszuwählen:
VCR (Videorecorder) oder DVD.Die Kontrolllampe der Fernbedienung
zeigt den ausgewählten Modus an. Die Kontrolllampe erlischt automatisch
nach 20 Sekunden ohne Aktion (Rückkehr zum TV-Modus).
é Je nach Gerät sind die Tasten wie folgt belegt:
b Bereitschaftsmodus,
· Aufnahme,
¢ Schneller Rücklauf,
Ê Stopp,
Æ Wiedergabe,
∫ Schneller Vorlauf,
∆ Pause
% Videorecorder Programmierung
c DVD: Sprache für Untertitel
H Aufrufen des Menüs,
Richtungstasten
Navigation und Einstellungen,
OK Bestätigung,
09 Eingabe einer Nummer,
@P# Programmauswahl,
e Wahl der Sprache,
d OSD-Menü.
EasyLink : Digitale Verbindung zwischen Fernsehgerät und Videorecorder, mit der eine direkte
Übertragung von Informationen, wie die Einstellung von Sendern oder die Programmierung des
Videorecorders.
PIP (Picture in Picture, Bild im Bild) : Eine Funktion, bei der ein kleines Bild zusätzlich im eigentlichen
Bild angezeigt wird. Im PC-Modus können Sie auf dem Bildschirm ein kleines Fenster mit dem
Fernsehbild oder dem Bild eines anderen Geräts (DVD,Video usw.) einblenden.
RGB-Signale : Das Bild setzt sich aus den drei Bildsignalen Rot, Grün und Blau zusammen. Die
Nutzung dieser Signale gewährleistet eine bessere Bildqualität.
Signale für S-VHS : Es handelt sich um 2 separate Videosignale Y/C der Aufzeichnungsnormen S-VHS und
Hi-8. Die Signale für Helligkeit Y (schwarz und weiß) und Chrominanz C (Farbe) werden separat auf dem
Band aufgezeichnet.Auf diese Weise wird eine bessere Bildqualität erzielt als mit dem herkömmlichen
Videosignal (VHS und 8 mm), bei dem nur ein einziges Videosignal aus Y/C gebildet wird.
NICAM :Verfahren,das eine digitale Tonübertragung ermöglicht.
Fernsehsystem : Fernsehbilder werden nicht in allen Ländern gleichartig übertragen. Es gibt unterschiedliche
Übertragungsnormen: B, G, D, K,I und L, L’.Mit der Einstellung SYSTEM (S. 6) werden die verschiedenen
Normen gewählt. Diese Einstellung ist nicht mit der PAL- bzw.SECAM - Farbcode- Wahl zu verwechseln.
Pal wird in den meisten europäischen Ländern,Secam in Frankreich, den osteuropäisshen Ländern und den
meisten afrikanischen Ländern benutzt. In den USA und Japan wird das NTSC-System benutzt. Die
Eingänge der EXT1- und EXT2-Buchsen können Aufzeichnungen mit NTSC-Farbcodes wiedergeben.
16:9 Format, bezeichnet das Verhältnis zwischen der Breite (B) und der Höhe (H) des Bildschirms.
Breitbild-Fernsehgeräte haben ein Verhältnis von 16/9, konventionellen Bildschirme 4/3.
Ÿ
MODE
VCR
Y
DVD
Å
ª
`
SMART SMART
MENU
+ +
”
OK
PC TV
∆
ù
ACTIVE
-
CONTROL
MUTE
[
- -
%
∏
12
564
879
0
Ë
.
ı
Æ∫Ê¢·
¤Ó
ª
P
RADIO
3
Á
Page 46

14
MODE
VCR
DVD
·¢Ê Æ
∫
Ó
ı
Ω∆
.
Z
¤
Anschluß von anderen Geräten
Videorecorder (oder DVD-Recorder)
Nehmen Sie die Anschlüsse vor (siehe Abbildung). Benutzen
Sie ein hochwertiges Euro-AV-Kabel. Bei Videorecordern mit
Easylink-Funktion verwenden Sie die Buchse EXT2.
Wenn Ihr Videorecorder keine Euro-AV-Buchse besitzt, ist nur die
Verbindung über ein Antennenkabel möglich. In diesem Fall müssen
Sie das Testsignal Ihres Videorecorders suchen und diesem die
Programmnummer 0 zuordnen (siehe Manuelle Programmierung, S. 6).
Zur Wiedergabe des Videorecorderbildes die Taste 0 drücken.
Videorecorder mit Decoder
Schließen Sie den Decoder an die zweite Euro-AV-Buchse
des Videorecorders an. Jetzt können Sie auch verschlüsselte
Übertragungen aufnehmen.
Videorecorder
Satelliten-Receiver,Decoder,DVD, Spielkonsolen,usw.
Bei Fernsehgeräten mit 2 externen Buchsen sollten Geräte,
die RGB-Signale erzeugen (Digitaldecoder, DVD-Geräte,
Spielekonsolen usw.), an den Anschluss EXT1 angeschlossen
werden. Für Geräte, die S-VHS-Signale erzeugen (S-VHS- und
Hi-8-Videorecorder,...) empfiehlt sich der Anschluss an EXT2.
Wahl der angeschlossenen Geräte
Drücken Sie die Taste n, und wählen Sie EXT1. Bei Modellen
mit 2 externen Anschlüssen wählen Sie
EXT2 und S-VHS2
(S-VHS-Signal von Anschluss EXT2), und EXT3.
Die meisten Geräte (Decoder,Videorecorder) übernehmen selbst die
Umschaltung.
Weitere Geräte
*
J
e nach Version ist das Fernsehgerät mit ein oder zwei Scart-Buchsen (EXT1 und EXT2)
ausgestattet. Im Lieferumfang ist ein Adapter enthalten, der in die Buchse EXT1 gesteckt wird und
über das Kabel abgewinkett auf der Geräterückseite angeschlossen werden können.
Die Buchse EXT1 verfügt über Ein-/Ausgänge für Audio und Video sowie über RGB-Eingänge.
Die Buchse EXT2 (falls vorhanden) verfügt über Ein-/Ausgänge für Audio und Video sowie über
Eingänge für S-VHS.
:
FM ANT
DC in PC input
L
Audio in
(PC)
R
EXT 1
Sub
woofer
out
*
L
Audio
EXT 2
R
out
:
FM ANT
VCR
Sub
woofer
out
*
L
R
Audio
out
Page 47

15
Die
AV- und S-Video-Anschlussbuchsen befinden sich unter
der linken bzw. (bei großen Geräten) rechten
Blende.Nehmen Sie folgende Anschlüsse vor (siehe
Abbildung): Drücken Sie die Taste
n, und wählen Sie EXT3.
Bei einem Monogerät wird das Tonsignal am Eingang AUDIO L
angeschlossen.
Der Ton wird automatisch von den rechten und
linken Lautsprechern des Fernsehgerätes wiedergegeben.
Wenn der Kopfhörer angeschlossen ist,schaltet der Ton des
Fernsehgeräts automatisch ab. Mit den Tasten
@”#
kann die Lautstärke eingestellt werden.
Die Impedanz des Kopfhörers muss zwischen 32 und 600 Ohm
liegen.
Videokamera,Videospiele
Kopfhörer
O
Zum Anschluss an eine HiFi-Anlage ist ein Cinch-Kabel
erforderlich.Verbinden Sie die Anschlüsse
Audio out L und R
des Fernsehgeräts mit dem linken und rechten Audioeingang
der HiFi-Anlage.
Wenn Sie über einen Aktiv-Subwoofer-Lautsprecher
verfügen, schließen Sie die Subwoofer-Ausgangsbuchse
Subwoofer out des Fernsehers an die Eingangsbuchse des
Subwoofers an.
Schließen Sie den Ausgang der Grafikkarte des Computers
an die PC-Eingangsbuchse
PC input (VGA) des Fernsehgeräts
an.Verbinden sie den rechten und linken Audioausgang
Audio
out L und R der Soundkarte mit den Audio-Eingangsbuchsen
Audio in (PC) L und R des Fernsehgeräts.
Weitere Informationen zum PC-Modus finden Sie auf Seite 8.
Die optimale Auflösung erreichen Sie bei der folgender
Einstellung: 1024 x 768 Pixel, 60 Hz.
Achtung:
Bei anderen Auflösungen steht die PIP-Funktion unter
Umständen nicht zur Verfügung. In diesem Fall wird eine
Warnmeldung angezeigt.
Folgende Auflösungen werden vom Fernsehgerät unterstützt:
640 x 350, 70 Hz 720 x 400,70 Hz 1024 x 768,60 Hz
640 x 350, 85 Hz 720 x 400,85 Hz 1024 x 768,70 Hz
640 x 480, 60 Hz 800 x 600,56 Hz 1024 x 768,75 Hz
640 x 480, 67 Hz 800 x 600,60 Hz 1024 x 768,85 Hz
640 x 480, 72 Hz 800 x 600,72 Hz 1152 x 864,75 Hz
640 x 480, 75 Hz 800 x 600,75 Hz 1280 x 960,60 Hz
640 x 480, 85 Hz 800 x 600,85 Hz 1280 x 1024,60 Hz
832 x 624, 75 Hz 1280 x 1024,75 Hz
Verstärker
Computer
S-VIDE
VIDEO
L
AUDIO
R
Sub
woofer
out
*
L
R
Audio
out
Sub
woofer
out
*
LR
Audio
out
PC input
Sub
woofer
in
Audio
in
Audio in (PC)
L
R
Page 48

16
Tips
Schlechter
Empfang
Kein Bild
Schwarzes oder
weißes Bild nach
Anschluß von
anderen Geräten
Kein Ton
Der PC-Modus und
die PIP-Funktion
stehen nicht zur
Verfügung
Ihre Fernbedienung
funktioniert nicht
mehr
Bereitschaftsposition
Reinigung des
Fernsehgerätes
Hinweis für
Recycling
Immer noch kein
Erfolg ?
Die Nähe von Bergen oder hohen Gebäuden kann die Ursache von
Schattenbildern, Echo oder Doppelbildern sein. In diesem Fall ist die Ausrichtung
der Außenantenne zu ändern oder nehmen Sie eine manuelle Einstellung der
Sender vor (siehe “Feineinstellung” S.7).Vergewissern Sie sich, daß Ihre Antenne
im gewählten Frequenzbereich (UHF oder VHF) Sendungen empfangen kann.
Vergewissern Sie sich, daß das Antennenkabel richtig angeschlossen ist und daß
Sie das richtige System gewählt haben (S. 7 ).
Ein nicht richtig eingesteckter SCART- oder Antennenstecker ist oft die Ursache
von Bild- oder Tonstörungen (es kommt vor, daß die Stecker etwas
herausrutschen, wenn das Fernsehgerät versetzt oder verdreht wird). Überprüfen
Sie alleVerbindungen.
Sie haben mit der Taste n nicht die richtige Buchse gewählt. S-VHS2 anstelle von
EXT2.Videokassetten müssen mit dem System abgespielt werden, mit dem Sie
aufgenommen wurden (PAL, SECAM, NTSC).Das System ist erkenntlich am
Videorecorder.
Falls einige Sender zwar ein Bild zeigen, aber keinen Ton senden, verfügen Sie
nicht über das richtige Fernsehsystem. Ändern Sie es in der Einstellung SYSTEM
(S. 7).
Wenn das Fernsehgerät an einen Verstärker angeschlossen ist,während das
Problem auftritt, so überprüfen Sie, ob Sie bei den Audiobuchsen Aus- und
Eingang verwechselt haben.
Überprüfen Sie, ob Sie auf dem Computer eine kompatible Auflösung eingestellt
haben (siehe S. 15).
Wenn im PC-Modus keine Radiowiedergabe möglich ist, kann dies am aktivierten
PIP-Modus liegen, bei dem automatisch das TV- statt des Radiosignals
wiedergegeben wird. Deaktivieren Sie den PIP-Modus, wechseln Sie in den
Radiomodus, und kehren Sie anschließend in den PC-Modus zurück.
Die Kontrollampe am Fernseher blinkt nicht mehr, wenn Sie die Fernbedienung
benutzen.Wechseln Sie die Batterien aus.
Bleibt das Fernsehgerät nach dem Einschalten in Bereitschaft und SPERRE
erscheint, sobald Sie die Tasten des Fernsehgerätes betätigen,so ist
KINDERSICHER aktiviert (S. 10 ).Wenn das Fernsehgerät innerhalb von 15
Minuten kein Antennensignal empfängt, schaltet es automatisch auf Bereitschaft.
Um Energie zu sparen ist Ihr Fernsehgerät mit Bauteilen ausgerüstet, die im
Bereitschaftsmodus einen geringen Energieverbrauch haben (unter 1W).
Bildschirm und Gehäuse dürfen nur mit einem sauberen,weichen und fusselfreien
Tuch gereinigt werden. Kein Produkt auf Alkohol- oder Lösungsmittelbasis
verwenden.
Ihr Fernsehgerät besteht aus Materialien, die wiederverwendet oder für Recycling
weiterverarbeitet werden können.Als Beitrag zum Umweltschutz werden die
Geräte von Spezialfirmen entsorgt, die sie dann für das Recycling
weiterverarbeiten (Weitere Informationen erhalten Sie bei Ihrem Fachhändler).
Ziehen Sie den Netzstecker des Fernsehgeräts,warten Sie 30 Sekunden, und
stecken Sie ihn wieder ein.Versuchen Sie nie bei einem Defekt den Schaden selbst
zu beheben, sondern setzen Sie sich mit Ihrem Kundendienst in Verbindung.
Page 49

1
Introduzione
Sommario
La ringraziamo di aver acquistato questo televisore. Il presente manualetto è
stato concepito per aiutarla ad installare e utilizzare il suo televisore. Le
consigliamo vivamente di leggerlo fino in fondo.Ci auguriamo che la nostra
tecnologia la soddisfi pienamente.
Dichiarazione di conformità
Questo apparecchio è fabbricato nella Comunità Economica Europea nel rispetto
delle disposizioni di cui al D. M. 26/03/92 ed in particolare è conforme alle
prescrizioni dell’art. 1 dello stesso D.M.
Si dichiara che l’apparecchio televisori a colori (vedere indicazioni sull’etichetta
nel retro della televisione) risponde alle prescrizioni dell’art.2 comma 1 del D.M.
28 Agosto 1995 n. 548.
Fatto a Dreux, il Febbraio 2003 P. E.G.P. 1,rue de Réveillon
28104 Dreux France
Predisposizione
Presentazione del televisore LCD . . . . . . . . . . . . . . . . . . . . . . . . . . . . . . . . . . . . . .2
I tasti del telecomando . . . . . . . . . . . . . . . . . . . . . . . . . . . . . . . . . . . . . . . . . . . . . .3
Installazione del televisore . . . . . . . . . . . . . . . . . . . . . . . . . . . . . . . . . . . . . . . . . . .4
Installazione rapida dei canali . . . . . . . . . . . . . . . . . . . . . . . . . . . . . . . . . . . . . . . . .5
Riordino dei programmi . . . . . . . . . . . . . . . . . . . . . . . . . . . . . . . . . . . . . . . . . . . . .5
Scelta della lingua e del paese . . . . . . . . . . . . . . . . . . . . . . . . . . . . . . . . . . . . . . . . .6
Memorizzazione automatica . . . . . . . . . . . . . . . . . . . . . . . . . . . . . . . . . . . . . . . . . .6
Funzione EasyLink . . . . . . . . . . . . . . . . . . . . . . . . . . . . . . . . . . . . . . . . . . . . . . . . . .6
Memorizzazione manuale . . . . . . . . . . . . . . . . . . . . . . . . . . . . . . . . . . . . . . . . . . . .7
Nome di programma . . . . . . . . . . . . . . . . . . . . . . . . . . . . . . . . . . . . . . . . . . . . . . .7
Funzionamento
Utilizzo della radio . . . . . . . . . . . . . . . . . . . . . . . . . . . . . . . . . . . . . . . . . . . . . . . . . .8
Utilizzo in modo monitor PC . . . . . . . . . . . . . . . . . . . . . . . . . . . . . . . . . . . . . . . . .8
Regolazione dell’immagine . . . . . . . . . . . . . . . . . . . . . . . . . . . . . . . . . . . . . . . . . . .9
Regolazione del suono . . . . . . . . . . . . . . . . . . . . . . . . . . . . . . . . . . . . . . . . . . . . . .9
Regolazione delle funzioni speciali . . . . . . . . . . . . . . . . . . . . . . . . . . . . . . . . . . . . . .9
Funzione TIMER . . . . . . . . . . . . . . . . . . . . . . . . . . . . . . . . . . . . . . . . . . . . . . . . . .10
Bloccaggio del televisore . . . . . . . . . . . . . . . . . . . . . . . . . . . . . . . . . . . . . . . . . . .10
Televideo . . . . . . . . . . . . . . . . . . . . . . . . . . . . . . . . . . . . . . . . . . . . . . . . . . . . . . . .11
Funzioni televideo . . . . . . . . . . . . . . . . . . . . . . . . . . . . . . . . . . . . . . . . . . . . . . . . .12
Tasti VCR o DVD . . . . . . . . . . . . . . . . . . . . . . . . . . . . . . . . . . . . . . . . . . . . . . . . . .13
Glossario . . . . . . . . . . . . . . . . . . . . . . . . . . . . . . . . . . . . . . . . . . . . . . . . . . . . . . . .13
Periferiche
Videoregistratore . . . . . . . . . . . . . . . . . . . . . . . . . . . . . . . . . . . . . . . . . . . . . . . . .14
Altri apparecchi . . . . . . . . . . . . . . . . . . . . . . . . . . . . . . . . . . . . . . . . . . . . . . . . . . .14
Selezione degli apparecchi collegati . . . . . . . . . . . . . . . . . . . . . . . . . . . . . . . . . . .14
Videocamera, videogiochi . . . . . . . . . . . . . . . . . . . . . . . . . . . . . . . . . . . . . . . . . . .15
Cuffie . . . . . . . . . . . . . . . . . . . . . . . . . . . . . . . . . . . . . . . . . . . . . . . . . . . . . . . . . . .15
Amplificatore . . . . . . . . . . . . . . . . . . . . . . . . . . . . . . . . . . . . . . . . . . . . . . . . . . . . .15
Computer . . . . . . . . . . . . . . . . . . . . . . . . . . . . . . . . . . . . . . . . . . . . . . . . . . . . . . .15
Consigli . . . . . . . . . . . . . . . . . . . . . . . . . . . . . . . . . . . . . . . . . . . . . . . . . . . . . . . .16
w
Pulizia del televisore
Per pulire lo schermo e la cassa del televisore utilizzare esclusivamente un panno
pulito, morbido e che non faccia peli. Non utilizzare prodotti a base di alcool o di
solventi.
Italiano
Page 50

2
Presentazione del televisore LCD
I tasti del televisore:
• . : per accendere o spegnere il televisore.
• VOLUME - + (-”+): per regolare il livello del
volume.
• PROGRAM - + (- P +):per selezionare i programmi.
• MENU: per visualizzare o uscire dai menu,premere
contemporaneamente i 2 tasti ” - e ” +.
Successivamente, i tasti P - + permettono di selezionare
una regolazione ed i tasti ” - + di regolare.
Nota: se la funzione BLOCCO TASTI è attivata, i tasti -”+
e - P + non possono venire utilizzati (vedi menu
SPECIALI
,
pagina 10).
Spia di accensione e sensori ad infrarossi.
Base inclinabile.
La base può essere smontata e sostituita mediante un kit
di fissaggio a muro disponibile in opzione (rivolgetevi al
vostro rivenditore).
Lato posteriore:
I collegamenti principali si eseguono dalla parte
inferiore del televisore.
Sportellini estraibili a sinistra* e a destra permettono
di accedere a delle prese di connessione
supplementari.
* Gli schermi di grandi dimensioni sono privi dello
sportellino sinistro. Per maggiori dettagli sui collegamenti,
vedi pagina 14.
Presa scart EXT1
Prese d’antenna per TV e radio
Ingresso VGA e audio per il collegamento di
computer.
Presa di alimentazione DC
MENU
”
VOLUME
+
-
P
.
PROGRAM
-
+
DC in PC input (VGA)
L
Audio in (PC)
R
:
FM ANT
EXT. 1
Ø
Page 51

3
12
MODE
MUTE
RADIO
VCR
DVD
SMARTSMART ACTIVE
CONTROL
MENU
PC TV
OK
P
564
879
0
·¢Ê∆Æ
∫
ù
¤Ó
`
Ÿı
Å
Ë
Á
∏
3
--
++
.
ª
-
[
”
Y
ª
I tasti del telecomando
Selezione prese EXT (p.14)
Premere più volte per selezionare
la sorgente esterna collegato.
Funzioni televideo (p. 11)
o VCR / DVD (p. 13)
œAttivazione del PIP (p. 8)
π Spostamento del PIP (p. 8)
Timer spegnimento
Per selezionare un lasso di tempo
prima di passare automaticamente allo
stato di attesa (da 0 a 240 minuti).
Active Control
Migliora la qualità dell’immagine in
funzione del livello di ricezione.
Modo suono
Permette di forzare le trasmissioni
STEREO
e NICAM STEREO in MONO o,
per le trasmissioni bilingua, di
scegliere tra LINGUA I o LINGUA II.
Se viene selezionato il suono mono,
l’indicazione sullo schermo e’ di color rosso.
Menu :
Per
richiamare
i menu o uscire dagli stessi.
Cursore
Questi 4 tasti permettono di
navigare nei menu.
Volume
Per regolare il livello audio
PC / TV / Radio
Premere uno di questi tasti per
commutare il televisore in modo
PC,TV o radio (p. 8).
Formato 16/9 (p.12).
Interruzione audio
Per eliminare o ripristinare l’audio.
Inform. schermo
Per visualizzare / rimuovere il
numero di programma,il nome (se
esiste), l’ora, il tipo di audio,il tempo
rimasto del timer. Per la
visualizzazione continua del numero
di programma allo schermo,
premere questo tasto per 5
secondi.
Stato di attesa
Per selezionare il modo Stato di
attesa. Per riaccendere il televisore,
premere b,P @#o 09.
Lista dei programmi
Per visualizzare / cancellare la lista
dei programmi. Servirsi dei tasti
îÏ per selezionare un
programma e del tasto ¬ per
visualizzarlo.
Il simbolo + appare davanti ai
programmi bloccati (p.10) ; il simbolo ?
appare davanti ai programmi sbloccati.
Preregolazioni immagine e suono
Permette di accedere ad una serie di
preregolazioni per immagine e suono.
La posizione PERSONALE corrisponde alle
regolazioni effettuate nei menu.
Suono Surround (Ambiofonia)
Per attivare / disattivare l’effetto
Incredibile surround.Nel modo
stereo-fonico,questa funzione dà
l’impressione che gli altoparlanti
siano molto più distanti. Con le
versioni dotate del Virtual Dolby
Surround*, otterrete gli effetti sonori
posteriori del Dolby Surround Pro
Logic. Nel modo monofonico, viene
simulato l’effetto ambiofonia.
Selezione dei programmi TV
Per selezionare il programma
precedente o il programma seguente.
Il numero,(il nome), e il suono
vengono visualizzati iper pochi secondi.
In alcuni programmi con televideo, il
titolo del programma appare sullo
schermo in basso.
Programma precedente
Per accedere al programma
selezionato precedentemente.
Tasti numerici
Per accedere direttamente ai
programmi. Per un numero di
programma a 2 cifre, aggiungere la
seconda cifra prima che il trattino
scompaia.
Selettore di modo (p.13)
Per attivare il telecomando in
modo TV,VCR (videoregistratore)
o DVD.
* ”Dolby” e il simbolo doppia-D £ sono dei marchi di Dolby Laboratories Licensing
Corporation. Fabbricato su licenza di Dolby Laboratories Licensing Corporation.
Page 52

4
&
Posizionamento del televisore
Mettere il televisore su una superficie solida e
stabile. Per evitare situazioni pericolose, non esporre
il televisore a schizzi d’acqua, a fonti di calore
(lampade, candele, radiatori,ecc.) e non ostruire le
griglie di ventilazione situate sul retro.
é
Collegamenti delle antenne
• Utilizzare il cavo antenna fornito e collegare la
presa
: situata sotto il televisore alla presa
d’antenna a muro.
• Collegare il cavo dell’antenna radio fornita, alla
presa FM ANT situata sotto il televisore.
• Sistemare i cavi facendoli passare attraverso la base
del televisore.
“
Collegamenti dell’alimentazione
Il televisore funziona mediante un’alimentazione
continua fornita (il valore della tensione è indicato
sull’etichetta). Utilizzare unicamente l’adattatore ACDC fornito con il televisore.
• Collegare il connettore DC dell’adattatore al
connettore DC del televisore. Lasciare un’area
libera intorno all’adattatore per la ventilazione.
• Collegare il cordone di alimentazione
dell’adattatore ed inserire la presa di corrente
nella presa murale (220-240 V / 50 Hz).
Per il collegamento di altri apparecchi, vedi p. 14.
‘
Telecomando
Inserire le due pile di tipo R6 fornite facendo
attenzione alle polarità.
Per la protezione dell’ambiente, le pile fornite con
l’apparecchio non contengono né mercurio né nichelcadmio. Si prega di non gettare le pile usate ma di
utilizzare i mezzi di riciclaggio messi a vostra disposizione
(consultate il vostro rivenditore).
(
Accensione
Per accendere il televisore, premere l’interruttore di
accensione e spegnimento. Una spia verde si accende
e lo schermo si illumina.Vedere direttamente il
capitolo
Installazione rapida, pagina 5. Se il televisore
rimane in stato di attesa (spia rossa), premere il
tasto P
# del telecomando.
Quando usate il telecomando, la spia lampeggia.
Installazione del televisore
5 cm
5 cm
5 cm
FM ANT.
MENU
”
P
++
--
.
VOLUME
PROGRAM
Page 53

5
Installazione rapida dei canali
Riordino dei programmi
Quando accendete il televisore per la prima
volta, sullo schermo appare un menu.
Tale menu vi invita a scegliere la lingua dei menu :
Se il menu non appare, per farlo apparire
mantenere premuti per 8 secondi i tasti ” e
” + del televisore.
& Per scegliere la vostra lingua,servitevi dei tasti
îÏ del telecomando,poi confermate con ¬.
é Selezionate poi il vostro paese con i tasti
îÏ e confermate con ¬
Se il vosto paese non appare nella lista,
selezionate la scelta ALTRO.
“ La ricerca si avvia automaticamente.
L’operazione dura pochi minuti.
La progressione della ricerca e il numero di
programmi trovati vengono visualizzati man
mano.Alla fine, il menu scompare.
Per uscire o interrompere la ricerca, premere il
tasto
H. Se non è stato trovato nessun
programma, consultare il capitolo Consigli, pag.24.
‘ Se il centro di telediffusione o la rete via cavo
trasmette il segnale di riordino automatico,i
programmi saranno numerati nell’ordine.
( In caso contrario,i programmi trovati saranno
numerati per ordine decrescente a partire dal
numero 99, 98, 97,... Per rinumerarli dovrete
utilizzare il menu RIORDINARE.
Determinati centri di telediffusione o reti via cavo
trasmettono i propri parametri di riordino (regione,
lingua, ...). In questo caso dovete indicare la vostra
scelta con i tasti
îÏ e convalidare con ¬.
Vedi anche: Funzione EasyLink, pag.6.
& Premere il tasto H.Sullo schermo verrà
visualizzato il menu principale.
é
Selezionare INSTALLAZIONE, poi premere ¬
.
Apparirà il menu INSTALLAZIONE :
“ Premere il tasto
Ï per selezionare
RIORDINARE, poi premere
¬.
Apparirà il menu RIORDINARE. La scelta DA
risulterà attivata.
Osser
vazione : questo menu funziona secondo la
logica seguente :
• “a partire DA” (digitare il n° del programma attuale),
• “per andare A”(digitare il nuovo numero),
• “SCAMBIARE i numeri” (l’operazione viene eseguita).
‘ Per selezionare il programma da rinumerare,
servitevi dei tasti
Ȭ o dei tasti da 0 a 9.
Esempio : volete fare una sostituzione DAL
programma 78 AL programma 2 :
digitate
78.
( Selezionate A (tasto
Ï) e digitate il nuovo
numero con i tasti
Ȭ o con i tasti da
0 a 9 (nel nostro esempio, digitate 2).
§ Selezionate SCAMBIARE (tasto
Ï), poi
premete
¬.Apparirà la scritta SCAMBIATO, e
lo scambio verrà eseguito.Nel nostro esempio,
il programma 78 verrà sostituito con il n°2 (e il
n°2 con il 78).
è Selezionate DA (tasto
î) e ripetete i punti da
‘ a § per ogni programma da rinumerare.
Vedi anche: Funzione EasyLink, pag.6.
! Per uscire dai menu,premere il tasto
d.
SELECT LANGUAGE
LANGUAGE
ITALIANO
NORSK
PORTUGUÊS
• ESPAÑOL
SVENSKA
NAZIONE
AUSTRIA
BELGIO
SVIZZERA
GERMANIA
DANIMARCA
• IMMAGINE
• SUONO
• SPECIALI
• PREDISPOS.
PREDISPOS.
• LINGUA
• NAZIONE
• MEM. AUTO.
• MEM. MANUALE
• RIORDINARE
• NOME
DA
A
SCAMBIARE
Page 54

6
Scelta della lingua e del paese
Memorizzazione automatica
& Per visualizzare il menu principale, premere il
tasto
H.
é
Selezionare INSTALLAZIONE (Ï),poi
premere
¬. Apparirà il menu
INSTALLAZIONE.
La scelta LINGUA risulta
attivata.
“ Premere
¬ per entrare nel menu LINGUA.
‘ Servirsi dei tasti
îÏ per scegliere la vostra
lingua.
I menu appariranno nella lingua prescelta.
( per uscire dal menu LINGUA,premere
È.
§ Selezionare NAZIONE (Ï), poi premere ¬.
è Per scegliere il paese, servirsi dei tasti îÏ.
Se il vosto paese non appare nella lista,
selezionate la scelta ALTRO.
! Per usicre dal menu NAZIONE,premere
È.
ç Per uscire dai menu,premere
d. Vedi anche:
Funzione EasyLink, in quanto segue.
Questo menu consente di lanciare una ricerca
automatica di tutti i programmi disponibili nella
vostra regione (o sulla vostra rete via cavo).
& Eseguire prima le operazioni da & a !
precedentemente descritte, poi :
é Selezionare MEM.AUTO. (
Ï), poi premere
¬. La ricerca si avvia.
Dopo alcuni minuti, il menu INSTALLAZIONE
apparirà automaticamente.
“ Se il centro di telediffusione o la rete via cavo
trasmette il segnale di riordino automatico,i
programmi saranno numerati nell’ordine.
‘ In caso contrario,i programmi trovati saranno
numerati per ordine decrescente a partire dal
numero 99, 98, 97.
Per rinumerarli dovrete utilizzare il menu
RIORDINARE.
Determinati centri di telediffusione o reti via cavo
trasmettono i propri parametri di riordino (regione,
lingua, ...). In questo caso dovete indicare la vostra
scelta con i tasti
îÏ e convalidare con ¬.
Per uscire o interrompere la ricerca, premere il
tasto
H. Se non appare nessuna immagine,
consultare il capitolo Consigli a pag. 16.
Vedi anche: Funzione EasyLink, in quanto segue.
( Per uscire dai menu,premere
d.
• IMMAGINE
• SUONO
• SPECIALI
• PREDISPOS.
PREDISPOS.
• LINGUA
• NAZIONE
• MEM. AUTO.
• MEM. MANUALE
• RIORDINARE
• NOME
ITALIANO
NORSK
PORTUGUÊS
PREDISPOS.
• LINGUA
• NAZIONE
• MEM. AUTO.
• MEM. MANUALE
• RIORDINARE
• NOME
RICERCA
ATTENDERE
NR.PROGRAMMA
2
215.18 MHZ
Se il televisore è collegato ad un
videoregistratore (mediante la presa EXT2)
dotato della funzione EasyLink, la lingua, il
paese e i canali trovati verranno trasmessi
automaticamente al videoregistratore al
momento dell’installazione. Durante il
caricamento, sullo schermo apparirà un
messaggio. La lista dei canali del
videoregistratore sarà la stessa del televisore.
La regolazione EASY LINK del menu OPZIONE va
posizionata su ON (regolazione per default), vedi
pag. 9.
Funzione EasyLink
(disponibile solo su alcune versioni)
Page 55

7
Memorizzazione manuale
Nome di programma
Questo menu consente di memorizzare i
programmi uno per uno.
& Premere il tasto
H.
é Selezionare INSTALLAZIONE (
Ï), poi
premere
¬.Apparirà il menu
INSTALLAZIONE.
“ Selezionare MEM. MANUALE (
Ï), poi
premere
¬ . Il menu apparirà :
‘ Premere
¬ per entrare nel menu SISTEMA.
Servirsi dei tasti
îÏ per
scegliere EUROPE (ricerca automatica*) o
ricerca manuale con :WEST EUR (norma BG),
EAST EUR (norma DK), UK (norma I) o
FRANCIA (norma LL’). Poi premere
È per
uscire dal menu.
* Tranne che per la Francia (norma LL’),
selezionare la scelta FRANCE.
( Selezionare RICERCA e premere
¬.
La ricerca comincia. Non appena viene trovato
un programma, la ricerca s’interrompe.
Passare al capitolo è.Se conoscete già la
frequenza del programma desiderato, digitate
direttamente il relativo numero per mezzo dei
tasti da
0 a 9.
Se non viene trovato nessun programma,
consultare il capitolo Consigli a pagina 16.
§ Se l’immagine è scadente, selezionare SINT.
FINE e premere il tasto
È o ¬.
è Selezionare NR. PROG e servirsi dei tasti
Ȭ oppure dei tasti da 0 a 9 per
digitare il numero desiderato.
! Selezionare MEMORIZZARE e premere
¬.
Apparirà il messaggio MEMORIZZATO. Il
programma è così memorizzato.
Vedi anche: Funzione EasyLink, pag. 6.
ç Ripetere i punti da ( a ! per ogni
programma da memorizzare.
Per uscire: premere il tasto
d.
Se lo desiderate, potete personalizzare i primi
40 programmi (da 1 a 40).
& Premere il tasto
H.
é
Selezionare INSTALLAZIONE (Ï),poi
premere
¬. Apparirà il menu
INSTALLAZIONE.
“ Premere 5 volte Ï per selezionare NOMI
(posto in fondo alla lista), poi premere
¬.
Apparirà il menu :
‘ Per selezionare il programma che desiderate
personalizzare, utilizzate i tasti da
0 a 9 o i
tasti
@ P #.
Osser
vazione : durante l’installazione, quando viene
trasmesso il segnale di identificazione, ai
programmi viene automaticamente attribuito un
nome.
( Per spostarsi nella zona di visualizzazione del
nome (5 caratteri) utilizzare i tasti
Ȭ.
§ Per scegliere i caratteri,utilizzare i tasti îÏ.
è Una volta immesso il nome, premere H.
Il nome del programma risulterà memorizzato.
Vedi anche: Funzione EasyLink, pag. 6.
! Ripetere i punti da ‘ a è per ogni
programma da memorizzare.
ç Per uscire dai menu,premere
d.
• IMMAGINE
• SUONO
• SPECIALI
• PREDISPOS.
INSTALLATIE
MEM. MANUALE
• SISTEMA
• RICERCA
• NR.PROGRAMMA
• SINTONIA FINE
• MEMORIZZARE
EUROPE
WEST EUR
EAST EUR
UK
FRANCE
PREDISPOS.
• LINGUA
• NAZIONE
• MEM. AUTO.
• MEM. MANUALE
• RIORDINARE
• NOME CNN_
Page 56

8
Utilizzo della radio
Utilizzo in modo monitor PC
Scelta della modalita' radio
Premere il tasto
Z del telecomando per
commutare il televisore in modalita' radio.
Premere il tasto
X per tornare in modalita’
tv.Nella modalita' radio, il numero,il nome
della stazione (se disponibile), la frequenza ed il
tipo di audio sono visualizzati sullo schermo.
Per immettere il nome delle stazioni, utilizzare il
menu NOME (p. 7)
Selezione dei programmi
Utilizzare i tasti
09o @ P # per
selezionare le stazioni FM (da 1 a 40).
Elenco delle stazioni radio
Premere il tasto ıper visualizzare /
cancellare l’elenco delle stazioni radio.
Utilizzare successivamente il cursore per
selezionare una stazione.
Utilizzo dei menu radio
Utilizzare il tasto
H per accedere alle
regolazioni specifiche della radio.
Ricerca delle stazioni radio
Se è stata utilizzata l’installazione rapida, tutte le
stazioni FM disponibili sono state memorizzate.
Per avviare una nuova ricerca, utilizzare il menu
INSTALLAZIONE
: MEM.AUTO. (per una ricerca
completa) o
MEM. MANUALE (per una ricerca
stazione per stazione). I menu
RIORDINARE e
NOME Permetteranno di riordinare o nominare
le stazioni radio. Il funzionamento di questi
menu è identico a quello dei menu TV.
Salva schermo
Nel menu OPZIONI è possibile attivare/disattivare
il salva schermo. L’ora, la frequenza della stazione
ed il nome (se disponibile) vengono visualizzati a
scorrimento sullo schermo.
Modalita' PC
Il televisore può essere utilizzato come un
monitor di computer. La funzione PIP permetterà
di visualizzare contemporaneamente uno
schermo di inserimento di immagine per
guardare i canali televisivi.
E’ necessario prima effettuare i collegamenti e
regolare la risoluzione (vedi p. 15).
Scelta della modalita' PC
Premere il tasto
V del telecomando per
commutare il televisore in modo PC.Premere su
X per tornare in modo mode tv.
In caso di assenza di segnale PC per più di 5 secondi, il
televisore passa automaticamente allo stato di attesa.
Utilizzo del PIP
In modo PC, è possibile visualizzare una finestra
che permette di visualizzare i canali televisivi.
&
Premere il tasto œ per visualizzare lo schermo
PIP. L’immagine della televisione è riprodotta in
una piccola finestra di inserimento.
é
Premere nuovamente œ per ridurre la
dimensione della finestra, quindi farla scomparire.
“
Utilizzare il tasto π se si desidera spostare la
finestra. E’ anche possibile spostarla
progressivamente utilizzando il cursore.
‘
Utilizzare i tasti 09o @ P # per cambiare
i programmi dello schermo PIP o il tasto
n se si
desidera visualizzare l’immagine di un
apparecchio collegato al televisore
(videoregistratore, DVD,ecc.).
Utilizzo dei menu PC
Premere il tasto
H per accedere alle regolazioni
specifiche del modo monitor PC. Utilizzare il
cursore per regolare (le regolazioni vengono
memorizzate automaticamente):
• SELEZIONE AUDIO: per scegliere l’audio
riprodotto sul televisore (PC o TV / Radio).
Ad esempio, è possibile ascoltare la radio
mentre si utilizza il computer.
Nota: occorre scegliere il modo TV o radio prima di
passare in modo PC. Quando lo schermo PIP è
visualizzato, non è possibile ascoltare la radio.
•
LUMINOSITA’ E CONTRASTO:per regolare la
luminosità ed il contrasto.
•
REGOLAZIONE
COLORE: per regolare la tonalità
dei colori (fredda,normale o calda).
•
DISTURBI VIDEO: permette di eliminare le linee
parassite orizzontali (
FASE) e verticali (CLOCK).
•
REGOLAZIONE
POSI
ZIONE
: per regolare il
posizionamento orizzontale e verticale dell’immagine.
•
REGOLAZIONE
AUTOMATICA: il posizionamento
è regolato automaticamente.
• CONTROLLO PIP:per regolare la dimensione e
la posizione dello schermo PIP.
•
SELEZIONE MODO: per tornare in modo TV o
radio.
•
RIPRISTINO IMPOST. FABBRICA: per tornare alle
regolazioni di fabbrica (regolazioni di default).
•
FORMATO IMMAGINE: per scegliere tra schermo
largo o il formato originale degli schermi PC.
Page 57

9
Regolazione dell’immagine
Regolazione del suono
& Premere il tasto H, poi il tasto ¬.
Apparirà il menu
IMMAGINE :
é Per selezionare una regolazione, servirsi dei tasti
îÏ, per regolare servirsi dei tasti Ȭ.
Osser
vazione : si tratta di un menu a scorrimento.
Per accedere alle regolazioni nascoste in fondo allo
schermo, mantenere premuto il tasto Ï.
“ Una volta eseguite le regolazioni,selezionare la
scelta
MEMORIZZARE, poi premere ¬ per
registrarle.
‘ Per uscire dai menu, premere
d.
Descrizione delle regolazioni :
•
LUMINOSITA’ : per agire sulla luminosità
dell’immagine.
•
COLORE : per agire sull’intensità del colore.
•
CONTRASTO :per agire sulla differenza tra
toni chiari e toni scuri.
•
NITIDEZZA :per agire sulla qualità dell’immagine.
• MEMORIZZARE : per memorizzare le
regolazioni dell’immagine.
•
TEMP.COLORE : per regolare la resa dei colori
dell’imamgine. Esistono tre opzioni:
FREDDA
(bianchi più blu), NORMALE (equilibrata) o
CALDA
(bianchi più rossi).
• CONTRASTO+:Per attivare/disattivare i
circuiti di regolazione automatica del
contrasto dell’immagine (riporta
continuamente la parte più scura
dell’immagine sul livello del nero).
& Premere H, selezionare SUONO (Ï),poi
premere
¬.Apparirà il menu SUONO :
é Per selezionare una regolazione, servirsi dei tasti
îÏ, per regolare servirsi dei tasti Ȭ.
“ Una volta eseguite le regolazioni,selezionare la
scelta
MEMORIZZARE, poi premere ¬ per
registrarle.
‘ Per uscire dai menu, premere
d.
Descrizione delle regolazioni :
•
EQUALIZZATORE
: per impostare la tonalità del
suono (da grave:120 Hz ad acuto: 10 kHz).
• BILANCIAMENTO :per equilibrare il suono
sull’altoparlante sinistro e quello destro.
•
DELTA.VOLUME : per compensare le differenze
di volume esistenti tra i programmi o tra le
prese EXT. Questa regolazione è operazionale
per i programmi da 1 a 40 e per le prese EXT.
Utilizzare i tasti
@ P # per raffrontare il
livello dei diversi programmi.
• MEMORIZZARE : per memorizzare la
regolazione del suono.
•
LIMIT.VOLUME:limitazione automatica del
volume, per limitare l’improvviso aumento di
liello sonoro,soprattutto al momento di
cambiare canale o durante gli spot pubblicitari.
• IMMAGINE
• SUONO
• SPECIALI
• PREDISPOS.
IMMAGINE
• LUMINOSITA
• COLORE
• CONTRASTO
• NITIDEZZA
• MEMORIZZARE
• TEMP. COLORE
• CONTRASTO+
--I------ 39
• IMMAGINE
• SUONO
• SPECIALI
• PREDISPOS.
SUONO
• EQUALIZZATORE
•
BALANCIAMENTO
• DELTA VOLUME
• MEMORIZZARE
• LIMIT. VOLUME
120 HZ
500 HZ
1500 HZ
5 KHZ
10 KHZ
Regolazione delle funzioni speciali
& Premere su H,selezionate
SPECIALI
(Ï) e
premere su
¬. Si può regolare:
é TIMER,
BLOCCO TASTI
e BLOCCO PROGR :
vedere pagina seguente
“ SELEZIONZE MODO : per commutare il
televisore in modo radio,TV o PC.
‘ EASYLINK (disponibile solo su alcune versioni) :
Se il televisore è collegato ad un
videoregistratore (mediante la presa EXT2)
dotato della funzione EasyLink, la lingua, il
paese e i canali trovati verranno trasmessi
automaticamente al videoregistratore al
momento dell’installazione. Se il vostro
videoregistratore non comprende questa
funzione, posizionate tale regolazione su OFF.
§ Per uscire dai menù,premere su
d.
Page 58

10
Funzione TIMER
Blocco del televisore
Questo menu consente di utilizzare il televisore
come sveglia.
& Premere il tasto
H.
é
Selezionare SPECIALI (Ï),poi premere 2 volte ¬.
Apparirà il menu SPECIALI.
“ Premere ¬ per entrare e uscire da ogni
sottomenu ; servirsi dei tasti
îÏ per regolare :
‘ ORA : digitare l’ora corrente.
Osser
vazione : Ogni volta che il televisore viene
acceso, l’orologio viene automaticamente
aggiornato sulla base delle informazioni televideo
del programma n°1. Se questo non prevede il
televideo, l’aggiornamento non avrà luogo.
( ORA INIZIO : digitare l’ora di accensione del
televisore
§ ORA FINE : digitare l’ora di stato di attesa.
è NR. PROGRAMMA :inserite il numero del
programma desiderato per la sveglia.Per i
modelli con la radio, potete selezionare una
stazione FM utilizzando i tasti
Ȭ (i tasti
09 permettono solo di selezionare i
programmi tv).
! ATTIVARE : potete regolare :
• UNA VOLTA : per un’unica attivazione della
sveglia
• GIORNALIERO :per ogni giorno,
• STOP : per annullare.
ç
Premere b per selezionare lo stato di attesa del
televisore. Esso si accenderà automaticamente
all’ora programmata.Se lasciate il televisore
acceso,esso cambierà canale all’ora indicata.
La combinazione delle funzioni BLOCCO e ORA
possono venir utilizzate, per esempio, per limitare la
durata di uso del televisore da parte dei bambini. La
posizione UNA VOLTA consente di programmare
l’ora di inizio o l’ora di fine (ma non entrambe).
Potete bloccare l’accesso a determinati
programmi o vietare completamente l’uso del
televisore, bloccandone i tasti.
Blocco dei programmi
& Premere il tasto H.
é Selezionare SPECIALI, poi premere
¬.
“ Selezionare BLOCCO PROGR. (
Ï), poi
premere
¬.
‘ Digitare il codice di accesso confidenziale. La
prima volta, digitate 2 volte il codice 0711.
Apparirà il menu.
( Premere
¬ per entrare nel menu.
§ Per selezionare il programma desiderato,
servirsi dei tasti
îÏ ;per confermare
premere
¬. Il simbolo + verrà visualizzato
davanti ai programmi o alle prese bloccate.
è Per uscire, premere il tasto
d.
A questo punto,per visualizzare un programma
bloccato occorrerà digitare il codice confidenziale,
altrimenti lo schermo resterà nero.
Attenzione, nel caso di programmi codificati che
utilizzano un decodificatore esterno, occorrerà
bloccare la presa EXT corrispondente.
Per sbloccare tutti i programmi :
Ripetere tutti i punti da & a ‘,poi selezionare
CANCELLA TUTTI e premere
¬.
Per cambiare il codice confidenziale :
Ripetere tutti i punti da & a ‘,poi :
( Selezionare CAMBIA COD. e digitare il
proprio codice a 4 cifre.
§ Per confermare,digitarlo nuovamente.
Il codice è memorizzato.
è.Per uscire dai menu, premere
d.
Se non vi ricordate il vostro codice confidenziale,
digitate due volte il codice universale 0711
Blocco dei tasti
& Premere H,selezionare SPECIALI (Ï), poi
premere
¬.
é
Selezionare BLOCCO TASTI (Ï), poi premere
¬
per selezionare ON.
“ Spegnere il televisore e nascondere il telecomando.
Il televisore risulterà inutilizzabile (potrà venir
riacceso solo per mezzo del telecomando).
‘ Per annullare :posizionare BLOCCO TASTI su
OFF.
• IMMAGINE
• SUONO
• SPECIALI
• PREDISPOS.
SPECIALI
TIMER
• ORA
• ORA INIZIO
• ORA FINE
•
NR.PROGRAMMA
• ATTIVARE
10:56
• IMMAGINE
• SUONO
• SPECIALI
• IPREDISPOS.
SPECIALI
• TIMER
• BLOCCO TASTI
•
BLOCCO PROGR.
• ROTAZIONE
CODICE ACCESSO
- - - -
Page 59

11
Televideo
Premere su:
Avrete :
Il televideo è un sistema d’informazioni, trasmesso da alcune emittenti, che si consulta come un
giornale. Consente inoltre di accedere ai sottotitoli per non udenti o per le persone che non
conoscono bene la lingua della trasmissione (reti via cavo, canali via satellite,...).
Attivazione
televideo
Selezione di
una pagina
Permette di attivare il televideo, di passare in modo
sovraimpressione su immagine TV e di uscire.Il sommario
appare con la lista delle rubriche alle quali potete accedere.
Per ogni rubrica viene indicato un numero di pagina a 3 cifre.
Se il canale selezionato non trasmette il televideo, apparirà
l’indicazione 100 e lo schermo rimarrà nero (in questo caso,
uscire dal televideo e scegliere un altro canale).
Comporre il numero della pagina desiderata con i tasti da
0 a 9 o @ P #. Esempio: pagina 120,digitare 120.
Il numero viene visualizzato in alto a sinistra, il contapagine
inizia la ricerca, la pagina viene visualizzata. Per consultare
un’altra pagina, ripetere l’operazione.
Se il contapagine continua la ricerca, la pagina richiesta non è
trasmessa. Scegliete un altro numero.
Sommario
Accesso
diretto alle
rubriche
Per tornare al sommario (generalmente a pagina 100).
In fondo allo schermo vengono visualizzate delle zone
colorate. I 4 tasti colorati servono ad accedere alle
rubriche o alle pagine corrispondenti.
Le zone colorate lampeggiano quando la rubrica o la pagina
non è disponibile.
Selezione
diretta delle
sottopagine
Alcune pagine contengono delle sottopagine (per esempio,la
pagina 120 contiene le sottopagine 1/3, 2/3 e 3/3). In questo
caso,il numero di pagina viene visualizzato in verde, preceduto
dal simbolo Æ,Í o ÍÆ.Per accedere direttamente alle
sottopagine prescelte, servirsi dei tasti
Ȭ.
Ingrandimento
di una pagina
Doppia pagina
televideo
(disponibile solo su
alcune versioni)
Per visualizzare la parte superiore, la parte inferiore, e
ritornare alle dimensioni normali.
Per attivare o disattivare la visualizzazione del televideo in doppia
pagina. La pagina attiva viene visualizzata a sinistra e la pagina
seguente a destra. Per fissare una pagina (per esempio il
sommario), premere il tasto s. In questo caso la pagina attiva
sarà quella di destra. Per ritornare in modo normale, premere e.
Informazioni
nascoste
Pagine
favorite
Per fare apparire o scomparire le informazioni nascoste
(soluzioni di giochi).
Per i programmi televideo da 1 a 40,si possono
memorizzare 4 pagine favorite,le quali saranno poi
direttamente accessibili per mezzo dei tasti colorati (rosso,
verde, giallo, blu).
& Premere sul tasto H per passare in modo pagine favorite.
éVisualizzare la pagina di televideo che si intende memorizzare.
“ Premere il tasto dpoi il tasto colorato di vostra scelta.
La pagina è memorizzata.
‘ Ripetere i punti é e “ per gli altri tasti colorati.
( Ora, non appena consulterete il televideo, le vostre pagine
preferite appariranno a colori in fondo allo schermo.
Per consultare le rubriche abituali,premere H.
Per cancellare tutto, premere su dper 5 secondi.
Ÿ
MODE
VCR
Y
DVD
ª
Å
∆
Ó
`
ù
SMART SMART
ACTIVE
-
CONTROL
MENU
+ +
MUTE
”
[
- -
%
OK
∏
PC TV
12
564
879
Ë
0
.
ı
∫
¤
ª
0
9
P
RADIO
P
3
Á
Ë
Å
ù
Y
MENU
Ë
Page 60

12
Funzioni televideo
Le immagini che ricevete possono essere trasmesse in formato 16:9 (schermo largo) oppure 4:3
(schermo tradizionale). Le immagini 4:3 hanno talvolta una banda nera in alto e in basso (formato
cinemascope). Questa funzione consente di eliminare le bande nere e di ottimizzare la visualizzazione
delle immagini sullo schermo.
Se il TV è in formato 4:3
Se il TV è in formato 16:9
Premere i tasto p (o
Ȭ
) per selezionare i diversi modi:
Il televisore è dotato di una commutazione automatica che decodifica il segnale specifico
emesso da alcuni canali e seleziona il formato giusto per lo schermo.
4:3
L’immagine è riprodotta in formato 4:3, una banda nera appare da ogni lato
dell’immagine.
ZOOM 14:9
L’immagine è ingrandita con il formato 14:9, una piccola banda nera rimane in
entrambi i lati dell’immagine.
ZOOM 16:9
L’immagine è ingrandita con il formato 16:9. Questo modo è raccomandato per
visualizzare le immagini con una banda nera in alto e in basso (formato cinemascope).
TITOLI ZOOM
Questo modo consente di visualizzare le immagini in formato 4:3 su tutta la
superficie dello schermo lasciando visibili i sottotitoli.
SUPER IMMAGINE
Questo modo consente di visualizzare le immagini in formato 4:3 su tutta la
superficie dello schermo allargando l’immagine ai lati.
SCHERMO LARGO
Questo modo permette di ripristinare le proporzioni corrette delle immagini
trasmesse in 16:9.
Attenzione :
se visualizzate un’immagine 4:3, sarà allargata sul piano orizzontale.
SCHERMO PIENO
Questo modo permette di visualizzare le immagini a pieno schermo.
Premere i tasto
p (o
îÏ
) per selezionare i diversi modi:
4:3
L’immagine è riprodotta nel formato 4:3
ESPANSA 4:3
L’immagine viene allargata verticalmente.Questo modo è utilizzato per eliminare le
bande nere quando si guarda un programma trasmesso in formato letterbox
COMPRESSA 16:9
L’immagine è compressa verticalmente nel formato 16 :9
Page 61

13
Tasti VCR o DVD
Glossario
Molti prodotti audio e video della gamma possono funzionare con il
telecomando del televisore.
Il telecomando è compatibile con tutti i videoregistratori che utilizzano lo
standard RC5 e tutti i DVD che utilizzano lo standard RC6.
& Premere sul tasto
MODE per selezionare il modo desiderato: VCR
(videoregistratore) o DVD.La spia del telecomando si accende per
indicare il modo selezionato.Si spegne automaticamente dopo 20
secondi di inattività (ritorno al modo TV).
é In funzione dell’apparecchio,sono operativi i tasti seguenti:
b stato di attesa,
· registrazione,
¢ riavvolgimento rapido,
Ê stop,
Æ lettura,
∫ avanzamento rapido,
∆ pausa,
% VCR : timer,
c DVD :lingua dei sottotitoli,
H richiamo menu,
cursore navigazione e regolazioni,
OK conferma,
09 tasti numerici,
@P# selezione dei programmmi,
e scelta della lingua,
d menu OSD.
EasyLink : Collegamento digitale tra il televisore e il videoregistratore, per trasferire direttamente
determinate informazioni quali la regolazione dei canali o la programmazione del videoregistratore.
PIP (Picture in Picture):Finestra di inserimento di immagine che permette di visualizzare una piccola
immagine nell’immagine principale. In modo PC, è possibile visualizzare in un piccolo schermo
l’immagine in provenienza dal televisore o da un altro apparecchio (DVD,videoregistratore, ecc.).
Segnali RVB : Sono 3 segnali video Rosso,Verde, Blu che compongono l’immagine.L’utilizzo di questi
segnali permette di ottenere una migliore qualità dell’immagine.
Segnali S-VHS :
Sono 2 segnali video separati Y/C risultanti dagli standard di registrazione S-VHS e Hi-8.
I segnali di luminanza Y (bianco e nero) e i segnali di crominanza C (colori) sono registrati
separatamente sulla banda. Ciò consente di migliorare la qualità dell’immagine rispetto ai sistemi video
standard (VHS e 8 mm) nei quali i segnali Y/C sono combinati per ottenere solo un segnale video.
Suono NICAM : Procedimento che consente di trasmettere il suono mediante sistema digitale.
Sistema : L’immagine televisiva non è trasmessa allo stesso modo da tutti i paesi. Esistono vari
standard: BG, DK, I, e L L’. La regolazione SISTEMA (pag. 6) serve a selezionare questi standard.
Da non confondere con i sistemi di codificazione dei colori PAL o SECAM: il sistema Pal è
utilizzato nella maggior parte dei paesi europei, il sistema Secam in Francia, in Russia e nella
maggior parte dei paesi africani. Gli Stati Uniti e il Giappone utilizzano un sistema diverso,
chiamato NTSC. Gli ingressi EXT1 e EXT2 possono riprodurre delle registrazioni effettuate con il
sistema di codificazione colori NTSC.
Formato 16/9 : Indica il rapporto tra la larghezza e l’altezza dello schermo.Gli schermi panoramici
hanno una proporzione 16/9, gli schermi tradizionali: 4/3.
.
Ÿ
MODE
VCR
DVD
Å
ª
ù
`
SMART SMART
-
MENU
+ +
”
- -
OK
PC TV
12
Ë
ı
Y
Æ∫Ê¢·
∆
¤Ó
ACTIVE
ª
CONTROL
MUTE
P
[
%
RADIO
∏
3
564
879
0
Á
Page 62

14
MODE
VCR
DVD
·¢Ê Æ
∫
Ó
ı
Ω∆
.
Z
¤
Collegamento ad apparecchi periferici
In base alle versioni, il televisore è dotato di 1 o 2 prese scart EXT1 e EXT2. Un adattatore
speciale è fornito per collegare la presa EXT1 e consentire di far derivare i fili sul retro.
La presa EXT1 possiede gli ingressi/uscite audio video e gli ingressi RVB.
La presa EXT2 (se disponibile) ha ingressi/uscite audio-video e gli ingressi S-VHS.
Videoregistratore (o DVD registrabile)
Eseguire i collegamenti necessari. Utilizzare un cordone di
collegamento (presa scart) di tipo europeo di buona qualità.
Se il videoregistratore è dotato della funzione Easylink,
utilizzare la presa EXT2
Se il vostro videoregistratore non ha una presa scart, l’unico
collegamento possibile rimane quello per mezzo dell’antenna.
Bisognerà quindi cercare il segnale di prova del vostro
videoregistratore e attribuirgli il numero di programma 0 (vedi
capitolo “ memorizzazione manuale” a pag. 6).
Per far apparire l’immagine del videoregistratore, premere
0.
Videoregistratore con decodificatore
Collegare il decodificatore alla seconda presa scart del
videoregistratore. Potrete così registrare le trasmissioni criptate.
Videoregistratore
Ricevitore via satellite,decodificatore, DVD, giochi, ecc.
Per i televisori con 2 prese scart,collegare preferibilmente ad
EXT1 le attrezzature con segnali RVB (decoder digitali, lettori
DVD, giochi, etc.) e a EXT2 le attrezzature con segnali S-VHS
(videoregistratori S-VHS e Hi-8, ...).
Selezione degli apparecchi collegati
Premere il tasto n per selezionare EXT1 e sulle versioni
con 2 prese scart:
EXT2 e S-VHS2 (segnali S-VHS della presa
EXT2) e
EXT3.
Alcuni apparecchi (decodificatore, videoregistratore) realizzano la
commutazione da soli.
Altri apparecchi
*
:
FM ANT
EXT 1
DC in PC input
L
Audio in
(PC)
R
Sub
woofer
out
*
L
Audio
EXT 2
R
out
:
FM ANT
VCR
Sub
woofer
out
*
L
R
Audio
out
Page 63

15
Le prese di connessione
AV e S-VIDEO sono situate sotto
lo sportellino sinistro oppure, per gli schermi di grandi
dimensioni, sotto lo sportellino destro.
Eseguire i collegamenti come illustrato a lato.
Con il tasto
d, selezionare EXT3.
Con un apparecchio monofonico, collegare il cavo audio
sull’ingresso AUDIO L. Il suono viene automaticamente riprodotto
sull’altoparlante sinistro e su quello destro del televisore.
A cuffie collegate, viene eliminato l’audio del televisore. I tasti
@”#permettono di regolare il volume.
L’impedenza delle cuffie deve essere compresa tra 32 e 600 ohm.
Videocamera, videogiochi
Cuffie
O
Per il collegamento ad un dispositivo Hi-Fi,utilizzare un
cavetto di collegamento audio e collegare le uscite
Audio
out L
e R del televisore ad un ingresso Audio in L e R del
canale Hi-fi. Se si possiede una cassa subwoofer attiva,
collegare l’uscita
Subwoofer out del televisore all’ingresso
Subwoofer in della cassa.
Collegare l’uscita del monitor del computer all’ingresso
PC
input (VGA) del televisore. Collegare l’uscita audio Audio out
L
e R del computer all’ingresso Audio in (PC) L e R del
televisore.
Per maggiori informazioni sull’utilizzo in modo PC, vedi pagina 8.
La risoluzione ottimale dello schermo si ottiene
configurando il computer su 1024 x 768, 60 Hz.
Attenzione:
se si utilizza un’altra risoluzione, è possibile che la
funzione PIP non sia operativa. In tal caso, un messaggio di
avvertimento viene visualizzato sullo schermo.
Ecco l’elenco delle varie risoluzioni di visualizzazione
disponibili sul televisore:
640 x 350, 70 Hz 720 x 400,70 Hz 1024 x 768,60 Hz
640 x 350, 85 Hz 720 x 400,85 Hz 1024 x 768,70 Hz
640 x 480, 60 Hz 800 x 600,56 Hz 1024 x 768,75 Hz
640 x 480, 67 Hz 800 x 600,60 Hz 1024 x 768,85 Hz
640 x 480, 72 Hz 800 x 600,72 Hz 1152 x 864,75 Hz
640 x 480, 75 Hz 800 x 600,75 Hz 1280 x 960,60 Hz
640 x 480, 85 Hz 800 x 600,85 Hz 1280 x 1024,60 Hz
832 x 624, 75 Hz 1280 x 1024,75 Hz
Amplificatore
Computer
S-VIDE
VIDEO
L
AUDIO
R
Sub
woofer
out
*
L
R
Audio
out
Sub
woofer
out
*
LR
Audio
out
PC input
Sub
woofer
in
Audio
in
Audio in (PC)
L
R
Page 64

16
Consigli
Immagine
scadente
Assenza di
immagine
L’apparecchio
periferico dà
un’immagine in
bianco e nero
Assenza di suono
Il modo PC o il PIP
non funzionano ?
Il telecomando non
funziona
Stato di attesa
Pulizia del
televisore
Direttive per il
riciclaggio
Non si ottiene
nessun risultato ?
La vicinanza di montagne o di edifici molto alti può essere all’origine di immagini
sdoppiate, di presenza di eco o di ombre. In questo caso, cercare di regolare
manualmente l’immagine: vedi "sintonia fine" (pag. 7) oppure modificare
l’orientamento dell’antenna esterna. La vostra antenna è atta a ricevere delle
trasmissioni in questa frequenza (banda UHF o VHF)?
La presa dell’antenna è collegata correttamente ? Avete selezionato il sistema
giusto? (pag. 7). Se mal inserite, la presa scart e la presa dell’antenna sono spesso
all’origine di problemi legati all’immagine e al suono (a volte, se il televisore viene
rimosso o girato, le prese possono fuoriuscire dalla presa murale).Verificare le
altre connessioni.
Non avete selezionato la presa giusta con il tasto n: S-VHS2 invece della presa
EXT2. Per leggere una videocassetta, verificare che sia stata registrata con lo
stesso standard (PAL, SECAM, NTSC) del videoregistratore.
Se un canale TV ha l’immagine ma non l’audio,significa che non avete selezionato
il sistema TV adeguato.Modificare la regolazione del SISTEMA (pag. 7).
L’amplificatore collegato al televisore non emette suono? Verificare di non aver
confuso l’uscita audio con l’ingresso audio.
Verificare di aver configurato correttamente il computer su una risoluzione di
visualizzazione compatibile (vedi p.15).
In modo PC, non si riesce ad ottenere il suono della radio? Quando il PIP è
attivo,il suono è forzato su tv. Occorre disattivare il PIP, passare alla modalita'
radio, quindi ritornare in modalita' PC.
La spia luminosa del televisore non lampeggia quando utilizzate il telecomando,
provate a cambiare le pile.
Una volta acceso,il televisore resta in posizione di attesa. BLOCCATO appare
sullo schermo quando si cerca di utilizzare i tasti del televisore. Questo significa
che la funzione BLOCCO è attiva (pag. 10). Se il televisore non riceve alcun
segnale per 15 minuti, esso passa automaticamente in stato di attesa.
Per economizzare energia,il vostro televisore è dotato di componenti che
consentono un basso consumo in stato di attesa (inferiore a 1 W).
Per pulire lo schermo e la cassa del televisore utilizzare esclusivamente un panno
pulito, morbido e che non faccia peli. Non utilizzare prodotti a base di alcool o di
solventi.
Il vostro televisore si compone di materiali riutilizzabili o riciclabili. Per ridurre al minimo
la dispersione di rifiuti nell’ambiente, alcune imprese specializzate ritirano gli apparecchi
usati per smontarli e recuperare i pezzi riutilizzabili (informarsi presso il rivenditore).
Scollegare la presa murale del televisore per 30 secondi, quindi ricollegarla
nuovamente.
Se il vostro televisore è guasto, non cercate di ripararlo da soli: rivolgetevi al
servizio assistenza.
Page 65

1
EEÈÈÛÛ··ÁÁˆˆÁÁ‹‹
¶¶ÂÂÚÚÈȯ¯fifiÌÌÂÂÓÓ··
™·˜ В˘¯·ЪИЫЩФ‡МВ БИ· ЩЛУ ·БФЪ¿ ·˘Щ‹˜ ЩЛ˜ ЩЛПВfiЪ·ЫЛ˜.
™·˜ Ы˘УИЫЩФ‡МВ У· ‰И·‚¿ЫВЩВ ЪФЫВОЩИО¿ ЩИ˜ Ф‰ЛБ›В˜ Ф˘ ·ОФПФ˘ıФ‡У БИ· У·
О·Щ·П¿‚ВЩВ О·П‡ЩВЪ· ЩИ˜ ‰˘У·ЩfiЩЛЩВ˜ Ф˘ Ы·˜ ЪФЫК¤ЪВИ Л ЩЛПВfiЪ·Ы‹ Ы·˜.
EП›˙Ф˘МВ fiЩИ Л ЩВ¯УФПФБ›· М·˜ ı· Ы·˜ ИО·УФФИ‹ЫВИ П‹Ъˆ˜.
EEÁÁÎη·ÙÙ¿¿ÛÛÙÙ··ÛÛËË
¶·ÚÔ˘Û›·ÛË Ù˘ ÙËÏÂfiÚ·Û˘ LCD . . . . . . . . . . . . . . . . . . . . . . . . . . . . . . . . . . . . . . .2
¶П‹ОЩЪ· ЩФ˘ ∆ЛПe¯ВИЪИЫЩЪ›Ф˘ . . . . . . . . . . . . . . . . . . . . . . . . . . . . . . . . . . . . . . . . . . .3
EÁηٿÛÙ·ÛË Ù˘ ÙËÏÂfiÚ·Û˘ . . . . . . . . . . . . . . . . . . . . . . . . . . . . . . . . . . . . . . . . . .4
°Ú‹ÁÔÚË ÂÁηٿÛÙ·ÛË ÙˆÓ Î·Ó·ÏÈÒÓ . . . . . . . . . . . . . . . . . . . . . . . . . . . . . . . . . . . .5
∆·ÍÈÓfiÌËÛË ÙˆÓ ÚÔÁÚ·ÌÌ¿ÙˆÓ . . . . . . . . . . . . . . . . . . . . . . . . . . . . . . . . . . . . . . . .5
∂ИПФБ‹ ЩЛ˜ БПТЫЫ·˜ О·И ЩЛ˜ ¯ТЪ·˜ . . . . . . . . . . . . . . . . . . . . . . . . . . . . . . . . . . . .6
∞˘ÙfiÌ·ÙË ªÓ‹ÌË . . . . . . . . . . . . . . . . . . . . . . . . . . . . . . . . . . . . . . . . . . . . . . . . . . . . . .6
§ÂÈÙÔ˘ÚÁ›· EasyLink . . . . . . . . . . . . . . . . . . . . . . . . . . . . . . . . . . . . . . . . . . . . . . . . . . . .6
ГВИЪФО›УЛЩЛ МУ‹МЛ . . . . . . . . . . . . . . . . . . . . . . . . . . . . . . . . . . . . . . . . . . . . . . . . . . . .7
ŸÓÔÌ· ÚÔÁÚ¿ÌÌ·ÙÔ˜ . . . . . . . . . . . . . . . . . . . . . . . . . . . . . . . . . . . . . . . . . . . . . . . . .7
§§ÂÂÈÈÙÙÔÔ˘˘ÚÚÁÁ››··
ГЪ‹ЫЛ ЩФ˘ Ъ·‰ИФКТУФ˘ . . . . . . . . . . . . . . . . . . . . . . . . . . . . . . . . . . . . . . . . . . . . . . . .8
ГЪ‹ЫЛ ЫВ ПВИЩФ˘ЪБ›· ФıfiУЛ˜ PC . . . . . . . . . . . . . . . . . . . . . . . . . . . . . . . . . . . . . . . . .8
ƒ‡ıÌÈÛË ÂÈÎfiÓ·˜ . . . . . . . . . . . . . . . . . . . . . . . . . . . . . . . . . . . . . . . . . . . . . . . . . . . . . .9
ƒ˘ıÌ›ÛÂȘ ‹¯Ô˘ . . . . . . . . . . . . . . . . . . . . . . . . . . . . . . . . . . . . . . . . . . . . . . . . . . . . . . .9
ƒ‡ıМИЫЛ ЩˆУ ВИПФБТУ . . . . . . . . . . . . . . . . . . . . . . . . . . . . . . . . . . . . . . . . . . . . . . . . .9
§ВИЩФ˘ЪБ›· Н˘УЛЩЛЪИФ‡ . . . . . . . . . . . . . . . . . . . . . . . . . . . . . . . . . . . . . . . . . . . . . .10
∫Ï›‰ˆÌ· Ù˘ ÙËÏÂfiÚ·Û˘ . . . . . . . . . . . . . . . . . . . . . . . . . . . . . . . . . . . . . . . . . . . .10
Teletext . . . . . . . . . . . . . . . . . . . . . . . . . . . . . . . . . . . . . . . . . . . . . . . . . . . . . . . . . . . . .11
¢È·ÛÙ¿ÛÂȘ ÂÈÎfiÓ·˜ 16:9 . . . . . . . . . . . . . . . . . . . . . . . . . . . . . . . . . . . . . . . . . . . . . .12
¶Ï‹ÎÙÚ· VCR ‹ DVD . . . . . . . . . . . . . . . . . . . . . . . . . . . . . . . . . . . . . . . . . . . . . . . . . .13
AÂÍÈÏfiÁÈÔ . . . . . . . . . . . . . . . . . . . . . . . . . . . . . . . . . . . . . . . . . . . . . . . . . . . . . . . . . . .13
™™‡‡ÓÓ‰‰ÂÂÛÛËË ÂÂÚÚÈÈÊÊÂÂÚÚÂÂÈÈ··ÎÎÒÒÓÓ
™˘Û΢‹ B›ÓÙÂÔ . . . . . . . . . . . . . . . . . . . . . . . . . . . . . . . . . . . . . . . . . . . . . . . . . . . . . .14
ÕÏϘ Û˘Û΢¤˜ . . . . . . . . . . . . . . . . . . . . . . . . . . . . . . . . . . . . . . . . . . . . . . . . . . . . . .14
EÈÏÔÁ‹ Û˘Ó‰Â‰ÂÌ¤ÓˆÓ Û˘Û΢ÒÓ . . . . . . . . . . . . . . . . . . . . . . . . . . . . . . . . . . . . . .14
µИУЩВФО¿МВЪ·, ‚ИУЩВФ·И¯У›‰И· . . . . . . . . . . . . . . . . . . . . . . . . . . . . . . . . . . . . . . . . . .15
∞ÎÔ˘ÛÙÈο . . . . . . . . . . . . . . . . . . . . . . . . . . . . . . . . . . . . . . . . . . . . . . . . . . . . . . . . . . .15
∂ÓÈÛ¯˘Ù‹˜ . . . . . . . . . . . . . . . . . . . . . . . . . . . . . . . . . . . . . . . . . . . . . . . . . . . . . . . . . . .15
∏ПВОЩЪФУИОfi˜ АФПФБИЫЩ‹˜ . . . . . . . . . . . . . . . . . . . . . . . . . . . . . . . . . . . . . . . . . . . .15
™™˘˘ÌÌ‚‚ÔÔ˘˘ÏϤ¤˜˜
. . . . . . . . . . . . . . . . . . . . . . . . . . . . . . . . . . . . . . . . . . . . . . . . . . . . . . . . . .16
w
∫∫··ıı··ÚÚÈÈÛÛÌÌfifi˜˜ ÙÙˢ˜ ÙÙËËÏÏÂÂfifiÚÚ··ÛÛˢ˜
√ О·ı·ЪИЫМfi˜ ЩЛ˜ ФıfiУЛ˜ О·И ЩФ˘ П·ИЫ›Ф˘ Ъ¤ВИ У· Б›УВЩ·И МfiУФ МВ ¤У·
О·ı·Ъfi ·У›, ··Пfi О·И ¯ˆЪ›˜ ¯УФ‡‰И. ªЛУ ¯ЪЛЫИМФФИВ›ЩВ ЪФ˚fiУЩ· МВ ‚¿ЫЛ
ЩФ ФИУfiУВ˘М· ‹ ‰И·П˘ЩИО¿.
°И· ЩЛУ ВИПФБ‹ ЩˆУ ЪФБЪ·ММ¿ЩˆУ Ъ¤ВИ ЪТЩ· У· И¤ЫВЩВ ЩФ П‹ОЩЪФ >
БИ· У· МВ›ЩВ ЫЩФ ˘ФМВУФ‡.
∂∂ÏÏÏÏËËÓÓÈÈÎο¿
Page 66

2
¶¶··ÚÚÔÔ˘˘ÛÛ››··ÛÛËË ÙÙˢ˜ ÙÙËËÏÏÂÂfifiÚÚ··ÛÛˢ˜ LLCCDD
∆∆·· ÏÏ‹‹ÎÎÙÙÚÚ·· ÙÙˢ˜ ÙÙËËÏÏÂÂfifiÚÚ··ÛÛˢ˜ ::
ñ . : ÁÈ· Ó· ·Ó¿„ÂÙÂ ‹ Ó· Û‚‹ÛÂÙÂ ÙËÓ ÙËÏÂfiÚ·ÛË.
ñ VOLUME (∂¡∆∞™∏) - + (-
”+) : ÁÈ· Ó· Ú˘ıÌ›ÛÂÙÂ
ÙËÓ ¤ÓÙ·ÛË ÙÔ˘ ‹¯Ô˘.
ñ PROGRAM (¶ƒ√°ƒ∞ªª∞) - + (- P +) : ÁÈ· Ó·
ÂÈϤÍÂÙ ٷ ÚÔÁÚ¿ÌÌ·Ù·.
ñ MENU (ª∂¡√À): ÁÈ· Ó· ÂÌÊ·Ó›ÛÂÙ ‹ Ó· ÂͤÏıÂÙÂ
·fi Ù· ÌÂÓÔ‡, ȤÛÙ ٷ˘Ùfi¯ÚÔÓ· Ù· 2 Ï‹ÎÙÚ·
”
- Î·È ” +. ™ÙË Û˘Ó¤¯ÂÈ·, Ù· Ï‹ÎÙÚ· P - + Û·˜
ÂÈÙÚ¤Ô˘Ó Ó· ÂÈϤÍÂÙ ÌÈ· Ú‡ıÌÈÛË Î·È Ù· Ï‹ÎÙÚ·
” - + Ó· Ú·ÁÌ·ÙÔÔÈ‹ÛÂÙÂ ·˘Ù‹ ÙË Ú‡ıÌÈÛË.
¶·Ъ·Щ‹ЪЛЫЛ: fiЩ·У ¯ЪЛЫИМФФИВ›ЩВ ЩЛ ПВИЩФ˘ЪБ›·
∫§∂π¢øª∞ TV
, Ù· Ï‹ÎÙÚ· - ” + Î·È - P + ›ӷÈ
·ВУВЪБФФИЛМ¤У· (‰В›ЩВ ЩФ МВУФ‡
Ã∞ƒ∞∫/ƒπ™∆π∫∞
,
ÛÂÏ›‰· 10).
§˘¯У›· ПВИЩФ˘ЪБ›·˜ О·И ¢¤ОЩЛ˜ ˘¤Ъ˘ıЪˆУ ·ОЩ›УˆУ.
™Ù‹ÚÈÁÌ· Ú˘ıÌÈ˙fiÌÂÓ˘ ÎÏ›Û˘.
∆Ô ÛÙ‹ÚÈÁÌ· ÌÔÚ› Ó· ·Ê·ÈÚÂı› Î·È Ó·
·УЩИО·Щ·ЫЩ·ıВ› МВ ¤У· ЫВЩ ЫЩВЪ¤ˆЫЛ˜ ЫЩФУ ЩФ›¯Ф
Ф˘ ‰И·Щ›ıВЩ·И ЪФ·ИЪВЩИО¿ (ВУЛМВЪˆıВ›ЩВ ·fi ЩФУ
ˆПЛЩ‹ Ы·˜).
¶¶››ÛÛˆˆ ÏÏ¢˘ÚÚ¿¿ ::
√È ‚·ÛÈΤ˜ Û˘Ó‰¤ÛÂȘ Ú·ÁÌ·ÙÔÔÈÔ‡ÓÙ·È ·fi οو
·fi ЩЛУ ЩЛПВfiЪ·ЫЛ.
∆· ·ФЫТМВУ· П·›ЫИ· ·ЪИЫЩВЪ¿* О·И ‰ВНИ¿
ВИЩЪ¤Ф˘У ЩЛУ ЪfiЫ‚·ЫЛ ЫЩИ˜ ‰В˘ЩВЪВ‡Ф˘ЫВ˜
˘Ф‰Ф¯¤˜ Ы‡У‰ВЫЛ˜.
* √И ФıfiУВ˜ МВБ¿ПˆУ ‰И·ЫЩ¿ЫВˆУ ‰ВУ ¤¯Ф˘У ·ЪИЫЩВЪfi
·ФЫТМВУФ П·›ЫИФ. °И· ВЪИЫЫfiЩВЪВ˜ ПВЩФМ¤ЪВИВ˜
Ы¯ВЩИО¿ МВ ЩИ˜ Ы˘У‰¤ЫВИ˜, ‰В›ЩВ ЩЛ ЫВП›‰· 14.
ÀÔ‰Ô¯‹ SCART EXT1
АФ‰Ф¯¤˜ БИ· ЩЛПВФЩИО¤˜ О·И Ъ·‰ИФКˆУИО¤˜ ОВЪ·›В˜
∂›ЫФ‰Ф˜ О¿ЪЩ·˜ VGA О·И О¿ЪЩ·˜ ‹¯Ф˘ БИ· ЩЛ
Ы‡У‰ВЫЛ ВУfi˜ ЛПВОЩЪФУИОФ‡ ˘ФПФБИЫЩ‹.
АФ‰Ф¯‹ П‹„Л˜ Ы˘УВ¯Ф‡˜ ЪВ‡М·ЩФ˜
MENU
”
VOLUME
-
P
.
+
-
PROGRAM
+
DC in PC input (VGA)
L
Audio in (PC)
R
:
FM ANT
EXT. 1
Ø
Page 67

3
12
MODE
MUTE
RADIO
VCR
DVD
SMARTSMART ACTIVE
CONTROL
MENU
PC TV
OK
P
564
879
0
·¢Ê∆Æ
∫
ù
¤Ó
`
Ÿı
Å
Ë
Á
∏
3
--
++
.
ª
-
[
”
Y
ª
¶¶ÏÏ‹‹ÎÎÙÙÚÚ·· ÙÙÔÔ˘˘ ∆∆ËËÏÏee¯¯ÂÂÈÈÚÚÈÈÛÛÙÙÚÚ››ÔÔ˘˘
∂∂ÈÈÏÏÔÔÁÁ‹‹ ˘˘ÔÔ‰‰ÔÔ¯¯ÒÒÓÓ EEXXTT ((ÛÛÂÂÏÏ.. 1144))
¶·Щ‹ЫЩВ ВЪИЫЫfiЩВЪВ˜ КФЪ¤˜ БИ· У·
ÂÈϤÍÂÙ ÙË Û˘Ó‰Â‰Â̤ÓË Û˘Û΢‹.
¶¶ÏÏ‹‹ÎÎÙÙÚÚ·· ttÈÈllÈÈtteexxttee
(Û. 11)
‹ VCR / DVD (Û. 13)
œ ∂ÌÊ¿ÓÈÛË PIP (Û. 8)
π ªÂٷΛÓËÛË PIP (Û. 8)
XXÚÚÔÔÓÓÔÔ‰‰ÈÈ··ÎÎfifiÙÙˢ˜
EÈÏÔÁ‹ ÙÔ˘ ¯ÚfiÓÔ˘ Ô˘ ·Ô̤ÓÂÈ
ÚÈÓ ÙËÓ ·˘ÙfiÌ·ÙË ÌÂÙ¿‚·ÛË ÛÙË
ПВИЩФ˘ЪБ›· ·У·МФУ‹˜ (·fi 0 ˆ˜
240 ÏÂÙ¿).
AAccttiivvee CCoonnttrrooll
‚ВПЩИЫЩФФИВ› ЩЛУ ФИfiЩЛЩ· ЩЛ˜
ÂÈÎfiÓ·˜, ·Ó¿ÏÔÁ· Ì ÙÔ Û‹Ì· Ï‹„˘.
§§ÂÂÈÈÙÙÔÔ˘˘ÚÚÁÁ››·· ‹‹¯¯ÔÔ˘˘
∂ÈÙÚ¤ÂÈ ÙË ÌÂÙ·ÙÚÔ‹ ÙˆÓ ÂÎÔÌÒÓ
STEREO
Î·È NICAM STEREO Û MONO
‹ ÁÈ· ÙȘ ‰›ÁψÛÛ˜ ÂÎÔ̤˜
ÂÈÙÚ¤ÂÈ ÙËÓ ÂÈÏÔÁ‹ ÌÂٷ͇ DUAL I ‹
DUAL II
.
∏ ¤Ó‰ÂÈÍË
MONO
›ӷÈ
ОfiООИУЛ fiЩ·У ЪfiОВИЩ·И БИ· М›·
·Ó·ÁηÛÙÈ΋ ı¤ÛË.
ªªÂÂÓÓÔÔ‡‡
: °È· ÙËÓ ÂÌÊ¿ÓÈÛË ÙˆÓ
ÌÂÓÔ‡ ‹ ÙËÓ ¤ÍÔ‰Ô ·fi ·˘Ù¿.
∫∫¤¤ÚÚÛÛÔÔÚÚ··˜˜
∞˘Ù¿ Ù· 4 Ï‹ÎÙÚ· ÂÈÙÚ¤Ô˘Ó
ÙËÓ ÏÔ‹ÁËÛË ÛÙ· ÌÂÓÔ‡.
ŒŒÓÓÙÙ··ÛÛËË ‹‹¯¯ÔÔ˘˘
°È· ÙË Ú‡ıÌÈÛË ÙÔ˘ ÂȤ‰Ô˘ ÙÔ˘ ‹¯Ô˘
PPCC // TTVV // ƒƒ¿¿‰‰ÈÈÔÔ
¶È¤ÛÙ ¤Ó· ·fi Ù· Ï‹ÎÙÚ· ÁÈ·
Ó· ı¤ÛÂÙÂ ÙËÓ ÙËÏÂfiÚ·ÛË ÛÂ
ЩЪfiФ ПВИЩФ˘ЪБ›·˜ PC, TV ‹
Ъ·‰ИФКТУФ˘ (Ы. 8).
¢¢ÈÈ··ÛÛÙÙ¿¿ÛÛÂÂÈȘ˜ ÂÂÈÈÎÎfifiÓÓ··˜˜ 1166::99
(ÛÂÏ. 12)
¶¶ÚÚÔÔÙÙÈÈÌÌ‹‹ÛÛÂÂÈȘ˜ ‹‹¯¯ÔÔ˘˘
: °È· ÙËÓ
О·Щ¿ЪБЛЫЛ ‹ ЩЛУ В·У·КФЪ¿ ЩФ˘ ‹¯Ф˘.
¶¶ÏÏËËÚÚÔÔÊÊÔÔÚÚ››Â˜˜ ÔÔııfifiÓÓˢ˜//
ÛÛÙÙ··ııÂÂÚÚfifi˜˜ ··ÚÚÈÈııÌÌfifi˜˜
°И· У· ВМК·УИЫЩВ›/Ы‚‹ЫВИ Ф
·ÚÈıÌfi˜ ÙÔ˘ ÚÔÁÚ¿ÌÌ·ÙÔ˜, ÙÔ
fiÓÔÌ· (·Ó ˘¿Ú¯ÂÈ), Ë ÒÚ·, Ë
ПВИЩФ˘ЪБ›· ‹¯Ф˘ О·И Ф ¯ЪfiУФ˜ Ф˘
·Ô̤ÓÂÈ ÛÙÔ ¯ÚÔÓԉȷÎfiÙË.
¶È¤ÛÙ ÁÈ· 5 ‰Â˘ÙÂÚfiÏÂÙ· ÒÛÙÂ
У· ВУВЪБФФИ‹ЫВЩВ ЩЛ ‰И·ЪО‹
ÂÌÊ¿ÓÈÛË ÙÔ˘ ·ÚÈıÌÔ‡ ÛÙËÓ ÔıfiÓË.
AAÓÓ··ÌÌÔÔÓÓ‹‹
EÈÙÚ¤ÂÈ Ó· ı¤ÛÂÙ ÙË Û˘Û΢‹
Û·˜ Û ı¤ÛË ·Ó·ÌÔÓ‹˜. °È· Ó·
·ÓÔ›ÍÂÙ ÙËÓ ÙËÏÂfiÚ·ÛË È¤ÛÙ ٷ
Ï‹ÎÙÚ· b,P @#‹ 0 ˆ˜ 9.
∫∫··ÙÙ¿¿ÏÏÔÔÁÁÔÔ˜˜ ÚÚÔÔÁÁÚÚ··ÌÌÌÌ¿¿ÙÙˆˆÓÓ
∂МК¿УИЫЛ/·fiОЪ˘„Л ·fi ЩЛУ
ФıfiУЛ ЩФ˘ О·Щ·ПfiБФ˘ ЩˆУ
ЪФБЪ·ММ¿ЩˆУ. ГЪЛЫИМФФИ‹ЫЩВ
О·ЩfiИУ Щ· П‹ОЩЪ· îÏ ÁÈ· Ó·
ÂÈϤÍÂÙ ÙÔ ÚfiÁÚ·ÌÌ·, Î·È ÙÔ
Ï‹ÎÙÚÔ ¬ БИ· У· ВМК·УИЫЩВ›
ЫЩЛУ ФıfiУЛ.
ªÚÔÛÙ¿ ÛÙ· ÎÏÂȉˆÌ¤Ó·
ÚÔÁÚ¿ÌÌ·Ù· ÂÌÊ·Ó›˙ÂÙ·È ÙÔ
ۇ̂ÔÏÔ
+
(ÛÂÏ. 10) ‹ ÙÔ Û‡Ì‚ÔÏÔ
?
: ·Ó ‰ÂÓ Â›Ó·È ÎÏÂȉˆÌ¤Ó·.
¶¶ÚÚÔÔ--ÚÚ˘˘ııÌÌ››ÛÛÂÂÈȘ˜ ÂÂÈÈÎÎfifiÓÓ··˜˜ Îη·ÈÈ ‹‹¯¯ÔÔ˘˘
∂ÈÙÚ¤ÂÈ ÙËÓ ÚfiÛ‚·ÛË Û ̛· ÛÂÈÚ¿
ÚÔ-Ú˘ıÌ›ÛÂˆÓ ÂÈÎfiÓ·˜ Î·È ‹¯Ô˘.
∏ ı¤ÛË
¶¶PPOO™™øø¶¶ππKKHH
·УЩИЫЩФИ¯В› ЫЩИ˜
Ú˘ıÌ›ÛÂȘ Ô˘ Á›ÓÔÓÙ·È Ì¤Û· ÛÙ· ÌÂÓÔ‡.
∂∂Êʤ¤ ‹‹¯¯ÔÔ˘˘
(Sound Surround)
EУВЪБФФ›ЛЫЛ/·ВУВЪБФФ›ЛЫЛ
ЩФ˘ ‹¯Ф˘ Surround. ™ЩФ
ЫЩВЪВФКˆУИОfi ‹¯Ф, Щ· МВБ¿КˆУ·
МФИ¿˙Ф˘У У· ·¤¯Ф˘У
ВЪИЫЫfiЩВЪФ. °И· ЩИ˜ ВО‰fiЫВИ˜ Ф˘
‰И·ı¤ЩФ˘У Virtual Dolby Surround*,
ÌÔÚ›Ù ӷ ‰ËÌÈÔ˘ÚÁ‹ÛÂÙ ٷ
˯ËÙÈο Âʤ ÊfiÓÙÔ˘ ÙÔ˘ Dolby
Surround Pro Logic.
EEÈÈÏÏÔÔÁÁ‹‹ ÚÚÔÔÁÁÚÚ··ÌÌÌÌ¿¿ÙÙˆˆÓÓ
¶ЪfiЫ‚·ЫЛ ЫЩФ ВfiМВУФ ‹
ЪФЛБФ‡МВУФ ЪfiБЪ·ММ·. O
·ЪИıМfi˜ (ЩФ fiУФМ·) О·И Л
ПВИЩФ˘ЪБ›· ‹¯Ф˘ ВМК·У›˙ФУЩ·И ЫЩЛУ
ФıfiУЛ БИ· МВЪИО¿ ‰В˘ЩВЪfiПВЩ·.
°И· ФЪИЫМ¤У· ЪФБЪ¿ММ·Щ· Ф˘
‰И·ı¤ЩФ˘У Teletext, ÛÙÔ Î¿Ùˆ
̤ÚÔ˜ Ù˘ ÔıfiÓ˘ ÂÌÊ·Ó›˙ÂÙ·È Ô
Ù›ÙÏÔ˜ ÙÔ˘ ÚÔÁÚ¿ÌÌ·ÙÔ˜.
¶¶ÚÚÔÔËËÁÁÔÔ‡‡ÌÌÂÂÓÓÔÔ ÚÚfifiÁÁÚÚ··ÌÌÌÌ··
¶ЪfiЫ‚·ЫЛ ЫЩФ ЪФЛБФ‡МВУФ
ЪfiБЪ·ММ· Ф˘ ‚П¤·ЩВ.
¶¶ÏÏ‹‹ÎÎÙÙÚÚ·· ··ÚÚÈÈııÌÌÒÒÓÓ
ХМВЫЛ ЪfiЫ‚·ЫЛ ЫЩ·
ЪФБЪ¿ММ·Щ·. °И· ¤У· ЪfiБЪ·ММ·
МВ ‰И„‹КИФ ·ЪИıМfi, Ъ¤ВИ У·
ЪФЫı¤ЫВЩВ ЩФ ‰В‡ЩВЪФ „ЛК›Ф ЪИУ
Ы‚‹ЫВИ Л ·‡П·.
∂∂ÈÈÏÏÔÔÁÁ¤¤··˜˜ ÏÏÂÂÈÈÙÙÔÔ˘˘ÚÚÁÁ››··˜˜ ((ÛÛÂÂÏÏ.. 1133))
°И· У· ВУВЪБФФИ‹ЫВЩВ ЩФ
ЩЛПВ¯ВИЪИЫЩ‹ЪИФ ЫЩЛ ПВИЩФ˘ЪБ›·
TV,VCR (‚›ÓÙÂÔ) ‹ DVD.
*∆o “Dolby Prologic” Î·È ÙÔ ‰ÈÏfi ۇ̂ÔÏÔ £ Â›Ó·È Û‹Ì·Ù· ηٷÙÂı¤ÓÙ· ·fi Ù· ÂÚÁ·ÛÙ‹ÚÈ· Dolby Laboratories Licensing Corporation.
ηٷÛÎÂÓ¿˙oÓÙ·È Î·ÙfiÈÓ ·‰Â›·˜ ÙˆÓ EÚÁ·ÛÙËÚ›ˆÓ Dolby Laboratories Licensing Corporation.
Page 68

4
&
∆∆ÔÔÔÔıı¤¤ÙÙËËÛÛËË ÙÙˢ˜ ÙÙËËÏÏÂÂfifiÚÚ··ÛÛˢ˜
∆ФФıВЩ‹ЫЩВ ЩЛУ ЩЛПВfiЪ·Ы‹ Ы·˜ ЫВ М›· ™Щ¤ЪВЛ О·И
ЫЩ·ıВЪ‹ ВИК¿УВИ·. °И· У· ЪФП¿‚ВЩВ Щ˘¯fiУ
ВИО›У‰˘УВ˜ О·Щ·ЫЩ¿ЫВИ˜, МЛУ ВОı¤ЩВЩВ ЩЛУ
ЩЛПВfiЪ·ЫЛ ЫВ УВЪfi, ЫВ М›· ЛБ‹ ıВЪМfiЩЛЩ·˜ (П¿М·,
ОВЪ›, О·ПФЪИК¤Ъ, ...) О·И МЛУ ВМФ‰›˙ВЩВ Щ· ·УФ›БМ·Щ·
ı˘Ъ›‰В˜ ВН·ВЪИЫМФ‡ Ф˘ ‚Ъ›ЫОФУЩ·И ЫЩЛУ ›Ыˆ fi„Л.
é
™™˘˘ÓÓ‰‰¤¤ÛÛÂÂÈȘ˜ ÙÙˆˆÓÓ ÎÎÂÂÚÚ··ÈÈÒÒÓÓ
с ГЪЛЫИМФФИ‹ЫЩВ ЩФ ·ЪВ¯fiМВУФ О·ПТ‰ИФ
Û‡Ó‰ÂÛ˘ Ù˘ ÎÂÚ·›·˜ Î·È Û˘Ó‰¤ÛÙ ÙËÓ ˘Ô‰Ô¯‹
: Ô˘ ‚Ú›ÛÎÂÙ·È ·fi οو ·fi ÙËÓ ÙËÏÂfiÚ·ÛË
ÛÙËÓ ˘Ô‰Ô¯‹ Ù˘ ÎÂÚ·›·˜ Û·˜.
ñ ™˘Ó‰¤ÛÙ ÙÔ ·Ú¯fiÌÂÓÔ Î·ÏÒ‰ÈÔ Ù˘ ÎÂÚ·›·˜ ÙÔ˘
Ъ·‰ИФКТУФ˘ ЫЩЛУ ˘Ф‰Ф¯‹ FM ANT Ф˘ ‚Ъ›ЫОВЩ·И
О¿Щˆ ·fi ЩЛУ ЩЛПВfiЪ·ЫЛ.
с ∆·ОЩФФИ‹ЫЩВ Щ· О·ПТ‰И· ВЪУТУЩ·˜ Щ· М¤Ы·
·fi ÙÔ ÛÙ‹ÚÈÁÌ· Ù˘ ÙËÏÂfiÚ·Û˘.
“
™™˘˘ÓÓ‰‰¤¤ÛÛÂÂÈȘ˜ ËËÏÏÂÂÎÎÙÙÚÚÈÈÎ΋‹˜˜ ÙÙÚÚÔÔÊÊÔÔ‰‰ÔÔÛÛ››··˜˜
∏ ЩЛПВfiЪ·ЫЛ ПВИЩФ˘ЪБВ› МВ ·ЪВ¯fiМВУЛ ЩЪФКФ‰ФЫ›·
Ы˘УВ¯Ф‡˜ ЪВ‡М·ЩФ˜ (Л ЩИМ‹ ЩЛ˜ Щ¿ЫЛ˜ ‰ЛПТУВЩ·И
ЫЩЛУ ВЩИО¤Щ·). ГЪЛЫИМФФИ‹ЫЩВ МfiУФ ЩФ ·УЩ¿ЩФЪ
AC-DC Ф˘ ·Ъ·‰›‰ВЩ·И М·˙› МВ ЩЛУ ЩЛПВfiЪ·ЫЛ.
с ™˘У‰¤ЫЩВ ЩФ ‚‡ЫМ· DC (™˘УВ¯Ф‡˜ ЪВ‡М·ЩФ˜) ЩФ˘
·УЩ¿ЩФЪ ЫЩФ ‚‡ЫМ· DC ЩЛ˜ ЩЛПВfiЪ·ЫЛ˜. ∞К‹ЫЩВ
ВПВ‡ıВЪФ ¯ТЪФ Б‡Ъˆ ·fi ЩФ ·УЩ¿ЩФЪ БИ· У·
О˘ОПФКФЪВ› Ф ·¤Ъ·˜.
с ™˘У‰¤ЫЩВ ЩФ О·ПТ‰ИФ ЩЪФКФ‰ФЫ›·˜ ЩФ˘ ·УЩ¿ЩФЪ
Î·È ÂÈÛ¿ÁÂÙ ÙÔÓ ÚÂ˘Ì·ÙÔÏ‹ÙË ÛÙËÓ Ú›˙· ÙÔ˘
ÙÔ›¯Ô˘ (220-240 V / 50 Hz).
°È· ÙË Û‡Ó‰ÂÛË ¿ÏÏˆÓ Û˘Û΢ÒÓ, ‰Â›Ù ÙË Û. 14.
‘
∆∆ËËÏϯ¯ÂÂÈÈÚÚÈÈÛÛÙÙ‹‹ÚÚÈÈÔÔ
∆ÔÔıÂÙ‹ÛÙ ÙȘ 2 ·Ú¯fiÌÂÓ˜ ̷ٷڛ˜ Ù‡Ô˘
R6 ÌÂ ÙË ÛˆÛÙ‹ ÔÏÈÎfiÙËÙ·.
√И М·Щ·Ъ›В˜ Ф˘ ·Ъ·‰›‰ФУЩ·И МВ ЩЛ Ы˘ЫОВ˘‹ ‰ВУ
ВЪИ¤¯Ф˘У ˘‰Ъ¿ЪБ˘ЪФ Ф‡ЩВ УИО¤ПИФ-О¿‰МИФ, БИ·
ПfiБФ˘˜ ЪФЫЩ·Ы›·˜ ЩФ˘ ВЪИ‚¿ППФУЩФ˜. ¶ЪФЫ¤НЩВ
У· МЛУ ВЩ¿НВЩВ ЩИ˜ ¯ЪЛЫИМФФИЛМ¤УВ˜ М·Щ·Ъ›В˜
Ы·˜ ·ПП¿ У· ¯ЪЛЫИМФФИ‹ЫВЩВ Щ· М¤Ы·
·Ó·Î‡ÎψÛ˘ Ô˘ ˘¿Ú¯Ô˘Ó ÛÙË ‰È¿ıÂÛ‹ Û·˜
(Û˘Ì‚Ô˘Ï¢Ù›Ù ÙÔÓ ˆÏËÙ‹ Û·˜).
(
∂∂ÓÓ··ÚÚÍÍËË ÏÏÂÂÈÈÙÙÔÔ˘˘ÚÚÁÁ››··˜˜
°И· У· ·У¿„ВЩВ ЩЛУ ЩЛПВfiЪ·ЫЛ, ·Щ‹ЫЩВ ЩФ П‹ОЩЪФ
ПВИЩФ˘ЪБ›·˜ - ‰И·ОФ‹˜. ª›· П˘¯У›· ·У¿‚ВИ Ъ¿ЫИУЛ
О·И Л ФıfiУЛ КˆЩ›˙ВЩ·И. ¶ЛБ·›УВЩВ ·В˘ıВ›·˜ ЫЩФ
ОВК¿П·ИФ
ÁÁÚÚ‹‹ÁÁÔÔÚÚËË ÂÂÁÁÎη·ÙÙ¿¿ÛÛÙÙ··ÛÛËË
, ЫВП›‰· 5. ∂¿У Л
ЩЛПВfiЪ·ЫЛ В›У·И ЫВ ·У·МФУ‹ (ОfiООИУЛ П˘¯У›·),
И¤ЫЩВ ЩФ П‹ОЩЪФ P
# ЩФ˘ ЩЛПВ¯ВИЪИЫЩЛЪ›Ф˘.
∏ П˘¯У›· ·У·‚ФЫ‚‹УВИ fiЩ·У ¯ЪЛЫИМФФИ‹ЫВЩВ ЩФ
ЩЛПВ¯ВИЪИЫЩ‹ЪИФ.
EEÁÁÎη·ÙÙ¿¿ÛÛÙÙ··ÛÛËË ÙÙˢ˜ ÙÙËËÏÏÂÂfifiÚÚ··ÛÛˢ˜
5 cm
5 cm
5 cm
FM ANT.
MENU
”
P
++
--
.
VOLUME
PROGRAM
Page 69

5
°°ÚÚ‹‹ÁÁÔÔÚÚËË ÂÂÁÁÎη·ÙÙ¿¿ÛÛÙÙ··ÛÛËË ÙÙˆˆÓÓ Îη·ÓÓ··ÏÏÈÈÒÒÓÓ
∆∆··ÍÍÈÈÓÓfifiÌÌËËÛÛËË ÙÙˆˆÓÓ ÚÚÔÔÁÁÚÚ··ÌÌÌÌ¿¿ÙÙˆˆÓÓ
∆ËÓ ÚÒÙË ÊÔÚ¿ Ô˘ ı· ·ÓÔ›ÍÂÙ ÙËÓ
ÙËÏÂfiÚ·ÛË, ÂÌÊ·Ó›˙ÂÙ·È ÛÙËÓ ÔıfiÓË ¤Ó· ÌÂÓÔ‡.
∆Ô ÌÂÓÔ‡ ·˘Ùfi Û·˜ ÚÔÛηÏ› Ó· ÂÈϤÍÂÙ ÙË
°ÏÒÛÛ· ÙˆÓ ÌÂÓÔ‡ :
∞У ЩФ МВУФ‡ ‰ВУ ВМК·УИЫЩВ›, ОЪ·Щ‹ЫЩВ
·ЩЛМ¤У· БИ· 8 ‰В˘ЩВЪfiПВЩ· Щ· П‹ОЩЪ·
”
- Î·È ”+ Ù˘ ÙËÏÂfiÚ·Û˘, ÁÈ· Ó·
ВМК·УИЫЩВ› ЩФ МВУФ‡.
& ГЪЛЫИМФФИ‹ЫЩВ Щ· П‹ОЩЪ· îÏ ÙÔ˘
ЩЛПВ¯ВИЪИЫЩЛЪ›Ф˘ БИ· У· ВИП¤НВЩВ ЩЛ БПТЫЫ·
О·И О·ЩfiИУ ВИ‚В‚·ИТЫЩВ МВ ЩФ П‹ОЩЪФ
¬.
é ™ÙË Û˘Ó¤¯ÂÈ· ÂÈϤÍÂÙ ÙË ¯ÒÚ· Û·˜,
¯ЪЛЫИМФФИТУЩ·˜ Щ· П‹ОЩЪ·
îÏ Î·È
ВИ‚В‚·ИТЫЩВ МВ ЩФ П‹ОЩЪФ
¬.
∞Ó Ë ¯ÒÚ·
Û·˜ ‰ÂÓ ·Ó·ÁÚ¿ÊÂÙ·È ÛÙÔÓ Î·Ù¿ÏÔÁÔ,
ÂÈϤÍÙ ÙËÓ ÂÈÏÔÁ‹ ∞§§∏.
“ ∏ ·У·˙‹ЩЛЫЛ НВОИУ¿ ·˘ЩfiМ·Щ·. ∏ ·У·˙‹ЩЛЫЛ
‰И·ЪОВ› МВЪИО¿ ПВЩ¿. ™ЩЛУ ФıfiУЛ ВМК·У›˙ВЩ·И
Л ЪfiФ‰Ф˜ ЩЛ˜ ·У·˙‹ЩЛЫЛ˜ ·ПП¿ О·И Ф
·ÚÈıÌfi˜ ÙˆÓ ÚÔÁÚ·ÌÌ¿ÙˆÓ Ô˘ ¤¯Ô˘Ó
‚ÚÂı›. ™ÙÔ Ù¤ÏÔ˜, ÙÔ ÌÂÓÔ‡ ÂÍ·Ê·Ó›˙ÂÙ·È.
°È· Ó· ‚Á›Ù ‹ Ó· ‰È·Îfi„ÂÙ ÙËÓ ·Ó·˙‹ÙËÛË,
ȤÛÙ ÙÔ Ï‹ÎÙÚÔ
H
. AÓ ‰ÂÓ ‚ÚÂı› ηӤӷ
ÚfiÁÚ·ÌÌ·, ‰È·‚¿ÛÙ ÙÔ ÎÂÊ¿Ï·ÈÔ
"™˘Ì‚Ô˘Ï¤˜" ÛÂÏ.24.
‘ AÓ Ô ÛÙ·ıÌfi˜ ‹ ÙÔ Î·Ïˆ‰È·Îfi ‰›ÎÙ˘Ô ÂΤÌÂÈ
ÙÔ Û‹Ì· Ù˘ ·˘ÙfiÌ·Ù˘ Ù·ÍÈÓfiÌËÛ˘, Ù·
ÚÔÁÚ¿ÌÌ·Ù· ı· ·ÚÈıÌËıÔ‡Ó ÛˆÛÙ¿.
( AÓ ·˘Ùfi ‰ÂÓ Û˘Ì‚·›ÓÂÈ, ÙfiÙ ٷ ÚÔÁÚ¿ÌÌ·Ù·
Ô˘ ¤¯Ô˘Ó ‚ÚÂı› ı· ·ÚÈıÌËıÔ‡Ó Ì Êı›ÓÔÓÙ·
·ÚÈıÌfi 99, 98, 97 ÎÏ. °È· Ó· ·ÏÏ¿ÍÂÙÂ ÙËÓ
·Ъ›ıМЛЫЛ, Ъ¤ВИ У· ¯ЪЛЫИМФФИ‹ЫВЩВ ЩФ
МВУФ‡ ∆∞•π¡√ª∏™∏.
ªВЪИОФ› ЫЩ·ıМФ› ‹ О·Пˆ‰И·О¿ ‰›ОЩ˘·
ВО¤МФ˘У ЩИ˜ ‰ИО¤˜ ЩФ˘˜ ·Ъ·М¤ЩЪФ˘˜
Щ·НИУfiМЛЫЛ˜ (ВЪИФ¯‹, БПТЫЫ·, ОП.). ™В
·˘Щ‹У ЩЛУ ВЪ›ЩˆЫЛ Ъ¤ВИ У· ‰ЛПТЫВЩВ ЩЛУ
ВИПФБ‹ Ы·˜ МВ Щ· П‹ОЩЪ·
îÏ
Î·È Ó·
ВИО˘ЪТЫВЩВ МВ ЩФ
¬
. µП. В›ЫЛ˜: ПВИЩФ˘ЪБ›·
EasyLink
, ÛÙË Û˘Ó¤¯ÂÈ·.
& ¶È¤ÛÙ ÙÔ Ï‹ÎÙÚÔ H. ™ÙËÓ ÔıfiÓË
ÂÌÊ·Ó›˙ÂÙ·È ÙÔ ‚·ÛÈÎfi ÌÂÓÔ‡.
é ∂ÈϤÍÙ ƒÀ£ªπ™∏ (Ï) Î·È ·Ù‹ÛÙ ÙÔ ¬.
™ÙËÓ ÔıfiÓË ÂÌÊ·Ó›˙ÂÙ·È ÙÔ ÌÂÓÔ‡ ƒÀ£ªπ™∏ :
“ ∂ÈϤÍÙ ∆∞•π¡√ª∏™∏ Ì ÙË ‚Ô‹ıÂÈ· ÙÔ˘
Ï‹ÎÙÚÔ˘
Ï Î·È È¤ÛÙ ÙÔ ¬. ∂ÌÊ·Ó›˙ÂÙ·È
ЩФ МВУФ‡ ∆∞•π¡√ª∏™∏. Œ¯ВИ ВУВЪБФФИЛıВ› Л
ВИПФБ‹ ∞¶√.
™ЛМВ›ˆЫЛ: ЩФ МВУФ‡ ·˘Щfi ПВИЩФ˘ЪБВ› Ы‡МКˆУ·
МВ ЩЛУ ВН‹˜ ПФБИО‹:
с “·fi ЩФ ∞¶√” (ПЛОЩЪФПФБ‹ЫЩВ ЩФУ ·ЪИıМ.
ÙÔ˘ ÙÚ¤¯ÔÓÙÔ˜ ÚÔÁÚ¿ÌÌ·ÙÔ˜),
с “БИ· У· ¿ЩВ ™∆√” (ПЛОЩЪФПФБ‹ЫЩВ ЩФУ
ηÈÓÔ‡ÚÁÈÔ ·ÚÈıÌfi),
ñ “∞¡∆∞§§∞°∏ ÙˆÓ ·ÚÈıÌÒÓ” (Ë ÂÓ¤ÚÁÂÈ·
¤¯ВИ ФПФОПЛЪˆıВ›).
‘ ∂ÈϤÍÙ ÙÔ ÚfiÁÚ·ÌÌ· Ô˘ ı¤ÏÂÙ ӷ
·ЪИıМ‹ЫВЩВ Н·У¿ ¯ЪЛЫИМФФИТУЩ·˜ Щ·
П‹ОЩЪ·
Ȭ ‹ ·fi 0 ˆ˜ 9.
¶·Ъ¿‰ВИБМ·: ı¤ПВЩВ У· О¿УВЩВ МИ· ·УЩ·ПП·Б‹
∞¶√ ЩФ ЪfiБЪ·ММ· 78 ™∆√ ЪfiБЪ·ММ· 2:
ПЛОЩЪФПФБ‹ЫЩВ
78
.
( ∂ÈϤÍÙ ™∆√ (Ï‹ÎÙÚÔ Ï) ηÈ
ПЛОЩЪФПФБ‹ЫЩВ ЩФУ О·ИУФ‡ЪБИФ ·ЪИıМfi Ф˘
ВИı˘МВ›ЩВ МВ Щ· П‹ОЩЪ·
Ȭ ‹ ·fi 0
ˆ˜ 9 (ЫЩФ ·Ъ¿‰ВИБМ¿ М·˜ПЛОЩЪФПФБ‹ЫЩВ
2).
§
∂ÈϤÍÙ ∞¡∆∞§§∞°∏ (Ï‹ÎÙÚÔ Ï) Î·È È¤ÛÙÂ
ÙÔ
¬. ∂ÌÊ·Ó›˙ÂÙ·È ÛÙËÓ ÔıfiÓË Ë ¤Ó‰ÂÈÍË
∞¡∆∞§§∞°∏, О·И Л ·УЩ·ПП·Б‹ ФПФОПЛЪТУВЩ·И.
™ЩФ ·Ъ¿‰ВИБМ¿ М·˜, ЩФ ЪfiБЪ·ММ· 78
·ÚÈıÌÂ›Ù·È Í·Ó¿ Û ÓÔ‡ÌÂÚÔ 2 (Î·È ÙÔ ÓÔ‡ÌÂÚÔ 2
ÛÂ 78).
è ∂ÈϤÍÙ ∞¶√ (Ï‹ÎÙÚÔ î) Î·È Â·Ó·Ï¿‚ÂÙÂ
Ù· ÛÙ¿‰È·
‘ ˆ˜ § ÙfiÛ˜ ÊÔÚ¤˜ fiÛ˜ Î·È Ù·
ÚÔÁÚ¿ÌÌ·Ù· Ô˘ ı¤ÏÂÙ ӷ ·ÚÈıÌ‹ÛÂÙÂ
Í·Ó¿.
µП. В›ЫЛ˜: ПВИЩФ˘ЪБ›·
EasyLink
, ÛÙË
Û˘Ó¤¯ÂÈ·.
! °È· Ó· ‚Á›Ù ·fi Ù· ÌÂÓÔ‡, ȤÛÙ ÙÔ
Ï‹ÎÙÚÔ
d.
SELECT LANGUAGE
LANGUAGE
FRANÇAIS
DEUTSCH
• E††HNIKA
ITALIA
NORSK
XflPA
ATRSQIA
BEKCIO
EKBESIA
ACCKIA
DAMIA
• EIKONA
• HXO∏
• XAPAK/PI∏TIKA
• PYıMI∏H.
PYıMI∏H
• °§fl™™A
• XflPA
• AY TOM. MNHMH
• XEIP. MNHMH
• TA•INOMH∏H
• ONOMA
∞¶√
™∆√
∞¡∆∞§§∞°∏
Page 70

6
∂∂ÈÈÏÏÔÔÁÁ‹‹ ÙÙˢ˜ ÁÁÏÏÒÒÛÛÛÛ··˜˜ Îη·ÈÈ ÙÙˢ˜ ¯¯ÒÒÚÚ··˜˜
∞∞˘˘ÙÙfifiÌÌ··ÙÙËË ªªÓÓ‹‹ÌÌËË
& ¶È¤ÛÙ ÙÔ Ï‹ÎÙÚÔ H БИ· У· ВМК·УИЫЩВ› ЫЩЛУ
ÔıfiÓË ÙÔ ‚·ÛÈÎfi ÌÂÓÔ‡.
é ∂ÈϤÍÙ ƒÀ£ªπ™∏ (Ï) Î·È È¤ÛÙ ÙÔ ¬.
™ЩЛУ ФıfiУЛ ВМК·У›˙ВЩ·И ЩФ МВУФ‡ ƒА£ªπ™∏.
Œ¯ВИ ВУВЪБФФИЛıВ› Л ВИПФБ‹ °§ш™™∞.
“ ¶È¤ÛÙ ÙÔ Ï‹ÎÙÚÔ ¬ ÁÈ· Ó· ̛٠ÛÙÔ
ÌÂÓÔ‡ °§ø™™∞.
‘ ∂ИП¤НЩВ ЩЛ БПТЫЫ· ¯ЪЛЫИМФФИТУЩ·˜ Щ·
Ï‹ÎÙÚ·
îÏ. ∆· ÌÂÓÔ‡ ı· ÂÌÊ·Ó›˙ÔÓÙ·È
П¤ФУ ЫЩЛ БПТЫЫ· Ф˘ ВИП¤Н·ЩВ.
( ¶È¤ÛÙ ÙÔ Ï‹ÎÙÚÔ È ÁÈ· Ó· ‚Á›Ù ·fi ÙÔ
ÌÂÓÔ‡ °§ø™™∞.
§
∂ÈϤÍÙ Ãøƒ∞ (Ï) Î·È ·Ù‹ÛÙ ÙÔ Ï‹ÎÙÚÔ ¬.
è ∂ИП¤НЩВ ЩЛ ¯ТЪ· Ы·˜ ¯ЪЛЫИМФФИТУЩ·˜ Щ·
Ï‹ÎÙÚ·
îÏ.
∞Ó Ë ¯ÒÚ· Û·˜ ‰ÂÓ ·Ó·ÁÚ¿ÊÂÙ·È ÛÙÔÓ
ηٿÏÔÁÔ, ÂÈϤÍÙ ÙËÓ ÂÈÏÔÁ‹ ∞§§∏.
! ¶È¤ÛÙ ÙÔ Ï‹ÎÙÚÔ È ÁÈ· Ó· ‚Á›Ù ·fi ÙÔ
ÌÂÓÔ‡ Ãøƒ∞.
ç
°È· Ó· ‚Á›Ù ·fi Ù· ÌÂÓÔ‡, ȤÛÙ ÙÔ Ï‹ÎÙÚÔ
d
µП. В›ЫЛ˜: ПВИЩФ˘ЪБ›·
EasyLink
, ÛÙË Û˘Ó¤¯ÂÈ·.
∆Ф МВУФ‡ ·˘Щfi Ы·˜ ВИЩЪ¤ВИ У· НВОИУ¿ЩВ ЩЛУ
·˘ÙfiÌ·ÙË ·Ó·˙‹ÙËÛË fiÏˆÓ ÙˆÓ
ÚÔÁÚ·ÌÌ¿ÙˆÓ Ô˘ Â›Ó·È ‰È·ı¤ÛÈÌ· ÛÙËÓ
ÂÚÈÔ¯‹ Û·˜ (‹ ÛÙÔ Î·Ïˆ‰È·Îfi Û·˜ ‰›ÎÙ˘Ô).
& ¶ЪТЩ·, О¿УЩВ ЩИ˜ ВУ¤ЪБВИВ˜ & ˆ˜ ! Ô˘
·Ó·Ê¤ÚÔÓÙ·È ·Ú·¿Óˆ Î·È ÛÙË Û˘Ó¤¯ÂÈ·:
é ∂ÈϤÍÙ ∞À∆√ª. ª¡∏ª∏ (Ï) Î·È È¤ÛÙÂ
ÙÔ Ï‹ÎÙÚÔ
¬. ∞Ú¯›˙ÂÈ Ë ·Ó·˙‹ÙËÛË.
ªВЩ¿ ·fi МВЪИО¿ ПВЩ¿, ВМК·У›˙ВЩ·И О·И ¿ПИ,
·˘ÙfiÌ·Ù·, ÙÔ ÌÂÓÔ‡ ƒÀ£ªπ™∏.
“ AÓ Ô ÛÙ·ıÌfi˜ ‹ ÙÔ Î·Ïˆ‰È·Îfi ‰›ÎÙ˘Ô ÂΤÌÂÈ
ÙÔ Û‹Ì· Ù˘ ·˘ÙfiÌ·Ù˘ Ù·ÍÈÓfiÌËÛ˘, Ù·
ÚÔÁÚ¿ÌÌ·Ù· ı· ·ÚÈıÌËıÔ‡Ó ÛˆÛÙ¿.
‘ AÓ ·˘Ùfi ‰ÂÓ Û˘Ì‚·›ÓÂÈ, ÙfiÙ ٷ ÚÔÁÚ¿ÌÌ·Ù·
Ô˘ ¤¯Ô˘Ó ‚ÚÂı› ı· ·ÚÈıÌËıÔ‡Ó Ì Êı›ÓÔÓÙ·
·ÚÈıÌfi 99, 98, 97 ÎÏ. °È· Ó· ·ÏÏ¿ÍÂÙÂ ÙËÓ
·Ъ›ıМЛЫЛ, Ъ¤ВИ У· ¯ЪЛЫИМФФИ‹ЫВЩВ ЩФ
МВУФ‡ ∆∞•π¡√ª∏™∏.
ªВЪИОФ› ЫЩ·ıМФ› ‹ О·Пˆ‰И·О¿ ‰›ОЩ˘· ВО¤МФ˘У
ЩИ˜ ‰ИО¤˜ ЩФ˘˜ ·Ъ·М¤ЩЪФ˘˜ Щ·НИУfiМЛЫЛ˜
(ВЪИФ¯‹, БПТЫЫ·, ОП.). ™В ·˘Щ‹У ЩЛУ ВЪ›ЩˆЫЛ
Ъ¤ВИ У· ‰ЛПТЫВЩВ ЩЛУ ВИПФБ‹ Ы·˜ МВ Щ·
П‹ОЩЪ·
îÏ
О·И У· ВИО˘ЪТЫВЩВ МВ ЩФ ¬.
°È· Ó· ‚Á›Ù ‹ Ó· ‰È·Îfi„ÂÙ ÙËÓ ·Ó·˙‹ÙËÛË,
ȤÛÙ ÙÔ Ï‹ÎÙÚÔ
H
. AУ ‰ВУ ‚ЪВıВ› О·М›·
ВИОfiУ·, ‚П¤В Ы˘М‚Ф˘П¤˜ (ЫВП. 16).
µП. В›ЫЛ˜: ПВИЩФ˘ЪБ›·
EasyLink
, ÛÙË Û˘Ó¤¯ÂÈ·.
( °È· Ó· ‚Á›Ù ·fi Ù· ÌÂÓÔ‡, ȤÛÙ ÙÔ
Ï‹ÎÙÚÔ
d.
• EIKONA
• HXO∏
• XAPAK/PI∏TIKA
• PYıMI∏H.
PYıMI∏H
• °§fl™™A
• XflPA
• AY TOM. MNHMH
• XEIP. MNHMH
• TA•INOMH∏H
• ONOMA
E††HNIKA
ITALIANO
NORSK
PYıMI∏H
• °§fl™™A
• XflPA
• AY TOM. MNHMH
• XEIP. MNHMH
• TA•INOMH∏H
• ONOMA
„AXNEI
∂EPIMENETE
API£M. ∂PO°P 2
215.18 MHZ
∞Ó Ë ÙËÏÂfiÚ·ÛË Â›Ó·È Û˘Ó‰Â‰Â̤ÓË (·fi ÙËÓ
˘Ô‰Ô¯‹ EXT2) ЫВ Ы˘ЫОВ˘‹ ‚›УЩВФ Ф˘ У·
‰И·ı¤ЩВИ ЩЛ ПВИЩФ˘ЪБ›· EasyLink, Л БПТЫЫ·, Л ¯ТЪ·
О·И Щ· О·У¿ПИ· Ф˘ ‚Ъ›ЫОФУЩ·И О·Щ¿ ЩЛУ
·Ó·˙‹ÙËÛË ÌÂÙ·‚È‚¿˙ÔÓÙ·È ·˘ÙfiÌ·Ù· ÛÙÔ ‚›ÓÙÂÔ
Ì ÙËÓ ÂÁηٿÛÙ·ÛË. ∫·Ù¿ ÙË ÌÂÙ·ÊÔÚ¿ ÙˆÓ
‰Â‰ÔÌ¤ÓˆÓ ·˘ÙÒÓ ÂÌÊ·Ó›˙ÂÙ·È ÛÙËÓ ÔıfiÓË ÙÔ
Û¯ÂÙÈÎfi Ì‹Ó˘Ì·. √ ηٿÏÔÁÔ˜ ÙˆÓ Î·Ó·ÏÈÒÓ ÙÔ˘
‚›ÓÙÂÔ Á›ÓÂÙ·È ÙfiÙ ›‰ÈÔ˜ Ì ·˘ÙfiÓ Ù˘ ÙËÏÂfiÚ·Û˘.
∏ Ú‡ıÌÈÛË
EASY LINK
ÙÔ˘ ÌÂÓÔ‡ ∂¶π§√°∂™
Ú¤ÂÈ Ó· ‚Ú›ÛÎÂÙ·È ÛÙË ı¤ÛË §∂π∆√Àƒ°π∞
(·˘ÙfiÌ·ÙË ÂÈÏÔÁ‹-default), ‚Ï. ÛÂÏ›‰· 9.
§§ÂÂÈÈÙÙÔÔ˘˘ÚÚÁÁ››··
EasyLink
(‰И·ı¤ЫИМФ ·ФОПВИЫЩИО¿ ЫВ ФЪИЫМ¤УВ˜ ВО‰fiЫВИ˜)
Page 71

7
ÃÃÂÂÈÈÚÚÔÔÎΛ›ÓÓËËÙÙËË ÌÌÓÓ‹‹ÌÌËË
ŸŸÓÓÔÔÌÌ·· ÚÚÔÔÁÁÚÚ¿¿ÌÌÌÌ··ÙÙÔÔ˜˜
∆Ô ÌÂÓÔ‡ ·˘Ùfi Û·˜ ÂÈÙÚ¤ÂÈ Ó· ·ÔıË·ÂÙÂ
Ù· ÚÔÁÚ¿ÌÌ·Ù· ¤Ó·-¤Ó·.
& ¶È¤ÛÙ ÙÔ Ï‹ÎÙÚÔ H.
é ∂ÈϤÍÙ ƒÀ£ªπ™∏ (Ï) Î·È È¤ÛÙ ÙÔ
Ï‹ÎÙÚÔ
¬. ™ÙËÓ ÔıfiÓË ÂÌÊ·Ó›˙ÂÙ·È ÙÔ
ÌÂÓÔ‡ ƒÀ£ªπ™∏.
“ ∂ÈϤÍÙ Ã∂πƒ. ª¡∏ª∏ (Ï) Î·È È¤ÛÙ ÙÔ
Ï‹ÎÙÚÔ
¬. ∂ÌÊ·Ó›˙ÂÙ·È ÙÔ ÌÂÓÔ‡ :
‘ ¶È¤ÛÙ ÙÔ Ï‹ÎÙÚÔ ¬ ÁÈ· Ó· ̛٠ÛÙÔ
МВУФ‡ ™А™∆∏ª∞. ГЪЛЫИМФФИ‹ЫЩВ Щ·
П‹ОЩЪ·
îÏ ÁÈ· Ó· ÂÈϤÍÂÙ EUROPE
(·˘ÙfiÌ·ÙË ·Ó·˙‹ÙËÛË*) ‹ ·Ó·˙‹ÙËÛË Ì ÙÔ
¯¤ÚÈ Ì ٷ: WEST EUR (ÚfiÙ˘Ô BG), EAST
EUR (ÚfiÙ˘Ô DK), UK (ÚfiÙ˘Ô I) ‹
FRANCE (ÚfiÙ˘Ô LL’). ™ÙË Û˘Ó¤¯ÂÈ· ȤÛÙÂ
ÙÔ Ï‹ÎÙÚÔ K ÁÈ· Ó· ‚Á›Ù ·fi ÙÔ ÌÂÓÔ‡.
* ∂ÎÙfi˜ ·fi ÙË °·ÏÏ›· (ÚfiÙ˘Ô LL’), ÂÈϤÍÙÂ
ÙËÓ ÂÈÏÔÁ‹
FRANCE.
( EÈϤÍÙ ANAZHTH™H Î·È È¤ÛÙ ÙÔ Ï‹ÎÙÚÔ
¬. TfiÙ ·Ú¯›˙ÂÈ Ë ·Ó·˙‹ÙËÛË. MfiÏȘ ‚ÚÂı›
οÔÈÔ ÚfiÁÚ·ÌÌ·, ÛÙ·Ì·Ù¿ Ë ·Ó·˙‹ÙËÛË.
BϤ ÎÂÊ¿Ï·ÈÔ
è. AÓ ÁÓˆÚ›˙ÂÙÂ ÙË
Ы˘¯УfiЩЛЩ· ЩФ˘ О·У·ПИФ‡ Ф˘ ı¤ПВЩВ,
ПЛОЩЪФПФБ‹ЫЩВ ЩФУ ·ЪИıМfi ·˘ЩfiУ О·ЩВ˘ıВ›·У
¯ЪЛЫИМФФИТУЩ·˜ Щ· П‹ОЩЪ·
09.
AÓ ‰ÂÓ ‚ÚÂı› ηӤӷ ÚfiÁÚ·ÌÌ·, ‚Ϥ ÙȘ
™˘Ì‚Ô˘Ï¤˜ (ÛÂÏ. 16).
§ AУ Л П‹„Л ‰ВУ В›У·И ИО·УФФИЛЩИО‹, ВИП¤НЩВ
MIKPO™YNTON. (ÛÙÔ Î¿Ùˆ ̤ÚÔ˜ Ù˘
ÔıfiÓ˘) Î·È ÎÚ·Ù‹ÛÙ ·ÙË̤ÓÔ ÙÔ Ï‹ÎÙÚÔ
È ‹ ¬.
è EÈϤÍÙ ÙÔ API£M. ¶PO°P. ηÈ
¯ЪЛЫИМФФИ‹ЫЩВ Щ· П‹ОЩЪ·
È ‹ ¬, ‹ Ù·
Ï‹ÎÙÚ·
0 ˆ˜ 9 БИ· У· ПЛОЩЪФПФБ‹ЫВЩВ
ÙÔÓ ÂÈı˘ÌËÙfi ·ÚÈıÌfi.
! EÈϤÍÙ A¶O£HKEY™H Î·È È¤ÛÙ ÙÔ
Ï‹ÎÙÚÔ
¬. ™ÙËÓ ÔıfiÓË ÂÌÊ·Ó›˙ÂÙ·È ÁÈ· Ï›ÁÔ
ÙÔ Ì‹Ó˘Ì· A¶O£HKEYTHKE. TÔ ÚfiÁÚ·ÌÌ·
¤¯ÂÈ ·ÔıË΢ٛ ÛÙË ÌÓ‹ÌË.
µП. В›ЫЛ˜: ПВИЩФ˘ЪБ›·
EasyLink
, ÛÂÏ›‰· 6.
ç E·Ó·Ï¿‚ÂÙ ÙȘ ‰È·‰Èηۛ˜ ( ˆ˜ ! ÁÈ·
οı ÚfiÁÚ·ÌÌ· Ô˘ ı¤ÏÂÙ ӷ
·ÔıË·ÛÂÙÂ.
°°ÈÈ·· ÓÓ·· ‚‚ÁÁ››ÙÙÂÂ::
ȤÛÙ ÙÔ Ï‹ÎÙÚÔ
d.
∞У ı¤ПВЩВ, МФЪВ›ЩВ У· ‰ТЫВЩВ ¤У· fiУФМ· ЫЩ·
40 ЪТЩ· ЪФБЪ¿ММ·Щ· (·fi 1 ˆ˜ 40).
& ¶È¤ÛÙ ÙÔ Ï‹ÎÙÚÔ H.
é
EÈϤÍÙ ƒÀ£ªπ™∏ (Ï) Î·È È¤ÛÙ ÙÔ Ï‹ÎÙÚÔ
¬. ™ÙËÓ ÔıfiÓË ÂÌÊ·Ó›˙ÂÙ·È ÙÔ ÌÂÓÔ‡
ƒÀ£ªπ™∏.
“ ¶È¤ÛÙ 5 ÊÔÚ¤˜ ÙÔ Ï‹ÎÙÚÔ Ï ÁÈ· Ó·
ÂÈϤÍÂÙ ÙÔ √¡√ª∞ (Ô˘ ÎÚ‡‚ÂÙ·È ÛÙÔ
οو ̤ÚÔ˜ Ù˘ ÔıfiÓ˘) Î·È Î·ÙfiÈÓ È¤ÛÙÂ
ÙÔ Ï‹ÎÙÚÔ
¬. ™ÙËÓ ÔıfiÓË ÂÌÊ·Ó›˙ÂÙ·È ÙÔ
ÌÂÓÔ‡ :
‘ ∂ÈϤÍÙ ÙÔ ÚfiÁÚ·ÌÌ· Ô˘ ı¤ÏÂÙ ӷ
ФУФМ¿ЫВЩВ ¯ЪЛЫИМФФИТУЩ·˜ Щ· П‹ОЩЪ·
09‹ @ P #.
™ЛМВ›ˆЫЛ: О·Щ¿ ЩЛУ ВБО·Щ¿ЫЩ·ЫЛ, Щ·
ЪФБЪ¿ММ·Щ· ФУФМ¿˙ФУЩ·И ·˘ЩfiМ·Щ· МВ ЩЛУ
ВОФМ‹ ЩФ˘ Ы‹М·ЩФ˜ ·У·БУТЪИЫЛ˜.
( ГЪЛЫИМФФИ‹ЫЩВ Щ· П‹ОЩЪ· Ȭ ÁÈ· Ó·
ÌÂÙ·ÎÈÓËı›Ù ÛÙË ˙ÒÓË ÂÌÊ¿ÓÈÛ˘ ÙÔ˘
ÔÓfiÌ·ÙÔ˜ (5 ¯·Ú·ÎÙ‹Ú˜).
§ ГЪЛЫИМФФИ‹ЫЩВ Щ· П‹ОЩЪ· îÏ ÁÈ· Ó·
ÂÈϤÍÂÙ ÙÔ˘˜ ¯·Ú·ÎÙ‹Ú˜.
è ¶È¤ÛÙ ÙÔ Ï‹ÎÙÚÔ H fiЩ·У ПЛОЩЪФПФБ‹ЫВЩВ
ÙÔ fiÓÔÌ·.
∞ÔıË·ÂÙ·È ÙÔ fiÓÔÌ· ÙÔ˘ ÚÔÁÚ¿ÌÌ·ÙÔ˜.
µП. В›ЫЛ˜: ПВИЩФ˘ЪБ›·
EasyLink
, ÛÂÏ›‰· 6.
! ∂·Ó·Ï¿‚ÂÙ ٷ ÛÙ¿‰È· ‘ ˆ˜ è ÁÈ· οıÂ
ÚfiÁÚ·ÌÌ· Ô˘ ı¤ÏÂÙ ӷ ÔÓÔÌ¿ÛÂÙÂ.
ç °È· Ó· ‚Á›Ù ·fi Ù· ÌÂÓÔ‡, ȤÛÙ ÙÔ
Ï‹ÎÙÚÔ
d.
• EIKONA
• HXO∏
• XAPAK/PI∏TIKA
• PYıMI∏H.
PYıMI∏H
XEIP. MNHMH
• ∏∫∏THMA
• ANAZHTH∏H
• APIıM. ∂PO°P.
• MIKPO∏∫NTON.
• A∂µ£HKEY∏H
EUROPE
WEST EUR
EAST EUR
UK
FRANCE
PYıMI∏H
• °§fl™™A
• XflPA
• AY TOM. MNHMH
• XEIP. MNHMH
• TA•INOMH∏H
• ONOMA
CNN_
Page 72

8
ÃÃÚÚ‹‹ÛÛËË ÙÙÔÔ˘˘ ÚÚ··‰‰ÈÈÔÔÊÊÒÒÓÓÔÔ˘˘
ÃÃÚÚ‹‹ÛÛËË ÛÛ ÏÏÂÂÈÈÙÙÔÔ˘˘ÚÚÁÁ››·· ÔÔııfifiÓÓˢ˜ PPCC
∂∂ÈÈÏÏÔÔÁÁ‹‹ ÏÏÂÂÈÈÙÙÔÔ˘˘ÚÚÁÁ››··˜˜ ÙÙÔÔ˘˘ ÚÚ··‰‰ÈÈÔÔÊÊÒÒÓÓÔÔ˘˘
¶È¤ÛÙ ÙÔ Ï‹ÎÙÚÔ Z ЫЩФ ЩЛПВ¯ВИЪИЫЩ‹ЪИФ БИ· У·
ı¤ЫВЩВ ЩЛУ ЩЛПВfiЪ·ЫЛ ЫВ ПВИЩФ˘ЪБ›· Ъ·‰ИФКТУФ˘.
¶И¤ЫЩВ ЩФ П‹ОЩЪФ
X ÁÈ· Ó· ÂÈÛÙÚ¤„ÂÙ ÛÙË
ПВИЩФ˘ЪБ›· ЩЛ˜ ЩЛПВfiЪ·ЫЛ˜. ™ЩЛ ПВИЩФ˘ЪБ›· ЩФ˘
Ъ·‰ИФКТУФ˘, ЩФ fiУФМ· ЩФ˘ ЫЩ·ıМФ‡ (В¿У
‰И·Щ›ıВЩ·И), Л Ы˘¯УfiЩЛЩ¿ ЩФ˘ О·И Ф ЩЪfiФ˜
ПВИЩФ˘ЪБ›·˜ ЩФ˘ ВМК·У›˙ФУЩ·И ЫЩЛУ ФıfiУЛ.
°И· У· О·Щ·¯ˆЪ‹ЫВЩВ Щ· ФУfiМ·Щ· ЩˆУ ЫЩ·ıМТУ
¯ЪЛЫИМФФИ‹ЫЩВ ЩФ МВУФ‡
√¡√ª∞
(Û. 7)
∂∂ÈÈÏÏÔÔÁÁ‹‹ ÚÚÔÔÁÁÚÚ··ÌÌÌÌ¿¿ÙÙˆˆÓÓ
ГЪЛЫИМФФИ‹ЫЩВ Щ· П‹ОЩЪ· 09‹ @ P # ÁÈ·
Ó· ÂÈϤÍÂÙ ÙÔ˘˜ ÛÙ·ıÌÔ‡˜ ÙˆÓ FM (·fi 1 ¤ˆ˜ 40).
∫∫··ÙÙ¿¿ÏÏÔÔÁÁÔÔ˜˜ ÚÚ··‰‰ÈÈÔÔÊʈˆÓÓÈÈÎÎÒÒÓÓ ÛÛÙÙ··ııÌÌÒÒÓÓ
¶И¤ЫЩВ ЩФ П‹ОЩЪФ ıБ· У· ВМК·У›ЫВЩВ
/·ФОЪ‡„ВЩВ ЩФУ О·Щ¿ПФБФ ЩˆУ Ъ·‰ИФКˆУИОТУ
ЫЩ·ıМТУ. ™ЩЛ Ы˘У¤¯ВИ· ¯ЪЛЫИМФФИ‹ЫЩВ ЩФУ
О¤ЪЫФЪ· БИ· У· ВИП¤НВЩВ О¿ФИФУ ЫЩ·ıМfi.
ÃÃÚÚ‹‹ÛÛËË ÙÙˆˆÓÓ ÚÚ··‰‰ÈÈÔÔÊʈˆÓÓÈÈÎÎÒÒÓÓ ÌÌÂÂÓÓÔÔ‡‡
ГЪЛЫИМФФИ‹ЫЩВ ЩФ П‹ОЩЪФ H ÁÈ· Ó·
·ФОЩ‹ЫВЩВ ЪfiЫ‚·ЫЛ ЫЩИ˜ ВИ‰ИО¤˜ Ъ˘ıМ›ЫВИ˜ ЩФ˘
Ъ·‰ИФКТУФ˘.
∞∞ÓÓ··˙˙‹‹ÙÙËËÛÛËË ÚÚ··‰‰ÈÈÔÔÊʈˆÓÓÈÈÎÎÒÒÓÓ ÛÛÙÙ··ııÌÌÒÒÓÓ
∂¿У ¤¯ВЩВ ¯ЪЛЫИМФФИ‹ЫВИ ЩЛ БЪ‹БФЪЛ
ВБО·Щ¿ЫЩ·ЫЛ, fiПФИ ФИ ‰И·ı¤ЫИМФИ ЫЩ·ıМФ› ЩˆУ FM
ı· ¤¯Ф˘У ·ФıЛОВ˘ЩВ› ЫЩЛ МУ‹МЛ. °И· У· ·Ъ¯›ЫВЩВ
М›· У¤· ·У·˙‹ЩЛЫЛ, ¯ЪЛЫИМФФИ‹ЫЩВ ЩФ МВУФ‡
ƒÀ£ªπ™∏: ∞À∆√ª. ª¡∏ª∏ (Á· Ï‹ÚË ·Ó·˙‹ÙËÛË)
‹
Ã∂πƒ. ª¡∏ª∏ (ÁÈ· ·Ó·˙‹ÙËÛË ·Ó¿ ÛÙ·ıÌfi). ∆·
ÌÂÓÔ‡
∆∞•π¡√ª∏™∏ Î·È √¡√ª∞ Û·˜ ÂÈÙÚ¤Ô˘Ó
У· Щ·НИУФМ‹ЫВЩВ ‹ У· ФУФМ¿ЫВЩВ ЩФ˘˜
Ъ·‰ИФКˆУИОФ‡˜ ЫЩ·ıМФ‡˜. ∏ ПВИЩФ˘ЪБ›· ·˘ЩТУ ЩˆУ
МВУФ‡ В›У·И ›‰И· МВ ·˘Щ‹ ЩˆУ МВУФ‡ TV.
∂∂ÍÍÔÔÈÈÎÎÔÔÓÓfifiÌÌËËÛÛËË ÂÂÓÓ¤¤ÚÚÁÁÂÂÈÈ··˜˜ ÙÙˢ˜ ÔÔııfifiÓÓˢ˜
∞fi ÙÔ ÌÂÓÔ‡
Ã∞ƒ∞∫/ƒπ™∆π∫∞
МФЪВ›ЩВ У·
ВУВЪБФФИ‹ЫВЩВ/ ·ВУВЪБФФИ‹ЫВЩВ ЩЛУ
ВНФИОФУfiМЛЫЛ ФıfiУЛ˜. ∏ ТЪ·, Л Ы˘¯УfiЩЛЩ· ЩФ˘
ЫЩ·ıМФ‡ О·И Л ФУФМ·Ы›· ЩФ˘ (В¿У ‰И·Щ›ıВЩ·И)
ВЪУФ‡У ·fi ЩЛУ ФıfiУЛ.
§§ÂÂÈÈÙÙÔÔ˘˘ÚÚÁÁ››·· PPCC
∏ ЩЛПВfiЪ·Ы‹ Ы·˜ МФЪВ› У· ¯ЪЛЫИМФФИЛıВ› Ы·У
ФıfiУЛ ЛПВОЩЪФУИОФ‡ ˘ФПФБИЫЩ‹. ∏ ПВИЩФ˘ЪБ›· PIP
Ы·˜ ВИЩЪ¤ВИ У· ВМК·У›ЫВЩВ Щ·˘Щfi¯ЪФУ· МИ· ¤УıВЩЛ
ФıfiУЛ БИ· У· ‚П¤ВЩВ Щ· ЩЛПВФЩИО¿ О·У¿ПИ·.
¶ЪТЩ· Ъ¤ВИ У· Ъ·БМ·ЩФФИ‹ЫВЩВ ЩИ˜ Ы˘У‰¤ЫВИ˜ ЩФ˘
˘ФПФБИЫЩ‹ О·И У· Ъ˘ıМ›ЫВЩВ ЩЛУ ·У¿П˘ЫЛ (‰В›ЩВ ЩЛ Ы.15).
∂∂ÈÈÏÏÔÔÁÁ‹‹ ÏÏÂÂÈÈÙÙÔÔ˘˘ÚÚÁÁ››··˜˜ PPCC
¶И¤ЫЩВ ЩФ П‹ОЩЪФVЩФ˘ ЩЛПВ¯ВИЪИЫЩЛЪ›Ф˘ БИ· У· ı¤ЫВЩВ
ЩЛУ ЩЛПВfiЪ·ЫЛ ЫВ ПВИЩФ˘ЪБ›· PC. ¶И¤ЫЩВ ЩФ П‹ОЩЪФ
X
БИ· У· ВИЫЩЪ¤„ВЩВ ЫЩЛ ПВИЩФ˘ЪБ›· ЩЛПВfiЪ·ЫЛ˜.
™В ВЪ›ЩˆЫЛ Ф˘ ‰ВУ ˘¿ЪНВИ Ы‹М· PC БИ·
‰И¿ЫЩЛМ· ¿Уˆ ЩˆУ 5 ‰В˘ЩВЪФП¤ЩˆУ, Л ЩЛПВfiЪ·ЫЛ
ВЪУ¿ВИ ·˘ЩfiМ·Щ· ЫВ О·Щ¿ЫЩ·ЫЛ ·У·МФУ‹˜.
ÃÃÚÚ‹‹ÛÛËË ÙÙˢ˜ ÏÏÂÂÈÈÙÙÔÔ˘˘ÚÚÁÁ››··˜˜ PPIIPP
™ЩЛ ПВИЩФ˘ЪБ›· PC, МФЪВ›ЩВ У· ВМК·У›ЫВЩВ ¤У·
·Ъ¿ı˘ЪФ БИ· У· ‚П¤ВЩВ Щ· ЩЛПВФЩИО¿ О·У¿ПИ·.
&¶È¤ÛÙ ÙÔ Ï‹ÎÙÚÔ
œ ÁÈ· Ó· ÂÌÊ·Ó›ÛÂÙ ÙËÓ
ÔıfiÓË PIP. ∏ ÂÈÎfiÓ· Ù˘ ÙËÏÂfiÚ·Û˘ ·Ó··Ú¿ÁÂÙ·È
̤۷ Û ¤Ó· ÌÈÎÚfi ¤ÓıÂÙÔ ·Ú¿ı˘ÚÔ.
é¶È¤ÛÙ ͷӿ ÙÔ Ï‹ÎÙÚÔ
œ ÁÈ· Ó·
ÂÏ·¯ÈÛÙÔÔÈ‹ÛÂÙ ÙÔ Ì¤ÁÂıÔ˜ ÙÔ˘ ·Ú·ı‡ÚÔ˘ ηÈ
Ó· ÙÔ ·ÔÎÚ‡„ÂÙÂ.
“ГЪЛЫИМФФИ‹ЫЩВ ЩФ П‹ОЩЪФ π Â¿Ó ÂÈı˘Ì›Ù ӷ
ÌÂÙ·ÎÈÓ‹ÛÂÙ ÙÔ ·Ú¿ı˘ÚÔ. ªÔÚ›Ù ›Û˘ Ó· ÙÔ
МВЩ·ОИУ‹ЫВЩВ ЪФФ‰В˘ЩИО¿ ¯ЪЛЫИМФФИТУЩ·˜ ЩФУ О¤ЪЫФЪ·.
‘ГЪЛЫИМФФИ‹ЫЩВ Щ· П‹ОЩЪ· 09‹ @ P # ÁÈ·
Ó· ·ÏÏ¿ÍÂÙ ٷ ÚÔÁÚ¿ÌÌ·Ù· Ù˘ ÔıfiÓ˘ PIP ‹ ÙÔ
Ï‹ÎÙÚÔ
n Â¿Ó ÂÈı˘Ì›Ù ӷ ÂÌÊ·Ó›ÛÂÙ ÙËÓ
ÂÈÎfiÓ· ÌÈ·˜ Û˘Û΢‹˜ Ô˘ ¤¯ÂÙÂ Û˘Ó‰¤ÛÂÈ ÛÙËÓ
ÙËÏÂfiÚ·ÛË (‚›ÓÙÂÔ, DVD, ...).
ÃÃÚÚ‹‹ÛÛËË ÙÙˆˆÓÓ ÌÌÂÂÓÓÔÔ‡‡ PPCC
¶È¤ÛÙ ÙÔ Ï‹ÎÙÚÔ H БИ· У· ·ФОЩ‹ЫВЩВ
ЪfiЫ‚·ЫЛ ЫЩИ˜ ВИ‰ИО¤˜ Ъ˘ıМ›ЫВИ˜ О·Щ¿ ЩЛ
ПВИЩФ˘ЪБ›· ФıfiУЛ˜ PC. ГЪЛЫИМФФИ‹ЫЩВ ЩФУ
О¤ЪЫФЪ· БИ· У· Ъ·БМ·ЩФФИ‹ЫВЩВ ЩИ˜ Ъ˘ıМ›ЫВИ˜ (ФИ
Ъ˘ıМ›ЫВИ˜ ·ФıЛОВ‡ФУЩ·И ·˘ЩfiМ·Щ· ЫЩЛ МУ‹МЛ) :
ñ
AUDIO SELECTION: ÁÈ· Ó· ÂÈϤÍÂÙ ÙÔÓ ‹¯Ô Ô˘
·У··Ъ¿БВЩ·И ЫЩЛУ ЩЛПВfiЪ·ЫЛ (PC ‹ TV / Radio).
ªФЪВ›ЩВ, БИ· ·Ъ¿‰ВИБМ·, У· ·ОФ‡ЩВ Ъ·‰ИfiКˆУФ
ВУТ ¯ЪЛЫИМФФИВ›ЩВ ЩФУ ˘ФПФБИЫЩ‹.
¶·Ъ·Щ‹ЪЛЫЛ : Ъ¤ВИ У· ВИП¤НВЩВ ЩЛ ПВИЩФ˘ЪБ›· TV ‹ Ъ¿‰ИФ
ЪФЩФ‡ ВЪ¿ЫВЩВ ЫЩЛ ПВИЩФ˘ЪБ›· PC. √Щ·У ВМК·У›˙ВЩ·И
Л ФıfiУЛ PIP, ‰ВУ МФЪВ›ЩВ У· ·ОФ‡ЩВ Ъ·‰ИfiКˆУФ.
ñ
BRIGHTNESS / CONTRAST: ÁÈ· Ó· Ú˘ıÌ›ÛÂÙ ÙË
ʈÙÂÈÓfiÙËÙ· Î·È ÙËÓ ·ÓÙ›ıÂÛË.
ñ ADJUST COLOUR : ÁÈ· Ó· Ú˘ıÌ›ÛÂÙ ÙËÓ ·fi¯ÚˆÛË
ЩˆУ ¯ЪˆМ¿ЩˆУ („˘¯Ъfi, О·УФУИОfi ‹ ıВЪМfi).
ñ VIDEO NOISE: ÂÈÙÚ¤ÂÈ ÙËÓ ÂÍ¿ÏÂÈ„Ë ÙˆÓ ÔÚÈ˙fiÓÙȈÓ
(PHASE) О·И О¿ıВЩˆУ (CLOCK) ·Ъ·ЫИЩИОТУ БЪ·ММТУ.
ñ ADJUST POSITION : ÁÈ· Ó· Ú˘ıÌ›ÛÂÙ ÙËÓ ÔÚÈ˙fiÓÙÈ·
Î·È Î¿ıÂÙË ı¤ÛË Ù˘ ÂÈÎfiÓ·˜.
ñ
AUTO ADJUST : Ë ı¤ÛË Ú˘ıÌ›˙ÂÙ·È ·˘ÙfiÌ·Ù·.
ñ
PIP CONTROLS : ÁÈ· Ó· Ú˘ıÌ›ÛÂÙ ÙÔ Ì¤ÁÂıÔ˜ Î·È ÙË
ı¤ÛË Ù˘ ÔıfiÓ˘ PIP.
ñ
MODE SELECT : Б· У· ВИЫЩЪ¤„ВЩВ ЫЩЛ ПВИЩФ˘ЪБ›·
TV ‹ Ú¿‰ÈÔ.
ñ RESET TO FACTORY SETTING : ÁÈ· Ó· ÂÈÛÙÚ¤„ÂÙ ÛÙȘ
ВЪБФЫЩ·ЫИ·О¤˜ Ъ˘ıМ›ЫВИ˜ (ЪФВИПВБМ¤УВ˜ Ъ˘ıМ›ЫВИ˜).
ñ VIEW FORMAT : ÁÈ· Ó· ÂÈϤÍÂÙ ·Ó¿ÌÂÛ· ÛÙË ÌÂÁ¿ÏË
ФıfiУЛ ‹ ЫЩЛУ ·˘ıВУЩИО‹ МФЪК‹ ЩˆУ ФıФУТУ PC.
Page 73

ƒƒ‡‡ııÌÌÈÈÛÛËË ÂÂÈÈÎÎfifiÓÓ··˜˜
ƒƒ˘˘ııÌÌ››ÛÛÂÂÈȘ˜ ‹‹¯¯ÔÔ˘˘
&
¶È¤ÛÙ ÙÔ Ï‹ÎÙÚÔ H Î·È Î·ÙfiÈÓ ÙÔ Ï‹ÎÙÚÔ ¬.
™ÙËÓ ÔıfiÓË ÂÌÊ·Ó›˙ÂÙ·È ÙÔ ÌÂÓÔ‡ ∂π∫√¡∞ :
é ГЪЛЫИМФФИ‹ЫЩВ Щ· П‹ОЩЪ· îÏ ÁÈ· Ó·
ÂÈϤÍÂÙ ÌÈ· Ú‡ıÌÈÛË Î·È Ù· Ï‹ÎÙÚ·
Ȭ
ÁÈ· Ó· οÓÂÙ ÙË Ú‡ıÌÈÛË.
™ËÌ›ˆÛË: ÚfiÎÂÈÙ·È ÁÈ· ΢ÏÈfiÌÂÓÔ ÌÂÓÔ‡.
∫Ú·Ù‹ÛÙ ·ÙË̤ÓÔ ÙÔ Ï‹ÎÙÚÔ
Ï
ÁÈ· Ó·
¤¯ÂÙ ÚfiÛ‚·ÛË ÛÙȘ Ú˘ıÌ›ÛÂȘ Ô˘ ÎÚ‡‚ÔÓÙ·È
ÛÙÔ Î¿Ùˆ ̤ÚÔ˜ Ù˘ ÔıfiÓ˘.
“ ªfiÏȘ οÓÂÙ ÙȘ Ú˘ıÌ›ÛÂȘ, ÂÈϤÍÙ ÙËÓ
ÂÈÏÔÁ‹
∞¶√£∏∫∂À™∏
Î·È ·Ù‹ÛÙ ÙÔ
Ï‹ÎÙÚÔ
¬ ÁÈ· Ó· ÙȘ ·ÔıË·ÛÂÙÂ.
‘ °È· Ó· ‚Á›Ù ·fi Ù· ÌÂÓÔ‡, ·Ù‹ÛÙ ÙÔ
Ï‹ÎÙÚÔ
d.
¶¶ÂÂÚÚÈÈÁÁÚÚ··ÊÊ‹‹ ÙÙˆˆÓÓ ÚÚ˘˘ııÌÌ››ÛÛˆˆÓÓ::
ñ
ºø∆∂π¡√∆∏∆∞: ÂËÚ¿˙ÂÈ ÙË ÊˆÙÂÈÓfiÙËÙ· Ù˘
ÂÈÎfiÓ·˜.
ñ
Ãøª∞: ÂËÚ¿˙ÂÈ ÙËÓ ¤ÓÙ·ÛË ÙˆÓ ¯ÚˆÌ¿ÙˆÓ.
ñ
∞¡∆π£∂™∏: ÂËÚ¿˙ÂÈ ÙË ‰È·ÊÔÚ¿ ÌÂٷ͇ ÙˆÓ
·ÓÔȯÙÒÓ Î·È ÙˆÓ ÛÎÔ‡ÚˆÓ ¯ÚˆÌ¿ÙˆÓ.
ñ
∂À∫ƒπ¡∂π∞: ÂËÚ¿˙ÂÈ ÙËÓ Î·ı·ÚfiÙËÙ· Ù˘ ÂÈÎfiÓ·˜.
ñ
∞¶√£∏∫∂À™∏
: ÁÈ· ÙËÓ ·Ôı‹Î¢ÛË ÙˆÓ
Ú˘ıÌ›ÛÂˆÓ Ù˘ ÂÈÎfiÓ·˜.
ñ
£EPM/™IA XPøMATO™ (ıВЪМФОЪ·Ы›· ¯ЪТМ·ЩФ˜):
Ú˘ıÌ›˙ÂÈ ÙËÓ ·fi‰ÔÛË ÙˆÓ ¯ÚˆÌ¿ÙˆÓ. Œ¯ÂÙ 3
‰˘Ó·ÙfiÙËÙ˜: æYXPO (ÈÔ ÌÏÂ), KANONIKO
(ИЫФЪЪФЛМ¤УФ) ‹ ZE™TO (ИФ ОfiООИУФ).
ñ ∞¡∆π£∂™∏ +: °И· У· ВУВЪБФФИ‹ЫВЩВ /
·ВУВЪБФФИ‹ЫВЩВ Щ· О˘ОПТМ·Щ· ·˘ЩfiМ·ЩЛ˜
Ъ‡ıМИЫЛ˜ ЩЛ˜ ·УЩ›ıВЫЛ˜ ЩЛ˜ ВИОfiУ·˜
(В·У·К¤ЪВИ Ы˘УВ¯Т˜ ЩФ ИФ ЫОФ‡ЪФ ЩМ‹М· ЩЛ˜
ВИОfiУ·˜ ЫЩФ М·‡ЪФ).
&
¶È¤ÛÙ ÙÔ Ï‹ÎÙÚÔ H, ÂÈϤÍÙÂ
∏Ã√™
(Ï) ηÈ
ȤÛÙ ÙÔ Ï‹ÎÙÚÔ
¬
. ™ÙËÓ ÔıfiÓË ÂÌÊ·Ó›˙ÂÙ·È
ÙÔ ÌÂÓÔ‡
∏Ã√™
:
é
ГЪЛЫИМФФИ‹ЫЩВ Щ· П‹ОЩЪ·
îÏ
ÁÈ· Ó·
ÂÈϤÍÂÙ ÌÈ· Ú‡ıÌÈÛË Î·È Ù· Ï‹ÎÙÚ·
Ȭ
ÁÈ·
Ó· οÓÂÙ ÙË Ú‡ıÌÈÛË.
“
ŸÙ·Ó ÚԂ›Ù ÛÙȘ Ú˘ıÌ›ÛÂȘ, ÂÈϤÍÙ ÙËÓ
ÂÈÏÔÁ‹
∞¶√£∏∫∂À™∏
Î·È È¤ÛÙ ÙÔ Ï‹ÎÙÚÔ
¬
ÁÈ· Ó· ÙȘ ·ÔıË·ÛÂÙÂ.
‘ °È· Ó· ‚Á›Ù ·fi Ù· ÌÂÓÔ‡, ȤÛÙ ÙÔ Ï‹ÎÙÚÔ d.
¶¶ÂÂÚÚÈÈÁÁÚÚ··ÊÊ‹‹ ÙÙˆˆÓÓ ÚÚ˘˘ııÌÌ››ÛÛˆˆÓÓ::
ñ
π™√™∆∞£ªπ™∆∏™
: БИ· ЩЛ Ъ‡ıМИЫЛ ЩЛ˜
ЩФУИОfiЩЛЩ·˜ ЩФ˘ ‹¯Ф˘ (·fi ¯·МЛП¤˜ Ы˘¯УfiЩЛЩВ˜:
120 Hz ¤ˆ˜ ˘„ЛП¤˜ Ы˘¯УfiЩЛЩВ˜: 10 kHz).
ñ
π™√ƒƒ√¶π∞
: БИ· ВНИЫФЪЪfiЛЫЛ ЩФ˘ ‹¯Ф˘ ЫЩФ
‰ВН› О·И ·ЪИЫЩВЪfi МВБ¿КˆУФ.
ñ ENTA™H (‰И·КФЪ¿ ¤УЩ·ЫЛ˜): ВЪИФЪ›˙ВИ ЩЛ
‰È·ÊÔÚ¿ Ù˘ ¤ÓÙ·Û˘ Ô˘ ˘¿Ú¯ÂÈ ÛÙ· ‰È¿ÊÔÚ·
ÚÔÁÚ¿ÌÌ·Ù· ‹ ÙȘ
E•øTEPIKE™ ˘Ô‰Ô¯¤˜. H
Ъ‡ıМИЫЛ ·˘Щ‹ ПВИЩФ˘ЪБВ› БИ· Щ· ЪФБЪ¿ММ·Щ· 1 ˆ˜
40 О·И ЩИ˜
E•øTEPIKE™ ˘Ф‰Ф¯¤˜. ГЪЛЫИМФФИ‹ЫЩВ
Ù· Ï‹ÎÙÚ·
@PP# ÁÈ· Ó· ÂÈϤÍÂÙ ÙÔ Â›Â‰Ô
ÙˆÓ ‰È·ÊfiÚˆÓ ÚÔÁÚ·ÌÌ¿ÙˆÓ:
ñ
∞¶√£∏∫∂À™∏
: ÁÈ· ·Ôı‹Î¢ÛË ÙˆÓ Ú˘ı̛ۈÓ
ÙÔ˘ ‹¯Ô˘.
ñ
AVL
: ·˘ЩfiМ·ЩФ˜ ¤ПВБ¯Ф˜ ЩФ˘ ‹¯Ф˘ Ф˘ ВИЩЪ¤ВИ
ЩФУ ВЪИФЪИЫМfi ЩˆУ Н·КУИОТУ ·˘Н‹ЫВˆУ ЩФ˘
‹¯Ф˘, И‰И·›ЩВЪ· О·Щ¿ ЩЛУ ·ПП·Б‹ ЩˆУ
ЪФБЪ·ММ¿ЩˆУ ‹ ЫЩИ˜ ‰И·КЛМ›ЫВИ˜.
• EIKONA
• HXO∏
• XAPAK/PI∏TIKA
• PYıMI∏H.
EIKONA
• ºflTEINOTH∏
• XPflMA
• ANTI£E∏H
• EYKPINEIA
• A∂O£HKEY∏H
• £EMP/∏IA XPflM
• ANTI£E∏H+
--I------ 39
• EIKONA
• HXO∏
• XAPAK/PI∏TIKA
• PYıMI∏H.
HXO∏
•
II™™OO™™TTAA££MMII™™TTHH™™
•
I∏OPPO
∂IA
• ENTA∏H ÑE§TA
• A∂O£HKEY∏H
• OPIO ENTA∏H∏
120 HZ
500 HZ
1500 HZ
5 KHZ
10 KHZ
ƒƒ‡‡ııÌÌÈÈÛÛËË ÙÙˆˆÓÓ ÂÂÈÈÏÏÔÔÁÁÒÒÓÓ
& ¶È¤ÛÙ ÙÔ H, ÂÈϤÍÙÂ
Ã∞ƒ∞∫/ƒπ™∆π∫∞
(Ï)
Î·È È¤ÛÙ ÙÔ
¬. ªÔÚ›Ù ӷ οÓÂÙ ÙË
Ú‡ıÌÈÛË:
é
Ã√¡√¢/∫√¶∆∏™, ∫§∂π¢øª∞ ¶∞π¢, ∫§∂π¢øª∞
TV
::
µÏ¤Â ÂfiÌÂÓË ÛÂÏ›‰·.
“ E¶I§O°H §EIT.: ÁÈ· Ó· ı¤ÛÂÙÂ ÙËÓ ÙËÏÂfiÚ·ÛË
ЫВ ПВИЩФ˘ЪБ›· Ъ·‰ИФКТУФ˘, TV ‹ PC.
‘ EASYLINK (‰И·ı¤ЫИМФ ·ФОПВИЫЩИО¿ ЫВ
ФЪИЫМ¤УВ˜ ВО‰fiЫВИ˜) : ∞У Л ЩЛПВfiЪ·ЫЛ В›У·И
Ы˘У‰В‰ВМ¤УЛ (·fi ЩЛУ ˘Ф‰Ф¯‹ EXT2) ЫВ
Ы˘ЫОВ˘‹ ‚›УЩВФ Ф˘ У· ‰И·ı¤ЩВИ ЩЛ ПВИЩФ˘ЪБ›·
EasyLink, Л БПТЫЫ·, Л ¯ТЪ· О·И Щ· О·У¿ПИ·
Ф˘ ‚Ъ›ЫОФУЩ·И О·Щ¿ ЩЛУ ·У·˙‹ЩЛЫЛ
МВЩ·‚И‚¿˙ФУЩ·И ·˘ЩfiМ·Щ· ЫЩФ ‚›УЩВФ МВ ЩЛУ
ВБО·Щ¿ЫЩ·ЫЛ. ∞У ЩФ ‚›УЩВfi Ы·˜ ‰ВУ ‰И·ı¤ЩВИ
·˘Щ‹ ЩЛ ПВИЩФ˘ЪБ›·, Ъ˘ıМ›ЫЩВ ЫЩЛ ı¤ЫЛ
¢π∞∫√¶∏ (OFF).
( °È· Ó· ÂÁηٷÏ›„ÂÙ ٷ ÌÂÓÔ‡, ȤÛÙ ÙÔ d.
9
Page 74

ªФЪВ›ЩВ У· ОПВИ‰ТЫВЩВ МВЪИО¿ ЪФБЪ¿ММ·Щ· ‹
У· ··БФЪВ‡ЫВЩВ ЩВПВ›ˆ˜ ЩЛ ¯Ъ‹ЫЛ ЩЛ˜
ЩЛПВfiЪ·ЫЛ˜, ОПВИ‰ТУФУЩ·˜ Щ· П‹ОЩЪ·.
∫∫ÏÏ››‰‰ˆˆÌÌ·· ÚÚÔÔÁÁÚÚ··ÌÌÌÌ¿¿ÙÙˆˆÓÓ
&
¶È¤ÛÙ ÙÔ Ï‹ÎÙÚÔ H.
é
∂ÈϤÍÙÂ
Ã∞ƒ∞∫/ƒπ™∆π∫∞
(Ï) Î·È È¤ÛÙ ÙÔ
Ï‹ÎÙÚÔ
¬
.
“
∂ÈϤÍÙÂ
∫§∂π¢øª∞ ¶∞π¢.
(Ï) Î·È È¤ÛÙ ÙÔ
Ï‹ÎÙÚÔ
¬
.
‘
¶Ъ¤ВИ У· ПЛОЩЪФПФБ‹ЫВЩВ ЩФУ ЪФЫˆИОfi
Оˆ‰ИОfi ЪfiЫ‚·ЫЛ˜. ∆ЛУ ЪТЩЛ КФЪ¿,
ПЛОЩЪФПФБ‹ЫЩВ 2 КФЪ¤˜ ЩФУ Оˆ‰ИОfi 0711. ™ЩЛУ
ФıfiУЛ ı· ВМК·УИЫЩВ› ЩФ МВУФ‡.
(
¶È¤ÛÙ ÙÔ Ï‹ÎÙÚÔ ¬ÁÈ· Ó· ̛٠ÛÙÔ ÌÂÓÔ‡.
§
ГЪЛЫИМФФИ‹ЫЩВ Щ· П‹ОЩЪ·
îÏ
БИ· У·
ВИП¤НВЩВ ЩФ ЪfiБЪ·ММ· Ф˘ ı¤ПВЩВ, О·И
ВИ‚В‚·ИТЫЩВ И¤˙ФУЩ·˜ ЩФ П‹ОЩЪФ
¬
. ∆Ô
ۇ̂ÔÏÔ
+
ÂÌÊ·Ó›˙ÂÙ·È ÌÚÔÛÙ¿ ·fi Ù·
ÚÔÁÚ¿ÌÌ·Ù· ‹ Ù· ‚‡ÛÌ·Ù· Ô˘ ¤¯Ô˘Ó ÎÏÂȉˆı›.
è
¶И¤ЫЩВ ЩФ П‹ОЩЪФ dБИ· У· ‚БВ›ЩВ.
™ЩФ ВН‹˜, БИ· У· К¤ЪВЩВ ЫЩЛУ ФıfiУЛ ¤У·
ОПВИ‰ˆМ¤УФ ЪfiБЪ·ММ·, Ъ¤ВИ У· ПЛОЩЪФПФБВ›ЩВ
ЩФУ ЪФЫˆИОfi Ы·˜ Оˆ‰ИОfi, ‰И·КФЪВЩИО¿ Л ФıfiУЛ
ı· ·Ъ·М¤УВИ М·‡ЪЛ.
¶ЪФЫФ¯‹, ЫЩЛУ ВЪ›ЩˆЫЛ ЩˆУ
ОЪ˘ЩФБЪ·КЛМ¤УˆУ ЪФБЪ·ММ¿ЩˆУ Ф˘
¯ЪЛЫИМФФИФ‡У ВНˆЩВЪИОfi ·ФОˆ‰ИОФФИЛЩ‹,
Ъ¤ВИ У· ОПВИ‰ТЫВЩВ ЩФ ·УЩ›ЫЩФИ¯Ф ‚‡ЫМ·
EXT
.
°°ÈÈ·· ÓÓ·· ÍÍÂÂÎÎÏÏÂÂÈȉ‰ÒÒÛÛÂÂÙÙ fifiÏÏ·· ÙÙ·· ÚÚÔÔÁÁÚÚ¿¿ÌÌÌÌ··ÙÙ··::
∂·Ó·Ï¿‚ÂÙ ٷ ÛÙ¿‰È· &ˆ˜ ‘Î·È ÛÙË Û˘Ó¤¯ÂÈ·
ÂÈϤÍÙÂ
¢π∞°ƒ∞º∏ √§ø¡
Î·È È¤ÛÙ ÙÔ Ï‹ÎÙÚÔ ¬.
°°ÈÈ·· ÓÓ·· ··ÏÏÏÏ¿¿ÍÍÂÂÙÙ ÙÙÔÔÓÓ ÚÚÔÔÛÛˆˆÈÈÎÎfifi ÛÛ··˜˜ ÎΈˆ‰‰ÈÈÎÎfifi::
∂·Ó·Ï¿‚ÂÙ ٷ ÛÙ¿‰È· &ˆ˜ ‘Î·È ÛÙË Û˘Ó¤¯ÂÈ·:
(
∂ÈϤÍÙÂ
∞§§∞°∏ ∫ø¢.
О·И ПЛОЩЪФПФБ‹ЫЩВ ЩФУ
‰ÈÎfi Û·˜ 4„‹ÊÈÔ Îˆ‰ÈÎfi.
§
∂И‚В‚·ИТЫЩВ, ПЛОЩЪФПФБТУЩ·˜ ЩФУ Оˆ‰ИОfi О·И
‰В‡ЩВЪЛ КФЪ¿. √ О·ИУФ‡ЪБИФ˜ Ы·˜ Оˆ‰ИОfi˜ ¤¯ВИ
·ÔıË΢ı›.
è
¶È¤ÛÙ ÙÔ Ï‹ÎÙÚÔ dÁÈ· Ó· ‚Á›Ù ·fi Ù· ÌÂÓÔ‡.
AУ НВ¯¿ЫВЩВ ЩФУ М˘ЫЩИОfi Ы·˜ Оˆ‰ИОfi,
ПЛОЩЪФПФБ‹ЫЩВ ЩФ БВУИОfi Оˆ‰ИОfi 0711 ‰‡Ф КФЪ¤˜.
∫∫ÏÏ››‰‰ˆˆÌÌ·· ÏÏ‹‹ÎÎÙÙÚÚˆˆÓÓ
&
¶È¤ÛÙ ÙÔ Ï‹ÎÙÚÔ H, ÂÈϤÍÙÂ
Ã∞ƒ∞∫/ƒπ™∆π∫∞
(Ï) Î·È È¤ÛÙ ÙÔ Ï‹ÎÙÚÔ ¬.
é
∂ÈϤÍÙÂ
∫§∂π¢øª∞ TV
(Ï) Î·È È¤ÛÙ ÙÔ
Ï‹ÎÙÚÔ
¬
. ÁÈ· Ó· ÂÚ¿ÛÂÙÂ ÛÙË
§∂π∆√Àƒ°π∞
.
“
™‚‹ЫЩВ ЩЛУ ЩЛПВfiЪ·ЫЛ О·И ОЪ‡„ЩВ ЩФ
ЩЛПВ¯ВИЪИЫЩ‹ЪИФ. ∏ ЩЛПВfiЪ·ЫЛ ‰ВУ МФЪВ› У·
¯ЪЛЫИМФФИЛıВ› (·КФ‡ МФЪВ› У· ЩВıВ› ЫВ
ПВИЩФ˘ЪБ›· МfiУФ МВ ЩФ ЩЛПВ¯ВИЪИЫЩ‹ЪИФ).
‘
°И· У· ·О˘ЪТЫВЩВ, ЩФФıВЩ‹ЫЩВ ЩФ
∫§∂π¢øª∞ TV
ÛÙË ı¤ÛË
¢π∞∫√¶∏
.
§§ÂÂÈÈÙÙÔÔ˘˘ÚÚÁÁ››·· Í͢˘ÓÓËËÙÙËËÚÚÈÈÔÔ‡‡
∫∫ÏÏ››‰‰ˆˆÌÌ·· ÙÙˢ˜ ÙÙËËÏÏÂÂfifiÚÚ··ÛÛˢ˜
∆Ф МВУФ‡ ·˘Щfi Ы·˜ ВИЩЪ¤ВИ У· ¯ЪЛЫИМФФИВ›ЩВ
ЩЛУ ЩЛПВfiЪ·Ы‹ Ы·˜ О·И ˆ˜ Н˘УЛЩ‹ЪИ.
&
¶È¤ÛÙ ÙÔ Ï‹ÎÙÚÔ H.
é
∂ÈϤÍÙÂ
Ã∞ƒ∞∫/ƒπ™∆π∫∞
(Ï) Î·È È¤ÛÙ 2 ÊÔÚ¤˜
ÙÔ Ï‹ÎÙÚÔ
¬
. ™ÙËÓ ÔıfiÓË ÂÌÊ·Ó›˙ÂÙ·È ÙÔ ÌÂÓÔ‡
Ã√¡√¢/∫√¶∆∏™
:
“
¶È¤ÛÙ ÙÔ Ï‹ÎÙÚÔ ¬ÁÈ· Ó· Ì›ÙÂ Î·È Ó· ‚Á›ÙÂ
·fi О¿ıВ ˘ФМВУФ‡ О·И ¯ЪЛЫИМФФИ‹ЫЩВ Щ·
П‹ОЩЪ·
îÏ
ÁÈ· Ó· Ú˘ıÌ›ÛÂÙ :
‘
шƒ∞ : ПЛОЩЪФПФБ‹ЫЩВ ЩЛУ ЩЪ¤¯Ф˘Ы· ТЪ·.
™ЛМВ›ˆЫЛ : Л ТЪ· ВУЛМВЪТУВЩ·И ·˘ЩfiМ·Щ· О¿ıВ
КФЪ¿ Ф˘ ı¤ЩВЩВ ЫВ ПВИЩФ˘ЪБ›· ЩЛУ ЩЛПВfiЪ·ЫЛ, МВ
‚¿ЫЛ ЩИ˜ ПЛЪФКФЪ›В˜
teletext
ÙÔ˘ ÚÔÁÚ¿ÌÌ·ÙÔ˜
·ÚÈıÌ. 1. AÓ ÙÔ ÚfiÁÚ·ÌÌ· ·˘Ùfi ‰ÂÓ ‰È·ı¤ÙÂÈ
teletext
, ‰ÂÓ ı· Á›ÓÂÈ Ë ÂÓË̤ڈÛË.
( øƒ∞ ∂¡∞ƒ•∏™ : ПЛОЩЪФПФБ‹ЫЩВ ЩЛУ ТЪ· ¤У·ЪНЛ˜.
§ øƒ∞ ¢π∞∫√¶∏™ : ПЛОЩЪФПФБ‹ЫЩВ ЩЛУ ТЪ· ‰И·ОФ‹˜.
è ∞ƒπ£ª. ¶ƒ√°ƒ.
:
ÂÈÛ¿ÁÂÙÂ ÙÔÓ ·ÚÈıÌfi ÙÔ˘
ÂÈı˘ÌËÙÔ‡ ÚÔÁÚ¿ÌÌ·ÙÔ˜ ÁÈ· ÙËÓ ·Ê‡ÓÈÛË.
°È· Ù· ÌÔÓ٤Ϸ Ô˘ Â›Ó·È ÂÍÔÏÈṲ̂ӷ ÌÂ
Ú·‰ÈfiʈÓÔ, ÌÔÚ›Ù ӷ ÂÈϤÍÂÙ ¤Ó· ÛÙ·ıÌfi
FM ¯ЪЛЫИМФФИТУЩ·˜ Щ· П‹ОЩЪ·
Ȭ
(Ù· Ï‹ÎÙÚ· 09 ВИЩЪ¤Ф˘У ·ФОПВИЫЩИО¿ ЩЛУ
ВИПФБ‹ ЩˆУ ЪФБЪ·ММ¿ЩˆУ ЩЛ˜ ЩЛПВfiЪ·ЫЛ˜).
! ∂¡∂ƒ°√¶/∏ª∂¡√
: ÌÔÚ›Ù ӷ Ú˘ıÌ›ÛÂÙ :
ñ
ªπ∞ º√ƒ∞
ÁÈ· ¤Ó· ÌfiÓÔ Í‡ÓËÌ·,
ñ
∫∞£∏ª∂ƒπ¡∞
ÁÈ· ͇ÓËÌ· οı ̤ڷ,
ñ
OXI
ÁÈ· ·Î‡ÚˆÛË.
ç ¶È¤ÛÙ ÙÔ Ï‹ÎÙÚÔ b ÁÈ· Ó· ı¤ÛÂÙ ÙËÓ
ЩЛПВfiЪ·ЫЛ ЫВ ·У·МФУ‹. £· ·У¿„ВИ ·˘ЩfiМ·Щ·
ЫЩЛУ ЪФБЪ·ММ·ЩИЫМ¤УЛ ТЪ·. AУ ·К‹ЫВЩВ ЩЛУ
ЩЛПВfiЪ·ЫЛ ·УФИ¯Щ‹, ı· ·ПП¿НВИ ЪfiБЪ·ММ· МfiУФ
ЩЛУ ТЪ· Ф˘ ¤¯ВЩВ ‰ЛПТЫВИ. O Ы˘У‰˘·ЫМfi˜ ЩˆУ
ПВИЩФ˘ЪБИТУ
K§EI¢øMA Î·È XPONO¢/TH™ ÌÔÚ›
У· ¯ЪЛЫИМФФИЛıВ› БИ· ЩФУ ВЪИФЪИЫМfi ЩЛ˜
‰И¿ЪОВИ·˜ ¯Ъ‹ЫЛ˜ ЩЛ˜ ЩЛПВfiЪ·ЫЛ˜, БИ·
·Ъ¿‰ВИБМ· ·fi Щ· ·И‰И¿ Ы·˜.
H ı¤ÛË
MIA ºOPA
Û·˜ ÂÈÙÚ¤ÂÈ Ó·
ÚÔÁÚ·ÌÌ·Ù›ÛÂÙ ÙËÓ ÒÚ· ¤Ó·Ú͢ ‹ Ï‹Í˘
(·ÏÏ¿ fi¯È Î·È ÙˆÓ ‰‡Ô).
• EIKONA
• HXO∏
• XAPAK/PI∏TIKA
• PYıMI∏H.
XAPAK/PI∏TIKA
XPONO¢/KO∂TH∏
• flPA
• flPA ENAP¥H™
• flPA ÑIAKO∂H™
• API£M. ∂POÉP.
• ENEPÉOM/HMENO
10:56
• EIKONA
• HXO∏
• XAPAK/PI∏TIKA
• PYıMI∏H.
XAPAK/PI∏TIKA
•
XPONOÑ/KO∂TH∏
•
K†EI¢flMA TV
•
K†EI¢flMA ∂AI¢
•
∂EPI™TPOºH
KflA. ∂PO∏BA∏H∏
- - - -
10
Page 75

12
MODE
MUTE
VCR
DVD
SMART SMART
RADIO
ACTIVE
CONTROL
MENU
OK
PC TV
P
564
879
0
`
¤
Ó
ù
Ÿ
Å
%
∆
ı
∫
Ë
Á
∏
3
- -
+ +
.
ª
-
[
”
Y
ª
P
9
0
Ë
Å
ù
MENU
Ë
Y
TTeelleetteexxtt
¶¶ÈȤ¤ÛÛÙÙ ÙÙÔÔ::
∂∂ÈÈÙÙ˘˘ÁÁ¯¯¿¿ÓÓÂÂÙÙÂÂ::
∆Ô teletext В›У·И ¤У· Ы‡ЫЩЛМ· ПЛЪФКФЪИТУ Ф˘ МВЩ·‰›‰ВЩ·И ·fi ФЪИЫМ¤У· О·У¿ПИ·, ЩФ ФФ›Ф Ы˘М‚Ф˘ПВ‡ВЫЩВ
Ы·У М›· ВКЛМВЪ›‰·. ∂ИЩЪ¤ВИ В›ЫЛ˜ ЩЛУ ЪfiЫ‚·ЫЛ ЫВ ˘fiЩИЩПФ˘˜ БИ· ¿ЩФМ· МВ ЪФ‚П‹М·Щ· ·ОФ‹˜ ‹ МВ МИОЪ‹
ВНФИОВ›ˆЫЛ ЫЩЛ БПТЫЫ· МВЩ¿‰ФЫЛ˜ (О·Пˆ‰И·О¿ ‰›ОЩ˘·, ‰ФЪ˘КФЪИО¿ О·У¿ПИ·,...).
ÀÀËËÚÚÂÂÛÛ››··
teletext
∂∂ÈÈÏÏÔÔÁÁ‹‹ ÌÌ››··˜˜
ÛÛÂÂÏÏ››‰‰··˜˜
∂ИЩЪ¤ВИ ЩЛУ ПВИЩФ˘ЪБ›· ЩЛ˜ ˘ЛЪВЫ›·˜ ЩФ˘ teletext, ЩФ ¤Ъ·ЫМ· ЫВ
‰И¿К·УЛ ПВИЩФ˘ЪБ›· О·И ЫЩЛ Ы˘У¤¯ВИ· ЩЛУ ¤НФ‰Ф. ∂МК·У›˙ВЩ·И Л
ВЪ›ПЛ„Л МВ ЩФУ О·Щ¿ПФБФ ЩˆУ ЫЩЛПТУ ЫЩИ˜ ФФ›В˜ МФЪВ›ЩВ У·
¤¯ВЩВ ЪfiЫ‚·ЫЛ. ∫¿ıВ ЫЩ‹ПЛ ВИЫЛМ·›УВЩ·И МВ ¤У·У ·ЪИıМfi ЫВП›‰·˜ МВ
3 „ЛК›·. ∞У ЩФ ВИПВБМ¤УФ О·У¿ПИ ‰ВУ МВЩ·‰›‰ВИ ЩЛУ ˘ЛЪВЫ›· teletext,
ÂÌÊ·Ó›˙ÂÙ·È Ë ¤Ó‰ÂÈÍË 100 Î·È Ë ÔıfiÓË ·Ú·Ì¤ÓÂÈ Ì·‡ÚË (Û ·˘Ù‹ ÙËÓ
ÂÚ›ÙˆÛË, ÂÁηٷÏ›„Ù ÙÔ teletext Î·È ÂÈϤÍÙ ¤Ó· ¿ÏÏÔ Î·Ó¿ÏÈ).
™˘Óı¤ÛÙ ÙÔÓ ·ÚÈıÌfi Ù˘ ÂÈı˘ÌËÙ‹˜ ÛÂÏ›‰·˜ Ì ٷ Ï‹ÎÙÚ· 0
¤ˆ˜ 9 ‹ @ P #. ¶·Ú¿‰ÂÈÁÌ·: ÛÂÏ›‰· 120, ·Ù‹ÛÙ 120. √
·ЪИıМfi˜ ВМК·У›˙ВЩ·И „ЛП¿ ·ЪИЫЩВЪ¿, Ф МВЩЪЛЩ‹˜ Б˘Ъ›˙ВИ, О·И ЫЩЛ
Ы˘У¤¯ВИ· ВМК·У›˙ВЩ·И Л ЫВП›‰·. ∂·У·П¿‚ВЩВ ЩЛ ПВИЩФ˘ЪБ›· БИ· У·
Ы˘М‚Ф˘ПВ˘ЩВ›ЩВ М›· ¿ППЛ ЫВП›‰·.
∞У Ф МВЩЪЛЩ‹˜ Ы˘УВ¯›ЫВИ ЩЛУ ·У·˙‹ЩЛЫЛ, ·˘Щfi ФКВ›ПВЩ·И ЫЩФ fiЩИ Л
ЫВП›‰· ‰ВУ МВЩ·‰›‰ВЩ·И. ∂ИП¤НЩВ ¤У·У ¿ППФ ·ЪИıМfi.
¶¶ÂÂÚÚ››ÏÏËË„„ËË
∞∞ÌÌÂÂÛÛËË
ÚÚfifiÛÛ‚‚··ÛÛËË ÛÛÙÙÈȘ˜
ÛÛÙÙ‹‹ÏϘ˜
°И· У· ВИЫЩЪ¤„ВЩВ ЫЩЛУ ВЪ›ПЛ„Л (БВУИО¿ Л ЫВП›‰· 100).
™ÙÔ Î¿Ùˆ ̤ÚÔ˜ Ù˘ ÔıfiÓ˘ ÂÌÊ·Ó›˙ÔÓÙ·È ¯ÚˆÌ·ÙÈÛÙ¤˜ ˙ÒÓ˜.
∆· 4 ¯ÚˆÌ·ÙÈÛÙ¿ Ï‹ÎÙÚ· ÂÈÙÚ¤Ô˘Ó ÙËÓ ÚfiÛ‚·ÛË ÛÙȘ ÛًϘ
‹ ÛÙȘ ·ÓÙ›ÛÙÔȯ˜ ÛÂÏ›‰Â˜.
√È ¯ÚˆÌ·ÙÈÛÙ¤˜ ˙ÒÓ˜ ·Ó·‚ÔÛ‚‹ÓÔ˘Ó
fiÙ·Ó Ë ÛÙ‹ÏË ‹ Ë ÛÂÏ›‰· ‰ÂÓ Â›Ó·È ·ÎfiÌ· ‰È·ı¤ÛÈÌË.
ÕÕÌÌÂÂÛÛËË ÂÂÈÈÏÏÔÔÁÁ‹‹
ÙÙˆˆÓÓ
˘˘ÔÔÛÛÂÂÏÏ››‰‰ˆˆÓÓ
ªÂÚÈΤ˜ ÛÂÏ›‰Â˜ ÂÚÈÏ·Ì‚¿ÓÔ˘Ó Î·È ˘ÔÛÂÏ›‰Â˜ (.¯. Ë ÛÂÏ›‰· 120
ÂÚÈÏ·Ì‚¿ÓÂÈ ÙȘ ˘ÔÛÂÏ›‰Â˜ 1/3, 2/3 Î·È 3/3). ™ÙËÓ ÂÚ›ÙˆÛË
·˘Щ‹, Ф ·ЪИıМfi˜ ЩЛ˜ ЫВП›‰·˜ ВМК·У›˙ВЩ·И МВ Ъ¿ЫИУФ ¯ЪТМ·, О·И
ЩФ˘ ·ЪИıМФ‡ ЪФЛБВ›Щ·И ЩФ Ы‡М‚ФПФ Í, Æ‹ ÍÆ.
ГЪЛЫИМФФИ‹ЫЩВ Щ· П‹ОЩЪ·
Ȭ
ÁÈ· Ó· ¤¯ÂÙ ¿ÌÂÛË
ÚfiÛ‚·ÛË ÛÙȘ ˘ÔÛÂÏ›‰Â˜ Ù˘ ÂÈÏÔÁ‹˜ Û·˜.
ªªÂÂÁÁ¤¤ıı˘˘ÓÓÛÛËË ÌÌ››··˜˜
ÛÛÂÂÏÏ››‰‰··˜˜
¢¢ÈÈÏÏ‹‹ ÛÛÂÂÏÏ››‰‰··
(‰È·ı¤ÛÈÌÔ
·ФОПВИЫЩИО¿ ЫВ
ФЪИЫМ¤УВ˜
ÂΉfiÛÂȘ)
°И· ЩЛУ ВМК¿УИЫЛ ЩФ˘ ·УТЩВЪФ˘, О·ЩТЩВЪФ˘ М¤ЪФ˘˜, О·И ЫЩЛ
Ы˘У¤¯ВИ· БИ· У· ВИЫЩЪ¤„ВЩВ ЫЩЛУ О·УФУИО‹ ‰И¿ЫЩ·ЫЛ.
∂УВЪБФФ›ЛЫЛ ‹ ·ВУВЪБФФ›ЛЫЛ ЩЛ˜ ВМК¿УИЫЛ˜ Teletext ÛÂ
‰ИП‹ ЫВП›‰·. ∏ ВУВЪБfi˜ ЫВП›‰· ВМК·У›˙ВЩ·И ·ЪИЫЩВЪ¿ О·И Л
ВfiМВУЛ ЫВП›‰· ‰ВНИ¿. ¶И¤ЫЩВ ЩФ П‹ОЩЪФ s·У ı¤ПВЩВ У·
ЫЩ·ıВЪФФИ‹ЫВЩВ МИ· ЫВП›‰· (fiˆ˜ Щ· ВЪИВ¯fiМВУ·). ∆fiЩВ Л
ВУВЪБfi˜ ЫВП›‰· ı· В›У·И Л ‰ВНИ¿. °И· У· В·У¤ПıВЩВ ЫЩЛУ
О·УФУИО‹ ПВИЩФ˘ЪБ›·, И¤ЫЩВ ЩФ П‹ОЩЪФ e.
∫∫ÚÚ˘˘ÌÌÌ̤¤ÓÓ˜˜
ÏÏËËÚÚÔÔÊÊÔÔÚÚ››Â˜˜
¶¶ÚÚÔÔÙÙÈÈÌÌÔÔ‡‡ÌÌÂÂÓÓ˜˜
ÛÛÂÂÏÏ››‰‰Â˜˜
°И· ЩЛУ ВМК¿УИЫЛ ‹ ЩЛУ ·fiОЪ˘„Л ЩˆУ ОЪ˘ММ¤УˆУ ПЛЪФКФЪИТУ
(··УЩ‹ЫВИ˜ ЫВ ОФ˘›˙).
°È· Ù· ÚÔÁÚ¿ÌÌ·Ù· teletext ·fi 0 ¤ˆ˜ 40, МФЪВ›ЩВ У· ·ФМУЛМФУВ‡ЫВЩВ
4 ЪФЩИМФ‡МВУВ˜ ЫВП›‰В˜ Ф˘ ЫЩЛ Ы˘У¤¯ВИ· ı· В›У·И ¿МВЫ· ЪФЫ‚¿ЫИМВ˜
МВ Щ· ¯ЪˆМ·ЩИЫЩ¿ П‹ОЩЪ· (ОfiООИУФ, Ъ¿ЫИУФ, О›ЩЪИУФ, МПВ).
& ¶È¤ÛÙ ÙÔ Ï‹ÎÙÚÔ HБИ· У· ВЪ¿ЫВЩВ ЫЩЛ ПВИЩФ˘ЪБ›·
ЪФЩИМФ‡МВУВ˜ ЫВП›‰В˜.
é ∂ÌÊ·Ó›ÛÙ ÙË ÛÂÏ›‰· ÙÔ˘ teletext Ф˘ ı¤ПВЩВ У· ·ФМУЛМФУВ‡ЫВЩВ.
“ ¶È¤ÛÙ ÙÔ Ï‹ÎÙÚÔ dÎ·È ÛÙË Û˘Ó¤¯ÂÈ· ÙÔ ¤Á¯ÚˆÌÔ Ï‹ÎÙÚÔ Ù˘
ÂÈÏÔÁ‹˜ Û·˜.
‘ E·Ó·Ï¿‚ÂÙ ÙȘ ‰È·‰Èηۛ˜ é Î·È “ ÁÈ· Ù· ¿ÏÏ· ¤Á¯ÚˆÌ· Ï‹ÎÙÚ·.
( ∆ТЪ·, ·fi ЩЛ ЫЩИБМ‹ Ф˘ ı· Ы˘М‚Ф˘ПВ˘ЩВ›ЩВ ЩФ teletext, ÔÈ
ЪФЩИМФ‡МВУВ˜ ЫВП›‰В˜ Ы·˜ ВМК·У›˙ФУЩ·И ¯ЪˆМ·ЩИЫЩ¤˜ ЫЩФ О¿Щˆ
М¤ЪФ˜ ЩЛ˜ ФıfiУЛ˜. °И· У· Н·У·‚ЪВ›ЩВ ЩИ˜ Ы˘УЛıИЫМ¤УВ˜ ЫЩ‹ПВ˜,
И¤ЫЩВ ЩФ H.
°È· Ó· Û‚‹ÛÂÙ ٷ ¿ÓÙ·, ȤÛÙ ÙÔ Ï‹ÎÙÚÔ dÁÈ· 5 ‰Â˘ÙÂÚfiÏÂÙ·.
11
Page 76

12
¢¢ÈÈ··ÛÛÙÙ¿¿ÛÛÂÂÈȘ˜ ÂÂÈÈÎÎfifiÓÓ··˜˜ 1166::99
OИ ВИОfiУВ˜ Ф˘ П·М‚¿УВЩВ МФЪВ› У· МВЩ·‰›‰ФУЩ·И ЫВ ‰И·ЫЩ¿ЫВИ˜ 16:9 (П·ЩИ¿ ФıfiУЛ) ‹ 4:3
(ОП·ЫЫИО‹ ФıfiУЛ). OИ ВИОfiУВ˜ ЫВ ‰И·ЫЩ¿ЫВИ˜ 4:3 ¤¯Ф˘У МВЪИО¤˜ КФЪ¤˜ М›· М·‡ЪЛ ПˆЪ›‰· ЫЩФ ¿Уˆ
О·И О¿Щˆ М¤ЪФ˜ ЩФ˘˜ (‰И·ЫЩ¿ЫВИ˜ ЫИУВМ·ЫОfi). ∏ ПВИЩФ˘ЪБ›· ·˘Щ‹ ВИЩЪ¤ВИ ЩЛУ ВН¿ПВИ„Л ЩˆУ
М·‡ЪˆУ ПˆЪ›‰ˆУ О·И ЩЛ ‚ВПЩ›ˆЫЛ ЩˆУ ВИОfiУˆУ ЩЛ˜ ФıfiУЛ˜.
∞∞ÓÓ ËË ÙÙËËÏÏÂÂfifiÚÚ··ÛÛ‹‹˜˜ ÛÛ··˜˜ ¤¤¯¯ÂÂÈÈ ÔÔııfifiÓÓËË 44::33
∞∞ÓÓ ËË ÙÙËËÏÏÂÂfifiÚÚ··ÛÛ‹‹˜˜ ÛÛ··˜˜ ¤¤¯¯ÂÂÈÈ ÔÔııfifiÓÓËË 1166::99
¶È¤ÛÙ ٷ Ï‹ÎÙÚ· p (¤ˆ˜ Ȭ) ÁÈ· Ó· ÂÈϤÍÂÙ ÙȘ ‰È¿ÊÔÚ˜ ƒ˘ıÌ›ÛÂȘ:
∏ ЩЛПВfiЪ·ЫЛ ‰И·ı¤ЩВИ ПВИЩФ˘ЪБ›· ·˘ЩfiМ·ЩЛ˜ ВУ·ПП·Б‹˜ ЩˆУ ‰И·ЫЩ¿ЫВˆУ ЩЛ˜
ФıfiУЛ˜ Ф˘ ·ФОˆ‰ИОФФИВ› ЩФ ВИ‰ИОfi Ы‹М· Ф˘ ВО¤МВЩ·И ·fi ФЪИЫМ¤У·
ЪФБЪ¿ММ·Щ· О·И ВИП¤БВИ ЩИ˜ ЫˆЫЩ¤˜ ‰И·ЫЩ¿ЫВИ˜ ЩЛ˜ ФıfiУЛ˜.
44::33
∏ ÂÈÎfiÓ· ·Ó··Ú¿ÁÂÙ·È ÛÙȘ ‰È·ÛÙ¿ÛÂȘ 4:3, Î·È Ì›· Ì·‡ÚË ÏˆÚ›‰· ÂÌÊ·Ó›˙ÂÙ·È
Î·È ·fi ÙȘ ‰‡Ô Ï¢ڤ˜ Ù˘ ÂÈÎfiÓ·˜.
MM∂∂°°∂∂££YY¡¡™™∏∏ 1144::99
∏ ÂÈÎfiÓ· ÌÂÁÂı‡ÓÂÙ·È ÛÙȘ ‰È·ÛÙ¿ÛÂȘ 14:9, Î·È Ì›· ÌÈÎÚ‹ Ì·‡ÚË ÏˆÚ›‰· ·Ú·Ì¤ÓÂÈ
Û οı ÏÂ˘Ú¿ Ù˘ ÂÈÎfiÓ·˜.
MM∂∂°°∂∂££YY¡¡™™∏∏ 1166::99
∏ ВИОfiУ· МВБВı‡УВЩ·И ЫЩИ˜ ‰И·ЫЩ¿ЫВИ˜ 16:9. ∏ Ъ‡ıМИЫЛ ·˘Щ‹ Ы˘УИЫЩ¿Щ·И БИ· У·
ВМК·УИЫЩФ‡У ФИ ВИОfiУВ˜ МВ М·‡ЪЛ ПˆЪ›‰· ЫЩФ ¿Уˆ О·И О¿Щˆ М¤ЪФ˜ (‰И·ЫЩ¿ЫВИ˜
ЫИУВМ·ЫОfi).
MM∂∂°°∂∂££YY¡¡™™∏∏ ÀÀ¶¶OOTTIITT§§ˆˆNN
∏ Ъ‡ıМИЫЛ ·˘Щ‹ ВИЩЪ¤ВИ ЩЛУ ВМК¿УИЫЛ ЩˆУ ВИОfiУˆУ 4:3 ЫВ fiПЛ ЩЛУ ВИК¿УВИ·
ЩЛ˜ ФıfiУЛ˜ ВУТ ·Ъ·М¤УФ˘У ФЪ·ЩФ› ФИ ˘fiЩИЩПФИ.
ÀÀ¶¶∂∂PPEEYYPPEEIIAA
∏ Ú‡ıÌÈÛË ·˘Ù‹ ÂÈÙÚ¤ÂÈ ÙËÓ ÂÌÊ¿ÓÈÛË ÙˆÓ ÂÈÎfiÓˆÓ 4:3 Û fiÏË ÙËÓ ÂÈÊ¿ÓÂÈ·
Ù˘ ÔıfiÓ˘ ‰È¢ڇÓÔÓÙ·˜ ÙȘ Ï¢ڤ˜ Ù˘ ÂÈÎfiÓ·˜.
EEYYPPEEIIAA OO££OONNHH
∞˘Щ‹ Л ПВИЩФ˘ЪБ›· ВИЩЪ¤ВИ ЩЛУ В·У·КФЪ¿ ЩˆУ ЫˆЫЩТУ ·У·ПФБИТУ ЩˆУ
ВИОfiУˆУ Ф˘ МВЩ·‰›‰ФУЩ·И ЫВ ‰И·ЫЩ¿ЫВИ˜ 16:9.
¶ÚÔÛÔ¯‹: ·Ó ÂÌÊ·Ó›ÛÂÙ ̛· ÂÈÎfiÓ· 4:3, ı· ‰È¢ڢÓı› ÔÚÈ˙fiÓÙÈ·.
¶¶§§HHPP∏∏™™ OO££OONNHH
∞˘Щ‹ Л ПВИЩФ˘ЪБ›· ВИЩЪ¤ВИ ЩЛУ ВМК¿УИЫЛ ЩˆУ ВИОfiУˆУ ЫВ П‹ЪЛ ФıfiУЛ.
¶È¤ÛÙ ٷ Ï‹ÎÙÚ·
p (¤ˆ˜ îÏ) ÁÈ· Ó· ÂÈϤÍÂÙ ÙȘ ‰È¿ÊÔÚ˜ Ú˘ıÌ›ÛÂÈ:
44::33
∏ ÂÈÎfiÓ· ·Ó··Ú¿ÁÂÙ·È Û ۯ‹Ì· 4:3.
¢¢ÈÈ¢˘ÚÚ//™™ËË 44::33
∏ ВИОfiУ· ‰ИВ˘Ъ‡УВЩ·И О¿ıВЩ·. ∞˘Щ‹ Л ПВИЩФ˘ЪБ›· ¯ЪЛЫИМФФИ‹Щ·И БИ· У· ·О˘ЪˆıФ‡У
ФИ М·‡ЪВ˜ ПˆЪ›‰В˜ fiЩ·У ·Ъ·ОФПФ˘ı‹ЩВ ЪfiБЪ·ММ· ЫВ Ы¯‹М· letterbox.
™™˘˘ÌÌ››ÂÂÛÛËË 1166::99
∏ ÂÈÎfiÓ· Û˘ÌȤ˙ÂÙ·È Î¿ıÂÙ· Û ۯ‹Ì· 16:9.
Page 77

13
¶¶ÏÏ‹‹ÎÎÙÙÚÚ·· VVCCRR ‹‹ DDVVDD
§§ÂÂÍÍÈÈÏÏfifiÁÁÈÈÔÔ
∆Ф ЩЛПВ¯ВИЪИЫЩ‹ЪИФ Ы·˜ ВИЩЪ¤ВИ У· ¯ВИЪ›˙ВЫЩВ ЩИ˜ ‚·ЫИО¤˜
ПВИЩФ˘ЪБ›В˜ ЩФ˘ ‚›УЩВФ ‹ ЩФ˘ DVD.
∆
Ф ЩЛПВ¯ВИЪИЫЩ‹ЪИФ В›У·И Ы˘М‚·Щfi МВ fiПВ˜ ЩИ˜ Ы˘ЫОВ˘¤˜ ‚›УЩВФ ЩЛ˜
ВЩ·ИЪВ›·˜ М·˜ О·ıТ˜ О·И МВ fiП· Щ· МФУЩ¤П· Ф˘ ¯ЪЛЫИМФФИФ‡У ЩФ
ЪfiЩ˘Ф RC5/RC6.
&
¶·Ù‹ÛÙÂ ÙÔ Ï‹ÎÙÚÔ
MMOODDEE
БИ· У· ВИП¤НВЩВ ЩЛУ ВИı˘МЛЩ‹ ПВИЩФ˘ЪБ›·:
VVCCRR
(М·БУЛЩФЫОfiЛЫЛ) ‹
DDVVDD
. ∆Ô Ï·Ì¿ÎÈ ÙÔ˘
ЩЛПВ¯ВИЪИЫЩЛЪ›Ф˘ ·У¿‚ВИ
БИ· У· ‰В›НВИ ЩЛУ ПВИЩФ˘ЪБ›· Ф˘ ВИП¤Н·ЩВ. ™‚‹УВИ ·˘ЩfiМ·Щ·
ÌÂÙ¿ ·fi 20
‰В˘ЩВЪfiПВЩ· ¯ˆЪ›˜ У· ПВИЩФ˘ЪБ‹ЫВИ (ВИЫЩЪФК‹ ЫЩЛ ПВИЩФ˘ЪБ›· TV).
é √ЫФУ ·КФЪ¿ ЫЩФУ ВНФПИЫМfi, Щ· ·ОfiПФ˘ı· П‹ОЩЪ· В›У·И ПВИЩФ˘ЪБИО¿:
b ·Ó·ÌÔÓ‹,
· ÂÁÁÚ·Ê‹,
¢ БЪ‹БФЪЛ ВИЫЩЪФК‹,
Ê ‰È·ÎÔ‹ (stop),
Æ ·Ó··Ú·ÁˆÁ‹
∫ ÁÚ‹ÁÔÚË ÚÔÒıËÛË,
∆ ·‡ÛË
% ›vÙÂo: ÚoÁÚ·ÌÌ·ÙÈÛÌfi˜,
c DVD: °ПТЫЫ· ˘ФЩИЩПИЫМФ‡
H ÎÏ‹ÛË ÙÔ˘ ÌÂÓÔ‡,
ÎΤ¤ÚÚÛÛÔÔÚÚ··˜˜
ÏÔ‹ÁËÛË Î·È Ú˘ıÌ›ÛÂȘ,
OOKK
ÂÈ·ڈÛË,
09 ·ЪИıМЛЩИО¿ П‹ОЩЪ·,
@PP# ÂÈÏÔÁ‹ ÙˆÓ ÚÔÁÚ·ÌÌ¿ÙˆÓ,
e ВИПФБ‹ ЩЛ˜ БПТЫЫ·˜,
d ÌÂÓÔ‡ OSD.
EasyLink: „ËÊȷ΋ Û‡Ó‰ÂÛË ÌÂٷ͇ ÙËÏÂfiÚ·Û˘ Î·È Û˘Û΢‹˜ ‚›ÓÙÂÔ Ô˘ ÂÈÙÚ¤ÂÈ ÙËÓ ¿ÌÂÛË
МВЩ·КФЪ¿ О¿ФИˆУ ПЛЪФКФЪИТУ, fiˆ˜ Л Ъ‡ıМИЫЛ ЩˆУ О·У·ПИТУ ‹ Ф ЪФБЪ·ММ·ЩИЫМfi˜ ЩФ˘
‚›УЩВФ МВ ЩФУ Ф‰ЛБfi NexTView.
PPIIPP
(Picture in Picture – ∂ÈÎfiÓ· ̤۷ Û ∂ÈÎfiÓ·) : ∂ÓıÂÙÔ ·Ú¿ı˘ÚÔ ÂÈÎfiÓ·˜ Ô˘ ÂÈÙÚ¤ÂÈ ÙËÓ
ВМК¿УИЫЛ МИ·˜ МИОЪ‹˜ ВИОfiУ·˜ М¤Ы· ЫЩЛУ О‡ЪИ· ВИОfiУ·. ™ЩЛ ПВИЩФ˘ЪБ›· PC, МФЪВ›ЩВ У· ВМК·У›ЫВЩВ
М¤Ы· ЫВ МИ· МИОЪ‹ ФıfiУЛ ЩЛУ ВИОfiУ· ·fi ЩЛУ ЩЛПВfiЪ·ЫЛ ‹ ·fi М›· ¿ППЛ Ы˘ЫОВ˘‹ (DVD, µ›УЩВФ, ...).
™™‹‹ÌÌ··ÙÙ·· RRGGBB ::
¶ЪfiОВИЩ·И БИ· 3 Ы‹М·Щ· ВИОfiУ·˜ БИ· Щ· ¯ЪТМ·Щ· ∫fiООИУФ, ¶Ъ¿ЫИУФ ªПВ Ф˘
Ы˘Уı¤ЩФ˘У ЩЛУ ВИОfiУ·. ∏ ¯Ъ‹ЫЛ ·˘ЩТУ ЩˆУ ЫЛМ¿ЩˆУ ВИЩЪ¤ВИ ЩЛУ В›ЩВ˘НЛ МИ·˜ О·П‡ЩВЪЛ˜
ФИfiЩЛЩ·˜ ВИОfiУ·˜.
™™‹‹ÌÌ··ÙÙ··
S-VHS
::
ÚfiÎÂÈÙ·È ÁÈ· ‰‡Ô ͯˆÚÈÛÙ¿ Û‹Ì·Ù· ‚›ÓÙÂÔ Y/C Ô˘ ÚÔ¤Ú¯ÔÓÙ·È ·fi Ù· ÚfiÙ˘·
М·БУЛЩФЫОfiЛЫЛ˜ S-VHS Î·È Hi-8. T· Û‹Ì·Ù· ʈÙÂÈÓfiÙËÙ·˜ Y (Ì·‡ÚÔ Î·È ¿ÛÚÔ) Î·È ¯ÚÒÌ·ÙÔ˜ C
ηٷÁÚ¿ÊÔÓÙ·È ¯ˆÚÈÛÙ¿ ÛÙËÓ Ù·ÈÓ›·. A˘Ùfi ÚÔÛʤÚÂÈ Î·Ï‡ÙÂÚË ÔÈfiÙËÙ· ·' fiÙÈ ÙÔ Û‡ÓËı˜ ‚›ÓÙÂÔ
(VHS О·И 8 mm) fiФ˘ Щ· Ы‹М·Щ· Y/C ·У·МВИБУ‡ФУЩ·И ТЫЩВ У· Ы¯ЛМ·Щ›ЫФ˘У ¤У· О·И МФУ·‰ИОfi Ы‹М·
‚›ÓÙÂÔ.
◊◊¯¯ÔÔ˜˜
NICAM::̤ıÔ‰Ô˜ ÌÂÙ¿‰ÔÛ˘ „ËÊÈ·ÎÔ‡ ‹¯Ô˘.
™™‡‡ÛÛÙÙËËÌÌ··::
H ÌÂÙ¿‰ÔÛË ÙˆÓ ÂÈÎfiÓˆÓ ‰ÂÓ Á›ÓÂÙ·È Î·Ù¿ ÙÔÓ ›‰ÈÔ ÙÚfiÔ Û fiϘ ÙȘ ¯ÒÚ˜. T¿Ú¯Ô˘Ó
‰È¿ÊÔÚ· ÚfiÙ˘·, fiˆ˜ Ù· BG, DK, I, Î·È LL'. H Ú‡ıÌÈÛË ™Y™THMA (ÛÂÏ. 6) Û·˜ ÂÈÙÚ¤ÂÈ Ó·
ÂÈϤÍÂÙ ¤Ó· ·fi ·˘Ù¿ Ù· ÚfiÙ˘·. MËÓ ÙË Û˘Á¯¤ÂÙ Ì ÙËÓ Îˆ‰ÈÎÔÔ›ËÛË ÙÔ˘ ¯ÚÒÌ·ÙÔ˜ PAL ‹
SECAM. TÔ PAL ¯ЪЛЫИМФФИВ›Щ·И ЫЩИ˜ ВЪИЫЫfiЩВЪВ˜ В˘Ъˆ·˚О¤˜ ¯ТЪВ˜, ВУТ ЩФ SECAM ÛÙË
°·ÏÏ›·, ÛÙËÓ CIS О·И ЩИ˜ ВЪИЫЫfiЩВЪВ˜ ·КЪИО·УИО¤˜ ¯ТЪВ˜. OИ HУˆМ¤УВ˜ ¶ФПИЩВ›В˜ О·И Л I·ˆУ›·
¯ЪЛЫИМФФИФ‡У ¤У· ¿ППФ Ы‡ЫЩЛМ· Ф˘ ФУФМ¿˙ВЩ·И NTSC. OÈ Â›ÛÔ‰ÔÈ EXT1 Î·È EXT2 ВИЩЪ¤Ф˘У
ЩЛУ ·У¿БУˆЫЛ ЩˆУ М·БУЛЩФЫОФ‹ЫВˆУ Ф˘ ¤¯Ф˘У Оˆ‰ИОФФИЛıВ› ЫВ NTSC.
1166//99::
¢ЛПТУВИ ЩИ˜ ·У·ПФБ›В˜ П¿ЩФ˘˜/‡„Ф˘˜ ЩЛ˜ ФıfiУЛ˜. OИ ЩЛПВФЪ¿ЫВИ˜ МВ П·ЩИ¿ ФıfiУЛ ¤¯Ф˘У
·Ó·ÏÔÁ›· ÔıfiÓ˘ 16/9.
Ÿ
MODE
VCR
Y
DVD
Å
ª
`
SMART SMART
MENU
+ +
”
OK
PC TV
∆
ù
ACTIVE
-
CONTROL
MUTE
[
- -
%
∏
12
564
879
0
Ë
.
ı
Æ∫Ê¢·
¤Ó
ª
P
RADIO
3
Á
Page 78

14
MODE
VCR
DVD
·¢Ê Æ
∫
Ó
ı
Ω∆
.
Z
¤
™™‡‡ÓÓ‰‰ÂÂÛÛËË ÂÂÚÚÈÈÊÊÂÂÚÚÂÂÈÈ··ÎÎÒÒÓÓ ÛÛ˘˘ÛÛÎ΢˘ÒÒÓÓ
∞Ó¿ÏÔÁ· Ì ÙÔ ÌÔÓÙ¤ÏÔ, Ë ÙËÏÂfiÚ·ÛË Â›Ó·È ÂÍÔÏÈṲ̂ÓË Ì 1 ‹ 2 ˘Ô‰Ô¯¤˜ EXT1 Î·È EXT2
ÁÈ· SCART. ª·˙› Ì ÙËÓ ÙËÏÂfiÚ·ÛË ·Ú·‰›‰ÂÙ·È ¤Ó· ÂȉÈÎfi ·ÓÙ¿ÙÔÚ Ô˘ Û˘Ó‰¤ÂÙ·È ÛÙËÓ
˘Ô‰Ô¯‹ EXT1 Î·È ÂÈÙÚ¤ÂÈ ÙË ‰È·ÎÏ¿‰ˆÛË ÙˆÓ Î·Ïˆ‰›ˆÓ ÛÙËÓ ›Ûˆ ÏÂ˘Ú¿.
∏
˘Ô‰Ô¯‹
EXT1 ‰È·ı¤ÙÂÈ ÙȘ ÂÈÛfi‰Ô˘˜/ÂÍfi‰Ô˘˜
‹¯Ô˘
ÂÈÎfi
Ó
·˜Î·È ÙȘ ÂÈÛfi‰Ô˘˜ RGB. ∏
˘Ô‰Ô¯‹
EXT2 (·Ó Â›Ó·È ‰È·ı¤ÛÈÌË) ‰È·ı¤ÙÂÈ ÙȘ ÂÈÛfi‰Ô˘˜/ÂÍfi‰Ô˘˜ audio video Î·È ÙȘ
ÂÈÛfi‰Ô˘˜ S-VHS.
µµ››ÓÓÙÙÂÂÔÔ ((‹‹ DDVVDD ÌÌÂÂ ÂÂÁÁÁÁÚÚ··ÊÊ‹‹))
K¿УВЩВ ЩИ˜ Ы˘У‰¤ЫВИ˜ Ф˘ К·›УФУЩ·И ЫЩФ ‰ИП·Уfi Ы¯¤‰ИФ.
¯ЪЛЫИМФФИ‹ЫЩВ ¤У· О·ПТ‰ИФ Ы‡У‰ВЫЛ˜ ™О·ЪЩ О·П‹˜
ФИfiЩЛЩ·˜. ∂¿У ЩФ ‚›УЩВfi Ы·˜ В›У·И ВНФПИЫМ¤УФ МВ ЩЛ
ПВИЩФ˘ЪБ›· Easylink, ¯ЪЛЫИМФФИ‹ЫЩВ ЩЛУ ˘Ф‰Ф¯‹ EXT2.
AÓ ÙÔ ‚›ÓÙÂfi Û·˜ ‰ÂÓ ‰È·ı¤ÙÂÈ ˘Ô‰Ô¯‹
™Î·ÚÙ
, ЩfiЩВ Л МfiУЛ
‰˘У·Щ‹ Ы‡У‰ВЫЛ В›У·И М¤Ыˆ ЩФ˘ О·Пˆ‰›Ф˘ ЩЛ˜ ОВЪ·›·˜. ¶Ъ¤ВИ
У· ·Ф‰ТЫВЩВ ЩФ ЪfiБЪ·ММ· 0 ЩЛ˜ ЩЛПВfiЪ·ЫЛ˜ ЫЩФ
‰ФОИМ·ЫЩИОfi Ы‹М· ЩФ˘ ‚›УЩВФ (‚П¤В XВИЪ. M˘‹МЛ, ЫВП. 6).
K·ЩfiИУ, БИ· У· ·У··Ъ¿БВЩВ ЩЛУ ВИОfiУ· ЩФ˘ ‚›УЩВФ, И¤ЫЩВ ЩФ 0.
BB››ÓÓÙÙÂÂÔÔ ÌÌ AAÔÔÎΈˆ‰‰ÈÈÎÎÔÔÔÔÈÈËËÙÙ‹‹
™˘У‰¤ЫЩВ ЩФУ ·ФОˆ‰ИОФФИЛЩ‹ ЫЩЛ ‰В‡ЩВЪЛ ∂˘ЪФ
˘Ф‰Ф¯‹ ЩФ˘ ‚›УЩВФ. ŒЩЫИ, МФЪВ›ЩВ У· М·БУЛЩФЫОФВ›ЩВ ЩИ˜
Оˆ‰ИОФФИЛМ¤УВ˜ ВОФМ¤˜.
™™˘˘ÛÛÎ΢˘‹‹ BB››ÓÓÙÙÂÂÔÔ
¢¢ÔÔÚÚ˘˘ÊÊÔÔÚÚÈÈÎÎfifi˜˜ ‰‰¤¤ÎÎÙÙˢ˜,, ··ÔÔÎΈˆ‰‰ÈÈÎÎÔÔÔÔÈÈËËÙÙ‹‹˜˜,,
DVD
,, ··ÈÈÁÁÓÓ››‰‰ÈÈ·· ÎÎÏÏ..
°И· ЩИ˜ ЩЛПВФЪ¿ЫВИ˜ Ф˘ В›У·И ВНФПИЫМ¤УВ˜ МВ 2 YФ‰Ф¯¤˜
™О·ЪЩ Ъ›˙В˜, Ы˘У‰¤ЫЩВ О·Щ¿ ЪФЩ›МЛЫЛ МВ ЩЛУ EXT1 ЩИ˜
Ы˘ЫОВ˘¤˜ Ф˘ ·ВПВ˘ıВЪТУФ˘У Щ· Ы‹М·Щ· RGB („ЛКИ·Оfi˜
·ФОˆ‰ИОФФИЛЩ‹˜, DVD, ·И¯У›‰И·, ...) О·И МВ ЩЛУ EXT2 ЩИ˜
Ы˘ЫОВ˘¤˜ Ф˘ ·ВПВ˘ıВЪТУФ˘У Щ· Ы‹М·Щ· S-VHS
(Ы˘ЫОВ˘¤˜ М·БУЛЩФЫОfiЛЫЛ˜ S-VHS О·И Hi-8, ..).
EEÈÈÏÏÔÔÁÁ‹‹ ÛÛ˘˘ÓÓ‰‰Â‰‰ÂÂÌ̤¤ÓÓˆˆÓÓ ÛÛ˘˘ÛÛÎ΢˘ÒÒÓÓ
¶È¤ÛÙ ÙÔ Ï‹ÎÙÚÔ n ÁÈ· Ó· ÂÈϤÍÂÙ EXT1 Î·È ÛÙȘ
ÂΉfiÛÂȘ Ì 2
ÓÔ‰Ô¯¤˜ ™Î·ÚÙ Ú›˙˜: EXT2 Î·È S-VHS2
(Û‹Ì·Ù· S-VHS Ù˘ Ú›˙·˜ EXT2) Î·È EXT3.
OИ ВЪИЫЫfiЩВЪВ˜ Ы˘ЫОВ˘¤˜ (·ФОˆ‰ИОФФИЛЩ¤˜, ‚›УЩВФ)
О¿УФ˘У ЩЛ МВЩ·ЩЪФ‹ ·fi МfiУВ˜ ЩФ˘˜.
ÕÕÏÏÏϘ˜ ÛÛ˘˘ÛÛÎ΢˘¤¤˜˜
*
DC in PC input
:
L
Audio in
(PC)
R
FM ANT
EXT 1
Sub
woofer
out
*
EXT 2
L
R
Audio
out
:
FM ANT
VCR
Sub
woofer
out
*
L
R
Audio
out
Page 79

15
√И ˘Ф‰Ф¯¤˜ Ы‡У‰ВЫЛ˜ AV О·И S-VIDEO ‚Ъ›ЫОФУЩ·И О¿Щˆ
·fi ЩФ ·ЪИЫЩВЪfi П·›ЫИФ ‹, ЫЩИ˜ ЩЛПВФЪ¿ЫВИ˜ МВ МВБ¿ПЛ
ФıfiУЛ, О¿Щˆ ·fi ЩФ ‰ВН› П·›ЫИФ.
¶Ъ·БМ·ЩФФИ‹ЫЩВ ЩИ˜ ·Ъ·О¿Щˆ ВУТЫВИ˜.
ªВ ЩФ П‹ОЩЪФ
n, ÂÈϤÍÙ EXT3.
°И· М›· МФУФКˆУИО‹ Ы˘ЫОВ˘‹, Ы˘У‰¤ЫЩВ ЩФ Ы‹М· ЩФ˘ ‹¯Ф˘
ЫЩЛУ В›ЫФ‰Ф
AUDIO L
. O ‹¯Ô˜ ‚Á·›ÓÂÈ ·˘ÙfiÌ·Ù· ·fi Ù·
·ЪИЫЩВЪ¿ О·И ‰ВНИ¿ МВБ¿„ˆУ· ЩЛ˜ Ы˘ЫОВ˘‹˜
√Ù·Ó Û˘Ó‰ÂıÔ‡Ó Ù· ·ÎÔ˘ÛÙÈο, Ô ‹¯Ô˜ Ù˘ ÙËÏÂfiÚ·Û˘
‰È·ÎfiÙÂÙ·È. ∆· Ï‹ÎÙÚ·
@”#ÂÈÙÚ¤Ô˘Ó ÙË
Ú‡ıÌÈÛË Ù˘ ¤ÓÙ·Û˘.
∏ ·УЩ›ЫЩ·ЫЛ ЩˆУ ·ОФ˘ЫЩИОТУ Ъ¤ВИ У· ВЪИП·М‚¿УВЩ·И
МВЩ·Н‡ 32 О·И 600
ohms
.
µµÈÈÓÓÙÙÂÂÔÔÎο¿ÌÌÂÂÚÚ··,, ‚‚ÈÈÓÓÙÙÂÂÔÔ··Èȯ¯ÓÓ››‰‰ÈÈ··
∞∞ÎÎÔÔ˘˘ÛÛÙÙÈÈÎο¿
O
°И· Ы‡У‰ВЫЛ ЫВ ¤У· ЫЩВЪВФКˆУИОfi О·У¿ПИ, ¯ЪЛЫИМФФИ‹ЫЩВ
ЩФ О·ПТ‰ИФ Ы‡У‰ВЫЛ˜ ‹¯Ф˘ О·И Ы˘У‰¤ЫЩВ ЩИ˜ ВНfi‰Ф˘˜
Audio out L Î·È R Ù˘ ÙËÏÂfiÚ·Û˘ Û ̛· ›ÛÔ‰Ô Audio in
L Î·È R ЩФ˘ ЫЩВЪВФКˆУИОФ‡ О·У·ПИФ‡. ∂¿У ‰И·ı¤ЩВЩВ Л¯В›·
Ì ‰˘Ó·Ù¿ Ì¿Û·, Û˘Ó‰¤ÛÙ ÙËÓ ¤ÍÔ‰Ô
Subwoofer out Ù˘
ÙËÏÂfiÚ·Û˘ Ì ÙËÓ Â›ÛÔ‰Ô
Subwoofer in ÙˆÓ Ë¯Â›ˆÓ.
™˘У‰¤ЫЩВ ЩЛУ ¤НФ‰Ф ЩЛ˜ ФıfiУЛ˜ ЩФ˘ ˘ФПФБИЫЩ‹ Ы·˜ ЫЩЛУ
В›ЫФ‰Ф
PC input (VGA) Ù˘ ÙËÏÂfiÚ·Û˘. ™˘Ó‰¤ÛÙ ÙËÓ ¤ÍÔ‰Ô
‹¯Ô˘
Audio out L Î·È R ЩФ˘ ˘ФПФБИЫЩ‹ ЫЩЛУ В›ЫФ‰Ф Audio
in (PC) L Î·È R Ù˘ ÙËÏÂfiÚ·Û˘.
°И· ВЪИЫЫfiЩВЪВ˜ ПЛЪФКФЪ›В˜ Ы¯ВЩИО¿ МВ ЩЛ ¯Ъ‹ЫЛ ЩЛ˜
ПВИЩФ˘ЪБ›·˜ PC, ‰В›ЩВ ЩЛ ЫВП›‰· 8.
∏ ‚¤ПЩИЫЩЛ ·У¿П˘ЫЛ ФıfiУЛ˜ ВИЩ˘Б¯¿УВЩ·И ‰И·МФЪКТУФУЩ·˜
ЩФУ ˘ФПФБИЫЩ‹ ЫВ ·У¿П˘ЫЛ
1024 x 768, 60 Hz.
¶ÚÔÛÔ¯‹:
В¿У ¯ЪЛЫИМФФИ‹ЫВЩВ ‰И·КФЪВЩИО‹ ·У¿П˘ЫЛ, В›У·И
Иı·Уfi Л ПВИЩФ˘ЪБ›· PIP У· МЛ ПВИЩФ˘ЪБВ›. ™ЩЛУ ВЪ›ЩˆЫЛ
·˘Щ‹, ВМК·У›˙ВЩ·И ЫЩЛУ ФıfiУЛ ¤У· ЪФВИ‰ФФИЛЩИОfi М‹У˘М·.
∞ОФПФ˘ıВ› ¤У·˜ О·Щ¿ПФБФ˜ ЩˆУ ‰И¿КФЪˆУ ·У·П‡ЫВˆУ
ВИОfiУ·˜ Ф˘ ‰И·ı¤ЩВИ Л ЩЛПВfiЪ·Ы‹ Ы·˜:
640 x 350, 70 Hz 720 x 400,70 Hz 1024 x 768,60 Hz
640 x 350, 85 Hz 720 x 400,85 Hz 1024 x 768,70 Hz
640 x 480, 60 Hz 800 x 600,56 Hz 1024 x 768,75 Hz
640 x 480, 67 Hz 800 x 600,60 Hz 1024 x 768,85 Hz
640 x 480, 72 Hz 800 x 600,72 Hz 1152 x 864,75 Hz
640 x 480, 75 Hz 800 x 600,75 Hz 1280 x 960,60 Hz
640 x 480, 85 Hz 800 x 600,85 Hz 1280 x 1024,60 Hz
832 x 624, 75 Hz 1280 x 1024,75 Hz
∂∂ÓÓÈÈÛÛ¯¯˘˘ÙÙ‹‹˜˜
∏∏ÏÏÂÂÎÎÙÙÚÚÔÔÓÓÈÈÎÎfifi˜˜ ÀÀÔÔÏÏÔÔÁÁÈÈÛÛÙÙ‹‹˜˜
S-VIDE
VIDEO
L
AUDIO
R
Sub
woofer
out
*
L
R
Audio
out
Sub
Sub
woofer
out
Audio
out
*
LR
woofer
Audio
in
in
PC input
Audio in (PC)
L
R
Page 80

16
™™˘˘ÌÌ‚‚ÔÔ˘˘ÏϤ¤˜˜
KK··Î΋‹ ÏÏ‹‹„„ËË
AAÔÔ˘˘ÛÛ››·· ÂÂÈÈÎÎfifiÓÓ··˜˜
OOÈÈ ÂÂÚÚÈÈÊÊÂÂÚÚÂÂÈÈ··ÎΤ¤˜˜
ÛÛ˘˘ÛÛÎ΢˘¤¤˜˜ ‰‰››ÓÓÔÔ˘˘ÓÓ
··ÛÛÚÚfifiÌÌ··˘˘ÚÚËË ÂÂÈÈÎÎfifiÓÓ··;;
AAÔÔ˘˘ÛÛ››·· ‹‹¯¯ÔÔ˘˘
∏∏ ÏÏÂÂÈÈÙÙÔÔ˘˘ÚÚÁÁ››·· PPCC ‹‹ ËË
ÏÏÂÂÈÈÙÙÔÔ˘˘ÚÚÁÁ››·· PPIIPP ‰‰ÂÂÓÓ
ÏÏÂÂÈÈÙÙÔÔ˘˘ÚÚÁÁÔÔ‡‡ÓÓ;;
¢¢ÂÂÓÓ ÏÏÂÂÈÈÙÙÔÔ˘˘ÚÚÁÁ›› ÈÈ··
ÙÙÔÔ ÙÙËËÏϯ¯ÂÂÈÈÚÚÈÈÛÛÙÙ‹‹ÚÚÈÈÔÔ;;
AAÓÓ··ÌÌÔÔÓÓ‹‹
∫∫··ıı··ÚÚÈÈÛÛÌÌfifi˜˜ ÙÙˢ˜
ÙÙËËÏÏÂÂfifiÚÚ··ÛÛˢ˜
OO‰‰ËËÁÁ››·· ÁÁÈÈ·· ÙÙËËÓÓ
··ÓÓ··Î·‡ÎÎÏψˆÛÛËË
KK··ÓÓ¤¤ÓÓ·· ··ÔÔÙÙ¤¤ÏÏÂÂÛÛÌÌ··;;
AУ ОФУЩ¿ ЫЩЛУ ВЪИФ¯‹ fiФ˘ ‚Ъ›ЫОВЩ·И Л ЩЛПВfiЪ·ЫЛ ˘¿Ъ¯Ф˘У ‚Ф˘У¿ ‹ „ЛП¿
ОЩ‹ЪИ·, МФЪВ› У· ·Ъ·ЩЛЪЛıВ› ‰ИП‹ ВИОfiУ·, Л¯Т ‹ ЫОИ¤˜. ™В ·˘Щ‹ ЩЛУ
ВЪ›ЩˆЫЛ, ЪФЫ·ı‹ЫЩВ У· Ъ˘ıМ›ЫВЩВ МВ ЩФ ¯¤ЪИ ЩЛУ ВИОfiУ· Ы·˜: ‚П¤В
“MИОЪФ-Ъ‡ıМИЫЛ” (ЫВП.7) ‹ ·ПП¿НЩВ ЩФУ ЪФЫ·У·ЩФПИЫМfi ЩЛ˜ ВНˆЩВЪИО‹˜
ОВЪ·›·˜. E›ЫЛ˜, ВП¤БНЩВ ·У Л ОВЪ·›· Ы·˜, Ы·˜ ВИЩЪ¤ВИ У· П·М‚¿УВЩВ ВОФМ¤˜
ЫВ ·˘Щfi ЩФ В‡ЪФ˜ Ы˘¯УФЩ‹ЩˆУ (UHF ‹ VHF).
Œ¯ÂÙÂ Û˘Ó‰¤ÛÂÈ Î·Ï¿ ÙËÓ ÎÂÚ·›·; Œ¯ÂÙ ÂÈϤÍÂÈ ÙÔ ÛˆÛÙfi Û‡ÛÙËÌ·; (ÛÂÏ. 7) AÓ Ë
˘
Ô‰Ô¯‹ ™Î·ÚÙ
‹ Ë ˘Ô‰Ô¯‹ Ù˘ ÎÂÚ·›·˜ ‰ÂÓ ¤¯Ô˘Ó Û˘Ó‰Âı› ηϿ, ÌÔÚ› Ó· ¤¯ÂÙÂ
ЪФ‚П‹М·Щ· МВ ЩЛУ ВИОfiУ· ‹ ЩФУ ‹¯Ф (МВЪИО¤˜ КФЪ¤˜ Щ· ‚
‡
ÛÌ·Ù· ÔÛ˘Ó‰¤ÔÓÙ·È ÂÏ·ÊÚ¿
fiÙ·Ó ÌÂٷʤÚÔ˘Ì ‹ ÛÙÚ¤ÊÔ˘Ì ÙËÓ ÙËÏÂfiÚ·ÛË). EϤÁÍÙ fiϘ ÙȘ Û˘Ó‰¤ÛÂȘ.
¢ÂÓ ¤¯ÂÙ ÂÈϤÍÂÈ ÙË ÛˆÛÙ‹ ˘Ô‰Ô¯‹ Ì ÙÔ Ï‹ÎÙÚÔ n : S-VHS2 ·ÓÙ› ÁÈ· EXT2.
°И· ЩЛУ ·У¿БУˆЫЛ МИ·˜ ‚ИУЩВФЩ·ИУ›·˜, ВП¤БНЩВ ·У ¤¯ВИ М·БУЛЩФЫОФЛıВ› ЫЩФ ›‰ИФ
Ы‡ЫЩЛМ· (PAL, SECAM, NTSC) Ì ·˘Ùfi Ô˘ ‰È·‚¿˙ÂÈ ÙÔ ‚›ÓÙÂfi Û·˜.
AУ МВЪИО¿ ЪФБЪ¿ММ·Щ· ‰ВУ ¤¯Ф˘У ‹¯Ф, ·ПП¿ ¤¯Ф˘У ВИОfiУ·, ЫЛМ·›УВИ fiЩИ ‰ВУ
¤¯ВЩВ ЩФ ЫˆЫЩfi Ы‡ЫЩЛМ· ЩЛПВfiЪ·ЫЛ˜. AПП¿НЩВ ЩЛ Ъ‡ıМИЫЛ ™T™THMA (ЫВП. 7).
√ ВУИЫ¯˘Щ‹˜ Ф˘ ¤¯ВЩВ Ы˘У‰¤ЫВИ ЫЩЛУ ЩЛПВfiЪ·ЫЛ ‰ВУ ·Ф‰›‰ВИ ‹¯Ф; µВ‚·ИˆıВ›ЩВ
fiЩИ ‰ВУ ¤¯ВЩВ МВЪ‰¤„ВИ ЩЛУ ¤НФ‰Ф ‹¯Ф˘ МВ ЩЛУ В›ЫФ‰Ф ‹¯Ф˘.
µВ‚·ИˆıВ›ЩВ fiЩИ ¤¯ВЩВ ‰И·МФЪКТЫВИ ЩФУ ЛПВОЩЪФУИОfi ˘ФПФБИЫЩ‹ ЫВ Ы˘М‚·Щ‹
·У¿П˘ЫЛ ВИОfiУ·˜ (‰В›ЩВ ЩЛ Ы. 15).
™ЩЛ ПВИЩФ˘ЪБ›· PC, ‰ВУ О·ЩФЪıТУВЩВ У· ·ОФ‡ЫВЩВ ‹¯Ф ·fi ЩФ Ъ·‰ИfiКˆУФ; ŸЩ·У
¤¯ВЩВ ВУВЪБФФИ‹ЫВИ ЩЛ ПВИЩФ˘ЪБ›· PIP, Л ‹¯Ф˜ ЪФˆıВ›Щ·И ЫЩЛУ ЩЛПВfiЪ·ЫЛ. £·
Ъ¤ВИ У· ·ВУВЪБФФИ‹ЫВЩВ ЩЛ ПВИЩФ˘ЪБ›· PIP, У· ВЪ¿ЫВЩВ ЫВ ПВИЩФ˘ЪБ›·
Ъ·‰ИФКТУФ˘ О·И ¤ВИЩ· У· ВИЫЩЪ¤„ВЩВ ЫЩЛ ПВИЩФ˘ЪБ›· PC.
H ЩЛПВfiЪ·ЫЛ ‰ВУ ·УЩ·ФОЪ›УВЩ·И ЫЩФ ЩЛПВ¯ВИЪИЫЩ‹ЪИФ: Л ВУ‰ВИОЩИО‹ П˘¯У›· ЩЛ˜
ЩЛПВfiЪ·ЫЛ˜ ‰ВУ ·У·‚ФЫ‚‹УВИ fiЩ·У ¯ЪЛЫИМФФИВ›ЩВ ЩФ ЩЛПВ¯ВИЪИЫЩ‹ЪИФ; AПП¿НЩВ ЩИ˜
М·Щ·Ъ›В˜.
ŸЩ·У ·УФ›БВЩВ ЩЛУ ЩЛПВfiЪ·ЫЛ, ·Ъ·М¤УВИ ЫВ О·Щ¿ЫЩ·ЫЛ ·У·МФУ‹˜ О·И ВМК·У›˙ВЩ·И Л
¤У‰ВИНЛ K§EI¢шMA МfiПИ˜ ¯ЪЛЫИМФФИ‹ЫВЩВ Щ· П‹ОЩЪ· ЩЛ˜ ЩЛПВfiЪ·ЫЛ˜; E¯ВИ
ВУВЪБФФИЛıВ› Л ПВИЩФ˘ЪБ›· K§EI¢шMA (‚П. ЫВП. 10). AУ Л ЩЛПВfiЪ·ЫЛ ‰ВУ П·М‚¿УВИ Ы‹М·
БИ· 15 ПВЩ¿, ВЪУ¿ ·˘ЩfiМ·Щ· ЫЩЛУ О·Щ¿ЫЩ·ЫЛ ·У·МФУ‹˜. °И· ВНФИОФУfiМЛЫЛ ВУ¤ЪБВИ·˜, Л
ЩЛПВfiЪ·Ы‹ Ы·˜ ¤¯ВИ ВНФПИЫЩВ› МВ ВН·ЪЩ‹М·Щ· Ф˘ ВИЩЪ¤Ф˘У ФП‡ ¯·МЛП‹ О·Щ·У¿ПˆЫЛ
ВУ¤ЪБВИ·˜ ЫЩЛ ı¤ЫЛ ·У·МФУ‹˜ (МИОЪfiЩВЪЛ ·fi 1 W).
√ О·ı·ЪИЫМfi˜ ЩЛ˜ ФıfiУЛ˜ О·И ЩФ˘ П·ИЫ›Ф˘ Ъ¤ВИ У· Б›УВЩ·И МfiУФ МВ ¤У·
О·ı·Ъfi ·У›, ··Пfi О·И ¯ˆЪ›˜ ¯УФ‡‰И. ªЛУ ¯ЪЛЫИМФФИВ›ЩВ ЪФ˚fiУЩ· МВ ‚¿ЫЛ ЩФ
ФИУfiУВ˘М· ‹ ‰И·П˘ЩИО¿.
°И· ЩЛУ ВИПФБ‹ ЩˆУ ЪФБЪ·ММ¿ЩˆУ Ъ¤ВИ ЪТЩ· У· И¤ЫВЩВ ЩФ П‹ОЩЪФ > БИ·
У· МВ›ЩВ ЫЩФ ˘ФМВУФ‡.
°И· ЩЛУ ЩЛПВfiЪ·Ы‹ Ы·˜ ¯ЪЛЫИМФФИ‹ıЛО·У ВН·ЪЩ‹М·Щ· Ф˘ МФЪФ‡У У·
Н·У·¯ЪЛЫИМФФИЛıФ‡У ‹ У· ·У·О˘ОПˆıФ‡У. °И· У· ВП·¯ИЫЩФФИЛıВ› Л ·fiЪЪИ„Л
·fi‚ПЛЩˆУ ЫЩФ ВЪИ‚¿ППФУ, ВИ‰ИОВ˘М¤УВ˜ ВЩ·ИЪ›В˜ Ы˘ПП¤БФ˘У ЩИ˜
¯ЪЛЫИМФФИЛМ¤УВ˜ Ы˘ЫОВ˘¤˜, БИ· У· ЩИ˜ ·ФЫ˘У·ЪМФПФБ‹ЫФ˘У О·И У·
Ы˘БОВУЩЪТЫФ˘У Щ· ˘ПИО¿ Ф˘ МФЪФ‡У У· Н·У·¯ЪЛЫИМФФИЛıФ‡У (ВУЛМВЪˆıВ›ЩВ
ЫЩФ О·Щ¿ЫЩЛМ· ·fi ЩФ ФФ›Ф ·БФЪ¿Ы·ЩВ ЩЛУ ЩЛПВfiЪ·Ы‹ Ы·˜).
∞ФЫ˘У‰¤ЫЩВ ЩЛУ ЩЛПВfiЪ·ЫЛ ·fi ЩЛУ Ъ›˙· ЩФ˘ ЩФ›¯Ф˘ БИ· 30 ‰В˘ЩВЪfiПВЩ· О·И
¤ВИЩ· Ы˘У‰¤ЫЩВ ЩЛ Н·У¿.
™В ВЪ›ЩˆЫЛ ‚П¿‚Л˜, ФЩ¤ МЛУ ЪФЫ·ı‹ЫВЩВ У· ВИ‰ИФЪıТЫВЩВ МfiУФИ Ы·˜ ЩЛУ
ЩЛПВfiЪ·ЫЛ, ·ПП¿ Ы˘М‚Ф˘ПВ˘ıВ›ЩВ ЩФ Ы¤Ъ‚И˜ ЩФ˘ ·УЩИЪФЫТФ˘ ЩЛ˜ ВЩ·ИЪ›·˜.
Page 81

1
Introduction
Ta b le of Contents
Thank you for purchasing this television set.
This handbook has been designed to help you install and operate your TV set.
We would strongly recommend that you read it thoroughly.
We hope our technology meets entirely with your satisfaction.
Installation
Presentation of the LCD Television . . . . . . . . . . . . . . . . . . . . . . . . . . . . . . . . . . . . .4
The remote control keys . . . . . . . . . . . . . . . . . . . . . . . . . . . . . . . . . . . . . . . . . . . .3
Installing your television set . . . . . . . . . . . . . . . . . . . . . . . . . . . . . . . . . . . . . . . . . .4
Quick installation . . . . . . . . . . . . . . . . . . . . . . . . . . . . . . . . . . . . . . . . . . . . . . . . . .5
Sorting programmes . . . . . . . . . . . . . . . . . . . . . . . . . . . . . . . . . . . . . . . . . . . . . . . .5
Choosing a language and country . . . . . . . . . . . . . . . . . . . . . . . . . . . . . . . . . . . . .6
Automatic tuning . . . . . . . . . . . . . . . . . . . . . . . . . . . . . . . . . . . . . . . . . . . . . . . . . .6
EasyLink function . . . . . . . . . . . . . . . . . . . . . . . . . . . . . . . . . . . . . . . . . . . . . . . . . . .6
Manual tuning . . . . . . . . . . . . . . . . . . . . . . . . . . . . . . . . . . . . . . . . . . . . . . . . . . . . .7
Programme name . . . . . . . . . . . . . . . . . . . . . . . . . . . . . . . . . . . . . . . . . . . . . . . . . .7
Operation
Using the radio . . . . . . . . . . . . . . . . . . . . . . . . . . . . . . . . . . . . . . . . . . . . . . . . . . . . .8
Using in PC monitor mode . . . . . . . . . . . . . . . . . . . . . . . . . . . . . . . . . . . . . . . . . . .8
Adjusting the picture . . . . . . . . . . . . . . . . . . . . . . . . . . . . . . . . . . . . . . . . . . . . . . .9
Adjusting the sound . . . . . . . . . . . . . . . . . . . . . . . . . . . . . . . . . . . . . . . . . . . . . . . .9
Feature settings . . . . . . . . . . . . . . . . . . . . . . . . . . . . . . . . . . . . . . . . . . . . . . . . . . . .9
Timer function . . . . . . . . . . . . . . . . . . . . . . . . . . . . . . . . . . . . . . . . . . . . . . . . . . .10
Locking the set . . . . . . . . . . . . . . . . . . . . . . . . . . . . . . . . . . . . . . . . . . . . . . . . . . .10
Teletext . . . . . . . . . . . . . . . . . . . . . . . . . . . . . . . . . . . . . . . . . . . . . . . . . . . . . . . . .11
16:9 Formats . . . . . . . . . . . . . . . . . . . . . . . . . . . . . . . . . . . . . . . . . . . . . . . . . . . . .12
Video recorder or DVD keys . . . . . . . . . . . . . . . . . . . . . . . . . . . . . . . . . . . . . . . .13
Glossary . . . . . . . . . . . . . . . . . . . . . . . . . . . . . . . . . . . . . . . . . . . . . . . . . . . . . . . .13
Peripherals
Video recorder . . . . . . . . . . . . . . . . . . . . . . . . . . . . . . . . . . . . . . . . . . . . . . . . . . .14
Other equipment . . . . . . . . . . . . . . . . . . . . . . . . . . . . . . . . . . . . . . . . . . . . . . . . .14
To select connected equipment . . . . . . . . . . . . . . . . . . . . . . . . . . . . . . . . . . . . .14
Video camera, video games . . . . . . . . . . . . . . . . . . . . . . . . . . . . . . . . . . . . . . . . . .15
Headphones . . . . . . . . . . . . . . . . . . . . . . . . . . . . . . . . . . . . . . . . . . . . . . . . . . . . . 15
Amplifier . . . . . . . . . . . . . . . . . . . . . . . . . . . . . . . . . . . . . . . . . . . . . . . . . . . . . . . . .15
Computer . . . . . . . . . . . . . . . . . . . . . . . . . . . . . . . . . . . . . . . . . . . . . . . . . . . . . . .15
Tips . . . . . . . . . . . . . . . . . . . . . . . . . . . . . . . . . . . . . . . . . . . . . . . . . . . . . . . . . . .16
w
Cleaning the set
Only use a clean, soft and lint-free cloth to clean the screen and the casing of
your set.Do not use alcohol-based or solvent-based products.
English
Page 82

2
Presentation of the LCD Television
Television keys:
• .: to switch the TV on or off.
• VOLUME - + (-”+): to adjust sound level.
• PROGRAM - + (- P +):to select programmes.
• MENU: to access or close menus, simultaneously
press the ” - and ” + keys. The - + keys can be
used to select an adjustment and the ” - + keys to
make that adjustment.
Note
: when the CHILD LOCK function is activated the
-”+ and - P + keys are unavailable (refer to FEATURES
menu on page 10).
On-light and infrared sensors.
Adjustable stand.
The stand can be removed and replaced with a wall
mounting kit available as an option (ask your dealer).
Rear of set :
The main connections are made at the bottom of the
television.
Removable panels to left* and right access the
supplementary connection sockets.
* The large screen sizes do not have a left panel. For more
details on connections see page 14.
EXT1 socket
TV and radio aerial sockets
VGA and audio input for connecting a computer.
DC supply socket
-
MENU
”
VOLUME
P
.
+
-
PROGRAM
+
DC in PC input (VGA)
L
Audio in (PC)
R
:
FM ANT
EXT. 1
Ø
Page 83

3
12
MODE
MUTE
RADIO
VCR
DVD
SMARTSMART ACTIVE
CONTROL
MENU
PC TV
OK
P
564
879
0
·¢Ê∆Æ
∫
ù
¤Ó
`
Ÿı
Å
Ë
Á
∏
3
--
++
.
ª
-
[
”
Y
ª
Remote control keys
Select peripherals (p.14)
Press several times to select the
required EXT connector.
Teletext keys (p. 11)
or VCR / DVD (p.13)
œ PIP on/off (p. 8)
π Move PIP (p. 8)
Sleeptimer
To select the length of time before
the set automatically switches to
standby (from 0 to 240 minutes)
Active control
Optimizes the quality of the picture
according to the quality of reception.
Sound mode
Used to force programmes in
STEREO
and
NICAM STEREO to MONO or,
for bilingual programmes, to choose
between DUAL I or DUAL II
.
When the sound mode is switched to
MONO, the indication is displayed in red.
Menu
To call up or exit the menus.
Cursor
These 4 keys are used to move
around the menus.
Volume
To adjust the sound level
PC / TV / Radio
Press one of these keys to switch
the television between PC,TV or
radio mode (p. 8).
16:9 formats (p.12)
Mute
To mute or restore the sound.
Screen information
To display / remove the programme
number, the name (if it exists), the
time, the sound mode and the time
remaining on the timer. Hold down
for 5 seconds to permanently
display the programme number on
the screen.The volume level and the
smart control adjustments are then
displayed each time they are used.
Standby
To set the TV to standby mode.To
switch the TV set on again, press
b,P @#or 09.
List of programmes
To display/clear the list of programmes.
Use the keys îÏ to select a
programme and the key
¬ to display it.
The symbol + is displayed alongside
all programmes which are locked (p.10)
or ? if they are not locked.
Smart picture and sound
Used to access a series of predefined
picture and sound settings.
The PERSONAL position relates to
settings selected from the menus.
Surround sound
To activate/deactivate the surround
sound effect. In stereo, this gives the
impression that the speakers are further
apart. For models equipped with Virtual
Dolby Surround*,you can obtain Dolby
Surround Pro Logic sound quality.In
mono,a stereo spatial effect is simulated.
* Manufactured under license from Dolby
Laboratories Licensing Corporation. ”Dolby” ”Pro Logic”
and the double-D symbol £ are trademarks of
Dolby Laboratories Licensing Corporation.
Selecting TV programmes
To move up or down a programme.
The number, (the name) and the sound
mode are displayed for a few seconds.
For some TV programmes the title of
the programme appears at the bottom
of the screen.
Previous programme
To access the previously viewed
programme.
Numerical keys
For direct access to programmes.
For a 2 digit programme number,
the 2nddigit must be entered
before the dash disappears.
Mode selector (p. 13)
To activate the remote control in
TV,VCR (video recorder) or DVD
mode.
Page 84

4
& Positioning the television set
Place your TV on a solid stable surface. To avoid
danger do not expose the TV to water, or a heat
source (e.g. lamp, candle, radiator). Do not obstruct
the ventilation grid at the rear.
é
Connecting the aerials
• Use the aerial connection lead supplied and
connect the
: socket situated at the bottom of
the TV to your aerial socket.
• Insert the radio aerial lead supplied into the FM
ANT socket located at the bottom of the TV.
• Arrange the leads by passing them through the
television stand.
“
Power supply connections
The TV works with a DC supply (the voltage is
indicated on the label). Only use the AC-DC
adaptor supplied with the TV.
• Connect the DC plug of the adaptor to the TV DC
socket. Leave a space round the adaptor for
ventilation.
• Insert the adaptor power lead and insert the mains
plug into the wall socket.
For connecting other appliances see page p.14.
‘
Remote control
Insert the two R6-type batteries supplied, making
sure they are the right way round.
The batteries supplied with the appliance do not
contain mercury or nickel cadmium so as to protect
the environment. Please do not discard your used
batteries, but use the recycling methods available
(consult your distributor).
(
Switching on
To switch on the set, press the on/off key. A green
indicator comes on and the screen lights up. Go
straight to the Quick Installation chapter on page 5.
If the TV remains in standby mode(red indicator),
press the P
# key on the remote control.
The indicator will flash when you use the remote control.
Installing your television set
5 cm
5 cm
5 cm
FM ANT.
MENU
”
P
++
--
.
VOLUME
PROGRAM
Page 85

5
Quick installation
Sorting programmes
The first time you switch on the television,a
menu appears on the screen.This menu asks
you to choose the language of the menus :
If the menu does not appear, hold down the ” - and
” + keys on the set for 8 seconds to bring it up.
& Use the îÏ keys on the remote control to
choose your language then confirm with
¬.
é Then select your country using the
îÏ
keys and confirm with ¬.
If your country does not appear in the list, select “.. .”
“ Tuning starts automatically.
The operation takes several minutes.
A display shows the search status and the
number of programmes found.When it has
finished the menu disappears.
To exit or interrupt the search, press the
H key.
If no programmes are found, refer to the chapter
entitled Tips on p. 16.
‘ If the transmitter or the cable network
broadcasts the automatic sort signal, the
programmes will be correctly numbered.
( If not, the programmes found will be numbered
in descending order starting at 99, 98, 97, etc.
Use the SORT menu to renumber them.
Some transmitters or cable networks broadcast
their own sort parameters (region, language,etc.).
Where this is the case, make your choice using the
îÏ keys and confirm with ¬.
See also: EasyLink function, page 6.
& Press the H key. The main menu is displayed.
é Select INSTALL (
Ï), then press ¬.
The INSTALL menu appears.
“ Using the
Ï key, select SORT then press
¬.The SORT menu appears.The FROM
option is activated.
Note:
this menu works as follows:
• Change "FROM" (enter the current programme
number),
• "TO" (enter the new number),
• EXCHANGE numbers" (the operation is carried out).
‘ Select the programme you wish to renumber
using
Ȭ keys or 0 to 9.
Example: to renumber programme 78 as 2
press
78.
( Select TO (using
Ï key) and enter the new
number with
Ȭ keys or 0 to 9 (for
the example given, enter
2).
§ Select EXCHANGE (
Ï key) and press ¬.
The message EXCHANGED appears, the
exchange takes place. In our example,
programme 78 is renumbered as 2 (and
programme 2 as 78).
è Select the option FROM (
î key) and repeat
stages ‘ to § as many times as there are
programmes to renumber.
See also: EasyLink function, page 6.
! To exit from the menus, press
d.
• PICTURE
• SOUND
• FEATURES
• INSTALL
INSTALL
• LANGUAGE
• COUNTRY
• AUTO STORE
• MANUAL STORE
• SORT
• NAME
FROM
TO
EXCHANGE
SELECT LANGUAGE
LANGUAGE
•
ENGLISH
DANSK
NEDERLANDS
FINNISH
FRANCAIS
COUNTRY
AUSTRIA
BELGIUM
SWITZERLAND
GERMANY
DENMARK
Page 86

6
Choosing a language and country
Automatic tuning
& Press the H key to display the main menu.
é Select INSTALL (
Ï), then press ¬.
The INSTALL menu appears.
The LANGUAGE option is activated.
“ Press
¬ to go into the LANGUAGE menu.
‘ Select your language with the
îÏ keys.
The menus will appear in the chosen language.
( Press
È to exit the LANGUAGE menu.
§ Select the option COUNTRY and press
¬.
è Select your country with
îÏ keys.
If your country does not appear in the list, select
OTHER.
! Press
È to exit the COUNTRY menu.
ç To exit from the menus, press
d.
See also: EasyLink function below.
This menu allows you to automatically search
for all the programmes available in your region
(or on your cable network).
& First carry out operations & to ! above, then:
é Press
Ï once to select AUTO STORE then
press
¬.The search begins.
After several minutes,the INSTALL menu
reappears automatically.
“ If the transmitter or the cable network
broadcasts the automatic sort signal, the
programmes will be correctly numbered.
‘ If not, the programmes found will be
numbered in descending order starting at 99,
98, 97, etc.
Use the SORT menu to renumber them.
Some transmitters or cable networks broadcast
their own sort parameters (region, language,etc.).
Where this is the case, make your choice using the
îÏ keys and confirm with ¬.
To exit or interrupt the search, press the H key. If
no picture is found, refer to the chapter entitled
Tips on p. 16.
See also: EasyLink function below.
( To exit from the menus, press
d.
• PICTURE
• SOUND
• FEATURES
• INSTALL
INSTALL
• LANGUAGE
• COUNTRY
• AUTO STORE
• MANUAL STORE
• SORT
•
NAME
ENGLISH
DANSK
NEDERLANDS
INSTALL
• LANGUAGE
• COUNTRY
• AUTO STORE
• MANUAL STORE
• SORT
•
NAME
SEARCHING
PLEASE WAIT
PROG. NO. 2
215.18 MHZ
If the set is connected (by the EXT2 socket)
to a video equipped with the EasyLink
function, the language, country and channels
found are automatically transmitted to the
video recorder at the time of installation.
A message is displayed on-screen during
loading.The list of video recorder channels is
then the same as those of the set.
The EASY LINK setting in the OPTIONS menu
must be set to ON (default setting), see page 9.
EasyLink function
(only available on certain versions)
Page 87

7
Manual tuning
Programme name
This menu allows you to store the
programmes one by one.
& Press
H.
é Select INSTALL (
Ï), then press ¬.
The INSTALL menu appears.
“ Select MANUAL STORE (
Ï) then press ¬.
The menu appears :
‘ Press
¬ to go to the SYSTEM menu.
Use
îÏ to choose EUROPE (automatic
detection*) or manual detection with WEST
EUR (standard BG reception), EAST EUR
(standard DK reception), UK (standard I
reception) or FRANCE (standard LL').
Then press
È to exit from the menu.
* Except for France (standard LL'): select the
option FRANCE.
( Select SEARCH and press
¬.
The search begins.As soon as a programme is
found, the search will stop.If you know the
frequency of the programme required, enter
its number directly using the
09keys and
go to step è.
If no programme is found, refer to the Tips chapter
on page 16).
§ If reception is un-satisfactory, select FINE
TUNE and hold down
È or ¬ key.
è Select PROG.NO (programme number) and
use the
Ȭor 0 to 9 keys to enter
the desired number.
! Select STORE and press
¬.The message
STORED appears.The programme is stored.
See also: EasyLink function, page 6.
ç Repeat steps ( to ! for each programme to
be stored.
To exit: press the
d key.
You may,if you wish, give a name to the first
40 programmes (from 1 to 40).
& Press
H.
é Select INSTALL (
Ï), then press ¬.
The INSTALL menu appears.
“ Press
Ï 5 times to select NAME (concealed
at the bottom of the screen), then press
¬.
The menu appears :
‘ Select the programme you wish to name using
the keys
09or @ P #.
Note: at the time of installation, the programmes
are automatically named when the identification
signal is transmitted.
( Use the keys
Ȭ to move within the
name display area (5 characters).
§ Use keys
îÏ to choose the characters.
è Press
H when the name has been entered.
The programme name is stored.
See also: EasyLink function, page 6.
! Repeat steps ‘ to è for each programme to
be named.
ç To exit from the menus, press
d.
• PICTURE
• SOUND
• FEATURES
• INSTALL
INSTALL
MANUAL STORE
• SYSTEM
• SEARCH
• PROG. NO.
• FINE TUNE
• STORE
EUROPE
WEST EUR
EAST EUR
UK
FRANCE
INSTALL
• LANGUAGE
• COUNTRY
• AUTO STORE
• MANUAL STORE
• SORT
•
NAME
BBC_1
Page 88

8
Using the radio
Using in PC monitor mode
Choosing radio mode
Press the
Z key on the remote control to
switch the TV to radio mode. Press the
X
key to return to TV mode. In radio mode the
number and name of the station (if available),
its frequency and the sound mode are
indicated on the screen.
To enter the name of the stations use the NAME
menu. (p. 7)
Selecting programmes
Use the
09or @ P # keys to select the
FM stations (from 1 to 40).
List of radio stations
Press the
ı
key to display / hide the list of
radio stations. Then use the cursor to select a
station.
Using the radio menus
Use the
H key to access the specific radio
settings.
Searching radio stations
If you have used the quick installation all the
available FM stations will be stored. To start a
new search use the INSTALL menu :AUTO
STORE (for a complete search) or MANUAL
STORE (for a station by station search). The
SORT and NAME menus let you classify or
name the radio stations. These menus work in
exactly the same way as the TV menus.
Screen saver
In the FEATURES menu you can activate / close
the screen saver. The time, the frequency of
the station and its name (if available) move
across the screen.
PC Mode
Your TV can be used as a computer monitor.
The PIP function lets you display a
superimposed image to watch the TV channels
at the same time.
You must first of all connect the computer and
adjust the resolution (see p.15).
Choosing PC mode
Press the
V key on the remote control to
switch the TV to PC mode. Press the
X key
to return to TV mode.
If there is no PC signal for more than five seconds,
the TV automatically goes into standby mode.
Using PIP
While in PC mode you can call up a window
for TV channels.
& Press the
œ key to display the PIP screen.
The television image is reproduced in a small
superimposed window.
é Press the
œ key again to reduce the size of
the window then make it disappear.
“ Use the π key if you want to hide the
window. You can also shift it progressively by
using the cursor.
‘ Use the
09or @ P # keys to change the
programmes of the PIP screen or the
n key
if you want to display a picture from an
appliance connected to the TV (e.g. video
recorder, DVD).
Using the PC menus
Press the H key to access the specific settings of
the PC monitor mode. Use the cursor to adjust
them (the settings are automatically saved) :
• AUDIO SELECTION :
to choose the sound
reproduced on the TV (PC or TV/Radio).
For example, you can listen to the radio while
you use the computer.
Note: you must choose TV or radio mode before
going into PC mode. You cannot listen to the radio
when the PIP screen is displayed.
•
BRIGHTNESS / CONTRAST
: to adjust the
brightness and contrast.
• ADJUST COLOUR :
to adjust the colours (cold,
normal or warm).
• VIDEO NOISE :
eliminates the horizontal (PHASE)
and vertical (CLOCK) interfering lines.
• ADJUST POSITION :
to adjust the horizontal and
vertical placing of the image.
• AUTO ADJUST :
position is set automatically.
• PIP CONTROLS :
to adjust the size and position
of the PIP screen.
• MODE SELECT :
to come back to TV or radio
mode.
• RESET TO FACTORY SETTING :
to return to the
factory settings (default settings).
• VIEW FORMAT:
to choose between large screen
or the original format of the PC screens.
Page 89

9
Adjusting the picture
Adjusting the sound
& Press H then ¬.
The
PICTURE menu appears :
é Use
îÏ keys to select a setting and
Ȭ keys to adjust.
Note: the menu is a scroll-down menu.
Keep the key Ï held down to access the
settings hidden at the bottom of the screen.
“ Once the necessary adjustments have been
made, select the option
STORE and press ¬
to store them.
‘ To exit from the menus, press
d.
Description of the settings:
•
BRIGHTNESS: alters the brightness of the
image.
•
COLOUR: alters the colour intensity.
•
CONTRAST: alters the variation between
light and dark tones.
•
SHARPNESS
: alters the crispness of the image.
• STORE:stores the picture settings.
•
COLOUR TEMP.
: adjusts the colour
temperature of the picture.Three options
are available here:
COOL (blue white),
NORMAL (balanced) or
WARM (red white).
•
CONTRAST + :To activate / de-activate the
automatic contrast adjustment system (the
dark areas are made darker whilst
maintaining the detail).
& Press H, select the
SOUND option (
Ï) and
press
¬.The SOUND menu appears :
é Use
îÏ keys to select a setting and keys
Ȭ to adjust.
“ Once the necessary adjustments have been
made, select the option
STORE and press ¬
to store them.
‘ To exit from the menus, press
d.
Description of the settings:
•
EQUALIZER: to adjust the sound tone (from
bass: 120 Hz to treble: 10 kHz).
•
BALANCE: to balance the sound between the
left and right speakers.
• DELTA VOLUME (volume difference):allows
you to compensate for the volume differences
between the different programmes or the
EXT sockets.This setting is available for
programmes 1 - 40 and the EXT sockets.Use
the
@ P # keys to compare the level of
different programmes.
•
STORE:stores the sound settings.
•
AVL : automatic volume control used to avoid
sudden increases in volume,particularly when
changing programmes or during advertisements
• PICTURE
• SOUND
• FEATURES
• INSTALL
PICTURE
• BRIGHTNESS
• COLOUR
• CONTRAST
• SHARPNESS
• STORE
• COLOUR TEMP.
• CONTRAST+
--I------ 39
• PICTURE
• SOUND
• FEATURES
• INSTALL
SOUND
• EQUALIZER
•
SURROUND MODE
• DELTA VOLUME
• STORE
• AVL
120 HZ
500 HZ
1500 HZ
5 KHZ
10 KHZ
Feature settings
& Press H,select FEATURES (Ï) and press
¬.You can adjust:
é
TIMER, PARENTAL. CONT. and CHILD LOCK :
see next page
“
MODE SELECT.: to switch the TV in radio,TV or
PC mode.
‘
EASYLINK (only available on certain versions) : If
the set is connected (by the EXT2 socket) to
a video equipped with the EasyLink function,
the language, country and channels found are
automatically transmitted to the video
recorder at the time of installation. If your
video recorder is not equipped with this
function, set to
OFF.
( To quit the menus, press
d.
Page 90

10
Timer function
Locking the set
This menu allows you to use your TV as an
alarm clock.
& Press
H.
é Select
FEATURES (
Ï) and press ¬ twice.
The
TIMER menu appears :
“ Press ¬ to enter and exit the sub-menus
and use keys
îÏ to adjust:
‘
TIME: enter current time.
Note: the time is updated automatically each time
the set is switched on using teletext information
taken from programme 1. If programme 1 does
not have teletext, the update will not take place.
(
START TIME
: enter the start time.
§
STOP TIME:enter the stop time.
è
PROG.NO.
: enter the number of the
programme for the wake-up alarm.For models
equipped with a radio, you can select an FM
station by using the
Ȭ keys (the 09
keys are only used to select TV programs).
!
ACTIVATE:you can set the alarm to be
activated:
•
ONCE ONLY for a one-off alarm,
•
DAILY for a daily alarm or
•
STOP
to cancel.
ç Press
b to set the TV to standby. It will
automatically switch on at the time
programmed. If you leave the TV switched on,
it will only change programme at the time
indicated.
The combination of the CHILD LOCK and TIMER
functions may be used to limit the length of time
your television is in use, for example, by your
children.
You can bar access to certain programmes or
completely lock the set by locking the keys.
Locking programmes
& Press H.
é Select (
Ï) and press ¬.
“ Select
PARENTAL. CONT. (Ï) and press ¬.
‘ Enter your confidential access code.The first
time, enter the code 0711 then confirm by
re-entering 0711.The menu appears.
( Press
¬ to go into the menu.
§ Use keys
îÏ to select the required
programme and confirm with
¬.The symbol
+ is displayed alongside the programmes or
sockets that have been locked.
è Press
d to exit.
To watch a programme which has been locked
you will now need to enter the confidential
code; otherwise the screen will remain blank.
The INSTALL menu access is also locked.
Caution:
in the case of encrypted programmes
which use an external decoder, it is necessary to
lock the corresponding EXT socket.
To unlock all programmes
Repeat stages & to ‘ above,then select
CLEAR ALL and press ¬.
To change the confidential code
Repeat stages & to ‘ above,then:
( Select CHANGE CODE and enter your own 4-
digit number.
§ Confirm by entering it again.
Your new code will be stored.
è Press
d to exit from the menus.
If you have forgotten your confidential code, enter
the universal code 0711 twice.
Locking the keys
& Press H,select FEATURES (Ï) and press ¬.
é Select
CHILD LOCK (Ï) and press ¬ to set
the lock to
ON.
“ Switch off the set and put the remote control
out of sight.The set cannot be used (it can only
be switched on using the remote control).
‘ To cancel: switch
CHILD LOCK to OFF.
• PICTURE
• SOUND
• FEATURES
• INSTALL
FEATURES
TIMER
• TIME
• START TIME
• STOP TIME
• PROG; NO;
• ACTIVATE
10:56
• PICTURE
• SOUND
• FEATURES
• INSTALL
FEATURES
• TIMER
• CHILD LOCK
• PARENTAL CONT
• ROTATION
ACCES CODE
- - - -
Page 91

11
Å
P
9
0
MENU
Y
Ë
Ë
ù
12
MODE
MUTE
VCR
DVD
SMART SMART
RADIO
ACTIVE
CONTROL
MENU
OK
PC TV
P
564
879
0
`
¤
Ó
ù
Ÿ
Å
%
∆
ı
∫
Ë
Á
∏
3
- -
+ +
.
ª
-
[
”
Y
ª
Teletext
Press :
You will obtain:
Teletext is an information system broadcast by certain channels which can be consulted like a
newspaper. It also offers access to subtitles for viewers with hearing problems or who are not familiar
with the transmission language (cable networks, satellite channels, etc.).
Teletext
on/off
Selecting
a page
This is used to call teletext, change to transparent mode and
then exit.The summary appears with a list of items that can be
accessed. Each item has a corresponding 3 digit page number.
If the channel selected does not broadcast teletext, the indication
100 will be displayed and the screen will remain blank (in this
case, exit teletext and select another channel).
Enter the number of the page required using the
0 to 9
or @ P # keys. Example: page 120, enter 120.
The number is displayed top left,the counter turns and
then the page is displayed.Repeat this operation to view
another page.
If the counter continues to search, this means that the page is
not transmitted. Select another number.
Contents
Direct
access to
the items
This returns you to the contents page (usually page 100).
Coloured areas are displayed at the bottom of the screen.
The 4 coloured keys are used to access the items or
corresponding pages.
The coloured areas flash when the item or the page is not yet
available.
Direct
selection of
sub-pages
Certain pages contain sub-pages (for example, page 120
contains sub-pages
1/3, 2/3 and 3/3). If this is the case, the
page number is displayed in green, preceded by the symbol
Æ, Í or ÍÆ. Use the keys Ȭ to directly access
the sub-pages of your choice.
Enlarge
a page
Double page
teletext
(only available
on certain
versions)
This allows you to display the top or bottom part of the
page and then return to normal size.
To activate or deactivate the double page teletext display
mode.The active pa
ge is di
splayed on the left and the
following page is displayed on the right. Press
s
if you want
to hold a page (i.e. the contents page).The active page is then
displayed on the right.To return to normal mode, press
e
.
Hidden
information
Favourite
pages
To display or hide the concealed information (games solutions).
Instead of the standard coloured areas displayed at the bottom
of the screen, you can store 4 favourite pages on the first
40 channels which can then be accessed using the coloured keys
(red, green, yellow, blue). Once set,these favourite pages will
become the default every time tetetext is selected.
& Press the
H
key to change to favourite pages mode.
é Display the teletext page that you want to store.
“ Press d then the coloured key of your choice.
The page is stored.
‘ Repeat steps é and “ for the other coloured keys.
( Now when you consult teletext, your favourite pages
will appear in colour at the bottom of the screen.
To temporaly retrieve the standard items,press H.
To clear everything, and return the standard items as the
default, press dfor 5 seconds.
Page 92

12
16:9 Formats
The pictures you receive may be transmitted in 16:9 format (wide screen) or 4:3 format
(conventional screen).4:3 pictures sometimes have a black band at the top and bottom of the screen
(letterbox format).This function allows you to optimise the picture display on screen.
If your television is equipped with a 4:3 screen.
If your television is equipped with a 16:9 screen.
Press the p key (or Ȭ) to select the different modes:
This TV set is also equipped with automatic switching which will select the correct-screen
format, provided the specific signals are transmitted with the programmes.
4:3
The picture is reproduced in 4:3 format and a black band is displayed on either side
of the picture.
ZOOM 14:9
The picture is enlarged to 14:9 format, a thin black band remains on both sides of
the picture.
ZOOM 16:9
The picture is enlarged to 16:9 format.This mode is recommended when displaying
pictures which have black bands at the top and bottom (letterbox format).
SUBTITLE ZOOM
This mode is used to display 4:3 pictures using the full surface of the screen leaving
the sub-titles visible.
SUPER WIDE
This mode is used to display 4:3 pictures using the full surface of the screen by
enlarging the sides of the picture.
WIDE SCREEN
This mode restores the correct proportions of images transmitted in 16:9.
Note:
If you display a 4:3 picture in thid mode, it will be enlarged horizontally.
FULL SCREEN
This mode displays images in full screen.
Press the
p key (or îÏ) to select the different modes:
4:3
The picture is reproduced in 4:3 format.
EXPAND 4:3
The picture is enlarged vertically.This mode is used to cancell the black bands when
watching a programme in letterbox format.
COMPRESS 16:9
The picture is compressed vertically into 16:9 format.
Page 93

13
Video recorder or DVD keys
Glossary
Most of the audio and video equipment from our range of products
can be operated with the remote control of the TV.
The remote control is compatible with all video recorders using the RC5
standard and all DVDs using the RC6 standard.
& Press the
MODE key to select the required mode : VCR (video
recorder) or
DVD.The remote control indicator lights up to display
the selected mode. It switches off automatically after 20 seconds if
left idle.The remote control automatically returns to TV mode.
é The following keys are operational, depending on the equipment :
b standby,
· recording,
¢ fast rewind,
Ê stop,
Æ play,
∫ fast forward,
∆ pause
% VCR timer,
c DVD :subtitling language
H menu,
cursor navigation and adjustments,
OK validation,
09 digit keys,
@ P # programme selection,
e audio selection.
d OSD menu,
EasyLink: Digital link between the set and the video recorder which allows a direct transfer of
certain information such as channel setting or programming.
PIP (Picture in Picture):Superimposed window that displays a small picture in the main picture.
In PC mode you can display an image from the TV or other appliance (e.g. DVD or video recorder)
in a small window.
RGB signals : These are the three video signals, Red Green Blue, which make up the picture.
Using these signals improves picture quality.
S-VHS signals : These are 2 separate Y/C video signals from the S-VHS and Hi-8 recording standards.
The luminance signals Y (black and white) and chrominance signals C (colour) are recorded
separately on the tape.This provides better picture quality than with standard video (VHS and 8
mm) where the Y/C signals are combined to provide only one video signal.
NICAM sound : Process by which digital sound can be transmitted.
System : Television pictures are not broadcast in the same way in all countries.There are different
standards: BG, DK, I, and L L’.The SYSTEM setting (p. 6) is used to select these different standards.
This is not to be confused with PAL or SECAM colour coding. Pal is used in the majority of
European countries, Secam in France, the CIS and the majority of African countries.
The United States and Japan use a different system called NTSC.The inputs EXT1 and EXT2 are
used to read NTSC coded recordings.
16:9 : Refers to the ratio between the length and height of the screen.
Wide screen televisions have a ration of 16/9, conventional screen TV sets have a ration of 4/3.
Ÿ
MODE
VCR
Y
DVD
Å
ª
`
SMART SMART
MENU
+ +
”
OK
PC TV
∆
ù
ACTIVE
-
CONTROL
MUTE
[
- -
%
∏
12
564
879
0
Ë
.
ı
Æ∫Ê¢·
¤Ó
ª
P
RADIO
3
Á
Page 94

14
MODE
VCR
DVD
·¢Ê Æ
∫
Ó
ı
Ω∆
.
Z
¤
Connecting peripheral equipment
Depending on the version the TV is equipped with one or two EXT1 and EXT2 sockets.
A special adaptor is supplied to connect to EXT1 and can route the leads to the back.
The EXT1 socket has audio, CVBS/RGB inputs and audio, CVBS outputs.
The EXT2 socket (if available) has audio, CVBS/S-VHS inputs and audio, CVBS outputs.
Video recorder (or DVD recorder)
Carry out the connections shown opposite, using a good
quality euroconnector cable. If your video recorder has the
Easylink function, use the EXT2 socket.
If your video recorder does not have a euroconnector socket, the
only connection possible is via the aerial cable.You will therefore
need to tune in your video recorder's test signal and assign it
programme number 0 (refer to manual store, p. 6).
To reproduce the video recorder picture, press
0.
Video recorder with decoder
Connect the decoder to the second euroconnector socket of
the video recorder.You will then be able to record scrambled
transmissions.
Video recorder
Satellite receiver, decoder, DVD,games, etc.
For TV sets with 2 SCART connectors, preferably connect the
equipment delivering RGB signals (digital decoders, DVD
players,games consoles, etc.) to EXT1 and the equipment
delivering S-VHS signals (S-VHS and Hi-8 VCRs) to EXT2.
To select connected equipment
Press the n key to select EXT1 and on the versions with 2 scarts,
EXT2, S-VHS2 (S-VHS signals from the EXT2 socket) and EXT3.
Most equipment (decoder, video recorder) carries out the switching itself.
Other equipment
*
:
FM ANT
EXT 1
DC in PC input
L
Audio in
(PC)
R
Sub
woofer
out
*
L
Audio
EXT 2
R
out
:
FM ANT
VCR
Sub
woofer
out
*
L
R
Audio
out
Page 95

15
The
AV and S-VIDEO connections are located under the
left panel or, for large screen sizes, under the right panel.
Make the connections as shown opposite.With the
n key,
select
EXT3.
For a monophonic device, connect the audio signal to the
AUDIO L input.The sound automatically comes out of the left
and right speakers of the set.
When headphones are connected, the sound on the TV set will
be cut.The
@ P # keys are used to adjust the volume level.
The headphone impedance must be between 32 and 600 Ohms.
Camcorder, video games
Headphones
O
To connect a Hi-fi unit use an audio connection cord and
connect the
L and R Audio out of the TV to an Audio in L
and R from the Hi-fi unit. If you have an active speaker
connect the
Subwoofer out of the TV to the Subwoofer in
of the speaker.
Connect the monitor output of your computer to the
PC
input (VGA) of the TV. Connect the sound output Audio out
L
and R of the computer to the input Audio in (PC) L and R
of the TV.
For more information on using PC mode see page 8.
Configure the computer on 1024 x 768, 60 Hz for optimum
resolution.
Attention:
if you use another resolution, the PIP function may not
work. In this case a warning message is displayed on the screen.
Here is the list of the different display resolutions available
on your TV:
640 x 350, 70 Hz 720 x 400,70 Hz 1024 x 768,60 Hz
640 x 350, 85 Hz 720 x 400,85 Hz 1024 x 768,70 Hz
640 x 480, 60 Hz 800 x 600,56 Hz 1024 x 768,75 Hz
640 x 480, 67 Hz 800 x 600,60 Hz 1024 x 768,85 Hz
640 x 480, 72 Hz 800 x 600,72 Hz 1152 x 864,75 Hz
640 x 480, 75 Hz 800 x 600,75 Hz 1280 x 960,60 Hz
640 x 480, 85 Hz 800 x 600,85 Hz 1280 x 1024,60 Hz
832 x 624, 75 Hz 1280 x 1024,75 Hz
Amplifier
Computer
S-VIDE
L
R
VIDEO
AUDIO
Sub
woofer
out
*
L
R
Audio
out
Sub
woofer
out
*
LR
Audio
out
PC input
Sub
woofer
in
Audio
in
Audio in (PC)
L
R
Page 96

16
Tips
Poor reception
No picture
Peripheral
equipment gives a
black and white
picture
No sound
PC and PIP modes
don’t work ?
Remote control
Standby
Cleaning the set
Recycling
Still no results?
The proximity of mountains or high buildings may be responsible for ghost
pictures, echoing or shadows. In this case, try manually adjusting your picture: see
"fine tuning" (p.7) or modify the orientation of the outside aerial. Does your
antenna enable you to receive broadcasts in this frequency range (UHF or VHF
band)?
Have you connected the aerial socket properly? Have you chosen the right
system? (p. 7). Poorly connected euroconnector cables or aerial sockets are often
the cause of picture or sound problems (sometimes the connectors can become
half disconnected if the TV set is moved or turned).Check all connections.
You have not selected the right socket with the n key: S-VHS2 instead of EXT2.
To play a video cassette, check that it has been recorded under the same
standard (PAL, SECAM, NTSC) which can be replayed by the video recorder.
If on certain channels you receive a picture but no sound,this means that you do not have
the correct TV system. Modify the SYSTEM setting (p. 7).
The amplifier connected to the TV does not deliver any sound? Check that you
have not confused the audio output with the audio input.
Check that you have configured the computer on a compatible display resolution
(see p. 15).
You can’t get the radio sound in PC mode? When PIP is active the sound is
forced to TV. You must de-activate PIP, go into radio mode and then come back
to PC mode.
The TV set does not react to the remote control; the indicator on the set no
longer flashes when you use the remote control? Replace the batteries.
When you switch the TV set on it remains in standby mode and the indication
LOCKED is displayed when you use the keys on the TV set?
The CHILD LOCK
function is switched on (p.10).
If the set receives no signal for 15 mins,it automatically goes into standby mode.
To save power, your set is fitted with components that give it a very low power
consumption when in standby mode (less than 1 W).
Only use a clean, soft and lint-free cloth to clean the screen and the casing of your
set. Do not use alcohol-based or solvent-based products.
The materials used in your set are either reusable or can be recycled.
To minimise environmental waste, specialist companies collect used appliances
and dismantle them after retrieving any materials that can be used again (ask your
dealer for further details).
Disconnect the mains plug of the TV for 30 seconds then reconnect it.
If your TV set breaks down, never attempt to repair it yourself:contact your
dealer's after-sales service.
Page 97

1
Indledning
Indhold
Tillykke med dit nye fjernsyn, som vi håber,du vil få megen glæde af.
Denne brugsanvisning hjælper dig med at installere og betjene fjernsynet.
Vi opfordrer dig til at læse brugsanvisningen,inden du tager fjernsynet i brug.
Vi håber, teknologien i dette fjernsyn opfylder dine forventninger.
Indstillinger
Præsentation af LCD-fjernsynet . . . . . . . . . . . . . . . . . . . . . . . . . . . . . . . . . . . . . . .2
Fjernbetjeningens knapper . . . . . . . . . . . . . . . . . . . . . . . . . . . . . . . . . . . . . . . . . . .3
Placering og indstilling . . . . . . . . . . . . . . . . . . . . . . . . . . . . . . . . . . . . . . . . . . . . . . .4
Hurtig indstilling af programmer . . . . . . . . . . . . . . . . . . . . . . . . . . . . . . . . . . . . . .5
Sortering af programmer . . . . . . . . . . . . . . . . . . . . . . . . . . . . . . . . . . . . . . . . . . . .5
Valg af sprog og land . . . . . . . . . . . . . . . . . . . . . . . . . . . . . . . . . . . . . . . . . . . . . . . .6
Automatisk indlæsning . . . . . . . . . . . . . . . . . . . . . . . . . . . . . . . . . . . . . . . . . . . . . .6
Funktionen EasyLink . . . . . . . . . . . . . . . . . . . . . . . . . . . . . . . . . . . . . . . . . . . . . . . .6
Manuel indlæsning . . . . . . . . . . . . . . . . . . . . . . . . . . . . . . . . . . . . . . . . . . . . . . . . . .7
Programnavn . . . . . . . . . . . . . . . . . . . . . . . . . . . . . . . . . . . . . . . . . . . . . . . . . . . . . .7
Anvendelse
Anvendelse som radio . . . . . . . . . . . . . . . . . . . . . . . . . . . . . . . . . . . . . . . . . . . . . . .8
Anvendelse som computerskærm . . . . . . . . . . . . . . . . . . . . . . . . . . . . . . . . . . . . . .8
Indstilling af billede . . . . . . . . . . . . . . . . . . . . . . . . . . . . . . . . . . . . . . . . . . . . . . . . .9
Indstilling af lyd . . . . . . . . . . . . . . . . . . . . . . . . . . . . . . . . . . . . . . . . . . . . . . . . . . . .9
Indstilling af andre finesser . . . . . . . . . . . . . . . . . . . . . . . . . . . . . . . . . . . . . . . . . . . .9
Tv-vækning . . . . . . . . . . . . . . . . . . . . . . . . . . . . . . . . . . . . . . . . . . . . . . . . . . . . . .10
Låsning af fjernsyn . . . . . . . . . . . . . . . . . . . . . . . . . . . . . . . . . . . . . . . . . . . . . . . . .10
Tekst-tv . . . . . . . . . . . . . . . . . . . . . . . . . . . . . . . . . . . . . . . . . . . . . . . . . . . . . . . . .11
16:9-format . . . . . . . . . . . . . . . . . . . . . . . . . . . . . . . . . . . . . . . . . . . . . . . . . . . . . .12
Knapper til videobåndoptager og dvd-afspiller og -optager . . . . . . . . . . . . . . . . .13
Ordforklaring . . . . . . . . . . . . . . . . . . . . . . . . . . . . . . . . . . . . . . . . . . . . . . . . . . . .13
Tilslutning af andet udstyr
Videobåndoptager . . . . . . . . . . . . . . . . . . . . . . . . . . . . . . . . . . . . . . . . . . . . . . . . .14
Andet udstyr . . . . . . . . . . . . . . . . . . . . . . . . . . . . . . . . . . . . . . . . . . . . . . . . . . . . .14
Vælge af det tilsluttede udstyr . . . . . . . . . . . . . . . . . . . . . . . . . . . . . . . . . . . . . . .14
Videokamera, videospil . . . . . . . . . . . . . . . . . . . . . . . . . . . . . . . . . . . . . . . . . . . . .15
Hovedtelefoner . . . . . . . . . . . . . . . . . . . . . . . . . . . . . . . . . . . . . . . . . . . . . . . . . . .15
Forstærker . . . . . . . . . . . . . . . . . . . . . . . . . . . . . . . . . . . . . . . . . . . . . . . . . . . . . . .15
Computer . . . . . . . . . . . . . . . . . . . . . . . . . . . . . . . . . . . . . . . . . . . . . . . . . . . . . . .15
Gode råd . . . . . . . . . . . . . . . . . . . . . . . . . . . . . . . . . . . . . . . . . . . . . . . . . . . . . . .16
w
Rengøring af fjernsynet
Tør skærmen og kassen af med en ren, blød og fnugfri klud.
Brug ikke spritholdige rengøringsmidler eller opløsningsmidler.
Dansk
Page 98

2
Præsentation af LCD-fjernsynet
Knapperne ovenpå fjernsynet:
• .: Bruges til at tænde og slukke fjernsynet.
• VOLUME (-”+):
Bruges til at indstille lydstyrken.
• PROGRAM (- P +):
Bruges til at vælge programmer.
• MENU: Bruges til at åbne og lukke menuerne.
Tr yk samtidigt på de to knapper ” - og ” +.
Knapperne P - + bruges til at vælge en indstilling,
og knapperne ” - + bruges til at lagre den aktuelle
indstilling.
Bemær
k: Når funktionen BØRNELÅS er aktiveret,
er knapperne
-”+ og - P + ikke aktive
(se menuen FINESSER, side 10).
Infrarøde følere og kontrollampe for tændt fjernsyn.
Stilbar fod.
Foden kan afmonteres og erstattes med et monteringssæt
til ophæng af fjernsynet på en væg.
Monteringssættet kan købes som ekstraudstyr
(kontakt forhandleren).
Bag på fjernsynet:
De vigtigste tilslutningsstik er placeret under
fjernsynet.
En aftagelig klap i venstre* og højre side giver adgang
til ekstra tilslutningsstik.
* Fjernsyn med en stor skærm har ingen klap i venstre side.
Yderligere oplysninger om tilslutninger finder du på side 14.
EXT1/SCART-stik
Stik til fjernsyns- og radioantenne
VGA- og lydindgang for tilslutning af en computer.
Stik til jævnstrømsforsyning (via adapter).
MENU
”
VOLUME
+
-
P
.
PROGRAM
-
+
DC in PC input (VGA)
L
Audio in (PC)
R
:
FM ANT
EXT. 1
Ø
Page 99

3
12
MODE
MUTE
RADIO
VCR
DVD
SMARTSMART ACTIVE
CONTROL
MENU
PC TV
OK
P
564
879
0
·¢Ê∆Æ
∫
ù
¤Ó
`
Ÿı
Å
Ë
Á
∏
3
--
++
.
ª
-
[
”
Y
ª
Fjernbetjeningens knapper
Valg af EXT-stik (side 14)
Tr yk flere gange for at vælge et
tilsluttet apparat.
Knapper til tekst-tv (side 11)
eller video/dvd (side 13)
œ PIP til/fra (side 8)
π Flytte PIP-vinduet (side 8)
Automatisk slukning
For at vælge det tidsrum, hvor
fjernsynet automatisk går i stand-by
(fra 0 til 240 minutter).
Aktiv kontrol
Optimerer billedkvaliteten
afhængig
af modtageforholdene.
Lydindstilling
Giver mulighed for at skifte
programmer i
STEREO
og
NICAM
STEREO
til
MONO
eller,
ved
tosprogede udsendelser, at vælge
mellem
DUAL I
og
DUAL II.Hvis
lyden skiftes til MONO, vises det i rødt.
Menu: Anvendes
til at åbne eller lukke menuerne.
Markør
Disse fire knapper bruges til at
bevæge sig rundt i menuerne.
Lydstyrke
Til at slukke eller tænde for lyden.
Pc / tv / radio
Tr yk på en af knapperne
for at indstille fjernsynet
til pc, tv eller radio (side 8).
16:9-format (side 12)
Mute
Afbrydelse eller aktivering af lyden.
Information på skærm
For at vise / fjerne programmets
nummer,navn (hvis det findes),
klokkeslæt,lydgengivelse og den tid,
der er tilbage, indtil apparatet slukker.
Tr yk i 5 sekunder for at vise
programnummeret permanent
på skærmen.
Standby
For at sætte fjernsynet i standbystilling. For at tænde for fjernsynet igen
trykkes på b,P @#eller 09.
Programliste
Til at vise status på programlisten.
Brug derefter knapperne îÏ
for at vælge et program.Tryk på
knappen ¬ for at vise
programmet.
Symbolet + vises foran de
programmer,der er låste (se side 10),
og ? vises foran de programme,
der ikke er låst.
Billed- og lydindstillinger
Til at få adgang til en række forudindstallerede billed- og lydindstillinger:
Indstillingen PERSONAL modsvarer de
indstillinger,der er foretaget i menuerne.
Surround lyd
For at aktivere / deaktivere
surround lydeffekten.I stereo får
man indtryk af, at der er større
afstand mellem højttalerne. På de
modeller, der er udstyret med
Virtual Dolby Surround*, høres
lyden via sidehøjttalerne i Dolby
Surround Pro Logic.I mono
efterlignes stereo-spatialeffekten.
Valg af fjernsynsprogrammer
For at bevæge sig op eller ned
mellem programmerne.
Nummeret (navnet) og
lydgengivelsen vises i få sekunder.
For visse programmer udstyret med
tekst-tv vises programmets titel
nederst på skærmen.
Foregående program
For at komme tilbage til det sidst
sete program.
Taltaster
Giver direkte adgang til
programmerne. Hvis
programnummeret er tocifret,
skal du indtaste det andet ciffer,
inden stregen forsvinder.
Vælgerknap (side 13).
Tr yk på knappen for at bruge fjern-
betjeningen til tv,videobåndoptager
eller dvd-afspiller og -optager
.
* Fremstillet pà licens fra Dolby Laboratories Licensing Corporation.DOLBY og dobbelt-D symbolet £
og PRO LOGIC tilhører Dolby Laboratories Licensing Corporation som varemærker
Page 100

4
& Placering af fjernsynet
Stil fjernsynet på et solidt og stabilt underlag.
Anvend ikke vand og varme genstande (lampe,
stearinlys, varmeovn osv.) i nærheden af fjernsynet.
Ventilationsrillerne bag på fjernsynet må ikke
tildækkes.
é Tilslutning af antenner
• Tilslut det medfølgende antennekabel tilstikket :
i bunden af fjernsynet og den anden ende til dit
antennestik.
• Tilslut det medfølgende radioantennekabel til stikket
FM ANT i bunden af fjernsynet og den anden ende
til dit antennestik.
• Antennekablerne kan føres igennem fjernsynets fod.
“ Tilslutning af strømforsyningen
Fjernsynet strømforsynes via den medfølgende
jævnstrømsadapter (spændingsværdien er anført
på etiketten). Brug kun den AC-DC-adapter,
der leveres sammen med fjernsynet.
• Tilslut adapterens stik til DC-stikket på fjernsynet.
Sørg for der er fri plads rundt om adapteren
til luftcirkulation.
• Tilslut netledningen til adapteren og sæt netstikket
i en stikkontakt (220-240 V / 50 Hz).
Se side 14 med hensyn til tilslutning af andre apparater.
‘ Fjernbetjening
Indsæt de to medfølgende R6-batterier
i fjernbetjeningen, så polerne vender rigtigt.
De batterier, der leveres med apparatet, indeholder
hverken kviksølv eller nikkel-kadmium af hensyn til miljøet.
Smid ikke de brugte batterier ud med husholdningsaffaldet
men benyt de tilgængelige indsamlingsmetoder.
( Tænde fjernsynet
Tr yk på tænd-/slukknappen for at tænde fjernsynet.
En grøn kontrollampe tændes,og skærmen tænder.
Hvis fjernsynet er i standby (rød kontrollampe),
skal du trykke på tasten P (+) på fjernbetjeningen.
Kontrollampen blinker,når du bruger fjernbetjeningen.
Gå derefter til afsnittet om hurtig installering på side 5.
Placering og tilslutninger
5 cm
5 cm
5 cm
FM ANT.
MENU
”
P
++
--
.
VOLUME
PROGRAM
 Loading...