

Page 1
&
OPERATING INSTRUCTIONS IN BRIEF
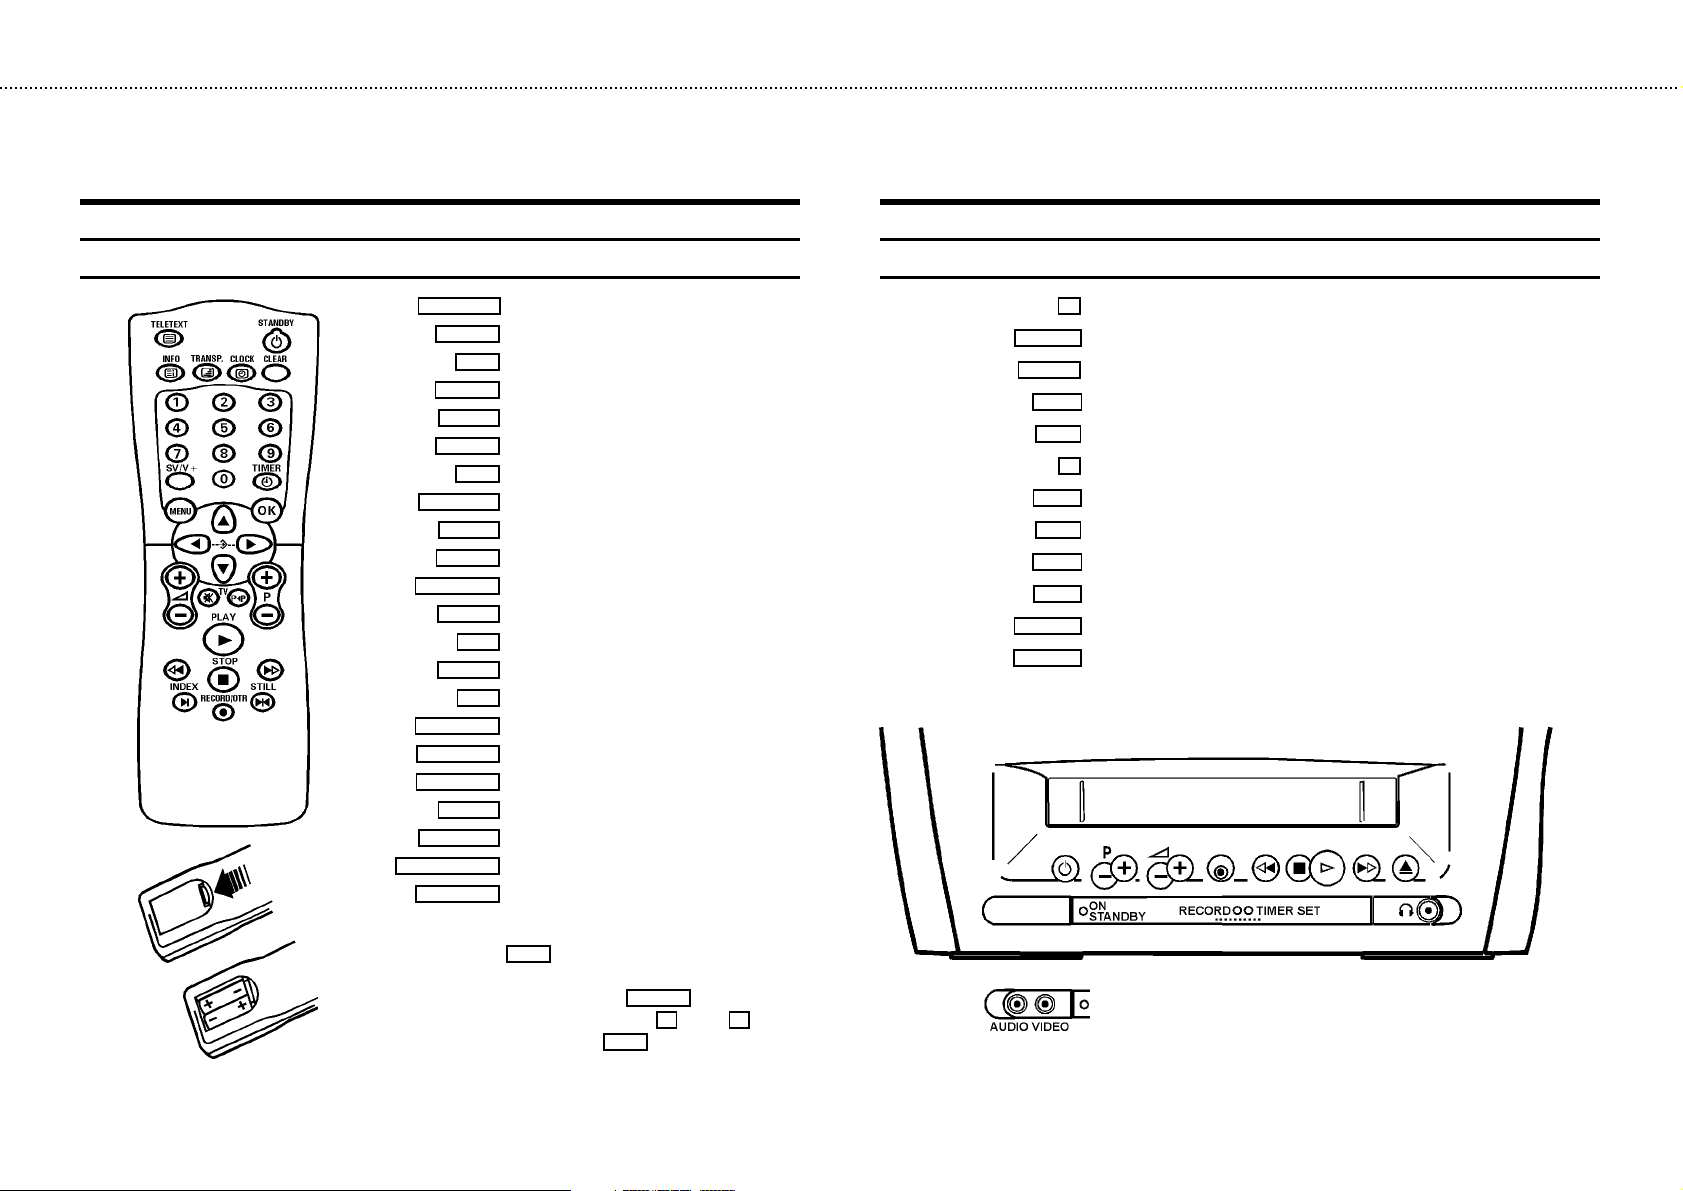
The remote control
STANDBY m
CLEAR
0-9
SV/V+
TIMER k
MENU
OK
D/C/A/B
Sp
P p
MUTE y
GPLAY
H
STOP h
I
INDEX E
RECORD n
STILL R
INFO ,
TRANSP. -
TELETEXT e
CLOCK .
Standby
Reset/clear
Digit buttons 0-9
’VIDEOPlus+’ programming
TIMER programming on the set
Call menu
Confirm button
Menu left/right/up/down
Volume control
Programme number Plus/Minus
Mute sound
Playback
Rewind/Reverse scanning
Pause/Stop
Forward wind/ Forward scanning
Index search
Record
Still picture
TELETEXT page 100
TELETEXT transparent
TELETEXT on/off
TELETEXT clock time
Front of the set
P p
Sp
5
H
G
I
J
w
AUDIO
VIDEO
m
Standby
Programme number Plus/Minus
Volume control
Record
Rewind/Reverse scanning
h
Pause/Stop
Playback
Forward wind/ Forward scanning
Cassette eject
Headphones socket
Audio input socket
Video input socket
In TELETEXT you can store the relevant page with the
OK
button.
Selecting TELETEXT functions: when you are in
TELETEXT, press the
required function with the
Confirm with the
OK
MENU
button. Select the
D
and theCbuttons.
button.
Page 2

&
Programming with ’VIDEOPlus+’
All the information required for programming is encoded in the ’VIDEOPlus+’ code.
1 Press the
2 Enter the entire ’VIDEOPlus+ code’. This code (up to 9 digits) is found next to the start time of a
TV programme in your TV guide.
If you entered an incorrect code number, clear it with the
3 If you want to repeat programming at daily or weekly intervals, select the required settings in
the ’DAILY/WEEKLY’ line.
’Daily’ programming can only be used for recordings to be made from Mondays to Fridays
inclusive.
4 After confirming the corresponding data appears on the TV screen.
Note: If you use VIDEOPlus+ for the first time, the ’PROGRAMME NR.’ line appears when you
enter the VIDEOPlus+ code. Enter the required programme number.
SV/V+
button on the remote control.
CLEAR
button.
Selecting a TV channel
Select the required TV channel (= programme number) with the
P p
button or the
tons on the remote control.
The selected programme number (e.g.: ’P 01’ ) appears in the upper right corner of the TV screen.
0-9
Volume control
You can control the volume level with the
If you want to mute the sound temporarily (e.g.: during a telephone call), press the
ton on the remote control. When you press it again, the sound returns at the same volume level.
Sp
button.
MUTE y
but-
but-
5 Confirm with the
OK
button.
The data has been stored in a TIMER block.
Please ensure that you loaded a cassette without erase protection.
6 Press the
STANDBY m
button.
How to enter, check or clear a TIMER-block manually
1 Press the
2 Select a free TIMER block or the TIMER block you want to check or clear.
3 Clear: Press the
4 Enter/Check: Press the
’PR’ (programme number), ’START’ (start time) and ’END’ (end time).
Press the
5 To end programming, press the
6 Press the
TIMER k
A
and the
STANDBY m
button.
CLEAR
button.
button.
DorC
B
button to switch between ’DATE’ (date), ’DW’ (daily, weekly),
or the
MENU
0-9
buttons to change the data.
button.
Picture control
You can control brightness, contrast, sharpness and colour here.
1 Press the
2 Select and confirm the line ’PICTURE’ .
3 Select and confirm the TV screen setting.
Note: In addition, you can adjust the tint for the playback of cassettes in the NTSC standard.
MENU
button.
Page 3

OPERATING INSTRUCTIONS PHILIPS 14PV284/05
Congratulations on the purchase of one of the most
sophisticated and simple-to-use television/video recorder
combinations (TV Combi) on the market. With this TV Combi
you can record and play VHS-standard cassettes.
Please take the time to read this operating manual before
using your TV Combi.
Safety instructions and other notes
• Danger: high voltage! Do not open the set. The set does not
contain any components that can be repaired by the customer.
When the appliance is connected to the power supply there are
some components that are constantly operational. To switch off
the set completely you must disconnect it from the power supply.
• Note that this power pack is designed for a power supply of
220-240V/50Hz.
• Ensure that air can circulate freely through the ventilation slots
on the set.
• Ensure that no objects or liquids enter the set. If liquid is spilt into
it, disconnect the set immediately from the power supply and call
the After-sales Service for advice.
• The set should not be used immediately after transportation from
a cold to a hot area or vice versa, or in conditions of extreme
humidity.
After unpacking the set, it should be allowed to acclimatize for at
least three hours before installation.
• These operating instructions have been printed on nonpolluting
paper.
• Deposit old batteries at the relevant collection points.
• Please make use of the facilities available in your country for
disposing of the packaging of the set in a way that helps to
protect the environment.
• This electronic equipment contains many materials that can be
recycled. Please inquire about the possibilitiesfor recycling your
old set.
• VIDEOPlus+ and PlusCode are trademarks of Gemstar Development Corpoation. The VIDEOPlus+ system is manufactured under
licence from Gemstar Development Corporation.
Contents Page
1. INSTALLATION 2...................................
Connecting additional equipment 3...................
Emergency interrupt 3...............................
User guide 3.......................................
Making standard settings 3..........................
Setting the clock and date 3..........................
2. PLAYBACK 5.......................................
Continuous playback 5..............................
3. RECORD 6.........................................
Programming with ’VIDEOPlus+’ 7....................
4. SPECIAL FEATURES 8...............................
On Screen Display (OSD) 8...........................
Sleep function (switch off) 8.........................
Switch set on function 9.............................
Child lock 9........................................
Before you call an engineer 10.......................
1
Page 4
1. INSTALLATION
Important for the United Kingdom
This apparatus is fitted with an approved moulded 13 Amp
plug. To change a fuse in this type of plug proceed as follows:
1 Remove fuse cover and fuse.
2 Fix new fuse which should be a BS1362 5A, A.S.T.A. or BSI
approved type.
3 Refit the fuse cover.
If the fitted plug is not suitable for your socket outlets, it should
be cut off and an appropriate plug fitted in its place.
If the mains plug contains a fuse, this should have a value of
5A. If a plug without a fuse is used, the fuse at the distribution
board should not be greater than 5A.
Note: * The severed plug must be destroyed to avoid a
possible shock hazard should it be inserted into a 13A
socket elsewhere.
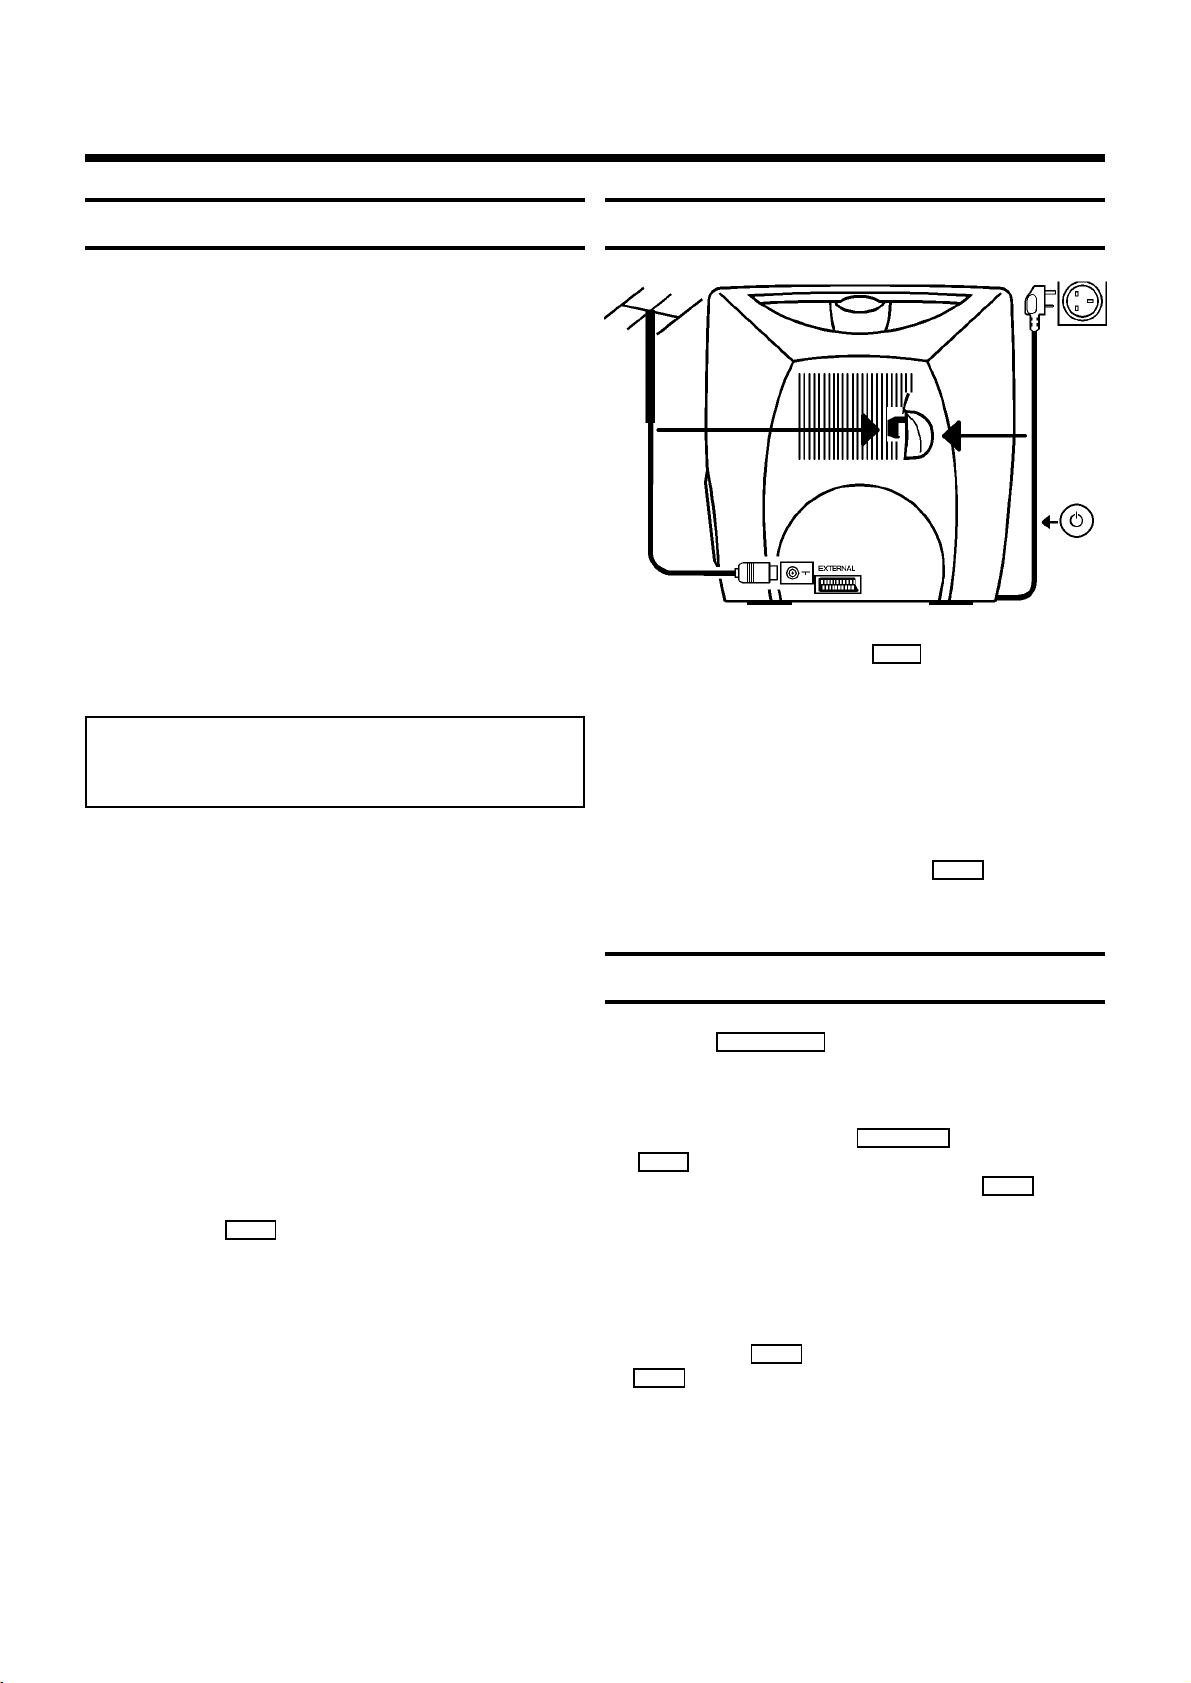
Connecting the cables
1 Insert the aerial plug into the
If you use the auxiliary aerial supplied, push the aerial into the
mounting on the back panel until it snaps into place.
Pull out the telescopic rod(s) as far as required. Tilt and rotate
the aerial until you have got the best picture quality.
2
socket.
How to connect a plug:
The wires in the mains lead are coloured in accordance with
the following code:
BLUE - ’NEUTRAL’ (’N’)
BROWN - ’LIVE’ (’L’)
1 The BLUE wire must be connected to the terminal which is
marked with the letter ’N’ or coloured BLACK.
2 The BROWN wire must be connected to the terminal
which is marked with the letter ’L’ or coloured RED.
3 Do not connect either wires to the earth terminal in the
plug which is marked with the letter ’E’ or by the safety
earth symbol
\
or coloured green or green-and-
yellow.
Before replacing the plug cover, make certain that the cord
grip is clamped over the sheath of the lead - not simply over
the two wires.
2 Insert the plug of the mains cable into the wall socket.
3 Switch the set on. The power switch
8
is located on
the left side panel of the set.
Important notes for operation
• We advise you, from now on, to switch the set to standby
using the
the remote control.
• When the set is in the standby mode, a small red lamp on
the left of the front of the set will be alight.
• You can switch on with the
0-9
• Attention: When you use the power switch
side panel, you have completely switched off the set from
the mains power supply. No programmed recordings will
then be made. The red lamp on the left of the front of the
set will not be alight. After a few hours, the date and clock
settings will be lost.
• Attention: Before you switch off the appliance with the
power switch
J
• Keep your TV Combi connected to the mains and the
power switch in ’on’ position at all times to ensure that
programmed recordings can be made and that the
television functions normally. The power consumption
required is low.
• Back-up power supply: TV channel storage - typically 1
year, Clock/Timer - typically 30 hours.
STANDBY m
button on the front of the set or on
STOP h
buttons or by inserting a cassette.
8
, remove the tape by pressing the
button.
button, the
8
on the
2
Page 5

Connecting additional equipment
Making standard settings
You can also connect additional equipment to the
EXTERNAL
socket, for instance, a decoder satellite receiver or camcorder.
Emergency interrupt
Both the set and the remote control have an ’Emergency
interrupt’ button. You can use the
terrupt any function.
To interrupt a TIMER recording, press the
ton several seconds.
Whenever you have operating problems you can simply
interrupt the function and start again.
You can practise operating your set without any worries. No
matter which buttons you press, you cannot damage it.
STANDBY m
button to in-
STANDBY m
but-
and
STOP h
C
simultaneously.
button. Press the menu
1 To start, press the
buttons
2 Select the required display language in the ’LANGUAGE’
D
INSTALLATION vw
LANGUAGE EN
COUNTRY GB
AUTO STORE
MANUAL STORE
SORT
PP STORE
line.
3 Select your country in the ’COUNTRY’ line.
Setting the clock and date
1 To start, press the
2 Press the
MENU
STOP h
button.
button.
User guide
With OSD (On Screen Display) the corresponding functions
appear on the TV-screen. The most important button-functions
are displayed at the bottom of the screen.
Throughout this instruction manual, use the following buttons
for the functions ’Call up’, ’Select’, ’Enter’/’Adjust’, ’Confirm’
and ’Exit’:
• Call up: Use the
• Select: Select a line with the
Use the
0-9
ton to select within a line.
• Enter/Alter: With the
0-9
button.
• Confirm: With the
• Exit: With the
MENU
button.
buttons or the
D
OK
button.
MENU
.
or
A
D
C
B
or
C
or
or with the
button.
menu but-
3 Select and confirm the line ’FEATURES’ .
4 Select and confirm the line ’SET CLOCK’ .
CLOCK
TIME 20:00
YEAR 1997
MONTH 01
DATE 01
xy 0-9
5 Enter the time, year, month and date.
3
Page 6

Automatic Channel Search
Allocating channel numbers
and
STOP h
C
button. Press the menu
simultaneously.
1 Switch on with the
buttons
2 Select and confirm the line ’AUTO STORE’ .
D
The ’Automatic Channel Search’ function starts.
AUTO STORE
PRESS xyTO STOP
SEARCH
PLEASE WAIT
CHANNELS FOUND: 1
aaabbbbbbbbbbbbbbbbb
3 Wait until all TV channels have been stored.
All TV channels will be stored from programme number
69 downward.
How to search for a TV channel manually, you can read in
chapter 4 ’SPECIAL FEATURES’ in the section ’Manual
channel search’.
Note: Automatic Channel Installation (ACI), only for sets
with TELETEXT:
Some cable companies or broadcasters offer the possibility to install TV channels automatically with ’ACI’.
Information about the installation offered and how to
select it, will appear in the display.
This set will recognize and install TV channels with ’ACI’
automatically.
TV channels will be stored from programme number 1
onward.
If ’ACI’ cannot identify a TV channel, you can search for
it using the method as described in the section ’Manual
channel search’.
* If the ’Automatic channel search’ function is activated,
any previously programmed TIMER blocks will be
cleared.
You can store up to 69 TV channels.
and
STOP h
C
simultaneously.
C-21
button. Press the menu
1 Switch on with the
buttons
2 Select and confirm the line ’SORT’ .
3 On the TV screen, in the line ’FROM’ , select the TV
D
SORT vw
FROM P01
TO P02
STORE
channel to which you want to allocate a programme
number, e.g.: ’P 01’ .
4 In the line ’TO’ , select the required programme number,
e.g.: ’P 02’ .
5 Select and confirm the line ’STORE’ .
The allocated TV channels will be exchanged.
6 Repeat steps 3to 5until you have allocated a pro-
gramme number to all the required TV channels.
To finish, press the
MENU
button twice.
4
Page 7

2. PLAYBACK
1 Insert a cassette into the cassette slot.
2 Press the
3 Picture search: Now press the
GPLAY
playback button.
H
(rewind) or
(wind) button once or several times.
4 Interrupt: Press the
5 Wind: Stop the tape and press the
I
(wind) button.
6 Eject: Press the
STOP h
J
button on the set.
button.
H
(rewind) or the
Note: Some functions switch off automatically after a
while (e.g.: Pause, Still Picture, Scanning). This helps to
protect the cassette and prevent unnecessary power
consumption.
* With this set you can play back cassettes that have
been recorded on another TV Combi in the NTSC
standard.
* If you load a cassette with erase protection, the TV
Combi starts playback automatically.
* The picture quality is affected during scanning. The
sound is switched off.
* Remove the cassette before transporting the TV
Combi.
I
Tape position/Index search
Tape position: If you press the
will be shown in the display during Wind, Rewind, Record,
Playback and Pause/Stop.
Index search: Every time you start to record, the tape is
marked with a code mark.
1 Press the
INDEX E
button. Press the
select the next code mark or the
previous code mark.
2 Once the TV Combi finds the code mark or unrecorded
area it will automatically switch to playback.
Note: When you press any tape transport button (e.g.:
the
H
or
I
button) this search function will be
stopped.
* You cannot use this function with recordings made on
another video recorder that does not have this function.
OK
button the tape position
I
button to
H
button for the
Eliminating picture interference
1 During playback press the
MENU
button.
Still picture
1 Press the
Interference stripes will appear.
Each time you press the
ture will move on one step.
STILL R
button. You see a still picture.
STILL R
button again the pic-
Continuous playback
1 Press the
2 Select and confirm the ’SPECIAL’ line.
3 Select the ’REPEAT PLAY’ line. Switch on the continuous
playback.
4 Press the
5 Start the continuous playback with the
button.
6 If you want to cancel the function, stop the continous
playback in the ’REPEAT PLAY’ line.
MENU
MENU
button.
button.
GPLAY
playback
2 Select and confirm the ’SPECIAL’ line.
3 Select the ’TRACKING’ line.
4 Press the
D
or
C
button until the playback
quality is at its best.
5 Press the
MENU
button. This setting will remain until
you remove the cassette.
6 Cleaning function: Press the
7 Select and confirm the ’SPECIAL’ line.
8 Select the ’CLEANING’ line.
9 Press the
OK
button. A blue screen appears for a few
MENU
button.
seconds.
0 Wait until the blue screen disappears and press the
MENU
button.
Note:
* Some hired cassettes may have a poor picture/sound
quality. This is not a fault in your set.
5
Page 8

3. RECORD
1 Insert a cassette.
2 Use the
P p
button to select the programme number
from which you wish to record, e.g.: ’P 01’ .
3 Press the
4 Use the
5 If, whilst recording, you want to switch off the TV screen,
press the
To switch the TV screen on again, press the
RECORD n
STOP h
STANDBY m
button.
button to stop the recording.
button once.
P p
button.
Important notes for recoding
• OTR: If you do not want to record to the end of the
or the
MENU
RECORD n
C
EXTERNAL
button.
button again. The display
button you can change the
CLEAR
scart socket).
STOP h
button. ’PAUSE’
MENU
button.
cassette, press the
shows at what time the recording will stop.
With the
D
end time of the recording in 30 minute intervals.
If you wish to cancel the end time, press the
button. This does not effect the recording.
• Programme number ’E1’ is provided for recording from
external sources (via the
• Programme number ’AV’ is provided for recording from
external sources (via the front socket).
• Erase protection: So that you don’t accidentally delete an
important recording, you can remove the special tab
(erase protection) on the narrow side of the cassette with
a screwdriver or slide the special tab to the left.
Later, if you no longer want the cassette to be erase
protected, you can seal the gap again with adhesive tape
or slide the special tab to the right.
• Auto-assembling: You can use the auto-assembling func-
tion to join individual recordings without any major
picture disturbance between the recordings.
Search for the correct position on the tape and then stop
the playback by pressing the
appears in the display.
Now start recording as usual by pressing the
RECORD n
button.
• Long play: Before recording, press the
Select and confirm the ’SPECIAL’ line.
Select and confirm the ’TAPE SPEED’ line.
Select the ’LP’ (=LongPlay) recording speed and stop by
pressing the
During playback the TV Combi will automatically select
the correct playback speed.
Programme a recording
The set needs the following information for every programmed recording:
* the date on which the recording is to be made
* the programme number for the TV channel
* the start and end time of the recording
* VPS/PDC on or off
The set stores all the information mentioned above in what is
known as a TIMER block. It can store 6 TIMER blocks for up
to one month in advance.
’VPS’ (Video Programming System)/ ’PDC’
(Programme Delivery Control)
With ’VPS/PDC’, the TV station controls the start and the
duration of a programmed recording. This means that the
video recorder switches itself on and off at the right time
even if a TV programme you have programmed begins earlier
or finishes later than expected.
Usually the start time is the same as the ’VPS/PDC’ time. If,
however, a different ’VPS/PDC’ time is given, e.g.: ’20.15
(VPS/PDC 20.14)’, you have to enter ’20.14’ (the ’VPS/PDC’
time) exactly to the minute.
If you are not using ’VPS/PDC’, the ’VPS/PDC’ indication must
be off.
6
Page 9

Programming with ’VIDEOPlus+’
All the information required for programming is encoded in
the ’VIDEOPlus+’ code.
1 Press the
2 Enter the entire ’VIDEOPlus+ code’. This code (up to 9
digits) is found next to the start time of a TV programme
in your TV guide.
If you entered an incorrect code number, clear it with the
CLEAR
SV/V+
button on the remote control.
button.
VIDEOPLUS
CODE
DAILY/WEEKLY ONCE
PROGRAMME NR. 01
How to enter, check or clear a TIMER
block manually
1 Press the
2 Select a free TIMER block or the TIMER block you want
to check or clear.
3 Clear: Press the
4 Enter/Check: Press the
between ’DATE’ (date), ’DW’ (daily, weekly), ’PR’ (programme number), ’START’ (start time) and ’END’ (end
time).
Press the
change the data.
5 To end programming, press the
TIMER k
A
and the
button.
CLEAR
button.
D
or
B
C
, or the
MENU
button to switch
0-9
buttons to
button.
xy 0-9 OK
3 If you want to repeat programming at daily or weekly
intervals, select the required setting in the ’DAILY/WEEKLY’ line.
’Daily’ programming can only be used for recordings to
be made from Mondays to Fridays inclusive.
4 After the confirmation the corresponding data appears on
the TV screen.
Note: If you use ’VIDEOPlus+’ for the first time, the
’PROGRAMME NR.’ line appears when you enter the
’VIDEOPlus+’ code. Enter the required programme number for this TV channel.
DATE DW PR START END d
01 01 17:15 18:45
vw xy 0-9 OK
5 Confirm with the
OK
button.
The data has been stored in a TIMER block.
Please ensure that you loaded a cassette without erase
protection.
6 Press the
STANDBY m
button.
Important notes for programmed recordings
• If the message ’PLEASE PRESS STOP’ or ’PLEASE PRESS
STANDBY’ appears on the TV screen, press the
STOP h
or the
A TIMER recording will function only, if the set isn’t used
for other video recorder functions (e.g.: playback).
• The TIMER lamp on the front of the set lights up when
one or more of the TIMER blocks are occupied.
• If the end of the cassette is reached during a recording,
the video recorder automatically ejects the cassette. The
set switches off after a few minutes.
• If you forget to load a cassette, ’NO CASSETTE CANNOT
RECORD’ will appear.
• If you inserted a cassette with erase protection when you
want to start a recording, the cassette will be ejected.
• If ’CODE ERROR’ appears on the TV screen, you entered
an incorrect code number or the incorrect date. Repeat
the entry or end with the
With ’Daily’ programming, the first recording must take
place within a week.
• If ’DAILY ERROR’ appears on the TV screen, the date was
incorrectly entered. ’Daily’ programming can only be used
for recordings to be made from Mondays to Fridays
inclusive.
• The programmed recording will always be made at the
recording speed (SP/LP) that has already been selected
on the TV Combi.
STANDBY m
STANDBY m
button.
button.
7
Page 10

4. SPECIAL FEATURES
How to read TELETEXT
• Press the
on and off. The TV-VIDEO Combi is now receiving the TXT
of the TV channel currently selected.
• To store the current page, press the
• If you want to select an other page, type in the number
with the digit buttons
TELETEXT e
button to switch the TXT decoder
OK
button.
0-9
.
Extra TELETEXT functions
• If you want to superimpose the clock time, press the
CLOCK .
• If you want to go to TELETEXT page 100, press the
INFO ,
• If you want TELETEXT to be shown transparently, press
the
To use the extra TELETEXT functions, press the
ton, when you are in TELETEXT.
• To enlarge the print, select the symbol ’ e; ’ and confirm
with the
• To switch off the TELETEXT decoder temporarily, select
the symbol ’ eX ’ and confirm with the
• To call up a sub-page:
1 Select the symbol ’ /00 ’ and confirm with the
ton.
button.
button.
TRANSP. -
OK
button.
button.
OK
MENU
button.
OK
but-
but-
3 Select the ’DISPLAY’ line.
4 Select one of the options indicated.
’FULL’: OSD appears for a few seconds each time an
operating mode is selected and then disappears.
’OFF’: OSD is switched off.
’PROG’: only the programm number appears.
’COUNT’: only the counter appears.
5 Confirm it with the
Note: With the
MENU
button.
OK
button you can superimpose the
actual operating mode on the TV screen.
Personal Preset
You can make your personal picture and volume settings
here. You can call up this setting and it will be used
automatically when you switch the set on.
1 Select your personal setting. (see chapter ’The TV set
functions’). Press the menu buttons
button simultaneously.
2 Select and confirm the ’PP STORE’ line.
D
and
C
2 Enter the page number of the sub-page.
• To call up concealed information, select the symbol ’ e?
’ and confirm with the
OK
button.
• To stop the pages from being turned over, select the
symbol ’ STOP ’ and confirm with the
OK
button.
On Screen Display (OSD)
You can switch OSD on or off.
1 Press the
2 Select and confirm the ’FEATURES’ line.
MENU
button.
FEATURES vw
PP RECALL
ON TIMER
SLEEPTIMER 0
DISPLAY FULL
CHILD LOCK OFF
SET CLOCK
3 To end, press the
MENU
button. The personal setting
has been stored.
4 Calling up your Preset: Press the
5 Select and confirm the ’FEATURES’ line.
6 Select and confirm the ’PP RECALL’ line.
7 Press the
MENU
button. The set will use this setting.
MENU
button.
Sleep function (switch off)
You can programme your set to switch off after a predetermined period.
1 Press the
2 Select and confirm the ’FEATURES’ line.
MENU
button.
8
Page 11

3 Select ’SLEEPTIMER’ line.
Manual channel search
4 With the
D
or the
C
button you can determine
the minutes left until switch off in 15 minutes intervals.
When you set the time to ’0’ with the
CLEAR
button the
sleep function is switched off.
5 Press the
MENU
button.
Switch set on function
You can programme your set to switch on at a predetermined
time.
1 Press the
2 Select and confirm the ’FEATURES’ line.
3 Select and confirm the ’ON TIMER’ line.
4 Determine the time you wish the set to switch on.
5 Select the ’WAKE UP’ line and switch the ’on-timer’ on or
MENU
button.
off.
6 Press the
7 Press the
MENU
button.
STANDBY m
button.
Child lock
1 Press the
MENU
button.
In certain cases the Automatic channel search may not be
able to find all of the TV channels (e.g.: coded TV channels).
You can then use this manual method to set the channels.
1 Switch on the set with the
menu buttons
2 Select and confirm the ’MANUAL STORE’ line.
MANUAL STORE vw
CHANNEL/FREQ.
SEARCH C-21
FINE TUNING
PROGRAMME NR. 1
DECODER
STORE
3 Select the ’SEARCH’ line.
4 Press the
D
and
C
button as often as necessary, until you
STOP h
C
simultaneously.
button. Press the
have found the right TV channel.
Note:
* If you want to allocate a decoder, switch the decoder
function on or off with the
D
or
C
button in the
’DECODER’ line.
* If you want to change the automatic channel setting,
select the ’FINE TUNING’ line.
With the
D
or
C
button you can vary the auto-
matic TV channel setting.
Important: This re-tuning is only necessary and useful in
special cases, e.g.: when there are stripes on the
picture with cable-TV systems.
2 Select and confirm the ’FEATURES’ line.
3 Select the ’CHILD LOCK’ line.
4 Switch the child lock on or off.
5 Press the
MENU
button.
Note: If a button is pressed with the child lock ’on’,
’CHILD LOCK’ appears for a few seconds in the display.
* Programmed recordings are made despite the child
lock and cannot be interrupted.
5 In the ’PROGRAMME NR.’ line use the
P p
button to
select the required programme number, e.g.: ’P 01’ .
6 Select and confirm the ’STORE’ line.
7 If you want to search for further TV channels, start again
at step 4.
To finish, press the
MENU
button twice.
9
Page 12

Before you call an engineer
If, contrary to expectation, you experience any difficulty in
operating this TV Combi, please call the customer service in
your country.
You will find the telephone numbers in the enclosed guarantee leaflet.
The set does not respond to any button being pressed:
• No power supply.
• Technical disturbance: disconnect from the mains for 30
seconds, then re-connect.
• The power switch on the side panel is switched off.
• Child lock is active.
Cassette jammed:
• Don’t use force. Pull out the mains plug for a moment.
Remote control does not operate:
• Remote control wasn’t pointed at the set.
• Batteries are exhausted.
No playback on TV Combi:
• No recording on the cassette.
No TV reception:
• The aerial is not connected.
• No TV channels have been stored.
Poor playback from TV Combi:
• Cassette badly worn or of poor quality.
• Use the ’TRACKING’ function.
No recording possible:
• TV channel not stored or wrongly selected.
• Cassette with erase protection has been loaded.
Programmed recording does not function:
• TIMER not set properly.
14PV284/05
• Time data wrongly programmed.
• A cassette with erase protection has been loaded.
• VPS/PDC switched on but ’VPS/PDC time’ wrong. Check
aerial.
This product complies with the requirements of the Directive
73/23/EEC + 89/336/EEC + 93/68/EEC.
(WwnnNNNwwnwNNnwnWwnNnNWwnNNwnw)
TYPE 14PV284/05
VNxx SER.NR......
3103 166 20643
8205/003
10
 Loading...