

Page 1

PHILIPS
Page 2

CODE ARTICLE
ARTIKEL KODE
/ ’-i C:* ¿i bi
t; ■ BULLETIN
DOKUMENT N'
64275S61
bi2
V
_____
N
LJ
MAG.
02
E/l
LOC.
RAŒÿS
QUANTITE
HOEVEELHEID
PRIX - PRIJS B.TAV,
T.V.A.
3 lO
m
^aO’¥Q(g(i
Service
Page 3
Installation
Follow the instructions very closely and step by step,
o This circle in front of a sentence indicates that you have to do something.
> This arrow in front of a sentence indicates the result of what you have done.
Text in Italic indicates help information.
Place the TV on a solid base.
Leave at least 5 cm around each side of the TV for ventilation.
To prevent any faults and unsafe situations, do not place any objects on top of the sets.
The TV can only operate at a mains voltage of 220/240 V-, 50 Hz; consult your dealer if the
mains supply is different.
Make sure that the connection facilities to any TV installed in your house are in good
condition. Only use good quality aerial connectors and cables.
The aerial plugs should be tightly connected.
o Connect the TV tightly to the mains supply socket.
o Connect the aerial (indoor or outdoor) plug tightly to the nr socket on the back of the TV.
Small screen TV’s ( l4"/34 cm. and 15"/36 cm. TV’s) are equipped with a high performance
indoor aerial, nevertheless in some circumstances (specific regions or if surrounded by high
buildings) reception problems could occur. Further improvement in reception could be
obtained by:
- Rotating or varying the angle of the aerial.
- Using other aerial executions.
- Connecting your TV to an outdoor aerial.
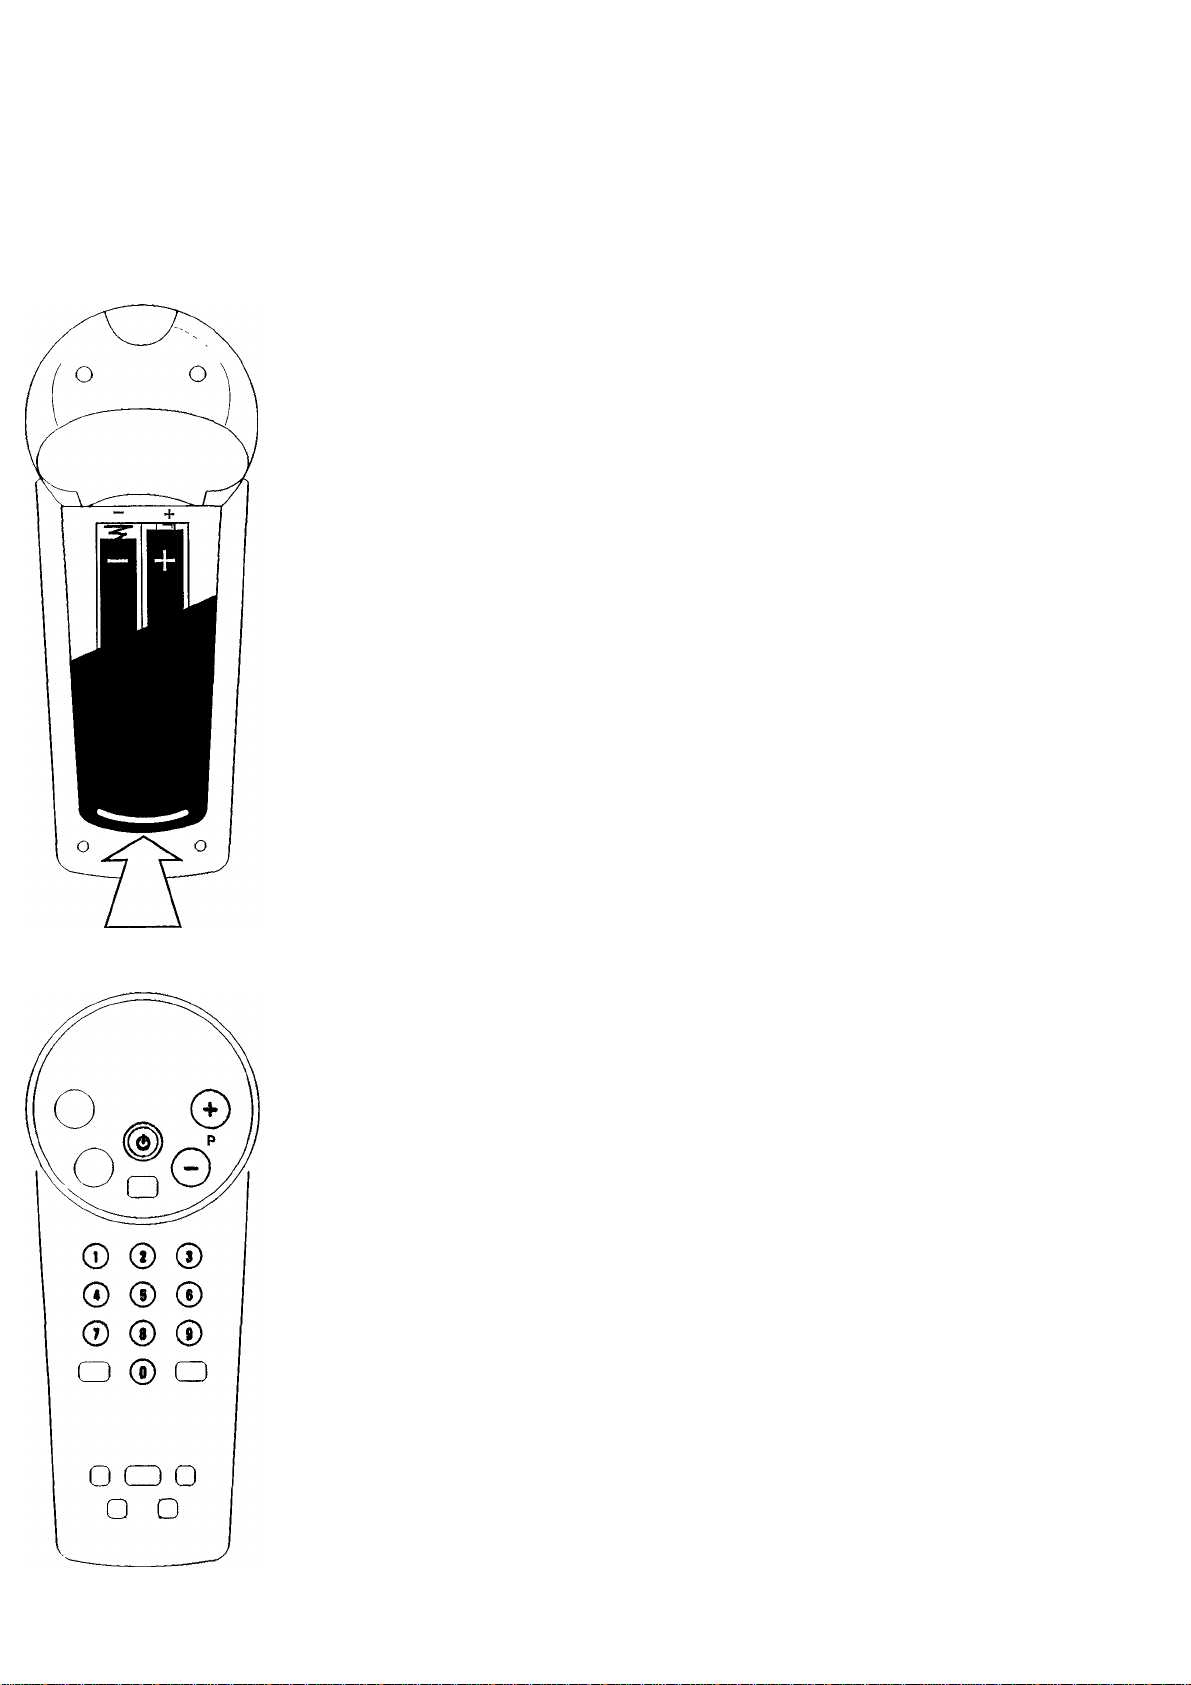
Remote control
Remove the battery cover from the remote control.
Insert the batteries, as indicated on the remote control.
Replace the battery cover.
The batteries supplied with the remote control of your TV do not contain the hea\y metals
mercury and cadmium. In many countries flat batteries may not be disposed off with your
household waste. Please ensure that batteries are disposed off in accordance with any local
regulations.
Switching TV on and off
o Press © on the front of the TV.
> The TV is switched on.
If the screen remains dark then the TV is in Stand-by.
o Pressing P —, P -T or a digit button on the remote control, or — or H- on the T\^ switches
the TV out of Stand-by.
o Press ® again to switch off the TV.
Stand-by
By pressing © on the remote control you can temporarily switch the TV off.
Press P — or -f- or a digit button on the remote control, or — or -f- on the TV, to switch on
the TV again.
Automatic switch off
If after a period of 15 minutes no aerial signal is received, the TV automatically switches to
Stand-by.
Televisions consume energy in the stand-by mode. Energy consumption contributes to air and water
pollution. We advice you to switch off your TV overnight instead of leaving it on stand-by. You save
energy and the picture tube is dem agnetised which maintains good picture quality.
Page 4

□ o c
0
]
Storing TV channels
Write down the TV channels and the assigned program numbers while storing.
Storing TV channels can he stopped by pressing simultaneously the two buttons.
69 TV channels (1 to 69) can be stored on program numbers.
Follow carefully steps 1, 2, 3, 4.
1.
o Press the two buttons C> and O simultaneously.
> INSTALLATION appears on the screen.
2.
o Press 0] to start the search.
> The TV automatically searches until a TV channel is found,
o If you want to continue searching for a specific TV channel then press 0] again.
3.
o Press P — or + to select the program number (1 to 69) where you want to store the I'V
channel.
> The selected program number is displayed on the screen.
Important
You cannot store TV channels on program number 0.
Program number 0 is reserved to select electronic equipment directly connected to the TV. See
“Peripheral connections”.
® ®
^ ® ®
0 ® (D
o ® o
□ a
f»yi
c>o-
4.
o Press the two buttons and O simultaneously to store this selection.
> The message STORED appears for a few seconds on the screen.
Repeat steps 1, 2j 3) 4 until all the TV channels you require have been stored on program
numbers.
Auto Store
The Auto Store function can be used to find and store all available channels quickly. Channels
are stored on program numbers in the same sequence as they are found. After Auto Store is
started, the TV starts searching for a TV channel. When a TV channel is found, it will be
automatically stored on program number 69. Searching will start again automatically. If
another TV channel is found, it will be stored on program 68, etc.
o Press simultaneously the two C>0 buttons longer than 4 seconds.
> INSTALLATION appears,
o Press + (YES) to start the AUTOSTORE function.
The Auto Store is stopped by pressing simultaneously the two C> O buttons.
At the end of the Auto Store cycle the TV switches to program 69.
To reorganize the sequence of the TV channels stored by the Autostore, refer to the section
“Storing TV channels” following steps 1,3,4.
Page 5

© 0 @
Operation
On Screen Display
The On Screen Display (OSD) information allows you to see the program number on which a
TV channel is stored, the timer status and a moving bar if the volume is adjusted,
o Press C±1 to display information on the screen,
o Press O again to switch off information.
Selecting TV channels
o Press P — or + or press one or two digit buttons on the remote control.
To select a program number from 0 to 9 press one digit button.
To select a program number from 10 to 69 you must press two digit buttons in less than 4
seconds.
or
o Press — or + on the TV.
Volume control
o Press — or + on the remote control.
O
o a o
□ :d
o Press iQC to switch off the sound,
o Press iQC again or -¿3 + to switch on the sound.
Menu on screen
With the menu on the screen you can change and store the picture and sound settings.
You can also set the timer.
When you switch on your TV, the picture and sound settings have certain values. These values
are initially stored by the factory. Using the menu on screen you can change these values. If you
store these values (by pressing the two buttons ^ and O simultaneously after a change), the
TV will switch on with your stored picture and sound values..
If you want to leave the menu, for example after changing the contrast setting, you can either wait
approximately 10 seconds or continue to press the MENU button until the menu disappears from the
screen.
The stored picture and sound values can also be recalled by pressing P P.
Press MENU.
VOLUME appears, adjust the volume by pressing — or +.
If you want to store this setting press the two buttons ^ and O simultaneously.
Press MENU again.
BRIGHTNESS appears, adjust the brightness by pressing — or +.
If you want to store this setting press the two buttons 0 and O simultaneously.
Press MENU again.
CONTRAST appears, adjust the contrast by pressing — or +.
If you want to store this setting press the two buttons 0 and <C> simultaneously.
Press MENU again.
SHARPNESS appears, adjust the sharpness by pressing — or +.
If you want to store this setting press the two buttons 0 and O simultaneously.
Press MENU again.
COLOUR appears, adjust the colour by pressing — or +.
If you want to store this setting press the two buttons 0 and O simultaneously.
Press MENU again.
Page 6

> TIMER appears.
The timer can be used to switch the TV on or ofif automatically after a preset time. This pieset
time can be set in steps of 10 minutes up to a maximum of 24.00 hours.
Switching off automatically:
o Press — or + to select the time after which the TA'' should switch off. The eount
down starts immediately. You can see the remaining time by pressing Q) on the
remote control.
During the final minute of the selected time period, the seconds remaining are
automatically shown on the screen.
At the end of this time period the TV switches to stand-by mode.
Switching on automatically:
o Press — or to select the time after w’hich the TA'' should switch on. fhe count
down starts immediately,
o Press (!) to switch the TV off temporarily.
> The TV will switch on after the time period you have selected.
Note: If you switch on your TV again before the selected time has elapsed, the timer will be
switched off automatically. If you do not press any button within 3 hours after the I V has
switched on automatically, the TV will switch automatically to Stand-by again.
If you want to stop the TIMER press — or + until the selected period on the screen i> 00.00.
o Press MENU.
> The menu disappears.
Different volume level for a specific TV channel
Not all TV channels broadcast volume at the same level.
With this function you can alter the volume level of one channel with respect to the others,
o Press MENU button for at least 4 seconds.
> Immediately VOLUME appears, keep on pressing until “^/PROGRAM” appears,
o Press P — or -f" to select the program you wish to alter.
o Press — or + to adjust the volume level.
o Press the two buttons and O simultaneously to store the volume level.
> STORED appears for a few seconds.
o Select another TV channel to adjust the volume level or press MENU several times to leave the
menu.
Page 7

VCR
o o ©
audioO»vldeo 0
Peripheral connections
Aerial connection
You can connect your videorecorder or other equipment via the aerial connection on the back
of the TV.
Unplug the aerial plug from your TV and insert it into the aerial input "ir of your equipment.
Connect another aerial plug to the output ® of your equipment, connect the other side to the
aerial input nr of your TV.
Switch on your equipment.
Check in the handbook of the panicular equipment to see what the test signal looks like.
Now, refer to the section Storing TV channels to search for and store this signal on a
programme number from 1 to 69 (you cannot store the signal on the program number 0).
After that, you can receive signals from your equipment on this programme number.
Euroconnection (scart) for e.g. videorecorder
Other products such as a videorecorder or satellite tuner can be connected to the euroconnector
on the back of the TV. Please ask your dealer for the appropriate cable.
Connect the eurocable to the euroconnector socket of your videorecorder and to the
euroconnector socket of your TV.
Connect an aerial cable to the output O of your video recorder and to the aerial input nr of
your TV.
Normally if the videorecorder is switched on, the picture will automatically appear on the TV
screen.
If you do not see the picture, select program number 0 by pressing P + or —.
AudioAfideo front connections
The AudioVideo front socket is only present on certain TV models.
You can connect audio/video equipment, like a camcorder or game-computer, to the
AudioVideo input on the front of your TV. Ask your dealer for an appropriate cable.
Connect your equipment to the AudioAftdeo input of your TV.
Press START or PLAY on your equipment.
Select program number 0.
The picture from your equipment appears on the screen.
Do not use the Audio- Video front socket and the euroconnector socket at the same time.
Headphones
o Connect the headphones plug to the headphones socket on front of the TV.
> The internal loudspeakers of your TV are automatically switched off.
Tips
To clean the TV
Clean the TV using a slighdy damp chamois leather.
Never use a^ressive cleaning agents.
If an indoor aerial is used, refer to the section “Installation” to improve the reception.
Poor or no picture:
Are the plugs tightly connected to the aerial socket and are the connection facilities to any other
installed TV in good condition? Do you use good quality aerial connectors and cables?
No solution:
Switch your TV off and on again with the ® button.
Never attempt to repair a defective TV set yourself.
Switch off the TV and call your dealer or TV-technician when nothing helps or when:
- A white horizontal stripe appears across the whole screen.
- The red lamp below' the screen starts blinking when no buttons are pressed on
the remote control.
Environmental information
Your TV contains material which can be recycled and reused. At end of life specialized
companies can dismantle the discarded TV to concentrate the reusable materials and to
minimize the ammount of materials to be disposed off.
Please find out about local regulations on disposal of yoiu: old TV set.
5
Page 8

Page 9

Printed in Italy by G.S.F 95/12 11 10987654
Printed on recycled paper
Stampato su carta riciclata
14PT136B 15PT136B 20PT135B
14PT135B 17PT136B 21PT135B
3119 105 2371.1
 Loading...