

Page 1

PHILIPS
PAL/SECAM
14GX8310 14GX8510 14GX8512
20GX8350 20GX8550 20GX8552
OPERATING INSTRUCTIONS
Page 2

Safety Information
Disconnect mains piug when :
• the RED light below the screen is flashing continuously.
• a bright white line is displayed across the screen.
• cleaning the TV screen. Never use aggressive cleaning agents. Use a slight damp chamois leather.
• there is a lightning storm.
• the set is left unattended for an extended period of time.
CAUTiON: Never attempt to repair a defective TV yourself. Always consult a skilled service personnel.
Switch off your TV overnight via the POWER ON/OFF button instead of leaving it on stand-by.
You save energy and at the same time demagnetise the picture tube. A demagnetised picture
tube supports good picture quality .When the set is switched on, do not shift, move or turn
(e.g. on a swivel base) the set around because an uneveness in colour in some parts of the screen
may occur.This can be eliminated by switching off the set by the mains power button . Wait for
20 minutes before switching on again. If symptom still exists, call for service.
Before Calling For Service
Please make these simple checks before calling for service.
SYMPTOM
CHECK/ACTION
Colour patch
(uneveness)
No power
No picture
Good picture but no sound
Good sound but poor or
abnormal colour or no picture
Snowish picture and noise
Horizontal dotted lines
'Ghosts' or double image
One white line across the
screen
TV not responding to remote
control handset
• Switch off TV by the mains power button. Wait for 20 minutes
before switching on again.
• Check TV's AC power cord is plugged into mains socket. If there is
still no power, disconnect plug. Wait for 60 seconds and re-insert
plug. Switch on TV again.
• Check antenna connection at rear of the TV.
• PossiblefaultyTVstation. Try another channel.
• Increase the contrast setting first and then the brightness setting.
• Try increasing the volume.
• Check sound is switched on.
• Increase the contrast setting first and then the brightness setting.
• Check antenna connection at rear of the TV.
• Possible electrical interference! e.g. hairdryer,nearby neon lights,
etc). Switch off equipment.
• Possible poor positioning of antenna. Using a highly directional
antenna may improve reception.
• Switch off set immediately and consult service personnel.
• Check life span of batteries.
• Aim remote control handset directly at remote control
sensor lens on the TV set.
Page 3
Safety Information
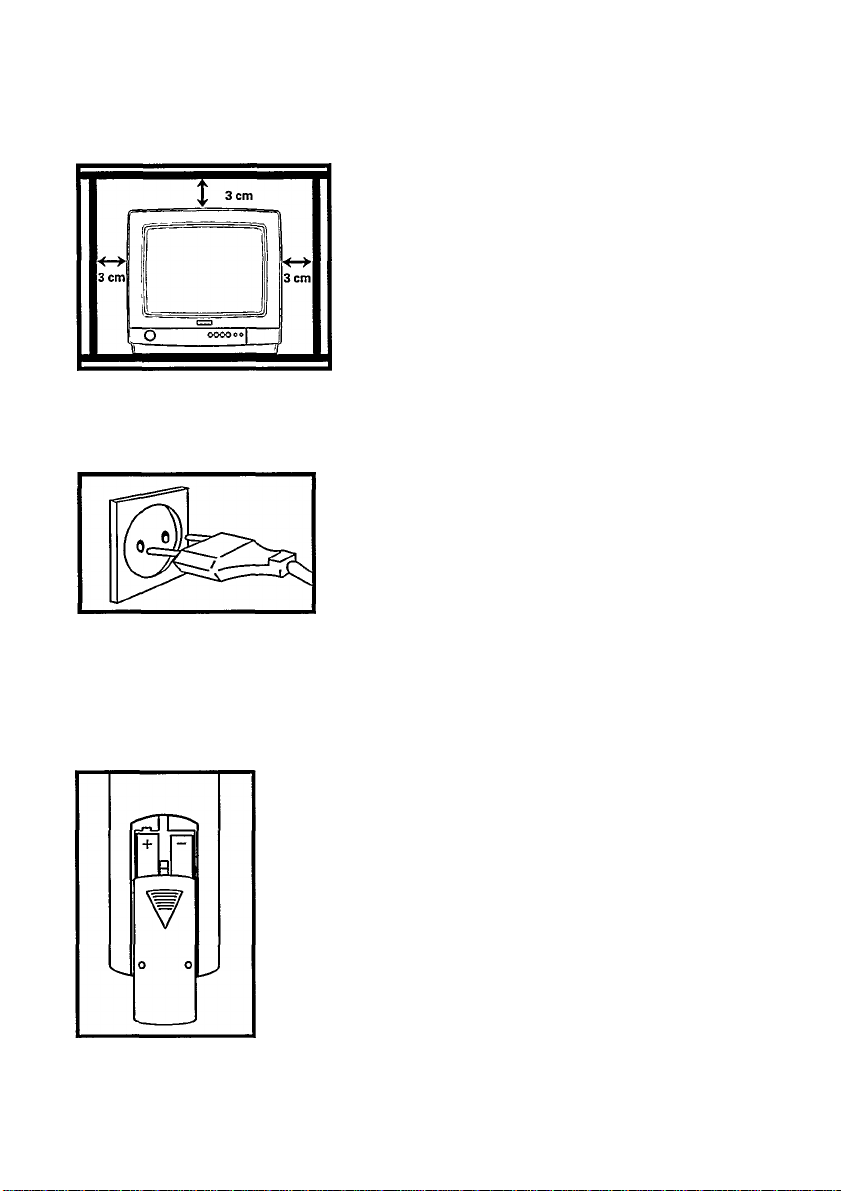
Positioning of the TV
Power Connection
Place TV set on a solid base (e.g. a TV/Video cabinet)
Leave at least 3 cm around each side of TV set for
ventilation to avoid over-heating.
Do not piece TV set near a radiator or other sources
of heat.
Do not place TV set where it can be exposed to rain
or excessive moisture.
For correct mains voltage, refer to Specification page.
Consuit your dealer if mains supply is different.
NOTE:
This plug is not representative of the actual plug
and socket.
Care of Remote Control handset
Always remove the batteries from the remote controi
handset if handset is not used for a long period.
This can help prevent damage to handset from
possible battery leakage.
Page 4
PRE-INSTALLATIOIM
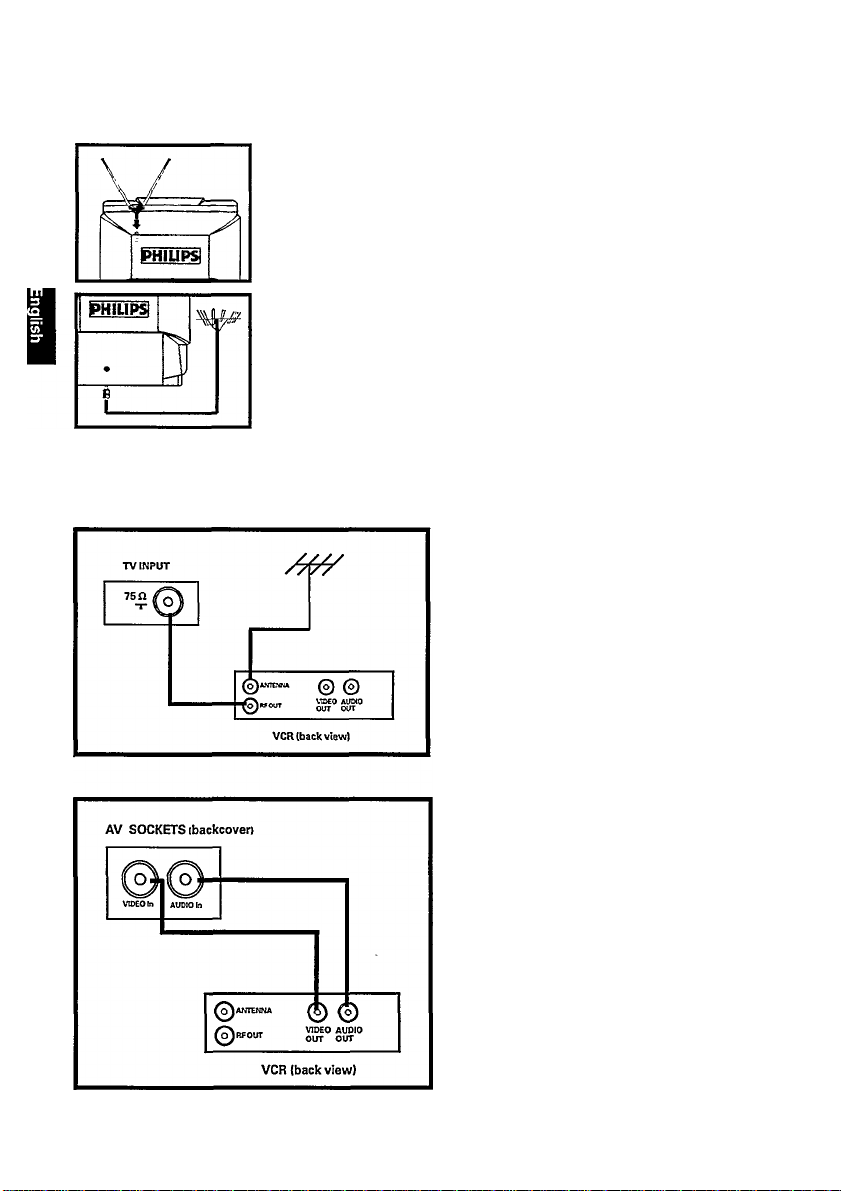
ANTENNA CONNECTION
PERIPHERAL EQUIPMENT CONNECTION
For indoor antenna, attach it to the
mounting socket of the backcover.
Connect aerial plug to the antenna socket
T on the backcover.
For external antenna, connect the aerial
plug to the antenna socket t on the
backcover.
Connect antenna to Antenna RF Input
of VCR.
Connect RF cable from RF Output of
VCR to the Antenna InputT of the TV.
Connect the VIDEO in and AUDIO in
sockets of the TV to the VIDEO out
and AUDIO out sockets of the VCR
for playback programmes.
(Applicable to sets with AV mode only)
Page 5

NAME AND FUNCTION OF CONTROLS
FUNCTIONS OF TV
Main Power button Turns main power on and off.
©
Headphone socket
©
Volume Down button Adjusts sound volume softer.
©
Volume Up button Adjusts sound volume louder.
©
Channel Down button Selects channel backward.
©
Channel Up button
©
Stand-by light indicator
©
Remote Sensor Aim remote control here.
©
Connects headphone jack to socket for personal
listening. (Applicable for certain models/versions only)
Selects channel forward.
Indicates red light when stand-by is on.
Page 6

NAME AND FUNCTION OF CONTROLS
FUNCTIONS OF REMOTE CONTROL
Stand-by button Turns TV on and off
©
when main power Is on.
Channel Up/Down
button
Volume Up/Down
button
Digit {0 - 9) button
®
Alternate channel
®
button
On Screen Display
®
button
Install button Starts installation menu
®
Menu and Menu
®
Up/Down button
Mute button
®
On-Tlmer button
Clock button
AV button
Selects channels preset
on programme number.
Adjusts sound volume
louder or softer.
Selects channel directly.
Press desired number
to selectjone digit). For
two-digit channel
number, press the first
digit followed by the
second digit.
Alternates last viewed
channel and present
channel.
Displays channel
number and sleep-timer.
and store new settings.
Selects and start the
various menu.
Mutes sound temporarily.
Not applicable.
Not applicable
ForAV playback
programmes.
(For sets with AV mode).
Smart Picture
button
Smart Sound
button
Allows you a choice of
4 picture settings.
Allows you a choice of
4 sound settings.
Page 7

INSTALLATION
Operating instructions generally explains the operation of the TV using the buttons on the remote control.
SEARCHING AND STORING TV CHANNELS
You can search and store TV channels with your remote
control handset either by AUTOMATIC installation or
MANUAL installation through the installation menu.
AUTOMATIC installation enables you to search
and store TV channels automatically.
MANUAL installation enables you to search and
store TV channels manually by entering your
preference channel number for every available station.
HOW TO GET INTO THE INSTALLATION MENU
50
Press I T button to start installation menu.
This menu allows you to do:
• Automatic Installation
• Manual Installation
• Fine Tuning
• Swapping of Channels
• Skipping of Channels
I ftllTO MANUAL I
IFINE SWAP skip!
A
HOW TO START AUTOMATIC INSTALLATION
Step 1 • Press CD button to start installation menu.
Step 2 • Press MENU button to start AUTO mode.
Step 3 • Press MENU + button to start AUTO installation.
NOTE: Installation menu will exit automatically when all
50
(AUTO menu is automatically highlighted first).
available stations are stored. Channel 1 will then
be displayed.
1 AUTO MANUAL. 1
IFINF SWAP
_ __ __ __ __ __ _1_ __ ___ __ __ _
1
_ __
auiQ
1VHP1 1 11 '.,i
________ft
1
_ _
AUTO
IVHFi 1 1.1. ::i1 ii-. 1
_ ___ _
_______
_ __
SKIPI
1
... .. .
n k>l
1
Page 8

INSTALLATION
HOW TO START MANUAL INSTALLATION
Step 1 • Press button to start installation menu
and press CD button again to highlight
MANUAL menu.
Step 2 • Press MENU button to start MANUAL mode.
Step 3 • Press MENU — button to select either UHF 1, VHP 1
or VHP 3 band.
Step 4 • Press MENU + button to start MANUAL installation.
Step 5 • Enter your preference number for that available
channel once a blinking channel number appears.
Step 6 • Press Ci) button to store channel number.
:>0
Step 7 • Repeat Step 3 to Step 5 to install other channels.
Step 8 • Press □□ button to exit from menu.
PD
HOW TO DO FINE TUNING
To achieve optimum picture and sound quality, you can use the
FINE TUNING feature to adjust the picture and sound quality.
Step 1 • Select the channel which you want to fine tune.
Step 2 • Press CD button to start installation menu.
Step 3 • Press MENU button to start FINE mode.
Step 4 • Press and hold MENU + or — button until the
Step 5 • Press CD button to store new setting.
Step 6 • Press qd button to exit from menu.
PD
and press qd button until FINE is highlighted.
PD
desired picture and sound is obtained. A blinking
channel number will then appear on the screen.
PD
Repeat all the above steps if you wish to do a
fine tuning for other channels.
PD
I AUTO MAHIIOL I
IFINE SWAP .SKIP I
I^^AUTO^^^ANUAU^^^I
I manual'^ 1 h>l
IVHF1 I . I
I MANUAL 1 K>l
I ■ UHF “I”.
I MANUAL 1 l±>t
I VHF1 I--
I MANUAL 1 F>l
I VHF3 I-"............................... I
I MANUAL — b>l
IVHF .................... 1............. I
I MANUAL*
IVHF i l~~ |....J.-r—I
I MANUAL* 5 PI
I STORED I
I AUTO MANUAL I
IFINE SWAP SKIPI
I AUTO MANUAL I
Ifc) FINE
ItnRF'f r
r<y' FlNF~
TORFi r
KR FINE~I»F
c
.....
........................
----
■
...............................
-------------
T-gi
~T~lg1
I
1
[
Page 9

INSTALLATION
HOW TO SWAP CHANNEL NUMBERS
You can change the channel number to your choice for a particular TV station.
Select the SWAP feature in the installation menu to re-arrange the TV stations
according to the channel numbers of your choice.
Step 1 • Select the channel which you want to swap.
Step 2 • Press CD button to start installation menu. Press I I
Step 3 • Press MENU button to start SWAP mode.
Step 4 • Press MENU -f button to select the TO column.
Step 5 • Press CD button to start SWAP function to store the swapped
Step 6 • Press button again to exit from menu.
HOW TO SKIP CHANNEL NUMBERS
This feature allows you to skip those channels which have bad or weak
TV station signal by the CHANNEL A or V button on the remote control.
Step 1 • Press I I button to start installation menu. Press (CD
Step 2 • Press Menu button to start SKIP mode.
Step 3 • Press Digit button to select the channel you want to skip.
Step 4 • Press Menu button to select YES. The skipped channel
Step 5 • Repeat Step 3 and 4 to skip other selected channels.
Step 6 • Press (CD button to exit from menu.
NOTE: Skipped channels can still be selected by pressing the digit button.
>t>
button until SWAP is highlighted.
The current channel is flashing and is indicated
in the FROM column.
Enter the channel number you want to swap here.
oo
channels. After the swapped channel is stored, the FROM “ —"
and TO symbol will appear immediately. If you want to
continue swapping other channel, enter the channel number in
the FROM “ - - “ column and the other channel that you want to
swap to in the TO “ - - “ column.
OC> 50
button until SKIP is highlighted.
will display a "x” on the top left hand of the channel number,
e.g. “lO.
50
1 AinrO MANIJA!. 1
IFINE swap
1 AUTO r.lANUAL 1
IFINE
____
Kd SWAP,
IFROM ^1'- TO
Kd SWAP ^
IFROM i TO" -1- I
Kd SWAP
IFROM 1 TO -
Kd SWAP
1 STORED 1
KH SWAP 1 .
ÜERQM
___
I AUTO MANUAL I
IFINE SWAP SKIP I
I AUTO r*NUflL I
IFINE
____
SWAP_
____________*___________
l<d SKIP 1 l+>l
I NO
IfeJ SKIP
I NO
Kd SKIP
1 NO
SKIP!
«
SWAP SKIPI
*
— 1
У^\
.1 u>l
I
____
♦
?-r TO
SKIPI
__
YESJ
»
R l-^l
___
YES I
1-
*10 E>l
VFS 1
FI
___
I
L¿l
FI
—I
HOW TO ADD BACK THE SKIPPED CHANNEL NUMBERS
Step 1
Step 2
■ Repeat Step 1 to Step 4 .(As in "How To Skip Channel Numbers")
• Press MENU — button to select NO and the channel wil be added
to the memory. The "x" on the top left hand of the channel
channel number will disappear. Press button to exit from menu.
Page 10

MENU OPERATION
The Picture and sound settings are pre-set for ideal viewing.
□
MENU
CD
+
Stepi * Press MENU button to start menu.
Step 2 • Press MENU button repeatedly to cycle through menu.
step 3 • Press MENU or — to increase or decrease setting.
o CONTRAST E>
<3 BRIGHTTgESS IS
Adjusts the picture contrast: weaker ► stronger
Adjusts the picture brightness : darker brighter
Adjusts the colour intensity: paler 4—► stronger
Adjusts hue : purplish 4-^ green
Adjuststhe picture sharpness : decrease ► increase
Adjusts the volume : softer louder
Sets timer in steps of 15 minutes from OFF up to a
maximun of 120 minutes.
NOTE
’ Hue adjustment is applicable to NTSC playback programmes only.
’ Last viewed/selected function will appear if menu operation is activated again.
SLEEP-TIMER
This feature allows you to select a time period after which the set will switch to stand-by automatically.
You can set the timer in steps of 15 minutes from OFF mode up to a maximun of 120 minutes.
Step 1 > Press MENU button to start menu.
Step 2 * Press MENU button again until SLEEP-TIMER function is selected.
Step 3 • Press MENU -p or — to select a time period.
12 PERSONAL PREFERENCE SETTINGS
• For programme number 0 to 10, you can make adjustment to picture settings to suit your
preference. Adjusted picture settings for each programme number will be stored automatically
under PERSONAL mode. (Refer to the next page on howto made adjustment to your preferred setting).
• Adjusted volume level setting for programme 0 to 10 is also stored automatically.
• Each programme number (0 to 10) will therefore has its Personal Preference Setting for picture and
volume level.
• For AV mode (if any), you can also store your personal preference setting for picture and volume level.
• For programme number 11 to 69, personal preference setting for picture and volume level will be
common. If any adjustment is made to the picture and volume setting, (for example, programme
number 18), all the programme numbers from 11 to 69 will follow the picture and volume level setting
of channel number 18.
10
Page 11

SMART CONTROLS
SMART PICTURE CONTROLS
Smart Picture offers you a choice of 4 picture settings - PERSONAL, RiCH, NATURAL and SOFT
PERSONAL
RICH
NATURAL
SOFT
Definition of Picture Settings
PERSONAL : Picture Settings are set to your preference.
RICH : Emphasize very vibrant colours. (Suitable for AV mode in brightly-lit room condition)
NATURAL : Emphasize original colours.
SOFT : Emphasize “warm“ colours. (Suitable for dimly-lit room condition and gives
cinema-like effect when light is switched off)
Adjustment can be made to the picture settings to suit your preference and stored under PERSONAL
mode through the menu operation.
Step 1 • Select channel you want for picture and sound adjustment.
Step 2 • Press MENU button to start menu.
Step 3 • Press MENU button repeatedly to cycle through menu and select menu items.
Step 4 • Press MENU + or — to increase or decrease setting.
Step 5 • Press button to exit.
PICT. SOUND
(
-------
1 (
i I J I
-------
_____________
\ SMART
i CONTROLS
NOTE : The new settings will be stored in the PERSONAL mode in the SMART CONTROLS menu.
SMART SOUND CONTROLS
Smart Sound offers you a choice of 4 settings - THEATRE, MUSIC, VOICE and NORMAL.
THEATRE
MUSIC
mrc
NORMAL
Definition of Sound Settings
THEATRE : Emphasize sensation to action. (Bass and Treble Boosted)
MUSIC : Emphasize low tone (Bass boosted)
VOICE : Emphasize high tone. (Treble boosted)
NORMAL : Emphasize normal tone. (No boosting)
11
r PICT. SOUND
(
-------
1 (
--------
.
-----------------
-Mi.
1 SMART
Page 12

SPECIFICATION
PIx Tube Size
Audio Output
Tuning System
Headphone
Connection
Rear Cconnection
Packed Set
Dimensions:
Width
Height
Depth
Antenna Assembly
Power
Consumption
Weight
(without packaging)
PAL B/G/H
14GX8310
14" (34 cm) 20" (48 cm)
3 W Front Firing Speaker
VST
03.5 mm
(Applicable to certain modelsA'ersions)
Nil AVIn AVIn
44.5 cm
41 cm
45 cm
Rod Aerial 300/75 ohm adaptor
38W
8.6 kg
14GX8510 14GX8512 20GX8350
Nil AVIn AVIn
58.5 cm
55.5 cm
57 cm
Nil
52W
18.4 kg
VERSIONS
50
X X X
52 57
20GX8550 20GX8552
58
59
75
E
PALI X
O
(A
PAL/SECAM B/G/D/K X
PAL 60 Playback X X
O
Ui
100-250 V~, 50/60 Hz
CO
4-*
O)
170-250 V~, 50/60 Hz
CO
k.
o
a
230 - 240 V~, 50/60 Hz
O
X X
12
X
X
X
X
X
X X
X
X
 Loading...