

Philips 11258U50CWX2, 11258U90CWX2, 11366U90CWX2, 11366U50CWX2, 11342U50CWX2 user manual [tz]
...
User Manual
Ultinon Pro
LED-HL
GB User Manual
繁體中文 使用手冊
JA ユーザーマニュアル
KO 사용 설명서
中文
用户手册
3
15
28
41
54

GB Thank you very much for purchasing this product. To facilitate long-term use, please
carefully read this User Manual before use. After reading, keep the User Manual safe so
that it is available for use at any time.
Table of Content
Packaging List..................................................................................................................................3
Important Information...................................................................................................................3
Installation for H4 and H7............................................................................................................5
Installation for FOG, H11, HIR2, HB3 and HB4.....................................................................6
Centre ring adjustment..................................................................................................................8
Centre ring alignment of HIR2, HB3, HB4, H11 and FOG...................................................8
Precautions H11 and FOG.......................................................................................................................10
Installation for H1 and H3..........................................................................................................................11
Correct beam performance.............................................................................................................13
Troubleshooting...................................................................................................................................13
Recycling, Warranty and Service..................................................................................................14

Packing list
1
GB
Item Description
Ultinon Pro lamps
burners with heat sink x 2
Drivers x 2
Hex Key x 1
Plastic Tie x 8
Additional HB4
O-Ring x 2
Product Manual x1
2
Important
Please read these instructions carefully before installing the Ultinon Pro lamp.
H7, H4 H11, FOG
& HIR2
HB3 H1, H3
HB4
Precautions
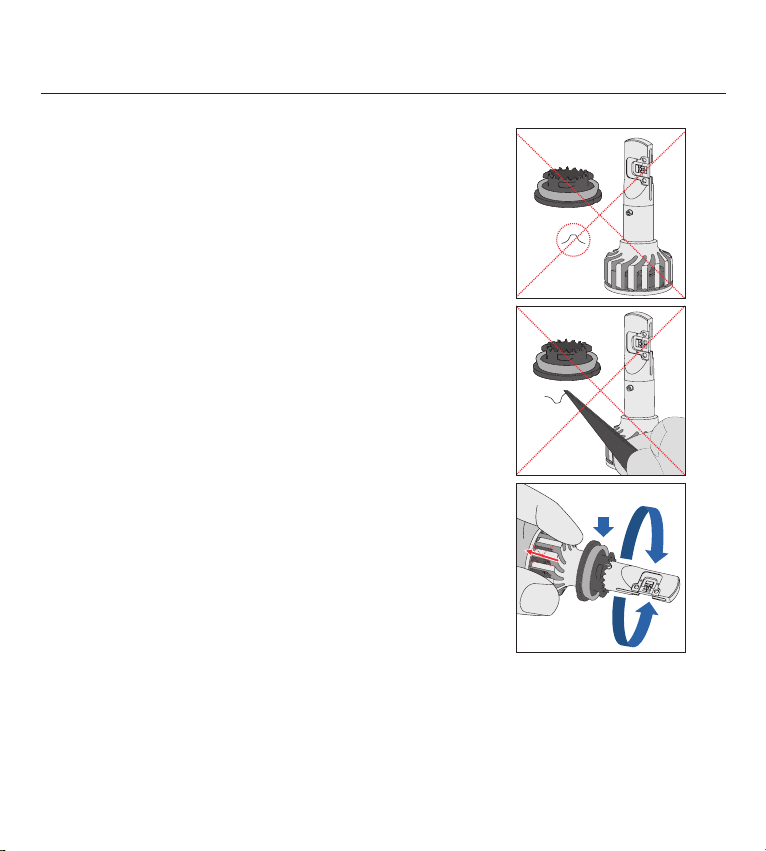
• Before installing the Ultinon Pro lamps, please ensure that the lamps are not damaged or
broken, and have not fallen on the ground. If any of these conditions exist, please do not
install the LED bulbs onto your vehicle.
• The temperature of the Ultinon Pro lamps burner can be very high. Do not place
ammable materials, such as paper, cloth, or other materials, close to the LED bulb.
• Keep the LED bulb out of areas that are exposed to ames or prone to combustion, such
as gas or petrol stations.
• Keep the LED bulb out of areas with high amounts of dust.
3

Warning
• The burner body and LED surface can reach very high temperatures. Do not touch the
area with the hands or allow any skin contact as it may result in severe burns. Do not
touch the LED ribbon bonding area! (Refer to picture below)
• The LED light intensity is very high while turned on. Do not look directly into the beam to
avoid damage to the eyes.
•
Do not wash the vehicle when the headlights are turned on. Changes in temperature may
cause damage to or an unexpected reaction from the LED headlight.
• Do not expose the surface of the LED bulb to dust or oils, or cause the surface to bear
shock or otherwise become damaged.
• Keep out of reach of children.
• Warning – Do not touch this area
Other Information
• Please ensure that the product comes from a legal sales channel.
• After installation, check that the high and low beams, the ash function, and other
electrical equipment on the dashboard work and that no warnings occur. If anything
abnormal happen, Philips LED CANbus adapter could be a solution.
•
After installation, ensure that the waterproof gasket is tted correctly to reduce the risk of leakage.
• Do not bend the cables excessively, especially near the heat sink area.
4

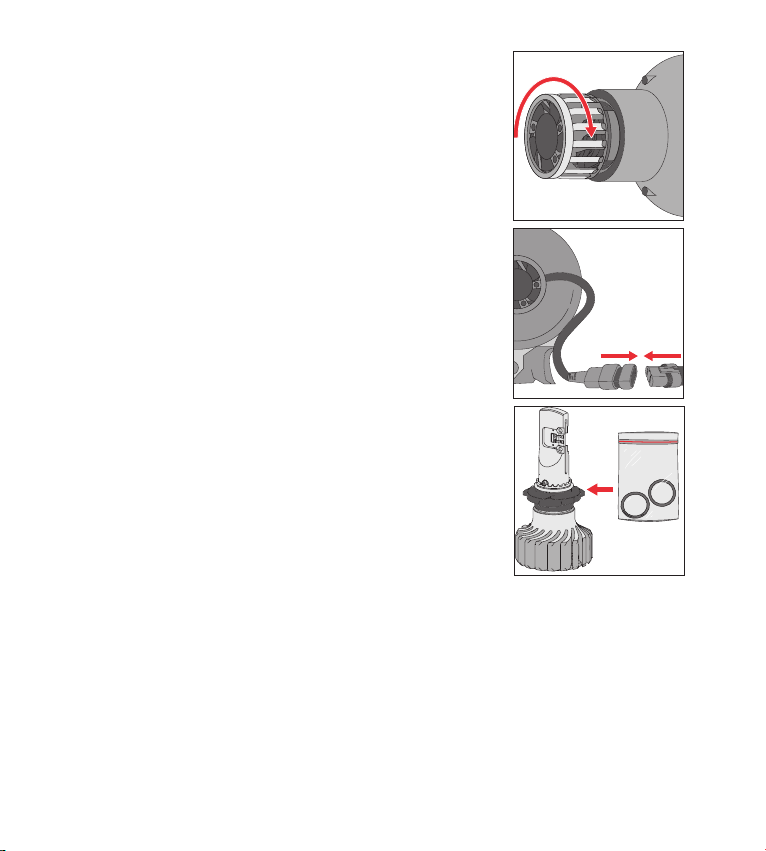
Installation steps for H4 and H7
3
• Twist and pull o the center ring
• Install and xate center ring in headlamp
• Insert and xate LED bulb by rotating until
end stop
2
1
*locked*
5

• Connect power line
• Optional and only for H7 – Beam pattern can
be optimized by rotating LED bulb, LED PCB
should be vertical
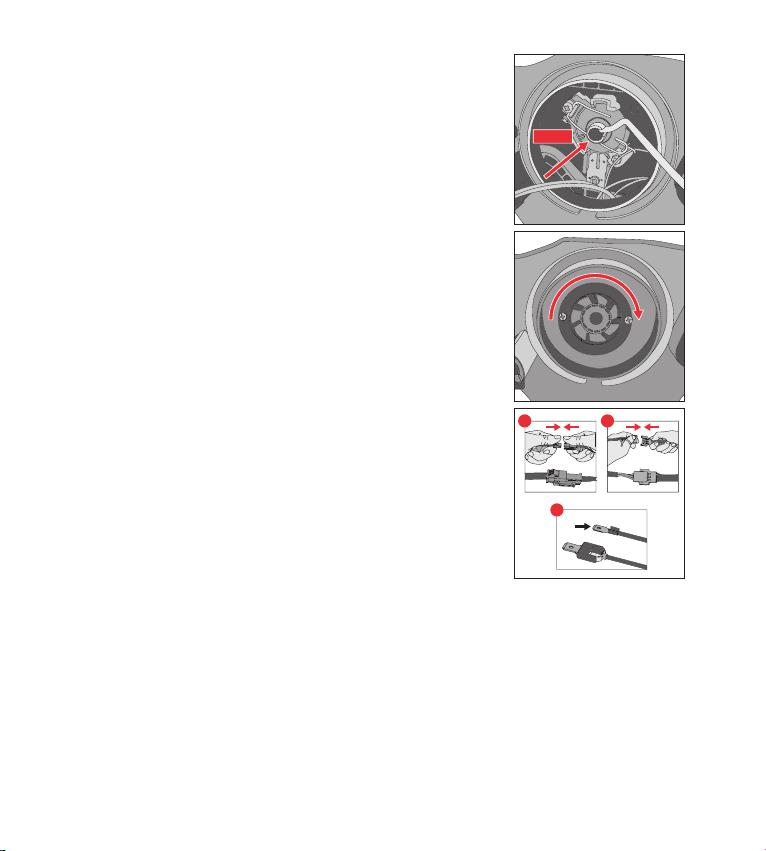
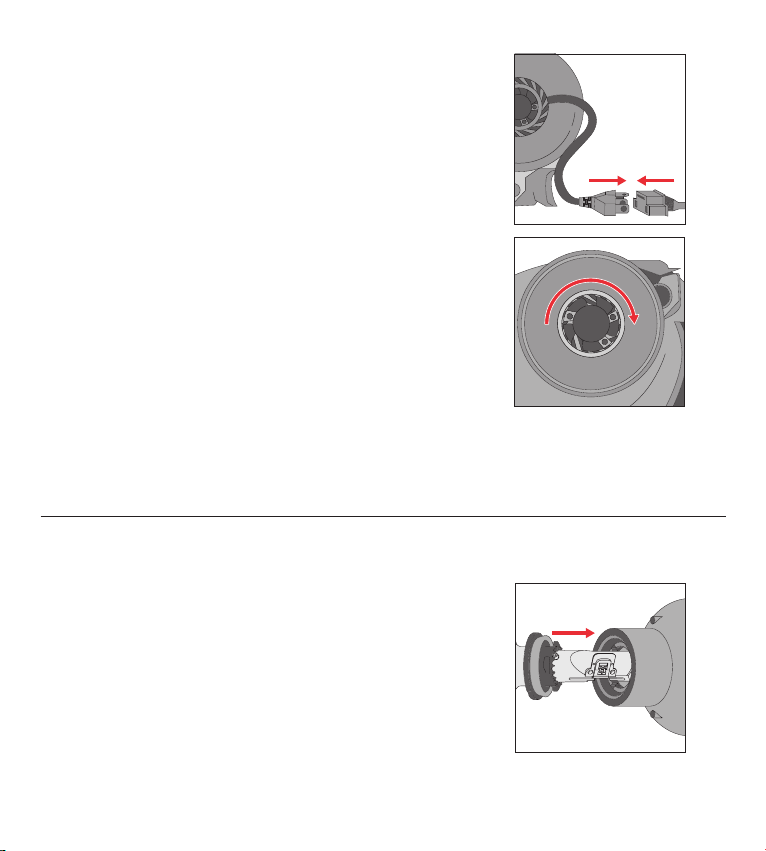
Installation for FOG, H11, HIR2, HB3, HB4
• Install the bulb inside the luminaire.
6

• Rotate the heatsink
• Connect the plug to the power socket
• If the original installed bulb is HB4 bulb
type; please replace the red o-ring
with the black o-ring.
(HB4 = black o-ring; HB3 = red o-ring)
7

Centre ring adjustment target
• If the bulb is not in vertical position
inside the luminaire, please follow below
instruction for adjusting centre ring angle.
• Make sure the LED emit light to the left and
right, burner is in vertical position
Hex Key
Illumination
orientation of
the left LED
Illumination
orientation of
the right LED
Centre Ring alignment of HIR2, HB3, HB4,
H11 and FOG
• Bulb not perpendicular (Not preferred)
• Screw inwards the two reference screws with
the Hex key.
8

• Rotate burner over the centre ring
• Screw outwards the two reference screws.
• For easy adjustment and easy screwing out it
is necessary to apply force to pull the centre
ring downwards.
• Bulb perpendicular (Preferred)
9

Precautions for H11 / FOG
• Do not dissemble. Risk of small component
(spring) coming loose
• Do not dissemble. Special tools are required
for re-assembly
• Keep centre ring pressed towards the heatsink
and the burner.
10

• Screw top should be same height
as centre ring surface after the
adjustment
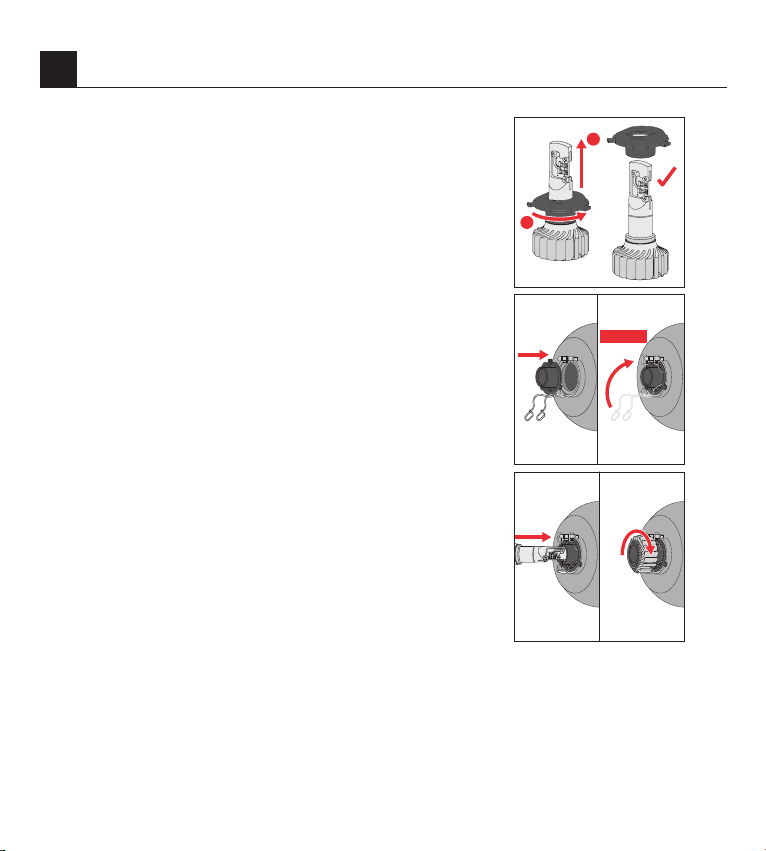
Installation for H1 and H3
• Fix the driver box inside the luminaire rstly.
• Screw out the heatsink from the burner
11

• Fix the burner onto the luminaire.
• Screw on the heatsink onto the burner.
*click*
• Connect the cable between driver to burner
and driver to power socket.
12
1 2
3
A
H1

Correct beam performance
• Correct beam with clear cut-o:
Superior visibility in fareld.
Reduced glaring, enhancing driver and trac
safety
Troubleshooting
4
If the Ultinon Pro fails to operate, please perform the following actions:
1. Check that the power connectors are well connected.
2. Ensure that the vehicle headlight switch is in the “ON” position.
3. Ensure that the vehicle battery has enough power to power the Ultinon Pro
13

Recycling
5
Your product is designed and manufactured with high quality material and
components that can be recycled and reused. The following symbol attached
to the product signies that the product is covered by the European Directive
2002/96/EC.
Never dispose of the product with other waste. Please inquire about the local
regulations about the separated collection of electrical and electronic products. The correct disposal of used old products helps prevents potentially
negative consequences on the environment and human health.
Warranty and Service
6
If you have any problems with the product or need service or need information, please visit
www.philips.com/automotive or contact the Philips call center in your country.
If there is no call center in your country, please consult your local Philips dealer.
Philips does not warrant its goods against any defect or damage caused by transportation,
storage, improper installation, maintenance, internal or external hostile environment, misuse,
abuse, negligence, accident, modication, tampering, the attachment of any unauthorized
accessory, alteration to the goods, or any other conditions whatsoever that do not constitute
a defect in material and/or workmanship.Philips sole responsibility under this warranty shall
be, at its option, to either repair or replace any goods which fail during the warranty period,
provided that Buyer has promptly reported same to Philips in writing, and complies with the
provisions of this Warranty.
In case of warranty claim, please provide the following information together with proof
of purchase:
Name__________________________ address___________________________________________
Phone_________________________ postal code________________________________________
Purchased from: (please provide name and location of retail outlet)
____________________________________________________________________________________
14
Warranty terms

繁體中文 感謝您購買本產品。使用前請先詳閱本使用手冊,以利長期使用。閱讀完畢後,請妥善保存
本使用手冊,以便隨時使用。
目錄
包裝清單 …………………………………………………………………………………………………………………………………………… 16
重要資訊 …………………………………………………………………………………………………………………………………………… 16
安裝 H4 及 H7 ………………………………………………………………………………………………………………………………… 18
安裝 FOG、H11、HIR2、HB3 及 HB4 …………………………………………………………………………………… 19
中央環調整 ……………………………………………………………………………………………………………………………………… 21
HIR2、HB3、HB4、H11 及 FOG 中央環校準 ……………………………………………………………………… 21
H11 及 FOG 注意事項 …………………………………………………………………………………………………………………… 23
安裝 H1 及 H3 ………………………………………………………………………………………………………………………………… 24
正確的光束效能 ……………………………………………………………………………………………………………………………… 26
疑難排解 …………………………………………………………………………………………………………………………………………… 26
回收、保固及維修 ………………………………………………………………………………………………………………………… 27

包裝清單
1
繁體中文
項目 說明
Ultinon Pro 燈泡燈體搭
附散熱器 x 2
驅動器 x 2
內六角扳手 x 1
塑膠束帶 x 8
額外的 HB4 O 型環 x 2
產品手冊 x1
重要事項
2
在安裝 Ultinon Pro 燈泡前,請先詳閱下列指示。
H7、H4 H11、FOG
及 HIR2
HB3 H1、H3
HB4
注意事項
• 在安裝
• Ultinon Pro 燈泡燈體的溫度可能非常高。請勿將易燃材料 (例如紙張、布料或其他材料) 置於
• 將 LED 燈泡遠離可能出現火燄或易燃的區域,例如加油站。
• 將 LED 燈泡遠離大量灰塵處。
Ultinon Pro 燈泡之前,請先確認燈泡無損壞或破裂,且未摔落地面。若發生上述任何
情況,請勿將該 LED 燈泡安裝在車輛上。
LED 燈泡附近。
16

警示
本體和
• 燈泡
成嚴重灼傷。請勿觸碰 LED 帶狀接合區域!(請參閱下圖)。
• 開啟時,LED 燈光強度會非常高。請勿直視光束,以免傷害眼睛。
•
請勿在頭燈開啟時清洗車輛。溫度的變化可能會導致 LED 頭燈損壞或產生非預期的反應。
• 請勿將 LED 燈泡表面觸及灰塵或油液,或是讓表面承受撞擊或損壞。
• 請置於兒童無法取得之處。
• 警告–請勿觸碰此區域。
LED 表面可達極高的溫度。請勿用手觸碰該區域並避免皮膚接觸,否則可能會造
其他資訊
• 請確保產品來自合法的銷售管道。
• 安裝後,請檢查儀表板上的遠光燈、近光燈、閃光功能及其他電氣設備是否正常運作,且未出現
警告。如果發生任何異常狀況,飛利浦 LED CANbus 轉接器或許可以解決此問題。
•
安裝後,請正確安裝防水墊圈,以降低滲漏的風險。
• 請勿過度彎曲纜線,尤其是靠近散熱器區域之處。
17

H4 及 H7 的安裝步驟
3
• 扭轉並拉出中央環。
• 將中央環安裝並固定在頭燈上。
• 插入並固定 LED 燈泡,轉動至尾端停止為止。
2
1
*locked*
18

• 連接電源線路。
•
選配且僅適用於 H7 – 光束模式可透過旋轉LED
燈泡的方式調整,LED PCB 板應保持與地面垂
直。
安裝 FOG、H11、HIR2、HB3、HB4
• 在燈具內安裝燈泡。
19

• 旋轉散熱
• 將插頭插入電源插座。
• 如果原先安裝的燈泡是 HB4 燈泡類型,
請將紅色 O 型環換成黑色 O 型環。
(HB4 = 黑色 O 型環; HB3 = 紅色 O 型環)
器。
20

中央環調整目標
• 若燈泡在燈具內並非垂直地面,請依照下列指
示調整中央環角度。
• 請確定 LED 可向左右發出光線,且燈泡燈體
於垂直狀態。
處
內六角扳手
Illumination
orientation of
the left LED
Illumination
orientation of
the right LED
HIR2、HB3、HB4、H11 及 FOG 中央環校準
• 燈泡未呈直角 (不建議)。
• 使用內六角扳手,將兩枚校準螺絲向內旋入。
21

• 對照中央環旋轉
• 將兩枚校準螺絲向外旋出。
• 為方便調整及輕鬆旋出,必須施力將中央環向下拉。
• 燈泡呈直角 (建議)。
燈泡燈體。
22

H11 / FOG 注意事項
• 請勿拆解。有小型元件 (彈簧) 鬆脫的風險。
• 請勿拆解。重新組裝需要特殊工具。
• 將中央環朝散熱
緊。
器和燈泡燈體的方向壓
23

• 調整後,螺桿頂部應與中央環表面等高。
安裝 H1 及 H3
• 先將驅動
• 從
器。
24
器固定在燈具內部。
燈泡燈體中旋出散熱
燈泡燈體固定在燈具
• 將
上。
器旋轉固定於燈泡燈體
• 將散熱
上。
*click*
• 連接驅動器至
的纜線。
燈泡燈體及驅動器至電源插座之間
1 2
3
A
H1
25

正確的光束效能
• 具明確邊界的正確光束:
絕佳的遠場視野。
眩光降低,可提升駕駛和交通安全。
疑難排解
4
若 Ultinon Pro 無法正常運作,請執行下列動作:
1. 確認電源接頭已穩固連接。
2. 確定車輛的頭燈開關處於「開啟」位置。
3. 確定車輛電池有足夠的電力,可向 Ultinon Pro 供電。
26

回收
5
您的產品是使用高品質材質和元件所設計與製造,可回收和重複使用。產品上的下列
符號表示產品符合歐盟指令 2002/96/EC 的規定。
請勿將本產品與其他廢棄物一同丟棄。請查詢當地的電子和電氣產品專用回收法規。
正確處理廢棄產品可避免對環境和人類健康帶來負面影響。
保固與維修
6
如果您對本產品有任何問題,或是需要維修或相關資訊,請造訪 www.philips.com/automotive,
或是聯絡您所在國家/地區的飛利浦客服中心。
若您所在國家/地區沒有客服中心,請洽詢當地的飛利浦經銷商。
保固條款
因運輸、保存、不當安裝、維護、內部或外部惡劣環境、不當使用、濫用、疏忽、意外、修改、竄改、
安裝任何未經授權的配件、變造商品所造成的任何瑕疵或損壞,或任何其他不屬於材料和/或製作
瑕疵的狀況,飛利浦一概不為其商品提供保固。飛利浦根據本保固的唯一責任為自行選擇維修或
更換在保固期內故障的任何商品,但購買者須及時以書面向飛利浦回報此情況,並遵守本保固條款
的規定。
如需申請保固,請提供下列資訊與購買證明:
姓名__________________________ 地址__________________________________________________
電話_________________________ 郵遞區號_______________________________________________
購買來源:(請提供零售店的名稱和地點)__________________________________________________
__________________________________
27

JA 本製品をご購入いただきありがとうございます。長期にわたり問題なくご使用いただけるよう、
ご使用前に本ユーザーマニュアルを十分にご確認ください。お読みになった後は、ユーザーマニュ
アルをいつでも確認できるよう大切に保管してください。
目次
パッケージの内容物 ……………………………………………………………………………………………………………………… 29
重要事項 …………………………………………………………………………………………………………………………………………… 29
H4 および H7 の 取り付 け …………………………………………………………………………………………………………… 31
フォグ ラ ン プ 、H11、HIR2、HB3、HB4 の取り付け …………………………………………………………………… 32
センターリングの調 整 …………………………………………………………………………………………………………………… 34
HIR2、HB3、HB4、H11、フォグランプのセンターリングの調整……………………………………………… 34
H11 とフォグランプに関する注意事項 ………………………………………………………………………………………… 36
H1 および H3 の 取り付 け ……………………………………………………………………………………………………………… 37
正常な照射性能 ……………………………………………………………………………………………………………………………… 39
トラブ ル シュー ティング ………………………………………………………………………………………………………………… 39
リサイクル、保証、サービス …………………………………………………………………………………………………………… 40
パッケージの内容物
1
JA
内容物 説明
Ultinon Pro ランプバーナー
(ヒートシンク付き)x 2
ドライバー x 2
六角レンチ x 1
ビニー ルタイ x 8
HB4 O リング(予備)x 2
製 品マニュア ル x 1
重要
2
Ultinon Pro ランプを取り付ける前に、以下の指示をよくお読みください。
H7、H4 H11、フ ォ グ
ランプ、HIR2
HB3
H1、H3
HB4
注意事項
• Ultinon Pro ランプを 取り付ける前に、ランプが損 傷したり破損したりしてい な いこと、ランプが 外れて
落下しないことを確認してください。これらの条件のいずれかに当てはまる場合は、LED 電球を
車両に取り付けないでください。
• Ultinon Pro ランプバーナーは非常に高温になることがあります。紙や布などの燃えやすいものを
LED 電球の近くに置かないでください。
• ガソリンスタンドなど、炎にさらされたり、燃える危険の ある場所に LED 電球を持ち込まないでくだ
さい。
• 大量のほこりがたまっている場所に LED 電球を持ち込まないでください。
29

警告
• バーナー本体と LED の表面は、非常に高温になる可能性があります。重いやけどを負うおそれがあ
るため、手などでバーナー本体や LED の表面に触れないでください。LED の帯状の結合部分には
触れないでください(下図を参照)。
• 電源を入れている間、LED は非常に強い光を発します。目の損傷を防ぐため、直接光線を見つめな
いでください。
•
ヘッドランプを点灯したまま洗車しないでください。温度が変化すると、LED ヘ ッド ラ ン プ が 損 傷 し た り 、
予期しない反応が生じたりする場合があります。
• 損傷するおそれがあるため、LED 電球の表面をほこりや油にさらしたり、衝撃を与えるなどしないで
くださ い 。
• お子様の手の届かない場所に保管してください。
• 警告 – この部分には触れないでください。
その他
• 製品は必ず正規の販売チャネルからご購入ください。
• 取り付け後、ダッシュボードのハイビームおよびロービーム、点滅機能、およびその他の電気機器が
作動しており、警告を発していないことを確認してください。異常が発生した場合は、フィリップス
LED CANbus アダプターを使用することで解消される場合があります。
•
取り付け後は、漏れが生じないよう、防水ガスケットが正しく取り付けられていることを確認してください。
• ケーブルを過度に曲げないでください。特にヒートシンク付近はご注意ください。
30

H4 および H7 の取り付け手順
3
• センターリングをひねって引き抜きます。
• センターリングをヘッドランプに取り付け、固定します。
• LED 電球を挿入し、しっかりと締めて固定します。
2
1
*locked*
31

• 電源ケーブルを接続します。
• オ プ ション( H7 のみ) - ビームパターンは
LED 電球を回転させることで調整できます。
LED PCB は垂直にしてください。
フォグランプ、H11、HIR2、HB3、HB4 の取り付け
• 電球を照明器具の内側に取り付けます。
32
• ヒート シ ンク を 回 し ま す 。
• プラグを電源ソケットに接続します。
• 元の取り付けバルブが HB4 タイプの場合は、
赤 い O リングを黒色の O リングに 交 換して
くださ い 。
(HB4 = 黒色の O リング、HB3 = 赤色の
O リング)
33

センターリングの調整が必要となる場合
• 電球が照明器具の内側で垂直に取り付けら
れていない場合は、後述の指示に従ってセン
ターリングの角度を調整してください。
• LED が左右に発光し、バーナーが垂直位置
にあ ることを 確 認します。
六角レンチ
Illumination
orientation of
the left LED
HIR2、HB3、HB4、H11、フ ォ グ ラ イ ト の
センターリングの調整
• 電球が垂直でない場合(望ましくない状態)は以下の
手順で調整します。
• 六角レンチを使用して、2 本の基準ネジを内側方向に
回転させます。
Illumination
orientation of
the right LED
34

• バーナーをセンターリング上で回転させます。
• 2 本の基準ネジを外側方向に回転させます。
• 下方向に力をかけてセンターリングを引くと、
簡単に調節してネジを回転させることができます。
• 電球が垂直になります(望ましい状態)。
35

H11 とフォグランプに関する注意事項
• 分解しないでください。小型部品(スプリング)が
緩む危険があります。
• 分解しないでください。再度組み立てるには専用の
工具が必要です。
• センターリングはヒートシンクとバーナーの方向に
押し続 けます 。
36

• スクリュートップは、センターリングの 表面
と同じ高さに調節します。
H1 および H3 の取り付け
• まず、照明器具の内側にドライバーボックスを
固定します 。
• ヒートシンクを回して バー ナ ー から外します。
37

• 照明器具にバーナーを固定します。
• ヒートシンクを回してバー ナ ーに取り付 けます。
*click*
• ドライバーとバーナー間のケーブルと、ドライバーと
電源ソケットの間のケーブルを接続します。
38
1 2
3
A
H1

正常な照射性能
• カットオフが明瞭な正しい照射状態:
遠距離での優れた視認性を実現します。
グレアを低減し、ドライバーや通行の安全を
確 保 し ま す 。
トラブ ル シュー ティング
4
Ultinon Pro が作動しない場合は、以下の操作を行ってください。
1. 電源コネクターが正しく接続されていることを確認します。
2. 車両のヘッドランプのスイッチが「ON」の位置にあることを確認します。
3. 車両のバッテリーに、Ultinon Pro に電源を供給するだけの電力があることを確認します。
39

リサイクル
5
お買い上げの製品は、リサイクルおよび再利用が可能な高品質の素材と部品で設計、
製造されています。製品に左下の記号が付与されている場合、欧州連合における指令
2002/96/EC の対象であることを意味します。
本製品を他の廃棄物と一緒に廃棄しないでください。電気製品と電子製品の分別収集に
関する地域の関連規制をご確認ください。使用済み製品を適切に廃棄することで、
環境や人体に悪影響を及ぼす可能性を回避できます。
保証とサービス
6
製品に問題がある場合、修理が必要な場合、情報が必要な場合は、www.philips.com/automotive
にアクセスするか、お住まいの国のフィリップスのコールセンターにお問い合わせください。
お住まいの国にコールセンターがない場合は、お近くのフィリップス代理店にお問い合わせください。
当社は、輸送、保管、不適切な設置、保守、内部または外部の有害な環境、誤用、乱用、過失、事故、改造、
改ざん、不正なアクセサリーの取り付け、製品の改変、その他の材料や製造上の欠陥にあたらない
条件により生じた欠陥や損傷に対しては、製品を保証しません。本保証における当社の単独の責任とは、
買主が書面で速やかに当社に報告し本保証の規定に準拠することを条件として、保証期間中に故障した
製品を修理または交換することを、当社の裁量で行うことを指すものとします。
保証請求を行う場合は、購入証明とともに以下の情報をご提供ください。
名前_______________________ 住所___________________________________________________
電話番号___________________ 郵便番号_______________________________________________
購入元:(小売店の名前と住所をご記入ください)
____________________________________________________________________________________
40
保証条件

KO 본 제품을 구매해 주셔서 감사합니다. 장기간 사용을 위해 사용하기 전에 본 사용 설명서를 주의 깊게
읽으십시오. 읽은 후에는 언제든지 참고할 수 있도록 사용 설명서를 안전하게 보관하십시오
.
목차
포장 목록 …………………………………………………………………………………………………………………………………………… 42
중요 정보
H4 및 H7 설치
FOG, H11, HIR2, HB3, HB4 설치
센터 링 조정……………………………………………………………………………………………………………………………………… 47
HIR2, HB3, HB4, H11, FOG 센터 링 조정
H11 및 FOG 주의사항
H1 및 H3 설치
정확한 빔 성능
문제 해결
재활용, 보증, 서비스
…………………………………………………………………………………………………………………………………………… 42
………………………………………………………………………………………………………………………………… 44
……………………………………………………………………………………………… 45
……………………………………………………………………………… 47
………………………………………………………………………………………………………………………… 49
……………………………………………………………………………………………………………………………………… 50
………………………………………………………………………………………………………………………………… 52
…………………………………………………………………………………………………………………………………………… 52
……………………………………………………………………………………………………………………… 53

포장 목록
1
KO
품목 설명
Ultinon Pro 램프 버너
(방열기 포함) x 2
드라이버 x 2
육각렌치 x 1
플라스틱 타이 x 8
추가 HB4 O-Ring x 2
제품 설명서 x1
중요함
2
Ultinon Pro 램프를 설치하기 전에 사용설명서를 주의 깊게 읽으십시오.
H7, H4 H11, FOG,
HIR2
HB3 H1, H3
HB4
주의사항
• Ultinon Pro 램프를 설치하기 전에 램프가 파손 또는 고장이 나지 않았는지, 바닥에 떨어지지
않았는지 확인하십시오. 이러한 상태가 하나라도 있으면 LED 전구를 차량에 설치하지 마십시오.
• Ultinon Pro 램프 버너는 온도가 매우 높을 수 있습니다. 종이, 천 또는 기타 소재 등의 가연성
물질을 LED 전구 근처에 두지 마십시오.
• LED 전구를 화염에 노출되거나 연소가 발생하기 쉬운 곳(예: 주유소)에 가까이 하지 마십시오.
• LED 전구를 먼지가 많은 곳에 가까이 하지 마십시오.
42

경고
• 버너 본체와 LED 표면의 온도가 매우 높아질 수 있습니다. 심각한 화상을 입을 수 있으므로 이
부위를 손으로 만지거나 피부에 닿지 않도록 하십시오. LED 리본 본딩 영역을 만지지 마십시오!
(아래 그림 참조)
• 전원이 켜져 있는 LED는 빛의 강도가 매우 높습니다. 눈의 손상을 방지하기 위해 빔을 직접
들여다보지 마십시오.
•
헤드라이트를 켠 상태로 세차를 하지 마십시오. 온도가 변하면 LED 헤드라이트가 손상되거나
예기치 않게 반응할 수 있습니다.
• LED 전구의 표면이 먼지나 기름에 노출되거나 표면이 충격을 받거나 손상되지 않도록 하십시오.
• 어린이의 손이 닿지 않는 장소에 보관하십시오.
• 경고 – 이 영역을 만지지 마십시오
기타 정보
• 합법적인 판매 채널을 통해 제품을 구하십시오.
• 설치 후 하이 빔, 로우 빔, 플래시 기능 및 대시보드의 기타 전기 장비가 작동하는지, 경고가
발생하지 않는지 점검하십시오. 비정상적으로 작동할 경우 필립스 LED CANbus 어댑터가
해결책이 될 수 있습니다.
•
설치 후 누수 위험을 줄이기 위해 방수 개스킷이 올바르게 장착되었는지 확인하십시오.
• 특히 방열기 근처에서 케이블을 과도하게 구부리지 마십시오.
43
H4 및 H7의 설치 단계
3
• 센터 링을 비틀어 당깁니다
• 헤드램프에 센터 링을 설치하고 고정합니다
• 끝까지 돌려 LED 전구를 삽입하고 고정합니다
2
1
*locked*
44

• 전선을 연결합니다
• H7 한정 선택 사항 – 빔 패턴은
LED 전구를 회전하여 최적화할 수 있습니다.
LED PCB는 수직이어야 합니다
FOG, H11, HIR2, HB3, HB4 설치
• 조명 기구 내부에 전구를 설치합니다.
45

• 방열기를 돌립니다
• 전원 소켓에 플러그를 꽂습니다
• 기존에 설치된 전구의 종류가 HB4인
경우 빨간색 O-링을 검은색 O-링으로
교체하십시오.
(HB4 = 검은색 O-링, HB3 = 빨간색 O-링)
46

센터 링 조정 대상
• 전구가 조명 기구 내부의 수직 위치에 있지
않은 경우 아래 지침에 따라 센터 링 각도를
조정하십시오.
• LED가 왼쪽 및 오른쪽으로 빛을 방출하고
버너가 수직 위치에 있는지 확인합니다
육각렌치
Illumination
orientation of
the left LED
Illumination
orientation of
the right LED
HIR2, HB3, HB4, H11 및 FOG의 센터 링 정렬
• 전구가 수직이 아닙니다(권장하지 않음)
• 육각렌치로 두 개의 기준 나사를 안쪽으로
돌립니다.
47

• 센터 링 위로 버너를 돌립니다
• 두 개의 기준 나사를 바깥쪽으로 돌립니다.
• 쉽게 조정하고 나사를 쉽게 빼려면 중앙 링을
아래쪽으로 당길 때 힘을 가해야 합니다.
• 전구가 수직입니다(권장)
48
H11/FOG 관련 주의사항
• 분해하지 마십시오. 작은 구성 부품(스프링)이
느슨해질 위험이 있습니다
• 분해하지 마십시오. 재조립하려면 특별한 공구가
필요합니다
• 센터 링을 방열기와 버너 쪽으로 계속 누르고
있습니다.
49

• 조정 후 나사 상단이 센터 링 표면과
높이가 같아야 합니다
H1 및 H3 설치
• 먼저 조명 기구 안에 드라이버 박스를
고정합니다.
• 방열기를 돌려 버너에서 분리합니다
50

• 조명 기구에 버너를 고정합니다.
• 버너에 방열기를 돌려 끼웁니다.
*click*
• 드라이버와 버너, 드라이버와 전원 소켓 사이의
케이블을 연결합니다.
1 2
3
A
H1
51

정확한 빔 성능
• 컷오프가 깨끗한 정확한 빔
원거리에서의 우수한 시야
눈부심이 적어 운전자 및 교통안전 향상
문제 해결
4
Ultinon Pro가 작동하지 않는 경우 다음 작업을 수행하십시오.
1. 전원 커넥터가 제대로 연결되어 있는지 확인합니다.
2. 차량 헤드라이트 스위치가 "ON" 위치에 있는지 확인하십시오.
3. 차량 배터리에 Ultinon Pro에 공급할 전원이 충분히 있는지 확인하십시오
52

재활용
5
이 제품은 재활용 및 재사용이 가능한 고품질의 자재 및 구성품으로 설계 및 제조되
었습니다. 제품에 부착된 다음 기호는 제품이 유럽 지침 2002/96/EC를 준수함을
나타냅니다.
제품을 기타 폐기물과 함께 폐기하지 마십시오. 해당 지역의 전기 및 전자 제품 분리수거
규정에 대해 문의하십시오. 사용한 제품을 올바르게 폐기하면 환경 및 인류의 건강을
유해한 영향으로부터 보호할 수 있습니다.
보증 및 서비스
6
제품에 문제가 있거나 서비스나 정보가 필요한 경우 www.philips.com/automotive
해당 국가의 필립스 콜 센터에 문의하십시오.
해당 국가에 콜 센터가 없는 경우 필립스 대리점에 문의하십시오.
를 방문하시거나
필립스는 운송, 보관, 부적절한 설치, 유지 관리, 내부 또는 외부의 부적절한 환경, 오용, 남용, 부주의,
사고, 개조, 변조, 무단 액세서리 부착, 상품 변경 또는 소재 및/또는 제조상의 결함을 구성하지
아니하는 기타 모든 조건으로 인해 발생한 결함이나 손상에 대해 제품을 보증하지
보증에 따른 필립스의 전적인 책임은 구매자가 해당 사항을 즉시 필립스에 서면으로 통보했으며 이
보증의 조항을 준수한 경우 보증 기간 동안 결함이 발생한 제품을 당사의 선택에 의거하여 수리
또는 교체하는 것입니다.
보증을 청구하는 경우 구매 증거와 함께 다음 정보를 제공하십시오.
이름__________________________ 주소_________________________________________________
전화_________________________ 우편 번호____________________________________________
구매처: (판매 대리점의 이름과 위치를 입력하십시오)
____________________________________________________________________________________
보증 규정
않습니다. 본
53

中文 非常感谢您购买本产品。为更利于长时间使用,请在使用前仔细阅读此《用户手册》。
阅读完毕后,请妥善保存此《用户手册》,以便日后需要时随时取用。
目录
包装清单 …………………………………………………………………………………………………………………………………………… 55
重要信息
H4 和 H7 的安装
FOG、H11、HIR2、HB3 和 HB4 的安装
中心环调整
HIR2、HB3、HB4、H11 和 FOG 的中心环对准
H11 和 FOG 防范措施
H1 和 H3 的安装
正确的光束性能
故障排除
回收、保修和服务
…………………………………………………………………………………………………………………………………………… 55
…………………………………………………………………………………………………………………………… 57
……………………………………………………………………………… 58
……………………………………………………………………………………………………………………………………… 60
…………………………………………………………………………………………………………………… 62
……………………………………………………………………………………………………………………………… 63
……………………………………………………………………………………………………………………………… 65
…………………………………………………………………………………………………………………………………………… 65
………………………………………………………………………………………………………………………… 66
…………………………………………………………………… 60

包装清单
1
中文
商品 描述
Ultinon Pro 灯泡灯体搭配
散热器 x 2
驱动器 x 2
六角扳手 x 1
塑料扎带 x 8
额外 HB4 O 形垫片 x 2
产品手册 x 1
重要信息
2
请在安装 Ultinon Pro 灯之前仔细阅读以下说明。
H7、H4 H11、FOG
和 HIR2
HB3 H1、H3
HB4
防范措施
• 安装 Ultinon Pro 灯前,请确保灯完好无损,未曾掉落在地面上。如果上述情形曾有发生,请勿
将 LED 灯泡安装在您的汽车上。
• Ultinon Pro 灯泡灯体的温度可能非常高。请勿将 LED 灯泡置于易燃材料(如纸张、布料或其他
材料)周围。
• 请确保 LED 灯泡远离可能接触火焰或易燃物的区域,如加气站或加油站。
• 请确保 LED 灯泡远离高灰尘区域。
55

警告
• 灯体主体和 LED 表面温度可能非常高。请勿用手触摸或使皮肤接触此区域,以免造成严重烧伤。
请勿触摸 LED 灯铝带焊接区域!(请参阅下图)。
• LED 灯开启时光强度非常高。请勿直视光束,以免损害眼睛。
•
清洗汽车时,请确保车大灯处于关闭状态。温度的变化可能导致 LED 车大灯损坏或出现意外
不良反应。
• 请勿将 LED 灯泡表面暴露于灰尘或油渍中,以防表面承受冲击或造成损坏。
• 放在儿童接触不到的地方。
• 警告 – 请勿触碰此区域。
其他信息
• 请确保产品来自正规合法销售渠道。
• 安装完成后,请检查远光灯、近光灯、闪光功能以及仪表板上的其他电子设备是否工作正常且
没有故障警告。若发现任何不正常现象,请尝试使用 Philips LED CANbus 适配器解决。
•
安装完成后,请确保防水垫片安装正确,以降低漏水风险。
• 请勿过度弯折线缆,特别是在散热器附近区域。
56

H4 和 H7 的安装步骤
3
• 扭转并拉出中心环。
• 将中心环安装并固定在大灯上。
• 插入 LED 灯泡,并旋转拧紧将 LED 灯泡固定。
2
1
*locked*
57
• 连接电源线。
• 选配且仅限 H7 – 可通过旋转 LED 灯泡
优化光束样式,LED 面板应是垂直的。
FOG、H11、HIR2、HB3、HB4 的安装
• 将灯泡安装在灯具内。
58

• 旋转散热器。
• 将插头连接至电源插座。
• 如果初始安装的灯泡是 HB4 灯泡类型;
请将红色 O 形垫片换为黑色 O 形垫片。
(HB4 = 黑色 O 形垫片;HB3 = 红色
O 形垫片)
59

中心环调整目标
• 如果灯泡在灯具中未处于垂直位置,请遵循以
下说明调整中心环角度。
• 请确保 LED 左右都发光,灯体处于垂直位置。
六角扳手
Illumination
orientation of
the left LED
Illumination
orientation of
the right LED
HIR2、HB3、HB4、H11 和 FOG 的中心环对准
• 灯泡不垂直(不推荐)。
• 使用六角扳手向内拧两个参考螺丝。
60

• 将灯体旋转到中心环上。
• 向外拧两个参考螺丝。
• 如需轻松调整和拧出,需用力向下拉中心环。
• 灯泡垂直(推荐)。
61

H11/FOG 的预防措施
• 请勿拆卸。小部件(弹簧)可能会变松。
• 请勿拆卸。需要特殊工具方可重新安装。
• 按压中心环,使其一直贴在散热器和灯体上。
62

• 调整后,螺丝头必须与中心环表面保持
同一高度。
H1 和 H3 的安装
• 首先将驱动器盒固定到灯具内。
• 将散热器从灯体中拧出。
63

• 将灯体固定到灯具上。
• 将散热器拧到灯体上。
*click*
• 连接驱动器至灯体与驱动器至电源插座之间的线缆。
64
1 2
3
A
H1

正确的光束性能
• 正确的光束,有清晰的明暗截止线:
远处仍具出众可视性。
减少刺眼光束,提升驾驶和交通安全。
故障排除
4
如果 Ultinon Pro 无法正常运行,请执行以下操作:
1. 请检查电源连接器是否正确连接。
2. 确保汽车大灯开关处于“开”位置。
3. 确保汽车电池电量充足,足以开启 Ultinon Pro。
65

回收
5
本产品采用可回收利用的高性能材料和组件制造而成。如果产品上贴有以下符号,
则表示此产品符合欧盟指令 2002/96/EC。
请不要将该产品与其他垃圾一同弃置。请参阅当地有关分类收集电子和电器产品的法规。
正确弃置使用过的旧产品有助于避免对环境和人类健康造成潜在的负面影响。
保修和服务
6
如果您对产品有任何问题,或需要服务或信息,请访问 www.philips.com/automotive 或联系您
所在国家/地区的飞利浦呼叫中心。
如果您所在的国家/地区没有飞利浦呼叫中心,请咨询您的当地飞利浦经销商。
保修条款
飞利浦针对以下原因导致产品缺陷或损坏的情形不予以保修:运输、储存、安装不当、保养问题、
内部或外部恶劣环境、误用、滥用、疏忽、事故、修改、篡改、安装任何未经授权的附件、物件变
更,或任何其他不构成材料和/或工艺缺陷的情况。在此保修政策下,飞利浦应根据自己的选项仅在
以下情况承担责任:维修或更换在保修期出现问题、买家立即以书面形式向飞利浦报告问题且符合
此保修条款规定的产品。
如有保修需求,请一同提供购买凭据以及以下信息:
姓名__________________________ 地址_________________________________________________
电话_________________________ 邮政编码_____________________________________________
购自:(请提供零售商店名称和地址)
____________________________________________________________________________________
66

Lumileds is the warrantor of this product.
Philips and the Philips Shield Emblem are registered trademarks of
Koninklijke Philips N.V. and are used under license.
2020 © Lumileds Holding B.V. All rights reserved.
本產品的保固由 Lumileds 提供。
Philips 以及 Philips 盾牌標誌為 Koninklijke Philips N.V. 的註冊商標,
經授權使用。
2020 © Lumileds Holding B.V. 版權所有。
ルミレッズ社は本製品の保証人です。
Philips および Philips Shield Emblem は、 Koninklijke Philips N.V. の
登録商標であり、ライセンスに基づいて使用されています。
2020 © Lumileds Holding B.V. All rights reserved.
Lumileds는 이 제품의 보증인입니다.
필립스 및 필립스 방패 문양은 Koninklijke Philips N.V.의 등록 상표이며
라이선스 하에 사용되었습니다.
2020 © Lumileds Holding B.V. All rights reserved.
Lumileds 是此产品的担保人。
飞利浦及飞利浦盾牌标志是 Koninklijke Philips N.V. 的注册商标,
并在授权下使用。
2020 © Lumileds Holding B.V. 保留所有权利。
3241 103 11451
 Loading...