

Page 1

PhotoFrame
Quick start guide
8FF3CDW
8FF3CME
10FF3CDW
10FF3CME
10FF3CMI
1
2
3
Connect
Setup
Enjoy
EN
Page 2
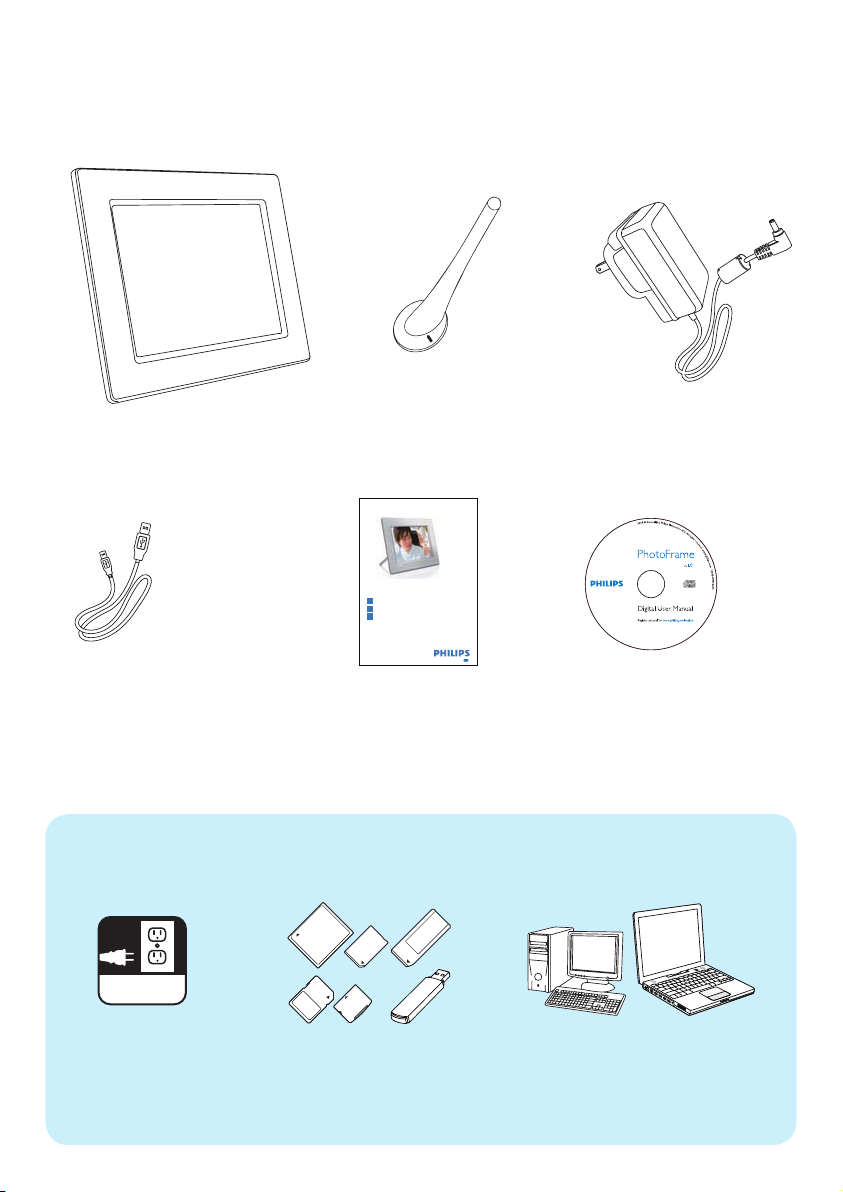
What’s in the box
Photoframe
USB cable to PC
What you also need
AC
Stand
PhotoFrame
8FF3CDW
8FF3CME
10FF3CDW
10FF3CME
10FF3CMI
Quick start guide
1
Connect
Install
2
Enjoy
3
Eng
Quick Start Guide
AC-DC power adaptor
Digital User Manual
Philips PhotoFrame Manager
software and user manual
or
AC power socket
Memory card/USB
PC
Page 3
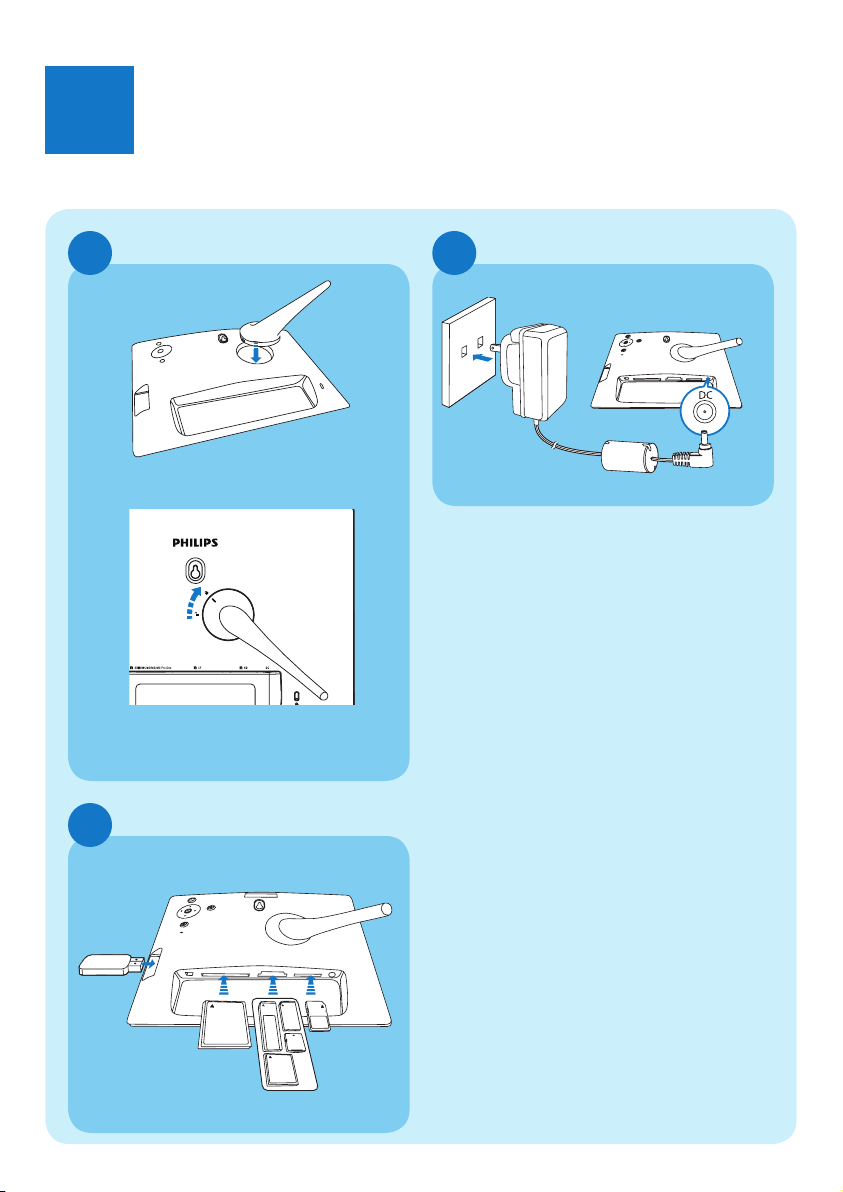
1
Connect
Install the stand
A
Step 1 Insert the stand into the PhotoFrame.
Note for product
Step 2 Turn the stand clockwise 45 degrees
to attach it to the PhotoFrame.
Insert a storage device
C
Connect the power
B
b
a
Step 1 Connect the power cord to the
PhotoFrame.
Step 2 Connect the power cord to a power
supply socket.
Insert a memory card or a USB fl ash drive.
• Compact Flash type I
• Secure Digital (SD)
• Secure Digital (SDHC)
• Multimedia Card
• xD card
• Memory Stick
• Memory Stick Pro
• Memory Stick Duo
• Memory Stick Pro Duo
• USB fl ash drive
Page 4
2
Setup
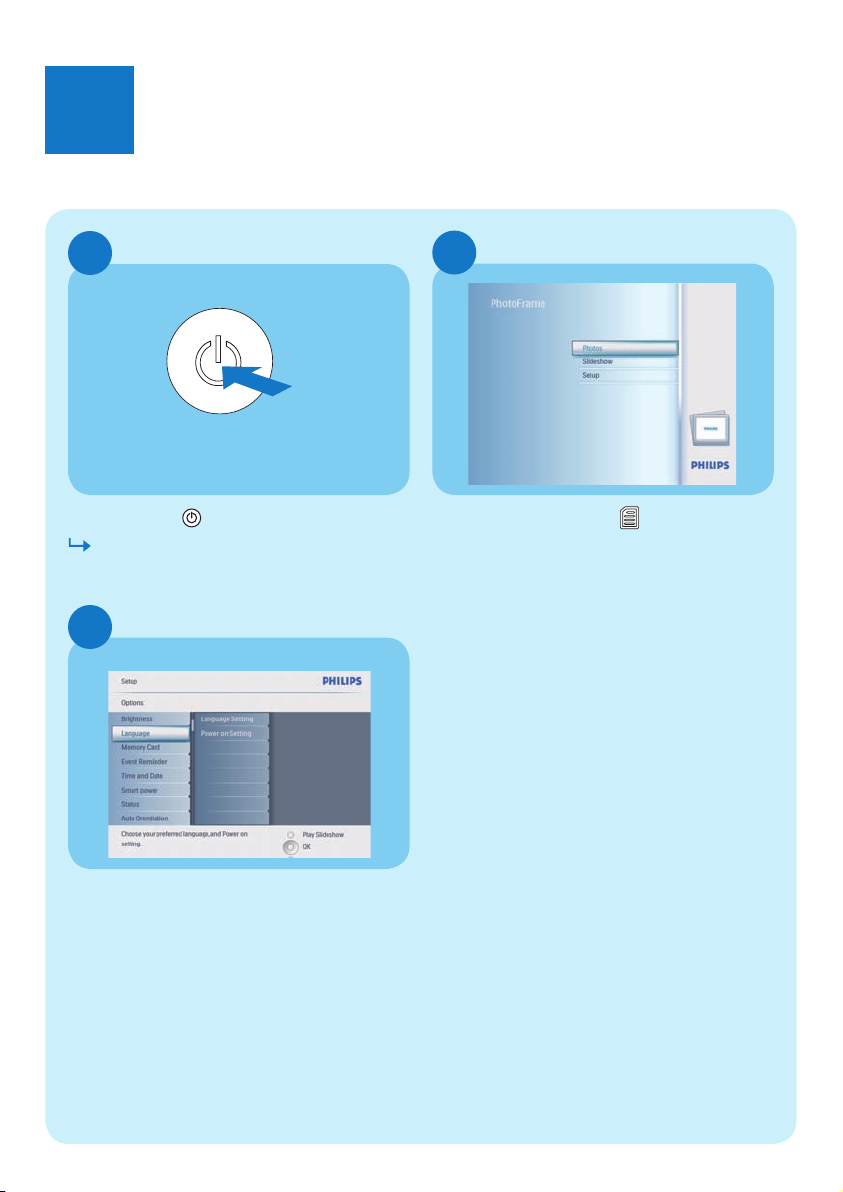
Turn on the PhotoFrame
A
Press and hold
The PhotoFrame starts to display all the
valid images in slideshow mode.
Select on-screen language
C
for more than 1 second.
Access the main menu
B
In slideshow mode, press
main menu.
to access the
Step 1 In the main menu, select [Setup] >
[Options] > [Language], then press
OK to confi rm.
Step 2 Select [Language Setting] and press
OK to confi rm.
Step 3 Select a language and press OK to
confi rm.
Page 5

Enjoy
3
Select display mode
A
Display collage photos
B
Step 1 In the main menu, select [Slideshow]
> [Collage] > [Multi], then press
OK to confi rm.
Step 2 Select a format and press OK to
confi rm.
Step 3 Press 1 (RIGHT) to select [Photo 1].
Step 4 Press 1 (RIGHT) again to select a
photo source, then press OK to
confi rm.
Step 5 Select an album and press OK to
confi rm.
Step 6 Select a photo and press OK to
confi rm.
In slideshow mode, press to toggle
between Slideshow mode, Browse mode and
Calendar mode.
Step 7 Repeat steps 3 to 6 to select other
photos.
Step 8 Press OK to confi rm.
If you select a collage layout, the
PhotoFrame displays a static
collage and the slideshow mode is
deactivated.
Step 9 To stop Collage display, select
If you select [Random] format,
the PhotoFrame automatically
does the random collage base on
the optimal layout of photos and
displays the collages in slideshow
mode.
[Slideshow] > [Collage] > [Single]
and press OK to confi rm.
Page 6

3
C
Enjoy
Zoom and crop pictures
Step 1 In the main menu, select
[Photos] > [Source] >
[PhotoFrame], then press OK to
confi rm.
Step 2 Select an album and press OK to
confi rm.
Step 3 Select a photo and press OK to
confi rm.
Step 4 Press to access [Photo Menu].
Step 5 Select [Zoom and Crop] and press
OK to confi rm.
Step 6 Press / repeatedly to zoom
in/out the photo.
• Press 3 / 4 / 1 / 2 to crop the photo.
Step 7 Press OK to confi rm.
Step 8 Select [Yes] and press OK to confi rm.
Page 7

Enjoy
3
Set the display auto
on/off by lighting
D
Tip
E
If the [On - Set current] brightness level
is too close with the [Off - Set current]
brightness level, the display Auto on/off
function may not work.
You can use the default brightness of ambient
lighting condition and you can also set the
brightness of ambient lighting condition.
Step 1 In the main menu, select [Setup]
> [Options] > [Smart power]
> [Lighting], then press OK to
confi rm.
Step 2 Select [Settings] and press OK to
confi rm.
• To use the default setting, select
[Default] and press OK to confi rm.
Step 3 Select [On - Set current] and press
OK to confi rm.
• To have the PhotoFrame sleep at the
The PhotoFrame wakes up when
the brightness of environment
reaches the [On - Set current]
brightness.
set brightness of ambient lighting
condition, select [Off - Set current].
Page 8

3
E
F
Enjoy
Set display auto on/off by time
Step 1 In the main menu, select [Setup] >
[Smart power], then press OK to
confi rm.
Step 2 Select [Time] and press OK to
confi rm.
Step 3 Select [Weekday] and press OK
to confi rm. To enable the Smart
Sleep function at weekends, select
[Weekend].
Step 4 Select [Auto on]/[Auto off] and
press OK to confi rm. To cancel
[Auto on]/[Auto off], select
[Set On/Off] > [Off].
Step 5 Press 3 / 4 / 1 / 2 and OK to set the
time for auto-on function.
Set Radiant Color
Step 1 In the main menu, select [Slideshow]
> [Settings] > [Background
Color] then press OK to confi rm.
Step 2 Select [RadiantColor] and press OK
to confi rm.
• If you select [RadiantColor], the
PhotoFrame extends the colour on
the edges of a photo that is smaller
than the full screen to fi ll the screen
without black bars or aspect ratio
distortion.
Page 9

3
Enjoy
Set an event reminder
G
Create an album
H
Step 1 In the main menu, select [Setup] >
[Options]>[Event reminder] >
[New reminder], then press OK to
confi rm.
Step 2 Select an alphabet and press OK to
confi rm.
Step 3 When the album name
(up to 24 characters) is complete,
select [Enter] and press OK to
confi rm.
Step 4 Select the reminder and press OK to
confi rm.
Step 5 Select [Time] and press OK to
confi rm.
Step 6 Press 3 / 4 / 1 / 2 and OK to set up
time, and press OK to confi rm.
Step 7 Repeat steps 5 to 6 to set date.
Step 1 In the main menu, select [Photos]
> [Source] > a storage device, then
press OK to confi rm.
Step 2 Select [New Album] and press OK
to confi rm.
Step 3 Select an alphabet/number and press
OK to confi rm.
Step 4 When the album name
(up to 24 characters) is complete,
select [Enter] and press OK to
confi rm.
Page 10

3
I
Enjoy
Set Auto Orientation function
Step 1 In the main menu, select [Setup] >
[Options]>
[Auto Orientation], then press OK
to confi rm.
Step 2 Select [Enable] and press OK to
confi rm.
Page 11

Troubleshooting
Problem
My Digital
PhotoFrame does
not go into Auto-off
status after I set it.
Tip
Ensure that you set current time, Auto off and Auto on
correctly.
My Digital
PhotoFrame is ON
but the system
does not respond
anymore!
My Digital
PhotoFrame does
not show some of
my photos.
Why the photos
distort?
What is the
difference between
background, Auto fit
and RadiantColor?
• Ensure that the PhotoFrame is properly powered.
• Use a pin to trigger the RESET button located on the back to
restore the PhotoFrame.
• The PhotoFrame shows photos in JPEG format.
If the format of picture is different as the PhotoFrame (for
example,if you set "auto fit" on the PhotoFrame, a 4x3 photo input
into a (16x9) PhotoFrame may distort. You can set a background
colour or set RadiantColor. A background colour keeps the
correct aspect ratio but may have black bar (or the background
colour you select). we recommend you to select RadiantColor to
keep the correct aspect ratio with the exterior of photo colour
RadiantColor does give you the best viewing experience. Users
can go to: Main menu>Slideshow>Background>RadiantColor/
Auto fit/black/red/gray.
If the picture format is different as the PhotoFrame, the
PhotoFrame provides several solutions for it.
1. Auto fit: it is just like wide screen TV, the PhotoFrame extends
the photo to fill fully the screen with picture distortion.t
2. Background colour : the PhotoFrame displays a photo without
distortion but with black bar or a selected background colour.
3. RadiantColor : the PhotoFrame displays a photo without
distortion with RadiantColor. RadiantColor is a new technology
that the system analyses the colour of picture edge and extend
the colour to fill the screen. This does improve the viewing
experience. Users can go to: Main menu>Slideshow>Backgroun
d>RadiantColor/Auto fit/black/red/gray.
Welcome to Philips!
Register your product and get support at
www.philips.com/welcome
Page 12

© Royal Philips Electronics N.V. 2008
All rights reserved.
Specifi cations are subject to change without notice.
Trademarks are the proper ty of Koninklijke Philips
Electronics N.V. or their respective owners.
Printed in China PDCC-2008
 Loading...