

User Manual
Instrucciones de Operación
Instruções de Uso
107S61 / 107S63
Philips_manual_
Tuesday, November 18, 2003 3:00:45 PM

Additional information available at our website:
Información adicional disponible en nuestro sitio:
Informação adicional disponível em nosso site:
www.philips.com
Specifications subject to change without notice.
All dimensions shown are aproximate.
Las especificaciones están sujetas a cambios sin previo aviso.
Todas las dimensiones son valores aproximados.
As especificações estão sujeitas a alterações sem aviso prévio.
Todas as dimensões são valores aproximados.
© 2003 Koninklijke Philips Electroniics N.V.
All rights reserved.Reproduction,copying,usage,
modifying,hiring,renting,public performance,transmission
and/or broadcasting in whole or part is prohibited
without the written consent of Philips Electronics N.V.
Microsoft and the Microsoft Internet Explorer logo are registered trademarks
or trademarks of Microsoft Corporation in the United State and/or other countries.
Made with Macromedia is a trademark of Macromedia,Inc.
Adobe,Acrobat,and the Acrobat logo are trademarks of Adobe System Incorporated.
QuickTime and the QuickTime logo are trademarks used under license.
QuickTime is registered in the U.S. and other countries.
BZ02
Philips_manual_
Tuesday, November 18, 2003 3:00:51 PM
41C 779813 1B6036
FABRICADO POR C.N.P.J. 04.176.689/0001-60

Before operating the monitor please read this manual thoroughly. This
manual should be retained for future reference.
Contents
Packing list -----------------------------------------------------Precautions -----------------------------------------------------Installation Instructions --------------------------------------
Swivel Base ---------------------------------------------------Power cord --------------------------------------------------Video cable ---------------------------------------------------
Operating Instructions ---------------------------------------
General Instructions --------------------------------------Front panel control ----------------------------------------How to adjust a setting ------------------------------------
Adjusting the picture --------------------------------------Plug and play --------------------------------------------------Technical Support (FAQ) -----------------------------------Appendix A – Specifications----------------------------------
Appendix B – Factory Preset Timing Table -------------Your International Guarantee -------------------------------
PACKING LIST
The product package should include the following items:
1. Pure Flat Color Monitor
2. Owner's Manual
3. Power Cord
4. Swivel Base
7-8
11-12
1
2
3
3
3
4
5
5
6
6
9
10
13
14
ENGLISH
1

PRECAUTIONS
z Do not use the monitor near water, e.g. near a bathtub, washbowl, kitchen
sink, laundry tub, swimming pool or in a wet basement.
z Do not place the monitor on an unstable cart, stand, or table. If the
monitor falls, it can injure a person and cause serious damage to the
appliance. Use only a cart or stand recommended by the manufacturer or
sold with the monitor. If you mount the monitor on a wall or shelf, use a
mounting kit approved by the manufacturer and follow the kit
instructions.
z Slots and openings in the back and bottom of the cabinet are provided for
ventilation. To ensure reliable operation of the monitor an d to protect it
from overheating, be sure these openings are not blocked or covered. Do
not place the monitor on a bed, sofa, rug, or similar surface. Do not place
the monitor near or over a radiator or heat register. Do not place the
ENGLISH
monitor in a bookcase or cabinet unless proper ventilation is provided.
z The monitor should be operated only from the type of power source
indicated on the label. If you are not sure of the type of power supplied to
your home, consult your dealer or local power company.
z The monitor is equipped with a three-pronged grounded plug, a plug with
a third (grounding) pin. This plug will fit only into a grounded power
outlet as a safety feature. If your outlet does not accommodate the three-
wire plug, have an electrician install the correct outlet, or use an adapter
to ground the appliance safely. Do not defeat the safety purpose of the
grounded plug.
z Unplug the unit during a lightning storm or when it will not be used fo r
long periods of time. This will protect the monitor from damage due to
power surges.
z Do not overload power strips and extension cords. Overloading can result
in fire or electric shock.
z Never push any object into the slot on the monitor cabinet. It could short
circuit parts causing a fire or electric shock. Never spill liquids on the
monitor.
z Do not attempt to service the monitor yourself; opening or removing
covers can expose you to dangerous voltages and other hazards. Please
refer all servicing to qualified service personnel.
z To ensure satisfactory operation, use the monitor only with UL listed
computers which have appropriate configured receptacles marked
between 100 - 240V AC, Min. 2.5A.
z The wall socket shall be installed near the equipment and shall be easily
accessible.
z Attention: Disconnect the power cord to stop the power supply to the
monitor.
41C779-813-1A 英文
2

INSTALLATION INSTRUCTIONS
Swivel Base
To attach the swivel base to the monitor, do the following:
• Carefully turn the monitor on its side or upside down. ( see figure 1 )
• Locate the cavities at the bottom front of the monitor.
• Insert the pegs on the swivel base into these cavities. Push the swivel base
forward until the swivel base locks in place.
• To remove the swivel base, hold the bottom of the swivel base, then push
it out.
Install Remove
Figure 1 Installing and Removing the Swivel Base
Power Cord
Power Source:
1. Make sure the power cord is the correct type that required in your area.
2. This monitor has a universal power supply that allows operation in either
100/120V AC or 220/240V AC voltage area. ( No user adjustment is
required. )
3. Connect the power cord into your monitor’s power input socket, and then
plug the other end into a 3-pin AC power outlet. The power cord may be
connected to either a wall power outlet or the power outlet socket on your
PC, depending on the type of power cord supplied with your monitor.
ENGLISH
3
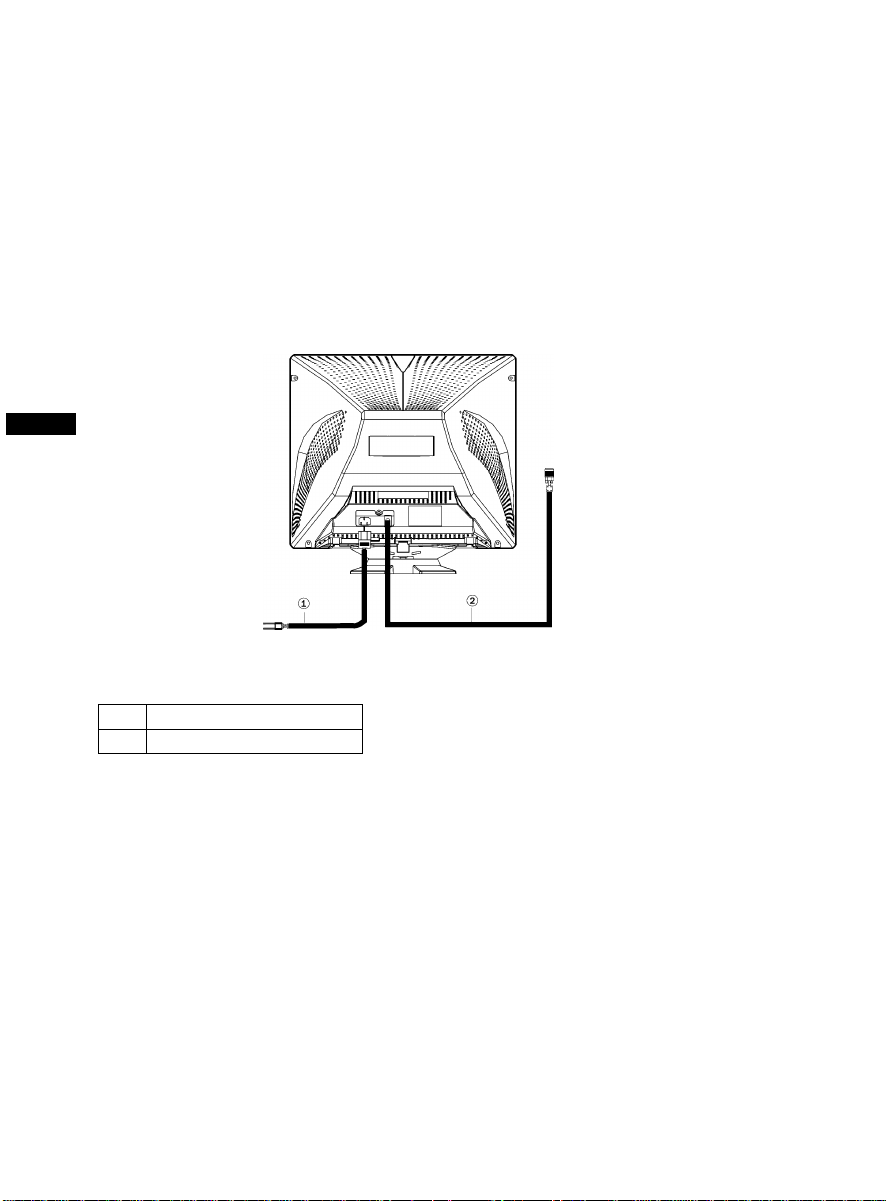
Video cable
Connecting the Video Cable: the monitor comes with a built-in video cable.
Plug the signal cable′s 15-pin connector into the computer's video port and
tighten the two screws on the cable connector.(see figure 2)
Caution:Don’t bend the signal cable, otherwise it will break the inner wire.
Connecting the Power Cord: Plug the power cord into the monitor's AC
power jack. Then plug the power cord into a grounded AC outlet, ULapproved power strip, or the power output socket on your PC.
Caution: If the AC outlet is not grounded (only two holes), install the
proper grounding adapter (not supplied).
ENGLISH
Figure 2 Connecting Cables
1. Power Cord
2. Signal Cable
41C779-813-1A 英文
4
OPERATING INSTRUCTIONS
General Instructions
The power switch is located at front panel of the monitor. Press the power
switch to turn the monitor on or off. The other control knobs are located at
the base of the monitor (See Figure 3). By changing these settings, the
picture can be adjusted to your personal preferences.
• The power cord should be connected.
• Connect the video cable from the monitor to the video card.
• To turn the monitor on, press the POWER switch to ON position. The
power indicator will light up.
• Your monitor features a unique quick switch system which provides a
picture within seconds after the monitor is switched on.
ENGLISH
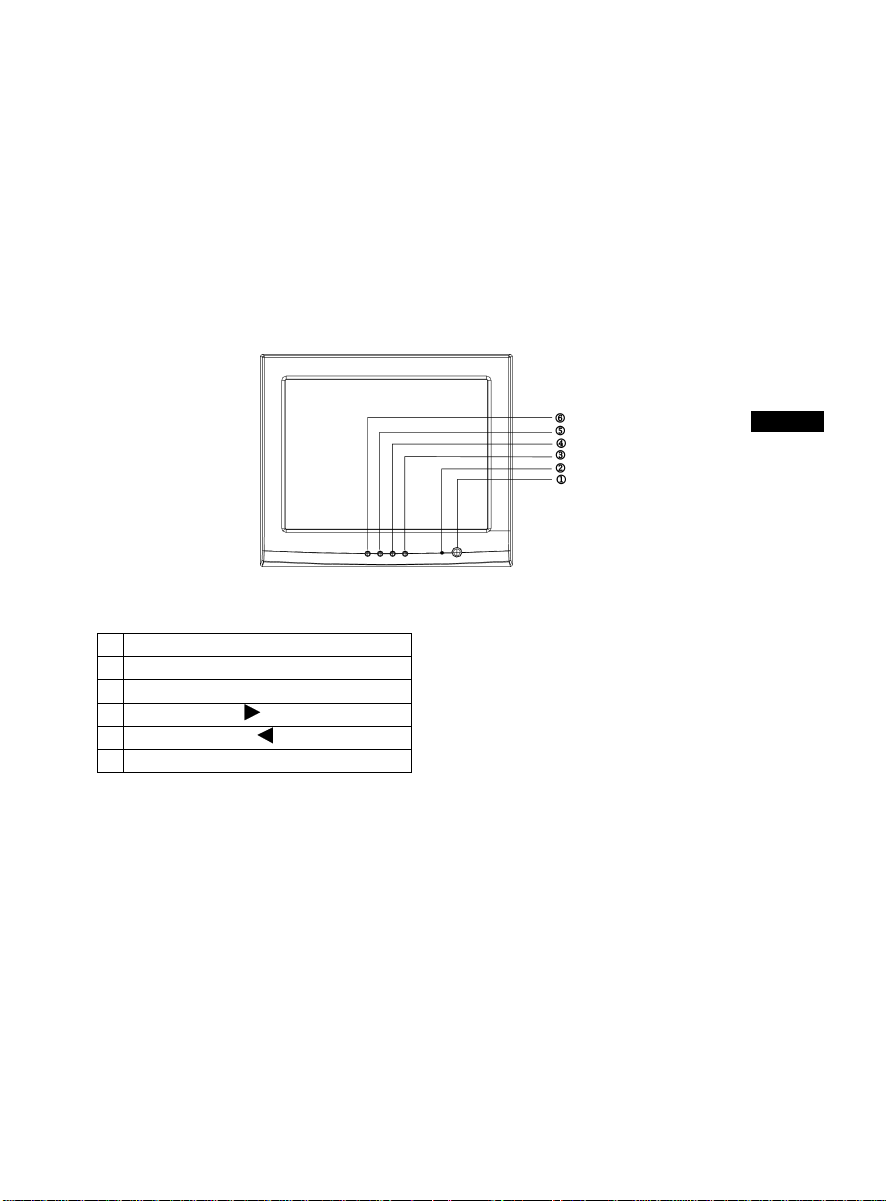
EXTERNAL CONTROLS
Figure 3 External Control Knob
1. POWER
2. POWER INDICATOR
3. MENU
4. CONTRAST/
5. BRIGHTNESS/
6. EXIT
Notes
• Do not install the monitor in a location near heat sources such as radiators
or air ducts, or in a place subject to direct sunlight, or excessive dust or
mechanical vibration or shock.
• Save the original shipping carton and packing materials, as they will
come in handy if you ever have to ship your monitor.
• For maximum protection, repackage your monitor as it was originally
packed at the factory.
• To keep the monitor looking new, periodically clean it with a soft cloth.
Stubborn stains may be removed with a cloth lightly dampened with a
mild detergent solution. Never use strong solvents such as thinner,
benzene, or abrasive cleaners, since these will damage the monitor. As a
safety precaution, always unplug the monitor before cleaning it.
5
FRONT PANEL CONTROL
• Power:
Press this knob to switch ON/OFF the monitor’s power.
•
MENU :
Active OSD menu or function adjust confirm.
• Contrast / :
Adjust contrast or function adjust.
• Brightness / :
Adjust brightness or function adjust.
• EXIT :
Press the EXIT key to disable OSD menu.
•
Power Indicator :
Green — Power On mode.
ENGLISH
Orange — Off mode.
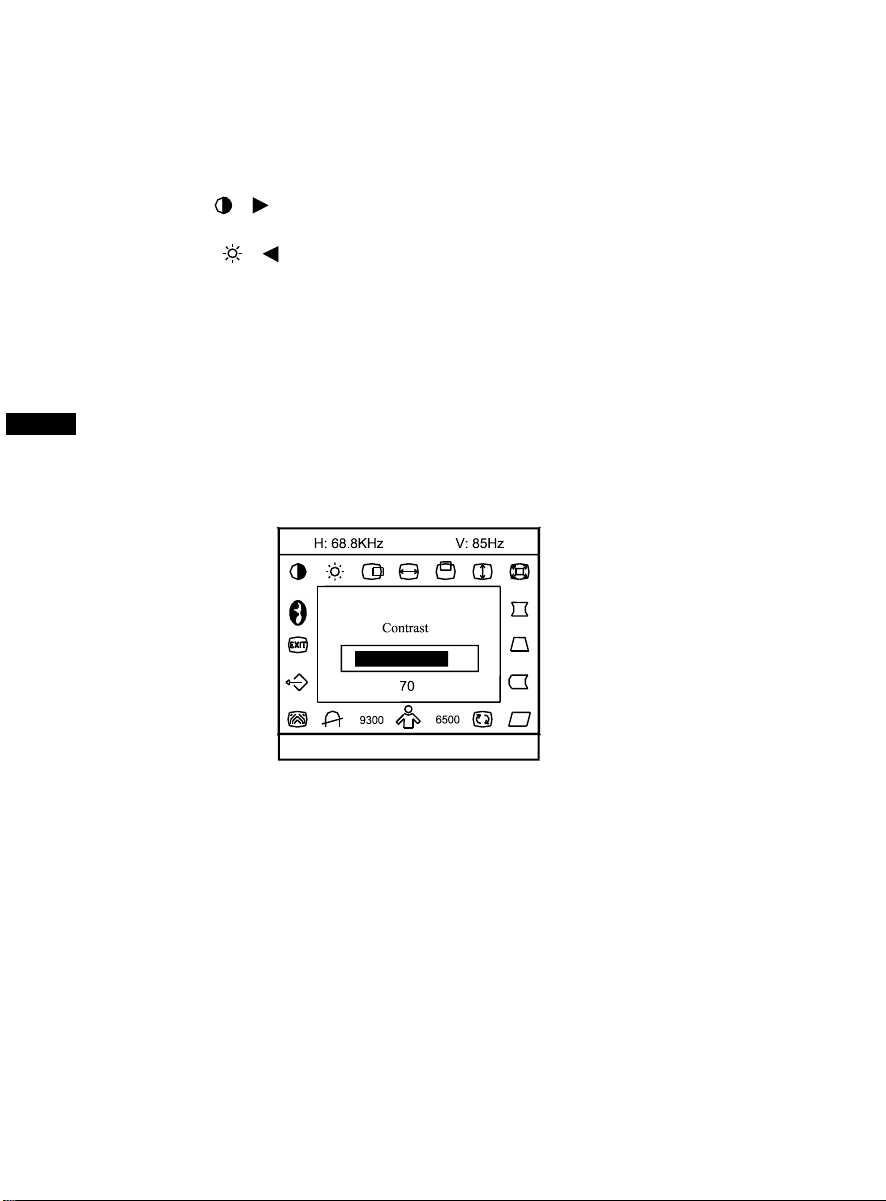
How to adjust a setting
The monitor controls are accessed by pressing button MENU to enable OSD
(On-Screen-Display). The main menu will be displayed as follows.
1024 × 768
Figure 4 The OSD Message
Note: If adjustment or selection of any OSD menu is not made for more
than 10 seconds, the current setup will be saved and the OSD will disappear
automatically.
41C779-813-1A 英文
6
Adjusting the picture
The description for functional control icons
1. CONTRAST
Adjust the picture contrast.
2. BRIGHTNESS
Adjust the picture brightness.
3. H-CENTER
Adjust the horizontal position of the picture.
4. H-SIZE
Adjust the picture’s horizontal size.
5. V-CENTER
Adjust the vertical position of the picture.
6. V-SIZE
:
:
:
:
:
ENGLISH
:
Adjust the picture’s vertical size.
7. ZOOM
:
Adjust the picture’s horizontal and vertical size simultaneously.
8. PINCUSHION
:
Adjust the pincushion and barrel.
9. TRAPEZOID
:
Adjust the picture’s trapezoid distortion.
10. PIN-BALANCE
:
Adjust to compensate the pincushion unbalance.
11. PARALLELOGRAM
:
Adjust the picture to be a rectangle.
12. ROTATION
:
Adjust the picture tilt to horizontal position.
13. 6500K /9300K (COLOR TEMPERATURE) :
The color temperature for 6500°K is x=0.313, y=0.329 and 9300°K
is x=0.283, y=0.297. It presents two different color sets on the screen.
You can select 9300°K or 6500°K by pressing MENU Key.
7
14. USER COLOR ( Red / Blue )
If the 9300°K normal white or 6500°K warmer white do not satisfy
your desire, properly adjust R . B GAIN controls to obtain your
optimum whiteness level.
15. DEGAUSS
If color impurity occurs when moving or swiveling the monitor,
press MENU Key and degauss to fix the picture condition.
16. MOIRE REDUCE
Moire is the result of interference between the phosphor layout and
the video signal. In some cases, you may find the moire very
noticeable. Press the MENU to enter in the moire reduce setting.
ENGLISH
Please adjust the level to the optimum condition. Note: Too high of a
setting will cause the picture to shake.
17. RECALL
Press RECALL to restore the monitor to factory settings.
18. EXIT
Close OSD window.
SELECT LANGUAGE
19.
Select the language as you like.
:
:
:
:
:
:
41C779-813-1A 英文
8
THIS MONITOR WILL APPEAR TO BE NON-FUNCTIONAL IF
THERE IS NO VIDEO INPUT SIGNAL. IN ORDER FOR THIS
MONITOR TO OPERATE PROPERLY, THERE MUST BE A VIDEO
INPUT SIGNAL.
This monitor meets the Green Monitor standards as set by the Video
Electronics Standards Association (VESA) and/or the United States
Environmental Protection Agency (EPA) and the Swedish Confederation
Employees ( NUTEK ). This feature is designed to conserve electrical energy
by reducing power consumption when there is no video input signal present.
When there is no video input signal this monitor, following a time-out period,
will automatically switch to an OFF mode. This reduces the monitor's
internal power supply consumption. After the video input signal is restored,
full power is restored and the display is automatically redrawn. The
appearance is similar to a "Screen Saver" feature except the display is
completely off. The display is restored by pressing a key on the keyboard, or
clicking the mouse.
Plug and play
Plug & Play DDC1/2B Feature
This monitor is equipped with VESA DDC1/2B capabilities according to the
VESA DDC STANDARD. It allows the monitor to inform the host system of
its identity and, depending on the level of DDC used, communicate
additional information about its display capabilities. The communication
channel is defined in two levels, DDC1 and DDC2B.
The DDC1 is a unidirectional data channel from the display to the host that
continuously transmits EDID information. The DDC2B is a bidirectional data
channel based on the I²C protocol. The host can request EDID information
over the DDC2B channel.
Video Cable Pin Assignments:
1. Red 5. Ground 9. NC 13. H-sync
ENGLISH
2. Green 6. R-Ground 10. Ground 14. V- sync / * VCLK
3. Blue 7. G-Ground 11. NC 15. DDC-Serial Clock
4. NC 8. B-Ground 12. DDC-Serial Data * FOR DDC
9
TECHNICAL SUPPORT (FAQ)
Problem & Question Possible Solution
Power LED is not on *Check if the Power Switch is in the ON
position
*Power Cord should be connected
No Plug & Play *Check if the PC system is Plug & Play
compatible
*Check if the Video Card is Plug & Play
compatible
*Check if the D-15 plug pin of Video
Cable is bent
ENGLISH
*Make sure the Monitor Drivers are
installed
Picture is fuzzy *Adjust the Contrast and Brightness
Controls.
Picture bounces or a wave
pattern is present in the
*Move electrical devices that may cause
electrical interference.
picture
The power LED is ON
(Orange) but there’s no video
or no picture.
*Computer Power Switch should be in the
ON position.
*Computer Video Card should be snugly
seated in its slot.
*Make sure monitor’s video cable is
properly connected to the computer.
*Inspect monitor’s video cable and make
sure none of the pins are bent.
*Make sure computer is operational by
hitting the CAPS LOCK key on the
keyboard while observing the CAPS
LOCK LED. The LED should either turn
ON or OFF after hitting the CAPS
LOCK key.
Missing one of the primary
colors (RED, GREEN, or
*Inspect the monitor’s video cable and
make sure that none of the pins are bent.
BLUE)
41C779-813-1A 英文
10

APPENDIX A - SPECIFICATIONS
CRT (Picture Tube) 43,2cm(17"), pure flat and 90º deflection, 29mm
neck, 0.25mm dot pitch non-glare screen.
Visible Image Size 40,6cm (16"), diagonal
Display Color
• Analog input Unlimited colors
Input Signal All timing that meets scanning frequencies
Specification
• Video • Analog R, G, B 0.7Vpp positive/75 ohm
• Sync.
• Horizontal sync. : Positive/Negative
• Vertical sync. : Positive/Negative
Synchronization
• Horizontal 30kHz to 72kHz automatically
• Vertical 50Hz to 160Hz automatically
Max. Resolution 1280 × 1024
Video Dot Rate 110MHz
Factory Preset Timings : 7
User mode Timings : 12
Misconvergence
• Center 0.3mm Max.
• Corner 0.4mm Max.
Power Source Switching mode power supply
AC 100-240V, 50Hz/60Hz full range
Operating
Humidity
0°C to 40°C ambient
10% to 85% relative, non-condensing
Weight 16.0kg (Net)
Dimensions
• Monitor 410(W) × 402(H) × 420(D)mm
Signal Cable 15 pin mini D-Sub
EXTERNAL CONTROLS:
SWITCH • POWER ON/OFF SWITCH
• MENU KEY
• CONTRAST/ UP KEY
• BRIGHTNESS/ DOWN KEY
• EXIT KEY
ENGLISH
11

FUNCTIONS( OSD ) • CONTRAST
• BRIGHTNESS
• H-CENTER
• H-SIZE
• V-CENTER
• V-SIZE
• ZOOM
• PINCUSHION
• TRAPEZOID
• PIN-BALANCE
• PARALLELOGRAM
• ROTATION
• 6500˚K
• USER COLOR
ENGLISH
• 9300˚K
• DEGAUSS
• MOIRE REDUCE
• RECALL
• EXIT
• SELECT LANGUAGE
Plug & Play DDC1/2B
EPA ENERGY
®
STAR
Power consumption 75 Watts Max.
Preset display area 310mm × 230mm
Regulations UL, CE, FCC, EPA, CSA, TUV/S
On mode
Off mode
≤75W
≤2W
41C779-813-1A 英文
12

Appendix B – Factory Preset Timing Table
STANDARD RESOLUTION
IBM 720 × 400 31.5kHz 70Hz
VGA 640 × 480 31.5kHz 60Hz
VESA/85 640 × 480 43.3kHz 85Hz
VESA/85 800 × 600 53.7kHz 85Hz
VESA/85 1024 × 768 68.7kHz 85Hz
VESA/60 1280 × 1024 64.0kHz 60Hz
HORIZONTAL
FREQUENCY
VERTICAL
FREQUENCY
VESA/75 1152 × 864 67.5kHz 75Hz
ENGLISH
13

Your International Guarantee
Dear Customer,
Thank you for purchasing this Philips product which has been designed and
manufactured to the highest quality standards.
If, unfortunately, something should go wrong with this product Philips
guarantees free of charge labor and replacement parts irrespective of the
country where it is repaired during a period of 12 months from date of
purchase. This international Philips guarantee complements the existing
national guarantee obligations to you of dealers and Philips in the country of
purchase and does not affect your statutory rights as a customer.
The Philips guarantee applies provided the product is handled prop erly for its
intended use, in accordance with its operating instructions and upon
ENGLISH
presentation of the original invoice or cash receipt, indicating the date of
purchase, dealer's name and model and production number of the product.
The Philips guarantee may not apply if:
• the documents have been altered in any way or made illegible;
• the model or production number on the product has been altered,
deleted, removed or made illegible;
• repairs or product modifications and alterations have been executed
by unauthorized service organizations or persons;
• damage is caused by accidents including but not limited to lightning,
water or fire, misuse or neglect.
Please note that the product is not defective under this guarantee in the case
where modifications become necessary in order for the product to comply
with local or national technical standards which apply in countries for which
the product was not originally designed and/or manufactured. Therefore
always check whether a product can be used in a specific country.
In case your Philips product is not working correctly or is defective, please
contact your Philips dealer. In the event you require service whilst in another
country a dealer address can be given to you by the Philips Consumer Help
Desk in that country, the telephone and fax number of which can be found in
the relevant part of this booklet.
In order to avoid unnecessary inconvenience, we advise you to read the
operating instructions carefully before contacting your dealer. If you have
questions which your dealer cannot answer or any related question please
contact the Philips Consumer Information Centers
Website: http://www.philips.com
or via:
14

Antes de operar el monitor por favor lee este manual completamente. Se debe
retener este manual para futura consulta.
Índice
Lista del paquete ---------------------------------------------Precauciones --------------------------------------------------Instrucciones de instalación --------------------------------
Base Giratoria ---------------------------------------------Cordón de corriente --------------------------------------Cable de video ---------------------------------------------
Instrucciones operativas -------------------------------------
Instrucciones generales ---------------------------------Mando del tablero de frente ---------------------------Como ajustar la instalación -----------------------------
Ajustando de imagen ------------------------------------Plug & Play ---------------------------------------------------Soporte técnico (FAQ) --------------------------------------Apéndice A - Características técnicas --------------------
Apéndice B - Tabla de Coordinación Programada por
Fabrica -----------------------------------------
Su Garantía Internacional------------------------------------
LISTA DE PAQUETE
El embalaje de producto debe incluir los siguientes articulos :
1. Monitor Color Completamente plano
2. Manual del Propietario
3. Cordón de Corriente
4. Base Giratoria
7-8
11-12
1
2
3
3
3
4
5
5
6
6
9
10
13
14
ESPAŇOL
41C779-813-1A 西文
1

PRECAUCIONES
No usar el monitor cercano a agua, por ejemplo cercano de una bañera ,
palangana, fregadero, tina de lavandería, piscina o en sótano mojado.
No poner el monitor en una carretilla inestable, plataforma, o mesa. Si el
monitor caer, él puede herir una persona y causar daños serios al aparato.
Usa sólamente la carretilla o plataforma recomendada por el fabricante o
vendido con el monitor. Si montar el monitor en una pared o estante, usa
un conjunto de soporte aprobado por el fabricante y sigue las
instrucciones del conjunto.
Rañuras o aberturas en la parte trasera y inferior de la caja son provistos
para ventilación. Para asegurar funcionamiento fiable del monitor y para
protegerlo de sobrecalentamiento, asegurarse que estas aberturas no
están bloqueadas o cubiertas. No pongas el monitor sobre la cama, sofá ,
alfombra, o superficie similar. No pongas el monitor cercano o encima
de un radiador o registro de calor. No pongas el monitor en un estante
para libros o armario a menos que sea proporcionada una ventilación
propia.
El monitor debe ser operado solamente con el tipo de fuente de energía
ESPAŇOL
indicado en la etiqueta. Si no estás seguro del tipo de energia
suministrado a su hogar, consulta a su vendedor o compañía de energía
local.
El monitor es equipado con clavija tripolar, una clavija con un tercero
polo (tierra). Esta clavija conectar_ solamente a una toma de corriente
conectada a tierra como característica de seguridad. Si su toma de
corriente no acomoda la clavija tripolar, llame a un electricista para
instalar la toma de corriente correcta, o usa un adaptador para conectar el
aparato a tierra seguramente. No descuidar del propósito de seguridad de
la clavija conectada a tierra.
Desenchufar la unidad durante una tormenta con relámpago o cuando el
monitor no es usado por períodos largos de tiempo. Esto protegerá el
monitor de daños debido a sobretensión transitória de energía.
No sobrecargar flejes de energías y cordones de extensión. Sobrecarga
puede resultar en incendio o choque eléctrico.
Nunca empuje cualquier objeto dentro de la rañura en la caja del monitor.
Él puede causar corto circuito en las piezas y resultar en fuego o choque
eléctrico. Nunca derrama líquidos en el monitor.
No intenta reparar el monitor tu mismo; abertura o quitación de tapas
puede exponerte a voltajes peligrosos y otro riesgos. Favor de referir
todo servicio al personal de revisión calificado.
Para asegurar funcionamiento satisfactorio, usa el monitor solo con
ordenadores listados UL que tienen receptáculos apropiadamente
configurados entre 100- 240V AC, Min. 2.5A.
El soquete de pared se debe instalar cerca del equipo y con fácil acceso.
Atención: Desconecte el cable de corriente para detener el suministro de
energía al monitor.
2

INSTRUCCIONES DE INSTALACIÓN
Base Giratoria
Para atar la base giratoria al monitor, haga el siguiente :
● Vuelve cuidadosamente el monitor sobre su lado o al revés. (véa figura 1).
● Localiza las cavidades a la parte inferior delantera del monitor.
● Introduce las clavijas sobre la base giratoria en estas cavidades. Empuje
la base giratoria hacia adelante hasta que la base giratoria cierre en el
lugar.
● Para quitar la base giratoria, ten la parte inferior de la base giratoria,
después empuje lo fuera.
Assemblage Démontage
Figura 1 Instalando y Quitando la Base Giratoria
Cordón de Energía
Fuente de energía:
1. Asegurate que el cordón de energía es el tipo correcto requerido en su
área.
2. Este monitor tiene una fuente de energía universal que permite
funcionamiento en voltaje 100/120V AC o 220/ 240V AC de la área
(No se requiere ningún ajuste del usuario.)
3. Conecta el cordón de energía dentro de un enchufe de entrada de
energía de su monitor, y después conecta el otro extremo en una toma
de corriente tripolar AC. El cordón de energía puede ser conectada a
una toma de corriente de la pared o enchufe de energía del su PC,
dependiendo del tipo de cordón de energía suministrado con su monitor.
ESPAŇOL
41C779-813-1A 西文
3

Cable de Video
Conectando el Cable de Video: el monitor viene con un cable de video
incorporado. Enchufar el conector de señal del cable con 15 polos dentro de
los orificios para video del ordenador y aprieta los dos tornillos en el
conector del cable. (Véa figura 2)
Caución: No encorva el cable de señal , de otro modo puede romper el
alambre interior.
Conectando el Cable de Rede : Enchufa el cable de rede en el portador AC
del monitor. Luego enchufa el cable en un tomacorrientes AC com tierra o
soquete de salida de rede en su PC.
Caución: Si el enchufe AC no está conectada a tierra, instala el adaptador
propio conectado a tierra (no suministrado).
ESPAŇOL
1. Cable de rede
2. Cable de signo
Figura 2 - Conectando Cables
4

INSTRUCCIONES OPERATIVAS
Instrucciones Generales
Los otros botones de control están localizados en la base del monitor. (Véa
Figura 3). Para cambiar estes ajustes , la imagen puede ser ajustada a sus
preferencias personales.
● El cordón de energía debe ser conectado.
● Conecta el cable de video del monitor a la tarjeta de video.
● Para encender el monitor, presiona el interruptor de energía POWER a la
posición encender ON. El indicador de energía alumbrará .
● Su monitor presenta un sistema de interruptor rápido y único que
proporciona una imagen dentro de segundos después de encender el
monitor.
ESPAŇOL
Figura 3 - Botón de Control Externo
CONTROLES EXTERNOS
1. INTERRUPTOR DE ENERGÍA ON/OFF
2.
INDICADORA DE ENERGÍA
3. MENU
4. CONTRASTE/
5. BRILLO/
6. SALIDA
Notas
No instales el monitor en un lugar cercano a fuentes de calor tal como
radiadores o conductos de aire, o en un lugar sujeto a luz directa del sol, o
polvo excesivo o vibración mecánica o choque.
Guarda el cartón original de embarque y materiales de embalaje, así ellos
estarán a mano si alguna vez necesitar de enviar su monitor.
Para protección máxima, reembala su monitor de la misma manera como
fue embalado por la fábrica.
Para mantener el monitor parecendo nuevo, lo limpia periódicamente con
una tela blanda. Se quitan manchas tercas con una tela ligeramente
humedecida con una solución de detergente suave. Nunca uses solventes
fuertes tal como disolvente, benceno, o limpiadores abrasivos, porque
estos dañarán la caja. Como precaución de seguridad, siempre desenchufa
el monitor antes de la limpieza.
41C779-813-1A 西文
5

Control del Panel Delantero
●
: Presiona este botón para cambiar el encendido/apagado del
monitor.
● MENU : Activa el menú OSD o confirma el ajustamiento.
●
/ : Ajusta el contraste u otro control.
/ : Ajusta el brillo u otro control.
●
● EXIT : Remueve el menú OSD de la pantalla.
● Indicador de Energía :
Verde — Modo de Encendido.
Anaranjado — Modo Apagado.
Como ajustar una instalación
A los controles del monitor se accede pulsando el MENU para activar el
ESPAŇOL
modo OSD. Se visualizará el menú principal.
1024 × 768
Figura 4 El Mensaje OSD
Observación: si transcurren más de 10 segundos durante el ajuste o
selección de cualquiera de los menús OSD, se almacenará la configuración
actual y se cancelará el modo OSD.
6

Ajustando la Imagen
La descripción para iconos de los mandos funcionales
1. CONTRASTE :
Ajusta el contraste de la imagen.
2. BRILLO
Ajusta el brillo de la imagen.
3. CENTRO - H
Ajusta la posición horizontal de la imagen.
4. TAMAÑO - H
Ajusta el tamaño horizontal de la imagen.
5. CENTRO -V
Ajusta la posición vertical de la imagen.
6. TAMAÑO -V
:
:
:
:
:
ESPAŇOL
Ajusta el tamaño vertical de la imagen.
7. ZOOM
:
Ajusta el tamaño horizontal y vertical de la imagen simultáneamente.
8. COJÍN
:
Ajusta a distorsión pincushion y barril.
9. TRAPEZOIDE
:
Ajusta la distorsión trapezoidal de la imagen.
10. BALANCE DE LINEALIDAD
:
Ajusta para compensar el desequilibrio del punteado.
11. PARALELOGRAMA
:
Ajusta la imagen para ser un rectángulo.
12. ROTACIÓN
:
Ajusta la inclinación de la imagen a la posición horizontal.
13. 6500°K/9300°K (TEMPERATURA DEL COLOR) :
La temperatura del color para x=0,313 , y=0,329 es 6500ºK y
x=0,283, y= 0,297 es 9300ºK. Él presenta dos juegos de color
diferentes en la pantalla. Puedes seleccionar 9300°K o 6500°K
presionando el MENU.
41C779-813-1A 西文
7

14. COLOR DEL USUARIO (Rojo/ Azul) :
Si el blanco normal 9300ºK o blanco cálido 6500ºK no satisface tu
deseo, ajusta propiamente R y B GAIN para obtener su nivel óptimo
de blanco.
15. DESMAGNETIZADOR
:
Si impureza del color ocurre cuando mudar o girar el monitor,
presiona el MENU y desmagnetiza para arreglar la condición de la
imagen.
16. REDUCIR MUARÉ
:
Muaré es el resultado de interferencia entre el esquema fosfórico y el
señal de video. En alguns casos, puedes encontrar el Muaré muy
notable. Presionar el MENU para entrar en el ajuste reducidor de
muaré. Favor de ajustar el nivel a la condición ópttima. Nota : Ajuste
ESPAŇOL
demasiado alto de una instalación causará sacudidas en la imagen.
17. RECUPERACIÓN
:
Presionar RELLAMADA para restaurar el monitor a los ajustes de
fábrica.
18. SALIDA
:
Cierra venta.
19. SELECTO EL IDIOMA
:
Seleccione el idioma que le gusta.
8

ESTE MONITOR PARECERÁ NON-FUNCIONAL SI NO HAY
NINGÚN SEÑAL DE ENTRADA DE VIDEO. PARA QUE ESTE
MONITOR OPERE PROPIAMENTE, DEBE HABER UN SEÑAL DE
ENTRADA DE VIDEO.
Este monitor cumple con los estándares de monitores Ecológicos como lo
establece la Video Electronics Standards Association (VESA) y/o la Agencia
de Protección del Ambiente (EPA) de los Estados Unidos y Los Empleados
de la Confederación Sueca (NUTEK). Esta característica es designada a
conservar energía eléctrica reducindo consumo de energía cuando no hay
ningún señal de entrada en el video presente. Cuando no hay ningún señal de
entrada en el video, siguiendo un período de tiempo funcionando en vacío,
este monitor comutará automáticamente para el modo Apagado OFF. Esto
reduce el consumo del suministro interno de energía del monitor. Después
de se restaurar el señal de entrada en el video, se restaura la energía y el
visualizador es automáticamente redeseñado. La apariencia es similar a una
característica "Ahorradora de Pantalla" excepto que el visualizador está
completamente apagado. El visualizador es restaurado presionando una llave
en el teclado, o tecleando el ratón.
PLUG & PLAY
Característica Plug & Play DDC1/2B
Este monitor es equipado con capacidades VESA DDC1/2B de acuerdo con
el PADRÓN VESA DDC. Él permite al monitor de informar la su identidad
al sistema organizador y dependiendo del nivel de DDC usado, comunica
información adicional sobre sus capacidades de visualización. El canal es
definido en dos niveles, DDC1 y DDC2B.
DDC1 es un canal de datos unidireccionales del visualizador al organizador
que transmite continuamente la información EDID. El DDC2B es un canal de
datos bidireccionales basados en el protocolo I²C. El organizador puede
solicitar información EDID sobre el canal DDC2B.
Asignaciones del Polo del Cable de Video:
1. Rojo 5. Tierra 9. NC 13. Sinc-H
ESPAŇOL
2. Verde 6. Tierra-R 10. Tierra 14. Sinc-V/ * VCLK
3. Azul 7. Tierra-G 11. NC 15. Reloj Serial-DDC
4. NC 8. Tierra-B 12. Datos Seriales DDC * PARA DDC
41C779-813-1A 西文
9

SOPORTE TÉCNICO (FAQ)
Problemas & Preguntas Posible Solución
LED de Energía no está
encendida
*Verifica si el Interruptor de Energía está
en la posición encendida ON.
*Cable de Energía debe estar conectado
Ningún Plug & Play *Verifica si el sistema PC es compatible
al Plug & Play.
*Verifica si la Tarjeta de Vídeo es
compatible al Plug & Play
*Verifica si polo conector D-15 del Cable
de Video está curvado
*Asegúrate que los Drivers del Monitor
estén instalados
Imagen está borrosa *Ajusta los mandos de Contraste y de
Brillo.
Imagen salta o ondulación
ESPAŇOL
está presente en la imagen.
El LED de encendido está
activado (naranja) pero no
aparece ninguna imagen ni
vídeo.
*Mover aparatos eléctricos que pueden
causar interferencia eléctrica.
*El interruptor de encendido del equipo
debe estar en la posición Encendido.
*La tarjeta de video debe estar
introducida completamente en el zócalo.
*Asegurarse que el cable de video del
monitor está propiamente conectado al
ordenador.
*Inspeccionar el cable de video del
monitor y asegurarse que ningun polo
está curvado.
*Asegurarse que el ordenador está
operativo presionando la tecla CAPS
LOCK sobre el teclado mientras
observando el LED del CAPS LOCK.
El LED debe encender en ON o apagar
en OFF después de presionar la tecla
CAPS LOCK
Uno de los colores primarios
(ROJO, VERDE o AZUL)
está ausente.
*Inspeccionar el cable de video del
monitor e asegurarse que ningun polo
está curvado.
10

APÉNDICE A - CARACTERISTICAS ESPECÍFICAS
CRT (Tubo de Imagen)
43,2cm (17"), Pantalla Plana no deslumbrante
90° deflexión, 29mm neck, punteada de 0,25mm.
Tamaño de la
40,6 cm (16"), diagonal
Imagen Visible
Visualización de color Colores ilimitados
Señal de Entrada Entrada análoga Todas las coordinaciones que
satisfacen los datos específicos sobre frecuencias
de escaneamiento
● Video ● Análogo R,G,B 0.7 Vpp positivo / 75 Ohms
● Sinc. ● Sinc. Horizontal : Positivo/Negativo
● Sinc. Vertical : Positivo/Negativo
Sincronización
● Horizontal 30kHz a 72kHz automáticamente
● Vertical 50Hz a 160Hz automáticamente
Resolución Máxima 1280 × 1024
Ancho de banda de video 110MHz
Coordinaciones
Programados por fábrica : 7
Coordinaciones de modo
del usuario :
12
Misconvergencia
● Centro 0.3mm Máx.
● Rincón 0.4mm Máx.
Fuente de Energía Fuente de alimentación en modo conmutación
AC 100-240V, 50Hz/ 60Hz alcance lleno.
Operando 0°C a 40°C ambiente
Humedad 10% a 85% relativa, non-condensante
Peso 16.0kg(Neto)
Dimensiones
● Monitor 410(Ancho) × 402(Alto) × 420(Profundidad) mm
Cable de Señal Mini Sub-D 15 polos
MANDOS EXTERNOS:
INTERRUPTOR ● INTERRUPTOR DE ENERGÍA ON/OFF
● MENU
● CONTRASTE/
● BRILLO/
● EXIT
,
ESPAŇOL
41C779-813-1A 西文
11

FUNCIONES ( OSD ) ● CONTRASTE
● BRILLO
● CENTRO-H
● TAMAÑO-H
● CENTRO-V
● TAMAÑO-V
● ZOOM
● COJÍN
● TRAPEZOIDE
● BALANCE DE LINEALIDAD
● PARALEL OGRAMA
● ROTACIÓN
● 6500°K
● COLOR DEL USUARIO
ESPAŇOL
● 9300°K
● DESMAGNETIZAR
● REDUCIÓN DE MUARÉ
● RECUPERACIÓN
● SALIDA
● SELECTO EL IDOMA
Plug & Play DDC1/2B
Modo Encendido ≤ 75W EPA ENERGY
®
STAR
Modo Apagado ≤ 2W
Consumo de Energía 75 Watts Máx.
Área de visualización Programada 310mm × 230mm
Regulaciones UL, CE, FCC, EPA, CSA, TUV/S
12

APÉNDICE B – TABLA DE
COORDINACIÓN PROGRAMADA POR FÁBRICA
ESTÁNDAR RESOLUCIÓN
IBM 720 × 400 31.5kHz 70Hz
VGA 640 × 480 31.5kHz 60Hz
VESA/85 640 × 480 43.3kHz 85Hz
VESA/85 800 × 600 53.7kHz 85Hz
VESA/85 1024 × 768 68.7kHz 85Hz
VESA/60 1280 × 1024 64.0kHz 60Hz
VESA/75 1152 × 864 67.5kHz 75Hz
FRECUENCIA
HORIZONTAL
FRECUENCIA
VERTICAL
ESPAŇOL
41C779-813-1A 西文
13

Su Garantía Internacional
Estimado cliente,
Gracias por su compra de este producto Philips, ya que ha sido diseñado y
fabricado bajo los estándares de calidad más elevados.
Si, desafortunadamente, pudiera existir algún problema con este producto,
PHILIPS garantiza libre de cargo la mano de obra y las piezas, durante 12
MESES a partir de la fecha de compra, independientemente del país en que el
producto sea reparado. Esta Garantía Internacional Philips, complementa las
obligaciones nacionales existentes sobre garantía hacia Ud., tanto de los
distribuidores como de Philips en el país de compra, no afectando los
derechos que la Ley establece para los Consumidores.
La Garantía Philips es aplicable en tanto que el producto sea TRATADO
CORRECTAMENTE para su uso, de acuerdo con el contenido de las
Instrucciones de Manejo y bajo la presentación de la FACTURA ORIGINAL
o RECIBO DE CAJA, en donde se indique la fecha de compra y el nombr e
del distribuidor, junto al modelo y número de producción del aparato.
La Garantía Philips NO será aplicable en los siguientes casos:
ESPAŇOL
• Cuando los documentos hayan sido alterados de alguna forma o
resulten ilegibles.
• En el caso de que el modelo y número de producción del aparato
haya sido alterado, borrado, retirado o hecho ilegible.
• Cuando las reparaciones hayan sido efectuadas por personas u
organizaciones de servicio NO AUTORIZADOS, o en el caso de
que se hayan producido modificaciones en el aparato.
• Cuando el daño en el aparato sea causado por accidentes que
incluyan, aunque no se limiten a: tormentas, inundaciones, fuego o
evidente mal trato del mismo.
Le rogamos tenga en cuenta que, el producto amparado por esta garantía, no
será defectuoso, cuando se hayan realizado modificaciones en el mismo, para
que cumpla con especificaciones técnica nacionales o locales, aplicables a
países, para los que, el aparato no fue, originalmente, desarrollado y/o
fabricado. Por esta razón siempre se debe comprobar, si, un producto puede
ser utilizado en un país específico.
En el caso de que su producto PHILIPS no funcione correctamente o esté
defectuoso, por favor contacte con su distribuidor Philips, o, con un
SERVICIO OFICIAL PHILIPS. En el supuesto de que Ud. requier a servicio
en algún otro país, el departamento de SERVICIO DE ATENCIÓN AL
CLIENTE del citado país, puede indicarle la dirección del SERVICIO
PHILIPS más próximo a su domicilio. El número de teléfono y de fax del
SERVICIO DE ATENCIÓN AL CLIENTE puede ser encontrado en la parte
inferior de este documento.
Para evitar problemas, le rogamos lea cuidadosamente las instrucciones de
manejo, antes de ponerse en contacto con su Distribuidor o Servicio Oficial.
Si Ud. tiene preguntas, que no puedan ser respondidas por el Distribuidor o el
Servicio Centros de Información al Cliente
http://www.philips.com
le rogamos escriba o llame a:
14

Antes de operar o monitor, favor ler cuidadosamente este manual. Este
manual deve ser guardado para consultas futuras.
1
2
3
3
3
4
5
5
6
6
7-8
9
10
11-12
13
14
PORTUGUÊS PORTUGUÊS
Índice
Lista de componentes -----------------------------------------Precauções ------------------------------------------------------Instruções para instalação-------------------------------------
Base giratória------------------------------------------------Cabo de alimentação----------------------------------------Cabo de vídeo ------------------------------------------------
Instruções de operação ----------------------------------------
Instruções gerais --------------------------------------------Painel de controle frontal ---------------------------------Como ajustar uma configuração -------------------------
Como ajustar a imagem -----------------------------------Plug and play --------------------------------------------------Suporte técnico e perguntas mais freqüentes (FAQ): --Anexo A – Especificações -------------------------------------
Anexo B – Tabela de tempos pré-configurados de
fábrica------------------------------------------------------------Sua Garantia Internacional-----------------------------------
LISTA DE COMPONENTES
A embalagem do produto deve conter os seguintes itens:
1. Monitor a cores plano puro
2. Manual do Proprietário
3. Cabo de alimentação
4. Base giratória
1

PRECAUÇÕES
z Não use o monitor perto de água, p. ex., perto de uma banheira, pias de
banheiro, de cozinha, de lavanderias, piscinas, ou em um porão molhado.
z Não coloque o monitor em uma base, mesa, ou carrinho instáveis. Se o
monitor cair, poderá causar danos físicos à pessoa, ou causar danos sérios
ao equipamento. Use apenas um carrinho ou a base recomendados pelo
fabricante ou adquiridos com o monitor. Se você montar o monitor em
uma prateleira, use um kit de montagem aprovado pelo fabricante e siga
as instruções do kit.
z As ranhuras e aberturas na parte traseira e inferior do gabinete são
projetadas para ventilação. Para assegurar a operação confiável do
monitor e para protegê-lo do superaquecimento, certifique-se que essas
aberturas não estejam bloqueadas ou cobertas. Não coloque o monitor em
uma cama, sofá, tapete, superfície similar. Não coloque o monitor perto
ou sobre um radiador ou medidor de calor. Não coloque o monitor em
uma estante de livros ou gabinete, a não ser que seja possível
proporcionar ventilação adequada.
z O monitor deve ser operado apenas a partir da fonte de alimentação do
tipo indicado na etiqueta. Se você não estiver certo do tipo de energia
elétrica fornecida em sua residência, consulte o distribuidor local ou a
empresa de energia elétrica local.
z O monitor é equipado com um plugue aterrado de três pinos, um plugue
PORTUGUÊS
com um terceiro pino para aterramento. Este plugue somente se encaixará
em uma tomada aterrada, como um fator de segurança. Se sua tomada de
força não suportar o plugue de três pinos, solicite que um eletricista
instale uma tomada adequada, ou use um adaptador para aterrar o
equipamento com segurança. Não elimine o fator de segurança do plugue
aterrado.
z Desligue a unidade da tomada durante tempestades de raios ou quando
ela ficar muito tempo sem uso. Isso protegerá o monitor de danos devido
a sobrecargas de voltagem.
z Não sobrecarregue os circuitos elétricos ou as extensões. A sobrecarga
pode resultar em incêndios ou em choques elétricos.
z Nunca insira nenhum objeto nas ranhuras existentes no gabinete do
monitor. Isso poderia causar curto circuito em componentes, causando
incêndios ou choques elétricos. Nunca derrame nenhum líquido no
monitor.
z Não tente executar a manutenção no monitor; abrir ou remover tampas
pode expor o usuário a voltagens perigosas e a outros perigos. Favor
solicitar qualquer tipo de manutenção somente a pessoal autorizado.
z Para assegurar operação satisfatória, use o monitor apenas com
computadores listados pela UL, que possuam receptáculos
apropriadamente configurados entre 100 – 240 Volts AC, e no mínimo
2,5 Amperes.
z Os soquetes de parede devem ser instalados perto do equipamento e
devem ser facilmente acessíveis.
z Atenção: desconecte o cabo de energia para cortar a alimentação ao
monitor.
41C779-813-1A 葡萄
2

INSTRUÇÕES DE INSTALAÇÃO
Base giratória
Para encaixar a base giratória à base do monitor, faça o seguinte:
z Vire com cuidado o monitor de lado ou de cabeça para baixo. (ver figura 1)
z Localize as cavidades na parte inferior do monitor.
z Insira as travas da base giratória nas cavidades. Empurre a base giratória
para frente até que a base se encaixe no local correto.
z Para remover a base giratória, segure a parte inferior da base, e empurre
para fora.
Instalar Remover
PORTUGUÊS PORTUGUÊS
Figura 1 Como instalar e remover a base giratória
Cabo de alimentação
Fonte de alimentação:
1. Certifique-se que o cabo de alimentação é o tipo correto exigido na área
da instalação.
2. Esse monitor tem uma fonte de alimentação que permite a operação
tanto em 100/120 Volts AC ou em 220/240 volts AC (não são
necessários ajustes por parte do usuário).
3. Conecte o cabo de alimentação no soquete de entrada de energia de seu
monitor, e ligue a outra extremidade em uma tomada de AC de três
pinos. O cabo de alimentação pode ser conectado em uma tomada na
parede, ou no soquete de saída de seu PC, dependendo do tipo de cabo
de alimentação que vem com o seu monitor.
3

Cabo de vídeo
Como conectar o seu cabo de vídeo: este monitor vem com um cabo de
vídeo embutido. Encaixe o conector do cabo do sinal de 15 pinos na porta de
vídeo do computador e aperte os dois parafusos do conector do cabo.
Cuidado: não dobre o cabo de sinal, ou poderá romper a fiação interna.
Como conectar o cabo de alimentação: encaixe o cabo de alimentação no
conector de AC do monitor. Então, encaixe o cabo de alimentação em uma
saída de AC, extensão aprovada pelo INMETRO ou no soquete de saída de
energia de seu PC.
Cuidado: se a saída de AC não for aterrada, instale o adaptador adequado
de aterramento (não-fornecido).
PORTUGUÊS
Figura 2 Como conectar os cabos
1. Cabo de alimentação
2. Cabo de sinal
41C779-813-1A 葡萄
4

INSTRUÇÕES DE OPERAÇÃO
Instruções gerais
O interruptor de liga/desliga está localizado no painel frontal do monitor.
Pressione o botão liga/desliga para ligar ou desligar o monitor.Os outros
botões de controle estão localizados na base do monitor (ver figura 3). Ao
alterar estas configurações, a imagem pode ser ajustada às suas preferências
pessoais.
O cabo de alimentação deve estar conectado.
z
Conecte o cabo de vídeo do monitor para a placa de vídeo.
z
Para ligar o monitor, pressione o botão de POWER (liga/desliga) para a
z
posição ON. O indicador de energia se ligará.
Seu monitor possui um interruptor exclusivo de ligação rápida, que
z
proporciona uma imagem poucos segundos depois de ligado o monitor.
PORTUGUÊS PORTUGUÊS
Figura 3 Botão de controle externo
CONTROLES EXTERNOS
1. POWER
2. INDICADOR DE ENERGIA
3. MENU
4. CONTRASTE/
5. BRILHO/
6. EXIT
Observações
z Não instale o monitor em um local perto de fontes de calor como
radiadores ou dutos de ar, ou em local sujeito a poeira, vibrações ou
choques físicos.
z Guarde a embalagem original e materiais de embalagem para eventual
uso se houver necessidade de mover ou transportar o monitor.
z Para proteção máxima, re-embale o monitor em sua embalagem original.
z Para manter o monitor com aparência de novo, limpe-o com um pano
macio. Manchas difíceis de remover podem ser limpas com um pano
levemente umedecido com uma solução fraca de detergente. Nunca use
solventes fortes, como thinner, benzina, ou limpadores abrasivos, pois
estes podem danificar o gabinete. Como precaução, sempre desconecte o
monitor da fonte de alimentação antes de qualquer limpeza.
5

Painel de controle frontal
z
: Pressione este botão para Ligar/Desligar (ON/OFF) a energia do
monitor.
z MENU: Menu do OSD ativo ou confirma função de ajuste.
z / : Ajusta o contraste ou ajuste da função.
z / : Ajusta o brilho ou ajuste da função.
z SAIR: Sair de uma função ou Retira o menu OSD da tela.
z Indicador de energia:
Verde — Modo Energia On (ligado).
Laranja —
Como ajustar uma configuração
Os controles do monitor são acessados pressionando-se o botão MENU para
habilitar o OSD (On-Screen-Display). O menu principal será exibido como
segue.
PORTUGUÊS
Modo Energia Off (desligado).
1024 × 768
Figura 4 A mensagem OSD
Observação: Se um ajuste ou seleção de qualquer menu OSD não for
efetuado por mais de 10 segundos, a configuração corrente será salva e o
OSD desaparecerá automaticamente.
41C779-813-1A 葡萄
6

Como ajustar a imagem
A descrição para ícones de controle funcional
1. CONTRASTE :
Ajusta o contraste da imagem.
2. BRILHO
Ajusta o brilho da imagem.
3. CENTRO H
Ajusta a posição horizontal da imagem.
4. TAMANHO H
Ajusta o tamanho horizontal da imagem.
5. CENTRO V
Ajusta a posição vertical da imagem.
6. TAMANHO V
:
:
:
:
:
Ajusta o tamanho vertical da imagem.
7. ZOOM
:
Ajusta o tamanho vertical e horizontal da imagem simultaneamente.
8. PINCUSHION
:
Ajusta a distorção pincushion e barril.
9. TRAPÉZIO
:
Ajusta a distorção trapezoidal da imagem.
10. PIN-BALANCE
:
Ajusta para a compensação do desbalanceamento pincushion.
11. PARALELOGRAMA
:
Ajusta a imagem para que se torne um retângulo.
12. ROTAÇÃO
:
Ajusta a inclinação da imagem para a posição horizontal.
13. 6500°K/9300°K (TEMPERATURA DA COR) :
A temperatura da cor para x=0,313 e y=0,329 é 6500ºK e para
x=0,283 e y= 0,297 é 9300ºK. Permite a seleção entre dois modos de
balanço de cores na tela.
Pode-se selecionar 9300°K ou 6500°K ao pressionar o botão MENU.
7
PORTUGUÊS PORTUGUÊS

14. COR DO USUÁRIO (Vermelho/Azul)
:
Se o branco normal 9300°K ou o branco mais quente 6500°K não o
satisfizer, ajuste os controles R e B GAIN para obter o melhor nível
de branco desejado.
15. DESMAGNETIZADOR
:
Se uma mancha de cor ocorrer ao se mover ou girar o monitor,
pressione o botão MENU e execute a função Desmagnetizar para
reparar a condição da imagem.
16. CORREÇÃO MOIRÉ
:
O Moiré é o resultado da interferência entre o layout de fósforo e o
sinal de vídeo. Em alguns casos, pode-se verificar moiré muito
pronunciado. Pressione o botão Shuttle para entrar na configuração
de redução de moiré. Favor ajustar o nível para a condição ideal.
Observação: as configurações demasiado elevadas poderão causar
tremores na imagem.
PORTUGUÊS
Pressione AJUSTE PADRÃO para restaurar o monitor às suas
17. AJUSTE PADRÃO
:
configurações de fábrica.
18. SAÍDA
Fecha a janela OSD.
19. SELECIONAR IDIOMA
:
:
Selecione o seu idioma preferido.
41C779-813-1A 葡萄
8

ESTE MONITOR APARENTARÁ SER NÃO-FUNCIONAL SE NÃO
HOUVER ENTRADA DE SINAL DE VÍDEO. PARA QUE ESTE
MONITOR OPERE APROPRIADAMENTE, DEVE HAVER UM
SINAL DE ENTRADA DE VÍDEO.
Este monitor está em conformidade com os padrões Green Monitor,
conforme definição da Video Electronics Standards Association (VESA)
e/ou o United States Environmental Protection Agency (EPA) e The Swedish
Confederation Employees (NUTEK). Este recurso foi projetado para
conservar energia elétrica por meio da redução do consumo de energia
elétrica, quando não houver presença de sinal de vídeo. Quando não houver
entrada de sinal de vídeo neste monitor, após um período, o mesmo entrará
automaticamente no modo STAND BY (ESPERA). Isso reduz o consumo
interno de energia do monitor. Após a restauração do sinal de vídeo, a
energia total é restaurada e o display é automaticamente reativado. Esta
aparência é similar ao recurso “Proteção de tela”, exceto que o display estará
totalmente desligado. O display é restaurado por meio da pressão de uma
tecla no teclado ou por meio de um clique do mouse.
Plug and play
Recurso Plug & Play DDC1/2B
Este Monitor é equipado com capacidade VESA DDC1/2B de acordo com o
PADRÃO VESA DDC. Isto permite que o Monitor se identifique com o
sistema organizador e, dependendo do nível de DDC utilizado, comunique
informações adicionais sobre sua capacidade de vídeo. Este canal é definido
em dois níveis, DDC1 e DDC2B.
O DDC1 é um canal unidirecional de dados do display para o sistema
organizador que transmite informações EDID continuamente. O DDC2B é
um canal bidirecional baseado no protocolo I²C. O sistema organizador pode
solicitar informações EDID no canal DDC2B.
Atribuições de pinos do cabo de vídeo:
1. Red
(Vermelho)
2. Verde 6. Terra -R 10. Terra 14. Sinc. V/*VCLK
3. Blue (Azul) 7. G-Terra 11. NC 15. Clock serial-DDC
4. NC 8. B-Terra 12. Dados seriais-DDC * PARA DDC
5. Terra 9. NC 13. Sinc. H
PORTUGUÊS PORTUGUÊS
9

SUPORTE TÉCNICO (PERGUNTAS FREQUENTES)
Problema e Pergunta Solução Possível
LED de energia não está ligado *Verifique se o interruptor de
liga/desliga está na posição ON.
*Cabo de alimentação deve ser
conectado
Sem Plug and Play *Verifique se o sistema do PC é
compatível com o Plug and Play
*Verifique se a placa de vídeo é
compatível com o Plug and Play
*Verifique se o pino D-15 do cabo de
vídeo está torto
*Certifique-se que os Drivers do
Monitor estão instalados
A imagem está embaçada *Ajuste os controles de Contraste e de
Brilho.
A imagem se move em saltos
ou um padrão em ondas está
presente na imagem
PORTUGUÊS
O LED de energia está ligado
(laranja), mas não há sinal de
vídeo ou nenhuma imagem.
Falta de uma das cores
primárias (VERMELHO,
VERDE ou AZUL)
*Mova os dispositivos elétricos que
possam causar interferência elétrica.
*O Interruptor de Energia do
Computador deve estar na posição ON
(LIGADO)
*A Placa de Vídeo do Computador deve
estar firmemente fixada em seu slot
*Certifique-se que o cabo e vídeo do
monitor esteja corretamente conectado
ao computador.
*Inspecione o cabo vídeo do monitor e
certifique-se que nenhum dos pinos
esteja torto.
*Certifique-se que seu computador
esteja operacional pressionando a tecla
CAPS LOCK enquanto observa o LED
do CAPS LOCK. O LED deve se
Ligar (ON) ou Desligar (OFF) após se
pressionar a tecla CAPS LOCK.
*Inspecione o cabo de vídeo do monitor
e certifique-se que nenhum dos pinos
esteja torto.
41C779-813-1A 葡萄
10

ANEXO A - ESPECIFICAÇÕES
CRT (Tubo de Imagem) 43,2cm (17”), tela plana não reflexiva, ângulo de
deflexão 90º, diâmetro do pescoço de 29mm e
0,25mm de “dot pitch”
Tamanho diagonal visual 40,6cm (16 "), diagonal
Cores da tela Cores ilimitadas
Sinal de entrada Entrada analógica – todos os tempos que
atendem a freqüências de varredura
z Vídeo z Analógico R, G, B 0,7 Vpp positivo/75 ohms
z Sincronização z Sinc. horizontal : Positivo/negativo
z Sinc. horizontal : Positivo/negativo
Sincronização
z Horizontal 30kHz a 72kHz automaticamente
z Vertical 50Hz a 160Hz automaticamente
Resolução máx. 1280 × 1024
Largura de banda de
Vídeo
Tempos pré-configurados
de fábrica:
Tempos de modo do
usuário:
Erro de Convergência
z Centro 0,3mm máx.
z Canto 0,4mm máx.
Fonte de alimentação Fonte de alimentação chaveada
Temperatura de operação 0°C a 40°C ambientes
Umidade 10% até 85% sem condensação
Peso 16,0kg (líquido)
Dimensões
z Monitor 410 (L) × 402 (A) × 420 (P)mm
Cabo de sinal 15-pinos Mini D-Sub
CONTROLES
EXTERNOS:
INTERRUPTORES z BOTÃO POWER LIGA/DESLIGA
z TECLA MENU
z TECLA CONTRASTE/ PARA CIMA
z TECLA BRILHO/ PARA BAIXO
z TECLA SAIR
110MHz
7
12
100-240V AC, 50Hz/60Hz
PORTUGUÊS PORTUGUÊS
11

FUNÇÕES (OSD) z CONTRASTE
z BRILHO
z CENTRO H
z TAMANHO H
z CENTRO V
z TAMANHO V
z ZOOM
z PINCUSHION
z TRAPÉZIO
z PIN-BALANCE
z PARALELOGRAMO
z ROTAÇÃO
z 6500°K
z AJUSTE DE COR DO USUÁRIO
z 9300°K
z DEGAUSS
z CORREÇÃO DE MOIRÉ
z AJUSTE PADRÃO
z SAIR
PORTUGUÊS
z SELECIONAR IDIOMA
Plug e Play DDC1/2B
®
STAR
Consumo de energia 75W máx.
Área pré-configurada do display 310mm × 230mm
Regulamentos UL, CE, FCC, EPA, CSA, TUV/S
Modo Off ≤ 2W
Modo On ≤75W EPA ENERGY
41C779-813-1A 葡萄
12

ANEXO B – TABELA DE TEMPOS
PRÉ-CONFIGURADOS DE FÁBRICA
PADRÃO
RESOLUÇÃO
IBM 720 × 400 31.5kHz 70Hz
VGA 640 × 480 31.5kHz 60Hz
VESA/85 640 × 480 43.3kHz 85Hz
VESA/85 800 × 600 53.7kHz 85Hz
VESA/85 1024 × 768 68.7kHz 85Hz
VESA/60 1280 × 1024 64.0kHz 60Hz
VESA/75 1152 × 864 67.5kHz 75Hz
FREQÜÊNCIA
HORIZONTAL
FREQÜÊNCIA
VERTICAL
PORTUGUÊS PORTUGUÊS
13

Sua Garantia Internacional
Prezado cliente,
Muito obrigado por comprar este produto Philips, que foi projetado e
fabricado com o mais alto padrão de qualidade.
Se por acaso, este produto apresentar algum problema, a Philips garante a
mão-de-obra e a reposição de peças, livre de qualquer despesa, independente
do país em que o produto for consertado, durante um período de 12 meses a
partir da data da compra. Esta garantia internacional da Philips complementa
as obrigações para com você da garantia nacional já existente dos
revendedores e da Philips no país da compra e não afeta os seus direitos
como consumidor previstos por lei.
A garantia da Philips se aplica desde que o produto seja devidamente
manuseado para seu uso indicado, de acordo com suas instruções de operação
e sob a apresentação de uma fatura original ou de um recibo de venda,
indicando a data da compra, o nome do revendedor, o modelo e o número de
fabricação do produto.
A garantia da Philips pode não ser aplicada se:
PORTUGUÊS
• os documentos forem alterados ou ilegíveis de alguma forma;
• o modelo ou o número de fabricação no produto for alterado,
apagado, removido ou tornado ilegível;
• reparos ou modificações e alterações do produto forem executados
por indivíduos ou organizações de serviço não autorizadas;
• o dano for causado por acidentes, incluindo, mas não limitando-se a,
relâmpago, água ou fogo, uso indevido ou negligência.
Note bem que o produto sob esta garantia não será considerado defeituoso
quando for necessário modificações para que o mesmo esteja de acordo com
os padrões técnicos locais ou nacionais, que se aplicam a países para os quais
o produto não foi primeiramente projetado e/ou fabricado. Portanto, sempre
verifique se o produto pode ser utilizado em um país específico.
Caso o seu produto Philips não estiver funcionando corretamente ou for
defeituoso, entre em contato com o seu revendedor Philips. Se o seu produto
precisar de serviço enquanto você estiver em outro país, o Serviço de
Assistência ao Consumidor Philips local, cujos números de telefone e fax
podem ser encontrados neste folheto, poderá fornecer-lhe o endereço de um
revendedor.
Para evitar qualquer inconveniência desnecessária, recomendamos que você
leia cuidadosamente as instruções de operação antes de contatar o seu
revendedor. No caso de dúvidas que o seu revendedor não possa esclarecer,
ou qualquer pergunta relacionada com o produto, entre em contato com o
Centro de Informações ao Consumidor Philips
Internet: http://www.philips.com
ou visite nosso endereço na:
14

Consumer Information Centers
Western Europe
Telephone numbers:
Austria Phone: (01) 546 575 603
Belgium Phone: (02) 275 0701
Cyprus Phone: 800 92256
Denmark Phone: (35) 25 87 61
France Phone: (03) 8717 0033
Germany Phone: (0696) 698 4712
Greece Phone: 00800 3122 1223
Finland Phone: (09) 2290 1908
Ireland Phone: (01) 601 1161
Italy Phone: (02) 48 27 11 53
Luxembourg Phone: (408) 443 5501
The Netherlands Phone: (053) 482 9800
Norway Phone: (22) 70 82 50
Portugal Phone: 0800 831 363
Sweden Phone: (08) 632 0016
Switzerland Phone: (02) 23 10 21 16
Spain Phone: (09) 17 45 62 46
United Kingdom Phone: (0207) 949 0069
U.S.A. Phone: (877) 835 1838
Philips_manual_
Tuesday, November 18, 2003 3:00:51 PM

Eastern Europe
CZECH REPUBLIC Phone: (02)-6831581
HUNGARY Phone: (01)-2164428
POLAND Phone: (02)-6286070
RUSSIA Phone: 095-937 9300
TURKEY Phone: (0800)-211 40 36
Latin América
ANTILLES Phone: (09)-4612799
ARGENTINA Phone: (011)-4544 2047
BRASIL Phone: 0800-7010-203
CHILE Phone: (02)-730 2000
COLOMBIA Phone: (01)-8000-111001 (toll free)
MEXICO Phone: (05)-3687788 / 9180050462
PARAGUAY Phone: (021)-211666
PERU Phone: (01)-2136200
URUGUAY Phone: (02)-6281111
VENEZUELA Phone: (02) 2377575
Canada
CANADA Phone: 800- 479-6696
Philips_manual_
Tuesday, November 18, 2003 3:00:51 PM
 Loading...