

Page 1

Rechargeable
Cordless Tripleheader Razor
1090X
1060X
1059X
1050X
Register your product and get support at
www.philips.com/norelco
Page 2

2
ENGLISH 4
Congratulations on your purchase and
welcome to Philips Norelco!
To fully benefit from the support that Philips
Norelco offers, register your product at
www.philips.com/norelco
¡Felicitaciones en su compra y recepción
a Philips Norelco!
Beneficiar completamente de la ayuda
que las ofertas de Philips Norelco, colocan
su producto en www.philips.com/norelco
1090X/1060X/1059X/1050X
Page 3

ENGLISHENGLISH
54
IMPORTANT SAFETY
INSTRUCTIONS
When using an electric appliance, basic precautions should always
be followed, including the following:
Read all instructions before using this appliance.
DANGER
To reduce the risk of electric shock:
1. Do not reach for a razor or corded charging stand/pod that has
fallen into water. Unplug immediately.
2. Use razor only in dry condition. Do not use a razor or corded
charging stand/pod while bathing or in a shower.
3. Do not submerge razor in water.
4. Do not place or store a razor or charging stand/pod where it
can fall or be pulled into a tub or sink. Do not place or drop a
razor or charging stand/pod into water or other liquid.
5. Always unplug this charging stand/pod from the electrical
outlet immediately after use, except when razor is (re)charging.
6. Unplug and remove power supply cord from charging stand/pod
before cleaning.
WARNING
To reduce the risk of burns, fire, electric shock, or injury
to persons:
1. Close supervision is necessary when this razor/charging
stand/pod is used by, on, or near children or invalids.
2. Use this razor for its intended household use as described in
this manual. Do not use attachments not recommended by
Philips Electronics North America Corporation.
3. Never operate this razor/charging stand/pod if it has a damaged
cord or charging plug, if it is not working properly, if it has
been dropped or damaged, or dropped into water while
plugged in. For assistance call 1-800-243-3050.
4. Keep the razor, charging stand/pod, cord and charging plug away
from heated surfaces.
5. Never drop or insert any object into any opening.
6. Do not charge razor or plug in charging stand/pod outdoors
or operate where aerosol (spray) products are being used or
where oxygen is being administered.
7. Do not use this razor with a damaged or broken comb, as facial
injury may occur.
8. Always put razor in stand/pod first, attach cord to stand/pod,
then plug into outlet. Be certain plug is inserted firmly into
charging stand/pod, up to mark indicated on plug. To disconnect,
remove charging plug from outlet.
9. Never put the razor in direct sunlight or store in a pouch or
charging pod at a temperature above 140°F.
10.Razor can be rinsed under running tap water. Do not charge or
operate razor until fully dried.
11. To prevent possible damage to the cord, do not wrap cord
around the razor or charging stand/pod.
SAVE THESE
INSTRUCTIONS
IMPORTANT: The power plug contains a transformer. Do not
cut off the power plug to replace it with another plug, as this will
cause a hazardous condition.
Page 4
6
ENGLISHENGLISH
7
Table of Contents
Features .........................................................8-9
45 - DAY MONEY-BACK GUARANTEE
To enjoy the closest and most comfortable shave from your new Philips Norelco
Men’s Razor, the razor should be used exclusively for 3 weeks. This allows your
hair and skin enough time to adapt to the Philips Norelco Shaving System. If, after
that period of time, you are not fully satisfied with your Philips Norelco Men’s
Raz or, se nd t he p roduct ba ck a lo ng w it h da ted sales rec ei pt a nd we ’l l refund yo u
the full purchase price. The razor must be shipped prepaid by insured mail,
insurance prepaid, and have the original sales receipt, indicating purchase price and the date of purchase, enclosed. We cannot be responsible for lost mail. The razor must be postmarked no later than 45 days from
the date of purchase. Philips Norelco reserves the right to verify the purchase
price of the razor and limit refunds not to exceed suggested retail price.
To obtain money-back guarantee return authorization form, call 1-800-243-3050
for assistance. Please allow 4-6 weeks for delivery of check.
Multi-Purpose Display...........................10-14
Charge Meter ...............................................14
Before First Use .....................................14-15
Charging ...................................................15-18
Recharging ..................................................... 18
Quick Charge ...............................................18
Put It To The Test & Shaving Tips ........18-19
How to Shave
With Razor .............................................. 19-20
Trimming ..................................................20-21
Travel Lock .............................................. 21-22
Cleaning .................................................... 22-26
Replacing Razor Head
Assembly ..................................................26-27
Maintenance .................................................. 27
Storage ............................................................ 28
Assistance ...................................................... 29
Accessories ................................................... 30
Warranty ........................................................31
Page 5
8
9
ENGLISH ENGLISH
Model 1090X
Model 1060X
Model 1059X
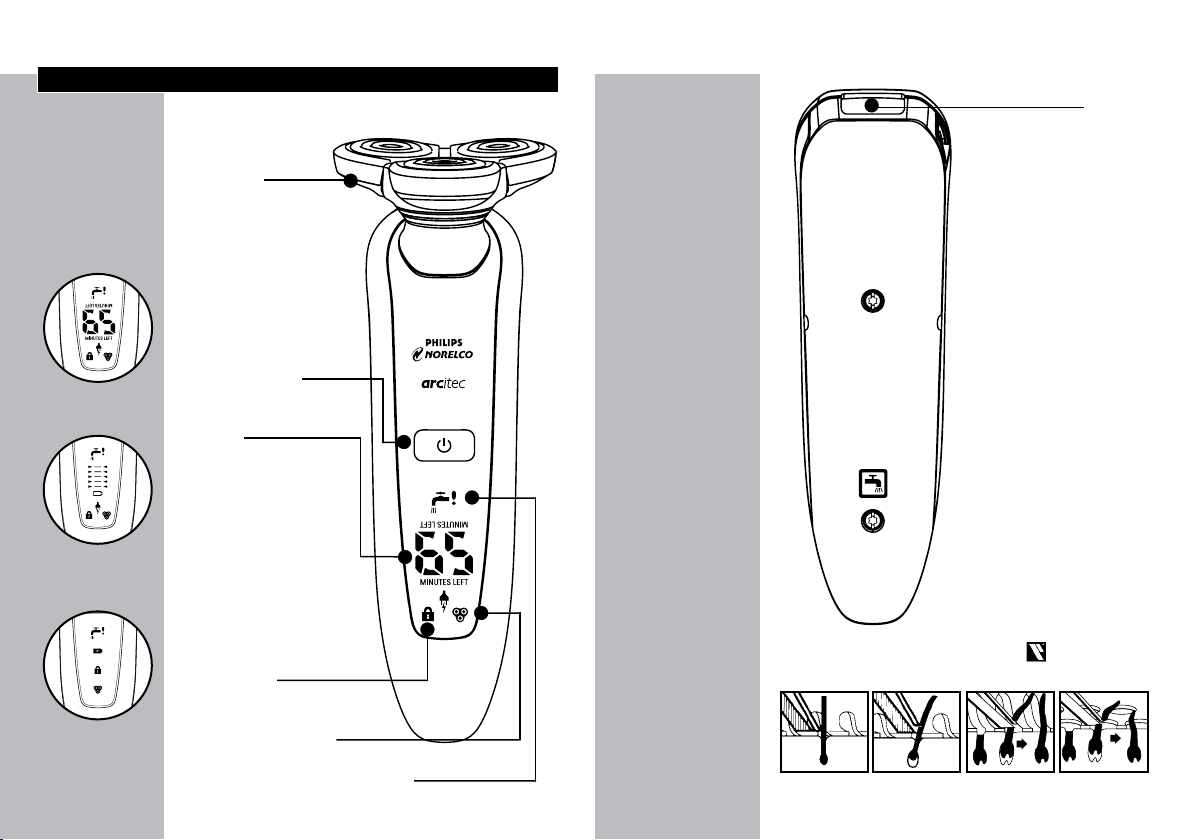
Features
Flex & Pivot Action
Razor Head
Assembly
• Hair Chamber
captures shaven hair
Quick Clean System
Protective Razor
Head Cap
Electronic
On/Off Button
Multi-Purpose
Display
• Shows remaining
power level in
batteries
(1059/1060X)
or actual remaining
shaving minutes
(1090X)
• Battery Charge,
Full & Low Indicators
Travel Lock
Precision Tube
Trimmer
Automatic
Worldwide Voltage
100V to 240V AC
Cleaning Brush
Power Pod
Charging Stand
Rechargeable 1-hour
Full Charge for up to
21 days of cordless
shaving time
Quick Charge
Cordless - To shave
without a cord
Full 2-Year Warranty
45-Day Money-Back
Guarantee
How the Unique Philips Norelco Lift and Cut
Shaving System Makes Close Comfortable:
Model 1050X
Replacement Razor Head
Assembly Indicator
Automatic Cleaning Indicator
• Indicates razor heads should be cleaned
Groove channels
beard closer to
cutting system
Lifter raises hair Slots to cut long
hairs
Holes to cut short
hairs even closer
Page 6

10
11
ENGLISH
Multi-Purpose Display
◗ Remove any sticker or protective foil from
the display before using razor.
◗ Depending on the razor model, there are 3
different types of displays:
Display for Model 1090X
C
Display for Models 1060X and 1059X
C
Display for Model 1050X
C
The display provides the following
information:
◗ When you turn the razor ON or OFF the
display will come on for approximately 10
seconds.
◗ Charging Indicator
-Model 1090X
C
As soon as you connect the power cord to
an electrical outlet, the display goes on. The
minutes indication appears as well as the plug
ENGLISH
symbol. Both the minutes indication and plug
symbol will start blinking. The display shows an
increase in shaving minutes from 0 to 65.
-Models 1060X and 1059X
C
As soon as you connect the power cord
to an electrical outlet, the display goes on.
The plug symbol and bottom arrowheads on
the display will blink. As charging continues,
more and more arrowheads will blink to
indicate what level the batteries have been
charged.
-Model 1050X
C
As soon as you connect the power cord to
an electrical outlet, the display goes on. The
battery symbol will blink during charging.
◗ Full Charge Indicator
-Model 1090X
C
When batteries have been fully charged, the
minutes indication appears on the display and
the plug symbol goes off.
-Models 1060X and 1059X
C
When batteries have been fully charged, all
arrowheads and charge level lights light up
continuously and the plug symbol goes off.
When you turn the razor ON, the arrowheads
C
at the top of the display light up to indicate the
razor is fully charged.
Page 7

12
13
ENGLISH
ENGLISH
-Model 1050X
C
When the batteries have been fully charged,
the battery symbol lights up continuously.
◗ Remaining Battery Capacity
-Model 1090X
C
The number on the display shows remaining
shaving time in minutes.
-Models 1060X and 1059X
C
The amount of charge level arrowheads indicates
the amount of charge remaining in batteries.
- When the top arrowheads on the display are
lit, the battery is 100% charged.
- When only the bottom arrowheads on the
display are lit, 20% of the battery capacity
is left.
◗ Low Battery Indicator
-Model 1090X
C
When the battery is almost empty (5 or less
shaving minutes left), the minutes indication
and plug symbol will blink. When you turn the
razor OFF the shaving minutes and plug symbol
continue to blink for a few seconds. You will
hear a beep when there are no minutes left.
-Models 1060X and 1059X
C
When the battery is almost empty (5 or less
shaving minutes left), the batter y symbol blinks
red and the arrowheads of the bottom charge
level blink. When you turn the razor OFF the
battery symbol and the arrowheads of the
bottom charge level continue to blink for a few
seconds.
-Model 1050X
C
When the battery is almost empty (5 or less
shaving minutes left), the batter y symbol lights
up red. When you turn the razor OFF the
battery symbol blinks for a few seconds.
◗ Cleaning Indicator
C
For optimal shaving performance, we
recommend cleaning the razor after EACH use.
The blinking faucet symbol will remind you the
Razor Head Assembly needs to be cleaned.
This happens after each shave.
◗ Replacement Razor Head Assembly Indicator
C
Every year, depending on your shaving behavior,
after turning the razor OFF, the replacement
head assembly symbol indicator starts to blink
(Model 1090X only, you will also hear a beep).
The replacement head symbol will remain visible
for the next 7 shaves to remind you that with
new shaving heads you will guarantee yourself
optimal shaving performance.
If the display shows a blinking replacement head
C
assembly symbol and faucet symbol with
exclamation mark, clean the razor thoroughly
before continuing to shave (see ‘Cleaning’).
After cleaning, if the blinking replacement
Page 8

14
15
ENGLISH
ENGLISH
head assembly symbol and faucet symbol with
exclamation mark remain on the display,
immediately replace the Razor Head Assembly
(see ‘Replacing Razor Head Assembly’).
Charge Meter
◗ Charge Meter monitors amount of remaining
battery power (Models 1060X and 1059X)
and actual shaving minutes (Model 1090X)
available. ‘Minutes Left’ or remaining
battery capacity is based on the amount of
power consumed shaving per minute and is
dependent upon your skin and beard type,
whether you use pre-shave lotion, and how
often the trimmer is used.
◗ Initially your razor may need to go through
2 or 3 full charge/recharge cycles before
‘Minutes Left’ (Model 1090X) or remaining
battery capacity indicators (Models 1060X
and 1059X) begins to display your accurate
shaving minutes left.
Before First Use
◗ Charge the razor before you start using
it (see ‘Charging’). Make sure the razor is
switched off before you start charging it.
◗ Remove any sticker or protective foil from
the Display before using razor.
Important
◗ Only use the power cord and charging stand
or power pod provided to charge
the razor.
◗ The power plug transforms 100-240V AC to
less than 24V DC.
◗ Do not attempt to disassemble the Razor
Head Assembly to individually clean each
cutter and comb. The individual shaving heads
are not removable.
Travel Lock
The razor is equipped with a travel lock function.
You can use the travel lock function when you are
going to store the razor for a longer period or if
you are going to take the razor with you when
traveling. See ‘Travel Lock’ section for instructions
on how to use this function.
Charging
◗ Charging or recharging at temperatures below
40ºF or higher than 95ºF adversely affects
lifetime of batteries.
◗ Always unplug this charging stand/pod from
the electrical outlet immediately after use,
except when razor is (re)charging. You can
store the razor in the charging stand or
power pod.
◗ Charging or recharging requires one full hour.
Page 9

16
17
ENGLISH
ENGLISH
◗ A fully charged razor has a shaving time of up
to 65 minutes.
◗ You may recharge when the recharge
indicators appear on the razor.
◗ Do not charge/recharge or use razor until
fully dried.
Charging in the Power Pod
1 Connect the small plug of cord to power
C
◗ An adaptor plug may be necessary for power
C
C
pod. Connect the power plug into any
100V to 240V AC outlet. Use only the
power cord provided.
cord usage in some foreign countries. Use
an attachment plug adaptor of the proper
configuration for the power outlet.
The power cord will automatically convert to
work on 100V to 240V AC systems.
2 Lift the top of the power pod lid (1) and
remove (2).
3 Remove protective razor head cap from
razor.
The razor will not fit in the power pod with the
protective razor head cap on razor.
4 Insert the top of the razor into the power
C
5 The display on the razor will indicate razor
6 Charging requires one full hour. A fully
pod (1) and then press the bottom part
into the power pod (2).
is charging.
charged razor has a cordless shaving time
of up to 21 days.
Charging in the Charging Stand
1 Connect the small plug of cord to charging
stand. Connect the power plug into any
100V to 240V AC outlet. Use only the
power cord provided.
◗ An adaptor plug may be necessary for power
cord usage in some foreign countries. Use
an attachment plug adaptor of the proper
configuration for the power outlet.
The power cord will automatically convert to
work on 100V to 240V AC systems.
2 Place razor in stand in an upright position.
C
Press the razor tightly into the holder
making sure the charging contacts on each
side of the razor fit into the holder. If
razor has been placed correctly, you will
hear a beep (Model 1090X only).
Page 10

18
ENGLISH
ENGLISH
19
3 The display on the razor will indicate razor
is charging.
4 Charging requires one full hour. A fully
charged razor has a cordless shaving time
of up to 21 days.
Recharging
1 Recharging requires one full hour.
Recharge when the recharge indicators
appear on the razor.
Always unplug charging stand/pod from the
electrical outlet immediately after use, except
when razor is (re)charging.
Quick Charge
When batteries are totally depleted, recharging
the razor for approximately 3 minutes gives
enough energy for a 3-minute cordless shave.
Put It To The Test & Shaving Tips
◗ 21 Day Trial and Conversion Process. It is a fact
that your skin and beard need time to adjust to
a new shaving system.
◗ Use your new razor exclusively for 3 weeks to
fully enjoy the closeness of a Philips Norelco
shave.
◗ At first you may not get as close a shave as you
expect, or your face may even become slightly
irritated. This is normal since your beard and
skin will need time to adjust. Invest 3 weeks and
you’ll soon experience the full joy of your new
razor.
◗ Stick with it! If you alternate shaving methods
during the adjustment period, it may make it
more difficult to adapt to the Philips Norelco
shaving system.
◗ If you are still not convinced after 21 days,
Philips Norelco will refund you the full
purchase price as long as the request is
received within 45 days of purchase.
How To Shave With Razor
◗ Use this razor for its intended household use
as described in this manual.
◗ Shaving with a clean, dry face gives the best
results.
C 1 Turn razor ON by pressing the on/off
button once. Shave against the direction
of beard growth using both straight and
circular movements.
2 Stretch your skin with your free hand so
blades can lift and cut whiskers. Gently
press razor to skin so the floating heads
can follow the contours of your face.
DO NOT press too hard. Too much
pressure can pinch the skin into the combs.
Page 11

20
ENGLISH
ENGLISH
21
3 Turn razor OFF by pressing the on/off
button once.
The display lights up for a few seconds and then
shows the remaining battery capacity (Models
1090X, 1060X and 1059X only).
C 4 Put the Protective Razor Head Cap on the
razor to protect razor heads.
C For optimal shaving results, replace Razor Head
Asssembly (model #RQ10) once a year or
when the replacement head symbol starts
blinking.
Trimming
To Groom Sideburns and Moustache:
1 Turn razor ON.
The display lights up for a few seconds.
2 Press the trimmer slide forward to slide out
C
the trimmer.
3 Hold trimmer to exact hairline desired.
C
4 Trim beard, moustache or sideburns using
C
Move trimmer downward with gentle
pressure.
the trimmer.
5 Turn razor OFF when finished.
The display lights up for a few seconds and then
shows the remaining battery capacity (Models
1090X, 1060X and 1059X only).
6 Thoroughly clean the trimmer after using
(see ‘Cleaning’).
7Put the Protective Razor Head Cap on the
razor.
Travel Lock
If you are going to store the razor for a longer
time period or if traveling, it is possible to lock
the razor. The travel lock prevents the razor from
being switched on by accident.
Page 12

22
ENGLISH
Activating the Travel Lock
1 Press the ON/OFF button for 3 seconds
C
2 The travel lock has now been activated.
until the lock symbol appears on the
display. For model 1090X only, you will also
hear a beep.
Deactivating the Travel Lock
1 Press the ON/OFF button for 3 seconds.
2 The razor turns ON to indicate that the
razor has been unlocked. The razor is now
ready for use.
B
The razor unlocks automatically when you place
the razor in the power pod or charging stand
while plugged in.
Cleaning
C◗ The tap symbol on the back of the razor
indicates that the razor can be rinsed under
running tap water.
◗ Always clean your razor after each use.
◗ Regular cleaning guarantees better shaving
results.
◗ Always switch razor OFF and remove from
charging stand or power pod before cleaning.
◗ Never remove or replace Razor Head
Assembly while motor is on.
ENGLISH
◗ Do not apply pressure to combs. Do not
touch razor heads with hard objects as this
may dent or damage precision-made slotted
combs.
◗ Do not use razor if combs are damaged or
broken. Facial injury may occur.
◗ Never dry the shaving unit with a towel or
tissue as this may damage razor heads.
◗ DO NOT attempt to disassemble the Razor
Head Assembly to individually replace or
clean each cutter and comb. The individual
shaving heads (cutters and combs) are NOT
removable/replaceable.
◗ Do not use abrasives, scourers or liquids such
as acetone to clean the razor.
1 The faucet symbol will start blinking after
C
each shave to remind you that the razor
needs to be cleaned.
23
Razor Head Assembly: After Each Use
◗ It is recommended that you clean the Razor
Head Assembly thoroughly after each use to
maintain optimal shaving performance.
1 Turn razor OFF.
2 Using your thumb and forefinger, grasp the
C
sides of the shaving head near the center
of the assembly and pull each individual
shaving head open.
Page 13

24
ENGLISH
ENGLISH
25
Note: Individual shaving heads are not removable
from the Razor Head Assembly.
3 Rinse all three shaving heads and three
C
C
5 Carefully shake off excess water and leave
C
7 Allow Razor Head Assembly to completely
hair chambers under hot tap water by
letting the water run in and around all the
openings for at least 30 seconds.
BE CAREFUL TO TEST WATER FIRST SO AS
NOT TO BURN OR SCALD HANDS.
4 You can also immerse the Razor Head
Assembly in hot water with some liquid
soap or a degreasing liquid (e.g. alcohol)
for at least 30 seconds.
Make sure the razor is ON to thoroughly
remove any residue. Rinse Razor Head Assembly
completely under hot tap water before using
razor.
the shaving heads open to dry the Razor
Head Assembly completely.
6 Press each shaving head back onto the
Razor Head Assembly. You will hear a
‘click’.
air dry before storing.
Razor Head Assembly: With A Brush
1 Turn razor OFF.
2 Using your thumb and forefinger pull each
C
C
C
1 Turn razor OFF.
C
individual shaving head open.
Note: Individual shaving heads are not removable
from the Razor Head Assembly.
3 Brush out hairs from each shaving head
and hair chamber with the supplied brush.
4 Press each shaving head back onto the
Razor Head Assembly. You will hear a
‘click’.
Trimmer: After Each Use
2 Push the trimmer slide switch forward to
slide out the trimmer.
Page 14

26
ENGLISH
ENGLISH
27
3 Clean the trimmer with the short-bristled
C
4 Turn the trimmer ON and OFF. Repeat
5 Lubricate trimmer teeth twice a year with
C
side of the brush supplied. Brush up and
down along the trimmer teeth.
step 3.
one drop of mineral oil.
6 Push the trimmer slide switch backward to
retract the trimmer.
Replacing Razor Head Assembly
◗ Replace the entire Razor Head Assembly once
a year for optimal shaving results.
◗ Replace damaged or worn Razor Head
Assembly with model RQ10 Philips Norelco
razor heads only.
◗ The individual shaving heads (cutters and
combs) are NOT removable/replaceable. Only
the one-piece Razor Head Assembly can be
replaced.
Replacement Razor Head Assembly
Indication
◗ The replacement head indicator symbol starts
C
blinking (model 1090X only, you will also hear
a beep) to remind you to check if it’s time to
replace your Razor Head Assembly to obtain
optimal shaving results.
1 Remove the Razor Head Assembly from
C
C
the razor by pulling the Razor Head
Assembly straight up away from the razor.
2 Place new Razor Head Assembly back on
the razor and push down (you will hear a
click).
The Razor Head Assembly will only fit correctly
in one position on razor. Make sure to align the
raised notch on the Razor Head Assembly (1)
with the slot inside the top of razor (2).
This razor and charging stand/power pod have no
other user-serviceable parts. For assistance call
1-800-243-3050.
Maintenance
◗ Always remove razor from the charging stand/
power pod before cleaning appliance.
◗ Unplug the charging stand/power pod after
charging/recharging razor. The charging stand/
power pod and razor may be wiped clean using
a damp cloth.
◗ Water from the tap should be on a warm
setting to clean any washable parts.
Note: DO NOT place or clean any parts of the
charging stand/power pod in a dishwasher.
Page 15

28
ENGLISH
ENGLISH
29
Storage
◗ The razor can be stored in the power pod
supplied. The power pod will provide extra
protection during travel.
◗ The razor can be placed in the charging
stand/power pod for safe storage. Remove the
plug from outlet as soon as the razor is fully
charged.
◗ If storing razor in power pod, be sure to
remove Protective Razor Head Cap from
razor.
◗ If appliance will not be used for an extended
period of time, it is recommended that you
thoroughly clean and air dry the Razor Head
Assembly and trimmer before storing.
◗ Be sure razor is turned off. Remove cord from
outlet and charging stand/power pod before
storing in a safe, dry location where it will not
be crushed, banged, or subject to damage.
◗ Do not wrap cord around razor or charging
stand/power pod when storing.
◗ Store cord in a safe location where it will not
be cut or damaged.
◗ Do not keep charging stand/power pod
permanently plugged into outlet.
◗ Do not place or store charging stand/power
pod where it can fall or be pulled into a tub
or sink, water or other liquid while plugged in.
◗ During storage in the charging stand, always
put the Protective Razor Head Cap on razor
to protect heads.
Assistance
◗ For assistance, call toll free:
1-800-243-3050
or visit our website:
www.philips.com/norelco
◗ Information is available 24 hours a day,
7 days a week.
Page 16

30
TM
®
LISTE D
TM
®
LISTE D
TM
TM
ENGLISH
ENGLISH
31
Accessories
◗ Replacement Razor Head Assembly
Model RQ10 – For maximum razor
performance, replace your Philips Norelco
Razor Head Assembly once a year. Razor Head
Assembly contains 3 cutters & 3 combs that
are not individually removable or replaceable.
◗ Philips Norelco Razor Accessories may be
purchased at a store near you or on our
website www.philips.com/norelco
FULL TWO YEAR WARRANTY
Philips Electronics North America Corporation warrants each new Philips Norelco Product,
Models 1090X/1060X/1059X/1050X (except cutters and combs) against defects in materials
or workmanship for a period of two years from the date of purchase, and agrees to repair or
replace any defective product without charge.
IMPORTANT: This warranty does not cover damage resulting from accident, misuse or abuse,
lack of reasonable care, the affixing of any attachment not provided with the product or loss of
parts or subjecting the product to any but the specified voltage.* Use of unauthorized replacement parts will void this warranty.
PHILIPS ELECTRONICS NORTH AMERICA CORPORATION WILL NOT PAY
FOR WARRANTY SERVICE PERFORMED BY A NON-AUTHORIZED REPAIR
SERVICE AND WILL NOT REIMBURSE THE CONSUMER FOR DAMAGE RESULTING FROM WARRANTY SERVICE PERFORMED BY A NON-AUTHORIZED
REPAIR SERVICE. NO RESPONSIBILITY IS ASSUMED FOR ANY SPECIAL,
INCIDENTAL OR CONSEQUENTIAL DAMAGES.
In order to obtain warranty service, simply go to www.philips.com/norelco or call 1-800-2433050 for assistance. It is suggested that for your protection you return shipments of product
by insured mail, insurance prepaid. Damage occurring during shipment is not covered by this
warranty.
NOTE: No other warranty, written or oral, is authorized by Philips Electronics North America
Corporation.
This warranty gives you specific legal rights, and you may also have other rights which vary from
state to state. Some states do not allow the exclusion or limitation of incidental or consequential damages, so the above exclusion and limitations may not apply to you.
* Read enclosed instructions carefully.
Manufactured for:
Philips Consumer Lifestyle
A Division of Philips Electronics North America Corporation
1600 Summer Street – 5th Floor, Stamford, CT 06905-5125
This symbol on the product’s nameplate means it is
listed by Underwriters’ Laboratories, Inc.
Norelco, Tripleheader, Lift and Cut and are Registered Trademarks of Philips Electronics
North America Corporation.
Arcitec is a Trademark of Philips Electronics North America Corporation.
is a Trademark of Philips Electronics North America Corporation.
PHILIPS is a Registered Trademark of Koninklijke Philips Electronics N.V.
© 2009 Philips Electronics North America Corporation. All Rights Reserved.
 Loading...