

Philips 10000032 User Manual [en, de, es, fr, it]

ITALIANOENGLISHDEUTSCHFRANÇAISESPAÑOLPORTUGUÊSNEDERLAND
Leggere attentamente queste istruzioni d’uso prima di utilizzare
la macchina
OPERATING INSTRUCTIONS
ISTRUZIONI PER L’USO
Read these operating instructions carefully before using the
Bedienungsanleitung ist vor dem ersten Gebrauch der Maschine
BEDIENUNGSANLEITUNG
machine
aufmerksam zu lesen
MODE D’EMPLOI
Lire attentivement ce mode d’emploi avant d’utiliser la machine
Diese Leer atentamente estas instrucciones de uso antes de
Ler atentamente estas instruções de uso antes de utilizar a
INSTRUCCIONES DE USO
utilizar la máquina
INSTRUÇÕES PARA USO
máquina
GEBRUIKSAANWIJZING
Lees deze INSTRUCTIES aandachtig door, alvorens het apparaat
te gebruiken
FOR HOUSEHOLD USE ONLY
Ideas with Passion

2
PRECAUZIONI IMPORTANTI
Durante l’utilizzo di elettrodomestici, è consigliabile prendere alcune precauzioni per
limitare il rischio di incendi, scosse elettriche e/o incidenti.
1 Leggere attentamente tutte le istruzioni ed informazioni riportate in questo
manuale e in qualsiasi altro opuscolo contenuto nell’imballo prima di avviare od
utilizzare la macchina espresso.
2 Non toccare superfici calde.
3 Non immergere cavo, spine o il corpo della macchina in acqua o altro liquido per
evitare incendi, scosse elettriche o incidenti.
4 Fare particolare attenzione durante l’utilizzo della macchina espresso in presenza
di bambini.
5 Togliere la spina dalla presa se la macchina non viene utilizzata o durante la
pulizia. Farla raffreddare prima di inserire o rimuovere pezzi e prima di procedere
alla sua pulizia.
6 Non utilizzare la macchina con cavo o spina danneggiati o in caso di guasti o rotture.
Far controllare o riparare l’apparecchio presso il centro di assistenza più vicino.
7 L’utilizzo di accessori non consigliati dal produttore possono causare danni a cose
e persone.
8 Non utilizzare la macchina espresso all’aperto.
9 Evitare che il cavo penda dal tavolo o che tocchi superfici calde.
10 Tenere la macchina espresso lontano da fonti di calore.
11 Controllare che la macchina espresso sia in posizione “Spento” prima di inserire la
spina nella presa. Per spegnerla, posizionarla su “Spento” e rimuovere quindi la
spina dalla presa.
12 Utilizzare la macchina unicamente per uso domestico.
13 Fare estrema attenzione durante l’utilizzo del vapore.
CONSERVARE QUESTE ISTRUZIONI
AVVERTENZA
La macchina espresso è stata studiata unicamente per uso domestico. Qualsiasi
intrevento di assistenza, fatta eccezione per le operazioni di pulizia e di normale
manutenzione, dovrà essere prestato da un centro di assistenza autorizzato. Non
immergere la macchina in acqua. Qualsiasi riparazione dovrà essere effettuata
unicamente dal centro di assistenza autorizzato.
1 Controllare che il voltaggio indicato sulla targhetta corrisponda al vostro.
2 Non utilizzate mai acqua tiepida o calda per riempire il serbatoio dell’acqua.
Utilizzate unicamente acqua fredda.
3 Non toccate con le mani le parti calde della macchina ed il cavo di alimentazione
durante il funzionamento.
4 Non pulire mai con detersivi corrosivi o utensili che graffiano. É sufficiente un
panno morbido inumidito con acqua.
5 Per evitare la formazione di calcare, si può utilizzare acqua minerale naturale.
ISTRUZIONI SUL CAVO ELETTRICO
A Viene fornito un cavo elettrico abbastanza corto per evitare che si attorcigli o che vi
inciampiate.
B Si possono utilizzare, con molta attenzione, delle prolunghe omologate.
C Qualora venga utilizzata una prolunga, verificare:
1 che il voltaggio riportato sulla prolunga sia perlomeno, uguale al voltaggio
elettrico dell’elettrodomestico;
2 che sia munito di una spina a tre pin con messa a terra (qualora il cavo
dell’elettrodomestico sia di questo tipo);
3 che il cavo non penda dal tavolo per evitare di inciamparvi.
3
GENERALITÀ
La macchina da caffè è indicata per la preparazione di caffè espresso impiegando
caffè in grani ed è dotata di un dispositivo per l’erogazione del vapore e dell’acqua
calda.
Il corpo della macchina, dall’elegante design, è stato progettato per uso domesti
co e non è indicato per un funzionamento continuo di tipo professionale.
Attenzione. Non si assumono responsabilità per eventuali danni in caso di:
• impiego errato e non conforme agli scopi previsti;
• riparazioni non eseguite presso i centri d’assistenza autorizzati;
• manomissione del cavo d’alimentazione;
• manomissione di qualsiasi componente della macchina;
• impiego di pezzi di ricambio ed accessori non originali.
In questi casi viene a decadere la garanzia.
PER FACILITARE LA LETTURA
Il triangolo d’avvertimento indica tutte le istruzioni importanti per la
sicurezza dell’utente. Attenersi scrupolosamente a tali indicazioni
per evitare ferimenti gravi!
IMPIEGO DI QUESTE ISTRUZIONI PER L’USO
Conservare queste istruzioni per l’uso in un luogo sicuro ed allegarle alla macchina per caffè qualora un’altra persona dovesse utilizzarla. Per ulteriori informazioni
o nel caso di problemi, non trattati del tutto o soltanto insufficientemente nelle
presenti istruzioni, rivolgetevi ai Centri di Assistenza Autorizzati.
DATI TECNICI
• Tensione nominale Vedi targhetta posta sull’apparecchio
• Potenza nominale Vedi targhetta posta sull’apparecchio
-
• Materiale corpo Metallo
• Dimensioni (l x a x p) (mm) 285 x 375 x 400
• Peso (Kg) 9
• Lunghezza cavo (mm) 1200
• Pannello comandi Frontale
• Serbatoio acqua (lt.) 2 - Estraibile
• Alimentazione Vedi targhetta posta sull’apparecchio
• Pressione pompa (bar) 15
• Caldaia Acciaio Inox
• Capacità contenitore caffè (gr) 300 di caffè in grani
• Macine In ceramica
• Quantità caffè macinato 8 g
• Rapacità cassetto raccoglifondi 13
• Dispositivi di sicurezza Valvola di sicurezza pressione caldaia
termostato di sicurezza.
Con riserva di modifiche di costruzione ed esecuzione dovute al progresso tec
nologico.
Macchina conforme alla Direttiva Europea 89/336/CEE (Decreto legislativo 476
del 04/12/92), relativa all’eliminazione dei disturbi radiotelevisivi.
ITALIANO
-

4
NORME DI SICUREZZA
IN CASO D’EMERGENZA
Estrarre immediatamente la spina dalla presa di rete.
UTILIZZARE ESCLUSIVAMENTE L’APPARECCHIO
- In luogo chiuso.
- Per la preparazione di caffè, acqua calda, per montare il latte o per riscaldare
bevande utilizzando vapore.
- Per l’impiego domestico.
- Da adulti in condizioni psico-fisiche non alterate.
NON UTILIZZARE MAI L’APPARECCHIO
per scopi diversi da quelli sopra indicati, al fine di evitare pericoli.
Non introdurre nei contenitori sostanze diverse da quelle indicate nel manuale
istruzioni.
Durante il normale riempimento di ogni contenitore, è obbligatorio chiudere tutti i
contenitori vicini.
Riempire il serbatoio acqua soltanto con acqua fresca potabile: acqua calda e/o
altri liquidi possono danneggiare la macchina.
Non utilizzare acqua addizionata con anidride carbonica. La regolazione del maci
nacaffè deve essere eseguita solo quando quest’ultimo è in funzione.
Nel macinacaffè è vietato introdurre le dita e qualsiasi materiale che non sia caffè
in grani. Prima di intervenire all’interno del macinacaffè disinserire la macchina
con l’interruttore generale e togliere la spina dalla presa di corrente.
ALLACCIAMENTO ALLA RETE
Allacciare la macchina per caffè soltanto ad una presa di corrente adeguata. La
tensione deve corrispondere a quella indicata sulla targhetta posta sull’apparec
chio.
INSTALLAZIONE
- Scegliere un piano d’appoggio ben livellato. Non collocare su superfici incandescenti!
- Porre a 10 cm di distanza da pareti e piastre di cottura.
- Non tenere a temperature inferiori a 0 °C, pericolo di danni da congelamento.
- La presa di corrente deve essere raggiungibile in ogni momento.
- Il cavo di alimentazione non deve essere danneggiato, legato con morsetti,
posto su superfici incandescenti, ecc.
- Non lasciar pendere il cavo d’alimentazione. (Att.: Pericolo d’inciampare o di far
cadere l’apparecchio a terra.)
- Non portare o tirare la macchina per caffè tenendola per il cavo d’alimentazione.
PERICOLI
- L’apparecchio non deve essere utilizzato da bambini e persone non informate
circa il suo funzionamento.
- L’apparecchio è pericoloso per i bambini. Se incustodito, disattivarlo.
- Non lasciare i materiali utilizzati per imballare la macchina alla portata dei bambini.
- Non dirigere contro se stessi e/o altri il getto di vapore surriscaldato e/o d’acqua
calda: pericolo di scottature.
- Non inserire oggetti attraverso le aperture dell’apparecchio (Pericolo! Corrente
elettrica!).
- Non toccare la spina con le mani e piedi bagnati non estrarre dalla presa tirando
il cavo.
- Attenzione pericolo di ustioni al contatto con l’acqua calda, il vapore e il beccuc
cio per l’acqua calda/il vapore.
GUASTI
- Non utilizzare l’apparecchio in caso di guasto accertato o sospetto, ad es. dopo
una caduta.
- Eventuali riparazioni devono essere effettuate dal servizio assistenza autorizzato.
-
- Non utilizzare un apparecchio con cavo di alimentazione difettoso. Se il cavo
d’alimentazione è danneggiato, deve essere cambiato dal produttore o dal suo
servizio assistenza clienti. (Pericolo! Corrente elettrica!).
- Spegnere l’apparecchio prima di aprire lo sportello di servizio. Pericolo di ustioni!
PULIZIA / DECALCIFICAZIONE
- Prima della pulizia, estrarre la spina di rete e lasciare raffreddare l‘apparecchio.
-
- Impedire che l’apparecchio venga a contatto con schizzi d’acqua o immerso in
acqua.
- Non asciugare le parti della macchina in forni convenzionali e/o a microonde.
PARTI DI RICAMBIO
Per ragioni di sicurezza, utilizzare solo parti di ricambio e accessori originali.
SMALTIMENTO
- L’imballaggio può essere riciclato.
- Apparecchio: Estrarre la spina di rete, recidere il cavo di allacciamento dell’ap
parecchio.
- Consegnare l’apparecchio e il cavo di allacciamento al servizio di assistenza o
al centro di smaltimento pubblico.
-
-
5
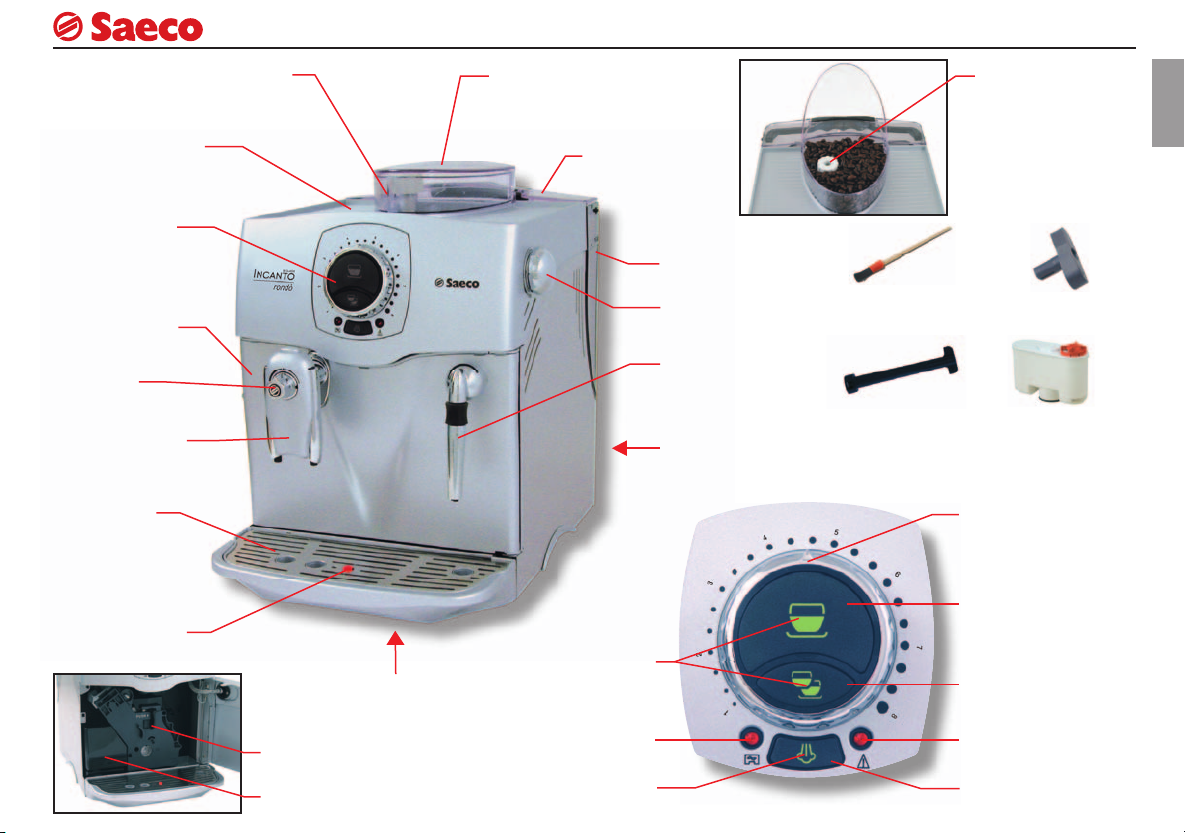
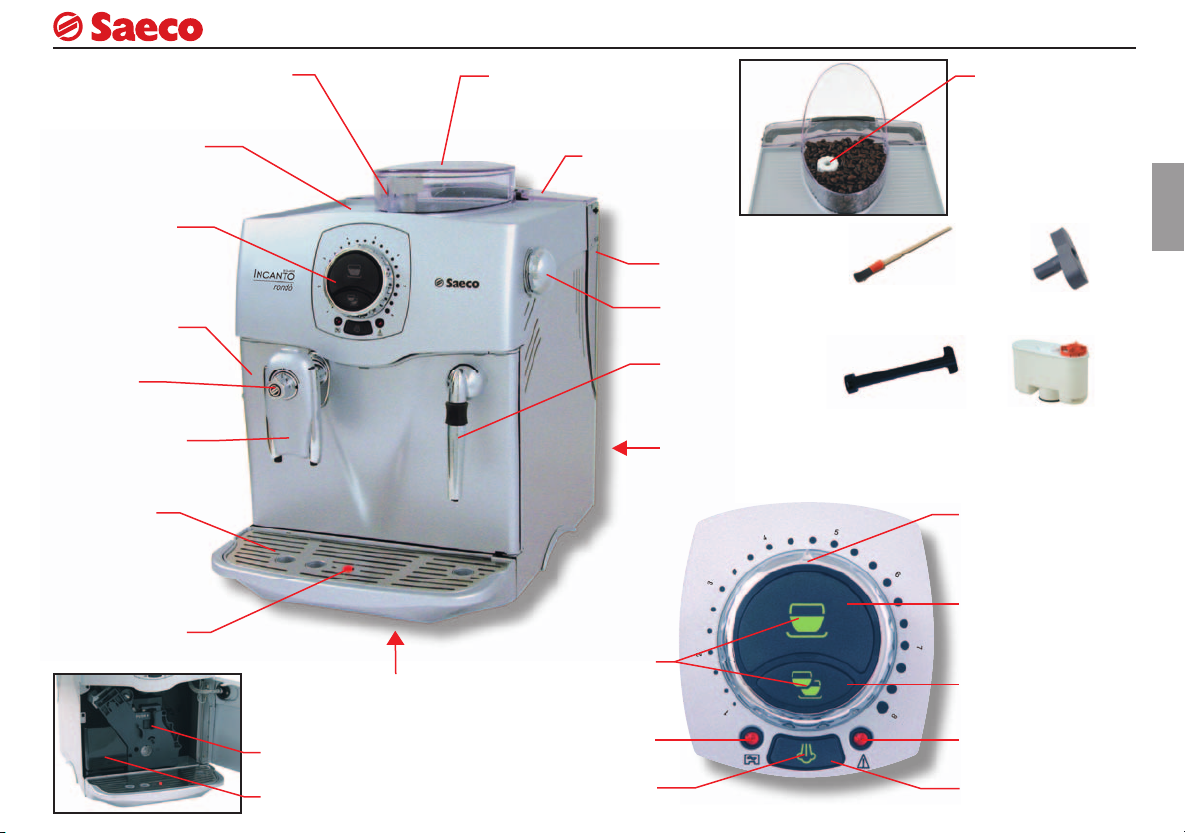
Contenitore caffè in grani
Piastra appoggia tazze
Pannello comandi
Sportello di servizio
SBS
Erogatore caffè
regolabile in altezza
e profondità
Vasca raccogli
gocce + griglia
Indicatore vaschetta
piena
Base girevole
Coperchio contenitore caffè in grani
Coperchio serbatoio
acqua
Serbatoio acqua
Pomello rubinetto
erogazione vapore
Tubo acqua
calda/vapore
Interruttore generale
(ON/OFF)
Spie pronto
temperatura caffè
Pennello per
la pulizia
Applicatore fi ltro
a cartuccia
Pomello regolazione
macinatura
ITALIANO
Chiave gruppo caffè
Filtro a cartuccia
“Aqua Prima”
Pomello regolazione quantità di caffè in tazza
Pulsante erogazione singolo caffè
Pulsante erogazione due
caffè
Gruppo erogatore
caffè
Cassetto raccogli fondi
Spia sostituzione fi ltro
“Aqua Prima” Vedi pag.13
Spia funzione vapore
Spia allarmi
Pulsante selezione vapore
Reset allarme fi ltro “Aqua
Prima”

6
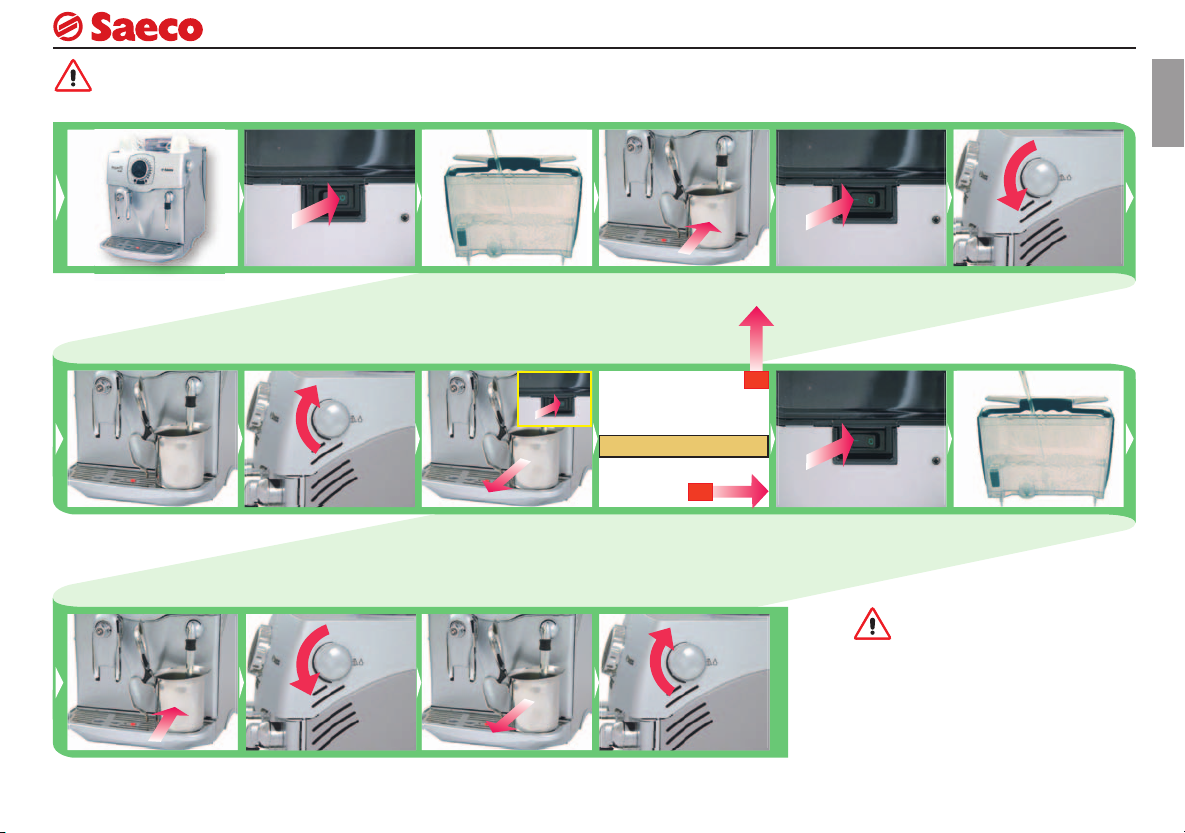
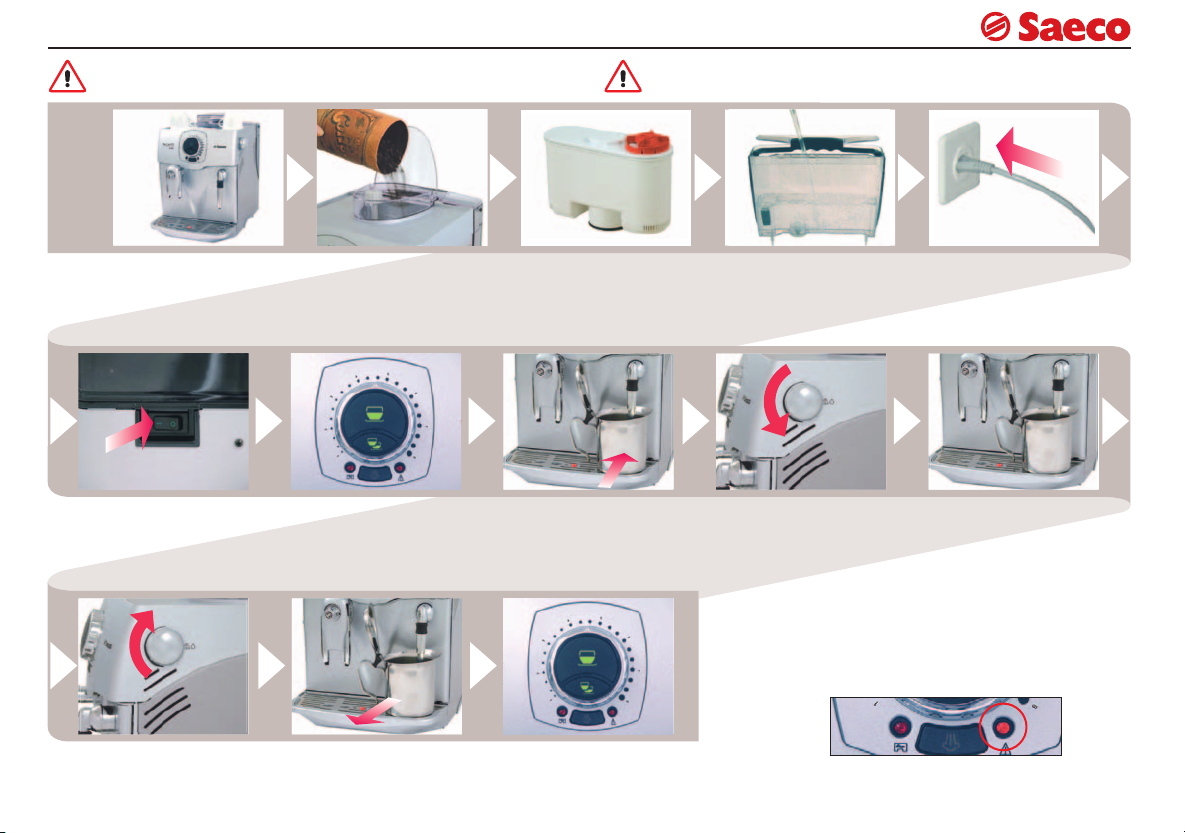
INSTALLAZIONE / CARICAMENTO CIRCUITO
A pag.14 sono riportati i messaggi che la macchina fornisce all’utente
durante il funzionamento.
Verifi care che tutti i componenti siano posizionati
correttamente.
Premere l’interruttore sulla
posizione “I” per accendere la macchina.
Riempire il contenitore con
caffè in grani.
La macchina si sta
riscaldando; le spie lampeggiano.
Si può installare il fi ltro
“Aqua Prima” (vedi pag.13).
Inserire un contenitore
sotto al tubo vapore .
Avvertenze importanti per l’utilizzo del fi ltro “Aqua prima” sono riportate
a pag.14.
Vedi targhetta dati
Riempire il serbatoio con
acqua fresca potabile.
Aprire il rubinetto per
iniziare il caricamento del
circuito.
Nota: Prima di procedere alla prima messa in funzione, in caso di prolungata inattività, se il serbatoio
acqua è stato vuotato completamente è obbligatorio
caricare il circuito della macchina.
va caricato ogni qual volta la spia rimane accesa in
modo fi sso:
Inserire la spina in una presa di corrente adeguata.
Attendere che dall’ugello
fuoriesca acqua in modo
regolare.
Inoltre il circuito
Chiudere il rubinetto per
terminare il caricamento
del circuito.
Togliere il contenitore.
Quando le spie si accendono
in modo fi sso, la macchina è
pronta per l’uso.
Verifi care il datario sul fi ltro “Aqua Prima”; se il fi ltro
è scaduto sostituirlo con uno nuovo.
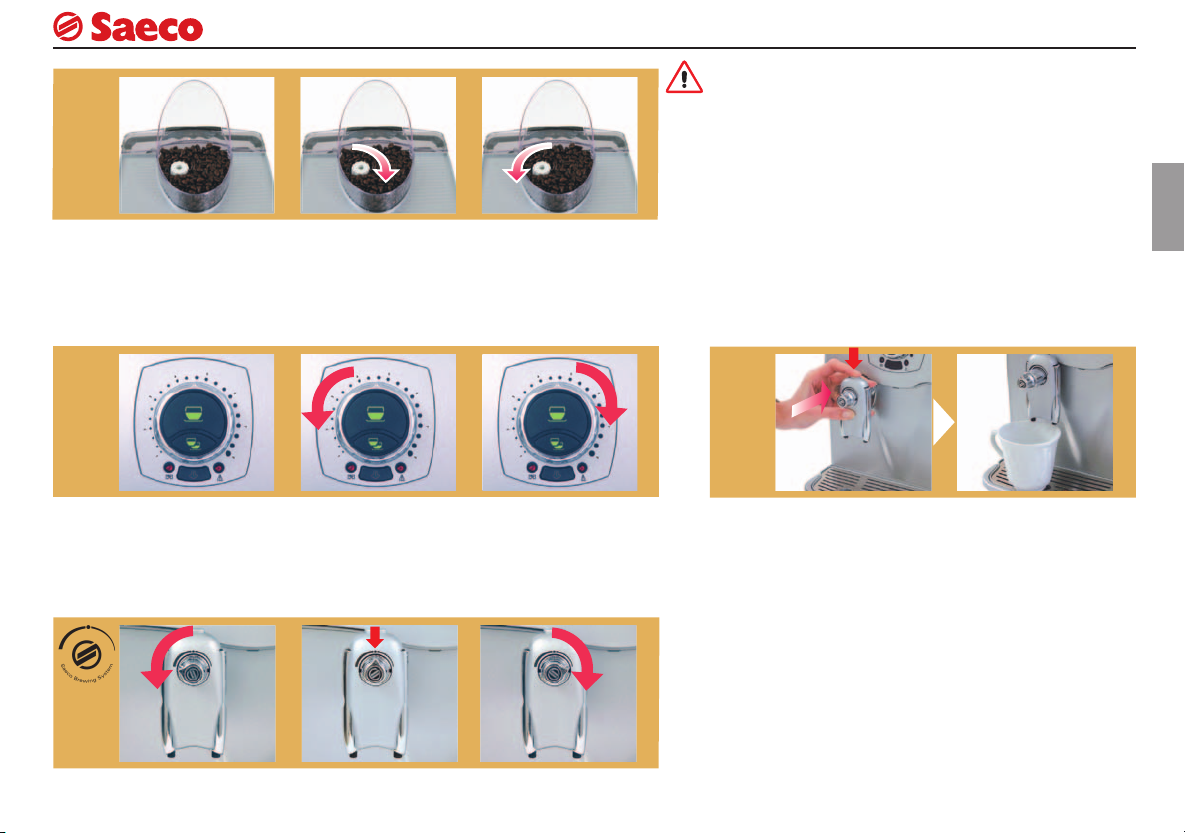
REGOLAZIONI
La regolazione deve essere eseguita solo quando il macinacaffè
è in funzione.
7
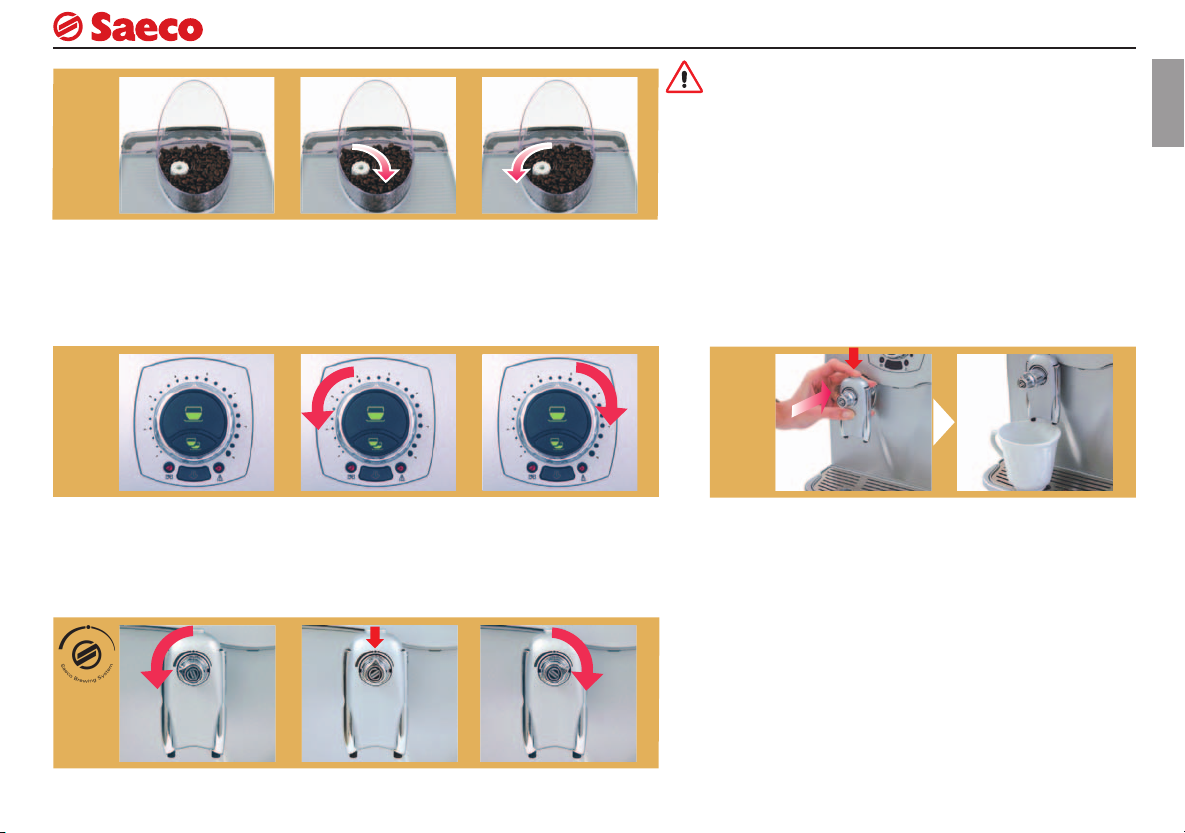
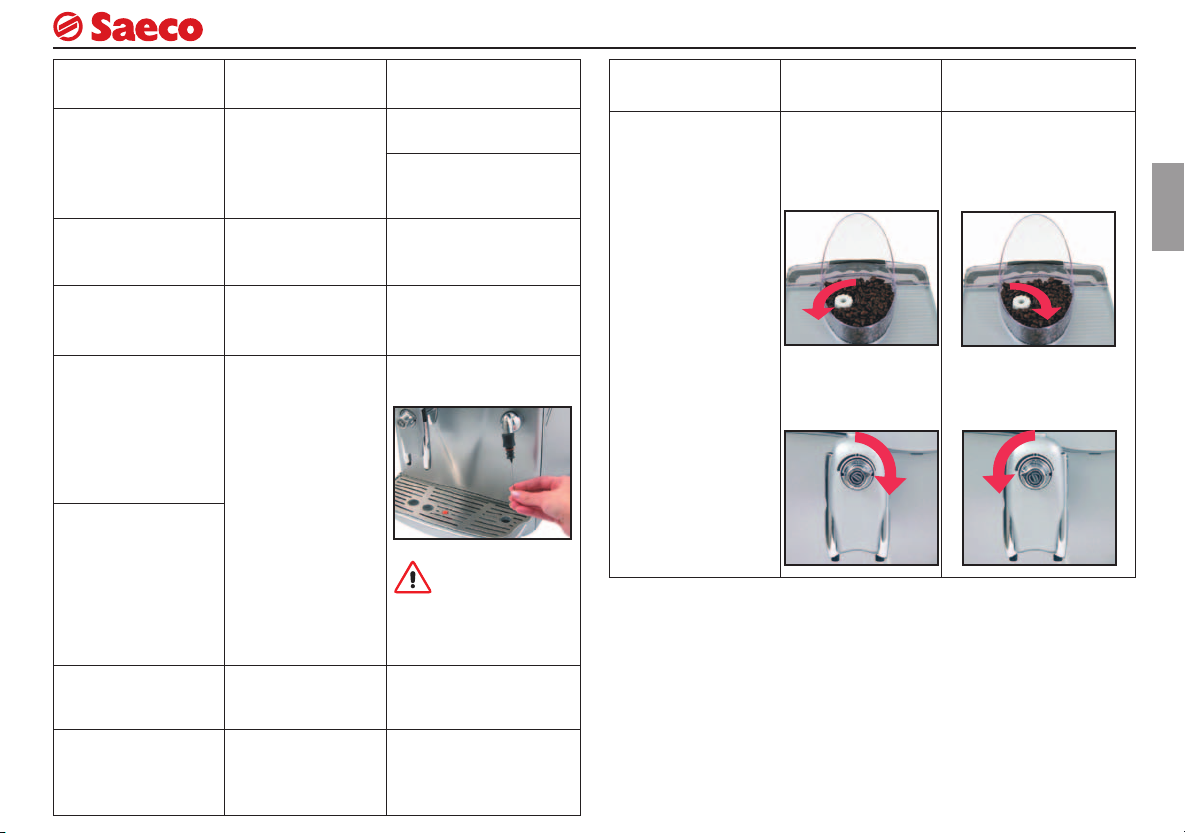
MACINATURA
REGOLAZIONE
Il grado di macinatura può essere
regolato con il pomello.
CAFFÈ IN TAZZA - La regolazione deve essere eseguita prima di erogare il caffè.
Questa regolazione ha un effetto immediato sull’erogazione selezionata.
Il caffè esce troppo lentamente. Premere e ruotare.
Il caffè esce troppo velocemente. Premere e ruotare.
CAFFÈ IN TAZZA
Per adattare la quantità di caffè erogato alle dimensioni delle tazze.
Solo per macchine provviste di SBS - Per regolare la corposità del caffè erogato. La regolazione
può essere eseguita anche durante l’erogazione del caffè. Questa regolazione ha un effetto immediato sull’erogazione selezionata.
Caffè corto.
Caffè lungo.
Usare miscele di caffè in grani per macchine espresso. Se non si ottiene il
risultato desiderato utilizzare miscele di caffè differenti. Conservare il caffè
al fresco, in un contenitore chiuso ermeticamente.
La variazione si ottiene dopo aver erogato 1 - 2 caffè.
Se regolate la macinatura su un valore troppo fi ne (pomello completamente in senso antiorario) e la manopola SBS sulla posizione “ristretto” (verso
destra), l’erogazione del caffè può risultare troppo scarsa o assente.
TAZZE GRANDI
Per riposizionare l’erogatore, tirarlo fi no al suo incastro.
TAZZE GRANDI
Per utilizzare tazze di grandi dimensioni, premere il
pulsante e spingere fi no a battuta l’erogatore.
ITALIANO
SBS
Caffè espresso. Caffè ristretto.Caffè Creme.

8
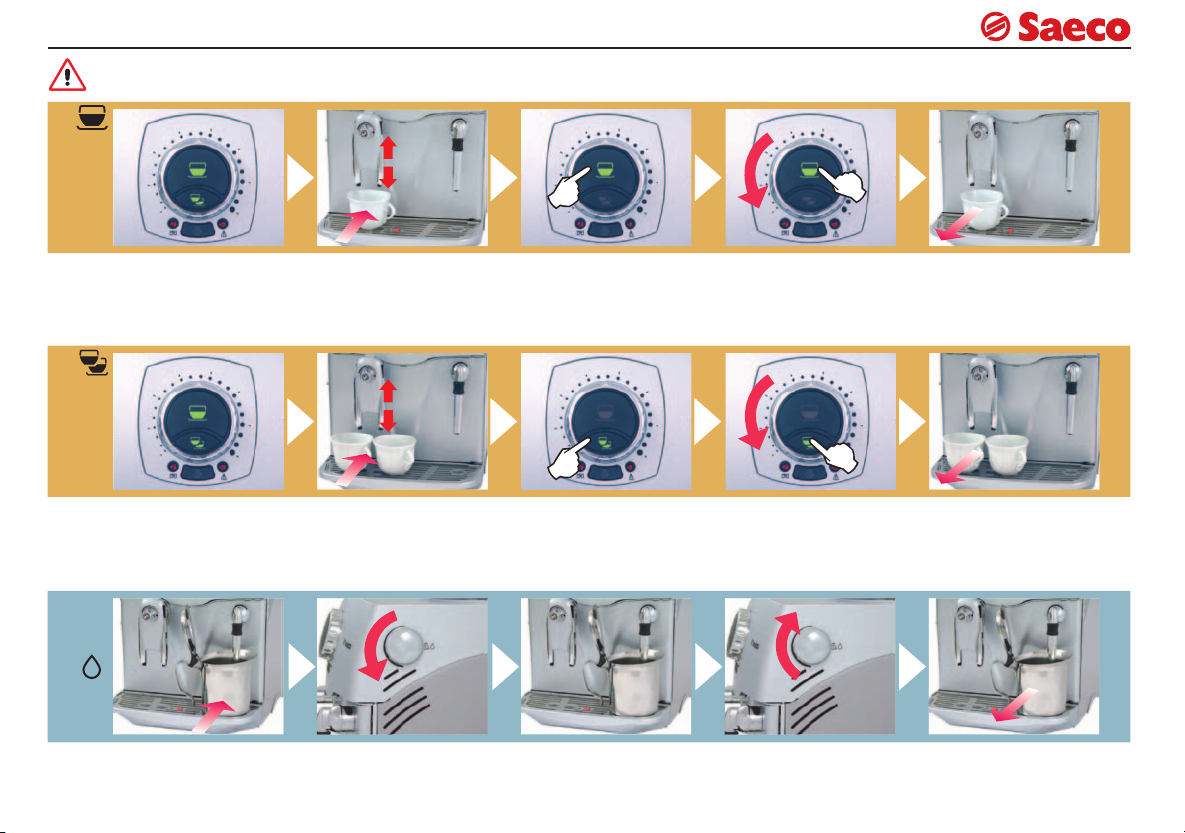
EROGAZIONE CAFFÈ - ACQUA CALDA
Attenzione: acqua calda e vapore possono provocare ustioni! Dirigere il tubo vapore sulla vasca raccogli gocce.
1 CAFFÈ
CAFFÈ IN GRANI
Verifi care che la macchina
sia pronta.
Posizionare la tazza da
caffè calda sotto l’erogatore.
2 CAFFÈ
CAFFÈ IN GRANI
Verifi care che la macchina
sia pronta.
Posizionare le tazze da caffè calde sotto l’erogatore.
Premere il tasto per erogare 1 caffè.
Premere il tasto per erogare 2 caffè.
Per interrompere prima l’erogazione premere il tasto o
ruotare la ghiera.
Per interrompere prima l’erogazione premere il tasto o
ruotare la ghiera. Se si interrompe l’erogazione del 1° caffè, il 2° non sarà erogato.
Quando la macchina termina la preparazione, prelevare la tazza.
Quando la macchina termina
la preparazione, prelevare le
tazze.
ACQUA CALDA
sotto al tubo vapore.
Aprire il rubinetto per iniziare l’erogare dell’acqua.
Attendere. Prelevare il contenitore.Posizionare un contenitore
Quando è stata raggiunta la
quantità desiderata chiudere
il rubinetto.
Attenzione: acqua calda e vapore possono provocare ustioni! Dirigere il tubo vapore sulla vasca raccogli gocce.
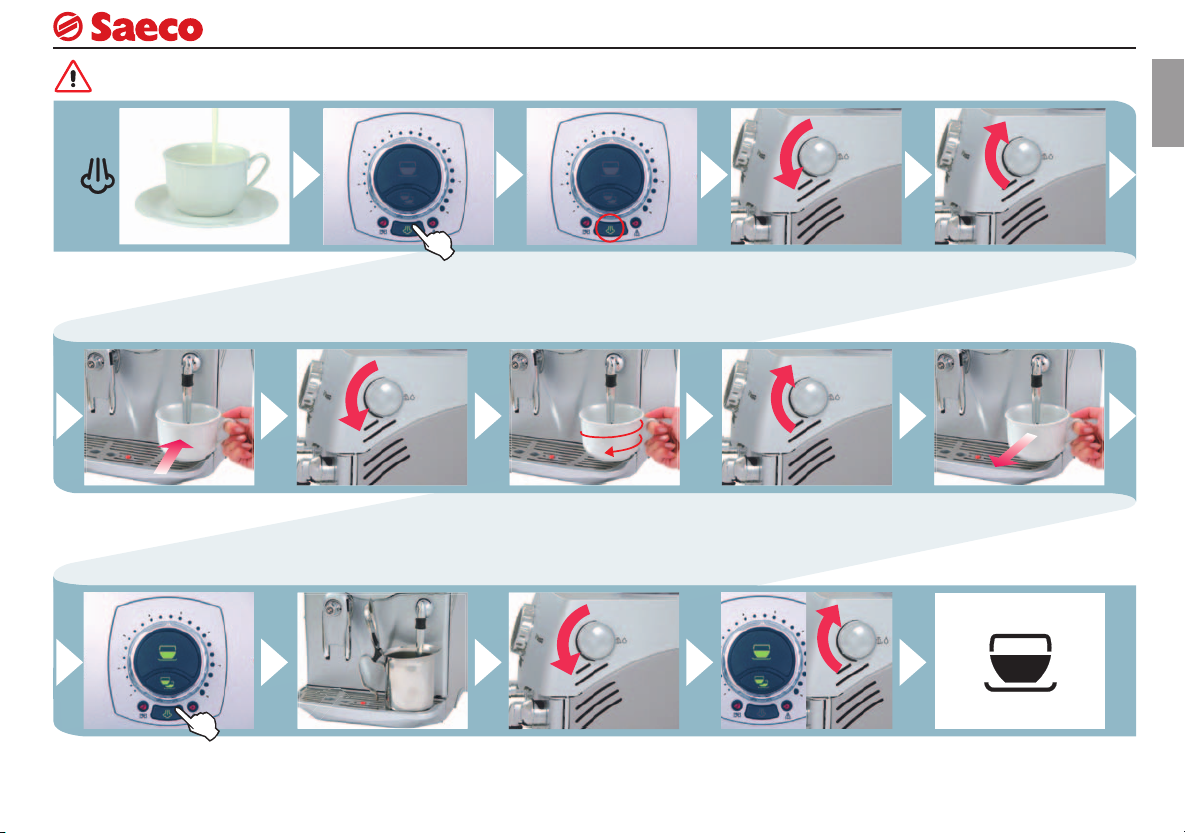
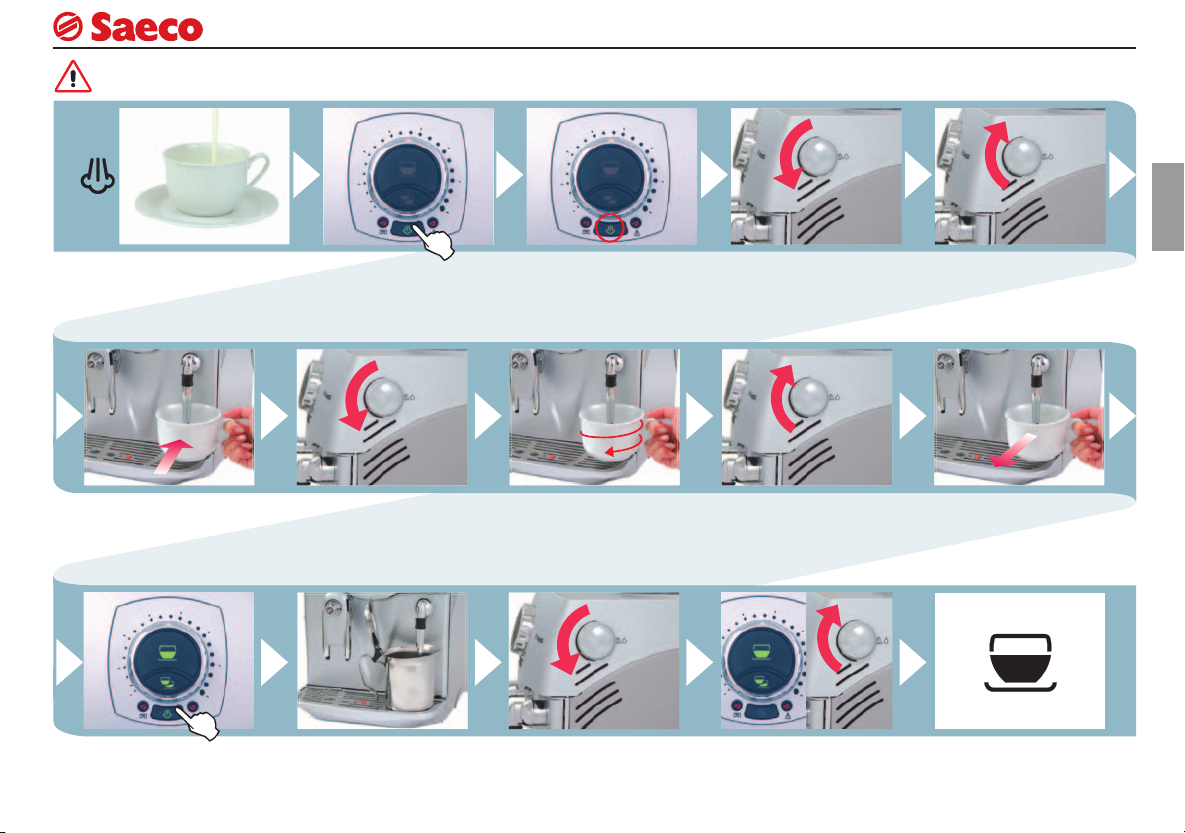
CAPPUCCINO
CAPPUCCINO
9
ITALIANO
Riempire la tazza con 1/3
di latte freddo.
Posizionare la tazza con il
latte sotto al tubo vapore.
Premere il pulsante per ripristinare il normale funzionamento.
Le spie lampeggiano.
Premere il pulsante per
selezionare la funzione.
La spia lampeggia.
Aprire il rubinetto per erogare vapore.
Posizionare un contenitore
sotto al tubo vapore.
Quando la spia si accende
in modo fi sso, la macchina
è pronta per l’erogazione
del vapore.
Muovere con movimenti
circolari la tazza per uniformare il riscaldamento.
Aprire il rubinetto ed erogare acqua.
Aprire il rubinetto per scaricare l’acqua residua.
Finito di montare il latte,
chiudere il rubinetto.
Quando le spie sono accese
in modo fi sso, chiudere il rubinetto e rimuovere il contenitore.
Quando esce solo vapore
chiudere il rubinetto.
Prelevare la tazza.
Erogare il caffè nella tazza
per ottenere un ottimo
cappuccino.

10
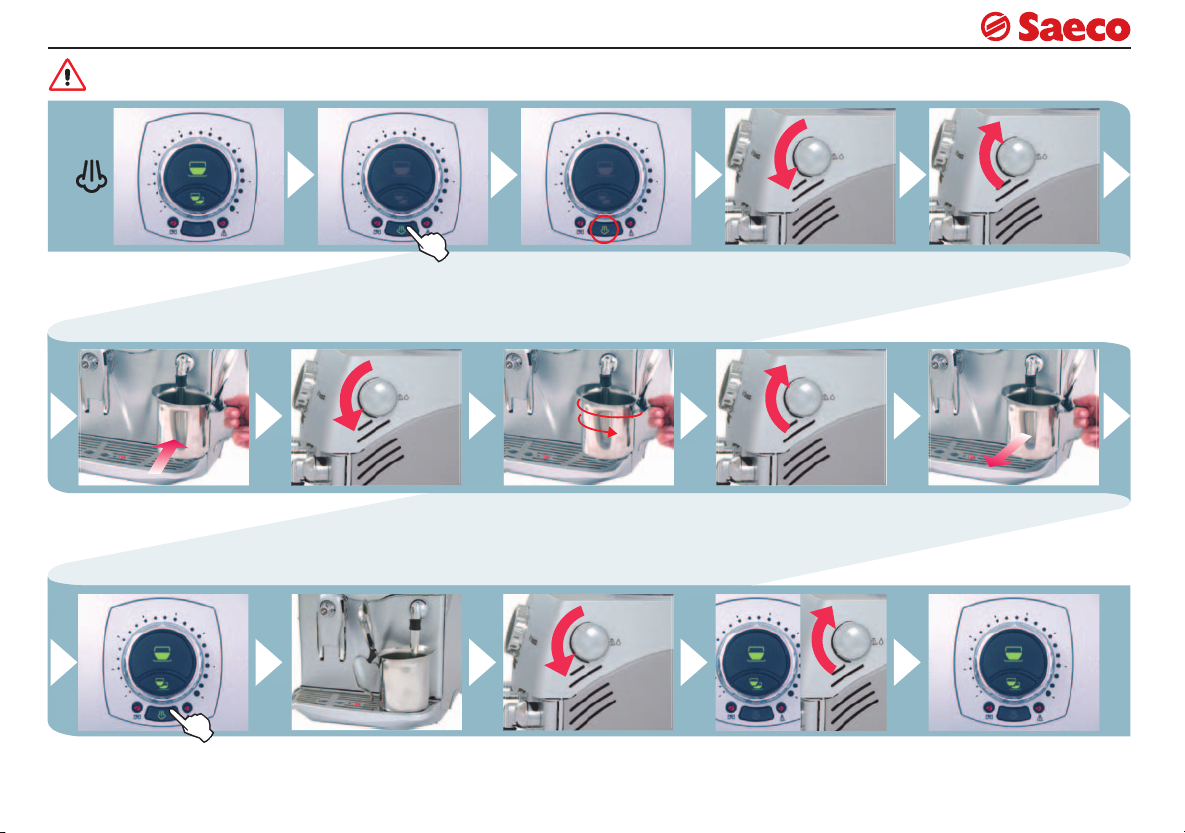
VAPORE
Attenzione: acqua calda e vapore possono provocare ustioni! Dirigere il tubo vapore sulla vasca raccogli gocce.
VAPORE
Controllare lo stato della
macchina.
Prelevare il contenitore e
posizionarlo sotto il tubo
acqua calda/vapore
Premere il pulsante per ripristinare il normale funzionamento.
Le spie lampeggiano.
Premere il pulsante per
selezionare la funzione.
La spia lampeggia.
Aprire il rubinetto per erogare vapore.
Posizionare un contenitore
sotto al tubo vapore.
Quando la spia si accende
in modo fi sso, la macchina
è pronta per l’erogazione
del vapore.
Muovere con movimenti
circolari il contenitore per uniformare il riscaldamento.
Aprire il rubinetto ed erogare acqua.
Aprire il rubinetto per scaricare l’acqua residua.
Finita la preparazione,
chiudere il rubinetto.
Quando le spie sono accese in modo fi sso, chiudere
il rubinetto e rimuovere il
contenitore.
Quando esce solo vapore
chiudere il rubinetto.
Prelevare il contenitore.
La macchina è pronta per
erogare caffè o acqua
calda.
DECALCIFICAZIONE
11
Attenzione! Non utilizzare in nessun caso l’aceto come decalcifi cante.
Si può utilizzare un prodotto decalcifi cante per macchine da caffè di tipo non
tossico e/o nocivo, comunemente reperibile in commercio.
Dopo 2 mesi d’utilizzo decalcifi care la macchina.
Rimuovere il fi ltro, vedi
pag.13.
Erogare la soluzione decalcifi cante nel recipiente.
Spegnere la macchina. Mettere un recipiente gran-
Dopo circa 30 secondi
chiudere il rubinetto.
Riempire il serbatoio con la
soluzione decalcifi cante.
Spegnere la macchina e
rimuovere il recipiente.
Si raccomanda il decalcifi cante Saeco. La decalcifi cazione è necessaria ogni 2 mesi; nel
caso l’acqua sia molto dura decalcifi care la macchina con maggiore frequenza. La macchina deve essere accesa e gestisce automaticamente la distribuzione del decalcifi cante
de sotto il tubo vapore.
Se nel serbatoio
Accendere la macchina.
A
Aprire il rubinetto.
Inizia il processo di decalcifi cazione.
c’è della soluzione
decalcifi cante.
Verifi ca
Se il serbatoio è
vuoto
Dopo 10 minuti seguire
il percorso (A) o (B).
B
Accendere la macchina.
al risciaquo della vasca dell’acqua e dei
circuiti interni della macchina. Percorso
di tipo “B”.
Sciacquare e riempire il
serbatoio con acqua fresca
potabile.
Se il ciclo di decalcifi cazione
viene interrotto si deve procedere
ITALIANO
Mettere un recipiente grande sotto il tubo vapore.
Aprire il rubinetto ed eseguire il risciacquo.
Se il recipiente si riempe,
vuotarlo.
Quando l’acqua è fi nita,
chiudere il rubinetto. Rimuovere il contenitore.
Dopo aver eseguito la decalcifi cazione ricaricare il circuito della macchina. Reinserire
il fi ltro a cartuccia nel serbatoio acqua.
12
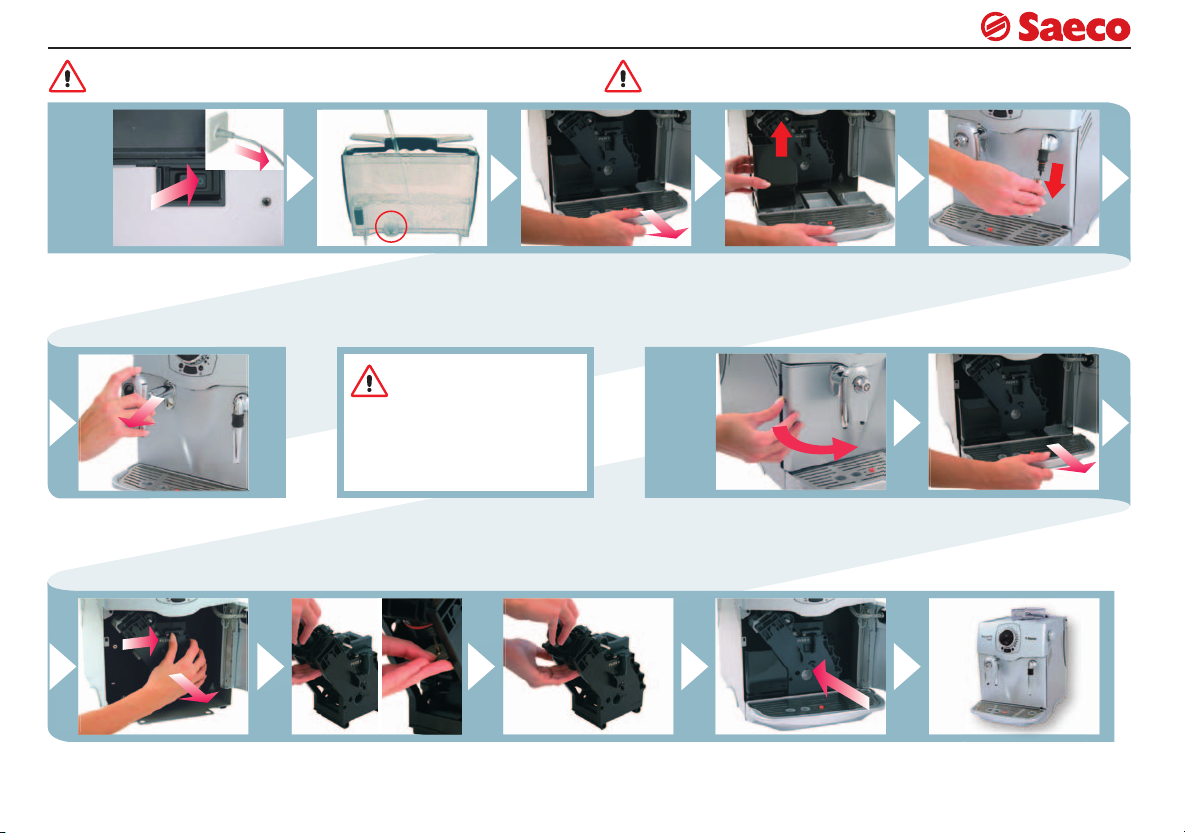
PULIZIA E MANUTENZIONE
Non asciugare la macchina e/o i suoi componenti utilizzando un forno a
microonde e/o un forno convenzionale.
PULIZIA
GENERICA
Spegnere la macchina.
Scollegare la spina.
Smontare l’erogatore e
lavarlo con acqua.
Lavare il serbatoio.
Lavare il fi ltro che si trova
all’interno.
La pulizia della macchina, dei
suoi componenti e del gruppo erogatore deve essere eseguita
almeno una volta alla settimana.
Non immergere la macchina nell’acqua e non inserire i componenti nella
lavastoviglie.
Estrarre la vasca raccogli
gocce, svuotarla e lavarla.
GRUPPO
Estrarre e vuotare il cassetto raccogli fondi e lavarlo.
Estrarre e pulire il pannarello.
EROGATORE
Aprire lo sportello frontale. Rimuovere il cassetto
raccogli gocce e il cassetto
raccogli fondi.
Premere sul tasto PUSH
per estrarre il gruppo.
Svitare, con l’apposita
chiave, il fi ltro superiore e
lavarlo.
Rimontare il fi ltro pulito.
Lavare il gruppo, asciugarlo e rimontarlo. Non
premere sul tasto “PUSH”.
Riposizionare tutti i componenti nella macchina.
Chiudere lo sportello.
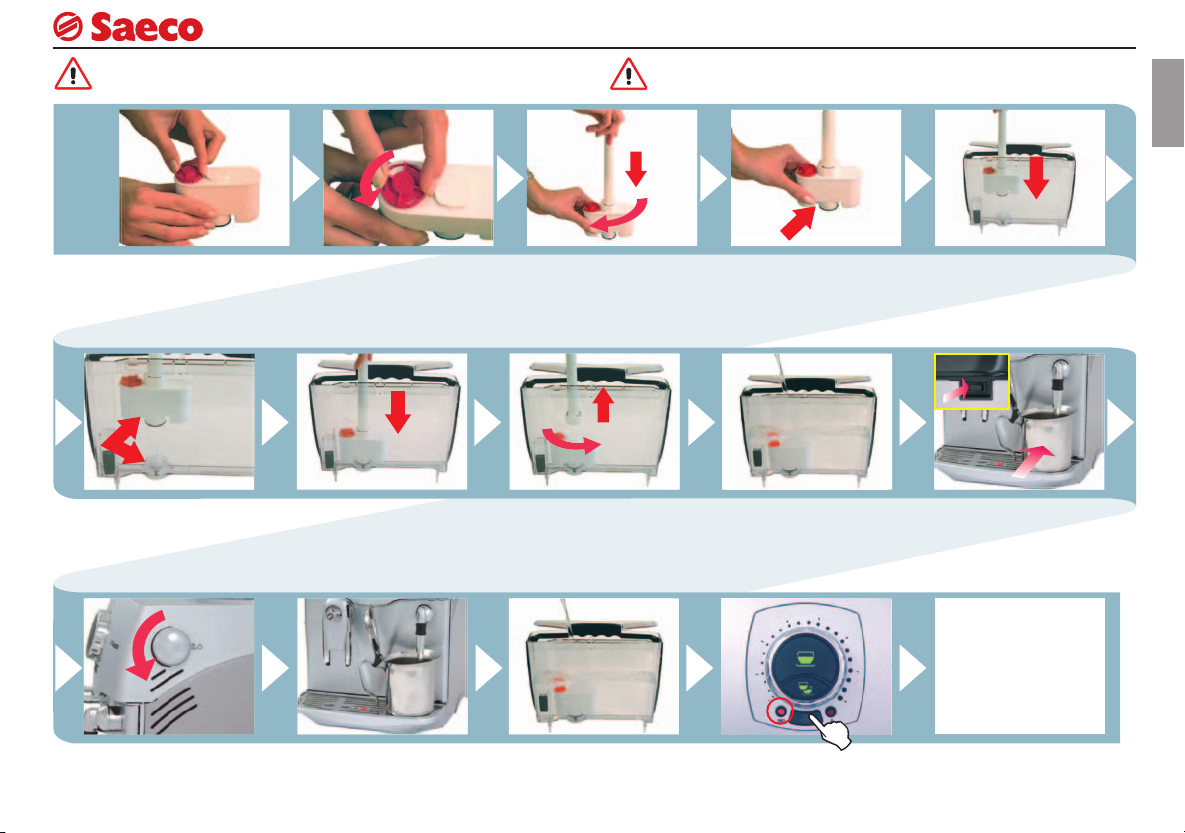
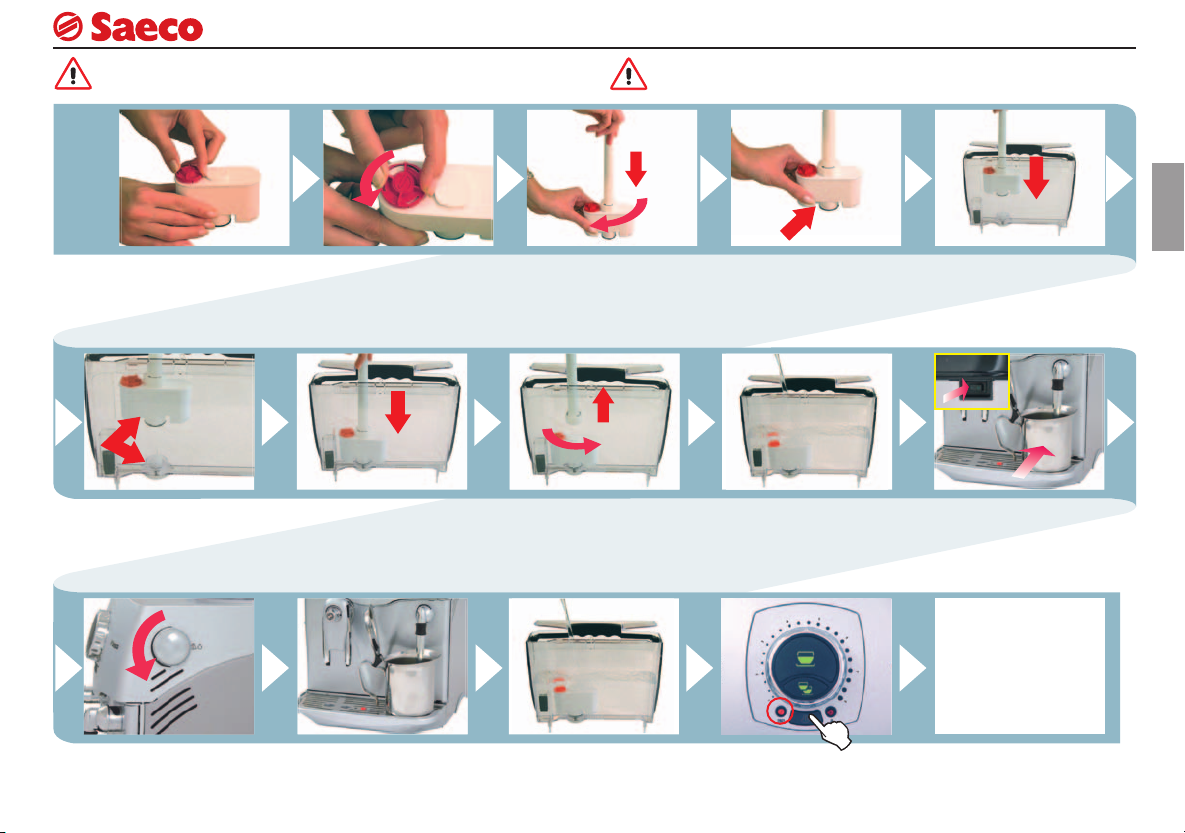
FILTRO A CARTUCCIA “AQUA PRIMA”
13
Il fi ltro deve essere sostituito quando viene segnalato dalla macchina
vedi pagina 14.
INSTALLAZIONE
Prelevare il fi ltro dall’imballo
Il riferimento deve essere
posizionato in corrispondenza della scanalatura.
Regolare il datario sul
mese corrente.
Premere fi no in fondo. Ruotare l’applicatore in
Inserire e ruotare l’applicatore in senso orario per
fi ssarlo al fi ltro.
senso antiorario ed estrarlo dal serbatoio.
Prima d’eseguire la decalcifi cazione il fi ltro deve essere rimosso dal
serbatoio.
Verifi care dove si trova la
tacca di riferimento e posizionamento del fi ltro.
Riempire il serbatoio con
acqua fresca potabile.
Inserire il fi ltro nel serbatoio vuoto.
Posizionare un contenitore
sotto al tubo vapore e accendere la macchina.
È possibile utilizzare la
macchina senza fi ltro,
Saeco ne consiglia l’utilizzo. Nel caso non venga utilizzato il fi ltro decalcifi care
la macchina con maggiore
frequenza.
ITALIANO
Aprire il rubinetto ed erogare acqua.
Vuotare ad intervalli l’intero
contenuto del serbatoio
dell’acqua.
Quando il serbatoio è vuoto
riempirlo nuovamente con
acqua fresca potabile.
Premere il pulsante. Quando la spia lampeggia rilasciare il pulsante.
Adesso potete utilizzare la
vostra macchina da caffè.
14
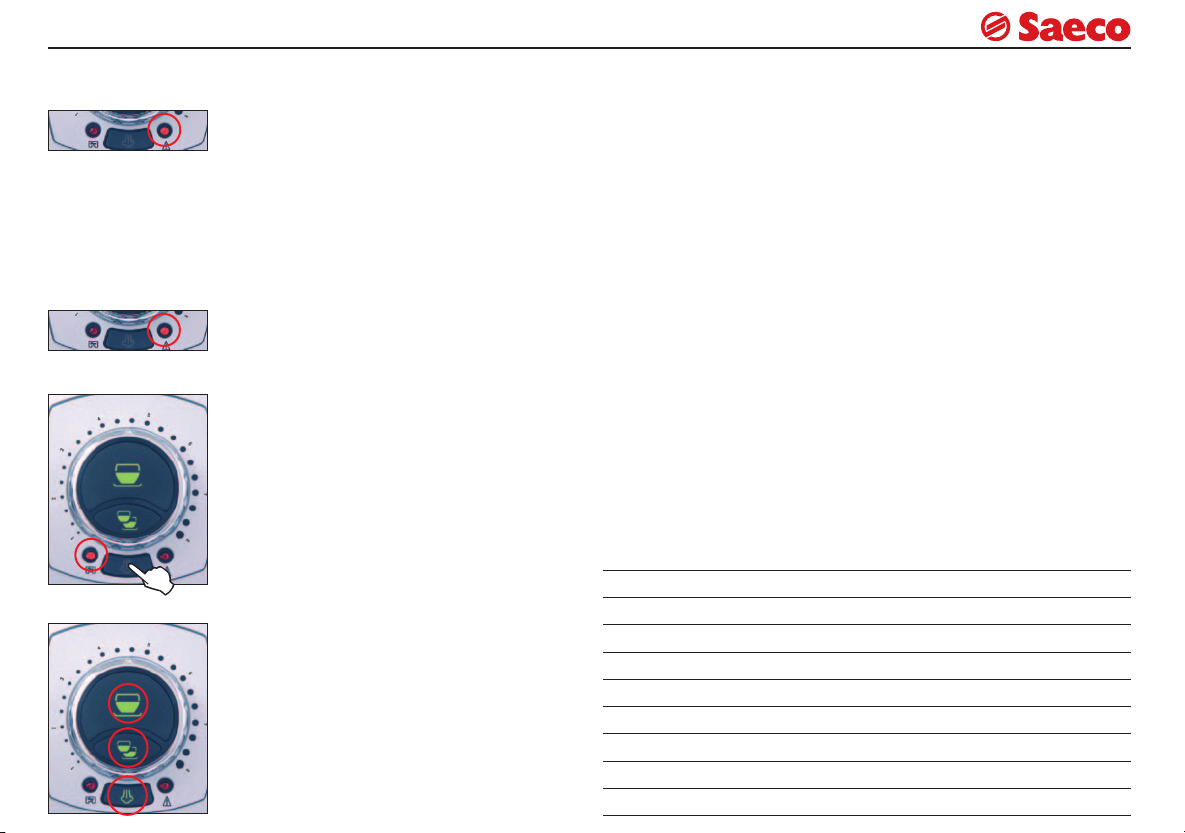
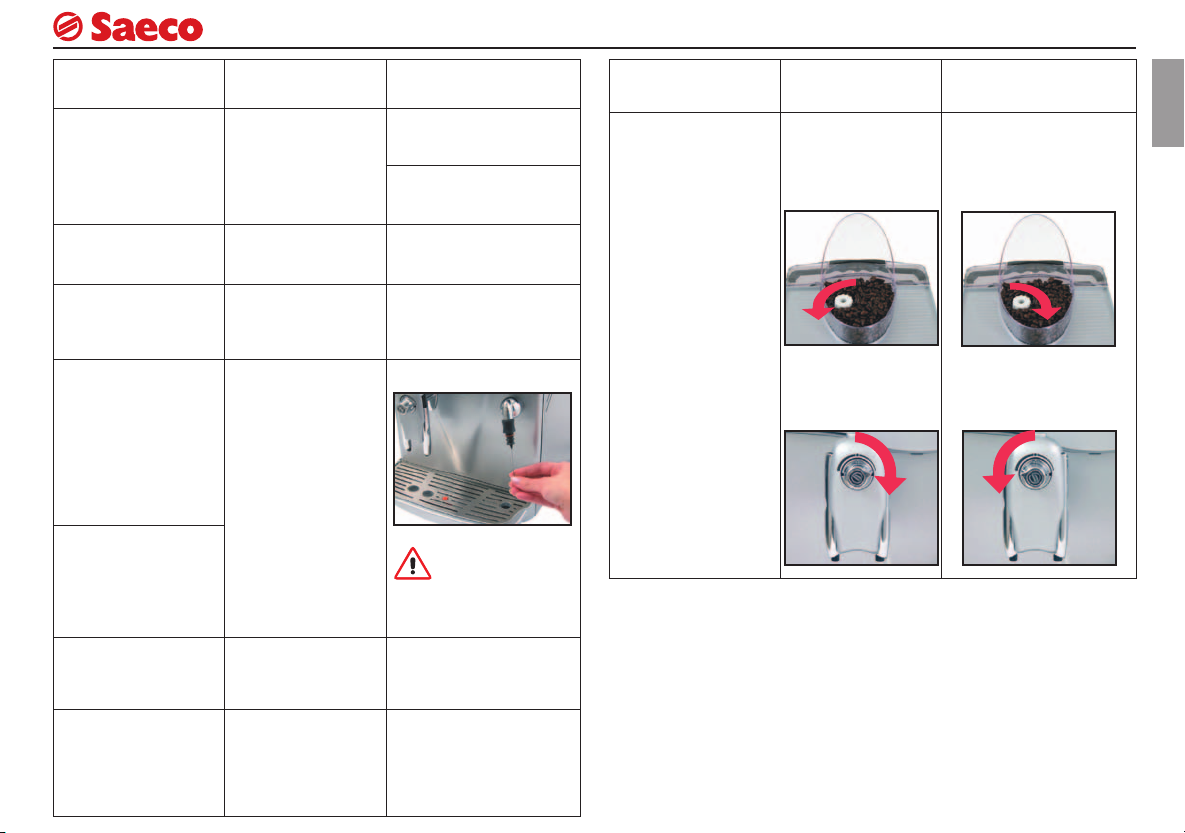
SEGNALAZIONI PANNELLO COMANDI - NOTE FILTRO AQUA PRIMA
Tramite il pannello comandi, la macchina guida l’utente al suo corretto utilizzo.
Riempire il contenitore caffè in grani con caffè
Fisso
Nota importante: il cassetto raccogli fondi deve essere vuotato solo quando la
macchina è accesa. Il cassetto deve essere estratto per almeno 5 secondi. Lo
svuotamento del cassetto a macchina spenta non permette l’erogazione del
caffè alla riaccensione della stessa.
Lampeggiante
Lampeggiante
in grani e riavviare il ciclo d’erogazione caffè.
Riempire il serbatoio dell’acqua con acqua
fresca potabile e caricare il circuito.
Caricare il circuito.
Vuotare cassetto raccogli fondi.
Inserire correttamente il gruppo erogatore.
Inserire correttamente la vasca raccogli goc-
ce ed il cassetto raccogli fondi .
Chiudere lo sportello anteriore.
Sostituire il filtro acqua presente nel ser
batoio.
Dopo aver sostituito il filtro nel serbatoio,
azzerare l’allarme premendo per 5 secondi il
pulsante fino allo spegnimento del led.
INFORMAZIONI AGGIUNTIVE PER IL CORRETTO UTILIZZO DEL FILTRO
“AQUA PRIMA”
Per utilizzare correttamente il filtro “Aqua prima” vi elenchiamo alcune avvertenze
da prendere in considerazione:
1. Conservare il filtro “Aqua prima” in un ambiente fresco al riparo dal sole; la
temperatura dell’ambiente deve essere compresa tra +5°C e +40°C;
2. Utilizzare il filtro in ambienti la cui temperatura non superi i 60°C.
3. Consigliamo di lavare il filtro “Aqua prima” dopo 3 giorni d’inutilizzo della macchina da caffè;
4. È necessario sostituire il filtro dopo 20 giorni d’inutilizzo della macchina da
caffè;
5. Nel caso si voglia conservare un filtro già aperto, chiuderlo ermeticamente in
un sacchetto di nylon e riporlo nel frigorifero; è vietato conservarlo nel freezer
in quanto si alterano le proprietà del filtro.
6. Prima d’utilizzare il filtro lasciarlo immerso nel serbatoio dell’acqua per 30
minuti.
7. Non conservare il filtro all’aperto una volta estratto dalla confezione.
-
8. Il filtro deve essere sostituito dopo 90 giorni dall’apertura dell’imballo o dopo
aver trattato 60 litri di acqua potabile.
Lampeggiante
Temperatura caldaia troppo alta, caricare il
circuito. Erogare acqua.
PROBLEMI - CAUSE - RIMEDI
15
PROBLEMI CAUSE RIMEDI
La macchina non si accende.
Il caffè non è abbastanza
caldo.
La macchina non eroga
caffè.
Nessuna erogazione di
acqua calda o vapore.
La macchina emette un
rumore dal tubo vapore.
La macchina impiega molto tempo per scaldarsi.
La macchina non è collegata alla rete elettrica.
Le tazzine sono fredde. Scaldare le tazzine.
Ghiera posizionata su un
valore troppo basso.
Beccuccio del tubo
otturato.
L’apparecchio ha molto
calcare.
Attivare l’interruttore generale.
Controllare la spina e la connessione.
Ruotare in senso orario la ghiera su un valore più elevato.
Pulire il beccuccio con un ago.
essere chiuso la macchina
deve essere spenta.
Decalcifi care l’apparecchio.
Per questa operazione il pomello deve
PROBLEMI CAUSE RIMEDI
Erogazione troppo scarsa
o assente
Macinatura troppo fi ne
e manopola SBS ruotata
verso destra.
Regolare la macinatura su un
valore più grosso (ruotare il
pomello in senso orario).
Ruotare la manopola SBS
verso sinistra.
ITALIANO
Il gruppo non può essere
estratto.
Il gruppo si è arrestato in
una posizione errata.
Chiudere lo sportello ed accendere la macchina; il gruppo
erogatore esegue un ciclo di
ripristino.

16
IMPORTANT SAFEGUARDS
When using electrical appliances, basic safety precautions should always be
followed to reduce the risk of fire, electric shock, and/or injury to persons, including
the following:
1 Read all instructions and information in this instruction book and any other
literature included in this carton referring to this product before operating or using
this appliance.
2 Do not touch hot surfaces. Use handles or knobs.
3 To protect against fire, electric shock and personal injury do not immerse cord,
plugs or appliance in water or other liquid.
4 Close supervision is necessary when any appliance is used by or near children.
5 Unplug from outlet when not in use and before cleaning. Allow to cool before
putting on or taking off parts, and before cleaning the appliance.
6 Do not operate any appliance with a damaged cord or plug or after the appliance
malfunctions or has been damaged in any way. Return appliance to the nearest
authorized service centre for examination, repair or adjustment.
7 The use of accessory attachments not recommended by the appliance manufacturer
may result in fire, electric shock or personal injury.
8 Do not use outdoors.
9 Do not let cord hang over edge of table or counter, or touch hot surfaces.
10 Do not place on or near a hot gas or electric burner, or in a heated oven.
11 Always turn appliance “OFF”, then plug cord into the wall outlet. To disconnect,
turn switch to “OFF”, then remove plug from wall outlet.
12 Do not use appliance for other then intended household use.
13 Use extreme caution when using hot steam.
SAVE THESE INSTRUCTIONS
CAUTION
This appliance is for household use. Any servicing, other than cleaning and user
maintenance, should be performed by an authorized service centre. Do not immerse
base in water. To reduce the risk of fire or electric shock, do not disassemble the base.
There are no user serviceable parts inside. Repair should be done by authorized service
personnel only.
1 Check voltage to be sure that the voltage indicated on the nameplate agrees with
your voltage.
2 Never use warm or hot water to fill the water tank. Use cold water only.
3 Keep your hands and the cord away from hot parts of the appliance during
operation.
4 Never clean with scouring powders or hard implements. Simply use a soft cloth
dampened with water.
5 To avoid your coffee maker scaling up, use purified or bottled water.
INSTRUCTIONS FOR THE POWER SUPPLY CORD
A A short power-supply cord is provided to reduce risks of getting tangled up or
tripping over a longer cord.
B Longer extension cords are available and may be used if care is exercised in their use.
C If a long extension cord is used:
1 the marked electrical rating of the extension cord should be at least as great as
the electrical rating of the appliance.
2 if the appliance is of the grounded type, the extension cord should be a
grounding type
3 the cable does not hang from the table to avoid the risk of getting caught up in it.

17
GENERAL INFORMATION
The coffee machine is suitable to make espresso coffee using coffee beans and is
equipped with a device for the distribution of steam and hot water.
This elegantly styled machine is designed for household use only. It is not suitable
for continuous professional-type use.
Warning. The manufacturer shall accept no liability for damage or injury
caused by:
• improper use or use for other than the intended purposes;
• repairs carried out by anyone other than an authorised service centre;
• tampering with the power cord;
• tampering with any machine component;
• use of spare parts and accessories other than those supplied by the
manufacturer.
The warranty will be invalidated in such cases.
TO FACILITATE INTERPRETATION
A warning triangle draws attention to the instructions that are important for user safety. Please carefully abide by these instructions to
avoid serious injury!
HOW TO USE THESE OPERATING INSTRUCTIONS
Keep these operating instructions in a safe place and make them available to
anyone else who should use the coffee machine. For further information or an
explanation of problems not completely or sufficiently addressed in these instruc
tions, contact an authorised service centre.
TECHNICAL SPECIFICATIONS
• Voltage rating See rating plate on appliance
• Power rating See rating plate on appliance
• Casing material Metal
• Size (w x h x d) (mm) 285 x 375 x 400
• Weight (Kg)
• Cord length (mm) 1200
• Control panel Front
• Water tank (lit.)
• Power supply See rating plate on appliance
• Pump pressure (bars) 15
• Boiler Stainless steel
• Coffee container capacity (g.) 300 of coffee beans
• Grinders Ceramic
• Quantity of ground coffee 8 g
• Dreg drawer capacity 13
• Safety devices Boiler pressure safety valve
safety thermostat
Subject to engineering and manufacturing changes as warranted by technological
developments.
-
Machine in conformity with European Directive 89/336/EEC (Italian Legislative
Decree 476 of 04/12/92) concerning electromagnetic compatibility.
9
2 - Extractible
ENGLISH

18
SAFETY RULES
IN THE EVENT OF AN EMERGENCY
Immediately unplug the appliance.
THE APPLIANCE MAY ONLY BE USED
- In a closed place.
- To prepare coffee, dispense hot water, froth milk or heat beverages using
steam.
- For household use.
- By adults in full possession of their physical and mental capacities.
NEVER USE THE APPLIANCE
for purposes other than those indicated above to avoid hazards.
Never place any substances in the containers other than those specified in the
instruction manual. When you fill a container, make sure all nearby containers
are closed.
Fill the water tank only with fresh drinking water: hot water and/or other liquids
may damage the machine. Do not use carbonated water. The coffee grinder may
be adjusted only while it is running. Do not introduce your fingers or any material
other than coffee beans into the coffee grinder. Before attempting to access the
inside of the coffee grinder, switch OFF the machine and remove the plug from
the electric socket.
MAINS CONNECTION
Connect the coffee machine to a suitable electric socket. The voltage must match
the voltage specified on the appliance rating plate.
INSTALLATION
- Choose a perfectly level supporting surface. Do not place on a hot surface!
- Maintain a distance of 10 cm from walls and electric or gas burners.
- Do not keep at temperatures below 0 °C; the appliance may be damaged by
freezing.
- The electric socket must be accessible at all times.
- The power cord must not be damaged, secured with clamps, placed on very hot
surfaces etc.
- Do not let the power cord hang loosely (Warning: danger of tripping or of
causing the appliance to fall).
- Do not use the power cord to carry or pull the coffee machine.
HAZARDS
- The appliance must not be used by children or by individuals unacquainted with
the operating instructions.
- The appliance is dangerous for children. If left unattended it must be
switched off.
- Do not leave the materials used to pack the appliance within children’s reach.
- Do not direct a jet of hot steam and/or hot water toward yourself or others:
danger of scalding.
- Do not introduce any objects through the openings in the appliance (Electrical
hazard!).
- Do not touch the plug when your hands or feet are wet. Do not unplug the
appliance by yanking at the power cord.
- Warning: contact with hot water, steam or and hot water/steam nozzle may
cause burns.
FAULTS
- Do not use the appliance if it malfunctions or you suspect damage, e.g.
after a fall.
- Repairs must be performed by an authorised service centre.
- Do not use an appliance with a defective power cord.
be damaged, it must be replaced by the manufacturer or his customer service
department. (Electrical hazard!).
- Switch off the appliance before opening the service door. Danger of burns!
CLEANING / DESCALING
- Before cleaning the appliance, unplug it and allow it to cool down.
- Avoid exposing the appliance to splashes of water. Do not immerge it in water.
- Do not dry machine components in a conventional or microwave oven.
SPARE PARTS
To guarantee safety, you should use only original spare parts and accessories.
DISPOSAL
- The packing materials can be recycled.
- Appliance: unplug the appliance and cut the power cord.
- Deliver the appliance and power cord to a service centre or public waste
disposal facility.
Should the power cord
19
Coffee bean container
Cup plate
Control panel
Service door
SBS
Height and depth
adjustable brew unit
Drip tray + grill
Tray full indicator
Brew group
Dregs drawer
Swivel base
Coffee bean container lid
Water tank lid
Coffee temperature
ready indicator lights
“Aqua Prima” fi lter replacement light – see page 27
Steam indicator light
Water tank
Steam knob
Hot water/ steam tube
ON/OFF switch
Grind adjustment knob
Cleaning brush Brew group key
Cartridge fi lter
applicator
“Aqua Prima”
cartridge fi lter
Knob to adjust the quantity
of coffee in the cup
Selector button for 1 coffee
Selector button for 2 coffees
Alarm indicator light
Steam button
“Aqua Prima” fi lter alarm
reset
ENGLISH
20
INSTALLATION / CIRCUIT LOADING
The messages displayed by the machine during operation are shown
on pg.28.
Check that all components
are correctly placed.
Move the ON/OFF switch
to “I” to turn on the
machine.
Fill the coffee bean container
with coffee beans.
The machine is warming
up; lights are fl ashing.
The “Aqua Prima” fi lter can
be installed (see pg.27).
Place a container beneath
the steam tube.
Important warning for using the “Aqua Prima Filter” can be found at
page 28.
See rating plate
Fill the tank with fresh drinking water.
Turn the knob counterclockwise to start loading the
circuit.
Note: You must load the circuit before starting up the
machine for the fi rst time, if it has been inoperative for a
lengthy period or if the water tank has been completely
emptied. The circuit must be also loaded each time
the light is steadily lit:
Insert the plug into a suitable electric socket.
Wait until a steady stream
of water fl ows out from the
nozzle.
Turn the knob clockwise
to terminate the circuitloading process.
Remove the container.
When lights remain steadily
lit, the machine is ready
for use.
Check the dater on “Aqua Prima” fi lter; if fi lter is past its
date, replace it with a new one.
ADJUSTMENT
COFFEE GRINDER
The fi neness of the grind may be
adjusted using the knob.
Coffee fl ows out too slowly.
Press and turn.
Coffee fl ows out too fast.
Press and turn.
ADJUSTMENTS
Adjustment may be made only while the coffee grinder is
operating.
Use coffee bean blends for espresso coffee makers. If you do not obtain
the desired result, try using different coffee blends. Store coffee in a cool
place, in a hermetically sealed container.
You will note a change after dispensing 1 - 2 coffees.
If you set the grinder on too fi ne a grind (knob turned all the way
anticlockwise) and the SBS control on “strong” (toward the right), coffee
may fl ow out in a slow trickle or not at all.
21
ENGLISH
COFFEE IN CUPS - You must adjust the dose before dispensing coffee.
This adjustment will have an immediate effect on the coffee brewed.
COFFEE IN CUPS
To adapt the quantity of coffee
brewed to the dimensions of cups.
For machines provided with SBS only. - To adjust the strength and consistency of brewed coffee.
The adjustment can also be made while brewing the coffe. This adjustment will have an immediate
effect on the coffee brewed.
Short coffee Weak black coffee
SBS
Espresso coffee
Strong black coffeeCafé crème
BIG CUPS
To place the brew unit again in its position, pull it until it fi ts in.
BIG CUPS
To use big cups, press the button and push the brew
unit until the end.
22
COFFEE DISPENSING / HOT WATER
Warning! Hot water and steam may cause burns! Direct the steam tube toward the drip tray.
1 COFFEE
COFFEE BEANS
Make sure that the machine is ready.
Position a warm coffee cup
beneath the brew unit.
2 COFFEES
COFFEE BEANS
Make sure that the machine is ready.
Position the warm coffee
cups beneath the brew
unit.
Press the button to brew
1 coffee.
Press the button to brew 2
coffees.
To stop brewing sooner,
press the button or turn the
knob.
To stop brewing sooner, press
the button or turn the knob.
Should the distribution of the
st
1
coffee be interrupted, the 2
coffee will not be distributed.
When the machine stops
making the coffee, remove
the cup.
When the machine stops
making the coffee, remove
the cups.
nd
HOT WATER
Place a container beneath
the steam tube.
Turn the knob counterclockwise to start dispensing
water.
Wait. When you reach the
desired amount, close the
knob.
Remove the container.
Warning! Hot water and steam may cause burns! Direct the steam tube toward the drip tray.
CAPPUCCINO
23
CAPPUCCINO
Fill a cup to 1/3 with cold
milk.
Position the cup containing
milk beneath the steam
tube.
Press the button to restore the
machine to normal operation.
Lights are fl ashing.
Press the button to select
the function.
The light is fl ashing.
Open the knob to release
steam.
Place a container beneath
the steam tube.
When the light is steadily
lit, the machine is ready to
release steam.
Move the cup in a circular
fashion to heat the milk
evenly.
Open the knob and dispense hot water.
Open the knob to discharge
any residual water.
After frothing the milk,
close the knob.
When lights remain steadily
lit, close the knob and
remove the lid.
ENGLISH
When only steam comes
out, close the knob.
Remove the cup.
Dispense coffee into the
cup to prepare a delicious
cappuccino.
24
STEAM
Warning! Hot water and steam may cause burns! Direct the steam tube toward the drip tray.
STEAM
Check the machine status. Press the button to select
Take and place the
container beneath the hot
water/steam tube.
Press the button to restore the
machine to normal operation.
Lights are fl ashing.
the function.
The light is fl ashing.
Open the knob to release
steam.
Place a container beneath
the steam tube.
When the light is steadily
lit, the machine is ready to
release steam.
Move the container in a
circular fashion to heat
evenly.
Open the knob and dispense hot water.
Open the knob to discharge
any residual water.
After you have fi nished,
close the knob.
When lights remain steadily
lit, close the knob and
remove the lid.
When only steam comes
out, close the knob.
Remove the container.
The machine is ready to
brew coffee or dispense
hot water.

DESCALING
25
Warning! Never use vinegar as a descaling agent. You can use any
commercially available non-toxic, non-harmful descaling product for coffee
machines. We recommend using a Saeco descaling agent.
The machine must be
descaled every 2 months.
Remove the fi lter, see
page 27.
Dispense the descaling
solution into the receptacle.
Switch off the machine. Place a large receptacle
After about 30 seconds
close the knob.
Fill the water tank with the
descaling solution.
Switch off the machine and
remove the receptacle.
Descaling is necessary every 2 months; should water be very hard, descale the
machine more frequently. The machine must be on; it automatically controls the
distribution of the descaling solution.
beneath the steam
tube.
Whether there is
descaling solution
Switch on the machine.
A
Open the knob.
The descaling process
starts.
in the tank.
Check
Whether the tank is
empty.
After 10 minutes, follow
instructions (A) or (B)
B
Switch on the machine.
circuits must be rinsed. Type “B” routing.
Rinse out the tank and fi ll it
with fresh drinking water.
If the descaling cycle is interrupted,
the water tank and internal machine
ENGLISH
Place a large receptacle
beneath the steam tube.
Open the knob to rinse.
If the receptacle fi lls,
empty it.
After descaling the machine, reload the
machine circuit. Install the cartridge fi lter
again in the water tank.
When no water is left, turn
the knob to close the valve.
Remove the container.

26
CLEANING AND MAINTENANCE
Do not dry the machine and/or its components in a microwave and/or
conventional oven.
BASIC
CLEANING
Turn the machine off.
Unplug the machine.
Remove the brew unit and
wash it with water.
Wash the water tank.
Wash the fi lter inside it.
Clean the machine, its components, and the brew group
once a week at least.
Do not immerge the machine in water and do not place any of its
components in a dishwasher.
Remove the drip tray, empty it out and wash it.
Remove the dregs drawer,
empty it out and wash it.
Remove the “pannarello”
and clean it.
BREW GROUP
Open the front door. Remove the drip tray and
the dregs drawer.
Press the PUSH button to
release the brew group.
Unscrew the upper fi lter
by the special wrench, and
wash it.
Fit the fi lter back in place
when clean.
Wash the unit, dry it and
fi t it back in place. Do not
press the “PUSH” button.
Set all machine components
back in position.
Close the door.
“AQUA PRIMA” CARTRIDGE FILTER
The fi lter must be replaced when signalled by the machine, see page 28. Before descaling, remove the fi lter from the tank.
27
INSTALLATION
Remove the fi lter from the
packing container.
The reference must be
positioned in correspondence with the groove.
Open the knob and dispense water.
Adjust the dater to the
current month.
Press until the end limit. Turn the applicator coun-
Empty the water tank out at
intervals.
Insert the applicator and
turn it clockwise to secure
it to the fi lter.
ter-clockwise and remove
it from the tank.
When the tank is empty, fi ll
it again with fresh drinkable
water.
Check where the fi lter
positioning and reference
mark is.
Fill the tank with fresh
drinkable water.
Press the button. When
the light fl ashes, release
the button.
ENGLISH
Put the fi lter into the empty
tank.
Position a container beneath the steam tube and
turn the machine on.
It is possible to use the
machine without fi lter,
Saeco suggests its
use. If fi lter is not used,
the machine must be
descaled more frequently.
You can now use your
coffee machine.

28
CONTROL PANEL MESSAGES - NOTES ON THE AQUA PRIMA CARTRIDGE FILTER
The control panel display guides users and helps them to use the machine correctly.
Fill the coffee bean container with coffee
Steadily lit
Important note: the dregs drawer may be emptied only when the machine
is on. The drawer must be removed for at least 5 seconds. If you empty the
drawer with the machine off, you will not be able to dispense coffee the next
time you switch the machine on.
Flashing
Flashing
beans and start the coffee brewing cycle.
Fill the water tank with fresh drinking water
and load the circuits.
Load the circuit.
Empty the dregs drawer.
Fit the brew group properly in place.
Fit the drip tray and dregs drawer properly
in place.
Close the front door.
Replace the water filter in the tank.
After replacing the filter in the tank, reset the
alarm by pressing the button for 5 seconds
until the light goes off.
ADDITIONAL INFORMATION FOR CORRECTLY USING
THE “AQUA PRIMA” FILTER.
Please follow these simple instructions to correctly use the “Aqua prima” filter:
1. Keep the “Aqua prima” filter cool and away from sunlight; the room temperatu
re should be between +5°C and +40°C;
2. Do not use the filter in temperatures over 60°C.
3. If the coffee machine is not used for 3 days, we recommend washing the
“Aqua prima” filter;
4 If the coffee machine is not used for more than 20 days, it is advisable to
replace the filter.
5. To store an already opened filter, seal it in a nylon bag and keep in the fridge;
do not store it in the freezer to avoid damaging the filter properties.
6. Before using the filter, leave it to soak in the water tank for 30 minutes.
7. Once it is taken out of its pack, do not keep the filter in the open air.
8. The filter must be replaced 90 days after opening the packing or after treating
60 litres of drinking water.
-
Flashing
Too high boiler temperature, load the circuit.
Let water flow out.
PROBLEMS - CAUSES - REMEDIES
29
PROBLEMS CAUSES REMEDIES
The machine does not
turn on.
The coffee is not hot
enough.
The machine does not
brew coffee.
No hot water or steam is
dispensed.
A noise can be heard
coming from the steam
tube of the machine.
The machine is not
connected to the power
supply.
The cups are cold. Warm up the cups.
Knob positioned on too
low a setting
The tube nozzle is clogged.
Move the main switch to ON.
Check the plug and the
connection
Turn the knob clockwise to a
higher setting.
Clean the nozzle opening with
a needle.
closed and the machine
must be off.
During this operation,
the knob must be
PROBLEMS CAUSES REMEDIES
Coffee fl ows out in slow
trickle or not at all.
Excessively fi ne grind
and SBS control turned
to the right.
Adjust to a coarser grind (turn
the knob clockwise).
Turn the SBS control toward
the left.
ENGLISH
The machine takes a long
time to warm up.
The brew unit cannot be
removed.
Excessive scale has
built up.
The unit has stopped in
the wrong position.
Descale the machine.
Close the door and switch on
the machine; the brew unit will
move back into position.

30
WICHTIGE VORSICHTSMASSNAHMEN
Bei der Verwendung von Elektrogeräten empfiehlt es sich, sich an einige Vorsichtsmaßnahmen
zu halten, um die Gefahr von Brand, elektrischen Schlägen und Unfällen einzuschränken.
1 Alle in diesem oder jedem anderen in der Verpackung enthaltenen Heft
angegebenen Anweisungen und Informationen aufmerksam durchlesen, ehe die
Espressomaschine eingeschaltet oder benutzt wird.
2 Keine heißen Flächen berühren.
3 Netzkabel, Stecker oder den Maschinenkörper nicht in Wasser oder andere
Flüssigkeit tauchen, um Brand, elektrische Schläge und Unfälle zu vermeiden.
4 Im Beisein von Kindern die Espressomaschine mit besonderer Vorsicht handhaben.
5 Den Stecker aus der Steckdose ziehen, sobald die Maschine nicht mehr benutzt
wird oder gereinigt wird. Bevor Teile entnommen oder eingesetzt werden sowie vor
der Reinigung die Maschine abkühlen lassen.
6 Keine kaputten oder defekten Geräte oder Geräte mit beschädigtem Netzkabel
oder –stecker verwenden. Das schadhafte Gerät beim nächsten Händler oder
Kundendienst prüfen, reparieren oder neu einstellen lassen.
7 Die Verwendung nicht vom Hersteller empfohlenen Zubehörs kann Brand,
elektrische Schläge und Unfälle verursachen.
8 Die Espressomaschine nicht im Freien verwenden.
9 Das Kabel darf nicht vom Tisch herunterhängen oder heiße Flächen berühren.
10 Die Espressomaschine nicht in der Nähe von heißen Küchenherden oder Backöfen
verwenden.
11 Prüfen, ob die Maschine sich in Stellung „0” befindet, bevor man den Stecker einsteckt.
Zum Ausschalten auf „0” stellen, dann den Stecker aus der Steckdose ziehen.
12 Die Maschine nur im Haushalt verwenden.
13 Bei Verwendung von heißem Dampf mit äußerster Vorsicht verfahren.
DIESE ANWEISUNGEN GUT AUFBEWAHREN
HINWEISE
Diese Espressomaschine wurde ausschließlich für den Haushalt entwickelt. Sämtliche
Eingriffe mit Ausnahme der Reinigung oder normalen Wartung dürfen ausschließlich durch
den autorisierten Kundendienst vorgenommen werden. Das Gerät nicht in Wasser tauchen.
Reparaturen dürfen nur durch Fachpersonal des autorisierten Kundendienstes erfolgen.
1 Sicherstellen, dass die auf dem Datenschild des Geräts angegebene Spannung mit
der Ihres Netzanschlusses übereinstimmt.
2 Nie lauwarmes oder heißes Wasser in den Wasserbehälter füllen. Ausschließlich
kaltes Wasser verwenden.
3 Während des Betriebs nie die heißen Teile oder das Netzkabel der Maschine berühren.
4 Keine Schleif- oder Scheuermittel zum Reinigen verwenden. Es genügt ein weicher
Lappen mit Wasser.
5 Zur Vermeidung von Kalkablagerungen kohlensäurefreies Mineralwasser verwenden.
BETRIEBSANLEITUNGEN ZUM NETZKABEL
A Das mitgelieferte Netzkabel ist relativ kurz, damit es sich nicht verdrehen kann
oder Sie darüber stolpern.
B Längere Netzkabel können verwendet werden, doch sollte man dabei mit grösste
Vorsicht vorgehen.
C Sollte ein längeres Netzkabel verwendet werden, folgendes überprüfen:
1 dass die auf der Verlängerungsschnur vermerkte Spannung mindestens der des
Elektrogerätes entspricht;
2 dass es einen Stecker mit drei Stiften (Erdung) hat, falls das Netzkabel des
Elektrogerätes ebenfalls drei hat;
3 Das Netzkabel darf nicht am Tisch herunterhängen; Sie könnten darüber
stolpern.
 Loading...