

Page 1
Please read this manual carefully before operating the unit
and keep it for futrue reference.
Owner’s Manual
Model:
PD20GE
PD24GE
DEHUMIDIFIER
Page 2
CONTENTS
Safety Instr uctions………………………………………...2
Operating I
nstructi ons
About the controls on the dehumidifier………………..…...3
Choosing a Location………………………………………..4
moving C ollected Water…………………….....………...5
Re
Care and cleaning of the dehumidifier
Water Bucket……
……………………………………..........6
Air Filter…… ………………......……………………..........6
Troubleshooting…………………………………............... 7
Long term storage………………………………..……...... 8
Specifications……………………....…………..……............8
IMPORTANT INSTRUCTIONS
Do not install and use your dehumidifier before completely reading these instruction .
This will help you optimize the operation of your dehumidifier .
The following advice and instructions should be followed closely:
1.Your unit must always be used in an
contains cooling agent.
2.After unpacking Your unit, place the unit upright to allow the cooling
agent to stabilize , and wait 2 hours before use .
3.This product must not be disposed together with the domestic waste.
This product has to be disposed at an authorized place for recycling
of electrical and electronic appliances.
4.The appliance shall not be installed in the laundry.
5.If the power cord is damaged, it must be replaced by the manufacturer,
service agent or qualified person in order not to get any dangers.
6.Please check before the first operation:Check if the floater on bucket is at
right position. If the position is not correct, move it by hand to the right position.
upright position because it
Failure to comply with
these instructions may
damage the unit and will
invalidate the warranty .
1
Page 3

IMPORTANT SAFETY INFORMATION.
READ ALL INSTRUCTIONS BEFORE USING.
WARNING!
For your safety, the information in this manual must be followed to minimize the risk of fire, electric shock
or personal injury.
SAFETY PRECAUTIONS
When using this dehumidifier, always follow basic safety precautions, including the following:
Always operate the product from a power source
■
of the same voltage ,frequency and rating as
indicated on the product identification plate .
Close supervision is necessary when any product
■
is used by or near children or invalids .Do not
allow children to use it as a toy .
Do not operate any product with a damaged
■
cord or plug, or after the product malfunctions,
or is dropped or appears damaged in any way.
Return the complete product to the place of
purchase for inspection, repair or replacement.
Never connect the unit to a defective socket.
■
To avoid tripping the circuit, DO NOT USE
■
AN EXTENSION CORD FOR THIS UNIT.
Make sure that the unit is correctly connected
■
before turning on the unit's power. Never lay
down the unit while it is working.
Never unplug the dehumidifier while it is
■
working, This could damage the electronic
circuits.
Never place anything on top of the unit and
■
do not cover it with any kind of cloth while it
is plugged in or in-use.
Do not place objects on the product or allow
■
objects to obstruct the inlet or outlet openings,
or operate in close proximity to walls or curtains,
etc.
This product is intended for normal domestic
■
/household use only.
Repairs should only be carried out by
■
competent service department.
Always keep it in an upright position to avoid
■
any damage to the unit.
Switch off and unplug from outlet when not in
■
use or before cleaning.
Do not place the power cord under a carpet.
■
Never install the unit in direct sunshine.
■
Prevent children from climbing on the unit.
■
2
Page 4
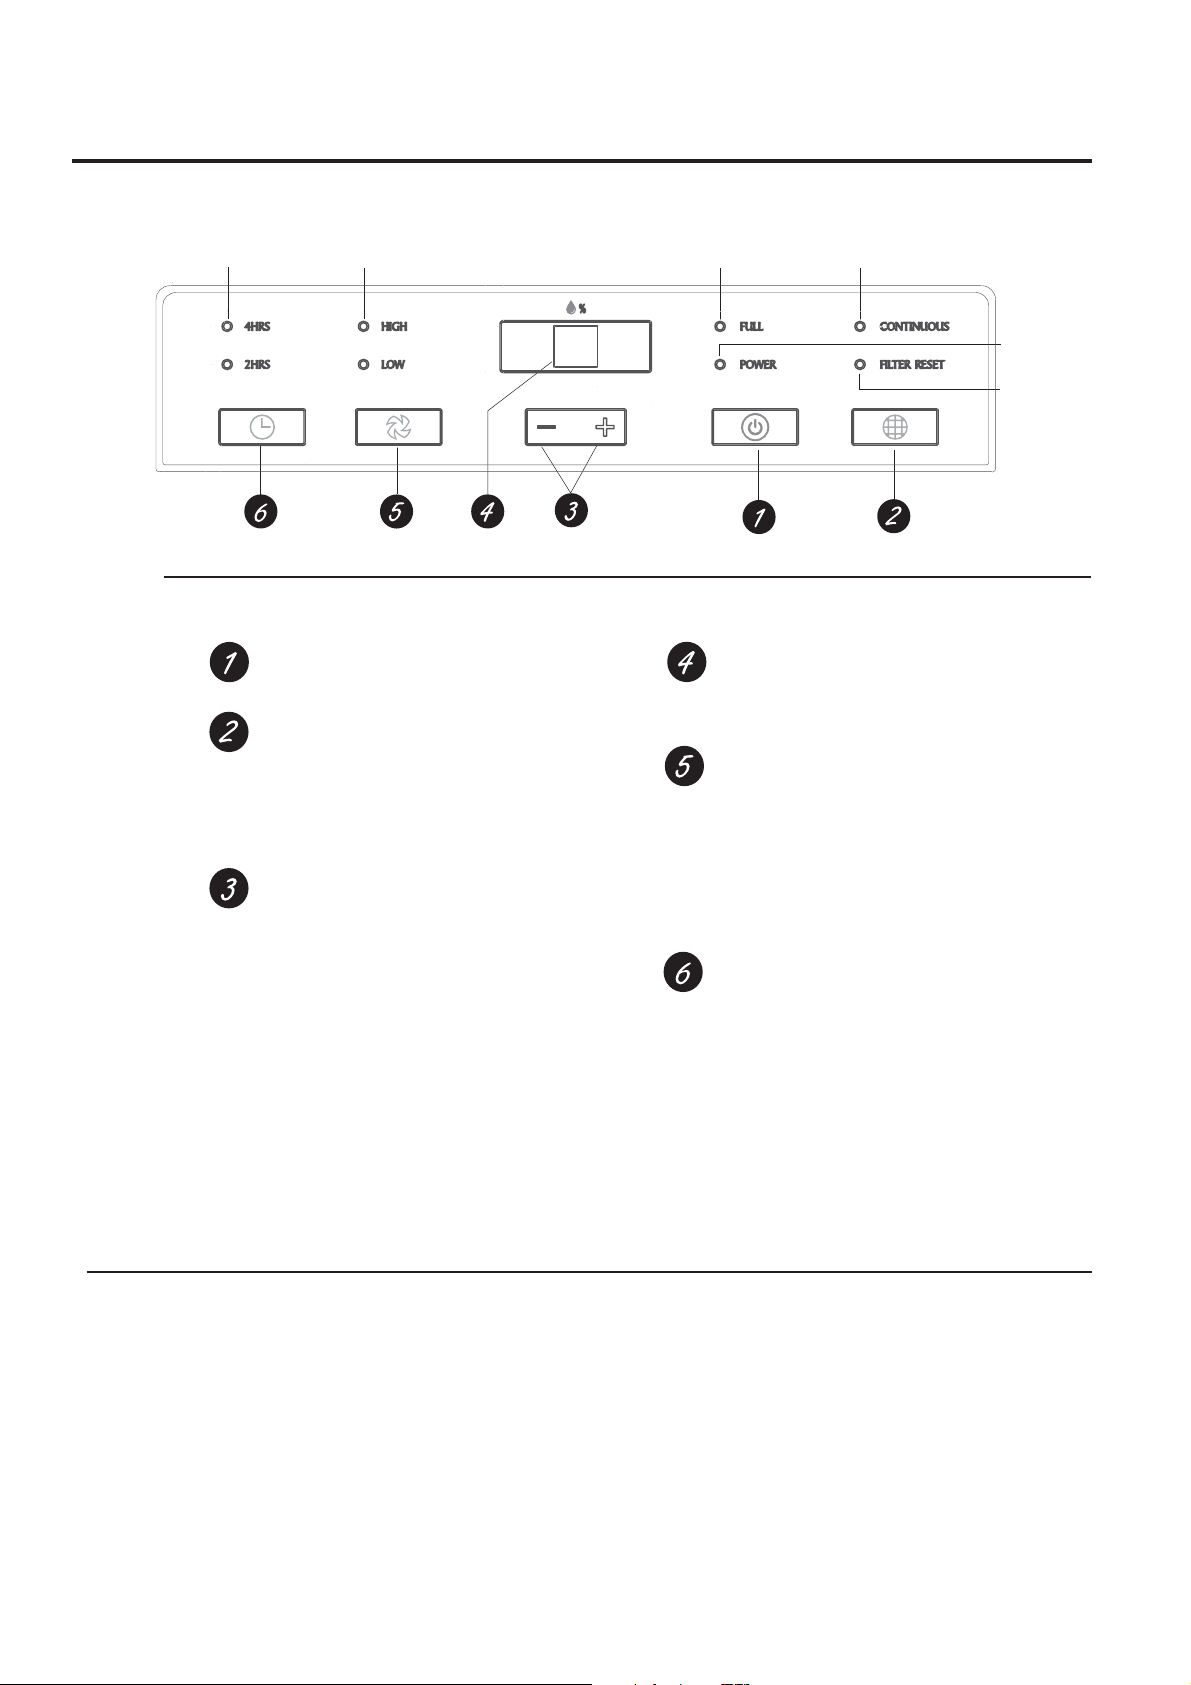
About the controls on the dehumidifier.
4 hour or 2 hour
delay on/off
indicator lights
High and Low fan
indicator lights
Controls
NOTE:
When the bucket is full or removed, the
controls cannot be set.
ON/OFF Pad
Press to turn the dehumidifier on and off.
FILTER Pad
After 250 hours of operation, the
Filter
indicator light will glow to remind you to
clean the filter. Remove the filter and clean it.
Press to turn off the
the
Care and Cleaning
Humidity Set Control Pads
The humidity level can be set within a range
of 80% RH (Relative Humidity) to 35% RH
(Relative Humidity) in 5% reduce or at
CO
for continuous operation.
NOTE:
If
dehumidifier will operate continuously at
its maximum dehumidification settings if
attached to a hose to drain or until the
bucket is full.
For drier air, press the - pad and set to
a lower percent value (%).
For damper air, press the + pad and set
to a higher percent value (%).
Clean the Filter
section.
CO
(Continuous) is selected, the
Bucket full light indicates
bucket needs to be emptied
or it is not in the proper place.
Clean the
light. See
Continuous operation on
indicator light
Power On
indicator light
Clean the Filter
indicator light
Display
Shows the set % humidity level while
setting, then shows the actual (+/– 5%
accuracy) room % humidity level.
FAN SPEED Pad
Controls the fan speed.
Press to select either
speed.
Set the fan control to
moisture removal. When the humidity
has been reduced and quiet operation is
preferred, set the fan control to
High
High
or
fan
Low
for maximum
Low
.
TIMER Pad
If unit is turned on and running in timer mode
for 2hr or 4hr,can turn off the unit. When unit
stand by and running in timer mode for 2hr or
4hr can turn on the unit.
Other Features
BUCKET FULL Light
Glows when the bucket is ready to be emptied,
or when the bucket is removed or not replaced
in the proper position.
Alarm
If the bucket is full or missing for more than three
minutes, an alarm will sound for about 10 seconds
to remind you to empty and replace the bucket.
Auto Shut Off
The Water Level Control Switch shuts off the
dehumidifier when the bucket is full, or when
the bucket is removed or not replaced in the
proper position.
Auto Defrost
When frost builds up on the evaporator coils,
the compressor will cycle off and the fan will
continue to run until the frost disappears.
3
Page 5
Using the dehumidifier.
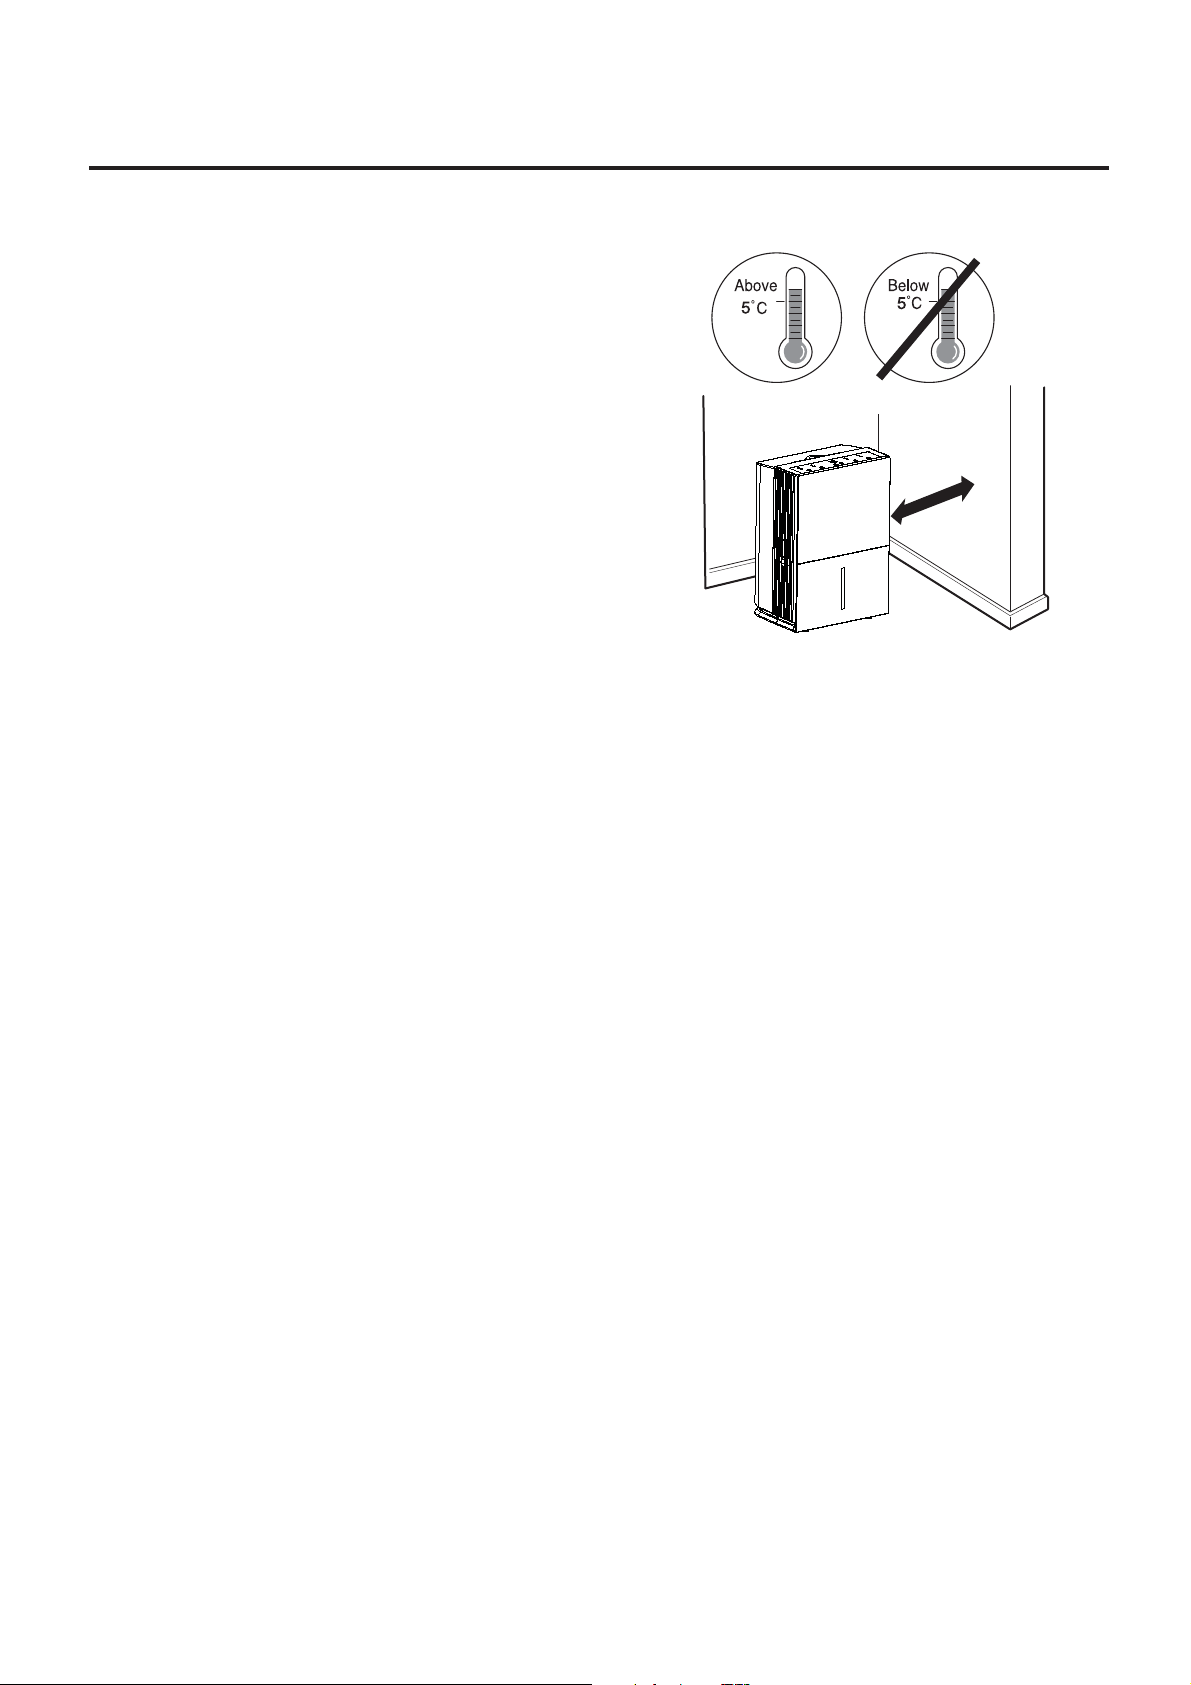
Choosing a Location
■
Do not use outdoors.
■
This dehumidifier is intended for indoor residential
applications only. This dehumidifier should not be
used for commercial or industrial applications.
■
Place the dehumidifier on a smooth, level floor
strong enough to support the unit with a full bucket
of water.
■
Allow at least 12–18 inches of air space on all sides
of the dehumidifier .
■
Place the dehumidifier in an area where the
temperature will not below 5°C. Or t he coils
can become covered with frost , which may
reduce performance.
■
Close all doors, windows and other outside openings
of the room.
It is normal that the surrounding air to become slightly
warmer as the dehumidifier operates.
YES NO
✓
sehcni04
4
Page 6
Using the dehumidifier.
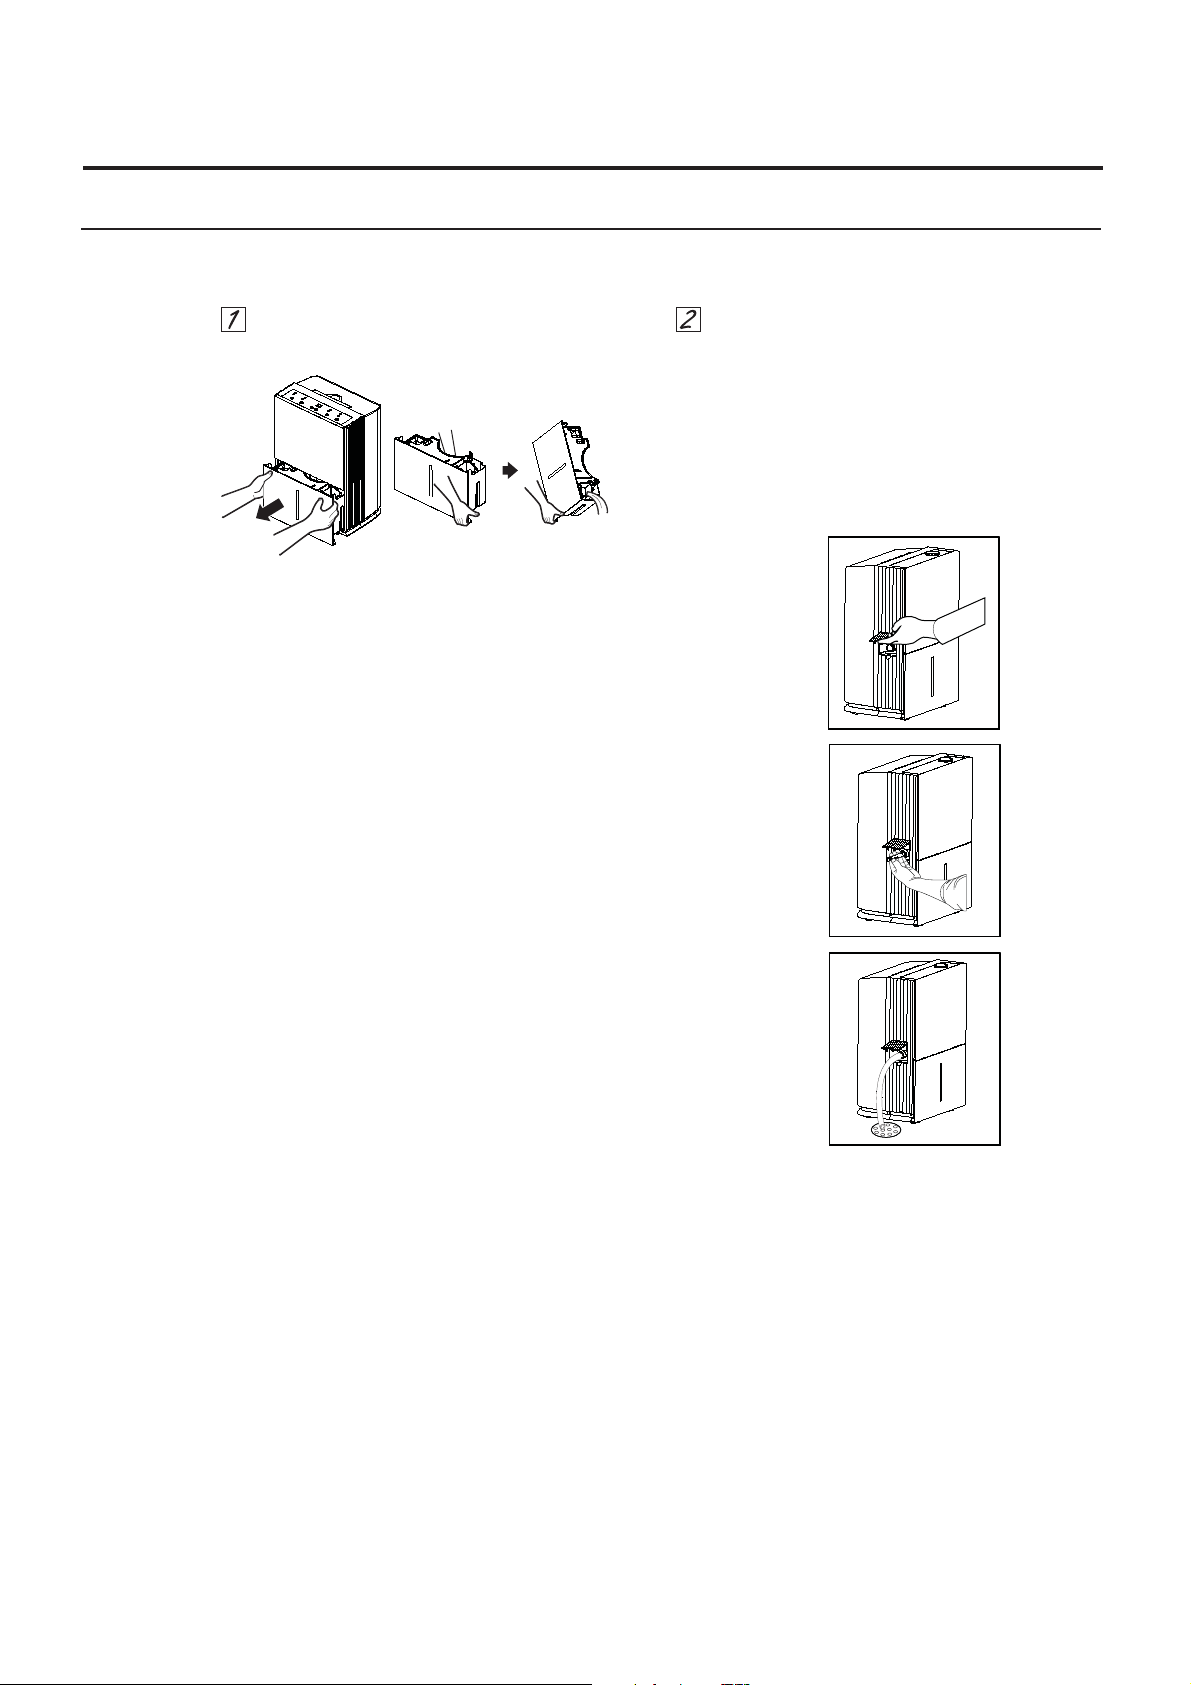
Always make sure the water bucket is locked into place on the dehumidifier.
Removing Collected Water
There are 2 ways to remove collected water:
Use the bucket.
the unit will shut off. Empty and replace the
bucket.
NOTES:
Do not remove the bucket while the unit
■
is in operation or it has just stopped.
When the bucket is removed,
NOTE:Hoold bucket with
both hands when emptying.
Use a hose.
flow into a floor drain by attaching a
14mm inner diameter hose (not included).
Open the drain cover on the side of
1.
the unit.
Thread the drain tie-in (supplied) onto
2.
the nozzle.
3.
Connect the hose to the drain tie-in.and
lead it to the floor drain.
Water will automatically
■
The bucket must be in place and securely
seated for the dehumidifier to operate.
5
Page 7

Care and cleaning of the dehumidifier.
RESET
Turn the dehumidifier off and remove the plug from the wall outlet before cleaning.
Water Bucket
To clean:
Every few weeks, clean the bucket to prevent
growth of mold, mildew and bacteria. Partially fill
the bucket with clean water and add a little mild
detergent. Swish it around in the bucket, empty
and rinse.
NOTE: Do not use a dishwasher to clean the
water bucket.
Air Filter
The air filter
least every 250 hours of
often if necessary.
should be
checked and cleaned at
operation or more
Buttons
After 250 hours of operation, the
Ć
indicator light will glow to remind you to clean the
filter. Remove the filter and clean it. Replace the
filter and press the
Clean the Filter
■
Press the two buttons, then pull out the filter.
Clean the filter with warm, soapy water. Rinse and
■
let the filter dry before replacing it.
■
Put the filter back into the dehumidifier.
light.
Filter
RESET
Clean the Filter
pad to turn off the
Caution: Do not operate the dehumidifier
without a filter because dirt will gather and affect the
unit ' s performance.
NOTE: Avoid using a dishwasher to clean the filter.
6
Page 8

Troubleshooting.
Symptoms Possible Causes
Is the water bucket in proper position
噝
Have you plugged in the electric power source
The Machine does not operate when you turn it on
The machine is inefficient
The machine runs continuously without turning off
Machine noisy
噝
Does the dehumidifier reach its present level
噝
Is there power supply shortage
噝
Is the filter too dirty
噝
Are the temperature and humidity too low
噝
Are the air inlet and outlet blocked
噝
Are the doors and windows open
噝
Is there any other appliances producing steam in the room
噝
Is the room too big
噝
Is the surface where you place the dehumidifier stable
噝
and flat
7
Page 9

When you do not use the unit for a long period, we suggest you to take following steps to store the
Long term storage.
Specifications.
unit in a good condition:
Make sure there is no water left in the water tank and take off the draining hose
Take off the power cord and plug and warp them well.
Clean the unit and packed it well to keep it from dust.
Model
Rated Vol tage
Rated Frequency
Power Input
Power Input
Moisture Removal
Operati ng Temperatu r e
Net Weight
Tank capacity
PD20GE PD24GE
V ~
220
50H z
380W
480W 600W
20L/DAY 24L/DAY
13kg
4 L(Automatic stop at about 3.6L)
420W
ć5ć-35
14kg
8
Page 10

ʳ
ڇࠌشհছᓮᇡาᔹᦰόࠌشᎅࣔύˎʳ ࠀᓮݔঅژ܂ֲ৵ەհشʳ
ʳ
ࠌشᎅࣔʳ
ࢼᛘᖲʳ
ʳ
ʳ
ʳ
ʳ
ীᇆˍʳ ʳ
ˣ˗˅˃˚˘ʳ
ˣ˗˅ˇ˚˘ʳ
ʳ
ʳ
Page 11

ؾᙕʳ
ڜ٤ښঞΞΞΞΞΞΞΞΞΞΞΞΞΞΞΞΞΞΞΞΞΞΞΞΞΞΞ˅ʳ
ᖙ܂ښঞʳ
堚ᑥፖঅ塄ʳ
ૹقʳ
൳ࠫ૿ΞΞΞΞΞΞΞΞΞΞΞΞΞΞΞΞΞΞΞΞΞΞΞΞΞΞˆʳ
ࢼᛘᖲឭ࣋ۯᆜΞΞΞΞΞΞΞΞΞΞΞΞΞΞΞΞΞΞΞΞΞΞˇʳ
堚ೈֽᒣֽΞΞΞΞΞΞΞΞΞΞΞΞΞΞΞΞΞΞΞΞΞΞΞΞˈʳ
ֽᒣΞΞΞΞΞΞΞΞΞΞΞΞΞΞΞΞΞΞΞΞΞΞΞΞΞΞΞΞˉʳ
ሶቺጻΞΞΞΞΞΞΞΞΞΞΞΞΞΞΞΞΞΞΞΞΞΞΞΞΞΞΞˉʳ
ඈೈᎽΞΞΞΞΞΞΞΞΞΞΞΞΞΞΞΞΞΞΞΞΞΞΞΞΞΞˊʳ
ΞΞΞΞΞΞΞΞΞΞΞΞΞΞΞΞΞΞΞΞΞΞΞΞΞΞΞΞˋʳ
ʳ
ʳ
ʳ
ᓮࠌشຍࢼᛘᖲছʿʳ ᓮาᔹຍᎅࣔˁʳ ຍױᚥܗ܃ڶயچࠌشຍࢼᛘᖲʳ
ᓮᙅښՀ٨༼ᤜࡉقˍʳ
˄ˁ ຍࢼᛘᖲڇࠌشழۯᆜؘᏁمإʿʳ ڂᖲփ៲ڶຳጟʳ
˅ˁ ᓮڇᇞೈץᇘ ˅ ՛ழ৵ʿʳ ৱᖲփຳጟࡳ৵ֱױࠌشࡳˁʳ ʳ
ˆˁ ຍࢼᛘᖲլױᙟࢹඵʿʳ ڕᏁඵᆜʿʳ ؘႊඵᆜڇሽᕴᛩঅڃگچֱʳ
ˇˁ ຍࢼᛘᖲլױᇘᆜڇ௮ࠌشʳ
ˈˁ ૉሽᒵჾᡏʿʳ ؘႊط፹ທʿʳ ࠡࣚ೭ࢭᙄࢨٽᇷݾԳޓངאᝩ܍ٲᙠʳ
ˉˁ ڇรԫڻࠌشழʿʳ ᓮ٣ᛀֽᒣփ௬ᑑˁʳ ᒔঅࠡۯᆜإൄˁʳ ʳ
ʳ
ʳ
ʳ
ʳ
ʳ
ʳ
ʳ
ʳ
ڕլᔞᅝࠌشڼࢼᛘᖲʿʳ
ۖᖄીჾᡏʿʳ ലլ࠹অ塄
ፂଥࣚ೭ʳ
ʳ
ʳ
ʳ
ʳ
ʳ
1
Page 12

ʳ
ڜ٤ښঞʳ ʻڇࠌشছؘႊาᔹࢬڶقʼʳ
ᤞܫʳ ʴʳ
ࠌشছڜ٤ࣹრࠃႈʳ
ʳ
ʳ
ڜ٤ದߠʿʳ ࠌشؘႊᅃᎅࣔփقࠌشڼࢼᛘᖲˁʳ ױ྇܅ᙑᎄࠌشழڶᖲᄎ֧࿇־
ᤞʿʳ ᤛሽࡉߪ᧯࠹႞ʳ
ʳ
ᅝࠌشڼࢼᛘᖲছʿʳ ؘႊᙅښՀ٨༼ᤜࡉقʳ
z ࠌشছᓮᒔᎁ൷ᏍሽᄭࡉขᎮྨՂޣઌٵʳ
z ᓮ֎ᨃࠝ࿙ݫࢼᛘᖲʿʳ ڕࠝ࿙Ꮑᖙ܂ڼࢼᛘᖲழʿʳ ؘႊڶګԳຩٵࠌشʳ
z ૉሽᒵჾᡏʿʳ ؘႊط፹ທʿʳ ࠡࣚ೭ࢭᙄࢨٽᇷݾԳޓངאᝩ܍ٲᙠˁʳ
z ᓮ֎൷Ꮝࢼᛘᖲࠩڶჾᡏሽᄭ༺ᙰՂʳ
z ᓮ֎شሽᒵࠐ൷Ꮝࢼᛘᖲ۟ሽᄭ༺ᙰʳ
z ࠌشছᓮᒔঅࢼᛘᖲإᒔچ൷Ꮝࡉࠌشழᓮ֎ٛࢼᛘᖲʳ
z אᒔঅሎ܂إൄʿʳ ةঅࢼᛘᖲি࣋ᆜʳ
z 堚ᑥࢼᛘᖲছʿʳ ᓮ٣ᣂຨࢼᛘᖲʿʳ ٦ࢸנሽᄭᒵˁʳ
z ᓮ֎ނሽᄭᒵگ៲ڇچཹࢍՀʳ
z ᝩ܍ၺ٠൷ᅃ୴ʳ
z ᓮ֎ᨃࠝ࿙ᡙࢼᛘᖲʳ
z ᓮ֎אࢸנሽᄭ༺ᙰֱࠐᣂຨࢼᛘᖲʳ
z ڇࠌشழࢨ༺Ղሽᄭழʿʳ ᓮ֎ڇࢼᛘᖲՂ࣋ᆜٚ۶ᠧʿʳ ڕ۪ʳ
z ᓮ֎࣋ᆜᠧᖒࢼᛘᖲנଅՑࡉԵଅՑˁʳ ࠌشழᓮ࣋ᆜᠦᛥᕻࡉ࿗კʳ
z ڼࢼᛘᖲʿࠎءچࡉ୮ࡺشຜʳ
z ࢼᛘᖲፂଥؘႊط፹ທʿʳ ࠡࣚ೭ࢭᙄࢨٽᇷݾԳၞ۩ʳ
ʳ
ʳ
ʳ
ʳ
ʳ
ʳ
ʳ
ʳ
ʳ
ʳ
ʳ
2
Page 13

ʳ
ᖙ܂ښঞʳ
൳ࠫ૿ʳ
ʳ
ʳ
ʳ
ʳ
ʳ
ʳ
ʳ
ʳ
ʳ
ʳ
ᖙ܂ᎅࣔʳ
ʳ
ֽᒣየᄨ᧩قᗉ, قֽᒣբᄨ
የࢨឭ࣋ۯᆜլإᒔ
2 ՛ழ/ 4 ՛ழᙈၲᣂ᧩قᗉ
(6 )
ൎஇଅԺ᧩قᗉ
(5 )
ሽᄭၲᣂ᧩قᗉ
ᥛࢼᛘ᧩قᗉ
堚ᑥሶ〈ጻ᧩قᗉ
(2) (1 ) (3 )
ʳ
˄ˁ ၲ˂ᣂၨʳ
൳ࠫࢼᛘᖲၲᣂʳ
˅ˁ 堚ᑥሶ〈ጻၨʳ
ࠌش ˅ˈ˃ ՛ழ৵ʿʳ ڼ᧩قᗉᄎದ, قሶ〈ጻᏁޓངࢨ堚ᑥ.
ޓངࢨ堚ᑥ৵, ٦堚ᑥሶ〈ጻၨዽᄰ᧩قᗉʳ
ˆˁ ᛘ৫ᓳᆏၨʳ
ױᓳᆏփઌኙᛘ৫ʿʳ ط ˆˈʸ۟ ˋ˃ʸˁʳ ٍױᓳᆏᥛࢼᛘʻ˖ˢʼˁʳ
ϙˀʳϘʳ ྇܅ઌኙᛘ৫ʿʳ ϙʾʳϘʳ ᏺףઌኙᛘ৫ʳ
ᅝᓳᆏ۟ᥛࢼᛘפ౨ழʿʳ ࢼᛘᖲᄎᥛࢼᛘֽ۟ᒣየᄨ. ʳ
ˇˁ ᧩قৠኟʳ
᧩قڇփઌኙᛘ৫ʳ ʻʾ˂ˀʳˈʸʳ ᎄʼࢨᓳᆏᛘ৫ழ᧩قᓳᆏᛘ৫ʳ
ˈˁ ଅԺᓳᆏၨʳ
൳ࠫଅԺൎஇʿʳ ൎଅழࢼᛘ౨Ժለൎʿʳ இଅழሎ܂ለኑᙩʳ
ˉˁ ழၴࠫၨʳ
ᅝࢼᛘᖲሎ܂ழʿʳ ױᓳඒ 2 ՛ழ/ 4 ՛ழ۞೯ᣂᖲ. ᅝࢼᛘᖲڇৱᖲՀʿױ܂ 2 ՛ழ/ 4 ՛ழ
(4 )
ᙈၲᖲפ౨
3
Page 14

其他功能
水箱滿溢顯示燈
表示水箱已滿溢, 請清除水箱中的水. 或表示水箱擺放位置不正確
警号
當水箱已滿溢, 或抽濕機發現水箱離開位置超過 3分鐘. 警号會自動發出約 10秘鳴叫. 提示用家
自動除霜
當
蒸發器環有結霜情況, 抽濕機會自動停止壓縮機的運作, 風扇會持續運作. 直至沒有結霜情況
抽濕機的擺放位置
z 請勿在室外使用
z 抽濕機的設計為室內家居用途, 不適宜作商業或工業用
z 請把抽濕機放置在固定的平面上, 確保能夠承托機身和
水箱溢滿後的總重量
z 請在抽濕機前後預留 12-18 吋和左右預留 40 吋
的空間作空氣傳流之用
z 請勿在低於攝氏 5 度的環境下使用抽濕機,
z 在使用時請關閉門窗, 以增加抽濕效能
抽濕機在運作時, 內部壓縮機會產生熱量, 故四周溫度會因而提升.
此是正常現象
4
Page 15

清除水箱的水
請經常確保水箱穩固地放在抽濕機內正確的位置
清除水箱的水
有 2 種方法清除水箱的水
1. 使用水箱. 當水箱離開抽濕機時, 抽濕機會自動關機
注意:
z 清除水箱的水時, 請用雙手握著水箱 (如圖顯示)
z 抽濕機操作時, 請勿移動水箱
z 清除水箱的水後, 水箱必須正確放回原位, 抽濕機方可再正常運作
2. 用水管排水: 由排水孔接駁 14 毫米的排水管(需另行購買),
抽濕機會自動由排水孔排水.
z 打開排水孔的門蓋
z 把接駁管連接至排水孔
z 把接駁管和排水管連接, 進行持續排水
5
Page 16

清潔與保養
在清潔抽濕機前, 請先關閉抽濕機和拔出電源插頭
水箱
避免水箱滋生細菌或發霉, 請每數星期清洗水箱
注意: 請勿把水箱放在洗碗碟機內清洗
隔麈網
隔麈網必須在每使用後 250 小時進行清洗或檢查
*使用 250 小時後, 此顯示燈會亮起, 表示隔麈網需要更換或清潔.更換或清潔後, 再按清潔隔麈
網按鈕熄滅顯示燈
z 按下隔麈網上的 2 個固定按鈕, 再向外拉
z 用皂水清洗隔麈網, 再用清水洗淨
z 把隔麈網放回原位
注意: 請勿把隔麈網放在洗碗碟機內清洗
注意: 請勿在沒安裝隔麈網的情況下使用抽濕機, 因污穢物會損壞抽濕機, 減低功能
6
Page 17

ඈೈᎽʳ
ʳ
ʳ
ʳ
ʳ
ʳ
ʳ
ʳ
ʳ
ʳ
Ꮍʳ Ꮍ֧࿇ױ౨ࢤʳ
೯ၲᣂ༲ࢼᛘᖲՈլ౨ඔ೯ʳ ˄ˁ ֽᒣឭ࣋ۯᆜإᒔႯʳ
˅ˁ ሽᄭܡբ൷Ꮝʳ
ˆˁ ࢼᛘᖲܡբሒࠩࡳᛘ৫ʳ
ˇˁ ܡሽᄭࠎᚨʳ
ೈᛘၦ֜֟ʳ ˄ˁ ሶ〈ጻܡᏁ堚ࢨޓང
˅ˁ ܡᄵ৫ࡉᛘ৫֜܅ʳ
ˆˁ ܡנଅۯࢨԵଅۯᖒʳ
ᥛࢼᛘՈྤሒࠩࡳᛘ৫ʳ ˄ˁ ܡ࿗ؚၲʳ
˅ˁ փܡڶขس፣ʳ
ˆˁ փၴܡ֜Օʳ
ᕳଃ֜Օʳ ࣋ᆜچֱܡࡳʿʳ ؓࡖʳ
ʳ
ʳ
ʳ
ʳ
ʳ
ʳ
ʳ
7
Page 18

گ៲ࢼᛘᖲʳ
ʳ
ᅝᏁழၴگ៲ࢼᛘᖲழʿʳ ༼ᤜᅃՀ٨قၞ۩گ៲ʳ
z ᓮᒔঅֽᒣփڶֽʿʳ ࡉฝೈඈֽጥʳ
z ࢸנሽᄭᒵࠀگ៲ଐړʳ
z 堚ᑥࢼᛘᖲࠀץݔ৵թگ៲ʳ
ʳ
ʳ
ൟ㰳
ᅮ両䳏ວ
ᅮ両丏⥛
䔌ܹࡳ⥛
᳔ࡳ⥛
䰸▩䞣
᪡⪄๗⑿ᑺ
⎼䞡
∈ㆅᆍ䞣
ʳ
ʳ
ʳ
ʳ
PD20GE PD24GE
220V~
50Hz
380W 420W
480W 600W
20L/DAY 24L/DAY
5ć-35ć
13 Kg 14Kg
4 L (∈ԡ䘨ࠄ 3.6L ᰖ᳗㞾ࢩ䮰″)
8
Page 19

Page 20

66129903969
 Loading...