

Page 1
Arté
FLAT PANEL
MULTI-CHANNEL SPEAKER
Arté
FLAT PANEL
MULTI-CHANNEL SPEAKER
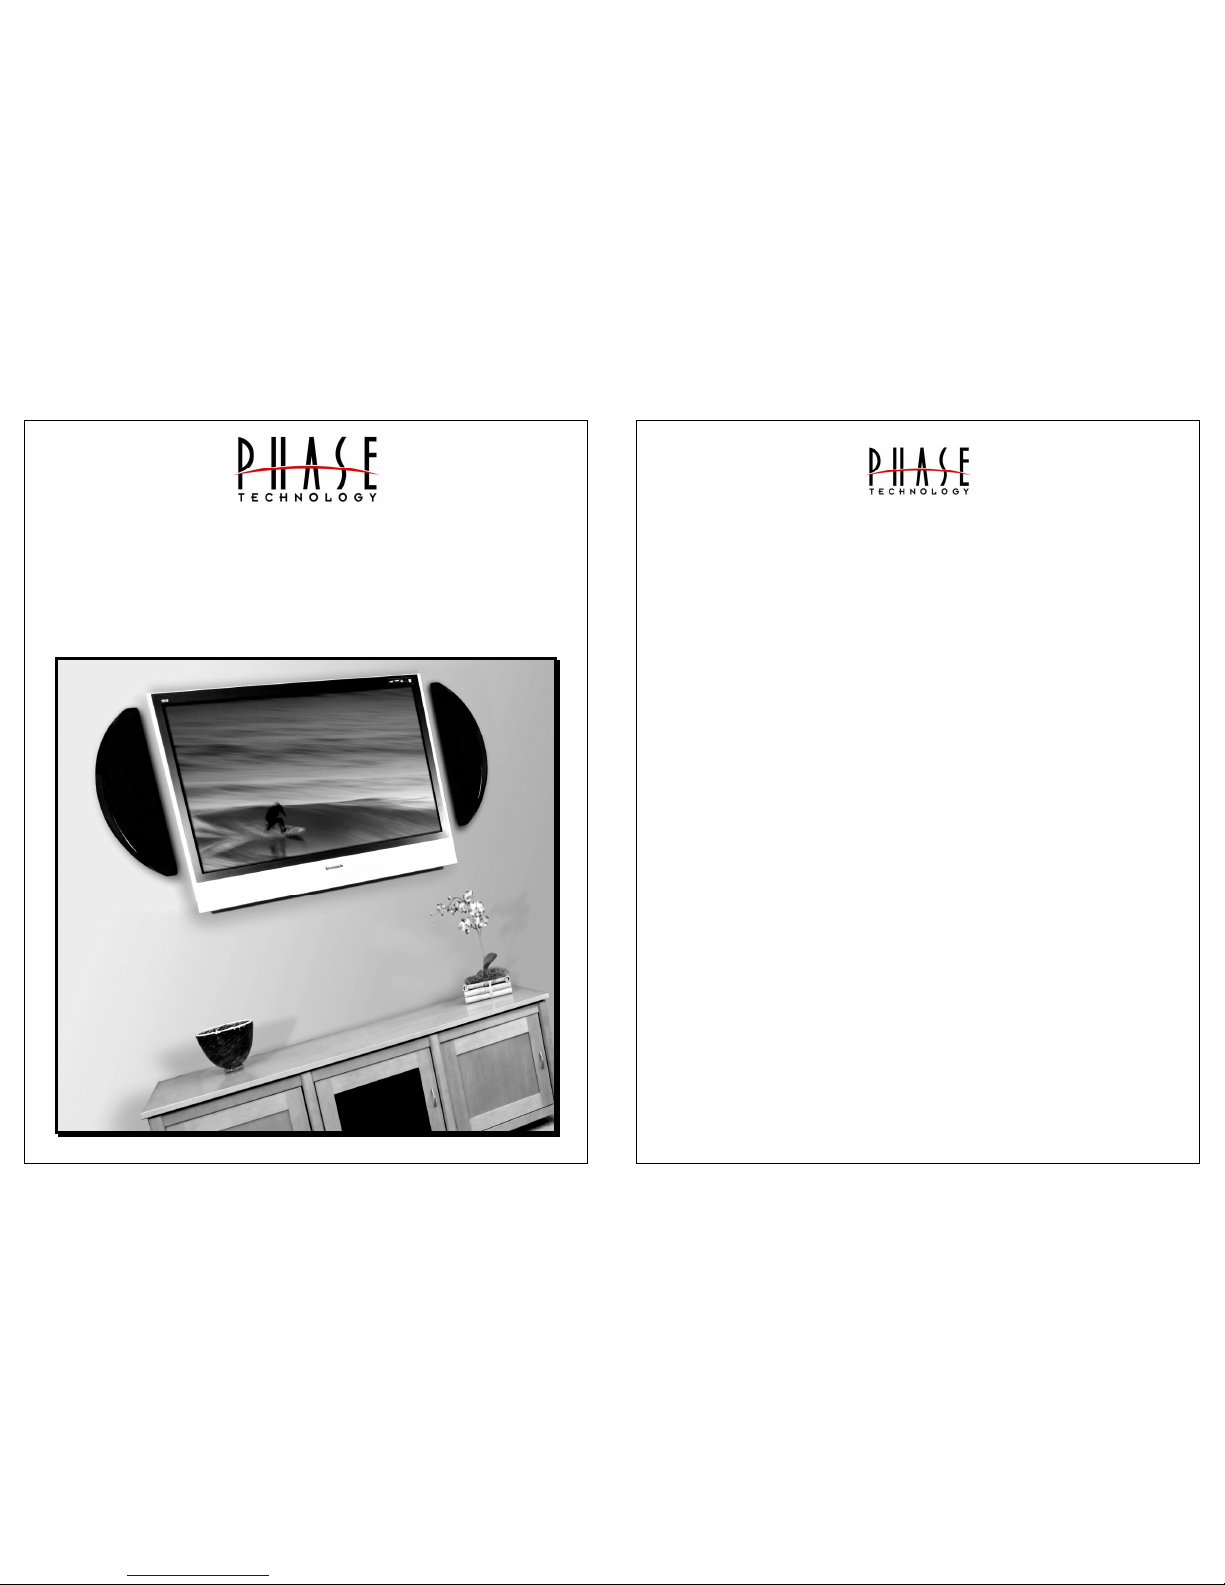
Thank you for your purchase of the Phase Technology Arte’ high definition flat panel, multi-channel
speaker system. Each pair of the Arte’ speakers create an LCR configuration. With Phase Technology’s 2
c
™
center channel design there is no need for a separate center channel speaker. The center channel sound field
is produced by combining the output from each Arte’ lower speaker array. This recreates the center channel
sound field from your amplifier and the content sounds like it is coming from the center of the TV screen.
The Arte’ flat panel, multi-channel speaker system is designed to fill a verity of applications and
incorporates a very flexible mounting system to facilitate your mounting requirements. The Arte’ speakers are
packaged with wall mount brackets for “on wall” applications when one will be placed on either side of a wall
mounted flat panel display. There are also 2 different sets of threaded inserts located on the rear of the cabinet
for applications were mounting the speakers to a display wall bracket mechanism is required, for use with the
Phase Technology table top speaker stands or for use with floor standing speaker stands (such as the Sanus
FF1s Speaker Stand with the Phasetech SMA1 mounting adapter). The 4, #10-32 screws provided with the
speakers can be used for mounting the Arte’ speakers to many flat panel display mounting brackets that have
provisions for speakers (Such as those available from Chief, Sanus and others).
WALL MOUNTING
When selecting the speaker mounting location, it is prudent to take a few extra minutes to carefully
inspect and measure the wall where you intend to mount the Arte’ speakers and your flat panel display.
An inspection of the room or rooms that back-up to the wall you have selected for mounting the Arte’
speakers, can often alert you to potential obstacles. For example, if the wall you want to mount to
happens to be the common wall for a bathroom or kitchen, there is a good chance you will encounter
water or sewer pipes in the wall that will not be detected by a stud-finder. An electronic stud-finder is a
useful tool to assist you in selecting the speaker placement, however be cautious as they often give
false readings. It is recommended that wherever possible you try to fasten these mounting brackets to
a vertical stud with the appropriate wood screws. If it is not possible to mount the brackets over the
studs then it is recommended that the appropriate hollow wall anchors or toggle bolts be used for the
weight of each speaker system. Be certain to use all 4 of the mounting holes on each bracket to assure
a safe and reliable installation.
Step 1
Determine that the desired mounting location is safe and clear of any physical obstructions that might
hinder the proper installation of the speakers. If the flat panel monitor is already installed on the wall
you can use it as a guide for the installation of the speakers. For the best appearance it is
recommended that the speakers be installed symmetrically on either side of the monitor. The spacing
from the monitor is not critical so you may use whatever is most appealing aesthetically but the
speakers’ response characteristics will be best if you stay within a few inches of the sides of the
display.
Special consideration must be taken to run two sets of speaker leads to each Arte’ speaker. One pair
will be connected to the left (or right) channel on your amplifier and the other pair will be used on each
Arte’ for the center channel. When you are ready to connect the speaker leads to your amplifier you
will have a set of leads for the left and right channel and TWO sets of leads for the center channel. This
connects the center channel drivers of each system in parallel.
Page 2
Be certain that you can get the speaker wire to the locations that you plan to mount the speaker
systems. Check with your Phase Technology dealer for their recommendation for the best wire for your
application but we suggest that you use a minimum of AWG #16/4 for the speakers. This will allow you
to have a pair of wires for both the left or right speaker and a separate 2 pairs of wires for the 2 center
channel speakers. Pre-run your speaker wire to the determined locations and be sure to leave about 2
feet of extra wire for the final speaker installation. Be certain to check for wall construction in the
desired mounting locations as mentioned above as well as the required hardware for the mounting
brackets. If the flat panel monitor is not yet mounted to the wall, mount the display first before mounting
the speakers.
Step 2
Using the mounting bracket as a guide measure equal distance from the top of the display and the
bottom of the display to the ends of the bracket. You need to allow a minimum of 1 ¼” from the edge of
the bracket side to the edge of the monitor so the speaker will clear the monitor when mounted to the
wall. Use a level to make sure you are mounting the bracket straight. With the bracket positioned in the
desired location use a pencil to mark the 4 mounting holes on the wall for the bracket mounting screws.
Drill the wall and install your anchors and screw the brackets to the wall.
Step 3
The pair of Arte’ speakers are sent as a matched mirror image pair of speakers. This means there is a
dedicated left speaker and a dedicated right speaker. There is a label on the rear of the speaker that
says “THIS END UP” that indicates the correct orientation of the speaker when it is mounted. There
are 2 terminal assemblies on the rear of the speaker cabinet. The upper one indicated by the label is for
the left/right channel input wires. The bottom terminal is for the center channel speaker wire connection.
Connect the speaker wires to the correct terminals observing the polarity indicated on the terminal.
Strip about ½” of insulation from the wires and separate the wires as necessary. If you are using other
wire lugs or connectors, attach them at this time to the bare wire. Unscrew the binding post terminals
and slip the stripped end of the wire through the hole in the metal post. Secure the wire in the post by
tightening the binding post terminal nut down on the bare wire or lug. Make sure the nut is tight and the
wire will not pull out of the terminal by lightly pulling back on the wire.
Step 4
The sturdy steel wall brackets supplied with the speakers are designed to attach to the key-way metal
slotted mounts on the rear of the speaker cabinet. Simply align the posts on the brackets with the holes
in the keyhole hangers and allow the speaker to slip down over the head of the bracket pins. Tuck the
speaker wire in behind the speaker cabinet and if necessary neaten up the wire with the use of tie
wraps.
Step 5
The Arte’ speakers are designed as a front LCR system that operates from a single pair of speaker
cabinets. As such the speaker hookup is treated the same as hooking up separate Left, Right and
Center speakers to a home theater receiver. The only difference is that you have 2 pairs of wires that
are connected to the amplifier’s center channel speaker output connection. The left and right pair of
wires are connected to their respective left and right speaker output terminals on the amplifier. Be
certain to observe the speaker polarity and refer to your amplifier manual for further information on
connecting your speakers.
Step 6
Since the Arte’ speakers form the front 3 speakers in a home theater system for flat panel displays they
are to be used and set up as you would normally for any 5.1 to 7.2 surround sound system for balance
and level adjustments. The amplifier should be set to the small speaker mode for best performance and
the subwoofer setting should be set to 100Hz. We recommend the use of our Phase Technology
subwoofers and surround speakers for complimenting your installation.
218-2072
The Arté is a unique 2-way systems for right and left main
+ center channel applications. Dual 5.25" RPF Kevlarlaminated solid piston drivers and dual 1. user-adjustable
soft dome tweeters offer superb sound quality for all three
front channels from just two speakers. The proprietary
mounting systems are included for the on-wall with optional
stand mount and flat panel display systems mounting
available.
Tweeter Two 1" user-adjustable soft dome
Woofer
Two 5.25" RPF Kevlar-laminated
solid flat-piston drivers
Dimensions 9" (W) x 24" (H) x 3.5" (D)
Frequency 80 Hz - 22 kHz ( 3 dB)
Sensitivity 88 dB
Impedence 4 Ohms (Main); 8 Ohms (Center)
Finish Gloss Black or Gloss Silver
Weight Each 17 lbs
 Loading...