


Ostia User’s Manual

SYSTEM REQUIREMENTS AND TERMS USED IN THE
MANUAL
Windows® Mobile-based device - Pharos Traveler GPS
devices, Pocket PCs, and Pocket PC Phones.
Windows CE device – Pharos Drive GPS devices
Pocket PC Requirements
Processor Type: StrongArm or XScale
Operating System: Windows CE Version 4.0 or higher
Memory: 5-MB Program (memory cards are suggested for
map storage)
Compact Flash card or SD/MMC card memory: 64 MB
minimum
Desktop/Laptop Requirements
CPU: Pentium class
Operating System: Windows 2000/XP or higher.
USB port or Card Reader for data transfers to Windows
Mobile-based devices: Microsoft ActiveSync must be
installed and connected if transferring data via connection
from the device to USB port using MapFinder.
Available hard drive space: 64-MB minimum for map
installation.
2

TABLE OF CONTENTS
System Requirements and Terms Used 2
Table of Contents 3
Precautions and Notices 6
Introduction to Pharos GPS Software and Hardware 7
1.0
2.0
2.1 Get Connected, Install Ostia and Open MapFinder
2.2 Using the MapFinder Software
2.3 Selecting Maps
2.4 Extracting and Transferring Maps
2.5 Other MapFinder Functions
3.0
4.0
4.1 Map Screen Buttons
4.2 Goto Buttons
4.3 Power User
4.4 View Buttons
4.5 Options Buttons
4.6 Smart Navigator Buttons
4.7 Options Details
5.0
5.1 Anatomy of the Navigation Screen
5.2 Opening and Viewing a Map
5.3 Satellite and Compass Information Screens
5.4 User Interface Options
5.5 Display Options
5.6 Zooming (In/Out) Capabilities
5.7 Smart Navigator Services
Summary of Features 8
Getting Started with Ostia and MapFinder 10
10
12
13
15
16
Ostia Terms and Abbreviations 17
On-screen Features 18
18
19
20
22
23
24
26
General Features of Ostia 28
28
29
30
31
32
35
36
PG
3

6.0
6.1 Creating a Route
6.2 Adding Multi-Stops to a Route
6.3 Using the Point of Interest Search
6.4 Saving Position as a Favorite, Contact, or Home
6.5 Using Trip Trace
6.6 Exporting Favorites
6.7 Deleting Favorites
6.8 When to use the Highway/Motorway Map
7.0
7.1 Register & Subscribe
7.2 Smart Login
7.3 Using Real-time Traffic, POI Finder, and Maps on
7.4 Using Follow Me
8.0
8.1 GPS Status Indicator/Powering on GPS Receiver
8.2 Configuring GPS in Ostia
8.3 Installing Pharos GPS Hardware
9.0
10.0
11.0
Using Features in Ostia 38
Smart Navigator Services 58
Demand
GPS Receiver Setup and Configuration 82
Troubleshooting 89
Contact Us at Pharos 90
SOFTWARE LICENSE AGREEMENT 91
38
45
47
52
54
56
56
57
58
60
62
69
82
83
85
4

!! IMPORTANT !!
Register your Pharos Ostia Software NOW at:
www.pharosgps.com/support
As a Pharos Registered Customer, you are
eligible to download updated maps and software
and participate in any future programs or services
that Pharos may announce. Discounted fees
and/or additional charges may apply. Registration
is easy, and Pharos never sells or releases user
information to any outside entities.
5

Precautions and Notices
¾ Do not attempt to operate the controls on a Pharos GPS system in a
vehicle while in motion or in any way that interferes with safe driving.
¾ Secure your device to the vehicle in such a way as to not endanger the
driver or passengers while driving or during operation.
¾ Do not place your device in any area of the vehicle where the use of
electronic displays is prohibited in motor vehicles.
¾ GPS signals cannot pass through opaque solid materials. Obstacles,
such as tall buildings, tunnels, highways, dense trees, and bad weather
can effect signal reception. If window tint contains metallic material,
GPS signal may be poor. Cordless phones, radar detectors, satellite
radio receivers, and other wireless devices may interfere with GPS
reception or result in poor GPS reception quality.
¾ Navigation maps may contain errors and omissions or may be out-of-
date with recent road changes or conditions. On the rare instance
where an address or section is missing from our maps, please contact
us as soon as possible to ensure that we keep our maps up-to-date with
the least amount of errors as possible. Please be attentive to roadway
signage, all posted roadway information, and the condition of the road
itself. Calculated routes are reference only. Users must obey traffic
signs and local regulations.
¾ GPS positioning is intended for use as a reference, not precise
measurement of direction, distance, or topography. Routes in Ostia
are recommendations only.
¾ Do not leave the product in direct sunlight or heat for extended periods
of time. Overheating the battery can be dangerous and/or cause
malfunctions.
Pharos software and hardware may not be used for any purpose in
which failure could lead to personal injury, physical, or
environmental damage.
6

Introduction to Pharos GPS Software and Hardware
winning mobility tools will help you travel in a more efficient, organized
and informed manner. This introduction should be used as a reference
when getting started with our system. While you may not need to use all
the steps in the introduction regularly, being familiar with these features
will make usage easier.
Use this product prudently. The product manufacturer is not liable for
any damages or lost profits caused by misuse of the product. Pharos
and its suppliers specifically disclaim any warranties, either
expressed or implied, for their products’ fitness for use in any highrisk activity
Thank you for choosing Pharos GPS products. These award-
¾ Make sure Microsoft ActiveSync is installed on your desktop/
laptop computer if you are using Windows Mobile-based devices
(Windows Vista does not require ActiveSync)
¾ Before Copying Maps (Section 2), make sure your Storage
Card is in your device or card reader and that it is not locked
¾ Use the MapFinder utility to choose and load maps (Section 2)
¾ Before installing Ostia on your Windows Mobile-based devices
(Section 2), make sure ActiveSync on your desktop shows
“Connected”
¾ Know both your departure location and your destination to
determine which maps you need
¾ To prevent many new-user issues, read the Owner’s Manual
that came with your device
7

1.0 Summary of Features
NMEA-0183 compliant
Detailed street level data, with up to 10 maps opened
Automatically opens the map for your current location when a
GPS lock is acquired
Screen View supports landscape as well as portrait options
Reference by address, intersection, POI, longitude/latitude or
Outlook Contacts
Routing from one Point of Reference to another, with up to 10
intermittent “Multi-Stops” in a single Route
Easy to use Points of Interest categories such as Cash, Fuel,
Food, Hotel, etc.
Text directions, Visual driving directions, and Voice guidance
Tap a street on the map to show street information
Zoom in and zoom out with stylus
Favorites stored on Pocket PC independent of Contacts
GPS status indicator with on-screen strength indicator
Real-time simulation of Route with GPS Powered Off
Two views (one 2D overhead, one 3D Birds-Eye), with night-view
map display option
8

When navigating with the Pharos GPS Receiver you will find:
o Four routing methods: Fastest, Shortest, No Highway/Motorway,
Avoid Toll Roads
o Street name of the next turn at the bottom of screen
o Displays the distance and direction of the next turn and distance
to final Destination
o Screen display options: Map, Split Map with Arrow, and Arrow
o Audible Voice-prompt Route guidance
o Auto zoom-in and out before and after change in trajectory
o GPS Receiver position is always Point of Origin when GPS is
enabled
o An Auto Re-Route option and one-touch Re-Route button
o Moving map while navigating with the GPS Receiver
o Selectable “North Up” or “Heading Up” for map display
Smart Navigator Services
o 4 Internet-based services with subscription
o Real-time Traffic shows traffic speed and/or incident data based
on your city (where available)
o POI Finder provides Points of Interest such as businesses, fire
departments, WiFi Hotspots, FedEx Kinko’s, and more
o Maps on Demand lets you load a map over the Internet without
using a CD
o Follow Me allows you to see where other Members of your group
are on the road, or for a Member to view a driver on the road
o Access each of these services wirelessly using built-in WiFi,
GPRS, or other data connection at any WiFi hotspot
9

2.0 Getting Started with Ostia and MapFinder
2.1 Get Connected, Install Ostia and Open MapFinder
Step 1:
is connected to your PC through
Microsoft ActiveSync.
Note: Applies only for Windows
Mobile-based devices
Note: ActiveSync is not used
with Windows Vista
Step 2:
PC and the Pharos Setup Screen should appear
Note: If Auto-run is not enabled on your PC, you will need to open
My Computer and double-click on the CDROM Drive to open the
Pharos Setup Screen.
Make sure your device
Microsoft ActiveSync
Insert the Ostia CD into the CD-ROM drive on your
Step 3: Select “Ostia”
to install Ostia to your
device, and follow the
installation instructions
on your screen.
Note: Ostia is pre-installed
on some Pharos’ devices
Note: After Ostia has been successfully installed on your device,
please perform a Soft Reset on your device. This will ensure that the
Ostia shortcut will appear on the Today screen
Step 4: To begin transferring maps from the CD to your
device, select MapFinder from the Pharos Setup Screen
Note: To activate Ostia on your Windows Mobile-based device, enter
the registration code that is located on the inside flap of the
cardboard CD holder. This does not apply for Smartphones.
10

Step 5: Selecting Pharos from the Pharos Setup Screen will
directly link to the Pharos Home page assuming your PC is
connected to Internet.
Step 6:
To read software or hardware manual, select Manual
from the Pharos Setup Screen. Select the manual you wish to
read from the list.
11

2.2 Using the MapFinder Software
The World MapFinder will
open. Select the region of
the world where your maps
are located by clicking on
the colored area of the
map.
Note: You will need to have the map CDs on-hand to use Pharos MapFinder.
MapFinder helps you determine which maps you need. Simply
select the maps you wish to use and copy them to your PC,
Pocket PC, Pharos navigation device, Smartphone, or Storage
Card. You can also browse features and data within your
maps.
USA
Canada
If using European maps, select the country that covers your
area by clicking on the map. The appropriate MapFinder for
that country will appear.
Europe
UK
12

2.3 Selecting maps
There are two methods used to select a map(s) you want to use:
1. Using the Search Field
Enter a city name or
zip/postcode and click
“Search”.
Note: A zip/postcode is the most precise way to search. Areas on
the edge of maps may need more than one map to travel efficiently.
After searching, a list
matching your criteria will
appear in the results field.
Double-click the city name
you wish to select. The map
selection will become
highlighted below. Repeat for
additional map selections.
To view a map on your PC,
right-click on the desired
map, and select “View
Current Map”.
This allows searching for
Addresses, Points of Interest
(i.e. Airports, City Centers,
etc.), and other features.
13

2. Directly Selecting Maps
Place the mouse cursor over
the map to be selected; the
information for that map will
be displayed (as seen to the
right).
Double-click on the map to select it. (Repeat for additional
map selections.)
MapFinder displays the
number of maps you have
selected, how much free
space is available on your
hard drive, and how much
storage is required to transfer
this map to your Device in the
upper right corner of the
window.
14

2.4 Extracting and Transferring Maps
•
•
After maps are selected, they need to be extracted and sent to
the “My Documents” folder on the Storage Card or the main
memory of Pocket PC or handheld device.
name is case sensitive and must be on either the SD card or Main
Memory of the device for the map files to be read correctly.
After selecting maps, the upper right
corner of the screen displays two options:
• MS ActiveSync
Transfer maps directly to
Pocket PC or memory card
via ActiveSync
Note: Applies only if using
Windows Mobile-based device
1. Choose appropriate option, and
click “Execute Map Copy”, as
seen to the right.
2. Select location to store maps. Click the drop-down menu
arrow to scroll through additional options in list:
Card Reader
Transfer maps directly to a
memory card in a card reader.
Make sure you know which
drive letter is assigned to your
card reader.
Note: The folder
• For the Windows Mobile-
based device: choose
either Main Memory or
Storage Card
3. Select the appropriate location and click OK to continue.
Continue to click OK on the next windows. The last screen will
display the progress of the transfer.
begin right away, move the mouse to prevent the program from idling.
If you are using a Card
Reader, select the drive
letter to use
Note: If transfer does not
15

2.5 Other MapFinder Functions
V
–
A
Right-click on a map and the following menu will appear:
MapFinder Menu Functions
Note: MapFinder will only function if the correct map CD is already
inserted into the CD drive on your PC.
iew Current Map – opens a
map to be viewed on the PC
Un-Select ALL Maps – clears all
map selections
Copy highway map
selected Country Hwy/Motorway
Map to device
Note: This selection is not available
for all MapFinders. It will only appear
in the list if you right-click over white
space
Copy Current Map(s) – map(s)
currently selected will be copied
to the device
Copy Selected Map –
downloads maps already on your
hard drive to your device
Extract Maps to the Hard Drive
– extracts maps directly to your
hard drive only
Delete Maps – deletes maps
from your hard drive only
bout Pharos MapFinder –
displays program information
Minimize – minimizes
MapFinder
Exit – exits MapFinder
completely
copy
16

3.0 Ostia Terms and Abbreviations
Action Button
Pressing the center of the Directional Pad located on the Windows
Mobile-based device allows you to automatically recalculate a Route
from your current location once you have driven off-Route.
Saved Place
Saved locations stored on your device as Favorites, Recent
Destinations, or Outlook Contacts for use as Point of References
(POR).
Intersection
Intersection of roadways. An intersection can be set as a POR.
MapFinder
Utility used to automate the transferring of maps to your device.
Microsoft ActiveSync
Developed by Microsoft. Use with a Windows Mobile-based device
and your desktop computer to install/manage maps. This software
can be downloaded from: www.microsoft.com/windowsmobile
Multi-Stop
Add up to 10 stops to a route between Origin & Destination.
Point of Interest (POI)
Common points of interest, which can be used as “PORs”, are listed
in the following categories: Cash, Fuel, Food, and Hotel. City
Centers, Shopping Centers, Airports, and other public landmarks are
also available.
Point of Reference (POR)
Any item used to define a specific point or coordinate used in
navigation (e.g. Origin, Destination, Point of Interest (POI),
Intersection, Address, etc.). A POR may also be set by doubletapping on the map.
17

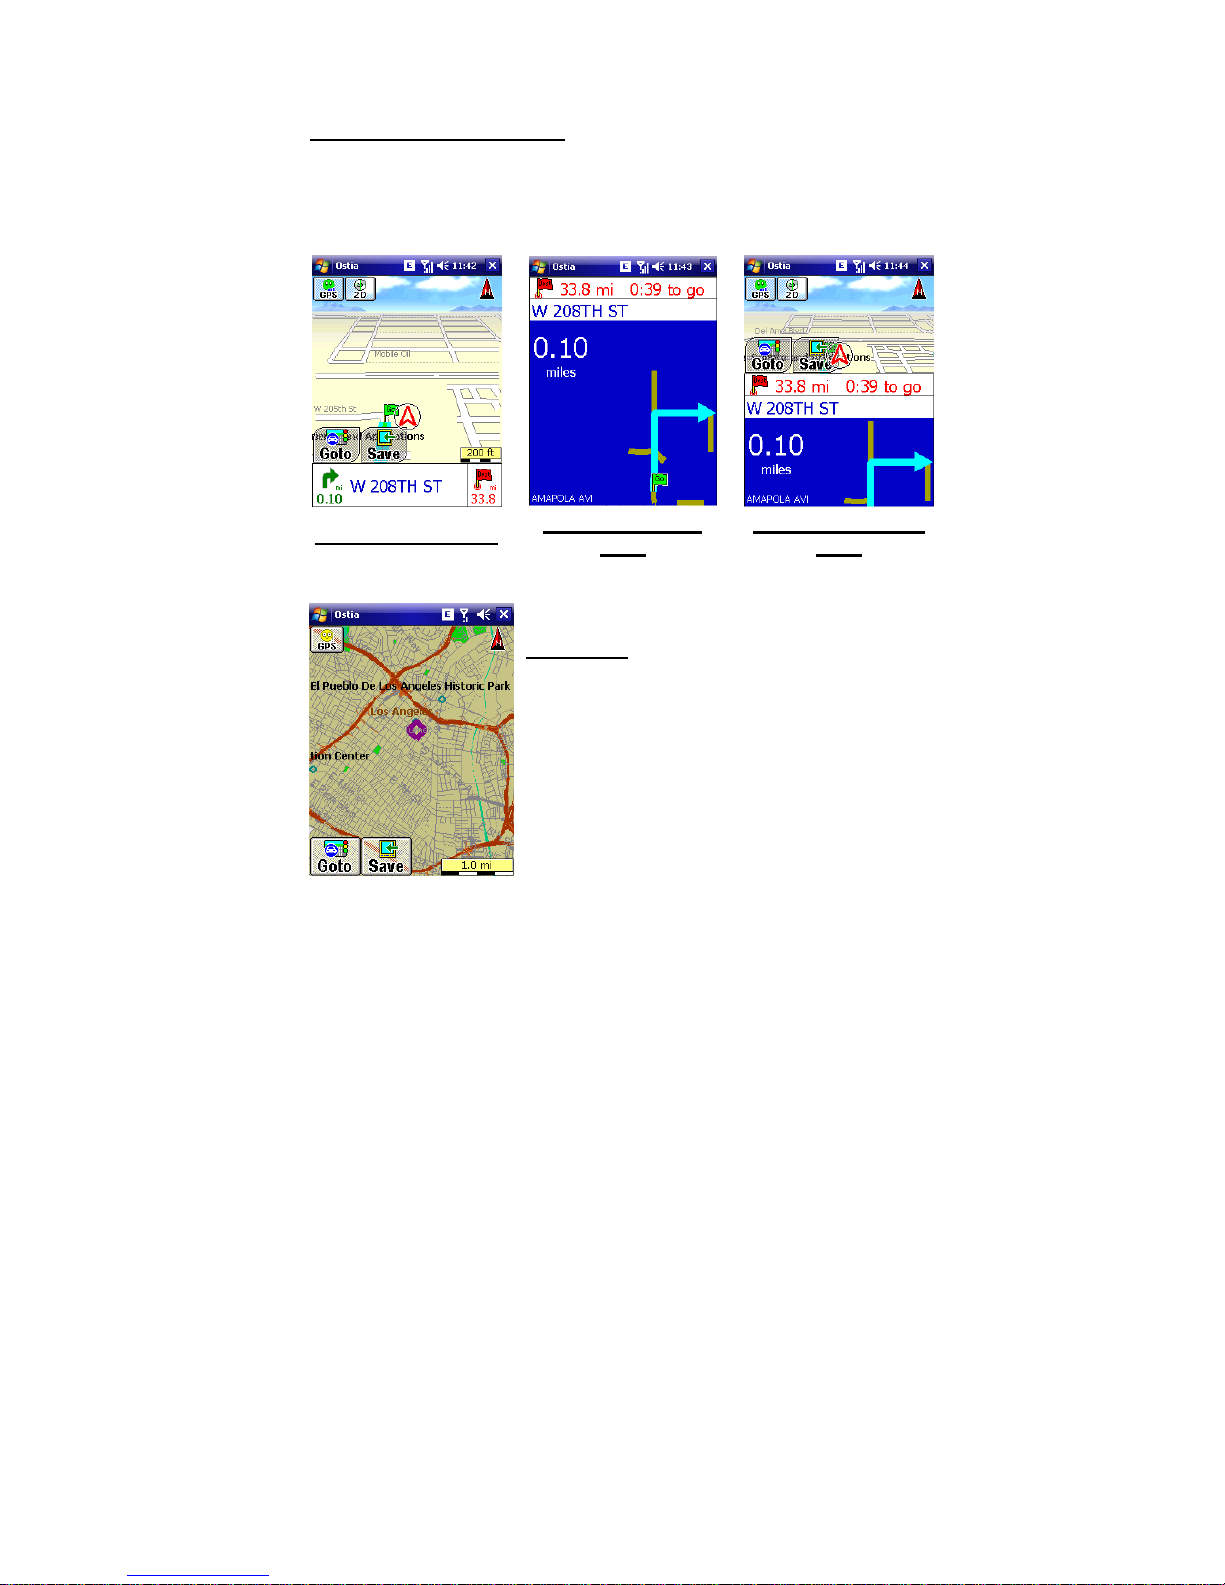
4.0 On-screen Features
4.1 Map Screen Buttons
Goto – Brings up on-screen Buttons that allow
you to search for a POR, change map view, see
GPS info, access Smart Navigator services,
manage Favorites, and view Options.
GPS – Enables you to turn the GPS on/off,
initialize/reset the GPS, and indicates the
current status of the GPS receiver.
Save – Brings up on-screen Buttons that
allow you to save your GPS/Map Center,
Current Origin, Current Destination or
Latitude/Longitude to Favorites, Home, or
Contacts.
2D – Enables you to switch back to 2D mode.
18

Map Screen (2D)
View Screen
Map Screen (3D)
Options Screen
Goto Screen
Smart Navigator
Screen
19
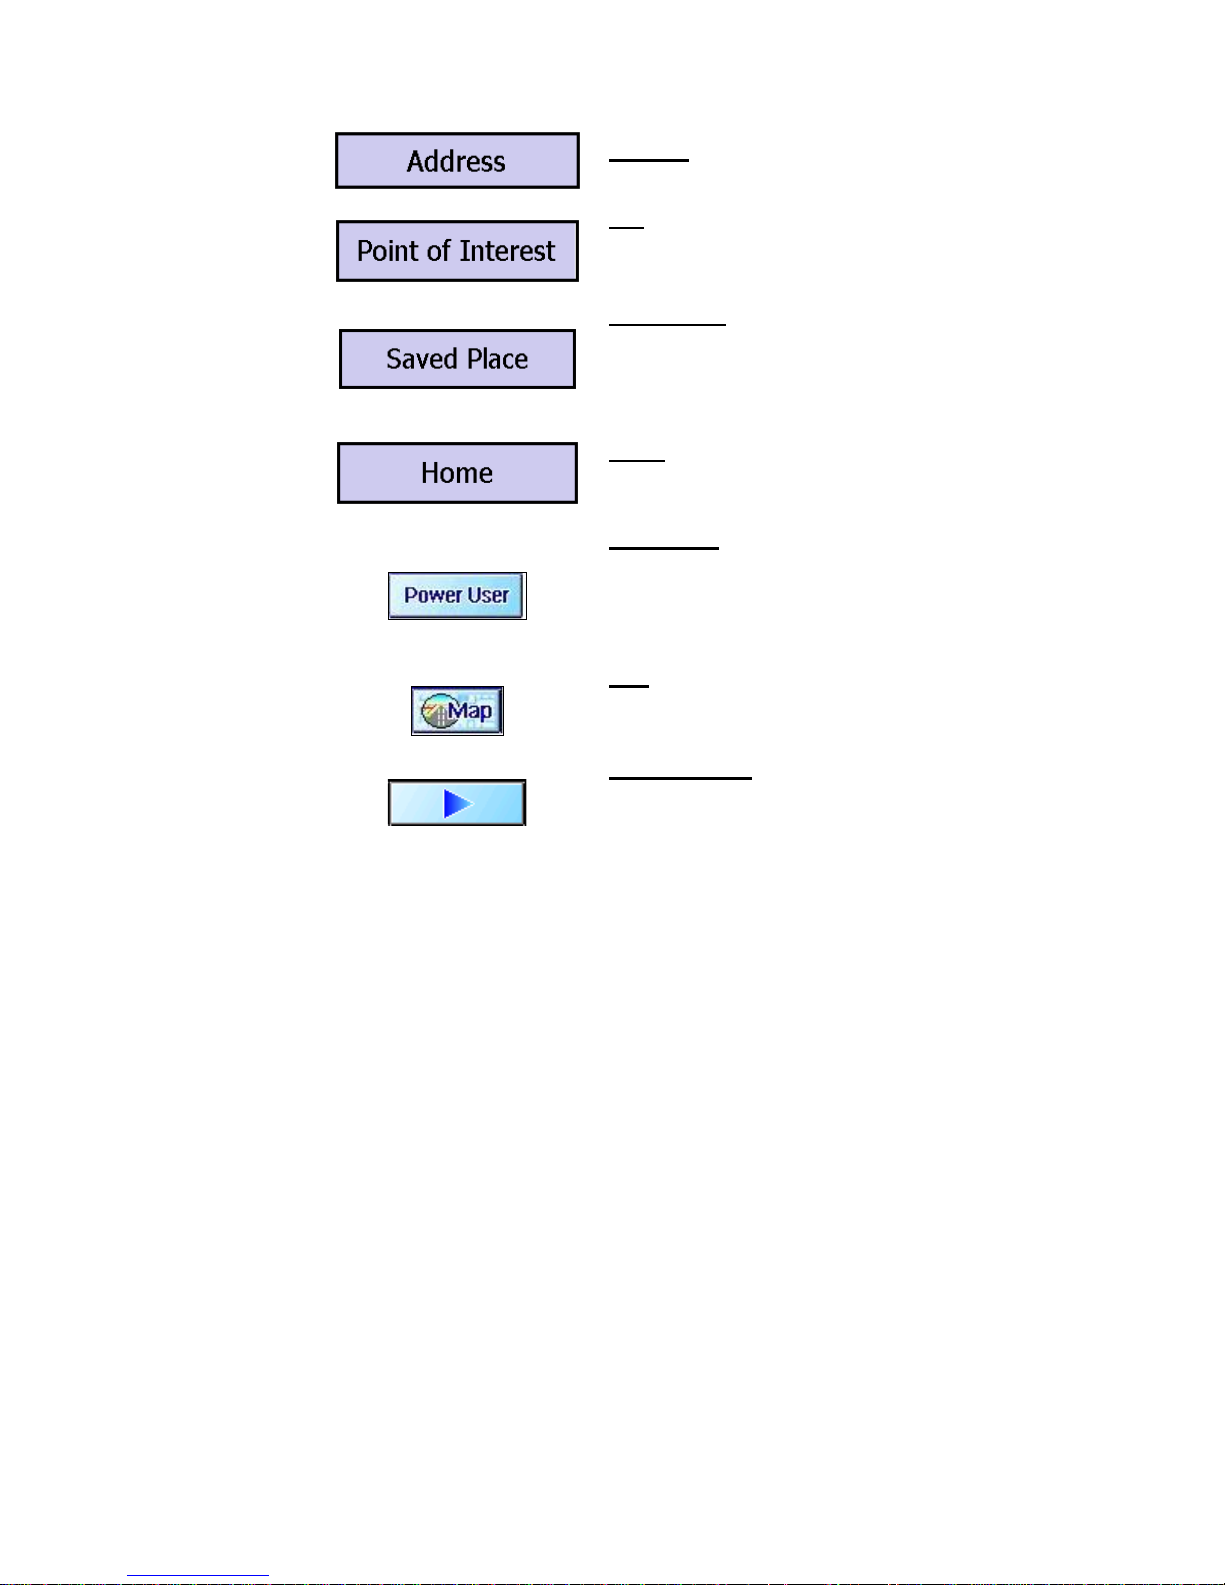
4.2 Goto Buttons
Address – Enter specific
address as a Destination.
POI – Search for specific POI’s
near your current location (or the
center of the screen) within a
given set of parameters.
Saved Place – Accesses pre-
designated Favorites, Recent
Destinations, and Pocket Outlook
Contacts database to set a
Destination.
Home – Routes you to the
Favorite pre-designated as
Home.
Power User – Gives you access
to additional Ostia features such
as setting an Origin or Opening a
Map. See Section 4.3 Power
User for a list of specific
functions within this option.
Map – Returns you to the map
screen. This applies to all
screens in which this button
appears.
Forward Arrow – Moves forward
to the next Screen. This applies
to all screens in which this button
appears.
20
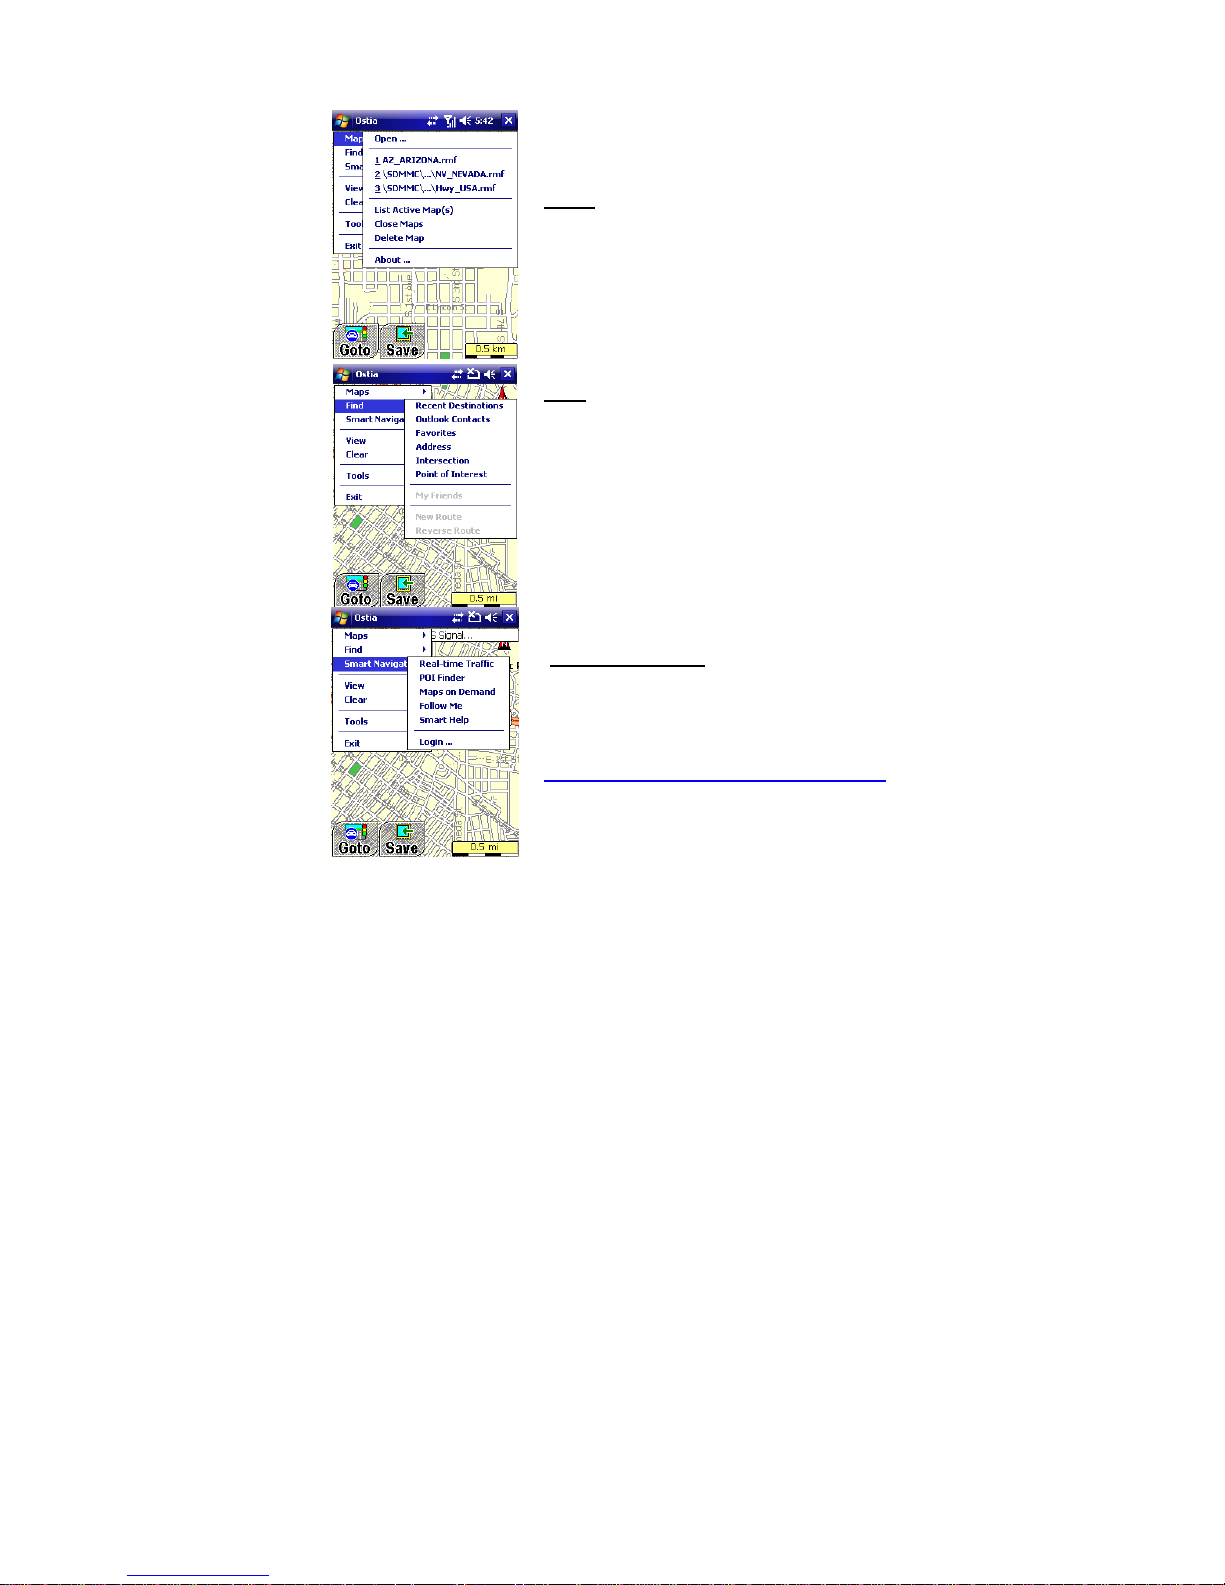
4.3 Power User
Maps – Open maps, List Active Maps,
Close Maps and Delete Maps. Provides
software and map version information.
Find – Search for a POR, view Recent
Destinations, view a Follow Me Friend,
make a New Route, and make a
Reverse Route.
Note: New Route and Reverse Route are
only available if an Origin and Destination
have been selected. My Friends only
available if you and at least one Friend are
logged into Follow Me; subscription
required.
Smart Navigator – Accesses Smart
Navigator Services. For more
information see Section 4.6 Smart
Navigator. Requires Internet access
and paid subscription from Pharos:
www.PharosGPS.com/SmartNavigator
Note: Applies only if using Windows Mobile-
based devices.
21

View – View Text Directions, GPS
Information, POR, Full Route, Real-time
Traffic, Places Found from POI Finder,
a saved Trip Trace, and Favorites.
Note: Some features are only available if
they have been activated on the map, such
as Real-time Traffic and POIs Found, or
have been previously saved such as Trip
Trace and Favorites.
Clear – Clear features that have been
added to the map such as Real-time
Traffic, Places Found, a Route, Multistops, Trip Trace, and Favorites.
4.4 View Buttons
Tools – Allows you to Simulate a route,
Turn GPS receiver On/Off, Record a
Trip Trace, Save a Place, Delete
Favorites, Export Favorites as a text
file, or view Options. For more info on
Options, see Section 4.7 Options
Details.
22

2D/3D View – Change map
view from Overhead (2D) to
Bird’s Eye (3D) View.
Text Directions – View the
complete text directions of a
pre-determined route.
GPS Info – View Satellite
strength and Compass info
such as Latitude/Longitude,
time, altitude, etc.
is based on Height Above Ellipsoid,
not Height Above Sea Level.
Show Destination – View the
currently selected Destination
on the map.
Back Arrow – Moves you back
to the previous Screen. This
applies to all screens in which
this button appears.
Note: Altitude
23
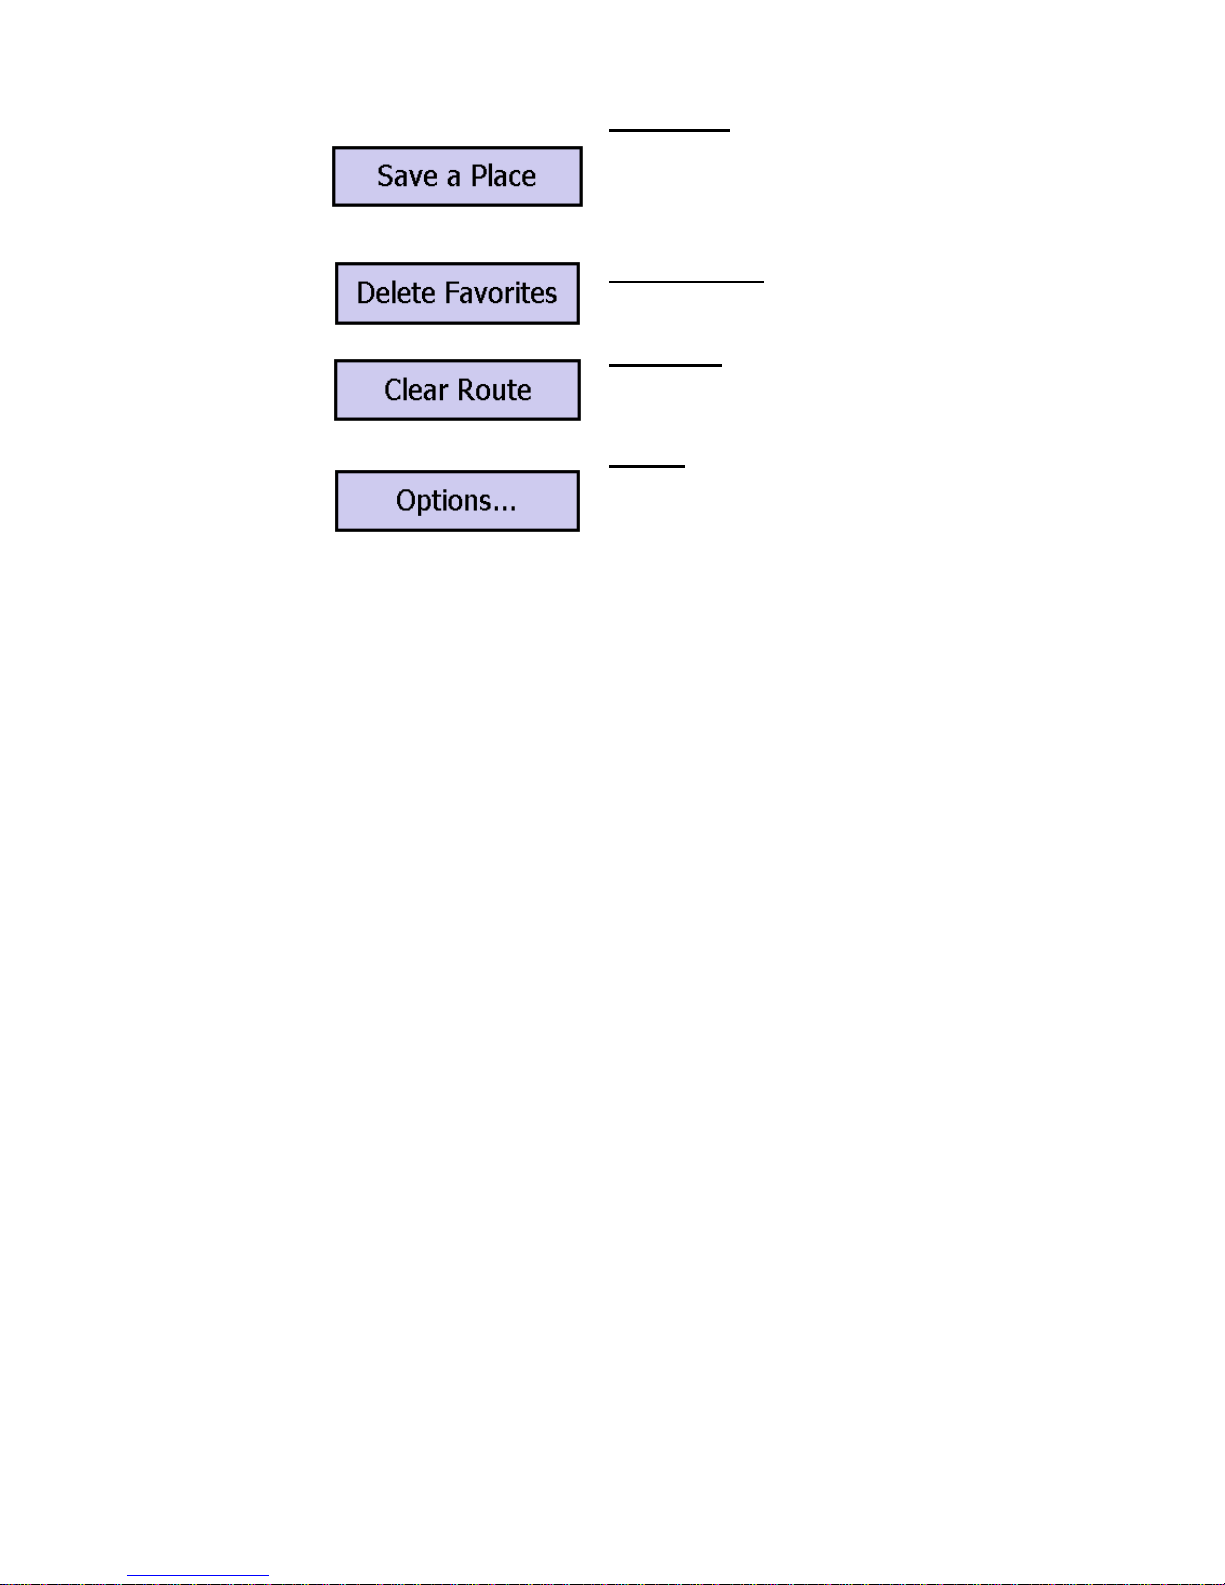
4.5 Options Buttons
Save a Place – Allows you to
save the GPS Location/Map
Center, Current Destination,
Current Origin, or a Lat/Lon as a
Favorite, as Home, or to Outlook
Contacts.
Delete Favorites – Delete a
Favorite from the list of saved
places.
Clear Route – Clears the route
from the map screen, including
the Origin, Destination, and MultiStops.
Options – Allows for
customization of Ostia. For
details on features inside
Options, see Section 4.7
Options Details.
24
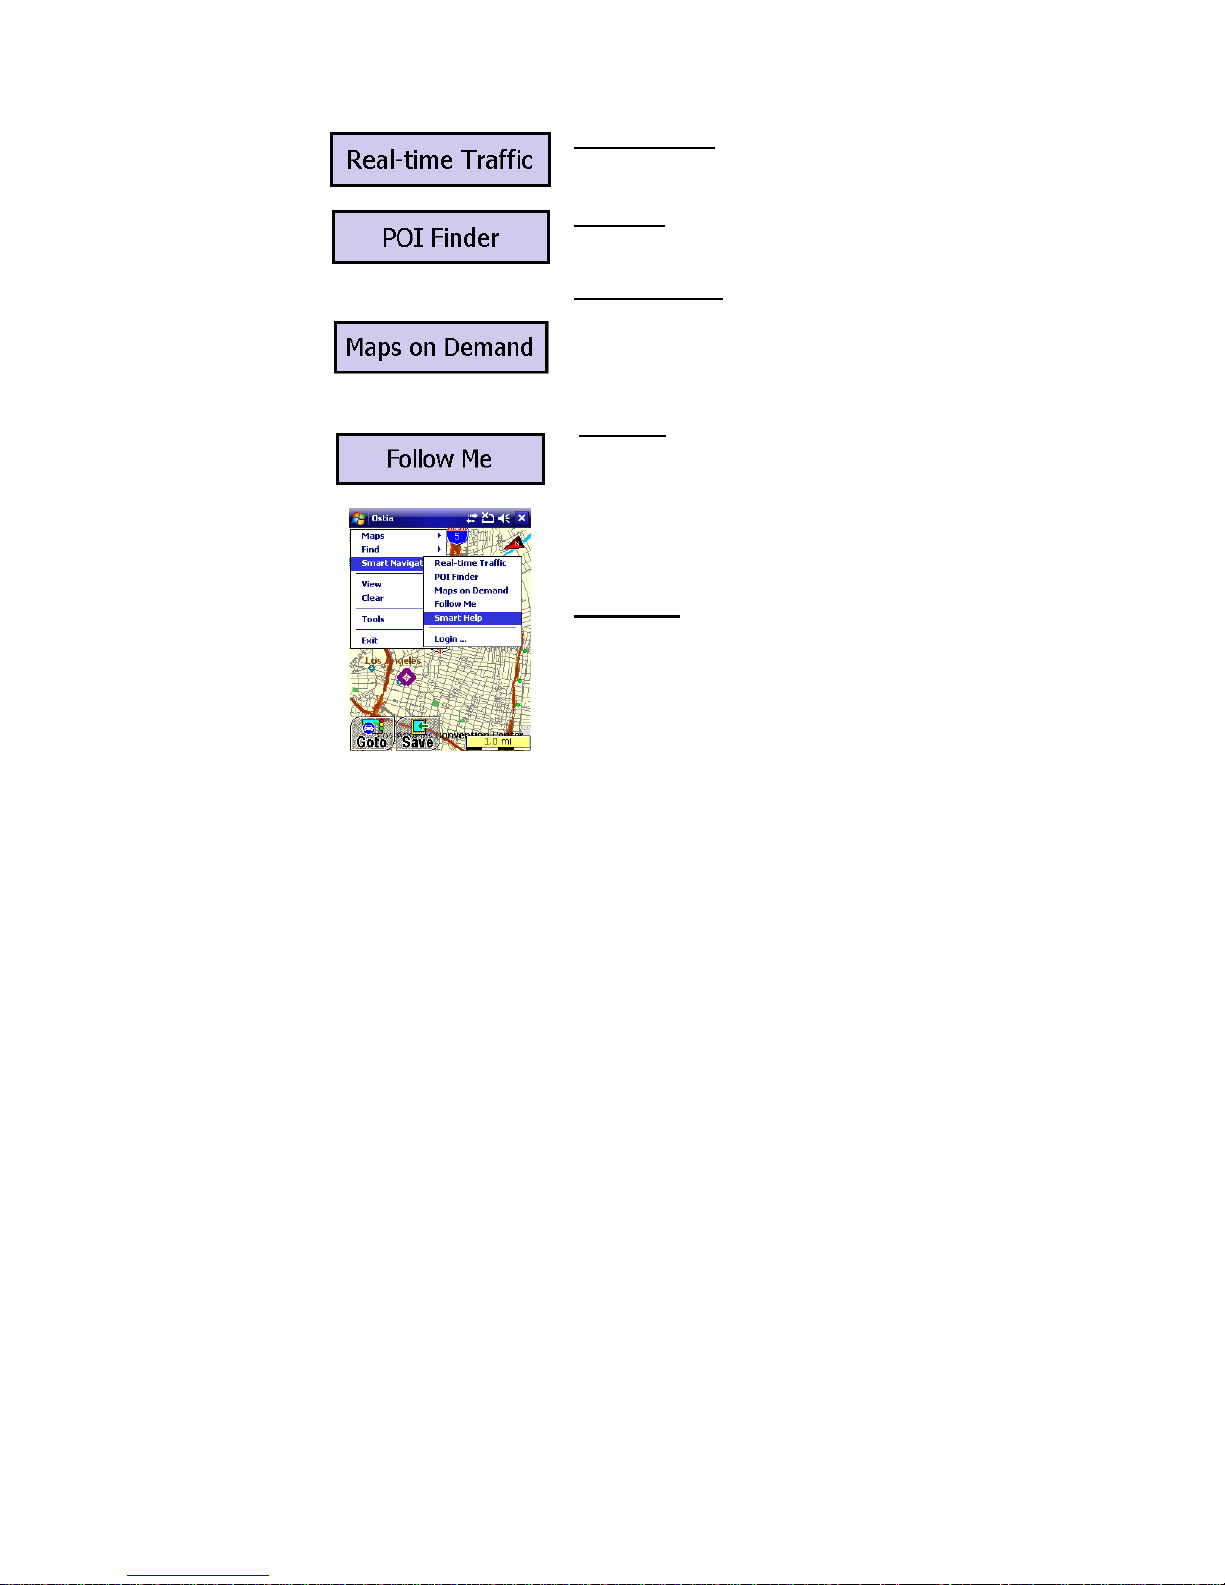
4.6 Smart Navigator Buttons
Note: Applies only if using Windows Mobile-based device
Real-time Traffic – Allows access to real-
time traffic data. (subscription required).
Check our website for availability.
POI Finder – Allows access to a large
active POI database (subscription
required).
Maps on Demand – Capability to
download maps to your device via the
Internet to your Pocket PC (Free service to
Registered Users).
Note: POI database files are not included in
Maps on Demand download.
Follow Me – Allows you to see exact
locations of any member/subscriber within
your “network” account, or for any member
to see you (subscription required).
Smart Help – Lists detailed
information about Pharos’ Smart
Navigator Services.
25

Login – Enter registered email
address and password to gain access
to the Smart Navigator Services, while
connected to the Internet.
4.7 Options Details
Auto/Manual Re-route
Enabling the Auto Re-route option will have the software
automatically calculate a new route if you go off the calculated
route. Manual Re-route requires you to press the action button
to Re-route.
North Up/ Heading Up
Enabling the North Up option will orient the screen to have
North always at the top of the screen. Heading Up option will
set the display to always show the GPS indicator pointing
towards the top of the screen with a compass in the upper
right corner of the screen.
26

Voice Guidance
This will allow either the Default (USA English using miles) or
an Alternative voice prompt (UK English using kilometers) to
be used for navigation, or to turn Off the Voice Guidance.
Route Options
This option sets the method the software uses to calculate a
route:
• Fastest: This will calculate the fastest route based on
posted speed limits
• Shortest: This will calculate the most direct route
• No Hwy: This will calculate a route avoiding
highways/motorways completely (Can not be used when
actually on a highway/motorway, or when using a Highway
map to route between two maps that are not touching)
• Avoid Toll Roads: This will calculate a route avoidin g
marked toll roads completely. Only applies to officially
designated toll roads
Daylight/Night View
Enabling Daylight View will use lighter colors on your screen.
Night View will display darker colors on the map, making it
less bright
Smart Server
This changes server access between sites A and B. This may
be necessary if experiencing slow downloading time for Smart
Navigator services such as POI Finder and Real-time Traffic.
Note: Applies only if using Windows Mobile-based device.
Tracking Interval
This allows you to change the Follow Me and Trip Trace
Interval times between 10 sec, 30 sec, 1 min, 5 min, and 20
min.
Note: Applies only if using Windows Mobile-based device.
(and less distracting to the driver) than Daylight View.
27

Follow Me ID
This allows you to enter your Follow Me Vehicle ID.
(subscription required)
Note: Applies only if using Windows Mobile-based device.
Smart Navigator User ID
This allows you to change the email address and password for
access to the Smart Navigator Services.
(subscription required)
Note: Applies only if using Windows Mobile-based device.
Color Scheme
This allows you to change the color scheme for Ostia. The
choices are Windows Default, Pharos Default, Dark Gray,
Peach Orange, and Moss Green.
28

5.0 General Features of Ostia
5.1 Anatomy of the Navigation Screen
Calculated Route
(Light Blue)
Change
3D to 2D
GPS
Indicator
Origin
(Green flag)
Compass
Indicator
Current
Location
Multi Stop
(Purple flag)
Menu toggle
Distance to
next turn
Next turn
Text display
29
Destination
(Red flag)
Save Location
Map scale
Distance to
Destination

5.2 Opening and Viewing a Map
Opening Map Automatically
Maps will automatically open when a GPS lock is acquired,
provided that the maps are already saved on the storage card or
main memory of the Device.
Opening Map Manually
To manually open maps, tap Goto Æ Power User Æ Maps Æ
Open, and select desired map from the list of available maps.
Tap the Forward Arrow to open the selected map. Repeat to
open multiple maps. The maximum number of maps that can be
opened at one time is 10.
Note: The last map opened when Ostia was turned off will be the first
map opened when Ostia is turned back on, and previous PORs are
cleared when new maps are opened.
30

5.3 Satellite and Compass Information Screens
This screen displays Satellite
Information. Typically, a nominal
value of 40 or higher on at least 3 bars
is normal for a GPS Lock. The bars
will be gray when searching for a
signal and blue when a lock is
acquired. The satellites are the gray
circles in the black target, which will
turn green when you have a Lock.
The Compass indicates the following
information when moving at 5mph or
faster:
• General direction of travel
• The red line represents the
general direction to your
selected Destination.
• Approximate:
o Latitude
o Longitude
o Altitude (based on HAE – Height Above
Ellipsoid)
o Global Time
o Speed
o Line-of-Site Distance to Destination from current
location
31

5.4 User Interface Options
With a Windows Mobile-based device running Windows
Mobile 2003 Second Edition, Version 4.21 or later, you have
the option to view the screen in Landscape mode or Portrait
mode, as seen below:
Landscape
Portrait
Note: To change the view of your device, follow these instructions:
Tap on the Start Menu Æ Settings Æ System Æ Screen, and select
the desired Orientation.
32
5.5 Display Options
Navigation Screen Options
Tapping the text directions will cycle through the three (3) navigation
screens that can be used while driving, as shown below, as well as
repeat the audible Voice Guidance. Refer to Section 4.7 Options
Details:
Standard Map View
Simplified Arrow
View
Night View
Uses optimal color scheme for night use.
You can set this view by checking “Night
View” on your Options screen, by tapping
Goto Æ Power User Æ Tools Æ Options Æ
select either Daylight View or Night View, and
tap Change to cycle through the options.
Tap Map when finished.
Split Map & Arrow
View
33
Map Scale
Tapping on the yellow “scale” box will
convert all units from Kilometers to
Miles, and vice versa, including all
distance information related to Route
calculation.
2D/3D View
Tapping on the Screen where the Sky
appears (in the horizon), will change the
3D Bird’s Eye View to 2D Overhead
View.
2D Overhead View
3D Bird View
34
Moving the Map Manually
There are 3 ways to move the maps manually so that other
sections of the map can be viewed:
1) Without a GPS
Lock, press the
Directional Pad on
your device in the
direction you wish to
view, and the map
will move
accordingly.
3) With a GPS Lock,
press the Directional
Pad in the direction
you wish to view and
the circled cross icon
will appear (pictured
to the right), and
the map will move
accordingly. If you
wish to resume back
to the view
displaying your
current position on
the map, select the
“GPS” button with
2) Without a GPS Lock, using
the stylus, tap and hold on the
screen, dots will circle around
the tip of the stylus. Without
letting go, drag the stylus in
the direction you wish to view,
and the map will move
accordingly.
Note: Applies only if using
Windows Mobile-based devices
or Pharos Drive GPS
+”, at the upper
red “
left-hand side of the
screen.
35

5.6 Zooming (In/Out) Capabilities
Note: Applies only if using Windows Mobile-based devices.
Zoom In
Drag the stylus or your finger on the
screen in a motion from the upper
left corner towards the bottom right
corner (creating a box on the
screen). The software will attempt
to do a best-fit zoom to the area
within the box.
Zoom Out
Zooming out is the opposite
direction, bottom left corner to the
upper right corner.
36

5.7 Smart Navigator Services
Note: Applies only if using Windows Mobile-based devices
Smart Navigator
A web-based suite of location-based services, including Realtime Traffic, POI Finder, Maps on Demand, and Follow Me.
With these Smart Navigator services, you can receive traffic
information, find points-of-interest, download maps on the go,
and view geographic locations of other users, all delivered via
an Internet connection directly to your mobile device. Smart
Navigator integrates these web-based information services
with Pharos' navigation and routing software for Windows
Mobile-based Pocket PCs, to give you the ultimate mobility
tool for information anywhere. For more information or to
subscribe to any of the Smart Navigator services, visit
www.pharosgps.com
described below. Refer to Section 7.0 Smart Navigator
Services to learn how to use these services.
Real-time Traffic
Real-time Traffic lets you view live traffic flow and events via
Internet connection, allowing you to better react to traffic
conditions. Simply connect to the Internet via ActiveSync from
your desktop PC, WiFi, wireless modem or Pocket PC phone.
Check our website for availability in your city. Refer to Section
7.0 Smart Navigator Services to learn how to use this
service.
POI Finder
POI Finder helps you find location information and directions
to a location using your Pocket PC and an Internet connection.
Look up restaurants, banks, hotels and other businesses,
specifying location by proximity to a destination or to your
current location. Refer to Section 7.0 Smart Navigator
Services to learn how to use this service.
. Each of the Smart Navigator services is
37

Maps on Demand
Get the map you need downloaded directly to your mobile
device when you have an Internet connection. Maps on
Demand is a service that delivers the map you need directly to
your device when you have an Internet connection. Refer to
Section 7.0 Smart Navigator Services to learn how to use
this service.
Note: Typical download time varies depending on file size and
connection speed (2-3 minutes for broadband Internet connection, or
15-30 minutes for wireless connection using GPRS).
Follow Me
Follow Me allows you to see the exact location of members of
your Follow Me Group, and allows other members to see your
location. Refer to Section 7.4 Using Follow Me to learn how
to use this service.
38

6.0 Using Features in Ostia
6.1 Creating a Route
Note: GPS needs to be enabled in Ostia before navigation can begin.
Refer to Section 8.0 GPS Receiver Setup and Configuration.
To create a Route, you need to have both an Origin and a
Destination selected. These PORs (Points of Reference) are
defined below:
• The Origin is your starting point. If the GPS has a lock
(Green Smiley Face), and the GPS position indicator (red
arrow) is displayed on a paved road, the center of the
screen will represent your Route Origin.
If you do not have a GPS lock, you can search for your Origin
by using any of the following methods from Goto Æ Power
User Æ Find: Recent Destinations, Outlook Contacts,
Favorites, Address, Intersection, or Point of Interest.
You can also select any location on the map as the Origin by
double-tapping the screen and choosing Origin.
• The Destination is your ending point. You can search for
your Destination by using any of the following methods
from the Goto screen: Address, Point of Interest, Saved
Place, or Home (Home is a pre-designated location and
cannot be selected unless a location has been previously
saved as Home).
Again, you can also use any location on the map as the
Destination, just by double-tapping the screen and choosing
Destination.
Note: For information regarding Multi-Stop Routing, refer to Section 6.2
Adding Multi-Stops to a Route.
39
Note: If you do not have a GPS lock, we suggest that you locate the
Origin first, and then the Destination. If Ostia does not automatically
create the Route after the Origin and Destination are set, you can
manually create it, by tapping Goto Æ Power User Æ Find Æ New
Route.
The features inside of the Goto screen can only be set as a
Destination. To set a location as an Origin, refer to Section 6.1
Creating a Route Æ Origin. To set a Destination using the Goto
screen features, do the following:
1. Tap Goto Æ and choose between Address, Point of
Interest, Saved Place, or Home. Each of these options is
described in detail below.
Note: For information regarding Multi-Stop Routing, refer to Section 6.2
Adding Multi-Stops to a Route.
Address
This option allows you to search for a location by a specific
address that can be used as the Destination in a Route. Make
sure that all necessary maps are already opened.
From the Map screen, tap Goto Æ Address, and follow the
steps below to perform an Address search:
Search the city from the
selected Country and
State/Province. This will
progress you to select
State/Province or Other
State.
40
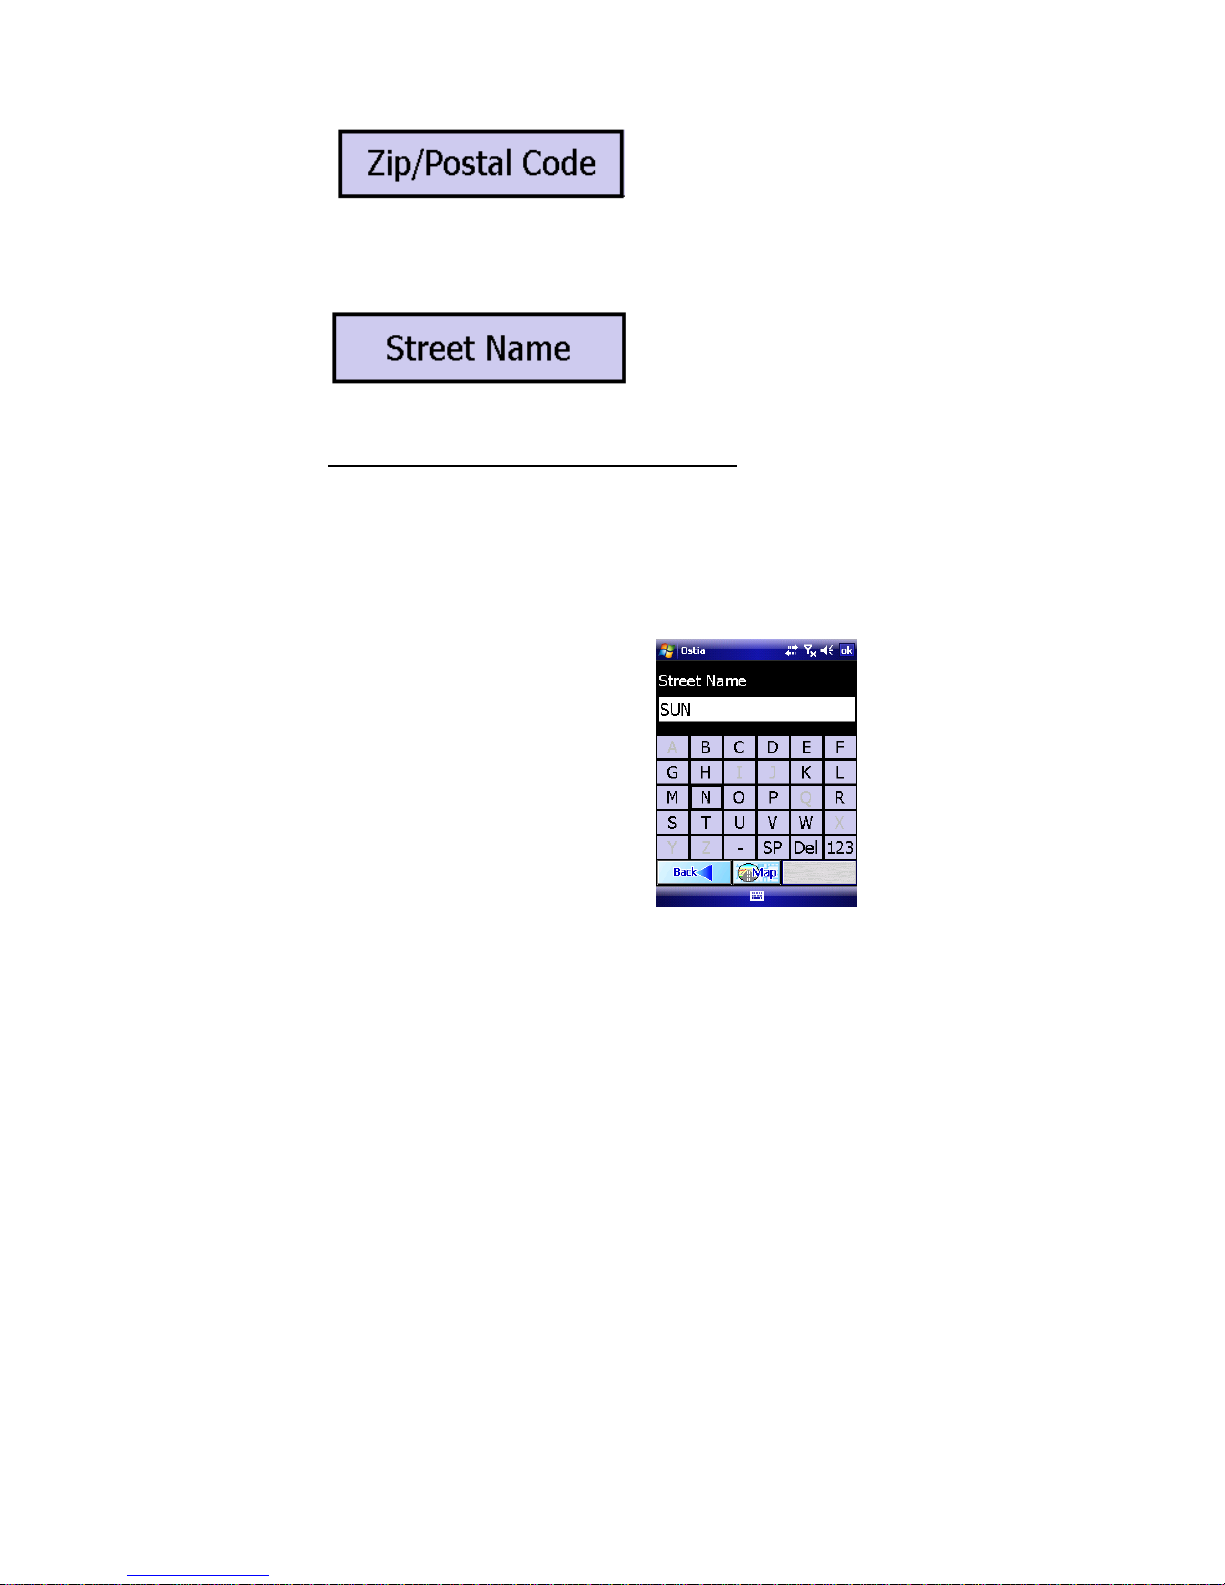
Choose the Zip/Postal Code
in which to search. This will
progress you to enter the
House Number, and Street
Name, then give a list of
possible cities that match that
zip/postal code.
If the map containing the
location is already opened,
this option will search by first
the House Number, then the
Street Name, and give a list
of possible cities in which
that street is located.
To Enter a House Number and Street Name
1. Regardless of which entry option you chose, when you arrive at
the House Number screen, enter the House Number you’re
looking for and tap the Forward Arrow.
Note: You can use the “Del” (Delete) button to backspace and correct or
change your entry.
2a. Enter the street name
in the field provided. As you
type each letter, only the
next available letters
matching the street search
results will appear on the
keyboard.
41

2b. This will provide a list of
the most closely matching
streets available, appearing
on the next screen. Select
the desired street name,
and tap the Forward Arrow.
Note: Avoid entering “N”, “E”, “S”, and “W” at the beginning of the street
name. In Ostia’s database, such directions usually come after the street
name, such as Main St, N. If the desired street name does not appear,
verify that the correct map is open. Refer to Section 5.2 Opening and
Viewing a Map.
3. Next, select the city. Based on which street you chose, Ostia
will show a list of cities in which that street is found. Select the
desired city from the list, and tap the Forward Arrow.
4. If accessing the Address from the Goto Button, the location can
only be saved as a Destination. If accessing the Address from
Power User, you have the option to select this location as an
Origin, Destination, or a Multi-Stop. Highlight your selection, and
tap the Forward Arrow.
Note: If you would like to Save this location, refer to Section 6.4 Saving
Position as a Favorite, Contact, or Home.
42

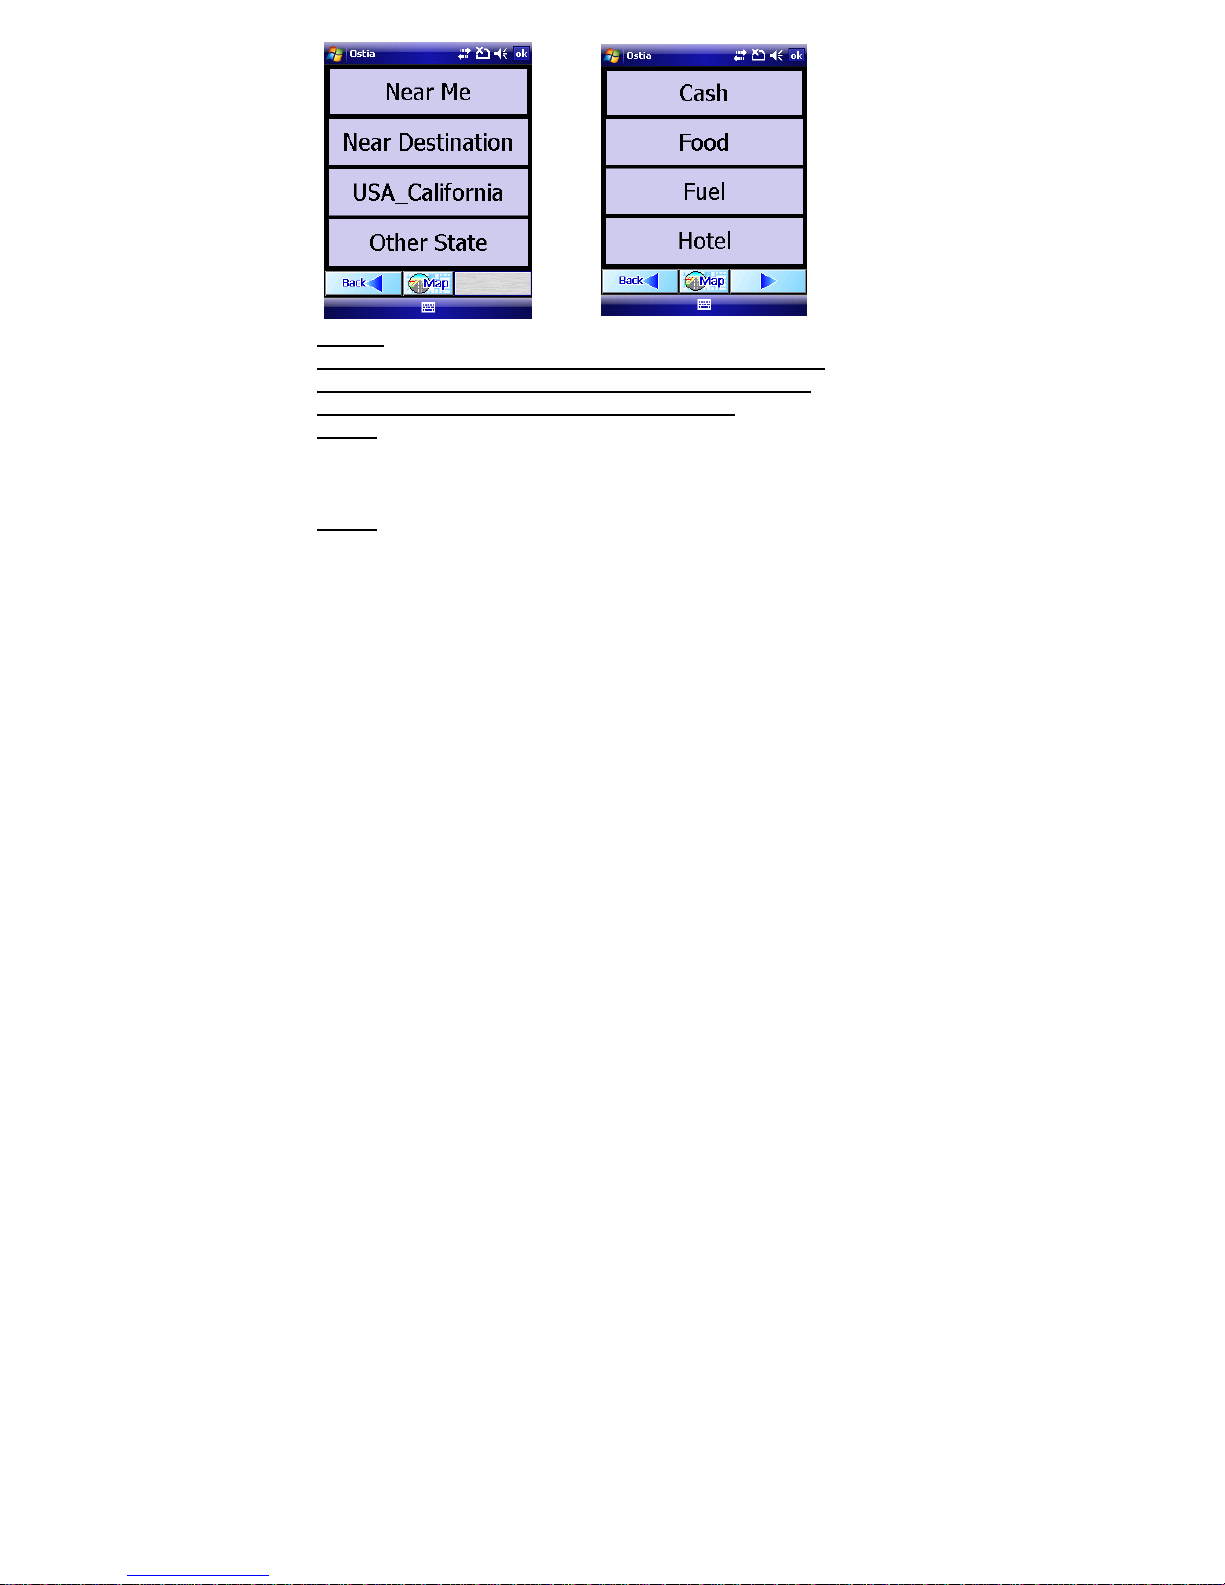
Point of Interest
This option allows you to search for Points of Interest, such as
Cash, Food, Fuel, Hotels, or other Public Landmarks, that can be
used as the Destination in a Route.
From the Map screen, tap Goto Æ Point of Interest, and refer
to Section 6.3 Using the Point of Interest Search.
Saved Place
This option will bring up a list of previously stored Saved Places to
select from. Make sure that all necessary maps are already
opened.
From the Map screen, tap Goto Æ Saved Place, then select
from Favorites, Recent Destinations, or Outlook Contacts.
Home
Once you have saved a location to be designated as your “Home”,
you can select this option to have a Route created from your
current location, to your Home. Make sure that all necessary maps
(from your current location to your home) are already opened.
From the Map screen, tap Goto Æ Home.
Note: Home can only be set as a Destination. If it needs to be set as
the Origin, the address will need to be re-entered and saved as an
Origin.
43

Outlook® Contacts
This option allows you to search for a location utilizing the Pocket
Outlook Contacts database. A Contact can be used as the
Destination, Multi-Stop, or Origin in a Route. Make sure that all
necessary maps are already opened.
From the Map screen, tap Goto Æ Power User Æ Find Æ
Outlook Contacts, select the location from the list of
Contacts, then tap the Forward Arrow.
Note: Contacts only applies if using Windows Mobile-Based Pocket PC or
Pocket PC Phone.
Intersection
This option allows you to search for a specific Intersection that can
be used as the Destination, Multi-Stop, or Origin in a Route.
From the Map screen, tap Goto Æ Power User Æ Find Æ
Intersection, and follow the steps below to perform an
Intersection search:
1. Enter the street name in the field provided. As you type each
letter, only the next available letters matching the street search will
appear usable on the keyboard. This will provide a list of the most
closely matching streets available, which will appear in the next
screen. Select the desired street name, and tap the Forward
Arrow (visual example of Street Name entry on keyboard is
available on pages 41-42).
Note: Avoid entering “N”, “E”, “S”, and “W” at the beginning of the street
name. In Ostia’s database, such directions usually come after the street
name, such as Main St, N. If the desired street name does not appear,
verify that the correct map is open. Refer to Section 5.2 Opening and
Viewing a Map.
44

2. Next, select the city from the list. Tap on the city name and tap
the Forward Arrow. Make sure the city selected is the city in which
the two streets intersect.
3. Based on the city chosen, a list of streets intersecting the Street
you entered will appear. Tap on the desired Street and tap the
Forward Arrow.
Note: If desired Street not available, reverse the order in which you enter
the intersecting streets.
4. You have the option to select this location as an Origin,
Destination, or a Multi-Stop. Highlight your selection, and tap OK.
Note: If you would like to Save this location, refer to Section 6.4 Saving
Position as a Favorite, Contact, or Home
The Route will be displayed
on the screen, zoomed in on
the Destination. The onscreen text directions display
at the bottom (if in Simulation
Mode or if GPS lock is
acquired). To view the
whole route, tap Goto Æ
Power User Æ View Æ Full
Route. Origin displays as a
Green Flag, Destination as a
Red Flag, and Multi-Stop(s)
as Purple numbered Flags.
You are now ready to
navigate.
45

6.2 Adding Multi-Stops to a Route
When creating a Multi-Stop Route, you can enter up to 10 stops
between the Origin and Destination. The Origin and Destination
are not considered as Multi-stops.
Setting Multi-Stop
Locations
In order to set a location as
a Multi-stop, tap Goto Æ
Power User Æ Find Æ and
choose from Outlook
Contacts, Favorites,
Address, Intersection, or
Point of Interest. After a
location has been selected,
a Set As window will pop up,
allowing you to set the
location as a Destination,
Origin, or Multi-stop.
Choose Multi-stop.
There is also the option to
Save the location. If you
would like to save the
location, first highlight your
selection between
Destination, Origin, and
Multi-stop, then tap Save.
The location can then be
saved to Outlook Contacts,
Favorites, or as Home.
46

Selecting a Multi-Stop Route
Once all Stops are set (limit up to
10 between Origin and
Destination) plus the Origin and
Destination locations, tap Goto
Æ Power User Æ FindÆ New
Route to calculate the Route.
This screen will allow you to
change the order of the stops, to
Optimize the order of the stops
based on your routing options, to
create a route Stop-By-Stop, to
create a route connecting all the
Multi-stops to the Destination, or
to not use the Multi-stops in the
route. You also have the option
here to delete any of the Multistops in the list.
Viewing a Multi-Stop
To View the Multi-stops, tap Goto Æ Power User Æ View Æ
Multi-stop. This will show the Multi-stops in order according to
the order in which they were entered.
Clearing all Multi-Stops
If you want to Clear all Multi-Stops in the Route, tap Goto Æ
Power User Æ Clear Æ Multi-Stop. You will need to
recalculate the Route after this if needed. To do this, tap on
Goto Æ Power User Æ Find Æ New Route.
47

6.3 Using the Point of Interest Search
The Point of Interest option allows you to search for Points
of Interest around a specific location, based on the area
surrounding the center of the screen (or the red arrow when
you have a GPS Lock) and when a map is opened.
Tap Goto Æ Point of Interest Æ and select one of the
following POI categories: Cash, Food, Fuel, or Hotel. Select
the Forward Arrow for a list of additional Points of Interest,
such as Public Landmarks, Airports, City Centers,
Museums, etc.
Option A: If you have a GPS Lock, with or without a Route
created, the center of the screen will represent your current
location. Using the POI button at this time will provide you with
a list of POI categories to choose from, based on your current
location only.
(Proceed to Step 1 on page 50 to continue POI Search)
Option B: If you do not have a GPS Lock, but a Route is
created, you can search for POIs based on a POR (for
example your Origin, Destination, or one of your pre-selected
Multi-Stops).
B1. To make sure that the POR is visible in the center of
the screen, tap Goto Æ Power User Æ View, and
select your POR (Origin, Destination, or Multi-stop),
bringing this location to the center of the screen.
(Proceed to Step 1 on page 50 to continue POI Search)
48

Option C: If you do not have a GPS Lock or a Route created,
but wish to search for a POI in an area other then the center of
the screen such as a specific city or a public landmark, you
will need to make this location the center of the screen. For
this example, we will search for a POI in a specific City:
C1. You will need to locate the City first. To do this, make
sure that the desired map is installed and open on
Pocket PC, then tap Goto Æ Point of Interest Æ
Forward Arrow Æ City Center, and tap the Forward
Arrow again
Type the first letter of the name of the City you are
searching for, and a list of cities will become available.
If the list does not appear after the first letter, continue
to type the name of the city until the list appears.
Select the appropriate City, and tap the Forward
Arrow
C2. With the desired city now open and at the map center,
select Goto Æ Point of Interest Æ Near Destination
and choose from Cash, Food, Fuel, and Hotel, or tap
the Forward Arrow for more POI categories. Choose a
POI from the list.
Note: If accessing Points of Interest through the Goto Button, it will
automatically set the POI as a Destination. To set the POI as an
Origin or Multi-stop, tap Goto Æ Power User Æ Find Æ Point of
Interest.
This will bring the POI to the center of the screen. If an
Origin was previously selected, and you chose this POI as
a Destination, it will automatically create the route and
show the Destination (POI) in the center of the screen.
(Proceed to Step 1 on page 50 to continue POI Search)
49
Step 1:
Tap Goto Æ Point of InterestÆ select where you want
to search and then select the POI from the following
POI category list: Cash, Food, Fuel, or Hotel
Step 2: For this example, we are going to search for Food
around the selected Destination so tap Near Destination
and then tap Food.
Step 3
keyword or the name of the location, and tap the Forward
Arrow. If you leave the field blank, it will bring up the
maximum number of results within the pre-designated
radius.
The results will list each available POI, including distance
from the center of the screen (your current location, or
POR), and the name of the POI.
: To narrow the search results, you can type in a
50

Step 4:
selecting the Forward Arrow, the full details for that POI are
displayed along with the options to Route to that POI, to set
that POI as a Multi-stop, to Call the POI (only on Pocket PC
Phones), or to Cancel.
After choosing one of the above options, you will return to
the map screen and display all the POIs from the list. Icons
differ between categories. For example, a knife and fork for
Food, and a bed for Hotel.
By tapping on one of the POIs from the list and
Showing POI icons
To bring up previously found POI
icons on the screen, tap Goto Æ
Power User Æ View Æ Places
Found to display a list of all POIs.
Those that have been searched
for will have a white box in which
to place a check mark to view the
results for that category on the
map screen; if a category has
never been searched for before, it
has no past record and will show
a gray box that cannot be
The icons above
represent the POIs for Food,
Cash, Fuel, and Hotel. All
other POIs will only display
one result, unless the
category was found using the
optional paid subscription
service, POI Finder. Refer to
Section 7.0 Smart Navigator
Services.
checked.
POI Information
To retrieve the specific
information for any given POI (to
Route to, Call, or Set as a Stop),
tap and hold on any of the POI
icons on the screen (as seen
below).
51

6.4 Saving Position as a Favorite, Contact, or Home
Saving a Position Using the Goto Button
Save Selected Position as Favorite
1. Tap Goto Æ Forward Arrow (twice) Æ Save a Place
Æ select which location to save from the list of
GPS/Map Center, Current Destination, Current Origin,
or Latitude/Longitude (you can also tap the Save
button to display this list directly)
2. Æ Choose Save as Favorite. Enter Favorite Name,
and tap on the Forward Arrow
Save Selected Position as Home
1. Repeat Step 1 above
2. Æ Choose Save as Home. This will now be the
location the software will route to when choosing Goto
Æ Home
52

Save Selected Position to Outlook Contacts
1. Repeat Step 1 above
2. Æ Choose Save to Contact
3. Enter Contact Name, and tap on the Forward Arrow
4. Contacts screen will appear. Tap Ok in the upper right
corner
Note: Contacts only applies if using Windows Mobile-based devices
Saving a Position Using Power User
Save Selected Position as Favorite
1. Tap Goto Æ Power User Æ Tools Æ Save a Place
Choose which location to save from the list of GPS/Map
Center, Current Destination, Current Origin, or Lat/Lon
2. Æ Choose Save as Favorite. Enter Favorite Name, and
tap on the Forward Arrow
Save Selected Position as Home
1. Repeat Step 1 above
2. Æ Choose save as Home. This will now be the
location the software will route to when choosing Goto
Æ Home
Save Selected Position to Outlook Contacts
1. Repeat Step 1 above
2. Æ Choose Save to Contact
3. Enter Contact Name, and tap on the Forward Arrow
4. Contacts screen will appear. Tap Ok in the upper right
corner
Note: Contacts only applies if using Windows Mobile-based devices
53

6.5 Using Trip Trace
Recording a Trip
To begin Recording a Trip, make sure you have a GPS Lock
(Green Smiley Face), with a map opened. Tap Goto Æ Power
UserÆ Tools Æ Record Trip Trace. Enter a name for this
specific Trip, and tap the Forward Arrow when finished.
Note: To Record a Trip, you must have a GPS Lock, with or without a
Route created. Alternately, you can have the GPS turned Off (Red
Smiley Face) with a route selected, and choose to run a Simulation
from Goto Æ Power User Æ Tools Æ Simulation
Setting Trip Interval
To set the amount of time between each marker, tap Goto Æ
Forward Arrow (twice) Æ Options Æ Tracking IntervalÆ
Change. You have the option to select the amount of time
between each marker to be 10 sec, 30 sec, 1 min, 5 min, or 20
min. Once you have chosen the desired time, tap on the Map
Button to return to the map screen. Refer to Section 4.7
Options Details
Note: Applies only if using Windows Mobile-based devices
54
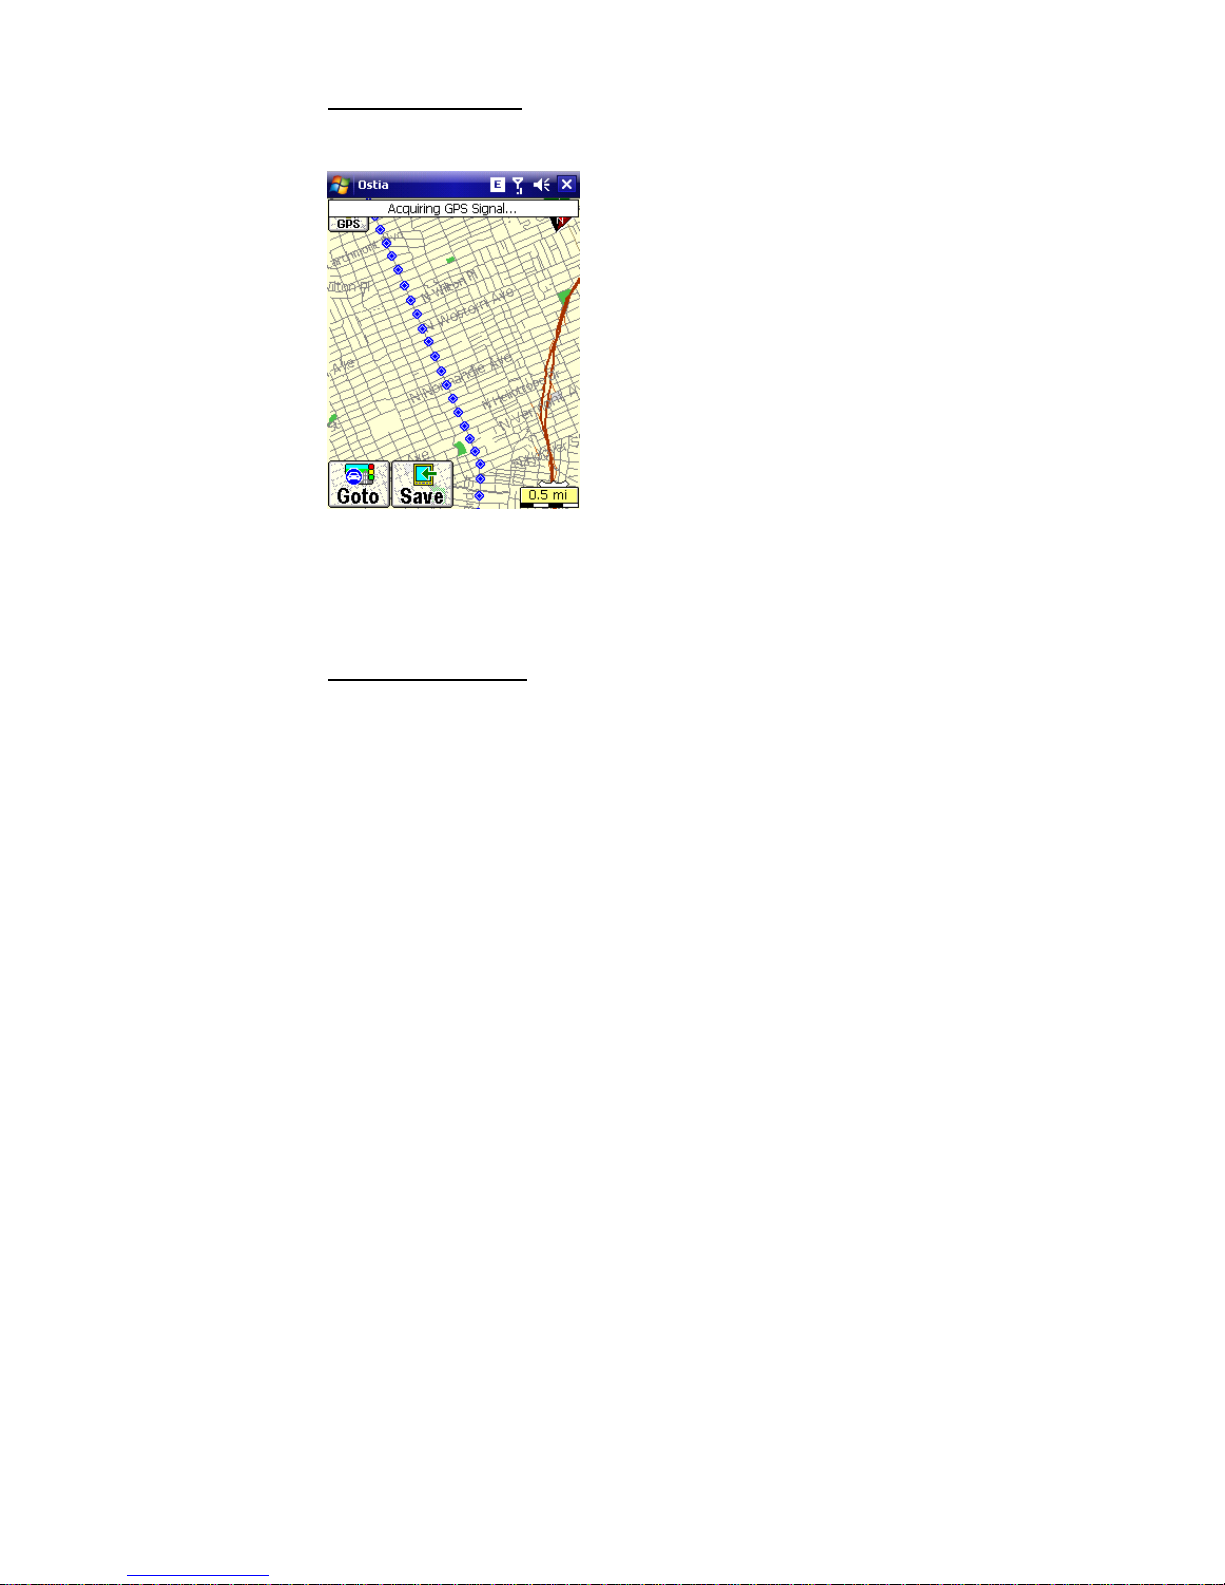
Viewing a Trip Trace
To view or use a pre-recorded Trip Trace, tap Goto Æ Power
User Æ View Æ Trip Trace
A list of pre-recorded Trip
Trace Files will be displayed.
Select the Trip Trace of your
choice, tap the Forward Arrow
when finished
Your Trip Trace will be
displayed with blue diamonds,
representing the markers (or
bread crumb trail) recorded for
you to follow.
Note: When Viewing a previously Recorded Trip Trace, it will not
provide an actual Route, text directions, or voice prompts. It will only
provide markers (bread crumb trail) to follow.
Clearing a Trip Trace
To clear the markers from your Trip Trace, tap Goto Æ Power
User Æ Clear Æ Trip Trace
55

6.6 Exporting Favorites
To export your Favorites into a text file (*.txt), tap Goto Æ
Power User Æ Tools Æ Export Favorites. Provide a Name
for this file, which will contain all the currently stored Favorites
(NOT the Contacts). This file will be stored in the My
Documents folder on the Main Memory of the Device
To view the exported file on the Device, go to Start Æ
Programs Æ File Explorer Æ My Documents Æ and select the
.txt file that contains the name you provided in the previous
step
The text file contains the following information for each
Favorite: Name of Favorite, Latitude, Longitude
6.7 Deleting Favorites
To Delete Favorites, tap Goto Æ Forward Arrow (twice) Æ
Delete Favorites, the pick from the list which Favorite to be
deleted, and tap on the Forward Arrow. Tap Yes on the next
screen to confirm Delete, or No to Cancel
56

6.8 When to use the Highway/Motorway Map
The Highway/Motorway map is to be used in conjunction with the
standard street-level maps to assist in routing from one map to
another, so that the fewest maps are opened at once. This single
Highway map contains only the Highways/Motorways for the
specified Country, but no street-level information.
If the Highway/Motorway map is loaded to the mobile device or
Storage Card, Ostia will automatically open it when required. In
addition, Ostia will also open the map for the Destination if it is not
already opened.
When Ostia automatically opens the Highway/Motorway and the
Destination maps, it will clear out any POR previously set on the
map. After Ostia opens the Highway/Motorway and the Destination
maps, the Origin will have to be re-entered manually unless you
have a GPS Lock.
Note: If the Route calculation method for “No Highway/Motorways” is
used, and you are on a Highway/Motorway, Ostia will not be able to
calculate the Route until you are no longer on the Highway/Motorway
The Canadian Highway/Motorway Map contains
highway/motorway information for all metropolitan areas, but some
additional areas are not covered by this map. If you are unable to
create a route using the Highway/Motorway map, please make
sure you manually open all the local maps needed for the route in
order to make the calculation.
57

7.0 Smart Navigator Services
Note: Applies only if using Windows Mobile-based devices
7.1 Register & Subscribe
All users who register on the Pharos GPS website with Ostia
version 7.5 or higher receive one month free of all Smart
Navigator Services. Otherwise, you must purchase the
subscription and register the Pharos product at the following
website:
http://services.PharosGPS.com/shopping/store/registration_form.asp
Step 1:
available subscriptions:
http://www.pharosgps.com/products/services/smartnavigator.htm
Note: Real-time Traffic may be referred to as Smart Traffic, and POI
Finder may be called Smart Finder, though in both cases there is no
difference in the service offered. Maps on Demand and Follow Me come
free with a registration of any Smart Navigator subscription
Go to the following website and choose from the list of
Step 2:
Make sure the product and quantity of the product you selected is
correct and click “To Checkout Click Here”
Click “Add to Shopping Basket” at the top of the screen.
Step 3:
If it is your first time registering, click on the link for New
Users, and enter your personal registration info. If you are
already registered, simply enter your email and password,
confirm your registration info is correct and click Submit
58

Step 4:
Shipping Necessary or Digital Delivery)
Step 5:
purchase. If all is correct, click Submit Order and proceed
to Step 6; if not, click Cancel Order
Step 6:
next page confirms your purchase and registration of the product.
You will receive an email confirmation of the purchase.
At this point, you may start using the Smart Navigator Service
you purchased immediately; you do not need to wait until you
receive the confirmation email
Click Select on the Shipment Type page (No
This next page shows a summary of your
Enter the Credit Card number and Expiration Date. The
59

7.2 Smart Login
To Enter User ID
Your User ID is the email address
you registered with when you
bought the subscription. The User
ID is NOT case sensitive.
Tap on Goto Æ Power User Æ
Smart Navigator Æ Login… to
arrive at the User ID entry
window (to the right)
Enter the letters for your User ID.
If your email address contains
numbers, select the “abc” or
“123” button in the bottom right
corner to access the numeric
keyboard.
60

To get the @ symbol for the email
address, select the “*%#” button
on the right side of the window
From the Symbols Menu, you can
then choose to go back to
numbers, or to the upper case
alphabet
Note: After entering the email carrier
name (Jane@yahoo
to repeat the steps above to get back
to the Symbol Menu in order to input
the period (Jane@yahoo.com
When you are done entering the
email address, select the Forward
Arrow and enter the password,
which IS case sensitive
), you will have
)
After entering the password,
select the Forward Arrow
and you will arrive back at
the Map Screen
Provided you have an Internet connection on your handheld
device, you are now ready to start using the Smart Navigator
Services for which you have registered.
61

7.3 Using Real-time Traffic, POI Finder and Maps on Demand
Real-time Traffic
To download Traffic information, follow the steps below after
Using Smart Login:
Tap Goto Æ Menu Æ Smart Navigator Æ Real-time Traffic
1. First make sure you have the correct map open. Select
your City (area), and then tap the Forward Arrow.
2. The next window will show the city you chose and
display the current time and date. These indicate the
time and day for which the traffic info currently being
displayed on the map was recorded.
Note: You may only view the Traffic info for one city at a time
62

Depending on the availability in your city, you may see one
of the following:
Note: The traffic and data info is based solely on the databases of the
Real-time Traffic and Data (incident only)
Department of Transportation. Some cities do not have Real-time Traffic because
the DOT has not built traffic sensors into the highways in that state.
63
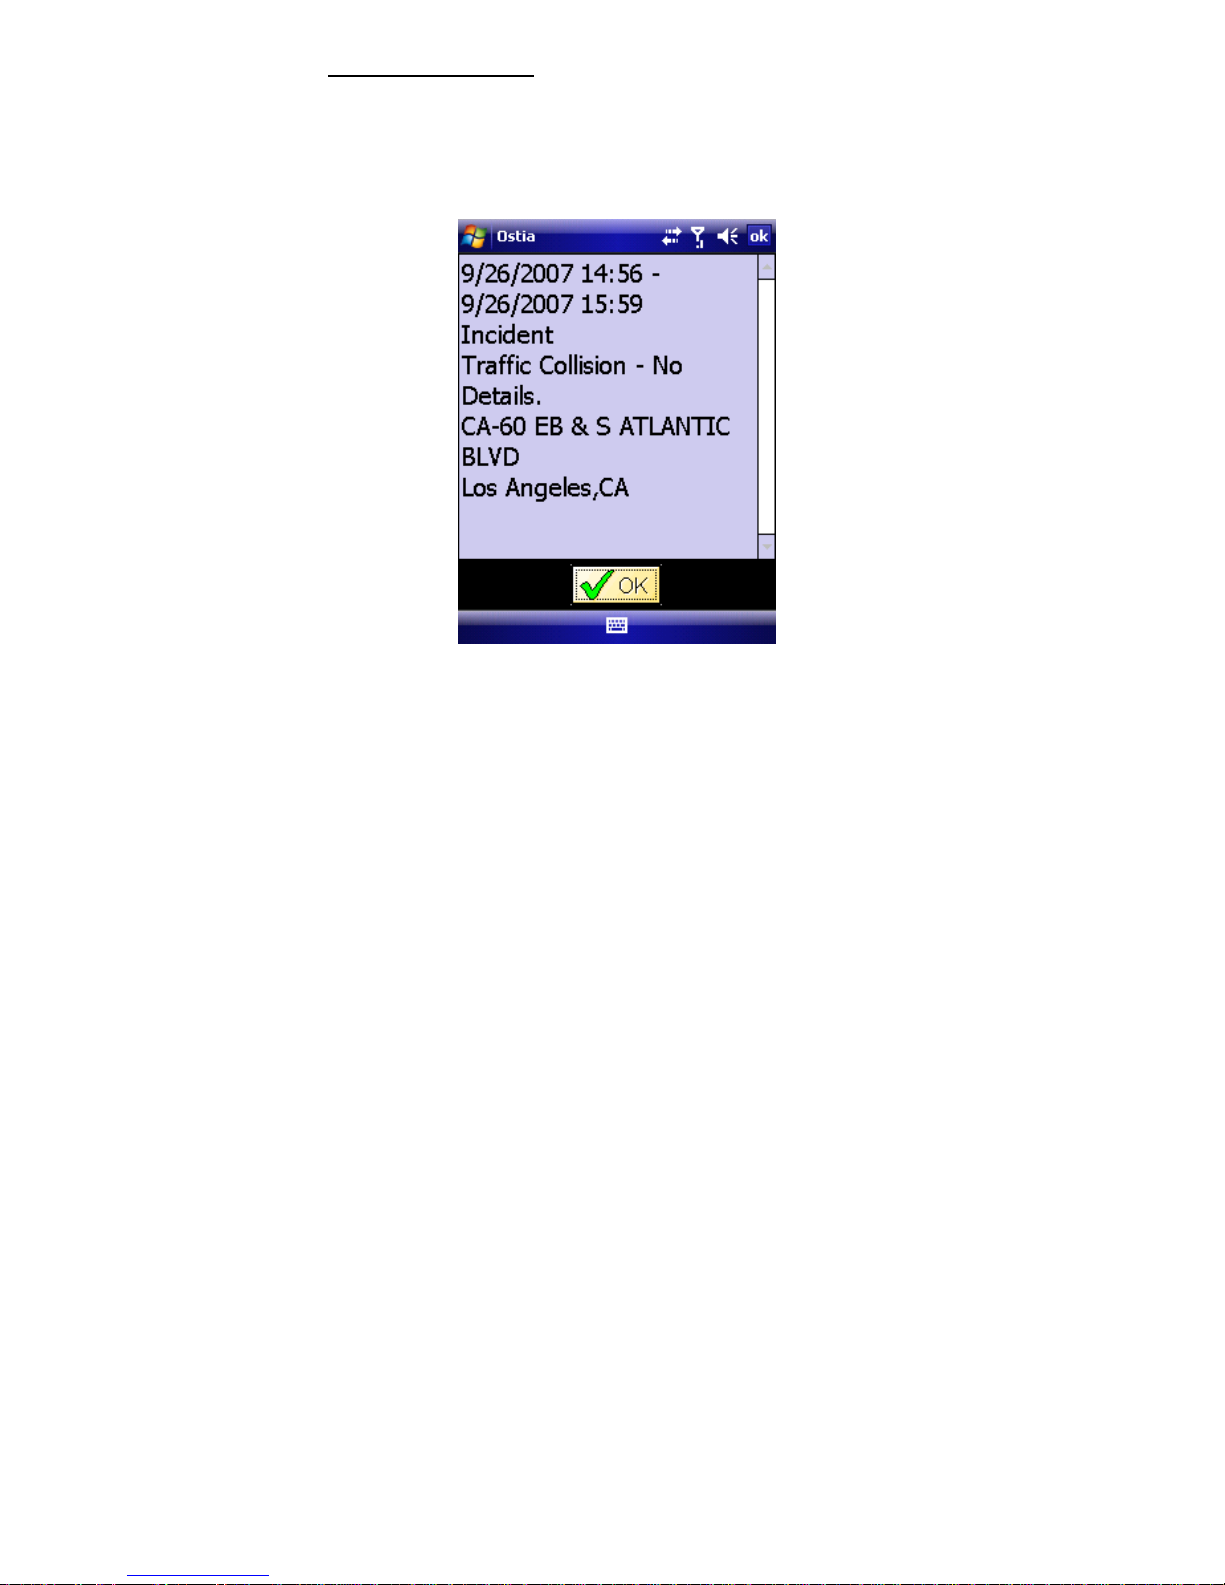
Viewing Incident Data
To view the Real-time Incident Data (yellow triangles), simply tap
and hold on a triangle to view the data exactly as the Highway
Patrol or other law enforcement entered it into their own
computers
64

POI Finder
To download Points of Interest (in addition to Cash, Food,
Fuel, or Hotel) to your device, follow the steps below after
using Smart Login:
Tap Goto Æ Power User Æ Smart Navigator Æ POI Finder
1. Enter a keyword, or name of POI to narrow the search
results or leave blank for a general search, then Tap
the Forward Arrow
2. Select a POI category, and tap the Forward Arrow
3. Lists available POIs as well as the distance from the
designated POR or center of Map Screen, and their
address of each. Refer to Section 6.3 Using the
Point of Interest Search for additional assistance
65

Maps on Demand
This feature allows you to download a dynamically-generated
map from Pharos Maps on Demand server. It is useful in
cases where you don’t have a preloaded map on your device
that covers the area you are traveling in. A dynamicallygenerated map is usually very small in size so you can
download it quickly even with a wireless internet connection.
To use this feature, follow the steps below after login:
Tap Goto Æ Forward Arrow (three times) Æ Maps on
Demand.
There are two types of maps you can get from the server:
Corridor Map and Area Map.
Corridor Map is a strip area
that covers the entire length a
route with a width of about 0.5
miles on each side of the
route. The route Origin is
always your current location,
and its Destination is an
Area Map covers a square
area of about 10x10 miles
with the center at a location
you can specify. The map
center can be an address, a
city center, a zip/postal code
or your current GPS location.
address or city center or a
zip/postal code you can
specify.
Corridor Map
1. First choose the Country and State/Province in which to
look by tapping the Country_State (i.e. USA_California)
button. Select your desired Country from the list and tap
the Forward Arrow to select the State/Province, and then
tap the Forward Arrow again.
2. Next choose to base your search on an address or
zip/postal code.
a. If using address, type a city name first. As you
type, Ostia will continue to narrow the search
66

results based on each letter. You will then see a
list of all available matches. Select the city from
the list and tap the Forward Arrow to enter a street
address. If you don’t enter a street address, the
city center will be used as the Destination.
b. If using Zip/Postal Code, enter the destination
zip/postal code and tap the Forward Arrow.
3. Choose the location to store the map, either to the SD
card or the Main Memory. The available memory space for
each location will be displayed for your review.
4. Once you finish the selection, Ostia will ask the server to
generate a map with your specification, download it,
create the route and show the Destination at the center of
the screen.
Area Map
1. First choose the Country and State/Province in which
to look by tapping the Country_State (i.e.
USA_California) button. Select your desired Country
from the list and tap the Forward Arrow to select the
State/Province, and then tap the Forward Arrow
again.
2. Next choose to base your search on an address,
zip/postal code, or current GPS location.
a. If using address, type a city name first. As
you type, Ostia will continue to narrow the
search results based on each letter. You will
then see a list of all available matches. Select
the city from the list and tap the Forward
Arrow to enter a street address. If you don’t
enter a street address, the city center will be
used as the center of the area map.
b. If using Zip/Postal Code, enter the zip/postal
code that you want the area map to center at
and then tap the Forward Arrow.
67

c. If using current GPS location just tap the
Forward Arrow for next step.
3. Choose the location to store the map, either to the SD
card or the Main Memory. The available memory
space for each location will be displayed for your
review.
4. Once you finish the selection, Ostia will ask the server
to generate a map with your specification, download it,
and display it.
Note: A map downloaded from the server does not include any POIs for
Cash, Food, Fuel, and Hotel. It does, however, include the index file so
you can do address search against the downloaded map.
Note: You can identify the type of a downloaded map by its file name. The
file name of a corridor map has a prefix of “to_”. The file name of an area
map has a prefix of “area_”.
68

7.4 Using Follow Me
The Pharos Follow Me service makes it easy for your family,
group, or fellow company members to see exactly where each of
the other members are in real time. By using Follow Me you can
insure that people don’t get lost, you can help your friends find that
hard to locate parking space, or you can make sure that
customers are quickly served by sending the closest driver to the
next pickup location.
An Introduction to Follow Me
Follow Me uses a combination of several capabilities to help you
stay in touch. First, of course, is your Pharos GPS device which
precisely determines your location. Next there is the wireless
connection to the Internet which enables you to both send and
receive information. Finally, there is the Pharos Follow Me Web
portal that tracks and distributes the information for your group.
Each of these pieces is a vital part of the process so we’ll begin by
having a closer look at them.
Getting GPS Location Information
Your Pharos GPS navigation device includes a powerful GPS
receiver which can pinpoint your location with considerable
accuracy. The Ostia software application on your device uses this
information to display your position on a map so you can always
see exactly where you are.
GPS receivers get their information from the series of GPS
satellites that orbit the Earth. This information is received from the
satellites, but no information is sent back from your device. This
means that no one can track your location—you aren’t sending out
your location simply because you have a GPS receiver.
69

Sending Your Location Information
If you want someone to know where you are, you need to provide
your location information to them. Until now, it was difficult to
provide that information when you were on the go.
Your Pharos GPS Phone 600 (or GPS Phone 600E) can not only
receive GPS location information, but it can also use the
GPRS/EDGE data network to send that information. This makes
your GPS Phone 600 the perfect tool for communicating your
present location with one or more other people in real time.
Note: The Follow Me service can also be used with the Pharos
Traveler GPS 535 if you have a Wi-Fi connection that you can use
to connect to the Internet.
Connecting It All
Even if you have a GPS receiver and a mobile phone, sharing
your location information in real time isn’t easy without using a
service like Follow Me. The Follow Me service gathers the location
information from each group member and places a mark on the
map to show exactly where each person is so you can see those
locations at a glance.
The following illustration shows an example where the location of
two Follow Me group members, Bart and Lisa, appear on the map.
In this case we’re looking at the information you might see on your
desktop, but as you will see later, Follow Me information is also
available on your mobile screen.
70
71

Getting Started with Follow Me
Follow Me is easy to use, so let’s see just what you need to know
to get going.
Understanding Follow Me Groups
Each Follow Me group can have a couple of different types of
participants. Everyone who will be tracked or who needs to view
the tracking information must be a part of the group or be invited to
be an observer—this protects your privacy because anyone else
will not be able to track the group members.
Group Supervisor
Every Follow Me group has one person who is designated as the
supervisor. Usually this is the person who sets up the group, but it
can be someone else if the existing supervisor wishes to assign
the group to another member.
The supervisor has the ability to both add members and invite
buddies. The supervisor can also remove members and his or her
own buddies from the group. The supervisor can also track the
location of members.
Group Members
Group members are people whose location can be tracked. Group
members can view the tracking information for other group
members.
You can have up to five members in a Follow Me group. The
supervisor is also a member, so this means you can track the
location of four regular members in addition to the supervisor. If
you are on someone’s buddy list, you can track them, too.
Observers
Observers do not belong to any group. They have the least
privileges. They can not send their GPS locations to the Follow Me
server and thus can not be tracked by anyone. As an observer the
only thing you can do is to view other people’s locations on the
web portal - once you become their buddy. To become someone’s
72

buddy, you have to receive an invitation from that person and then
accept the invitation.
Buddies
Buddies are a pool of people who can potentially view your trips.
By default all members in your group are your buddies, and vice
versa. On top of that you can invite members of other groups and
observers to be your buddies. If you invite someone to be your
buddy, then he may view your trips. But you may not view his trips,
unless he invites you to be his buddy as well. You and only you
have the total control over your buddy list. You can add or remove
people from the list. You can control which subset of the pool of
people can view a particular trip of yours.
Setting Up a Follow Me Account
You need to register your Pharos GPS device on the Pharos Web
site in order to establish your Follow Me account. To do so, please
visit the following address:
https://services.pharosgps.com/shopping/store/registration_form.a
sp
You can also visit www.pharosgps.com
Registration, and then Register to display the form.
Tip: You will need the Registration Code and UPC from your
Pharos GPS device box in order to complete the registration.
Your Follow Me account is created automatically after you
complete the form and click the Submit button. Make certain you
remember the e-mail address and password. Watch for the e-mail
confirming your account (and remember to check your Junk Mail
folder if it does not arrive).
and click Support,
Logging in to Follow Me
Before you can begin using the Follow Me services you need to
add the group members. You add the members and any buddies
by logging in to the Follow Me web portal:
http:// webapps.pharosgps.com /monitoring/login.asp
73

Enter the e-mail address and password you used when you
registered your Pharos GPS device and then click the Log In
button.
Tip: If you want to be logged in automatically in the future, make
sure the Remember me on this computer box is checked.
74
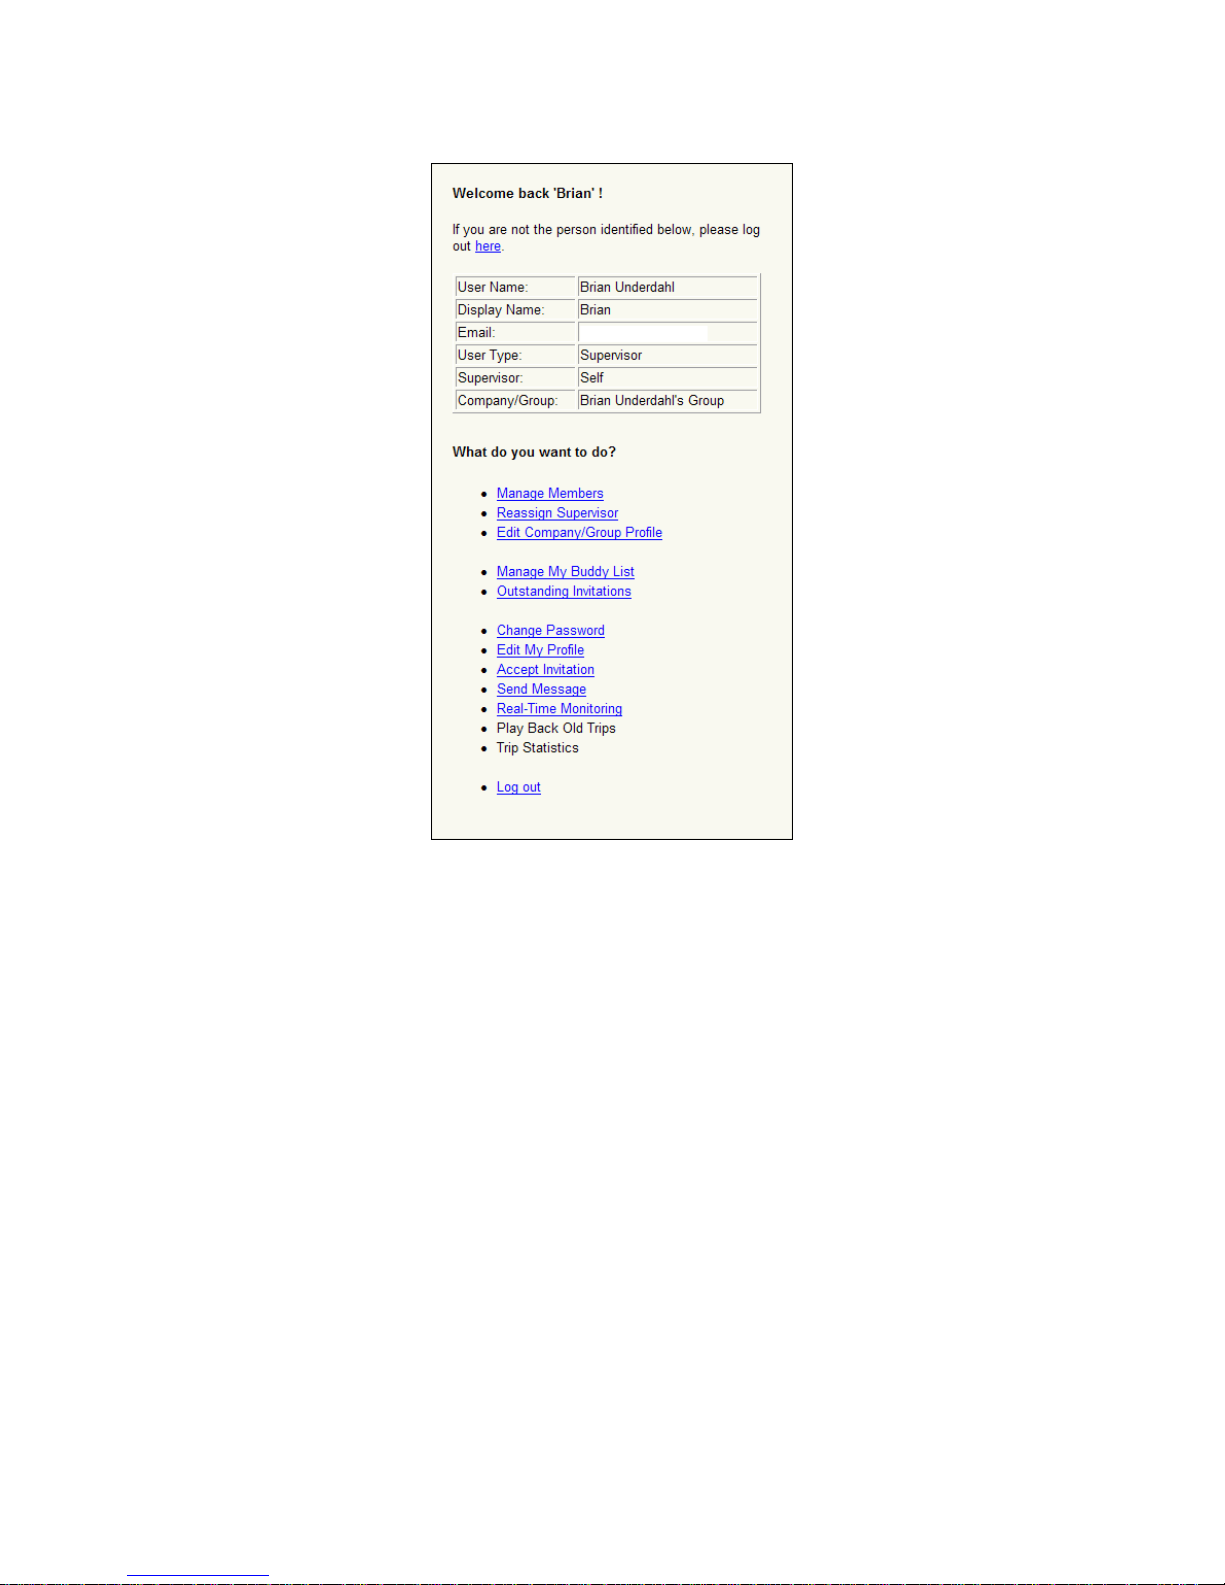
After you click Log In, you’ll see a screen similar to the following
(with your information, of course). Members and buddies will see a
slightly shorter list that only includes the options they are allowed
to use.
75

Adding Members
You will want to begin by adding the group members. Click the
Manage Members link to display the following screen:
Click the Add Member link to display the Add Member form. Use
this form to enter the member’s name and e-mail address.
Tip: You can add several members at once by clicking Add
Members in Batch.
After you click the Add button, the new member is added to your
group. In addition, he will be sent an e-mail that includes a
randomly-generated password, so make sure you have entered
the e-mail address correctly.
76

Using Additional Follow Me Functions
The main Follow Me page has several additional options you may
want to use from time to time. Each of these options is designed to
allow you to administer your group and Buddy List.
• If you are a Supervisor, you can manage your Group and
Buddy List.
• If you are a Member, you can manage your Buddy List,
but not the Group.
• If you are an Observer, you don’t have a group or a buddy
list to manage. All you can do is to do the real-time
tracking – view other people’s trips whenever allowed.
For example, if you want someone else to take over the
group’s management, click the Reassign Supervisor link. Use
the Manage My Buddy List link when you want to invite
someone to observe you.
77

Monitoring Group Locations
After you have added the members to your Follow Me group, you
can monitor their locations. You can do the monitoring on your
mobile device or on your desktop using a Web browser—
depending on your needs. You could, for example, use a Web
browser to track the current locations of your team in order to send
the nearest driver to pick up a package that needed rush delivery.
Or, you might use the mobile tracking feature to keep track of
family members during an outing at a large amusement park.
The tracking method you choose determines the steps you need
to take to begin the tracking. In the following sections you see how
to begin tracking using your desktop Web browser or your mobile
device.
Monitoring Via a Web Browser
You can use a Web browser to monitor the location of group
members no matter where you happen to be. That is, you don’t
have to be close to the monitored group member locations in order
to see where they are. This is unlike mobile monitoring where you
only see the location of group members whose location appears
on your current mobile map.
You begin Web-based monitoring by selecting the people you
want to monitor as shown in the following illustration. Click the
Real-Time Monitoring link on the main page to display this screen.
78

Note: You can only monitor group members who are logged in on
their mobile device.
After you have selected the group members you wish to monitor,
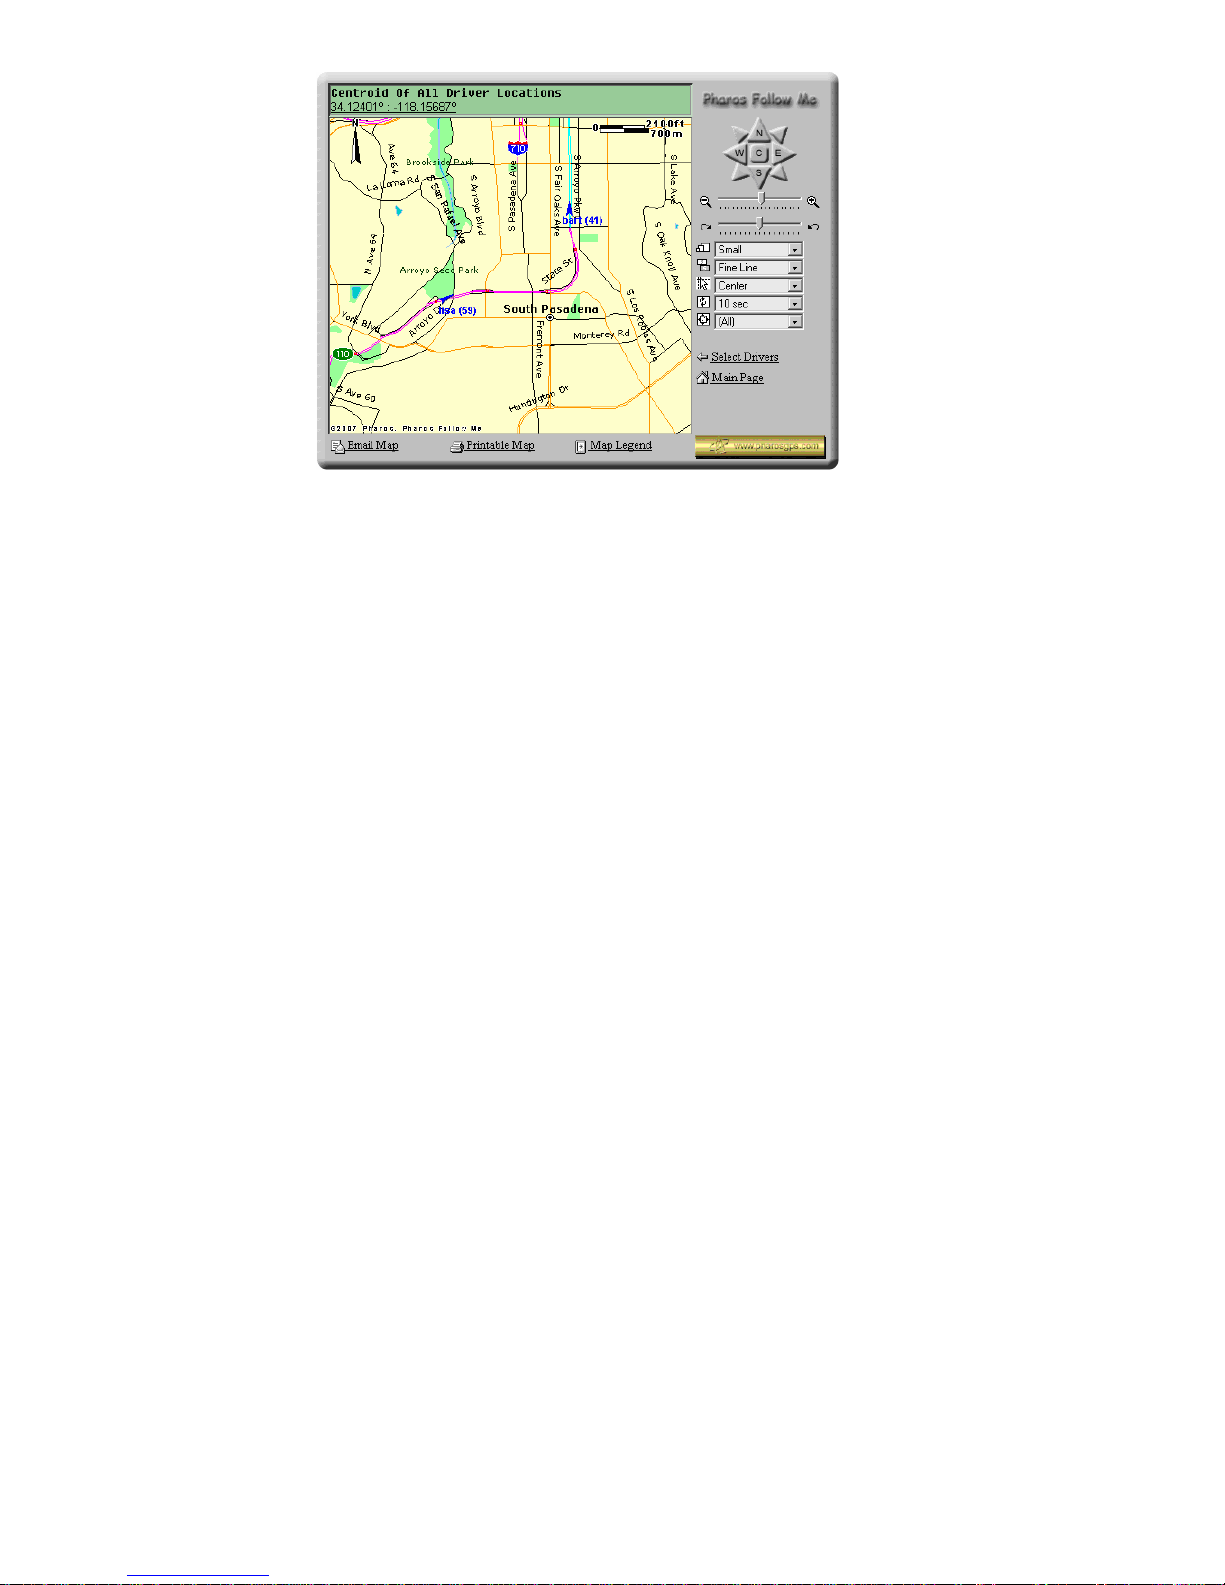
click the Show Selected On Map link to display a map that shows
the current position and travel speed for those members as shown
in the following illustration.
The map display updates as necessary in order to keep showing
the current member locations. You can use the controls along the
right side of the map to change the display as needed.
The map display updates at the selected interval as long as the
map page is displayed. To stop monitoring the locations click the
Main Page link.
Tip: If a group member turns off the Follow Me function on their
mobile device their last location continues to display on the map,
but the indicator showing their location turns from blue to red when
the last location information received was at least 20 minutes old.
79

Monitoring Via a Mobile Device
When you use Follow Me on your mobile device you can see
where the other members of your group (or people who have
added you to their buddy list) are in comparison with your current
position. The tracked members show up as small automobile icons
on your Ostia map.
Logging in For Tracking
In order to allow yourself to be tracked, you need to log into Follow
Me tracking on your mobile device. To log in, tap the Goto Button
and choose Power User to display the Power User menu. Then
choose Smart Navigator, Login to display the User ID screen.
Enter your Follow Me user name (your e-mail address) and then
your password. Don’t forget that your password is case sensitive—
you must enter it correctly or you will not be able to log in.
In addition to logging in, you must also activate Follow Me by
selecting the Follow Me option from the Smart Navigator section of
the Power User menu. You can deselect the Follow Me option if
you want to temporarily stop sending location information to the
Follow Me server.
Note: You mobile device will beep each time it sends location
information to the Follow Me server. You can change the tracking
interval on the Ostia Options screen.
Monitoring Member Locations
To add icons for other people to your Ostia map display you use
the Find, My Friends option on the Power User menu. You can
select up to five people to display and each of them is shown
using a different color icon so that you can identify them by color.
After you have selected the people you want to monitor, you will
see their location as an automobile icon as shown in the following
illustration. In this case the other person appears near the top of
the map.
80
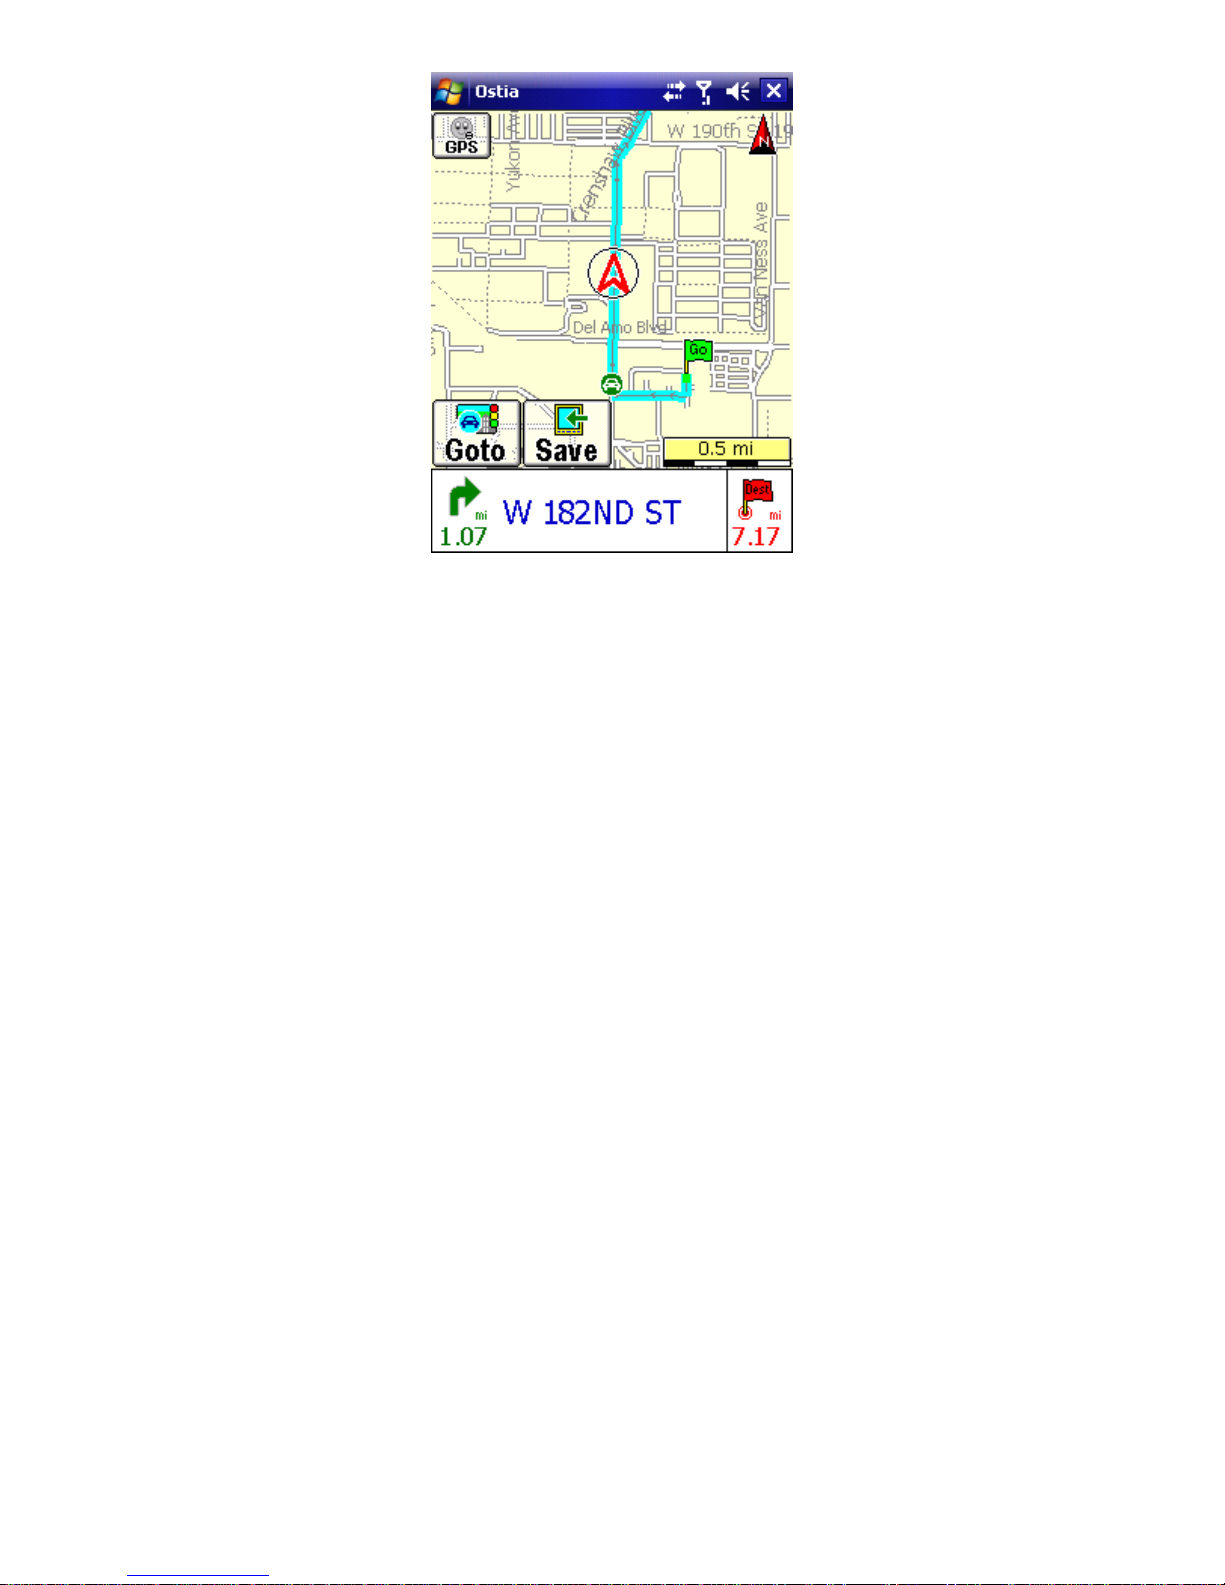
Other people will only appear on your map if they are currently
logged in to the Follow Me service and if they are within the area
displayed on the map at your current zoom level. If you zoom in to
see more detail about your current location you may not be able to
see the locations of the other people until you once again zoom
out on the map.
Note: The Follow Me service functions by sending location
information to the Follow Me server at regular intervals. This
requires a live data connection either through your cellular service
provider or through an active Wi-Fi connection. Therefore you may
not be able to track people in areas where cellular service or Wi-Fi
connections are not available.
81

8.0 GPS Receiver Setup and Configuration
Note: For Pharos All-In-One devices such as Drive GPS 135, Drive GPS
140, Traveler GPS 505, Traveler GPS 535, GPS Phone 600, and EZ
Road, the GPS receiver does not need to be setup or installed because it
is already built into the device
8.1 GPS Status Indicator/Powering On the GPS Receiver
The Smiley Face at the
bottom of the screen
Tap the GPS Status Indicator (face) to Power ON/OFF the GPS,
as well as to Initialize (reset) the GPS. Refer to Section 4.1 Map
Screen Buttons
indicates the current status of
the GPS receiver
Red Face = The Pocket PC is not receiving data
from the GPS receiver. The receiver is either turned
Off, or the connection, power or communication port
(does not apply for Pharos All-In-One devices) may
be disabled and should all be checked
Yellow Face = The GPS receiver is currently
acquiring signals from the satellites for a signal lock,
but does not yet have a lock
Note: This will also occur If the GPS does not have a clear view
of the sky, or if there is environmental or electronic interference
from any of the following items: radar detector, CB radio, Satellite
radio, metallic material in windshields, 3
systems, etc.
Green Face = A GPS signal lock has been
established and the system is ready for navigation.
A red arrow will appear on the map, signifying the
current position of the GPS receiver. The blue bars
next to the face indicate the GPS signal strength.
rd
party in-car navigation
82
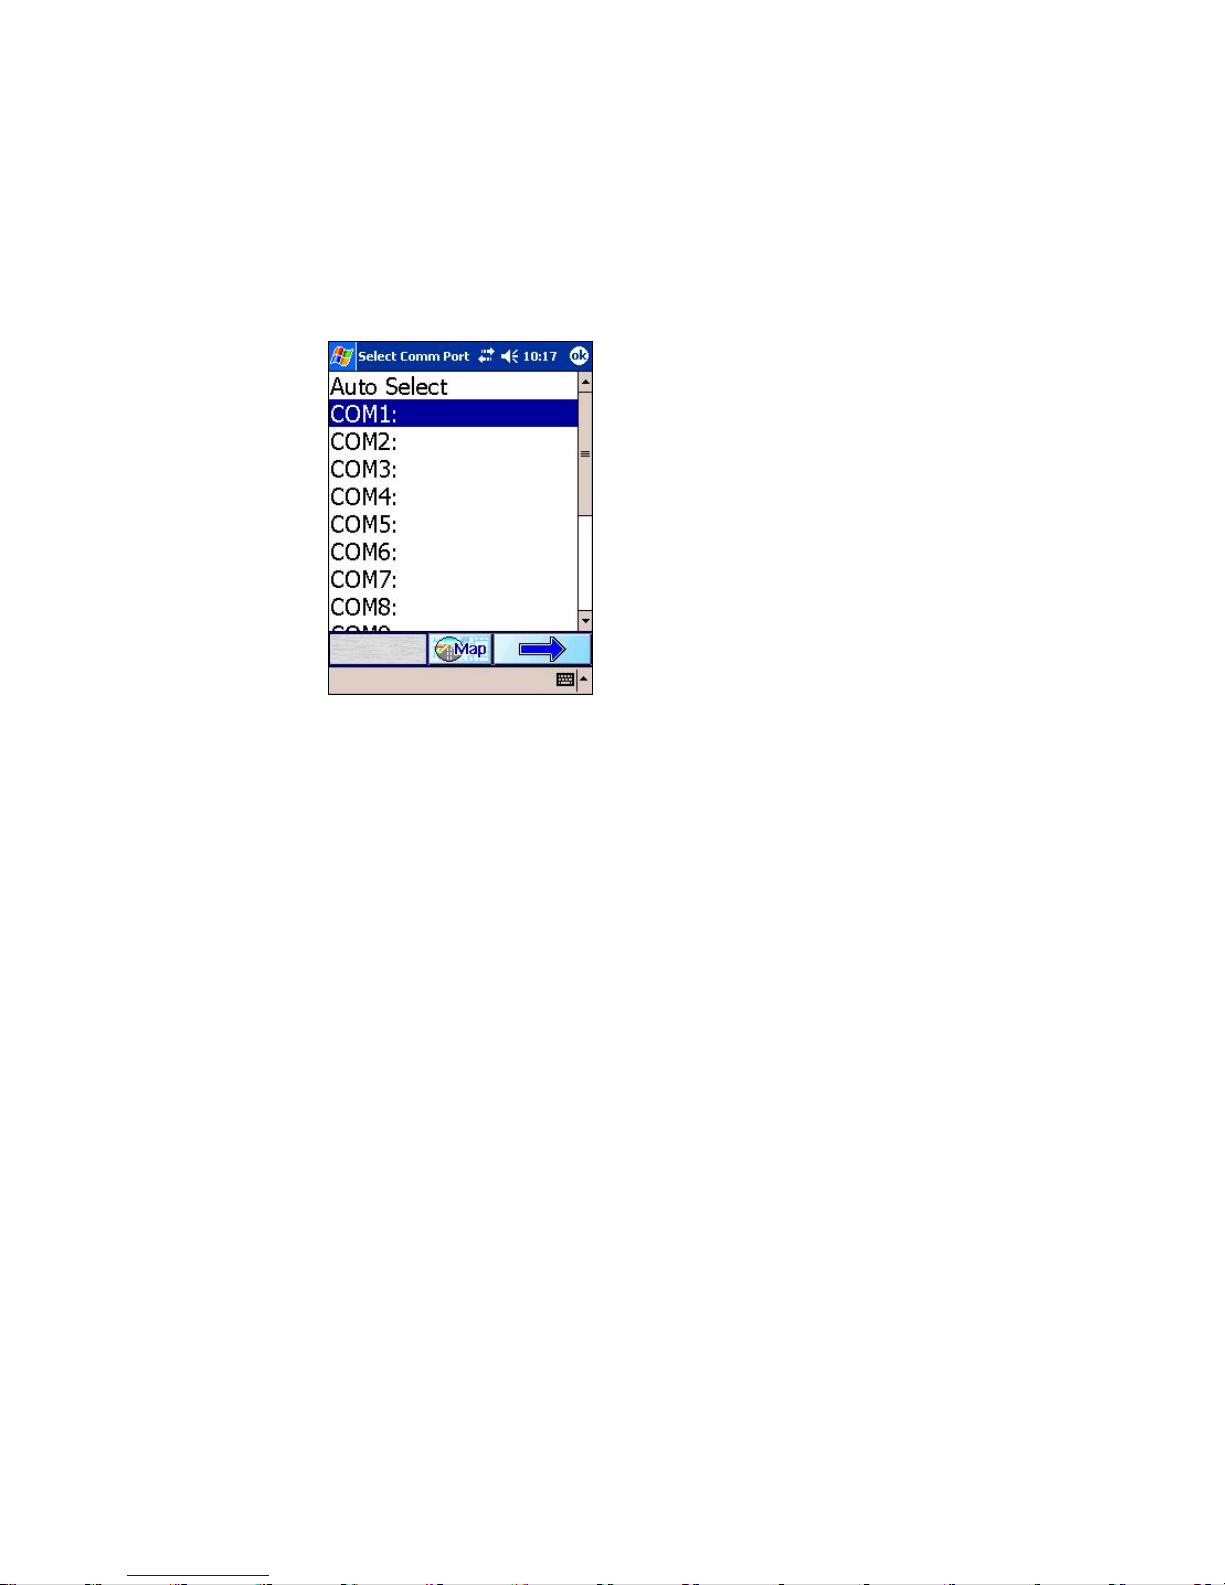
8.2 Configuring GPS in Ostia
Note: Comm Port Selection only applies if using Windows Mobile-based
devices (does not apply to Pharos All-In-One devices)
The first time Ostia starts, the Select Comm Port screen will appear. The
screen allows you to configure the communication port that the GPS will
be using. You can select the Comm Port manually or automatically.
Selecting Auto will allow
Ostia to configure your
GPS automatically. For
Bluetooth GPS users, this
should be sufficient.
For Serial, CF, and SDIO
GPS receivers, the Comm
port must be set manually.
To set the Comm port
manually, please refer to
the User Manual of your
handheld device for the
appropriate Comm Port #.
Select the COM# from the
list, and tap the Forward
Arrow when finished.
To access the GPS Configuration screen manually at any time,
tap Goto Æ Power User Æ Tools Æ Select Comm Port.
Select the appropriate Comm Port needed, and tap the Forward
Arrow when finished.
Note: If the GPS is taking a long time to acquire a satellite lock, tap
GPS Æ Initialize, to reset the GPS Receiver
83

If you are using a Thirdparty GPS receiver on a
Pocket PC or Pocket PC
Phone, you can select the
Baud Rate at which the
GPS communicates to the
software. The Baud Rate
for your receiver should be
listed in the packaging it
came in.
For all Pharos labeled GPS
receivers, the Baud Rate is
4800, or the Default.
Select the proper Baud
Rate and tap the Forward
Arrow.
84

8.3 Installing Pharos GPS Hardware
iGPS-SD
1.
Insert the iGPS-SD into
the Secure Digital Card
port of the Pocket PC.
Make sure you have
installed the iGPS-SD
driver from the driver
disc. This is a separate
process from installing
any other software.
2. To install the driver,
connect your device to
the computer/laptop via
Microsoft Activesync and
run the Setup from the
Driver Disk. When
finished, perform a soft
reset on your device,
making sure the iGPSSD driver is plugged into
your device. This will
activate the driver and
allow you to use the
GPS receiver.
iGPS-SD
PDA
85
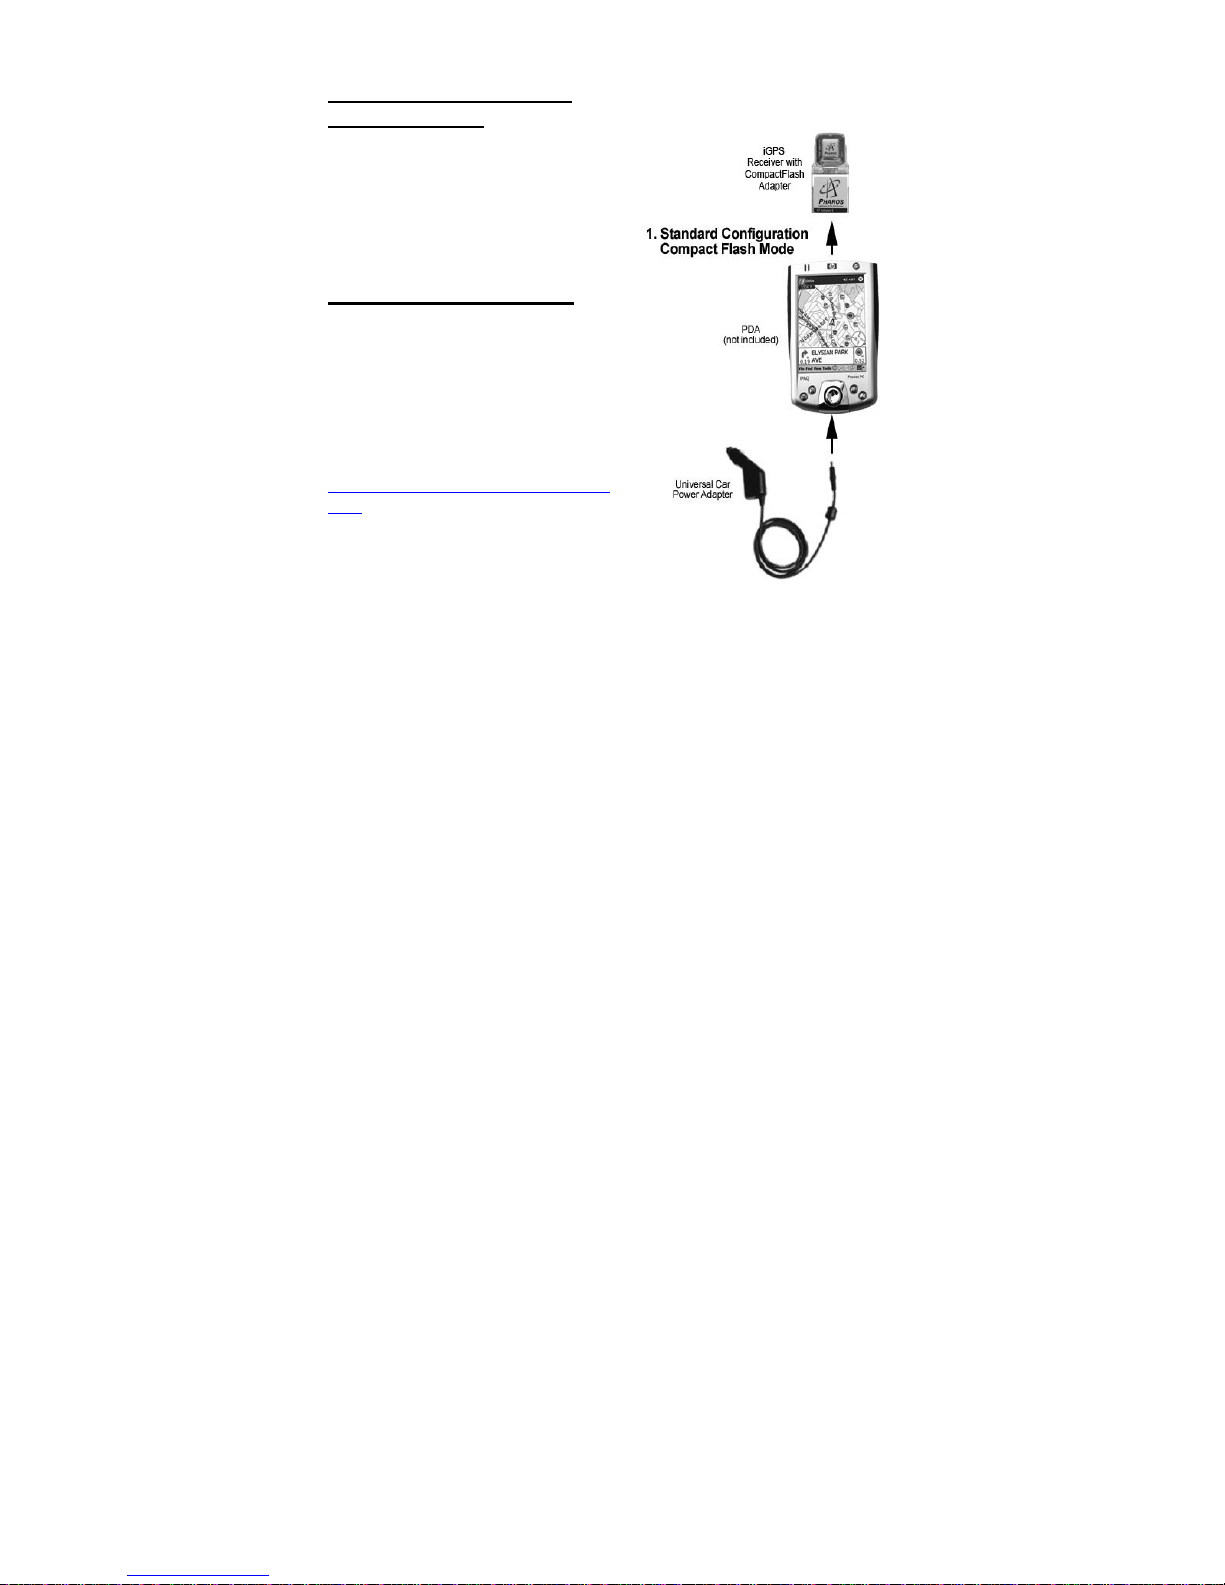
iGPS-360 and iGPS-500
Configurations
There are 4 (four) different
setup configurations available
for the iGPS-360 and iGPS-
500.
1) Compact Flash Mode
1a. Insert the iGPS-360 or
iGPS-500 into the Compact
Flash adapter, and then into the
Compact Flash slot of the
Pocket PC.
not come with a CF adapter, you
can purchase one from
www.services.pharosgps.com/shop
ping
1b. The Universal Car Power
Adapter can also be used, while
in a vehicle, to supply power to
the Pocket PC and GPS.
Note: If your GPS did
86

2) Compact Flash
Extended Antenna Mode
2a. Detach the iGPS-360 or
iGPS-500 receiver from the
Compact Flash Adapter base.
2b. Attach the CF extension
cable between the iGPS-360
or iGPS-500 and the base.
2c. Insert the iGPS-360 or
iGPS-500 Compact Flash
Adapter base into the
Compact Flash slot of the
Pocket PC.
2d. The Universal Car Power
Adapter can also be used,
while in a vehicle, to supply
power to the Pocket PC and
GPS simultaneously.
87

3) Serial Attach Mode
3a. Connect the iGPS-360 or
iGPS-500 to the Serial Cable
specifically for your Pocket
PC.
3b. Connect the Serial Cable
to your Pocket PC serial port
and connect the Universal
Car Power Adapter. This
mode requires power via the
12V cigarette lighter adapter
in your vehicle to work.
4) Bluetooth
Your Passkey is:
12345678
For further info, please refer
to the Walkthrough Guides in
section II of your iGPS-BT
User Manual or the Support
section at
www.pharosgps.com
Bluetooth setup instructions.
for
88

9.0 Troubleshooting
Visit the Pharos website (http://www.pharosgps.com/support) for FAQs,
tips, troubleshooting and latest updates.
Some things to watch for:
• Know how to do a “Soft Reset” on your Pocket PC as per your
Pocket PC manual. This can resolve a large number of
issues.
• With a serial-based GPS setup, you may need to disabl e the
external keyboard for your PDA in your Programs list, if you
have one. It may need to be disabled every time you soft
reset, as most are programmed to be enabled by default.
• Make sure you are outside in an area clear of any obstructions
that may block the GPS satellite signals to your GPS receiver.
Obstructions include large buildings, as well as mountains,
tunnels, and even large trees planted very close together
• To use a storage card for map storage, make sure the *.cash,
*.food, *.fuel, *.hotel, *.inx, and *.rmf files (total of 6 files) for
each map are stored in a "My Documents" folder and that the
folder is not located inside any other folders or directories. It
must appear as follows to function properly:
My Documents
(Take note of spacing and capitalization. They are important.)
• The Registration key is located on the inside flap of the
cardboard CD holder, and the UPC code is on the back
• When trying to connect your device to your laptop/tablet/PC,
you need to have the latest version of ActiveSync installed and
showing that it is both Connected and Synchronized. If you do
not have the latest version, you can download it from
www.microsoft.com/windowsmobile. Devices using Windows
Mobile 5.0 or higher require ActiveSync 4.2 or higher
• Since the Canadian high way/motorway map does not cover
the entire country, when trying to route in Canada across long
distances, and you are unable to create a route using the
highway/motorway map, try opening all the necessary local
maps to create the route
89

10.0 Contact Us at Pharos
Pharos Science & Applications, Inc.
http://www.PharosGPS.com
411 Amapola Avenue
Torrance, CA
90501-1478
USA
Phone: • Toll free at 888-PHAROS8 (888-742-7678) for
Technical Support in USA and Canada
• 877-774-2767 for Product Info & Sales
Fax: 310-320-1808
Email: Support@PharosGPS.com
Sales@PharosGPS.com
Info@PharosGPS.com
Telephone technical support is available Monday through
Friday between the hours of 8:30 AM to 5:30 PM Pacific
Standard Time
90

11.0 SOFTWARE LICENSE AGREEMENT
This is a legal agreement ("this Agreement") between you
("Licensee") and Pharos Science & Application, Inc. (Pharos). By
opening the Pocket PC, Ostia software package ("Software Package")
and or by using the Pocket PC, Ostia software ("Software"), you agree
to be bound by the terms of the Agreement.
If you do not agree to the terms of this Agreement, promptly return the
software, and its accompanying items, to the retailer.
1. Grant of License: This Software License Agreement ("License")
permits Licensee to use one (1) copy of the Software Package
enclosed with the License. The Software Package includes Software
and documentation. This non-exclusive License, without the right to
sublicense, rent or lease, is to install and use the Software on a single
personal computer.
2. Software Transfer: Licensee may permanently transfer the License
and all rights hereunder to a third party by written notification to
Pharos and where the recipient agrees to the terms of the License.
When Licensee delivers the entire Software Package to a third party,
Licensee must also destroy any and all remaining copies of the
Software whether installed on a personal computer or other device.
Such a transfer terminates Licensee's rights to upgrade the Software
or map information.
3. Pharos' Rights: Licensee acknowledges that the Software consists
of proprietary, unpublished products of Pharos, protected under U.S.
copyright law and trade secret laws of general applicability. Licensee
further acknowledges and agrees that all right, title, and interest in
and to the software are and shall remain with Pharos. This
Agreement does not convey to licensee an interest in or to the
software, but only a limited right of use, revocable in accordance with
the terms of this Agreement.
91

4. Limitation of Liability: IN NO EVENT WILL PAHROS OR ITS
SUPPLIERS BE LIABLE FOR ANY INDIRECT, SPECIAL
INCIDENTAL, ECONOMIC OR CONSEQUENTIAL DAMAGES,
ARISING OUT OF THE USE OF OR INABLITY TO USE THE
SOFTWARE PACKAGE, INCLUDING SOFTWARE OR
DOCUMENTATION, EVEN IF ADVISED OF THE POSSIBILITY OF
SUCH DAMAGES. IN NO CASE SHALL PHAROS OR ITS
SUPPLIERS' LIABILITY EXCEED THE AMOUNT PAID BY
LICENSEE FOR THE SYSTEM. Some states do not allow the
exclusion or limitation of liability for incidental or consequential
damages, so in those states, the above limitation or exclusion may not
apply to you.
5. Disclaimer of Warranty: THIS SOFTWARE AND THE
ACCOMPANYING FILES ARE SOLD "AS IS". PHAROS AND ITS
SUPPLIERS DISCLAIM ANY WARRANTIES AS TO
PERFORMANCE OR MERCAHNDISE OR ANY OTHER
WARRANTIES WHETHER EXPRESSED OR IMPLIED. In particular,
there is no warranty for high-risk activities. NO WARRANTY OF
FITNESS FOR A PARTICULAR PURPOSE IS OFFERED. The user
must assume risk of using the program.
6. Limitations on Reverse Engineering, Decompilation, and
Disassembly: Licensee may not reverse engineer, decompile, or
disassemble the Software, except and only to the extent that such
activity is expressly permitted by applicable law notwithstanding this
limitation.
7. Separation of Components: The Software is licensed as a single
product. Its component parts may not be separated for use on more
than one computer.
8. Termination: Without prejudice to any other rights, Pharos may
terminate this License if Licensee fails to comply with the terms and
conditions of this license. In such event, Licensee must destroy all
copies of the Software and all its component parts.
92

9. Copyright: All title and copyrights in and to the Software (including
but not limited to any images, photographs, animations, video, audio,
music, and or text incorporated into the Software), the accompanying
printed materials, and any copies of the Software are owned by
Pharos or its suppliers. Copyright laws and international treaty
provisions protect the Software. You may not copy the printed
materials accompanying the Software.
10. Governing Law: The agreement shall be governed by the laws of
the State of California.
11. Export Laws and Regulations: Licensee agrees to comply fully
with all relevant export laws and regulations thereof, is not exported,
directly or indirectly, in violation of United States laws.
12. Proprietary Products: For purpose of any public disclosure
provision under and federal, state or local law, it is agreed that the
Products are a trade secret and a proprietary commercial product and
not subject to disclosure.
13. Restricted Rights: End User hereby represents and warrants that
the Products shall be protected for public disclosure and considered
exempt from and statute, law, regulation, or code, including any
sunshine Act, Public Records Act, Freedom of Information Act, or
equivalent, which permits access and/or reproduction or use of the
Products. In the event of breach of any part of this paragraph by such
disclosure, this Agreement shall be considered breached and any and
all right to retain any copies or to use of the Products shall be
terminated and considered immediately null and void. Any copies of
the Licensed Products held by End User shall immediately be
destroyed. If any court of competent jurisdiction considers this clause
void and unenforceable in whole or in part, for any reason this
Agreement shall be considered terminated and null and void, in its
entirety, and any and all its copies of the products shall immediately
be destroyed.
14. Portions of this product may be Copyrighted (c) by 1996-2007
deCarta, TeleAtlas, or NAVTEQ.
93
 Loading...