

Page 1

OWNER’S MANUAL
Page 2

Thank you for the purchase of your new Diamond
Amplification Phantom 100watt guitar amplifier.
This amplifier is of the highest quality and will give
you years of enjoyment if it is well maintained.
Before you begin, remember, learn your amp and
you’ll be in the best position to achieve the tones
and performance you want. So please take the
time to read this manual. Afterwards, enjoy the
finest in tone and American craftsmanship –
Diamond Amplification.
Jeff Diamant
President/CEO
Page 3

OWNER’S MANUAL
FEATURES............................................................................................................................ 1
FRONT PANEL...................................................................................................................... 2
REAR PANEL ....................................................................................................................... 2
MAKING CONNECTIONS .................................................................................................... 2
BEFORE YOU BEGIN .......................................................................................................... 4
QUICK START GUIDE ......................................................................................................... 4
POWER/STANDBY .............................................................................................................. 5
DIALING IN ........................................................................................................................... 6
LOW FOCUS ............................................................................................................. 6
EFFECTS LOOP ........................................................................................................ 6
TONE/VOLUME CONTROLS .................................................................................... 8
CHANNEL 1 ............................................................................................................. 10
CHANNEL 2 ............................................................................................................. 11
SWITCHING ........................................................................................................................ 12
FRONT PANEL SWITCHING ................................................................................... 12
PHANTOM CONTROLLER ...................................................................................... 12
ALTERNATE SWITCHING METHODS .................................................................... 13
TUBES ................................................................................................................................ 14
TUBE LAYOUT ........................................................................................................ 14
CHANGING/REPLACING TUBES ........................................................................... 14
DIAGNOSING TUBE PROBLEMS ........................................................................... 15
Page 4

PHANTOM OWNER’S MANUAL (rev.2) PAGE 1 OF 17
Welcome to a new world in guitar amplification. Combine the functionality you want with the
tried and true technology of tube tone, wrap that in a completely new approach to the
structure of a high gain sound, and unleash the dynamic range of Diamond Amplification’s
Phantom.
This manual will walk you through the features, controls and tonal possibilities available to
you. It is highly suggested that you read through this manual in its entirety before dialing in
your new tone! The information in this manual will familiarize you with this amp’s capabilities,
FEATURES
• 100 watts (4 x Svetlana “Winged C” EL34 - 6 x selected 12AX7A-C)
• 2 fully independent channels (Channel 1 - Clean/Channel 2 - Crunch)
• Both Channels feature Volume, Gain, Bass, Middle, Treble, Presence
• Dual Volume/Gain Channel 2 (switchable, allows for two gain settings with 2 volumes
for level adjustment to match volumes)
• Rear panel low frequency 3-position adjustment switch (allows for changing the
amount and character of the bottom end - effects both channels)
• 2 switch foot controller for access to all three volume/gain controls (Channel 1,
Channel 2A, Channel 2B) connected with a TRS cable.
• Footswitch connects through TRS (“stereo”) 1/4" jacks allowing for switching through a
variety of other devices.
• 110v, 120v, 220v and 230/240v power selection.
• Ohm selector switch for 4, 8 or 16ohm output.
• Green LED's light the box for a distinctive look on stage, along with a unique silver-
vein steel front grille and etched zinc logo.
• All components specifically spec'd and tested by Diamond before inclusion in the
product.
• Independent LED's indicate which volume/gain is active.
• Properly designed, tube-driven effects loop (so the loop will automatically engage
when cables are plugged in and disengage when cables are removed).
• Front panel Effects Return control that acts as an overall master when loop is engaged
for quick overall volume adjustment.
Page 5
PHANTOM OWNER’S MANUAL (rev.2) PAGE 2 OF 17
FRONT PANEL
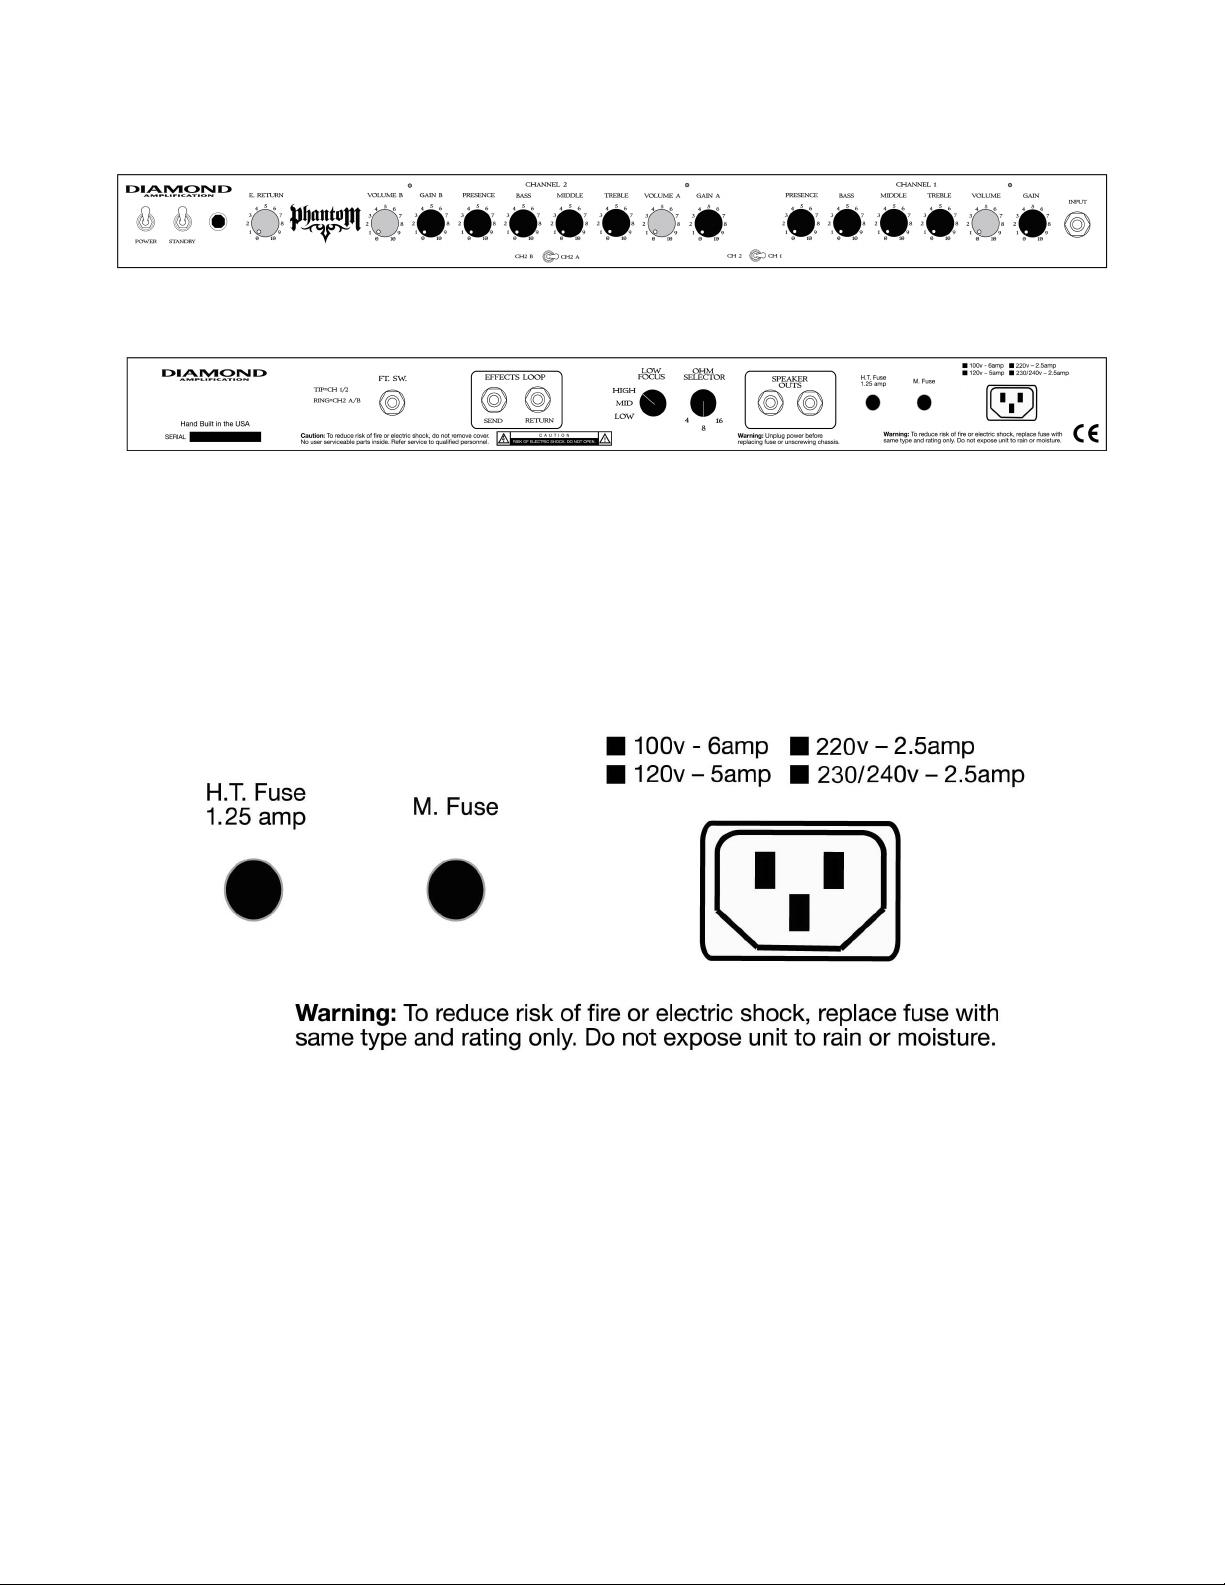
REAR PANEL
MAKING CONNECTIONS
Power. As always, plug your power cable in first.
Your amp can be wired for any voltage. This allows you to take your amp all over the world
and ensure you’re ready for the voltage you need. Rewiring for an alternate voltage should
only be done by a qualified technician.
Speakers. Your DA product comes equipped with two speaker jacks. Always ensure, when
connecting speakers, that you use a high quality speaker cable. Never use instrument cable
to connect your amp to speakers and never put effects between your amp and speakers.
If you are using one speaker cabinet, you can plug into either speaker jack. Make sure your
impedance selector is set to the same impedance as the speaker cabinet. If you are unsure
of the impedance of your speaker cabinet, please find out before making your connection.
Page 6

PHANTOM OWNER’S MANUAL (rev.2) PAGE 3 OF 17
If you are using two speaker cabinets, you should reduce the impedance to half that of the
impedance of the cabinets. For example, if you are using two 16ohm cabinets, your
impedance selector should be set to 8ohms, not 16 (if you were using only one 16ohm cab,
you’d set the impedance selector to 16). So, for example:
Load Amp Setting
1 cab @ 16ohms 16ohms
1 cab @ 8ohms 8ohms
2 cabs @ 16ohms 8ohms
2 cabs @ 8ohms 4ohms
Never use your amp without a load! Doing so is likely to damage your amp!
Instrument. Plug your guitar into the input jack (duh!). When doing so, remember, your
cable DOES matter. Always use a high quality cable when possible. Try to remember that
when a cable is plugged into the input of the amp, it’s always best to make sure it’s also
plugged into a guitar. Otherwise, you assuredly encounter lots of popping and annoying
sounds.
Effects loop. Your effects loop is a series loop with a “shorting” jack in the Return position.
What does this mean to you? When you plug a cable into the effects return, it goes active.
When you unplug the cable in the Return position, the loop return goes inactive.
If you are using, for whatever reason, your amp just for its power stage, no problem. When
you plug into the loop return, you’re set. When you do, the E. Return knob on the front panel
becomes the power stage (master) volume (more on this later).
If you are using, for whatever reason, your amp just for its preamp stage (e.g., your amp’s
preamp stage will be feeding another power amp instead), you should put a shorting jack into
the Return jack. You should also ensure that the E. Return knob is set to 0. Note, if you run
your amp this way, it is highly recommended that you pull all 4 power tubes out of the
amp or ensure the amp has a load on it. When the amp is used in this manner, the
particular channel volume control becomes that channel’s “master” volume, which is
functionally operating as the loop “send” level.
Page 7

PHANTOM OWNER’S MANUAL (rev.2) PAGE 4 OF 17
BEFORE YOU BEGIN
Ensure your guitar is plugged into the front panel “Input” jack. Make sure your amplifier is
connected to a speaker (or speakers) and ensure your impedance is set correctly (more on
this in the previous section). Flip the “Power” switch up with the amp on standby and let it
warm up. A minute or two of warm up is usually recommended before using the amp. As
most of you know, a solid 15 minutes is optimal to ensure the tubes are nice and warm. If
you’re going to play loud and haven’t let the amp warm up at least 15 minutes, try to control
the volume (challenging for us guitar players, I know – just ask your singer if you don’t believe
me) until the amp has warmed up some more.
If you’re plugging in for the first time, ensure your amp is prepared for the correct voltage.
DA’s products ship ready for the voltage of the destination country that receives the amp.
Your amp can be wired for any voltage. This allows you to take your amp all over the world.
Rewiring for an alternate voltage should only be done by a qualified technician.
Following these guidelines will extend the life of your amp! Enjoy!
QUICK START GUIDE
So you’re an experienced user, you’ve made your connections and you’re ready to go.
Here’s a few settings to get you started and dial you in some quick tones to get rockin’.
NOTE: Unlike most amps, dialing any control to or near 10 is not recommended. Like
most good amps, you won’t need or want to vary too far from 5 (other than volume) to
dial in.
NOTE: if you the amp is too loud for you when trying to achieve the tone you want, or
if you do not want very, very high volumes when running through this Quick Start
Guide, please read the section(s) in this manual on the Effects Loop. It will show you
how to activate the Effects Loop, allowing you to run your preamp channels much hotter, but
control volume through the E. Return knob on the front panel. For this quick start, however,
plug a short patch cable in from Send to Return, turn the E. Return knob to a low setting
(around 1 or 2) on the front panel. Then after dialing the settings below, bring the E. Return
up to the desired volume as you play.
1. Dial Channel 1 like this:
a. Gain 2
b. Volume 5
c. Treble 5
d. Middle 5
e. Bass 5
f. Presence 5
Page 8

PHANTOM OWNER’S MANUAL (rev.2) PAGE 5 OF 17
2. Dial Channel 2 like this:
a. Gain A 6
b. Volume A 6
c. Treble 5
d. Middle 4.5
e. Bass 5
f. Presence 6
g. Gain B 3
h. Volume B 6
3. Set your Low Focus knob on the rear panel to Low
4. Take the amp off standby and try out Channel 1. Play with the “Low Focus” knob.
Go first from Low to High (wait ‘til you hear this!), then back down to Mid. This will
give you the flavor of what that knob does. The higher the volume, the more
dramatic the effect.
5. Now switch to Channel 2A and play away! Try varying the “Low Focus” knob
again. When varying the “Low Focus” knob, resist the temptation to adjust the
other knobs. This will give you the best idea as to what effect that knob has on the
overall tone of the amp. Last two . . .
6. Toggle back and forth between 2A and 2B to get a feel for the varying tones on
lower and higher gain settings.
POWER/STANDBY
Always keep the Power switch off when unplugging and plugging in to your power source.
Once the amp is turned on (the jewel light will illuminate to indicate power is on), and when
you have made all the appropriate connections, take the amp off standby. Allow the amp to
warm up for several minutes before playing for optimal result.
You should always return the amp to standby before turning off to allow the amp to
“discharge” voltage. Doing this habitually will extend the life of your amp.
Page 9

PHANTOM OWNER’S MANUAL (rev.2) PAGE 6 OF 17
DIALING IN
LOW FOCUS
The Low Focus knob on the rear panel is one of the best features on all DA products. This
knob lets you focus your low frequencies and adjust the amount of lows relative to mids and
highs. It is NOT a bass boost. DA’s products are tuned to the optimal frequency ranges
beneficial to your place in the mix. Bass boosts are wonderful, but usually end up boosting
frequencies found in your bass player’s rig, which will assuredly overpower your new low
end-heavy tone. Consequently, we let you adjust your tone to give you the low end you want
in the frequency range it needs to be in.
The Low Focus knob does much, much more. As you move the knob from Low to Mid to
High, you are also increasing the clarity of the amp and filling out your tone. Hence, as you
move from Low to High, you’ll hear the amp get fuller with the feel of much more low end.
You’ll find, however, something you’ve probably not ever had – your low E will ring at the
same volume level as your high E, which is uncharacteristic of most high gain amps. So you
should find that you hear the separation between notes more than you ever have giving you
the clarity, punch and beef you’ve been looking for. The Mid position is a nice compromise
between Low and High (obviously, right?).
Experiment and find what works for you. The original circuit design in your amp was for the
High position only. Our advice is to try this position first, dial in a tone and play. Switch to the
Low position WITHOUT adjusting other knobs than repeat in the Mid position. The point of
refraining from adjusting front panel knobs is to get a real feel for what that control does.
When you get locked in to the position you like, then adjust away!
EFFECTS LOOP
The Effects Loop is tube driven. It is wired in series and there is no need to turn it on or off.
The Return jack will activate when you put a cable in it. Hence, when you plug a cable in, it
turns on. When you unplug it, it’s off.
Page 10

PHANTOM OWNER’S MANUAL (rev.2) PAGE 7 OF 17
People sometimes inquire about the lack of an effects send. There is one. When the loop is
engaged, each Volume control becomes that Volume/Gain’s effects send. So, when on the
clean channel with the loop engaged, the Volume control on the clean channel becomes the
effects send. When on Channel 2, Volume/Gain A, that Volume control becomes 2A’s effects
send, and so on. So if you’re clipping your effects, that is the control to reach for.
What about that E. Return knob on the front panel? When the loop is on, the E. Return knob
replaces each channel’s volume control and becomes the overall master volume control.
This turns each Volume control into a balancing control to level out channel volumes (and
that channel’s effects send as noted in the preceding paragraph). What is the advantage to
this? When you have the loop engaged, you can heat up the preamp to drive the channel
hotter while controlling the overall volume.
Let’s do a test.
1. Set your amp on Channel 2A.
2. Set the Gain at 6 and the Volume at 4. It should be pretty loud.
3. Now, make sure the E. Return control is set to 0 and plug a short patch
cable into the loop (provided), jumping the Send to the Return. When you
play now, you should hear nothing.
4. Gently bring the E. Return knob up. When you get to about 2 or 3, you
should be at a normal, listenable level for home practice, and tonally the
amp should be about the same.
5. Leave the E. Return knob on 2 or 3 (wherever you ended up) and bring the
volume level of 2A up to about 6 or 7. You’ll hear the amp getting a lot
hotter but the volume will remain listenable (although a little louder).
6. Unity gain is about 5. So, if you bring the E. Return up to 5, you should be
able to unplug the loop without any volume difference.
7. Now switch back and forth between the channels setting the Volume
controls to a nice, balanced level or vary them from one to the other as
desired.
It is perfectly normal to run the amp with a short (1’ or 2’) patch cable in the loop at all times.
If you like having the master, jump the loop. If you don’t want it, take it out.
Page 11

PHANTOM OWNER’S MANUAL (rev.2) PAGE 8 OF 17
THE TONE/VOLUME CONTROLS
The interplay between the volume and gain dictates your tone more than any other controls.
So let’s start there.
Volume/Gain. As with any amp, the gain control dictates the amount of saturation, break up
or distortion of the channel. The higher the gain, the more the channel distorts. Like any
good tube amp, this amp is very sensitive to the signal it is being fed. Think of it like a car,
the more you press down on the gas, the more then engine turns over, hence, the car goes
faster. Well your pickups are your gas pedal. The hotter the pickup, the more crunch you’ll
get out of the amp. So, with a low output (maybe, say, a single coil), the more sweep you
have on the gain knob before the amp will start to provide more crunch. For us metal
players, our super high output pickups will cause this channel to distort much more quickly.
For gain settings, generally your cleaner tones will be lower on the gain knob and the higher
you run it up, the more crunch you’ll get out of the channel. But volume and gain interplay.
Assume you dime the gain, but set the volume to 1. You’ll hear the distortion, but not like you
want. As you roll the volume up, the true tone will emerge.
Keeping with our analogy, think this time of the gain as the gas pedal. How many times have
we raced go karts as a kid? Can you remember mashing the gas pedal as hard as you could
but the go kart just didn’t want to go as fast as you wanted it to? Well often those go karts
came with some sort of governing device. You can put the proverbial pedal to the metal, but
the kart will only go so fast. So dime your gain. But when it’s not fast enough, open up that
governor by introducing some volume. As you bring up the volume and heat up the channel,
mashing that gas pedal starts to really get that machine moving.
When deciding how to run your volume/gain settings, try some things first. Bring the gain up
to around 7 and volume to around 3. After you’ve made mental note of the tone, start rolling
that volume up and listening for the tonal changes (although you’ll assuredly also hear
volume changes). When the volume hits around 6 or 7, you’ll really hear a difference from
the tone when the volume was on 3. Now let’s reverse it somewhat. Bring the gain down to
2 or 3 and set the volume at 3. Rinse and repeat.
What will we have learned? Most likely, this test will have resulted in few observations: (1)
the tone is brighter, tighter and punchier when the gain is down on the gain channel; (2) the
tone is cleaner and rounder when the gain is down on the clean channel; (3) the tone is mean
and nasty when the gain is up on the crunch channel; (4) the higher the volume, the fuller the
amp is and the more punch you’ll get from the channel; and (5) there is a lot you can do
tonally by simply varying these two controls.
NOTE: This amp is capable of producing extreme amounts of gain. IT IS NOT
ADVISED TO EVER TURN THE GAIN UP ALL THE WAY. In year’s past, our amps
sounded great, but just didn’t quite have enough gain. So we rolled them to 10 and
sometimes still added a pedal. Nowadays, the gain we wanted is built in and sometimes a lot
more than we may ever need. The high end of the gain structure on this amp is capable of
potentially surpassing the tube’s ability to keep up. This can result in feedback and squeals.
It will also push the tubes beyond where they optimally perform. On your crunch channel,
Page 12

PHANTOM OWNER’S MANUAL (rev.2) PAGE 9 OF 17
start with your gain at 5 and work from there. On your clean, start with your gain at around 2
and work up.
Bass. This is the most incorrectly used control on an amp. Do we all want fat low end? You
bet. Do we get that by diming the bass control? Not on this amp.
The simple truth of a good tube amp is that the amp will do its job and produce low end. The
higher the volume, the more low end the amp will produce. So when the amp is producing
your nice low tones, introducing extra low frequencies from the bass knob has a tendency to
“muddy” the tone or make the amp sound “looser.” Lesson here? Keep your bass knob
under control if you’re putting any real volume through the amp (at low volume, you may want
to add a little bass back in to try to mimic the tones you’ve dialed in on higher settings).
Middle. The mid-range of an amp is by far the most critical tone range. Remember, guitar is
a predominately mid-range instrument. Suck out the mids and try hearing yourself in the mix.
DA spent truckloads of time on the mid-range. As a result, one thing is for sure. It will take a
concerted effort on your part to dial yourself out of the mix. That being said, your mid-range
control will wildly change your tone. After you’ve set your other controls, work on this one.
Set your mids at 5 and see what you think. Then, to hear the variance, sweep the mid-range
from 3 or 4 on the low range to 9 or 10 on the high.
NOTE TO US METAL GUYS: Don’t be afraid of your mids. All the crunch in the world is fine,
so long as the audience can hear us. Take out too many mids and you’ll get lost in the mix.
Keep your mids lower for that great metal “edge”, but lower on this amp is still north of 3. Try
the settings between 3 and 5. Of course, if your metal sound of choice bears more
resemblance to the metal tones of the 80’s (yes, I grew up on these!), you’ll be happiest with
mid settings well north of 5 (say 6-8 or even higher in some cases).
Treble/Presence. The interplay between treble and presence is always unique. Depending
on how your old amp was designed, sometimes they work backwards, sometimes one
doesn’t work, sometimes they work like you’d expect. So, forget what amp(s) you’ve used
before. Here is how they work on this amp.
Your treble knob really will decrease and increase high end frequencies. So, start with this
knob around 5. As you roll it up, you’ll think the amp is getting harsher. It is. Increase treble,
increase harshness. DO NOT use your Treble knob for “brightness.” That is the function of
the Presence knob.
Presence on this amp could be labeled “brightness.” Due to what the Presence control is and
where it is in the circuit, you may not see much of a difference in your Presence control from
0-4 on the dial. When the presence knob is dialed up north of around 4, you’ll really start to
hear the change. If you want your tone more aggressive, roll the presence up. If you want to
smooth it out a bit, bring it down. Pretty simple, huh?
Page 13

PHANTOM OWNER’S MANUAL (rev.2) PAGE 10 OF 17
Dialing in Channel 1 (Clean)
Your clean channel is capable of a huge array of tones ranging from full, round crystal cleans
to vintage classic rock crunch including blues/Texas blues tones and everything in between.
Our suggestions?
Start for true clean tones first. Set the gain around 2, dial your tone controls to 5, bring your
volume up to the desired level, then work your tone knobs.
For blues tones or more break up, try a few things. Try bringing the gain up first leaving the
volume in place. Now, pick any spot on the gain setting (above at least 3) and varying the
volume controls. For a punchier, rounder blues tone, you’ll find lower gain settings with high
volume to be great. For more break up, bring the volume not quite as high, but drive the gain
more.
For classic rock tones, try the gain knob anywhere from 6-8 and vary the volume control
(same principle – high volume lower gain is punchier and tighter, lower volume, more gain is
grittier and meaner.
NOTE: Work your guitar’s volume knob and listen to how well the amp cleans up. Try
a setting with more gain, then roll off your guitar’s volume to clean it up, rolling the volume
back up for grittier passages or leads.
Page 14

PHANTOM OWNER’S MANUAL (rev.2) PAGE 11 OF 17
Dialing in Channel 2 (Crunch)
You’ll note the Dual Volume/Gain design of Channel 2. For the moment, let’s forget about
Volume/Gain B. Set them to 0 and forget them.
You’re crunch channel is also capable of producing a range of tones as well. The most
important feature is that as you bring the gain below 5, the amp will brighten. So, if you’re
looking for punchier, cleaner and brighter tones, keep the gain down. If you want to make it
heavier, bring the gain up above 5. YOU SHOULD NOT LIKELY EVER NEED TO BRING
THE GAIN ABOVE 7 OR 8. As noted, this amp is capable of producing more gain than
tubes can handle (or than you’ll need). Bringing gain levels to 10 can exceed the tube’s
capabilities depending on the circumstances, which is why excessive gain will not
likely produce a desirable tonal result.
Start with your Channel 2 controls all at 5. Try, first, bringing up the Presence control and
sweeping that knob. Once you get your presence dialed in, then sweep your midrange (see
the previous section on the mid-range control. Those controls will tone alter the amp more
than any others on this channel. Here’s a few sample settings to give you some idea of what
you can do:
Bright, British, Tight and Punchy Lower Gain setting:
Presence: 6
Bass: 5
Middle: 7
Treble: 5
Volume: 6
Gain: 3
Modern, Heavy and Thick High Gain setting:
Presence: 8
Bass: 7
Middle: 4.5
Treble: 5
Volume: 6
Gain: 7
Page 15

PHANTOM OWNER’S MANUAL (rev.2) PAGE 12 OF 17
Start with whichever of these settings is closer to your tone, then tweak the controls one at a
time. Until you really get used to the amp, after altering one control, return it to where you
started before tweaking the next.
NOTE: In both examples, none of the controls vary far from 5. You should dial
similarly when you work the amps to get your sound.
OK – so what about that Volume/Gain B? Are the different from Volume/Gain A? No.
Switching between them is like turning the knob. So, for example, set Volume A and Volume
B at 5. Set Gain A at 7. Set Gain B at 3. Now turn Gain A to 3. Now back to 7. Now back
to 3. That is what is happening when you toggle between A and B. You are only changing
the value on the knob. There is no tonal difference between them. For those that are sure
they can hear a difference, that is only the natural variance in taper on the pots. Pots are +/10%. So 3 on one pot is not always exactly 3 on the other.
So why have it? Maybe you like one setting when the gain is at 3 and one when it is at 7 so
you can chug those low chords on high gain, but clean it up for more intricate rhythm
passages. Now you don’t have to choose. Set A one way and B another then switch away!
Maybe you want one to be identical with just a touch more gain or just a touch more volume?
Set them the way you want them and switch away. This feature is only to give you, the
player, more options live. Two rhythms and a boost for lead? You got it. One rhythm and
one lead, forget the boost? All within your control on this amp.
SWITCHING
Your Phantom provides you a number of ways to switch your amp. Let’s get familiar with all
of them!
FRONT PANEL SWITCHING
Your amp’s front panel comes equipped with 3 small toggle switches. Switch 1 switches
between Channel 1 and Channel 2. Channel 1 is to the right as you face the amp, which is
the “off” position of the switch.
When the amp is switched to Channel 2, Switch 2 (labeled Ch 2A/Ch 2B) will toggle between
Volume/Gain A and Volume/Gain B on Channel 2. Ch 2A is on the right, which is the “off”
position of the switch.
Note: if Switch 2 is in the “on” (Ch 2B position), when you flip Switch 1 back to Channel 1
may not cause the amp to switch back. It is recommended that if you want to switch back
from Channel 2B to Channel 1 that you set both Switch 1 and Switch 2 to “off.
PHANTOM CONTROLLER (FOOTSWITCH)
The supplied footswitch is as rugged as the amp. Featuring the highest grade of switches
and a 14 gauge steel chassis, you’ll be hard pressed to kill this piece. The footswitch is
connected through the use of a TRS cable. Any standard TRS cable will work so you can
obtain shorter or longer cables as necessary.
Page 16

PHANTOM OWNER’S MANUAL (rev.2) PAGE 13 OF 17
Button 1 (labeled CH 1/2) will control switching between the two channels (i.e. clean to dirty).
Once on Channel 2, button 2 (labeled CH2 A/B) will toggle between the two volume/gain
controls on Channel 2. The intended use for the two settings is rhythm/lead so button 1 will
take you to crunch and button 2 then takes you to a lead channel. Clearly they can be used
for two different rhythm sounds as well if you use outboard rack or pedal effects to obtain
your lead tones.
Note: the front panel switches will override the footswitch. Hence, for the footswitch to
operate correctly, all front panel switches must be in the “off” position, which is toward the
right when facing the front panel. The front panel switches are made to override the
footswitch in the event of an emergency (probably caused by your bass player).
ALTERNATE SWITCHING METHODS
Your amp’s TRS switching jack on the back panel allows you to control your amp with any
device that conducts simple latching tip to ground switching functions (e.g., the Diamond
Amplification/RJM Music MAC-2, a Bradshaw (Custom Audio Electronics) switching system,
an RJM Music Amp Gizmo, a TC Electronic G-System, a GCX switching system or a simple
latching footswitch). The three jacks correspond exactly with the front panel switches.
To get the most of your amp if you’re a MIDI kinda player, we recommend our MAC-2, which
will allow you to use this jack and switch your amp with any standard MIDI controller! MIDI
In/Thru also allows you to control your MIDI effects and your amp at the same time from one
controller. The MAC-2’s 4th jack is a TRS jack for this purpose.
If your switching device, whatever it is, does not utilize TRS switching jacks, try using a
stereo “insert” cable (available at most music stores and generally used in PA’s), which is
TRS at one end (connect this to the amp) and “Y’s” out to two mono jacks at the other end
(connect to your switching device).
Page 17

PHANTOM OWNER’S MANUAL (rev.2) PAGE 14 OF 17
TUBES
TUBE LAYOUT
V1 – Common
V2 – Channel 1 (Clean)
V3 – Channel 2 (Gain 1)
V4 – Channel 2 (Gain 2)
V5 – Loop
V6 – Phase Inverter
CHANGING/REPLACING TUBES
Preamp tubes have a much longer life than power tubes. You are not likely to have to
replace them unless one or more tubes fail. Preamp tubes can have a life span of at least
two to three years and usually much longer. If it becomes time (say it’s been a few years or
you regularly change your power tubes and feel like the amp has become lifeless), contact
DA for a replacement set. If you want to buy tubes on your own, please consult DA to ensure
you do not buy an inappropriate tube. Generally, however, any good 12AX7, ECC83 or
replacement tube will be OK, although they can change your amp’s tone.
If you play regularly, power tubes should be changed every 6 months to a year. If you don’t
play frequently, they can last longer. NOTE: While power tubes can simply and suddenly
fail, they generally degrade over time. So while your tubes may be working, they will
not sound the same as they get older. People often go years with the same power tubes
and never replace them claiming, “Well, they still work fine.” You can be assured that the
amp, however, does not sound the same as it does with new, functioning tubes. DON’T
WAIT UNTIL YOU HEAR A DIFFERENCE. FOLLOW A REGIMENTED TUBE CHANGING
SCHEDULE TO AVOID HEARING A DIFFERENCE.
When it is time to change power tubes, bias should always be checked. It is easiest to have
a qualified tech retube and rebias your amp. If you buy replacement tubes from DA, you may
not have to adjust bias as your tubes will be of the same or similar rating and matched
correctly. It is still good, however, to verify bias. If you feel competent to check or adjust
bias, call DA for instruction. But generally, bias should average between 33 and 39 milliamps
Page 18

PHANTOM OWNER’S MANUAL (rev.2) PAGE 15 OF 17
between the two outside tubes. You will need a Bias King or similar bias probe to check this.
The bias trim pot, in the event you need to adjust bias, is located on the PCB.
DIAGNOSING TUBE PROBLEMS
Most tube amp problems relate to the tubes themselves. After all, tubes are not the cutting
edge of technological advancement. DA tube choices are based both on tone and reliability.
Nevertheless, tube problems are not infrequent occurrences. But before you have to worry
about shipping your amp for repairs, learning to diagnose a tube problem can keep you
rockin’.
If you read the preceding section, you’ve learned when and how to change your tubes. We
can not stress enough the importance of changing tubes to keep your amp running optimally.
But even with regular maintenance, you can still have tube problems. If you are playing out
regularly, we suggest you keep a spare set of power tubes in your gig bag and maybe a few
preamp tubes just in case.
Crackling, squeals and feedback, excessive noise and muddiness or low output are all
evidence of tube problems.
Power tubes. The two main symptoms of a power tube problem are a blown fuse or a tube
that begins to glow cherry red. Either are typically indicative of a power tube failure. Some
failures can be an intermittent short and some can be a tube failure. If you blow a fuse,
replace it. If it happens again, replace your power tubes. If the tube glows cherry red, shut
the amp off immediately. As power tubes are wired in pairs, a failure of this nature in one
tube can cause the other tube in the pair to fail with it. If you encounter this problem, as
noted, shut the amp down immediately. Wait a few minutes and fire it back up. If it happens
again, replace the tubes before using the amp again. If not, you should probably still replace
the tubes soon, but you should be able to operate the amp for a short period of time.
In the event you have one or two power tube failures, you can replace that one tube or two
tubes to get you through a show, but then replace all four with a matched set (see the
preceding section).
If you are hearing noise and/or crackling, you can rule out (or in) a power tube with a simple
test. Gently tap on the power tubes, one at a time. They should not make noise. If noise
changes with the tapping, you may have a failing power tube. Always be prepared to shut
the amp off in case you have a failing tube and the tap causes it to short. If so, shut the amp
off immediately and replace the tubes.
Preamp Tubes. Preamp tubes usually cause problems through noise or microphonics. If
noise, you will hear hiss, crackling, popping or similar issues. If you hear squeal, hum or
feedback, it is typically a microphonic tube. Noise from microphonic tubes will typically
increase with a volume increase.
To diagnose which tube is bad, the most important thing is to determine, if possible, whether
the problem is on both channels or just one. If you can tell that it is in both channels (even if
only slightly on one channel), it is most likely V1, which is common to both channels. A noisy
Page 19

PHANTOM OWNER’S MANUAL (rev.2) PAGE 16 OF 17
or microphonic tube in this position will affect the entire amp. Microphonic or noisy tubes in
several other positions may not be audible at all. You can try tapping the tubes like you did
the power tubes and see if the problem worsens. It is normal to hear a slight ring when you
tap on preamp tubes. This test is only to see if the identified problem changes when tapping.
This test is NOT outcome determinative.
If the problem is only on one channel or the other, you’ll know which tube is the problem. If
it’s only on the clean channel, it’s tube V2. If it’s on the crunch channel, it is either V3 or V4,
but most likely V3. NOTE: V1 usually is the culprit. Even if you don’t hear it on both
channels, you should check V1 anyway. Tube problems are much more dramatic on
V1 than any other position. When you think you have determined the culprit, put the amp
on standby and change that tube. Retest.
NOTE: It is always advisable to change preamp tubes one at a time. It is a good idea
to keep at least one known good preamp tube for this purpose. Then you will know for
sure if you have found the problem.
Page 20

DIAMOND AMPLIFICATION, INC.
5261 LANGFIE LD RD.
HOUSTON, TEXAS 77040
713.934.0100 (TEL)
713.934.0155 (FAX)
www.diamondamplification.com
 Loading...