

Page 1

MANUAL
Page 2

MANUAL
www.abelcine.com
First Edition: 09.20.10
New York Chicago Los Angeles
Page 3

Preliminary Edition
Flex Manual
Contents
Contents
1 Introduction to Phantom Flex 1
2 From Muybridge to Phantom 3
3 CameraTheory of Operation 7
4 Camera Set Up + Quick Start 13
5 Power & Connectors 19
6 Optics 21
7 On-Camera Controls 25
8 CineMag 53
9 Phantom Software 61
10 CineStation 81
www.abelcine.com
Writthen and produced by the Technical Dept at AbelCineTech Inc.
Jamie Alac, Mitch Gross, Liz McGill, Jesse Rosen, Moe Shore
With Special Thanks to Rick Robinson of Vision Research
09.23.10
11 Post Flow & File Formats 83
12 Maintenance & Troubleshooting 85
13 FAQ 87
Page 4

specifications
Up to 2,570 fps at 1920x1080 in Standard mode
•
1000 ISO (measured using ISO 12232 SaT method)
•
HQ Mode provides ultimate in image stability under changing
•
shooting conditions
2 x 4:2:2 HD-SDI video ports, can be configured as dual-link 4:4:4 video
•
2560x1440 scaled to 1920x1080 HD-SDI output
•
Genlock for synchronizing video playback – essential for 3D video
•
workflows
Internal mechanical shutter for hands-free and remote Black Balance
•
Global, electronic shutter to 1µs (shutter angles in HQ mode
•
dependent upon frame rate)
Phantom CineMag compatible, CineMag interface
•
has field-replaceable pin array
12VDC, 1.5A auxiliary power outputs for powering external devices.
•
External trigger signal through dedicated port and aux power connectors
•
Advanced on-camera controls for camera modes, settings, playback,
•
edit & save
12-bit pixel depth
•
SDI Ready frame synchronization to external signal, allows multiple
•
cameras to be synchronized
Phantom Flex Manual
Page 5
Introduction to
Assistant Side
1
Camera Capabilities
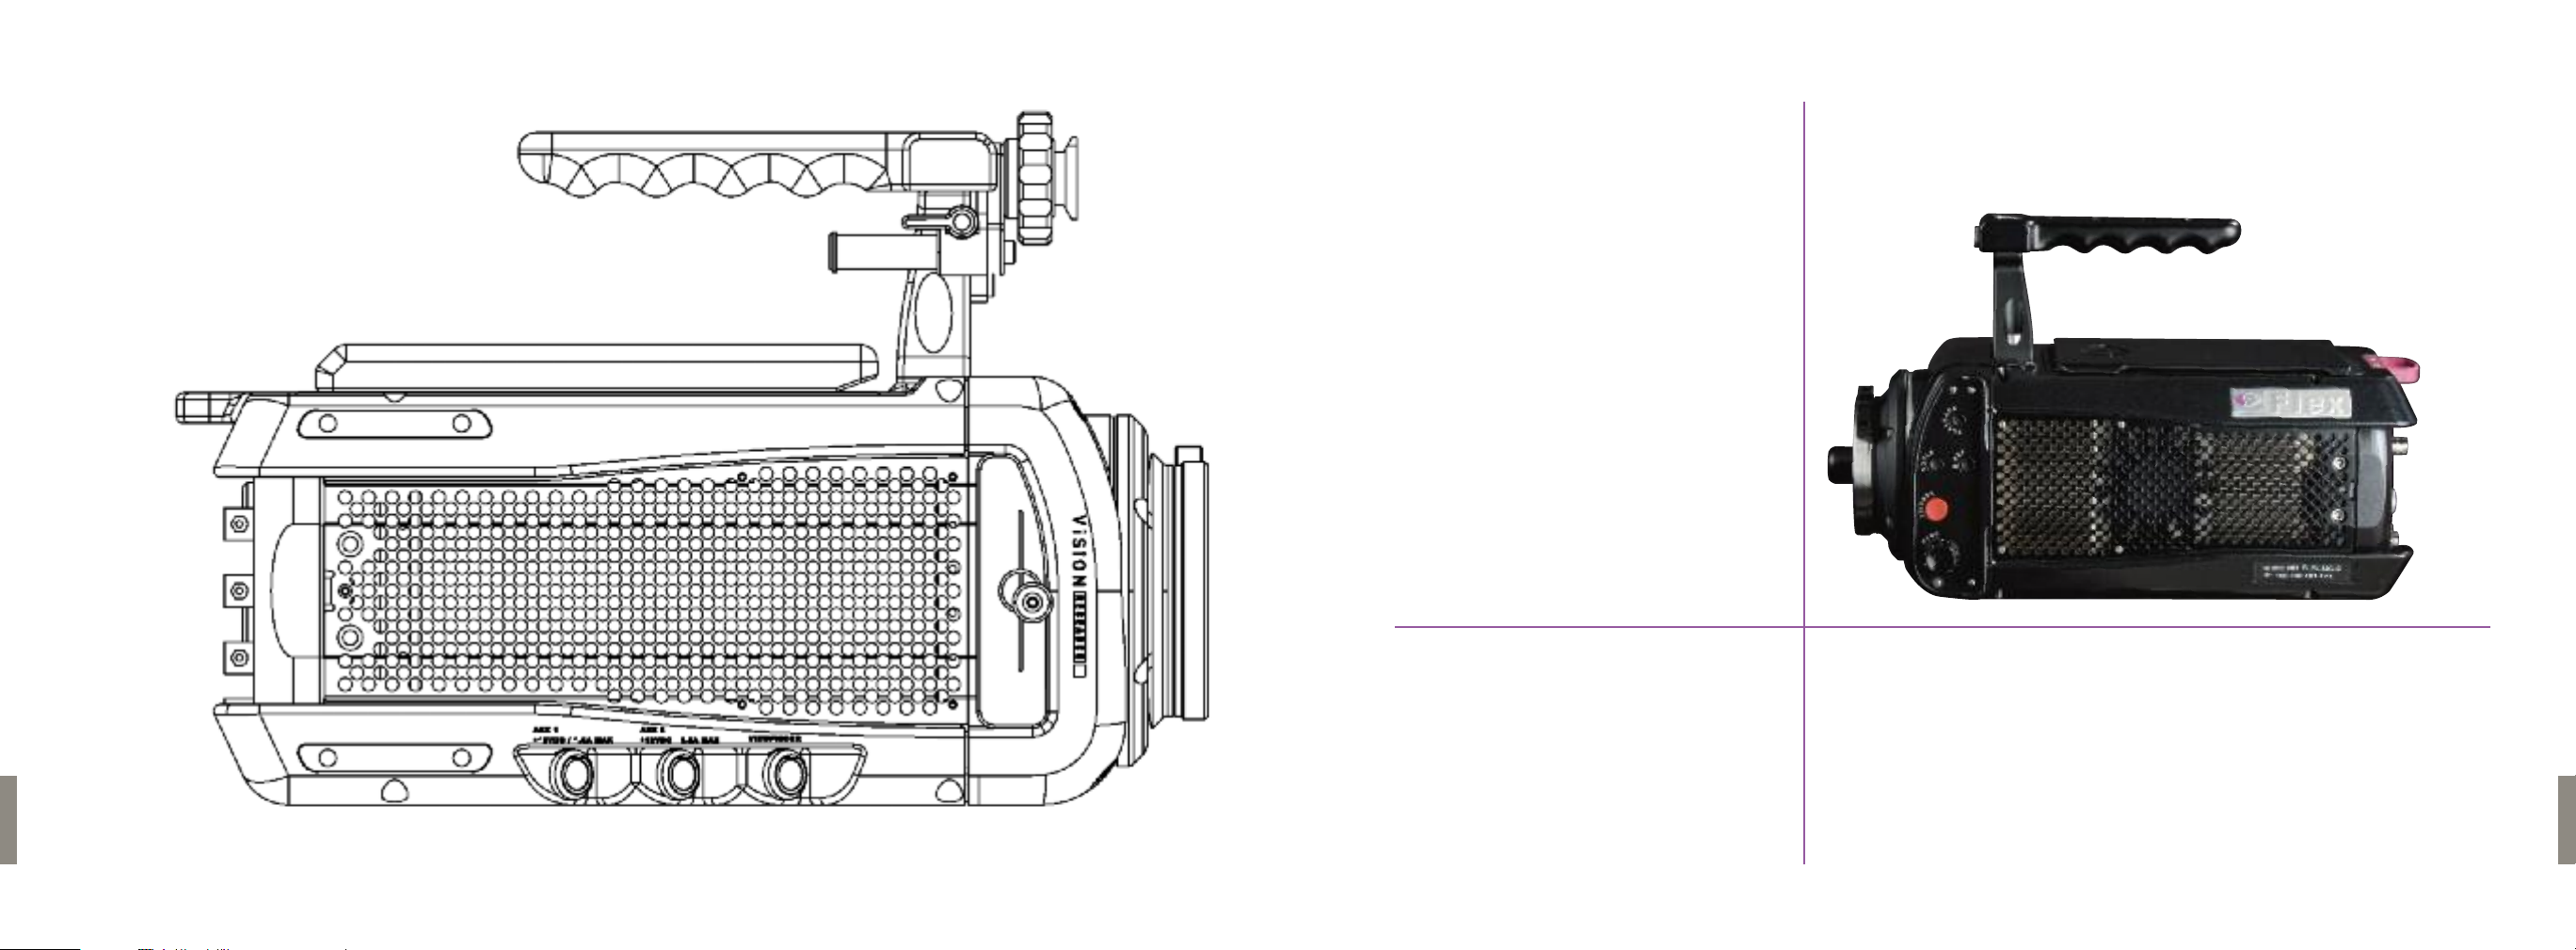
Phantom Flex
The Phantom Flex offers unprecedented flexibility in all areas of high-speed
image capture. The Flex is over two stops more sensitive than previous
generation cameras at 1,000 ISO, making it the most sensitive high-speed
camera in the production market. In terms of resolution, the camera goes
beyond HD to support 4-megapixel imaging (2560x1600). Frame rates are
increased to over 2500fps at 1920x1080 or more than 5,000fps at 1280x720.
Phantom Flex Manual
A new proprietary image enhancement technology results in electronic image
stability unprecedented in digital high-speed cameras: stable blacks, low noise,
higher dynamic range, and repeatable shots over the full range of supported
Phantom Flex Manual
1
Page 6

resolutions,frame rates and temperatures without the need for pre-shot black
references.
From Muybridge
Other New Features
Lens Format
Multiple Workflows
Another significant new feature of the Phantom Flex is automatic scaling
of the video output.The full resolution of the sensor is scaled to standard
HD-SDI output (1920x1080 or 1280x720).This oversampling technique results
in higher quality video.
A Global Shutter, which ensures no artifacts on fast moving objects
•
or strobes/flashes.
An internal capping shutter, which makes for a more convenient
•
black balance procedure.
New connectors, improved buttons and streamlined
•
user interface all make for a friendlier experience.
One way the Flex earns its name is by accommodating various format lenses.
35mm PL lens coverage is standard.The HDx2 optical adapter, available from
Abel Cine Tech allows B4 mount lenses to be used. Super16 optics will
work with (1080p) or without (720p) an adapter. Also available are Panavision,
Nikon F and powered Canon EF mounts.
The Phantom Flex supports multiple workflows: a raw digital workflow, a
video workflow, or combination of both for maximum control and flexibility.
All of these features and more will be covered in the following pages,
but first we take a quick look back at the history of high-speed photography
and the evolution of Phantom camera technology.
2
to Phantom
More than 120 years ago, a galloping horse was the subject of one of the
most well known early applications of high-speed imaging. In the 1870’s
Eadweard Muybridge sought a way to see whether a horse’s hooves were
ever all off the ground at the same moment in time. He used 12 cameras
each triggered by a length of string stretched across the horse’s path.
The Muybridge images clearly captured what hadn’t been possible to see
before. What surprised people around the world was that the feet were
off the ground when under the belly of the horse instead of legs stretched
forward and backward – so traditional in painting. Thus began the era of high
speed photography, with its power to reveal what had never been seen.
2
Phantom Flex Manual
3
Phantom Flex Manual
Page 7
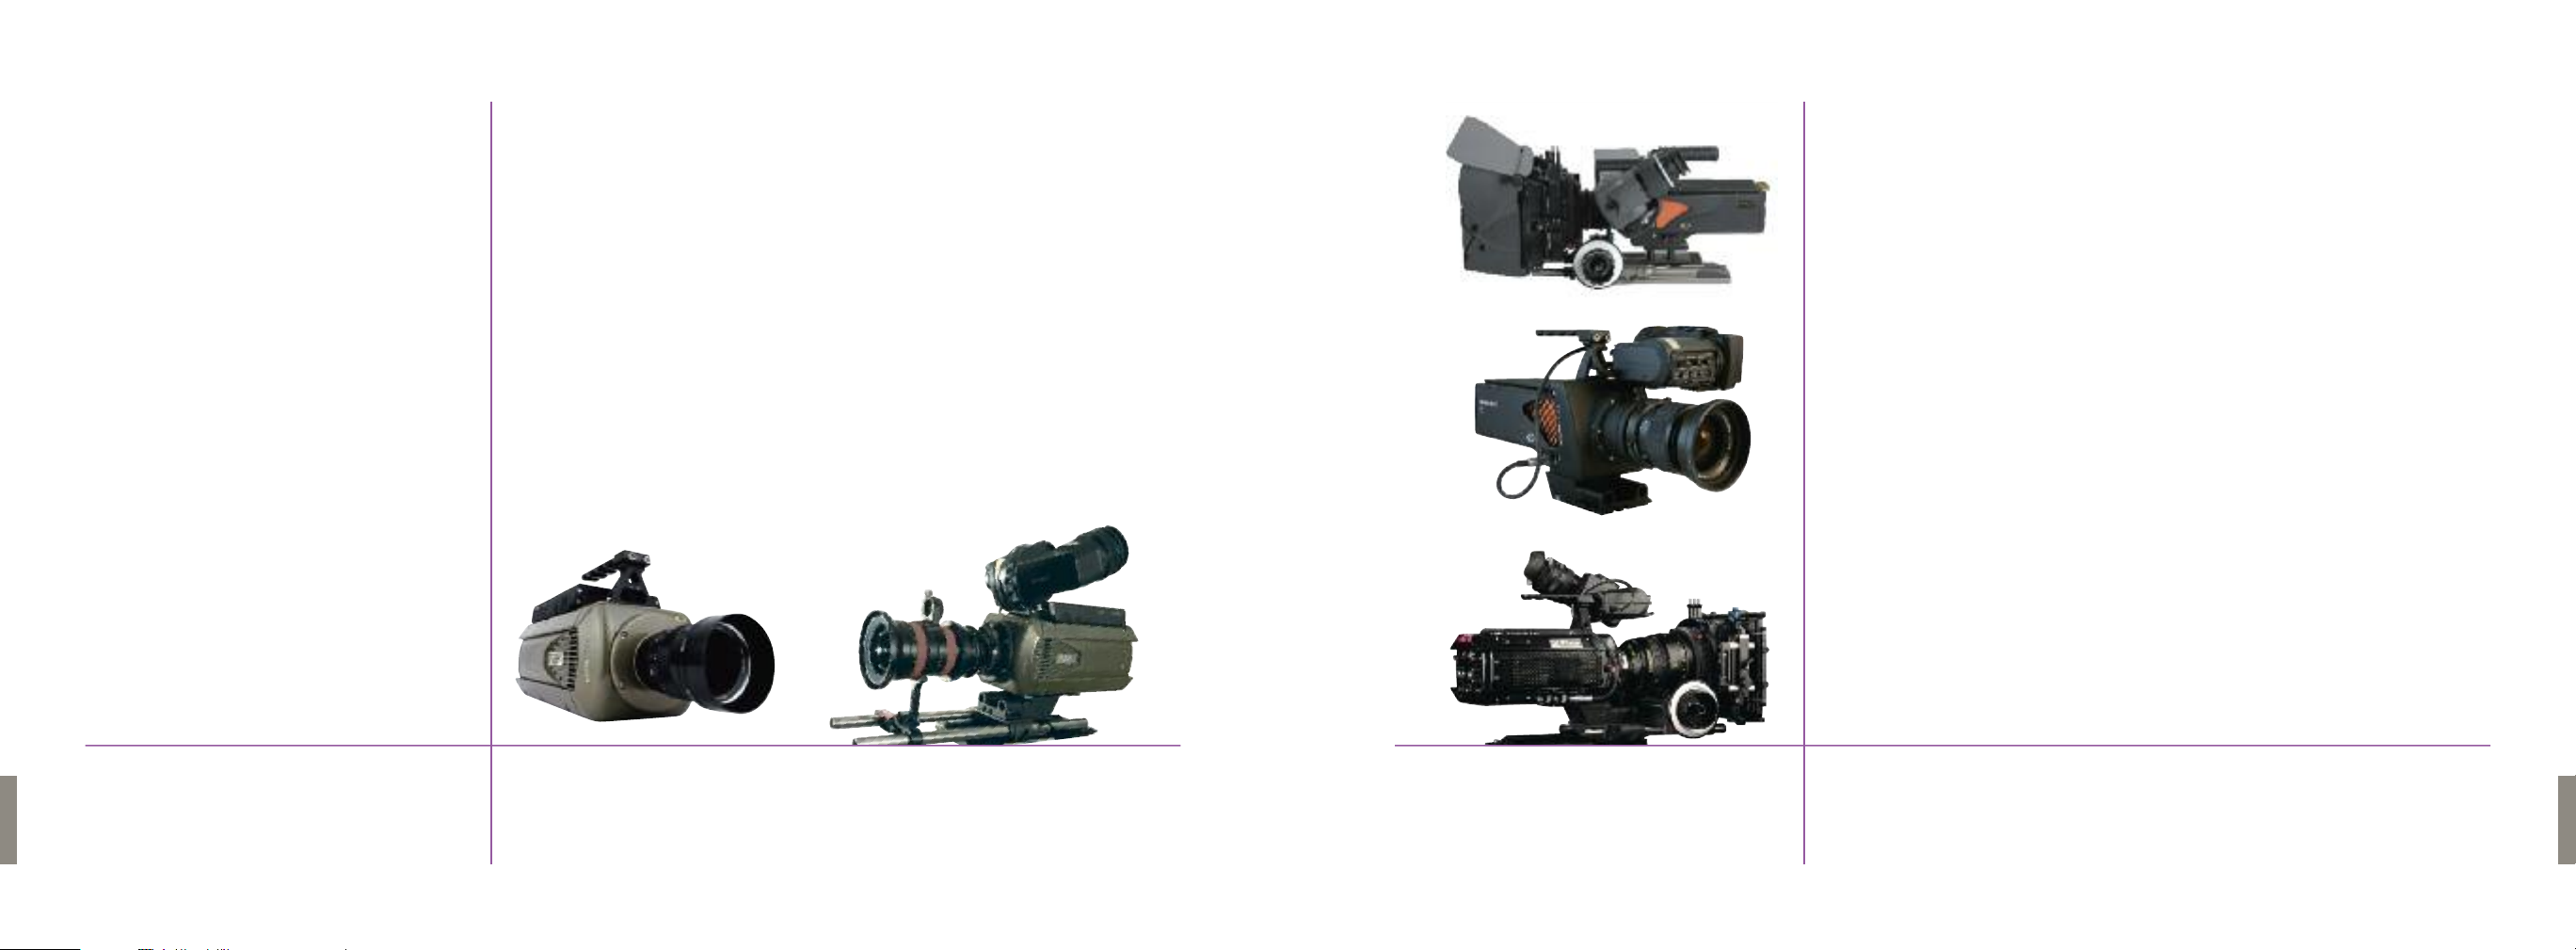
Fifty years later high-speed photography was used by business and industry
to analyze events too fast to see with the naked eye. Eastman Kodak
developed a high-speed 16mm camera in the early 1930s that ran up to
1,000 frames per second. Some of the industrial uses included “cause of the
breaking of threads when sewing leather goods.” By the 1960’s several
companies were producing high-speed film cameras in 16mm, 35mm
and even 70mm formats, including the predecessor of Vision Research.
Vision Research, the manufacturer of Phantom high speed digital cameras,
was founded in 1950 by a young, idealistic, engineer who quit his job at
Fairchild Camera to form a brand new company named Photographic Analysis
Company. The company’s sales motto was "Research Through Photography".
High speed photography was used as an engineering tool for industrial,
scientific and military applications, and the film cameras were widely
accepted.
In 1992 the company decided to form a separate entity that was to design
and fabricate high-speed electronic imagers that did not rely on photographic
film for imaging.That "spin off" became known as Vision Research® Inc. and
their family of electronic imagers is currently marketed under the "Phantom®"
trade mark.
Digital imagers combined with solid state memory solve many of the
inherent limitations of film when it comes to size, weight, cost and perhaps
most especially the flexibility of triggering the camera before, during or after
an event. Eventually the quality of digital caught up with film and the rest,
as they say, is history.
In 2007, Vision Research named Abel CineTech the exclusive North American
reseller of Phantom products and introduced a high-speed, high quality
camera for cinema and television – the Phantom HD. Since then, Vision
Research and Abel CineTech have established the HD Gold as the standard
for high speed imaging in the motion picture and television industries.
The ability to reveal what had never been seen before could extend beyond
the industrial, scientific and military realm into story telling and human
emotion. The Phantom Flex brings that capability to a new plateau.
Phantom Flex Manual
54
Phantom Flex Manual
Page 8

Camera Theory
Operaotor Side
3
What the Flex Does
in a Nutshell
& Operation
The key to the Flex’s capabilities as a high-speed camera is the ability to move
vast amounts of video information from the camera’s sensor to some form
of storage extremely quickly. The Flex can read over 5 billion pixels (over
6 gigabytes of data) per second. (In comparison, a typical 1080P HD camera
reads only 62 million pixels per second.) At this rate a 1-terabyte hard drive
could be filled in under 3 minutes. There doesn’t yet exist any permanent,
portable storage that can record at these speeds.The one form of storage able
to keep up with this torrent of data is RAM.
When shooting at the highest frame rates, images go straight to RAM.
RAM acts as a circular buffer – new frames push out older frames. This limits
the length of a shot (it can only be as long as what fits in RAM), but allows
great flexibility in capturing fast events.The camera can be left continuously
recording without consuming any permanent storage. At the critical moment
the camera can be triggered before, during or even after, the event, stopping
recording and allowing the shot to be played back or saved to permanent
storage.
The primary factor determining the maximum frame rate of the camera
is memory bandwidth. There is a fixed number of pixels that can be pushed
from the sensor to RAM per second. One way of increasing the maximum
frame rate is to reduce the resolution of the recorded images. The same
number of pixels per second will give more frames of lower resolution.
The Flex can be cropped both horizontally and vertically, either of which
will both increase the maximum frame rate as well as the number of frames
that will fit in memory.
Phantom Flex Manual
One other factor that affects the maximum frame rate is a new camera mode
Phantom Flex Manual
76
Page 9

introduced with the Flex called HQ mode. HQ mode captures some extra
information in between frames, which increase the signal to noise ratio
of the camera as well as eliminates the need for black balancing the camera.
The trade off is that the maximum frame rate and shot length are reduced to
about half of what they would otherwise be.
From the temporary storage of RAM, there are a few paths to permanent
storage.These include HD-SDI out, data out over Ethernet and saving to
a CineMag. The simplest is to record the HD SDI output of the camera with
a tape or data recorder. This results in a deliverable that doesn’t require any
specialized equipment or software to use for editing or color correcting.
The quality of the video image is excellent, especially when shooting using
the full resolution of the sensor, but there are a few downsides to this
workflow. It is necessary to wait for each take to play back before shooting
the next take — this can take several minutes. While the quality is very good,
still better quality and higher resolution can be obtained by converting
Uncompressed RAW images in post, which is also the only way to retain
all of the metadata such as the shooting time, frame rate and shutter info.
Getting the Shot
Of course eventually footage needs to be saved from a CineMag to
permanent storage. Using a CineStation with a 10G Ethernet connection
to a workstation with fast storage, it is possible to download an entire 512GB
CineMag in under an hour. Another alternative is to use the CineMag /
CineStation to output HD SDI to a tape or data recorder.
One of the great challenges of shooting high-speed film was timing.
The camera needed to start and come up to speed before the action
happened, but not so long or else the film would run out. This was tenable
for studio shooting, but made many documentary subjects impossible
to shoot. Imagine trying to predict when lightning is about to strike,
or a whale about to breach!
One of the most liberating aspects of shooting digital high-speed with
a Phantom is the circular buffer. Now the camera can be recording constantly,
waiting for the action — you just need to hit the trigger at the right time.
Phantom Flex Manual
There are a few ways of recording the RAW sensor output with the Flex.
Clips can be downloaded over Ethernet after every shot.This results in high
quality images but is slow. Downloading the entire contents of RAM can take
20 minutes. A faster way to save clips is to trim and save them to a CineMag.
The CineMag is one of the great advantages to shooting with a Phantom
— there is no faster storage device. Clips that would take several minutes
to output over Ethernet or to play out over SDI can be saved to a CineMag
in a few seconds.
Another flexibility that using a CineMag affords is the ability to record directly
to it without the limitations of what fits in RAM. It is possible to record
Uncompressed RAW 1080P footage at 24 fps to a 512GB CineMag
continuously for over two hours, or at 360 fps for more than eight minutes.
What happens when you trigger the camera depends on how the trigger
point is set.You can trigger the end of the shot, in which case the frames
already in memory preceding the trigger will be kept.This is common for
very fast subjects.
You can also move the trigger to an earlier point in the shot.Triggering the
middle of a shot might be useful if you want to preserve the maximum
number of frames both before and after an event.
Moving the trigger to the beginning of a shot might be useful when recording
an event of indeterminate length where it is most important to record the
beginning of the action.
Triggering the camera is a skill, and you should practice to get a feel for how
to best capture different events. Get comfortable with a single trigger point –
Phantom Flex Manual
98
Page 10

don’t think about starting and stopping recording. It is not unusual to leave
the camera recording for a great deal of time – especially in a documentary
situation – before triggering the event.
Household or office fluorescent lights will flicker at the line frequency, but
many fluorescents made for film or video use (such as most Kino-Flo’s) have
high-speed ballasts that allow use for high-speed shooting.
10
Phantom Flex Manual
Lighting
For some, usually lower frame-rate shots, it is desirable to record
continuously for a time. With a CineMag this is possible. Direct recording
to a CineMag is the perfect solution for moderate frame-rate shooting
without any extra effort dedicated to trigger points or manually trimming
and saving shots. When recording to a CineMag directly, one starts and
stops the capture similarly to a traditional camera.
Lighting for high-speed cinematography can be a challenge. The two major
issues have been the intensity of light needed and flicker. With the high
sensitivity of the Phantom Flex the light needed is much less of an issue;
but many lighting sources that work perfectly for low frame-rate shooting
will cause flicker problems when used for high-speed work. In fact, you will
find that very many light sources that appear continuous to our eyes actually
flicker at a rate that we (and most cameras) don’t perceive. Any lighting unit
that flickers at the line frequency will generally be acceptable for use when
filmed at double the line frequency (120 or 100 fps, in North America and
Europe respectively.) Above these speeds special care needs to be taken
to avoid flicker
Small tungsten incandescent lights will flicker at double the line frequency
(i.e. at 120Hz in North America and 100Hz in Europe) as the tungsten filament
heats up cools during the different phases of the AC cycle.This affects both
practical lights as well as smaller, professional tungsten fixtures. Due to
their larger filaments, tungsten lamps of 2K watts or higher generally are
acceptable in 60Hz-land, and 5K watts or higher in the 50Hz world. If available,
tungsten lights in the 5K or 10K range are the ‘safest’ illumination for highspeed work. Note that lights with multiple smaller lamps (such as nine-lights)
will generally flicker – what matters is the size of the individual lamps.
HMI’s, even those with electronic ballasts, may flicker. Due to the differences
in individual ballasts and lamps that affect the refresh rate and evenness of
illumination of a fixture, it will generally be necessary to test individual lamps
and ballasts to be sure.
Most un-dimmed LED lights designed for production use will not flick er, but
dimming will usually introduce flicker.
Most DC-powered lights will not flicker. There are several DC-powered xenon
lights manufactured by Luminys that will not flicker.
If you wish to use an unfamiliar light, it is best to test it before committing
to its use.
11
Phantom Flex Manual
Page 11
A
Camera Set Up
4
Phantom Flex Manual
D
B
H
C
F
G
Building the Camera
Connecting a Computer
Monitoring
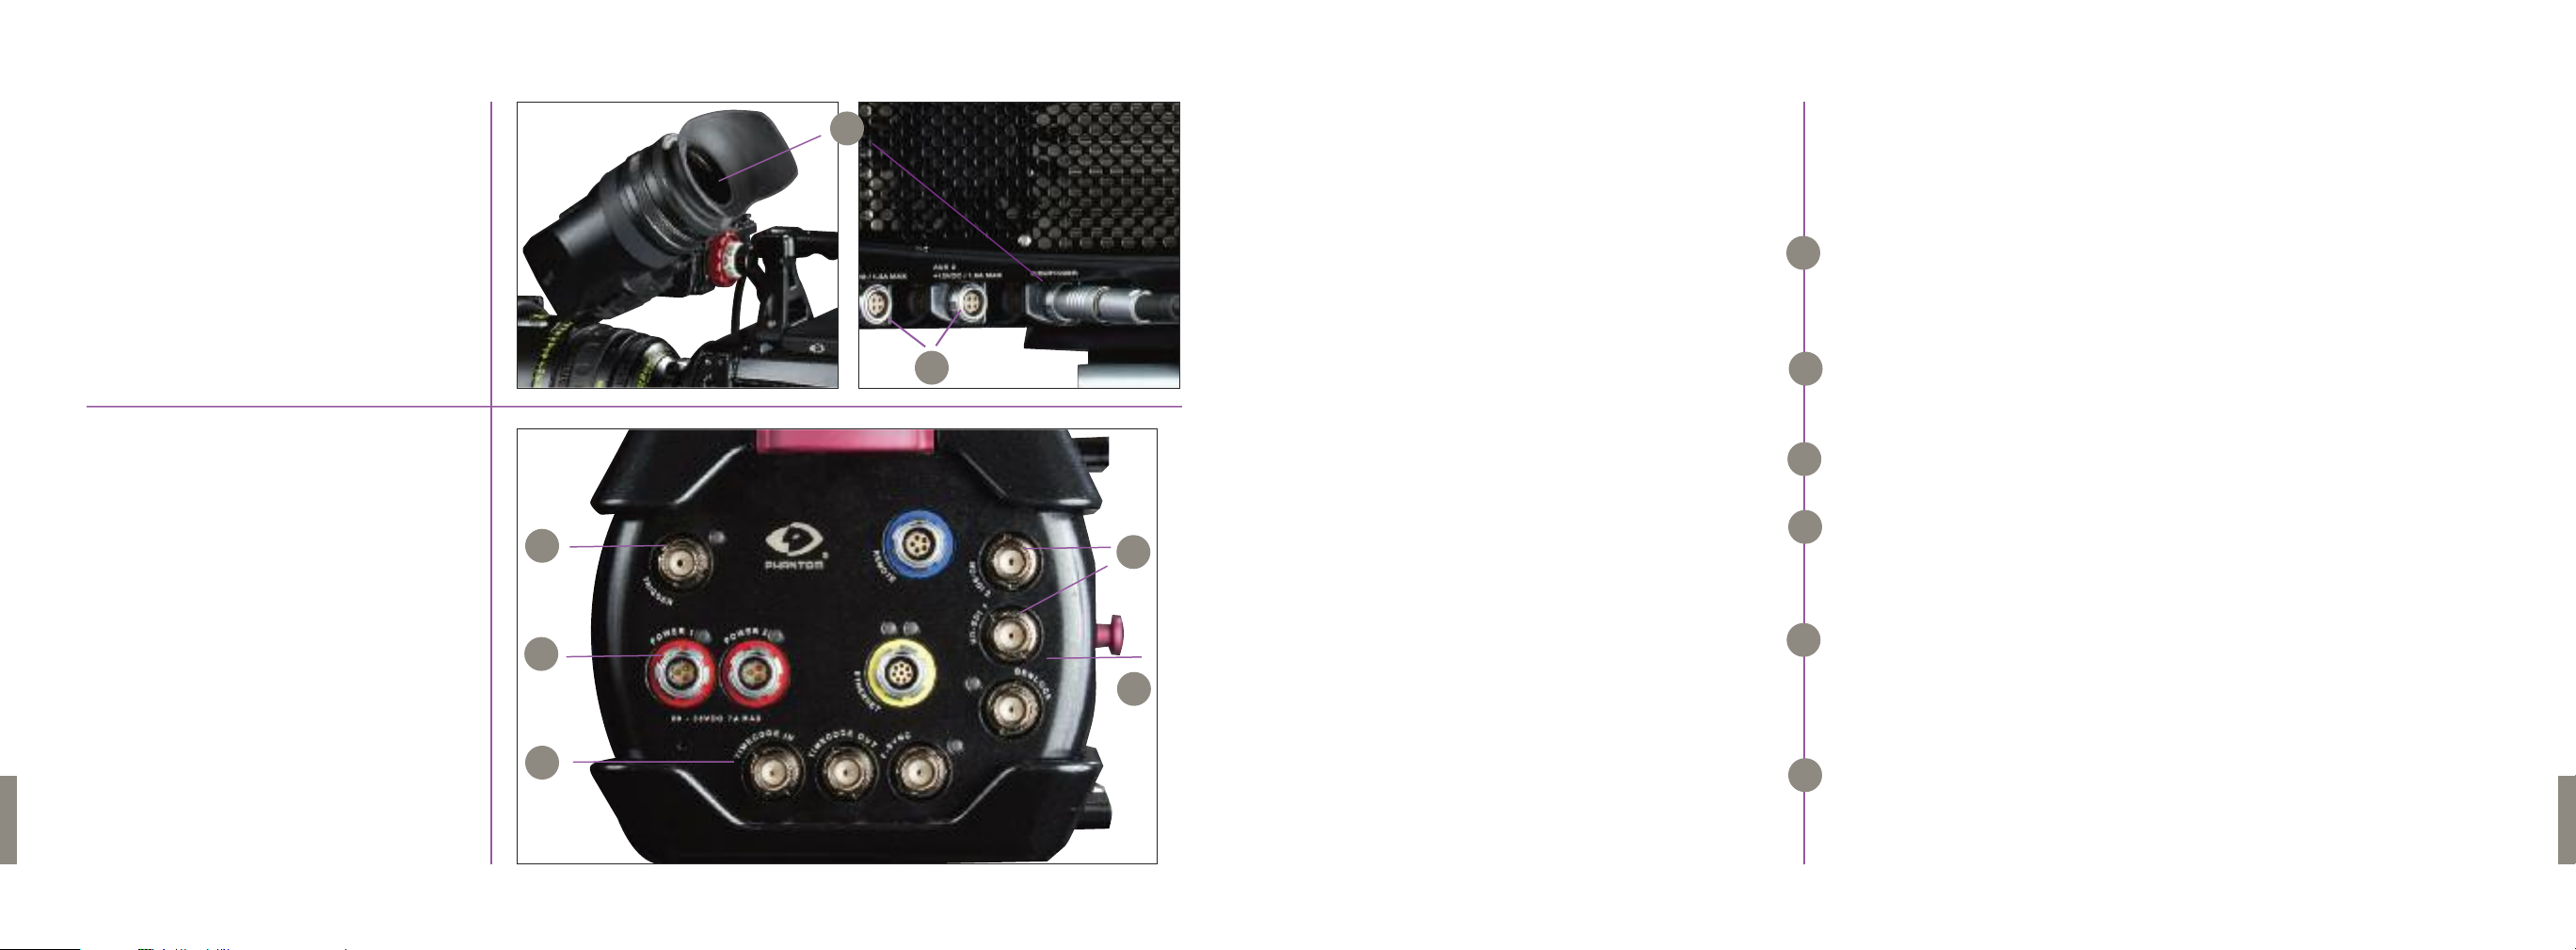
Viewfinder
A
Mount the viewfinder on the bracket at the front of the camera’s handle.
Connnect the viewfinder cable to the viewfinder socket on the right side
of the camera.
Powering the Camera
B
Connect a 24v power source the either of the inputs on the back of the camera.
There is no power switch the camera will turn on when power is connected.
Powering 12v accessories – Two 12v accessory outputs are provided
C
on the side of the camera. Each provides up to 1.5A (approx 18 watts).
Remote trigger
D
Any closed contact switch can be used as a trigger thru this BNC connector.
Momentary closed contact switch can be used for trigger in loop mode;
a continuous closed contact switch is required for recording in run/stop mode.
To be controlled by a computer, the Phantom Flex needs to be on the same
E
Ethernet network as the computer. All Phantoms are preset with permanent
IP addresses on the same subnet. A computer needs to be on the same
subnet to communicate with the camera.To ensure this, set the computer’s
address to 100.100.100.1 with a subnet mask of 255.255.0.0.
There are 2 HDSDI outputs on the rear of the camera. In 4:2:2 mode, output 1
F
is always a clean feed, with no characters.The characters can be enabled
or disabled on output 2 by enabling the SDI OSD (On Screen Display) in the
PVP software. (See chapter 6). When the camera is set to output 4:4:4,
outputs 1 and 2 become the A and B links of a single dual-link output.
Phantom Flex Manual
1312
Page 12
The viewfinder output provides component video and 12V power to a
viewfinder, but can alternately feed a monitor via a component breakout
cable.The OSD can be enabled with the Analog OSD control in the PVP
software.The viewfinder output and SDI outputs always output the same
video format. This affects the video output only.
Quick Guide to Shooting
This is a brief overview of getting up and running with the camera,
covering the basic operations that need to be performed to get usable shots. Due to the number of different ways that the camera can
be used, you should read the rest of this manual and practice using
NOTE
the camera before using the Flex in a commercial environment.
14
Phantom Flex Manual
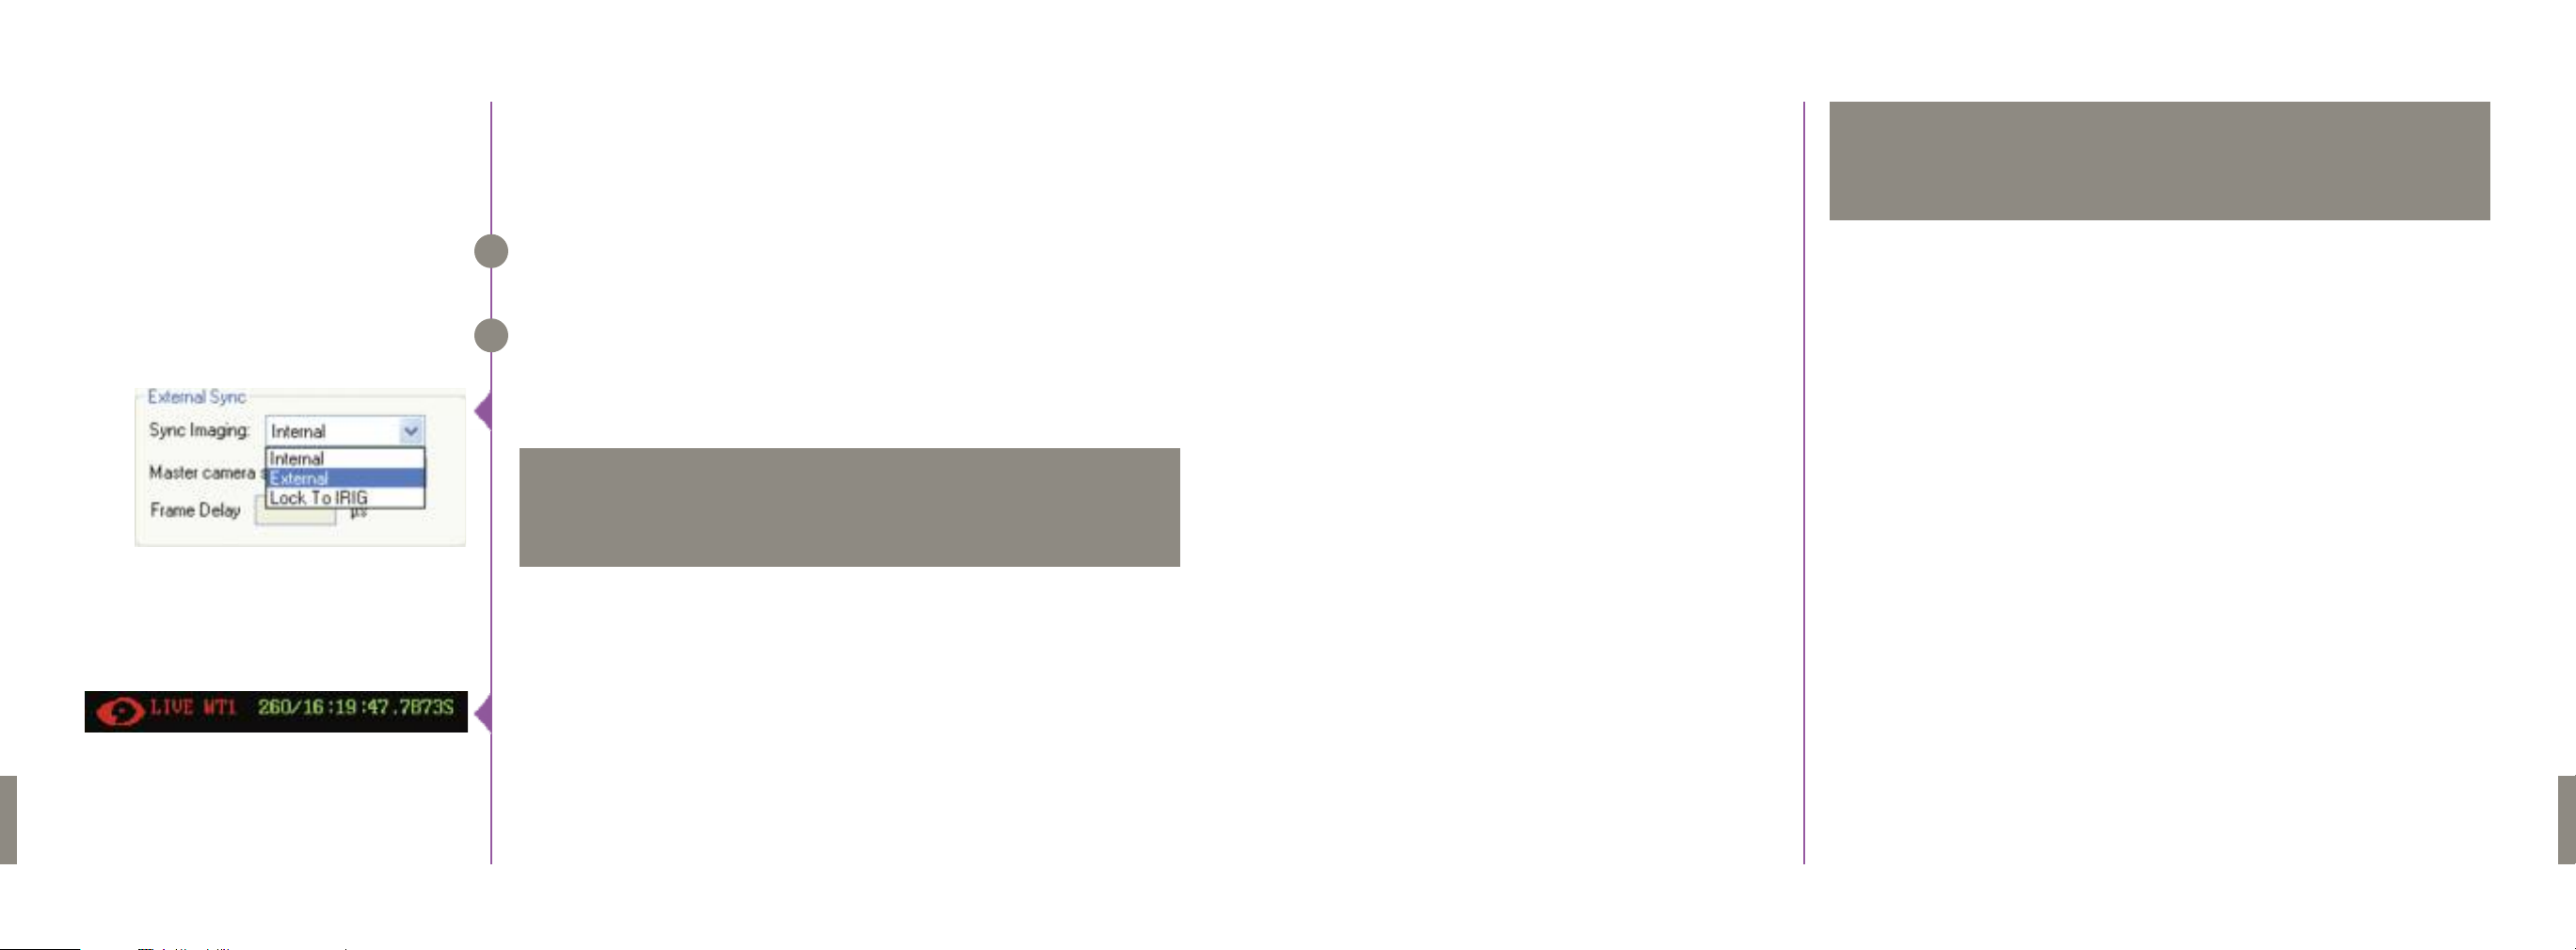
Genlock
Syncing Multiple Cameras
The camera will genlock to an external tri-level sync signal connected to the
G
genlock connector on the rear of the camera. The sync signal must be exactly
the same format as the output video format of the camera.
Two cameras can be synchronized by connecting the F-SYNC signals to each
H
other, and running time code out of one camera to time code in of the other.
In the Phantom software one camera must be set to external sync.
This will ensure that both cameras are capturing images at exactly the same
time and will be recording with identical time code.
Adding the serial number of a camera in the "Master camera serial"
field will ease camera control with the Phantom software by causing
some settings to automatically be transferred from the master camera to the slave.
NOTE
To synchronize the triggers of the two cameras, a BNCT-connector can be
used to bridge the trigger inputs of the two cameras to a single external
trigger.
When time-code is being properly fed from one camera to another, there
will be an “S” after the time-code display on the OSD of the slave camera.
On a camera set to external sync, if there is no proper sync signal feeding
the camera, there will be a frozen image output. Proper F-SYNC can be
verified by the presence of a moving image on the video output.
Power Up the Camera
Setting a Video Format
Attaching a CineMag
Choosing HQ or SQ mode
Quick Start
Choosing R/S or Loop mode
Setting the Resolution
The camera will power up as soon as a 24V power source is connected to one
of the 2 power inputs on the back of the camera. The camera should fully
power up in under 30 seconds.
If you don’t see an image on the viewfinder, you probably need to change the
video format. See Phantom Software Chapter.
If you will be recording to a CineMag, mount it now.
For more information on CineMags, see The CineMag Chapter.
For continuous shooting at lower frame rates, you may want to enable HQ
mode to reduce the need for black balance. Press the “Settings” knob on
the operator side of the camera to enter the menu, turn the knob to select
the HQ Mode setting on page 1. Push in the knob to edit the value, twist until
you have selected the value you wish, then push the knob again to lock in
the value.
For recording directly to the CineMag, change the “Capture” setting in
page one of the menu to “R/S”. For the highest possible frame rates, use the
camera’s RAM buffer by changing this setting to “Loop”.
Set your desired resolution by changing the horizontal and vertical values
of the RES setting. If the resolution you choose is higher than the resolution
of the output format, the image will be scaled to fit the video format.
Keep in mind that the lower the resolution selected the higher the achievable
frame-rate.
Phantom Flex Manual
15
Page 13

Triggering / Ending Recording
16
Phantom Flex Manual
Recording Parameters
Frame Rate and Shutter
Trigger point
Performing Black Balance
Performing White Balance
Beginning Recording
On page 1 of the camera menu:
Change SPEED and SHUTTER to your desired values.
If in LOOP mode, set the trigger point visually by changing the position of
the “T” on the line of the “TP” setting. Moving the “T” to the right moves
the trigger point closer to the end of the shot.
When all other settings are where you want them, black balance the camera
by either choosing “BLACK REFERENCE” in page 2 of the menu,
or holding the “bref” button of the camera for a few seconds. The internal
capping shutter of the camera will close while the camera performs a black
balance.
Highlight the “AUTO WHITE BAL” setting on page 2 of the menu. Hold in the
Menu button and rotate clockwise until the red box appears in the center
of frame. Keep holding the Menu button & point the red box towards a white
area of the image.
The color of the Phantom logo in the upper left corner of the viewfinder
image indicates the current mode of the camera. If you haven’t recorded
an image since the camera was powered up, the logo will be blue. Press the
Trigger button to begin recording – the logo will turn red, indicating that frames
are being written to RAM (or to the CineMag if the camera is in R/S mode.)
If the logo is green, there is already a clip in RAM. In this case, pressing and
holding the trigger button for a few seconds will erase this clip and begin
recording.
Pressing the trigger button (or an external trigger plugged into the trigger
connector on the rear of the camera) will stop recording. If the trigger position
is at the end of the clip, recording will stop instantly – otherwise recording will
continue until the portion of the clip after the trigger point is completed.
Playing Back a Clip
Trimming and Saving a Clip
to the CineMag
Downloading a Clip
to a Computer
Beginning the Next Clip
Press the “Playback” button to bring up the SELECT page on the on-screen
display. Use the “Menu” knob to pick the clip you want to play – if the camera
is in Loop mode, the clip will be called “RAM 1.” If the camera is in “R/S” mode,
turn the knob to the right to get to the last clip in the CineMag – “MAG n”
where n is the clip number.To begin playing, press the “B-REF” button.
Pressing the B-REF button again will pause playback. Pressing the “TOOLS”
button will cause the clip to play in reverse. Turning the MENU knob will step
through the clip frame-by-frame.
If the camera is in LOOP mode, you can mark an in and out point in the clip,
then save it to the CineMag. Navigate to the frame you wish to mark as the
in point, then press and hold the MENU knob – you will see the word “Edit”
appear on the bottom left corner of the screen. While holding, turn the knob
to the right, until the words “Set In” appear, then release. To mark an out point,
press and turn the “MENU” knob to the right again until the words “Set Out”
appear, then release. Save the clip by pressing and turning the knob to the left
until the “Save” appears, then release. It will take a few seconds to save the
clip to the CineMag. For more information on operating the camera using the
on-board controls, please see On Camera Control Buttons Chapter.
To save a clip from the camera to a hard drive, run the PCC software and
navigate to the “Play” tab. To choose the clip to download, select it from the
“Cine” pull-down menu. A clip in the camera’s RAM will be numbered 1, while
the clips in the CineMag have numbers preceded by the letter ‘F.’ The most
recently recorded clips will be at the end of the list. Save the clip by clicking
the “Save Cine…” button. In the Save dialog box that appears, ensure that
the format “Cine Raw” is selected in the “Save asType” selector. Navigate
to the folder where you wish to save the clip and click the “Save” button.
For more information on operating the camera with PCC, please see Phantom
Software Chapter.
To prepare for recording the next clip, press theTRIGGER button for a few
seconds to return to the live view. Press and hold the TRIGGER button again
to erase the clip in RAM and begin recording the next shot.
Phantom Flex Manual
17
Page 14
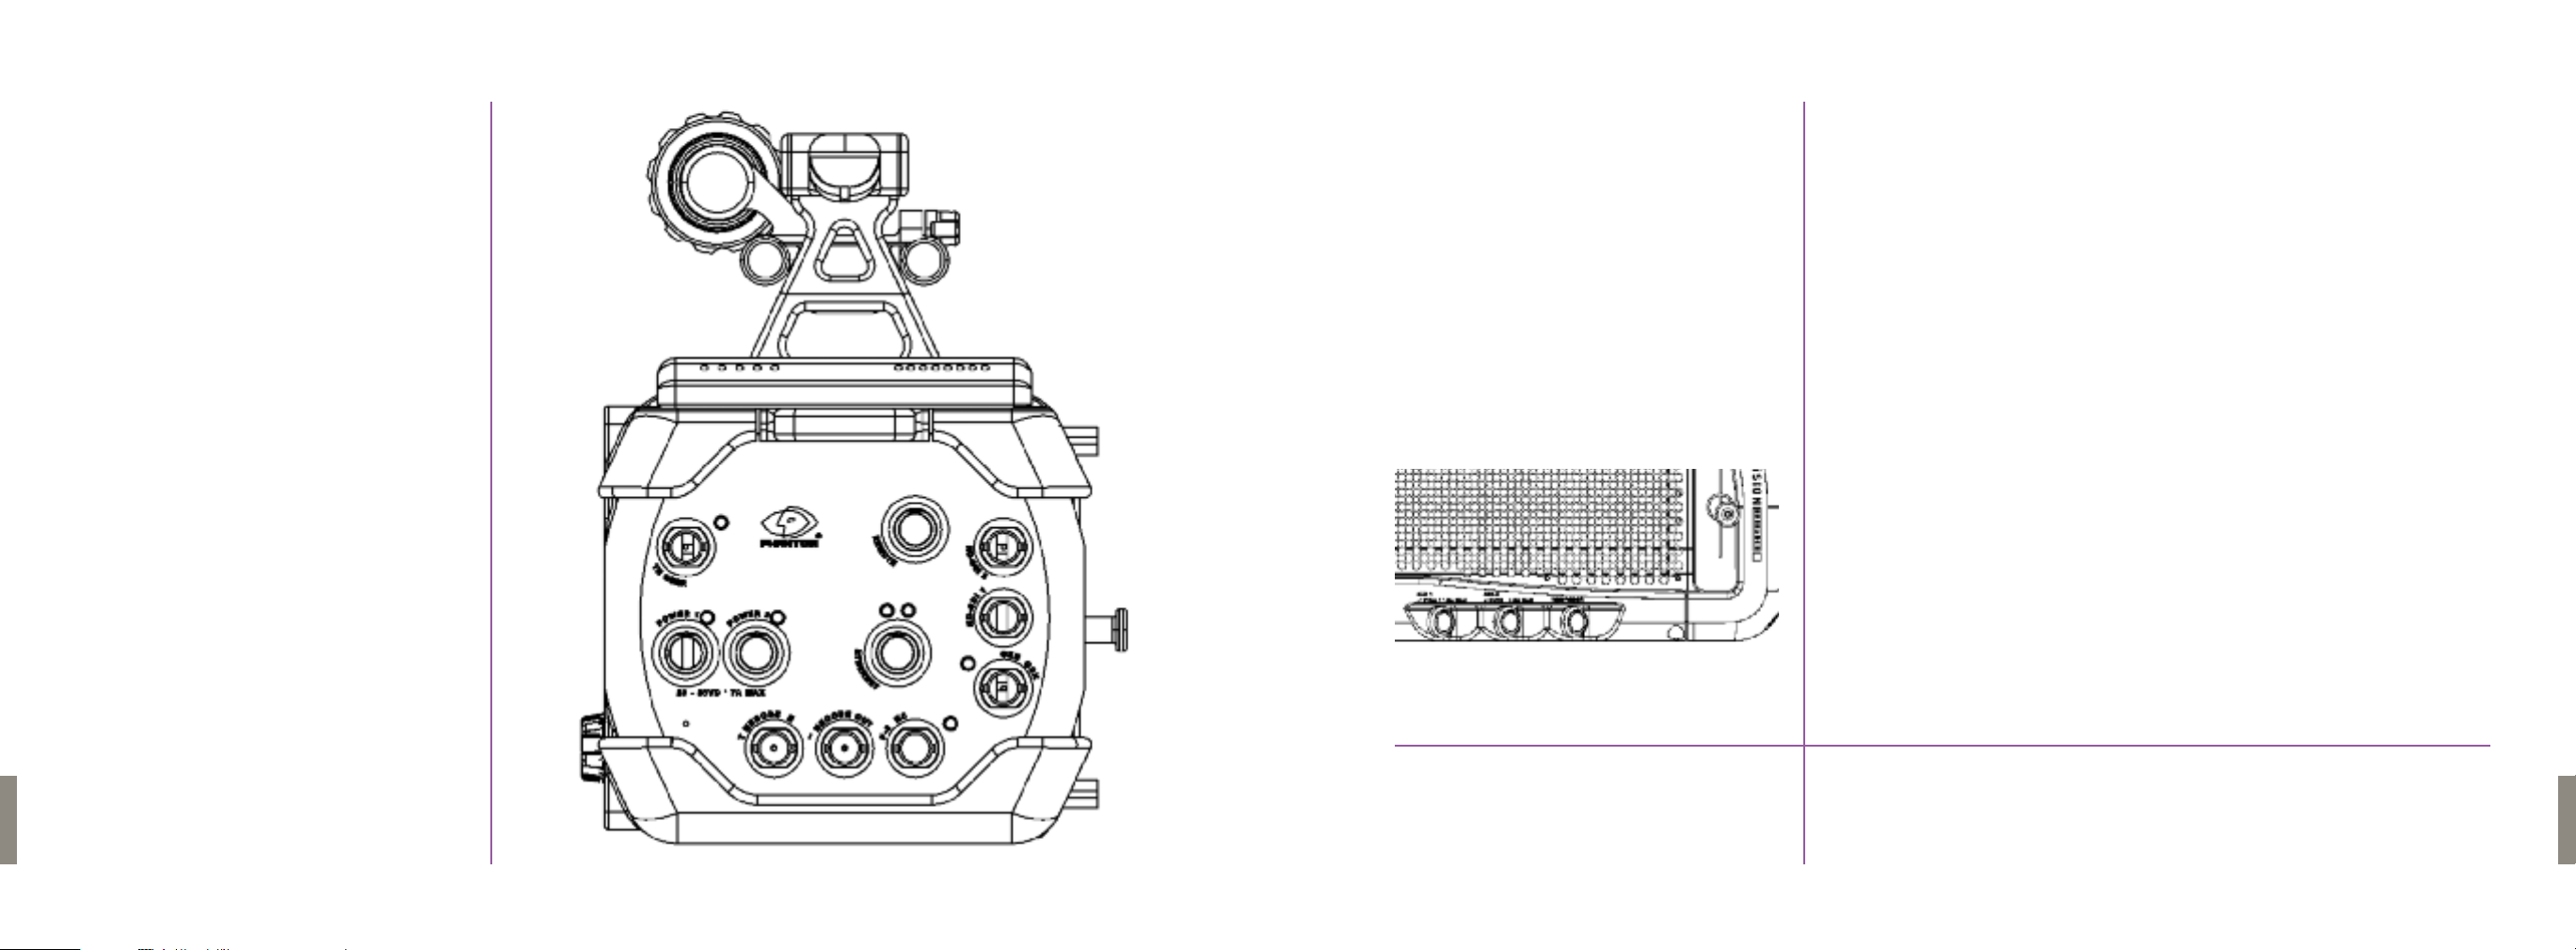
Rear View
Power & Connectors
5
Power In:
Connectors: 2 x Fischer 3-pin Male
Spec: 20-36V DC, 6.2A Max, 5A typical
2 power inputs are provided to enable hot swapping between power
sources
Power Out:
Connectors: 2 x Fischer 4-pin Female
Spec: 12V accessory power, 1.5A Max
Power Draw:
Min: 80W in standby mode with no CineMag
Max: 150W with CineMag, recording at high frame rate
Typical: 110W
Power draw increases with frame rate and while actively recording
Phantom Flex Manual
1918
Phantom Flex Manual
Page 15
Front
6
A wide choice of lens formats
helps define the Phantom Flex.
Optics
FLEX
35mm PL
20
Phantom Flex Manual
35mm PL
The standard 35mm PL mount
can be used full frame at full resolution
(2560x1600) or an extraction
can be taken out of the full frame.
When used at full resolution
the new automatic scaling function
will output 1920x1080P.
Any resolution below 2560x1600
can be extracted including
standard 1920x1080 or 1280x720.
When a 1080P extraction is used,
the equivalent focal length
of the lens will slightly ‘longer’
(see chart on right).
FOCAL LENGTH
equiv AOV (/1.28)
11mm14mm18
39mm50mm65
58mm75mm96
77.5mm100mm129
mm
mm
mm
mm
35mm FULL APERTURE
31.1mm Diameter
FULL FRAME 1.78
2560 X 1440
25.6 X 14.4MM
equiv FL (x1.28)
1920x1080
19.2x10.8mm
22mm Diagonal
21
Phantom Flex Manual
Page 16

2/3” B4
The Abel HDx2 adapter converts
B4 mount lenses to PL mount.
The 11mm diagonal coverage
of the B4 lens is ‘blown up’
by a factor of “x2” to 22mm.
The angle of view is the same as
it would have been if the lens were
placed directly on a 2/3” B4 camera
but the depth of field will be
shallower and closer to a
PL/35mm depth of field.
FLEX
Abel HDx2
Optical Adapter
optimized for
Flex imager
1920x1080
22mm Diameter
Standard 2/3” B4
11mm Diameter
2/3” B4
1920x1080
19.2x10.8mm
22mm Diagonal
Super 16
The Flex can accommodate
Super 16 PL mount lenses.
FLEX
1280x720
12.8x7.2mm
14.7mm Diagonal
Super 16
Super16
14.5mm Diameter
22
Phantom Flex Manual
23
Phantom Flex Manual
Page 17
7
On-Camera Controls
The Phantom Flex cameras can be controlled via their On-Camera Controls
Controls
24
Phantom Flex Manual
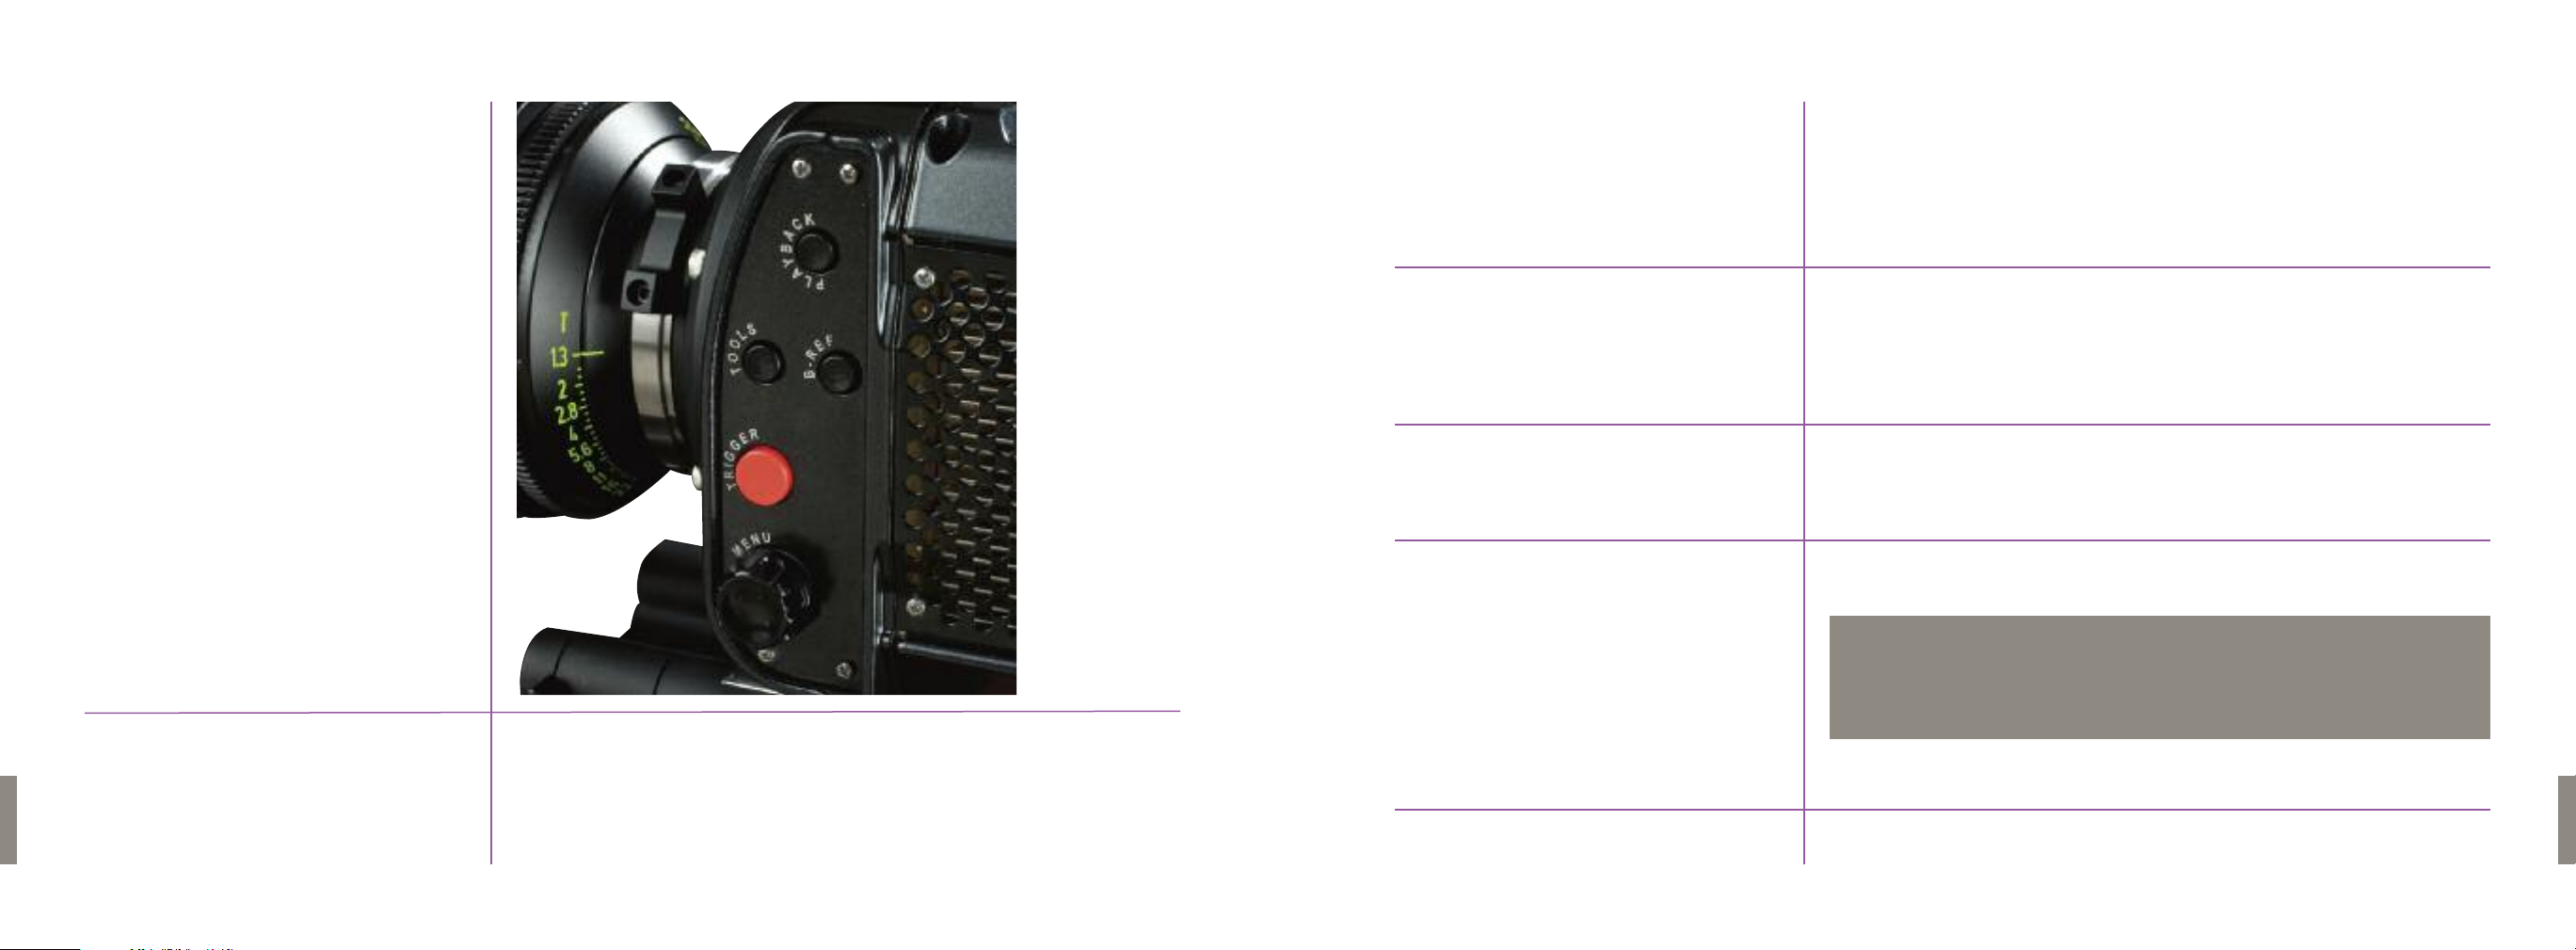
Trigger Button
Menu Button / Knob
Tools Button
B-REF
TheTrigger button is used to start and stop recording.
If there is a clip in the camera’s RAM, holding the trigger button for several
seconds will erase the clip and begin recording.
Pressing the button while the camera is recording ends recording either
instantly, or after a delay (depending on the “TP” setting.)
TheTrigger Button can also be used to exit the Camera Menu.
The Menu Button / Knob is used to display the Settings menu and
to navigate/select recording parameters.
In Playback mode it can be used to select and scroll through clips which have
been recorded.
When the camera is is outputting a live image, the tools button is used
to toggle between live preview, zoom, and threshold modes.
The zoom mode provides a 1:1 pixel view.
Threshold mode provides an exposure aid by coloring over-exposed
portions of the image.
NOTE
When the camera is in playback mode, the Tools button is used to play and/or
stop the playback of the recorded/stored cine file in reverse.
In LIVE mode, pressing & holding the B-REF button performs a black balance.
In Playback mode, this button is used to start & stop playback.
Phantom Flex Manual
25
Page 18

LIVE
LIVE Display Screens
The LIVE PRE, (live image preview), mode is the operational state the camera
will be in when it is first powered up. The camera will display a live image
on the monitor or viewfinder screen, but is not yet recording any image data
or frames to the camera memory buffer or Phantom CineMag.
In this state, the user can:
View a live image to focus on the subject.
•
A Camera State Designators
B Time Indicator
C w/ PHANTOM CINEMAG
Phantom CineMag State Indicator
Number of Takes
Memory Usage/Size
A
B
C
26
Phantom Flex Manual
Zoom in to 1:1 pixel view to assist in focus.
•
Define the recording parameters.
•
Determine if any image area is over exposed.
•
Examine the recording duration time and the number of frames
•
that will be recorded within the recording time frame.
On-Screen Display
D Resolution
E Sample Rate
F Shutter Angle
G Memory Buffer Graphical
Representation
H Maximum RecordingTime
I Maximum Recording Frames
D
E
F
G
H
I
27
Phantom Flex Manual
Page 19
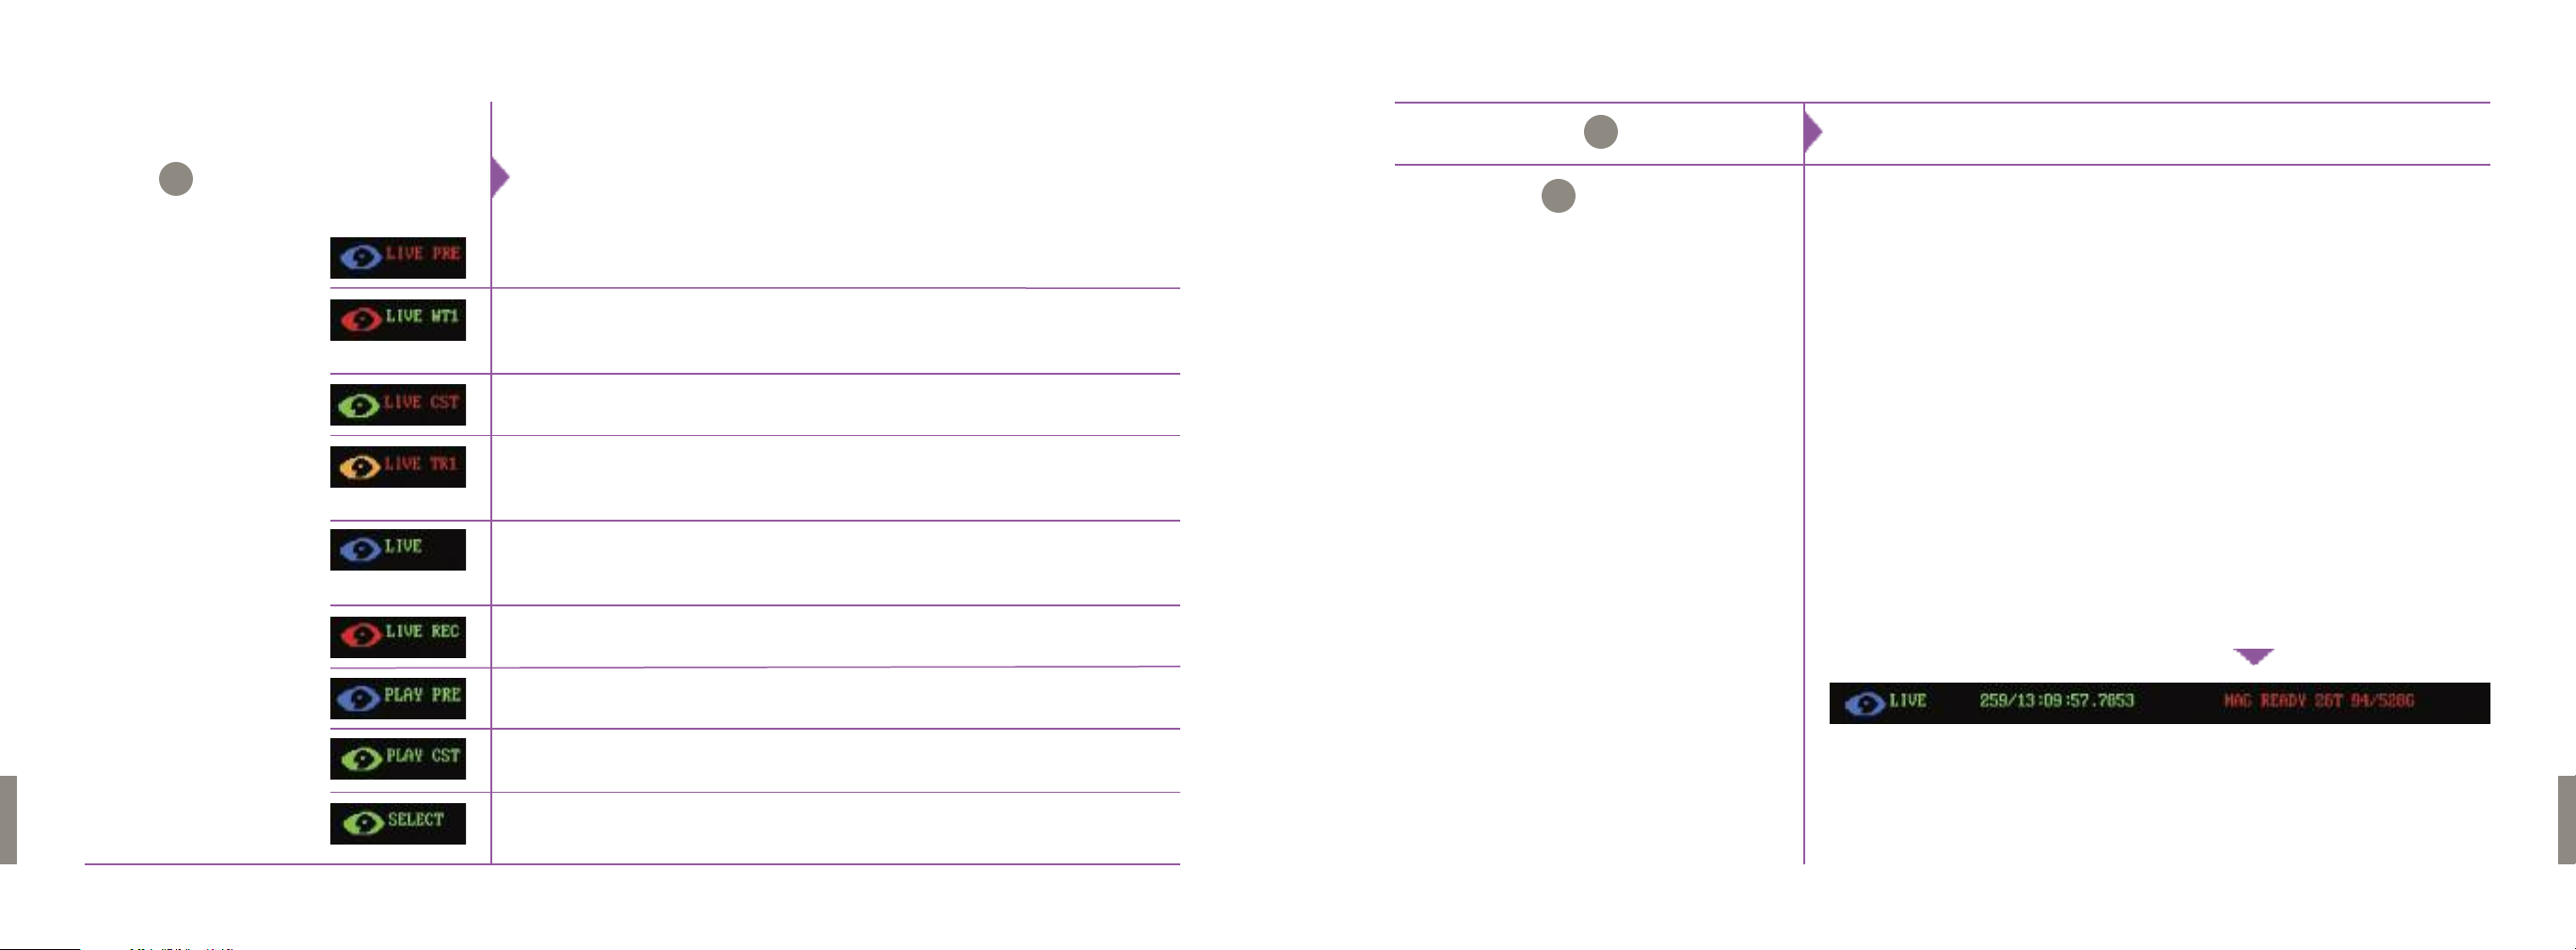
Below is a brief description of the information that could be displayed
in the display screen:
Time Indicator
B
TheTime indicator indicates; day number/hour:minute:second:microsecond.
A
Display Fields
Camera State Designator
The color of the Phantom logo will change based on the state of the camera.
LIVE PRE: In this state the camera is in LOOP mode and will display
a live image from the video output. The camera is not recording.
LIVE WT1: The camera is in LOOP mode and will display a live image from
the video output.The camera is currently recording to RAM and
awaiting a trigger signal.
LIVE CST: The camera is in LOOP mode and will display a live image from
the video output: there is a clip stored in the RAM.
LIVE TR1: The camera is in LOOP mode and recording to the RAM.
It has received a trigger signal is currently recording the
post trigger frames.
LIVE: The camera is in R/S mode and will display a live image from
the video output.The logo will be green if there is a clip stored
in RAM, and blue if not.
LIVE REC: The camera is in R/S mode and will display a live image from the
video output. If attached, it is recording to the cinemag.
PLAY PRE: The camera is in playback mode and there are no clips stored
in RAM.
C
Phantom CineMag
Status Indicator
The CineMag Status Indicator shows the operation state of the camera.
Various state designators include:
Mag Off
Indicates the Phantom CineMag is presently in the Off state.
A Phantom CineMag will remain in the Off state until it initiates its power
up diagnostic routine.
MagInit
Indicates the Phantom CineMag has been detected either during camera
power-up, or when a Phantom CineMag has been inserted onto the
camera.
MagScan
Indicates that the Phantom CineMag is running through it’s power-up,
self-diagnostics routines.
Mag Ready
It indicates that the Phantom CineMag has passed its power-up,
self-diagnostics routines and is ready to record a cine.
28
Phantom Flex Manual
PLAY CST: The camera is in PLAYBACK mode and there is a clip
stored in RAM.
SELECT: The camera is in PLAYBACK mode and a clip can be selected
to playback.The logo will be green if there is a clip stored in RAM,
and blue if not.
29
Phantom Flex Manual
Page 20
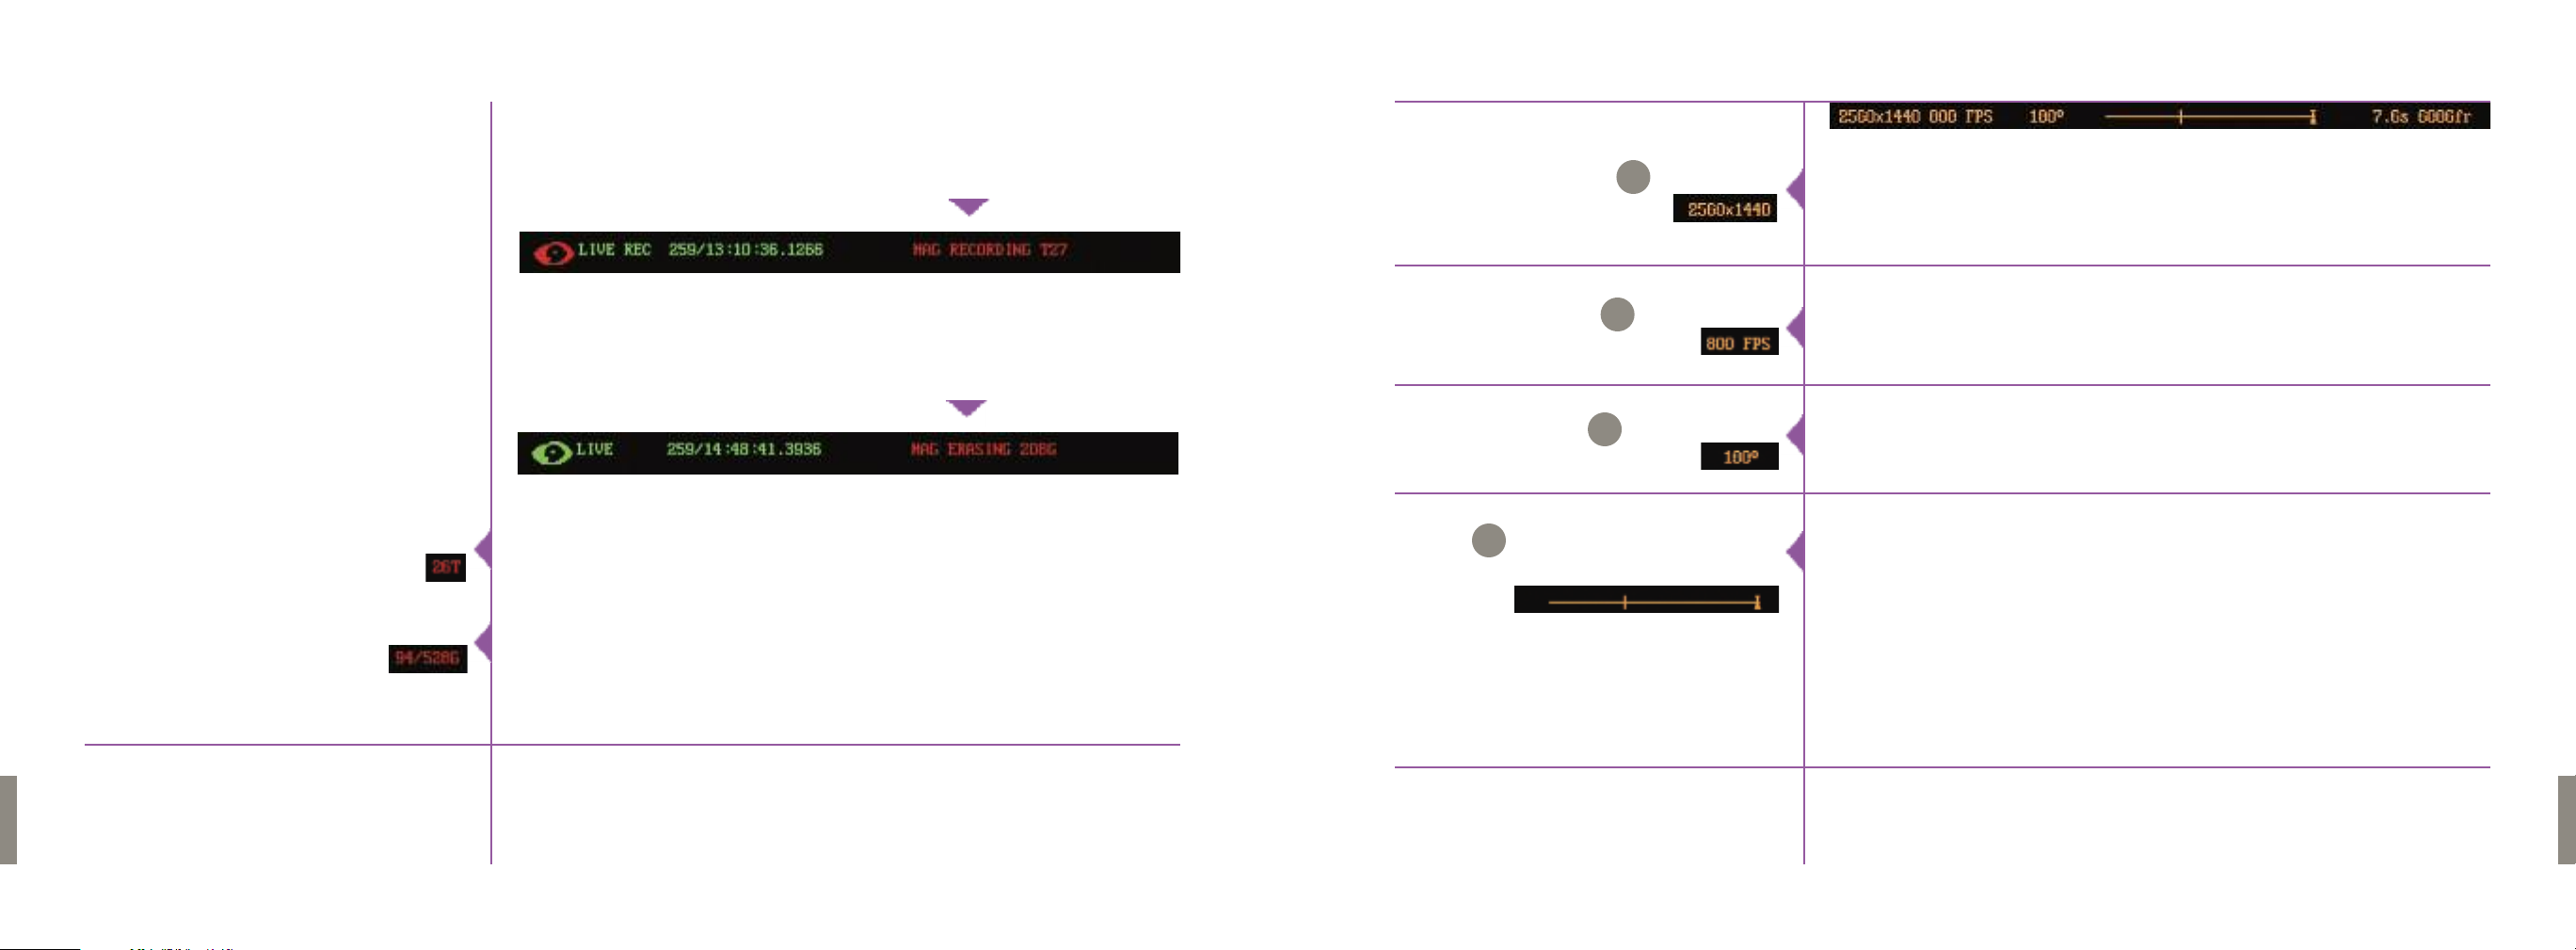
Mag Recording Tn
It indicates that a cine is presently being saved into the Phantom
CineMag.TheTn indicates the "take" number being recorded to
the Phantom CineMag.
D
Resolution
This field indicates the active pixel area, (Width x Height),
of the sensor defined by the user.
Number of Takes
Memory Usage/Size
MagErase
It indicates that the Phantom CineMag has been instructed to erase its
contents, and is performing the erasure procedure.
This field indicates the number of takes recorded to the Phantom CineMag.
As takes are recorded the Number of Takes field increments.
The Usage field indicates the amount of Gigabytes used to store recorded
frames. As the takes are recorded the Memory Usage field increases,
while the Size field indicates the total number of bytes, or the memory size,
of the Phantom CineMag.
Sample Rate
E
Shutter Angle
F
Memory Buffer Graphical
G
Representation
This field specifies the rate the Phantom camera will capture or record image
data, (frames), into the camera's memory.
This field shows the current, user defined, Shutter Angle or exposure setting of
the camera.
This is a graphical representation of the camera's memory buffer.
It acts as a memory gauge that consists of two basic components.
The first component, of the graphical representation is the line which
represents the total frames that can be stored in the camera’s buffer.
The second component is a "T" on top of the line.The "T" represents
a trigger point that is defined by the user. Any frames that are captured
after a trigger signal is detected by the camera are referred to as PostTrigger
frames, and the frames recorded prior to the trigger signal are referred to
as Pre-Triggered frames.
30
Phantom Flex Manual
31
Phantom Flex Manual
Page 21

Maximum Recording Time
H
This field indicates the total length of recording time. The recording duration is
based on the amount of memory in the camera, along with the resolution and
sample rate settings.This fieldwill change based on these variables.
Menu for Setup
and Recording
Parameters
There are five Camera display screens used to define the operating
parameters of the Phantom Flex camera. Following is a brief description of
each of these display screens and the Step-by-Step Process to define each
of the Camera parameters, including:
Maximum Recordable Frames
I
This field indicates how many images or frames will be recorded within the
Duration time. This field will also change based on how the amount of memory in the camera, and how the resolution, and sample rate are set and will
change accordingly.
Step-by-Step Procedures
Selecting the Parameter to be Defined
1. From any of the LIVE display screens:
a. Press the Settings button one time, then
b. Rotate the button to the desired Camera parameter to be specified.
The field will change from yellow to red indicating the field has been
selected for change.
2. Once the desired Camera field has been selected:
a. Hold in the Settings Setup button, then
b. Rotate the button to the desired operational setting and release.
3. To exit the Camera Setup Display Screens press theTrigger button one
time.
The above step is required to define all subsequent Camera
parameters.
NOTE
32
Phantom Flex Manual
33
Phantom Flex Manual
Page 22

Speed (Frame Rate)
Speed, (Frame Rate), is the rate at which images are recorded.The Speed field selection list will change according to the Resolution selected, the larger the selection area the lower the maximum frame rate.
Set the Resolution before setting the Speed. To set high Frame rates,
or increase the recording time, reduce the selected Resolution (Width
x Height).
1. To increase the Speed, (Frame Rate), hold in Settings button
NOTE
and rotate clockwise.
2. To decrease the Speed, (Frame Rate) hold in and rotate
counter clockwise.
34
Phantom Flex Manual
Menu One
Camera 1 /5
Shutter (Angle)
TP (Trigger Point)
Adjusting the shutter angle affects the amount of time that sensor is exposed to
light. A larger shutter angle may result in an increased motion blur on
moving objects.
1. To increase the Shutter Angle hold in Settings button and rotate clockwise.
2. To decrease the Shutter Angle hold in and rotate counter clockwise.
TheTrigger Point or PostTrigger value represents how many frames will be
recorded after the trigger signal is detected by the Phantom camera. Since the
memory is scrolling memory, the Post Trigger value also sets the number of
pre-trigger images captured.
When a PostTrigger value is defined in the Phantom Camera Control software,
the camera will continue to record and store, to the camera’s DRAM buffer, image
data after a trigger signal is detected for n fames, where n is the
number of post trigger frames specified.
After the trigger signal is detected by the camera, recording continues for an
exact number of frames, n, and stored in the image buffer, then recording stops;
n will depend on the number of post trigger frames defined by the user.
It’s important to note that the camera can only store a finite number of images
into the memory buffer based on the resolution, sample rate, and the memory
35
Phantom Flex Manual
Page 23

size. When a post trigger value has been defined the camera will only store the
maximum image count allowed for the particular capture settings.The camera
will only display the frames stored in the memory buffer, the last x images,
where x is the total number of images recorded or stored in the image buffer.
1. To move the TP, (Trigger Point), to the right, decreasing the number of
PostTrigger frames to be recorded, hold in Menu button and rotate
clockwise.
2. To move theTP, (Trigger Point), to the left, increasing the number of Post
Trigger frames to be recorded, hold in and rotate counter clockwise.
HQ Mode
the camera's DRAM buffer. In this mode, after a cine file is recorded into
the camera's DRAM frame buffer, you can manually save it into the CineMag.
b. Run/Stop - In Run/Stop Mode the image data is recorded directly
into the Phantom CineMag.
High Quality Mode reduces the need to black balance, as well as increase the
signal to noise ratio in the image. In LOOP mode, the maximum frame rate will
be reduced by approx half when this is switched on.
1. To turn on HQ MODE, hold in Menu knob and rotate clockwise.
36
Phantom Flex Manual
Resolution
Capture (Operational Mode)
Resolution refers to the shape of the captured area in pixels. It represents the
number of pixels enabled to capture an image. For example, if 2560x1600 is set
(W x H), the full sensor space available, it is called 'Full Frame'.The Resolution
setting allows the user to change the dimensions, or aspect ratio, of the sensors
active pixel area. The aspect ratio is the width to height ratio of the image being
recorded.
Changing the Resolution settings to match the dimensions of the subject of
interest allows the user the option of recording at higher frame rates, or longer
recording times at the same frame rate. Smaller resolutions ‘crop’ the capture
image by enabling a subset of pixels, this allows you to customize the shape
of the capture area to the application.
1. To increase the Resolution hold in Menu button and rotate clockwise.
2. To decrease the Resolution hold in and rotate counter clockwise.
RESULT: The image aspect ratio will be displayed with the defined
Resolution setting.
This field selects whether the camera is to run in either Loop or Run/Stop Mode.
1. Hold in the Menu button, and rotate to the desired parameter:
a. Loop - In the Loop Mode the camera stores the recorded image data into
Auto BREF
GenLock
Maximum Recording Time
(Non-Selectable)
Maximum Recordable Frames
(Non-Selectable)
2. To turn off HQ MODE, hold in Menu knob and rotate counter clockwise.
Automatic black reference or black balance. When this function is switched on,
the camera will automatically black balance as soon as the recording starts.
1. To turn on AUTO BREF, hold in Menu knob and rotate clockwise.
2.To turn off AUTO BREF, hold in Menu knob and rotate counter clockwise.
Genlock allows 2 or more cameras to synchronize their video outputs.
This is necessary when outputting to a switcher or 3D monitor.
1. To turn on GENLOCK, hold in Menu knob and rotate clockwise.
2. To turn off GENLOCK, hold in Menu knob and rotate counter clockwise.
This field indicates the total length of recording time. The recording duration
is based on the amount of memory in the camera, along with the resolution
and frame rate settings.This field will change based on these variables.
This field indicates how many images or frames will be recorded within
the Duration time.This field is based on the amount of memory in the camera,
and how the resolution is set, and will change accordingly.
Phantom Flex Manual
37
Page 24

Auto White Bal
This will set the white balance under the current lighting conditions.
1. To set the Auto White Balance, hold in the Menu button and rotate
clockwise until a red box appears in the center of frame.
Keep holding the Menu button & point the red box towards a white
area of the image.
2. Release the Menu button and the white balance will set instantly.
Menu Two
Image 2 /5
Black Reference
EI (Exposure Index)
Also known as black balance, is required to be performed when resolution,
frame rates or shutter angle is changed.This should also be done when there
are any visible image artifacts, such as vertical banding.
1. To set the black balance, hold in the Menu button and rotate clockwise
until OK appears.
2. Release the Menu button.The built-in mechanical shutter will activate
and a countdown will be visible. After approx 5 seconds, the black
balance will be set.
3. Black balance can also be performed by holding in the B-REF button
for approx 2 seconds while in the LIVE mode.
Also known as ISO or ASA, represents the sensitivity of teh camera. Increasing EI adds gain to the video outputs. It is recorded as metadata in the clip,
but doesn’t affect the RAW data.
1. To increase the Exposure Index hold in Settings button and rotate clockwise.
2.To decrease the Exposure Index hold in and rotate counter clockwise.
38
Phantom Flex Manual
39
Phantom Flex Manual
Page 25

Gamma
Gamma is the nonlinear relationship between signal level and brightness output of pixels, (a small signal level change at low voltage produces a larger
variation in brightness than the same change in level at high voltage);
gamma correction for monitors is the compensation for this nonlinearity.
The default camera setting is 2.2
1. To increase the Gamma value hold in Settings button and
rotate clockwise.
PAO
This will offset the above described Production Area box left, right, up or
down.
1. To move the box either left or right, hold in the Menu button on the
first 0 and turn the button either clockwise or anti clockwise.
2. To move the box either up or down, hold in the Menu button on the
second 0 and turn the button either clockwise or anti clockwise.
Black
PA (Production Area)
2. To decrease the Gamma hold in and rotate counter clockwise.
Also known as Pedestal, is an offset to the black level in the camera’s video
output.
1. To increase the Pedestal, hold in the Menu button and rotate clockwise.
2. To decrease the pedestal, hold in the menu button and rotate
counter clockwise.
The camera will highlight the production area specified by under exposing
the area outside the production area by 1-stop, and changing it to be
monochrome.This production area can be thought as the area of the
captured image that will be used in the final production, but can be used for
any purpose. It is not recorded in teh RAW data.
1. To increase the Production Area hold in Menu button
and rotate clockwise.
2. To decrease the Production Area hold in and rotate counter clockwise.
UNIT ZOOM
COLOR BARS
This function allows you to see the LIVE video output at a 1:1 ratio (pixel for
pixel)
1. To turn on the Unit Zoom, hold in the Menu button
and rotate clockwise until ON appears.
2. To turn off the Unit Zoom, hold the Menu button and rotate counter
clockwise until OFF appears.
These are SMPTE Color bars, which can be generated through the SDI output
and is useful for setting up a monitor.
1. To turn on the Color bars, hold in the Menu button and
rotate clockwise until ON appears.
2. To turn off the Color bars, hold the Menu button and rotate counter
clockwise until OFF appears.
40
Phantom Flex Manual
41
Phantom Flex Manual
Page 26

WB R/G
This is the amount of red relative to green. When a white balance is performed,
this value is automatically changed.This value can also be changed manually.
1. To increase the red relative to green amount, hold in Menu button
and rotate clockwise.
2. To decrease red relative to green amount, hold in and rotate counter
clockwise.
Menu Three
Color 3 /5
WB B/G
This is the amount of blue relative to green. When a white balance is
performed, this value is automatically changed. This value can also be changed
manually.
1. To increase the blue relative to green amount, hold in Menu button
and rotate clockwise.
2.To decrease blue relative to green amount, hold in and rotate counter
clockwise.
42
Phantom Flex Manual
43
Phantom Flex Manual
Page 27

Chroma
Chroma is the color component of the video signal.
1. To increase the Chroma value hold in Menu button and rotate clockwise.
PEDR, PEDG, PEDB
The pedestal can be adjusted in three separate color channels, red, blue &
green.
Hue
2. To decrease the Chroma hold in and rotate counter clockwise.
The hue angle is adjustable both in a positive & negative value.
1. To turn the Hue more positive, hold in Menu knob and rotate clockwise.
2. To turn the Hue more negative, hold in the settings knob and rotate
counter clockwise.
GAMMAR, GAMMAB
1. To increase the red, green or blue channel, hold in Menu button and
rotate clockwise.
2. To decrease red, green or blue channel, hold in and rotate counter
clockwise.
The gamma can change be changed in individual red & blue channels.
1. To increase the red or blue amount, hold in Menu button and rotate
clockwise.
2. To decrease red or blue amount, hold in and rotate counter clockwise.
44
Phantom Flex Manual
45
Phantom Flex Manual
Page 28

Menu Four
G-R, B-R, R-G, B-G, R-B, G-B,
& Sat(Saturation)
The color matrix settings (G->R to G->B) affect the color reproduction of the
camera’s video output. By using a calibrated chart (such as a DSC Labs’
“Chroma Du Monde”) and a vector scope, the color reproduction of various
cameras can be closely matched by adjusting the Matrix settings.
Up to four matrices can be set and individually selected by changing “#0 (off)”
to values from 1 to 4.
Sat will increase or decrease the overall color saturation with the value “0.00”
being a completely desaturated (black and white) image, 1.00 being the
default value, and values over 1.00 being hyper-saturated.
1. To increase any of the above options, hold in the Menu knob
and rotate clockwise.
2.To decrease any of the above options, hold in the Menu Knob and
rotate counter clockwise.
46
Phantom Flex Manual
Color Matrix 4 /5
47
Phantom Flex Manual
Page 29

This menu allows the user to load factory default settings and save 6 different
custom user files.
Menu Five
Settings 5 /5
To Load Factory
Settings
User 1-User 6
To Save a User file
To Load a Saved User File
1. Highlight LOAD, which is immediate right of FACTORY.
2. Push & hold the Menu Knob, while turning clockwise until
OK appears.
3. Release Menu Knob. The default factory settings will load.
6 different user files can be created which save all the user adjustable options
in the menu.
1. Select which user file to save (USER 1-6) & highlight SAVE
2. Push & hold the Menu Knob, while turning clockwise
until OK appears.
3. Release the Menu Knob. LOAD will now appear immediately right.
The user file will now be saved into memory.
1. Select which user file to load (USER 1-6) & highlight LOAD
2. Push & hold the Menu Knob, while turning clockwise until OK appears.
3. Release the Menu Knob.The user file will now be loaded onto the
camera settings.
48
Phantom Flex Manual
49
Phantom Flex Manual
Page 30

PLAY
To playback a clip from
RAM or CineMag
Press the playback button which will bring up the SELECT page.
•
To scroll through clips, turn the Menu knob in a clockwise or counter-
•
clockwise direction. Each clip is stored sequentially and each clip has
its own label “RAM 1, MAG 1, MAG 2, etc”
To playback a selected clip, press the “B-REF” button.
•
The frame numbers on the top right of image will appear and start to roll.
To pause the playback, press the “B-REF” button while playing back.
To playback in reverse, press the “TOOLS” button.
To edit a RAM clip prior to
saving it to a CineMag
Select & playback the clip as described above.
•
To edit the clip, push & hold the “MENU” knob.
•
“Edit” will appear on the bottom left of image.
While pushing & holding the “MENU” knob, turn it clockwise until “Set
in” appears & then release the knob.
To set the out point, keep turning the “MENU” button until “Set Out”
appears & then release.
This will set the in and out point on the frame that is currently selected
at the time.
50
Phantom Flex Manual
To save a RAM clip
to the CineMag
To step through the clip frame by frame, turn the “MENU” knob.
•
To go back into “LIVE” mode, press the “TRIGGER” button.
•
Select & playback the clip as described above.
•
To save an entire clip to the CineMag, push & hold the “MENU” knob.
•
“Edit” will appear on the bottom left of image.
While pushing and holding the “MENU” knob, turn it counter-clockwise
until “Save” appears & then release the knob.
“Mag Recording” will show on the top of the image while the saving
is in progress.
It takes approx 30 seconds to transfer an entire 32GB RAM clip.
To save the edited clip from the RAM to the CineMag, follow the
•
above step.
A clip saved or recorded to the cinemag cannot be edited.
NOTE
51
Phantom Flex Manual
Page 31

8
The CineMag
Overview
The CineMag is a high-speed solid-state data recorder that clips into the top
of the Phantom Flex or a CineStation. It records raw, 10-bit log-encoded
footage. Although similar in concept to a traditional hard drive or solid-state
disk, it differs in operation in a couple of critical ways. First, there is no file
system on a CineMag. Secondly, data is recorded sequentially and continuously on the mag, with no gaps. This is all done to guarantee a high and consistent write speed on the CineMag. Unlike with a hard drive, it is possible to
record at the highest speed no matter how many clips are already recorded
without ever dropping a frame.
Due to the nature of how the CineMag works, the use of the CineMag differs
slightly from a hard drive recorder. Because all frames are and must be
recorded contiguously, it is not possible to delete individual clips off the CineMag. It is important to take this into consideration when saving clips — once
the CineMag is full, you can only re-record on it by completely deleting its
contents.
The CineMag doesn’t mount on your computers desktop like a hard drive.The
clips are downloaded over Ethernet (either 1Gb or 10Gb) using the Phantom
software and written as raw cine files to an attached drive.
52
Phantom Flex Manual
53
Phantom Flex Manual
Page 32

CineMag and CineMag II
The Erase Protect Switch
There have been two generations of CineMags. The newer CineMag II is thinner and lighter than the first generation CineMags.The functionality of the
two is identical.
When the erase-protect switch is in the lock position, the CineMag cannot be
erased. Recording to the mag is still possible. It is recommended to enable
this switch when you begin shooting to avoid accidentally erasing a CineMag
Attaching a CineMag
The CineMag clips into the MagMate
of the Phantom as shown in the illustration.
All of the power and data connections
are made between the pins on the MagMate
and the pads of the CineMag.
Please be careful when attaching or
removing the CineMag that you don’t
damage the pins on the camera.
Avoid dragging the tabs on the front
of the CineMag across the pins.
Removing a CineMag
To remove the CineMag,
pull the red tab on the back
of the camera and lift the mag,
being sure not to damage
the pins on the camera.
54
Phantom Flex Manual
55
Phantom Flex Manual
Page 33

CineMag Indicators
On the back of the CineMag
are a number of LED indicators
that show the current mag status.
Mag Read Indicator: Lights when data or the
CineMag is being accessssed
Mag write Indicator:
Lights when footage
Power
Indicator
is being recorded
to the CineMag
Mag Capacity Indicator:
When a CineMag is
empty, all lights will be
illuminated. As material
is recorded to the mag,
the lights will turn off.
The last light will go out
when the mag is filled.
Downloading from a CineMag
While it is possible to save clips from a mag in a number of different formats,
almost always you will want to save them as Cine Raw files, as this format will
be the fastest and best quality format to save, as well as being the only format
that will preserve all of the metadata of the clips (such as frame rate, shutter
speed, timestamps, etc.).
Traditionally the Phantom Cine Raw files were defined as containing 16 bit,
linear data, and this is still the default format. Clips saved this way will take up
60% more data on disk than on the CineMag, so plan your storage requirements accordingly.
It is possible to save the clips with the same 10 bit log data that is on the
CineMag by checking the “Packed” check box in the Save dialog box. Files
saved this way will be smaller and faster to save than the 16 bit files, but
there is still limited third-party support for these files. Make sure that your
post-production tools are compatible with these files before creating them.
56
Phantom Flex Manual
Downloading individual clips
from a CineMag
From the “Play” tab in PCC, select the cine you want to save from the “Cine:”
pull down menu.You will see all clips in the RAM as well as the CineMag in
this list. Once you’ve selected a clip, you can mark an in and out point if desired by clicking the “[” and “]” buttons respectively.
Then click the green “Save Cine…” button.
In the “Save Cine” dialog box, choose “Cine Raw” as the file format, navigate
to the folder where you wish to save the clip and click “Save.”
57
Phantom Flex Manual
Page 34

Downloading all clips
from a CineMag
Downloading selected clips
from a CineMag
In the PlayTab, click the triangle to the right of the “Save Cine…”
button, and from the popup menu choose “Save All Flash CinesTo
File.” Alternately, from the “Cine” menu, choose “Save All Flash CinesTo File.”
In the subsequent save dialog, navigate to the folder where you wish to save
the clips, and choose the appropriate file format (generally Cine Raw).
Choose a name for the clips and click the “Save” button.
In the PlayTab, click the triangle to the right of the “Save Cine…” button,
and from the popup menu choose “Select&Save Cines to File.”
Erasing a CineMag
To erase a CineMag, mount the mag on a camera or CineStation and connect
a computer running the Phantom Camera Control software.
From the “Camera” menu choose “Erase Flash Memory”, and confirm that you
wish to delete all clips. It will take a few minutes to erase the CineMag.
If you find it impossible to erase a CineMag, check that the Erase Protect
Switch is not enabled on the bottom of the mag.
58
Phantom Flex Manual
Alternately, from the “Cine” menu, choose “Select&Save Cines to File.” In the
popup window, select the cines you wish to save. Use the shift key to select a
range of clips, or the control key to add individual clips. When you’ve selected
the cines you want to save, click “OK.” In the subsequent save dialog, navigate
to the folder where you wish to save the clips, and choose the appropriate file
format (generally Cine Raw). Choose a name for the clips and click the “Save”
button.
“_Flashcine#” will be appended to the file name of all batch-saved
clips, where “#” represents the number of each clip in the CineMag.
NOTE
Care of CineMags
Do not get the CineMag wet.
Do not drop a CineMag or otherwise expose it to excessive shock.
Always protect the electrical contacts on the bottom of the CineMag.
If they get dirty or corroded, clean them with denatured alcohol before
mounting the mag to a camera or CineStation.
59
Phantom Flex Manual
Page 35

9
Phantom Software
Phantom Flex Manual
Programs installed
by the PCC1.1 installer
Before Running the Software
Note:There are two versions of Phantom software that are installed
with a single installer. As of this writing, they will appear on your
desktop as “Phantom 689” and “PCC 1.1”. This manual covers only
the newer PCC (Phantom Camera Control) software. The older
Phantom software will work, though there are a few features of the
NOTE
Phantom Flex that are only accessible through the PCC software.
The Phantom control software runs on Microsoft Windows, and is currently
certified to be compatible with Windows XP and Windows Vista.
While not yet certified for Windows 7, testing indicates that it works when run
in XP compatibility mode.
Phantom Flex Manual
6160
Page 36

The computer connects to the camera via Ethernet.To get acceptable speeds
downloading clips from the camera, the connection should be 1Gb/sec
(1000-BaseT) running in full duplex. If the computer is only going to be used
for control, a 100-BaseT connection is acceptable.
Overview of Phantom Camera
Controller (PCC)
The main window of PCC is divided into 3 tabs: Live, Play and Manager.
When the software is first started, the Manager tab will be selected.
From here any cameras on the local network can be seen.
If a new camera is connected, pressing the reload button will make
the software look for it. Clicking on the name of a camera will allow
you to rename the camera. This can be useful when working with
multiple cameras, such as on a 3D rig.
All camera control and setting of shooting parameters (frame rate, shutter,
etc.) is performed in the Live tab.
The Play tab is used for reviewing and saving clips (either from the camera
or from files on the local hard drive) on the computer screen.
Phantom Flex Manual
In order for the software to communicate with the camera, they must be
on the same sub-network. All Phantom cameras have preset IP addresses on
the same subnet — 100.100.x.x with subnet mask 255.255.0.0. It is customary
to assign the controlling computer the IP address 100.100.100.1/255.255.0.0.
To the left of the tabs is an area used for viewing images. At the top of this
area are a series of icons for saving clips, changing viewing options, and
starting the video output program PVP.
There are several menus which will be covered in detail later in this section.
Note now the Help menu, which leads to several help documents which
provide valuable reference information about the software and different
camera models.
In Phantom terminology a clip is called a “Cine.”
A cine can exist in the memory of a camera, in a CineMag,
or on a hard drive as a .cine file.
NOTE
Phantom Flex Manual
6362
Page 37

Overview of Phantom Video Player
(PVP)
The PVP software can either be launched directly from the desktop,
or by clicking the “Video Out” icon in the PCC software. All video output
functions, such as setting the video output format and parameters (gain,
gamma, etc.) as well as actually playing back a cine over the camera’s video
output are performed in the PVP software.
Controlling the Camera with PCC
PCC can use different units for certain camera parameters. If this is your first
time running PCC, select the units you wish to use by “Preferences” from
the “Tools” menu.The most important unit to set is “Exp,” which sets what
unit to use when setting the exposure time.You probably will want this set
to degrees. The other unit to set is PTF which stands for “PostTrigger Frames”.
We’ll cover what this is later in this section, but for now set it to “Percent.”
All the camera parameters that effect your shooting are set in the Live tab.
In order for the controls to be active, you must select the camera you want
to control from the “Camera:” pull-down menu. If you have multiple cameras
connected on the same network, they will all appear in the pull-down menu.
64
Phantom Flex Manual
65
Phantom Flex Manual
Page 38

The large frame at the bottom left part of the window when in the Live tab
shows the current image being captured by the camera. The image should
look similar to the image being output over SDI by the camera, but will
always differ somewhat due to the differing natures of video monitors
and computer screens.
Clicking on the “ImageTools” icon above this frame shows the Image
Processing popup window. From here you can change gain, gamma,
and a few other options. This will affect both the computer display as
well as the video output of the camera.The “Default” button restores
all parameters except white balance to their default values.
The “Default White Balance” restores white balance to the default
(which under most typical lighting will produce a green image.)
Keep in mind that all changes made in the ImageTools window affect
the meta data of the cine file only, not the raw data.
If you are recording the camera’s video output however, it is
important that these be set to values that produce the image you wish
to record.
The “Zoom Actual Size” icon zooms the camera image to pixel-topixel mode. This is a good view for checking focus or otherwise
evaluating image quality.
The “Zoom Fit” icon scales the image to fit the current window size.
This is the best view for checking framing.The image can also be
zoomed to a specific magnification ratio by selecting a number from
the pull-down menu to the right of the Zoom Fit icon.
66
Phantom Flex Manual
67
Phantom Flex Manual
Page 39
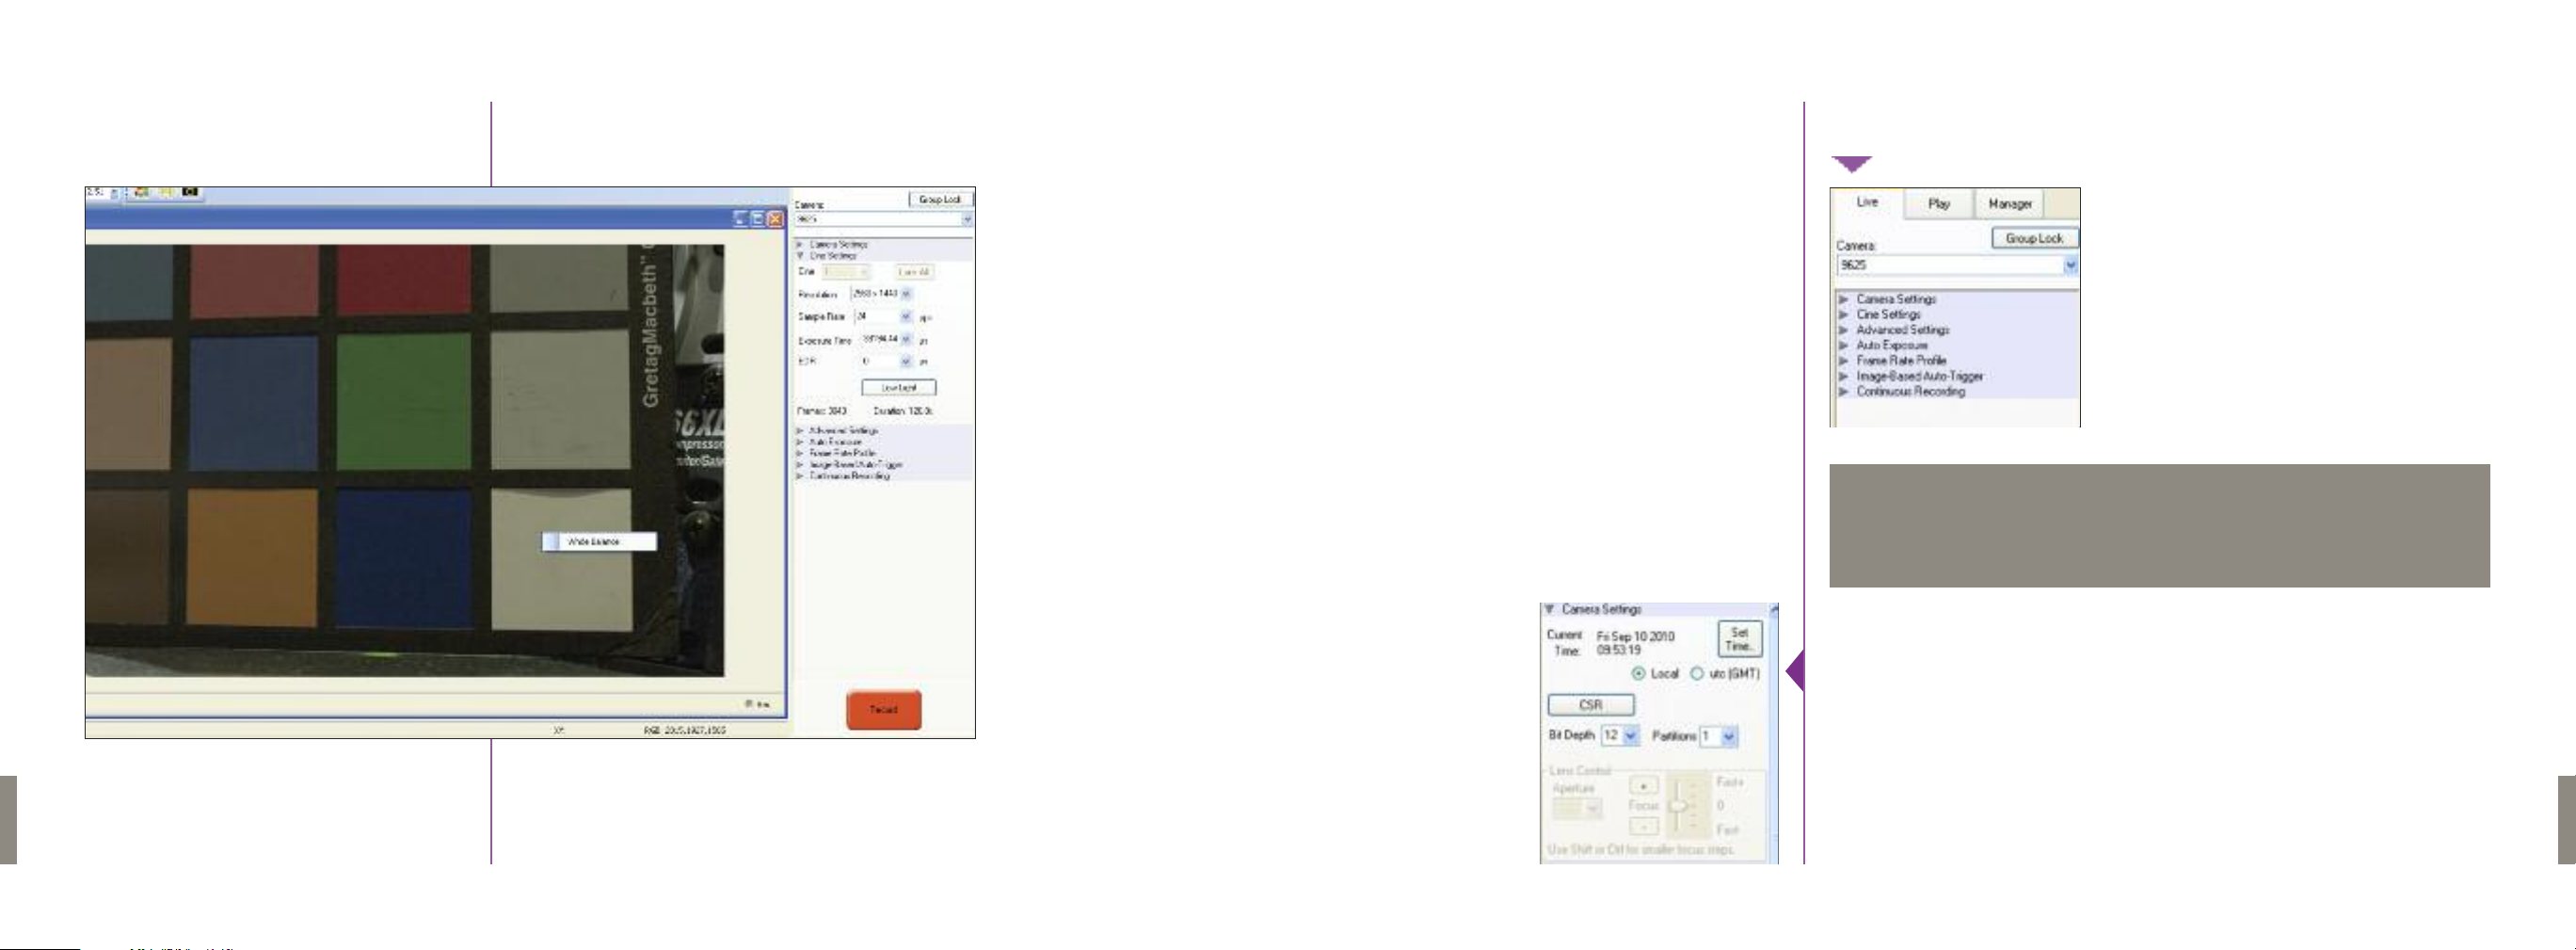
Right-clicking on a point on the displayed image brings up a white balance
popup. It is not necessary to fill the frame with white – a small target can
be used.
Beneath the Camera selector are a series of expandable headers which
contain groups of related camera settings.
We will cover the most commonly used settings in this manual.
For explanations of more rarely-used settings, please select
“Pcc Help” from the “Help” menu.
NOTE
From the Camera Settings section you can set the time of the internal clock
in the camera.This will affect the time stamps that are embedded in the
recorded cines. The simplest way to set the time is to click the “Set Time…”
button, then in the resultant pop-up window click the “Update and Set”
button.This will set the camera’s time to the computer’s time.
Phantom Flex Manual
The Phantom Flex always operates in 12 bit mode - no other option will be
available in thr “Bit Depth” pull down selector.
6968
Phantom Flex Manual
Page 40
You can partition the RAM of the camera by changing the number in the
“Partitions” pull-down menu. This lets you record more than one clip in the
camera’s memory at a time. It is rare that you will need to do this, especially
if working with a CineMag. Generally this should be set to 1.
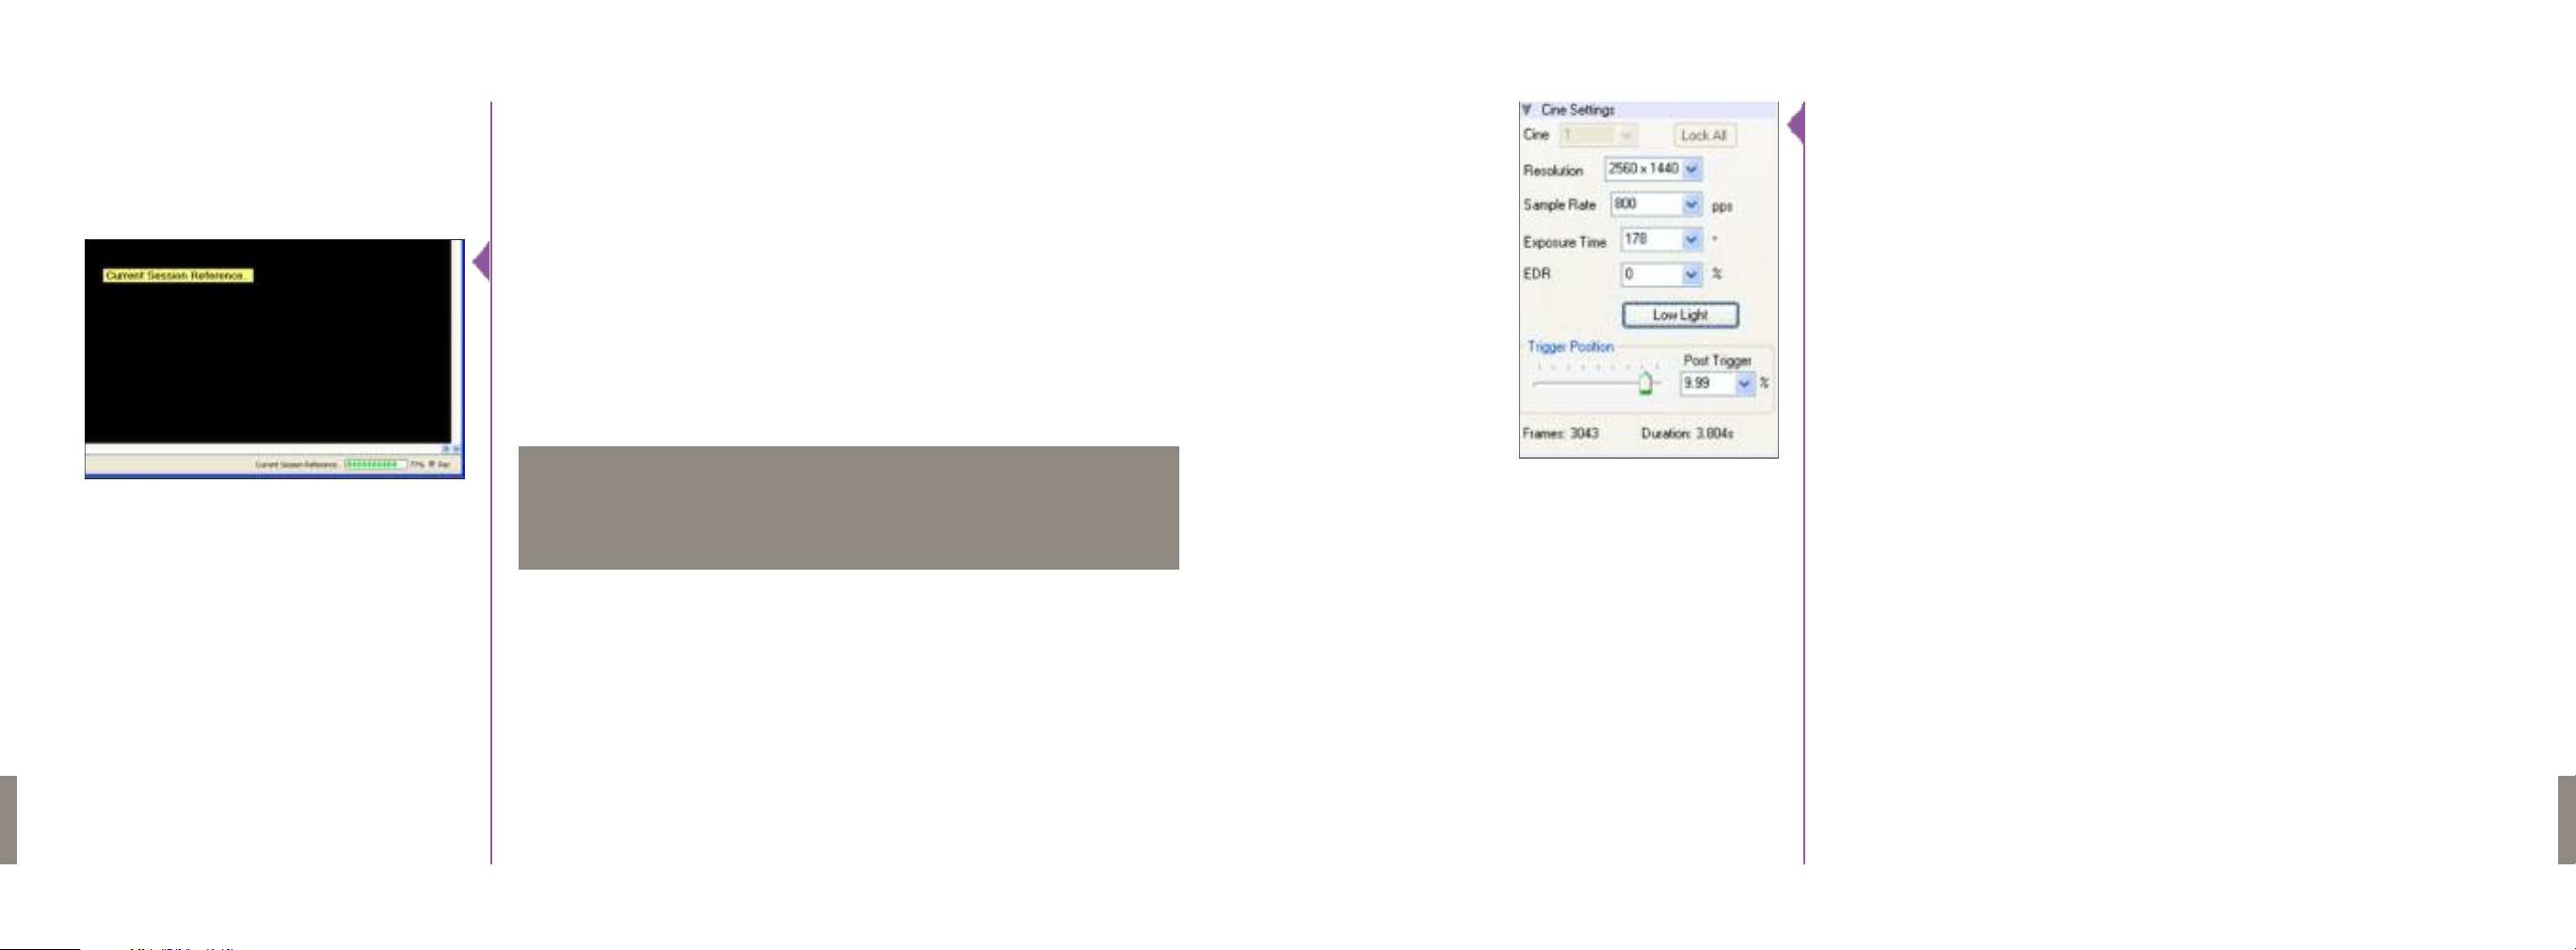
By far the most common operation performed in Camera Settings is CSR,
which stands for “Current Session Reference.”This is the Phantom software’s
term for black balance. When not running in HQ mode, it is necessary
to perform a CSR after changing frame rate, shutter or resolution.
After pressing this button, the camera’s internal capping shutter will close,
and you will see a progress meter in the bottom of the image window.
When the CSR completes the shutter opens and the camera is ready for
shooting.
If you don’t black balance the camera, you may see shifted colors
in the image as well as vertical bands.You should get into the habit
of performing a CSR after any parameter change.
NOTE
The most common shooting parameters are set in the “Cine Settings”
section. Resolution, Sample Rate (i.e. frame rate) and ExposureTime
(i.e. shutter) can be set by choosing a setting from the appropriate pull-down
menu. If you wish to use a setting that doesn’t appear in the menu, type in
the value you with to use. If you type in a value that isn’t supported by
the camera, the software will round the value to the closest supported value.
In addition to the pulldown menu, the trigger position can also be set in
a third way, by dragging the selector in the slider to the left of the numerical
indication left or right to visually represent where the trigger occurs in
the shot. This representation closely matches the on-screen display of the
camera.
The length of the shot in frames and seconds at the current settings is always
displayed at the bottom of this section.
70
Phantom Flex Manual
71
Phantom Flex Manual
Page 41
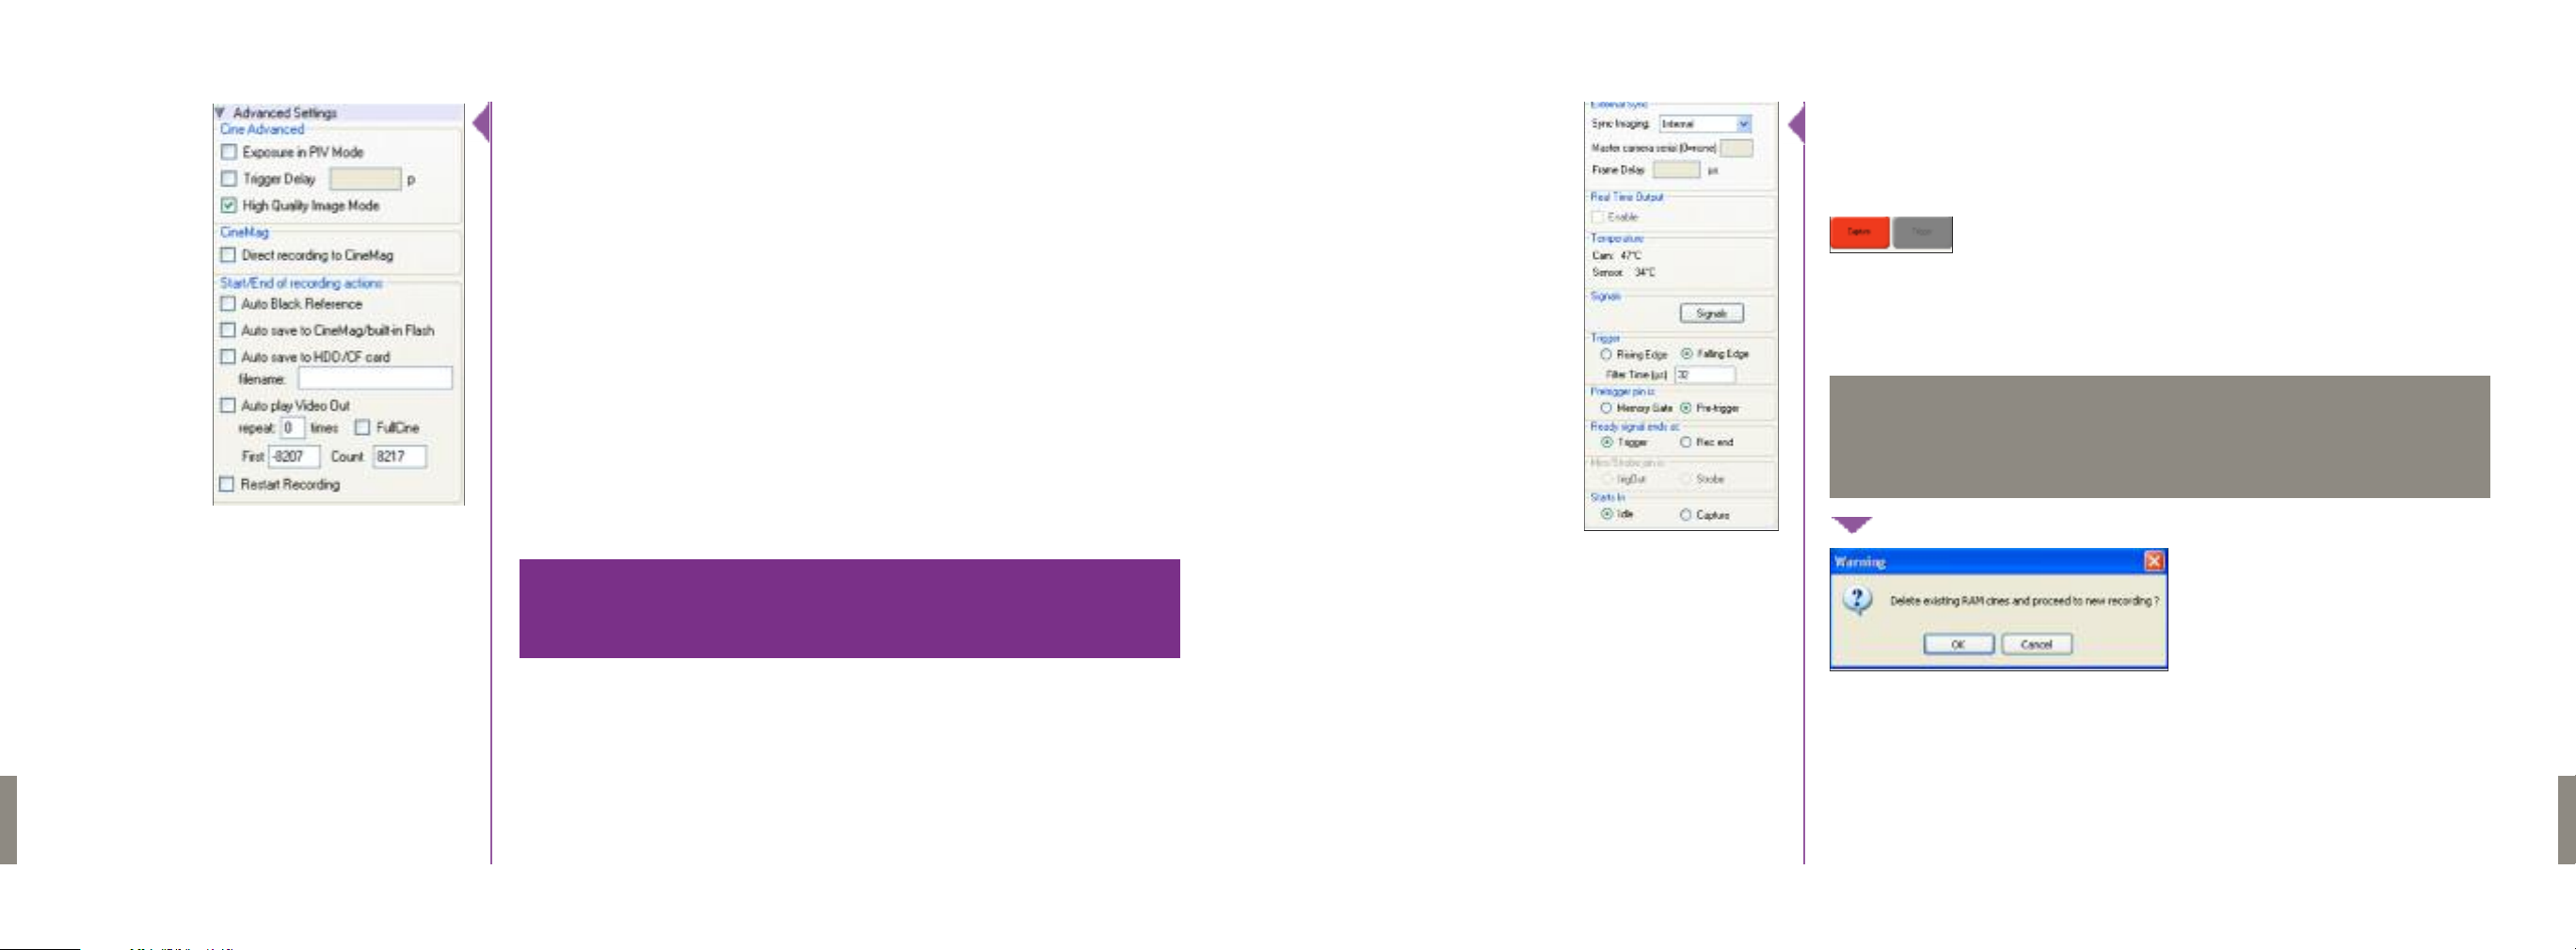
There are a number of settings available in the “Advanced Settings” section.
Here are some key ones:
“High Quality Image Mode” enables and disables HQ mode.
•
When working with a single camera, “Sync Imaging” should be set to
“Internal.” For information on syncing two cameras, such as in a 3D rig,
please read the chapter “Camera Setup.”
“Direct recording to CineMag” enables recording directly to the mag.
•
It is the equivalent of choosing “R/S” mode using the camera’s
on-board controls.
Enabling the options under “Start/End of recording actions” add
•
procedures that are performed automatically by the camera at the
beginning or end of a shot.The most common ones are “Auto save to
CineMag/built-in Flash” which saves the marked portion of a clip to the
mag immediately after recording and “Auto play Video Out” which begins
playback after recording. The range marked under “Auto play Video Out”
affects both playback and saving to the CineMag. If “Restart Recording”
is checked, recording will start automatically after the auto actions are
performed.
There is no user confirmation before the clip is erased from RAM
and recording begins when “Restart Recording” is enabled.
!
This feature should be used with care!
Once the camera is set, click the red “Capture” button to
begin recording. If the camera is in Loop mode, this will
begin recording to the camera’s RAM.
If the camera is in “Direct Recording to CineMag” (AKA R/S) mode, this will
begin recording to the CineMag.
If there is already a clip in the camera’s memory, you will be asked if
you are sure you wish to delete it before continuing. If you are sure,
click “OK.”
NOTE
72
Phantom Flex Manual
73
Phantom Flex Manual
Page 42
Once the camera is recording, the red button changes to
“Abort Recording” and the green “Trigger” button is enabled.
In loop mode, the Abort Recording button will stop recording, leaving the
camera’s RAM empty. In Direct to CineMag mode, Abort will stop recording
but the footage already recorded to the CineMag will remain in the CineMag.
TheTrigger button will stop recording leaving the recorded clip in RAM.
In loop mode, the “Trigger Position” set in “Cine Settings” will determine
whether recording stops immediately upon triggering the camera (post trigger at 0%), or if the camera continues recording for a while. The “PostTrigger”
percentage is the amount of the RAM buffer that is used to record after
the trigger point.
When the camera is in Direct to CineMag mode, recording always stops
immediately on triggering.
Reviewing Clips in PCC
After triggering a shot, you can review it by entering the “Play” tab in PCC.
In the Play tab, you can review any shot currently in the camera’s RAM,
in an attached CineMag, or even off your computer’s hard drive.
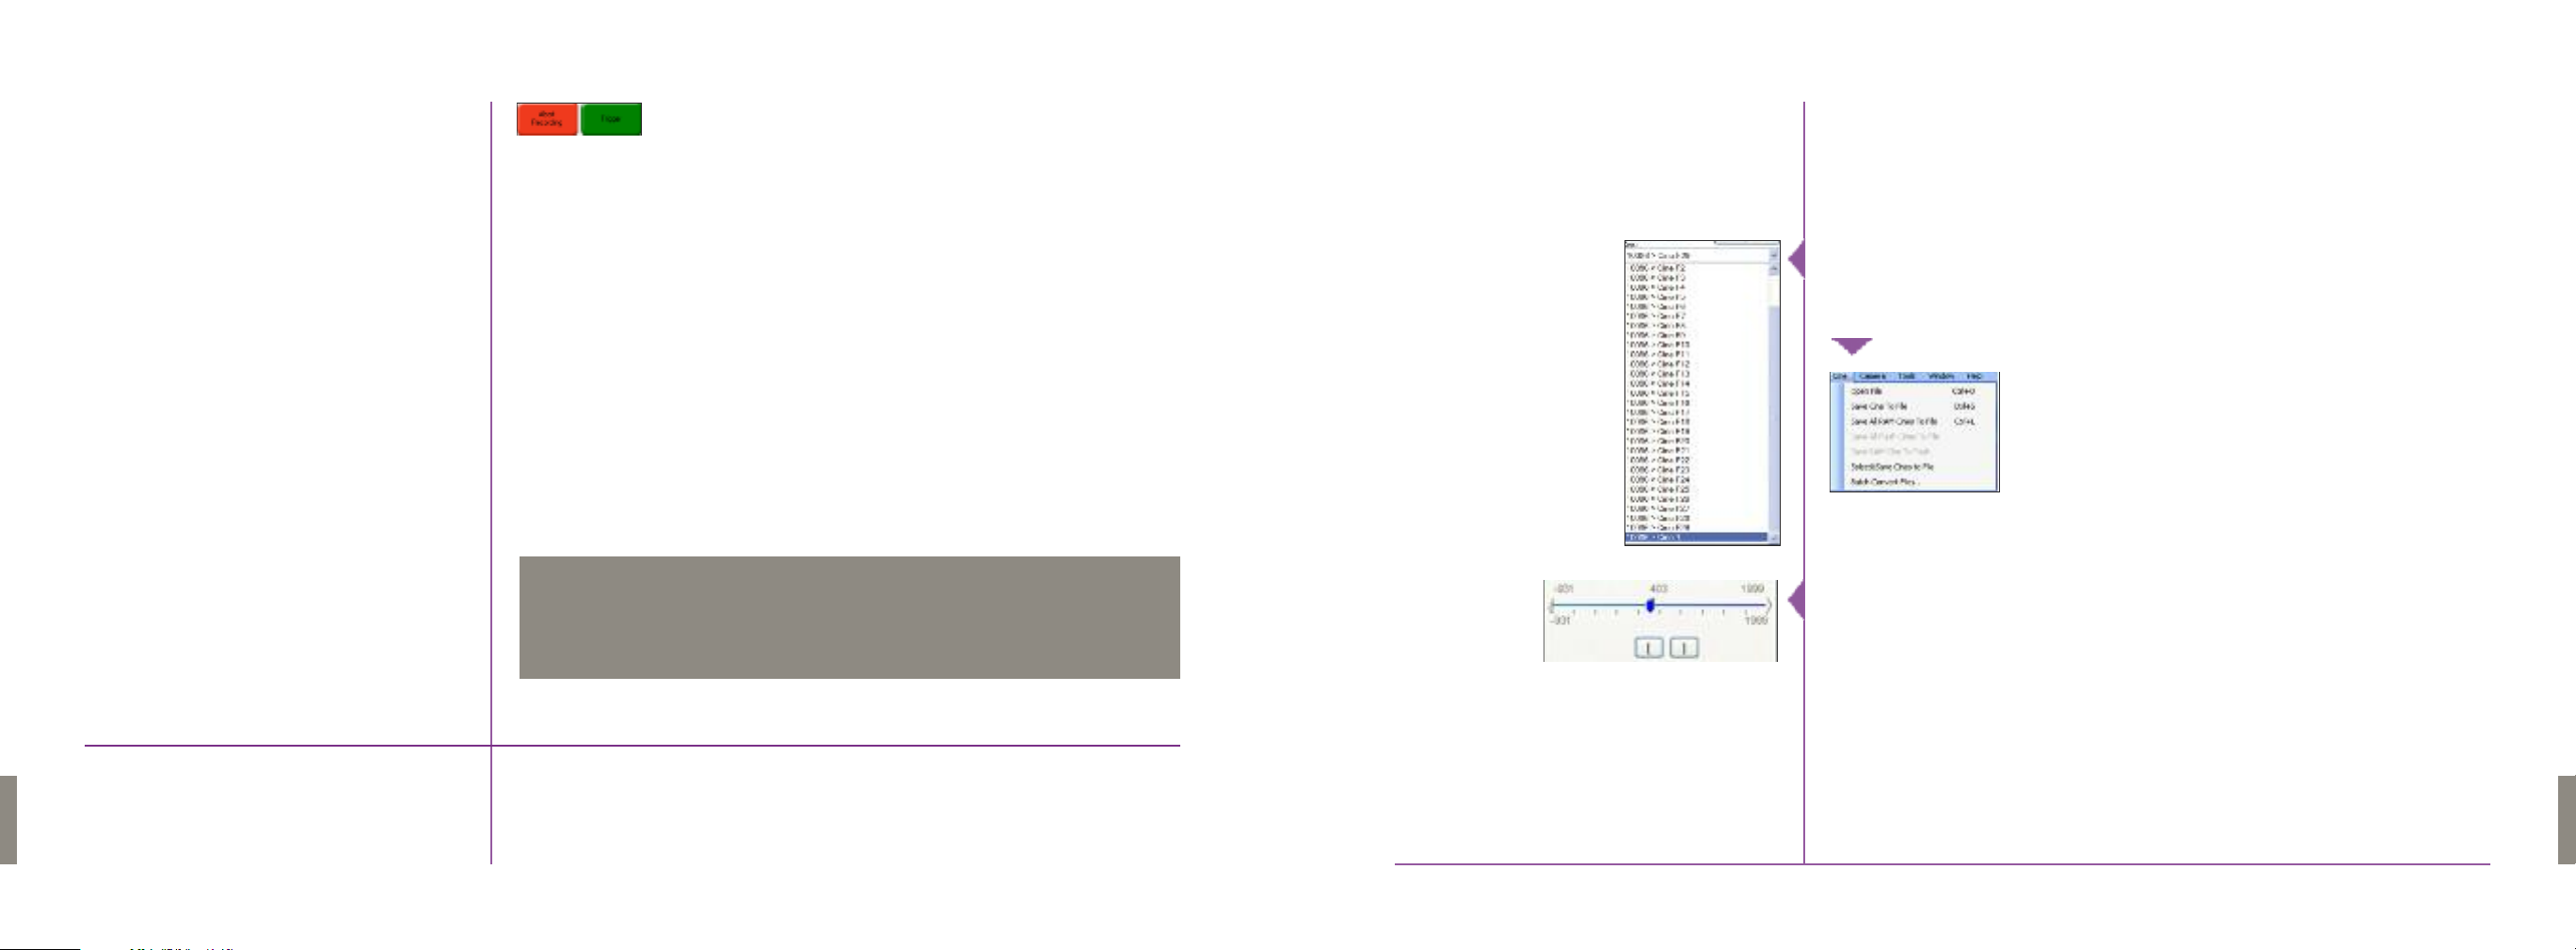
Select a cine from the “Cine:” pull-down menu,
or open a saved cine file by choosing “Open File” from the “Cine” menu.
74
Phantom Flex Manual
For the most accurate triggering, we recommend using either the
trigger button on the camera or an external trigger connected to
the camera’s trigger port.
NOTE
Once you are viewing a clip, you can change the viewing options with
“ImageTools.” All clip metadata is visible in the “Frame Info” and “Cine Info”
sections.You can scroll through individual frames of the clip using
the timeline, and mark an in and out point with the “[” and “]” buttons.
After trimming a clip, you can save it to the local hard drive by clicking the
“Save Cine…” button.You can save it to a CineMag by clicking the triangle on
the right of the “Save Cine…” button and selecting “Save RAM Cine to Flash.”
For further instructions on working with CineMags, please read the
“CineMags” chapter.
75
Phantom Flex Manual
Page 43

File Operations
It is possible to use the PCC software to convert cine files to a number of other
formats.
A single cine file can be converted by opening it from the “Cine” menu, then
saving it using either the “Save CineTo File” option on the “Cine” menu or
clicking the “Save Cine…” button in the “Play” tab.
100, then the first converted frame will have the name: image_-00100.jpg.
The ‘+’ annotator will add frame numbers starting from 1.
Example: image_+5.jpg
This will cause the first converted frame to have the name: image_00001.jpg.
There is a long list of formats in the “Save asType” selector.The formats
above the separator line are clip-per-file formats (meaning the entire clip gets
saved as a single file) while those below are frame-per-file formats (meaning
clips get saved as frame sequences.)
It is even possible to resave a clip in the “Cine Raw” format. This is
useful for creating sub-clips with no loss in image quality or metadata.
NOTE
Saving a clip in a clip-per-file format is quite straightforward. Simply choose
the format, navigate to a destination folder, name the clip and save.
Saving to a file sequence requires one extra step to ensure that the individual
files are properly named with sequential frame numbers. When specifying the
file name, add one of the following annotations to the end of the name: “!5”
or “+5”.
Example: image_!5.jpg
Once clips are converted to any non-raw format, any metadata (gain,
gamma, saturation, etc.) will be permanently “baked in” to the images. Before converting clips, make sure that you are applying appropriate image corrections for your use.
NOTE
Batches of cine files can be converted by choosing “Batch Convert Files…”
from the “Cine” menu. In the “Open Cine(s)” dialog that opens, select the
clips you want to convert. Use the shift and/or control keys to select multiple
files and click the “Open” button. In the “Multifile Convert Destination” dialog
that follows, navigate to a destination folder and choose a file format as you
would if converting a single file. Choose a file name in the same manner, but
make it somewhat generic since it will apply to all of your source files.
Upon clicking the “Convert” button, a progress window will appear. Each converted clip will end up in it’s own folder named after the original cine file.
76
Phantom Flex Manual
The ‘!’ annotator will cause the software to append the cine’s image number
(relative to the trigger point) to the file name. If the first frame in the clip is -
77
Phantom Flex Manual
Page 44

Using PVP
PVP (the Phantom Video Player) can be opened directly from the desk
top or by clicking the “Video Out” button in the PCC software.
The video output parameters are set by opening the “Settings…” window.
There the video format is set, as well as video controls such as gain, gamma
and saturation.
Video playback control is performed from the main PVP window.
Switch to the desired clip to view by selecting it in the “Cine:” pull-down
menu. Clips from the CineMag are preceded by the letter ‘F’.
To return to the live output, select “Live.”
Scrub through a clip by dragging the play head back and forth on the timeline.
Use the playback controls to play forward and in reverse. Use the speed slider
to change the playback speed.
78
Phantom Flex Manual
You can use the “[” and “]” buttons to mark in and out points. After trimming
a clip, press the “Save to Flash” button to save it to the CineMag, or “Save to
File…” button to download it to the computer. The same file save dialog familiar from the PCC software will appear.
It is also possible to erase a CineMag from PVP by clicking the “Erase All…”
button.
Phantom Flex Manual
79
Page 45
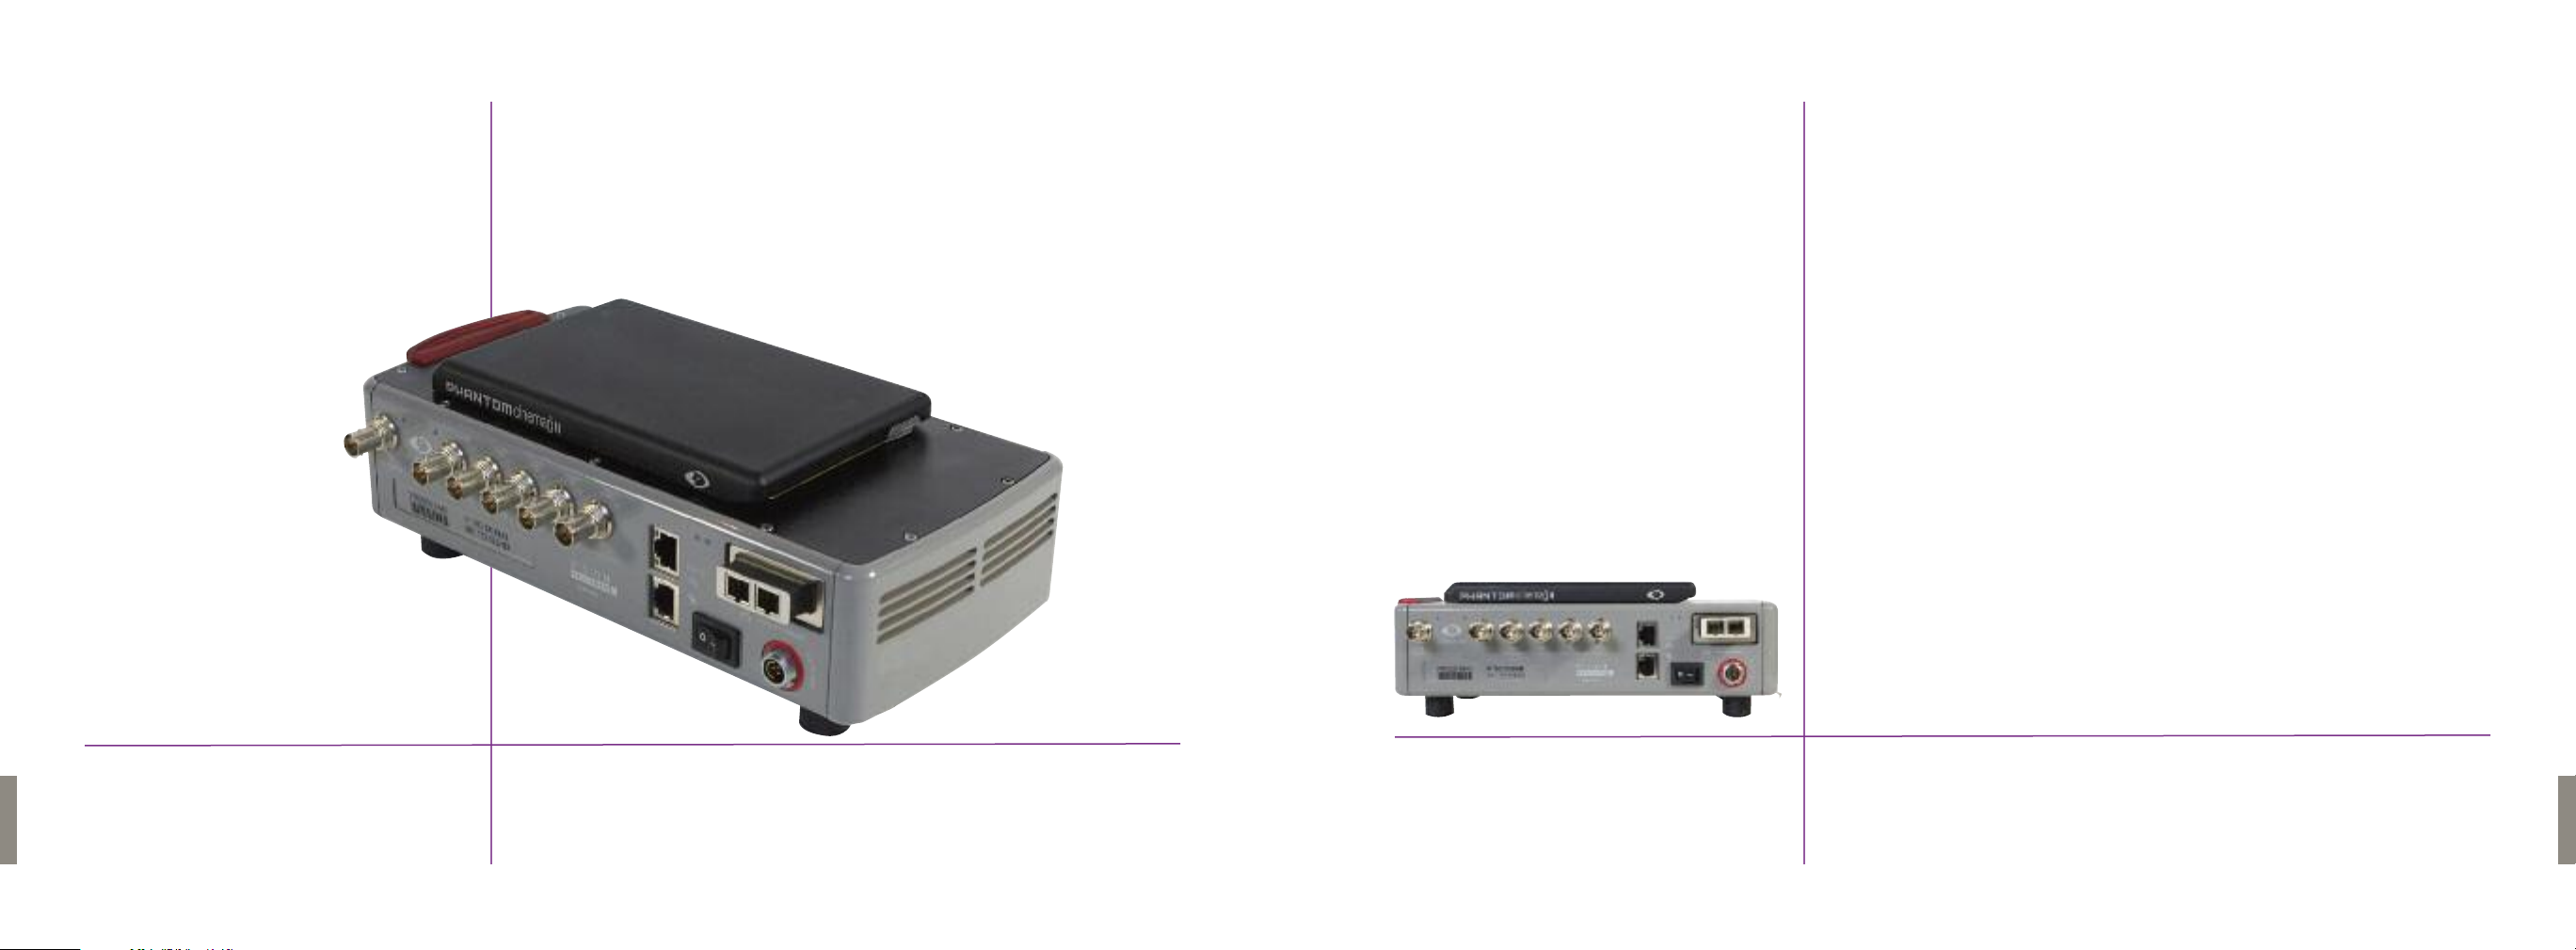
10
The CineStation
When connected to a computer running the Phantom software, a CineStation
behaves almost identically to a camera, except that no capture functions will
be enabled. Playing back and downloading clips from a CineMag works
identically whether the CineMag is mounted on a camera or a CineStation.
The one major functional difference between a camera and CineStation is the
availability of a 10G Ethernet connection on the CineStation.To establish a
10G connection between a CineStation and a computer, the devices must be
put onto the same physical network, and the 10G interface of the computer
must be assigned an IP address on the same subnet as the CineStation.
The recommended IP address to use is 172.16.0.1 with subnet mask
255.255.0.0.The Phantom software will automatically detect the IP address
of the CineStation. If you need to manually connect to the CineStation, its IP
address is printed on the side of the device, label XIP.
80
Phantom Flex Manual
81
Phantom Flex Manual
Page 46
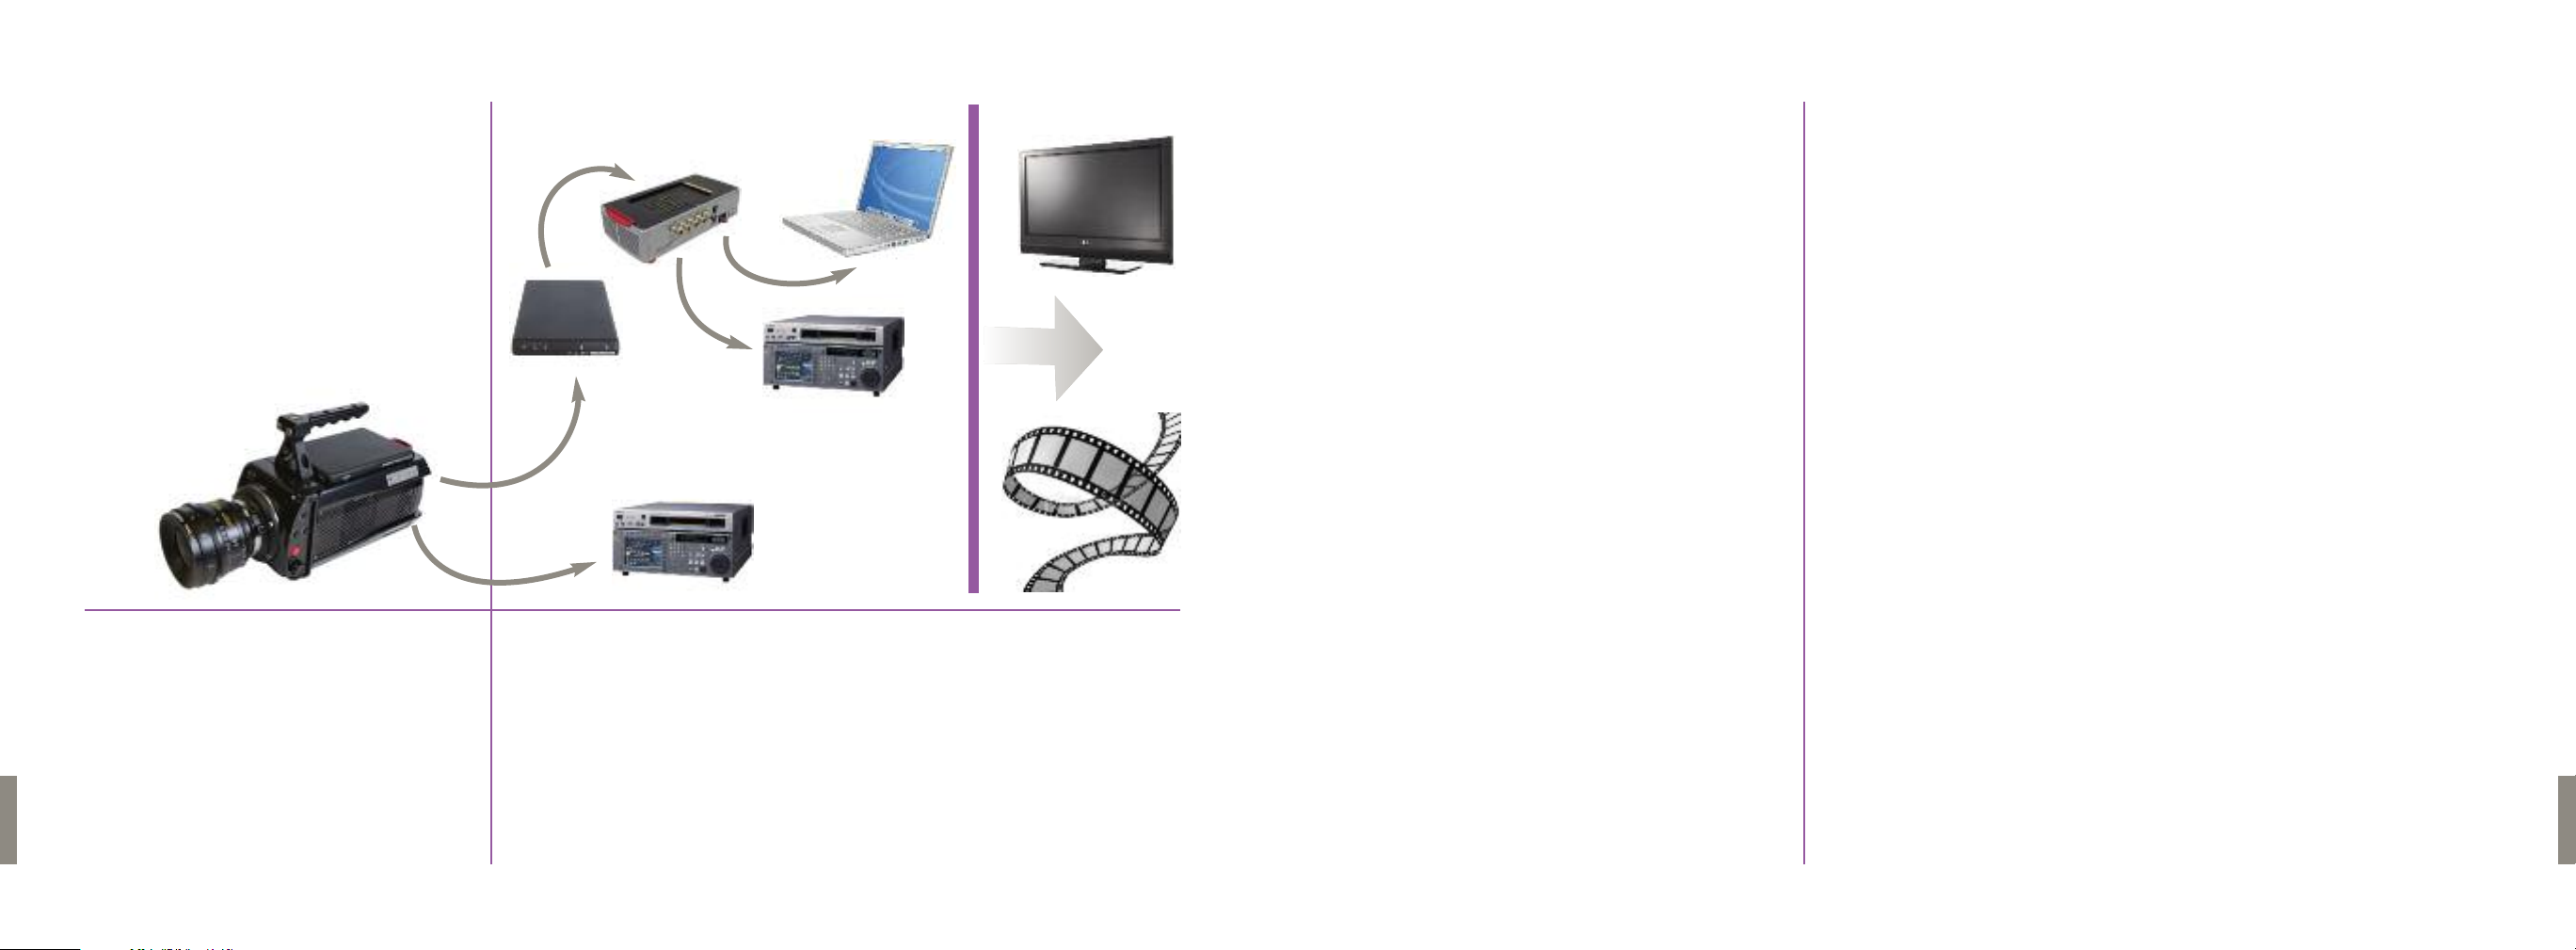
Post Flow & File
Workflow
Data or Video
11
Formats
Captured images are recorded as raw files and can be output in two basic
ways, as either HD Video or as native RAW files.
HD Video is available as either single link (4:2:2) or dual link (4:4:4) HD-SDI.
Playback can be directly from the camera or from the CineStation.
The RAW files are recorded on the camera’s internal RAM or onto a CineMag
and are uncompressed. The format is a Vision Research proprietary file structure called a Cine file. These Cine files can be converted to industry standard
DPX,TIFF, JPEG, DNG or CinemaDNG files with software provided by Vision
Research. IRIDAS Speedgrade and FrameCycler can also convert and color
correct Cine files. Glue Tools Phantom Cine Toolkit can make Cine files available to any Mac program that uses QuickTime along with full Final Cut Pro integration. Hardware systems which support Cine files include FilmLight’s
Baselight and the Quantel Pablo, with others in development.
82
Phantom Flex Manual
83
Phantom Flex Manual
Page 47

Maintenance
12
There are fixed black spots
on the image, particularly
at small apertures.
There is a MAG Err 0
or MAG Err 1 showing
on the video output.
The Phantom software is not
connecting to the camera
or CineStation.
& Troubleshooting
This is caused by dust particles stuck on either the sensor surface or filter assembly. If the black spots are somewhat out of focus & do not appear to have
a hard edge to them, then they are most likely on the filter assembly. You can
try dislodging them with a hand blower bulb or with a cleaning swab & solution.
If the black spots look in focus & have sharp edges, then they are most likely
on the sensor surface.This requires the lens mount & filter assembly to be removed. It is recommended that only qualified bench technicians do this.
Try releasing & reseating the CineMag back into place. Ensure the red latch
has clicked into the lock position. If after three attempts you still see the Err
warning, clean the gold contact pads on the CineMag with a Q-tip & alcohol.
Also check for any damage on the pogo spring-loaded pins on the camera
side.
First check all the Ethernet cables & connections, and then ensure the computer is seeing a connection via Ethernet. Check the IP address & subnet mask
are set correctly. Also see if in the Phantom controller software that the “connect only to” box does not have any IP addresses listed.
84
Phantom Flex Manual
The camera keeps switching
back to LIVE mode when trying to
playback via the camera controls
while connected to the laptop.
If you have the Phantom Video Player software open & it’s set to LIVE, this will
cause the camera to switch back to LIVE mode when trying to playback.The
software must be closed for playback to work from the camera controls.
85
Phantom Flex Manual
Page 48

There is an image from the
SDI output but no image
in the viewfinder.
I cannot see any on screen display
from the SDI-1 output, even when I
switch on the OSD.
I cannot set the maximum frame
rate I’d expect to have at this reso-
lution.
Check the video output format.The Sony viewfinder will only work with 1080i
& 1080psf, not with any 720p formats.
The SDI-1 BNC connector will only output a clean signal, meaning it will not
overlay any menu features on top of the video image. SDI-2 has the option to
switch the menu characters on or off.
The camera could be set to R/S mode (direct recording to magazine).The Flex
has the option to capture in HQ mode, which can also reduce the maximum
frame rate.
13
What is the resolution of the
camera?
Phantom Flex FAQs
The maximum sensor resolution is 2560x1600.The record resolution is selectable for the given application, which in turn expands options on record time
and frame rates.The camera uses a single CMOS sensor and a 35mm film format PL lens mount. (Other available lens mounts include Nikon & B4 using an
adapter) Common resolution choices are 1920x1080 (aka 1080p) and 1280x720
(720p). Other resolutions are also available for Digital Cinema or broadcast
use.The resolution is selectable in eight pixel increments for custom framing
options.
The Flex can record RAW file at 2560x1440 and then output via HD-SDI at
1920x1080 without cropping the image area.This oversampling technique results in higher quality video.
86
Phantom Flex Manual
What is the size of the sensor?
What is the fastest frame rate?
What is the difference between
HQ & SQ mode?
The full size of the sensor (2560x1600) is 25.6mm x 16mm, which is slightly
larger than 3-perf Super35 film. When shooting at 2560x1440 (16:9 ratio) &
using the oversampling method on the Flex, the sensor size is 25.6mm x
14.4mm. At 1920x1080 without using oversampling, the image area is 19.2mm
x 10.8mm. In 1280x720, the image area used is 12.8mm x 7.2mm.
Frame rates are dependent on the choice of resolution & bit depth. At full resolution (2560x160 0) in SQ mode, the max frame rate is 1455fps. In HQ mode,
it is 725fps. At 1920x1080 in SQ mode, it is 2570fps. In HQ mode, it is 1275fps.
The maximum frame rate when recording at 256x8 pixels, is a whopping
280,000fps! For a detailed list of all available frame rates, go to: (insert link)
HQ mode is a new proprietary recording mode introduced by the Phantom
Flex that greatly reduces the need for black balancing the camera, as well
increasing the signal to noise ratio of the camera. It involves reading extra
Phantom Flex Manual
87
Page 49

what is a “capping shutter”?
How light sensitive is the camera?
88
Phantom Flex Manual
What type of shutter does
the camera use, and
How big is the camera?
How much power does the
camera use?
How long can it shoot?
information from the sensor between exposures, and as such imposes some
limitations on the camera's settings.The maximum camera frame rate is reduced to about half of what it would be in SQ mode, and there are limitations
on the minimum and maximum exposure times. It is ideal for lower frame
rate shooting, especially directly to a CineMag, as it eliminates the need to
stop between takes to black balance the camera.
The Phantom Flex uses an electronic Global shutter, where it captures all of
the information from every photosite on the sensor at once.
The “capping shutter” is a built-in mechanical cap directly in front of the sensor used for black balancing only. When a black balance is performed (only
necessary in SQ mode), the shutter automatically closes to achieve 100%
darkness.
The Phantom Flex body weighs 10.5 lbs (4.5 kilograms). When a viewfinder,
riser, CineMag and other standard accessories are added, the camera weighs
approximately 20 lbs. The Phantom Flex body alone is approx 12” x 8” x 5.5”
or 30.6cm x 20.1cm x 14.2cm (LxHxW). It is by far the smallest HD high speed
camera available & can easily fit inside underwater housings, mount on
Steadicams and lightweight jibs, and with its ability to frame sync can be
used in motion control and 3D rigs.
The Phantom Flex is rated at approximately 1000 ISO. It has a dynamic range
of exposure of approximately 11 stops.
The camera runs natively on 20-36V DC with an ideal voltage being 24V or
28.8V, which is common to many battery packs. Power draw is approx
100 watts when in standby mode & up to 150 watts when recording directly
to a CineMag.
The most common versions of the Phantom Flex are equipped with 32G of internal RAM. Runtime is determined by resolution, as a given resolution will
How can I view the shot?
What do I do with the material
once it is captured on
the camera?
yield a given number of frames that will fill this memory. So at 2560x1440 in
HQ mode, the memory can hold 3076 frames, which translates to 4.2 seconds
when shooting at 725fps (max frame rate). Played back at 30p (common for
NTSC video use) this translates to 102 seconds of material. At 24p, this would
be 128 seconds of material. In SQ mode at 2560x1440, the memory can hold
6214 frames.
16G internal RAM is also available as an option. If the Phantom Flex you are
using is a 16G model, the frame and time length capabilities described above
would be halved. Longer shots can be achieved by recording directly to a CineMag (see below).
For a complete list of memory capacity & frame rates for RAM & CineMags,
please use the link below:
http://www.visionresearch.com/Tools/TimeCalc/
The Phantom Flex has an HD-SDI port, which can feed directly to a standard
HD field monitor. It also has an analog output for use with most Sony or Panasonic HD color & mono viewfinders. Material is immediately available for
playback at selectable frame rates with no additional rendering or processing
delay. Shots in the camera’s internal memory or saved to a CineMag (see
below) are available for immediate playback.
Captured material can leave the camera in three ways. The camera has two
HD-SDI ports (single wire, 4:2:2 & dual-link 4:4:4), which can be used to feed
directly to an HD deck in a variety of formats. Using the laptop computer controller or on-board camera controls, some basic color correction can be performed on the image output over the HD-SDI. Downloading in this manner is
in real-time, so a full file of 2560x1440 material played at 1080/30p would take
102 seconds.
The second way to output material is by direct data transfer.The camera captures in Uncompressed RAW, which is considerably more information than
any video format can handle. This is excellent for complicated post-grading
and effect work and offers the richest material for Digital Cinema production.
Phantom Flex Manual
89
Page 50

90
Phantom Flex Manual
What are the CineMag
and CineStation?
To copy this material, the files are downloaded from the cameraʼs internal
RAM via Gigabit Ethernet through the laptop computer controller to a hard
drive. Downloading Uncompressed RAW is not a real-time operation; it tak es
more than 10 min to transfer the entire memory buffer from the camera.
However, there are ways to make this process more efficient (see below).
The third & most common method is to transfer data to a CineMag, a portable
flash memory device that clips to the top of the Phantom Flex. A 32G RAM
memory in the camera takes just 30 seconds to transfer to the CineMag,
which can then be downloaded later.The CineMag is available in 128G, 256G
and 512G models.The CineMag stores or “packs” data differently from the
internal RAM using a 10-bit Log structure rather than a 12-bit Lin one.
By doing this, a 512G CineMag can hold 76 minutes of 2560x1440 footage
when played back at 24fps.The CineMag can be later downloaded using the
camera or through a CineStation docking station. When downloaded and
returned to Linear files, the RAW material will unpack to approximately 850G,
so Abel suggests planning to use a one terabyte hard drive for each 512G
CineMag of footage. For more on the CineMag and CineStation, see below.
The Phantom is limited by its internal RAM recording capabilities, but it is
also able to record to 128G, 256G and 512G capacity CineMags, which are
interchangeable flash-based memory magazines that clip to the top of the
camera.The 512G CineMag can record up to 76 minutes of Uncompressed
RAW footage at 24fps (2560x1440).There are two ways to work with the
CineMags. One can record directly to them, but the capture speed capability
is less than that of the internal memory, so the top frame rate at 2560x1440 is
222fps. It takes approximately 8 minutes to fill an entire 512G CineMag at this
resolution and frame rate.
The CineMag fills its memory sequentially, so a shot cannot be “thrown
away.” Instead the entire CineMag must be cleared all at once, akin to
exposing a roll of film. The other method is to capture to the Phantomʼs
internal RAM and then transfer to the CineMag. One advantage to this is that
What do I do with the
Uncompressed RAW files?
the shot can be trimmed quickly and easily at the camera before transfer.
Even if an entire 32G shot is transferred, this process only takes 30 seconds
to complete. This is by far the most efficient system for shooting, as bad takes
need not be saved and only the valuable parts of good takes are saved, saving
both time and memory space.
The CineStation is a downloading dock for the CineMags.The Flex camera can
be used to download the files, however it is limited to Gigabit Ethernet speed,
and this also ties up the camera. The standard CineStation has component HD,
single link 4:2:2 HD-SDI & dual-link 4:4:4 HD-SDI outputs, as well as Gigabit
Ethernet connectivity. An optional module upgrades the CineStation to
10 Gigabit Ethernet (10GE) output. With a standard laptop computer and
a reasonably fast portable hard drive, a 512G CineMag will download over
Gigabit Ethernet in approximately seven hours. Using a 10GE CineStation
with an optimized workstation and hard drive array that same 512G CineMag
can download in about one hour (depending on other conditions).
Using a pair of CineMags and a CineStation, the Phantom Flex can be used
in a style similar to a standard production film camera. One need not fill
an entire CineMag before downloading it.To limit the amount of downloading
needed at the end of the production day, a few shots may be captured to
a CineMag, before swapping it with another CineMag on the Phantom.
The first CineMag may then be downloaded at the CineStation.
All cameras come with Vision Research’s Phantom software (PC only), which
can convert RAW files to DPX,TIFF, JPEG,or DNG or formats.This software is
free to use.
Gluetools Phantom CineToolkit (Mac only) is a QuickTime plug-in which
allows CINE files to be used natively by Compressor or Final Cut. Gluetools
also has a product called Cineon/DPX Pro which, together with teh Phantom
Cine toolkit will convert RAW files in compressor to DPX.
91
Phantom Flex Manual
Page 51

Sensor Cleaning
Lighting for High-Speed
IRIDAS Speedgrade or FrameCycler, Quantel Pablo & Baselight (FilmLight)
also have support for Phantom RAW files.
The sensor on the Phantom Flex is a very expensive item. We do not recommend cleaning it without special tools and training. If any dust should land on
the surface of the sensor, it can be blown off using a hand-squeezing bulb syringe. Never use compressed air, lens cleaning fluid or lens cleaning cloths on
a sensor.
Lighting issues are not specific for the Phantom cameras but for high frame
rate photography in general. Even with the great sensitivity of modern cameras, be prepared to use a considerable amount of light, the Phantom Flex,
however, has made this easier with its sensitivity of 1000ISO. Beyond illumination, the largest issue in high-speed lighting is flicker.Tungsten lights actually have a flicker rate. When powered by alternating current (AC) electricity,
the power cycles 50 or 60 times per second (depending on the country and its
power system). During the down cycle the tungsten lamp filament can dim
slightly, causing flicker.The amount of dimming is related to the type of bulb,
wattage and physical size of filament. In general, we have found that lamps
larger than 2000 watts use tungsten filaments so large that they do not have
time to cool and dim before the power cycles back up. Therefore, we recommend using 2K or greater tungsten light fixtures when shooting above 120fps
in 60hz countries and 5K or greater when shooting above 100fps in 50hz countries.
light output. LED lights are subject to the electronic circuits driving them
which can create a vast array of refresh rates, but generally we have found
that LED fixtures designed for the production community will not flicker as
long as they are not dimmed.
Finally, the shutter angle on the Phantom can affect flicker as well, since a
greater shutter angle allows for a longer response time from the light. When
shooting extremely high frame rates, it may no longer be necessary to retain
a 180-degree shutter to capture the motion generally preferred for a filmic
look. A 360-degree shutter allows both more light sensitivity and reduced
flicker possibilities.
For further technical questions, feel free to contact Sean Coles in
AbelCineTech’s Los Angeles office at scoles@abelcine.com or Jamie Alac in
their New York office at jamie@abelcine.com.
92
Phantom Flex Manual
Be aware that a unit such as a nine-light is NOT a large fixture but is actually
an array of smaller lights and as such can flicker. Some additional recommendations are to use DC power for tungsten lights, which eliminates flicker entirely. HMI and fluorescent lights are generally fine for speeds under 120fps,
as long as they use electronic ballasts. Magnetic ballasts should not be used.
HMI lights can suffer from “arc wander,” whereby a plasmatic “hot spot” can
move about within the bulb, causing an amorphous shifting movement in the
93
Phantom Flex Manual
Page 52

94
Phantom Flex Manual
Page 53

 Loading...