

Page 1
ECLIPSE P400A / P400(S)
INSTALLATION GUIDE V1.0
ECLIPSE P400A / P400(S)
INSTALLATION GUIDE V1.0
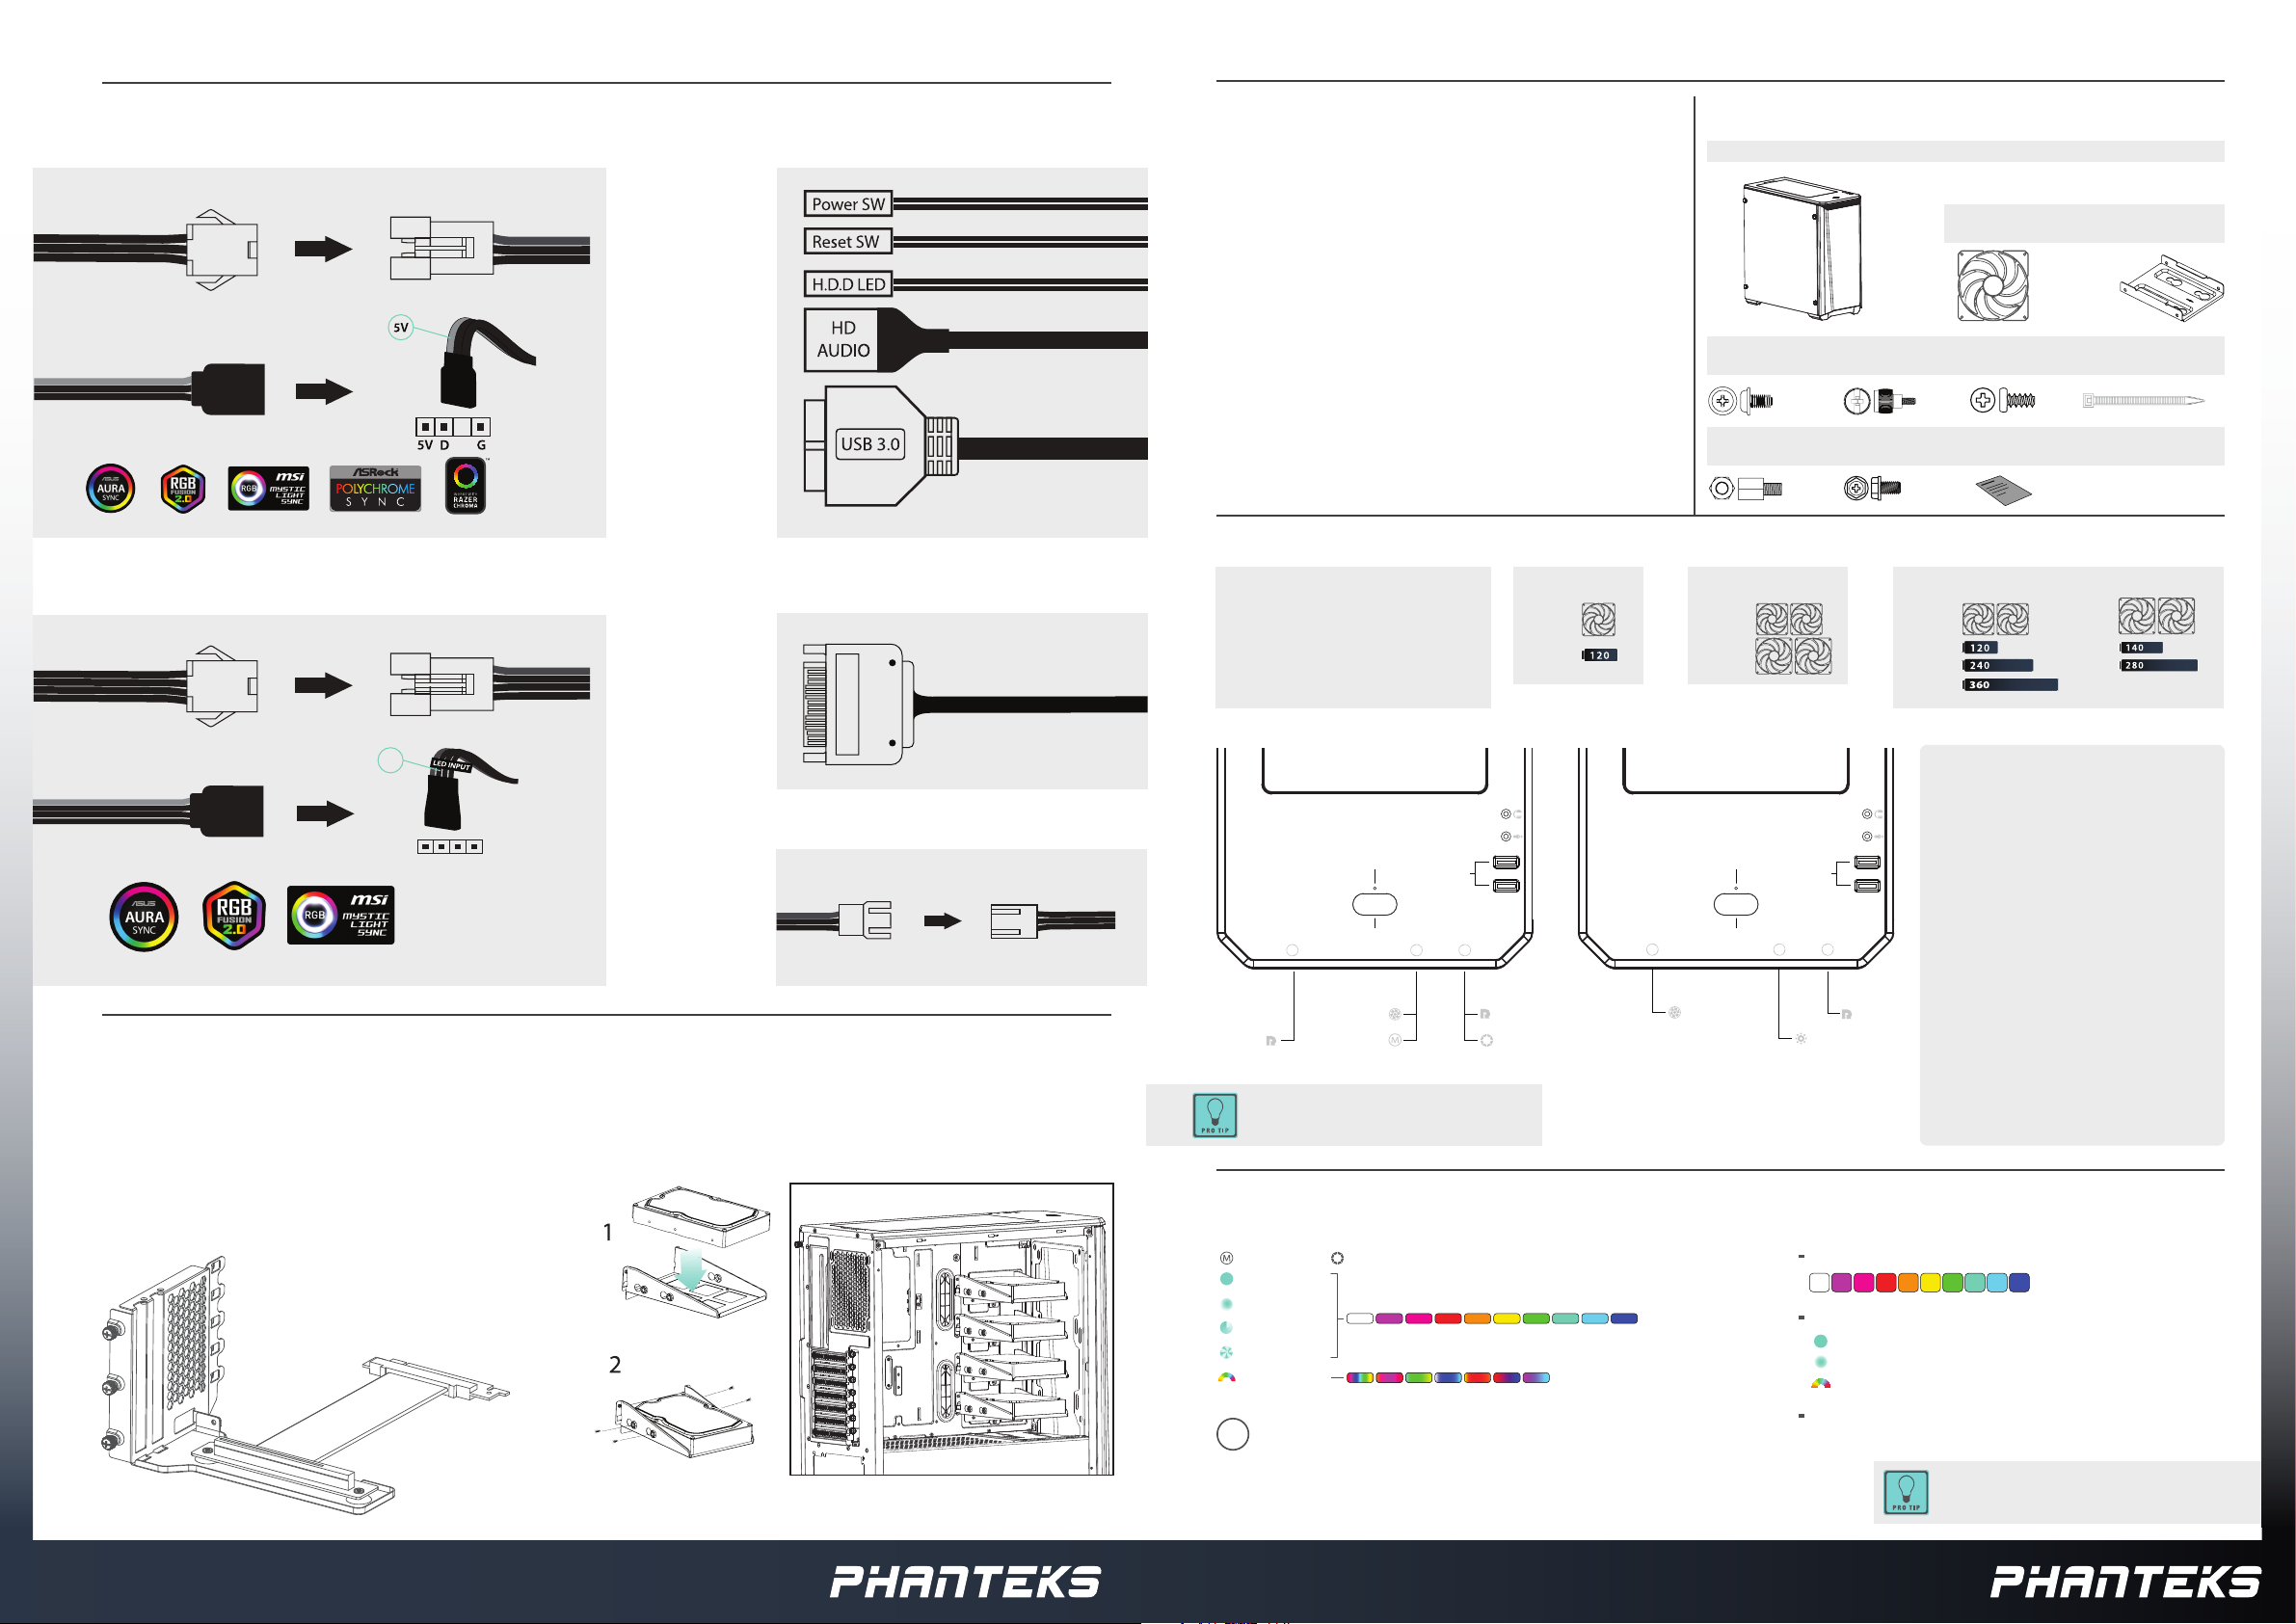
CABLE CONNECTION
CONNECT TO DRGB LIGHTING PRODUCTS P400A_D MODEL
To DIGITAL-RGB Products
To D-RGB Motherboard (optional)
MOTHERBOARD
Compatible with:
ADDRESSABLE ADDRESSABLE
RAINBOW
D-RGB HEADER
CONNECT TO RGB LIGHTING PRODUCTS P400S MODELS
To RGB Products
To RGB M otherboard (optional)*
Compatible with:
*Motherboard Adapter is sold separately (PH-CB_RGB4P)
12V
12V G R B
MOTHERBOARD
RGB HEADER
OPTIONAL UPGRADES
VERTICAL GPU BRACKET
(PH-VGPUKT-02)
THE PHANTEKS VERTICAL GPU BRACKET CAN BE EASILY
INSTALLED IN THE REAR PCISLOT AREA WITHOUT
MODIFICATIONS. FOLLOW THE INSTRUCTION THAT COME
WITH THE VERTICAL GPU RACKET.
CONNECT TO THE MOTHERBOARD
CONNECT TO THE POWER SUPPLY
SATA
CONNECT TO THE 3PIN FANS
To 3-PIN FAN
*P400S and P400A models only
MODULAR HDD BRACKET
(PH-HDDKT_02)
UP TO 4 ADDITIONAL HDD DRIVES CAN BE INSTALLED USING THE
MODULAR HDD BRACKET.
INTRODUCTION INCLUDED ACCESSORIES
Thank you for choosing Phanteks. Please take a moment
to carefully go through the manual. Phanteks will not
take responsibility for any damages incurred due to
incorrect installation or usage of this product.
This manual is applicable for the following products:
PH-EC400ATG
PH-EC400ATG_D
PH-EC416PTG
PH-EC416PSTG
Eclipse P400A / Eclipse 400(S)
+ SSD Screw
1x Motherboard
Stando
2x Thumb Screw
4x PSU Screw
120 mm Case Fan
(Pre-Installed)
12x Fan Screw
1x This Manual
PRODUCT OVERVIEW
CLEARANCE
CPU Cooler Height 160mm
PSU Clearance 270mm
GPU Clearance 420mm
E-ATX Motherboard
360mm Front radiator
280mm Front radiator
6. Reset Button
P400A_D only
272mm
4. HDD LED
5. Power Button
6. Fan Control
9. D-RGB Mode
The 3-pin fan controller allows you to set any
connected fans to low, medium or full speed.
130x420x115mm
145x325mm
1. Headphone
2. Microphone
3. USB 3.0
7. Reset Button
P400A onlyP400A only
10. D-RGB Color
P400A_D onlyP400A_D only
REAR
120
FAN
120
RAD
TOP
120
FAN
140
FAN
FRONT
120
FAN
120
RAD
*remove the mid-plate cover
ECLIPSE P400(S) FRONT I/OECLIPSE P400A FRONT I/O
English
1. Headphone
2. Microphone
3. USB 3.0
4. HDD LED
5. Power Button
6. Fan Control
7. Reset Button
8. RGB Control
9. D-RGB Mode
10. D-RGB Color
Deutch
1. Kopfhörer
2. Mikrofon
3. USB 3.0
4. HDD LED
5. Ein-/Aus Schalter
6. Lüftersteurung
7. Reset-Knopf
8. RGB Steurung
9. D-RGB Modus
10. D-RGB Farbe
4. HDD LED
5. Power Button
6. Fan Control
P400S only
1. Headphone
2. Microphone
3. USB 3.0
7. Reset Button
8. RGB Control
LIGHTING CONTROLS
2.5” SSD Bracket
(Pre-Installed)
6x Zip Tie22x Motherboard
140
FAN
140
RAD
Francais
1. Casque
2. Microphone
3. USB 3.0
4. HDD LED
5. Bouton d’alimentation
6. Contrôle du ventilateur
7. Bouton de réinitialisation
8. RGB Contrôle
9. D-RGB Mode
10. D-RGB Couleur
Espanol
1. Auricular
2. Micrófono
3. USB 3.0
4. HDD LED
5. Botón de encendido
6. Control del ventilador
7. Botón de reinicio
8. RGB Controlar
9. D-RGB Mode
10. D-RGB Color
MODE S
SOLID
BREAT HING
R ADA R
SP ARKL E
R AINBOW
PRESS AND HOLD TH E MODE BUT TO N T O TURN O FF LEDS
2 SEC
CO LO RS
RGB CONTROLS (P400(S) MODELS)Digital-RGB CONTROLS (P400A_D MODEL)
Short Press to change color:
Long Press to change mode:
Solid
Breathing
Color Cycle
Press and Hold to turn o or
switch to motherboard control.
Press and Hold to turn o the case controller to sync
with the motherboard RGB or D-RGB software.
Page 2
ECLIPSE P400A / P400(S)
INSTALLATION GUIDE V1.0
ECLIPSE P400A / P400(S)
INSTALLATION GUIDE V1.0
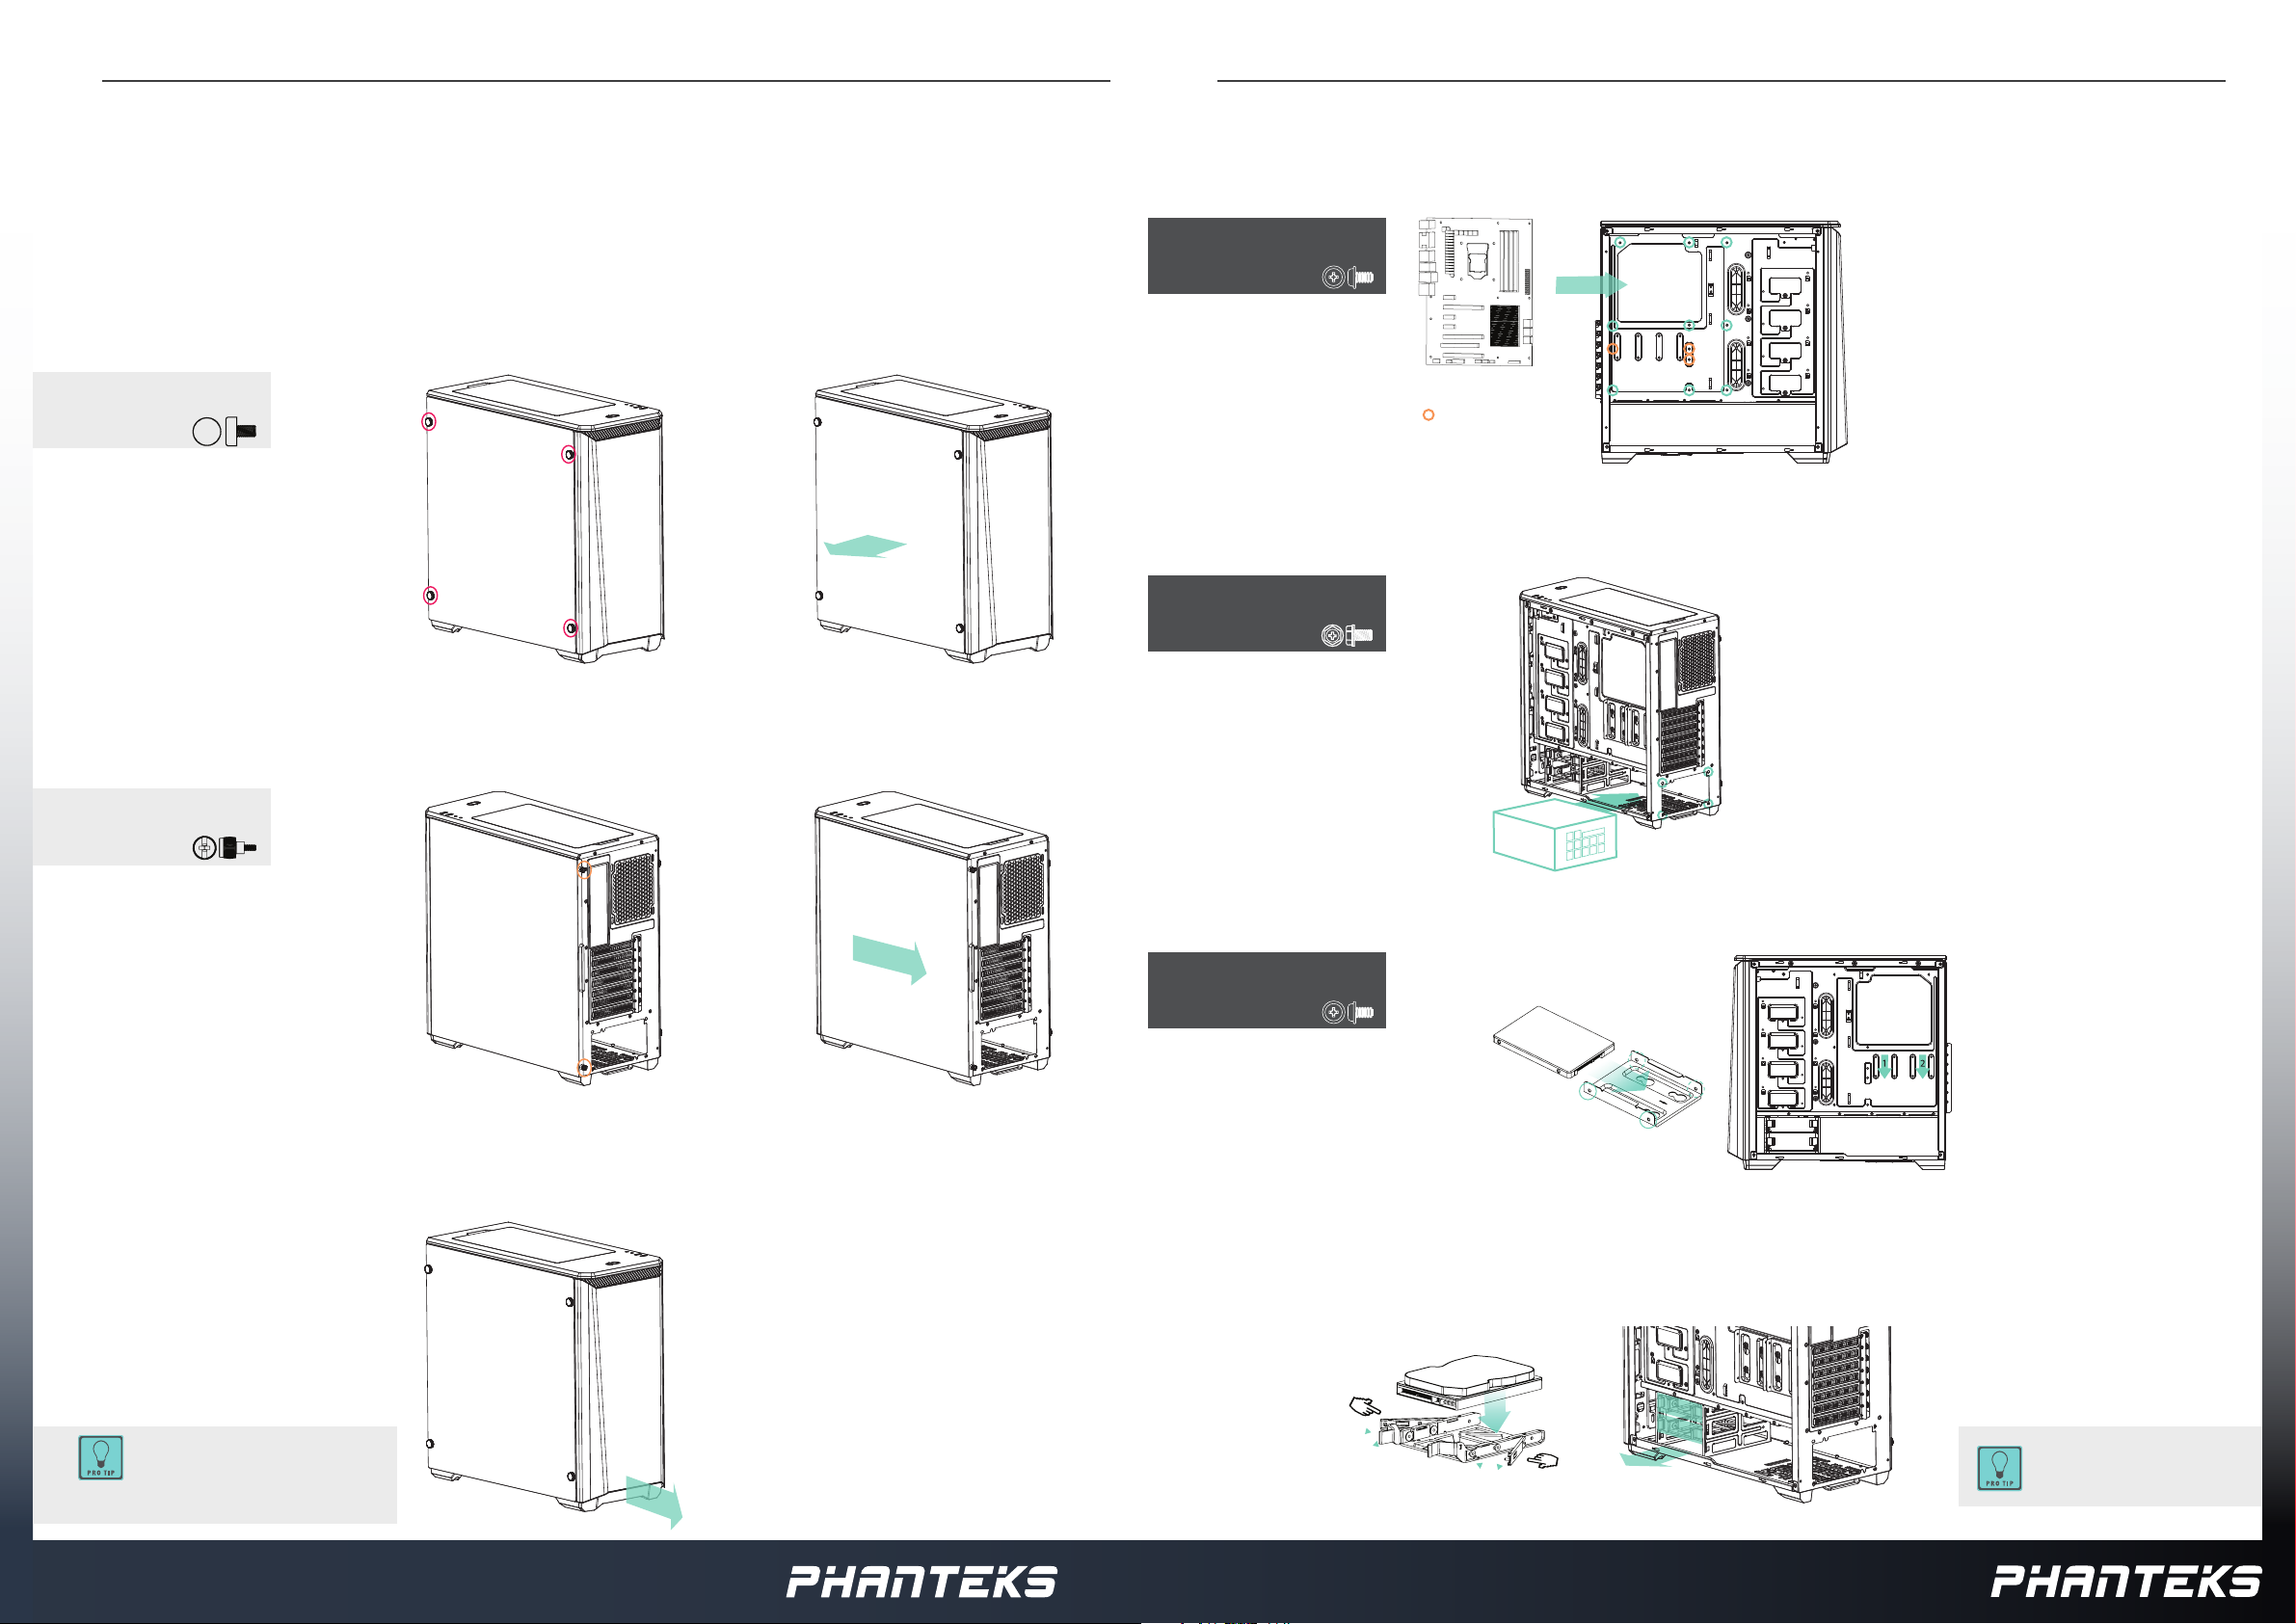
INTRODUCTION
There are three panels that can be removed from the P400 Chassis; the left side tempered
glass panel, the right side panel and the front panel. Follow these steps below.
LEFT SIDE PANEL
1. REMOVE 4 THUMB SCREWS 1. 2.
REMOVE:
4x
2. REMOVE TEMPERED GLASS PANEL
HARDWARE INSTALLATION
MOTHERBOARD
1. INSTALL THE MOTHERBOARD WITH 9 MOTHERBOARD SCREWS
INSTALL:
9x
Micro - ATX
POWER SUPPLY
1. INSTALL THE POWER SUPPLY WITH 4 PSU SCREWS
INSTALL:
4x
RIGHT SIDE PANEL
1. LOOSEN THUMB SCREWS
LOOSEN:
2x
2. SLIDE SIDE PANEL OFF
FRONT PANEL
1. REMOVE FRONT PANEL BY PULLING
ON THE PANEL FROM BELOW
1. 2.
2.5” SSD
1. INSTALL THE SSD DRIVE WITH 4 SSD SCREWS
INSTALL:
4x
3.5” HDD
With the P400(S) models you can acces the
dust lters after removing the front panel.
We recommend to clean the dust lters every
month for optimal performance.
1. INSTALL THE HDD DRIVE IN THE TOOLLES HDD TRAY AND SLIDE IT BACK INTO THE CHASSIS
The HDD Tray can also
hold a 2.5” SSD
 Loading...