

Page 1
GrandQuilter
Owner´s manual
Page 2

This houshold sewing machine is designed to comply with IEC/EN 60335-2-28
and UL1594
IMPORTANT SAFETY INSTRUCTIONS
When using an electrical appliance, basic safety precautions should always be followed, including
the following: Read all instructions before using this household sewing machine.
DANGER - To reduce the risk of electric
shock:
• A sewing machine should never be left unattended when plugged in. Always unplug this sewing
machine from the electric outlet immediately after using and before cleaning.
• Always unplug before relamping. Replace bulb with same type rated 12V, 5 Watt.
WARNING - To reduce the risk of burns, fi re,
electric shock, or injury to persons:
• Do not allow to be used as a toy. Close attention is necessary when this sewing machine is used by
or near children or infi rm person.
• Use this sewing machine only for its intended use as described in this manual. Use only
attachments recommended by the manufacturer as contained in this manual.
• Never operate this sewing machine if it has a damaged cord or plug, if it is not working properly,
if it has been dropped or damaged, or dropped into water. Return the sewing machine to the
nearest authorised dealer or service center for examination, repair, electrical or mechanical
adjustment.
• Never operate the sewing machine with any air openings blocked. Keep ventilation openings
of the Sewing machine and foot controller free from the accumulation of lint, dust, and loose
cloth.
• Keep fi ngers away from all moving parts. Special care is required around the sewing machine
needle.
• Always use the proper needle plate. The wrong plate can cause the needle to break.
• Do not use bent needles.
• Do not pull or push fabric while stitching. It may defl ect the needle causing it to break.
• Switch the sewing machine off (“0”) when making any adjustment in the needle area, such as
threading needle, changing needle, threading bobbin, or changing presser foot, etc.
• Always unplug the sewing machine from the electrical outlet when removing covers, lubricating,
or when making any other user servicing adjustments mentioned in the instruction manual.
• Never drop or insert any object into any opening.
• Do not use outdoors.
• Do not operate where aerosol (spray) products are being used or where oxygen is being
administrated.
• To disconnect, turn all controls to the off (“0”) position, then remove plug from outlet.
• Do not unplug by pulling on cord. To unplug, grasp the plug, not the cord.
• Hold plug when rewinding into cord reel. Do not allow plug to whip when rewinding.
SAVE THESE INSTRUCTIONS
Page 3

Congratulations on purchasing
your new GrandQuilter!
Your GrandQuilter is so easy to use and will, together
with your imagination, create wonderful quilts. Please
spend some time reading these operating instructions
as it is a great way to learn the machine and also to
make full use of its features.
Your Pfaff dealer will be at your service with any help
or advice you need.
We wish you many enjoyable hours of sewing and
quilting!
VSM Group AB
Some fabrics have excess dye which can cause discoloration on other fabric
but also on your sewing machine. This discoloring may be very diffi cult or
impossible to remove.
Fleece and denim fabric especially in red and blue often contains a lot
excess dye.
If you suspect that your fabric/ready to wear garment contains a lot
of excess dye, always pre-wash it before sewing/embroidering to avoid
discoloring.
Page 4
Table of content
1. Introduction
Machine overview 4
Standard accessories 6
Extra accessories 7
Needle chart 8
2. Operating your
GrandQuilter
Carrying handle 10
Soft cover 10
Electrical connection 11
Connecting the foot control 11
Controlling sewing speed 12
Foot control 12
Speed control slide 12
Bobbin winding button 13
Thread cutter 13
Needle Up/Down 13
Stitch length dial 14
Reverse lever 14
Presser foot lifter 14
Pressure dial 15
Knee lift 15
Changing the presser foot 16
Changing the needle 16
Attaching the darning plate 17
Placing a thread spool on the
spool pin 17
Placing a thread cone on the
spool pin 17
Bobbin winding 18
Inserting a bobbin 19
Inserting a bobbin into
the hook 20
To remove the bobbin case
and bobbin 20
Threading the machine 21
Needle threader 23
Bringing up the bobbin thread 24
Balancing the thread tension 25
Attaching the extension table 26
3. Getting started
Getting started to sew 28
Turning a corner 29
Using the Fabric guide 29
How to use the Free-motion foot 30
Quilting 31
Stitch-in-the-ditch 31
Free-motion stippling 32
4. Maintenance and
troubleshooting
Cleaning the hook
and feed dogs 34
Oiling the machine 35
Changing the light bulb 36
Troubleshooting 37
Index 39
Introduction
Page 5
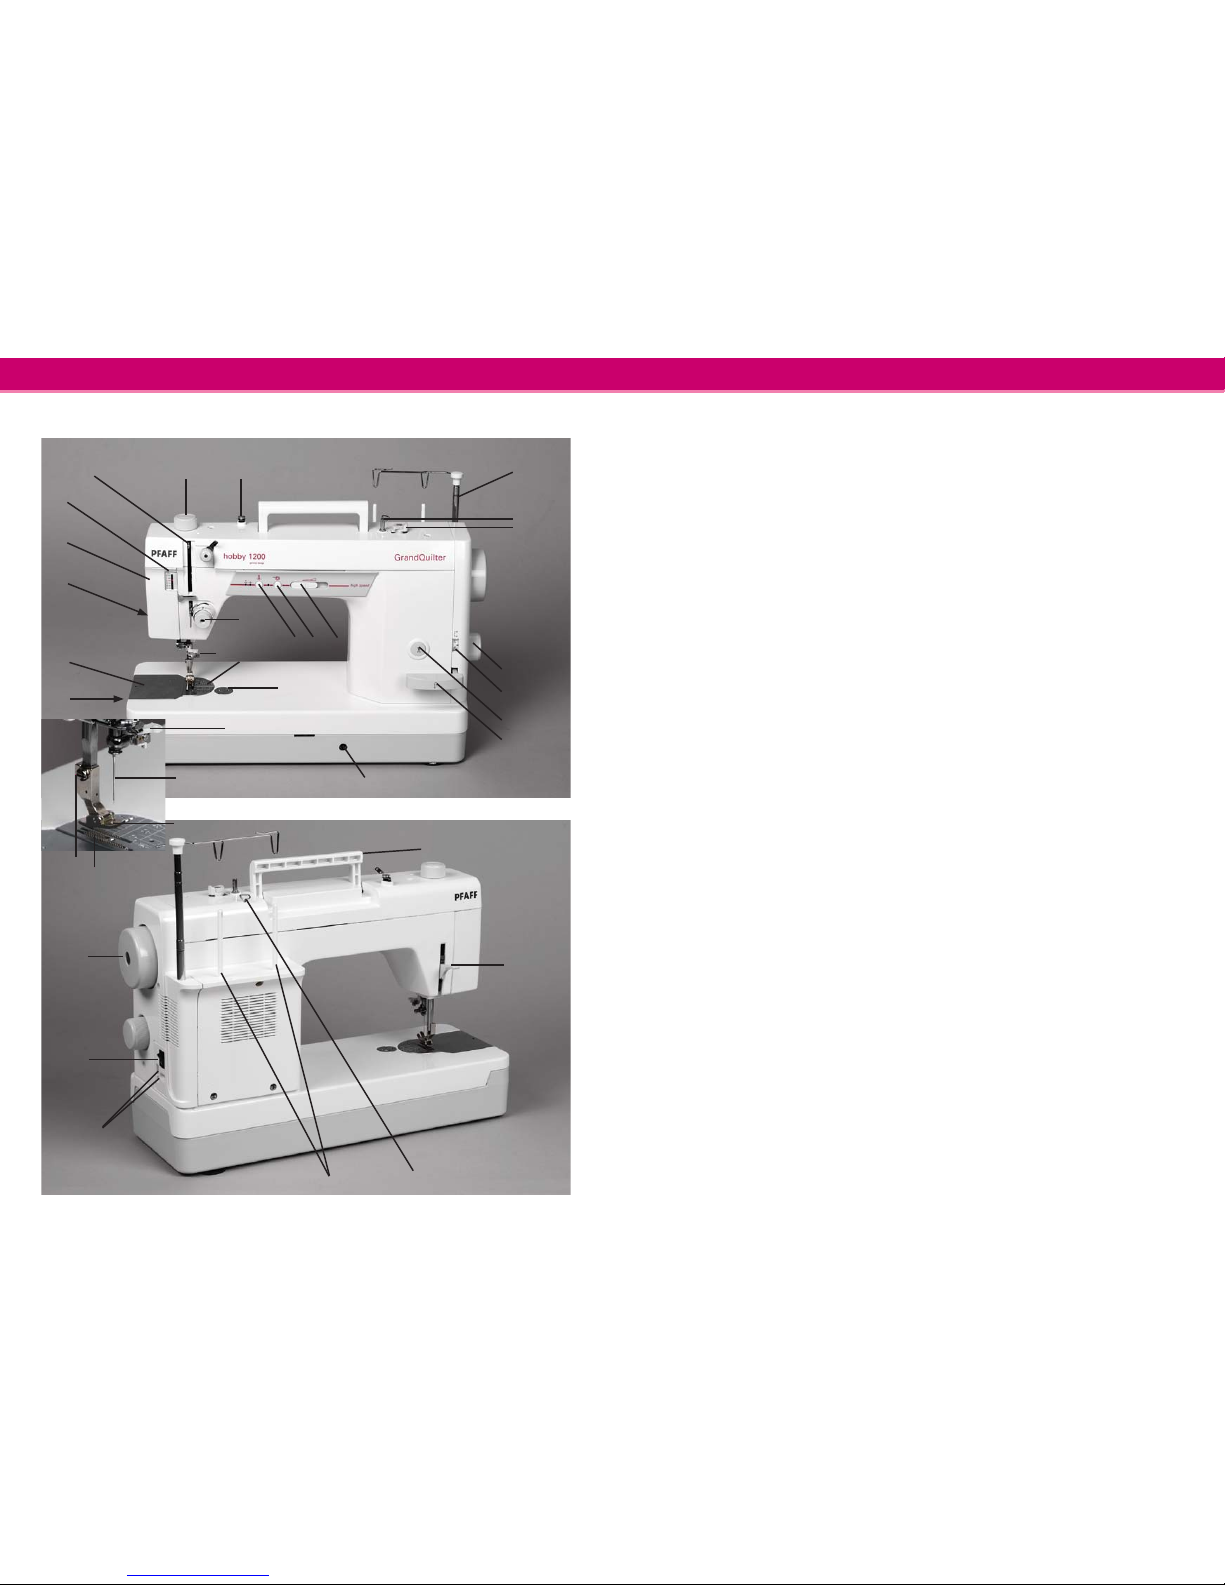
1
2
3
4
5
7
8
9
10
6
1112
13
17
18
19
15
20
21
22
23
14
16
24
25
26
27
28
35
34
33
32
30
29
31
Machine Overview
Introduction
4
Introduction
5
Machine Overview
1. Pressure dial
2. Bobbin winding tension disk
3. Thread stand
4. Bobbin winder spindle
5. Bobbin winder stop
6. Stitch length dial
7. Stitch length indicator
8. Thread cutter button
9. Reverse lever
10. Speed control slide
11. Bobbin winding button
12. Needle Up/Down button
13. Thread tension dial
14. Needle clamp screw
15. Needle plate
16. Attachments holes
17. Knee lift socket
18. Bobbin case cover
19. Hook cover plate
20. Thread cutter
21. Face cover
22. Pressure indicator
23. Take-up lever
24. Needle threader
25. Needle
26. Presser foot
27. Feed dogs
28. Set-screw
29. Carrying handle
30. Presser foot lifter
31.Thread guide for bobbin winding
32. Spool pins
33. Machine sockets
34. Power switch
35. Handwheel
Page 6
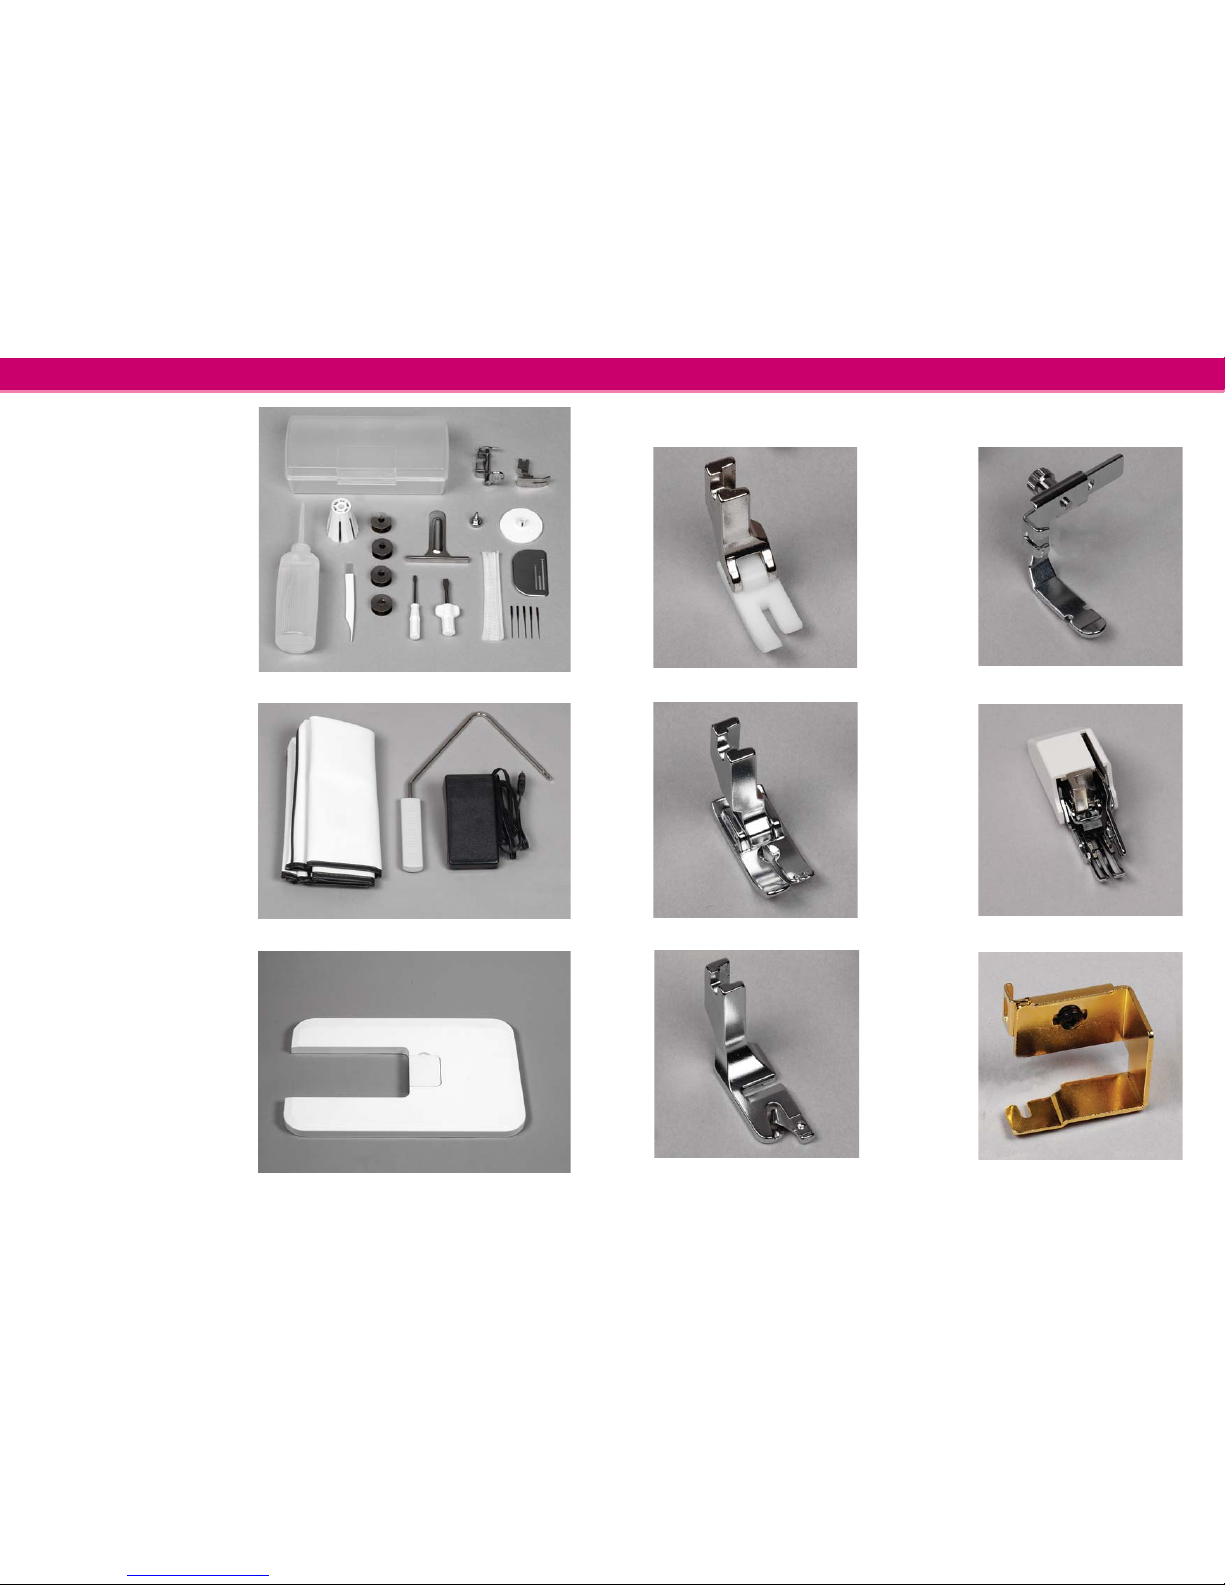
16. 17. 18.
1. 2. 3.
9.
4.
10.
11.
5.
12. 13.
14.
6.
8.
15.
7.
19.
Introduction
6
Introduction
7
Standard
accessories
1. Accessory box
2. Free-motion foot
3. Standard foot
4. Spool holder
5. Fabric guide
6. Screw for the fabric guide
7. Spool cap
8. Darning plate
9. Oil
10. Lint brush
11. Bobbins
12. Small screwdriver
13. Large screwdriver
14. Net
15. Needles
16. Soft cover
17. Knee lift
18. Foot control
19. Extension table
Extra accessories
Leather foot
Article no: 416 04 81-01
Silk foot
Article no: 416 04 83-01
Zipper foot
Article no: 416 04 82-01
Walking foot
Article no: 416 04 84-01
Rolled hem foot
Article no:416 04 85-01
Velvetfoot
Article no: 416 04 86-01
Page 7
Introduction
8
Operating your
GrandQuilter
Needle chart
Fabrics Thread Needle
(HL x 5) size
Light weight
Crepe de
chine, Voile,
Lawn, Organdy,
Georgette, Tricot
Fine silk, fi ne
cotton, fi ne
synthetic or
covered polyester
9 or 11
Medium weight
Linens, Cotton,
Pique, Serge,
Double Knits,
Percale
50 silk, 50 to 80
cotton, 50 to 60
Synthetic, cotton
covered polyester
11 or 14
Heavy weight
Denim, Tweed,
Gabardine,
Coating, Drapery
and Upholstery
Fabric
50 silk, 40 to 50
Cotton, 40 to 50
Synthetic, Cotton
Covered Polyester
14, 16 or 18
Page 8
A
B
C
Operating your GrandQuilter
10
Operating your GrandQuilter
11
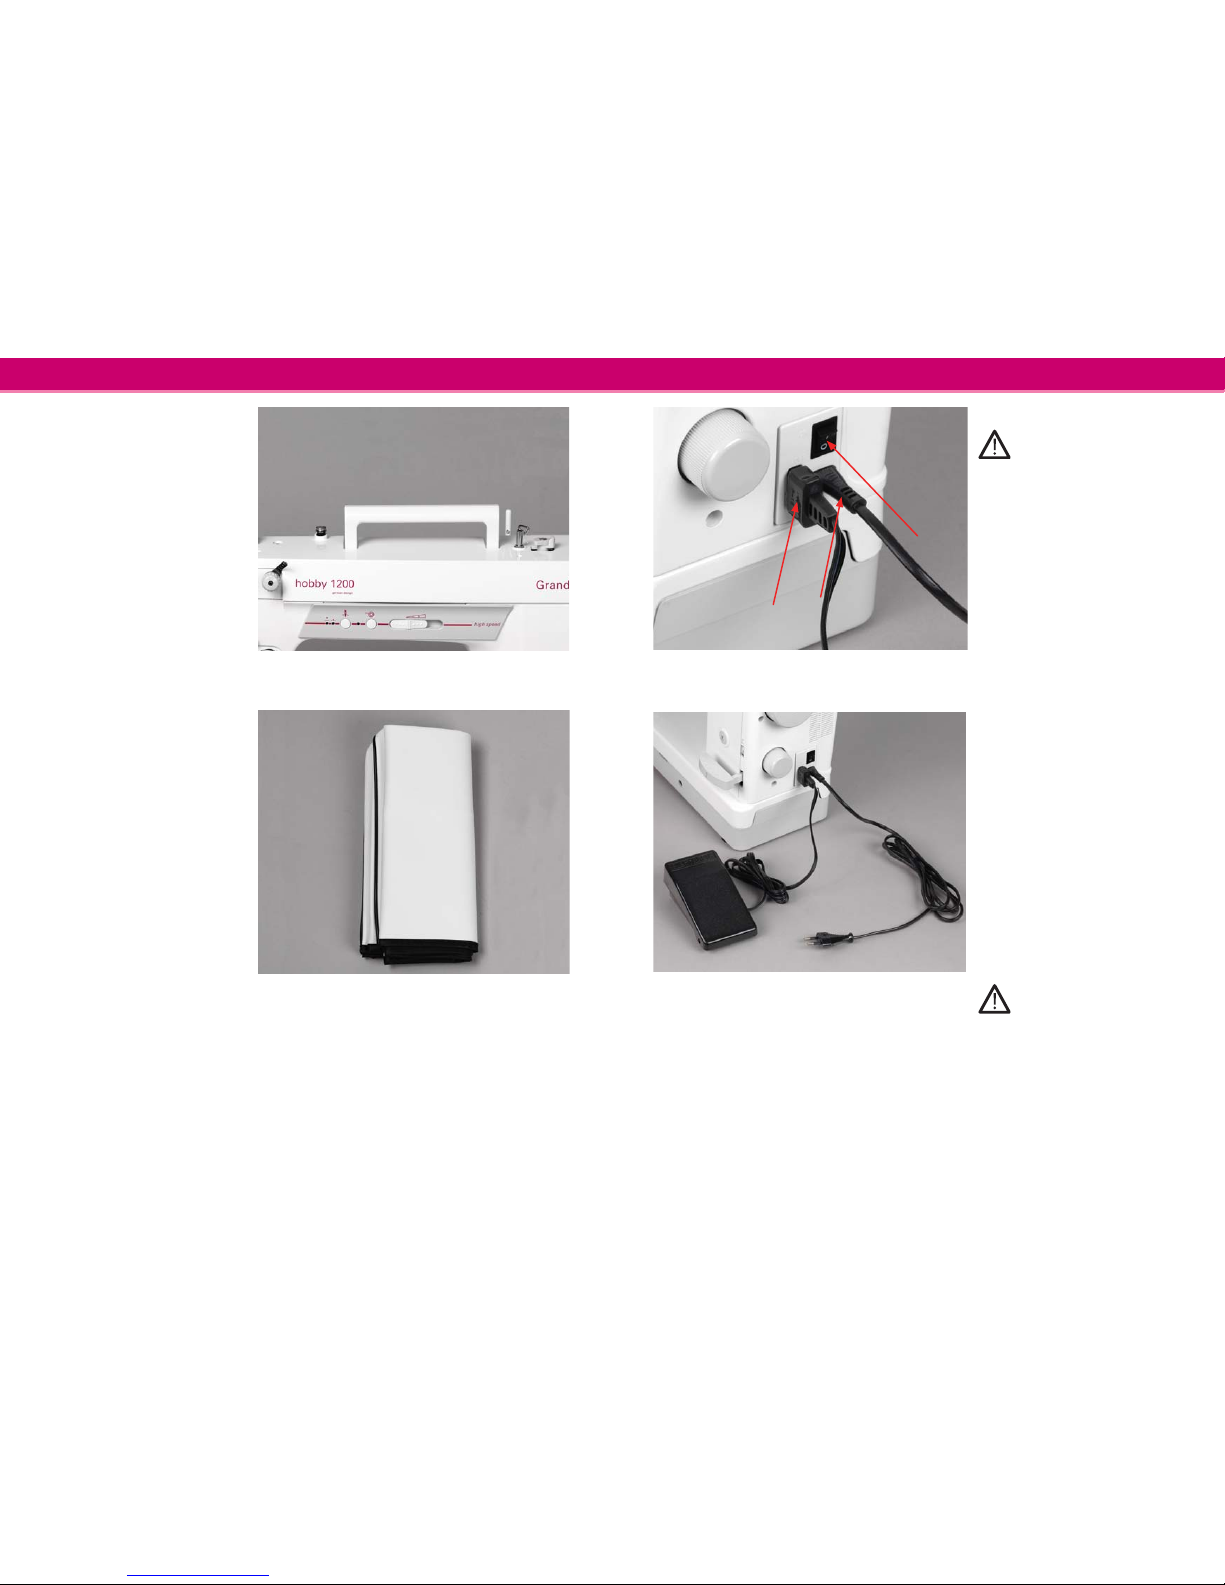
Carrying handle
Lift up the carrying handle
of the sewing machine from
behind.
Soft cover
The soft cover, which is part of
the basic equipment, protects
your sewing machine from dust
and damage while transporting.
Electrical connection
Before connecting to the power
supply, make sure the voltage shown
on the machine conforms to your
electrical power. Always turn the
power off and unplug the sewing
machine from the electrical outlet
when the machine is not in use.
Connect the lead cord between
the socket of the sewing
machine (A) and the wall
outlet.
For the USA and Canada:
This sewing machine has a
polarized plug (one blade wider
than the other). To reduce the
risk of electric shock, this plug
is intended to fi t in a polarized
outlet only one way. If the plug
does not fi t fully in the outlet,
reverse the plug. If it still does
not fi t, contact a qualifi ed
electrician to install the proper
outlet.
DO NOT modify the plug in
any way!
Connecting the foot
control
Switch off the main
switch.
Connect the plug of the foot
control (B) to the connection
socket of the sewing machine.
Turn on the power switch (C).
Page 9
Operating your GrandQuilter
12
Operating your GrandQuilter
13
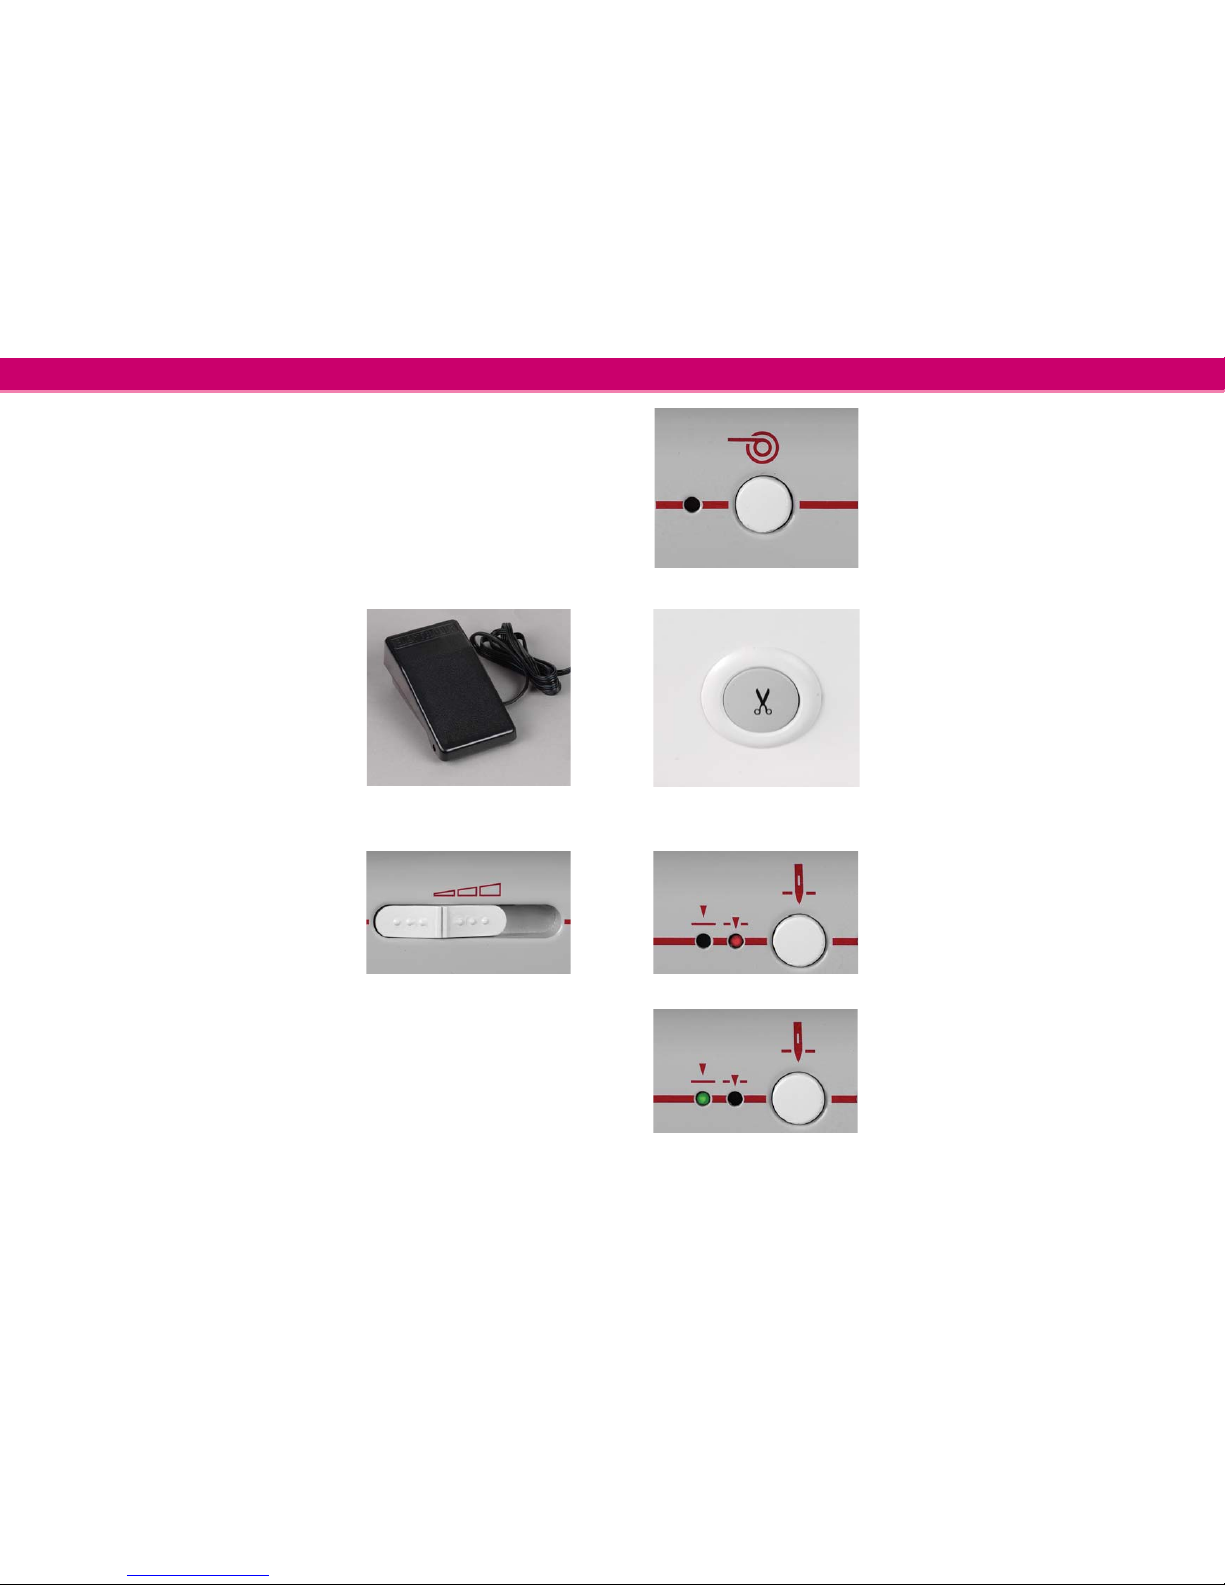
Controlling sewing speed
You can control the sewing speed on your
machine in two ways; with your foot control
and with the speed control slide on your sewing
machine.
Foot control
On your GrandQuilter you can control the
sewing speed by using your foot control. The
harder you press the foot control, the faster the
machine runs.
If you press the foot control to the bottom, the
machine runs at the maximum speed set by the
speed control slide.
Note: Make sure you have the right type of foot control
for your machine. Foot Control model YC-485 is used
for the GrandQuilter.
Speed control slide
With the speed control slide on your
GrandQuilter, you can change the sewing speed
to suit your needs. For instance when making
freehand quilt designs/stippling, lower the the
sewing speed to avoid jump stitches.
To raise the sewing speed, slide the bar to the
right.
To lower the sewing speed, slide the bar to the
left.
Bobbin winding button
Press the bobbin winding button on your
GrandQuilter to wind the bobbin. The light
beside the button will light up while you are
winding the bobbin. When the bobbin is full,
the GrandQuilter will automatically stop and the
bobbin light will be turned off.
Note: With your GrandQuilter you can wind the bobbin
while sewing.
Thread Cutter
The thread cutter button on your GrandQuilter
helps you trim the top and bobbin thread while
sewing.
After trimming the threads you can continue
sewing without having to pull the bobbin thread
to the top.
Note: If you are using a thread thicker than 30, use
the the thread cutter on the face cover. You cannot use
the footcontrol or the Needle Up/Down while you are
trimming the threads.
Needle Up/Down
The Needle Up/Down function on your
GrandQuilter is useful when you are turning a
corner on your quilt. Press the Needle Up/Down
button to bring the needle bar up or down.
When the needle is down the red indicator next
to the button will light up. When the needle is
up the green indicator will light up.
Your GrandQuilter will stop with the needle
up or down depending on which light is
switched on. After using the Thread Cutter your
GrandQuilter will always stop with the needle in
the up position.
Page 10
A
A
Operating your GrandQuilter
14
Operating your GrandQuilter
15
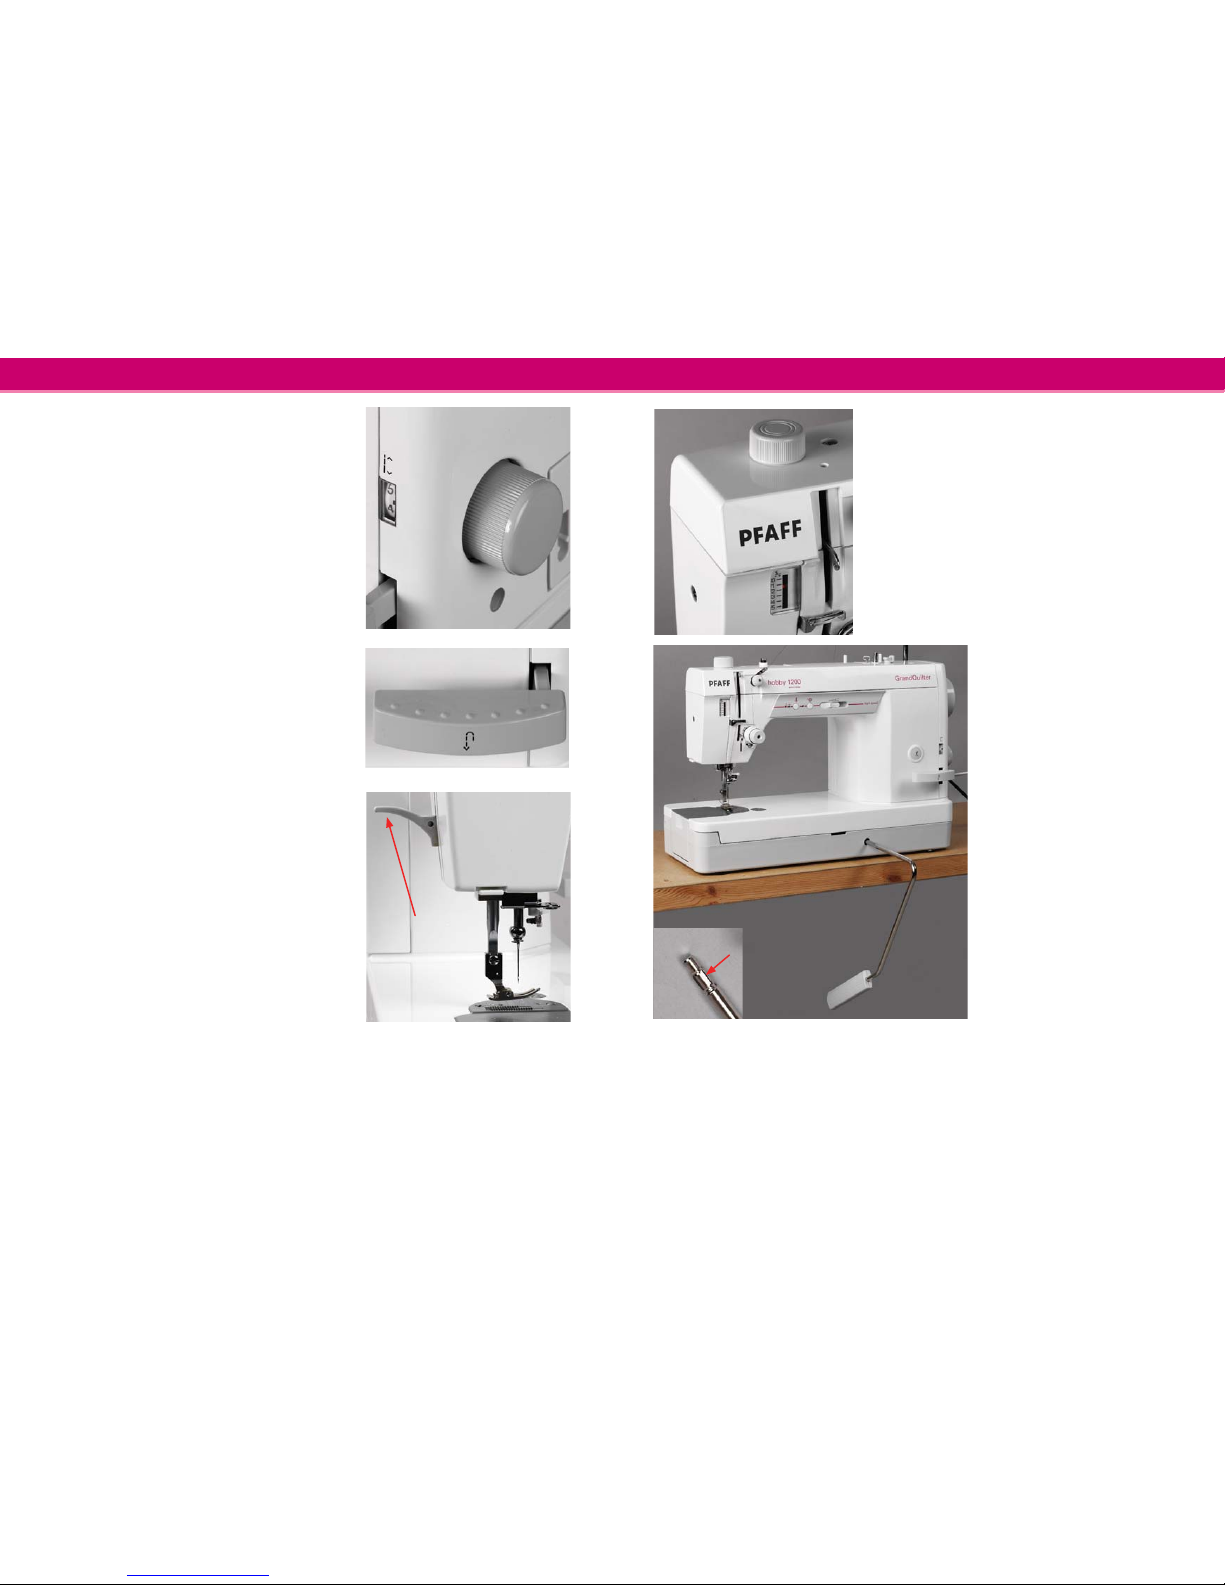
Stitch length dial
The stitch length can be adjusted on your
GrandQuilter by turning the stitch length dial
located on the side of your machine. The stitch
length can be adjusted from 0 to 6 mm. On
the front of the machine there is an indicator
showing the stitch length.
Reverse lever
Sewing in reverse will help you to secure the
beginning and end of seams. When you press the
reverse lever downwards, the machine will sew in
reverse. The machine will only sew in reverse as
long as the reverse lever is pressed down.
Presser foot lifter
You can raise or lower the presser foot by raising
or lowering the presser foot lifter (A). You can
also raise the foot higher than the normal up
position to help you place thick material under
the foot.
Knee lift
Your GrandQuilter is provided
with a kneelifter for regulating
the presser foot height. It is
especially useful when you need
both of your hands to guide the
fabric.
1. Insert the kneelift by
matching the ribs on the
knee lift (A) with the
notches in the kneelifter
socket.
2. Push the kneelift with your
knee sideways to raise and
lower the pressserfoot.
To remove the kneelift, pull it
gently out of the hole.
Note: Avoid touching the knee lift
while sewing, as the fabric will not
be fed smoothly.
Pressure dial
Turn the pressure dial to adjust the pressure
of the presser foot when sewing on different
thicknesses of fabric.
For heavy fabrics or when sewing on several
layers of fabric, you should raise the pressure.
When sewing on thin fabric you should lower the
pressure. For regular sewing set the pressure to
3.
Note: Do not reduce the pressure lower than ”0”.
Page 11
A
B
B
C
A
Operating your GrandQuilter
16
Operating your GrandQuilter
17
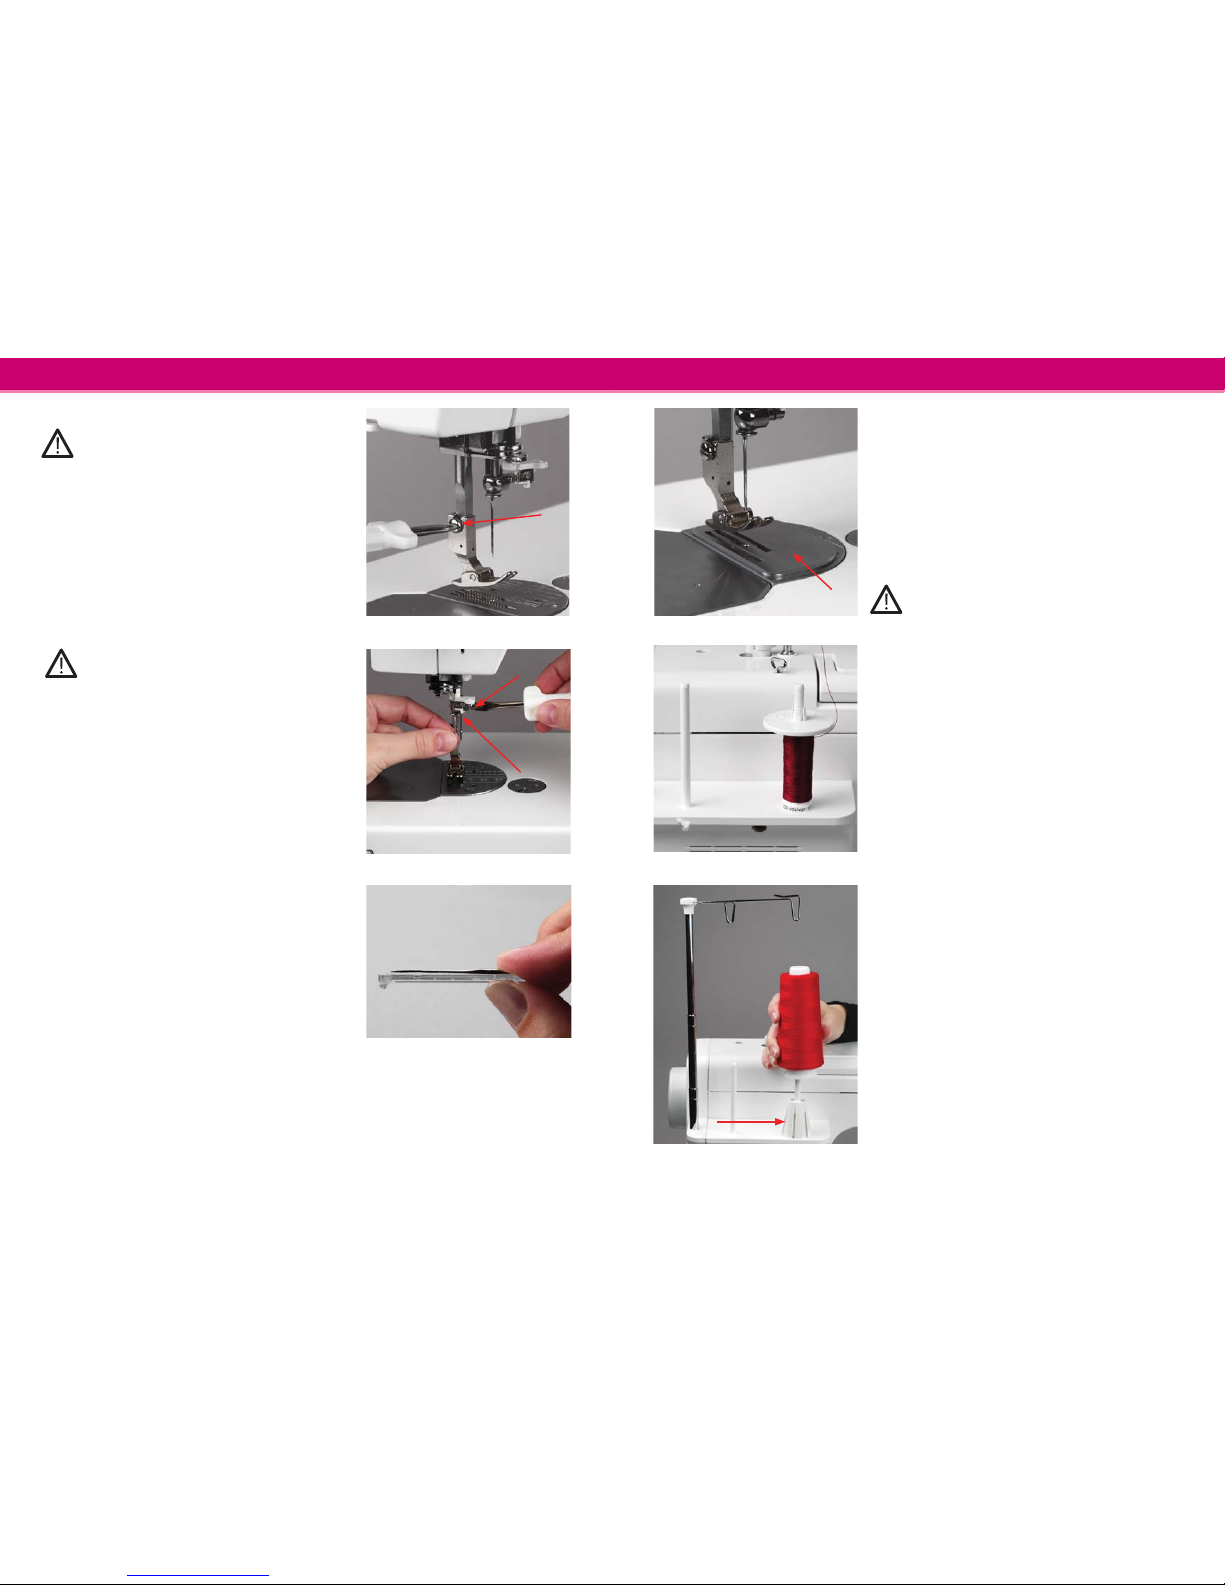
Changing the presser foot
Switch off the main switch and unplug the
machine.
1. Raise the presser foot lifter. Loosen the
setscrew (A) with the large screwdriver.
2. Choose the proper foot and insert it from the
bottom.
3. Tighten the setscrew with a large screwdriver
to secure the foot.
Changing the needle
Switch off the main switch and unplug the
machine.
1. Lower the presser foot.
2. Using the large screwdriver, turn the needle
clamp screw counter-clockwise.
3. Loosen the screw and remove the needle
from the needle clamp (B).
4. Insert a new needle into the needle clamp
(B). Make sure that the fl at side is to the
right. Push the needle as far as it will go and
then thighten the clamp screw (C) fi rmly.
Note: Use an HL x 5 needle.
To check for a good needle
Put the fl at side of the needle onto something
fl at (needle plate, glass etc.).
The gap between the needle and the fl at surface
should be consistent.
Never use a blunt needle. A damaged needle can
cause permanent snaps or runs in knits, fi ne silks
and silklike fabrics.
Note: Check the needle frequently for barbed or blunted
points.
Attaching the darning plate
If you want to feed the fabric manually, for
instance when stippling, you should use the
darning plate (A) that has been provided with
your GrandQuilter.
To attach the darning plate you should start by
raising the presser foot lifter. Raise the needle
to its highest position by pressing the Needle
Up/Down button twice.
Switch off the main switch and unplug the
machine.
Attach the darning plate by matching the pins
on the darning plate with the holes in the needle
plate.
Placing a thread spool on the spool
pin
Place a spool of thread on the spool pin and put
a large spool cap fi rmly against the spool. The
thread should come off the spool as shown in the
picture.
Placing a thread cone on the spool
pin
If you are using a large thread cone, use a spool
holder to hold the cone in place. Put the spool
holder (B) on the spool pin, then place the
thread cone on the spool holder.
Note: If the spool is wobbly when sewing, cover the
thread cone with the net that comes with the machine.
Page 12
A
D
E
F
B
C
A
B
Operating your GrandQuilter
18
Operating your GrandQuilter
19
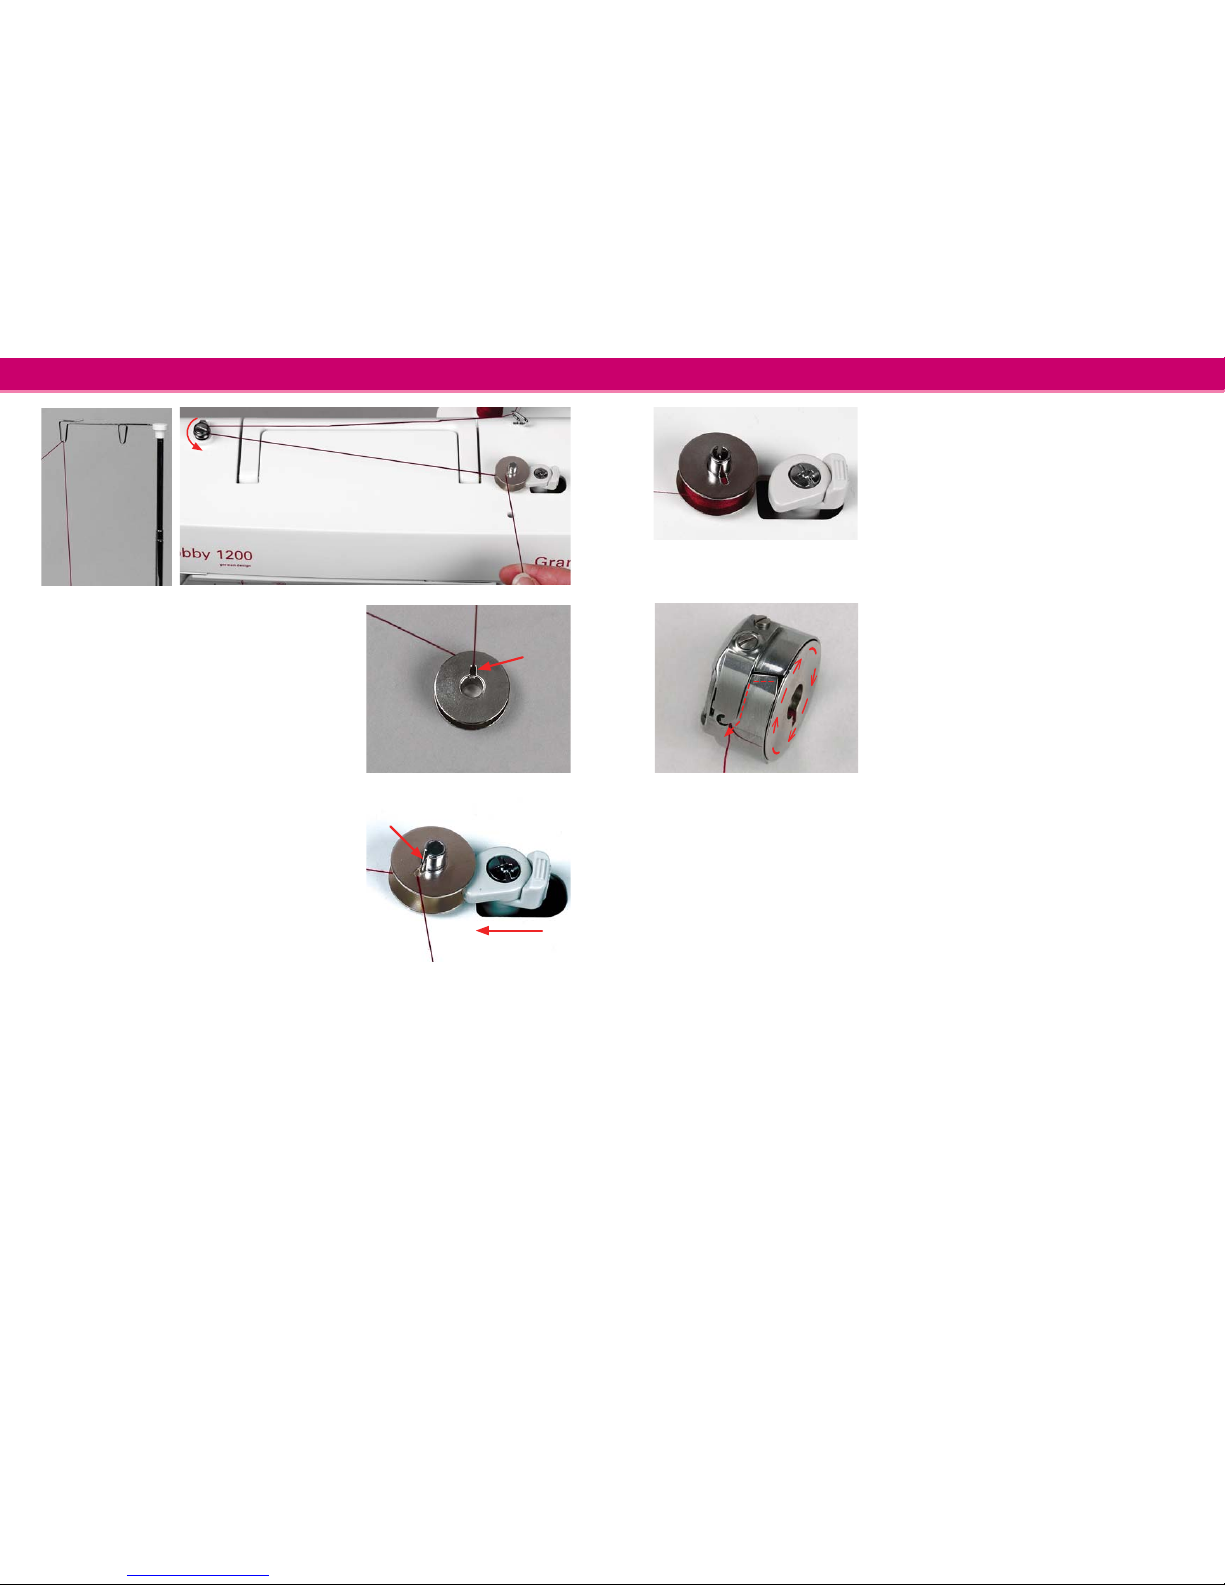
Bobbin winding
1. Pull the thread stand up as far as it will go
and turn it around until it clicks into position.
2. Pass the thread through the guide (A) on
the thread stand from behind.
3. Pass the thread through the second thread
guide (B).
4. Pass the thread under the bobbin winding
tension disk (C).
5. Thread through the hole (D) in the bobbin
from the inside to the outside. Place the
bobbin on the bobbin winder spindle by
matching the hole on the bobbin with the
spring on the bobbin winder spindle (E).
6. Push the bobbin winder stop to the left
(F).
7. Hold the end of the thread and press the
bobbin winding button. Press the bobbin
winding button again to stop the bobbin
when it has made several turns, and cut the
thread close to the hole in the bobbin.
8. Press the bobbin winding button again. The
machine will stop automatically when the
bobbin is full and the bobbin winder stop will
return to the original position.
9. Cut the thread with scissors. Remove the
bobbin from the bobbin winder spindle.
Note: This machine has an exclusive motor for bobbin
winding, which allows you to wind a bobbin while
sewing.
Inserting a bobbin
1. Place a bobbin in the bobbin case making
sure the thread winds clockwise.
2. Draw the thread through the slit (A) of the
bobbin case.
3. Continue to draw the thread under the
tension spring and through the opening (B).
4. Pull about 4” (10cm) of thread.
Page 13
A
B
A
B
C
Operating your GrandQuilter
20
Operating your GrandQuilter
21
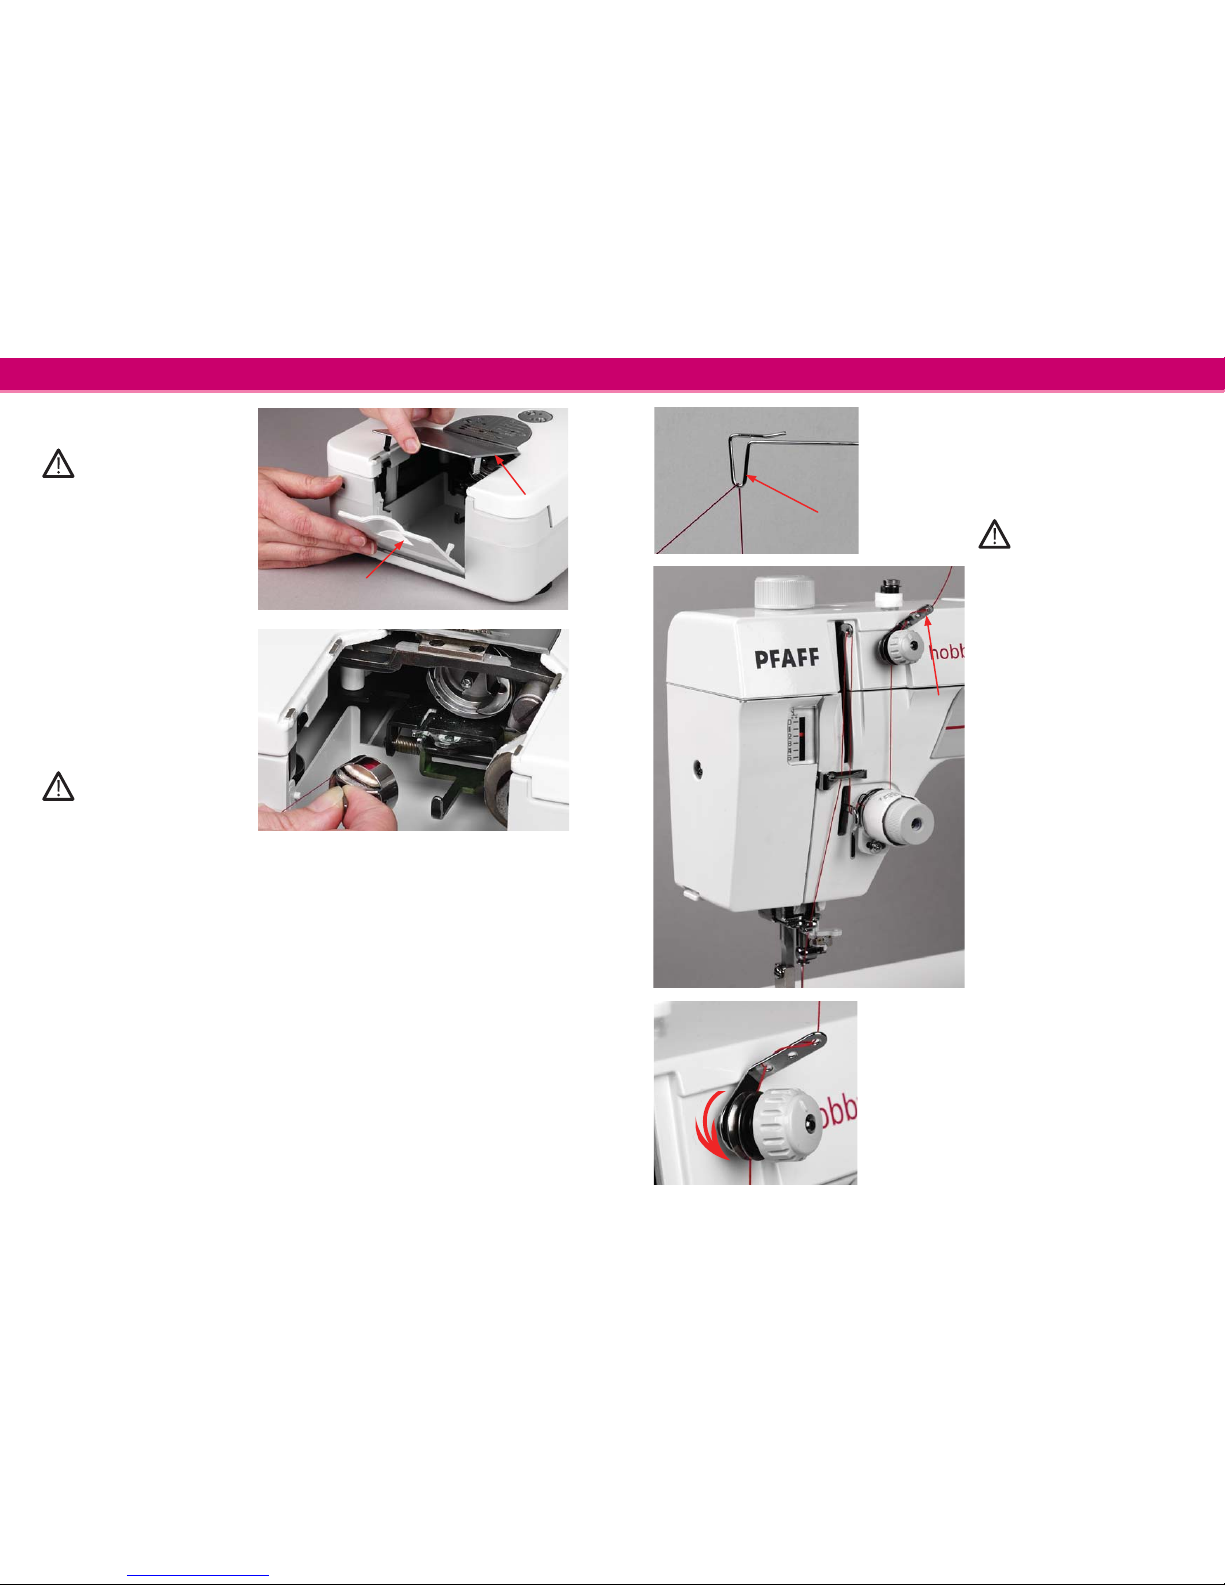
Inserting a bobbin into
the hook
Switch off the main switch
and unplug the machine.
1. Lift the hook cover plate (A)
up and remove it. Open the
bobbin case cover (B).
2. Holding the latch on the
bobbin case (see picture),
position the bobbin case
into the hook aligning the
slot with the rib. The bobbin
case should lock into place
when the latch is released.
3. Close the bobbin case cover
and the hook cover plate.
To remove bobbin case
and bobbin
Switch off the main
switch and unplug the
machine.
1. Raise the needle and presser
foot. Lift the hook cover
plate (A) up and remove it.
Open the bobbin case cover
(B).
2. Take the bobbin case out
of the hook by pulling the
latch and taking the bobbin
case straight out of the
hook.
3. To remove the bobbin,
release the latch, and the
bobbin will be released from
the bobbin case.
Threading the machine
1. Raise the presser foot lifter.
Press the Needle Up/
Down button twice to raise
the needle to its highest
position.
Switch off the main switch
and unplug the machine.
2. Place a thread spool on the
spool pin.
3. Pass the thread through the
guide on the thread guide
bar (A) from the behind.
4. Pass the thread through the
thread guide (B), then draw
the thread between the pretenison disks (C).
Note: The standard pre-tension dial
setting is for the screw head to sinks
about 4 mm (1/8˝ to 3/16˝).
If you fi nd that the thread is too
loose while sewing, you can pass the
thread through all three holes in the
guide plate.
Page 14
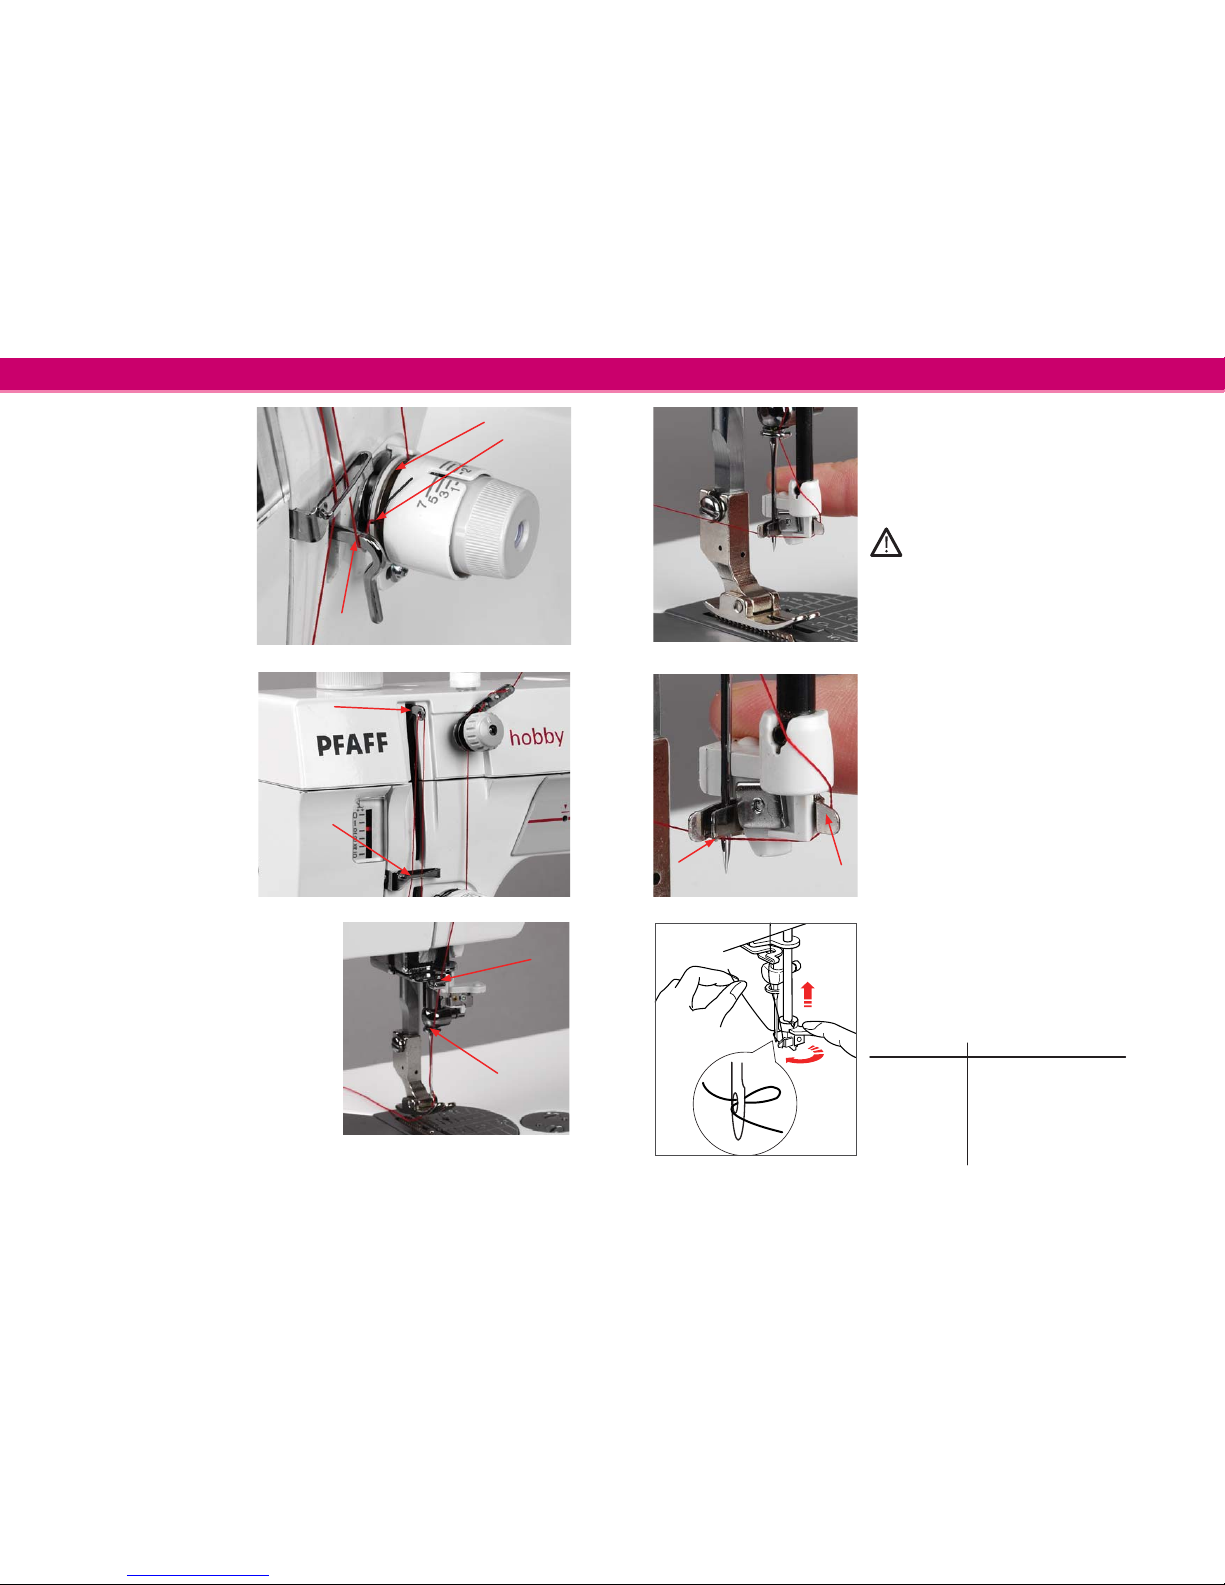
5. Holding the thread with
both hands, draw the thread
down and around the
tension dial from right to
left.
6. Pull the thread up to insert
it between the tension disks
(F) and pass it over the tail
of the check spring. Pull the
thread down over the loop
of the check spring (G).
7. Draw the thread under
the thread guide (H) and
through the second thread
guide (I). Pass the thread
through the eye of the takeup lever (J).
8. Pass the thread through the
thread guide (I) again.
9. Slip the thread into the
thread guide (K).
10. Draw the thread down to
the needle bar thread guide
(L), then pass the thread
through the needle eye.
I
J
G
F
H
K
L
A
B
Operating your GrandQuilter
22
Operating your GrandQuilter
23
12, 20, 30, 40, 50, 60
12, 20, 30
12, 16, 20, 30
12, 20, 30
Needle size Thread size
Needle threader
To make threading the needle easier and quicker
you have been provided with a needle threader.
1. Lower the presser foot. Press the needle Up/
Down button twice to raise the needle to its
highest position.
Switch off the main switch and unplug the
machine.
2. Move the needle threader completely
downwards and turn it towards the needle so
that the small hook goes through the needle
eye from the right.
3. Pull the thread from behind around the
guide (A) and under the hook (B).
4. Hold the end of the thread with your hand
while pulling up the thread lightly.
5. Turn the knob (see picture). This will draw
a thread loop through the needle. Release
the threader knob slowly and then pull the
thread loop to the right.
Note: When using the threads below the needle threader
may not work.
9/70
11/80
14/100
16/100
Page 15
Operating your GrandQuilter
24
Operating your GrandQuilter
25
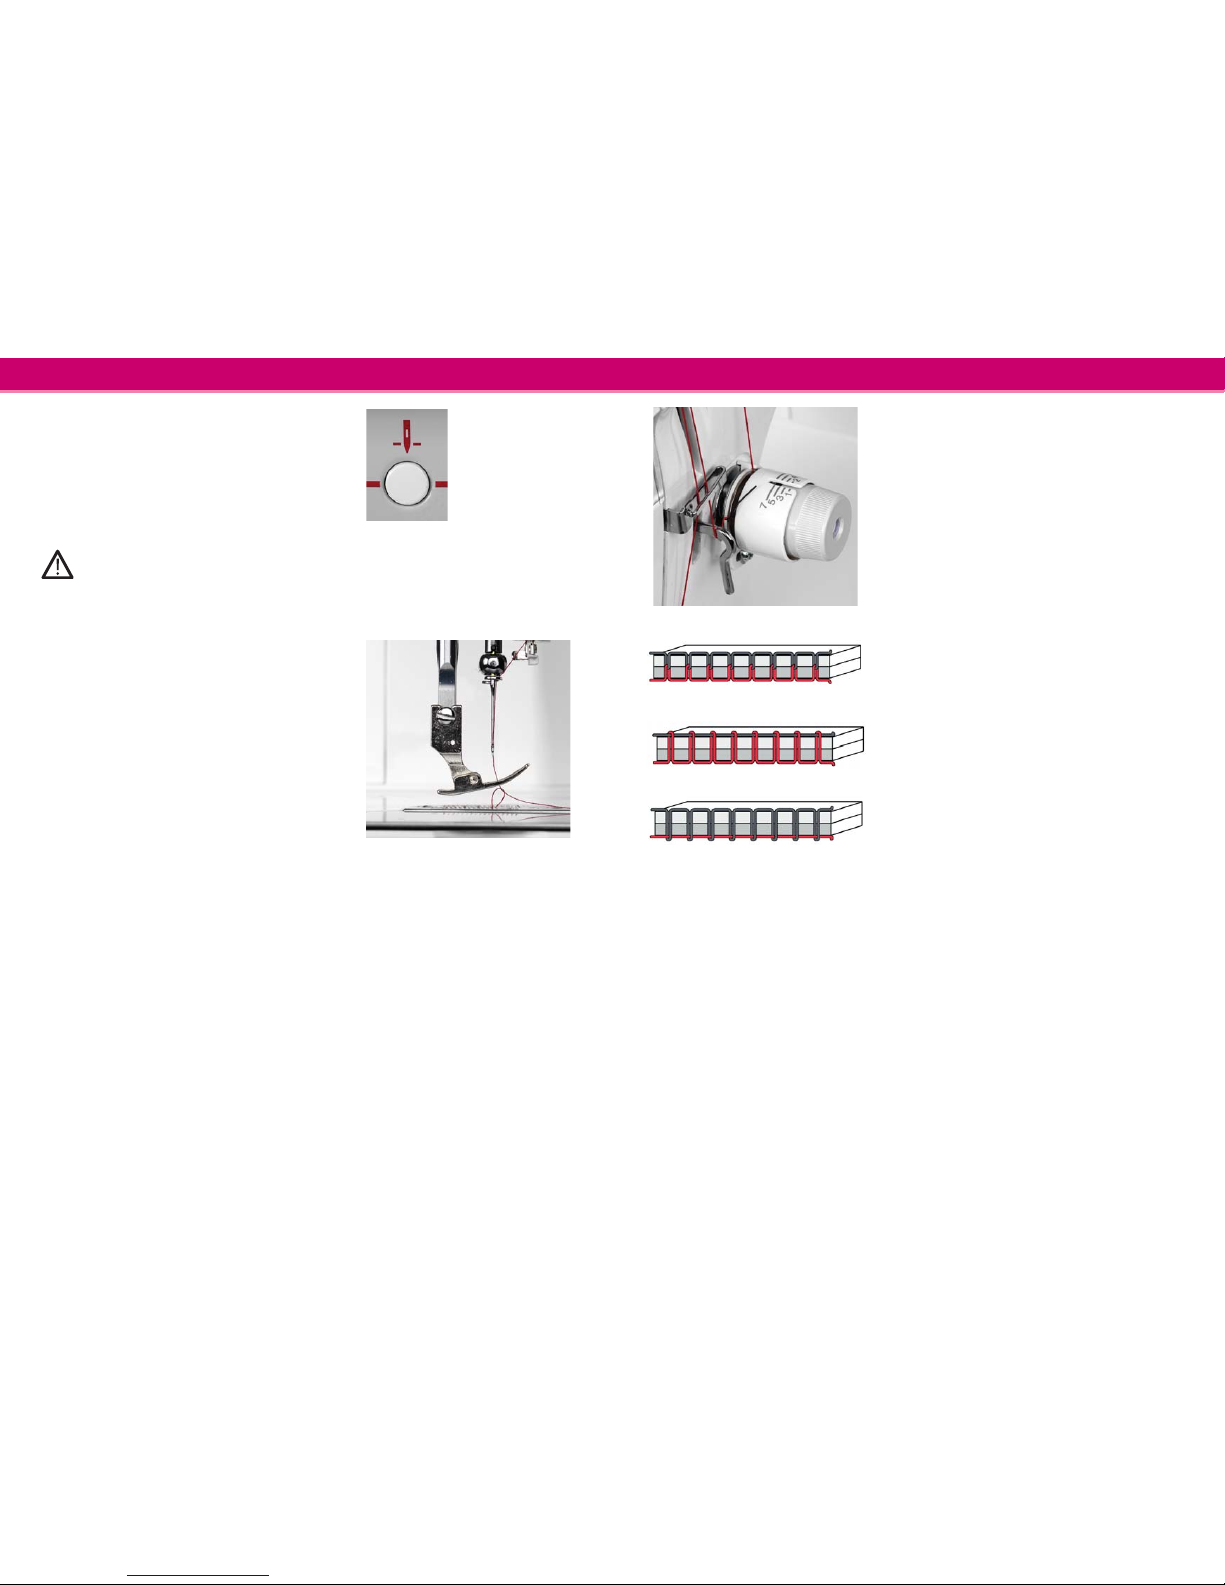
Bringing up the bobbin thread
1. Hold the thread with your left hand.
2. Turn the switch on. Press the Needle Up/
Down button twice to pick up the bobbin
thread.
Switch off the main switch and unplug the
machine.
3. Bring the bobbin thread up by pulling the
needle thread.
4. Pull 4” (10cm) of both threads back and
under the presser foot.
Balancing the Thread Tension
The thread tension should be adjusted
depending on the sewing materials, layers of
fabric and sewing method. To ensure perfect
sewing results, the thread tension must be
perfectly tuned. Set the required thread tension
with the thread tension dial.
Balanced tension:
The ideal straight stitch has threads locked
between two layers of fabric, as shown in the
picture.
Thread tension is too tight:
If the needle thread tension is too high the
threads are interlaced above the top fabric.
Loosen the needle thread tension by turning the
dial to the left.
Thread tension is too loose
If the needle thread tension is too low the
threads are interlaced below the lower fabric.
Tighten the needle thread tension by turning
the dial to the right.
Page 16
Operating your GrandQuilter
26
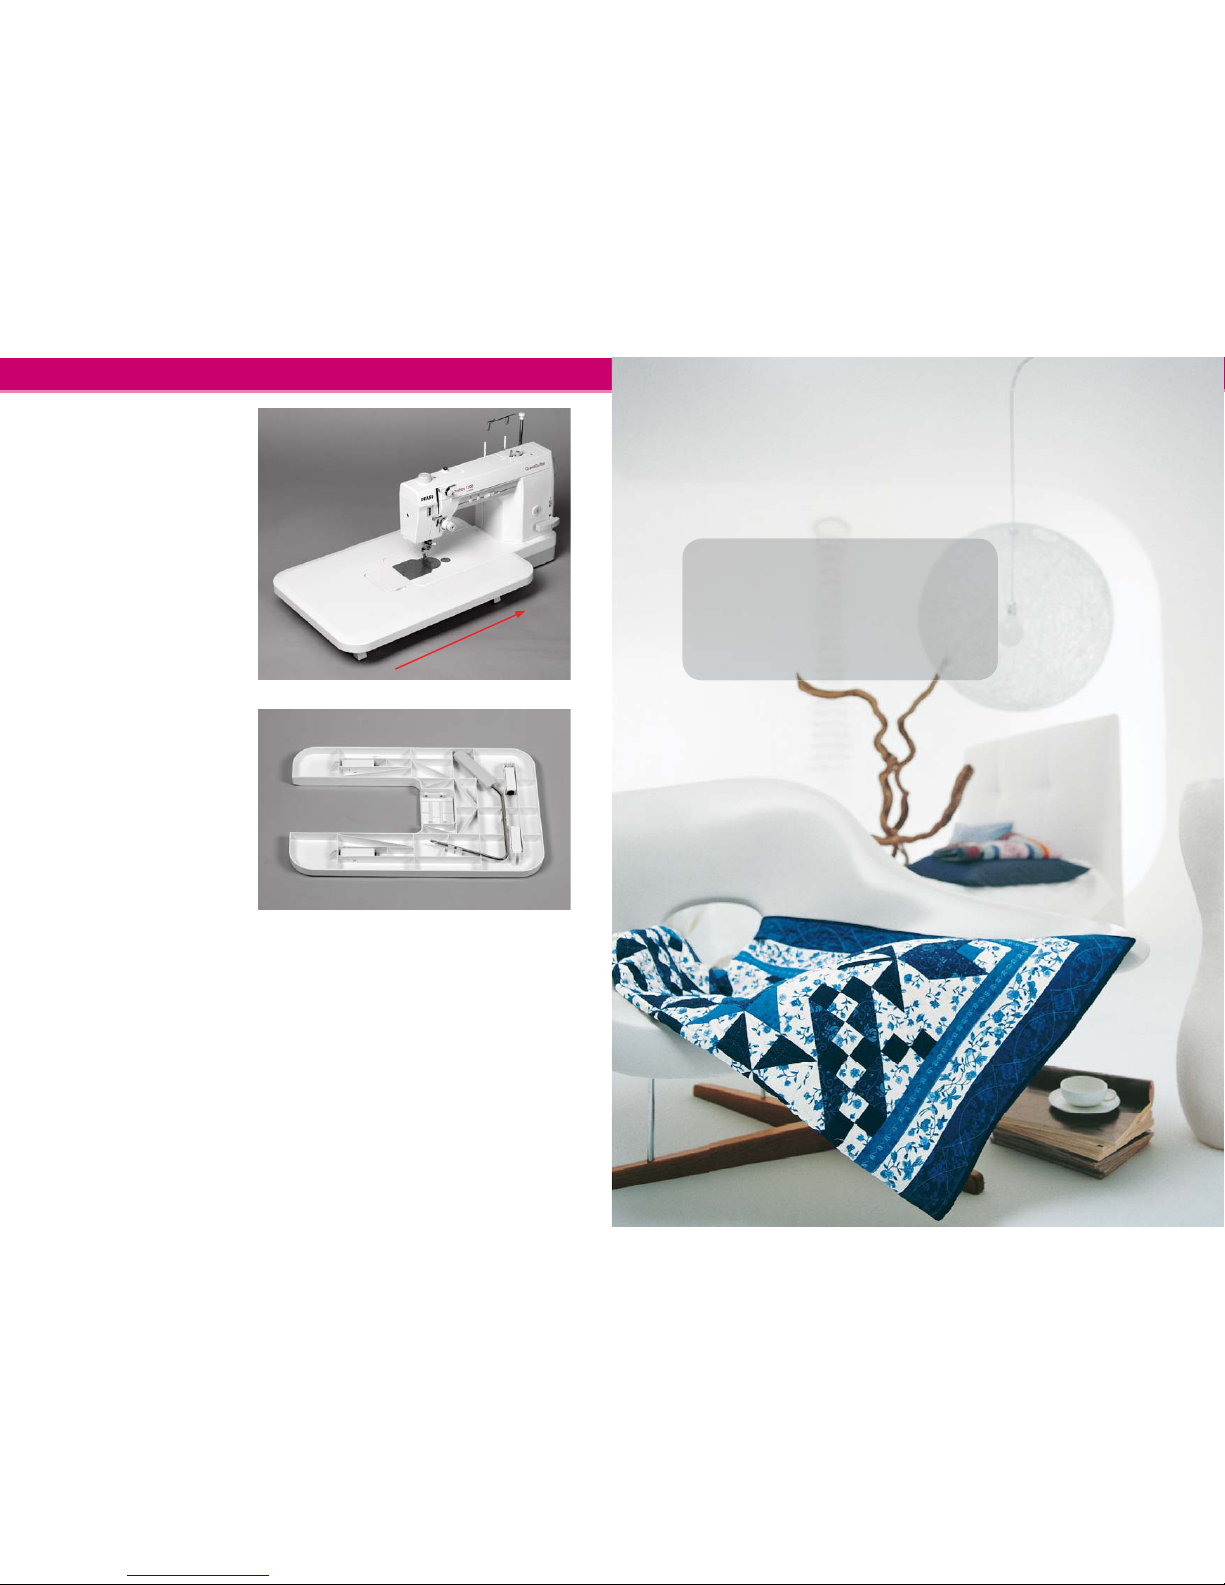
Attaching the extension
table
Your GrandQuilter has been
provided with an extension
table to make it easier for you
to work with large pieces of
fabric.
On the underside of the
extension table there are four
table legs. Pull them all up to
support the table.
Turn the table around and
slide the extension table in the
direction of the arrow in the
picture, onto the machine.
Note : There is small door on the
extension table which makes it
possible for you to change the bobbin
thread without having to remove the
table. You can also store the knee
lifter on the backside of the extension
table.
Getting started
Page 17
Getting Started
28
Getting Started
29
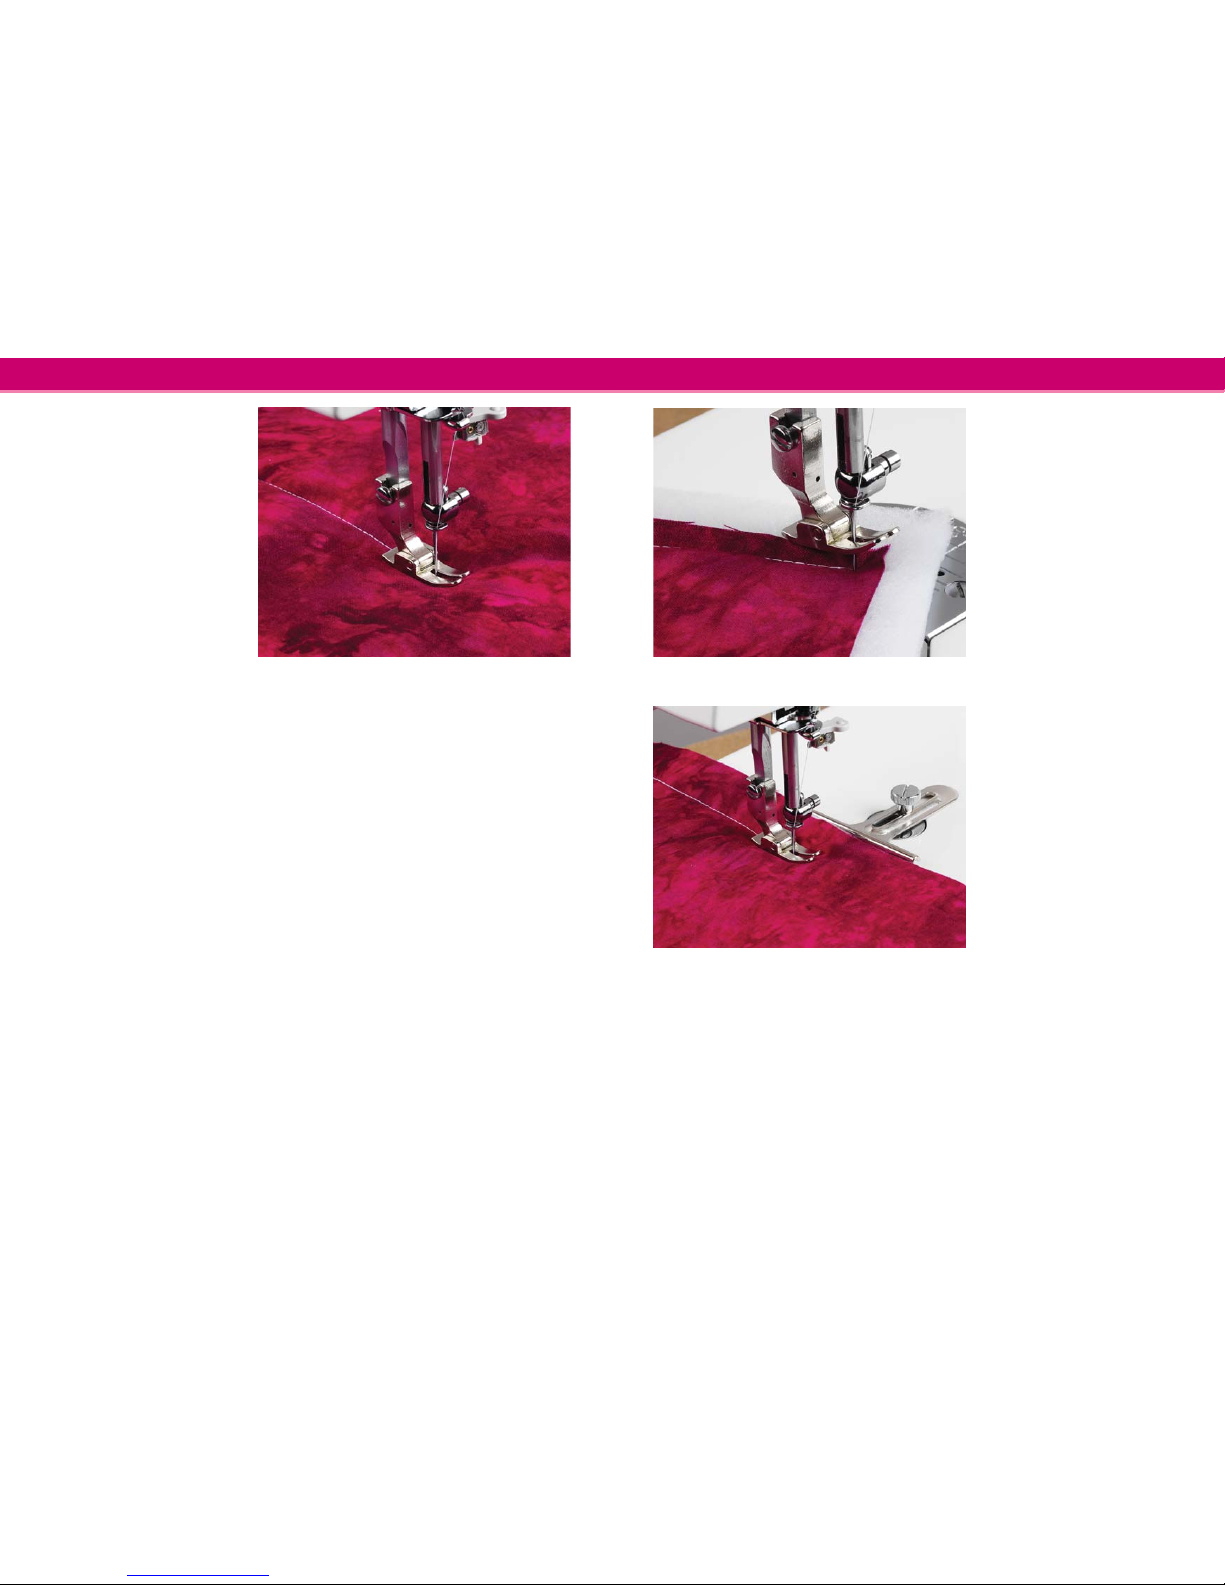
Getting started to sew
Before you start to sew, try test
stitching with the same thread
and with the same type of
fabric.
1. Raise the presser foot and
place the fabric under the
foot.
2. Lower the needle into the
fabric.
3. Lower the presser foot and
pull the threads towards the
back.
4. Set the speed control slide
to slow until you get used
to the speed. Press down on
the foot control.
5. Gently guide the fabric
along the seam guide letting
the fabric feed by itself.
6. Check the sewing result and
adjust the needle thread
tension if needed.
Note: To lock the beginning of the
seam, sew a few stitches forward,
then sew a few stitches in reverse,
then sew forward again. You can
also pull the bobbin thread to bring
the needle thread to the wrong
side of the fabric. Tie the threads
together. Trim the remaining
threads.
Turning a corner
1. Stop the machine a few
stitches before the end of
the seam.
2. Press the Needle Up/Down
button a few times until the
needle falls on the end of
the seam.
3. Raise the presser foot.
4. Pivot the fabric around the
needle to change the sewing
direction.
5. Lower the presser foot and
continue sewing in the new
direction.
Using the Fabric Guide
1. Attach the fabric guide to
the attachment hole with the
screw.
2. Adjust the position of the
fabric guide and tighten the
screw.
3. Place the fabric with its edge
against the fabric guide.
4. Lower the presser foot and
start to sew.
Page 18
A
Getting Started
30
Getting Started
31
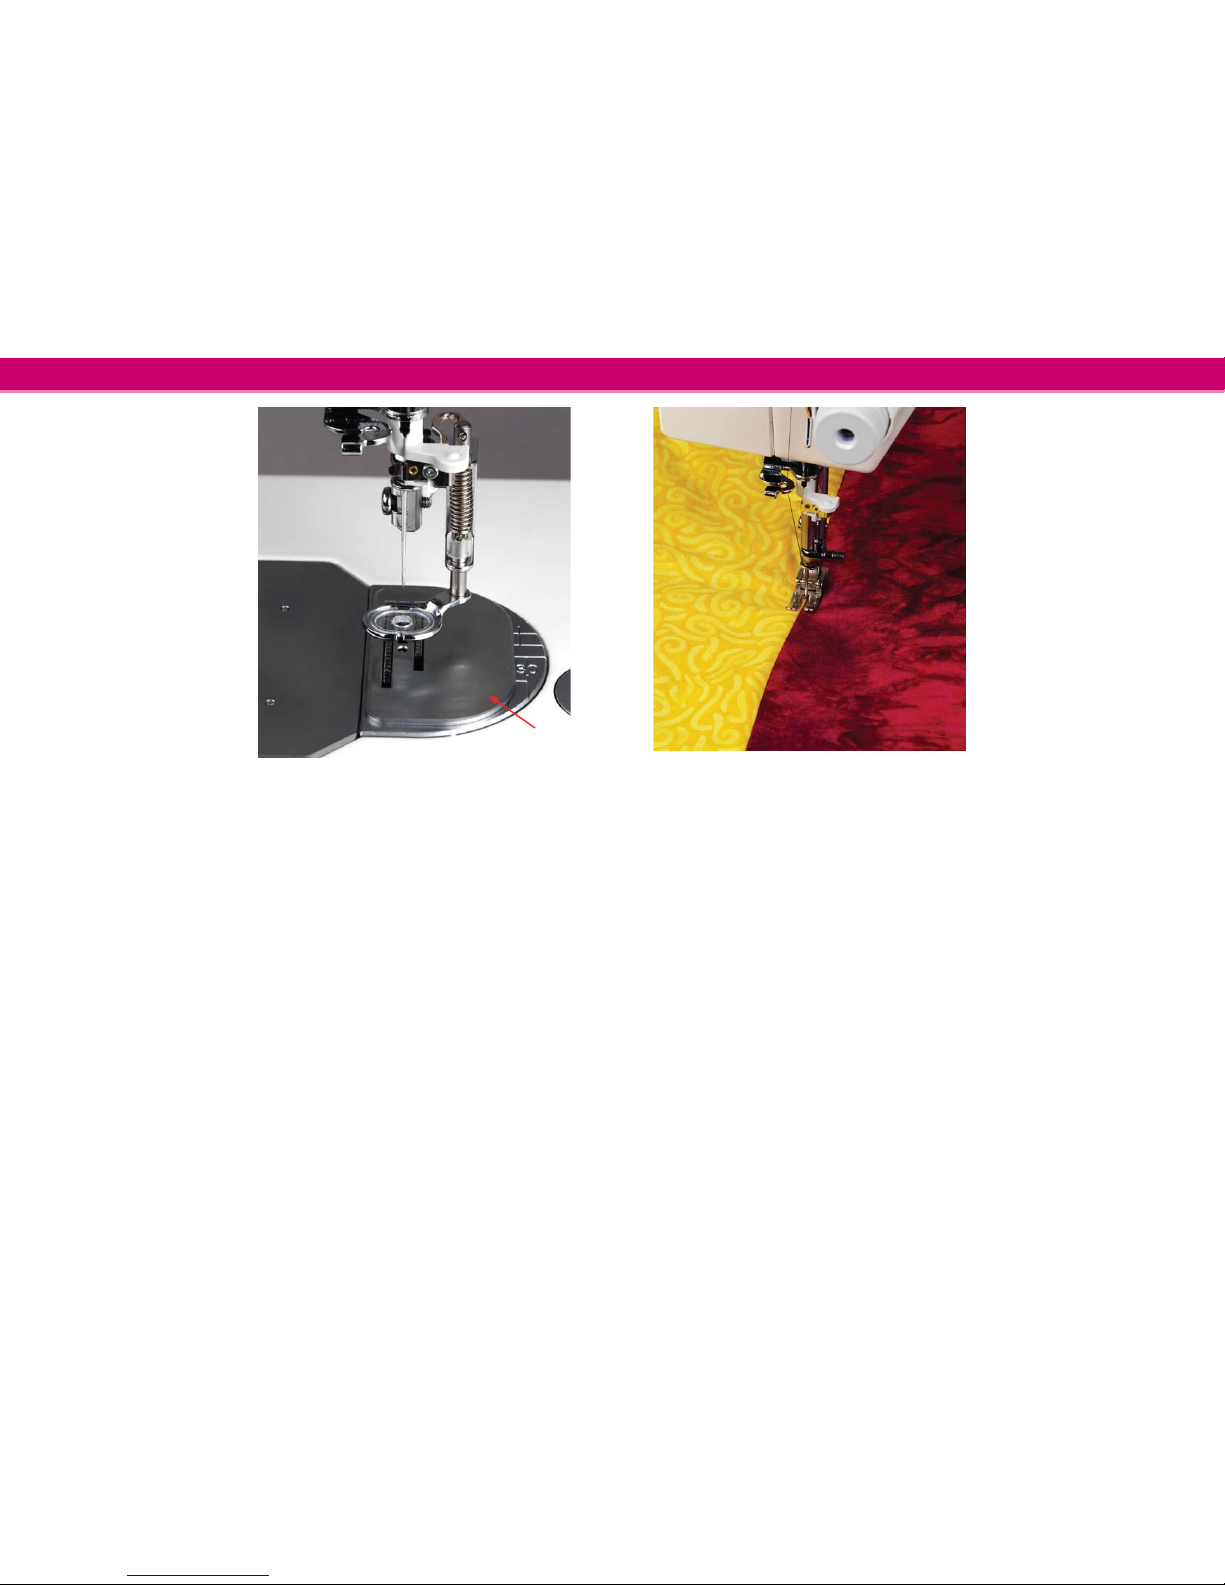
How to use the
Free-motion foot
The Free-motion foot can
be used when stippling or
freehand quilting your quilt.
1. Place the darning plate (A)
on top of the needle plate,
matching the two holes in
the needle plate with the
two pins on the darning
plate.
2. Attach the Free-motion foot
to the presser bar with the
lever over the needle clamp.
3. When using this foot, set the
speed to the lowest to avoid
jumpstitches.
4. Start to sew. Always test sew
on a piece scrap fabric.
• Prepare your quilt by pin basting through
all layers with safety pins – starting from the
center of your quilt and working outward.
Place a pin about every 6 – 8 inches (15 – 20
cm).
• To begin quilting, start sewing from the
middle of the quilt and continue out. Starting
from the center and sewing outward will help
keep layers in place. Plan which seams you
will actually stitch in. This stitching will not
only hold the quilt together it will also create
the pattern on the quilt back. You do not
need to follow every seam in the quilt, sew
every 3 – 4 inches to keep the quilt in place.
Of course you can sew more to create a more
decorative pattern for the back.
Note: Always test sew on scrap fabric before starting
to sew to make sure your stitching is proper before you
start quilting your piece.
Quilting
Quilting is a traditional
technique. A quilt consists
of three layers, two layers of
fabric with a layer of batting
sandwiched between.
Stitch-in-the-Ditch
One way to hold the quilt top,
batting and backing all together
is using the "Stitch-in-the-Ditch"
method of quilting. Stitching-inthe-ditch means stitching in the
seams in the quilt blocks.
Page 19
Getting Started
32
Free-motion Stippling
Free-motion Stippling not only
keeps the top, batting and
backing together, but it also
adds texture and interest to
your quilt.
• Attach the Darning plate by
placing it ontop of the cover
plate. Match the two pins
in the Darning plate with
the two holes in the needle
plate.
• Attach the extension table to
your sewing machine.
• Attach the Free-motion foot.
• Prepare your quilt by pin
basting through all layers
with safety pins – starting
from the center of your quilt
and working outward. Place
a pin about every 10 – 12
inches (25 – 30 cm).
• Practice stippling on scraps of fabric and
batting. When the feed dogs are covered,
you move the fabric to determine the stitch
length. Sewing with a constant speed will help
to keep the stitches even. You should also
lower the speed control slide in order to help
make the stitches even.
• Begin near the center of your quilt. Take one
stitch and pull the bobbin thread to the top
of the quilt. Take a few stitches right next to
one another to secure the threads. Now move
the quilt so that your stitching creates scrolls
and swirls. The stitching should not cross
itself – but travel in swivling stitches all over
the quilt.
Page 20
A
B
C
D
E
A
B
C
Maintenance and troubleshooting
34
Maintenance and troubleshooting
35
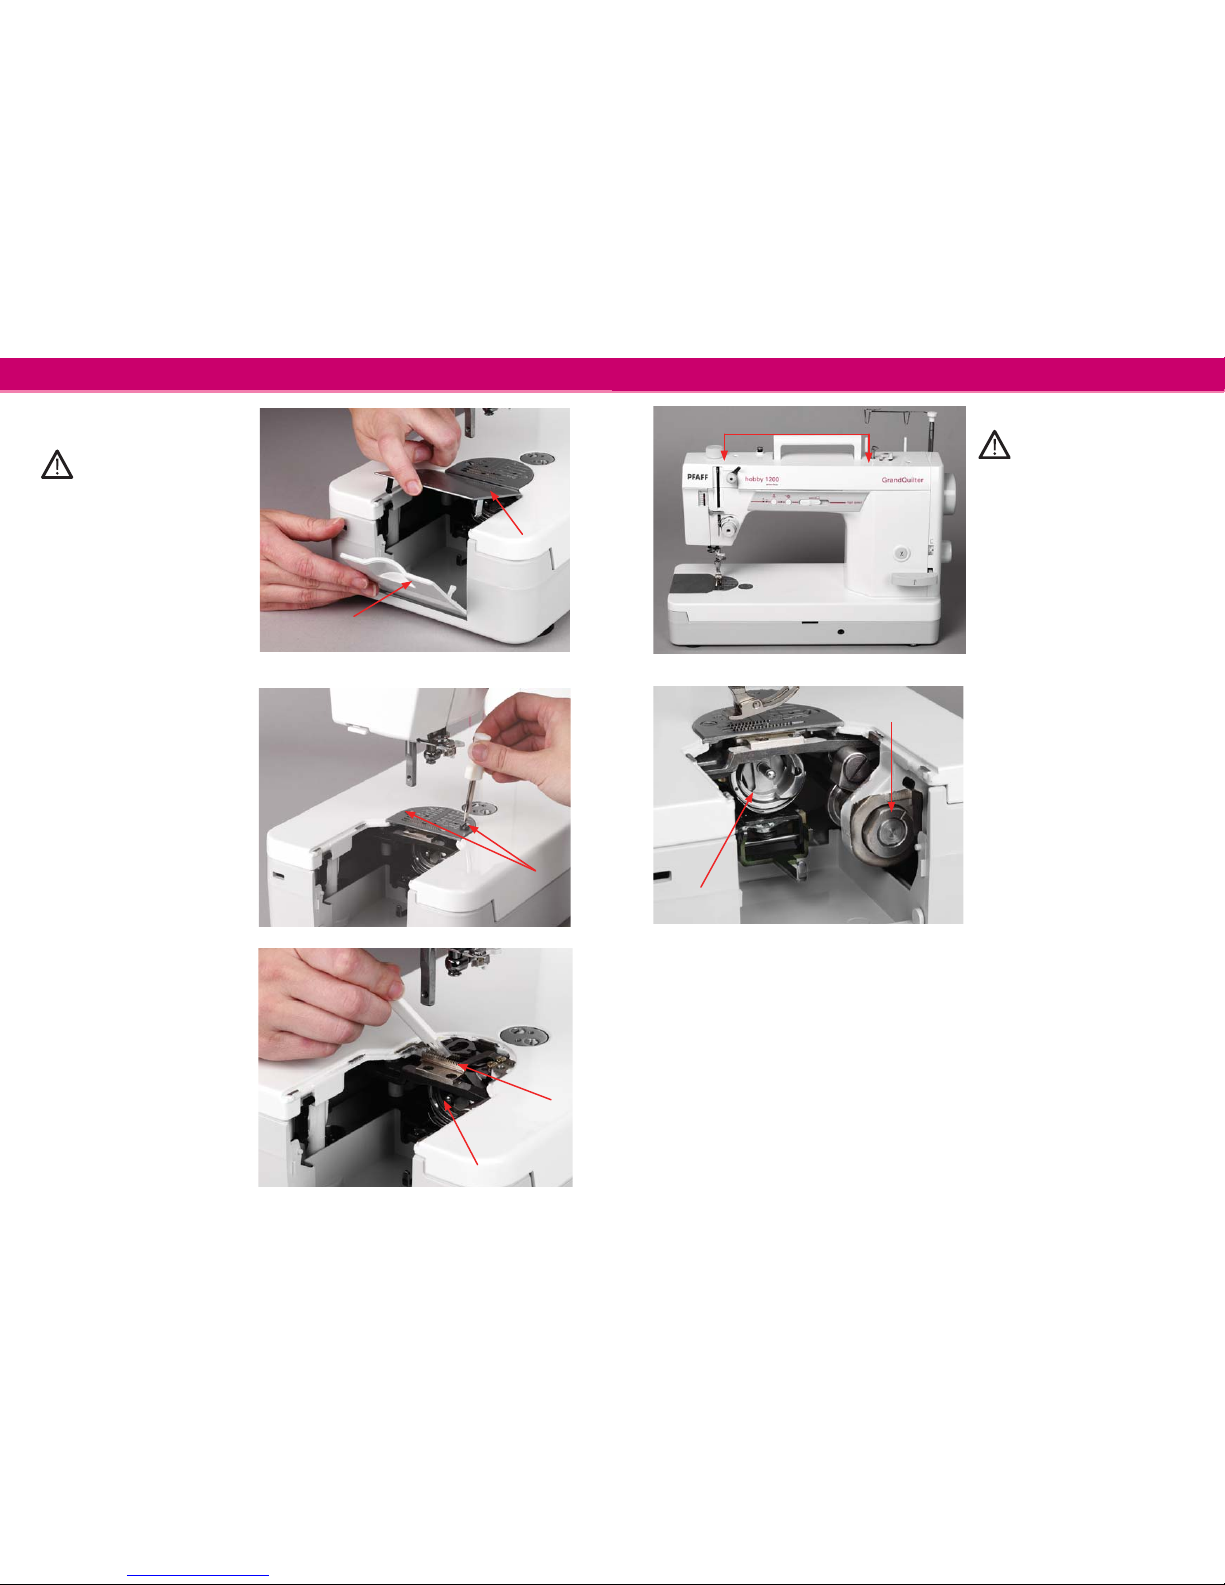
Cleaning the hook and
feed dogs
Switch off the main switch
and unplug the machine.
1. Remove the needle and
presser foot.
2. Remove the hook cover
plate (A) and open the
bobbin case cover (B).
3. Loosen the setscrews (C)
and remove the needle
plate.
4. Clean the hook (D) and
feed dogs (E) with the lint
brush.
5. After cleaning the machine,
attach the needle plate,
needle and presser foot.
Oiling the machine
Switch off the main
switch and unplug the
machine.
Add two or three drops of oil in
the places shown (A), (B) and
(C). You should only use the
MO 70 sewing machine oil for
your GrandQuilter.
If you use the machine
frequently you should oil the
machine once a day.
Use a soft, dry cloth to remove
excess oil.
When you oil the hook race
(B), remove the bobbin case
from the hook.
After oiling, sew on a piece of
scrap fabric to absorb excess oil.
Page 21
A
B
C
D
Maintenance and troubleshooting
36
Maintenance and troubleshooting
37
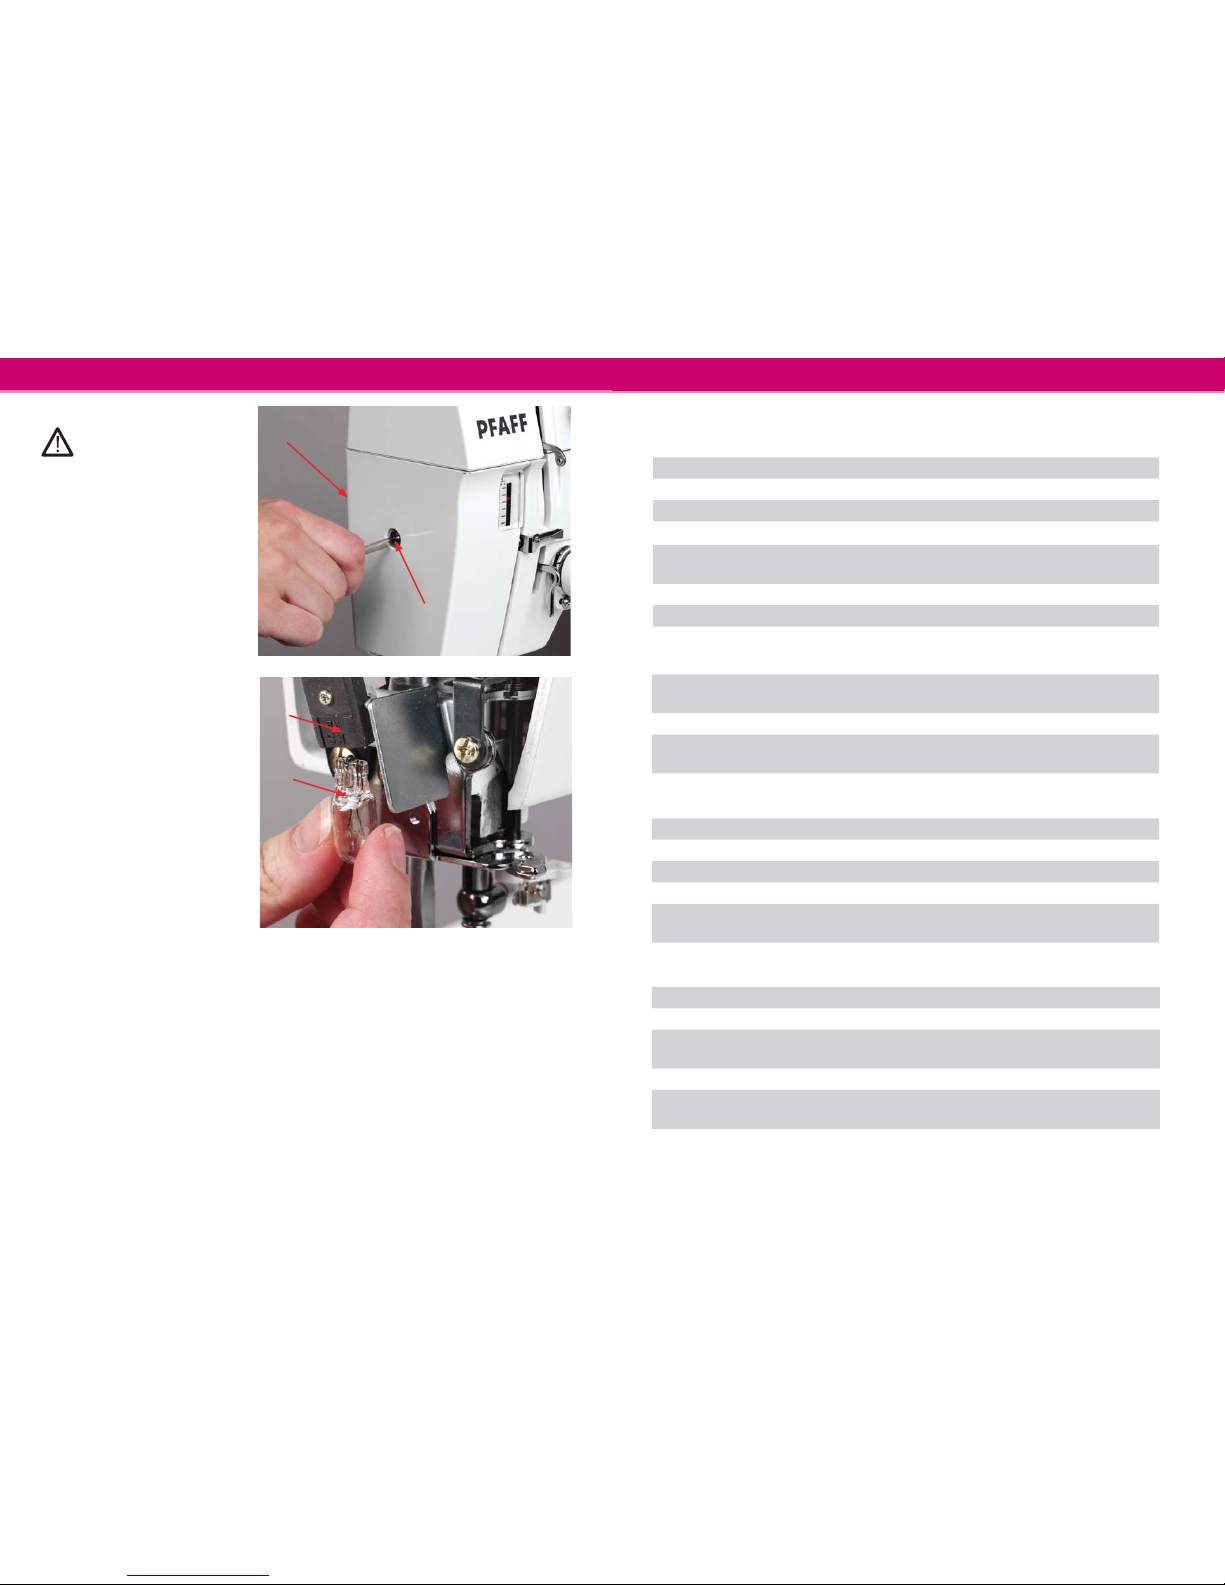
Changing the light bulb
Switch off the main
switch. If you have used the
machine, wait for the lamp to
cool before touching it.
Removal:
Remove the setscrew (A).
Remove the face cover (B).
Pull out the light bulb (C) from
the lamp socket (D).
Insertion:
Insert a new light bulb into the
opening of the socket (D).
Attach the face cover (B) with
the setscrew.
Note: Replace the bulb with the same
type, rated 12 V, 5 W.
The needle thread breaks.
The needle thread is not threaded properly. Page 21-23
The needle thread tension is too tight. Page 25
The needle is bent or blunt. Page 16
The needle is incorrectly inserted. Page 16
The needle thread and the bobbin thread are not set
under the presser foot when starting sewing.
Page 24
The threads were not pulled to the rear after sewing. Page 24
The thread is too heavy or too fi ne for the needle. Page 8
The bobbin thread breaks
The bobbin thread is not threaded properly in the bobbin
holder.
Page 19
Lint has collected in the bobbin holder. Page 34
The bobbin is damaged and does not turn smoothly. Change the
bobbin
The needle breaks
The needle is incorrectly inserted, bent or blunt. Page 16
The needle clamp screw is loose. Page 16
The threads were not pulled to the rear after sewing. Page 24
The needle is too fi ne for the fabric being used. Page 8
The needle and/or threads are not suitable for the work
being sewn.
Page 8
The machine skips stitches
The needle is incorrectly inserted, bent or blunt. Page 16
The needle thread is not threaded properly. Page 21-23
A poor quality needle is used. Change the
needle
The needle thread tension is too tight. Page 25
The needle and/or fabrics are not suitable for the work
being sewn.
Page 8
Troubleshooting
Page 22

Maintenance and troubleshooting
38
39
Index
The cloth is not fed smoothly
The feed dog is packed with lint. Page 34
The stitches are too fi ne. Page 14
Loops on the seams
The needle thread tension is too loose. Page 25
The needle is too thick or too fi ne for the fabric. Page 8
The machine does not sew or run
The machine is not plugged in. Page 11
Thread has been caught in the hook race. Page 34
The machine is noisy
Thread has been caught in the hook race. Page 34
Lint has built up in the hook race or bobbin holder. Page 34
The machine needs oiling. Page 35
Important notes: Before changing presser foot and needle you must turn the main
switch off. Do not attempt to sew without fabric under the presser foot.
When leaving the machine, even for only a short time, switch off the main switch. This
is important if there are any children nearby.
Seam puckering
The needle thread is not threaded properly. Page 21-23
The needle is too heavy for the fabric being sewn. Page 8
The stitch length is too long for the fabric.
Page 14
The needle thread tension is too tight.
Page 25
Index
A
Accessories 6-7
Accessories box 6
Attaching the darning plate 17
Attaching the extension table 26
Attaching the knee lift 15
B
Balancing the thread tension 25
Bobbin 6, 13, 18-20
Bobbin case 19-20
Bobbin winding 13, 18-19
Bobbin winding button 13
Bobbin case cover 20
Bringing up the bobbin thread 24
Brush 6, 34
Bulb 36
C
Carrying handle 10
Changing the light bulb 36
Changing the needle 16
Changing the presser foot 16
Cleaning the hook and
feed dogs 34
Connecting the foot control 11
D
Darning plate 17, 30
E
Electrical connection 11
Extension table 26
Extra accessories 7
F
Feed dogs 17, 34
Foot control 11-12
Free-motion foot 6, 30
Free-motion stippling 32
G
Getting started to sew 28
H
Hook 20, 34-35
Hook cover plate 4-5, 20, 34
I
Inserting a bobbin 19
Inserting a bobbin into
the hook 20
K
Knee lift 15, 26
L
Leather foot 7
Light bulb 36
M
Machine overview 4-5
Maintenance 33
Main switch 4-5, 11,16-17, 20-21,
23-24, 34-36
Page 23

40
Index
N
Needle 4-6, 8
Needle chart 8
Needle plate 4-5, 16
Needle size 8
Needle treader 23
Needle Up/Down 13
O
Oil 6, 35
Oiling the machine 35
Overview 4-5
P
Placing a tread cone on
the spool pin 17
Pressure dial 15
Presser foot 4-5, 16
Presser foot lift 14
Problems and solutions 37-38
Q
Quilting 31
R
Raise presser foot 14, 15
Remove the bobbin case
and bobbin 20
Reverse lever 14
Revers sewing 14
Rolled hem foot 7
S
Sewing speed 12
Silk foot 7
Soft cover 10
Speed control slide 12
Spool pin 4-5, 17
Spool cap 6, 17
Standard accessories 6
Stippling 32
Stitch balance 25
Stitch-in-the-ditch 31
Stich length 14
Stitch length dial 14
T
Thread cone 6, 17
Thread cutter 4-5, 13
Thread guide 4-5, 18-19, 21-22
Thread spool 17
Thread tension 21-22, 25
Threading the machine 21-22
Troubleshooting 37-38
Turning a corner 13, 29
U
Using the Fabric guide 29
V
Velvet foot 7
W
Walking foot 7
Z
Zipper foot 7
Page 24

We reserve the right to change the machine
equipment and assortment of accessories without
prior notice, or make modifi cations to the
performance or design.
Such modifi cations, however, will always be to the
benefi t of the user and the product.
Page 25

VSM Group AB • SE-561 84 Huskvarna •
SWEDEN
www.pfaff.com
412 91 38 - 26C • English • Inhouse • © 2004 VSM Group AB • All rights reserved • Printed in Sweden on environmentally-friendly paper
 Loading...