


USER MANUAL
ANY PROBLEMS, please contact us by Email.
Here is the address:
US Customers: support-us@peztio.com
EU Customers: support-eu@peztio.com
For E-Instruction, Please Scan the Code:
DASH CAM
TOUCH SCREEN
1080P HIGH DEFINITION WIDE ANGLE LENS

INTRODUCTION
Welcome to use PEZTIO DASH CAM. Equipped with the new
intelligent interaction, the design of touch screen makes it easier
to use. Automatic start to record, just plug and play, video files
will be saved on the memory card.
POWER SOURCE
Use car charger (5V 1A) to get power from cigarette lighter. Need
to keep the power on to ensure the normal use.
MAIN FUNCTION
1. Dual lens Record
Equipped with dual lens camera, PEZTIO DASH CAM provides you
double safety.
Front camera: 170° wide angle. Resolution:1080P/720P/480P.
Rear camera: Resolution: 640*480px.
2. Loop Record
The Loop recording video can be set the timing 1 min, 3min or 5
min. It will save the vital videos in case losing or damaging the
videos when an accident occurs, the TF card slipped out or the
power connection is loosening.
3. Emergency Record
Motion Detection: When the Motion Detection is on, it will detect
whether there is the moving object, and the recording will auto
on if it finds a moving object.
Gravity Sensor: When there is a severe bump in vehicles, the video
will be locked and will not be deleted by cyclic recording.
MULTIPLES MODES
There are 3 modes of camera operation - Video, Photo and
Playback.
1. Video Mode: The default mode when the camera is turned
on, for video recording.
2. Camera Mode: Allows you to take still photographs.
WARNING
Please keep the DASH CAM plugged into the power, plug and
play it. This is a small capacity battery. It will automatically shut
down after 10 seconds when the disconnect power.
3. Files Mode: Allows you to view recorded video or
photographs upon the DASH CAM IPS screen.
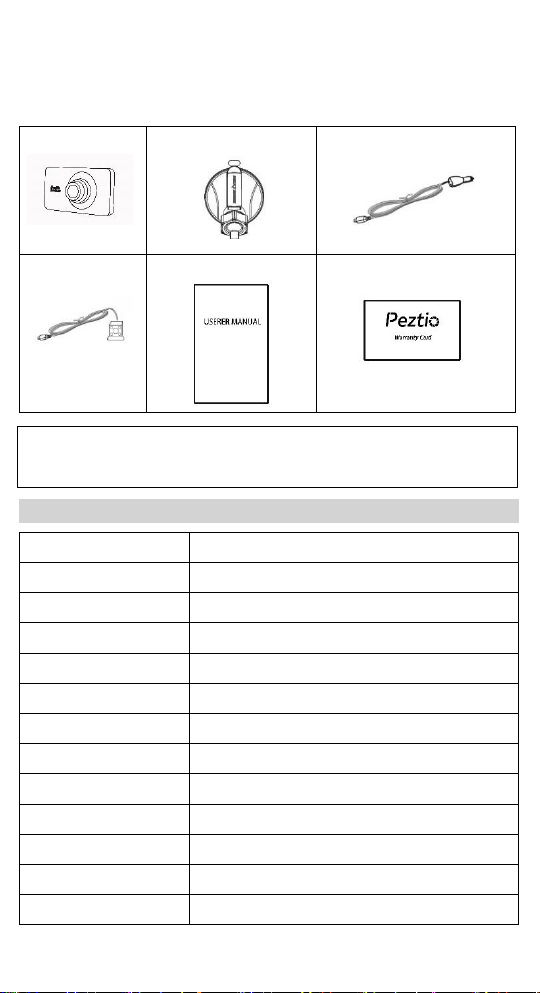
PACKAGE CONTENT
DASH CAM
SUCTION MOUNT
CAR POWER CABLE
REAR CAM
USER MANUAL
WARRANTY CARD
PRODUCT SPECIFICATION
Display Screen
4.0-inch IPS Touch Screen
G-sensor
Built-in
Resolution
FHD 1080P/720P/480P
Sensor
170 Degree Ultra-Wide Angel Lens
Language
English, German, Japanese, etc.
File Format
AVI
Video Format
M-JPEG
Picture Format
JPEG
Microphone
Support
Build-in Speaker
Support
USB Function
USB-Disk/PC camera
Power interface
5V/1A
Battery
Build in 300mah
If you find that there are missing accessories in the package,
please contact our customer support email immediately.

PRODUCT STRUCTURE
1. IPS Touch screen
2. Power button/ Shot change button/ Screen save button
3. Rear camera interface 4. USB data interface
5. Mount connection 6. MIC
7. TF card slot 8. Reset
9. Fill light 10. Lens 11. Speaker
INSTALLATION GUIDANCE
INSTALL THE FRONT CAMERA
1. Insert the TF card as shown above, please gently insert the TF
card into the slot.
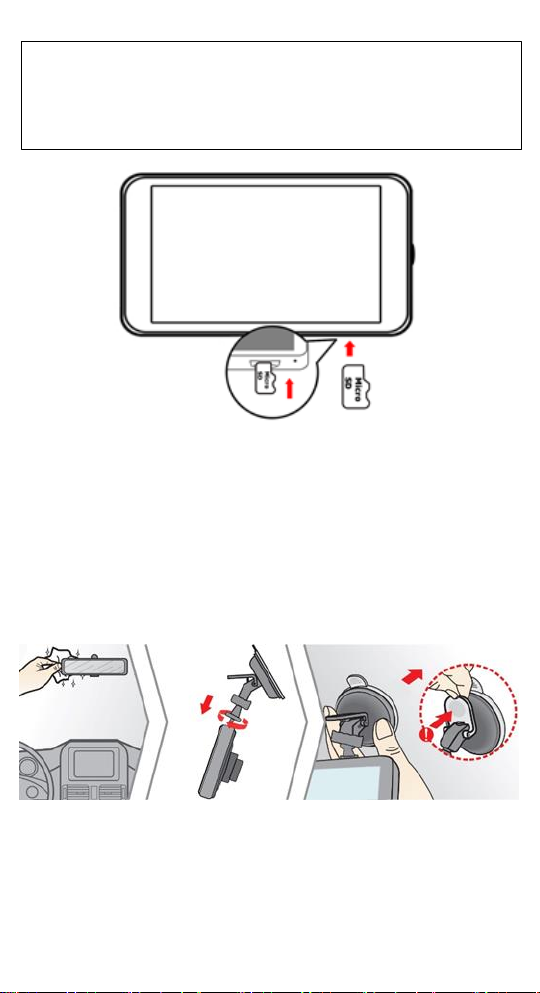
2. Mount the front camera
- Clean the front windscreen.
- Assemble the suction mount and front camera together.
- Remove the e protective plastic film from the suction pad, push
the suction cup onto the inner windshield in a suitable position
(Won't shade your vision while driving), press the suction bracket
handle to ensure that it is well fixed.
3. Connect the car original charger to the cigarette lighter.
Route the cables through the top ceiling and the A-pillar so that
it does not interfere with driving.
WARNING: Please choose a good quality branded SD card
between 8GB and 32GB (Class 10 or UHS type 1) and format
the card within the setup menu before use. Please insert the
card in the right direction.

INSTALL THE REAR CAMERA
1. Please connect the cables as shown above:
- Connect the socket to the dash camera’s rear camera interface.
- Connect the red cable to the positive lead of reversing lamp.
2. There are two methods to place the camera:
Mode 1: Mount on the rear windscreen. Package includes a 3M
glue for the rear camera. Please clean the rear windscreen and
find an appropriate position before you stick the rear camera onto
the windscreen.
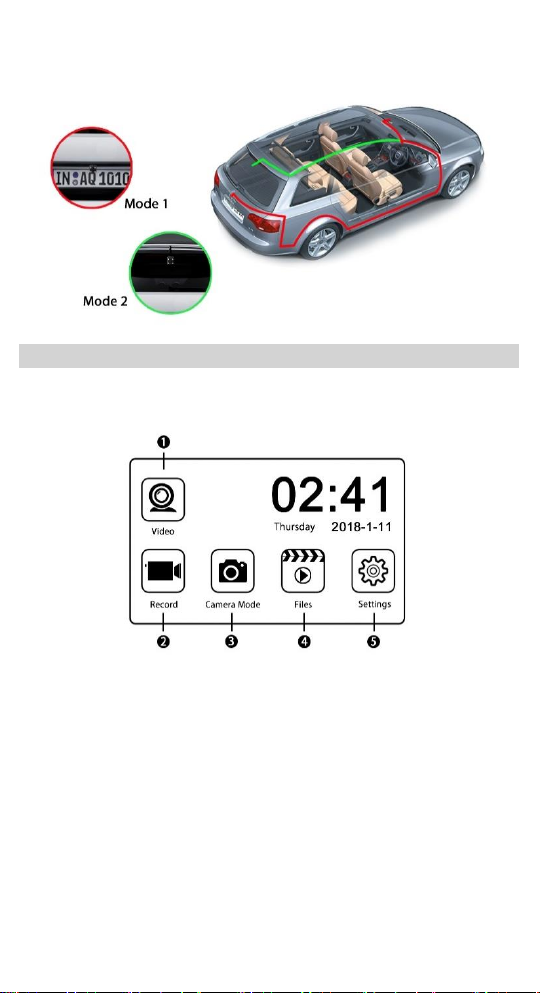
Mode 2: Mount near the license plate. Package includes fixing
screws to help you fix it.
SETTING
MAIN INTERFACE
Power on/off
Long press the power button to Power on/off; in the recording
mode, short press this button will enter the screen saver status.
1. Start recording Video (Click to start recording video)
2. Video mode (Click to enter video recording mode)
3. Camera mode (Click to enter camera mode)
4. Files mode (Click to replay/manage the video files)
5. Setting (Click to modify system setting)

VIDEO MODE
1. Record time
2. Start record
3. Emergency lock button
4. Switch to camera mode
5. Back
6. Back to main Menu
7. Video setting
CAMERA MODE
1. Switch to video mode 2. Shoot photos
3. Camera mode setting
FILES MODE
Manage the files
To lock/unlock the files: Select the files you want to lock/unlock,
then press the Lock button.
To delete the files: Select the files you want to delete, press the
edit button, then press the delete button.
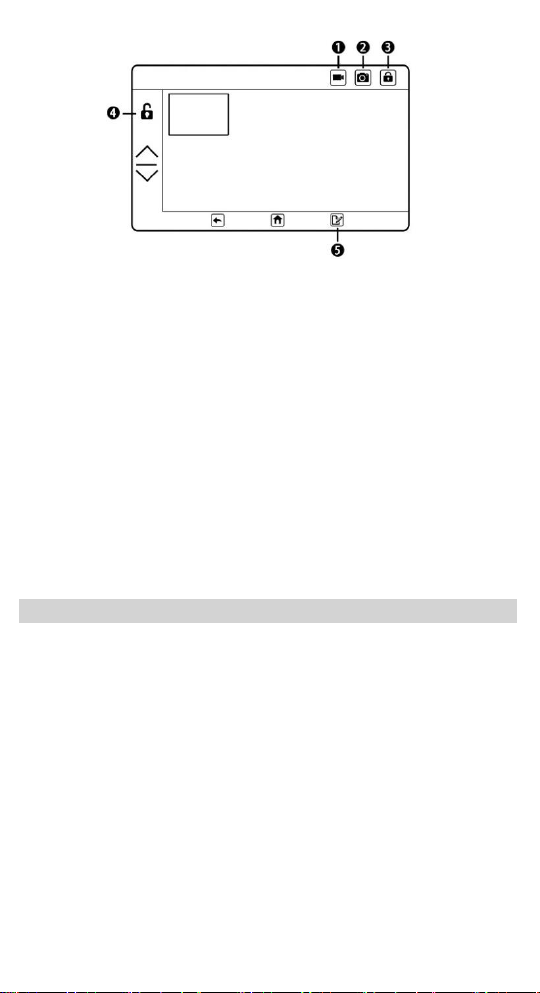
1. Switch to video mode
2. Switch to camera mode
3. Emergency lock button
4. Lock/Unlock
5. Edit
SYSTEM SETTING
Protection(Close/30 s/60 s/120 s)
Auto-Shutdown (3/5/10 Mins)
Frequency (50/60 Hz)
Key Sound: (Close/Open)
Language: (Japanese/French/English/Deutsch)
Date & Time
Fill light:(Auto/open/close)
Format: (Confirm/Cancel)
Default: (Confirm/Cancel)
FUNCTION INTRODUCTION
1. Loop Recording
The Loop recording video can be set the timing 1 min, 3min or 5
min. It will save the vital videos in case losing or damaging the
videos when an accident occurs, the TF card slipped out or the
power connection is loosened.
2. Motion Detection
When the Motion Detection is on, it will increase the storage time
of the cyclic record videos in the TF card. When the camera
recorder is standby, it will detect whether there is the moving
object, and the recording will auto on if it finds a moving object.
3. Parking Guard
This parking guard will automatically begin to record when the
vehicle manifests shake after the vehicle key is off.

Tip: This function needs to co-work with the Gravity Sensing
function. This function can only be available when connected the
vehicle battery.
4. Gravity Sensing
There are three options in Gravity sensing: Low, Medium and High.
1) When there is a severe bump in vehicles, the video will be
locked and will not be deleted by cyclic recording.
2) The Parking Guard function need the operation of Gravity
Sensing. The camera recorder will automatically power on and
begin to record when there is a shock, it will automatically power
off after recording 10 seconds.
5. White Balance
Used for color choice in different environment.
Tips: It’s better to select Auto, in case the color distortion.
6. Exposure
Used to adjust the intensity of the light falling on the sensor.
Tips: If the exposure is too high it will hard to recognize the vehicle
license plate, it’s better to select 0.
7. Auto Power Off
The camera recorder will auto power off in setting time when
there is no memory card inserted or no recording directive has
been given.
8. Format
TF memory card format. When there are too many videos locked
and the memory card has been full, it can be deleted at once by
formatting the card.
9. Default Setting
When there is some setting error, the default setting can be used
to recover the factory setting.

TROUBLE SHOOTING
PROBLEM
SOLUTION
Video Image is
blurred.
Remove the protective lens cover, clean
the lens, clean the windscreen!
Cannot insert
the memory
card.
Micro SD card is very small and requires
delicate use. Align the card with the
diagram shown upon instruction and
insert the card until you feel a slight spring
resistance. You now need to push the
card, using your finger nail, until you hear
and feel a small latch. Release pressure
and the card will stay retained within the
device. Use the edge of a small coin if you
have difficulty.
Cannot remove
the memory
card.
With the card previously installed, you
now need to push the card further inwards
slightly, using your finger nail, until you
hear and feel a small latch. Use the edge
of a small coin if you have difficulty.
Release pressure and the card will spring
out sufficiently for you to take hold of it.
The SD card
cannot be read.
Use a good quality branded SD card
between 8GB and 32GB (Class 10 or UHS
type 1) and format the card within the
Setup menu.
I can only record
a few minutes of
videos on my
memory card.
Change the recording size (Video Length
function) to a smaller size. Increase the
size of the MicroSD card. Max 32GB.
I can't delete
files on SD card
within the DASH
CAM.
Check to see if these files are 'protected',
if so, please follow instructions to 'unprotect'.
The battery only
last 10 seconds.
This battery can only reserve limited
power. Plug and play it. Based on the
design of power-off protection, the
battery needs to reserve a part of power
to support emergency recording function.

PROBLEM
SOLUTION
Cannot see the
reversing guide
image when
reversing.
Please check the wiring and make sure
the RED LINE of rear camera is correctly
linked to the POSITIVE ELECTRODE of
the reserve light.
When I press the
MENU button
nothing happens.
This is normal during recording. Stop
the recording before pressing the
MENU button.
The date & time
on my DASH CAM
is incorrect.
This time is the time when the product
leaves the factory. Please calibrate in the
settings.
The images
displayed in the
screen is upside
down.
Please ensure that the lens is in the
correct recording direction. If you
mount the DASH CAM on the
dashboard, it will take the wrong image.
Please mount it on the windshield with
the diagram shown upon instruction.
The DASH CAM is
no response.
Please reset the DASH CAM.
The screen blanks
after a few
minutes.
The screen saver is set to ON. Change
settings to OFF if required. Default
setting is off.
Find the DASH
CAM a little
heated after a
period time of
use.
The camera has metal frame with good
thermal conductivity for extended life of
cam. The Operating temperature is
designed between -10℃ to 60℃, so
don’t worry, it is a common
phenomenon.
Unresolved
issues.
Reset the DASH CAM to the default
settings within the Setup Menu and try
again. Should the problem persist
contact us by support e-mail.
ANY PROBLEMS, please contact us by Email.
Here is the address:
US Customers: support-us@peztio.com
EU Customers: support-eu@peztio.com
 Loading...