

Page 1
Familiarisation
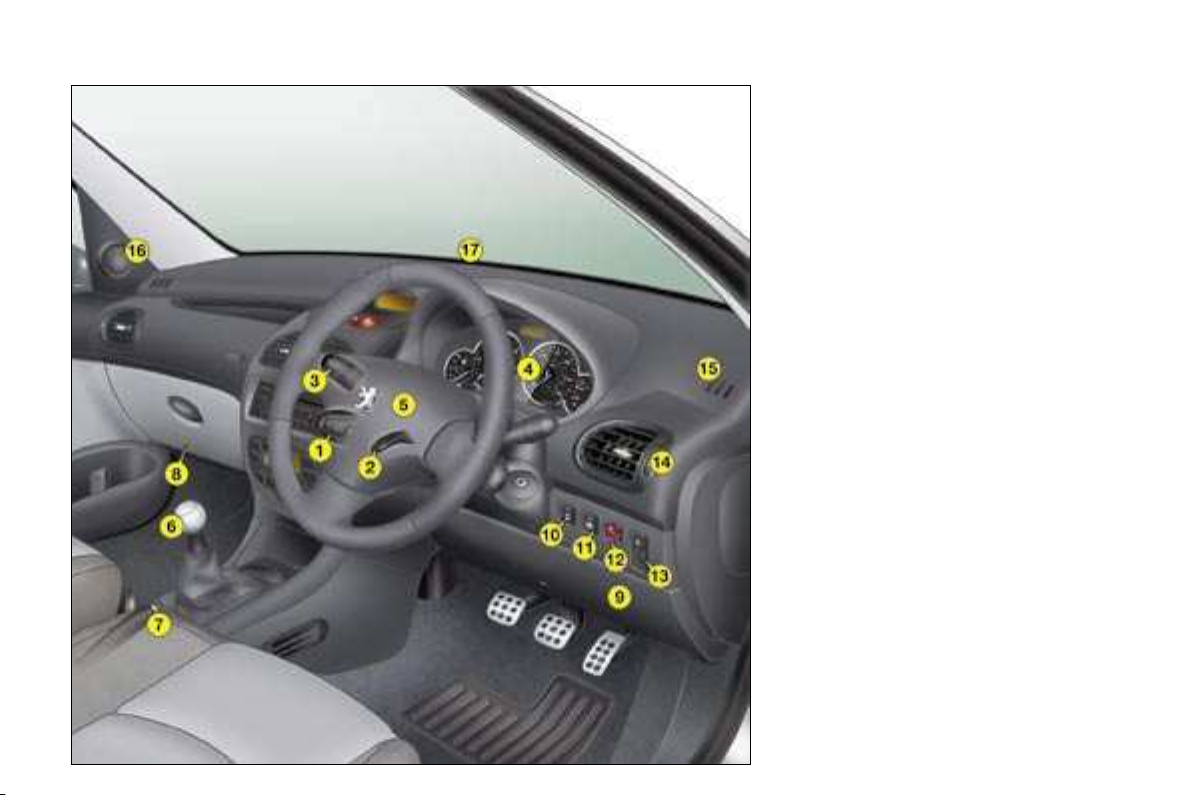
4 -
INSTRUMENTS AND
CONTROLS
1. Cruise control/speed limiter control.
2.
Steering wheel adjustment control.
3. Lights and direction indicators
stalk.
4. Instrument panel.
5. Driver’s air bag.
Horn.
6. Gear lever.
7. Handbrake.
8. Bonnet release.
9. Fuse box.
10. Dynamic stability control
(ESP/ASR) button.
11. Rear electric windows
deactivation control.
12. Passenger air bag disarming
control.
13. Headlamp height adjustment.
14. Side adjustable and closing
vent.
15. Side window demisting vent.
16. Speaker (tweeter).
17. Windscreen demisting vent.
Page 2
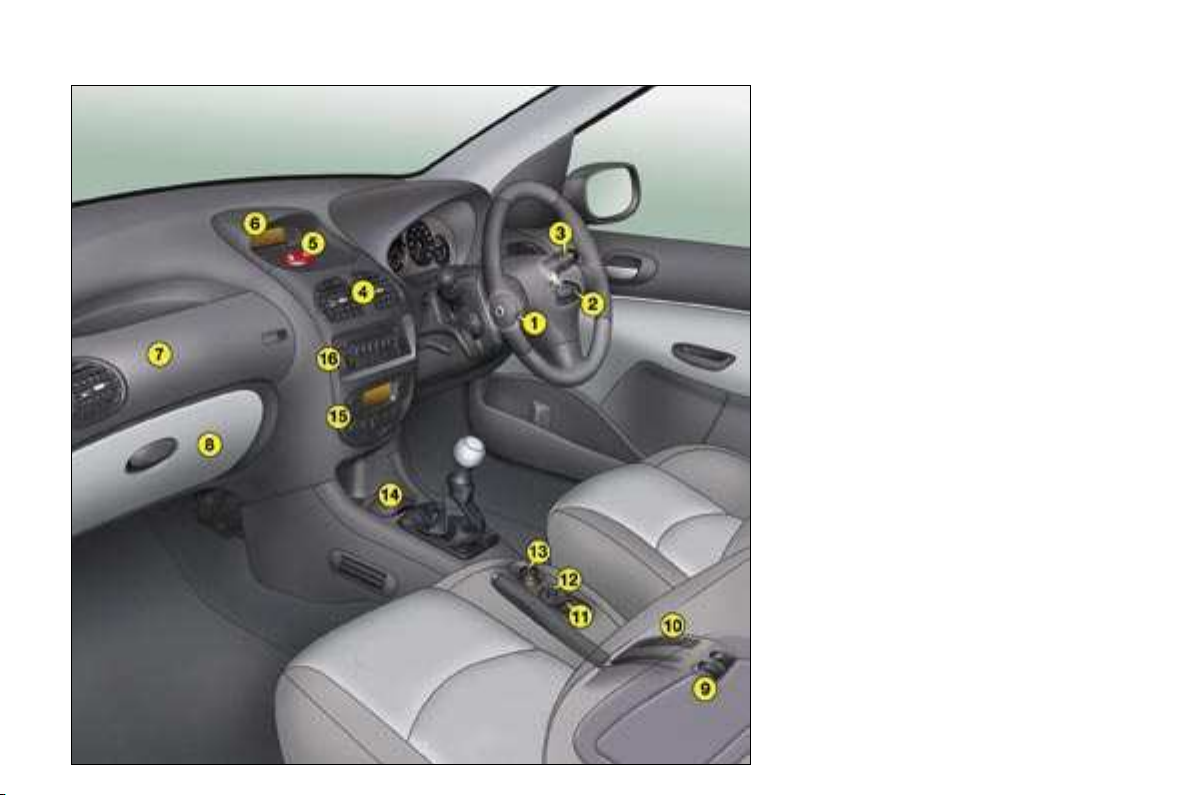
Familiarisation
INSTRUMENTS AND
CONTROLS
1. Steering lock and ignition.
2. Steering wheel audio equipment
control.
3. Wipers/wash-wipe/trip computer
stalk.
4. Central adjustable and closing
vents.
5. Hazard warning lights switch.
Central locking button.
6. Multifunction display.
7. Passenger air bag.
8. Glove box.
9. Rear electric windows control.
10. Heated seats control
(according to country).
11. Front electric window controls.
12. Exterior mirrors control.
13. Lighter.
14. Front ashtray.
15. Heating/air conditioning
controls.
16. Audio RD3.
5
-
Page 3
Familiarisation
6 -
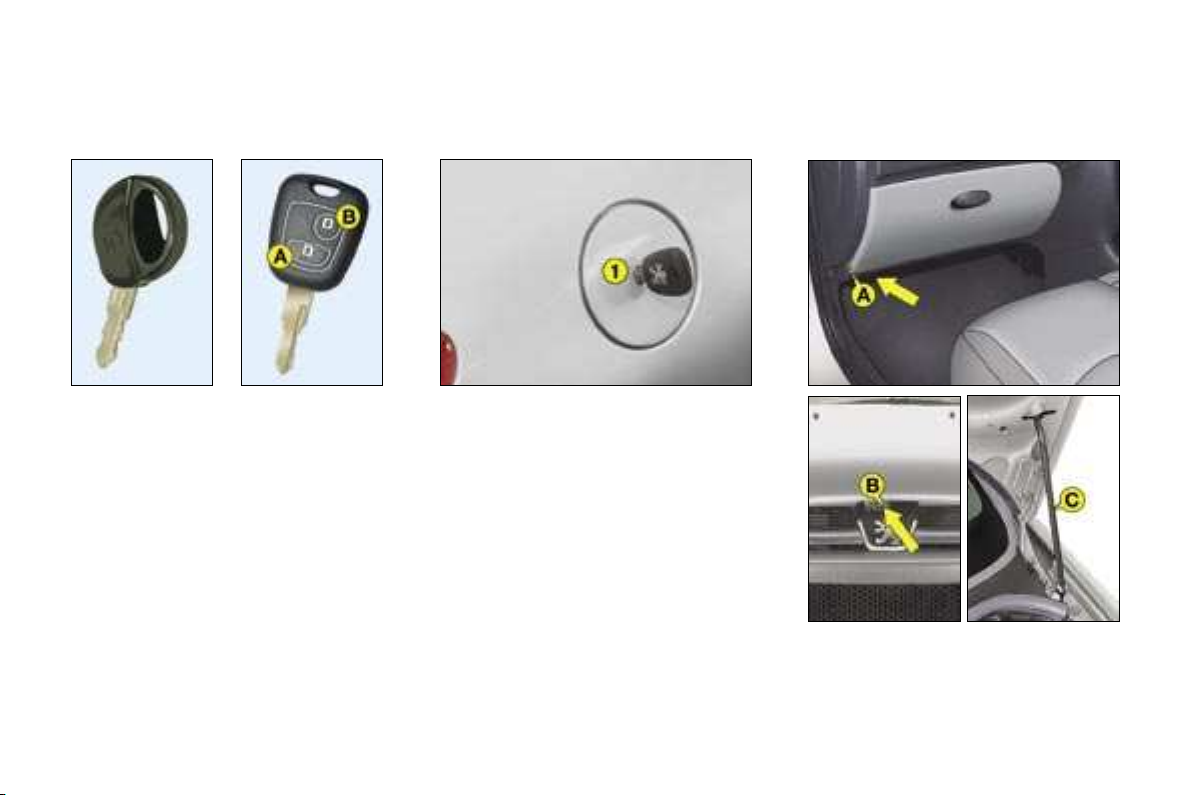
OPENING
Normal key - Remote control
BonnetFuel tank
A. Locking of the vehicle.
B. Unlocking of the vehicle.
101
1. Opening of the fuel tank cap.
Fuel tank capacity: approximately
50 litres.
107
A. Interior control.
B. Exterior control.
C. Bonnet strut.
107
Page 4
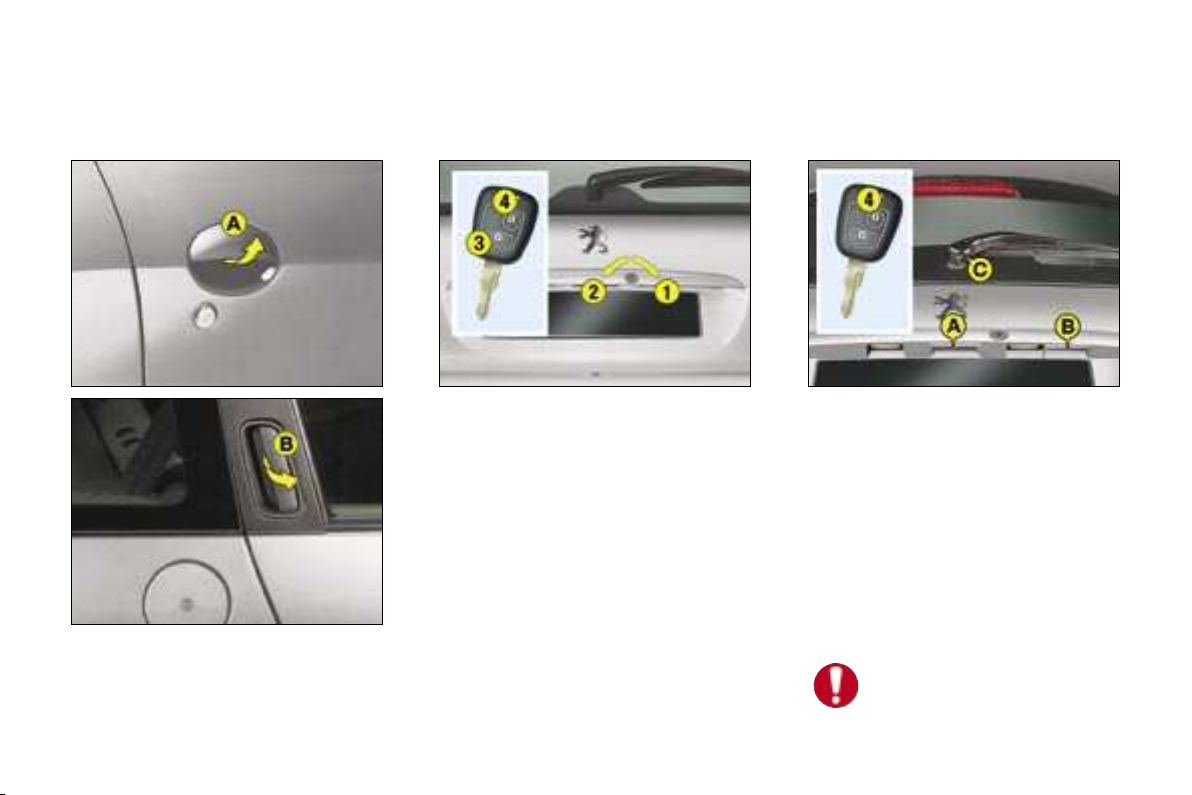
OPENING
Doors
Boot (saloon)
Familiarisation
Tailgate and rear screen
(206 SW)
7
-
A. Opening/Closing of the front
doors.
B. Opening/Closing of the rear
doors (206 SW).
103
1. Locking.
2. Unlocking.
3. Remote locking
(at the same time as the doors).
4. Remote unlocking
(at the same time as the doors).
105
A. Opening of the tailgate
(rear screen closed).
B. Unlocking of the rear screen
(tailgate closed).
C. Opening of the rear screen
using the wiper arm.
4. Unlocking of the rear screen
remotely (long press).
105
The tailgate and the rear
screen cannot be open at the
same time.
Page 5
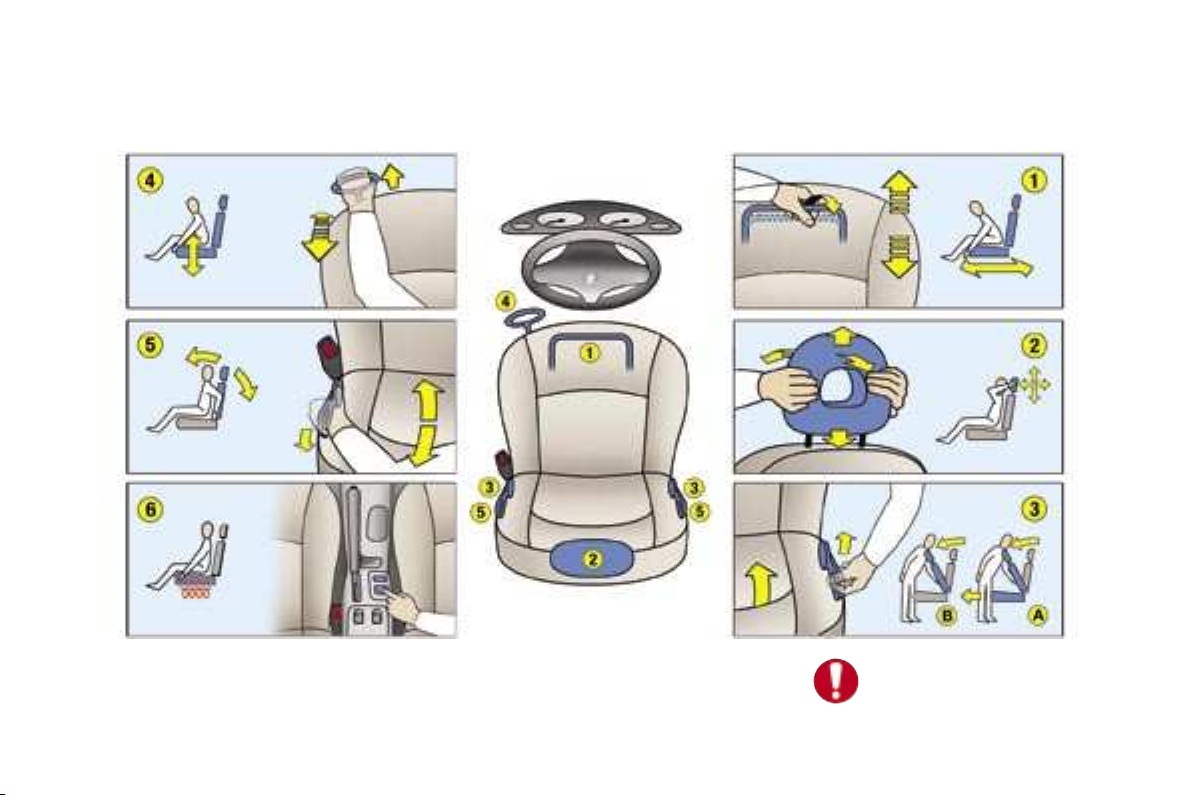
Familiarisation
8 -
SITTING COMFORTABLY
Front seat adjustment (saloon and 206 SW)
1. Forwards-backwards
adjustment.
2. Head restraint height and angle
adjustment.
3. Access to rear seats (3-door).
4. Height adjustment.
5. Seat back angle adjustment.
6. Heated seats control
(according to country).
Never drive with the head
restraints removed.
88
Page 6
Familiarisation
SITTING COMFORTABLY
Interior mirror adjustment Manual exterior mirrors
Electric exterior mirrors
adjustment
adjustment
9
-
1. Selection of the mirror’s "day"
position.
2. Adjustment of the mirror.
116
A. Selection of the left or right
mirror.
B. Adjustment of the position of the
mirror.
C. Deselection of the mirror.
D. Electric Folding/Unfolding.
116
A. Adjustment of the position of the
mirror.
B. Manual Folding/Unfolding.
116
Page 7
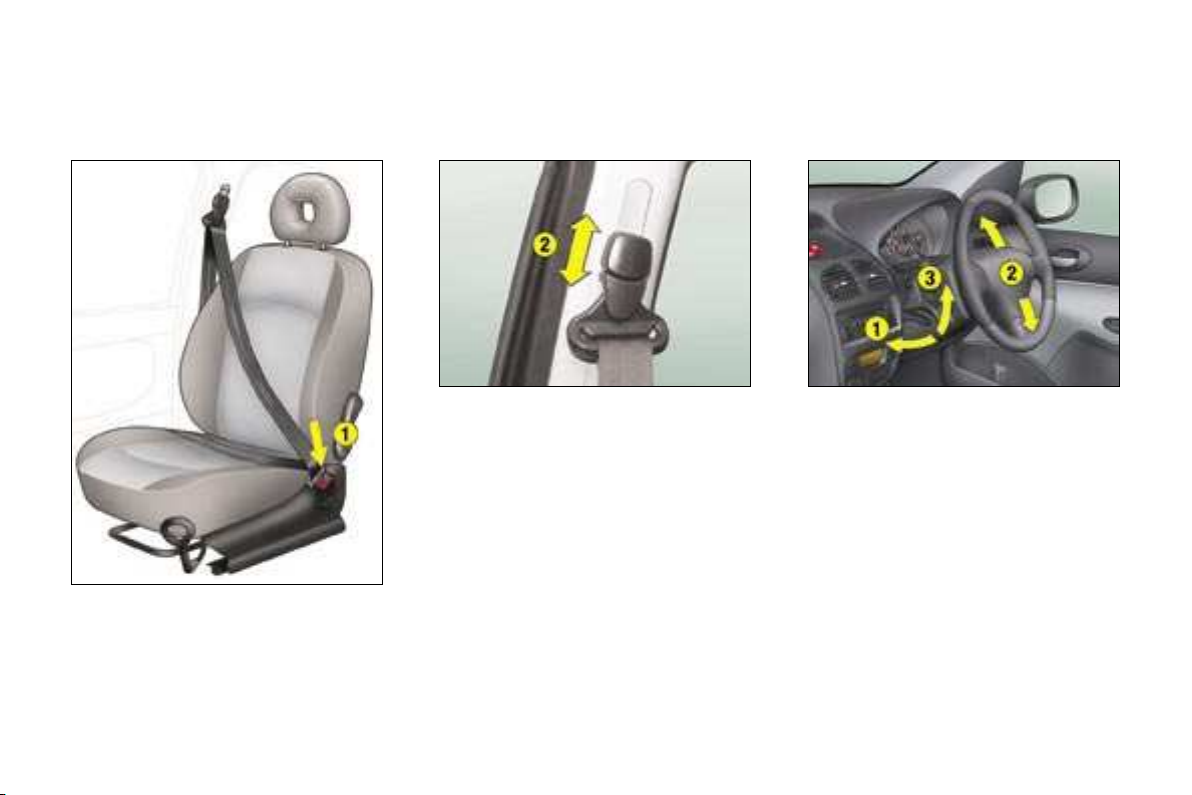
Familiarisation
10 -
SITTING COMFORTABLY
Front seat belts adjustment
Steering wheel adjustment
1. Fastening.
2. Height adjustment.
137
1. Unlocking.
2. Height adjustment.
3. Locking.
117
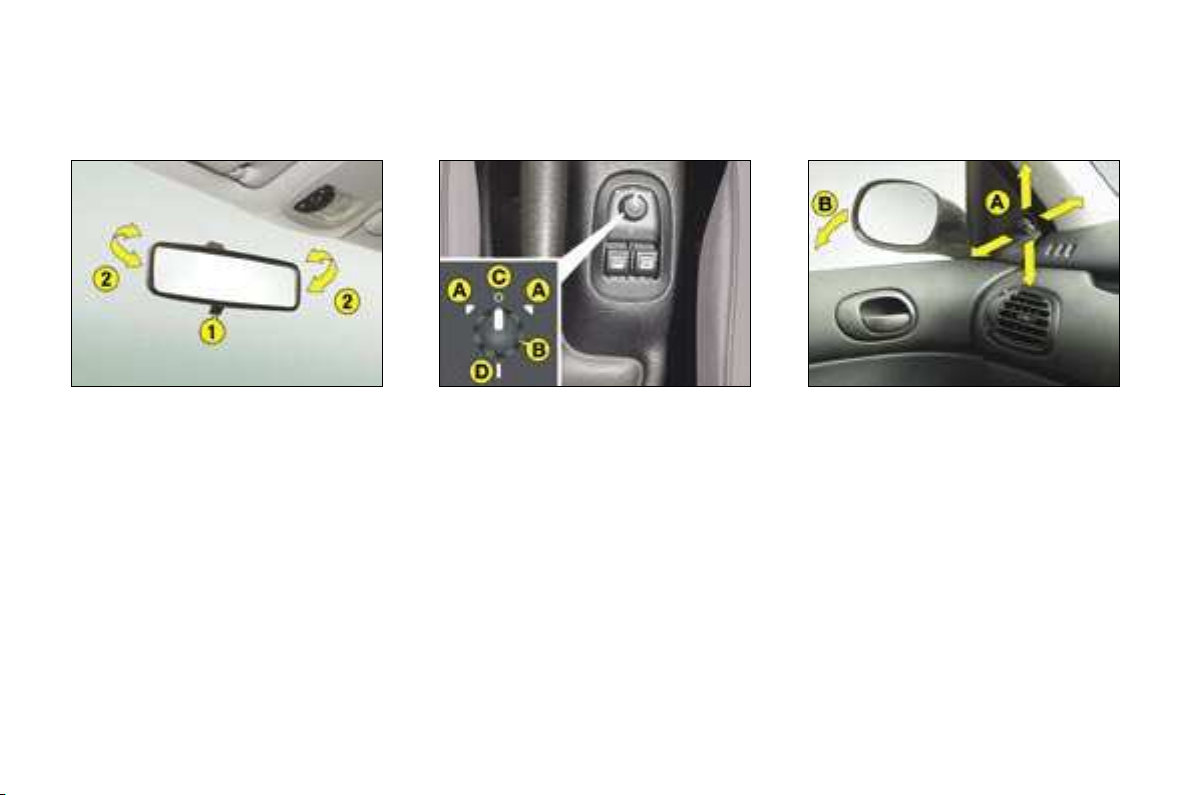
Page 8
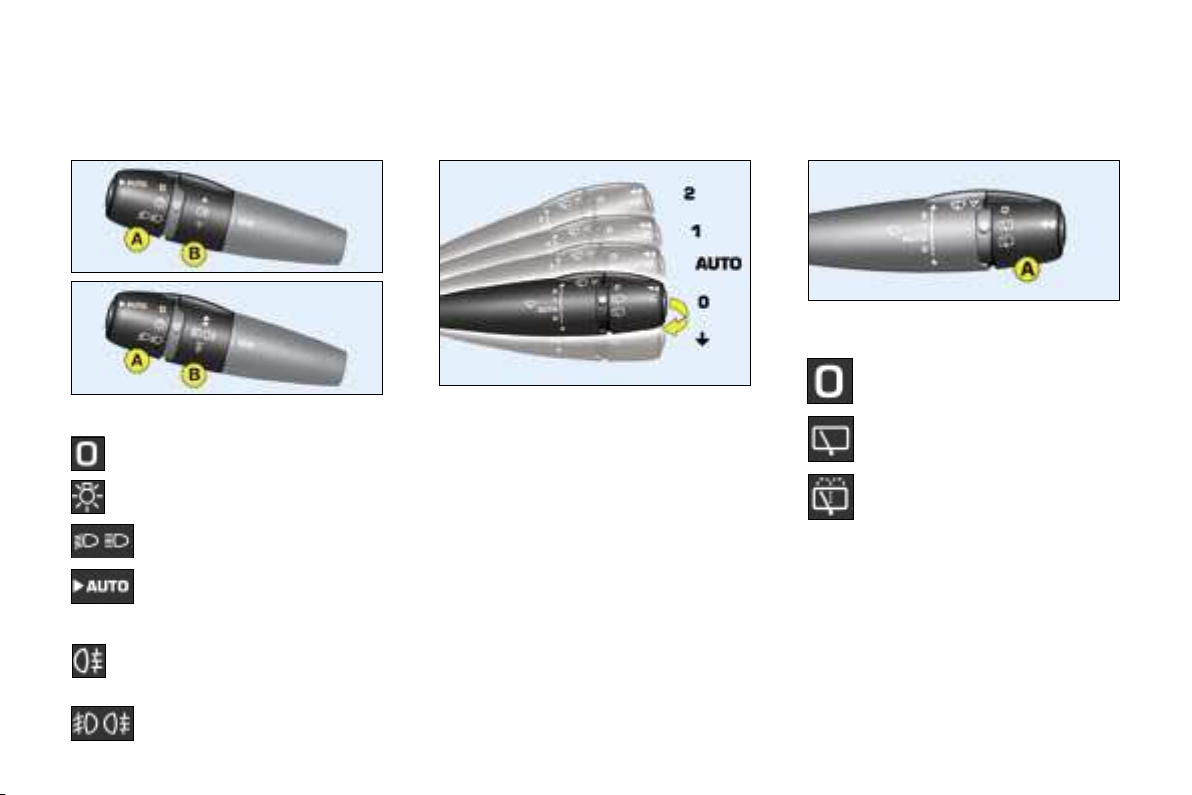
SEEING CLEARLY
Lights
Wipers
Familiarisation
Rear wiper (ring A)
Park.
11
-
Ring A
Lights off.
Side lights.
Dipped/main beam headlamps.
Automatic switching on of
the lights.
Ring B
Rear fog lamp.
or
Front and rear fog lamps.
108
Windscreen wipers
2 Fast wipe.
1 Normal wipe.
I Intermittent wipe.
or
AUTO Automatic wipe.
0 Park.
Single wipe (press downwards).
Wash-wipe: pull the stalk towards
you.
110
Intermittent wipe.
Wash-wipe.
111
Page 9
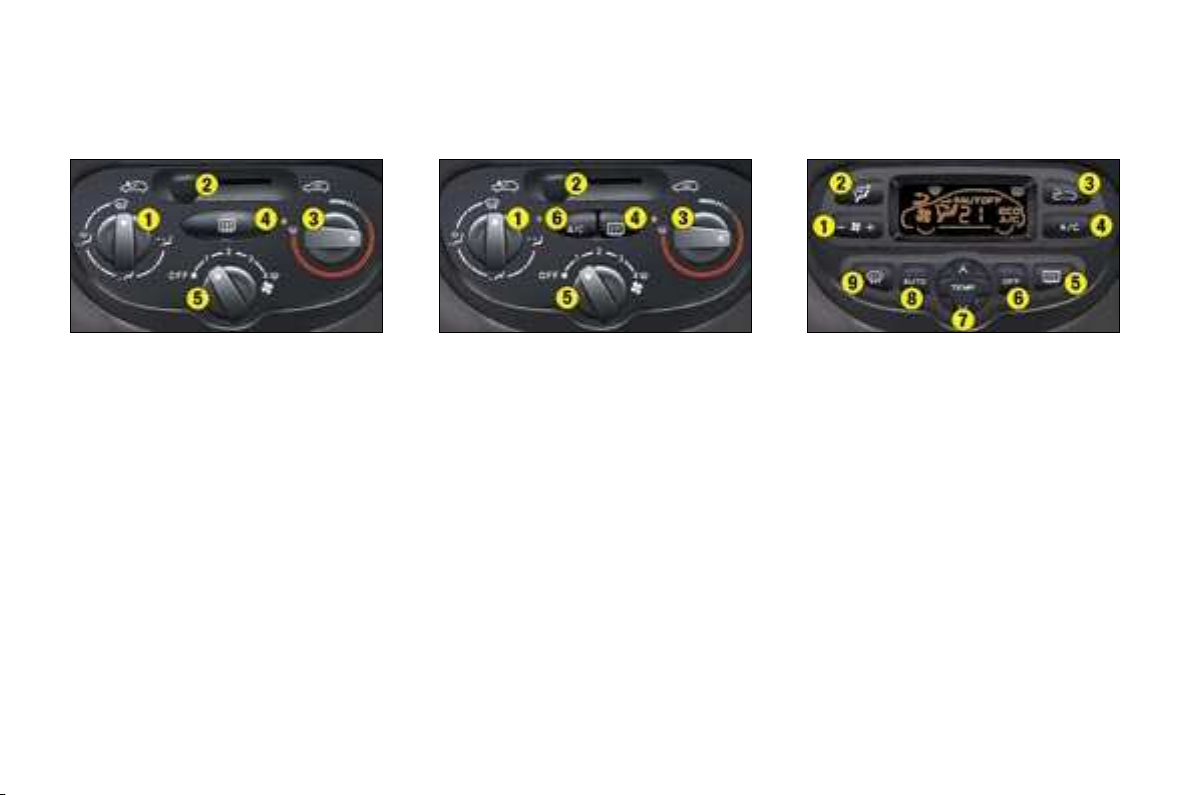
Familiarisation
12 -
VENTILATION
Heating Manual air conditioning Automatic air conditioning
1 Air distribution adjustment.
2 Air intake control.
3 Temperature adjustment.
4 Rear screen and mirrors
demisting.
5 Air flow adjustment.
83
1 Air distribution adjustment.
2 Air intake control.
3 Temperature adjustment.
4 Rear screen and mirrors
demisting.
5 Air flow adjustment.
6 Air conditioning control.
84
1 Air flow adjustment.
2 Air distribution adjustment.
3 Air intake control.
4 Air conditioning control.
5 Rear screen and mirrors
demisting.
6 System off.
7 Temperature adjustment.
8 Automatic comfort programme.
9 Automatic visibility programme.
86
Page 10
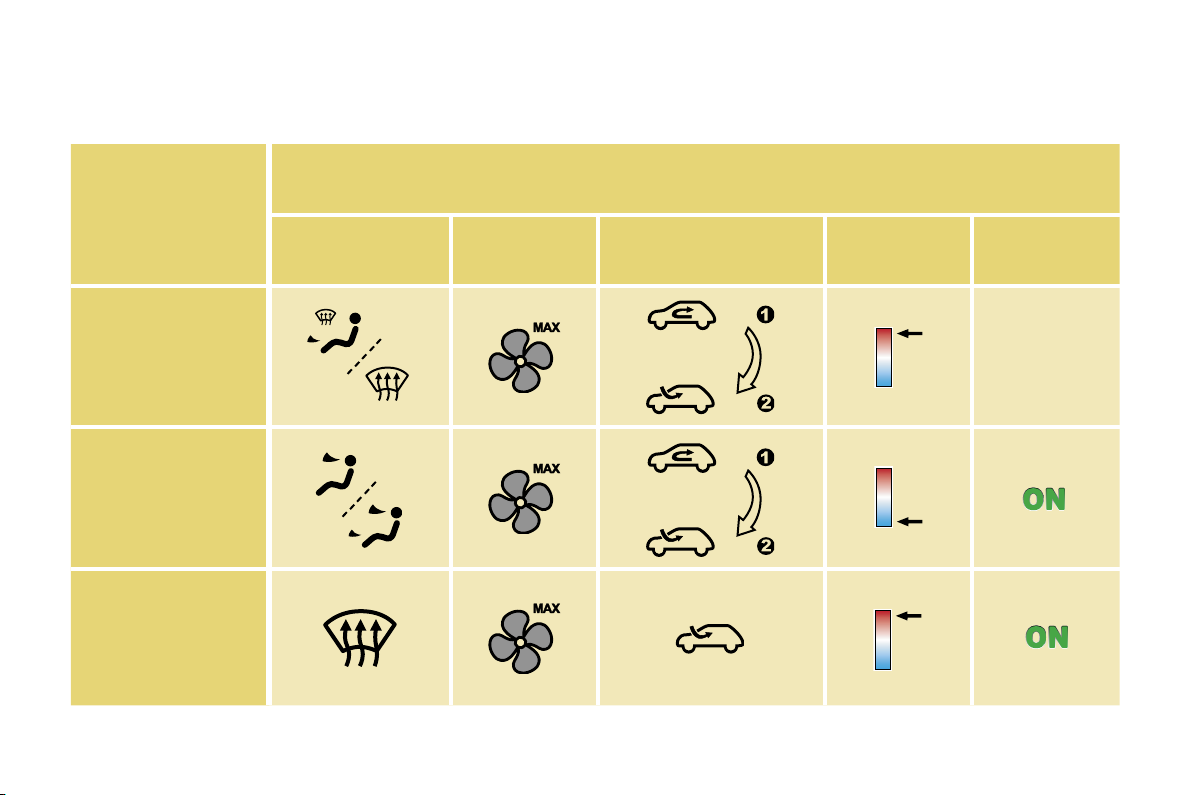
VENTILATION
Recommended interior settings
I require...
Air distribution Air flow
HEATING
COOLING
Heating or Manual air conditioning
Air recirculation/Intake
of exterior air
Familiarisation
Temperature Manual A/C
13
-
DEMISTING
DE-ICING
Automatic air conditioning: use of the fully automatic mode is recommended, press the "AUTO" button.
Page 11
Familiarisation
14 -
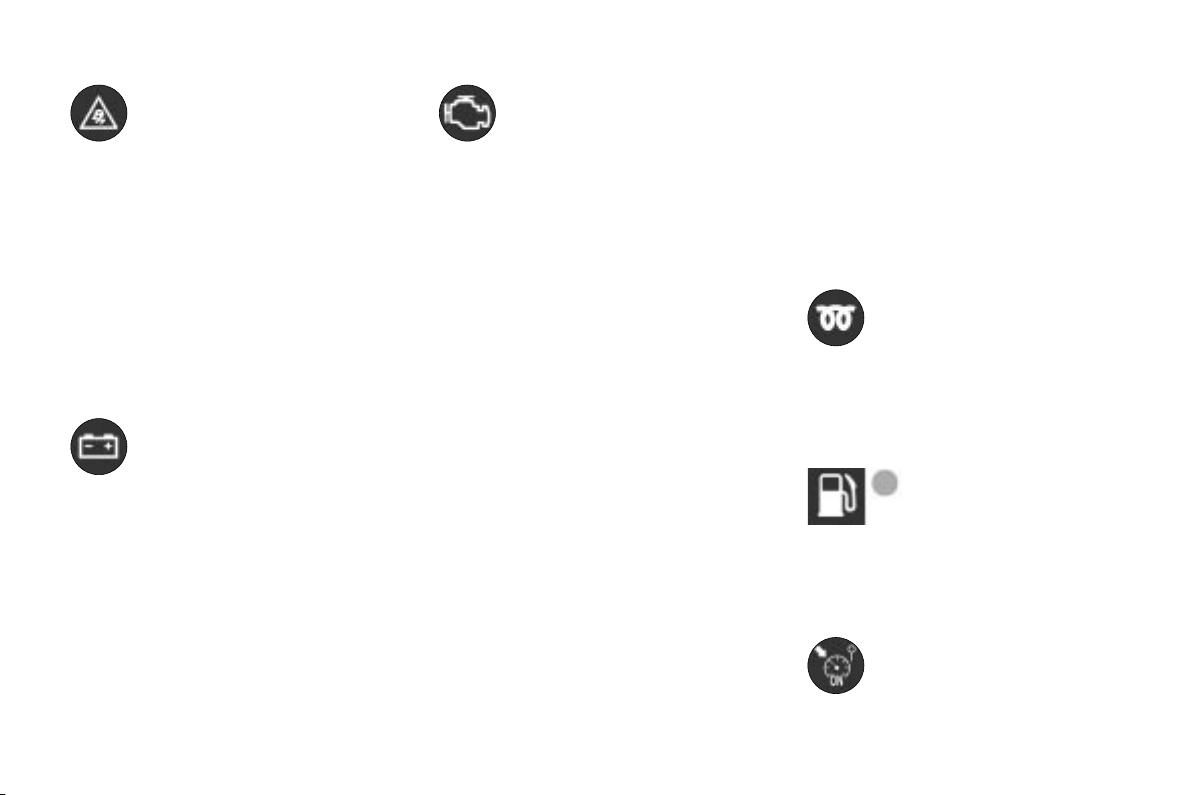
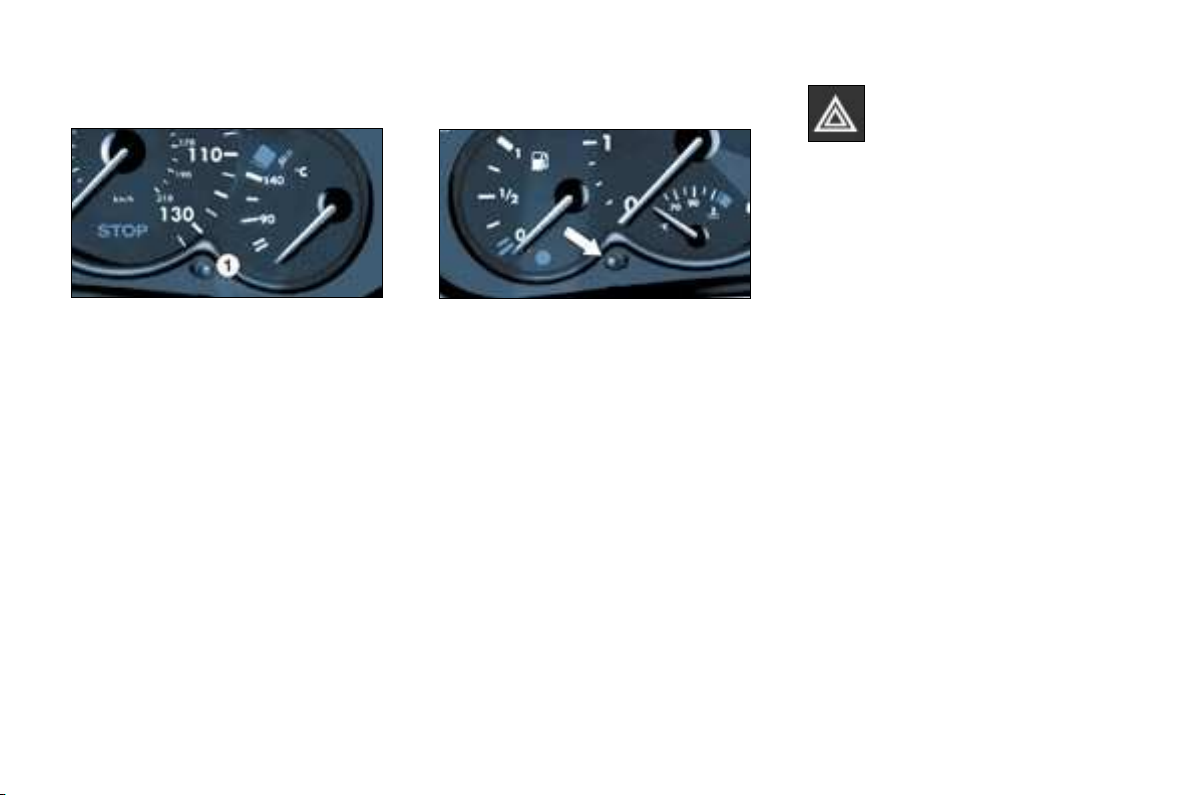
MONITORING
Instrument panel
Warning lights
Controls
A. When the ignition is on, the fuel
gauge needle should rise.
B. When the engine is running, its
associated low level warning
light should switch off.
C. When the ignition is on, the oil
level indicator should display
between one and six squares
for a few seconds.
If the levels are not correct, top up
the corresponding level.
17, 25
1. When the ignition is on, the
orange and red warning lights
come on.
2. When the engine is running,
these warning lights should
switch off.
If warning lights remain on, refer to
the page concerned.
20
Lighting of the indicator light indicates the status of the corresponding
function.
A. Deactivation of the rear electric
windows.
115
B. Deactivation of the ESP and
ASR systems.
133
C. Central Locking/Unlocking.
104
Page 12
Familiarisation
15
-
KEEPING YOUR PASSENGERS SAFE
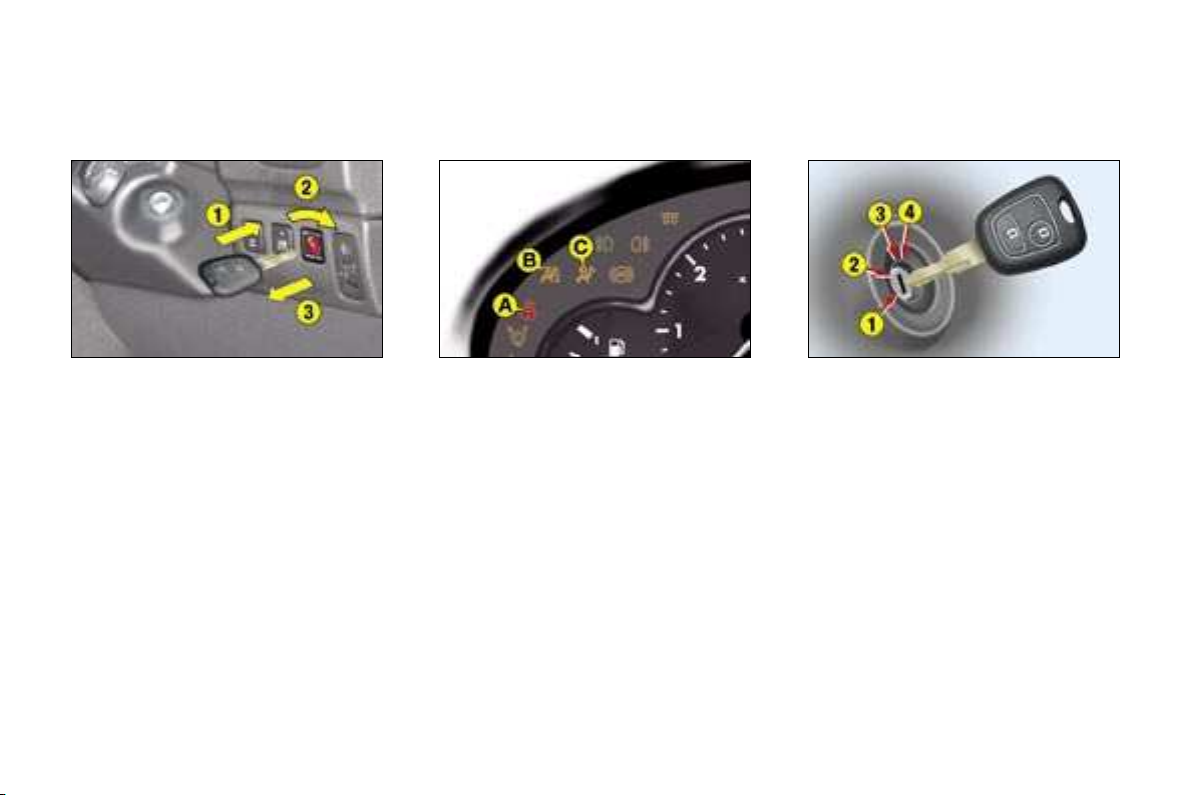
Front passenger air bag
1. Insertion of the key.
2. Selection of the position:
"ON" (activation), with front
passenger or "forward facing"
child seat,
"OFF" (disarming), with "rear
facing" child seat.
3. Removal of the key keeping the
switch in this position.
134
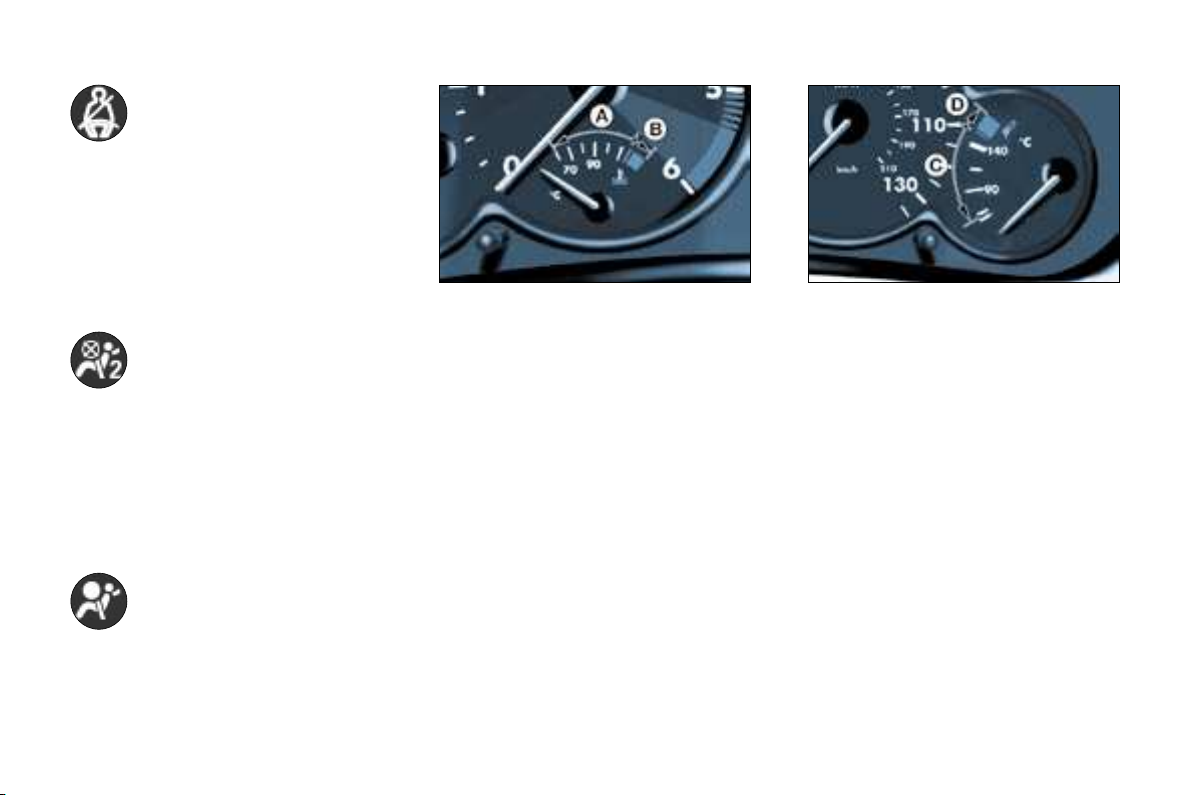
Driver’s seat belt and
air bags
A. Driver’s seat belt not fastened
or unfastened warning light, lit in
red.
B. Passenger air bag warning light;
lit if the air bag is disarmed.
C. Air bags warning light; off after
the ignition is switched on.
22
STARTING
Ignition switch
1. Stop position.
2. Accessories position.
3. Running position.
4. Starting position.
Page 13
Familiarisation
16 -
DRIVING SAFELY
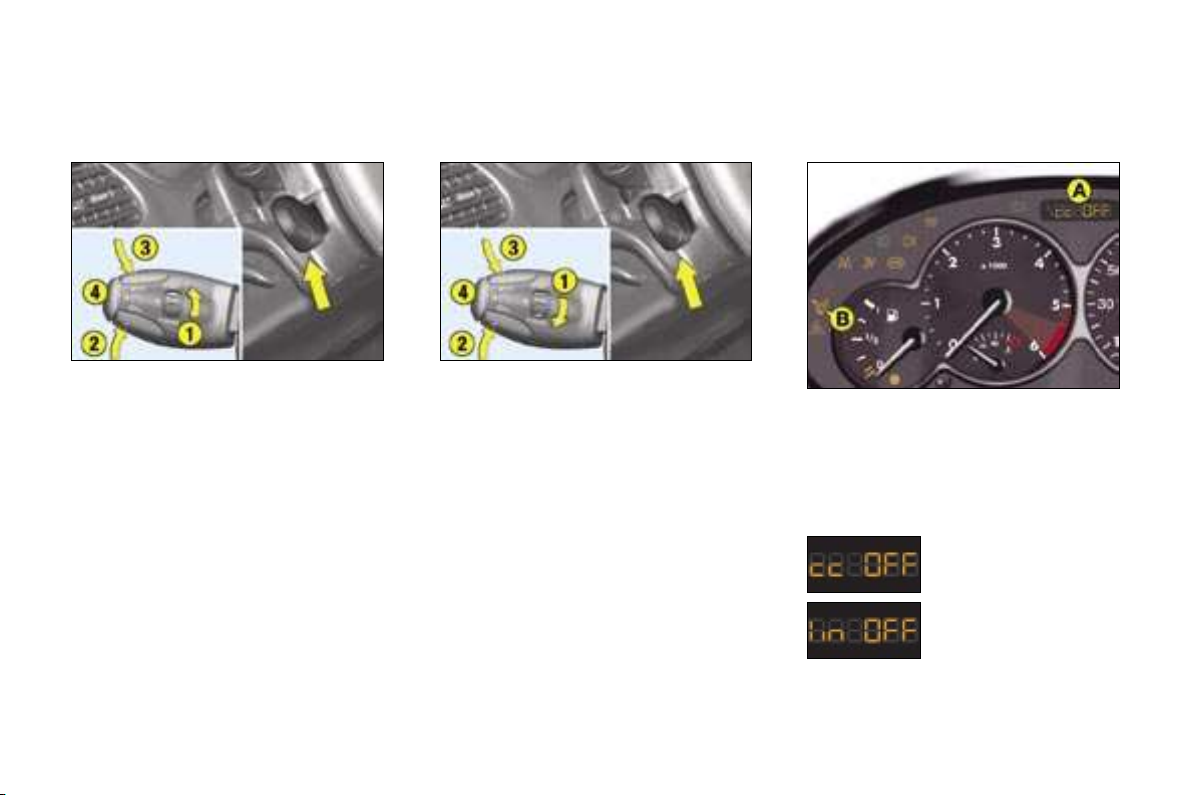
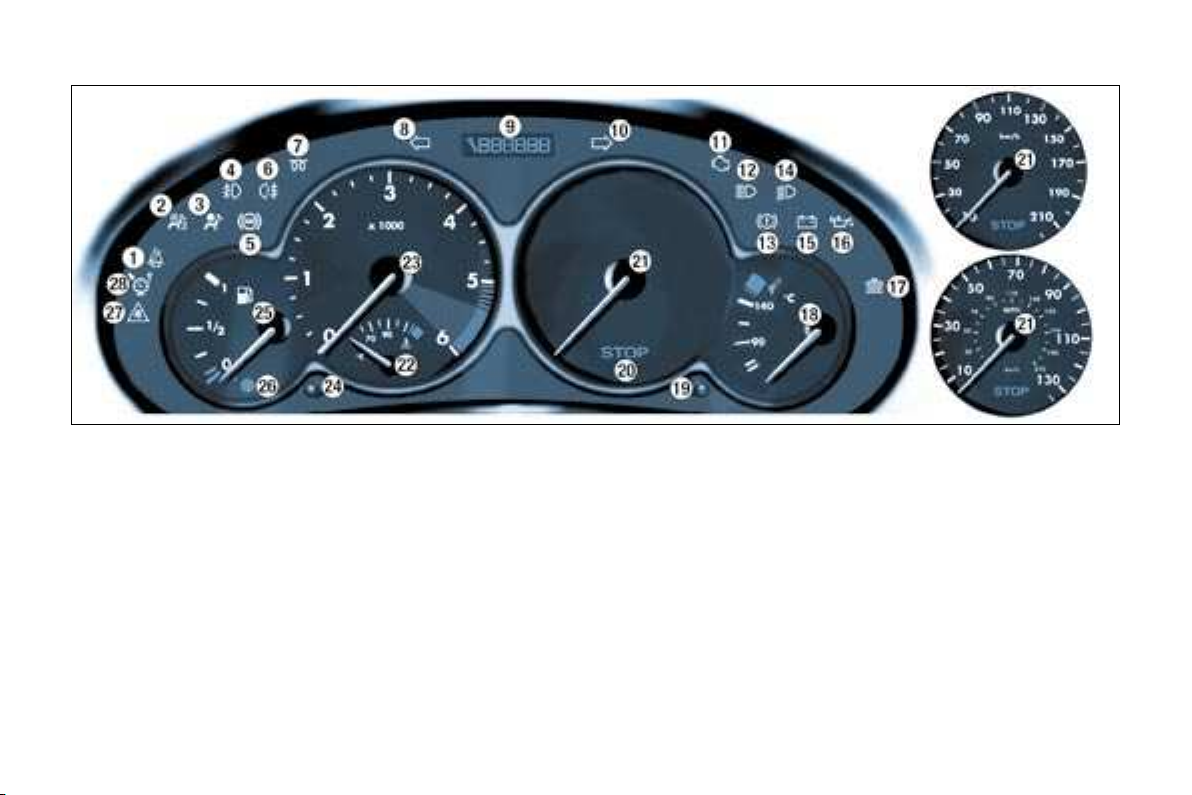
Speed limiter
Cruise control
Display on the instrument
panel
1. Speed limiter mode Selection/
Off.
2. Decreasing of the programmed
value.
3. Increasing of the programmed
value.
4. Speed limiter On/Off.
The speed limiter operates with
a programmed speed of at least
20 mph (30 km/h).
Values must be set with the engine
running.
128
1. Cruise control mode Selection/
Off.
2. Decreasing of the programmed
value.
3. Increasing of the programmed
value.
4. Cruise control On/Off.
In order to be programmed or activated, the vehicle speed must be above
25 mph (40 km/h), with at least fourth
gear engaged on the manual gearbox.
130
The cruise control or speed limiter
mode appears on the instrument panel
display A when it is selected; an indica-
tor light B comes on on the instrument
panel when it is activated.
Cruise control
Speed limiter
Page 14
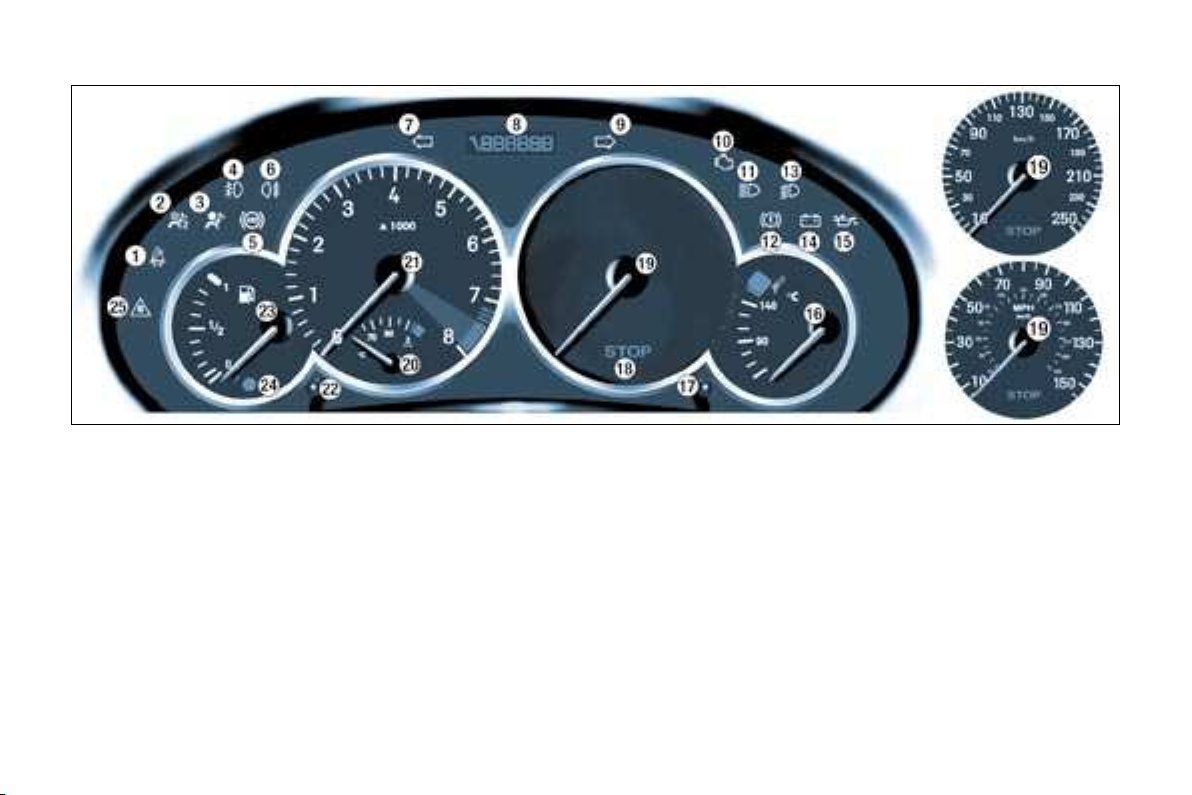
Instruments and controls
INSTRUMENT DIALS: PETROL - DIESEL MANUAL GEARBOX (saloon and 206 SW)
17
-
1. Seat belt not fastened warning
light*
2. Passenger air bag disarmed
warning light*
3. Air bags warning light
4. Front fog lamps indicator light
5. Anti-lock braking system (ABS)
warning light
6. Rear fog lamp indicator light
7. Diesel pre-heat warning light
8. Left hand direction indicator
9. Total distance recorder, service,
engine oil level and speed
limiter/cruise control indicator
10. Right hand direction indicator
11. Engine diagnostics warning light
12. Main beam headlamps indicator
light
13. Handbrake, low brake fluid
level and electronic brake force
distribution warning light
14. Dipped beam headlamps
indicator light
15. Battery charge warning light
16. Engine oil pressure and
temperature warning light
17. Coolant low level warning light
(Diesel)*
18. Engine oil temperature indicator
19. Total distance recorder button
20. Central (STOP) warning light
21. Speedometer
22. Coolant temperature indicator
23. Rev counter
24. Lighting rheostat button
25. Fuel level indicator
26. Low fuel level warning light
27. Dynamic stability control
(ESP/ASR) warning light
28. Speed limiter/cruise control
indicator light
* According to country.
Page 15
Instruments and controls
18 -
INSTRUMENT DIALS: PETROL MANUAL GEARBOX (206 GTi 180)
1. Seat belt not fastened warning
light*
2. Passenger air bag disarmed
warning light*
3. Air bags warning light
4. Front fog lamps indicator light
5. Anti-lock braking system
(ABS) warning light
6. Rear fog lamp indicator light
7. Left hand direction indicator
8. Total distance recorder, service
indicator and engine oil level
indicator
9. Right hand direction indicator
10. Engine diagnostics warning light
11. Main beam headlamps indicator
light
12. Handbrake, low brake fluid
level and electronic brake force
distribution warning light
13. Dipped beam headlamps
indicator light
14. Battery charge warning light
15. Engine oil pressure and
temperature warning light
16. Engine oil temperature indicator
17. Total distance recorder button
18. Central (STOP) warning light
19. Speedometer
20. Coolant temperature indicator
21. Rev counter
22. Lighting rheostat button
23. Fuel level indicator
24. Low fuel level warning light
25. Dynamic stability control
(ESP/ASR) warning light
* According to country.
Page 16
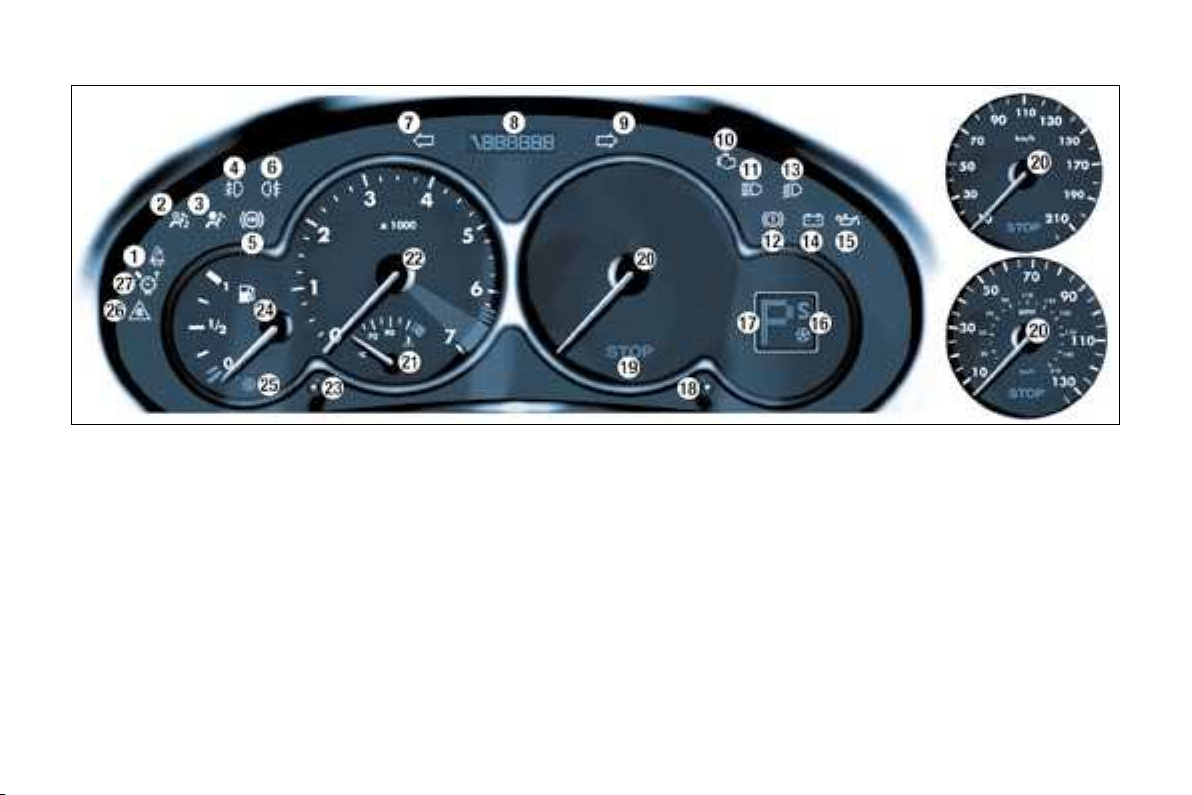
INSTRUMENT DIALS: PETROL AUTOMATIC GEARBOX (saloon and 206 SW)
Instruments and controls
19
-
1. Seat belt not fastened warning
light*
2. Passenger air bag disarmed
warning light*
3. Air bags warning light
4. Front fog lamps indicator light
5. Anti-lock braking system (ABS)
warning light
6. Rear fog lamp indicator light
7. Left hand direction indicator
8. Total distance recorder, service,
engine oil level and speed
limiter/cruise control indicator
9. Right hand direction indicator
10. Engine diagnostics warning light
11. Main beam headlamps indicator
light
12. Handbrake, low brake fluid
level and electronic brake force
distribution warning light
13. Dipped beam headlamps
indicator light
14. Battery charge warning light
15. Engine oil pressure and
temperature warning light
16. Operating programmes
17. Gear indicator
18. Total distance recorder button
19. Central (STOP) warning light
20. Speedometer
21. Coolant temperature indicator
22. Rev counter
23. Lighting rheostat button
24. Fuel level indicator
25. Low fuel level warning light
26. Dynamic stability control
(ESP/ASR) warning light
27. Speed limiter/cruise control
indicator light
* According to country.
Page 17

Instruments and controls
20 -
WARNING LIGHTS
A permanently lit warning light
or one flashing, with the engine
running, indicates an operating
fault of the unit concerned.
The illumination of certain warning
lights may be accompanied by
an audible signal and a message
on the multifunction display. Do
not ignore this warning: consult
a PEUGEOT dealer as soon as
possible.
If the central STOP warning light
comes on when you are driving,
stop your vehicle immediately,
where it is safe to do so.
Central (STOP)
warning light
Linked to the warning
lights:
- engine oil pressure and temperature,
- low coolant level,
- handbrake,
- low brake fluid level,
- electronic brake force distribution
system fault.
Linked to the coolant temperature
indicator.
You must stop if the light flashes
with the engine running.
Consult a PEUGEOT dealer.
Engine oil pressure
and temperature
warning light
Linked to the central (STOP) warning
light.
You must stop.
This warning light indicates one of
the following:
- insufficient oil pressure,
- a lack of oil in the lubrication circuit.
Top up the level,
- an oil temperature which is too
high. The warning light is accompanied by an audible signal. To lower
the oil temperature, reduce your
speed.
Consult a PEUGEOT dealer.
Diesel engine low
coolant level warning
light (according to
model)
Linked to the central (STOP) warning
light.
You must stop.
Wait for the engine to cool before
topping up the level.
The cooling circuit is pressurised.
In the event of breakdown and to pre-
vent any risk of burns, unscrew the
cap by two turns to allow the pressure to drop.
When the pressure has dropped, remove the cap and top up the level.
Consult a PEUGEOT dealer.
Handbrake, low
brake fluid and
Electronic Brake Force
Distribution system
fault warning light
Linked to the central (STOP) warning
light.
This indicates one of the following:
- that the handbrake is applied or not
fully released,
- an excessive drop in brake fluid
level (if the warning light remains
on even when the handbrake is released),
- a fault in the Electronic Brake Force
Distribution system, if lit at the same
time as the ABS warning light.
You must stop.
Consult a PEUGEOT dealer.
Anti-lock braking
system (ABS) warning
light
This comes on for a few seconds
each time the ignition is switched on.
If the warning light remains on or
comes on above 8 mph (12 km/h),
this indicates an ABS malfunction.
However, the vehicle retains conventional servo-assisted braking.
Illumination of this warning light,
accompanied by an audible signal
and a message on the multifunction
display, indicates a fault in the ABS
system.
Consult a PEUGEOT dealer.
Page 18
Instruments and controls
21
-
Dynamic stability
control system (ESP/
ASR) warning light
This comes on for a few seconds
each time the ignition is switched on.
With the engine running and when
the vehicle is moving, it comes on if
the system is activated.
It lights permanently accompanied by
a message on the multifunction display when the system is disarmed.
If the warning light remains lit with
the engine running and when the vehicle is moving, consult a PEUGEOT
dealer.
Battery charge warning
light
This indicates one of the
following:
- faulty operation of the charging circuit,
- slack battery or starter terminals,
- a cut or slack alternator belt,
- an alternator failure.
Consult a PEUGEOT dealer.
Emission control
warning light
(according to model)
This comes on for a few seconds
each time the ignition is switched
on.
If it comes on with the engine running,
this indicates incorrect operation of
the injection, ignition or emission control system.
If the warning light flashes, there
is a risk of damage to the catalytic
converter on petrol engines.
Consult a PEUGEOT dealer.
Particle emission filter
saturation warning (Diesel)
An audible signal and a message on
the multifunction display indicate clogging of the diesel filter (PEF), this is
the beginning of saturation of the particle emission filter due to exceptionally
prolonged urban driving conditions:
low speed, long traffic jams, ...
In order to regenerate the filter, you
are advised to drive at a speed of
40 mph (60 km/h) or above as soon
as possible when traffic conditions
permit for at least five minutes, until
the message disappears. If this fault
persists, consult a PEUGEOT dealer
as soon as possible.
Diesel additive level warning
(Diesel)
An audible signal and a message
on the multifunction display indicate
a low diesel additive level. This additive must be topped up, consult a
PEUGEOT dealer as soon as possible.
Diesel engine pre-heat
warning light
Wait until the warning light
goes out before starting the
engine.
If the temperature is high enough,
the warning light comes on for less
than one second. You can start the
engine without waiting.
Low fuel level
warning light
When this light first
comes on, you have
enough fuel to drive at least 30 miles
(50 km). The tank capacity is approximately 50 litres.
Speed limiter/cruise
control indicator light
This comes on when the
speed limiter or cruise control is activated.
Page 19

Instruments and controls
22 -
Seat belt not fastened
warning light*
When the ignition is switched
on if the driver has not fastened his
seat belt.
Above 12 mph (20 km/h), the warning
light flashes for about two minutes
accompanied by an increasingly audible signal and a message on the
multifunction display. This warning
light remains lit until the driver’s seat
belt is fastened.
on, this indicator light comes
Passenger air bag
disarmed warning
light*
Illumination of this warning light accompanied by a message on the
multifunction display, indicates that
the passenger air bag is disarmed.
The warning light remains lit as long
as the passenger air bag is disarmed.
Always consult a PEUGEOT dealer if
the warning light flashes.
Air bags warning light
The light will come on for a
few seconds when the ignition is switched on.
With the engine running, illumination
of this warning light, accompanied by
an audible signal and a message on
the multifunction display, indicates a
fault in the air bags.
Consult a PEUGEOT dealer.
Coolant temperature indicator
- needle in zone (A), the temperature
is correct,
- needle in zone (B), the temperature is too high. The central STOP
warning light flashes.
You must stop.
Consult a PEUGEOT dealer.
* According to country.
Engine oil temperature
indicator
With the engine running, this indicates the oil temperature:
- needle in zone (C), the temperature
is correct,
- needle in zone (D), the temperature
is too high. To lower the oil temperature, reduce your speed.
Page 20
Instruments and controls
22 -
Seat belt not fastened
warning light*
When the ignition is switched
on if the driver has not fastened his
seat belt.
Above 12 mph (20 km/h), the warning
light flashes for about two minutes
accompanied by an increasingly audible signal and a message on the
multifunction display. This warning
light remains lit until the driver’s seat
belt is fastened.
on, this indicator light comes
Passenger air bag
disarmed warning
light*
Illumination of this warning light accompanied by a message on the
multifunction display, indicates that
the passenger air bag is disarmed.
The warning light remains lit as long
as the passenger air bag is disarmed.
Always consult a PEUGEOT dealer if
the warning light flashes.
Air bags warning light
The light will come on for a
few seconds when the ignition is switched on.
With the engine running, illumination
of this warning light, accompanied by
an audible signal and a message on
the multifunction display, indicates a
fault in the air bags.
Consult a PEUGEOT dealer.
Coolant temperature indicator
- needle in zone (A), the temperature
is correct,
- needle in zone (B), the temperature is too high. The central STOP
warning light flashes.
You must stop.
Consult a PEUGEOT dealer.
* According to country.
Engine oil temperature
indicator
With the engine running, this indicates the oil temperature:
- needle in zone (C), the temperature
is correct,
- needle in zone (D), the temperature
is too high. To lower the oil temperature, reduce your speed.
Page 21
Instruments and controls
23
-
Display screen showing the
positions of the automatic
gearbox selector lever
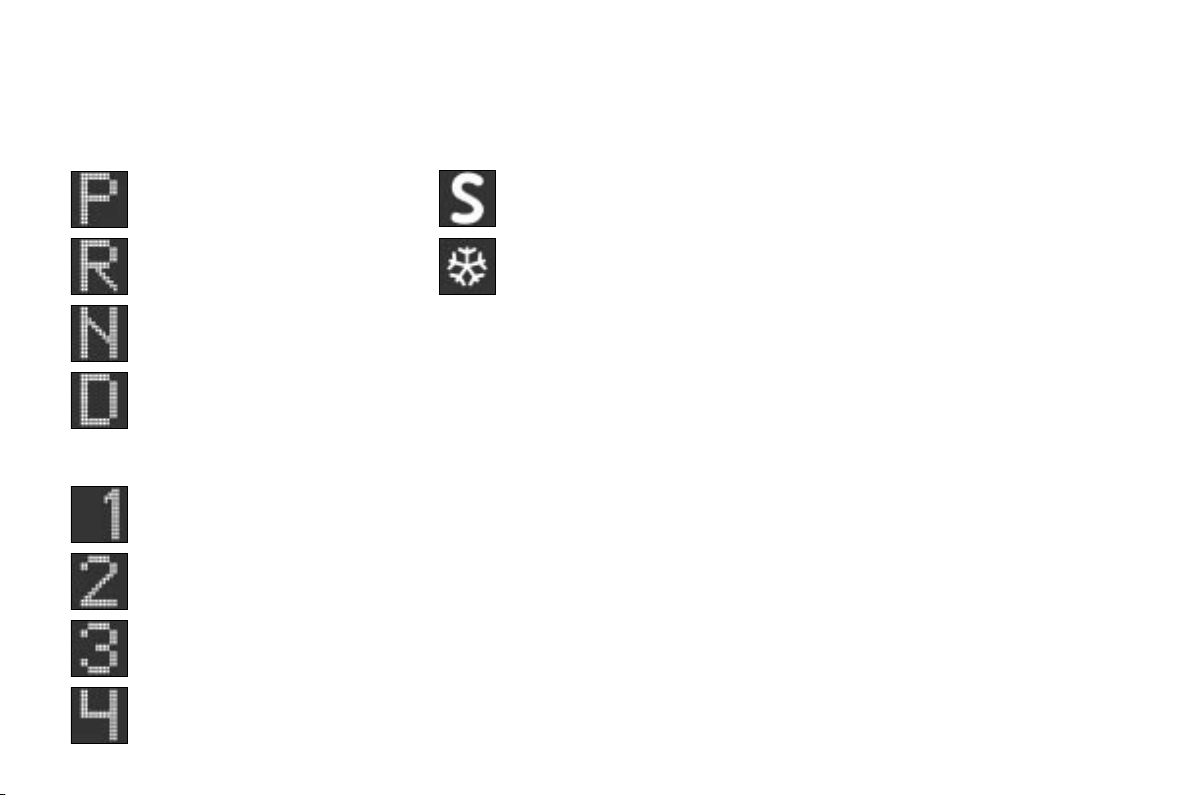
Park
Reverse
Neutral
Drive
Manual mode:
1st gear engaged
2nd gear engaged
3rd gear engaged
Automatic gearbox indicator
lights
"SPORT" Indicator light
This comes on when the
"SPORT" programme is selected.
"SNOW" Indicator light
This comes on when the
"SNOW" programme is selected.
Operating abnormality
If the Sport and Snow indicator lights
flash, accompanied by an audible
signal and a message on the multifunction display, consult a PEUGEOT
dealer.
4th gear engaged
Page 22
Instruments and controls
24 -
INSTRUMENT PANEL
DISPLAY
After switching on the ignition, three
functions are shown in succession:
- service indicator,
- engine oil level indicator,
- total distance recorder, it remains
displayed for 30 seconds after the
ignition is switched off.
It also displays the speed limiter/
cruise control information, when one
of these systems is active (see corresponding section).
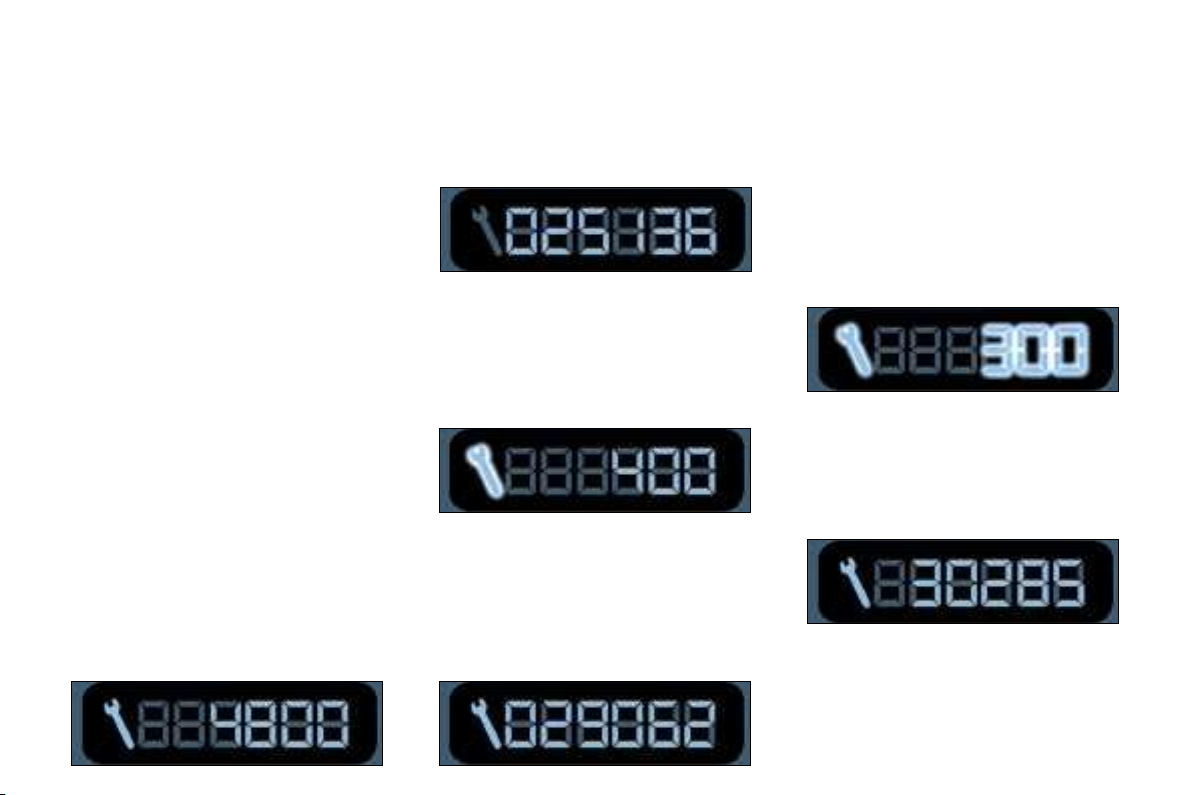
Service indicator
This is a visual reminder of when the
next service is due. This service is to
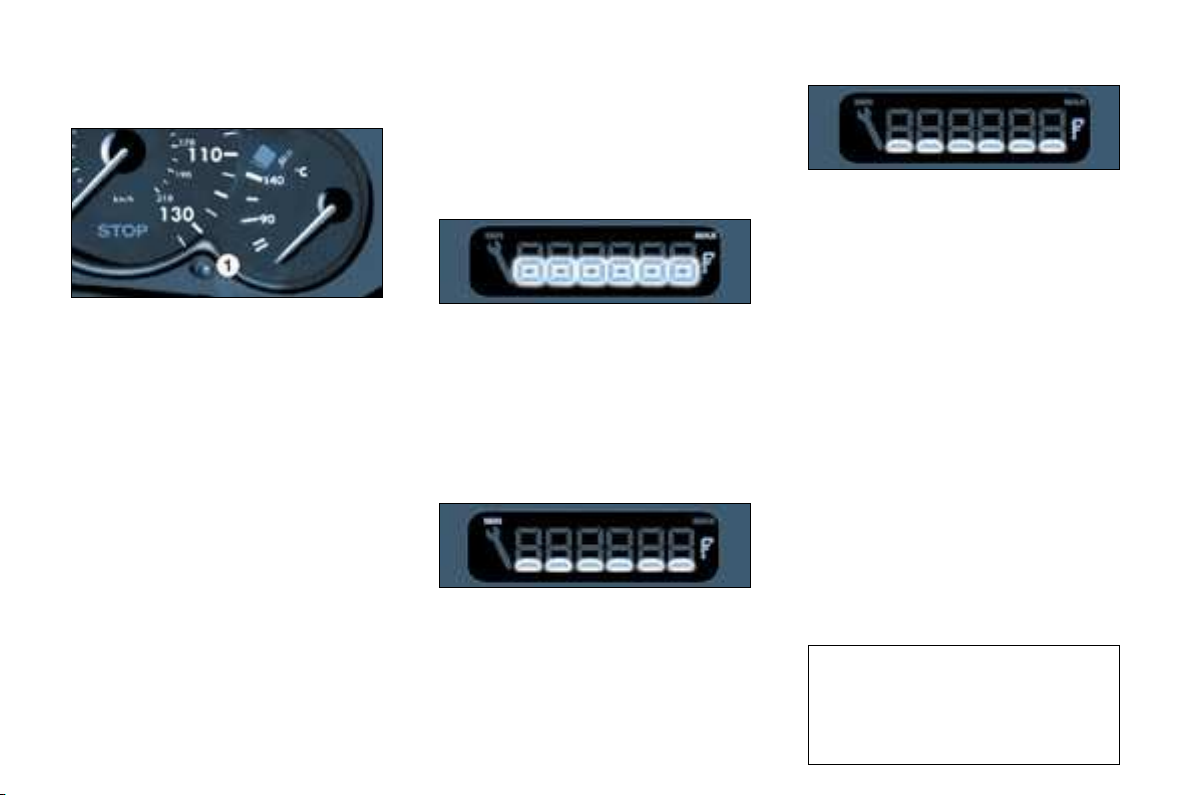
be carried out according to the manufacturer’s servicing schedule.
Operation
As soon as the ignition is switched
on and for 5 seconds, the spanner
symbolising "service operation" is lit.
The trip recorder display shows the
distance remaining (in round figures)
before the next service.
Example: 4,800 miles/km remain
before the next service is due. When
the ignition comes on and for 5 seconds the display indicates:
5 seconds after the ignition is switched
on, the total distance recorder resumes normal operation and the display
shows the total or trip distances.
The distance remaining before
the next service is less than
500 miles (1,000 km).
Example: 400 miles (900 km) re-
main before the next service is due.
When switching on the ignition and
for 5 seconds, the display shows:
5 seconds after the ignition is switched on, the total distance recorder
resumes normal operation and the
symbol remains lit.
This indicates that a service should
be carried out shortly. The display
shows the total or trip distances.
The service is overdue
Each time the ignition is switched on
and for 5 seconds, the symbol and
the excess distance flash.
Example: the service is overdue by
300 miles/km. The service should be
carried out very shortly.
When the ignition is switched on and
for 5 seconds, the display shows:
5 seconds after the ignition is switched on, the total distance recorder resumes normal operation and
the symbol remains lit. The display
shows the total or trip distances.
Note: the service spanner lights if
the two-year interval has been exceeded*.
* According to country.
Page 23
Instruments and controls
25
-
Resetting the service indicator
Your PEUGEOT dealer carries out
this operation after each service.
The reset procedure is as follows:
- Switch off the ignition.
- Press and hold button 1.
- Switch on the ignition.
The display begins a 10 second
countdown.
-
Keep button 1 pressed for 10 seconds.
The display shows [= 0] and the service symbol disappears.
Engine oil level indicator
When the ignition is switched on,
the engine oil level is indicated for
approximately 10 seconds, after the
service information.
Surplus of oil
Flashing of the six squares and displaying of "max" indicate a surplus of
oil which could damage the engine.
If the surplus of oil is confirmed by
a check using the dipstick, contact a
PEUGEOT dealer without delay.
Lack of oil
Flashing of the six segments and displaying of "min" indicate a lack of oil
which could damage the engine.
If the lack of oil is confirmed by a
check using the dipstick, it is essential that the level is topped up.
Oil level gauge fault
Flashing of the six segments indicates a malfunction of the oil level
gauge.
There is a risk of damage to the engine.
Contact a PEUGEOT dealer.
The level read on the gauge
will only be correct if the vehicle is on level ground and the
engine has been off for more
than 10 minutes.
Page 24
Instruments and controls
26 -
Total distance recorder
Pressing button 1 alternates between:
- the total distance display,
- the trip distance display,
-
the speed limiter or cruise control
display when one of these systems
is selected with the engine running.
To reset the trip recorder to zero,
when it is displayed press button 1
until zeros appear.
LIGHTING RHEOSTAT
With the lights on, press the button
to vary the intensity of the lighting of
the instruments and controls. When
the lighting reaches the minimum (or
maximum) setting, release the button
then press it again to increase (or reduce) the brightness.
As soon as the lighting is of the required brightness, release the button.
HAZARD WARNING
LIGHTS
Press the button, the direction indicators flash.
They can operate with the ignition off.
Automatic lighting of hazard
warning lights*
When braking in an emergency,
depending on the deceleration, the
hazard warning lights come on automatically. They switch off automatically the first time you accelerate.
It is also possible to switch them off
by pressing the button.
* According to country.
Page 25
Multifunction displays
27
-
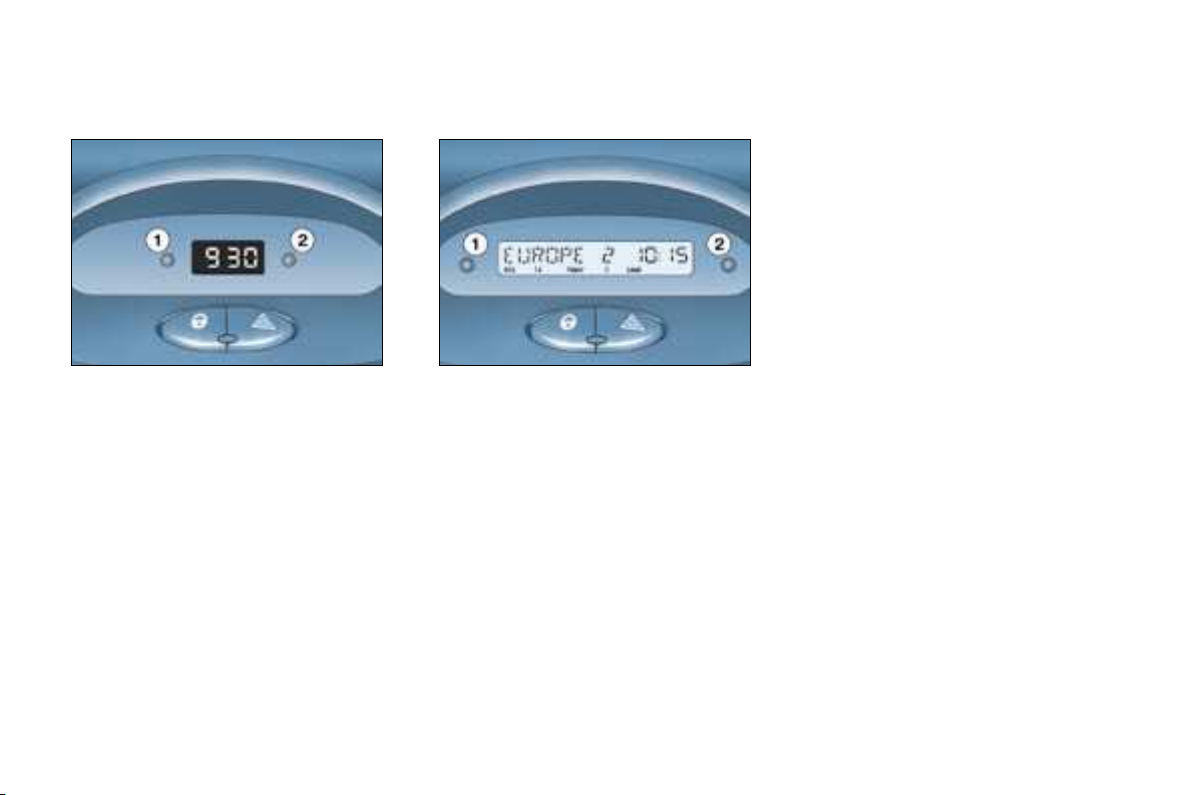
CLOCK
Button 1: hour adjustment
Button 2: minute adjustment
Press and hold the button for rapid
advance.
DISPLAY A
This displays the following information:
- the time,
- the date,
- the outside temperature*
(this flashes if there is a risk
of ice),
- the audio system displays,
- a door check
(e.g.: "left front door open"),
- warning messages
(e.g. "remote control battery flat")
or information messages
(e.g. "economy mode active"),
displayed temporarily.
Adjusting the parameters
Press and hold button 1 for two seconds to access the settings; the
data flashes, indicating it is ready to
be modified.
Then, each press of button 1 scrolls
through the various data in the following order:
- language of information displayed,
- hours (12 then 24 hour mode),
- minutes,
- year,
- month,
- day,
- unit of temperature (degrees Celsius or Fahrenheit).
Pressing button 2 allows modification
of the data selected. Press and hold
for rapid advance (return to start after
the last possible value).
After 7 seconds with no action, the
main display returns; the modified
data are now recorded.
Note: Pressing button 2 briefly displays the outside temperature for a
few seconds.
* According to model.
Page 26

Multifunction displays
28 -
MONOCHROME DISPLAY B
This enables the following information to be displayed:
- the time,
- the date,
- the outside temperature (this
flashes when there is a risk of ice),
- the radio displays,
- the status of the doors. The display
shows you, by means of a graphic,
whether a door is open,
- the warning messages (e.g. "battery charge fault") or information
messages (e.g. "fuel level low"),
displayed temporarily, can be cleared by pressing button 1 or 2,
- the trip computer.
Setting the parameters
Press button 1 for two seconds to
access the settings. The information flashes to show it is ready to be
modified.
Then, individual presses on button 1
allow you to scroll through the various
data in the following sequence:
- language in which the information
is displayed,
- unit of distance (kms or miles),
- unit of temperature (degrees Celsius
or Fahrenheit),
- time format (12 then 24 hour mode),
- hour,
- minutes,
- year,
- month,
- day.
Pressing button 2 allows you to
change the information selected.
Maintain the pressure for rapid
scrolling.
After 7 seconds without operation,
the screen returns to the normal
display and the modified data is
recorded.
Page 27
Multifunction displays
29
-
MONOCHROME SCREEN CT
This is controlled by the RT3 GPS
audio/telephone keypad.
It enables the following information to
be displayed:
- the time,
- the date,
- the outside temperature (a message warns you when there is a risk
of ice),
- the audio source displays (radio,
CD, ...),
- the telematic system displays (telephone, services, ...),
- the status of the openings (doors,
bonnet, ...),
- the warning messages (e.g. "Fuel
level low") and vehicle functions
status messages (e.g. "Passenger air bag deactivated") displayed
temporarily,
- the trip computer display (see corresponding section),
- the satellite navigation system displays (see corresponding section).
Note: to enable you to use all of your
system’s functions, you have two CD
ROMs: one, "Configuration", contains
the software and the various display
and spoken information languages,
the other, "Navigation", contains the
satellite navigation system map data.
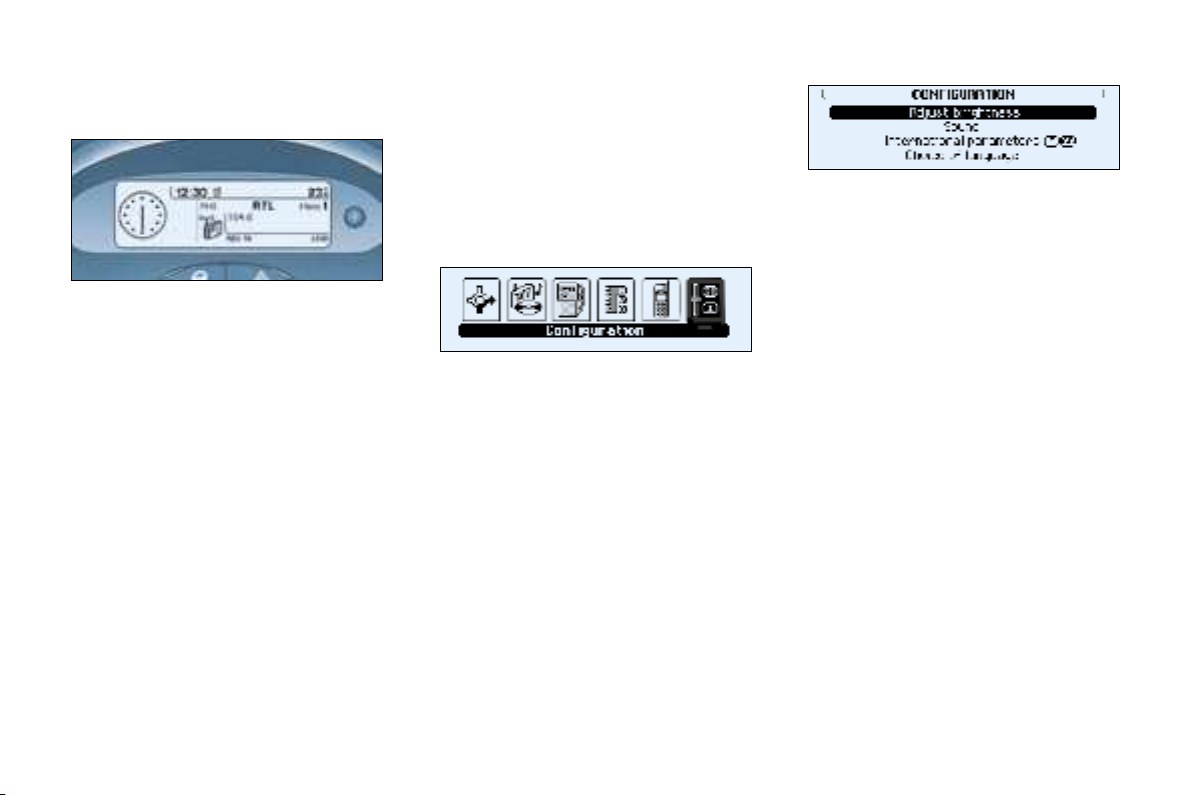
Main menu
Press the RT3 audio/telephone
"MENU" button to access the main
menu and select one of the following
applications:
- navigation/traffic info (see section
"Satellite navigation system"),
- audio functions (see "RT3 Audio/
telephone" section),
- trip computer (see corresponding
section),
- directory (see "RT3 audio/telephone"
section),
- telephone and telematic services
(see "RT3 audio/telephone" section),
- configuration.
Configuration menu
This gives access to the following
parameters:
- "Adjust the brightness": adjust the
brightness of the display.
- "Sound": voice synthesiser setting
(for the masculine/feminine voice
parameter; insert the configuration
CD-Rom); setting of the spoken
commands.
- "International parameters": date
and time setting (12 or 24 hour
mode, adjustment of the minutes
on GPS); units setting (l/100 - °C or
mpg - °F).
- "Choice of the language": choice
of the language of the display, information and spoken commands
(Dutch, English, French, German,
Italian, Portuguese, Spanish: insert
the configuration CD-Rom).
Page 28
Audio equipment and telematics
30 -
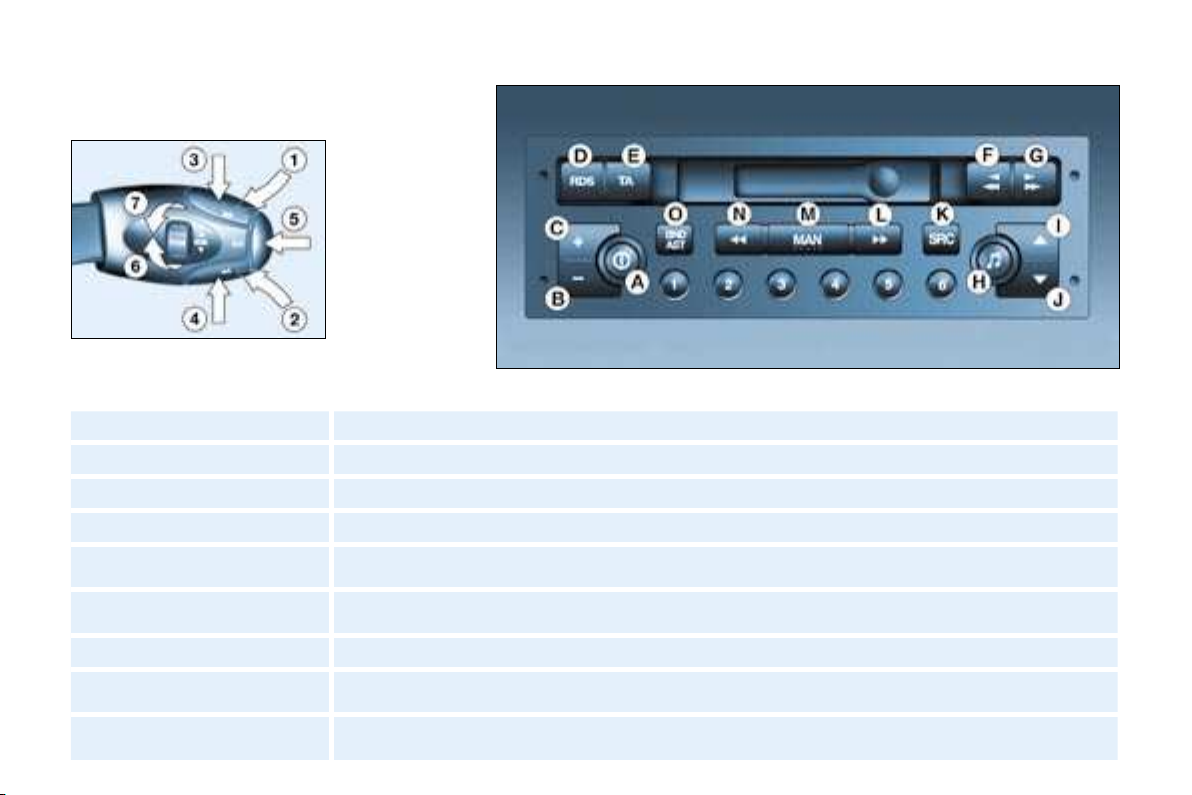
AUDIO RB3
Stalk movement Function
1 - Press (behind) Increase volume.
2 - Press (behind) Decrease volume.
1 + 2 - Simultaneous press Sound cut-off (mute); restoring of the sound by pressing any button.
3 - Press Automatic search of higher frequencies (radio).
4 - Press Automatic search of lower frequencies (radio).
5 - Press the end Change of source (radio/cassette).
6 - Rotation
(clockwise)
7 - Rotation
(anti-clockwise)
Selection of next station stored in the memory (radio).
Selection of previous station stored in the memory (radio).
Page 29

Button Function
A Radio on/off.
B - Decrease volume.
C + Increase volume.
D RDS
E TA Traffic information priority on/off.
F Press fully: cassette rewind.
G Press fully: fast forward.
F + G
RDS function on/off.
Press for more than 2 seconds: regional following mode on/off.
Press half way: reversal of direction of play of the cassette.
Press fully: ejection of the cassette.
Audio equipment and telematics
31
-
H
I
J
K SRC Selection of source: radio, cassette.
L
M MAN Manual/automatic operation of buttons L and N in radio mode.
N
O
1 to 6 1 2 3 4 5 6
BND
AST
Selection of bass, treble, loudness, sound distribution and automatic volume correction.
Increase setting of functions associated with button H.
Decrease setting of functions associated with button H.
Manual and automatic search of higher frequency.
Manual and automatic search of lower frequency.
Selection of FM1, FM2, FMast and AM wavebands.
Press for more than 2 seconds: automatic storing of stations in the memory (autostore).
Selection of station stored in the memory.
Press for more than 2 seconds: storing of a station in the memory.
Page 30
Audio equipment and telematics
34 -
GENERAL FUNCTIONS
On/off
With the ignition key
in the accessories or
ignition position, press
button A to switch the
set on or off.
The set can operate for 30 minutes
without the vehicle ignition being
switched on.
Anti-theft system
The audio system is coded in such a
way that it can operate only on your
vehicle. It would not function if fitted
to another vehicle.
The anti-theft system is automatic and requires no action on
your part.
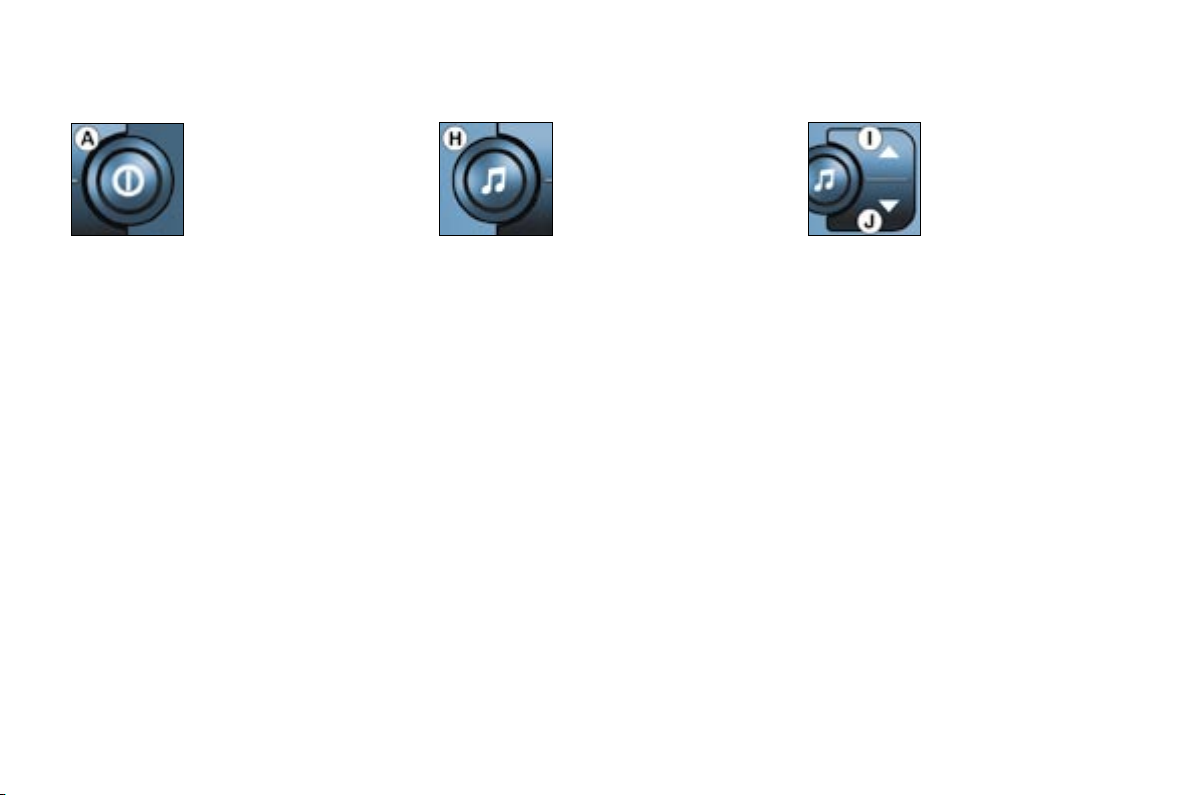
ADJUSTING THE VOLUME
Press button C to increase the volume,
or button B to decrease it.
Continuous pressure on buttons C
and B allows a gradual adjustment of
the volume.
AUDIO SETTINGS
Press button H several times in succession to access the
bass (BASS), treble
(TREB), loudness
(LOUD), fader (FAD),
balance (BAL) and
automatic volume correction settings.
Exit from audio mode is automatic
after a few seconds without pressing
any button, or by pressing button H
after configuration of the automatic
volume correction.
Note: bass, treble and loudness settings are specific to each source. It
is possible to set them differently for
radio, cassette (RB3), CD (RD3) and
CD changer.
Adjusting the bass
When "BASS" is displayed, press button
I or J to vary the setting.
-
"BASS -9" for a minimum bass setting,
- "BASS 0" for a nor-
- "BASS +9" for a maximum bass
setting.
Adjusting the treble
When "TREB" is displayed, press
button I or J to vary the setting.
- "TREB -9" for a minimum treble
setting,
- "TREB 0" for a normal setting,
- "TREB +9" for a maximum treble
setting.
Adjusting the loudness
This function automatically emphasises bass and treble tones. Press
button I or J to switch the function on
or off.
mal setting,
Page 31

Audio equipment and telematics
35
-
Adjusting the front/rear sound
distribution (Fader)
When "FAD" is displayed, press
button I or J.
Button I increases the volume in the
front.
Button J increases the volume in the
rear.
Adjusting the right/left sound
distribution (Balance)
When "BAL" is displayed, press button I or J.
Button I increases the volume on the
right-hand side.
Button J increases the volume on the
left-hand side.
Automatic volume correction
This function enables the volume to
be automatically adjusted depending
on the level of noise produced by the
speed of the vehicle.
Press buttons I or J to switch the
function on or off.
RADIO
Notes on radio reception
Your car radio is subject to phenomena which do not affect domestic
radio sets. Both AM (MW/LW) and FM
reception are subject to various forms
of interference. This is no reflection on
the quality of the equipment, but is due
to the nature of the signals and the way
in which they are transmitted.
On MW/LW, interference may be noticed when passing under high voltage
power lines or bridges, or in tunnels.
On FM, interference may be the result
of increasing distance from the transmitter, deflection of the signals by
obstacles (mountains, hills, buildings,
etc.), or of being in an area which is
not covered by a transmitter.
Selecting radio mode
Audio RB3: press the
"SRC" button several
times in succession.
Audio RD3: press button R.
Selecting a waveband
Audio RB3: briefly
press the "BND/AST"
button to select the
FM1, FM2, FMast and
AM wavebands.
Audio RD3: briefly
press button R to select
the FM1, FM2 FMast
and AM wavebands.
Page 32

Audio equipment and telematics
35
-
Adjusting the front/rear sound
distribution (Fader)
When "FAD" is displayed, press
button I or J.
Button I increases the volume in the
front.
Button J increases the volume in the
rear.
Adjusting the right/left sound
distribution (Balance)
When "BAL" is displayed, press button I or J.
Button I increases the volume on the
right-hand side.
Button J increases the volume on the
left-hand side.
Automatic volume correction
This function enables the volume to
be automatically adjusted depending
on the level of noise produced by the
speed of the vehicle.
Press buttons I or J to switch the
function on or off.
RADIO
Notes on radio reception
Your car radio is subject to phenomena which do not affect domestic
radio sets. Both AM (MW/LW) and FM
reception are subject to various forms
of interference. This is no reflection on
the quality of the equipment, but is due
to the nature of the signals and the way
in which they are transmitted.
On MW/LW, interference may be noticed when passing under high voltage
power lines or bridges, or in tunnels.
On FM, interference may be the result
of increasing distance from the transmitter, deflection of the signals by
obstacles (mountains, hills, buildings,
etc.), or of being in an area which is
not covered by a transmitter.
Selecting radio mode
Audio RB3: press the
"SRC" button several
times in succession.
Audio RD3: press button R.
Selecting a waveband
Audio RB3: briefly
press the "BND/AST"
button to select the
FM1, FM2, FMast and
AM wavebands.
Audio RD3: briefly
press button R to select
the FM1, FM2 FMast
and AM wavebands.
Page 33

Audio equipment and telematics
36 -
Automatic station search
Briefly press button L or N to search
for the station immediately above or
below. By continuing to press the
button in the direction selected, you
will obtain continuous scrolling of the
frequency.
The scrolling stops at the first station found as soon as the button is
released.
If the TA traffic program is selected,
only stations broadcasting this type
of program are selected.
Searching for a station occurs first in
"LO" sensitivity (selection of the most
powerful transmitters) during scanning of the waveband, then in "DX"
sensitivity (selection of the weakest
and most distant transmitters).
To make a direct search in "DX" sensitivity, press button L or N twice.
Manual station search
Press the "MAN" button.
Briefly press button L or N to in-
crease or decrease the frequency
displayed.
By continuing to press the button in
the direction selected, you will obtain
continuous scrolling of the frequency.
The scrolling stops as soon as the
button is released.
Pressing the "MAN" button again
returns you to automatic station
search.
Manual storing of stations in the
memory
Select the station required.
Press one of the buttons "1" to "6"
for more than two seconds.
The sound stops then becomes audi-
ble again, confirming that the station
has been stored in the memory.
Automatic storing of FM stations
in the memory (autostore)
Audio RB3: press
and hold the "BND/
AST" button for more
than two seconds.
Audio RD3: press and
hold button R for more
than two seconds.
Your radio automatically stores the
6 stations with the strongest signal in
FM. These stations are stored in the
FMast waveband.
If it is not possible to find 6 stations,
the remaining memories are empty.
Recalling stations stored in the
memory
For each waveband, briefly press
buttons "1" to "6" to recall the
corresponding station.
Page 34

Audio equipment and telematics
37
-
RDS
Using the RDS (Radio Data
System) function on FM
Radio Data System allows you to
continue listening to the same station, whatever frequency it is using
for the region you are going through.
Briefly pressthe "RDS"
button to switch the
function on or off.
The multifunction display will show:
- "RDS" if the function is selected.
- "(RDS)" if the function is selected
but not available.
RDS station following
The display indicates the name of the
station selected. The radio is continually searching for the station which
has the best reception and which is
transmitting the same program.
Traffic information program Regional following mode
When they are part of a network,
Press the "TA" button
to switch the function
on or off.
The multifunction display will show:
- "TA" if the function is selected,
- "(TA)" if the function is selected but
not available.
Any traffic information flash will be
given priority, whatever source you
are listening to (radio, cassette or CD
changer).
If you wish to interrupt a message,
press the "TA" button; this switches
the function off.
Note: the volume of traffic information announcements is independent of the volume of normal
radio listening. You can adjust
it using the volume button. The
setting will be stored and will be
used when the next messages are
broadcast.
certain stations broadcast regional
programs in the various areas they
serve. With regional following mode
you can keep listening to the same
program.
Press the "RDS" button for more
than two seconds to switch the function on or off.
Page 35

Audio equipment and telematics
38 -
PTY function: Audio RD3
This allows you to listen to stations
broadcasting a specific type of program (news, culture, sport, rock, etc.).
With FM selected,
press the "TA" button for two seconds to
switch this function on
or off.
To search for a PTY program:
- select the PTY function,
- briefly press button L or N to scroll
down the list of the various types of
programs offered.
- when the program of your choice
is displayed, keep button L or N
pressed for two seconds to carry
out an automatic search (after an
automatic search the PTY function
is switched off).
In PTY mode the different types of
programs can be stored in the memory. To do this, press the preselection
buttons "1" to "6" for two seconds.
Briefly press the corresponding
button to recall the type of program
stored in the memory.
EON system: Audio RD3
This connects stations which are part
of the same network. It enables the
broadcast of traffic information or a
PTY program, by a station that is part
of the same network as the station to
which you are listening.
This service is available when you
have selected the TA traffic information program or the PTY function.
Page 36

Audio equipment and telematics
39
-
CASSETTE:
AUDIO RB3
Selecting cassette mode
When a cassette is
inserted, the cassette
player will start automatically.
If a cassette is already
inserted, press the "SRC" button until cassette mode is selected.
Note: before inserting the cassette,
ensure that the tape is taut.
Ejecting the cassette
Fully press buttons F
and G to eject the cassette from the player.
Direction of play
The player will play sides 1 and 2 of
the cassette alternately, by automatically reversing the direction of play at
the end of a side.
To manually reverse the direction of
play, press buttons F and G half-way.
Fast forward/rewind
Fully press button F or G to fast
forward or rewind the cassette. At
the end of the fast forward/rewind,
the set plays the current side.
Recommendations for using
cassettes
- Use good quality cassettes.
- Avoid the use of cassettes which
play for longer than 90 minutes.
- Never expose the cassettes to heat
or the direct rays of the sun.
- Re-tighten the tape if necessary
before inserting the cassette into
the player.
- Clean the playing head regularly with
a damp-type cleaning cassette.
Page 37

Audio equipment and telematics
41
-
CD CHANGER
Selecting CD changer mode
Audio RB3: press the
"SRC" button several
times in succession.
Audio RD3: press
button P.
Selecting a disc
Press buttons "1" to "5" on the radio
to select the corresponding disc.
Selecting a track
Press button L to select the next
track.
Press button N to return to the start
of the current track or to select the
previous track.
Accelerated play
Press and hold button L or N for
forwards or backwards accelerated
play.
Accelerated play stops as soon as
the button is released.
Shuffle (RDM)
When the CD changer is selected:
- audio RB3: press and hold the
"SRC" button for two seconds;
- audio RD3: press and hold button
P for two seconds.
The tracks will be played in random
sequence. Pressing the button again
for two seconds returns you to normal play.
The use of copied compact
discs may cause faults.
Insert circular compact
discs only.
Page 38

Audio equipment and telematics
32 -
AUDIO RD3
Stalk movement Function
1 - Press (behind) Increase volume.
2 - Press (behind) Decrease volume.
1 + 2 - Simultaneous press Sound cut-off (mute); restoring of the sound by pressing any button.
3 - Press
4 - Press
5 - Press the end Change of source (radio/CD/CD changer).
6 - Rotation
(clockwise)
7 - Rotation
(anti-clockwise)
Automatic search of higher frequencies (radio) Selection of the next track (CD).
Automatic search of lower frequencies (radio) Selection of the previous track (CD).
Selection of next station stored in the memory (radio) Selection of following CD.
Selection of previous station stored in the memory (radio) Selection of previous CD.
Page 39

Button Function
A Radio on/off.
B - Decrease volume.
C + Increase volume.
D RDS
E TA
RDS function on/off.
Press for more than 2 seconds: regional following mode on/off.
Traffic information priority on/off.
Press for more than 2 seconds: PTY function on/off.
Audio equipment and telematics
33
-
H
I
J
L
M MAN Manual/automatic operation of buttons L and N.
N
P CH.CD
Q CD
R Radio
S
1 to 6 1 2 3 4 5 6
1 to 5 1 2 3 4 5 Selection of a CD changer disc.
Selection of bass, treble, loudness, sound distribution and automatic volume correction.
Increase setting of functions associated with button H.
Decrease setting of functions associated with button H.
Manual and automatic search of higher frequency.
Selection of next CD track and PTY (radio).
Manual and automatic search of lower frequency.
Selection of previous CD track and PTY (radio).
Selection of the CD changer.
Press for more than 2 seconds: shuffle.
Selection of the CD.
Press for more than 2 seconds: shuffle.
Selection of the radio. Selection of FM1, FM2, FMast, AM wavebands.
Press for more than 2 seconds: automatic storing of stations in the memory (autostore).
Ejection of the CD.
Selection of station stored in the memory.
Press for more than 2 seconds: storing of a station in the memory.
Page 40

Audio equipment and telematics
40 -
COMPACT DISC: AUDIO RD3
Selecting CD mode
After insertion of a
disc, printed face
upwards, the player
starts automatically.
If a disc is already inserted, press
button Q.
Ejection of a disc
Press button S to
eject the disc from the
player.
Selecting a track Shuffle (RDM)
When the CD player is selected,
press and hold button Q for two seconds. The tracks will be played in
random sequence. Pressing the button again for two seconds returns
Press button L to select the next
track.
Press button N to return to the start
of the current track or to select the
previous track.
Accelerated play
Press and hold button L or N for
forwards or backwards accelerated
play.
Accelerated play stops as soon as
the button is released.
you to normal play.
Shuffle mode is de-activated each
time the set is switched off.
The use of copied compact
discs may cause faults.
Insert circular compact
discs only.
Page 41

Audio equipment and telematics
42 -
RT3 GPS AUDIO/TELEPHONE
Stalk movement Function
1 - Press (behind) Increase volume.
2 - Press (behind) Decrease volume.
1+2 - Press together Switch off sound (mute); restore sound by pressing any button.
Automatic search of upper frequencies (radio) -
3 - Press
4 - Press
5 - Press end
6 - Rotation (clockwise)
7 - Rotation
(anti-clockwise)
Selection of following track (CD/MP3/CD changer).
Continuous pressure until release: accelerated forwards play (CD/CD changer),
rapid scanning of following tracks (MP3).
Automatic search of lower frequencies (radio) -
Selection of previous track (CD/MP3/CD changer).
Continuous pressure until release: accelerated backwards play (CD/CD changer),
rapid scanning of previous tracks (MP3).
Change radio mode (radio/CD/MP3/CD changer/AUX) - Confirmation of selection (on a menu or
screen) - Call connect/Call disconnect (Tel./Incoming call) - Call disconnect (Tel./Engaged).
Press for more than 2 seconds: display telephone contextual menu (Tel./Not engaged).
Selection of higher station stored in memory or storing in memory in position 1 for station not in
memory (radio) - Selection of following CD - Selection of following MP3 directory - Selection of
following item on a menu or screen.
Selection of lower station stored in memory or storing in memory in position 6 for station not in
memory (radio) - Selection of previous CD - Selection of previous MP3 directory - Selection of
previous item on a menu or screen.
Page 42

Button Function
Audio equipment and telematics
-
43
A
B
C SOURCE
D Call connect (Tel/Incoming call) - Display contextual menu (Tel/Not engaged).
E Access "PEUGEOT" services menu (if the options and services are available).
F MODE Change display
G
H
I
J Infra-red window (IrDA).
K ESC Cancel current operation.
L SIM card cover.
M
Press: audio/telephone on/off.
Rotation: volume adjustment.
Ejection of CD.
Selection of source: radio, CD,
Press: display contextual menu of display - Confirm inputting or adjustment.
Rotation: move within a menu - Select function/parameter - Audio settings: sound ambience, bass,
treble, loudness, fader (front/rear balance), balance (left/right balance), automatic volume.
Adjust higher frequency, step by step or continuous (long press).
Select previous MP3 directory (MP3).
Select previous CD (CD changer).
Adjust lower frequency, step by step or continuous (long press).
Select following MP3 directory (MP3).
Select following CD (CD changer).
Automatic search of higher frequency - Selection of following CD track.
Double press: change from LO mode to DX mode.
Press for more than 2 seconds: CD accelerated forwards play (CD/CD changer),
rapid scanning of the following tracks (MP3).
MP3, CD changer or AUX.
Page 43

Audio equipment and telematics
44 -
Button Function
Automatic search of lower frequency - Selection of previous CD track.
N
O DARK
Double press: change from LO mode to DX mode.
Press for more than 2 seconds: CD accelerated backwards play (CD/CD changer),
rapid scanning of the previous tracks (MP3).
1st press: display top band (remainder of screen is black) -
2nd press: brightness removed (black screen) - 3rd press: return to normal screen.
Press for more than 10 seconds: reinitialisation of the system.
P MENU
Q Disconnect.
R
S TA/PTY
T RDS
U AUDIO
V SOS Press between 2 and 8 seconds: emergency call.
1 to 6 1 2 3 4 5 6
1 to 5 1 2 3 4 5 Selection of CDs in the CD changer.
0 to 9
* #
BAND
AST
0 1 2 3 4 5
6 7 8 9 * #
Display general menu - Press for more than 2 seconds: display help screen with list of voice
commands, a description of the version of your equipment, a demonstration mode and the status
of the services.
Select FM1, FM2, FMast, AM wavebands.
Press for more than 2 seconds: automatic storing of stations (autostore).
Traffic information priority on/off.
Press for more than 2 seconds: PTY function on/off.
RDS function on/off.
Press for more than 2 seconds: regional following mode on/off.
Display window for adjusting sound ambience, bass, treble, loudness,
sound distribution and automatic correction of volume.
Select station in memory.
Press more than 2 seconds: store station being listened to in memory.
Alphanumeric keypad for entering text and telephone numbers.
Page 44

SCREEN
In accordance with your selections, the
screen displays the information relating
to the Navigation - Traffic Information,
Audio, Directory, Telephone and Telematic Services, Configuration*, Map*
and Video* functions.
It is possible to change the information displayed on the right-hand side
of your screen by pressing "F", "G",
"P" and "U", or using the voice commands.
The information on the left-hand side
and at the top of the screen depends
on the selection made for the righthand side.
Some information and actions (warning, settings, contextual menu) are
indicated by the temporary opening
of a window on the screen.
GENERAL MENU
Pressing button "P" provides access
to all of the functions available on the
RT3 GPS audio/telephone:
"Navigation - Traffic info".
"Audio functions".
"Directory".
"Telephone and telematic services".
"Configuration" of your vehicle.
"Map"*.
"Video"*.
MOVING WITHIN THE MENUS
Buttons "G", "H", "M", "I", "N" enable you to move within the menus
and pressing button "G" confirms
your selections.
We recommend that you do not use
the RT3 GPS audio/telephone buttons while driving. In some countries,
certain buttons may be deactivated
(in accordance with national legislation).
Audio equipment and telematics
SELECTING THE SOURCE
Press the SOURCE button to select
the audio source: RADIO, CD, CD
CHANGER, MP3 or audio/video auxiliary input (AUX)*.
Auxiliary Input (AUX)*
The auxiliary input allows the connection of portable equipment (MP3
player, ...).
Activate the auxiliary input via the
"Configuration"menu, then"Sound"
and finally "Activate aux input".
Connect the portable equipment to
the audio sockets (white and red,
type RCA) located in the glove box.
Press the SOURCE button suc-
cessively and select AUX.
-
45
* According to screen.
Page 45

46 -
Audio equipment and telematics
GENERAL FUNCTIONS
On/off
With the ignition switch
in the accessories/
running position or with
the ignition on, press
button A to switch the
audio function of the
RT3 GPS audio/telephone on or off.
in the absence of an ignition
Note:
key, press button A to switch the telematics system on or off.
The RT3 GPS audio/telephone can
operate for 30 minutes without
switching the vehicle ignition on.
Notes:
- the SIM card must be removed only
after the audio/telephone has been
switched off,
- following automatic switching off of
the audio/telephone after 30 minutes
it is possible to make a telephone call
by pressing button D,
- after the ignition has been switched
off, the audio/telephone can be
switched on again by pressing buttons D, E, V or by inserting a CD in
the player.
Anti-theft system
The RT3 GPS audio/telephone is coded in such a way that it can operate
only on your vehicle. If fitting it to another vehicle, consult your PEUGEOT
dealer for configuration of the system.
The anti-theft system is automatic
and requires no action on your part.
ADJUSTING THE VOLUME
Turn button A clockwise to increase
the volume of the audio/telephone or
anti-clockwise to decrease it.
You can also increase
or decrease the volume using the controls
on the steering wheel.
Notes
The volume setting is specific to each
source. It is possible to have different
settings for radio, CD, CD changer or
AUX.
The volume is adjusted automatically
in relation to the speed if the auto-
matic volume function is active.
The volume when stationary will be
the same the next time the audio
equipment is switched on.
MUTE
Use the control on the
steering wheel to activate this function.
The sound is cut off,
regardless of which
source is in use. The
permanent audio
sources (radio, CD,
CD changer, MP3, auxiliary input)
remain cut off but not the others (guidance instructions, for example).
To restore the sound, press one of
the two volume buttons.
AUDIO SETTINGS
Press button U to ac-
cess the Sound Am-
bience, Bass, Treble,
Loudness, Fader
(front/rear balance), Balance (left/
right balance) and Automatic volu-
me adjustment setting windows.
Exit from audio mode is automatic after a few seconds without any action,
or by pressing the "ESC" button.
Note: bass, treble and loudness settings are specific to each source. It is
possible to have different settings for
radio, CD MP3, CD changer or AUX.
Page 46

Audio equipment and telematics
-
47
Sound ambience
This function permits
the selection of a
"None", "Rock", "Classical", "Jazz", "Vocal"
or "Techno" sound
ambience.
Turn button G to select the sound
ambience.
Selecting "None" permits access to
all of the settings defined below. Selecting another ambience sets the
bass and treble automatically.
Bass setting
When
"Bass" is displayed, turn but-
ton G to vary the setting.
- "-9" for minimum bass setting,
- "0" for normal setting,
- "+9" for maximum bass setting.
Treble setting
When "Treble" is displayed, turn button
G to vary the setting.
- "-9" for minimum treble setting,
- "0" for normal setting,
- "+9" for maximum treble setting.
Adjusting the loudness
This function automatically emphasises bass and treble tones when the
volume is low.
Rotate button G
tion on or off.
Setting the front/rear sound
distribution (Fader)
When "Fader" is displayed:
- Turn button
the volume in the front.
- Turn button
crease the volume in the rear.
to switch the func-
G clockwise to increase
G anti-clockwise to in-
Setting the right/left sound
distribution (Balance)
When "Balance" is displayed:
- Turn button G clockwise to increase
the volume on the right.
- Turn button G anti-clockwise to in-
crease the volume on the left.
Automatic volume adjustment
This function allows the volume to
be adjusted automatically depending
on the level of noise produced by the
speed of the vehicle.
Press button G to switch the function
on or off.
Page 47

Audio equipment and telematics
48 -
RADIO
Notes on radio reception
Car radio/telephone receivers are
subject to phenomena which do not
affect domestic radio sets. Both MW/
LW and FM are subject to various
forms of interference. This is not a
reflection on the quality of the equipment, but is due to the nature of the
signals and the way in which they are
transmitted.
On MW/LW interference may be noticed when passing under high voltage
power lines or bridges, or in tunnels.
On FM, interference may be the result
of the increasing distance from the
transmitter, deflectionof the signals by
obstacles (mountains, hills, buildings,
etc.) or of being in an area which is
not covered by a transmitter.
Selecting the radio
Press "SOURCE" several times.
Selecting a waveband
Briefly press button "BAND/AST" to
select the FM1, FM2, FMast and AM
wavebands.
Automatic station search
Briefly press button M or N to search
for the station immediately above or
below.
The search stops at the first station
found.
If the TA traffic programme is selected, only the most powerful stations
broadcasting this type of programme
are selected.
Search sensitivity
It is possible to carry out automatic
searches at two levels of sensitivity:
- To tune in to the most powerful
transmitters, select the local search
mode "LO" (default option).
- To tune in to the weakest or most
distant transmitters, select the sensitive search mode "DX".
The station search is carried out first
in "LO" (local) sensitivity, then in
"DX" (distant) sensitivity.
To make a direct search in "DX" (distant) sensitivity, press button M or N
twice in succession.
Page 48

Audio equipment and telematics
-
49
Manual station search
Briefly press button H or I to
increase or decrease the frequency displayed.
By continuing to press the
button in the direction selected, you will obtain continuous
scrolling of the frequency.
Scrolling stops when you release the button.
Manual station storing
Select the station required.
Press one of the buttons "1" to "6"
for more than two seconds.
A window appears on the screen, the
station is stored when it is displayed
on the memory number that you have
allocated to it.
Automatic storing of FM stations
in the memory (autostore)
Press the "BAND/AST" button for
more than two seconds.
Your audio/telephone automatically
stores the 6 stations with the strongest signal in FM. These stations are
stored in the FMast waveband.
If it is not possible to find 6 stations,
the remaining memories are empty.
Recalling stations stored
in the memory
For each waveband, briefly press the
buttons "1" to "6" to recall the corresponding stored station.
In the case of an RDS station, the
frequency appears for a few seconds
before its name.
Recalling an RDS station may result
in a search for the frequency which
corresponds to the region through
which you are travelling.
Page 49

Audio equipment and telematics
50 -
RDS SYSTEM
Using the RDS (Radio Data
System) function on FM
Most FM radio stations use the RDS
system.
This system allows you to continue
listening to the same station, whatever frequency it is using for the
region you are going through.
RDS station following
This screen indicates the name of the
station selected. The
audio/telephone con-
for the transmitter which transmits
the same programme with the best
reception. This search may cause
slight interference with the transmission.
The function can be switched on or off
via the "RDS" button or the "AUDIO
FUNCTIONS" main menu.
The screen will show:
- "RDS" if the function is active and
available for the station selected.
- "RDS" crossed out or "RDS" greyed
out on the screen* if the function is
active but is not available on the sta-
tion.
If the station to which you are listening does not have several frequencies in the region through which you
are travelling, you can switch off the
automatic frequency following.
tinuously searches
Traffic information programme
Press the "TA/PTY"
button to switch the
function on or off.
The multifunction screen will show:
- TA if the function is selected,
- TA crossed out or greyed out*
if the function is selected but not
available.
Any traffic information flash will be given priority, whatever source you are
listening to (radio, CD or CD changer).
If you wish to interrupt the broadcasting of a message, press the "TA/
PTY" button.
Notes: the volume of the traffic
information is independent of the
volume of normal audio/telephone
listening.
You can adjust it by using the volume
button. The setting will be stored and
will be used when the next messages
are broadcast.
You must be on the FM waveband.
During station search or automatic
storing phases, if the "TA" function
is selected, transmitters which are
compatible with the broadcasting of
these messages will be tuned to or
stored first.
The station being listened to must
indicate via the RDS system that it
broadcasts traffic information.
Stations which are organised in a
network (EON) have regional transmitters which broadcast their own
programmes: you can listen to one
of these stations and switch to the
network station which broadcasts the
traffic information messages.
Regional following mode (REG)
When they are part of a network, certain
stations broadcast regional programmes in the various areas they serve.
With regional following mode you can
keep listening to the same programme.
You can choose to follow:
• Either a regional station only.
• Or the entire network, with the possibility of listening to a different programme.
The function can be switched on or
off via the "AUDIO FUNCTIONS"
main menu or by pressing the "RDS"
button for more than 2 seconds.
The multifunction screen will show:
- REG if the function is active,
REG crossed out or greyed out* if
the function is active but not available.
* According to screen
Page 50

Audio equipment and telematics
-
51
PTY function
This allows you to listen to stations
broadcasting a specific type of programme, selected from the list of
available types below:
NEWS SCIENCE
AFFAIRS VARIED
INFO POP M
SPORT ROCK M
EDUCATE EASY M
FICTION LIGHT M
CULTURE OTHER M
WEATHER LEISURE
FINANCE JAZZ
CHILDREN COUNTRY
SOCIAL NATION M
RELIGION OLDIES
PHONE IN FOLK M
TRAVEL DOCUMENT
When FM is selected, press button
"TA/PTY" for more than two seconds
to switch the function on or off.
To find a PTY programme:
- select the PTY button,
- turn button G to scroll down the
different types of programmes offered, then confirm your choice,
when the programme of your choice
is displayed press button M or N to
carry out an automatic search (after
an automatic search the PTY function is switched off if no station has
been found).
In PTY mode the different types of
programmes can be stored in the memory. To do this, press the preselection buttons "1" to "6" for more than
two seconds. To recall the type of programme stored in the memory, briefly
press the corresponding button.
EON system
This system connects stations which
are part of the same network. It enables the broadcast of traffic information or a PTY programme, by a station
that is part of the same network as the
station to which you are listening.
The service is available when you
have selected the TA traffic information programme or the PTY function.
Audio functions menu
Select the "Audio functions" menu
from the general menu to:
-
"Activate/Deactivate RDS frequency
following",
-
"Activate/Deactivate regional mode",
- "Activate/deactivate Radio Text
display", broadcast by the radio
station if available ("RT" is displayed
at the bottom of the screen).
- "Activate/deactivate CD details
display", also permits MP3 display.
Page 51

Audio equipment and telematics
52 -
Contextual menu
By pressing knob G, the contextual
menu allows you to access the following functions:
- "Inputting a frequency",
- "List of stations" to access the
30 stations picked up locally directly,
- "Refresh list" to update this list,
- "Display Radio Text" broadcast
by the radio station if it is available
("RT" is displayed at the bottom of
the screen).
When you are in radio mode, pressing
knob G enables you to call up the Radio
contextual menu to select "Read Radio
Text" (information broadcast by the station concerning the programme to which
you are listening) (example: name of
singer, title of the song...).
COMPACT DISC
Selecting CD mode
After inserting a disc, printed face
upwards, the CD drive starts automatically.
If a disc has already been inserted,
press the "SOURCE" button to select
CD mode.
Notes:
• Before inserting a CD, press but-
ton B to check that the drive does
not already contain a CD.
• When the navigation CD is in the
drive, it is not possible to listen to a
CD in CD mode.
Ejecting a disc Accelerated play
Press button B to
eject the disc from the
drive.
If the CD is not removed within 10 to 15 seconds following
ejection, it is re-inserted into the drive
automatically but is not played.
Selecting a track
Press button M to select the following
track.
Press button N to return to the start
of the current track or to select the
previous track.
Press several times in succession to
skip several tracks.
Press and hold button M or N for
forwards or backwards accelerated
play.
Accelerated play stops as soon as
the button is released.
Page 52

Audio equipment and telematics
52 -
Contextual menu
By pressing knob G, the contextual
menu allows you to access the following functions:
- "Inputting a frequency",
- "List of stations" to access the
30 stations picked up locally directly,
- "Refresh list" to update this list,
- "Display Radio Text" broadcast
by the radio station if it is available
("RT" is displayed at the bottom of
the screen).
When you are in radio mode, pressing
knob G enables you to call up the Radio
contextual menu to select "Read Radio
Text" (information broadcast by the station concerning the programme to which
you are listening) (example: name of
singer, title of the song...).
COMPACT DISC
Selecting CD mode
After inserting a disc, printed face
upwards, the CD drive starts automatically.
If a disc has already been inserted,
press the "SOURCE" button to select
CD mode.
Notes:
• Before inserting a CD, press but-
ton B to check that the drive does
not already contain a CD.
• When the navigation CD is in the
drive, it is not possible to listen to a
CD in CD mode.
Ejecting a disc Accelerated play
Press button B to
eject the disc from the
drive.
If the CD is not removed within 10 to 15 seconds following
ejection, it is re-inserted into the drive
automatically but is not played.
Selecting a track
Press button M to select the following
track.
Press button N to return to the start
of the current track or to select the
previous track.
Press several times in succession to
skip several tracks.
Press and hold button M or N for
forwards or backwards accelerated
play.
Accelerated play stops as soon as
the button is released.
Page 53

Audio equipment and telematics
-
53
Contextual menu
By pressing knob G, the contextual
menu permits you to switch the following functions on or off:
- playing of the start of a track ("Introscan"),
- random play ("Random"),
- programming of the track playing
order,
- list of tracks.
Do not use copied CDs as
these could damage your
player.
discs only.
Insert circular compact
Playing MP3 CDs
Following the insertion of an MP3
CD, playing of the first song of the
first MP3 directory begins. You can
select the track to be played using
buttons M or N or the MP3 directory
using buttons H or I.
Note: when the navigation CD is in
the drive, it is not possible to listen to
an MP3 CD in CD mode.
Selecting a track
To display the list of MP3 directories,
press the MODE button to enter MP3
mode. When the knob G is pressed,
the contextual menu permits displaying of the "list of tracks".
Using buttons H or I,
select the MP3 directory to be played.
To open an MP3 directory, press knob G.
Using buttons M or N, select the track
to be played.
Confirm by pressing knob G.
MP3 contextual menu
In MP3 mode, pressing the knob G
enables you to switch the following
functions on or off:
- Playing of the start of each track on
the CD ("Introscan").
- Random play ("Random").
- Repeating of the tracks in the current MP3 directory.
- List of MP3 tracks.
This equipment enables you to listen
to music which is usually protected
by copyright in accordance with current national and international regulations.
Please refer to these regulations and
comply with them.
The playing and displaying of an
MP3 compilation may depend on the
recording programme and/or the parameters used.
We recommend use of the ISO 9660
recording standard.
Page 54

54 -
Audio equipment and telematics
COMPACT DISC CHANGER
Selecting CD changer mode
Press the "SOURCE" button several
times.
Selecting a disc
Press one of the buttons "1" to "5"
on the audio/telephone to select the
appropriate disc.
Buttons H and I allow
you to select respectively the previous or
following disc in the
changer.
Playing of the first
track on the disc begins automatically.
Following each change of source, on
returning to CD changer mode, play
will resume where it stopped.
Selecting a track
Press button M to select the following
track.
Press button N to return to the start
of the current track or to select the
previous track.
Press several times in succession to
skip several tracks.
Accelerated play
Press and hold button M or N for
forwards or backwards accelerated
play.
Accelerated play stops as soon as
the button is released.
Contextual menu
By pressing knob G, the contextual
menu permits you to switch the following functions on or off:
- playing of the start of the track ("Introscan"),
- random play ("Random"),
- programming of the track playing
order,
- list of tracks.
Page 55

Audio equipment and telematics
-
55
TELEPHONE
This function is a GSM dual-band tele-
phone (900 and 1 800 MHz) incorporated in the RT3 GPS audio/telephone
system.
It is a "hands free" telephone. This
function is provided by a microphone
located next to the front courtesy light,
the speakers, a steering column control and voice commands which allow
access to most of the functions (the
audio/telephone control panel buttons
allow access to all the functions).
Display of the principal "mobile"
type functions, as well as consultation of the indexes, is provided by the
multi-function display.
This function is active, whatever
position the ignition key is in even after thirty minutes, when the message
"Economy mode active" appears
on the multi-
Note:
Do not allow yourself to become
distracted when you are behind the
wheel and comply with current national legislation. The driver is advised
to stop in order to hold a telephone
conversation or carry out certain actions (manual dialling of a number,
for example).
function display.
"Telephone and telematic
services" menu
Press the MENU button then, using
the knob G, select the "Telephone
and telematic services" application
and confirm to gain access to the following options:
- "Call".
- "Service", permits access to the
PEUGEOT services.
- "Telephone functions", permits
setting of all of the telephone functions.
- "Text messages (SMS)", permits
management of all of the functions
for the text messages (SMS).
Contextual menu
Press button D to display the telephone contextual menu.
This menu enables you to gain access to the following functions:
- "List of calls".
- "Enter number".
- "Access to directory".
- "Access to your voice mail"
(message service of your GSM
operator).
Page 56

Audio equipment and telematics
56 -
Using the menus, example
"Telephone functions"
Press the "MENU" button to display the
general menu. Select the "Telephone
and telematic services" application,
validate "Telephone functions" to ac-
cess the principal telephone functions,
then the various menus, in order to
reach the one required.
This menu allows you to access the
following functions:
- "Network": allows you to select
the network search mode and to
see the networks available.
- "Duration of calls": allows you
to consult the duration recorder of
calls made and zero re-set.
- "Process the PIN code": allows
you to use or modify the PIN code.
- "Call options": allows you to con-
figure the calls with entering of my
number, automatic answering after
X rings, specification of ring options
and allows you to configure the diversion number for the text messages and clear the list of calls and
the text messages.
Within each menu:
Move around and select a function by turning the G button then
validate by pressing
the button.
Cancel an operation using the "ESC"
button.
Using the alphanumeric keypad
For a given button, to input a character in the second or subsequent rows
press until you obtain the character
required.
Buttons Associated characters
[1] 1 or space
[2] 2 or A B C 2 or a b c 2
[3] 3 or D E F 3 or d e f 3
[4] 4 or G H I 4 or g h i 4
[5] 5 or J K L 5 or j k l 5
[6] 6 or M N O 6 or m n o 6
[7] 7 or P Q R S 7 or p q r s 7
[8] 8 or T U V 8 or t u v 8
[9] 9 or W X Y Z 9 or w x y z 9
[0] 0 or + (long press)
[#] # or validation
[*] * or erasing of last character
input (long press)
Page 57

Audio equipment and telematics
-
57
Installing the SIM card
Open flap L by pressing the point of a
pencil on the circular opening above
the flap.
Insert your SIM card, available from
a mobile telephone operator, as indicated in the graphics, then close the
flap.
Note: removal or insertion of the SIM
card must only be carried out after
the RT3 audio/telephone has been
switched off (key in position S (ignition switch) and screen off).
If you have a duplicate card, when
carrying out the first installation or to
update your directory you must insert
your mobile telephone’s SIM card
then transfer its information to the
RT3 audio/telephone directory - refer
to the Directory main menu.
Inputting the PIN code
Input your PIN code using the alphanumeric keypad and validate by pressing button
network. Connection to the network
is validated by the appearance of a
symbol on the screen.
Warning: if you make three errors in
succession when inputting your PIN
code, your SIM card will be blocked.
To unblock it, you will need to input
the PUK code. The PUK code will be
supplied to you by the person selling
your SIM card (input of the PUK code
allows for 10 errors in succession;
after this the SIM card becomes permanently unusable).
Note: the PIN code is required each
time the ignition is switched on, unless the PIN code has been stored in
the memory or protection by PIN code
is not activated on the SIM card.
G or button # to access the
Cancelling of PIN code request
In the menu "Telephone functions"
select "Process the PIN code", then
validate the "Cancel" function.
Warning: in this case, do not lose
your SIM card. Losing it would mean
anyone who finds it would be able to
make unlimited calls.
Page 58

58 -
Audio equipment and telematics
Telephone function screens
Not in use
This screen indicates the presence
of voice messages or text messages
(SMS) not listened to/read, the cumulative time in use since the last zero
reset and the status of your telephone.
In use
This screen indicates the time
elapsed since the start of the conversation, as well as the number* or
name of the person to whom you are
speaking (if recorded in the index)
and the status of your telephone.
Making a call
Press button D to display the contextual menu of the telephone.
Entering a number
Select the function "Call"
then "Enter number"
then enter the number of
the person you wish to
speak to using the alphanumeric keypad.
Press button D to make the call.
Making a call from a directory
Select the "Call" function then "Di-
rectory" to access all the files con-
taining a telephone number or the
"List of calls" function to access the
list of the last twenty incoming (if the
number display option is active) or
outgoing calls.
Note: there are two directories, the
RT3 audio/telephone directory and
the SIM card directory.
Receiving a call
When a ringing sounds
to let you know that a call
is waiting, you can choose either to accept it by
pressing button D or the
remote control or not to accept it by
pressing the button Q or by selecting
and validating the "NO" button on
the "Answer?" screen.
If you accept the call, to end your
communication, press button Q.
If you do not accept the call, it is
transferred to your voice mail or to a
call diversion number.
end of the steering wheel
*
If this option and service are available.
Page 59

Audio equipment and telematics
-
59
Text messages (SMS)
Receiving text messages
When the buzzer sounds (if the SMS
text messages buzzer option is active)
and a superimposed screen announces
"Do you wish to read the new text
message (SMS)?", you can choose to
read the text message received by selecting and validating "YES" or postpo-
ne reading it by selecting and validating
"NO", by pressing the "ESC" button or
by waiting until the announcement disappears. The message is read by the
voice synthesiser, if it is active.
Note: the old text messages stored
and the new text messages, the reading of which you wished to postpone,
can be consulted. Press the "MENU"
button then validate the "Telematic"
icon, select "Text messages (SMS)"
and validate the function "Reading of
SMS received" by pressing button G.
Then scroll through the list by turning
the button and press the button to select the text message to be read (if the
voice synthesiser is active).
Replying to a text message
After reading a text message, you can:
Reply directly to the sender by selec-
ting "Reply". A screen appears automatically to enable you to enter your
message.
Record the number of the sender of
the text message in your current directory by selecting "Record".
Sending a text message
In the menu "Text messages (SMS)"
validate the function "Typing of an
SMS". Type your text message using
the alphanumeric keypad and validate it using the "OK" button to store
it or validate the "Send" button to
send it. Validation of the "Send" button enables you to enter the number
of your recipient or select it from the
directory or from the list of calls and
send the message.
"Duration of calls" menu
Select the "Duration of calls" function
from the "Telephone functions" menu
to consult the duration counters for the
calls made. The partial counter totals
the duration of the calls since the last
zero reset carried out using the "Zero
reset" button.
"Telephone options" menu
Select the "Call options" function
from the "Telephone functions"
menu to access the functions:
- "Configure the calls" which permits activation and deactivation of
the "show my number" and "automatic answering after X rings" functions
- "Ringing options" which permits
adjustment of the ringing volume
for voice calls, activation of the text
messages (SMS) receipt buzzer
and selection of a ring tone from
the five offered
- "Voice call diversion number"
which permits recording of the call
diversion number chosen by the
customer, otherwise the call will be
transferred to the voice mail if the
call diversion box is ticked.
Page 60

Audio equipment and telematics
60 -
Services*
Press button E to display the "Services"
menu and select one of
the following services:
"Customer Contact Centre" which
enables you to contact the PEUGEOT
Customer Contact Centre directly
and access the services offered (this
type of call is suspended if an emergency or breakown call is made).
"PEUGEOT Assistance" which
enables you to contact the call centre which controls the PEUGEOT
breakdown service directly and receive rapid assistance (you have
6 seconds within which to cancel
the call when it is made). During the
breakdown call phase it is not possible to make any other calls with the
exception of emergency calls. If you
have signed the specific PEUGEOT
contract, your call will be located.
"Operator services" which gives
access to the list of services specific
to your operator (e.g.: customer service, consumption monitoring, news,
stock market, weather, travel, games,
etc) if they are available.
Emergency call*
In an emergency, press but-
ton V until a signal is heard
and a call validation/deletion
screen is displayed (delay of
6 seconds) or enter 112 directly.
Make an emergency call if
you are involved in a situation which leads you to fear serious
consequences (injuries, ...) for those
who are exposed to it (if you witness
or are involved in an accident resulting in injuries, an attack, ...).
Before making a call of this kind, the
audio/telephone must detect a cellular network.
If you have not signed the specific
PEUGEOT contract, the parameters
of the SOS button are set so that a
call is made to 112 - unique number
made available by the worldwide GSM
network, reserved for emergency calls.
No security mode is required and,
depending on the network or country,
you do not need to insert your SIM
card or enter your PIN.
If you have signed the specific
PEUGEOT contract, your call will be
located and you will be put in contact
with a PEUGEOT assistance team.
For further details, refer to the general conditions of your contract.
"PEUGEOT Assistance"/
Emergency call
During a connection to "PEUGEOT
Assistance" or an emergency call,
it is not possible to send or receive
calls or SMS text messages; these
will be transferred to your voice
mail.
In this case, a green diode flashes
on the RT3 GPS audio/telephone
panel, when the emergency call or
"PEUGEOT Assistance" call procedure begins, then lights continuously when the call is taken by
the services concerned.
* If option and service available.
Page 61

Audio equipment and telematics
-
61
The Directory
General
The directory can contain up to
396 files divided into 4 independent
sub-directories ("User 1", "User 2",
"User 3" and "User 4").
When the system is delivered, the
default current directory is "User 4".
A file can contain:
- an address,
- 5 telephone numbers,
- 5 e-mails,
- a note,
- a voice description which can be
used for a voice command.
The address is entered by indicating
the town and the street.
Note: if you enter the address in the
absence of the navigation CD ROM,
you will not be able to use this address for navigation.
"Directory" menu
Press the MENU button then, using
the knob G, select the "Directory"
application and confirm to gain access to the following options:
- "Management of directory files"
with:
• "Consult or modify a file".
• "Add a file", enter the descrip-
tion of the new file then select
on the file the section to be
completed then confirm and enter the information.
• "Delete a file".
• "Delete all files" in a directory.
- "Directory configuration" with:
• "Select a directory".
• "Name a directory".
• "Select the starting directory"
(current directory).
- "File transfer", with:
• "Exchange by infrared" of the
files to portable equipment and
vice versa.
• "Exchange with the SIM card"
of the information entered in the
RT3 GPS audio/telephone.
"Consult or modify a file"
To modify an existing file, select it
using the "Consult or modify a file"
function of the "Management of di-
rectory files" menu then make the
modifications.
Note: when the address is entered,
the navigation CD-Rom must be present in order to obtain guidance to
this destination.
Page 62

62 -
Audio equipment and telematics
Description of a directory file
When a description is linked to a
directory file, you can record the
description vocally so that it can be
used subsequently for direct access
by voice commands (e.g.: "Call"
"[Name of the voice description]"
or "Guide to" "[Name of the voice
description]").
Select "Consult or modify the file"
from the "Management of directory
files" menu to access the screen
which permits entering and recording
of the description.
Press the record button and follow
the instructions.
"File transfer"
To "Exchange by infrared" between
the RT3 GPS audio/telephone and
portable equipment (which has an
infrared port) all or some of the files
recorded in the current directory.
Following selection of the "File
transfer" menu and of the direction
of this transfer, you must initiate the
exchange by presenting at the same
time opposite the infrared port, the
portable equipment on which you
started the transfer (consult the instructions provided with this equipment). A message confirms that the
exchange is progressing correctly.
To "Exchange with the SIM card":
Send all of the files to the SIM card
from the current directory of your
RT3 GPS audio/telephone.
Send one file to the SIM card from
the current directory of your RT3
GPS audio/telephone.
Receive all of the files from the SIM
card in the current directory of the
RT3 GPS audio/telephone.
Receive one file from the SIM card in
the current directory of the RT3 GPS
audio/telephone.
Reminder: when transferring a file
from the RT3 GPS audio/telephone
to the SIM card, only the first number
entered in the file is recorded.
Note: The SIM card represents an
independent collection of information
among which the telephone numbers
may be accessible by consulting the
current directory.
TMC (Traffic Message Channel)
RDS Traffic Information
You can access information regarding the traffic conditions from the
"Navigation - Traffic Info" menu,
then from the "TMC Traffic Informa-
tion" function (see section "Satellite
navigation system").
Page 63

Audio equipment and telematics
-
63
VOICE COMMANDS
The voice commands make it possible to use pre-recorded words or
phrases to control a certain number
of functions of the RT3 GPS audio/
telephone.
They are organised in three levels
(levels 1, 2 and 3).
When you say a level 1 command,
the system makes the level 2 commands available; when you say a
level 2 command, the system makes
the level 3 commands available.
Pressing the "MENU" button for more
than 2 seconds permits access to the
"list of voice commands".
Activation of the voice
commands
Press the button on the end of the
lights stalk to activate or deactivate
this function.
Activation of the function is confirmed by a bleep and the opening of a
window on the screen. The system is
then listening.
Example: to recall the radio station
stored on button 3, the key words
are: "Radio" "Memory" "3".
To use these key words, you must
say the word "Radio", wait for the
audible confirmation signal, then
say the word "Memory", wait for the
audible confirmation signal, then end
with the word "3", wait for the audible
confirmation signal which will carry
out the action requested.
Notes:
- between two key words, a screen
indicates the time remaining and
the key word recognised,
- in the absence of any voice commands, this function will be switched
off after approximately five seconds,
- if a command is not understood,
the system transmits "Pardon" and
displays "Word not recognised"
on the screen.
Saying the phrase "Help" or "What
can I say" displays all of the commands available on the screen.
Saying the word "Cancel" cancels
all of the voice commands.
Miscellaneous words: STOP/DELETE/
YES/NO/PREVIOUS/NEXT
Page 64

Audio equipment and telematics
64 -
The list of voice commands available is presented in this table:
Level 1 Level 2 Level 3
PREVIOUS
NEXT
RADIO
CD PLAYER
CHANGER
MEMORY 1 ... 6
AUTOSTORE
LIST
PREVIOUS TRACK
NEXT TRACK
TRACK NUMBER 1 ... 20
RANDOM
SCAN
REPEAT
LIST
PREVIOUS TRACK
NEXT TRACK
TRACK NUMBER 1 ... 20
PREVIOUS DISC
NEXT DISC
DISC NUMBER 1 ... 6
RANDOM
SCAN
REPEAT
LIST
Level 1 Level 2 Level 3
LAST NUMBER
DIRECTORY
TELEPHONE
SMS/MESSAGE
TRAFFIC INFO
NAVIGATION/
GUIDANCE
SERVICES
VOICE BOX
VOICE MAIL
DISPLAY
READ
DISPLAY
READ
STOP
RESUME
DIRECTORY
ZOOM IN
ZOOM OUT
SHOW
AUDIO
TELEPHONE
DISPLAY
CALL DESCRIPTION
GUIDE TO DESCRIPTION
NAVIGATION
TRIP COMPUTER
GUIDANCE
DESCRIPTION
DESCRIPTION
DESTINATION
EHICLE
V
Page 65

Audio equipment and telematics
-
65
SATELLITE NAVIGATION
SYSTEM
Initialisation
When the navigation is used for the
first time, or if the battery is disconnected, the navigation system must
be initialised.
To do this, park the vehicle in the
open so that it can make contact with
a satellite then turn the ignition key
to the Running position for fifteen
minutes.
Introduction
The satellite navigation system guides
you, by means of vocal and visual
instructions (graphics), to your chosen
destination.
The heart of the system lies in the
use of a map database and
(Global Positioning System). With
this system you can fix the position of
your vehicle by means of a satellite
network.
GPS
The system uses the following elements:
- A CD ROM drive.
- A last voice message recall control during navigation, a long press on
the end of the lights stalk repeats
the last spoken information.
- Map data in the form of a CD ROM
which must be inserted in the drive
printed side up.
- A configuration CD ROM, required
in order to change the voice synthesiser voice (female or male) or
the language used by the system.
- A voice synthesiser which utters
the manoeuvre instructions during
navigation.
- A screen.
- A GPS aerial.
- Controls on the panel and at the
steering wheel.
Certain functions or services described may vary depending on the
version of CD ROM or the country
where the vehicle is sold.
For safety reasons, the
inputting of navigation information by the driver
must be carried out when
the vehicle is stationary.
The CD ROM drive
This is part of the RT3 GPS audio/telephone.
1. CD ROM ejection button.
2. CD ROM drive.
The navigation CD ROM
This contains all the map data.
It must be inserted in the drive, prin-
ted face upwards.
Use only CD ROMs approved by
PEUGEOT.
Page 66

Audio equipment and telematics
66 -
The last voice message recall
control
Pressing for more than two seconds
on the button at the end of the lights
stalk repeats the last voice information.
The control keypad
This lets you select and validate the
functions, controls and programmes
displayed.
Rotation of the dial:
This allows you to move round the
screen and thus select a function.
It also allows you :
- with a "setting" type parameter, after
selection, to increase or decrease
the value,
- with a "list" type parameter, to
open the list and scroll through
the values.
- with map guidance, to increase the
zoom.
Pressing the dial:
This allows:
- access to the list of controls (contextual menu) of the permanent
display, if there is no other display
superimposed.
- confirmation of the selected function or the modified value.
- selection of a "setting" or "list"
type parameter for modification.
"MODE" button:
- brief press: modification of permanent display (audio system, navigation/guidance...),
"ESC" button:
- brief press: cancelling of operation
in progress or erasing of last super-
imposed display.
- pressing for more than two seconds:
erasing of all superimposed displays and return to the permanent
display.
"MENU" button:
- brief press: access to the general
menu.
- press for more than two seconds:
displaying of a help menu with the
list of voice commands, a description of the version of your equipment, a demonstration mode and
the status of the services.
Page 67

Audio equipment and telematics
-
67
General notes on the display
During navigation, if the navigation
CD ROM is present, the screen indicates the manoeuvres to be carried
out:
1. During navigation: manoeuvre
to be carried out or, temporarily,
course to be followed.
2. Next manoeuvre to be carried
out.
3. Next road to be taken and name
of the town.
4. Current road and name of the
town.
5. Symbol concerning the
Traffic Information or the local
services*.
6. Estimated time of arrival at
destination (based on
free-flowing traffic).
7. Distance to final destination.
8. Distance to next manoeuvre.
Notes:
Depending on the situation of the vehicle and the reception of GPS information, this information may disappear
from the screen temporarily.
In Navigation display mode, a long
press of the "Menu" control permits
access to the activation of a demonstration of the Navigation function of
your RT3 GPS audio/telephone.
Next, select a destination using the
Navigation Menu. After entering, start
the Navigation to display a simulation
of the movement of your vehicle. The
starting point will be either the current location of the vehicle or the last
known location. It is possible to enter
an alternative starting point via the
demonstration menu.
This demonstration may enable you
to visualise a journey that you wish
to make in the near future.
General menu
Switch on the RT3 GPS audio/telephone and insert the navigation CD
ROM.
Press the "MENU" button to access
the general menu.
Select the Navigation/Traffic Information icon using the dial G, then
validate by pressing the dial to access the main "Navigation - Traffic
Info" menu.
* According to screen.
Page 68

68 -
Audio equipment and telematics
Navigation - Traffic Information
The main "Navigation - Traffic Info"
menu offers various options for activation or management of guidance:
- "Select a destination".
- "Stages and routes".
- "Guidance options".
- "TMC traffic information".
- "Stop guidance".
Once guidance has been started, a
display warns you about use of the
navigation. If you accept its content,
press G. Observe current road indications.
Selecting a destination
The "Select a destination" menu
offers various options for reaching a
destination:
- "Entering an address".
- Select a "service" available in a
town (restaurant, airport, hotel, cinema, theatre, etc.).
- Select a destination stored in a "di-
rectory".
- Select one of the twenty "previous
destinations".
Entering an address
The last guidance address is displayed.
Select and validate in succession the
entry zones "Town", "Road", then
"N°" to fill them in.
The "OK" function permits validation
of the address and access to the guidance activation function.
The "Store" function permits recording of the address in a directory file.
The "Curr. loc" function permits display of the current address.
The "GPS" function permits selection of the GPS coordinates.
Page 69

Audio equipment and telematics
-
69
Entering the name of the town Entering the name of the road
Enter the name of the street in the
same way as the name of the town.
When the full name of the street is
displayed, select the "OK" function
then confirm by pressing the dial.
Note: do not enter the type of road
(road, avenue, etc.).
To enter the name of a town, select
each letter by turning the dial, then validate each letter by pressing the dial.
If an error is made entering the letters, the "Change" function permits
erasing of the last letter entered.
Note: following the validation of a
letter, only those which could make
up a name existing in the database
appear.
As letters are entered, the "List"
function indicates the number of
towns beginning with the same letters. Activation of this function permits selection of a town from the list.
When the list contains fewer than six
names, these are displayed automatically. Select a town then validate by
pressing the dial.
When the complete name of the town
is displayed, select the "OK" function
then confirm by pressing the dial.
Note: once the town has been entered, you can confirm by pressing
"OK". You will then be guided to the
centre of this town automatically.
Entering the town and road using
the alphanumeric keypad
Press the numeric key which corresponds to the letter required until the
letter appears on the screen, then
confirm by pressing the # key after
each letter.
If you make an inputting error, press
the * button to correct the last letter
entered.
Entering the number
of the road or junction
Enter the number of the street previously entered.
Select the "OK" function, then confirm by pressing the dial.
Note: if the number of the street entered is not available, it is rejected.
You can also select a street from the
"Junctions" function, which avoids
having to enter the street number.
Note: if the street selected does not
have a number, the list of junctions is
displayed automatically.
The full destination is displayed.
Select the "OK" function, then
confirm by pressing the dial to access the guidance activation function. Follow the instructions given
by the system.
Page 70

70 -
Audio equipment and telematics
Selecting a service
If you wish to be directed to a service,
select the category of service and confirm.
The list of services in the category
selected is displayed. Select then
confirm the required service to gain
access to selection of the location.
The last address entered is displayed.
There are 3 options for defining the
location around which you wish to
obtain a service:
• Accept the last address entered by
confirming the "OK" function.
• Enter the name of another town
then confirm the road (optional).
• Automatically display the name
of your current location using the
"Curr. loc" function.
Note:
If the service selected is not available
in the programmed location, a message will inform you of this.
Following confirmation of the location,
the service nearest to it is displayed.
The distance indicated is the distance
to it as the crow flies.
An indication in the (X/n) band indicates whether there are several establishments (n = maximum) offering
the same service within a radius, as
the crow flies, of 30 miles (50 km) of
the chosen location.
Use the functions "<<", ">>" or "<",
">" to consult the list offered.
When the establishment of your choice
is displayed, you can select:
- "OK" to activate guidance to this
service.
- "Store" to add to your directory.
- "Contact" to call the service.
GPS details
The most recent destinations are
shown.
There are three possible methods
of defining the location to which you
wish to travel:
- accept the last details input by
means of the "OK" function,
- input the details of your destination,
- automatically input the details of
your current location by means of
the "Curr. loc." function.
Page 71

Audio equipment and telematics
-
71
Selecting a destination stored
in the directory
Select the "Directory" function to
access the file in which the address
you are looking for is archived.
Select a description by scrolling down
the list by means of the dial, then
confirm by pressing the dial. The directory file is then displayed.
Select the "OK" function, then press
the dial to access the guidance activation function.
Follow the directions given by the
system.
Selection of one of the previous
destinations
Select the "Previous destinations"
function to access one of the last
twenty addresses stored.
Select a description by scrolling
down the list by means of the dial,
then confirm it by pressing the dial.
The complete address is then displayed.
Select the "OK" function, then press
the dial to access the guidance activation function.
Follow the instructions given by
the system.
Stages and routes
- "Add a stage" to your route after
starting guidance.
- "Order or delete stages".
- "Divert route". You must indicate
the number of miles (kilometres)
that you wish to avoid to permit the
calculation of a new route.
- Select the initial "Chosen destina-
tion" in order to change it.
Note: if a stage is programmed, the
navigation system will always try to
pass via this stage until you have
gone through it or deleted it.
Page 72

Audio equipment and telematics
72 -
Guidance options
- "Define the calculation criteria"
for your route so that it is the fastest, the shortest, takes account
of the traffic information, etc... The
last criteria selected are displayed.
- "Set the voice synthesiser", set
the volume of the guidance instructions.
- "Activate/deactivate road names",
set the pronunciation in the spoken
instructions.
- "Description of the CD ROM", to
display the Navigation CD ROM information.
"Delete the previous destinations".
-
Calculation criteria Management of the directory
This function enables you to rename
an address stored in the directory.
Select the description corresponding
to the stored address to be changed.
Select the "Rename" function, then
confirm by pressing the dial.
Select the "OK" function, then con-
The last criterion used is displayed.
Select a criterion from the list, then
validate by pressing the dial.
When the criterion of your choice
has been selected, select the "OK"
function then confirm by pressing the
dial.
firm by pressing the dial to record the
changes made.
Stopping/Resuming guidance
"Stop guidance"
During guidance, select this function
then validate.
"Resume guidance"
In the absence of guidance, select
this function then validate to activate
guidance to the last destination programmed.
Note: after re-starting the engine, a
screen appears enabling you to resume guidance activated before the
ignition was switched off.
Page 73

Audio equipment and telematics
-
73
"Navigation - Traffic Info"
contextual menu
The contextual menu associated with
the "Navigation - Traffic Info" application appears as a superimposed
display, when this is the application
currently in use in the main screen
window.
This menu is limited to the following
functions:
- displaying of the map in "full screen"
mode or downsized on the righthand side ("windowed screen")*,
- changing of the initial route,
- storing of the current location (postal address if available or, if it is not,
the GPS co-ordinates of the position),
- changing of the route "guidance criteria",
- stopping or resuming of guidance.
TMC (Traffic Message Channel)
RDS Traffic Information
The RT3 GPS audio/telephone permits access to the TMC RDS traffic
information which is broadcast free
of charge on the FM waveband.
This function enables you to receive
messages regarding the traffic conditions (accidents, traffic jams, weather, ...).
They may appear temporarily as a
superimposed display or be read by
the voice synthesiser, if it is active.
You can read the messages broadcast by the TMC station while listening to another station.
In map mode, special TMC symbols
are displayed depending on the type
of information*.
Select the "TMC Traffic Informa-
tion" function from the "Navigation/
Traffic Info" menu:
- "Consult the messages" to display
the list of TMC messages available,
- "Filter the TMC information" to
select a type of message and initialise the TMC station,
- "Voice synthesis" to listen to the
TMC messages received,
- "Activate/Deactivate message
presentation" to display/not display the TMC messages received.
* According to screen.
Page 74

74 -
Audio equipment and telematics
Filtering of the TMC messages
To filter these messages, select the
"Filter the TMC info" function from
the "TMC Traffic Information" menu,
the screen then shows:
- "Activate/deactivate the filter ac-
cording to route", in navigation
mode, this permits the selection of
events located on the guidance route
and in the direction of travel only.
- "Filter by event", permits selection of the required kinds of event
only (all selected by default).
- "Geographical filter", permits selection of the events located around
the vehicle and/or around a given
location. The various filters can by
used simultaneously.
- "Selection of the TMC station",
permits the selection of another
station indicating that it broadcasts
RDS-TMC information.
You can filter these messages using
one or more filters simultaneously.
Filter by event
This choice enables you to select the
kinds of event about which you wish
to be informed:
- Those classified as road-related
such as traffic, road closures or vehicle restrictions and/or,
- Those concerning the town in which
you are located such as parking, public transport and demonstrations.
Access to this information depends
on its availability.
Note: if you do not select any events,
you will not receive any TMC traffic
information.
Geographical filter
This choice enables you to select the
events zone (radius of 1 to 125 miles
(3 to 200 km) about which you wish
to be informed:
- events which are taking place
around your vehicle and/or,
- events in a location to be selected.
The two filters can be used simultaneously. In this case, the radius is the
same for both.
We recommend a filter according to
the route and a geographical filter
around the vehicle:
- of 3 miles (5 km) or 6 miles (10 km)
for a region with heavy traffic,
- of 12 miles (20 km) for a region with
normal traffic,
- of 60 miles (100 km) for long journeys (motorway).
Page 75

Audio equipment and telematics
-
75
DISPLAY FLOW CHARTS
MAIN FUNCTION
CHOICE A
Choice A1
Choice A2
CHOICE B...
NAVIGATION/TRAFFIC INFO
CHOICE OF DESTINATION
enter an address
town
street
junction n°
gps
longitude
latitude
choice of a service
administration & security
town halls, town centre
universities, colleges
hospitals
hotels, restaurants & businesses
hotels
restaurants
vinyards
business centres
supermarkets, shopping
craft centres
culture, tourism & shows
tourism, historical monuments
culture, museums & theatres
shows & exhibitions
casinos & nightlife
cinemas
sports centres & outdoor pursuits
sports centres, complexes
golf courses
skating rinks, bowling alleys
winter sports centres
parks & gardens
theme parks
transport & automobile
ports, airports
station, bus stations
automatic checks
vehicle hire
automatic checks
service stations, garages
directory
nav directory
town, street, n°
ok
previous destinations
list of destinations
town, street, n°
ok
STAGES AND ROUTES
add a stage
enter an address
town
street
junction n°
gps
longitude
latitude
choice of a service
administration & security
hotels, restaurants & businesses
culture, tourism & shows
sports centres & outdoor pursuits
transport & automobile
directory
nav directory
town, street, n°
ok
previous destinations
list of destinations
town, street, n°
ok
order/delete stages
divert route
divert route over 2 km
the best diversion possible is 3 km.
continue?
range 1-50
ok
chosen destination
town, street, n°
change
GUIDANCE OPTION
define the calculation criteria
the fastest
the shortest
distance/time
with tolls
with ferry
traffic info
adjust speech synthesis
volume
activate/deactivate
activate/deactivate street names
description of the cd-rom
delete the previous destinations
do you want to delete the list of previous
destinations?
yes/no
TMC TRAFFIC INFORMATION
consult the messages
filter the TMC traffic information
activate/deactivate the route filter
filter by event
traffic information
traffic information
road closures
size restrictions
road conditions
weather & visibility
urban information
parking
public transport
demonstrations
geographical filter
around the vehicle
around a place/select
filter radius 50 km
choice of TMC station
station name
Page 76

Audio equipment and telematics
76 -
next station
speech synthesis
volume
activate/deactivate
activate/deactivate message
presentation
RESUME/STOP GUIDANCE
AUDIO FUNCTIONS
ACTIVATE/DEACTIVATE RDS
ALTERNATIVE FREQUENCIES
ACTIVATE/DEACTIVATE REGIONAL
MODE
ACTIVATE/DEACTIVATE RADIO TEXT
INFO
ACTIVATE/DEACTIVATE CD DETAILS
INFO
TRIP COMPUTER
TRIP COMPUTER CONFIGURATION
enter distance to destination
0 km
select units
l/100 & km
mpg & miles
km/l & km
°c/°f
bar, psi
DIAGNOSTICS
warning log
equipment backup supply
gps coverage
STATUS OF FUNCTIONS
list of functions
DIRECTORY
MANAGEMENT OF DIRECTORY FILES
consult or change a file
entire directory
name
voice recording
notes
address
town
street
n°
number
display
list of numbers
change
add
delete
e-mail
display
list of numbers
change
add
delete
add a file
description
delete a file
entire directory
delete all files
do you want to delete all of the files
in the directory (non sim)?
yes
no
CONFIGURATION OF THE DIRECTORY
select a directory
user xxxx
name a directory
select the starting directory
user xxx
last directory used
FILE TRANSFER
infrared exchange
send all files
send one file
receive by infrared
exchange with the sim card
send all sim files
send one sim file
receive all files from sim
receive a file from sim
TELEPHONE AND TELEMATIC
SERVICES
CALL
list of calls
dial
directory
voice mail
SERVICE
customer contact centre
PEUGEOT assistance
PEUGEOT mobile services
(if atx services activated)
messages received
list of v-cards
TELEPHONE FUNCTIONS
network
network search mode
automatic mode
manual mode
list of networks
networks available
list of networks
duration of calls
partial counter
total duration
zero reset
manage the pin code
activate
store the pin code
Page 77

change the pin code
entering the pin code
old code
> new code
confirmation
>> correct
call options
delete the list of calls and sms
do you want to delete the list of calls and
sms from the equipment?
configure the calls
displaying of my number
automatic pick-up after 3 rings
ring options
for voice calls
volume
type of ring
for text messages (sms)
text message buzzer
voice call diversion n°
TEXT MESSAGES (SMS)
reading text messages received
list of text messages received
sending a text message
list of saved text messages
writing a text message
text message
message sent
delete the list of text messages
CONFIGURATION*
DISPLAY CONFIGURATION
adjust the brightness
sound
speech synthesis adjustment
volume of guidance instructions
volume
activate/deactivate
volume of other messages
volume
activate/deactivate
select a voice
male
female
speech synthesis
activate/deactivate
voice command adjustment
volume
activate/deactivate
international parameters
adjust the date & time
day, month, year
time, 12 h, 24 h, am/pm
adjusting the minutes on gps
select the units
l/100 & km
mpg & miles
km/l & km
°c /°f
bar, psi
choice of language
list of languages available
Audio equipment and telematics
-
77
* Configuration menu: according to
display.
Flow chart version 5.5
Page 78

Audio equipment and telematics
78 -
5 CD CHANGER*
This is located in the glove box. It
holds up to 5 discs.
To load the changer, insert the discs
with the printed side upwards.
To remove a disc, press and hold one
of the buttons "1" to "5".
The use of copied compact discs may cause
faults.
Insert circular compact
discs only.
RADIO RECEPTION
(aerial adjustment)
Notes on radio reception
Your radio will be subject to phenomena which do not affect domestic
radio sets. Both MW/LW and FM reception are subject to various forms
of interference, which are no reflection on the quality of your equipment
but are due to the nature of the signals and the way in which they are
transmitted.
On MW/LW, interference may be noticed when passing underneath high
voltage power lines, under bridges or
in tunnels.
On FM, interference may be the result of increasing distance from the
transmitter, deflection of the signal
by obstacles (mountains, hills, buildings, etc.), or of being in an area not
covered by a transmitter.
Saloon: recommended position for
the front aerial for best reception.
No particular position for the fixed
rear aerial (preset aerial).
* According to country.
Page 79

206 AUDIO SYSTEM (RD3 and RT3)
Presentation
Your 206 is fitted with a JBL audio
system, designed specifically for the
passenger compartment.
At the heart of the system, a 240 watt
multifunction amplifier (1) (integrated in the subwoofer in the boot)
independently controls 8 high
acoustic definition speakers and
the subwoofer.
This system provides optimal reproduction and distribution of the
sound in the vehicle, both in the
front and the rear.
Audio equipment and telematics
The speakers are situated:
- in the front door pillars: two Twee-
ters (2) for reproduction of the treble
(high frequency) in the front.
- in the front doors: two Woofers (3)
for reproduction of the bass (low
frequencies) in the front.
- in the rear doors: two Tweeters (4)
set into two Woofers (5), providing a
balance of frequencies in the rear.
- in the boot: a Subwoofer (6) for
reproduction of the bass and ultrabass (very low frequencies) throughout the whole of the passenger compartment.
You will appreciate the clarity and
depth and notice that the sound
fills the whole of the vehicle perfectly.
Adjusting in CD or Radio mode
The basic functions remain those of
the audio set.
There is no need for any further adjustment. However, in order to take
full advantage of your JBL audio
system, you are advised to set the
AUDIO functions (BASS, TREB,
FAD, BAL) to position "0" (zero), the
Loudness (LOUD) to the "ON" position for CD mode and to the "OFF"
position for radio mode.
-
79
Page 80

80 -
Comfort
Page 81

Comfort
81
-
VENTILATION
1. Windscreen de-icing or demis-
ting vents.
2. Front door windows de-icing or
demisting vents.
3. Side vents.
4. Centre vents.
5. Air outlet to front footwells.
6. Air outlet to rear footwells (with
automatic air conditioning only).
Advice on operation and
notes
Place the air flow control at a level
sufficient to ensure an adequate renewal of air in the passenger compartment.
When the air flow control is in the
OFF position (system switched off),
temperature-related comfort is no
longer guaranteed. However, a slight
flow of air, due to the movement of
the vehicle, can still be felt.
Select the air distribution which is
most suited to your requirements and
the weather conditions.
Change the temperature setting progressively for greater comfort.
Place the air intake control in the
"Exterior air" position, this facilitates
demisting.
If the interior temperature remains
very high following a long period
parked in the sun, do not hesitate to
ventilate the passenger compartment
for a few minutes.
To obtain a perfectly uniform distribution of air, do not cover the exterior
air intake grille, the vents, the air passages and the air outlets in the footwells.
In certain cases of particularly arduous use (towing the maximum load
on a steep gradient in a high temperature), cutting off the air conditioning
permits recovery of the engine power
and, therefore improvement of the
towing capacity.
Ensure that the passenger compartment filter, located by the windscreen, under the bonnet, is in good
condition. Have the filter elements
replaced regularly. If you drive in a
dusty environment, change them
twice as often.
The air conditioning system does not
contain chlorine and does not present
any danger to the ozone layer.
Operate the air conditioning system
for 5 to 10 minutes, once or twice a
month to keep it in perfect working
order.
The water formed by the condensation of the air conditioning system is
discharged via an opening provided
for this purpose. Therefore, a puddle may form underneath the vehicle
when stationary.
If the system does not produce cold
air, do not use it and contact your
PEUGEOT dealer.
Page 82

Comfort
82 -
DE-ICING AND
DEMISTING
De-icing the rear screen and
mirrors
When the engine is running,
pressing this button de-ices
the rear screen and exterior
mirrors.
It switches off automatically, after
approximately twelve minutes*, to
prevent an excessive consumption
of current. Pressing the button again
restarts operation for twelve minutes.
It is possible to stop the operation of
the de-icing before it is switched off
automatically by pressing the button
again.
Switch off the de-icing as soon as
you consider this necessary as low
current consumption reduces fuel
consumption.
Manual demisting*
To quickly demist the windscreen and
side windows:
- switch on the air conditioning,
- place the temperature and air flow
controls in the maximum position,
- close the central vents,
- place the exterior air intake control
on the left, in the "Exterior Air" position.
Automatic demisting, visibility
programme*
In some cases, the AUTO programme may not be sufficientto demistthe
windscreen and side windows (humidity, several passengers, ice...).
Select the "visibility" demisting programme by pressing this button to
clear the windows quickly.
To exit from this programme and return to the AUTO programme, press
the AUTO button.
* According to version or country.
Page 83

Comfort
83
-
HEATING/VENTILATION
The heating and ventilation can only operate when the engine is running.
1. Temperature adjustment
Turn the control from blue (cold) to
red (hot) to adjust the temperature to
suit your requirements.
2. Air distribution adjustment
Windscreen and side windows (de-icing/demisting).
Windscreen, side windows
and footwells.
These settings are recommended for
cold climates.
This setting is recommended for hot
climates.
The air distribution can be adjusted
by placing the control in an intermediate position, marked "-".
Footwells.
Centre and side vents.
3. Air flow adjustment
Turn the control from position 1 to position 4 to obtain
an air flow sufficient to ensure your comfort.
4. Air intake/Air recirculation
The recirculation of interior air prevents exterior odours and smoke entering the passenger compartment.
The intake of exterior air prevents
and eliminates misting of the windscreen and side windows.
Air intake.
Air recirculation.
Move the manual control 4 to the right for the "Interior air recirculation"
position.
Move the manual control 4 to the
left to return to the "Exterior air intake" position as soon as possible
to prevent deterioration of the air
quality.
Page 84
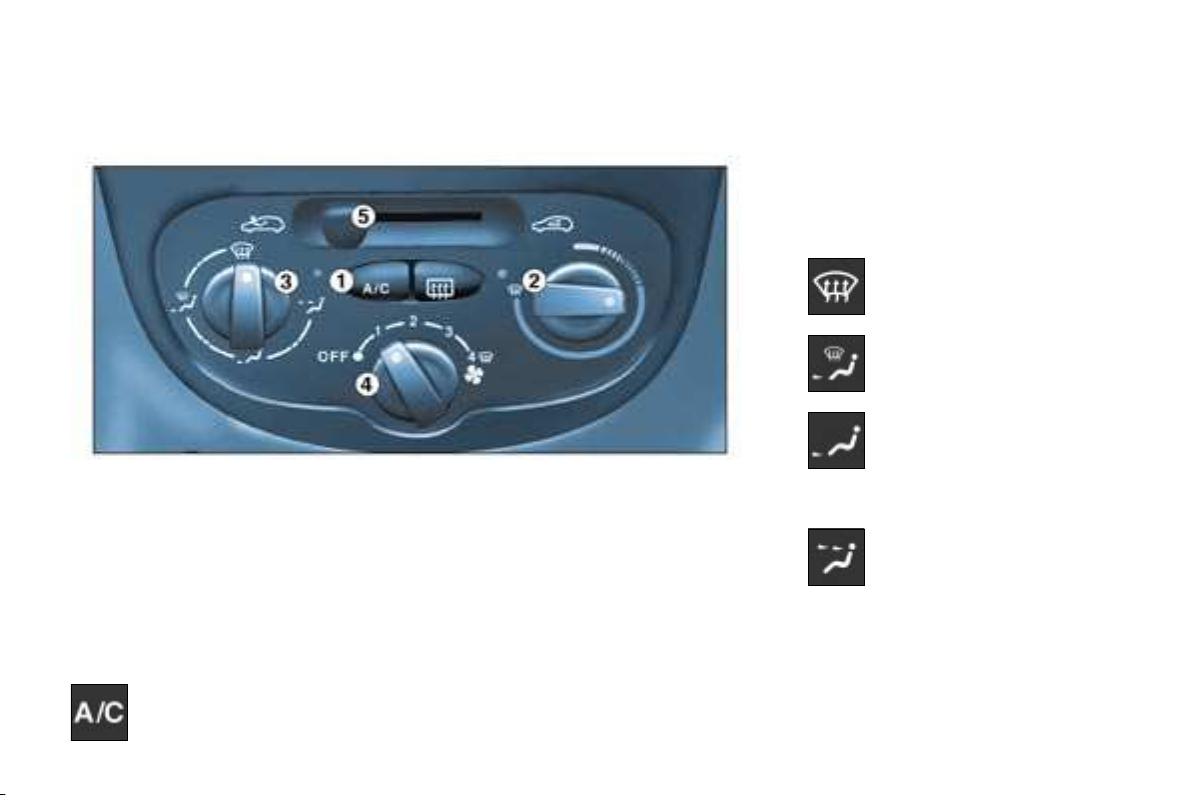
84 -
Comfort
AIR CONDITIONING
The air conditioning can only operate when the engine is running.
1. Air conditioning On/Off
The air conditioning is designed to
operate effectively in all seasons,
with the windows closed. In summer,
it permits lowering of the temperature
and in winter, above 0 °C, it increases
the effectiveness of the demisting.
Press the switch, the indicator light comes on.
The air conditioning does not operate while the air flow adjustment
control is in the "OFF" position.
To guarantee correct operation of
your air conditioning system, we also
recommend that you have it checked
regularly.
2. Temperature adjustment
Turn the control from blue (cold) to
red (hot) to adjust the temperature to
suit your requirements.
3. Air distribution adjustment
Windscreen and side windows (de-icing/demisting).
Windscreen, side windows
and footwells.
Footwells.
These settings are recommended for
cold climates.
Centre and side vents.
This setting is recommended for hot
climates.
The air distribution can be adjusted
by placing the control in an intermediate position, marked "-".
Page 85

4. Air flow adjustment
Turn the control from position 1 to position 4 to obtain
an air flow sufficient to ensure your comfort.
5. Air intake/Air recirculation
Intake of exterior air.
Air recirculation.
The recirculation of interior air prevents exterior odours and smoke entering the passenger compartment.
The intake of exterior air prevents
and eliminates misting of the windscreen and side windows.
Used simultaneously with the air
conditioning, air recirculation improves air conditioning performance.
Used in a damp climate, air recirculation may result in misting of the windows.
Move the manual control 5 to the
right to the "Interior air recirculation"
position.
Move the manual control 5 to the left
to the "Exterior air intake" position as
soon as possible to prevent deterioration of the air quality.
Comfort
85
-
Page 86

Comfort
86 -
AUTOMATIC AIR CONDITIONING
The air conditioning can only operate when the engine is running.
Automatic operation
1. Temperature adjustment
The value indicated on the
display corresponds to a
level of comfort and not to a
temperature in degrees Celsius or Fahrenheit.
Press the arrows 1 (up and down) to
change this value. A setting around
21 enables a comfortable temperature to be obtained.
2. Control by the AUTO
programme
Press the "AUTO" button.
We recommend that you use
this mode: it provides opti-
all of the functions, passenger compartment temperature, air flow, air
distribution and air recirculation, in
accordance with the comfort value
that you have chosen. This system is
designed to operate effectively in all
seasons, with the windows closed.
mised automatic control of
Note: for your comfort, the values
set when the engine is switched off
are retained on re-starting if the temperature in the passenger compartment has not changed significantly;
otherwise, operation resumes in automatic mode.
When the engine is cold, to prevent
too great a distribution of cold air, the
ventilation will only reach its optimum
level gradually.
On entering the vehicle, if the interior
temperature is much colder or warmer than is comfortable, there is no
need to change the value displayed
in order to reach the required level of
comfort. The system eliminates the
temperature difference automatically
and as quickly as possible.
Manual operation
If you wish, you can make a different
choice from that offered by the system by changing a setting. The other
functions will still be controlled automatically.
Pressing the AUTO button returns
the system to completely automatic
operation.
Page 87

Comfort
87
-
3. Air conditioning On/Off
Press this button to stop air
cooling.
The symbol ECO is displayed.
Automatic operation of the air conditioning is resumed when the button is
pressed again.
The symbol A/C is displayed.
Notes
To prevent condensation on the inside of the vehicle in cold or wet
weather, you are advised to avoid
using the ECO mode.
To guarantee correct operation of
your air conditioning system, we also
recommend that you have it checked
regularly.
4. Air distribution
Pressing this button several
times in succession enables
the air flow to be directed in
turn towards:
- the windscreen (de-icing or demisting),
- the windscreen and the footwells,
- the footwells,
- the centre and side vents and the
footwells,
- the centre and side vents.
5. Air flow
Press buttons "+" and
"-" respectively to in-
crease or decrease
the air flow.
6. Air intake/Air recirculation
Press this button for recirculation of the interior air.
Recirculation, shown on the
display, enables the passenger compartment to be insulated from
exterior odours and smoke.
Avoid prolonged recirculation of interior air (risk of condensation and deterioration of the air quality).
Press the button again to resume automatic management of the intake of air.
7. Switching the system off
The OFF button switches off
all the functions of the system.
Temperature-related comfort
and demisting are no longer guaranteed but a slight flow of air is maintained.
Pressing the OFF, AUTO, or "visi-
bility" button again reactivates the
system with the values set before it
was switched off.
Note: if you wish to cut off the flow
of air completely, press the air intake
button 7.
Page 88

88 -
Comfort
Saloon and 206 SW
Page 89

206 GTi 180
Comfort
89
-
Page 90

90 -
Comfort
FRONT SEATS
1 - Forwards-backwards
adjustment
Lift the control and slide the seat
forwards or backwards.
2 - Head restraint height and
angle adjustment
(except 206 GTi 180)
To raise the restraint, push it
upwards.
The adjustment is correct when the
upper edge of the head restraint is
level with the top of the head.
The head restraint is fitted with a frame with notches, which prevent the
head restraint dropping down (this
is a safety device in the case of impact).
To lower the head restraint, it is necessary to push simultaneously:
- the button located at the base of
the head restraint frame,
- the head restraint downwards.
To remove the head restraint, press
the lug.
The head restraint angle can also be
adjusted.
Never drive with the head
restraints removed; they
should be in place and
correctly adjusted.
Rear head restraints
These have one position for when
they are in use (high) and a storage
position (low). They can be removed.
To lower the head restraints, press
the lug.
To remove them, pull upwards as far
as the stop then press the release
control.
3 - Access to the rear seats
(3-door), A or B according to
version
A - Place your fingers in one of the
two handles and push forwards to
fold down the seat back and move
the seat forwards.
When put back, the seat returns to its
initial position.
No person or object must prevent the
seat from returning to its initial position. Returning to this position is necessary for it to be locked.
It is impossible to access the rear
seats if the front seat is in a reclining
position.
B - Place your fingers in one of the
two handles and push forwards to
fold down the seat back.
When put back, the seat back returns
to its initial position.
4 - Height adjustment
Pull the handle upwards.
Remove your weight from the seat to
raise, or press on the seat to lower.
5 - Seat back angle adjustment
Push the handle towards the rear.
Page 91

90 -
Comfort
FRONT SEATS
1 - Forwards-backwards
adjustment
Lift the control and slide the seat
forwards or backwards.
2 - Head restraint height and
angle adjustment
(except 206 GTi 180)
To raise the restraint, push it
upwards.
The adjustment is correct when the
upper edge of the head restraint is
level with the top of the head.
The head restraint is fitted with a frame with notches, which prevent the
head restraint dropping down (this
is a safety device in the case of impact).
To lower the head restraint, it is necessary to push simultaneously:
- the button located at the base of
the head restraint frame,
- the head restraint downwards.
To remove the head restraint, press
the lug.
The head restraint angle can also be
adjusted.
Never drive with the head
restraints removed; they
should be in place and
correctly adjusted.
Rear head restraints
These have one position for when
they are in use (high) and a storage
position (low). They can be removed.
To lower the head restraints, press
the lug.
To remove them, pull upwards as far
as the stop then press the release
control.
3 - Access to the rear seats
(3-door), A or B according to
version
A - Place your fingers in one of the
two handles and push forwards to
fold down the seat back and move
the seat forwards.
When put back, the seat returns to its
initial position.
No person or object must prevent the
seat from returning to its initial position. Returning to this position is necessary for it to be locked.
It is impossible to access the rear
seats if the front seat is in a reclining
position.
B - Place your fingers in one of the
two handles and push forwards to
fold down the seat back.
When put back, the seat back returns
to its initial position.
4 - Height adjustment
Pull the handle upwards.
Remove your weight from the seat to
raise, or press on the seat to lower.
5 - Seat back angle adjustment
Push the handle towards the rear.
Page 92

REAR SEATS
To fold the rear seats:
- lift the front of the seat cushion 1,
- tilt the seat cushion 1 against the
front seats,
- position the seat belt under the belt
holder 2,
- pull control 3 to unlock the seat
back 4,
- remove or lower the head restraint,
- tilt the seat back 4.
Always start with the seat, never
the seat back (risk of damage).
Comfort
When repositioning:
- return the seat back to the upright
position,
- fold back the seat cushion,
- reposition the buckles before locking the front of the seat cushion.
Take care not to trap the seat
belts.
91
-
Page 93

Comfort
92 -
BENCH SEAT
To fold the bench seat:
- lift the front of the seat cushion 1,
- tilt the seat cushion 1 against the
front seats,
- position the seat belt under the belt
holder 2,
- pull the controls 3 to unlock the seat
back 4,
- remove or lower the head restraints,
- tilt the seat back 4.
Always start with the seat, never
the seat back (risk of damage).
When repositioning:
- return the seat back to the upright
position,
- fold back the seat cushion,
- reposition the buckles before locking the front of the seat cushion.
Take care not to trap the seat
belts.
Page 94

Comfort
93
-
Removing the rear seat
- Tilt the seat cushion against the
front seats.
- Squeeze the seat fasteners to release them from their attachments.
- Remove the seat cushion.
Folding seat back
- Remove the head restraint for complete folding of the seat back.
- Push handle 5 towards the rear to
tilt the seat back.
TRANSPORTING LONG
OBJECTS
Front seat:
- Tilt the seat back towards the front
using the control 5 (see corresponding paragraph).
Rear seat:
- Remove the seat cushion,
- Tilt the seat back.
Page 95

Comfort
92 -
BENCH SEAT
To fold the bench seat:
- lift the front of the seat cushion 1,
- tilt the seat cushion 1 against the
front seats,
- position the seat belt under the belt
holder 2,
- pull the controls 3 to unlock the seat
back 4,
- remove or lower the head restraints,
- tilt the seat back 4.
Always start with the seat, never
the seat back (risk of damage).
When repositioning:
- return the seat back to the upright
position,
- fold back the seat cushion,
- reposition the buckles before locking the front of the seat cushion.
Take care not to trap the seat
belts.
Page 96

94 -
Comfort
GENERAL POINTS RELATING
TO CHILD SEATS
Although one of PEUGEOT’s main
criteria when designing your vehicle,
the safety of your children also depends on you.
For maximum safety, please follow
these precautions:
- since 1992, and in accordance with
Directive 2000/3, all children un-
der the age of 12 must travel in
approved child seats* suited to
their weight, on seats fitted with a
seat belt or ISOFIX mountings**.
- statistically, the safest seats in
your vehicle for the transportation of children are the rear
seats,
- a child weighing less than 9 kg
must travel in the "rearwards-facing" position both in the front
and in the rear.
PEUGEOT recommends that chil-
dren should travel in the rear seats
of your vehicle:
- "rearwards-facing" up to the age
of 2,
- "forwards-facing" over the age
of 2.
INSTALLING A CHILD SEAT
USING A THREE POINT SEAT
BELT
"Rearwards-facing"
When a "rearwards-facing" child seat
is installed on the front passenger
seat, it is essential that the passenger air bag** is disarmed. Otherwise,
the child would risk being seriously injured or killed if the air bag
were to inflate.
"Forwards-facing"
When a "forwards-facing" child seat
is installed on the front passenger
seat, adjust the vehicle’s seat to the
intermediate longitudinal position
with the seat back upright and leave
the passenger air bag armed**.
* According to current legislation in
the country.
** According to model.
Intermediate longitudinal
position
Page 97

Comfort
CHILD SEATS RECOMMENDED BY PEUGEOT
PEUGEOT offers a complete range of recommended child seats which are secured using a three point seat belt:
Group 0: from birth to 10 kg
Group 0+: from birth to 13 kg
95
-
Passenger air bag OFF**
** According to version.
L1
"BRITAX
Babysure"
(E11 0344117)
Installed in the
rear-facing
position.
Groups 1, 2 and 3: from 9 to 36 kg
"KIDDY Life"
(E1 03301135)
For the safety of young children
(from 9 to 18 kg), PEUGEOT
recommends use of the
restraining cushion.
Groups 2 and 3: from 15 to 36 kg
L4
"RECARO Start"
(E1 03301108).
L2
"RÖMER
Baby-Safe"
(E1 03301146)
Installed in the
rear-facing
position.
L3
L5
"KLIPPAN
Optima"
(E17 030007)
From the age of
6 years (approximately
22 kg), the booster is
used on its own.
Page 98

100 -
Comfort
ADVICE ON CHILD
SEATS
The incorrect installation of a child
seat in a vehicle compromises the
child’s protection in the event of an
accident.
Remember to fasten the seat belts or
the child seat harnesses keeping the
slack in relation to the child’s body to
a minimum, even for short journeys.
For optimum installation of the
"forward facing" child seat, ensure
that the back of the child seat is in
contact with the back of the vehicle’s
seat and that the head restraint does
not cause any discomfort.
If the head restraint has to be removed, ensure that it is stored or
attached securely to prevent it from
being thrown around the vehicle in
the event of sharp braking.
Children under the age of 10 must not
travel in the "forward facing" position
on the front passenger seat, unless
the rear seats are already occupied
by other children, cannot be used or
are absent.
Disarm the passenger air bag* when
a "rear facing" child seat is installed
on the front seat.
Otherwise, the child would risk being
seriously injured or killed if the air
bag were to inflate.
Installing a booster seat
The chest part of the seat belt must
be positioned on the child’s shoulder
without touching the neck.
Ensure that the lap part of the seat
belt passes correctly over the child’s
thighs.
PEUGEOT recommends the use of
a booster seat which has a back, fitted with a seat belt guide at shoulder
level.
As a safety precaution, do not leave:
- one or more children alone and unsupervised in a vehicle,
- a child or an animal in a vehicle
which is exposed to the sun, with
the windows closed,
- the keys within reach of children inside the vehicle.
To prevent accidental opening of the
doors, use the "Child lock"*.
Take care not to open the rear windows by more than one third*.
To protect young children from the
rays of the sun, fit side blinds on the
rear windows.
* According to version.
Page 99

Comfort
CHILD SEATS RECOMMENDED BY PEUGEOT
PEUGEOT offers a complete range of recommended child seats which are secured using a three point seat belt:
Group 0: from birth to 10 kg
Group 0+: from birth to 13 kg
95
-
Passenger air bag OFF**
** According to version.
L1
"BRITAX
Babysure"
(E11 0344117)
Installed in the
rear-facing
position.
Groups 1, 2 and 3: from 9 to 36 kg
"KIDDY Life"
(E1 03301135)
For the safety of young children
(from 9 to 18 kg), PEUGEOT
recommends use of the
restraining cushion.
Groups 2 and 3: from 15 to 36 kg
L4
"RECARO Start"
(E1 03301108).
L2
"RÖMER
Baby-Safe"
(E1 03301146)
Installed in the
rear-facing
position.
L3
L5
"KLIPPAN
Optima"
(E17 030007)
From the age of
6 years (approximately
22 kg), the booster is
used on its own.
Page 100

Comfort
96 -
LOCATION OF CHILD SEATS SECURED USING THE SEAT BELT
In accordance with European regulations (Directive 2000/3), this table indicates the options for the installation of child seats
secured using the seat belt and universally approved (a), in relation to the weight of the child and the seat in the vehicle.
Weight of child/indicative age
Seat
Saloon and 206 SW
Front passenger
seat (c)
Fixed seat,
Height adjustable seat
Rear side seat U U U U
Less than 13 kg
(groups 0 (b) and 0+)
Up to 1 year approx
U U U U
From 9 to 18 kg
(group 1)
From 1 to 3 years approx
From 15 to 25 kg
(group 2)
From 3 to 6 years approx
From 22 to 36 kg
(group 3)
From 6 to 10 years approx
Rear centre seat (d)
3-point seat belt
Rear centre seat (e)
2-point seat belt
206 GTi 180
Front passenger
seat (c)
Rear side seat
X UF UF UF
X UF UF UF
U U U U
 Loading...