

Page 1
PLEASE READ THIS ENTIRE GUIDE BEFORE BEGINNING
1 Dog Model Number
p-collar 620
2 Dog Model Number
p-collar 620B
Remote Training Collar
operating and training guide
Page 2
Important Safety Information
Safety during on-leash training. It is vitally important that
you and your dog remain safe while learning during on-
leash training. Your dog should be on a strong leash, long
enough for him to attempt to chase an object, but short enough for him not to
reach a road or other unsafe area. You must also be physically strong enough to
restrain your dog when he tries to chase.
R
isk of skin damage. Please read and follow the instructions in
this manual. Proper fit of the collar is important. A collar worn
for too long or made too tight on the pet’s neck may cause skin
damage. Ranging from redness to pressure ulcers; this condition is commonly
known as bed sores.
Ÿ Avoid leaving the collar on the dog for more than 12 hours per day.
Ÿ When possible reposition the collar on the pet’s neck every 1 to 2 hours.
Ÿ Check the fit to prevent excessive pressure; follow the instructions in this manual.
Ÿ Never connect a lead to the electronic collar; it will cause excessive pressure on
the contacts.
Ÿ When using a separate collar for a lead, don’t put pressure on the electronic
collar.
Ÿ Wash the dog’s neck area and the contacts of the collar weekly with a damp
cloth.
Ÿ If a rash or sore is found, discontinue use of the collar until the skin has healed.
Ÿ If the condition persists beyond 48 hours, see your veterinarian.
These steps will help keep your pet safe and comfortable. Millions of pets are
comfortable while they wear stainless steel contacts. Some pets are sensitive to
contact pressure. You may find after some time that your pet is very tolerant of the
collar. If so, you may relax some of these precautions. It is important to continue
daily checks of the contact area. If redness or sores are found, discontinue use
until the skin has fully healed.
3
Not for use with aggressive dogs. Do not use this Product if
your dog is aggressive, or if your dog is prone to aggressive
behavior. Aggressive dogs can cause severe injury and
even death to their owner and others. If you are unsure whether this product is
appropriate for your dog, please consult your veterinarian or certified trainer.
Dear C us to mer, than k yo u ve ry much for c ho os ing Pet Sp y! I t’s our
plea su re t o serve you a nd y ou r belov ed d og . Our missi on i s to e nsure
your p et ’s s afety and h ap pi ness by p ro vi ding you wi th t he t ools and
tech ni qu es to succe ss fu lly train y ou r dog. If you h av e an y questio ns ,
plea se v is it our webs it e or c ontac t Pe tS py Custom er S er vice at
[email protected]
- we wil l be h ap py to assis t yo u.
Warranty
PetS py e -c ollars ar e co vered by th e 1- YE AR WARRAN TY . Yo u can
regi st er y our produ ct w ar ranty at ww w. pe tspy .c om . If you r purc ha sed
item malf un ctions or b re aks withi n 1 ye ar , we will sen d you a f re e
repl ac em ent. No mor e th an o ne replac em en t per pur ch as ed
item .
Replace me nt w arranty d oe s no t apply t o pr om otional o rd er s with
tota l di sc ount grea te r th an 30%. The w ar ranty beg in s fr om the date o f
purc ha se . A purchas e co nfi rmation s uc h as amazon o rd er i d is requir ed
for a cl ai m. T he warran ty d oe s not cover p ro ducts wit h ph ys ical dama ge
or whe n pr od uct is lost . Pe tS py does not o ffe r wa r
rant y fo r pr oducts
purc ha se d from unau th or ized re se ll ers such as o nl ine aucti on s.
PetS py p ro ducts are e xc lu sivel y so ld on PetSpy.com, Amazon.com, and
Chewy.com.
Any ot he r sources a re c onsider ed a s un authori ze d reselle rs.
The re fu nd p eriod is st ri ct ly limite d to 3 0- days star ti ng f rom the d at e of
purc ha se
.
Rest ri ct ions appl y.
Webs it e: w ww.pets py .com
Cust om er S upport: s up po rt@pets py .com
Soci al M ed ia: @pets py br and
Thank you
Contacts
Page 3
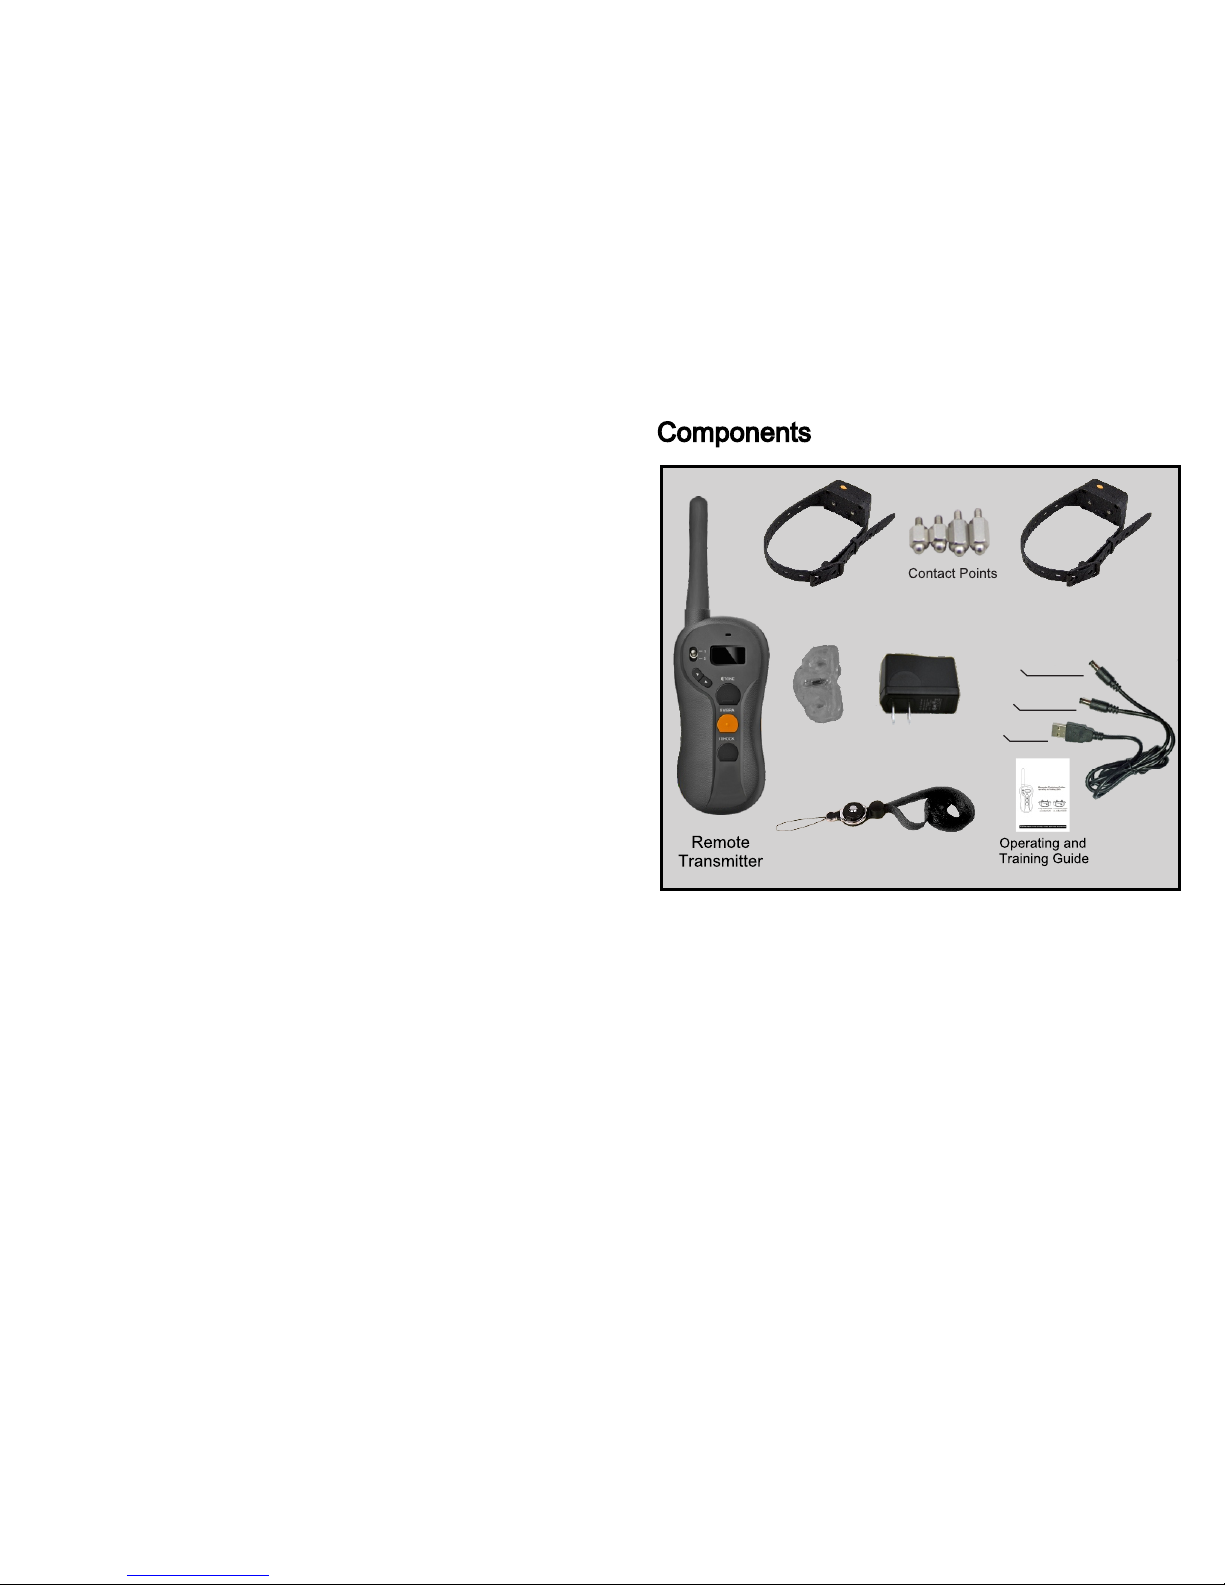
Table of Contents
Components........................................................................................
Other Items You May Need................................................................
Main Features.....................................................................................
Overview.............................................................................................
Operating Guide..................................................................................
How to turn the p-collar 620 on/off...................................................
How the transmitter buttons work.....................................................
Collar fitting......................................................................................
How to find the best Vibration/Shock level.......................................
To maximize the distance................................................................
The LCD & LED indicator.................................................................
Charging the battery.........................................................................
How to pair the Remote Transmitter and Receiver Collar................
How to use the Test Light.................................................................
Gerneral Training Tips.........................................................................
Frequently Asked Questions...............................................................
Troubleshooting...................................................................................
Warranty and repair informatiion.........................................................
Reference Size for Difference Dogs....................................................
Reference Weight for Dogs.................................................................
5
5
6
7
9
9
11
12
13
13
14
15
17
18
19
20
21
22
24
24
Other Items You May Need
Ÿ Screwdriver
Ÿ Scissors
4
5
Test Light
Dog 1 Receiver Collar
Dog 2 Receiver Collar
for Receiver
for Transmitter
USB Port
Battery Charger
Neck Strap
Page 4
Main Features
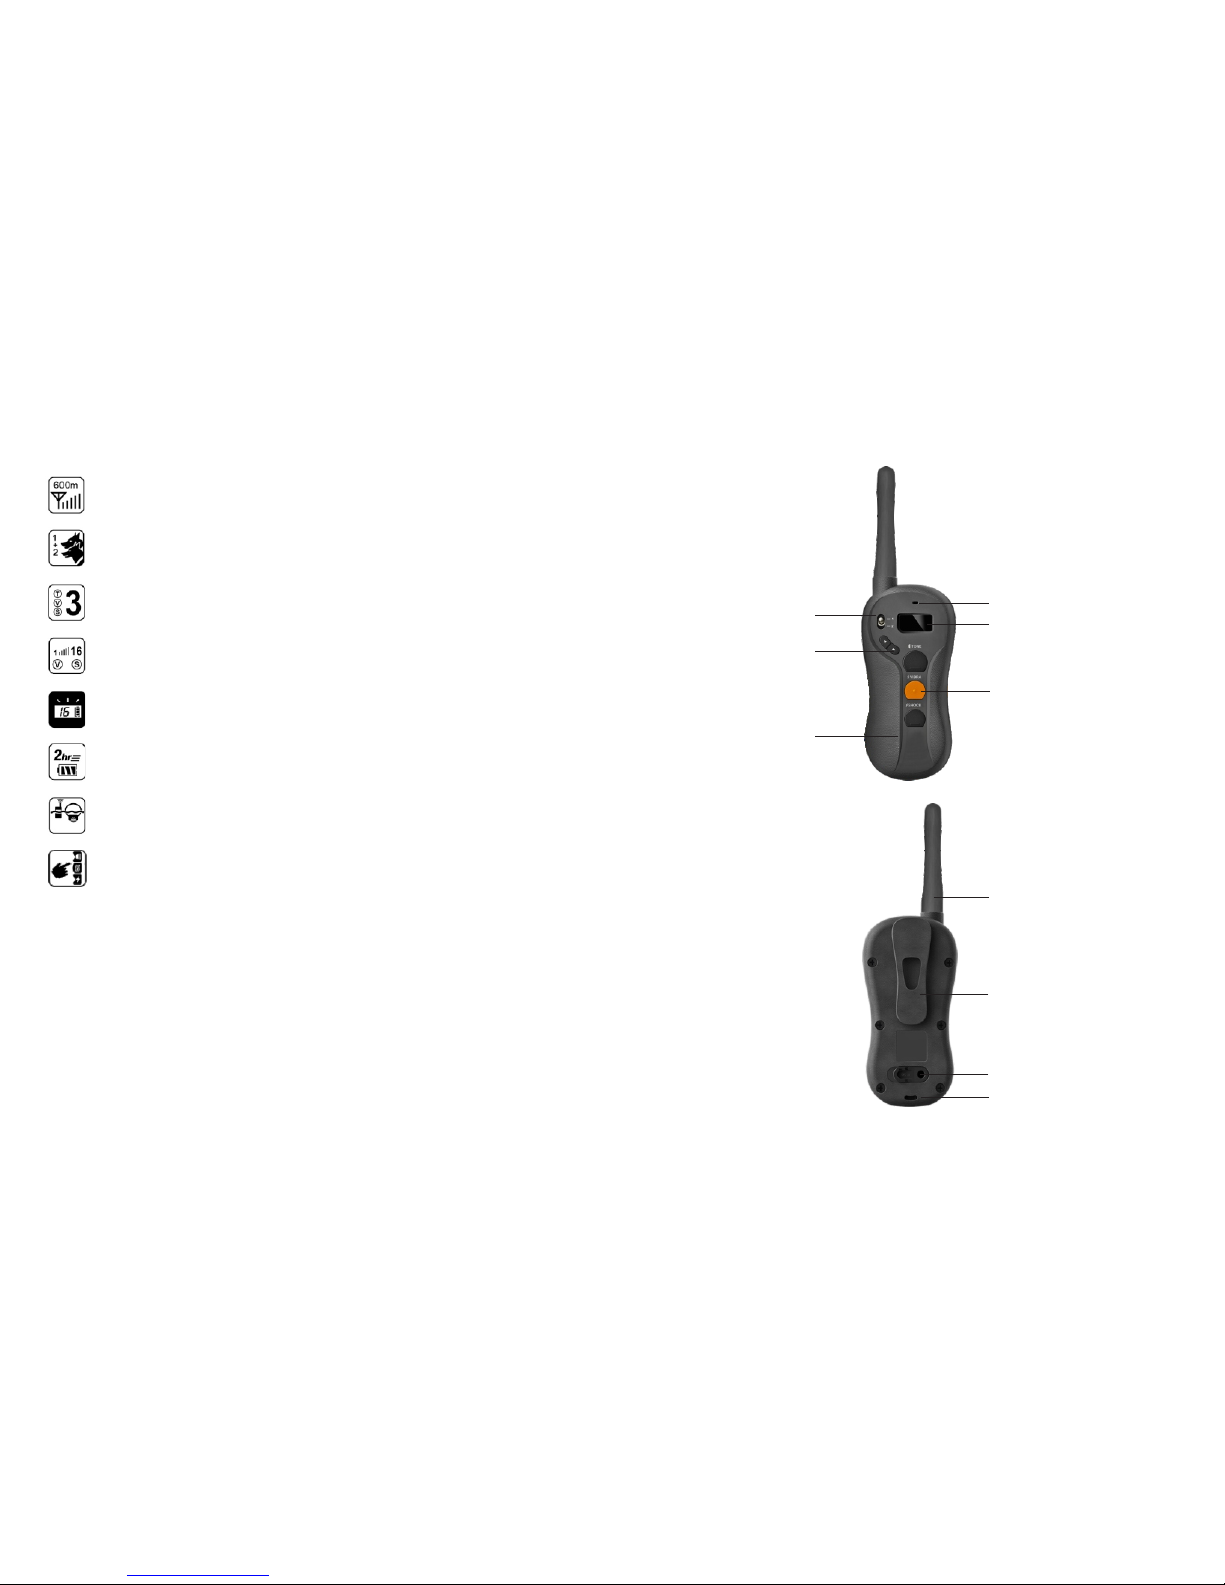
600M Remote Training Range
User Expandable to a Two-dog System
Tone, Vibration, and Shock Commands
16 Adjustable Progressive Intensity Levels for Vibration and Shock
Blue Backlit LCD Indicating Intensity Level and Battery
2-hour Rapid Charging Lithium Polymer Battery
100% Waterproof
Innovative Blind Operation with Touch Distinguishing Mode Buttons
Overview
LED Indicator Light
Blue Backlit LED Display
Indicating Intensity Level
under Any Circumstances
of Visibility.
Blind Operation
Buttons
Easily distinguish and
send the correct training
command without eyes on
by touching and feeling on
buttons with different
structure.
Touch
Distinguishing
Edge
Effectively preventing
unexpected operation
and avoiding
unattended training.
Intensity Level
Adjustment
Quick selection for
the certain dog we
want to train.
Selecting
Channels
Antenna
Belt Clip
Waterproof
Charging Jack
(with cover)
Neck Strap Pin
Transmitter
6
7
Page 5
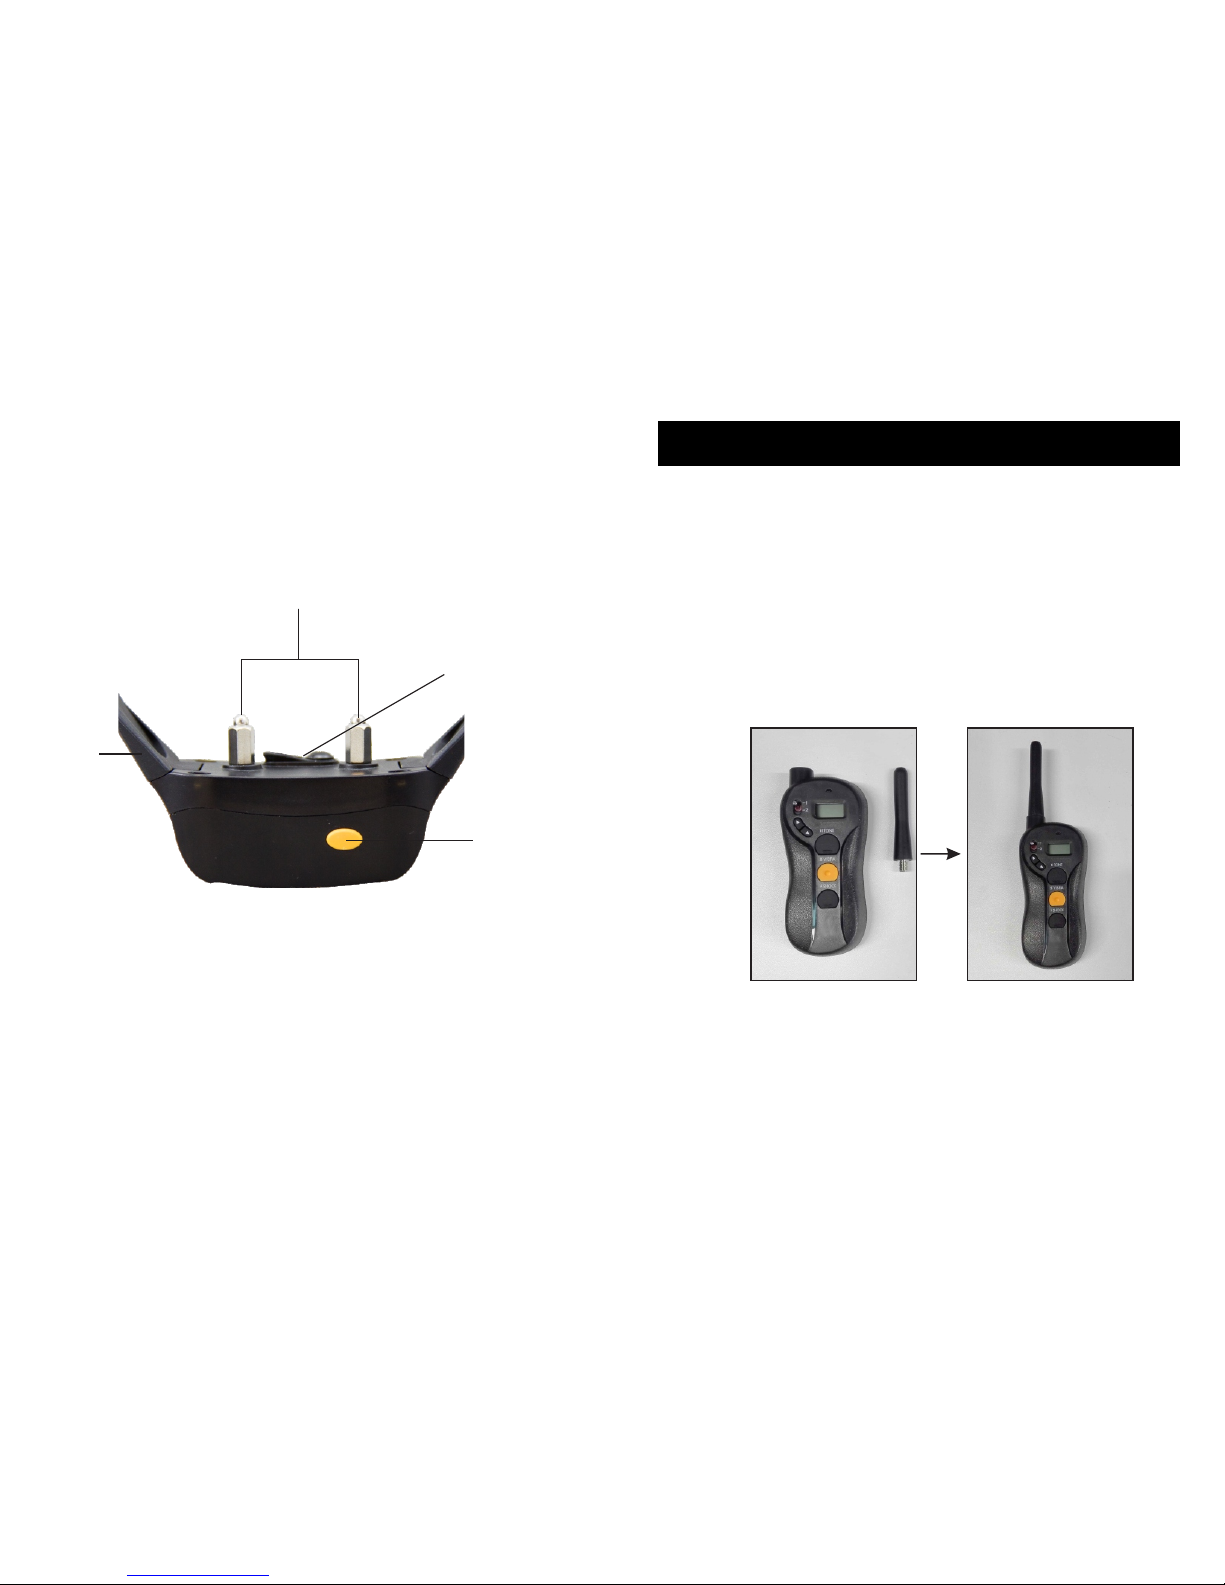
Receiver Collar
Collar
Contact Points
Charging Jack
(with cover)
On/Off
Button
Operating Guide
Step
1
How to turn the p-collar 620 on/off
To turn the Transmitter on
The blue backlight on the display stays on for approximately 30 seconds
after a button press. After that with no button press, the blue backlight
shuts off first, and if no button press with another five minutes, the display
shuts off and the Transmitter goes into battery conservation mode.
Pressing any button will turn the display back on.
8 9
1.To mount the antenna to the corresponding position of the transmitter
tightly.
2.Press any button on the Transmitter.
Page 6
Step
2
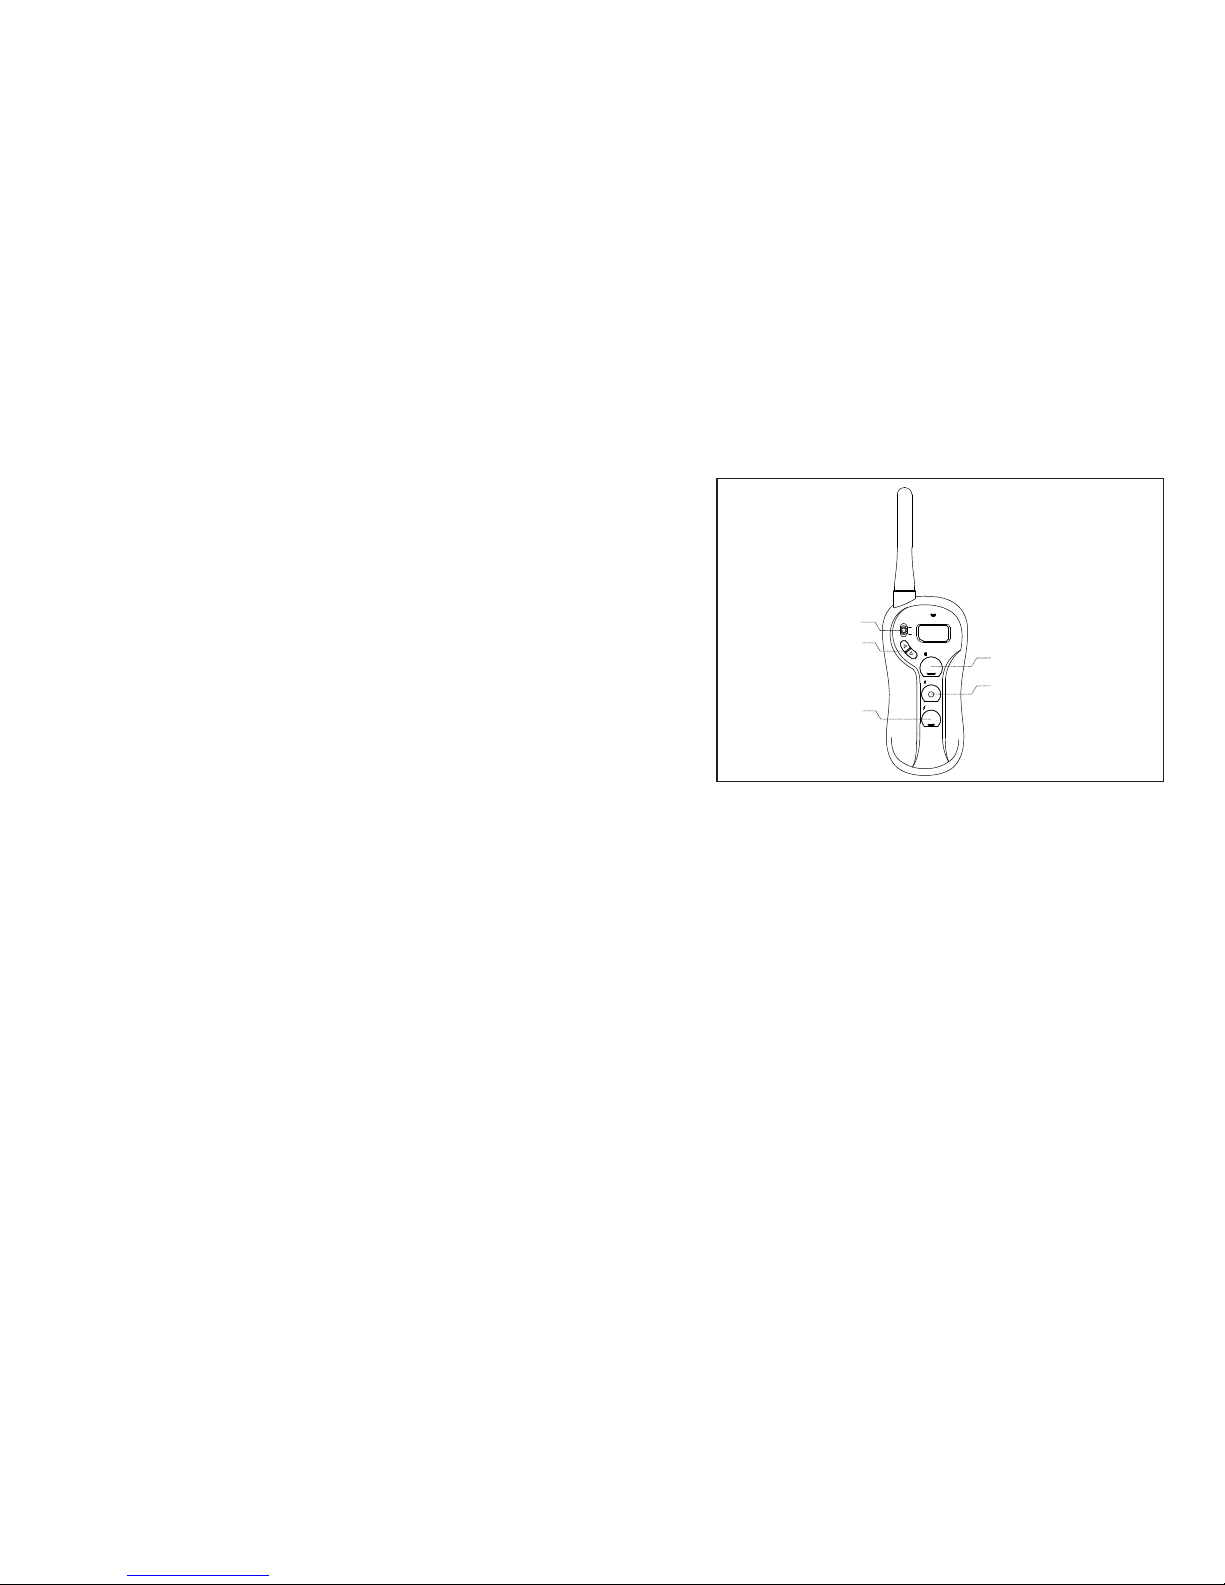
How the Transmitter buttons work
TONE
Button (Black with Bar)
SHOCK
Button (Black with Bar)
Up/Down
Button
VIB RA
But ton ( wit h Dot)Ora nge
Dog 1/2 Toggle
TONE
VIBRA
SHOCK
1
2
Tone Only Button (Black with Bar):
Sends an audible tone to the collar. No stimulation is delivered.
Vibration Only Button /Shock Only Button(Orange with Dot) (Black with
Bar):
Delivers vibration/shock through the Contact Points on the Receiver
Collar at the level shown on the Digital Display. When held down for 10
consecutive seconds, the Transmitter will “time-out”, and
vibration/shock cannot be delivered for 5 seconds. You must release
and press the button again after the 5 second time-out period, before
additional shock can be delivered. vibration/
Dog 1/2 Toggle Switch
Located on the upper left face of the Transmitter is a toggle switch,
allowing switch between Dog 1 and Dog 2.
Vibra/Shock Up Button ( ): Increases vibration/shock Level by 1.
Vibra/Shock Down Button ( ): Decrease vibration/shock Level by 1.
10
11
To turn the Receiver Collar on
1. Press and hold the On/Off Button until the Green LED light comes on.
(This takes approximately one second.)
2. Release the On/Off Button.
To turn the Receiver Collar off
1. Press and hold the On/Off Button until the Red LED light shuts off.
(This takes approximately three seconds.)
2. Release the On/Off Button.
Note: To extend the life of the batteries, turn the Receiver Collar off when it is
not in use.
In nor ma l mo de, the Gre en L ED w ill flash on ce e ve ry 5 second s,
indi ca ti ng the Rece iv er C ollar is on a nd r ea dy to rec ei ve a s ig nal fro m
the Ha nd he ld Transm it te r.
Page 7
Step
4
How to find the best Vibration/Shock Level
The unit comes with Up and Down buttons to control the
Vibration/Shock Level, with Level 1 being the lowest level and Level 16
being the highest.
The level of Vibration/Shock best suited for your dog depends on your
dog’s temperament and threshold for Vibration/Shock. Always start at
the lowest level and work your way up.
The appropriate level can be found when the dog responds to the
Vibration/Shock with a mild reaction, such as a tensing of the neck
muscles. The Vibration/Shock Level may vary depending on the
training situation. When highly distracted, dogs will require a higher
level of Vibration/Shock.
Step
5
To maximize the distance
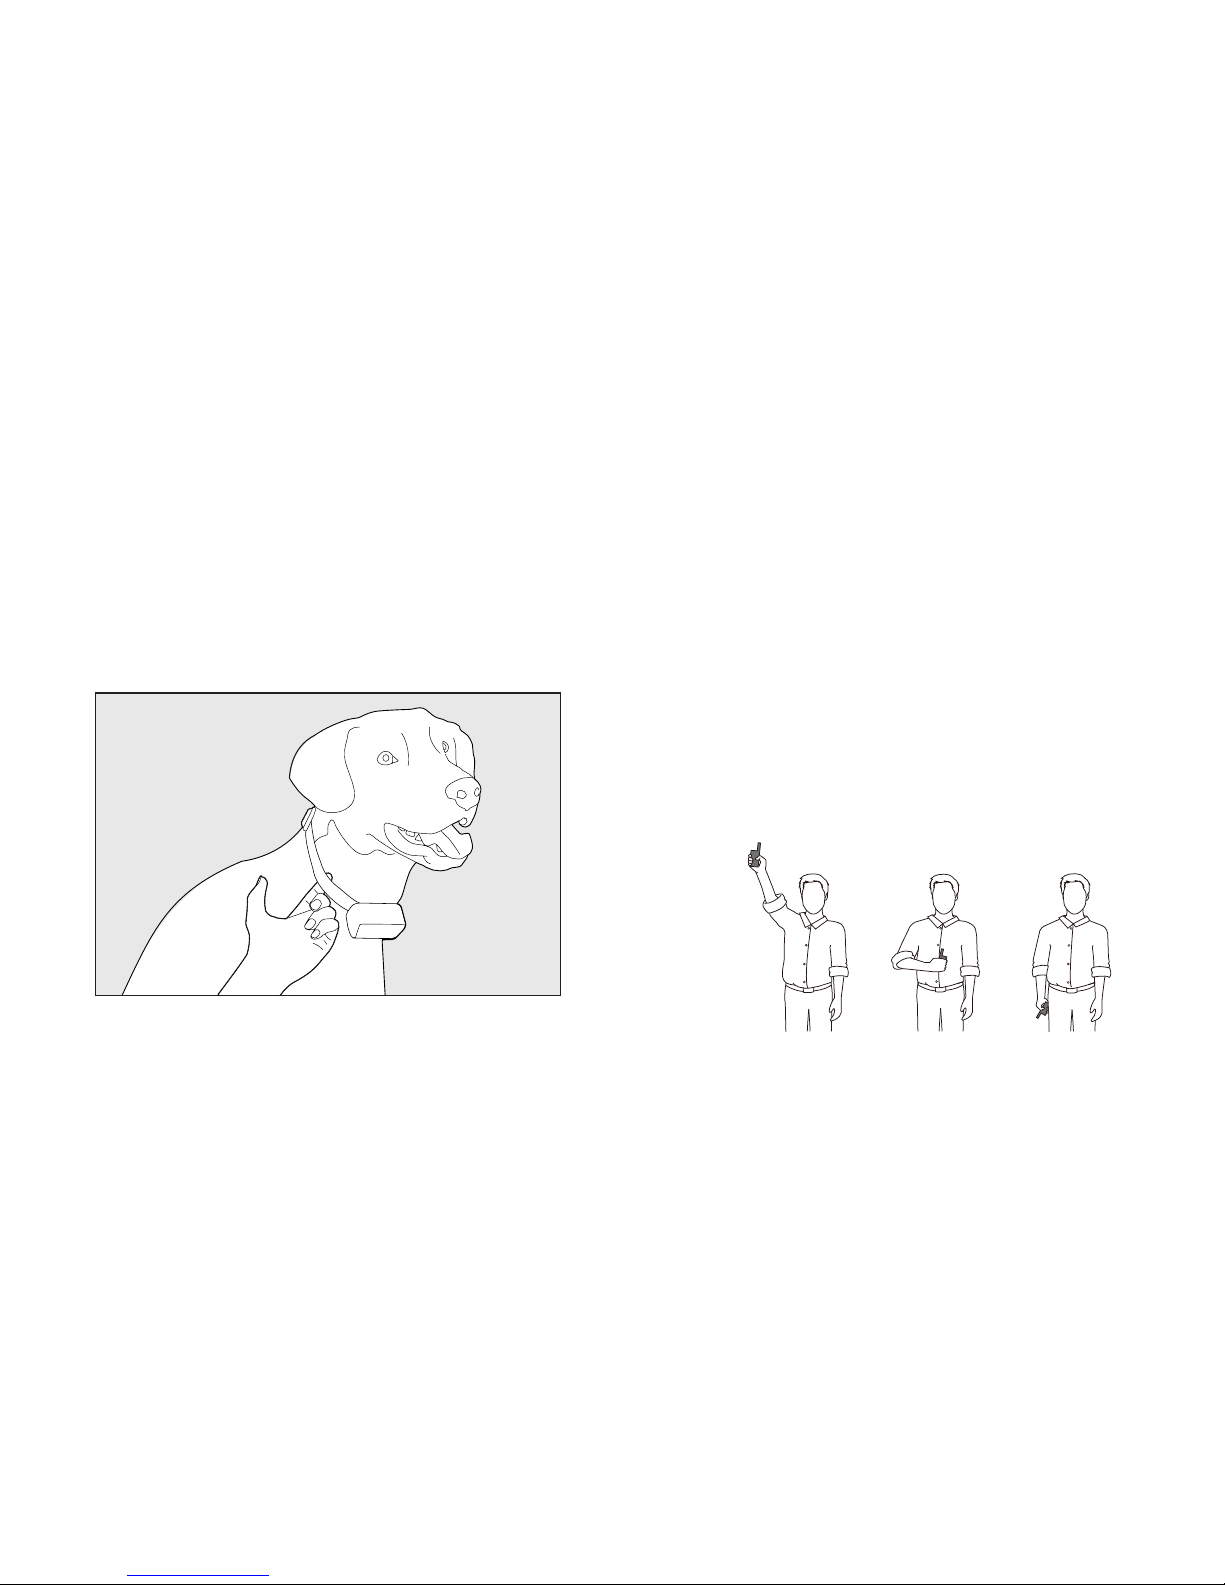
The unit has a 600 meter range. The range may vary depending on
the way the Transmitter is held. Hold the Transmitter away from your
body to receive the greatest range. For maximum signal strength,
keep the device properly charged.
Maximum range Typical range Minimum range
*Avoid touching the antenna or the range may decrease
substantially.
13
12
Step
3
Collar fitting
The Receiver/Collar should be fitted so that the surgical stainless steel
contact points press firmly against the dog’s skin. When properly fitted,
you should be able to fit a finger or two snugly in between the collar and
you dog’s skin. When properly fitted, the Receiver/Collar should not
move on the dog. The best location for the Receiver/Collar box is either
side of the dog’s windpipe.
A loose fit can allow the Receiver/Collar to move around on the dog’s
neck. When this happens, the contact points may rub the skin and
cause irritation. If the Receiver/Collar is too tight, the dogs may have
difficulty breathing.
Page 8
Receiver Indicator Light – Function and Response
Power on
Normal operation - Good battery
Training tone
In pairing position
Pairing Complete
Charging Complete
Receiver Collar Function
Green LED Response
Flashes once
1 flash every 5 seconds
On length of TONE button press
Flashes once every second
within 16 seconds
Receiver Collar Function
Power off
Normal operation - Low battery
Vibration/Shock
Charging
Red LED Response
On for 3 seconds
Flashes rapidlly
On length of VIBRA/SHOCK button press
On length of charging within 2-3 hours
Flashes rapidly for five times
On length of the charger connected
Step
7
Charging the battery
The unit uses Lithium-Polymer batteries.
1. Charge the unit before using the unit for the first time.
2. Do not charge the batteries near any flammable substances.
3. Fully charge the batteries if the unit is to be stored without use for a
period of 3 months or more.
Recharge the unit if:
The indicator light on the collar is emitting a red color and flashes rapidly.
The 3 bar indicator on the Transmitter LCD shows just 1 bar.
The indicator light on the Transmitter or Receiver will not come on.
The indicator light on the Transmitter or Receiver comes on momentarily
when any of the Mode Buttons is pushed.
Battery Charging Procedure
NOTE: The unit has a partial charge when it leaves our facility, upon
receipt of the collar, be sure to give it a 4-hour initial charge before the
first use.
14
15
Step
6
The LCD & LED indicator
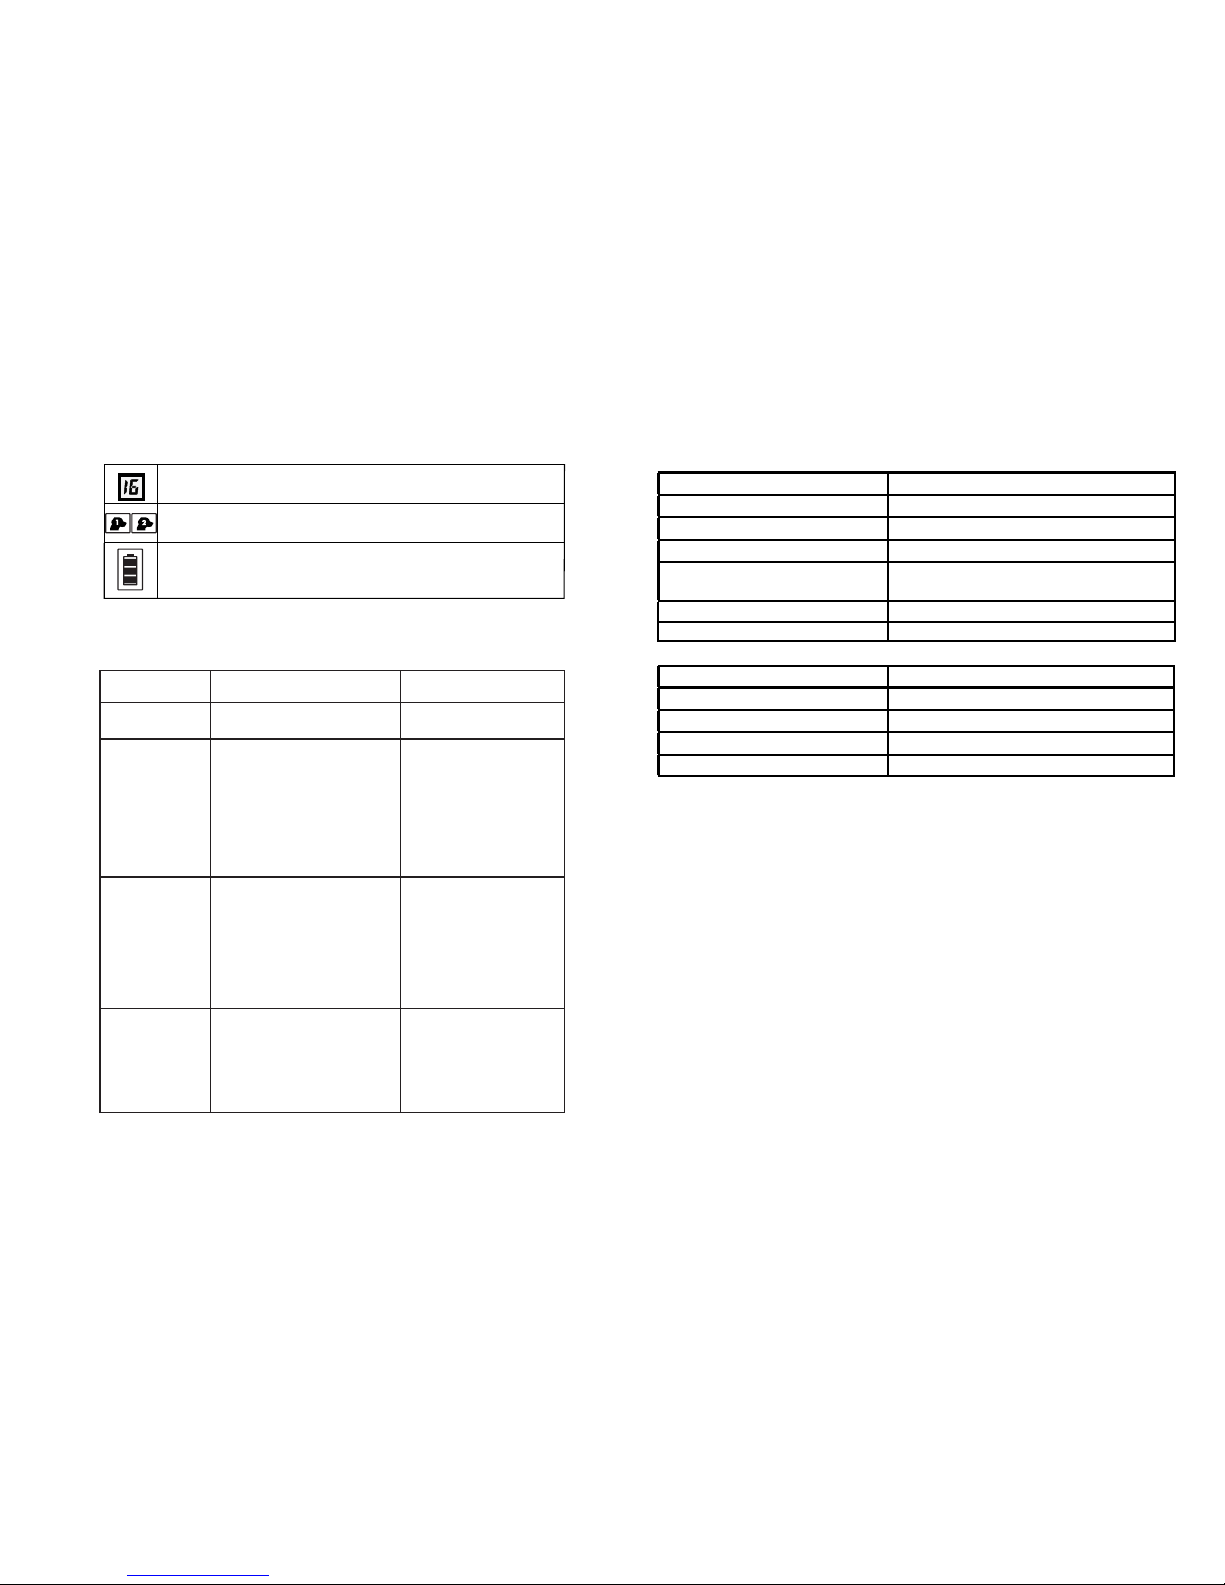
Indicates Vibration/Shock levels ranging from 1-16, and
appears in the middle part.
Indicates the active dog receiver and appear in the left part.
Indicates battery’s power level.
Note: The battery indicator will flash every second to indicate
low battery.
Transmitter LED Indicator Light – Function and Response
Button
Button Function
Transmitter Indicator Light
Response
TO NE
(Black w/ Bar)
Delivers audible tone to collar
Red LED on for length of
button press
VIBRA
(Orange w/ Dot)
Delivers vibration to collar
base on current level shown
on Digital Display (vibration
will time-out for 5 seconds if
pressed continuously for 10
seconds and will reset after
timeout period)
Red LED on for length of
button press
SHOCK
(Black w/ Bar)
Delivers shock to collar base
on current level shown on
Digital Display (shock will
time-out for 5 seconds if
pressed continuously for 10
seconds and will reset after
timeout period)
Red LED on for length of
button press
TONE and VIBRA
Buttons held
simultaneously
Transmits Pairing
command to Receiver
Collar
Red LED on for length of
button press
Page 9
Step
8
How to pair the Remote Transmitter &
Receiver Collar
If your Receiver Collar does not beep when the TONE Button of the
Remote Transmitter is pushed,or if you feel the Receiver Collar is not
responding to the Remote Transmitter, follow these steps to pair:
1. With the Receiver Collar off your pet, turn the Receiver Collar off.
Restart, press and hold the On/Off Button until the Green LED flashes
every second on the Receiver Collar. This continues for 16 seconds,
within which pairing should be completed.
2. Press and hold the TONE and VIBRA Button of the Remote
Transmitter at the same time until the Green LED Light on the Receiver
Collar flashes rapidly for 5 times, indicating pairing is completed.
Two Dog System
NOTE: If you wish to add another Receiver Collar to the training system,
extra Receiver Collars are available where you bought your unit.
Remote Transmitter
1. Set the Toggle Switch to 2.
2. Turn on the Receiver Collar for Dog 2, press any Mode Buttons to
verify function.
3. If Dog 2 Receiver Collar does not respond. Pairing may be needed.
Repeat steps in How to pair the Remote Transmitter & Receiver
Collar above.
16
17
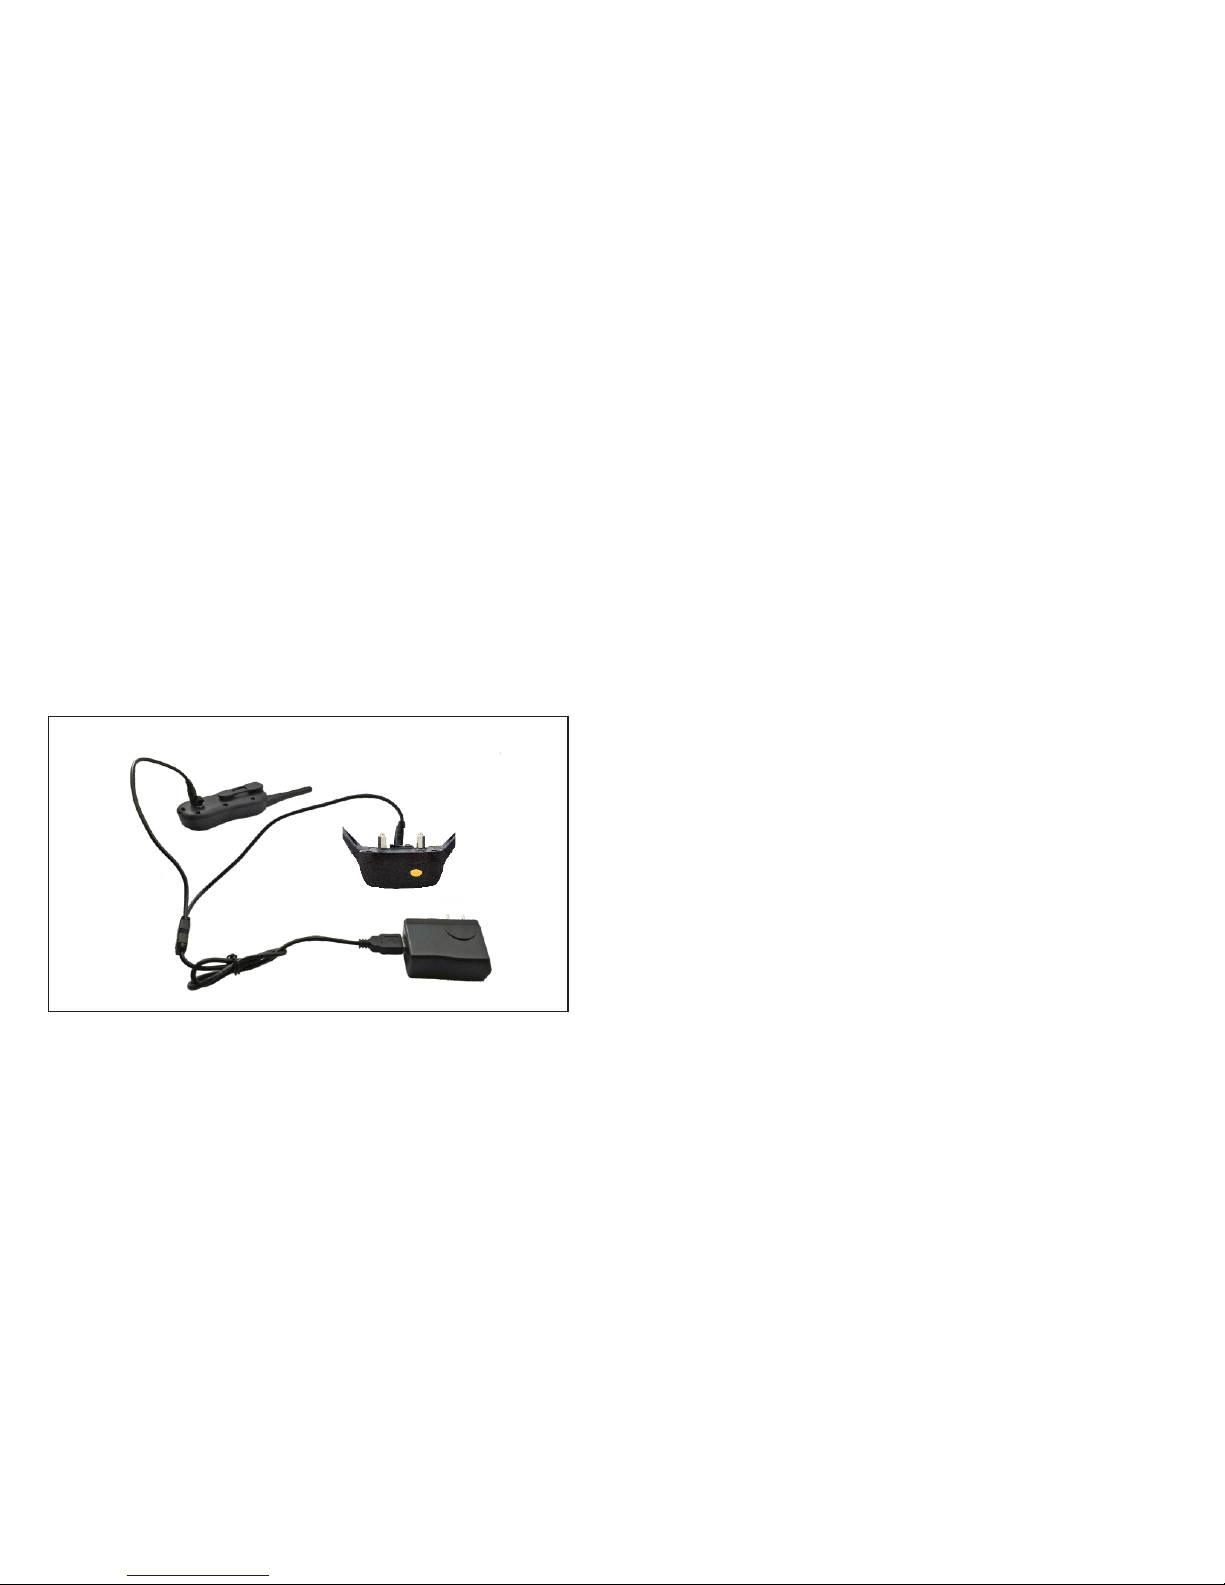
1. Lift the rubber covers protecting the Transmitter/Receiver Collar Charging Jack.
2. Connect the charger connectors to the Transmitter and Receiver Collar
Charging Jack, and as shown below.
3. Connect the USB port to the Charging Adapter.
4. Plug the charger into a standard wall outlet.
5. Charge the unit for 4 hours for the first charge. Recharges take only 2-3 hours.
Note: The Battery Indicator on the Transmitter will scroll and the indicator light in
steady red while charging; and the Battery Indicator will become steady, and the
LED Indicator Light flashes when fully charged.
The indicator light on the Receiver Collar will be in steady red while charging and
green light turned on when fully charged.
6. When charging is completed, remove the charger connector.
Page 10
Training Guide
General Tips
Ÿ E liminat e on e mi sbehavi or o r te ach one o be di en ce comm an d at a t ime.
If you m ov e to o fast with t ra in ing, your p et m ay b ecome con fu se d.
Ÿ B e consist en t. C orrect yo ur p et e very time h e mi sb ehave s.
Ÿ U nless you c an s up ervise hi m, i t is r ecomm en de d th at you re st ri ct y our
pet fr om s it uations i n wh ic h he has a hist or y of m isbehav in g. H oweve r,
sett in g up a s ituatio n as a t ra ining ses si on c an dramat ic al ly impr ov e
your c ha nc es of succe ss .
Ÿ I f your pet re ac ts t o the tones b y hi di ng or actin g fe ar ful, re di re ct h is
atte nt io n to a simple a nd a pp ropriat e be ha vior, suc h as t he “ sit”
comm an d.
Ÿ P ets shoul d be a t le ast 6 month s ol d be fore usin g th e Tr ainin g Co ll ar.
Ÿ O nly let res po ns ible fami ly m em bers us e th e Tr ai ning Co ll ar . It is not a
toy!
Ÿ O ther pets i n he ar ing range w il l be a ffecte d by t he t ra ining t on es .
Ther ef or e, traini ng s es sions sho ul d be c onducte d ou t of h earin g ra ng e
of oth er p et s.
18
19
Never use the Remote Training Collar to correct or
eliminate any form of aggressive behavior. We recommend
you contact your local veterinarian or professional trainer to
determine if your pet might be aggressive. See page 3 for
more information.
Step
9
How to use the Test Light
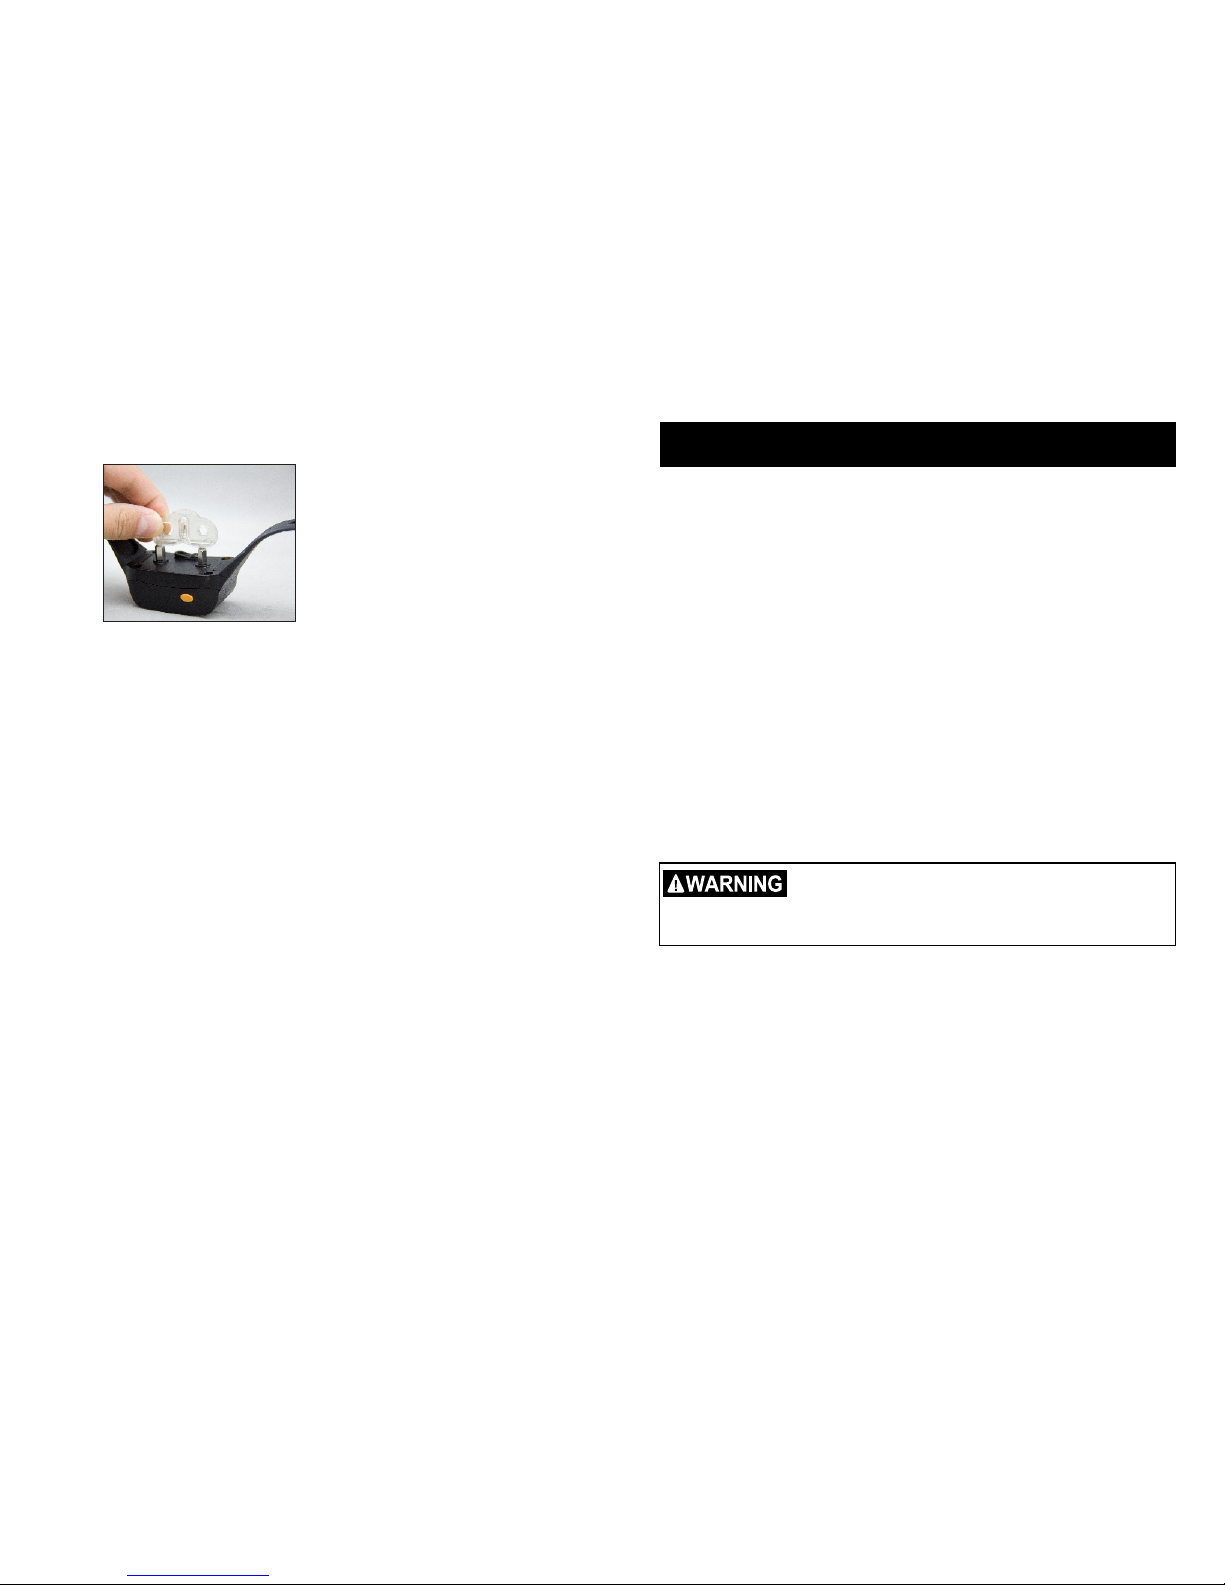
1. Turn the Receiver Collar on.
2. Hold the Test Light Contacts to the
Contact Points.
3. Press the SHOCK Button on the
Remote Transmitter.
4. The Test Light will flash.
Note: At higher Shock Levels, the Test
Light will flash brighter.
5. Turn the Receiver Collar off.
Save the Test Light for future testing.
Note: If the Test Light does not flash,
recharge the Receiver and re-test. If Test
Light still does not flash, contact us for
Customer Service.
Page 11
20
21
Troubleshooting
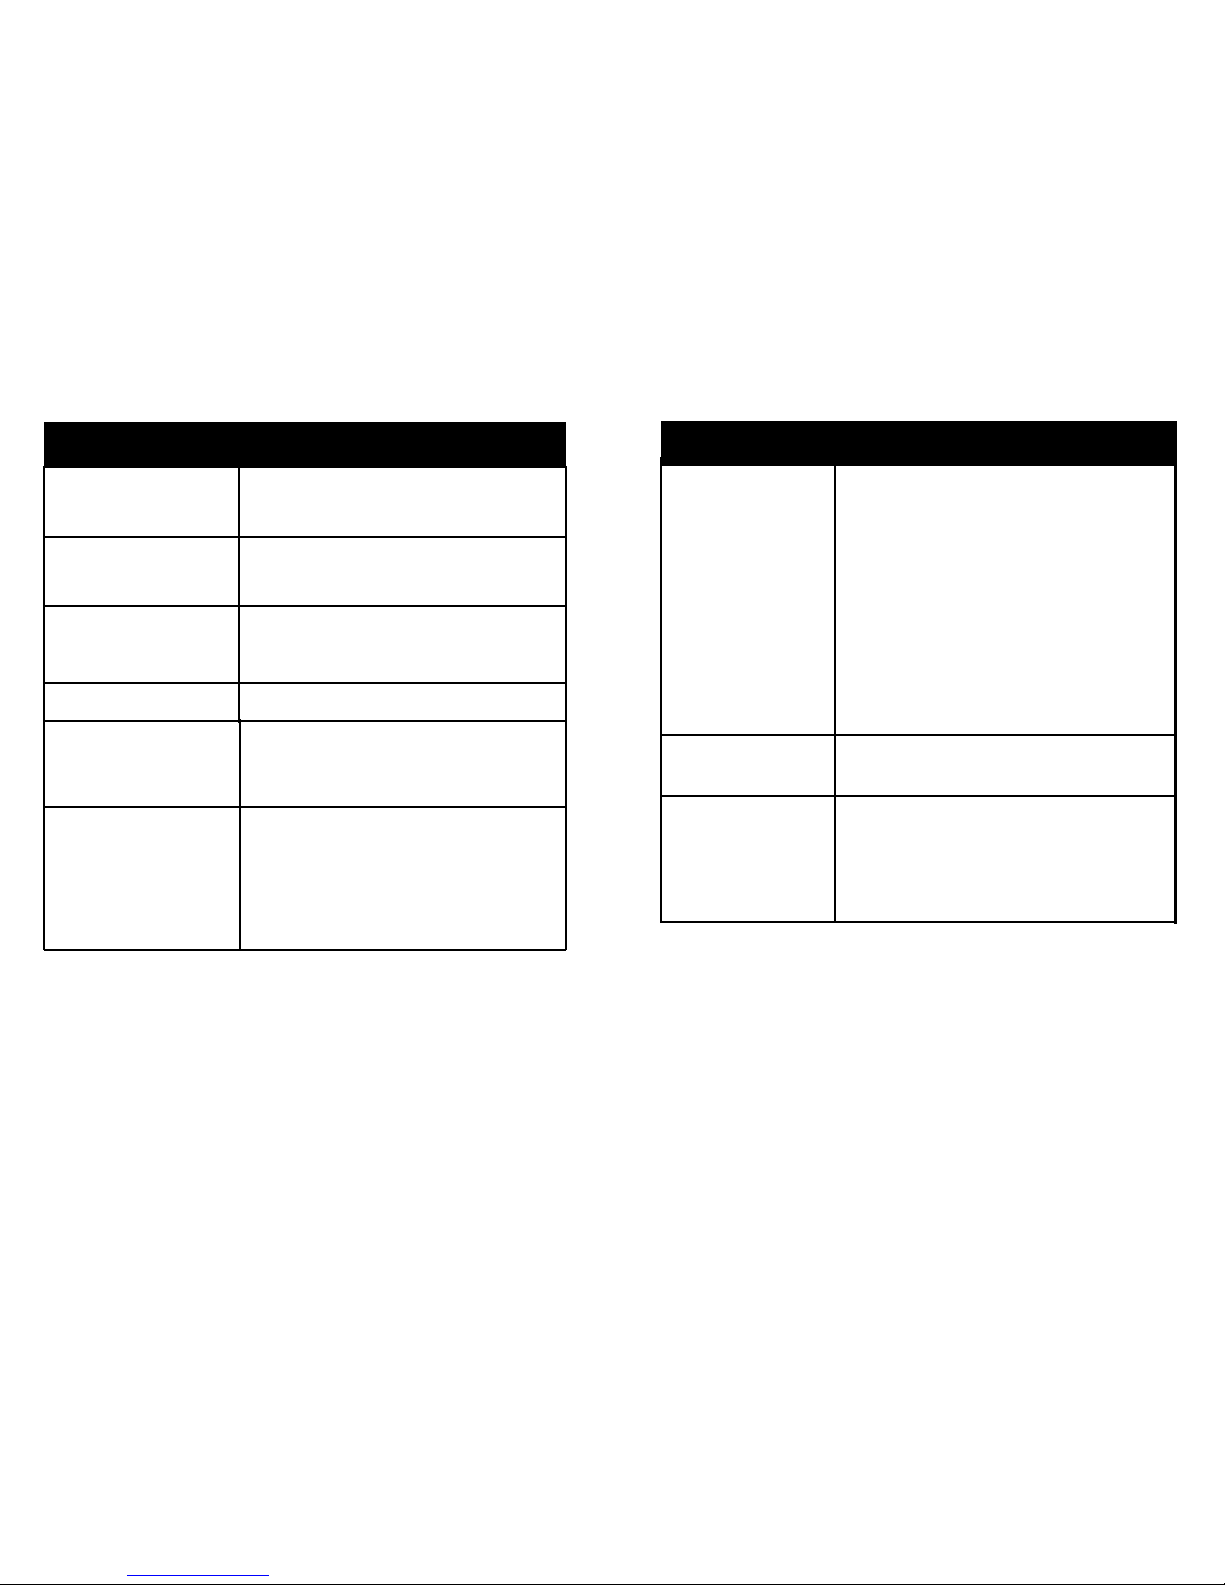
My pet does not respond
when I press a button.
Make sure the Receiver Collar has been turned on.
•
•
If your range has reduced from the first time you
used the Remote Training Collar, the battery(s)
may be low in either the Remote Transmitter or
Receiver Collar.
•
Terrain, weather, vegetation, transmission from
other radio devices and many other factors can
impact the amount of range you have with the unit.
•
Test the Receiver Collar. See “How to use the Test
Light” for details.
•
Increase the Vibration/Shock Level. Refer to “How
to find the best Vibration/Shock Level” for more
information.
•
Make sure the Receiver Collar’s Contact Points
are placed snugly against your pet’s skin. Refer to
“Collar fitting” for more information.
The Receiver Collar will
not turn on.
•
Make sure the Receiver Collar has been charged.
For the initial charge, be sure to charge it for 4
hours. Subsequent charges only take 2-3 hours.
The Receiver Collar is not
responding to the Remote
Transmitter.
•
Verify the Receiver Collar is on.
•
If the Indicator Light does not come on when any
button is pressed on the Transmitter, ensure that
the batteries are fully charged.
•
If the first two solutions did not resolve your
problem, see “How to pair the Remote Transmitter
& the Receiver Collar”.
Frequently Asked Questions
Is the Vibration/Shock safe
for my pet?
How old does my pet have to
be before using the Remote
Training Collar?
Once my pet is trained and
has been obeying my
commands, will he have to
continue to wear the
Receiver Collar?
Is the Receiver Collar
waterproof?
Will I get exactly 600 meters
of range with the Remote
Training Collar?
How long can I continuously
deliver Vibration/ Shock to
my pet?
While the Vibration/Shock is unpleasant, it is
harmless to your pet. Electronic training devices
require interaction and training from the owner to
achieve desired results.
Your pet should be able to recognize basic
obedience commands such as “Sit” or “Stay”.
Pets should be at least 6 months old before
using the Training Collar.
Probably not. You may need to reinforce training
with the Receiver Collar from time to time.
Yes.
The range of the Remote Training will vary
according to terrain,weather, vegetation, as well
as transmission from other radio devices. See
“To maximize the distance” for tips on
maximizing your range.
The maximum amount of time you can press the
Vibration/Shock Button and deliver
Vibration/Shock to your pet continuously is 10
seconds. After this, there's a time-out and
Vibration/Shock cannot be delivered for 5
seconds. After the 5 second time-out period,
Button can be pressed and Vibration/Shock can
be delivered again.
Page 12

22
23
The warranty is void if the unit has been altered or an unauthorized person has
damaged the unit while attempting repair work.
Battery replacement by the customer during the first year of the Limited Lifetime
Warranty is not recommended. If the customer chooses to replace the batteries,
any damage to the unit during the change-out by the owner will void the warranty.
We reserve the right to retain and discard any parts or accessories that have
been found damaged upon replacement and repair.
Procedure for Repair Work
If the unit is malfunctioning, please refer to the “Troubleshooting Guide” in the
Operating and Training Guide before sending it back for Service.
The cost of shipping products under warranty back is the customer’s responsibility.
We are not responsible for units damaged or lost in transition. We are not
responsible for loss of training time or inconvenience while the unit is in for repair
work. We do not provide loaner units or any form of compensation during the
repair period.
A copy of the sales receipt showing the purchase date may be required before
warranty work is initiated.Please include a brief explanation outlining the problem
and include your name, address, city/state/zip code, daytime phone number,
evening phone number, and email address.
Compliance
FCC - USA
This device complies with part 15 of the FCC Rules. Operation is subject to the
following two conditions: (1) This device may not cause harmful interference,
and (2) this device must accept any interference received, including interference
that may cause undesired operation.
CAUTION: Modification or changes to this equipment not expressly approved by
Manufacturer may void the user’s authority to operate the equipment.
NOTE: This equipment has been tested and found to comply with the limits for a
Class B digital device, pursuant to part 15 of the FCC Rules. These limits are
designed to provide reasonable protection against harmful interference in a
residential installation. This equipment generates,uses, and can radiate radio
frequency energy and, if not installed and used in accordance with the
instructions, may cause harmful interference to radio communications. However,
Warranty and repair information
1-Year Limited Lifetime Warranty
The original purchaser for this unit is provided with 1-YEAR WARRANTY.
The warranty begins from the date of purchase. For the first year, coverage is for
both Parts and Labor on warranty repair services.
Accessories such as chargers, splitter cables, antennas, straps, and batteries are
covered for the first year only. After the first year, the Limited Lifetime Warranty
covers Parts only and does not cover Labor Fees and Accessories. All shipping
fees incurred, the cost of Accessories after the first year, and Labor fees
associated with out of warranty repair work, are the customer’s responsibility.
Labor fees wil be variable depending on the extent of the work required. The
Limited Lifetime Warranty expires 5 years after a model is discontinued from
production.
To Qualify for the Warranty
All products must provided a proof of purchase is required to initiate repair work
under warranty. We strongly recommend keeping the original receipt. If a proof of
purchase is not available at the time of service, we will estimate the age of unit by
the serial number. Serial number estimates can differ from the actual purchase
date. A serial number estimate is the only method of determining an apporoximate
date of purchase without a proof of purchase.
Not Covered Under Warranty
We DO NOT offer warranty for products that have been bought secondhand or as
a resold product.We DO NOT replace defective units or provide refunds for
products purchased from us after 30 days from the date of purchase.
Issues of replacement and refunds on units purchased less than 30 days from an
authorized dealer must be addressed to the dealer directly. If the products
purchased from an authorized dealer are after 30 days from the date of purchase,
please send the units to us for service and repair.We DO NOT cover the cost of
repairs and replacements due to misuse by the owner or dog, improper
maintenance, and/or lost units. Any water damage on the Water Resistant
Transmitters and the Water Resistant Receivers of our product series will not be
covered. All replacement costs for either the transmitter or receiver will be the
owner’s responsibility.
Page 13
24
25
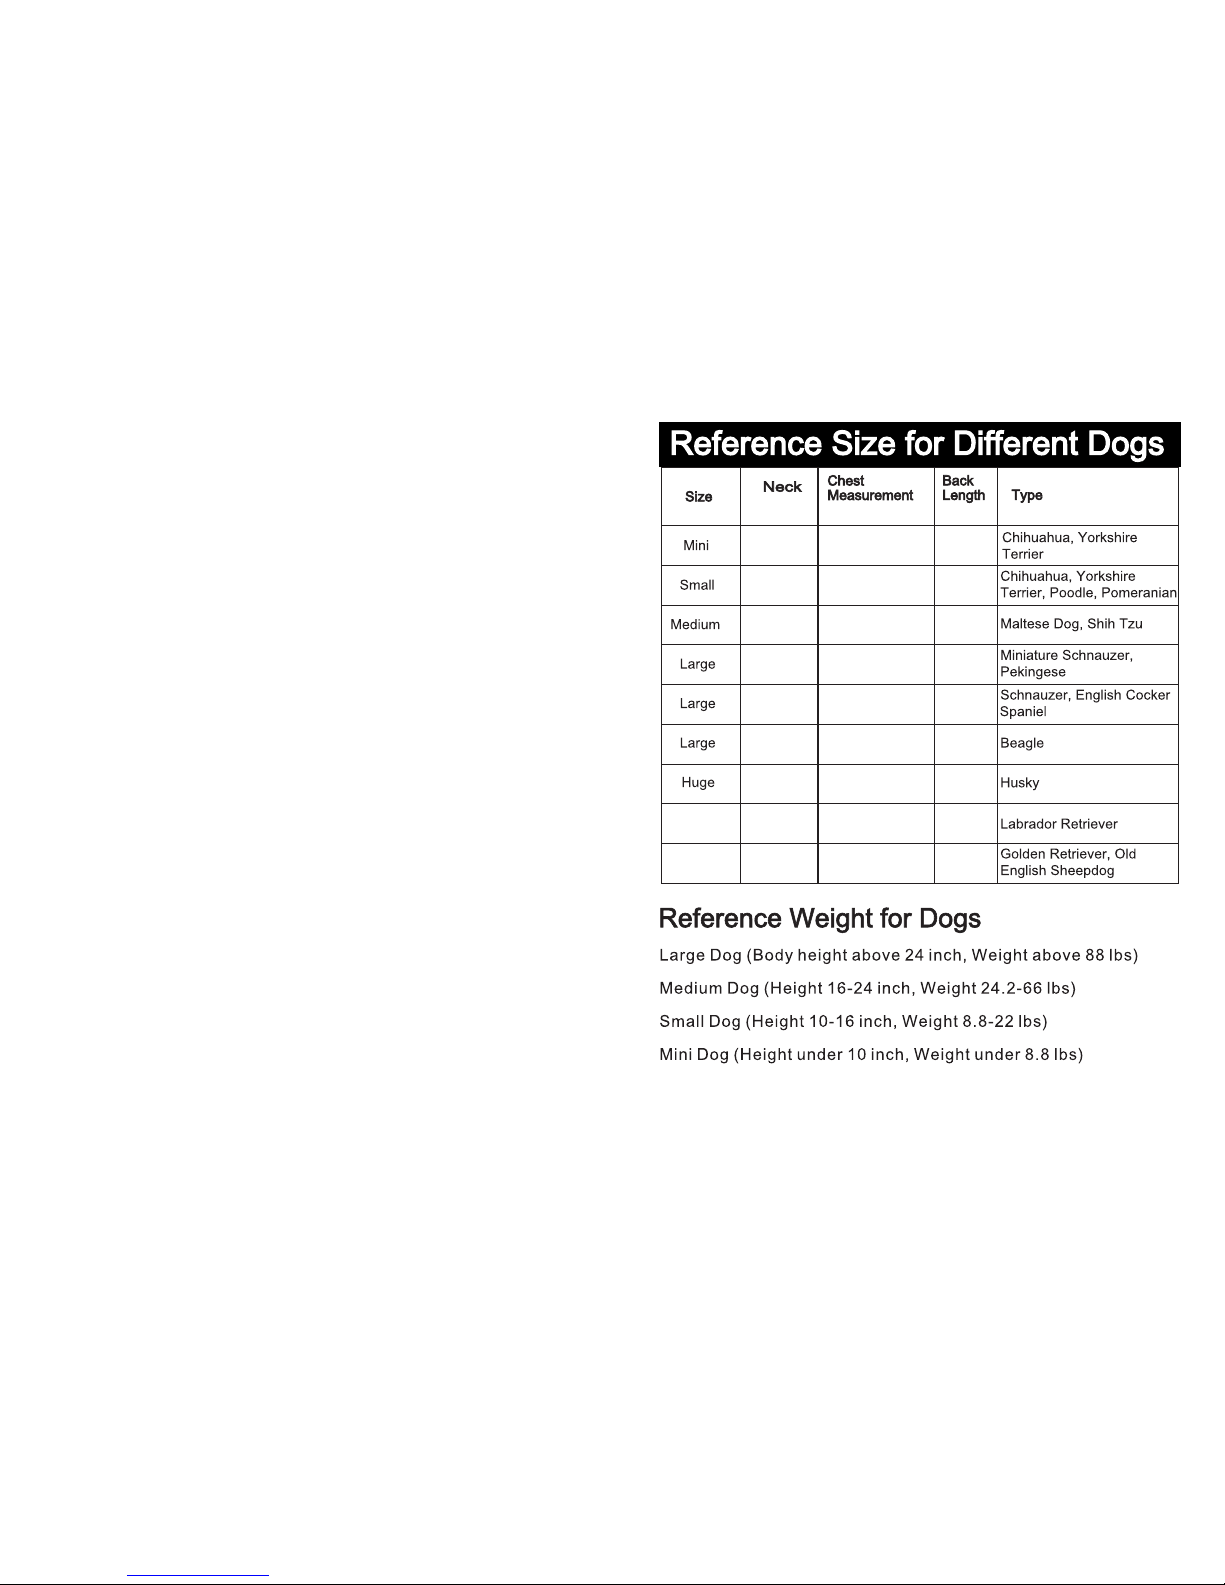
7.8-8.6
7.8-9.5
9-11
10.6-12.2
11.8-13.4
13-14.5
17-18.9
18.5-20.5
21.6-24.4
(in)
(in) (in)
9.8-11.8
11.4-14.2
13.7-16.5
16.2-18.5
18.1-20.8
20.5-23.2
30-33
34.6-38.2
36.2-39.3
7.5
9
11
12.2
13.8
15.7
23.6
25.6
27.5
there is no guarantee that interference will not occur in a specific installation. If
interference does occur to radio or television reception, which can be determined
by turning the equipment off and on, the user is encouraged to try to correct the
interference by one or more of the following measures:
• Reorient or relocate the receiving antenna.
• Increase the separation between the equipment and the receiver.
• Connect the equipment to an outlet on a circuit different from that to which the
receiver is connected.
• Consult customer care, the dealer, or an experienced radio/TV technician for
help.
Page 14

 Loading...