

Page 1
Page 2
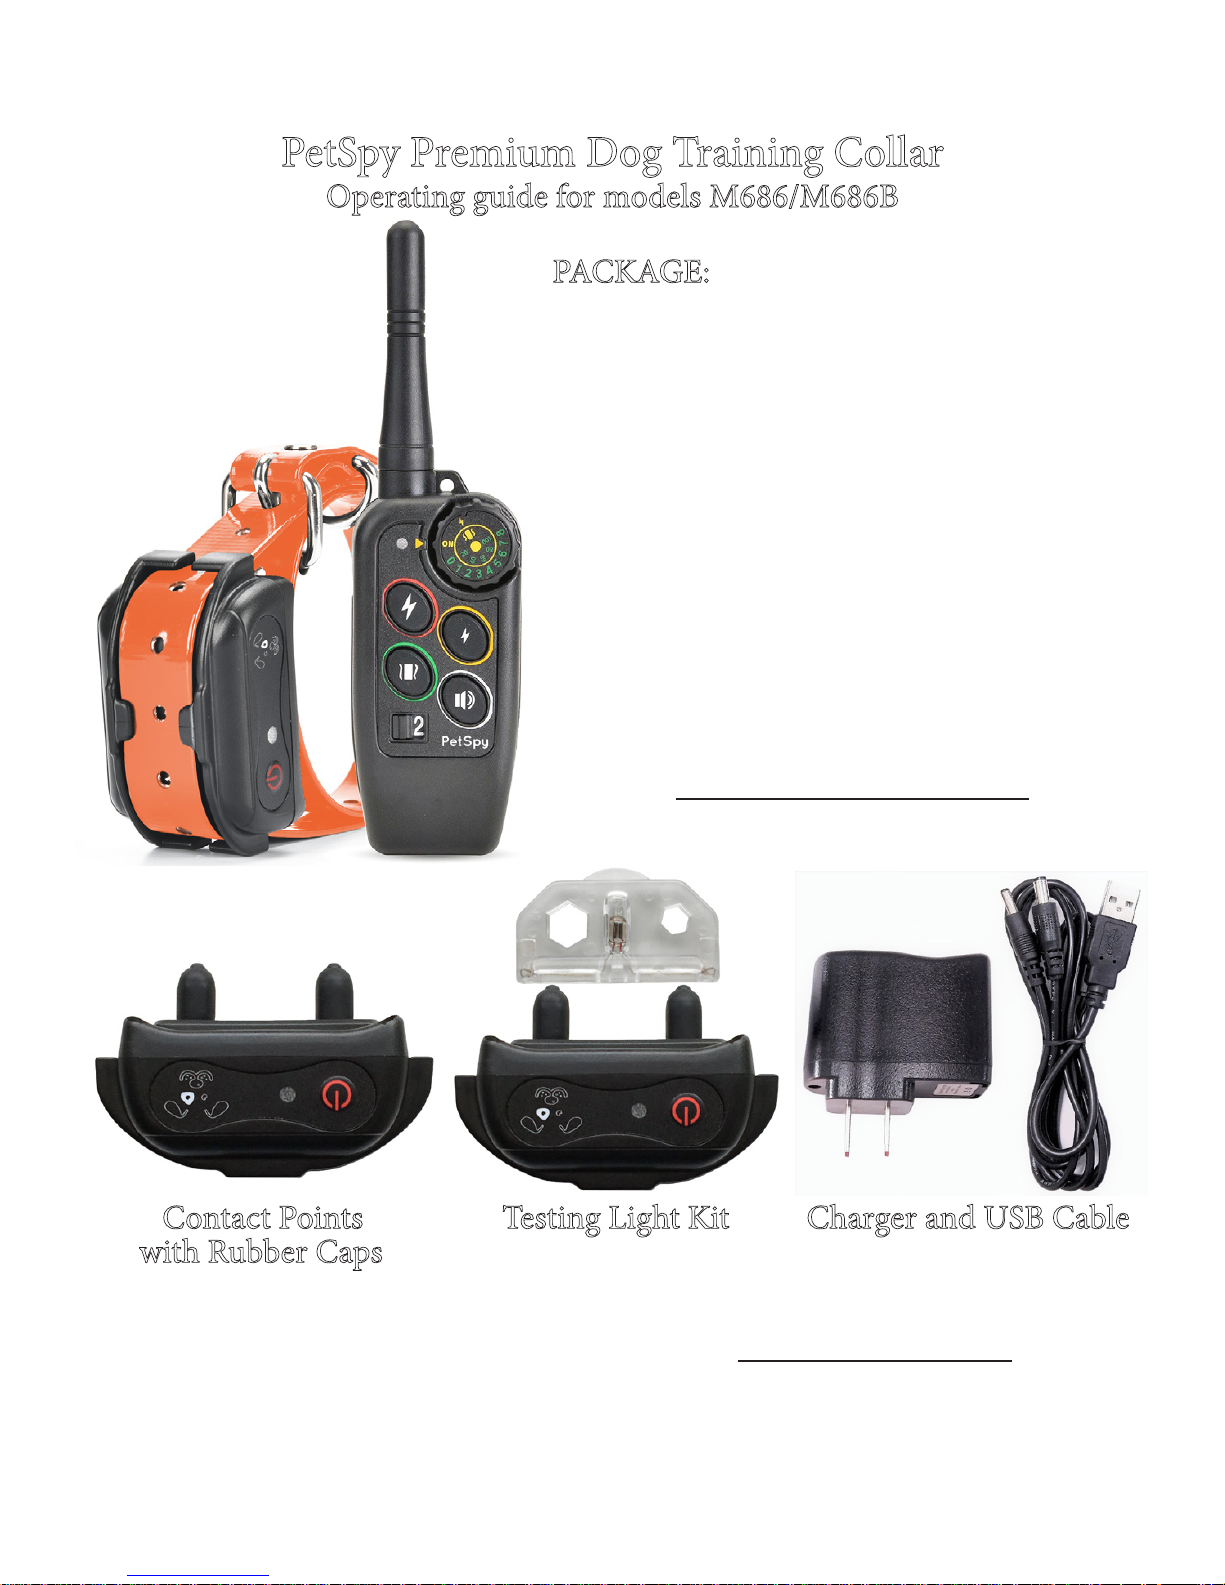
Contact Points Testing Light Kit Charger and USB Cable
with Rubber Caps
PACKAGE:
1x Remote Transmitter
1x Receiver Collar (
2 in M686B
)
1x Collar Strap (
2 in M686B
)
2x Pair of Contacts (
4 in M686B
)
2x Pair of Rubber Caps (4
in M686B
)
1x Dual USB Charger
1x Test Light
Frequency: 900 Mhz
Transmitter: 3.7V 500mAh LiPo
Receiver: 3.7V 500mAh LiPo
Contact:
PetSpy Premium Dog Training Collar
Operating guide for models M686/M686B
Note: PetSpy has 2 models of Premium Dog Training Collars: M686 and M686B (for 2
dogs). is manual is designed for both models. Visit
www.petspystore.com
to download this guide.
Copyright © 2015-2018 PetSpy Inc. All rights reserved.
Page 3
PETSPY PREMIUM DOG TRAINING COLLAR
Dear Customer, thank you very much for choosing the PetSpy Brand! It’s our pleasure
to serve you and your beloved dog. Our mission is to ensure your pet’s safety and happiness by providing you with the tools and techniques to successfully train your dog.
If you have any questions, please contact PetSpy Customer Service at
we will be happy to assist you!
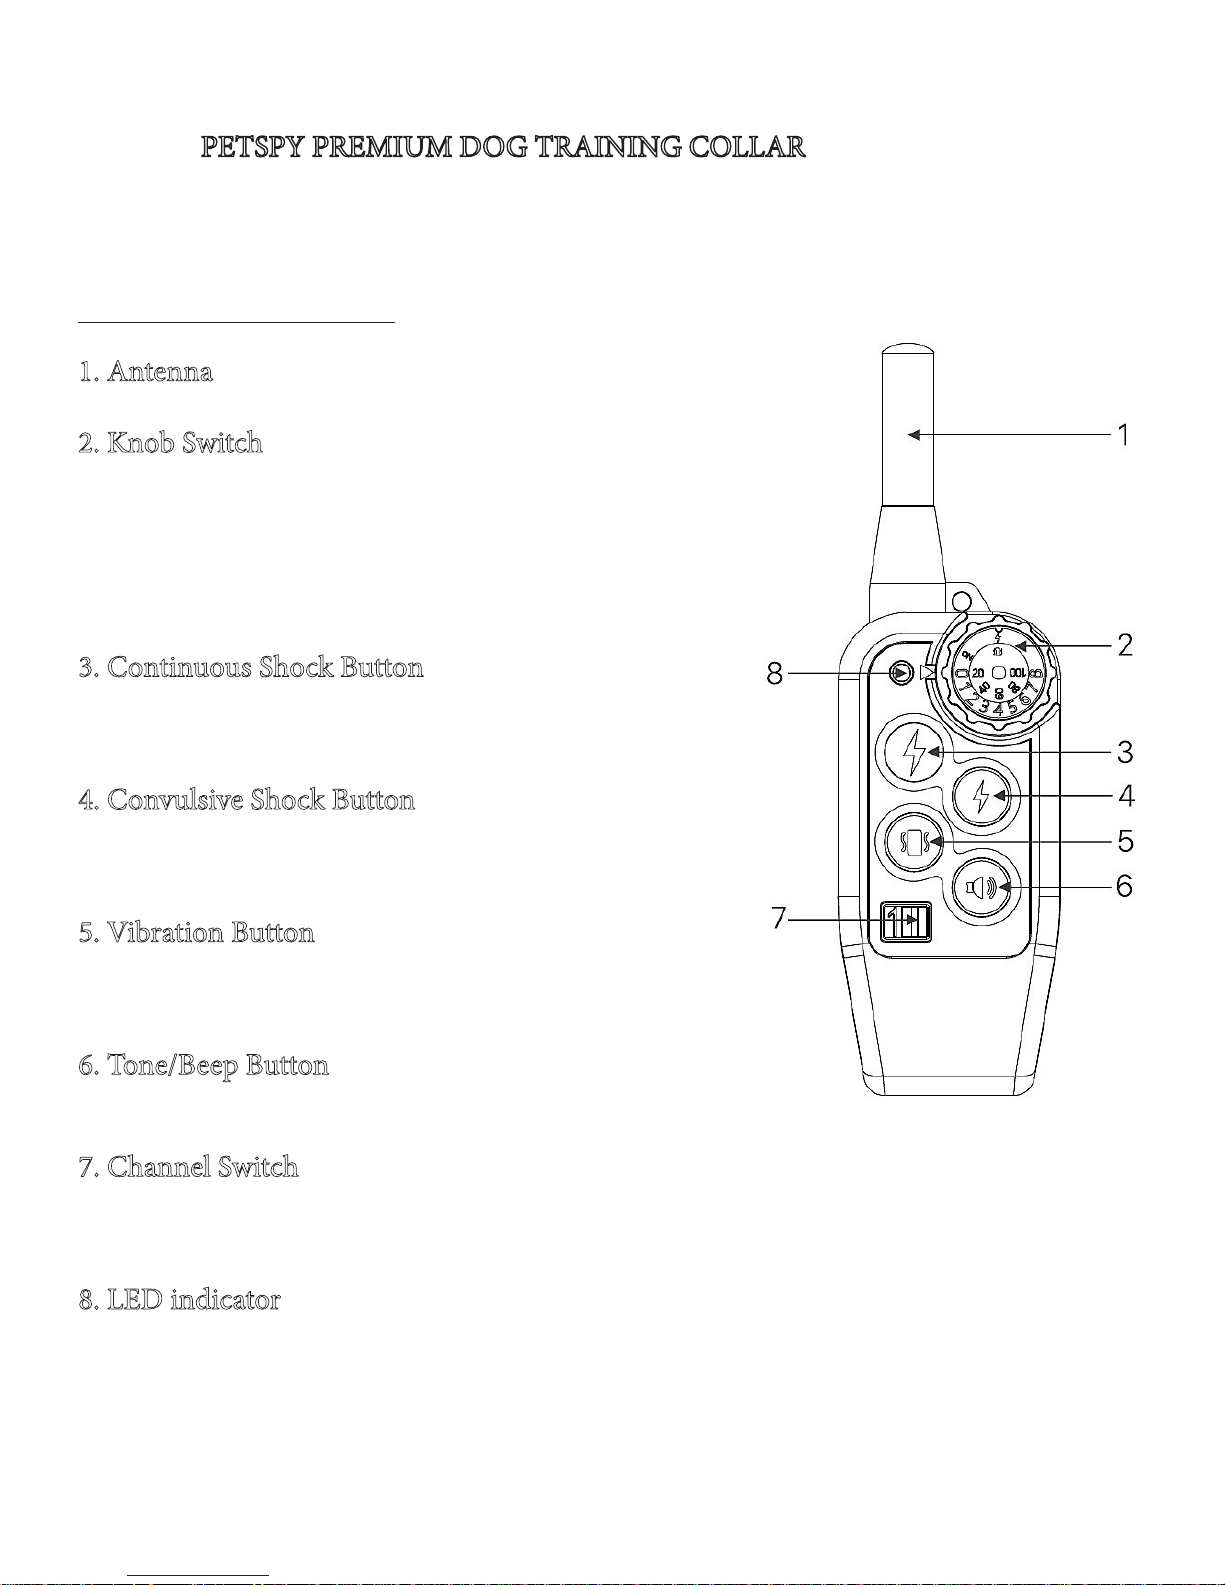
1. Antenna - transmits an electromagnetic signal to
receiver collar. You can screw it o when needed.
2. Knob Switch - rotate the knob with your thumb to
turn the remote on. It also allows you to quickly switch
between dierent stimulation levels of Shock and Vibration.
Outer numbers 0-8:
indicate the stimulation intensity.
Inner numbers 20-100:
show the percentage from the
maximum level of intensity.
3. Continuous Shock Button - press the button to
deliver continuous Shock to the collar. It will keep
shocking your pet while you holding the button. It will
stop automatically aer 10 seconds to avoid injury.
4. Convulsive Shock Button - press the button to deliver a short impulse of Shock to the collar. Unlike the
continuous shock, the convulsive shock is limited to 1
second even if you keep holding the button.
5. Vibration Button - press the button to deliver Vibration stimulation to your pet. Similar to the continuous
Shock, the vibration will stop automatically aer
10 seconds even if you keep holding the button.
6. Tone/Beep Button - press the button to send an audible tone/beep to the receiver collar. When your dog is
well trained, the tone button is all you need to eectively interact with dog.
7. Channel Switch - if you have 2 collars, slide the channel switch to choose between
collar 1 and collar 2. Note that one collar can only work with one channel. Please refer
to
Synchronizing Remote Transmitter with Receiver Collar
paragraph to learn how you
can reprogram the system.
8. LED indicator - It ashes green every 3-4 seconds when remote is turned on. A solid
green light goes on when you press and hold any stimulation button. LED also serves
as a battery charge indicator: the LED is red while remote is charging, it will turn green
when battery is fully charged.
Page 4

FEATURES
1. 4 Training Modes: Continuous and Convulsive Shock, Vibration, and Tone.
2. Rechargeable Transmitter and Receiver - recharge time is about 2-3 hours.
3. Fully waterproof Receiver Collar.
4. e system communication range is up to 1100 yards (in ideal conditions).
5. Eight correction levels of Shock and Vibration Stimulation.
6. e system can be used with 1 or 2 collars. It gives you a simultaneous control of up
to 2 dogs.
7. Power Saving Design with auto sleep mode and remote collar activation.
8. Two pairs of metal contacts (short and long) for dogs with dierent hair length.
9. Two pairs of conductive rubber caps for added safety. ey were specically designed
to avoid skin irritation and injuries.
HOW DOES PETSPY DOG TRAINING SYSTEM WORK?
PetSpy Dog Training System can assist you with controlling and training your dog
without a leash in the range up to 1100 yards. Using a Remote Transmitter you can send
a signal to the collar in form of Shock, Vibration, or Tone. By using PetSpy Dog Training System consistently, you can train your dog to eliminate any undesired behavior
(jumping up, digging, chasing, etc.) and teach your dog understand many obedience
commands (sit, come, stay, etc).
IMPORTANT NOTES
•e Remote System range goes up to 1100 yards. Hold the Transmitter horizontally
and away from your body to achieve maximum range. Weather condition, terrain,
vegetation, and interference from other electronic devices can aect the maximum
communication distance of the system.
•ere are 8 levels of Shock and Vibration Simulation. If you use the strongest level
there is a chance that it can penetrate dog’s fur up to 6mm thick. Do not shave your
Dog’s neck to reduce the risk of skin irritation.
•For comfort, safety, and eectiveness of the system, please start training your pet with
the lowest level of Shock. It’s ne to have a Vibration level on medium or high. Please
check your dog’s neck aer each training session for skin irritation. If skin irritation develops, discontinue to use the collar for 48 hours. If condition persist beyond 48 hours,
please consult your veterinarian.
•Do not attach a leash to the collar. Use a separate collar if there is a need for a leash.
•We suggest you to use the Vibration Stimulation rst before starting to use the Shock
Stimulation. en slowly start with the lowest level of the Shock Stimulation. If you
follow this training method, your dog will learn that the Shock Stimulation will come
aer Vibration. Hence, the Vibration alone can eectively cure unwanted behavior of
your dog without a need for the Shock.
Page 5
PREPARING REMOTE TRANSMITTER FOR YOUR FIRST USE:
Make sure that Remote Transmitter is charged before proceeding to the training:
1. e charging port is located on the rear side of remote. Carefully open the rubber
cover and connect the charger.
2. Red LED light will indicate that remote is charging.
3. LED indicator will turn green when remote is fully charged. It takes about 2 hours to
a full charge.
4. Put the rubber cover back over the charging port.
REMOTE TRANSMITTER OPERATION
1. Rotate the knob clockwise with your thumb to turn it on. e knob also allows you to
quickly switch between dierent stimulation levels of Shock and Vibration.
2. If you have 2 collars, you can select which collar is being controlled (1 or 2) by sliding
the Channel switch.
3. Press the Vibration Button to deliver Vibration Stimulation to your dog.
4. Press the Continuous/Convulsive Shock Button to deliver shock to your dog.
5. Press the Tone/Beep Button to deliver beeping tone to your dog.
6. e Remote Transmitter will enter a Standby Mode if not operated for 1 minute.
Simply press any button to bring it back.
PREPARING RECEIVER COLLAR FOR YOUR FIRST USE:
Make sure that Receiver Collar is charged before proceeding to the training:
1. Carefully open the rubber cover over the charging port and connect the charger.
2. Red LED light will indicate that receiver is charging. It takes about 3 hours to fully
charge it. Make sure to unplug the collar aer 3 hours to avoid battery damage.
3. Put the rubber cover back over the charging port to ensure collar is fully waterproof.
4. Press the Power Button to turn it on. e red LED will start ashing every 4-5 seconds.
5. When Receiver is charged and turned on, it always stands in the Sleep/Standby Mode
waiting for any command (e.g. Shock, Vibration or Beep) to activate it.
Page 6
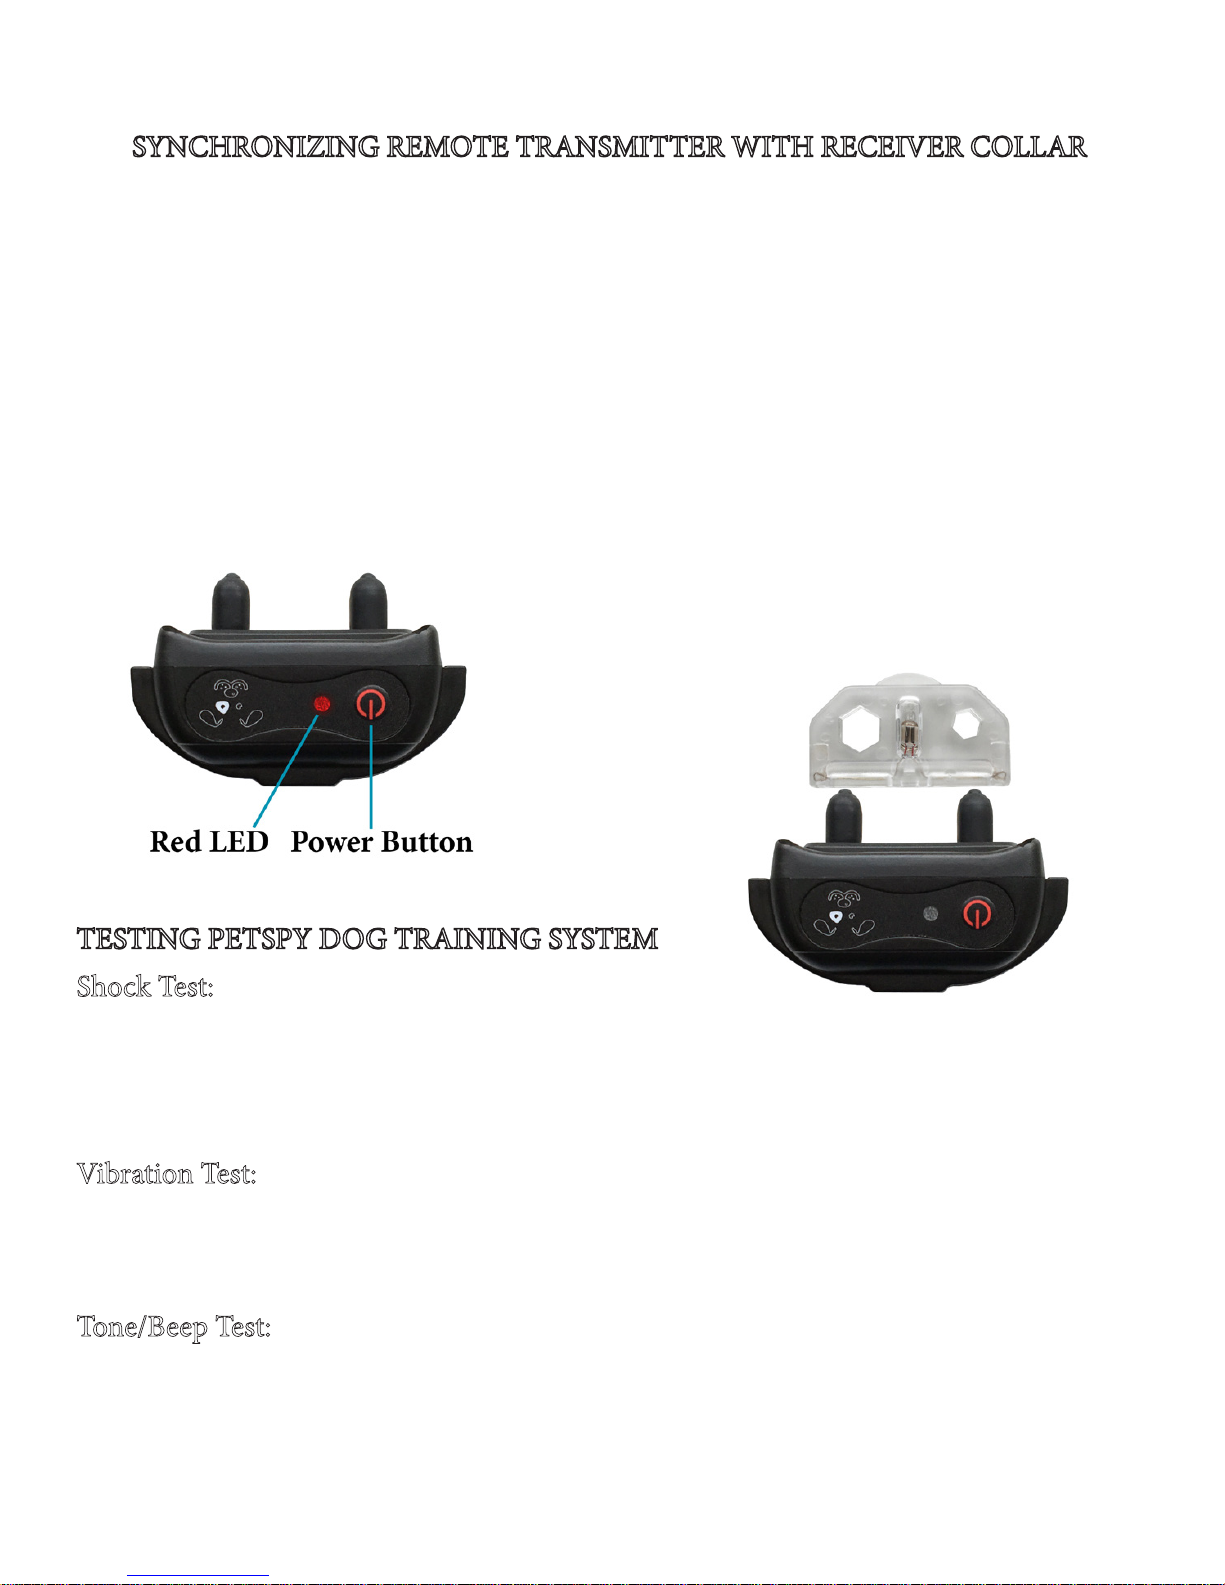
SYNCHRONIZING REMOTE TRANSMITTER WITH RECEIVER COLLAR
Sometimes the collar can loose connection with remote. e x is pretty quick and
simple. Follow these steps to re-synchronize the system:
1. Make sure that both the Transmitter and Receiver are fully charged and turned on.
2. Press and hold the Power button on the Receiver Collar for about 5 seconds to enter
the Synchronization Mode - the receiver will beep and red LED will start ashing fast.
3. While red LED is ashing, send any correction command from remote. We recommend you to send a Vibration command by pressing and holding the Vibration button
on remote until you feel that collar vibrating. If no command is sent, the ashing will
stop aer 10 seconds.
4. e system is now resynchronized - try to send any command to test it.
If you have 2 collars, repeat the above steps for both collars on channel 1 and channel 2.
TESTING PETSPY DOG TRAINING SYSTEM
Shock Test:
•Take the included Test Light and put its metal wire on the Receiver’s Contact Points.
•Press the Shock Button on the Remote Transmitter.
•e Test Light will light up indicating that shock is working.
•e higher the shock level is the brighter it should be.
Vibration Test:
•Press the Vibration Button on the Remote Transmitter.
•e Receiver Collar will vibrate indicating that vibration stimulation is working.
•Try to adjust the level of vibration and see how the intensity is changing.
Tone/Beep Test:
•Press the Tone Button on the Remote Transmitter.
•e Receiver Collar will beep indicating that tone/beep is working.
Page 7
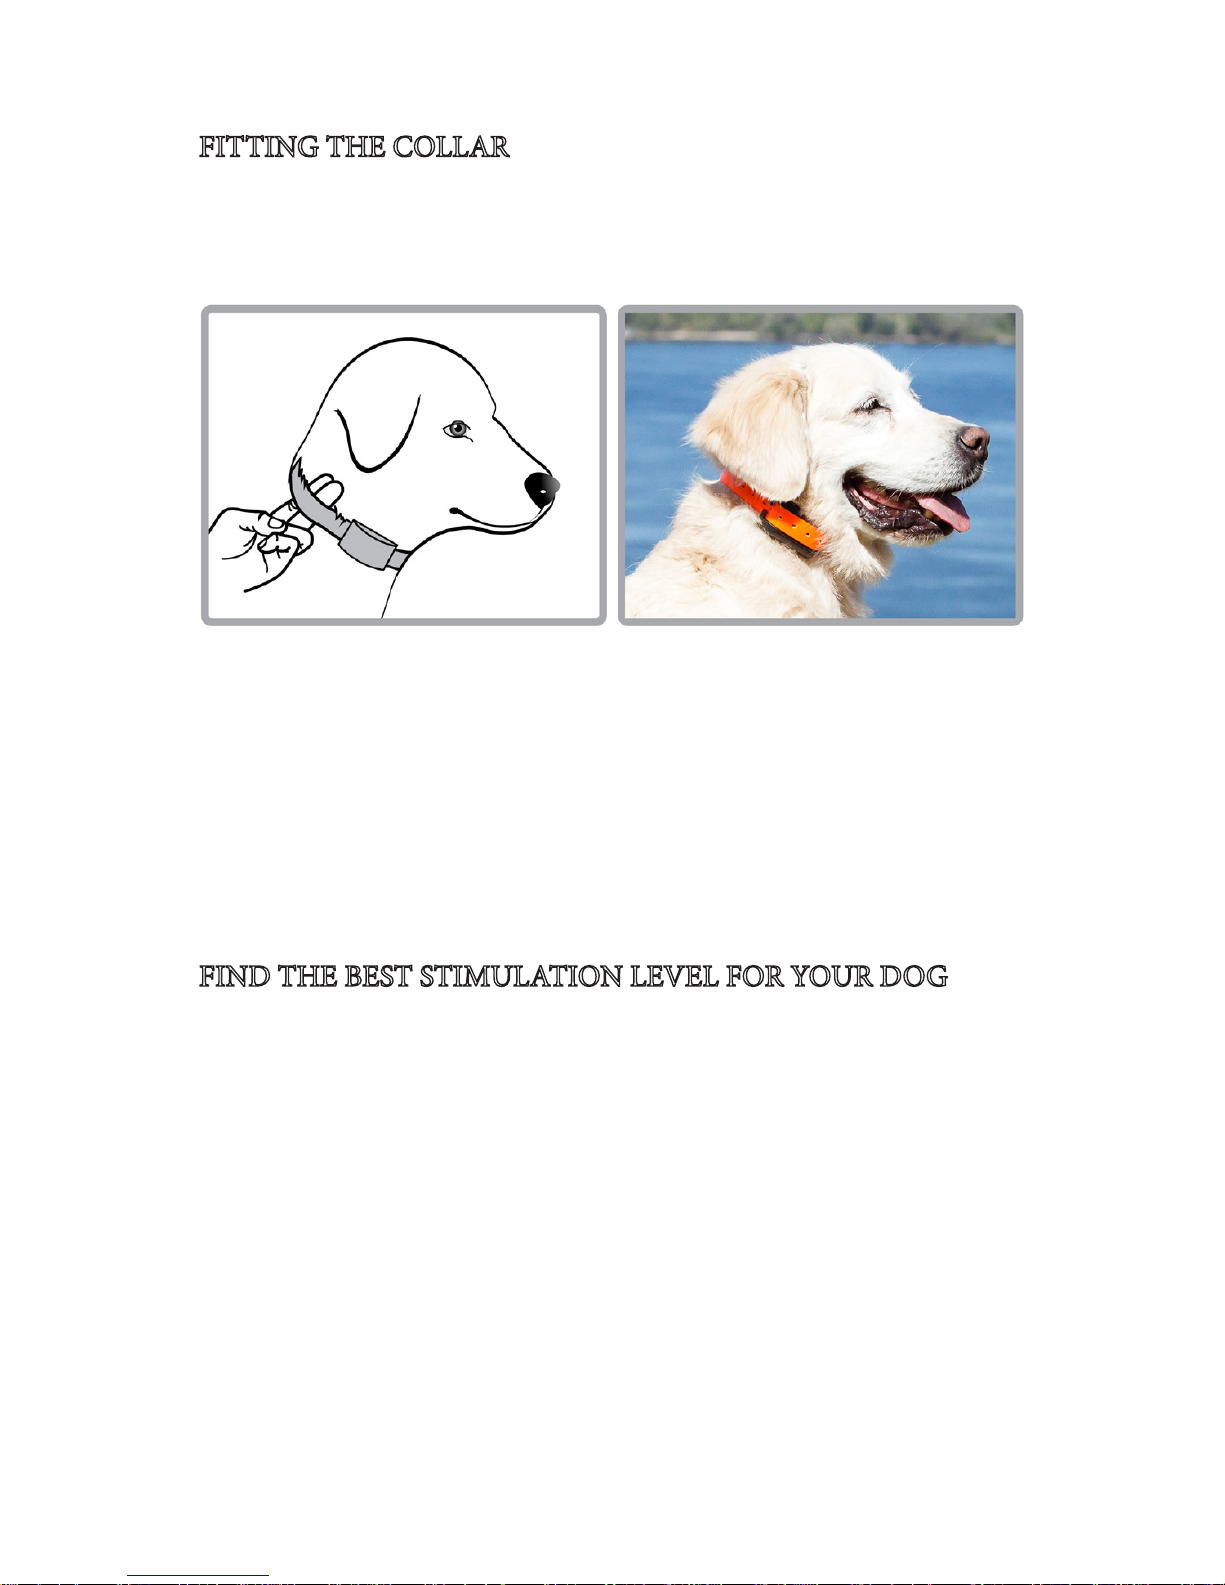
FITTING THE COLLAR
To ensure eective training and dog’s safety, you must properly t the collar on your
dog. e collar must t snugly to allow the “contact points” to have direct contact with
the skin. Position the receiver unit high up on your dog’s neck just below ears.
You should be able to t two ngers between the collar strap and your dog’s skin. Too
tight poses the risk of skin irritation and discomfort. Too loose and the contact points
will not be able to administer the stimulation reliably and can cause skin irritation due
to chang. Cover the contact points with conductive rubber caps to reduce the risk of
skin irritation or injury.
CAUTION: E-collars are not designed to be worn constantly. We recommend using
e-collars only under adult supervision and for no longer than 4 hours per day. NEVER
attach a leash to an e-collar. Use a separate regular collar if there is a need for a leash.
FIND THE BEST STIMULATION LEVEL FOR YOUR DOG
CAUTION: Start with Vibration mode rst and use Shock mode as a last resort.
PetSpy e-collar can be a powerful tool for encouraging desired behavior. But rst, you
must identify the stimulation intensity level for your dog - it has to be high enough to
be noticed, but not so high as to be disruptive. Your dog must learn to act in response to
the e-collar stimulation and understand that he can control it by his actions.
is method of e-collar training is even gentler than many traditional leash-training
methods. Additionally, the e-collar improves communication by providing instant
feedback to your dog during training. is reduces confusion, fosters a positive training
attitude, and accelerates learning, rapidly producing o-leash reliability.
Even if your dog already knows the basic obedience commands, follow the procedures
given. Your dog must learn how to respond to the e-collar for each command before
you can use your PetSpy collar for training at a distance.
Page 8
PetSpy Premium Dog Training Collar has 8 dierent stimulation levels. is allows you
to choose the level that is best for your pet. Once you have placed the Receiver Collar
on your pet, it is time to nd the Stimulation Level that is best for him. is is called
the
Recognition Level
. A slight change in your pet’s behavior, such as looking around
in curiosity, scratching at his collar, or icking his ears, indicates the Recognition Level
that is best for him.
Follow the steps below to nd your pet’s Recognition Level:
1. Starting at the Lowest Level of stimulation on the Remote, press the Vibration or
Shock Stimulation Button continuously.
2. If your pet shows no reaction, repeat the Stimulation Level several times before moving up to the next level.
CAUTION: YOUR DOG SHOULD NOT BARK OR PANIC WHEN RECEIVING
STIMULATION. IF THIS HAPPENS, THE STIMULATION LEVEL IS TOO HIGH
AND YOU NEED TO GO BACK TO THE PREVIOUS LEVEL AND REPEAT THE
PROCESS.
3. Move up through the Stimulation Levels until your dog reliably responds to the
stimulation.
4. If your dog continues to show no response at the Highest Level, check the t of the
Receiver Collar. If your dog has long or thick fur, use the longer set of Contact Points.
en go back to step 1 and repeat the process. If this still does not yield any results,
your pet’s hair will need to be trimmed around the Contact Points.
Please refer to PetSpy Dog Training E-Book for more dog training tips.
You can download it at
www.petspystore.com
- it is free!
GENERAL TIPS
• PetSpy Dog Training Collar is not design to be worn constantly. We recommend you
to limit collar usage just for active training sessions. Always take o the collar when you
leave your dog unattended.
• Most dogs will feel uncomfortable wearing the collar for the rst time. Don’t use any
commands until your dog has gotten used to the collar which will normally take several
days.
• Eliminate one unwanted action or teach one obedience command at a time. If you
move to quickly with training, your dog may become confused.
Page 9
• Be consistent in your training. Give your dog the same stimulation for each unwanted
action. We suggest you to use Vibration Stimulation before the Shock Stimulation. If
you follow this training method, your dog will learn that Shock Stimulation might come
aer Vibration. Hence, the Vibration Stimulation alone can eectively cure unwanted
behavior of your dog.
• Do not over-correct. Use as few stimulation as possible to train your dog.
• Following a predened scenario in all Training Sessions can dramatically improve
your chances of success.
• Should your dog react to the training by hiding or reacting fearfully, redirect his attention to a simple command such as “Speak” or “Sit” to calm him down. Use treats to help
your dog understand which commands have been done correctly.
TROUBLESHOOTING
My e-collar does not respond to any command, what should i do?
•Make sure that both the Remote Transmitter and Receiver Collar are fully charged and
turned on. e red LED on the receiver should be ashing every 4-5 seconds.
•Follow the steps from “
Synchronizing Remote Transmitter with Receiver Collar”
para-
graph to pair remote transmitter with the collar.
•Watch our video guides for more information at
www.petspystore.com/video
•Contact us at
if the above steps don’t help.
REGULAR MAINTENANCE AND STORAGE
•When not used, PetSpy Dog Training System must be kept in a dry place just like any
other electronic devices.
•To prevent batteries from damage, charge both the Transmitter and Receiver regularly
even when it’s not used. Make sure you do not charge it for longer than 3 hours.
•Clean the receiver and contact points weekly. Make sure that contact points are tightly
attached to the collar.
•Check your dog’s neck for irritation daily.
Page 10
FREQUENTLY ASKED QUESTIONS
1. Is the Receiver Collar waterproof?
Yes, the Receiver Collar is fully waterproof.
2. Is the Remote Transmitter waterproof?
No, the Remote Transmitter must be kept away from water.
3. Once my dog is trained, do we have to continue using the collar?
You might have to reinforce training with the collar from time to time.
4. How long can I continuously deliver Vibration or Shock to my dog?
e max amount of time you can deliver the Vibration or Shock to you dog contin uously is 10 seconds. e remote transmitter will time out and the Vibration/Shock
button must be released and pressed again.
CAUTION: While it is ne to use the Vibration for up to 10 seconds, it is highly
recommended to limit the continuous Shock delivery to no more than 3 seconds (the
smaller the dog the shorter it should be).
5. What should I do if my dog’s neck becomes red and irritated?
Stop using the collar immediately for at least 48 hours. If the condition persists be yond 48 hour please consult your veterinarian.
6. Can I attach a leash to the Receiver collar?
No, this can result in pulling the contact points to tightly against your dog’s neck
causing an injury. Use a separate collar when needed.
7. How long can I leave a Receiver Collar on my dog?
E-collars are not designed to be worn constantly! We recommend to use it only
during active training sessions and outdoor activities for no longer than 4 hours per
day under adult supervision.
8. How long should the training sessions be?
Training sessions should be kept short and positive (10-15 minutes).
9. How long does the battery charge last?
It depends on the intensity of training sessions and vary from one day to one week.
10. What is the maximum operational range?
e max operational range is 1100 yards in ideal conditions. e range may vary
depending on the terrain, buildings, trees and electromagnetic interference.
11. Will the collar t my dog?
e collar strap is adjustable to t dogs from 10 to 140 pounds. It has a maximum
length of 26 inches and minimum length of 8.
12. What is the best dog’s age to start training?
Your pup should be old enough to understand basic commands. 6 months is nor mally a good age.
Should you have more questions, feel free to contact us at
Page 11
TERMS OF USE AND LIMITATION OF LIABILITY
1. Terms of Use
is Product is designed to be used with dogs where training is desired. e specic
temperament of your dog may not work with the product. We do not recommend you
to use this product if your dog is less than 10 lbs, under 6 months old, or if your pet
is aggressive. If you are unsure whether this is appropriate for your pet, please consult
your veterinarian, or a certied trainer. Proper use includes reviewing the entire User
Manual and Dog Training Guide provided with the product. Pay extra attention to all
Caution statements.
2. No Unlawful or Prohibited Use
is Product is designed for use with dogs only. PetSpy dog training collar is not
intended to harm, injure, or provoke. Using this product in a way that is not intended
could result in violation of Federal, State or local laws.
3. Limitation of Liability
In no event shall we be liable for any direct, indirect, punitive, incidental, special or
consequential damages and injuries, or any damages and injuries whatsoever arising
out of or connected with the use or misuse of this Product. Buyer assumes all risks and
liability from the use of this Product.
4. Modication of Terms and Conditions
We reserve the right to change the terms, conditions and notices under which this
Product is oered.
WARRANTY
Please register your 1-year replacement warranty at
www.petspystore.com/warranty
If your purchased e-collar malfunctions or breaks within 1 year, we will send you a free
replacement. No more than one replacement per purchased item. Replacement warranty does not apply to promotional orders with total discount greater than 30%. e warranty begins from the date of purchase. A purchase conrmation such as amazon order
id is required for a claim. e warranty does not cover products with physical damage
or lost items. PetSpy does not oer warranty for products purchased from unauthorized
resellers such as online auctions. PetSpy products are exclusively sold on Amazon.
com, Chewy.com and PetSpy.com. Any other sources are considered as unauthorized
resellers. e refund period is strictly limited to 30 days for all products starting from
the date of purchase.
Page 12

 Loading...