

Page 1
Model Number
ZIRF-100
PLEASE READ THIS ENTIRE GUIDE BEFORE BEGINNING
Indoor Radio Fence
®
Operating and Training Guide
OFF
ON
MAX.
Page 2
2 1-800-732-2677
Hereinafter Radio Systems Corporation, Radio Systems PetSafe Europe Ltd.,
Radio Systems Australia Pty Ltd. and any other aliate or Brand of Radio
Systems Corporation may be referred to collectively as “We” or “Us.”
Important Safety Information
Explanation of attention words and symbols used in this guide
This is the safety alert symbol. It is used to alert you to potential
personal injury hazards. Obey all safety messages that follow
this symbol to avoid possible injury or death.
WARNING indicates a hazardous situation which, if not
avoided, could result in death or serious injury.
CAUTION, used without the safety alert symbol, indicates
a hazardous situation which, if not avoided, could result in
harm to your pet.
NOTICE is used to address safe use practices not related
to personal injury.
Not for use with aggressive dogs. Do not use this product if
your dog is prone to aggressive behavior. Aggressive dogs can
cause severe injury or death to their owners and others. If you
are not sure that this product is right for your dog, please talk to
your veterinarian or a certied trainer.
Page 3

www.petsafe.net 3
This System is NOT a solid barrier. The system is designed to
act as a deterrent, using
static correction
to condition pets to
remain outside of the established barrier area. It is important that
you reinforce training with your pet on a regular basis. Since the
tolerance level to
static correction
varies from pet to pet, Radio
Systems Corporation CANNOT guarantee that the system will in
all cases keep a pet outside of the established barrier area. Not all
pets can be trained to avoid entering the barrier area. Therefore, if
you have reason to believe that your pet may harm himself or pose
a danger to others if he is not kept from entering the barrier area,
you should NOT rely solely upon this system to restrict your pet.
Radio Systems Corporation shall NOT be liable for any personal
injuries, property damage, injury to or death of your pet, economic
loss or any consequential damages sustained as a result of any
animal entering the barrier area.
To prevent an unintended correction, do not perform set up
procedures while the receiver collar is on your pet.
- If you are using a collar and leash for training, be sure the
extra collar does not put pressure on the contact points
of the receiver collar.
Page 4

4 1-800-732-2677
To avoid damage to the transmitter do not use on wet
surfaces, in damp or wet locations or around swimming
pools. This product is designed for indoor use only. Do not
expose to rain or snow.
Thank you for choosing PetSafe
®
Brand. You and your pet deserve
a companionship that includes memorable moments and a shared
understanding together. Our products provide you with the tools and
technologies to successfully train your pet. If you have any questions about
our products or training your pet, please visit our website at www.petsafe.net
or contact our Customer Care Center at 1-800-732-2677.
To get the most protection out of your warranty, please register your product
within 30 days at www.petsafe.net. By registering and keeping your receipt,
you will enjoy the product’s full warranty and should you ever need to call the
Customer Care Center, we will be able to help you faster. Most importantly,
we will never give or sell your valuable information to anyone. Complete
warranty information is available online at www.petsafe.net.
Page 5

www.petsafe.net 5
Inside the Box
• Barrier transmitter
• Power adapter
• Operating and training guide
Other Items Needed (Not Included)
• PetSafe® compatible In-Ground Fence™ receiver collar models include:
– Deluxe UltraLight™ receiver collar
– Stubborn Dog In-Ground Fence™ receiver collar
– Premium Little Dog receiver collar
– Deluxe In-Ground Cat Fence receiver collar
– Rechargeable In-Ground Fence™ receiver collar
Other Items You May Need
• Non-metallic collar and leash
Page 6

6 1-800-732-2677
How the System Works
The PetSafe® Indoor Radio Fence® can keep your pet out of a certain room,
away from a trash can or o of a piece of furniture. Just place the barrier
transmitter near the area that your pet should avoid. The barrier transmitter
sends a spherical radio signal that covers a radius between 2 and 10 ft.
Your pet wears a receiver collar (not included) with contact points that
touch his neck. When your pet enters the barrier area, he will hear a series of
audible tones from the receiver collar, and he will feel a safe static correction,
delivered through the contact points on his neck. The static correction will
get his attention, but will not cause harm. The correction continues until your
pet leaves the barrier area. If your pet doesn’t leave, the collar will continue to
correct until the collar times out.
Key Definitions
Barrier transmitter:
Transmits the wireless
radio signal.
Barrier area:
The area that you want
to prevent your pet from
gaining access to.
Barrier
Transmitter
Barrier
Area
Receiver
Collar
2
3
OFF
ON
MAX.
On ButtonPower Outlet
Dial Button
(2 to 8)
Page 7
www.petsafe.net 7
Operating Guide
STEP 1
Install the Barrier Transmitter
The barrier transmitter emits a radio signal from all sides in a spherical
pattern. The signal will transmit through a wall or the ceiling/oor. The barrier
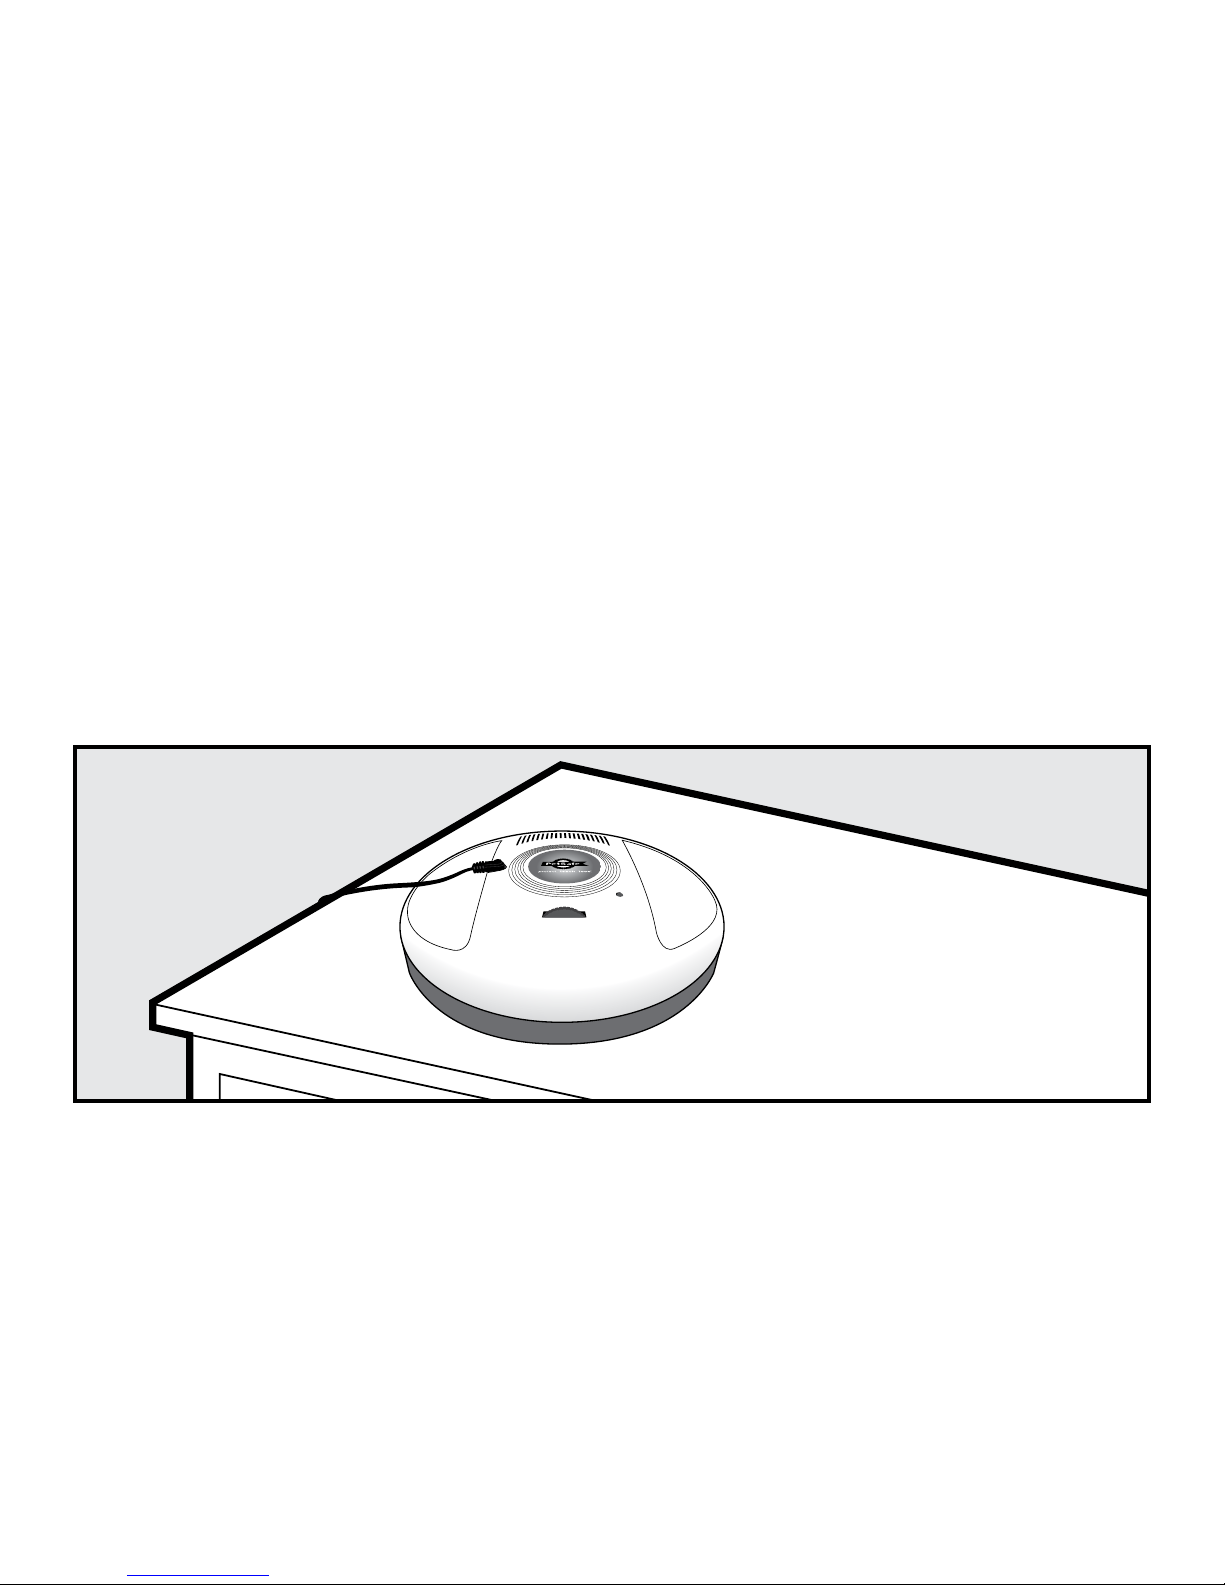
transmitter is designed to be placed laying at on a surface.
Do not:
• Place the barrier transmitter on metal surfaces.
• Place the barrier transmitter near large metal objects such as refrigerators,
washing machines, etc.
• Place the barrier transmitter near audio speakers.
To avoid damage to the transmitter do not use on wet surfaces, in damp
or wet locations or around swimming pools. This product is designed for
indoor use only. Do not expose to rain or snow.
Page 8
8 1-800-732-2677
STEP 2
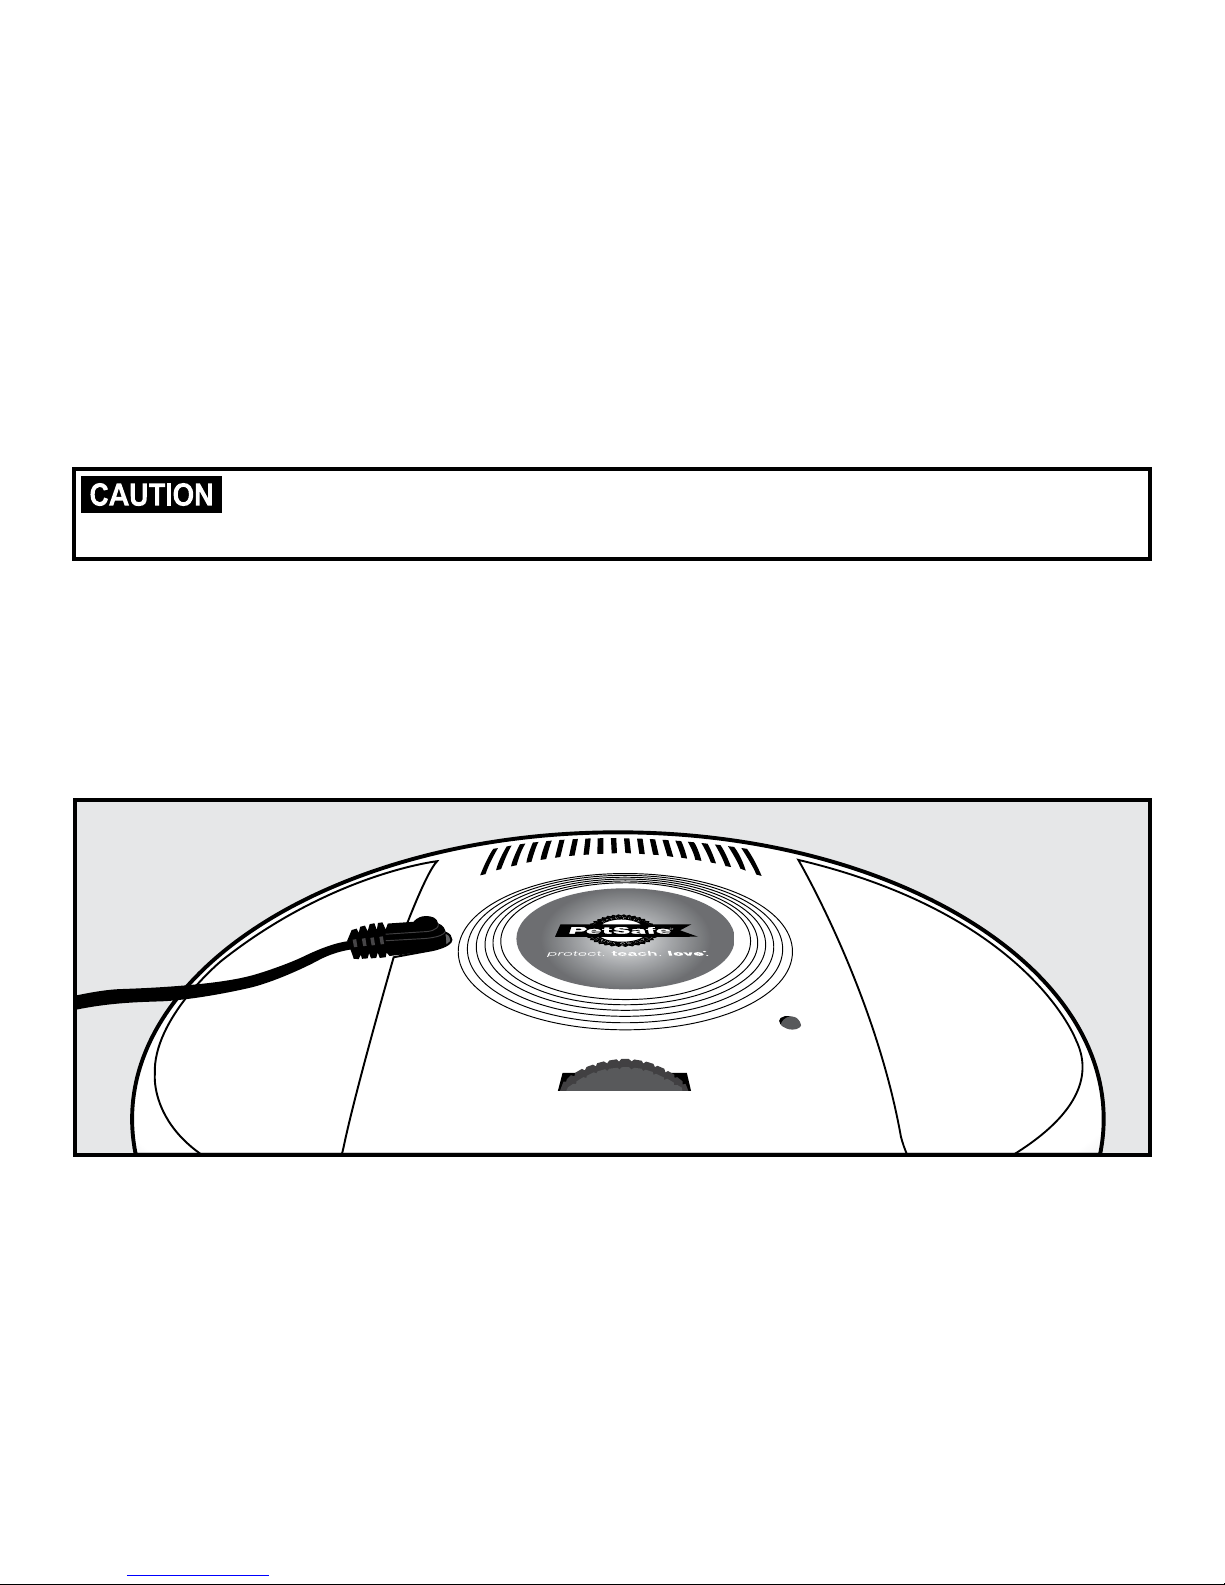
Set Up the Barrier Transmitter
To prevent an unintended correction, never perform setup
procedures while your pet is wearing the receiver collar.
1. Plug the power adapter into the power jack and a standard 120 volt outlet.
2. Adjust the dial clockwise from 2 to 8. The power light will turn red
indicating that the unit is turned on.
3. You can create a barrier area from 2 ft. in radius up to 10 ft. in radius by
adjusting the dial from 2 (minimum range) to 8 (maximum range).
3
4
OFF
ON
MAX.
Page 9

www.petsafe.net 9
STEP 3
Test the Barrier Area
1. Refer to your receiver collar operating
guide for setup instructions and proper
use of the test light tool.
2. Place the test light tool that came
with your In-Ground Fence™ system
on the contact points of the receiver
collar. Hold the receiver collar at the
approximate height of your dog’s
neck (3A). Start outside of the range
and walk slowly toward the barrier
transmitter. As you reach the barrier
area, the receiver collar emits a series
of high-pitched tones. For each tone
you hear, you should notice the test
light flashing, which indicates that a
static correction is being delivered. The receiver collar’s tone is easily
heard by dogs, but may be difficult for us humans to hear.
3. Check the range of the barrier area from multiple angles to ensure that
you are getting the desired coverage.
3A
Page 10
10 1-800-732-2677
Note: If you find that you are not getting the desired range at the maximum
setting, move the barrier transmitter a few feet. Metal objects can alter the
magnetic field and change the transmitting signal range. The effect on the
range depends on the size and shape of the objects. Signal range can be
reduced if the barrier transmitter is placed on a concrete floor, due to steel
reinforcement in the concrete. For best range results, place the barrier
transmitter on a nonconductive surface, like a wood floor or table. Placing
the barrier transmitter beneath sofas and beds can reduce the range due to
the metal springs altering the magnetic field.
3
4
OFF
ON
MAX.
Tabletop
Placement
Page 11

www.petsafe.net 11
Multiple Pet Usage
For multiple pet households, additional PetSafe® In-Ground Fence™ receiver
collars can be purchased to work with one or more PetSafe® indoor barrier
transmitters. You can set up an unlimited number of barrier transmitters in your
home. An unlimited number of receiver collars can be used with one or more
barrier transmitters.
Page 12

12 1-800-732-2677
Training Guide
The PetSafe® Indoor Radio Fence® barrier operates on the principle
of positive and negative reinforcement. Your pet will learn to avoid the
barrier areas you have set after receiving a static correction (negative
reinforcement). Your pet will learn that he is more comfortable when he
avoids the barrier areas (positive reinforcement).
In some cases, it may not be necessary to train your pet. You can let your pet
wander freely to determine the new boundaries. Monitor your pet during
his first session. Pets learn at dierent rates and it may take several times
for your pet to successfully understand and honor the barrier areas.
Begin Your Pet’s First Session
1. Move your pet away from the barrier area.
2. Turn on the receiver collar and set to the appropriate level for
your pet.
3. Allow your pet to wander freely to learn the new boundaries.
Page 13

www.petsafe.net 13
Further Training
If your pet is confused or unsure of how to avoid the barrier areas,
then you may need to teach your pet how to do so by following these easy
training steps:
1. Place a second non metallic collar on your pet below the receiver
collar and attach a long leash.
Be sure the extra collar does not put pressure on the contact
points of the receiver collar.
2. Turn on the receiver collar and set to the appropriate level for your pet.
Walk your pet toward the barrier area. As soon as you hear the tone or
you see that your pet is receiving a static correction, gently pull him away
from the barrier area and back into the safe zone.
3. Reward your pet with praise each time he leaves the barrier area.
4. Practice this technique a few times until you feel that your pet is
mastering avoidance of the barrier areas.
Never force or entice your pet to enter the barrier areas.
Page 14

14 1-800-732-2677
Additional Information
• The system should only be used with healthy pets. Contact your
veterinarian if you have concerns about the medical condition of your pet
(medication, pregnant, heart conditions, etc).
• This system is not for aggressive pets. If your pet may pose a threat to
others, DO NOT USE THIS SYSTEM. If you are unsure if your dog is
aggressive, please consult your veterinarian or a certied trainer.
Page 15

www.petsafe.net 15
Troubleshooting
Barrier
transmitter
does not
appear
to work
• Check that the power light is red to indicate that it
has been turned on
• Make sure the power adapter is plugged into a
working 120 volt outlet
• Verify that the outlet is working properly by plugging
in a known working item such as a radio
• If the power light still does not come on, the barrier
transmitter and/or the power adapter needs to be
replaced—Contact the Customer Care Center
• Increase the barrier area range on the
barrier transmitter
Barrier area
range is
too low
• Check the receiver collar battery status
• Adjust the barrier transmitter range to increase the
barrier area size
Barrier area
range is
too high
• Adjust the barrier transmitter range to decrease the
barrier area size
Page 16

16 1-800-732-2677
Terms of Use and Limitation of Liability
1. Terms of Use
This Product is oered to you conditioned upon your acceptance
without modication of the terms, conditions and notices contained
herein. Usage of this Product implies acceptance of all such terms,
conditions and notices.
2. Proper Use
This Product is designed for use with pets where training is desired.
The specic temperament of your pet may not work with this Product.
We recommend that you not use this Product if your pet is less than
eight lb. or if your pet is aggressive. If you are unsure whether this is
appropriate for your pet, please consult your veterinarian or certied
trainer. Proper use includes reviewing the entire Guide provided with
your Product and any specic Caution statements.
3. No Unlawful or Prohibited Use
This Product is designed for use with pets only. This pet training
device is not intended to harm, injure or provoke. Using this Product
in a way that is not intended could result in violation of Federal, State
or local laws.
Page 17

www.petsafe.net 17
4. Limitation of Liability
In no event shall Radio Systems Corporation be liable for any direct,
indirect, punitive, incidental, special or consequential damages, or
any damages whatsoever arising out of or connected with the use or
misuse of this Product. Buyer assumes all risks and liability from the
use of this Product.
5. Modification of Terms and Conditions
Radio Systems Corporation reserves the right to change the terms,
conditions and notices under which this Product is oered.
Page 18

18 1-800-732-2677
Compliance
FCC/IC
This Class B digital apparatus complies with Canadian RSS-310. This
equipment has been tested and found to comply with the limits for a
Class B digital device, pursuant to Part 15 of the FCC Rules. These limits
are designed to provide reasonable protection against harmful interference
when the equipment is operated in a residential environment. This
equipment generates, uses and can radiate radio frequency energy and,
if not installed and used in accordance with the instruction guide, may
cause harmful interference to radio communications. However, there is no
guarantee that interference will not occur in a practical installation. If this
equipment causes harmful interference to radio or television reception,
which can be determined by turning the equipment off and on, the user
is encouraged to try to correct the interference by one or more of the
following measures:
• Relocate the interfered receiving antenna.
• Increase the separation between the equipment and receiver.
• Connect the equipment into an outlet on a circuit dierent from that to
which the receiver is connected.
• Contact the Customer Care Center at 1-800-732-2677.
Page 19

www.petsafe.net 19
This device complies with Industry Canada Rules. This device complies
with part 15 of the FCC Rules. Operation is subject to the following two
conditions: (1) This device may not cause harmful interference, and (2) this
device must accept any interference received, including interference that
may cause undesired operation.
Unauthorized changes or modifications to the equipment, not approved
by Radio Systems Corporation, could result in not meeting compliance
with FCC regulations and could void the user’s authority to operate the
equipment.
ACMA/Australia
This device complies with the applicable EMC requirements specified by
the ACMA (Australian Communications and Media Authority).
Customer Care International
USA & Canada—Tel: 800-732-2677
Monday–Friday 8 AM – 8 PM / Saturday 9 AM – 5 PM
Australia—Tel: 1800 786 608
Monday–Friday 8:30 AM – 5 PM
New Zealand—Tel: 0800 543 054
Monday–Friday 10:30 AM – 7 PM
Page 20

20 1-800-732-2677
Battery Disposal
Separate collection of spent batteries is required in many regions; check
the regulations in your area before discarding spent batteries. At the end
of the product life, please contact our Customer Care Center to receive
instructions on proper disposal of the unit. Please do not dispose of the
unit in household or municipal waste. For a listing of Customer Care Center
telephone numbers in your area, visit our website at www.petsafe.net.
Warranty
One Year Non-Transferrable Limited Warranty
This Product has the benefit of a limited manufacturer’s warranty. Complete
details of the warranty applicable to this Product and its terms can be
found at www.petsafe.net and/or are available by contacting your local
Customer Care Center.
United States and Canada—Radio Systems Corporation, 10427 PetSafe
Way, Knoxville, TN 37932 USA
Australia/New Zealand—In compliance with the Australian Consumer
Law, Warranties Against Defects, effective January 1, 2012, warranty
details of this Product are as follows:
Page 21

www.petsafe.net 21
Australia/New Zealand One Year Non-Transferrable
Limited Warranty
What is covered: Radio Systems Australia Pty Ltd. (hereinafter referred
to as “Radio Systems”) warrants to the original retail purchaser, and
not any other purchaser or subsequent owner, that its product, when
subject to normal and proper residential use, will be free from defects in
material or workmanship for a period of one (1) year from the purchase
date. An “original retail consumer purchaser” is a person or entity who
originally purchases the Product, or a gift recipient of a new product that is
unopened and in its original packaging. When serviced by Radio Systems
Customer Service, Radio Systems covers labour and parts for the first year
of ownership; after the first year, a service or upgrade charge will apply
relative to replacement of the product with new or refurbished items at
Radio Systems’ sole discretion.
The limited warranty is non-transferrable and shall automatically terminate
if the original retail consumer purchaser resells the Radio Systems
product or transfers the property on which the Radio Systems product is
installed. This Limited Warranty excludes accidental damage due to dog
chews; lightning damage; or neglect, alteration and misuse. Consumers
who purchase products outside of Australia, New Zealand, or from an
unauthorised dealer will need to return the Product to the original place of
purchase for any warranty issues.
Page 22

22 1-800-732-2677
Please note that Radio Systems does not provide refunds, replacements,
or upgrades for change of mind, or for any other reason outside of these
Warranty terms.
Claims Procedure:
Any claim made under this Warranty should be made directly to Radio
Systems Australia Pty Ltd. Customer Care Centre at:
Radio Systems Australia Pty Ltd.
PO Box 7266, Gold Coast Mail Centre QLD 9726, Australia
Australia Residents: 1800 786 608
New Zealand Residents: 0800 543 054
Email: info@petsafeaustralia.com.au
To file a claim, a proof of purchase must be provided. Without a proof of
purchase, Radio Systems will not repair or replace faulty components.
Radio Systems requests the Consumer to contact the Radio Systems
Customer Care Centre to obtain a Warranty Return number, prior
to sending the Product. Failure to do so may delay in the repair or
replacement of the Product.
Page 23

www.petsafe.net 23
If the Product is deemed to be faulty within 30 days from date of original
purchase, Radio Systems will organise for a replacement to be sent in
advance of returning the faulty Product. A Post Bag will be included
with the replacement Product for the return of the faulty Product. The
Product must be returned within 7 days of receiving the replacement. If
the Product is deemed to be faulty after 30 days from the date of original
purchase, the consumer will be required to return the Product to Radio
Systems at the consumer’s own expense. Radio Systems will test and
replace the faulty unit or its components and return to the consumer
free of charge, provided the Product is within its said warranty period.
This warranty is in addition to other rights and remedies available to you
under the law. Radio Systems goods come with guarantees that cannot
be excluded under the Australia Consumer Law. You are entitled to a
replacement or refund for a major failure and for compensation for any
other reasonably foreseeable loss or damage. You are also entitled to
have the goods repaired or replaced if the goods fail to be of acceptable
quality and the failure does not amount to a major failure.
Should you have any queries or require any further information, please
contact our Customer Care Centre on 1800 786 608 (Australia) or
0800 543 054 (New Zealand).
Page 24

Radio Systems Corporation
10427 PetSafe Way
Knoxville, TN 37932
1-800-732-2677
www.petsafe.net
400-1973
©2016 Radio Systems Corporation
 Loading...