

Page 1

operating and training guide
Model Number
PDT00-13649
PLEASE READ THIS ENTIRE GUIDE BEFORE BEGINNING
Train ‘n Praise
™
Potty Training System
Page 2
2 Customer Care Center 1-800-732-2677
Important Safety Information
Explanation of Attention Words and Symbols used in this guide
This is the safety alert symbol. It is used to alert you to potential personal injury hazards. Obey all
safety messages that follow this symbol to avoid possible injury or death.
WARNING indicates a hazardous situation which, if not avoided, could result in
death or serious injury.
CAUTION, used with the safety alert symbol, indicates a hazardous situation which,
if not avoided, could result in minor or moderate injury.
CAUTION, used without the safety alert symbol, indicates a hazardous situation which,
if not avoided, could result in harm to your pet.
Risk of explosion. Do not short circuit, mix old and new batteries, dispose of in fire,
or expose to water. When batteries are stored or disposed, they must be protected
from shorting. Dispose of used batteries properly.
Not for use with aggressive dogs. Do not use this Product if your dog is aggressive,
or if your dog is prone to aggressive behavior. Aggressive dogs can cause severe
injury and even death to their owner and others. If you are unsure whether this product is appropriate for
your dog, please consult your veterinarian or certified trainer.
Save these instructions for future reference. Read all instructions before
operating product.
:
For indoor use only.
:
For dry treats/kibble use only.
:
Do NOT use the Treat Dispenser with puppies or dogs with any physical disability.
:
Intended for use with pets only.
:
Do NOT allow small children to play with, in or around the Treat Dispenser or Pee Pads.
:
Before leaving for an extended time, always replace used batteries with new batteries to insure
continual operation.
:
Do NOT place any foreign object in the Treat Dispenser.
:
Treat Dispenser should always be leveled.
:
Do NOT disassemble the Treat Dispenser except for the Hopper.
:
Dispose of all packaging material properly. Some items may be packed in poly bags; these bags
could cause suffocation; keep away from children and pets.
:
Check operation frequently to be sure the Treat Dispenser is dispensing properly.
:
The Treat Dispenser, Handheld Remote, and Pee Pad Transmitter should NOT be submerged in water
at any time, this may damage electronic components.
Pee Pads can be a choke hazard if your dog chews or swallows the material. Do NOT
allow your pet unsupervised access to the pad until he is trained in the proper use of
the pad.
Page 3

www.petsafe.net 3
Thank you for choosing the PetSafe® brand. You and your pet deserve a companionship that includes
memorable moments and a shared understanding together. Our products and training tools promote a
lifestyle of protection, teaching, and love—essentials that influence memories for a lifetime. If you have
any questions about our products or training your pet, please visit our website at www.petsafe.net or
contact our Customer Care Center at 1-800-732-2677.
To get the most protection out of your warranty, please register your product within 30 days at
www.petsafe.net. By registering and keeping your receipt, you will enjoy the product’s full warranty
and should you ever need to call the Customer Care Center, we will be able to help you faster.
Most importantly, we will never give or sell your valuable information to anyone. Complete warranty
information is available online at www.petsafe.net.
Table of Contents
Components .....................................................................................................................................4
Other Items You May Need ..............................................................................................................4
How the System Works .................................................................................................................... 4
Features ............................................................................................................................................5
Key Definitions .................................................................................................................................5
Operating Guide .............................................................................................................................7
Prepare the Handheld Remote .....................................................................................................7
Prepare the Treat Dispenser .........................................................................................................7
Prepare the Pee Pad and Pee Pad Clip .......................................................................................9
To Pair the Handheld Remote, Pee Pad Clip and Treat Dispenser .............................................11
Training Guide ...............................................................................................................................12
General Tips ...............................................................................................................................12
Nutritionally Balanced Diet for Your Dog ....................................................................................12
Training Sessions ........................................................................................................................12
Introducing Moisture Detection Pads .........................................................................................12
Training with Handheld Remote .................................................................................................13
Training With Pee Pad Clip ........................................................................................................13
Teaching Your Pet the Audible Tone ...........................................................................................14
Additional Training ......................................................................................................................14
Teaching Basic Obedience .........................................................................................................15
Eliminating Unwanted Behavior..................................................................................................15
Optional Treat Dispenser Wall Mounting ........................................................................................16
Frequently Asked Questions .......................................................................................................17
Troubleshooting ............................................................................................................................17
Care and Cleaning ..........................................................................................................................18
Customer Care International ..........................................................................................................18
Terms of Use and Limitation of Liability .........................................................................................18
Battery Disposal .............................................................................................................................18
Perchlorate Battery .........................................................................................................................19
FCC ................................................................................................................................................19
Warranty .........................................................................................................................................19
Treat Dispenser Mounting Template ............................................................................................... 23
Page 4
4 Customer Care Center 1-800-732-2677
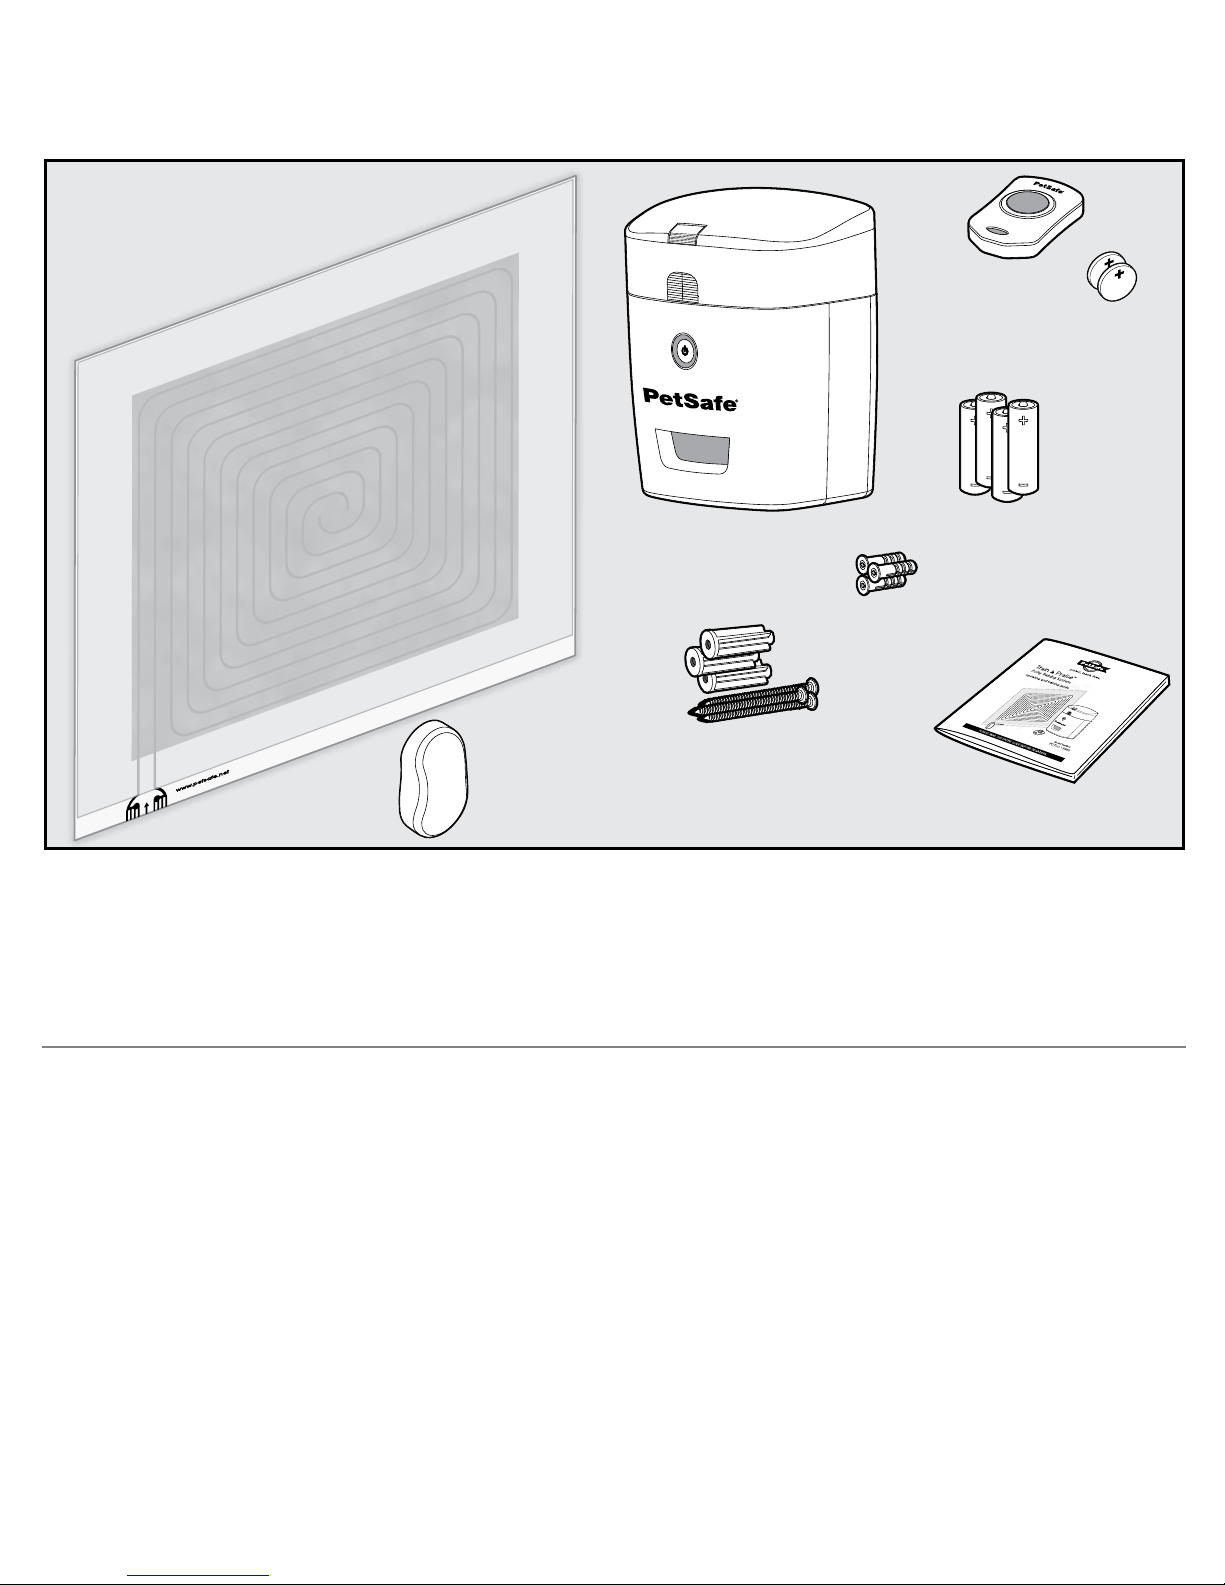
Components
Other Items You May Need
:
Dry treats or kibble 1/2" or smaller
:
Small flat head screwdriver or equivalent
:
Collar and leash (optional) for training
:
Phillips screwdriver
How the System Works
The PetSafe® Train 'n Praise™ Potty Training System is an innovative aid to housebreaking. It is a reward system
that uses an automated Treat Dispenser with Moisture Detection Pee Pads. A Handheld Remote for the
Dispenser is also included for easy potty training in any room. When your dog has properly used the pee pad,
the behavior is reinforced by providing the treat from the Treat Dispenser! Your dog will associate the usage of
the pee pads with the treat and will repeat using the pads when you're not there.
For successful use of the PetSafe
®
Train 'n Praise™ Potty Training System we recommend at least 2-4 weeks of
training with your new puppy or dog. We have included some guidelines with this operating and training guide.
Treat Dispenser
Pee Pad Clip
3 Wall
Mounting Screws
and Standoffs
3 Wall
Anchors
4 AA Batteries
2 3-volt
Lithium
Batteries
(CR2032)
Handheld
Remote
Operating and
Training Guide
10 Moisture Detection
Pee Pads
Page 5
www.petsafe.net 5
Features
:
Treat Dispenser can be used with or without an audible tone for additional training and holds dry
treats/kibble up to 1/2" in size
:
Treat Dispenser has a 20 minute time-out after a treat is dispensed
:
Treat Dispenser can be wall mounted or free standing and includes a low battery indicator
:
Handheld Remote or the Pee Pad Clip activates the Treat Dispenser up to 25 feet away
:
Moisture Detection Pee Pads include 6 layers for extra protection and include an attractant to
encourage your pet to use them
:
Pee Pad Clip is water-resistant and easily attaches and reattaches to new pads
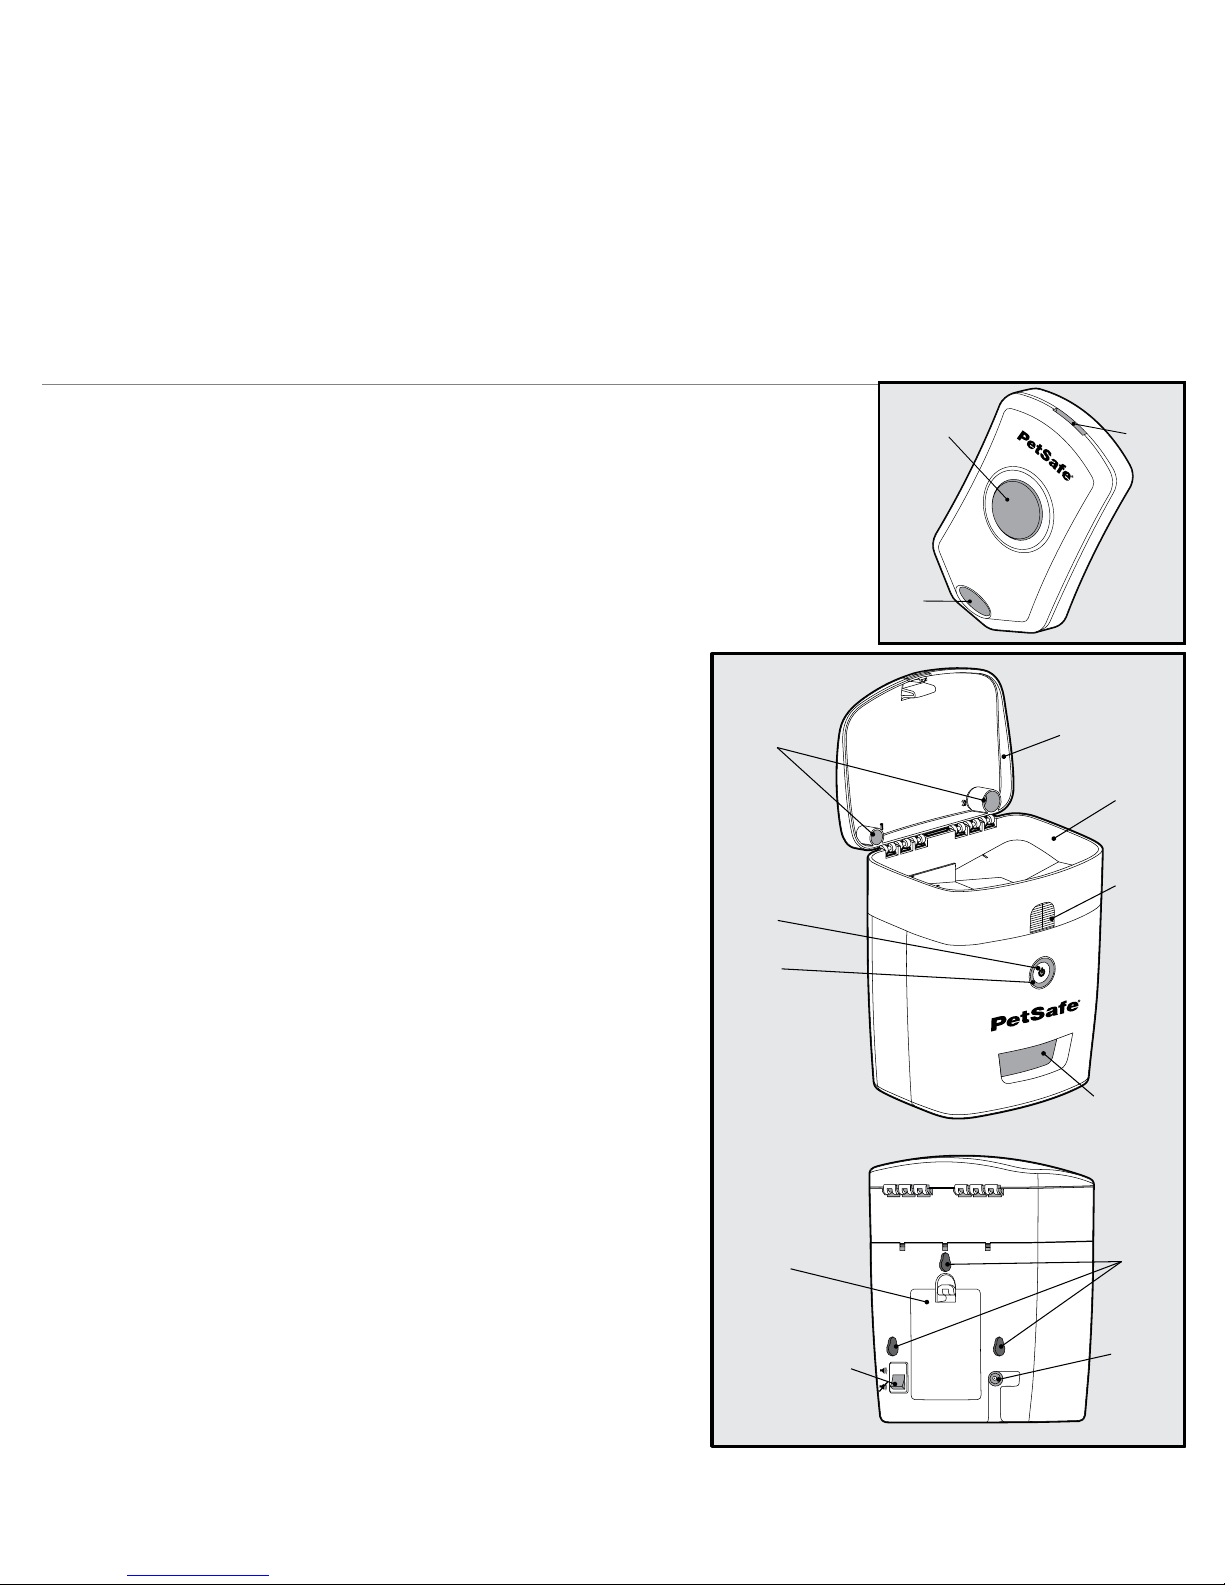
Key Definitions
Handheld Remote: Transmits signal to the Treat Dispenser to release dry
treats/kibble. Used during training sessions.
Dispense Button: Activates the Treat Dispenser with or without an
audible tone.
Battery Slot: Opens the Handheld Remote to add/replace the battery.
Clip Opening: Attaches to a key chain, wrist strap, lanyard, etc. (not included).
Treat Dispenser: Delivers dry treats/kibble and tone
(optional) on a signal from the Handheld Remote or the Pee
Pad Clip.
Treat/Kibble Size Indicators: Appropriately size the treats/
kibble before adding to the Treat Dispenser Hopper (1/2" or
smaller).
Hopper Lid: Encloses dry treats/kibble in the Treat Dispenser.
Hopper: Holds dry treats/kibble in the Treat Dispenser.
Hopper Button: Opens Hopper for cleaning.
On/Off Button: Turns the Treat Dispenser on and off.
Three Color Treat Dispenser LED: Indicates when the Treat
Dispenser has been turned on or off; when the treats are
dispensed and also serves as a battery status indicator.
Treat Compartment: Delivers dry treats/kibble to your dog.
Battery Compartment/Door: Remove to add/replace the
batteries (4-AA).
Tone Switch: Turns the audible tone on and off.
Mounting Keyholes: Attaches to wall mounting screws
(optional).
AC Adapter Input: Option for use without batteries,
requires AC Adapter (sold separately).
Battery
Slot
Clip
Opening
Dispense
Button
On/Off Button
Hopper Lid
Treat/Kibble
Size Indicators
Battery
Compartment/Door
Tone Switch
Hopper
Button
Treat
Compartment
Mounting
Keyholes
AC
Adapter
Input
Adapter
not included
Hopper
Three Color LED
Page 6
6 Customer Care Center 1-800-732-2677
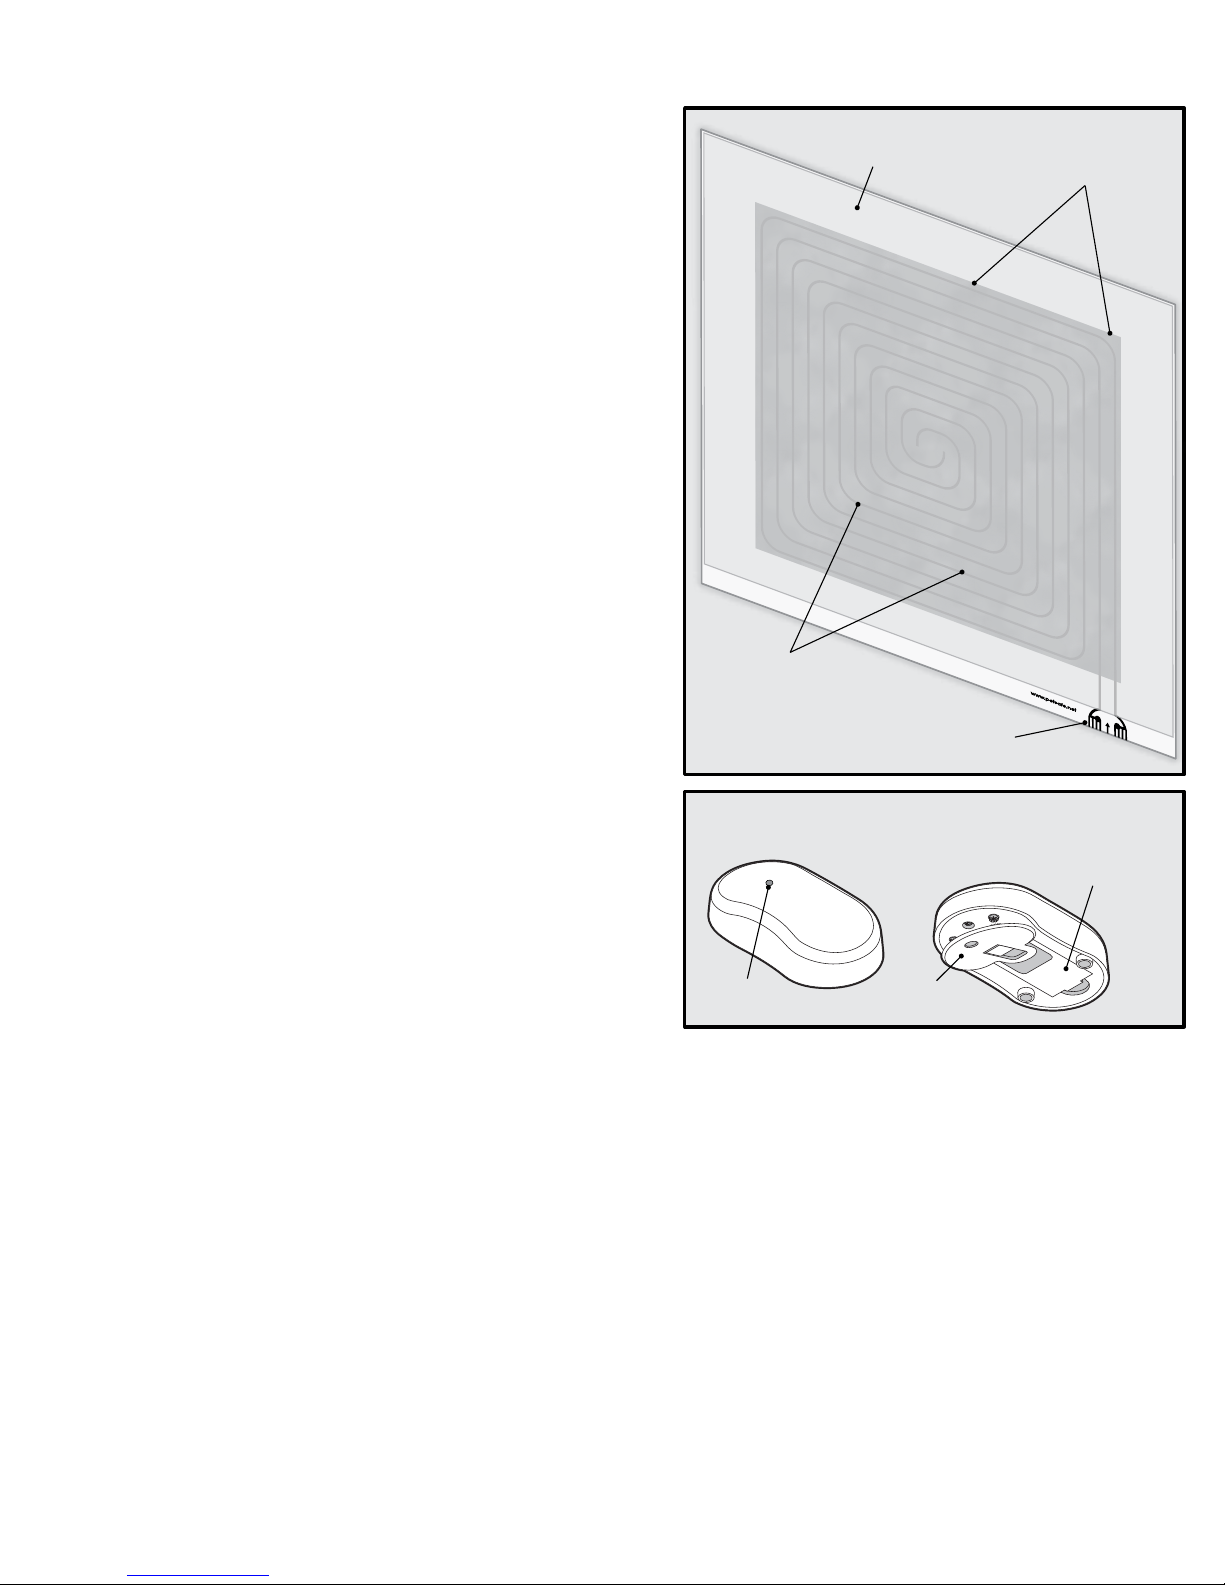
Moisture Detection Pee Pad: Used with the Pee Pad
Clip to detect moisture and sends a signal to the Treat
Dispenser to
release treats/kibble
.
Absorbent Area: 6 layers of absorbent, leak-proof
protection.
Moisture Detection Sensors: Senses moisture on pad
and activates the Pee Pad Clip.
Clip Attachment Area: Where the Pee Pad Clip attaches to
the pad and converts the Pee Pad Clip to a wireless remote.
Pee Pad Clip: Transmits signal to the Treat Dispenser to
release dry treats/kibble when Moisture Detection Pee Pad
is used during post training sessions.
Battery Compartment/Door: Remove to add/replace
battery.
Clamping Plate: Attaches the Pee Pad Clip to the pad.
Pee Pad Clip LED: Indicates when the Pee Pad Clip is on,
when the battery is low, and when moisture is detected.
Absorbent Area
Moisture Detection
Pee Pad
Clip Attachement Area
Moisture
Detection
Sensors
(top view)
Battery
Compartment/Door
Pee Pad
Clip LED
Clamping
Plate
(bottom view)
Pee Pad Clip
Page 7
www.petsafe.net 7
Operating Guide
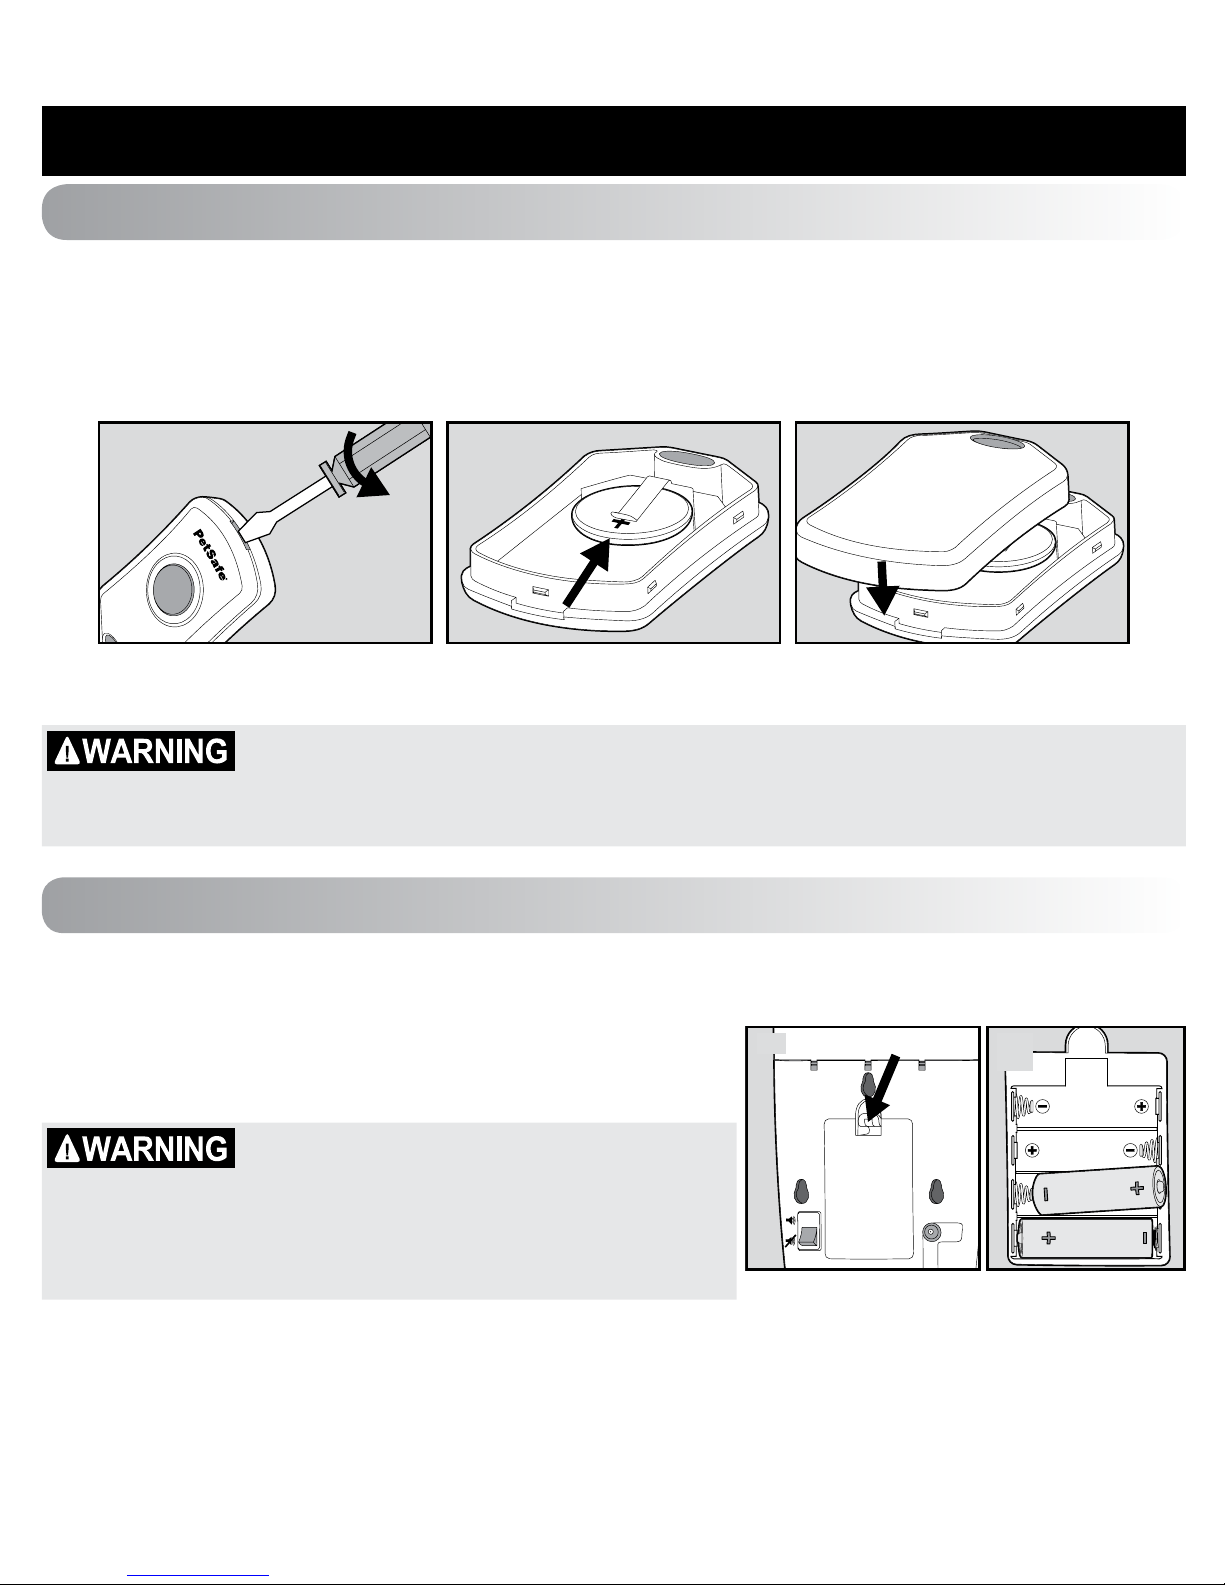
Step 1
Prepare the Handheld Remote
1. Using a small flathead screwdriver (or equivalent), place into the slot on the bottom and turn until the
top and bottom release (1A).
2. Install one (1) 3-volt (CR2032) battery under the clip, positive (+) side up (1B).
3. Firmly press the top and bottom back together (1C).
1C1A 1B
Replacement batteries (3-volt, CR2032) can be found at many retailers. Contact the Customer Care
Center or visit our website at www.petsafe.net for a list of common retailers.
Risk of explosion if batteries are replaced by an incorrect type. Do not short circuit,
mix old and new batteries, dispose of in fire, or expose to water. When batteries
are stored or disposed, they must be protected from shorting. Dispose of used
batteries properly.
Step 2
Prepare the Treat Dispenser
1. Remove the battery compartment door (2A).
2. Install four (4) AA batteries into the battery compartment on the
back of the Treat Dispenser (2B).
3. Replace the battery compartment door.
Risk of explosion if batteries are replaced by
an incorrect type. Do not short circuit, mix
old and new batteries, dispose of in fire, or
expose to water. When batteries are stored
or disposed, they must be protected from
shorting. Dispose of used batteries properly.
2A 2B
Page 8
8 Customer Care Center 1-800-732-2677
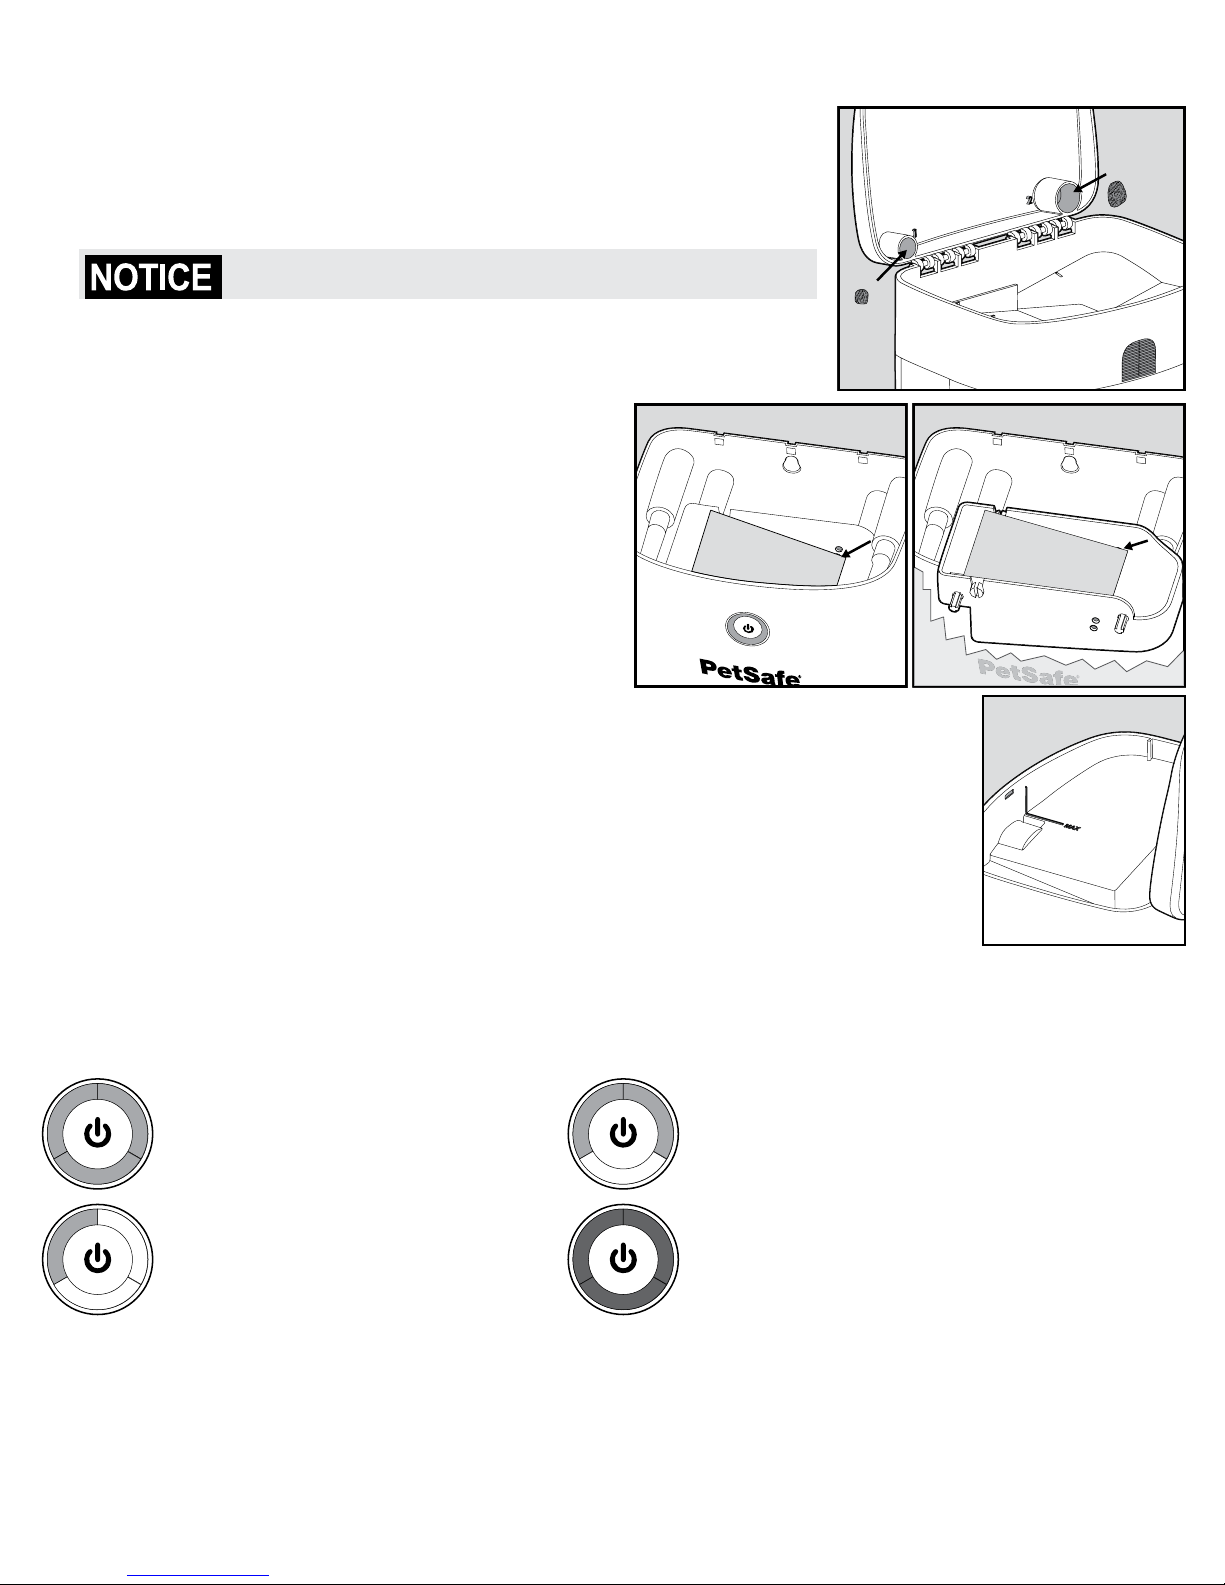
4. Open the Hopper lid on the Treat Dispenser to size the
treats/kibble before filling. This Treat Dispenser requires dry treats
or kibble that can fit through the dispenser. Round or oval kibble of
uniform size and shape work best, 1/2" size or smaller. The treat/
kibble size indicator is located inside the Hopper lid (2C).
For dry treats/kibble up to 1/2" size or smaller only.
5. Remove the Hopper by pressing the Hopper button. Locate the ramp in
the treat compartment. Move the ramp to correspond to the measured
treat size. If the kibble fits into the cup labeled 1, the ramp needs to be
in the lower position (2D). In this position you should
be able to see the upper setting hole. If the kibble is
larger and fits into cup 2, then the ramp must be
snapped into the upper position (2E). Note: The
ramp will be set by default from the factory in the
lower position for #1 size treats.
6. Once the treat/kibble size and ramp height have
been determined, fill the Hopper to the fill line (2F)
and close the hopper lid.
7. Press and release the power button on front of the
Dispenser to turn the Dispenser on. The LED’s will
light to indicate it is on and will display the battery status (see Battery Status
Indicator below).
8. The audible tone is on from the factory. Turn the tone switch off (on back of
Dispenser) if you prefer to train without it.
9. Press the button on the Handheld Remote to dispense the dry treats/kibble.
10. To turn the Treat Dispenser off, press and hold the power button for 3 seconds
or until the Red LED's turn off.
Battery Status Indicator
When turning on the Treat Dispenser, the LED surrounding the on/off button will indicate the battery
status in the following manner:
70-100% Battery
3 Green LEDs appear
for 3 seconds
40-70% Battery
2 Green LEDs appear
for 3 seconds
10-40% Battery
1 Green LEDs appear
for 3 seconds
1-10% Battery
3 Red LEDs appear for 1 second
then flash for 2 seconds
1
/
2
"
3
/
8
"
2C
2D 2E
2F
Page 9

www.petsafe.net 9
Treat Dispenser LED – Function and Response
Treat Dispenser Function LED Response
Treat Dispenser is turned on Battery status LEDs flash for 3 seconds
Treat Dispenser is on and idle No LEDs or flashing
Treat Dispenser is on with low battery 3 Red LEDs flash 3 times every 8 seconds
Signal from Handheld Remote is received 3 Orange LEDs flash once
Pairing Mode 3 Green LEDs flash once every second
Pairing successful 3 Orange LEDs flash once
Step 3
Prepare the Pee Pad and Pee Pad Clip
1. Pull up lever to open battery door and remove (4A).
2. Install one (1) 3-volt (CR2032) battery, positive (+) side up (4B), under the battery contact (4C).
3. Slide battery door back into place and snap down firmly to close (4D).
4A 4B 4C 4D
Risk of explosion if batteries are replaced by an incorrect type. Do not short circuit, mix
old and new batteries, dispose of in fire, or expose to water. When batteries are stored or
disposed, they must be protected from shorting. Dispose of used batteries properly.
Page 10

10 Customer Care Center 1-800-732-2677
4. To attach the Pee Pad Clip to the
pad, press the Clamping Plate lever
(4E) to open and slide onto the
designated area (4F).
NOTE: The pad must be fully opened
with no folds. If the Pee Pad Clip is not
attached to the designated area it will
not operate.
Pee Pad Clip LED – Function and Response
Pee Pad Clip Function LED Response
Battery added and on Green LED flashes once
Low battery
Red LED flashes once every 10 seconds
Moisture detected from Pee Pad Orange LED flashes once
4E 4F
Page 11

www.petsafe.net 11
Step 4
To Pair the Handheld Remote, Pee Pad Clip and Treat
Dispenser
The Handheld Remote, Pee Pad Clip and Treat Dispenser are paired from the factory. If you installed
the batteries properly and the Treat dispenser is not responding to the handheld Remote or Pee Pad
Clip, follow these steps:
1. Remove the battery from the Pee Pad Clip.
2. Begin with the Treat Dispenser Off. Press and hold the power button for 4 seconds. During this time
the green LED will appear solid. After the green LED disappears, release the button. The green LED
will now flash for 30 seconds indicating the treat dispenser is in paring mode.
3. While standing at least 3 feet away from the Treat Dispenser, press and release the Handheld
Remote button once. The LED will flash orange and emit a confirmation tone (if the audible tone is
enabled) when the Handheld Remote is paired.
4. While standing at least 3 feet away from the Treat Dispenser, insert the battery into the Pee Pad Clip.
The Pee Pad Clip will automatically send a pairing message after the green LED turns off. The Treat
Dispenser LED will briefly turn orange and emit an audible tone (if the audible tone is enabled), when
the Pee Pad Clip pairs.
5. After 30 seconds the Treat Dispenser pairing mode is automatically exited. To exit pairing mode prior
to 30 seconds press and release the Treat Dispenser button.
6. To test the Pee Pad Clip pairing, remove the battery from the Pee Pad Clip and return after 1 second.
If paired correctly, the Treat Dispenser will dispense a treat.
7. To test the Handheld Remote pairing, push and release the Handheld Remote button once. If paired
correctly, the Treat Dispenser will dispense a treat.
8. If the Handheld Remote or Pee Pad Clip is still not pairing, please contact the Customer Care Center.
Page 12

12 Customer Care Center 1-800-732-2677
Training Guide
General Tips
:
For multi dog households, train one dog at a time.
:
Use only dry treats/kibble.
:
When using the Handheld Remote, it is best that your dog associate the treats/kibble with you, not
the Handheld Remote.
:
Don’t point the remote at your pet.
:
Keep training fun!
:
If your dog barks, tries to bite or paw at the Treat Dispenser during training, change his focus to the
pee pad. Give him some treats from your hand before using the Treat Dispenser. As he quiets and
gives you good behavior give a treat from the Dispenser. Secure the Treat Dispenser at a level on wall
higher than your dog can reach.
:
Make sure your dog is motivated with desirable treats/kibble before training begins. Change the
treats/kibble until the value of the treat is worth the work.
:
Don’t punish your pet for mistakes. This can only confuse your dog. If you notice he's about to pee in
an inappropriate place, move him to the pee pad.
Nutritionally Balanced Diet for Your Dog
It is important that your dog is already on a nutritionally balanced feeding program before you begin
using the Treat Dispenser. If you are using dry dog food/kibble, ensure they are the correct size and can
be used in the Treat Dispenser for training.
NOTE: If you free feed your dog, and he shows no interest in the kibble from the Treat Dispenser, change
to specific meal feeding times during the day while training with the Treat Dispenser. This should make the
dispensed kibble more enticing. If you use treats instead of kibble, your training sessions should be over
a longer number of days and the total calorie intake should be subtracted from your dog’s daily intake of
food. For most dogs, treats should make up less than 10% of a dog’s daily food intake.
Training Sessions
Although we typically take our dogs outside to eliminate, it is sometimes necessary to provide an indoor potty
area. This will require a minimum of four (estimated 10 – 15 minute) training sessions throughout a full day of
your time with your dog over 2 – 4 week period. Your patience and direct supervision is critical to the success
of the Train 'n Praise™ Potty Training System. If you have more than one dog, train each dog separately with
no distractions by other pets, small children or any other interruptions. Training will begin without the Treat
Dispenser and Pee Pad Clip. These will be introduced gradually. Please read all training steps before starting.
Step 1
Introducing Moisture Detection Pads
1. With the Treat Dispenser turned off, place or coax your dog onto a
Train 'n Praise™ Pee Pad. It is best
to choose the typical times dogs need to eliminate when on a regular nutritionally balanced diet.
Be consistent by placing or coaxing your dog on a pee pad right after your dog wakes up in the
morning, after eating or drinking, after playtime, after napping and before going to bed. Each time
your dog is on the pee pad is considered a training session.
Page 13

www.petsafe.net 13
2. During the first couple of training sessions say a cue word as in “potty time” or “bathroom” and give
a treat/kibble by hand when your dog is on the center of the pad. Keep your dog on the pee pad by
giving treats/kibble until he is comfortable and familiar with the feel of the pee pad. Use the same treat/
kibble by hand as you will use later in the Treat Dispenser.
Step 2
Training with Handheld Remote
The next step is introducing treats/kibble using the Handheld Remote and Treat Dispenser. Place the
Treat Dispenser within range of the pee pad. Determine whether you are using the tone. Continue placing
your dog on the pee pad. After your dog eliminates on the pee pad wait 10 seconds before pressing the
Handheld Remote. Ensure he gets the treats/kibble. In addition, wait at least 20 minutes before the next
training session as both of these specific time allowances will sequence your pet to fully relieve bladder
and not pee a little to get a treat and “trick” the system, thus resulting in a conditioned training behavior/
positive reward routine. Also, the specific times designed for the Train 'n Praise™ Potty Training System will
provide adequate time for the pee pad’s top layer to dry before the next use. Using the audible tone on the
Treat Dispenser to alert the dog will also reinforce the positive reward.
1. When your dog eliminates on the pad (only on the absorbent section area) use the Handheld Remote to
release a treat/kibble from the Treat Dispenser and do not use or show treats/kibble in your hand any longer.
2. Continue to place or coax your dog onto a Train 'n Praise
™
Moisture Detection Pee Pad several times during
the day and multiple days until the dog starts to go to the pee pad without your assistance or your verbal
cues. It is important to continue to supervise during these training sessions to use the Handheld Remote
to release a treat in a timely manner stated above. Consistency and patience during this time, just like any
other type of training will be key to moving to the next training step and ultimately, successful indoor housetraining. Do not give a treat when the dog goes outside of the absorbent pee pad area. Train to only allow a
treat when used properly and not allowing a treat when the pad is missed will give you the desired results.
3. The pee pads are 100% disposable to keep clean-up easy and hassle free. It is recommended to use one
pee pad per day, per dog and replace each night or first thing in the morning. Depending on use, a new
pee pad must be replaced when it is full. Conveniently pull the pee pad together and toss in the garbage
and lay down a new pee pad.
Step 3
Training With Pee Pad Clip
After your dog is consistently using the pee pad and taking treats/kibble that you dispense using the Handheld
Remote, you are ready for the last step. The water-resistant, removable Pee Pad Clip is a wireless transmitter
that works similar to the Handheld Remote. It is designed to send a signal to the Treat Dispenser when the
pee pad detects moisture and is already programmed to wait 10 seconds before a treat/kibble is released. In
addition, it is scheduled to wait at least 20 minutes before another signal can be given to the Treat Dispenser.
The specific times designed for the Train 'n Praise™ Potty Training System will provide adequate time for the pee
pad top layer to dry before the next use. You can decide to continue the audible tone on the Treat Dispenser to
alert the dog, reinforcing the positive reward, as if you were there and using the Handheld Remote.
1. Following the instructions on page 10, add the Pee Pad Clip to the Moisture Detection Pee Pad
within range of the Treat Dispenser.
2. After the Pee Pad Clip is attached, continue to monitor your pet 2-3 more times to ensure he is using
the pee pad, the Treat Dispenser is releasing treats/kibble, and he is eating them.
Page 14

14 Customer Care Center 1-800-732-2677
3. Most dogs learn within a 2-4 week period to use the Train 'n Praise™ Potty Training System because the
treat/kibble is dispensed and they are rewarded consistently for going in the right place. After following these
recommendations, your dog should be consistently using the pee pad properly. This will allow you to have
peace of mind that your dog is demonstrating good dog behavior when you are away for periods of time.
Tips
:
The Train 'n Praise™ Potty Training System has technology to show you when the batteries are low
on the Treat Dispenser or the Pee Pad Clip. It is important to notice the low battery LED lights and
change batteries before they have expired, keeping a well maintained system and turning housetraining into a happy solution.
:
The Treat Dispenser works with up to 10 Moisture Detection Pee Pads and Pee Pad Clips (sold separately).
:
The Train 'n Praise™ Moisture Detection Pee Pads are 100% disposable to keep clean-up easy and
hassle free. The Pee Pad Clip is water resistant, removable and can be wiped off to keep clean. The
Pee Pad Clip has to be properly attached to a Train 'n Praise™ Moisture Detection Pee Pad as stated in
the setup section and reattached to a new pee pad every time. It is recommended to use one pee pad
per day, per dog and replace each night or first thing in the morning. Depending on use, a pee pad must
be replaced when it is full. After removing the Pee Pad Clip, conveniently pull the pee pad together and
toss in the garbage. Wipe off the Pee Pad Clip and reattach to a new pee pad. Lay both the Pee Pad
Clip and pee pad down ready to be used when your dog needs it.
Teaching Your Pet the Audible Tone
The Treat Dispenser includes an audible tone that can be used for additional training. The tone is turned
on by default from the factory. Using the Handheld Remote and Treat Dispenser, spend 10-15 minutes a
day for a few days to teach your dog the association. Most dogs quickly learn a treat follows the tone.
1. Before teaching your dog the tone, use the Tone Switch on the back of the dispenser (see page 5) to
turn the tone off.
2. Place treats/kibble in front of the Treat Dispenser. After he eats them, repeat adding more treats/kibble.
3. If your dog is comfortable with the Treat Dispenser, press the button on the Handheld Remote and
dispense the treats/kibble. Continue until your dog is comfortable taking the food from the Treat Dispenser.
4. Turn the tone on using the Tone Switch on the back of the dispenser.
5. Press the Handheld Remote button and dispense the treats/kibble. Repeat 6-8 times. Your dog will
learn the treats follow the tone!
Additional Training
The PetSafe® Train 'n Praise™
Moisture Detection
Pee Pads have been designed to be an innovative aid to
housebreaking, however with the addition of the Handheld Remote it can be used to reinforce other good
behaviors at home. We recommend your dog be fully trained using the Treat Dispenser with the pad before
other training begins.
NOTE: Please ensure the Treat Dispenser and pee pads are not together before doing the additional training.
Page 15

www.petsafe.net 15
Teaching Basic Obedience
Place
1. Ensure your dog’s bed (a simple mat or blanket will also work) is in close proximity to the
Train 'n Praise™ Treat Dispenser.
2. Ensure the Treat Dispenser is on and ready for use.
3. Using a leash, lead your dog to his spot while repeating the “Place” command.
4. While continuing to hold the leash, dispense treats/kibble and praise your dog as soon as he has all
four paws on the surface of the bed.
5. Repeat steps three and four for up to ten minutes before giving your dog a training break.
Stay
1. Repeat PLACE steps
three and four
until you are confident your dog associates going to his place
with receiving treats/kibble.
2. With your dog on his place, let go of (but do not remove) the leash.
3. Slowly begin adding distance by backing away, no more than four feet in the beginning, repeating
the “Stay” command.
4. If your dog begins to follow while you add space, quickly grab the leash, lead him back to his place,
and begin adding space again.
5. For every “Stay” command that is obeyed while you back away, dispense treats/kibble and praise
your dog.
6. When you are confident your dog understands “Stay,” lengthen the duration of the stay and
diminish the frequency of treat dispensing.
7. Using the leash, lead your dog off his place while repeating “Release,” communicating that the
“Stay” is over.
8. Combine and repeat PLACE and STAY exercises in ten-minute training sessions for 4-5 days until
the dog understands. Work to build up to a 15 minute “Stay.”
9. After your pet stays reliably on receiving the “Stay” command, training for this behavior is complete.
10. Release your pet from his place and praise him verbally.
11. Practice this in several different areas and use different people or guest for distractions.
Eliminating Unwanted Behavior
Jumping Up
Pets typically jump up to get attention. If you do not want your pet to jump on you, then friends or members of
the family should not encourage this behavior. That means every time your pet jumps on someone, he should
be reprimanded or redirected to an alternate and acceptable behavior for which he can receive praise.
1. Ensure the Treat Dispenser is on and ready to use.
2. As soon as your pet lifts his paws off the ground to jump on you (or a guest) press the Handheld
Remote button and dispense the treats/kibble.
3. Immediately praise him after he eats the treats/kibble.
4. Practice this in several different areas and use different people or guest for distractions.
NOTE: You (or your guest) should stand completely stationary and not give the dog any attention during
this training. Continue to dispense treats/kibble until your dog goes to the Treat Dispenser. Your dog will
learn he doesn’t get attention until he stops jumping.
Page 16

16 Customer Care Center 1-800-732-2677
Begging
Begging can be annoying and disruptive. If you don’t want your pet to beg, then friends or members of the
family should not encourage this behavior. This means every time your pet begs, he should be reprimanded or
redirected to an alternate and acceptable behavior, for which he can receive praise.
1. Ensure the Treat Dispenser is on and ready to use.
2. As soon as your pet begins to beg, press the Handheld Remote button and dispense the treats/kibble.
3. Immediately praise him after he eats the treats/kibble.
4. Practice this several times. Be consistent. Your dog will learn to redirect his focus from begging to the
Treat Dispenser.
NOTE: Ensure you ignore your dog at the table. Don’t make eye contact when he is begging. Keep the
remote with you each time you are going to be in situations where your dog begs.
Optional Treat Dispenser Wall Mounting
A mounting template is located on the back cover of this guide. In order
to ensure stability when mounting the Treat Dispenser, be sure to follow
all instructions. Note: It is important that the Treat Dispenser is level when
mounted. Follow leveling instructions if mounting about floor level. Be sure to
use the included anchors if there is no stud to avoid damage to your wall or the
Treat Dispenser.
1. If mounting the Treat Dispenser at floor level, fold at the line shown on the
template (located on the back cover of this guide).
2. Place the fold flush with the floor and place removable tape on the template
so it doesn’t move during drilling.
3. If mounting on the wall above floor level, pick your desired location.
Hold a level at the top of the template and lightly mark with a pencil. Align
the template top to the pencil marks and use removable tape to keep the
template in place during drilling.
4. If mounting the Treat Dispenser into a stud, use a 3/32” drill bit.
5. If using the included wall anchors to mount the Treat Dispenser, use a 1/4”
drill bit.
6. Remove the template and install wall anchors in the holes.
7. Tap wall anchors flush with a hammer if necessary.
8. Place the screw in the standoff and screw into the anchors or
wall stud (3A), making sure the standoff is flush against the wall.
Note: It is necessary to use the screws AND the standoffs to
allow enough space for the Hopper lid to open when filling the
Treat Dispenser.
9. Align the screw heads with the lower portion of the
mounting keyholes on the Treat Dispenser (3B). When all three
are aligned, gently slide the Treat Dispenser onto the screw
heads and then slide downward to secure the screw heads into
the smaller upper portion of the mounting keyholes (3C).
WALL
3A
WALL
3B
WALL
3C
Page 17

www.petsafe.net 17
Frequently Asked Questions
How old does my dog have
to be before using the
PetSafe® Train 'n Praise™ Potty
Training System?
:
Training can begin as soon as your puppy begins eating dry treats/
kibble and is weaned.
What type of behaviors can be
improved or changed using
the Train 'n Praise™ Potty
Training System
?
:
House-training, jumping, trash raiding, begging at the table or
for teaching basic obedience commands such as down, stay
and rewarding calm behavior.
What is the range?
:
The Pee Pad Clip and the Handheld Remote both work up to 25 feet.
What if my dog is afraid of
the Train 'n Praise™ Potty
Training System?
:
Begin by giving treats from your hand. After providing a few treats/
kibble, make a trail of treats/kibble leading to the Treat Dispenser.
Do not dispense any treats, but allow your dog to walk up to the
dispenser. After repeating this several times, your dog will learn to
walk up to the Treat Dispenser without begin afraid.
My dog is barking or pawing
at the Treat Dispenser.
:
If your dog barks or paws at the Treat Dispenser, the Dispenser can
be secured to a wall at a level your pet cannot reach.
:
Do not dispense any treats/kibble if your dog is barking or pawing at
the dispenser. When your dog is quiet or not pawing, give him a treat/
kibble from your hand. Repeat, giving him a treat/kibble from your
hand several times until he is quiet or not pawing. Gradually increase
the interval between treats/kibble. This will extend the time of not
pawing and not barking. Once he consistently waits for his treats/
kibble, begin treating him from the Train 'n Praise™ Treat Dispenser.
Troubleshooting
My Treat Dispenser is not
dispensing when I press the
Handheld Remote button.
:
Check to see if the Treat Dispenser has been turned on.
:
Check to see if the batteries are low in the Treat Dispenser – the LED
will flash red.
:
Check the battery in the Handheld Remote.
:
Replace the batteries.
:
If your Treat Dispenser still does not respond, contact the Customer
Care Center.
My Treat Dispenser is not
dispensing after my pet uses
the pee pad.
:
Ensure you are using only PetSafe® Train 'n Praise™ Moisture
Detection Pee Pads.
:
Ensure the
Pee Pad Clip
is in the designated area outlined on the
pee pad.
:
Check for low batteries in the Treat Dispenser and in the Pee Pad Clip.
:
Replace the batteries.
:
If your Treat Dispenser or
Pee Pad Clip
still does not respond,
contact the Customer Care Center.
Page 18

18 Customer Care Center 1-800-732-2677
Care and Cleaning
:
Remove all batteries before cleaning.
:
Clean the Treat Dispenser and
Pee Pad Clip
with a damp cloth.
:
Do not disassemble the Treat Dispenser except for the Hopper.
:
Do not use any kind of spray chemicals or solvent to clean.
:
Do not immerse in water or any other liquid.
Customer Care International
USA & Canada - Tel: 800-732-2677
Monday - Friday 8 AM - 8 PM / Saturday 9 AM – 5 PM
Australia - Tel: 1800 786 608
Monday - Friday 8:30 AM - 5 PM
New Zealand - Tel: 0800 543 054
Monday - Friday 10:30 AM - 7 PM
Terms of Use and Limitation of Liability
1. Terms of Use
This Product is offered to you conditioned upon your acceptance without modification of the terms,
conditions and notices contained herein. Usage of this product implies acceptance of all such terms,
conditions, and notices.
2. Proper Use
This Product is designed for use with pets where training is desired. The specific temperament of your pet may
not work with this product. We recommend that you not use this product if your pet is aggressive. If you are
unsure whether this is appropriate for your pet, please consult your veterinarian, certified trainer or contact our
Customer Care Center or visit our website at www.petsafe.net.
Proper use includes reviewing the entire Operating and Training Guide provided with your product and
any specific Caution statements.
3. No Unlawful or Prohibited Use
This Product is designed for use with pets only. This pet training device is not intended to harm, injure, or
provoke. Using this product in a way that is not intended could result in violation of Federal, State or local laws.
4. Limitation of Liability
In no event shall Radio Systems® Corporation be liable for any direct, indirect, punitive, incidental, special or
consequential damages, or any damages whatsoever arising out of or connected with the use or misuse of
this Product. Buyer assumes all risks and liability from the use of this Product.
5. Modification of Terms and Conditions
Radio Systems® Corporation reserves the right to change the terms, conditions and notices under which this
Product is offered.
Battery Disposal
Separate collection of spent batteries is required in many regions; check the regulations in your area before
discarding spent batteries. At the end of the product life, please contact our Customer Care Center to receive
instructions on proper disposal of the unit. Please do not dispose of the unit in household or municipal waste.
For a listing of Customer Care Center telephone numbers in your area, visit our website at www.petsafe.net.
Page 19

www.petsafe.net 19
Perchlorate Battery
Perchlorate Material – special handling may apply. See www.dtsc.ca.gov/hazardouswaste/perchlorate.
FCC
This device complies with part 15 of the FCC Rules. Operation is subject to the following two conditions:
(1) This device may not cause harmful interference, and (2) this device must accept any interference received,
including interference that may cause undesired operation.
CAUTION: Modification or changes to this equipment not expressly approved by Radio Systems
®
Corporation
may void the user’s authority to operate the equipment.
NOTE: This equipment has been tested and found to comply with the limits for a Class B digital device, pursuant to
part 15 of the FCC Rules. These limits are designed to provide reasonable protection against harmful interference in a
residential installation. This equipment generates, uses, and can radiate radio frequency energy and, if not installed and
used in accordance with the instructions, may cause harmful interference to radio communications. However, there is
no guarantee that interference will not occur in a specific installation. If interference does occur to radio or television
reception, which can be determined by turning the equipment off and on, the user is encouraged to try to correct the
interference by one or more of the following measures:
:
Reorient or relocate the receiving antenna.
:
Increase the separation between the equipment and the receiver.
:
Connect the equipment to an outlet on a circuit different from that to which the receiver is connected.
:
Consult customer care, the dealer, or an experienced radio/TV technician for help.
Warranty
One Year Non-Transferable Limited Warranty
This Product has the benefit of a limited manufacturer’s warranty. Complete details of the warranty
applicable to this Product and its terms can be found at www.petsafe.net and/or are available by sending
a stamped addressed envelope to Radio Systems PetSafe Europe Ltd, 2nd Floor, Elgee Building, Market
Square, Dundalk, Ireland.
Australia/New Zealand – In compliance with the Australian Consumer Law, Warranties Against
Defects, effective January 1, 2012, warranty details of this Product are as follows:
One Year Non-Transferable Limited Warranty
What is covered: Radio Systems Australia Pty Ltd (hereinafter referred to as “Radio Systems”) warrants
to the original retail purchaser, and not any other purchaser or subsequent owner, that its Product, when
subject to normal and proper residential use, will be free from defects in material or workmanship for a
period of one (1) year from the purchase date. An “original retail consumer purchaser” is a person or entity
who originally purchases the Product, or a gift recipient of a new Product that is unopened and in its
original packaging. When serviced by Radio Systems Customer Service, Radio Systems covers labor and
parts for the first year of ownership; after the first year, a service or upgrade charge will apply relative to
replacement of the Product with new or refurbished items at Radio System’s sole discretion.
The limited warranty is non-transferable and shall automatically terminate if the original retail consumer
purchaser resells the Radio Systems Product or transfers the property on which the Radio Systems Product is
installed. This Limited Warranty excludes accidental damage due to dog chews; lightning damage; or neglect,
alteration, and misuse. Consumers who purchase Products outside of Australia, New Zealand, or from an
unauthorized dealer will need to return the Product to the original place of purchase for any warranty issues.
Page 20

20 Customer Care Center 1-800-732-2677
Please note that Radio Systems does not provide refunds, replacements, or upgrades for change of mind,
or for any other reason outside of these Warranty terms.
Claims Procedure
Any claim made under this Warranty should be made directly to Radio Systems Australia Pty Ltd Customer
Care Center at:
Radio Systems Australia Pty Ltd
PO Box 765, Mudgeeraba QLD 4213
Australia Residents: 1800 786 608
New Zealand Residents: 0800 543 054
Email: info@petsafeaustralia.com.au
To file a claim, a proof of purchase must be provided. Without a proof of purchase, Radio Systems will not
repair or replace faulty components. Radio Systems requests the Consumer to contact the Radio Systems
Customer Care Center to obtain a Warranty Return number, prior to sending the Product. Failure to do so
may delay in the repair or replacement of the Product.
If the Product is deemed to be faulty within 30 days from date of original purchase, Radio Systems
will organise for a replacement to be sent in advance of returning the faulty Product. A Post Bag will
be included with the replacement Product for the return of the faulty Product. The Product must be
returned within 7 days of receiving the replacement. If the Product is deemed to be faulty after 30 days
from the date of original purchase, the consumer will be required to return the Product to Radio Systems
at the consumer’s own expense. Radio Systems will test and replace the faulty unit or its components
and return to the consumer free of charge, provided the Product is within its said warranty period. This
warranty is in addition to other rights and remedies available to you under the law. Radio Systems goods
come with guarantees that cannot be excluded under the Australia Consumer Law. You are entitled to
a replacement or refund for a major failure and for compensation for any other reasonably foreseeable
loss or damage. You are also entitled to have the goods repaired or replaced if the goods fail to be of
acceptable quality and the failure does not amount to a major failure.
Should you have any queries or require any further information, please contact our Customer Care
Center on 1800 786 608 (Australia) or 0800 543 054 (New Zealand).
Page 21

www.petsafe.net 21
Page 22

22 Customer Care Center 1-800-732-2677
Page 23

www.petsafe.net 23
Floor
Fold Line
Wall
Mounting Holes
Treat
Dispenser
Mounting
Template
Page 24

Radio Systems® Corporation
10427 PetSafe Way
Knoxville, TN 37932
1-800-732-2677
www.petsafe.net
400-1591
©2013 Radio Systems Corporation
 Loading...