

Page 1
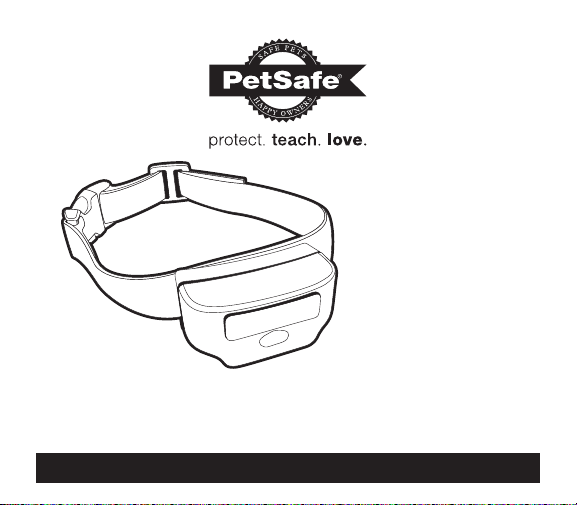
rechargeable
in-ground fence™
Model Number
PIG00-13737
PLEASE READ THIS ENTIRE GUIDE BEFORE BEGINNING
receiver collar
operating guide
Page 2
Important Safety Information
Explanation of Attention Words and Symbols used in this guide
This is the safety alert symbol. It is used to alert you
to potential personal injury hazards. Obey all safety
messages that follow this symbol to avoid possible injury
or death.
WARNING indicates a hazardous situation
which, if not avoided, could result in death or
serious injury.
CAUTION, used without the safety alert
symbol, indicates a hazardous situation which,
if not avoided, could result in harm to your pet.
NOTICE is used to address safe use practices
not related to personal injury.
2 1-800-732-2677 www.petsafe.net 3
Page 3

• Not for use with aggressive dogs. Do not
use this product if your dog is prone to
aggressive behavior. Aggressive dogs can
cause severe injury or death to their owners
and others. If you are not sure that this
product is right for your dog, please talk to
your veterinarian or a certified trainer.
www.petsafe.net 3
Page 4
• This PetSafe® In-Ground Fence™ is NOT
a solid barrier. The system is designed
to act as a deterrent to remind pets by
Static Correction to remain in the boundary
established. It is important that you reinforce
training with your pet on a regular basis.
Since the tolerance level to Static Correction
varies from pet to pet, Radio Systems®
Corporation CANNOT guarantee that the
system will, in all cases, keep a pet within
the established boundary. Not all pets can
be trained to avoid crossing the boundary!
Therefore, if you have reason to believe
that your pet may pose a danger to others
or harm himself if he is not kept from
crossing the boundaries, you should NOT
rely solely upon the PetSafe® In-Ground
Fence™ to confine your pet. Radio Systems®
Corporation shall NOT be liable for any
property damage, economic loss or any
consequential damages, sustained as a
result of any animal crossing the boundary.
4 1-800-732-2677 www.petsafe.net 5
Page 5
• Proper fit of the collar is important. A collar
worn for too long or made too tight on the
pet’s neck may cause skin damage. Ranging
from redness to pressure ulcers; this condition
is commonly known as bed sores.
- Avoid leaving the collar on the dog for
more than 12 hours per day.
- When possible reposition the collar on the
pet’s neck every 1 to 2 hours.
- Check the fit to prevent excessive
pressure; follow the instructions in
this manual.
- Never connect a lead to the electronic
collar; it will cause excessive pressure on
the contacts.
- When using a separate collar for a lead,
don’t put pressure on the
electronic collar.
- Wash the dog’s neck area and the
contacts of the collar weekly with a damp
cloth.
www.petsafe.net 5
Page 6

- Examine the contact area daily for signs of
a rash or a sore.
- If a rash or sore is found, discontinue use
of the collar until the skin
has healed.
- If the condition persists beyond 48 hours,
see your veterinarian.
- For additional information on bed sores
and pressure necrosis, please
visit our website.
These steps will help keep your pet safe and
comfortable. Millions of pets are comfortable
while they wear stainless steel contacts. Some
pets are sensitive to contact pressure. You may
find after some time that your pet is very tolerant
of the collar. If so, you may relax some of these
precautions. It is important to continue daily
checks of the contact area. If redness or sores
are found, discontinue use until the skin has fully
healed.
6 1-800-732-2677 www.petsafe.net 7
Page 7

• You may need to trim the hair in the area of the
Contact Points. Never shave the dog’s neck;
this may lead to a rash or infection.
• Always remove your dog’s Receiver Collar
before performing any Transmitter testing.
• The Receiver Collar should not be on your
dog when the system is tested. Your pet may
receive an unintended correction.
• The Boundary Width of the system must be
tested whenever an adjustment is made to
the containment field to prevent unintended
corrections to your pet.
• If you use a collar and leash for training, be
sure the extra collar does not put pressure on
the contact points.
www.petsafe.net 7
Page 8
• If possible, DO NOT use an AC circuit
protected with a Ground Fault Circuit
Interrupter(GFCI) or Residual Current Device
(RCD). In rare cases, nearby lightning strikes
may cause the GFCI or RCD to trip. Without
power, your dog may be vulnerable to escape.
You will have to reset the GFCI or RCD to
restore power to the system.
• To prevent an unintended correction, after
the Boundary Flags have been placed,
be sure to set the static correction on the
Receiver Collar back to level 1 tone only.
• Do not charge your Receiver Collar every
night. Charging too often can reduce battery
life. Charge your Receiver Collar when the
Receiver Indicator Light blinks yellow; or
when the light blinks red.
8 1-800-732-2677 www.petsafe.net 9
Page 9

Thank you for choosing PetSafe® brand. You and your pet
deserve a companionship that includes memorable moments
and a shared understanding together. Our products and
training tools promote a lifestyle of protection, teaching, and
love — essentials that influence memories for a lifetime. If
you have any questions about our products or training your
pet, please visit our website at www.petsafe.net or contact
our Customer Care Center at 1-800-732-2677.
To get the most protection out of your warranty, please
register your product within 30 days at www.petsafe.net.
By registering and keeping your receipt, you will enjoy the
product’s full warranty and should you ever need to call
the Customer Care Center, we will be able to help you
®
faster. Most importantly, PetSafe
will never give or sell
your valuable information to anyone. Complete warranty
information is available online at www.petsafe.net.
Fence installation and training help: www.petsafe.net
www.petsafe.net 9
Page 10

How the System Works
A radio signal travels from the Fence Transmitter through a buried
wire, marking the boundaries you wish to set for your dog. Your dog
wears a Receiver Collar that detects the signal at the boundary. As
your dog approaches the boundary, the receiver issues a warning
tone. If he proceeds further, he receives a safe but startling Static
Correction. While harmless, the correction will persuade him to stay
in the containment area you’ve established. Boundary flags are a
temporary visual aid for your pet; remove them after training.
This Receiver Collar has been proven safe, comfortable and effective
for pets over 5 pounds.
Key Definitions
Receiver Collar: Receives the radio signal from the
Transmitter.
Mode Button: Turns Receiver on/off and adjusts the level of
Static Correction your pet receives outside the Pet Area.
10 1-800-732-2677 www.petsafe.net 11
Page 11
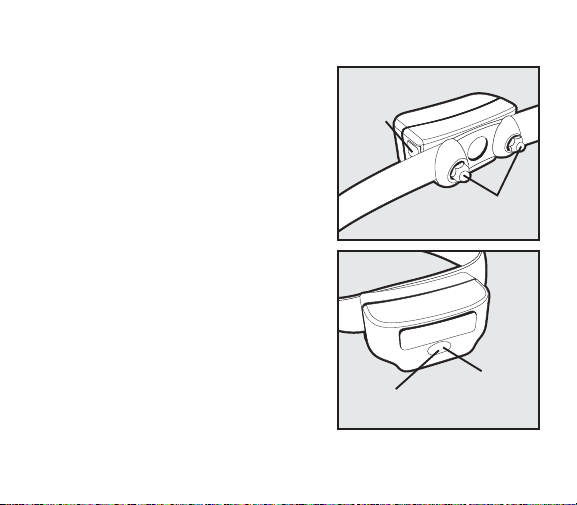
Receiver Indicator Light:
Indicates the level of correction at
which the Receiver Collar is set.
This light also indicates battery
status.
Contact Points: Deliver the safe
Static Correction when your pet
moves into the Static Correction
Zone.
Receiver Charger: Charges the
batteries inside the Receiver Collar
Receiver Charge Jack:
Connection point for charging
Receiver battery.
Receiver Collar
Receiver
Charge
Jack
Contact
Points
Mode
Button
Receiver
Indicator
Light
www.petsafe.net 11
Page 12
Step
1
12 1-800-732-2677
Charge the Receiver Collar
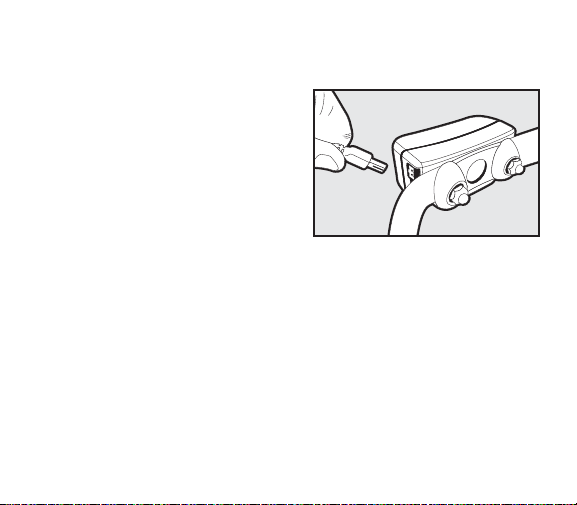
The Receiver Collar
Charger is designed to
plug into a standard AC
wall outlet. The Receiver
Collar light will glow red
when the Receiver Charger
is properly seated into the
Receiver Charge Jack. The
light will turn green when
charging is complete. A built in safety circuit prevents the
Receiver Collar from overcharging.
The Receiver Collar will achieve a full charge in 2-3 hours.
Each charge can last up to 2 months depending upon
frequency of use.
1A
Page 13
• Do not charge your Receiver Collar every night. Frequent
charging can have a negative effect on the battery. We
recommend that the Receiver Collar be used until the
Receiver Indicator Light blinks yellow or red.
To charge the Receiver Collar, lift the rubber plug to allow
access to the Receiver Charge Jack. The rubber plug needs
to remain attached to the Receiver Collar. Plug the Receiver
Charger into the Receiver Charge Jack on the Receiver
Collar. The Receiver Charge Jack and Receiver Charger are
keyed to fit one way. Do not force it in backwards.
www.petsafe.net 13
Page 14
Step
2
14 1-800-732-2677 www.petsafe.net 15
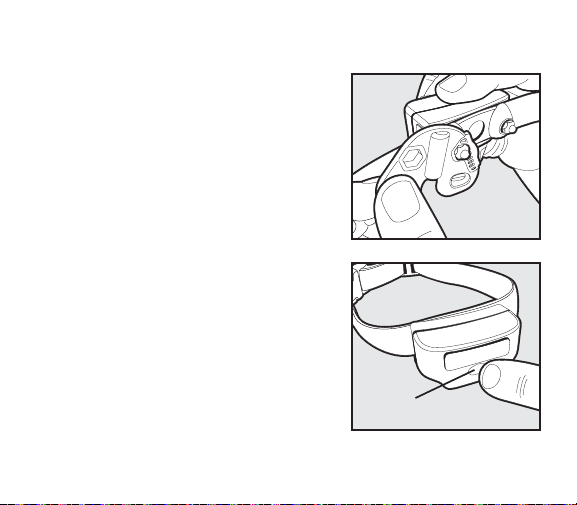
Prepare the Receiver Collar
Your Receiver Collar comes with
Short Contact Points. Use the
Long Contact Points for pets
with long or thick hair. Tighten
the Contact Points using the
Test Light Tool (2A) one-half
turn beyond finger tight. Check
tightness weekly.
Turning the
Receiver Collar ON
Press and hold the Mode Button
continuously for 5 seconds (2B).
The Green or Yellow or Red
Receiver Indicator Light will turn
ON for 5 seconds to indicate
battery status, followed by the
Red Receiver Indicator Light
flashing the Static Correction
Level Settings.
2A
Mode
Button
2B
Page 15

Turning the Receiver Collar OFF
Press and hold the Mode Button continuously for 5 seconds
(2B). The Red Receiver Indicator Light will be ON during this
time. The Red Receiver Indicator Light will then turn OFF and
all Receiver Indicator Lights will stay OFF indicating that the
unit is turned OFF.
To extend the time between charging the Receiver Collar,
consider turning OFF the Receiver Collar when it is not in use.
www.petsafe.net 15
Page 16
Receiver Collar Status Indicators
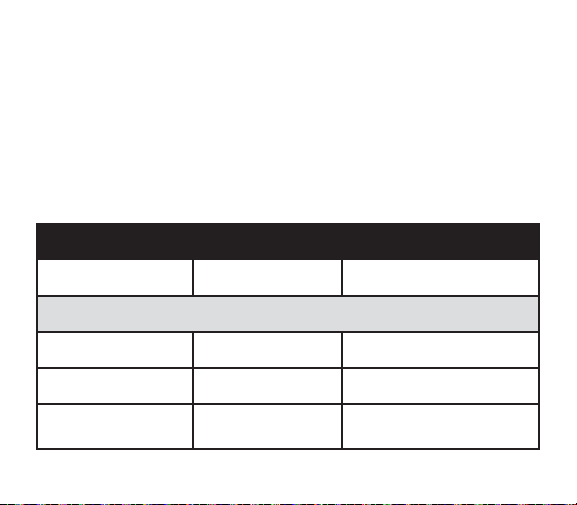
The Receiver Collar Status Indicator Light along with the Receiver Collar
Alarm Tone are used to determine the battery status, and the correction
type. Refer to the Receiver Collar Status Indicator Table below to
understand the status lights and tones for the Receiver Collar.
During normal operation, the Receiver Collar Indicator Light will flash
every 4-5 seconds to indicate the battery status as shown in the table
below.
Receiver Collar Status Indicator Table
Status Light Alarm Tone Condition
While Plugged into Receiver Charger
Solid red No tone Charge in progress
Solid green No tone Charge complete
No light
Charge failure, contact
Customer Care Center
16 1-800-732-2677 www.petsafe.net 17
Page 17
After Removing from Receiver Charger
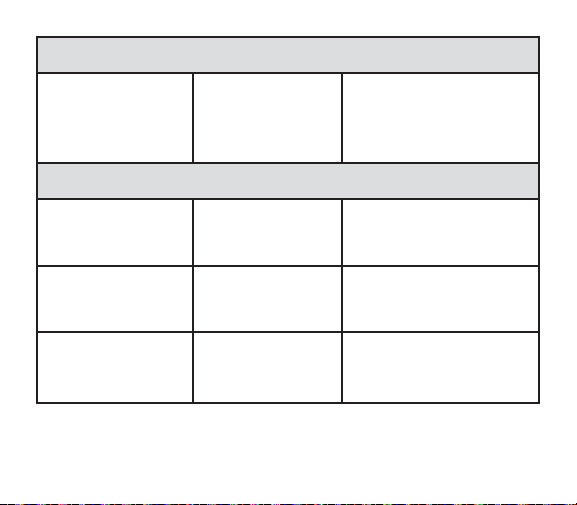
Continuous
green or yellow
or red
(5 seconds duration)
No tone
Battery Charge Indication.
Occurs immediately after
unplugging the charger
from the Receiver Collar
Operating Battery Status
Slow blinking
green
(every 4-5 seconds)
Slow blinking
yellow
(every 4-5 seconds)
Slow blinking red
(every 4-5 seconds)
No tone
No tone
No tone
Collar battery charge
100%-60%
Collar battery charge
60%-20%
Collar battery charge
20% or less, charge
immediately
www.petsafe.net 17
Page 18
Receiver Activation Status
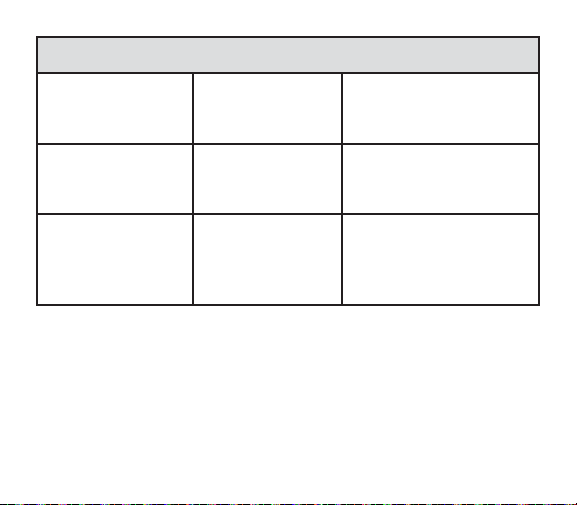
Fast pulsating
green
(3 flashes per second)
Fast pulsating red
(3 flashes per second)
Warning tone Warning tone
Tone for
duration of
Static Correction
Static Correction
being delivered
up to 15 seconds
Over Correction
Continuous green
(10 seconds)
No tone
Protection;
collar locked for
10 seconds
18 1-800-732-2677 www.petsafe.net 19
Page 19

To Set the Static Correction Level
Read all steps before attempting to set the Static Correction Level.
1. Press the Mode Button and release (2B) when the Receiver
Indicator Light illuminates Red.
2. The Receiver Indicator Light will emit a series of Red flashes
representing the Static Correction Level.
3. Increase the Static Correction Level by pressing and releasing the
Mode Button within 5 seconds of the previous series of flashes.
The Static Correction levels increase in strength from 1 to 5. Pushing
the Correction Level Button while the Receiver Collar is on level
5 will cause the Receiver Collar to revert to level 1. Refer to the
Function and Response Table to choose the Static Correction level
that best fits your pet.
www.petsafe.net 19
Page 20
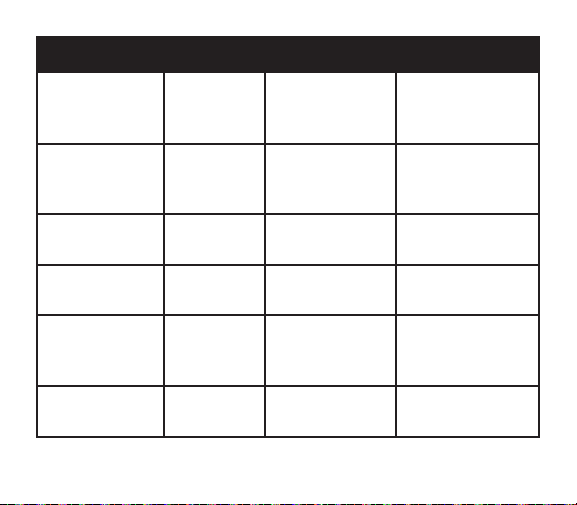
Function and Response Table
Indicator
Light
Response
1 Red Flash 1 No Static
2 Red Flashes 2 Low Static
3 Red Flashes 3 Medium Static
4 Red Flashes 4 Medium-
5 Red Flashes 5 High Static
Static
Correction
Level
Receiver
Collar
Function
Correction,
Tone Only
Correction
Correction
High Static
Correction
Correction
Temperament
of Pet
Initial Training
Mode
Timid
Timid or Average
Average or
High Energy
High Energy
20 1-800-732-2677 www.petsafe.net 21
Page 21

Over Correction Protection
In the unlikely event that your pet “freezes” in the Static Correction
Zone, this feature limits the Static Correction duration to a maximum
of 15 seconds. After 15 seconds, the Static Correction will stop
and the Green Indicator Light will stay on for 10 seconds. The
Receiver Collar must be removed from the Static Correction Zone to
reactivate the Receiver Collar.
www.petsafe.net 21
Page 22
Step
3
22 1-800-732-2677 www.petsafe.net 23
Fit the Receiver Collar
Important: The proper fit and placement of
your Receiver Collar is important for effective
training. The Contact Points must have direct
contact with your pet’s skin on the underside
of his neck. See important safety information
on pages 5-7.
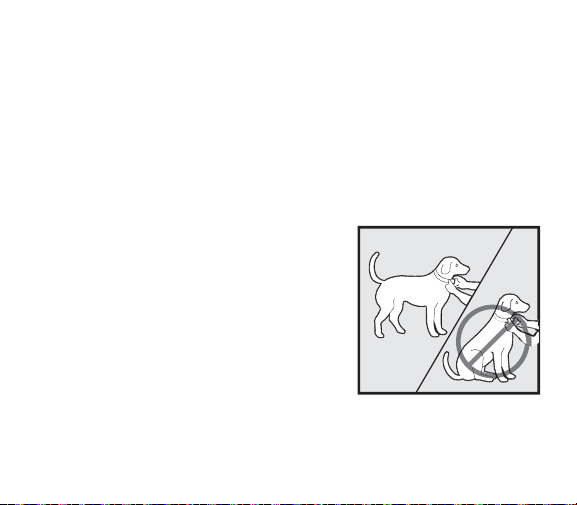
To assure a proper fit, please
follow these steps:
1. Make sure the receiver is
turned off.
2. Start with your pet standing
comfortably (3A).
3. Place the Receiver Collar on
your pet where you can read
the PetSafe logo correctly as
you face your pet.
4. Center the Contact Points
underneath your pet’s neck,
touching the skin.
3A
Page 23
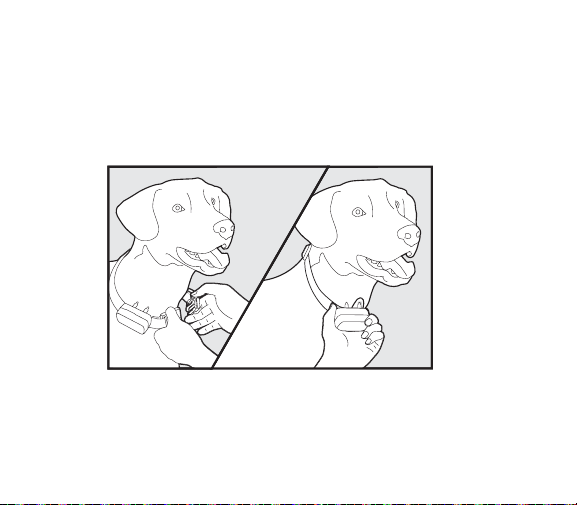
5. Check the tightness of the Receiver Collar by inserting
one finger between the end of a Contact Point and your
pet’s neck. The fit should be snug but not constricting
(3B).
Allow your pet to wear the collar for several minutes then
recheck the fit. Check the fit again as your pet becomes
more comfortable with the Receiver Collar.
3B
www.petsafe.net 23
Page 24
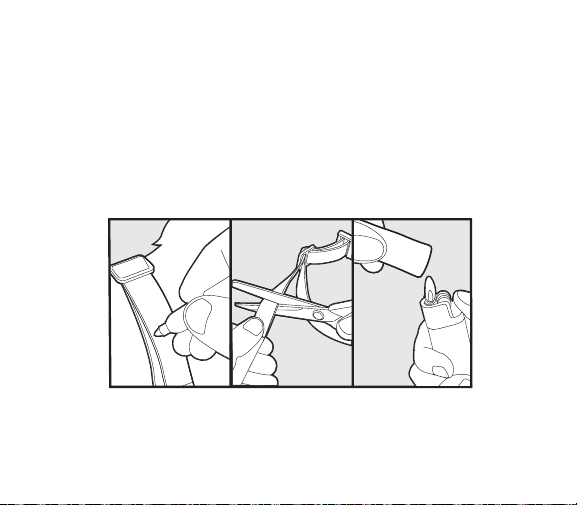
6. Trim the collar as follows (3C):
a. Mark the desired length of the Receiver Collar
with a pen. Allow for growth if your pet is young or
grows a thick winter coat.
b. Remove the Receiver Collar from your pet and cut
off the excess.
c. Before placing the Receiver Collar back onto your
pet, seal the edge of the cut collar by applying a
flame along the frayed edge.
3C
24 1-800-732-2677 www.petsafe.net 25
Page 25
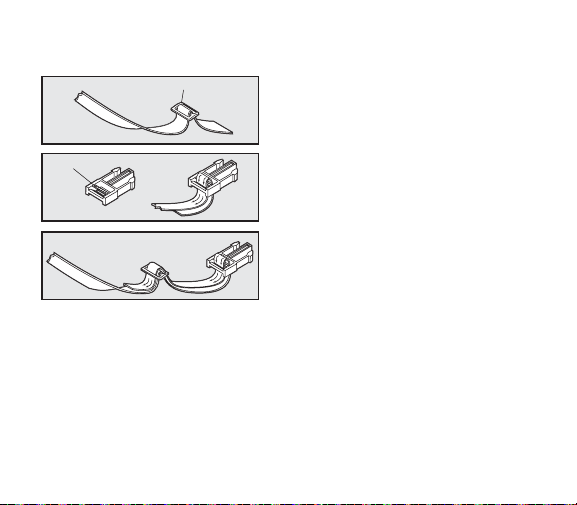
To Re-Thread the Collar
Slide Buckle
The slide buckle prevents the collar
from becoming loose around your
pet’s neck.
Ridges
The ridges must be facing up; the
collar will slip if it is not properly
threaded.
www.petsafe.net 25
Page 26
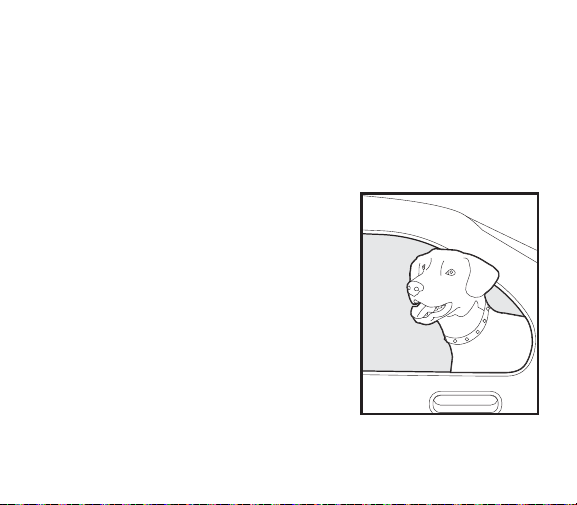
Taking Your Pet Out of the Pet Area
Important: Remove the Receiver Collar and leave it in the Pet Area.
Once your pet learns the Boundary Zone, he will be reluctant to cross
it for walks or car rides.
Option 1: Replace the Receiver Collar with a regular collar. Put your pet
in a car that is within the Pet Area and drive him out of the Pet Area.
Option 2: Replace the Receiver Collar with
a regular collar and leash. Walk your pet out
of the Pet Area while giving a command
such as “OK” at a specific place of the
Boundary Zone (the end of your driveway,
sidewalk, etc.). Always leave the Pet Area
with a leash at this place and your pet will
associate leaving the Pet Area only on a
leash, only at this place, and only with a
person. You may initially need to convince
your pet to leave the Pet Area with a food
treat and lots of praise.
Note: You may also carry your pet out of
the Pet Area.
26 1-800-732-2677 www.petsafe.net 27
Page 27
Please refer to your PetSafe® In-Ground Fence™ Operating
and Training Guide for a complete list of Troubleshooting or
visit www.petsafe.net.
Troubleshooting
The Receiver Collar
has to be held on
top of the Boundary
Wire to activate.
www.petsafe.net 27
•Make sure Receiver Collar is turned on and
Battery Status Lights are flashing every 4-5
seconds
•Charge Receiver Collar
•The beep may be difficult to hear in a noisy
environment.
•Adjust Boundary Width Control knob
clockwise to increase the distance from
the Boundary Wire that the Receiver Collar
activates. Verify the Boundary Control Switch
is placed at the proper setting according to
the amount of Boundary Wire used.
•If the Receiver Collar still has to be held
on top of the Boundary Wire, refer to the
In-Ground Fence™ Operating and Training
Guide.
Page 28
The Receiver Collar
is not beeping or
administering a
Static Correction.
The Receiver Collar
activates inside the
house.
•Make sure Receiver Collar is turned on and
Battery Status Lights are flashing every 4-5
seconds
•Charge Receiver Collar
•Check that both lights are lit on the Fence
Transmitter. Refer to the In-Ground Fence™
Operating and Training Guide.
•It is recommended to remove the Receiver
Collar from your pet when indoors to avoid
activation of the Receiver Collar.
•Turn the Boundary Width Control knob
counterclockwise to decrease the distance
from the Boundary Wire that the Receiver
Collar activates.
•Make sure the Boundary Wire is not running
within 15 feet of the house. The signal can
transmit through the walls of your house.
•Make sure the Boundary Wires are twisted
from the Boundary to the Fence Transmitter.
28 1-800-732-2677 www.petsafe.net 29
Page 29
The Receiver
Collar is beeping
but my pet is not
responding to the
Static Correction.
•Make sure the Static Correction Level is set
at 2 or above.
•Test the Receiver Collar with the Test Light
walking toward the Boundary Wire. If
the Test Light flashes, check the fit of the
Receiver Collar.
•Trim your pet’s fur where the Contact Points
touch the neck and/or switch to the longer
Contact Points.
•Contact Points must be in contact with dog’s
skin.
•Increase the Static Correction Level.
•Repeat training steps to reinforce training.
www.petsafe.net 29
Page 30

The Receiver Collar
has injured my pet’s
neck.
•Failing to follow the important safety
information at the front of the Operating
Guide has caused pressure ulcers. Some
descriptions of advanced pressure ulcers
describe the sores as looking like burns on
the dog’s neck. Be assured that electronic
collars do not use enough energy to create
electrical burns. The energy in an output
pulse is only a few thousandths of a Joule;
it is similar in nature to the static pulse
that you may feel when getting out of
your car. In some cases, pressure ulcers
are described as chemical burns. The
battery in your Receiver Collar is sealed, in
addition, your collar’s housing is also sealed.
This redundant sealing makes it virtually
impossible, without misuse or abuse, for your
Receiver Collar battery to leak onto your pet’s
neck. Please review and follow the important
safety information on pages 2-8, and the
instructions in Step 3 under the heading “Fit
the Receiver Collar” on pages 22-25.
30 1-800-732-2677 www.petsafe.net 31
Page 31

Additional Information
• The system should only be used with healthy pets. Contact your
veterinarian if you have any concerns about the medical condition of
your pet (medication, pregnant, heart conditions, etc...)
• The PetSafe® In-Ground Fence™ is for residential use only.
• The Static Correction will get your pet’s attention, but will not cause
harm. It is designed to startle, not punish.
• Test the Receiver Collar at least once a month to verify that it is
functioning properly. Check that it activates at the Boundary Wire.
Battery life depends upon how often the Receiver Collar is activated.
• Remove the Receiver Collar from your pet when indoors for the
comfort of your pet.
• Never leave the Receiver Collar on your pet for more than 12
consecutive hours.
www.petsafe.net 31
Page 32
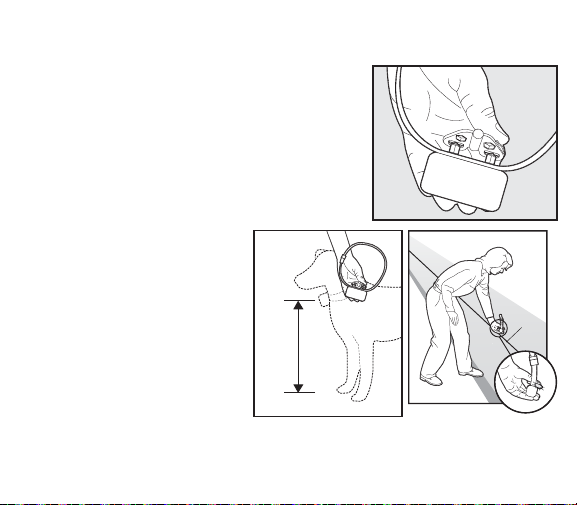
Test Light Instructions
1. Make sure the Receiver Collar battery
is properly charged. Set the Correction
Level to 2 or above.
2. Hold the Test Light Contacts to the Contact
Points (4A).
3. Walk toward the Boundary Wire with
Contact Points pointing up and holding
the Receiver Collar at your pet’s neck level
(4B) until the Receiver Collar tones and the
Test Light flashes (4C).
4B
4C
Boundary
Wire
4A
32 1-800-732-2677 www.petsafe.net 33
Page 33

Note: The Receiver Collar is waterproof, which can make the tone
hard to hear.
Save Test Light for future testing.
www.petsafe.net 33
Page 34

Terms of Use and
Limitation of Liability
1. Terms of Use
This Product is offered to you conditioned upon your
acceptance without modification of the terms, conditions
and notices contained herein. Usage of this Product implies
acceptance of all such terms, conditions, and notices.
2. Proper Use
This Product is designed for use with pets where training
is desired. The specific temperament of your pet may not
work with this Product. If you are unsure whether this is
appropriate for your pet, please consult your veterinarian or
certified trainer.
34 1-800-732-2677 www.petsafe.net 35
Page 35

3. No Unlawful or Prohibited Use
This Product is designed for use with pets only. This pet
training device is not intended to harm, injure or provoke.
Using this Product in a way that is not intended could result
in violation of Federal, State or local laws.
4. Limitation of Liability
In no event shall Radio Systems
®
Corporation be liable
for any direct, indirect, punitive, incidental, special or
consequential damages, or any damages whatsoever arising
out of or connected with the use or misuse of this Product.
Buyer assumes all risks and liability from the use of this
Product.
5. Modification of Terms and Conditions
Radio Systems
®
Corporation reserves the right to change
the terms, conditions and notices under which this Product
is offered.
www.petsafe.net 35
Page 36

Compliance
FCC/Canada
This Class B digital apparatus complies with Canadian ICES-003.
This equipment has been tested and found to comply with the limits
for a Class B digital device, pursuant to Part 15 of the FCC Rules.
These limits are designed to provide reasonable protection against
harmful interference when the equipment is operated in a residential
environment. This equipment generates, uses, and can radiate
radio frequency energy and, if not installed and used in accordance
with the instruction guide, may cause harmful interference to radio
communications. However, there is no guarantee that interference will
not occur in a practical installation. If this equipment causes harmful
interference to radio or television reception, which can be determined
by turning the equipment off and on, the user is encouraged to try to
correct the interference by one or more of the following measures:
36 1-800-732-2677 www.petsafe.net 37
Page 37

• Relocate the interfered receiving antenna.
• Increase the separation between the equipment and receiver.
• Connect the equipment into an outlet on a circuit different from
that to which the receiver is connected.
• Contact the Customer Care Center at 1-800-732-2677.
This device complies with part 15 of the FCC Rules. Operation is
subject to the following two conditions: (1) This device may not cause
harmful interference, and (2) this device must accept any interference
received, including interference that may cause undesired operation.
This device complies with Industry Canada licence-exempt RSS
standard(s). Operation is subject to the following two conditions:
(1) this device may not cause interference, and (2) this device must
accept any interference, including interference that may cause
undesired operation of the device.
Unauthorized changes or modifications to the equipment, not approved
by Radio Systems® Corporation, could result in not meeting compliance
with FCC regulations and void the user’s authority to operate the
equipment.
Australia
This device complies with the applicable EMC requirements specified
by the ACMA (Australian Communications and Media Authority).
www.petsafe.net 37
Page 38

Customer Care
International
USA & Canada - Tel: 800-732-2677
Monday - Friday 8 AM - 8 PM / Saturday 9 AM – 5 PM
Australia - Tel: 1800 786 608
Monday - Friday 8:30 AM - 5 PM
New Zealand - Tel: 0800 543 054
Monday - Friday 10:30 AM - 7 PM
This product has the benefit of a limited manufacturer’s warranty.
Details of the warranty applicable to this product and its terms can be
found at www.petsafe.net and/or are available by sending a stamped
addressed envelope to PetSafe
West Business Park, Ackhurst Road, Chorley, Lancashire PR7 1NL,
United Kingdom.
38 1-800-732-2677 www.petsafe.net 39
®
Ltd. Redthorn House, Unit 9, Chorley
Page 39

www.petsafe.net 39
Page 40

Radio Systems® Corporation
10427 PetSafe Way
Knoxville, TN 37932
1-800-732-2677
www.petsafe.net
Protected by US Patent 6,538,617.
400-1587
©2012 Radio Systems Corporation
 Loading...