

Page 1
Congratulations!
You have chosen the World’s best selling pet containment system. Our mission is to
ensure your pet’s safety by providing you the tools and techniques to successfully
train your pet. If this is your fi rst pet containment system, there are just a few
important things you need to know:
• Use the system with healthy pets only.
• This system may not be effective for vicious or aggressive pets. If your pet poses a
threat to others, DO NOT USE THE SYSTEM.
• The system is for residential use only.
• You can contain several pets within the Pet Area, but each one must wear a
Receiver Collar.
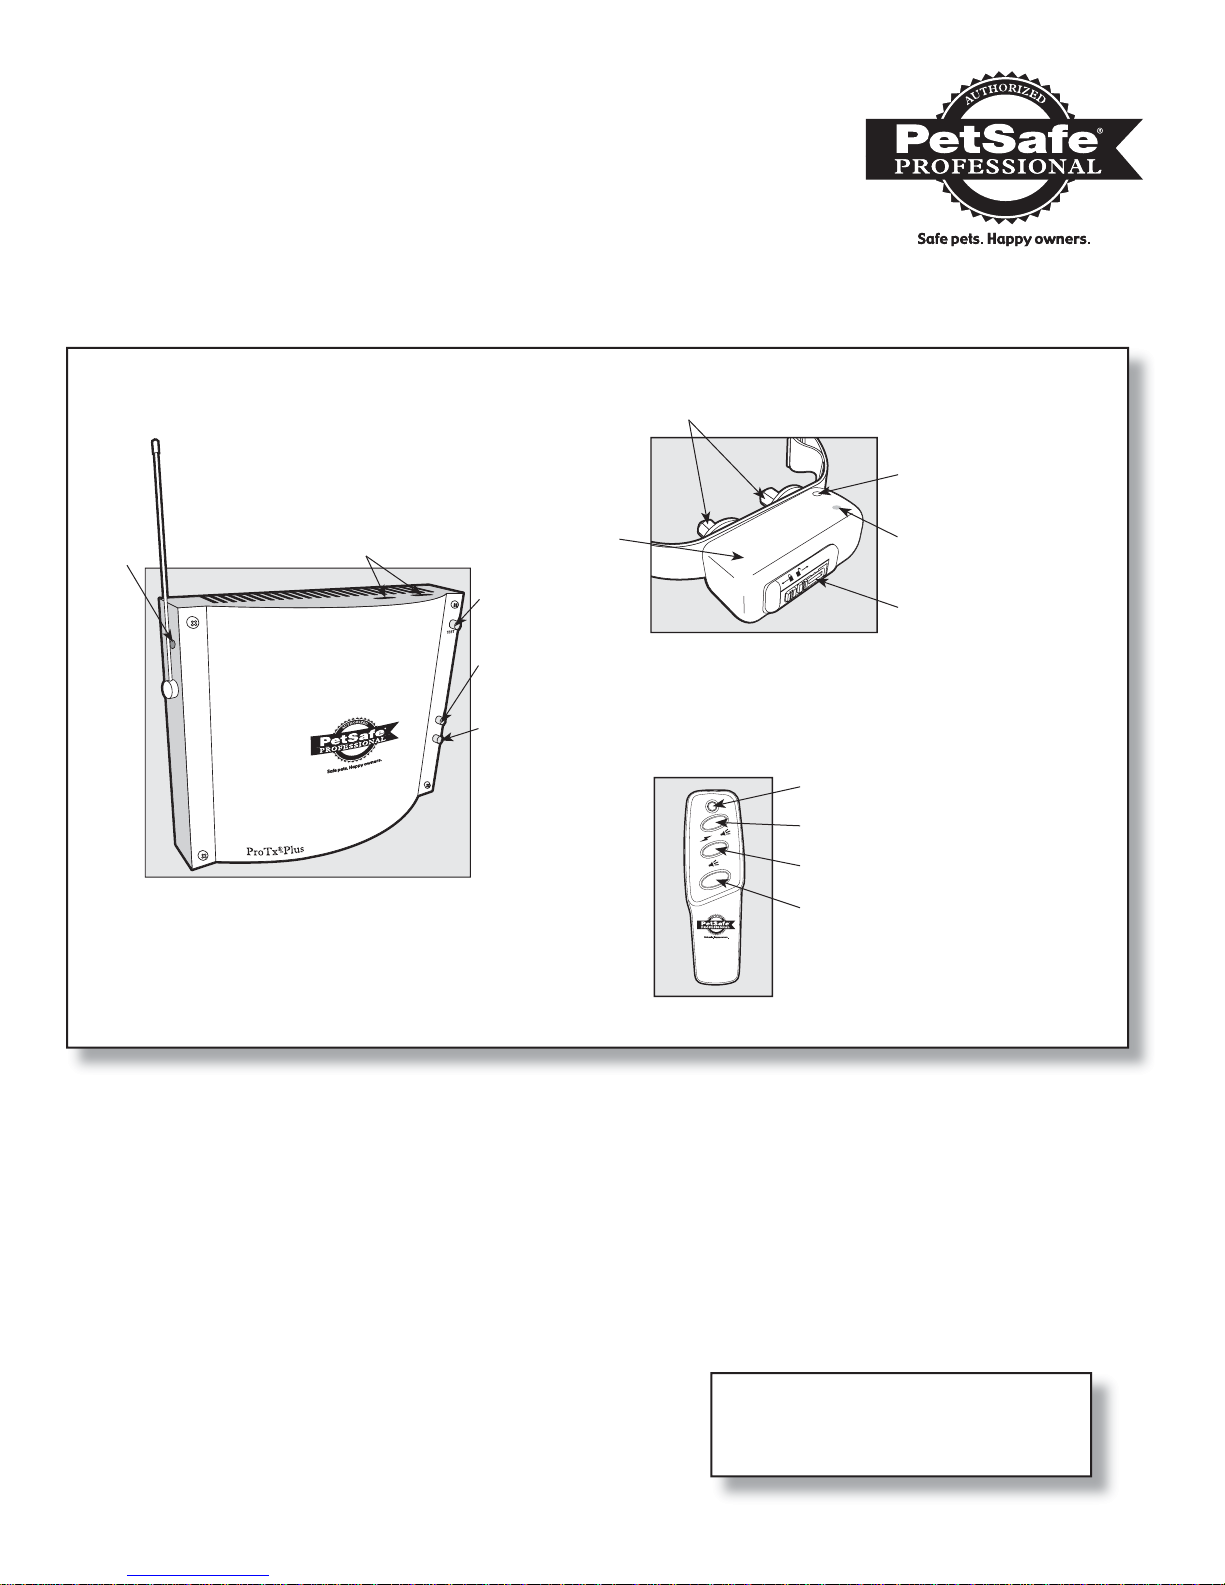
Contact Posts deliver the Static
Correction—2 sizes, short (for most
pets) and long (for pets with long hair)
Magnet Key Dot—
adjusts the
Correction Level
Correction
Level
Magnet
Test Station—
Place Receiver Collar
Contact Posts Here
R
E
W
O
P
1
P
O
O
L
Receiver Collar
Test Light
Power
On/Off Light
Boundary Loop 1 Light
Light on: no Wire
problems
Light off: possible
broken Wire
ProTx®Plus Transmitter
The Transmitter is the control center for the fence.
It plugs into a standard outlet. It is not waterproof
and must be installed in a dry location.
Setup and Ongoing Operation
Your PetSafe Professional will perform all the setup steps
for you.
1. Bury the Wire at the Boundary you specify.
2. Install the Transmitter in a dry location.
3. Install the batteries in the Receiver Collar and Remote
Transmitter.
4. Set the Correction Level and test the Receiver Collar.
5. Place the Receiver Collar on your pet.
For the system to operate properly, you must fi rst
• Train your pet to the containment system. (See the
training plan enclosed.) After you’ve completed training,
you can begin using the Remote Transmitter portion of
the ProTx®-Plus System. (See Training Guide enclosed)
• Regularly check and clean your pet’s neck. If the
Receiver Collar is too tight or your pet wears it too long, it
can cause Pressure Necrosis, a condition where the skin
deteriorates. If a rash or sore forms, remove the Receiver
Waterproof
Case
SafeLight™—
LED indicator of
low battery and
Correction Level
Battery Door
ProLite® Receiver Collar
When your pet reaches the Warning Zone, the Receiver
Collar gives a warning beep. If your pet continues into the
Static Correction Zone, a safe Static Correction will be
delivered through the Contact Posts to get his attention
until he returns to the Pet Area.
Transmitter Indicator Light
+
PROGRAM
Stimulation and Tone Button
Tone Only Button
Programming Button
Remote Transmitter
Collar for a few days. When replacing the Receiver Collar,
make sure the Contact Posts and the pet’s neck are clean.
Consult a veterinarian if needed.
• Every month, check that the Receiver Collar beeps
near the Boundary. If not, check the Troubleshooting
Guide.
• Battery life depends upon how often your pet tests
the Boundary. The SafeLight™ acts as a low battery
indicator, fl ashing every 4 to 5 seconds when replacement
is required.
• Always be careful when using a weed eater or shovel
near the Boundary to prevent damage to the Wire.
Ask your PetSafe Professional
about our Gentle LiteTouch
Training™ video and other options.
Page 2
Operating Guide
A
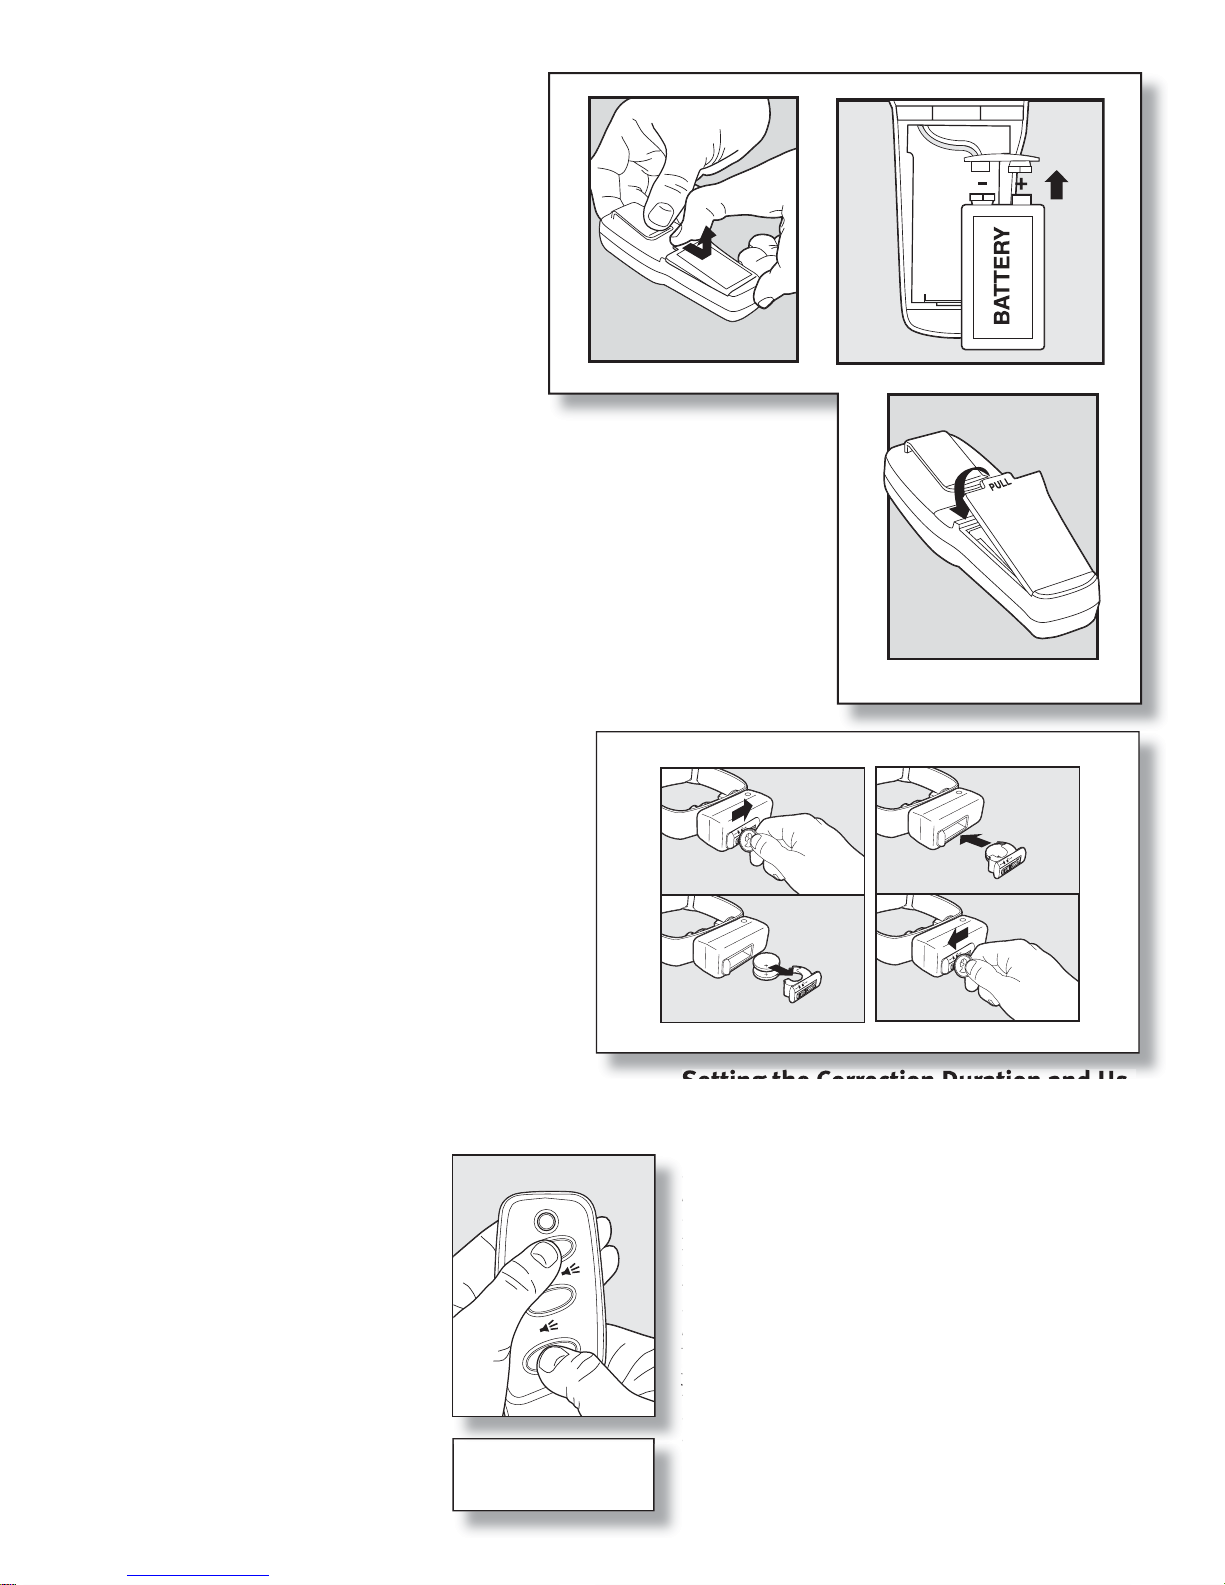
Prepare the Remote Transmitter
To Insert and Remove the Battery
1. Hold the Remote Transmitter face down and
pull the battery door open (A).
2. Insert the 9-volt battery with the positive side
oriented as shown (B).
3. Replace the battery door by positioning the
bottom edge (C), and snap the battery door into
place.
To verify the battery has been inserted correctly
1. Press either button on the Remote Transmitter.
2. The Transmitter Indicator Light should come on.
3. If the Transmitter Indicator Light does not come on, you may have inserted a
bad or dead battery. Try taking it out and replacing it with one that is known
to be good.
4. If the Transmitter Indicator Light still does not come on, contact your PetSafe
Professional.
B
C
Prepare the Receiver Collar
To Insert and Remove the Batteries
1. With a coin, unlock the Battery Door and remove it (D).
2. Insert two 3-volt Lithium (CR2032 batteries) into the
Battery Door (D).
3. Place the Battery Door back into the Receiver (E).
4. With a coin, slide Battery Door latch to lock it (E).
To Pair the Remote Transmitter
and the ProTx
Transmitter
If your Receiver Collar does not beep
when the Tone Only Button of the Remote
Transmitter is pressed, or if you feel the
Receiver Collar is not responding:
1. With the Receiver Collar off your pet,
Separate the Remote Transmitter and the
ProTx®-Plus Transmitter by no more than
10 feet.
2. Press both the top and bottom buttons (F)
on the Remote Transmitter at the same
time.
3. The ProTx®-Plus Transmitter should beep.
4. If the ProTx®-Plus Transmitter does
not beep, please contact your PetSafe
Professional.
®
-Plus
F
+
PROGRAM
Note: Remote will only work
with Receiver Collar inside
the containment area.
DE
Setting the Correction Duration and Using the Remote Transmitter
To set the Correction duration, press the “Program” button.
The ProTx®-Plus Transmitter will indicate the present
Correction duration by beeping once or twice. It will beep
once for a 1/2 second Correction and twice for a one second
Correction.
Program the system to the desired Correction duration;. The
Correction duration will be stored even if the containment
transmitter has been turned off.
Once you have set the system to the desired Correction
duration, you are ready to begin training.
When you press and hold the Stimulation and Tone Button,
your pet will receive a Correction for the duration set, then
there will be a one second pause before receiving another
Correction for the same duration, until the button is released.
Once your pet starts to associate the warning tone with the
Correction, you can press the Tone Only button to warn your
pet that if the behavior does not change, he will receive a
Correction.
Page 3

PetSafe Professional® Gentle
LiteTouch Training™ for Containment
Developed by Professional Trainer and
Behavior Specialist Rich Weinssen
4 Simple Training Steps to a Fully Contained Pet
1. TEACH your pet to avoid the line of Flags using
slow, progressive Static Correction.
2. TRAIN your pet to avoid the Flags using
maintenance-level Static Correction.
3. PROVE your pet’s commitment to avoiding the
Boundary Flags.
4. SUPERVISE your pet in the yard for several weeks.
During all training sessions, remember to
• Focus on playing, having fun, and giving treats
• Spend the last 5-10 minutes of each training
session having fun
The Static Correction gets your pet’s attention, but will
not harm him. The Static Correction is similar to that of
static electricity and is designed to startle, not to punish.
Setup for Training
• Install system fully, make all adjustments and leave the
power on.
• Set Flags 10 feet apart, 2-3 feet from the Wire. This
gives your pet a visual marker for the Boundary.
• Read this training guide fully.
• Assess your pet’s level of aggression. If your pet has
a known or developing aggression problem, seek
professional training/behavior assistance before using
this product.
• Use a leash at all times until you’ve completed Steps
1-3 successfully.
Before Every Training Session
• Prepare 25-50 high-grade treats (beef hot dogs, sliced
and diced into tiny pieces).
• Adjust the Receiver Collar to the desired Correction
Level and place it on your pet.
• Put your pet in a quiet place (in a crate or room) for
20-30 minutes, then spend 2-4 minutes having fun with
your pet. Play, stroke, and practice commands in the
yard. Use meat treats to get your pet excited.
• Use a leash at all times until you’ve completed Steps
1-3 successfully.
Walking Your Pet Out of Your Yard
Always remove your pet’s Receiver Collar before leaving
your property to avoid unintended Static Corrections.
After you begin training, DO NOT walk your pet past the
Flags for several weeks. Instead, either pick your pet up
or put him in the car to cross the Boundary.
Once your pet successfully completes training, choose
one spot to always walk your pet out of the yard. While
on lead, give your pet a permission command such as
“Okay!” Immediately pull your pet through the Boundary
while repeating, “Okay!” Repeat this exercise several
times each day until your pet crosses comfortably with
you. Using meat treats will accelerate your pet’s learning.
Step 1: TEACH your pet to avoid the line of Flags
using slow, progressive Static Correction.
Suggested Correction Level: 2 – 4
Goal: Your pet begins to avoid the Flags and is
comfortable 3-5 feet inside the Flag line.
Suggested Duration (vary as necessary): 2 days, 2
fi fteen-minute sessions per day. Spend 75% of the
sessions playing with and rewarding your pet.
Technique
1. Adjust the Receiver Collar to the desired Correction
Level and place it on your pet.
2. Using a 6’ leash, steer your pet towards any Flag. Shake
the Flag and say “No, Bad Flag” in a calm, but growling
tone. Back your pet into the Pet Area (well inside the
Boundary), and praise and reward your pet.
3. Allow your pet to walk up to or past the Flags. (The
Static Correction begins when your pet is near a Flag).
If your pet is not interested in the Flags, toss a few
meat treats in the Pet Area then throw some past the
Flags.
4. After your pet is near a Flag for 2-4 seconds, gently
pull him back into the Pet Area and reward with meat
treats. Use your leash to stop your pet from receiving
treats that are near or beyond the Flags.
5. Repeat 10 to 20 times until your pet avoids the Flags.
Praise and reward Flag avoidance!
6. After every few Static Corrections, back your pet away
from the Flags and perform basic commands (sit, stay)
so you can reward correct behavior with meat treats.
7. Occasionally toss your pet meat treats in the Pet Area.
Repeat Step 1 at several different areas of your Flag line
each session.
Step 2: TRAIN your pet to avoid the Flags using
maintenance-level Static Correction.
Suggested Correction Level: 6 – 9
Goal: Your pet completely avoids the Flags and
remains comfortable within 3-5 feet of the Flags.
Duration: 2 or more 15-20 minute sessions per
day for 2 days (4 sessions minimum)
Technique
1. Adjust the Receiver Collar to the desired Correction
Level and place it on your pet.
2. Use the same techniques you used in Step 1 and
increase the distractions and temptations to cross the
Boundary. Have family, friends and/or pets walking
5’ outside of the Boundary, parallel to the Flags. For
example, following your pet, allow him to bump into
the Flag Line a few times. Return to the Pet Area
and reward/play with your pet. Place or toss meat
treats beyond the Flags. Have a child on a bicycle ride
around outside the Flags.
Page 4

Important: As you increase the Correction Level and
distractions, also increase meat treats and reward/play
time. Remember to remain playful and upbeat following
any Static Correction.
You are ready for Step 3 when your pet avoids the Flags
and distractions for at least 2 consecutive sessions and is
comfortable within 3-5 feet of the Flags.
Step 3: PROVE your pet’s commitment to avoiding
the Boundary.
Alternate Techniques for Step 1
Indoor Transmitter:
dog can approach, but must back up to leave, for example, a
corner behind a garbage pail or litter box, a closed door or gate.
This way your dog’s only choice is to back away after a Static
Correction. Defi ne the Boundary with Flags and allow your pet
to “occasionally” run into the Flag line during normal activities.
Pay extra attention and frequently play with and reward your
pet during the training. You are ready to move outside to Step 2
when your pet generally avoids the Flag line and is comfortable
within 3-5 feet of it.
Choose an indoor location that the
Suggested Correction Level: 6-9
Goal: Your pet completely avoids the Flags and
remains comfortable within 3-5 feet of the Flags,
even with exciting distractions.
Duration: 2 or more 15-20 minute sessions per day for 2
days
Technique
1. Adjust the Receiver Collar to the desired Correction
Level and place it on your pet.
2. Use a 12’-20’ leash.
3. Add new temptations and distractions like family,
friends and other pets walking away from the property
and continuing until they are out of sight. You can also
have family members or friends appear and stay outside
of the Boundary. Ask a child to ride a bike while pulling
a stuffed animal on a string. Training success depends
on the quality and quantity of distractions you provide.
Move to Step 4 when the strongest temptations do not
draw your pet out of the Pet Area for at least 3 consecutive
sessions.
Step 4: SUPERVISE your pet in the yard for several
weeks.
Suggested Correction Level: 6-9
Goal: Your pet completely avoids the Flags and
remains comfortable within 3-5 feet of the Flags,
even with exciting distractions, without a leash.
Duration: 2 days of ongoing distractions as before, then 2
weeks of fully supervised sessions
Technique
1. Adjust the Receiver Collar to the desired Correction
Level and place it on your pet.
2. When you begin this stage, allow your pet to drag a
leash around on the ground. (If necessary, your pet will
be easier to catch with a dragging leash.)
3. Continue to provide distractions and temptations to
cross the Boundary and continue to reward your pet for
good choices.
4. When your pet has not felt any Static Corrections for 2
weeks, decrease supervision.
Tie-Out: You can use the Tie-Out technique for dogs and
cats. Follow the instructions on the next page.
How to Set the Correction Level
1. Place the magnet on the Correction Level Key Ring next to
the Magnet Key Dot on the Receiver Collar (The Transmitter
also has a magnet to use in place of the Key Ring). The
SafeLight™ will come on.
2. Remove the magnet from the Key Dot. The number of
SafeLight™
Level.
To increase the Correction Level, place the magnet next
3.
to the Magnet Key Dot within 5 seconds of performing the
above step. The number of SafeLight™ fl ashes indicates
the new Correction Level. Performing this step while the
Receiver Collar is on Correction Level 10 will cause it to
reset to level 1.
fl ashes indicates the current Correction
During Training Sessions
• Focus on playing, having fun, and giving treats. If
your pet appears stressed after any Static Correction,
stop training and focus on play. Reward simple
commands with meat treats and attention. Avoid further
Static Corrections for the rest of the training session.
(Signs of stress include refusing meat treats, hanging
head down, tucking tail or not wagging it, lowering
ears, frantic movement, jumping on handler, excessive
panting, etc.)
Have fun for the last 5-10 minutes of each training
•
session. Play, stroke and practice commands in the yard.
Use meat treats to get your pet excited. Stay outside
during the session while your pet is thinking about the
Static Correction. Going inside may cause your pet to be
reluctant in the yard during the NEXT training session.
• Pet Not Responding:
after 10 or more Static Corrections at the Flags, check the fi t
of the Receiver Collar. Ensure that the Contact Posts make
contact with your pet’s skin. Increase the Correction Level
only if necessary.
Any time you believe your containment system may
not be functioning properly, place your pet on a leash
and remove the Receiver Collar immediately. Follow
the Troubleshooting Guide and/or call your PetSafe
Professional.
If your dog doesn’t seem to respond
After Each Training Session
• Put your pet in a quiet room for 20-30 minutes.
• If you choose to remove the Receiver Collar, wait until
your pet comes out of the quiet room.
• Do not act sympathetic or sad. Staying positive yourself
helps your pet stay positive.
Flag Removal
After you are satisfi ed your pet’s training is complete,
remove every other Flag every 4 days until all Flags are
removed.
Page 5

Cat Containment Training
Setup
Your goal is to train your cat to turn towards home every
time he hears the warning beep from the Receiver Collar.
Training should take about one week.
1. When training a cat, use a harness for attaching the
tie-out or lead.
2. Set the Receiver Collar to Correction Level 2 or 3,
depending on the size and temperament of your cat.
The higher the Correction Level, the stronger the Static
Correction.
3. Select the length of Contact Posts appropriate for your
cat and fi t the Receiver Collar. Cats must wear Receiver
Collars much tighter than standard collars. Both
Contact Posts must touch the skin.
Choose one of the training techniques outlined below.
Outdoor Technique 1: Tie-Out
1. Purchase a 15’ to 20’ yard tie-out from any pet store.
2. Follow the Setup for Training directions.
3. Insert the yard anchor in the ground so the end of the
tie-out reaches 1-2 feet past the Flag line.
4. To ensure your cat’s well-being, be sure there is shade
and fresh water within the radius of the tie-out.
5. Attach your cat’s harness to the tie-out.
6. Leave your cat in the tie-out area for 4 to 6 hours.
7. Move the tie-out to different areas of your yard so your
cat will experience different areas of the Boundary.
8. Continue the training for 3 days. During this period,
your cat will learn to recognize the warning beep and to
avoid the Correction Zone.
Outdoor Technique 2: On Lead
Day 1
You need an assistant on Day 1.
1. Choose a small area for your fi rst training session.
Place the Flags approximately 3-4 feet apart. Change
the training area for each session.
2.
Have your assistant lead your cat slowly into the
Warning Zone. When you hear the beep, shake the Flag
from side to side to startle your cat. Repeat several times.
Day 2
1. Do not touch the Flags.
2. With your cat on lead, take him into the Warning Zone.
If he does not back out of the Warning Zone within a few
seconds, he will experience a mild Static Correction.
3.
If your cat attempts to leave the Pet Area, make sure he
does not get past the Flags. Never let the cat past the
Flags with or without the Receiver Collar on. If your cat
thinks he can pass the Flags, the training will take longer.
Leave the Flags in place for 3 weeks after your cat is
trained. Then remove every other Flag every 4 days until
they are all gone. Keep the Flags for future use.
Regularly check the Receiver Collar and the fi t against your
cat’s skin. Refer to the Troubleshooting Guide if needed.
Indoor Technique
Set up the Indoor Transmitter near a wall or just inside
a room you wish to keep your cat out of. When your cat
hears the warning and receives the Static Correction, his
only choice is to back away. If you set up the Transmitter
where your cat can run through the Correction Zone,
training will take longer.
Containment Troubleshooting Guide
Contact your PetSafe Professional anytime you have a question or concern.
Receiver Collar does not
beep near the Boundary
Pet does not respond to
the Static Correction
Pet ignores Static
Correction and runs
through Boundary
Pet’s neck seems irritated
Transmitter Boundary
Loop Light is off
Transmitter loop alarm
is sounding
• Check and replace the batteries if necessary. The SafeLight™ acts as a low battery
indicator, fl ashing every 4 to 5 seconds when replacement is required.
• Test the Receiver Collar to verify it is activated. Look at the Test Station on the
Transmitter. The Receiver Test Light fl ashes when activated.
• Check fi t of the Receiver Collar to ensure the Contact Posts touch the skin.
•
Shave pet’s fur where the Contact Posts touch the skin or try the long Contact Posts.
• Increase the Correction Level of the Receiver Collar.
• Check and replace the batteries if necessary. The SafeLight™ acts as a low battery
indicator, fl ashing every 4 to 5 seconds when replacement is required.
• Repeat training to reinforce it.
• Increase the Correction Level.
• Leaving the Receiver Collar on for periods longer than 12 hours may cause neck
irritation. If a rash or sore is observed, remove the Receiver Collar for a few days or
relocate it on your pet’s neck. If the condition persists beyond 48 hours, see your
veterinarian
• Contact your PetSafe Professional.
• Contact your PetSafe Professional.
Page 6

PetSafe Professional® Remote
Training Guide
General Tips
• Eliminate one misbehavior or teach one obedience
command at a time. If you move too fast with the
training, your pet may become confused.
• Be consistent. Give your pet a tone or stimulation with
each misbehavior.
• Do not over-correct your pet. Use as few stimulations as
possible to train your pet.
• Unless you can supervise him, it is recommended that
you restrict your pet from situations in which he has a
history of misbehaving. However, setting up a situation
as a training session can dramatically improve your
chances of success.
• If your pet reacts to the training by hiding or acting
fearful, redirect his attention to a simple and appropriate
behavior such as the “Sit” command.
• Never use the Remote Trainer to correct or eliminate any
form of aggressive behavior. If you are unsure if your
dog is aggressive, please consult your veterinarian or a
certifi ed trainer.
Teaching Basic Obedience
The “Sit” Command
1. Put a separate, non-metallic collar on your pet’s neck
ABOVE the Receiver Collar, and attach a 10-foot leash.
Note: Be sure the extra collar does not put pressure on
the Contact Posts.
2. Hold the leash and the Remote Transmitter in one
hand. Keep your other hand free to guide your pet into
a “Sit” position.
3. Press and hold the Stimulation and Tone Button.
4. Immediately give the “Sit” command while continuing to
hold the Stimulation and Tone Button.
5. Release the Stimulation and Tone Button as soon as
your pet is in position, and praise him.
6. Release your pet from the “Sit” command and play.
7. Repeat Steps 2 through 6.
Note: If your pet breaks the “Sit” command, repeat steps
3 through 6. Keep your pet close to you while teaching the
“Sit” command.
The “Come” Command
1. Put a separate, non-metallic
collar on your pet’s neck
ABOVE the Receiver Collar,
and attach a 10-foot leash.
Note: Be sure the extra collar
does not put pressure on the
Contact Posts.
2. Hold your leash in one hand
and the Remote Transmitter in
the other.
3. Wait for your pet to walk away
from you. Press and hold the
Stimulation and Tone Button.
4. Immediately give the command
“Come” while continuing to
hold the Stimulation and Tone Button.
5. Using the leash, gently guide your pet
toward you until he begins to come in
your direction.
6. Immediately release the Stimulation and
Tone Button as soon as your pet steps
towards you, and praise him enthusiastically.
7. Quickly move backwards as your pet begins to come back to
you, praising him the entire time.
8. Praise your pet when he returns to you.
9. Repeat Steps 3 through 8.
10. Once your pet responds readily to the “Come” command
several times, back away from him without giving a
command. When your pet turns toward you, give the
command “Come” (WITHOUT STIMULATION) and praise
him while you continue to back up. Praise your pet when he
returns to you.
11. Use your leash to prevent your pet from running past you. If
your pet manages to run past you, repeat Steps 3 through 8.
The “Stay” Command
1. Put a separate, non-metallic collar on your pet’s neck
ABOVE the Receiver Collar, and attach a 10-foot leash.
Note: Be sure the extra collar does not put pressure on the
Contact Posts.
2. Put your pet on his bed. Hold your leash in one hand and
the Remote Transmitter in the other.
3. Staying within 3 feet, walk the perimeter of the bed. Do not
say anything to your pet.
4.
If your pet tries to leave the bed, press and hold the
Stimulation and Tone Button and give the “Stay” command.
Continue to hold the button until your pet is back on his bed.
If necessary, use the leash to guide your pet onto his place.
5. Praise your pet when he is back on his bed.
6. Once your pet has settled for a few seconds, release him and
play calmly.
7. Repeat steps 1 through 5.
Page 7

Eliminating Unwanted Behavior
Jumping Up
Pets typically jump up to get attention. If you do not want
your pet to jump on you, then friends or members of the
family should not encourage this behavior. That means
every time your pet jumps on someone, he should be
reprimanded or redirected to an alternate and acceptable
behavior, for which he can receive praise.
Note: It is best if your pet fi rst understands the “Sit”
command.
1. As soon as your pet lifts his paws off the ground to
jump on you, press the Stimulation and Tone Button
and give the command “Sit.”
2. Release the Stimulation and Tone Button immediately
once your pet is sitting, and verbally praise him.
3. If your pet ignores the stimulation, increase the
Intensity Level by 1.
4. Practice this exercise in
several different areas
and use different people
for distractions.
Digging
It is important to fi rst
understand why your pet is digging. Many dogs, such as
terriers, were bred to fl ush out prey, and digging is very
innate to them. Other dogs may be digging to fi nd a cool
spot to lie down, or simply out of boredom. Your pet may
no longer have the desire to dig if he is provided with the
following:
• A cool, shaded area in which to lie down, and plenty of
water.
• An alternate activity, such as a favorite toy.
• Plenty of play, exercise, and attention.
• A yard free from rodents or prey that he may be trying to
fl ush out.
1. Choose the Intensity Level 1 higher than normal.
2. Place the Receiver Collar on your pet and wait at least
10 minutes before placing him in the yard. No other
people or pets should be in the yard, as you do not want
your pet to associate the stimulation with anything
other than his digging. Your pet must be securely fenced
in or contained during training.
3. From a window or area where your pet cannot see you,
wait until your pet begins to dig.
4. While your pet digs, press the Stimulation and Tone
Button and release it when he stops digging. Only press
the button while your pet is in the act of digging, and do
not say anything to him.
5. If your pet ignores the stimulation, increase the
Intensity Level by 1.
6. Continue to watch your pet, as he may choose another
area to dig.
7. Do not allow your pet in the yard unsupervised until he
has completely stopped digging.
Trash Raiding
The easiest way to prevent trash raiding is to remove
garbage and tempting food from your pet’s environment.
You can use the Remote Trainer to teach your pet to stay
away from these items; however, you must be prepared to
correct your pet every time he approaches them.
1. Choose the Intensity Level 1 higher than normal.
2. Pick a temptation for your pet and position yourself
where he cannot see you.
3. While your pet’s mouth is touching the temptation,
press and hold the Stimulation and Tone Button.
Immediately release the button when your pet leaves
the temptation.
4. Do not say anything, as you want your
pet to associate the stimulation with his
behavior, not you.
5. If your pet does not respond to the
stimulation, increase the Intensity Level by
1 and repeat the process.
6. Repeat this process in several different
locations with different temptations.
Excessive Barking
Barking is an instinctive behavior for dogs. It is impossible
to keep your dog from barking entirely, but you can teach
him to be quiet when you give him a command.
Note: This will only be effective when you are at home with
your dog.
1. Put your dog in a situation that will tempt him to bark.
2. When your dog begins to bark, press the Stimulation
and Tone Button and give him the command “Quiet.”
3. Immediately release the button once your dog stops
barking and praise him.
4. If your dog ignores the stimulation and continues to
bark, increase the Intensity Level by 1 and repeat the
process.
5. Practice this exercise in different areas using different
situations that would cause your dog to bark.
Page 8

Once my dog is fully trained
to the Containment Boundary,
can I give him a Correction
via the Remote Transmitter at
the same time he is receiving
the Correction from the
Containment Transmitter?
Can I use the Remote
Transmitter to train my dog
outside the Containment area?
When I begin to use the
Remote Transmitter within the
Containment area, are there
certain things I should know or
work on fi rst?
If my dog becomes confused
when I correct him with the
Remote Transmitter within the
Containment area, what should
I do?
Other than acting confused
in response to receiving the
Correction from either the
Containment or Remote
Transmitter - what else might I
expect to see him do?
If I have supervised my dog
receiving the fi rst Correction
from the Containment
Transmitter, do I have to provide
the same on-leash supervision
with the Remote Transmitter?
Is there one general rule or tip
I should keep in mind when
training my dog with the
®
ProTx
-Plus system?
Commonly Asked Questions and Answers
Yes; The Receiver Collar does not differentiate which mode the system is in. Either
way, the dog will receive a Correction for being too close to the Boundary or for a
bad behavior if you so desire.
No; The Receiver Collar must be within the fence boundary and the Remote
Transmitter must be within 200 feet from the Containment Transmitter. The
Remote Transmitter can be taken outside and be effective from outside the
Containment area, so long as it is within 200 feet of the Containment Transmitter.
Understand that when you attempt Remote Training within the Containment area
your dog may demonstrate some “confusion” at fi rst. After all, he is now being
corrected within an area in which he has grown to know as a “safe area” - an area
which he can roam free and an area that has been free of Correction.
Thus, it is best that the fi rst time your dog receives a Remote Correction within
the Containment area, he is on a leash and is being corrected for a behavior that
he already knows as inappropriate. A good starting point is to work with him on
obedience commands that you have already established in other areas such as the
local park or in other areas of your neighborhood.
Once he begins to look comfortable and is demonstrating an understanding of
how to avoid the Remote Corrections, you can then move on to using the Remote
Trainer for modifying such behaviors as keeping him out of the garden, preventing
him from digging holes, or teaching him to stop barking on command.
If this or any other unexpected behavior happens, your best choice is to keep your
response simple - one that asks your dog to do something basic. Pick something
your dog has done many times before, such as the “Sit” or “Stay” commands.
Reliance on an old habit can bring a misbehaving dog - even a frightened dog
- back into the comfort zone. This will enable you to reward your dog or to regroup
should this become necessary.
Every dog has his own unique personality and thus will have his own way of
responding to a Static Correction. Some of the more common ways a dog may
inappropriately respond to the fi rst few Static Corrections include hiding under
a bush or table or running into the garage. It is important that no matter which
reaction your dog chooses that you always respond the same way. As was
described earlier, keep your response simple and direct your dog to a behavior
that he is already comfortable with, such as the “Sit” or “Stay” commands.
Yes; It is always a good idea to have your dog on a leash the fi rst time he receives
a Correction from either. It is also a good idea for you to supply this same onleash supervision anytime you use the Remote Transmitter in a new situation.
For example, if your dog has successfully learned to respond to the Remote
Transmitter in your yard, you should still have him on a leash the fi rst time he
receives the Correction inside your home.
Perhaps the one general rule most essential for training with the ProTx
system is work on only one behavior at a time. For example, train your dog to yard
boundaries fi rst and once this training is complete then, and only then, begin to
use a Remote Transmitter to improve obedience commands.
Moreover, it is critical not to correct out of frustration or as the result of misguided
humor. As an owner, you need to be as disciplined as you want your dog to be.
®
-Plus
Caution Notes
• Always have the collar on your dog, and the Remote Transmitter in your possession, when you and your dog are in
potentially troublesome situations.
• Your dog may “test” the Receiver Collar. Be consistent when this occurs.
• Do not attach the Receiver to a metal choker collar.
• Do not attach a leash to the Receiver Collar.
• Do not usr the Remote Transmitter in an attempt to correct or eliminate any form of aggressive or biting behavior.
©Copyright 2005, Radio Systems Corporation
Radio Systems Corporation
10427 Electric Avenue
Knoxville, TN 37932
www.petsafeprofessional.com
400-744
 Loading...