

Page 1
Please read this entire guide first before beginning installation
Veuillez lire l’intégralité de ce manuel avant de procéder à l’installation
Lees deze handleiding helemaal door voordat u aan de installatie begint
Lea esta guía en su totalidad antes de empezar la instalación
Leggere attentamente il presente manuale prima di iniziare l’installazione
Lesen Sie bitte zunächst diese Anleitung vollständig durch, bevor Sie mit der
Installation beginnen
Installation Guide
Guide d’installation
Montagehandleiding
Manual de instalación
Manuale di installazione
Montageanleitung
1000
Series
Série
Serie
Serie
Serie
Serie
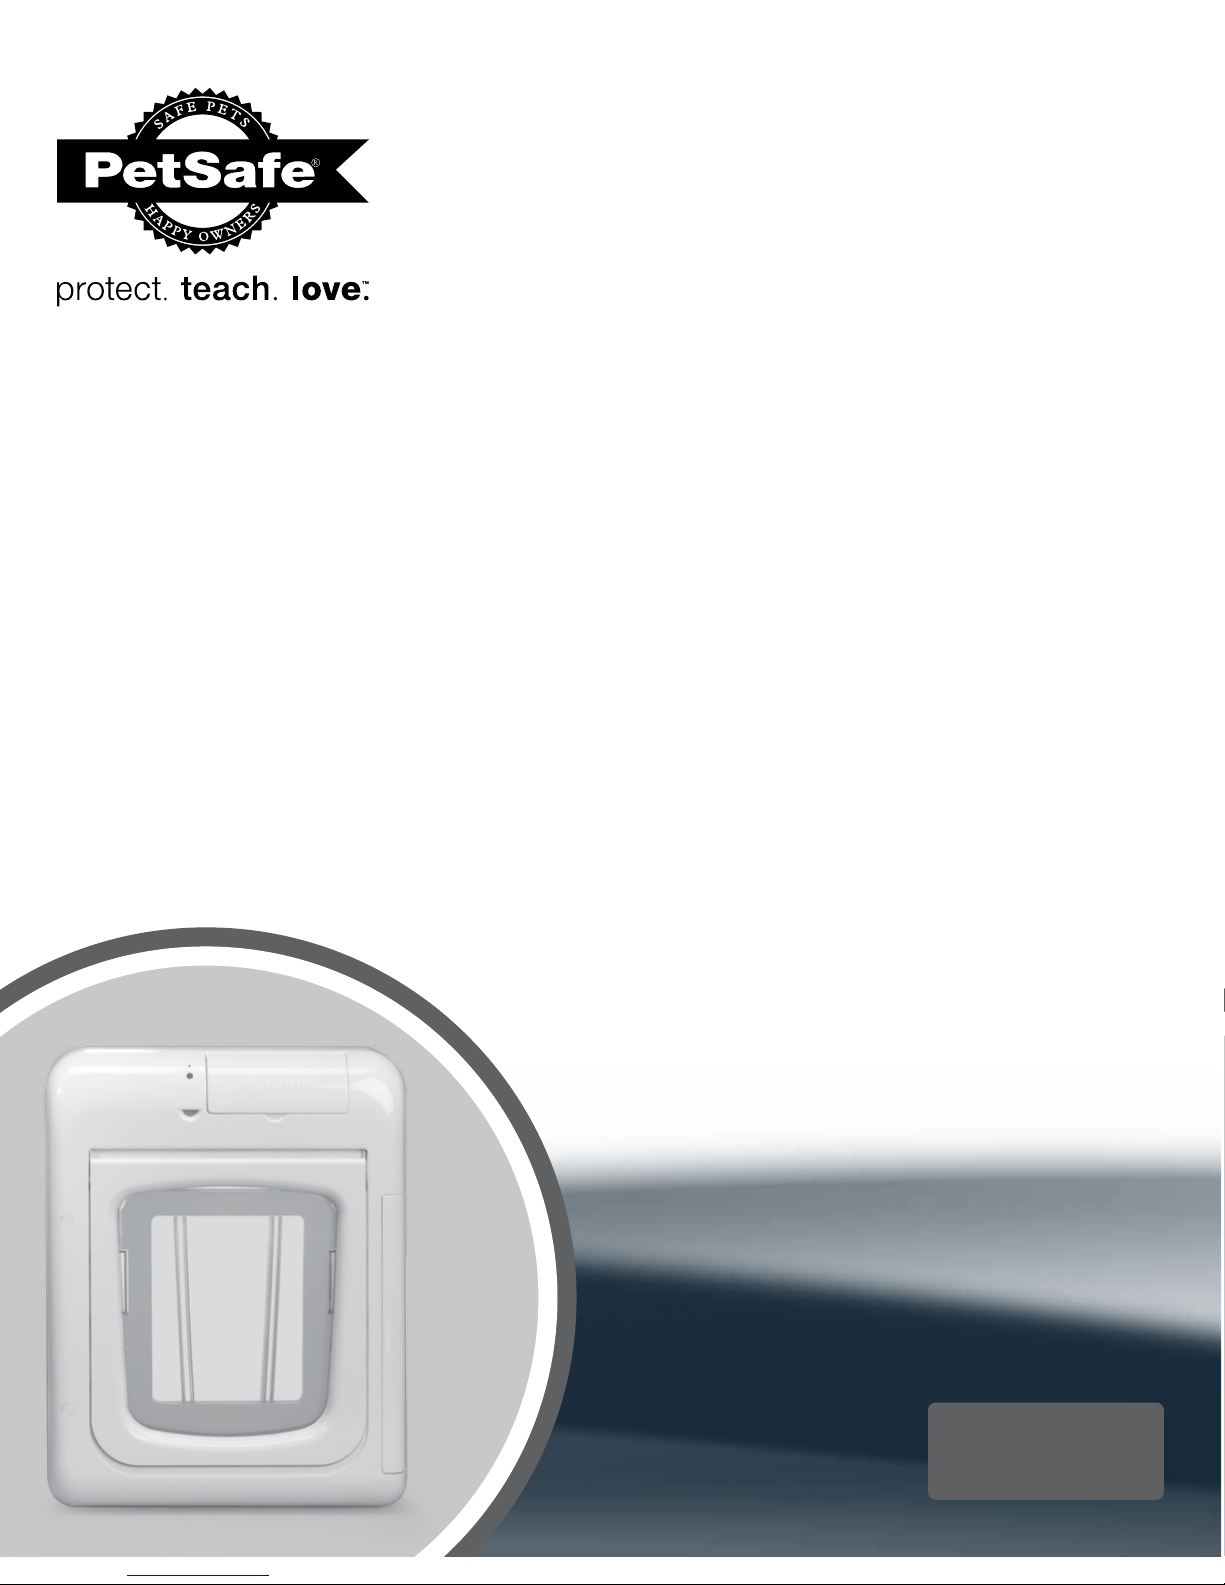
Passport™ Intelligent Cat Flap
Passport
™
Chatière intelligente pour chat
Passport
™
intelligent kattenluik
Puerta inteligente para gatos Passport
™
Passport™ Porta intelligente per gatti
Passport
™
Intelligente Katzenklappe
PPA19-20558
Page 2
ENES FRIT NLDE
2 www.petsafe.net
IMPORTANT SAFETY INFORMATION
Explanation of Attention Words and Symbols used in this guide
This is the safety alert symbol. It is used to alert you to potential personal injury hazards. Obey all safety messages that follow
this symbol to avoid possible injury or death.
WARNING indicates a hazardous situation which, if not avoided, could result in death or serious injury.
CAUTION, used with the safety alert symbol, indicates a hazardous situation which, if not avoided, could result in minor or
moderate injury.
CAUTION, used with the safety alert symbol, indicates a hazardous situation which, if not avoided, could result in minor or
moderate injury.
NOTICE is used to address safe use practices not related to personal injury.
• When children are present in the home, it is important to consider the Cat Flap during child proofing activities. The Cat
Flap may be misused by a child resulting in the child accessing potential hazards that may be on the other side of the Cat
Flap. Purchasers/Homeowners with swimming pools should ensure that the Cat Flap is monitored at all times and that the
swimming pool has adequate barriers to entry. If a new hazard is created inside or outside of your home, which may be
accessed through the Cat Flap, Radio Systems Corporation recommends that you properly guard access to the hazard or
remove the Cat Flap. The closing panel or lock, if applicable, is provided for aesthetic and energy efficiency purposes and
is not intended as a security device. Radio Systems Corporation will not be liable for unintended use, and the purchaser of
this product accepts full responsibility for oversight of the opening it creates.
• Follow all safety instructions for your power tools. Be sure to always wear your safety goggles and other proper
safetyequipment.
• Ensure the Power Adaptor is used only on a standard outlet.
• Do not unplug by pulling on cord. To unplug, grasp the Power Adaptor plug housing, not the cord.
• Inspect the power cord before and periodically during use. Discontinue use if damage or deterioration occur, such as
blistering, cracking, chewing or deformation. Continued use may result in injury or property damage.
• To avoid tripping, always position the power cord out of the path of foot traffic.
• The user, prior to installation, must become familiar with all building codes that may affect the installation of the Cat Flap
and determine, along with a licensed contractor, its suitability in a given installation. This Cat Flap is not a fire door. It is
important for the owner and contractor to consider any risks that may be present inside or outside of the Cat Flap, any risks
that may be created by subsequent changes to your property and, how they may relate to the existence and use, including
misuse of the Cat Flap.
• If cutting a metal surface, be aware of sharp edges to prevent injury.
• During pet training while Cat Flap is in Open Mode, make sure to GENTLY lower flap onto pet’s back. Also avoid possible
injury by making sure your pet is entirely through the Cat Flap opening, including paws and tail, before completely
releasing flap.
• Do not allow your pet to chew on the power cord.
Page 3
DENL ITFR ESEN
www.petsafe.net 3
• Read this entire guide prior to cutting or modifying an opening in your door or wall. Do not proceed with cut-out or
installation until your Cat Flap is assembled, powered up, programmed for your pet and all steps under “Prepare, Setup
and Test” have been completed.
• Keep these instructions with important papers; be sure to transfer these instructions to the new owner of the property.
• Unauthorised changes or modifications may void the user’s authority to operate this equipment, and void the warranty.
• Radio Systems Corporation does not accept any responsibility for openings that are cut or modified in doors or walls or
any damage caused to doors or walls in forming or modification of such openings, including any costs associated with the
repair or replacement.
• The unit only operates properly while outside temperatures are greater than -20.5° C and less than 55° C. If operating
from the optional rechargeable lithium-ion battery, the battery and Battery Compartment cannot be exposed to
temperatures below 0° C.
• Do not install in a location where the Cat Flap Interior Frame, including the LCD Screen and Battery Compartment, and the
Power Adaptor are exposed to damp or wet conditions or to water or outside elements, such as rain or snow.
• Only use designated Power Adaptor with the product.
• Do not use Power Adaptor in temperatures below 0° C or above 40° C. Power Adaptor for inside use only.
• If homeowner’s door or other application is not level, the Cat Flap must be installed level to swing properly.
• When applying the cutting template, there should be a minimum of 8 cm between the bottom and sides of the door and the
outer edge of the template to maintain the structural integrity of the door.
• Make sure there is nothing on the other side of the door where you will be drilling the holes or cutting the opening.
• Use a manual screwdriver to tighten screws. Do not over-tighten. Over-tightening can strip the screws or warp the
Cat Flap frame.
Page 4
ENES FRIT NLDE
4 www.petsafe.net
Table of Contents
Components . . . . . . . . . . . . . . . . . . . . . . . . . . . . . . . . . . . . . . . . . . . . . . . . . . . . . . . . . . . . . . . . . . . . . . . .4
GETTING STARTED . . . . . . . . . . . . . . . . . . . . . . . . . . . . . . . . . . . . . . . . . . . . . . . . . . . . . . . . . . . . . . . . . . . 5
How the Passport
™
Intelligent Cat Flap Works . . . . . . . . . . . . . . . . . . . . . . . . . . . . . . . . . . . . . . . . . . . . . . . . . . . . 5
Passport™ Key . . . . . . . . . . . . . . . . . . . . . . . . . . . . . . . . . . . . . . . . . . . . . . . . . . . . . . . . . . . . . . . . . . . . . . 5
Features, Controls and Indicators . . . . . . . . . . . . . . . . . . . . . . . . . . . . . . . . . . . . . . . . . . . . . . . . . . . . . . . . . . . 6
Key Definitions . . . . . . . . . . . . . . . . . . . . . . . . . . . . . . . . . . . . . . . . . . . . . . . . . . . . . . . . . . . . . . . . . . . . . 7
Icon Definitions . . . . . . . . . . . . . . . . . . . . . . . . . . . . . . . . . . . . . . . . . . . . . . . . . . . . . . . . . . . . . . . . . . . . . 8
Connecting Cat Flap to Computer. . . . . . . . . . . . . . . . . . . . . . . . . . . . . . . . . . . . . . . . . . . . . . . . . . . . . . . . . . . 9
Battery Operation . . . . . . . . . . . . . . . . . . . . . . . . . . . . . . . . . . . . . . . . . . . . . . . . . . . . . . . . . . . . . . . . . . . 9
PREPARE, SETUP, AND TEST . . . . . . . . . . . . . . . . . . . . . . . . . . . . . . . . . . . . . . . . . . . . . . . . . . . . . . . . . . . . 9
Install Clock Battery and Power Adaptor . . . . . . . . . . . . . . . . . . . . . . . . . . . . . . . . . . . . . . . . . . . . . . . . . . . . . . . 9
Understanding Motion Sensors . . . . . . . . . . . . . . . . . . . . . . . . . . . . . . . . . . . . . . . . . . . . . . . . . . . . . . . . . . . .10
Check for Radio-Frequency Interference . . . . . . . . . . . . . . . . . . . . . . . . . . . . . . . . . . . . . . . . . . . . . . . . . . . . . . .10
Select Installation Location. . . . . . . . . . . . . . . . . . . . . . . . . . . . . . . . . . . . . . . . . . . . . . . . . . . . . . . . . . . . . . .10
Initial User Setup . . . . . . . . . . . . . . . . . . . . . . . . . . . . . . . . . . . . . . . . . . . . . . . . . . . . . . . . . . . . . . . . . . . . 11
Program Cat . . . . . . . . . . . . . . . . . . . . . . . . . . . . . . . . . . . . . . . . . . . . . . . . . . . . . . . . . . . . . . . . . . . . . . 12
Test Microchip . . . . . . . . . . . . . . . . . . . . . . . . . . . . . . . . . . . . . . . . . . . . . . . . . . . . . . . . . . . . . . . . . . . . . 12
Prepare Passport™ Key . . . . . . . . . . . . . . . . . . . . . . . . . . . . . . . . . . . . . . . . . . . . . . . . . . . . . . . . . . . . . . . . . 13
INSTALLATION . . . . . . . . . . . . . . . . . . . . . . . . . . . . . . . . . . . . . . . . . . . . . . . . . . . . . . . . . . . . . . . . . . . . .13
Checklist Before Installation . . . . . . . . . . . . . . . . . . . . . . . . . . . . . . . . . . . . . . . . . . . . . . . . . . . . . . . . . . . . . .13
Tools Required . . . . . . . . . . . . . . . . . . . . . . . . . . . . . . . . . . . . . . . . . . . . . . . . . . . . . . . . . . . . . . . . . . . . . 14
Installation in a Non-Glass Door . . . . . . . . . . . . . . . . . . . . . . . . . . . . . . . . . . . . . . . . . . . . . . . . . . . . . . . . . . . 14
Installation in a Wall . . . . . . . . . . . . . . . . . . . . . . . . . . . . . . . . . . . . . . . . . . . . . . . . . . . . . . . . . . . . . . . . . .17
Installation in Glass . . . . . . . . . . . . . . . . . . . . . . . . . . . . . . . . . . . . . . . . . . . . . . . . . . . . . . . . . . . . . . . . . . 18
Thank you for choosing the PetSafe® brand. You and your pet deserve a companionship that includes memorable moments and a shared
understanding together. Our products and training tools enhance the relationship between pets and their owners. If you have any questions
about our products or training your pet, please visit our website at www.petsafe.net or contact our Customer Care Centre.
For a listing of Customer Care Centre telephone numbers, visit our website at www.petsafe.net.
To get the most protection out of your warranty, please register your product within 30 days at www.petsafe.net. By registering and keeping
your receipt, you will enjoy the product’s full warranty and should you ever need to call the Customer Care Centre, we will be able to help you
faster. Most importantly, your valuable information will never be given or sold to anyone. Complete warranty information is available online at
www.petsafe.net.
Note: This product will have updates and additional accessories developed. You may want to take advantage of these offerings. By registering
your product, we will be able to alert you when these updates become available.
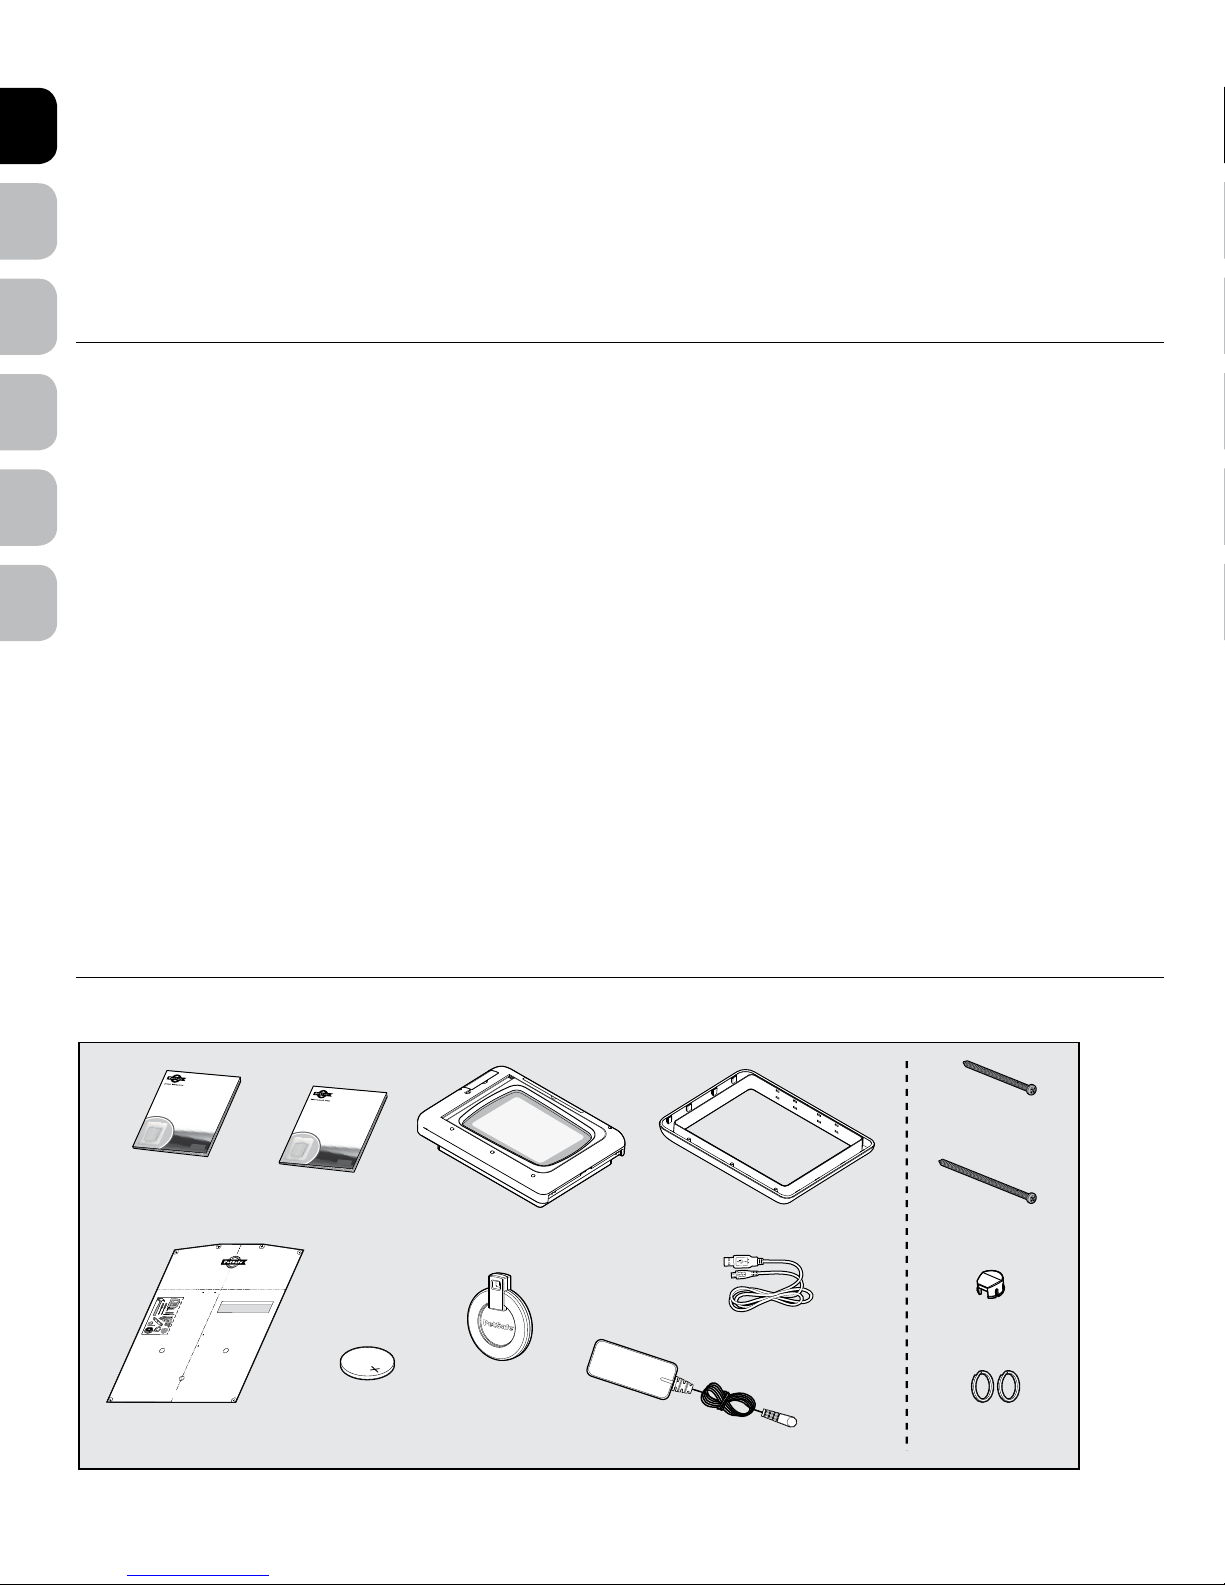
Components
Center Line
Cutting Template
NOTICE:
When applying cutting template there should be a
minimum of 3” between the bottom and sides of the
door and the outer edge of the template to maintain the
structural integrity of the door.
Radio Systems
®
Corporation
• 10427 PetSafe Way, Knoxville, TN 37932
1-800-732-2677 • www.petsafe.net • ©2013 Radio Systems
®
Corporation
408-082
Center Line
Medium
17
1
/
16
” (43.4 cm) H
Shoulder Height Shoulder Height
• Hammer
• Jigsaw
*
• Phillips Screwdriver
• Slotted Screwdriver
• Drill
• ½” Drill Bit
• Level
• Tape Measure
• Masking or Painter's Tape
• Duct Tape
• String
• Pencil
• Safety Equipment
Optional:
• Caulk
*
With appropriate blade type and length;
example, a metal door would require a
blade for metal.
Tools Needed
Medium
13
1
/
8
” (33.4 cm) W
Center Line
Cutting Template
NOTICE:
When applying cutting template there should be a
minimum of 3” between the bottom and sides of the
door and the outer edge of the template to maintain the
structural integrity of the door.
Radio Systems
®
Corporation
• 10427 PetSafe Way, Knoxville, TN 37932
1-800-732-2677 • www.petsafe.net • ©2013 Radio Systems
®
Corporation
408-082
Center Line
Medium
17
1
/
16
” (43.4 cm) H
Shoulder Height Shoulder Height
• Hammer
• Jigsaw
*
• Phillips Screwdriver
• Slotted Screwdriver
• Drill
• ½” Drill Bit
• Level
• Tape Measure
• Masking or Painter's Tape
• Duct Tape
• String
• Pencil
• Safety Equipment
Optional:
• Caulk
*
With appropriate blade type and length;
example, a metal door would require a
blade for metal.
Tools Needed
Medium
13
1
/
8
” (33.4 cm) W
Please read this entire guide first before beginning installation
Veuillez lire l’intégralité de ce manuel avant de procéder à l’installation
Lees deze handleiding helemaal door voordat u aan de installatie begint
Lea esta guía en su totalidad antes de empezar la instalación
Leggere attentamente il presente manuale prima di iniziare l’installazione
Lesen Sie bitte zunächst diese Anleitung vollständig durch, bevor Sie mit der
Installation beginnen
Installation Guide
Guide d’installation
Montagehandleiding
Manual de instalación
Manuale di installazione
Montageanleitung
1000
Series
Série
Serie
Serie
Serie
Serie
Passport
™
Intelligent Cat Flap
Passport
™
Chatière intelligente pour chat
Passport
™
intelligent kattenluik
Puerta inteligente para gatos Passport
™
Passport
™
Porta intelligente per gatti
Passport
™
Intelligente Katzenklappe
PPA19-20558
Please read this entire guide first before beginning installation
Veuillez lire l’intégralité de ce manuel avant de procéder à l’installation
Lees deze handleiding helemaal door voordat u aan de installatie begint
Lea esta guía en su totalidad antes de empezar la instalación
Leggere attentamente il presente manuale prima di iniziare l’installazione
Lesen Sie bitte zunächst diese Anleitung vollständig durch, bevor Sie mit der
Installation beginnen
Installation Guide
Guide d’installation
Montagehandleiding
Manual de instalación
Manuale di installazione
Montageanleitung
1000
Series
Série
Serie
Serie
Serie
Serie
Passport
™
Intelligent Cat Flap
Passport
™
Chatière intelligente pour chat
Passport
™
intelligent kattenluik
Puerta inteligente para gatos Passport
™
Passport
™
Porta intelligente per gatti
Passport
™
Intelligente Katzenklappe
PPA19-20558
Exterior Frame
USB Cable
Power Adaptor
Key Ring
2 pcs.
Finishing Plugs
11 pcs.
100 mm
Screws 6 pcs.
88 mm
Screws 6 pcs.
3-V Lithium Battery
for door Clock
(CR2032)
Installaton Guide
Interior Frame
(with Flap)
Passport
™
Key
Operating Guide
Cutting Template
Page 5
DENL ITFR ESEN
www.petsafe.net 5
GETTING STARTED
How the Passport™ Intelligent Cat Flap Works
With its advanced entry and exit technology, the Passport™ Intelligent Cat Flap provides freedom and peace of mind no other Cat Flap offers. Using
radio frequency identification (R.F.I.D.) technology, the Cat Flap identifies the unique code in your cat’s implanted microchip or the Passport™Key
worn on your cat’s collar. When your cat approaches the Cat Flap the flaps will respond according to the settings you have programmed for that
cat. The Cat Flap will remain locked and deny access to cats that are not programmed, wild animals, pests, and strays. Offering advanced selective
entry and exit by cat, multiple access options (such as In-Only Access and Out-Only Access), and the option to only allow access at specific times
of day, the Cat Flap gives you complete control of each cat’s access. You can set access individually by cat or easily set the same access setting
for all cats with the Master Access option. The Pet Tracking feature shows your cat’s current location and the last 4 times your cat used the Cat Flap,
allowing you to monitor your cat’s access. Programming is easy using the LCD Screen and 5-Button Navigation or by connecting to your computer
with included USB cable. The Passport
™
Intelligent Cat Flap is programmable for up to 20 pets.
This model of the Passport
™
Intelligent Cat Flap (PPA19-20558) reads the most common type of microchip implanted in cats, the FDX-B (15 digit)
microchip, using radio frequency identification (R.F.I.D.) technology. If you are not sure what type of microchip your cat has, please either ask your
veterinarian or visit www.petsafe.net and navigate to our Chip Checker, microchip compatibility checker, and enter your microchip code to
verify that your microchip is compatible. Occasionally a microchip migrates to a position within the cat that the scanner cannot read reliably.
There is a R.F.I.D. identification tag provided, the Passport
™
Key, which will need to be used on your pet if any of the following apply:
• Your cat does not have an implanted FDX-B microchip
• Your cat’s implanted FDX-B microchip has migrated out of the Cat Flap’s read range
• You are using the Cat Flap for a small dog
This key can be programmed to your Passport
™
Intelligent Cat Flap and will communicate with your Cat Flap in the same manner as the implanted
microchip when worn on your pet’s collar.
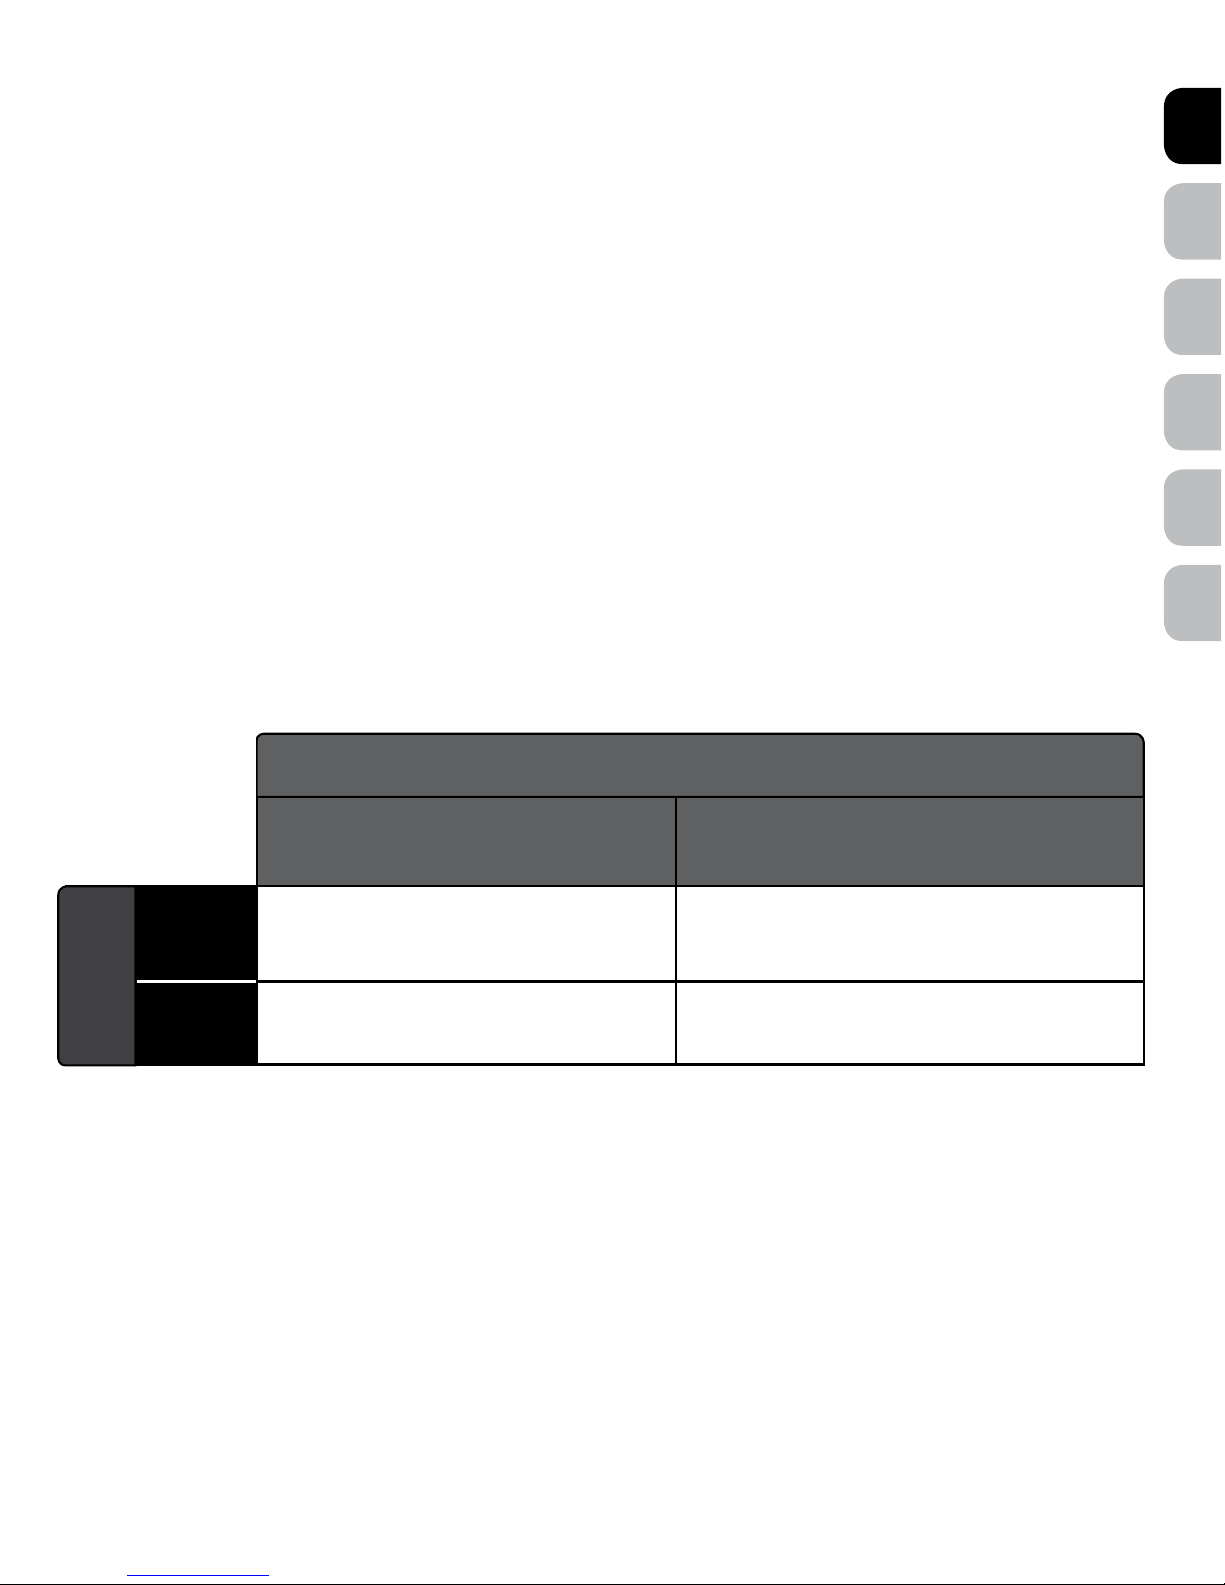
Based on your type of pet, the following table indicates your programming options:
Now that you know which R.F.I.D. technology is appropriate for your use, please note:
Throughout the rest of this Installation Guide and the Operating Guide, when you see the word “microchip” this is
referring to either your cat’s implanted FDX-B microchip or the Passport
™
Key, as applicable based on the table above.
Follow all steps under “Prepare, Setup and Test”, including “Test Microchip”, before starting installation.
Passport™ Key
The Passport™ Key does not require a battery to operate. One Passport™ Key is included which is NOT pre-programmed to operate with the Cat
Flap. Additional Passport™ Key accessories are sold separately. Visit our website at www.petsafe.net or call the Customer Care Centre to
purchase accessories.
Implanted FDX-B Microchip Passport™ Key
Cat
Yes Yes
Dog
No Yes
PROGRAMMABILITY
YOUR PET
Page 6
ENES FRIT NLDE
6 www.petsafe.net
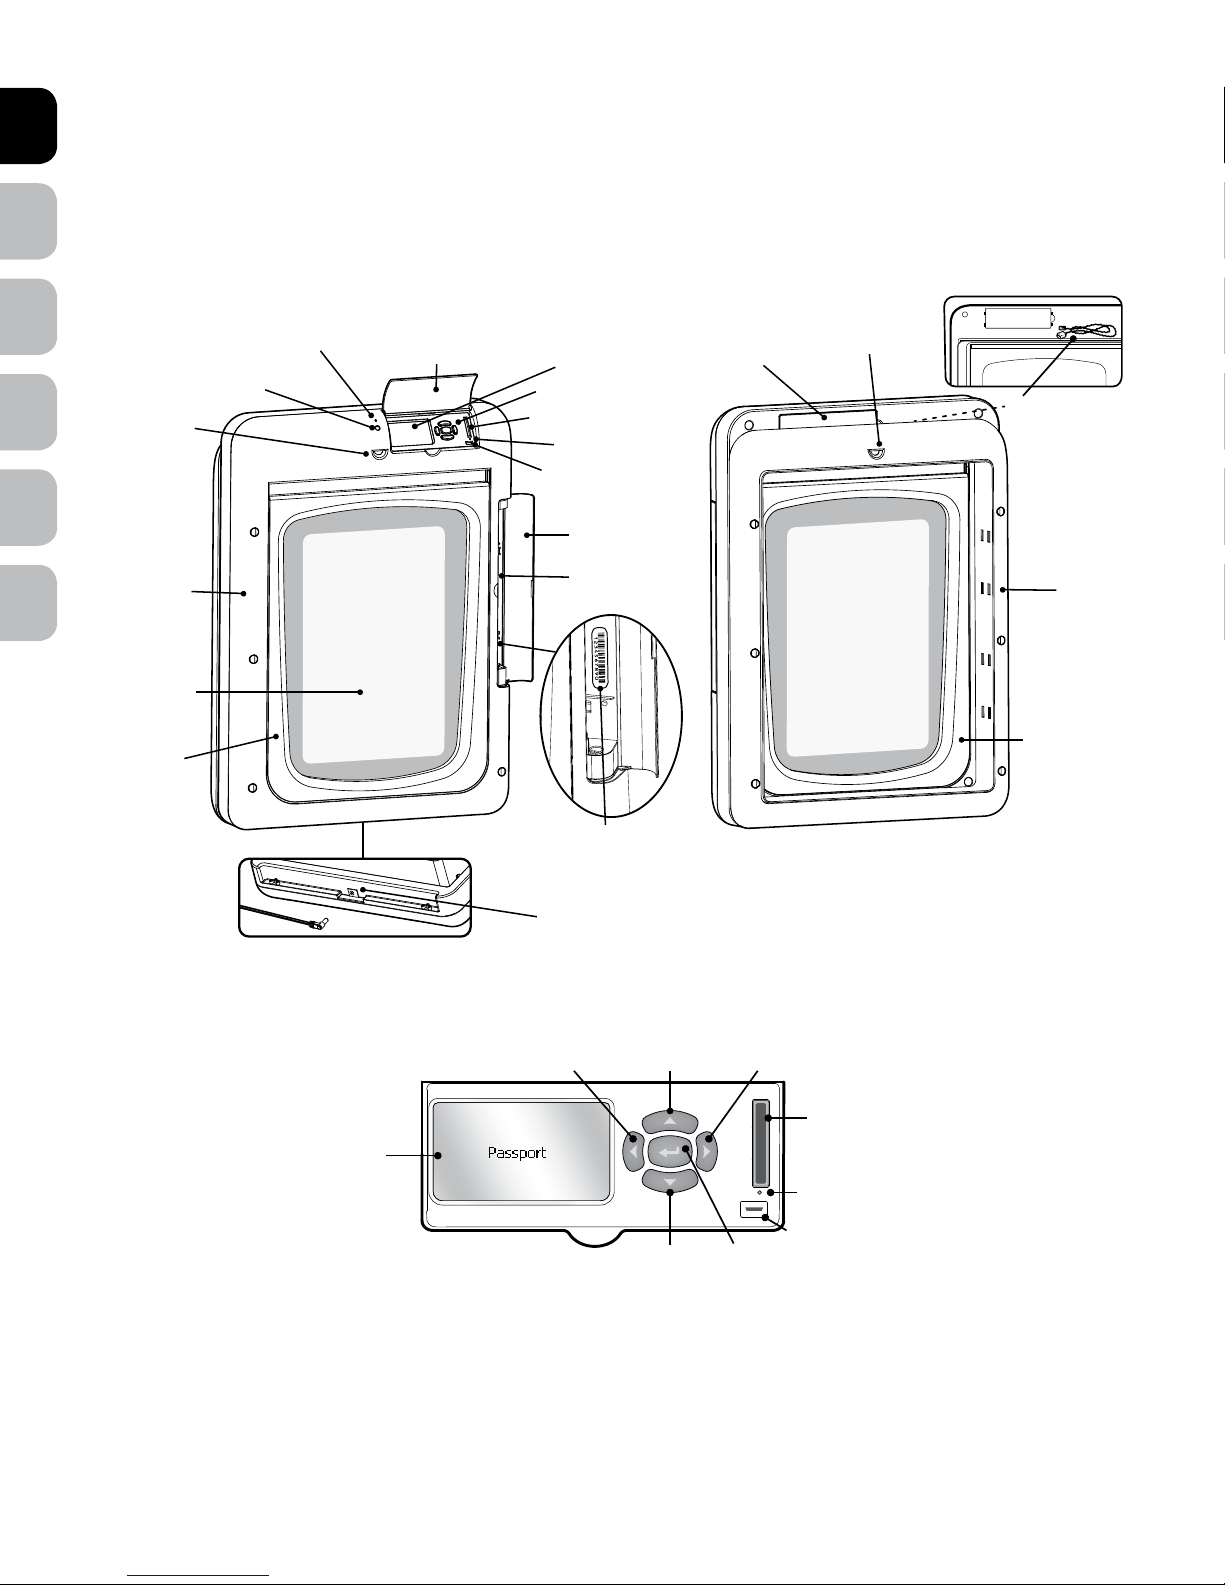
Features, Controls and Indicators
CONTROL PANEL
Interior
Motion Sensor
Exterior
Motion Sensor
Interior
Frame
Exterior
Frame
Interior
Locking U-Flap
Exterior
Locking U-Flap
Main Flap
Serial Number inside
battery compartment
USB Port
LED Indicator
(Low Battery Indicator)
Speaker
Control Panel
Cover
LCD Screen
5-Button Navigation
Reset Button
Battery
Cover
Battery
Compartment
Concealed
Power
Connection
Motion Sensor
Wire
Wireless Card Port
Clock Battery
Cover
Interior View Exterior View
LCD Screen
USB Port
Enter/Select
Arrow Key
Down
Arrow Key
Left Arrow/
Back KeyUpArrow Key
Right
Arrow Key
Reset Button
Wireless
Card Port
Page 7
DENL ITFR ESEN
www.petsafe.net 7
Key Definitions
• 5-Button Navigation – Group of five buttons with up arrow key, down arrow key, left arrow/back key, right arrow key, and enter/select
key used to navigate the Cat Flap’s menu system for easy programming. Located in Control Panel on Interior Frame.
• Antenna – The Antenna is located inside Main Flap and receives radio signals from microchips. The microchip must be located within a certain
distance of Antenna in order for the unique code to be read.
• Battery Compartment – The Battery Compartment is located on Interior Frame and holds the optional Passport
™
Rechargeable Battery
(sold separately).
• Battery Cover – Covers and protects optional rechargeable lithium-ion battery and Battery Compartment.
• Blind Zones – Areas where Motion Sensors cannot detect your cat and the Cat Flap will not read your cat’s microchip or Passport
™
Key.
• Clock Battery – The 3-V lithium coin cell battery (size CR2032) which keeps the clock’s time during any power loss.
• Clock Battery Cover – Covers and protects 3-V lithium coin cell Clock Battery and electronics circuit board.
• Control Panel – Area at top of Interior Frame where LCD Screen, 5-Button Navigation, Wireless Card Port, USB Port, and Reset Button
are located.
• Control Panel Cover – Door that covers and protects Control Panel.
• Concealed Power Connection – For connecting the Cat Flap to the Power Adaptor.
• Cut-Out Size – Size of opening cut in homeowner’s door for proper fit and Cat Flap installation.
• Exterior Frame – Size of Cat Flap frame on the outside of the home.
• Flap Opening Size – Size of usable flap space for cat to enter and exit through the Cat Flap.
• In-Only Access – Pet access setting which only allows programmed cats to enter but not exit. Flap operational mode must be set to Smart
Mode for In-Only Access to work.
• In/Out Access – Pet access setting which only allows programmed cats to enter and exit. Flap operational mode must be set to Smart Mode
for In/Out Access to work.
• In-Tone – Optional, audible alert that sounds when programmed cat enters. Flap operational mode must be set to Smart Mode for In-Tone to
work. Default factory setting is off with 10 sound options available.
• Interior Frame – Cat Flap frame on the inside of home. Frame with Main Flap and Control Panel.
• LCD Screen – Liquid crystal display screen to visually display text and images to easily program the Cat Flap. Located in the Control Panel on
the Interior Frame.
• LED/Light Indicator – Light on Interior Frame which blinks green once every 6 seconds when power source (Power Adaptor or rechargeable
battery) is in good operating status. Blinks a red light twice every 6 seconds when powered by the rechargeable battery and the battery is low
(Low Battery Mode). If Cat Flap has an error alert (ATTENTION screen), the LED will blink red once every 6 seconds.
• Lock Keypad – Allows 5-Button Navigation buttons to be disabled by setting a 4 digit PIN number.
• Locked Mode – Cat Flap operational mode where flaps are locked and do not allow entry or exit for any cat.
• Locking U-Flap – The “U” shaped flaps on the interior and Exterior Frames which lock in multiple points along the bottom and sides for added
lock strength and improved weather resistance.
• Low Battery Mode – When powered by the optional Passport
™
Rechargeable Battery, allows the Cat Flap to be set to a specified open or
locked position when the battery charge runs low and shuts down. Also allows an optional audible alert to notify you when the battery is low.
The default factory setting is off for the beep and locked for the flap if the battery shuts down. An alert (ATTENTION screen) will appear on the
LCD Screen and LED will blink red twice every 6 seconds when the Cat Flap enters Low Battery Mode.
• Main Flap – The center, plastic flap with UV sun protection which covers the flap opening.
• Master Access – Pet access setting which easily allows same access mode and settings to be set for all programmed cats without the need to
individually program setting by cat. This is the default factory pet access setting for each cat.
• Motion Sensing Zones – Areas where Motion Sensors detect motion and trigger the reader, which reads your cat’s microchip, to turn on.
• Motion Sensor – Detects movement from cat (or other moving objects) and triggers the Cat Flap to power up so it can read the microchip. A
Motion Sensor is located on both the Interior Frame and Exterior Frame.
• Motion Sensor Wire – Connects the exterior Motion Sensor to the electronics board.
• Open Mode – Cat Flap operational mode where flaps are unlocked and allows entry and exit for all. The Cat Flap will function like a
traditional cat flap in this mode.
• Out-Only Access – Pet access setting which only allows programmed cats to exit but not enter. Flap operational mode must be set to Smart
Mode for Out-Only Access to work.
• Out-Tone – Optional, audible alert that sounds when programmed cat exits. Flap operational mode must be set to Smart Mode for Out-Tone
to work. Default factory setting is off with 10 sound options available.
• Outer Frame Size – Overall Cat Flap dimensions.
Page 8
ENES FRIT NLDE
8 www.petsafe.net
• Passport™ Key – A Passport™ Key is a passive transmitter that sends a unique identification code to the Cat Flap.
• Passport
™
Intelligent Cat Flap – The Passport™ Intelligent Cat Flap is an intelligent receiver using an internal Antenna to pick up R.F.I.D.
codes for selective pet access.
• Passport
™
Rechargeable Battery – Optional, rechargeable lithium-ion battery specially designed to work with the Cat Flap to allow full
operation in place of the Power Adaptor or as a power back-up option in case of mains power loss (sold separately).
• Radio-Frequency Interference – Radio-Frequency Interference is due to radio-frequency signals from other household appliances or
common electronic products that negatively affect the ability of the Cat Flap to receive a signal from a microchip. Radio-Frequency Interference
or “noise” can come from a variety of sources. Interference can be minimal, constant or ever changing based on usage and closeness of other
electronic household items during operation of the Cat Flap. It is recommended that household appliances and common electronic products be
placed at least 61 cm away from the location of the Cat Flap.
• Radio-Frequency Technology – The use of a radio-frequency signal that can be transmitted without wires.
• Re-latch Time – Amount of time it takes the Cat Flap to re-lock after microchip is no longer in Read Range or detected. Default factory setting
is 2 seconds but can be adjusted from 1 second to 60 seconds.
• Read Range – Distance between microchip and the Passport
™
Intelligent Cat Flap when it first detects the microchip and triggers the flap to
unlock or operate as programmed for cat.
• Reset Button – Pin-sized button located in the Control Panel which reboots the Cat Flap.
• Smart Mode – Cat Flap operational mode where flaps are electronically locked and will function as specifically programmed for cats. The
default factory setting for flap operational mode.
• Speaker – Produces sound and used to alert when In-Tone or Out-Tone has been set, or when battery alert or error has been detected.
• Serial Number – Unique identification number assigned to each Cat Flap during manufacturing. The Serial Number is located on a label
inside Battery Compartment or on Passport
™
Intelligent Cat Flap About screen.
• Timer Mode – Allows the different pet access settings to be set at specific times of day for all programmed cats through Master Access or can
be programmed by cat. Four time slots available with a minimum of 2 programmed times required. Flap operational mode must be set to Smart
Mode for Timer Mode to work.
• USB Port – Connection for a mini-USB cable to connect Cat Flap to a computer for programming or to download firmware updates (USB
cable included).
• Volume – Turns Speaker on or off. Default factory setting is on.
• Wireless Card Port – Connection for Passport
™
Wireless Card (sold separately) which is used to connect to your existing wireless router to
remotely program and operate the Cat Flap from a computer, smartphone or other smart device. Contact Customer Care Centre for availability.
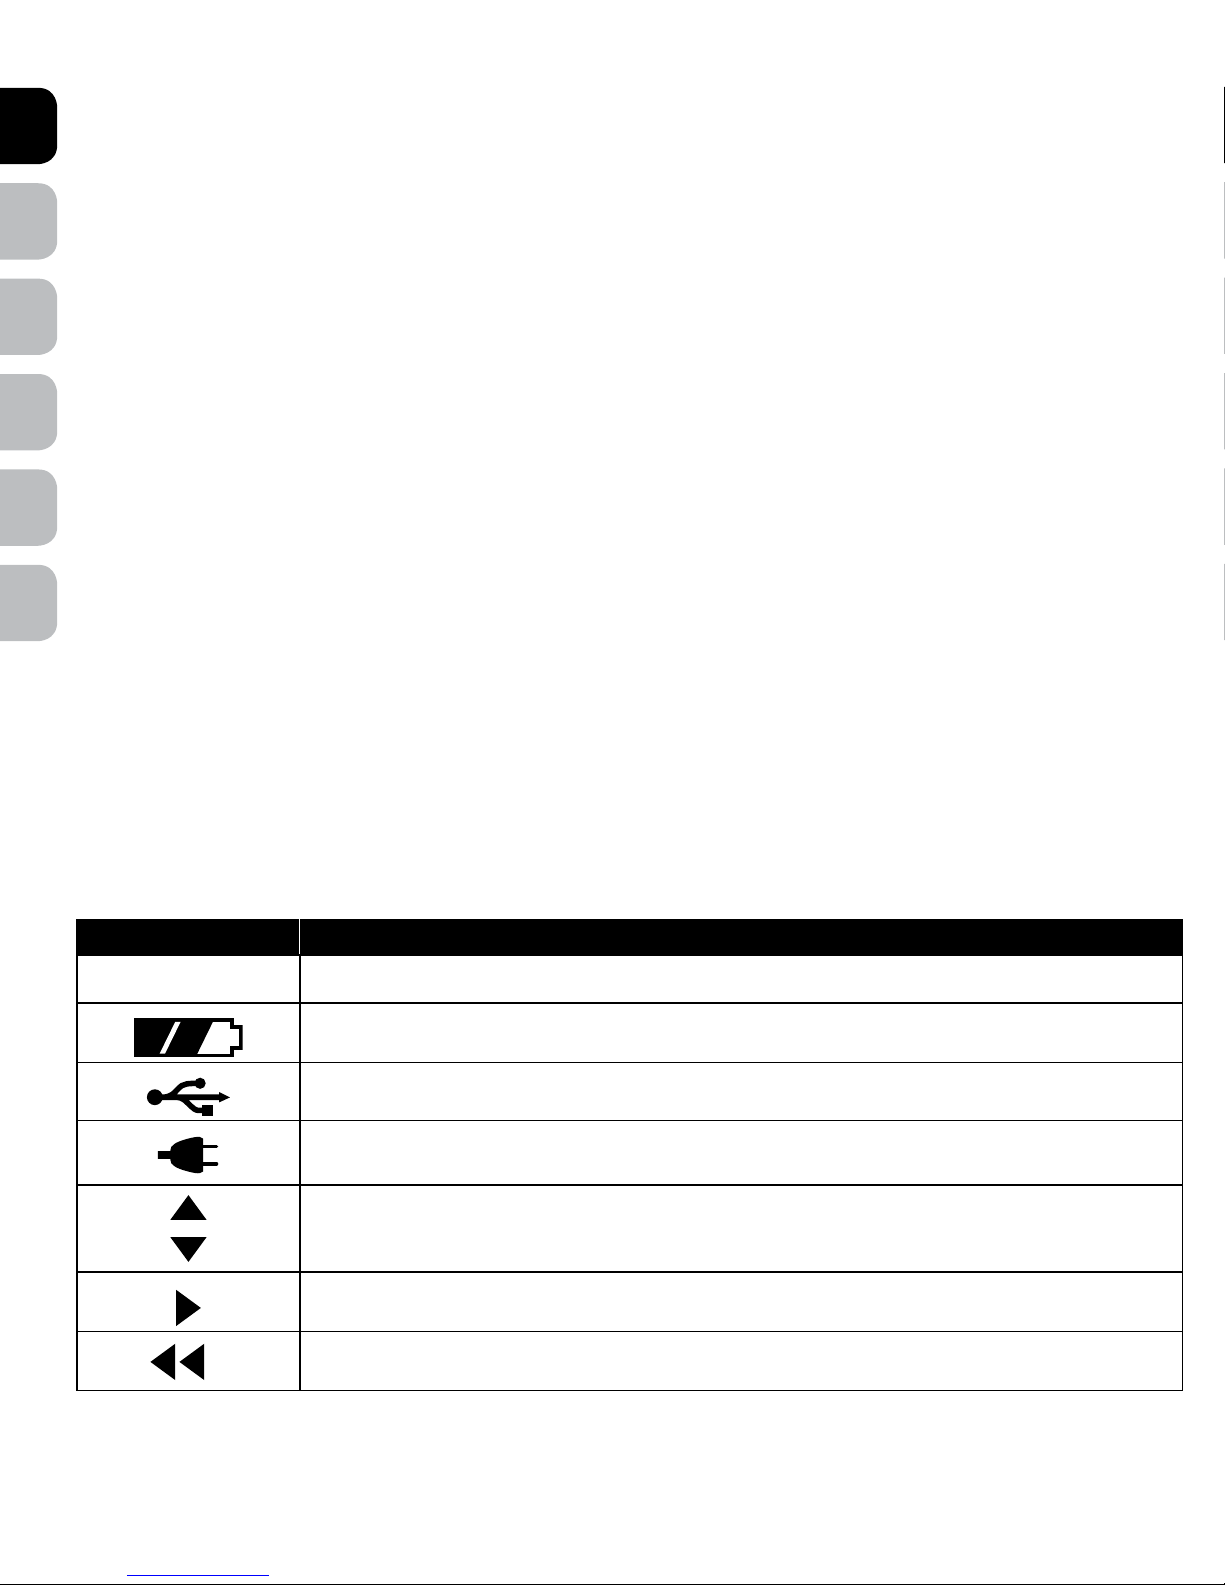
Icon Definitions
ICON FUNCTION
05:30
TIME INDICATOR — Displays the current set time. Can be set to 12 hour or 24 hour format.
BATTERY INDICATOR — Displays when the optional Passport™ Rechargeable Battery is in use with its
charge status.
USB CONNECTION — Indicates a mini-USB cable is connected to the Cat Flap.
POWER ADAPTOR — Indicates the Power Adaptor is connected to the Cat Flap.
UP / DOWN INDICATORS — Indicates menu choices available above or below. Use the up and down
arrow keys on 5-Button Navigation to view additional menu items not shown on screen.
MORE / SELECT INDICATOR — Indicates more information or options available. Use right arrow key on
5-Button Navigation to view additional information or options. Can sometimes be used to select an option.
BACK INDICATOR — Indicates lower menu level. Press the back or left arrow key on 5-Button Navigation
to return to previous screen.
Page 9
DENL ITFR ESEN
www.petsafe.net 9
Connecting Cat Flap to Computer
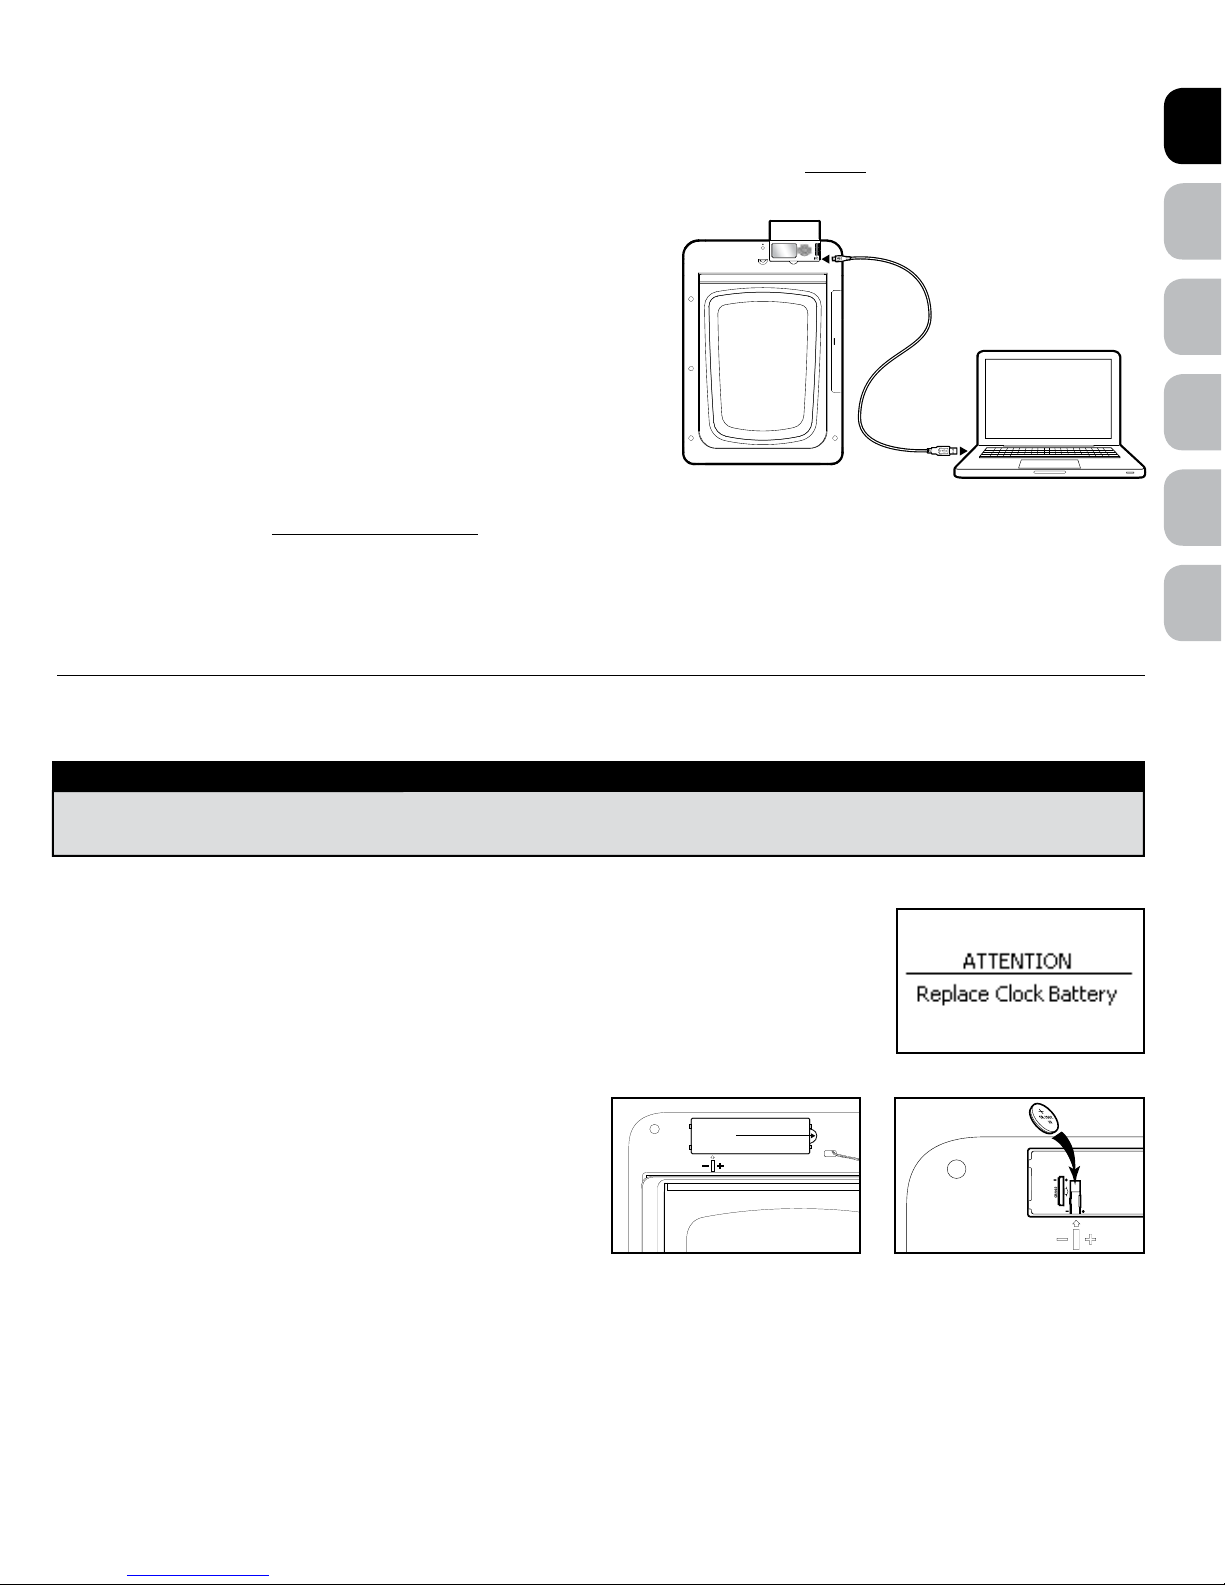
With the Computer Application, you have the option to connect your Cat Flap to your computer to complete the “Initial User Setup” steps and to
program the Cat Flap instead of using the Cat Flap Control Panel. Again, the Computer Application is optional but NOT required to operate your
Cat Flap. Connecting the Cat Flap to your computer also allows you to check for and install computer application software and Cat Flap
firmware updates.
To use Cat Flap with your computer, you need:
• Internet connection for your computer
• PC or Mac with a USB 2.0 port and one of the following operating systems:
- Windows
®
XP, Windows® Vista, Windows® 7 or 8
- Mac OS 10.5 or newer
• Minimum 1 GHz processor
• Minimum 1 GB Ram
• 30MB hard drive space
Connecting to your computer: Use the included USB cable to connect the Cat
Flap to the USB Port on your computer.
Downloading Software:
Open your browser and visit http://connect.petsafe.net. Click the “Register” button and complete registration steps.
Battery Operation
An optional, rechargeable lithium-ion battery is available to use with the Passport™ Intelligent Cat Flap (sold separately). The Passport™
Rechargeable Battery can be used for full operation of the Cat Flap or as a battery back-up option in case of a mains power loss.
PREPARE, SETUP, AND TEST
Install Clock Battery and Power Adaptor
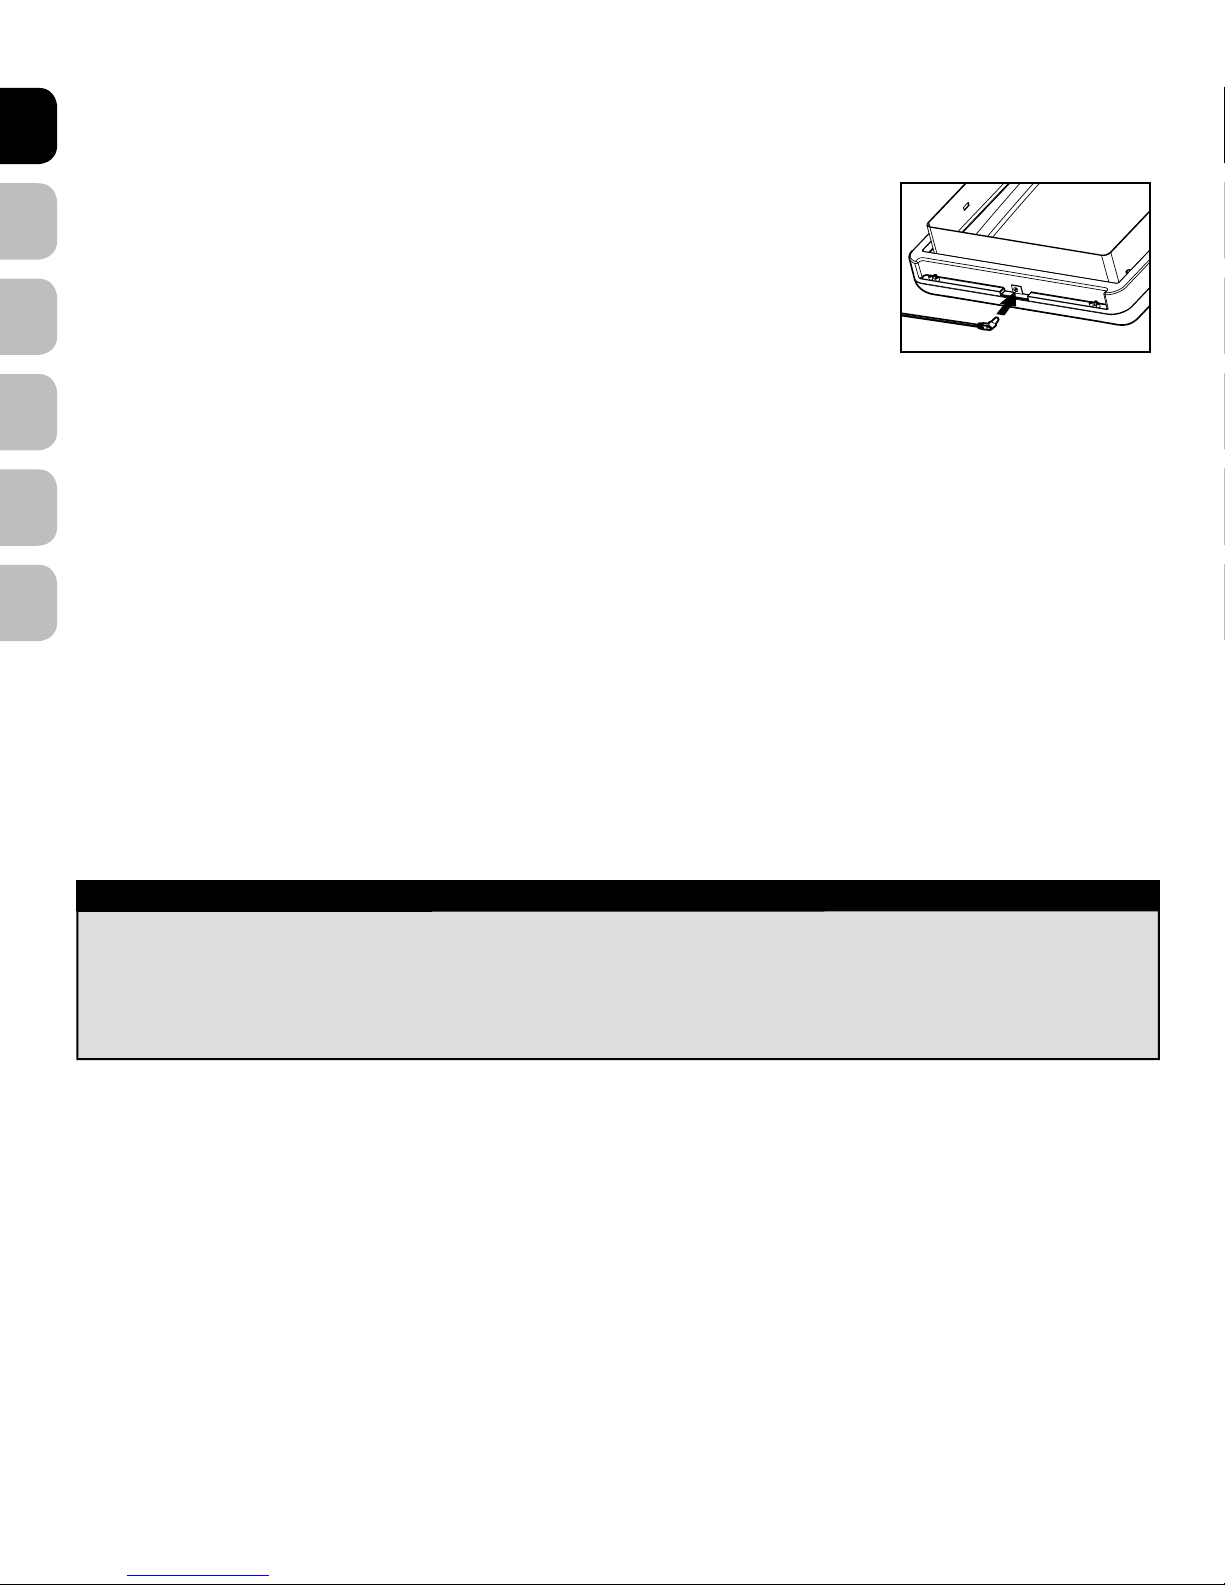
The Cat Flap is shipped with the Clock Battery not installed. The 3-V lithium coin cell battery (size CR2032) will
need to be installed before proceeding with setup, testing and installation. The battery is required to keep the
clock’s time during any power loss. Typical battery life is about 1 year with normal use and operating power
from Power Adaptor or optional rechargeable lithium-ion battery (sold separately). With no operating power,
the expected Clock Battery life is about 10 weeks. When Clock Battery needs replaced, if battery has not been
installed, or if installed incorrectly, you will receive an alert on the LCD Screen.
To install Clock Battery: Remove Clock Battery Cover from back of
Interior Frame. Battery slot is located on left side of circuit board. Insert
battery with positive (+) side facing the right side of the battery slot.
Make sure battery is fully inserted. Reinsert Battery Cover and push to
snap into place.
NOTICE
Read this entire guide prior to cutting or modifying an opening in your door or wall. Do not proceed with cut-out or installation until your Cat
Flap is assembled, powered up, programmed for your cat and all steps under “Prepare, Setup and Test” have been completed.
Pull and lift
here
Page 10
ENES FRIT NLDE
10 www.petsafe.net
To replace Clock Battery: Remove Interior Frame from wall to access the Clock Battery Cover. Remove Clock Battery Cover from the back of
Interior Frame. Locate used battery on the left side of circuit board. Remove used battery by pulling it out of the slot. Insert good battery with positive
(+) side facing the right side of the battery slot. Make sure battery is fully inserted. Reinsert Battery Cover and push to snap into place. Reattach
Interior Frame to wall.
To install Power Adaptor: The Cat Flap is supplied with a low-voltage AC adapter for power. Insert
Power Adaptor into Concealed Power Connection located underneath bottom of Interior Frame.
An optional rechargeable lithium-ion battery is available to use with the Cat Flap (sold separately). If using
the Passport
™
Rechargeable Battery instead of adapter for power source, insert it into Battery Compartment
on right side of Interior Frame (see Passport
™
Rechargeable Battery Operating Guide for how to install the
rechargeable battery).
Understanding Motion Sensors
Note: For testing purposes, the Motion Sensor Wire should have been connected from the Interior Frame to Exterior Frame at the factory. Before
proceeding with the next steps, make sure the Motion Sensor Wire is connected or the Cat Flap will not detect the microchip and open from the
outside during testing (See “Installation In a Non-Glass Door” Step 4F for connecting Motion Sensor Wire).
It is important to understand how the interior and exterior Motion Sensors work and keep this in mind when selecting your installation location.
When the Motion Sensors detect movement, they trigger the reader (which detects and reads the microchip or Passport
™
Key) to turn on. The areas
where the Motion Sensors can detect motion are called the Motion Sensing Zones. Where your cat is detected within the Motion Sensing Zones can
depend on your cat’s size and hair type, surrounding temperatures, and the location where the Cat Flap is installed. For example, if your cat has
longer hair, it may take longer for the Motion Sensors to detect your cat. Also, if your Cat Flap is installed in a location with stairs on one side, the
Motion Sensor will detect your cat differently on the side with the stairs than on the side without the stairs. Blind Zones are areas where the Motion
Sensors cannot detect your cat and the Cat Flap will not read your cat’s microchip or Passport™ Key.
Check for Radio-Frequency Interference
Prior to installation, it is recommended to set-up, program and test the Cat Flap in the intended installation location or application to check for
possible Radio-Frequency Interferences. These interferences could negatively affect the Cat Flap, keeping it from working properly and receiving
the signal of the microchip. Common household appliances and electronic products should be located at least 61cm away from the location where
the Cat Flap will be installed. Typical household products to consider are microwaves, televisions, wireless telephones, computers, garage door
openers and hand-held electronic devices such as remote controls or game stations.
Select Installation Location
The Cat Flap must be installed in a location where the LCD Screen, Battery Compartment and Power Adaptor are not exposed to outside elements
such as rain or snow. The Power Adaptor is for inside use only. It is recommended to install the Cat Flap in a location where prolonged exposure to
direct sunlight is not a factor. Cat Flap operating temperature range is: -20.5° C to 55° C.
Go to location where you plan to install the Cat Flap. Place the Cat Flap directly in front of door or desired installation location in the upright
position. Make sure the Cat Flap is vertical and not leaning so flap will operate properly. If using supplied Power Adaptor, find closest power outlet.
Plug in adapter to power the Cat Flap. The Power Adaptor cord is 1.8 m in length. If Power Adaptor cord will not reach closest outlet, you will need
a power cord extension, or to use the optional Passport
™
Rechargeable Battery (both sold separately) or find an alternative location to install the
Cat Flap.
Keep the Cat Flap in front of the door or application in the upright, vertical position and proceed to “Initial User Setup”, “Program Pet” and “Test
Microchip” steps to continue to check for Radio-Frequency Interferences and check the Motion Sensors.
NOTICE
•The unit only operates properly while outside temperature is greater than -20.5°C and less than 55°C. If operating from optional
rechargeable lithium-ion battery, the battery and Battery Compartment cannot be exposed to temperatures below 0°C.
•Do not install in a location where the Interior Frame, including the LCD Screen and Battery Compartment, and the Power Adaptor are
exposed to damp or wet conditions or to water or outside elements, such as rain or snow.
•Do not use Power Adaptor in temperatures below 0° C or above 40° C. Power Adaptor for inside use only.
•To avoid tripping, always position the power cord out of the path of foot trafc.
Page 11
DENL ITFR ESEN
www.petsafe.net 11
Initial User Setup
Note: If your cat does not have an implanted FDX-B microchip, the chip has migrated out of Read Range, or you are programming a small dog, a
Passport™ Key is required for your pet to be programmed to and access the Passport™ Intelligent Cat Flap. One Passport™ Key is included. Additional
Passport™ Key accessories are available for multiple pet households (sold separately). If you are programming multiple keys, it is important to note
which key belongs to which pet. The Cat Flap can be programmed for up to 20 microchipped cats/Passport™ Keys.
The Initial User Set Up and Programming Pet steps quickly get your Cat Flap ready for you and your cat to use. These steps can be completed using
the Cat Flap Control Panel or the Computer Application. To use the Computer Application, see “Connecting Cat Flap to Computer”section.
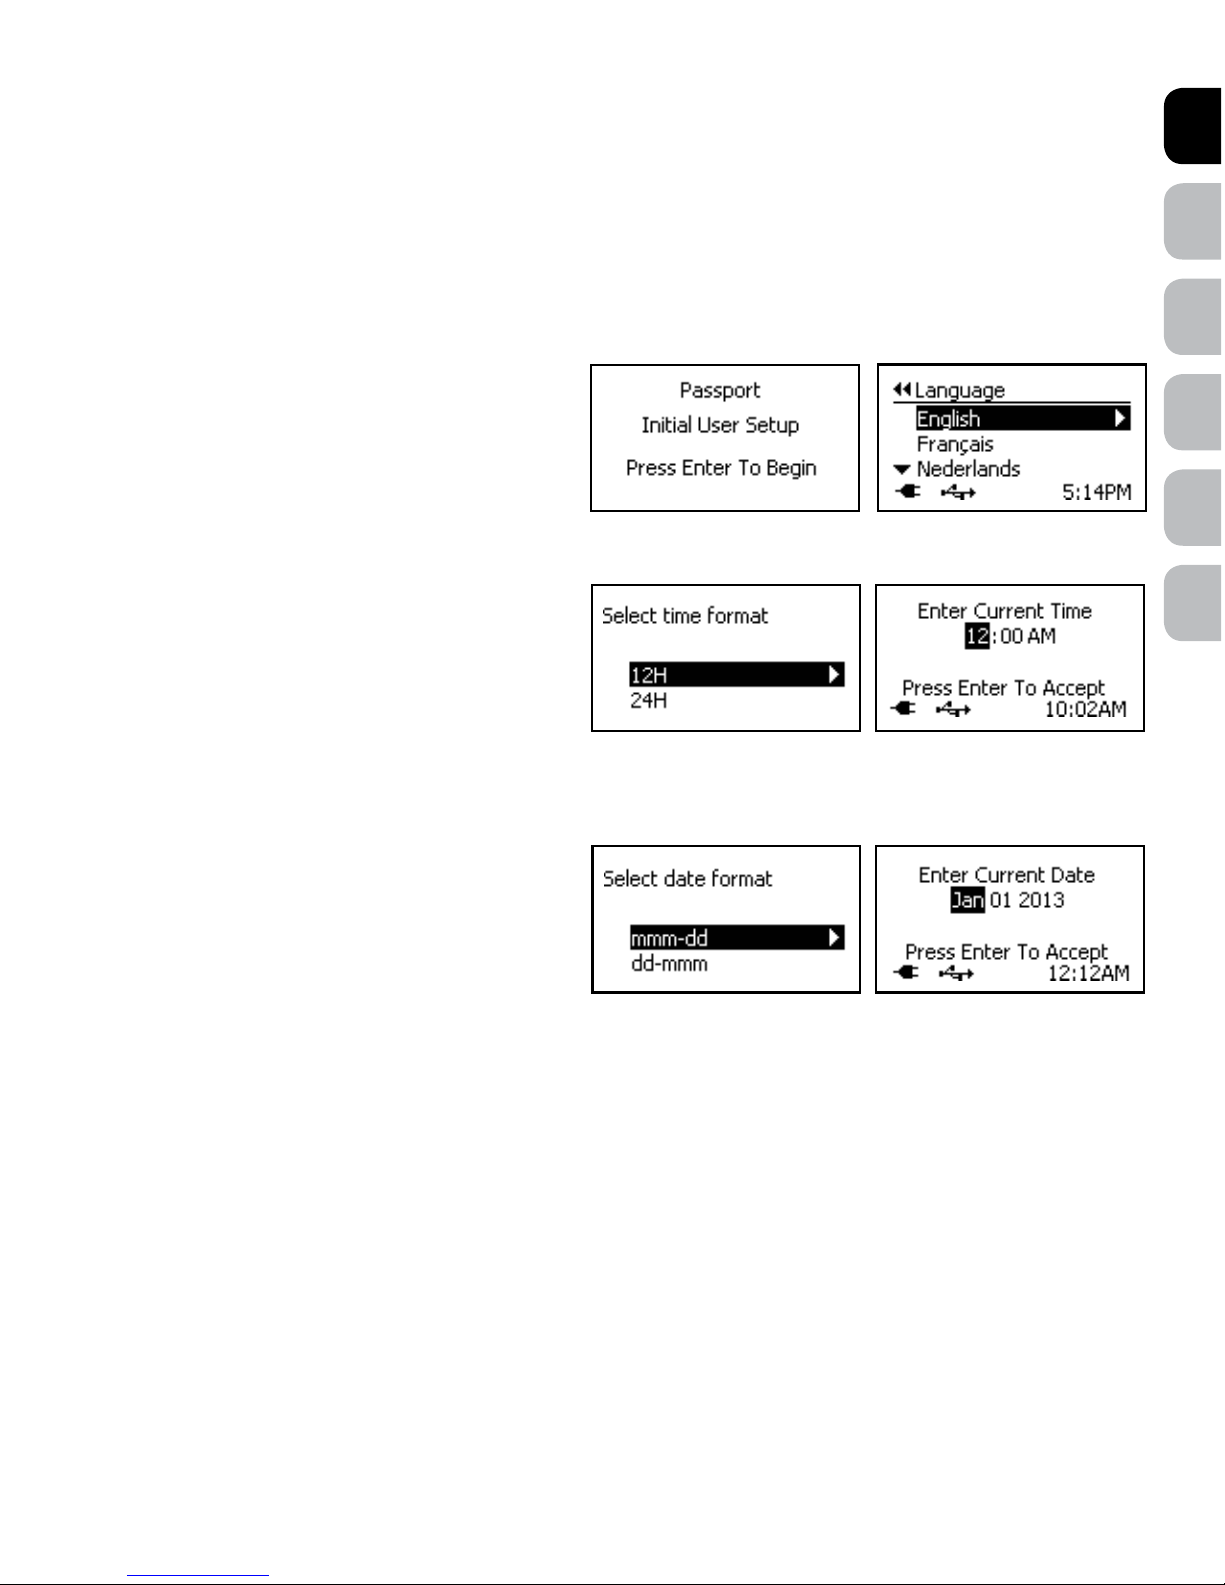
To use the Cat Flap Control Panel to begin setup, press the enter key on 5-Button Navigation and follow steps below:
Select Language
The Cat Flap is factory-set to the English language.
To change language:
1. Use up and down arrow keys to highlight desired language.
2. Press enter/select key or right arrow key on highlighted language
to select.
Select Time Format
The clock can be set to 12-hour or 24-hour format.
To select time format and set time:
1. Use up and down arrow keys to highlight desired time format.
Press enter or right arrow key to select.
2. Press up or down arrow keys to set current hour. Press right arrow
key to move to minute field.
3. Press up or down arrow keys to set current minute.
4. If in 12-hour format, press right arrow key to move to AM/PM field. Press up or down arrow key to toggle between AM/PM.
5. Press enter key to accept time.
Select Date Format
The date can be set to month/day or day/month format.
To select date format and set date:
1. Use up and down arrow keys to highlight desired date format.
Press enter or right arrow key to select.
2. Press up or down arrow keys to set month or set day. Press right
arrow key to move to next field.
3. Press up or down arrow keys to set day or set month. Then press
right arrow key to move to year field.
4. Press up or down arrow keys to set year. After setting last field, you are ready to program your cat’s microchip to the Cat Flap. Ensure your cat is
nearby before pressing enter to accept date and start programming. Programming the cat to the Cat Flap is time sensitive.
Page 12
ENES FRIT NLDE
12 www.petsafe.net
Program Cat
Note: Only one cat/Passport™ Key can be programmed at a time. Any other microchipped cat or Passport™ Key near the Cat Flap will prevent
proper programming.
To program Pet:
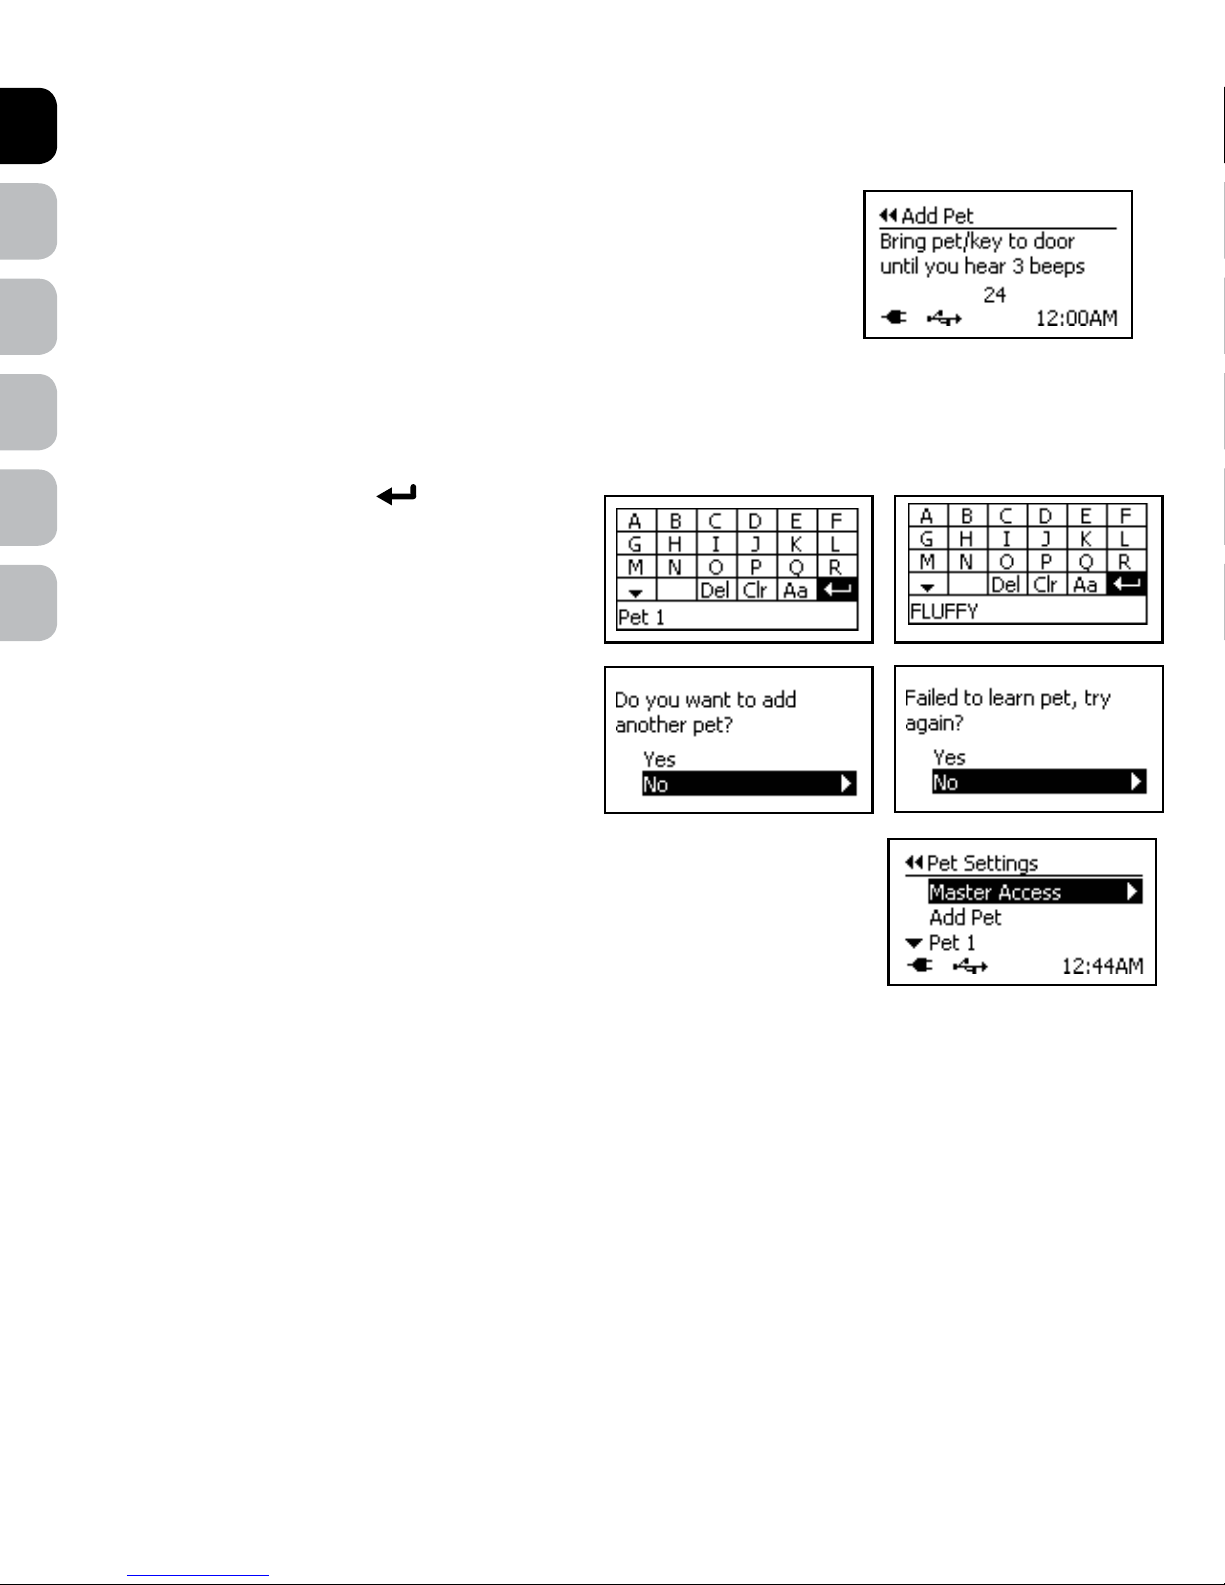
1. After pressing the enter key to accept date, you will have 30 seconds to program your cat’s
microchip or Passport
™
Key to the Cat Flap. The LCD Screen will show a 30 second countdown.
2. Position your cat’s microchip or Passport™ Key near the center of the Main Flap. Microchips are
usually implanted on the back of the neck. Have your veterinarian check the location of your cat’s
microchip if you are having trouble getting it programmed. Patiently hold pet in this position and wait
for it to program during the 30 second countdown.
3. When your cat’s microchip/Passport™ Key is successfully programmed, you will hear three beeps
and the rename pet text screen will appear. Pet ‘X’ (with ‘X’ being the next available pet number)
will be listed at the bottom of the screen. You can leave the pet name as default Pet ‘X’ or you can
rename the pet (examples provided are for Pet 1).
4. To rename pet, use arrow keys on 5-Button Navigation to scroll through text entry screen to Clr (clear). Press enter/select key on 5-Button
Navigation to clear name. Use arrow keys to select letters on text
screen to type cat’s name. Select the symbol on text screen
to complete the new name.
5. A screen will display asking if you want to program additional
pets. If you are programming an additional cat, ensure your
cat is close by since you only have 30 seconds to program the
microchip. Repeat for all cats you want programmed to use
the Cat Flap. If multiple cats have been programmed, you may
want to keep a list of which cat is Pet 1, Pet 2, etc. if you did not
rename pets.
If your cat’s microchip or Passport
™
Key is not successfully
programmed, you will receive a failure message on the LCD Screen.
If the Cat Flap does not program your cat’s microchip after a few
tries, double check for household appliances, electronic devices , or
any other microchips/keys in the area that may be interfering and
remove them from the location. Try to program your cat’s microchip
again. If you continue to have issues, move the Cat Flap to another location and follow the “Program Pet”
steps once more. If the attempt to program your pet in the new location is unsuccessful, please contact our
Customer Care Centre for additional help. DO NOT PROCEED WITH INSTALLATION.
Once you successfully complete the programming of your cat’s microchip to the Cat Flap, the Pet Settings
menu will display. All programmed pets will be listed at the bottom of the screen. You are now ready to
proceed to “Test Microchip”.
Test Microchip
Once your cat’s microchip has been programmed, it is important to test to make sure it is working properly and can be read by the Cat Flap in your
planned installation location. Testing should be done on both the interior and exterior side of the location for each programmed microchip.
Note: To test the microchip, the Cat Flap operational mode must be set to Smart Mode (which is default factory setting). Check to make sure the
Cat Flap is in Smart Mode prior to testing (see “Flap Operational Modes” section of Operating Guide).
Hold the Cat Flap in the upright position, directly in front of interior side of door or installation application. It is VERY IMPORTANT the Cat Flap is
vertical and not leaning so the flap system will operate properly and not jam.
Stand to side of Cat Flap out of view of interior Motion Sensor. Do not stand in front of Cat Flap or this could cause the Motion Sensor to not
operate properly.
To Test Microchip:
1. While standing to side, have your cat enter the Read Range area and approach the flap until the Cat Flap reads the microchip and flap unlocks.
Push through flap with your hand to check flap unlocked on interior side.
2. After testing from interior side, go to exterior side of your installation location. Position the Cat Flap where Exterior Frame is facing out as it would
be if installed.
3. Again, stand to side of Cat Flap. Repeat having your cat move toward the Cat Flap to test if the flap is reading the microchip. Make sure to push
through flap with your hand to check flap unlocked on exterior side.
4. If you have multiple cats, repeat this test for each cat.
Example:
Page 13
DENL ITFR ESEN
www.petsafe.net 13
To Test Passport™ Key:
1. While standing to side, wave your hand back and forth in front of Motion Sensor to activate. Next, hold the programmed Passport™ Key 25 cm
to 30 cm away from flap and parallel to flap. Slowly move toward flap until the Cat Flap reads Passport™ Key and flap system unlocks. Push
through flap with your hand to check flap unlocked on interior side.
2. After testing from interior side, go to exterior side of your installation location. Turn Cat Flap around where Exterior Frame is facing you.
3. Again, stand to side of Cat Flap. Repeat waving your hand back and forth in front of Motion Sensor to activate and test if the Cat Flap is reading
the Passport™ Key. Make sure to push through flap with your hand to check flap unlocked on exterior side.
4. Repeat this test for each programmed Passport™ Key.
If the Cat Flap does not read your cat’s programmed microchip or Passport
™
Key after several testing attempts, you may need to reprogram it (see
“Relearn Pet” section of Operating Guide). If the Cat Flap will still not read the microchip/key, move to another location and follow key testing
steps once more. If the “To Test” steps continue to be unsuccessful, contact our Customer Care Centre for additional help. DO NOT PROCEED
WITHINSTALLATION.
If the Cat Flap is reading your cat’s programmed microchip/Passport
™
Key and ALL steps under “Prepare, Setup and Test” were successful, you can
proceed with preparing the Passport
™
Key accessories, if applicable, and installation.
IF ANY STEPS UNDER “PREPARE, SETUP and TEST” WERE UNSUCCESSFUL, DO NOT PROCEED WITH INSTALLATION. Contact our
Customer Care Centre for assistance.
Prepare Passport™ Key
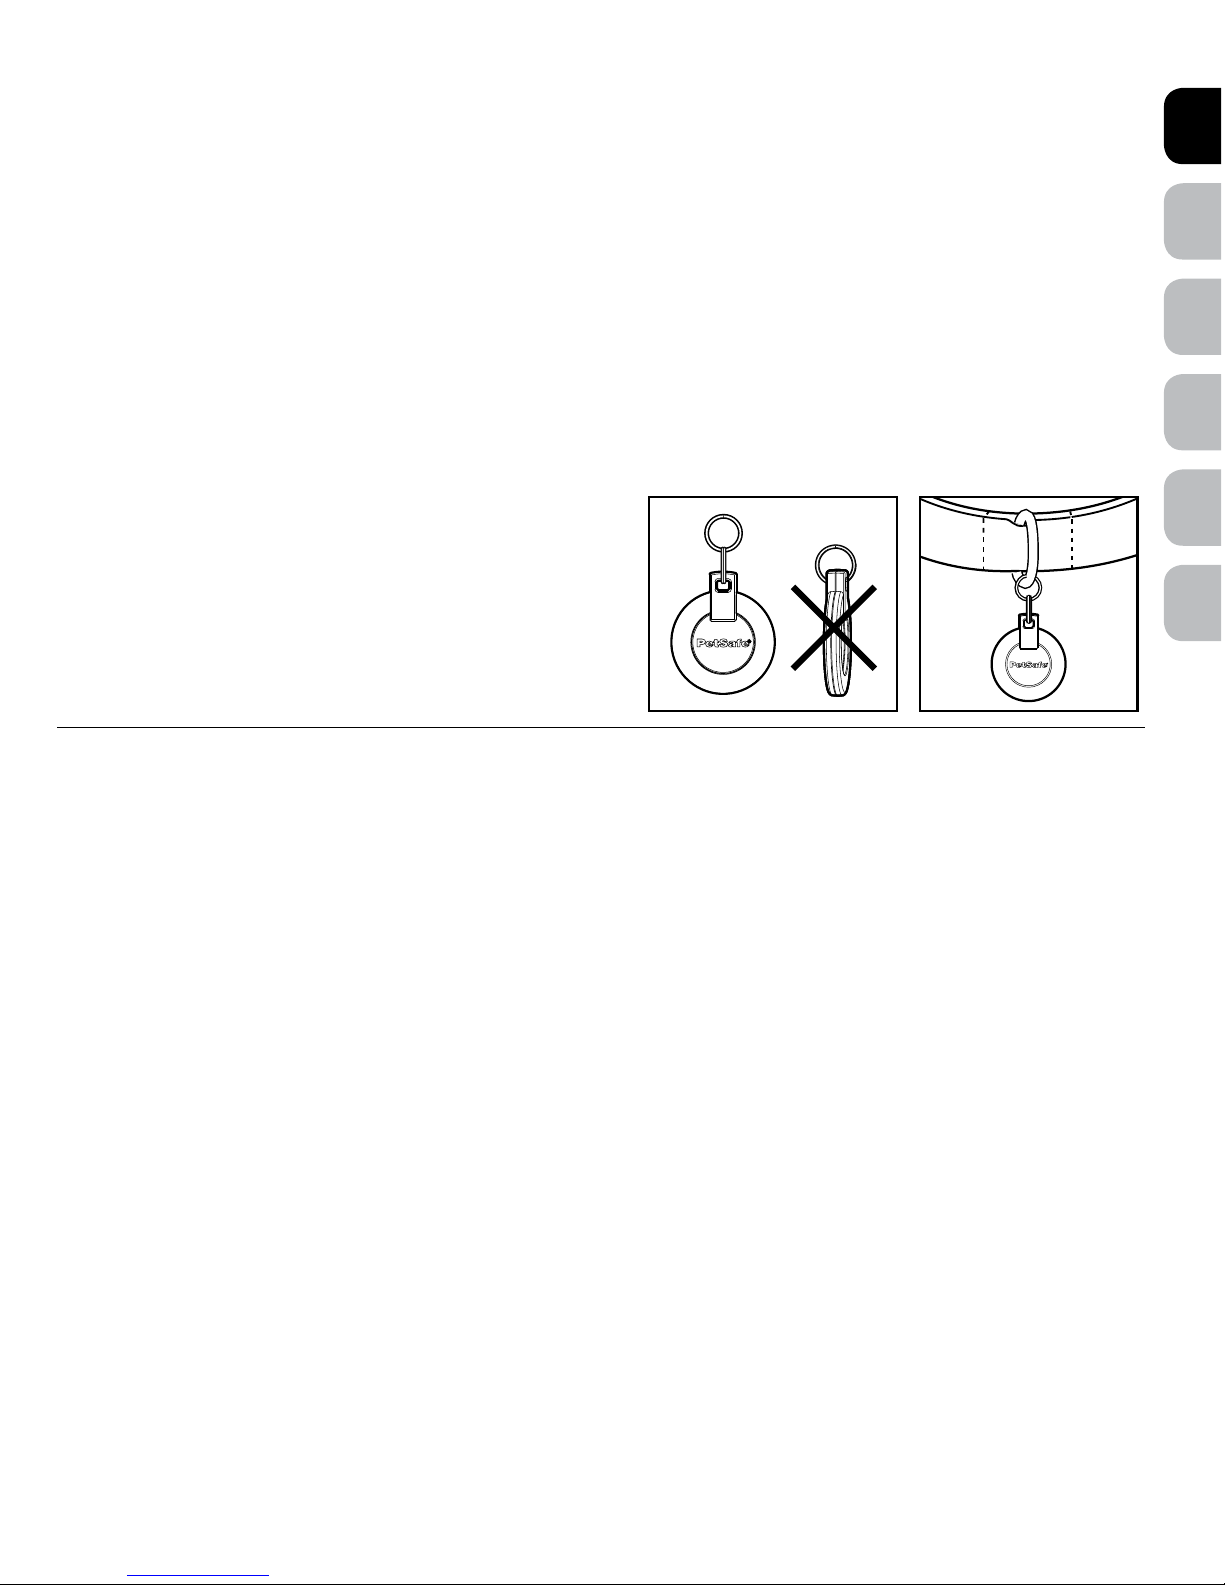
Attach the Passport™ Key to your pet’s collar using the included split key rings.
For best results, attach the Passport™ Key to the front of your pet’s collar. The
Passport™ Key should hang under your pet’s neck and parallel to the flap so
the Cat Flap can properly read the key.
INSTALLATION
Checklist Before Installation
Before installing the Passport™ Intelligent Cat Flap, it is important to consider the following:
*
Clock Battery is installed.
*
If using the Power Adaptor, you have located a power outlet in planned location on inside of home where Power Adaptor can plug in. If not,
you have a power cord extension to reach the outlet or are using the optional Passport
™
Rechargeable Battery instead (sold separately) as the
power source.
*
Planned location has been checked for possible Radio-Frequency Interference by ensuring all common household appliances and electronic
devices are at least 60 cm away.
*
Power Adaptor and Motion Sensor Wires have been disconnected or if using optional Passport™ Rechargeable Battery, it has been removed.
*
“Initial User Setup” steps to set the language, time and date have been completed.
*
Each cat to use the Cat Flap has been successfully programmed.
*
Each microchipped cat/Passport™ Key has been tested in the installation location on both interior and exterior side and the Cat Flap can read
each microchip/key.
*
If installing in a door, will any components of the Passport™ Intelligent Cat Flap be obstructed by the door opening and closing?
*
If installing in a wall, do you have a Passport™ Wall Entry Kit? The Passport™ Intelligent Cat Flap fits doors or applications up to 51 mm thick.
Wall installations and thicker applications 95 mm up to 305 mm require the Passport
™
Wall Entry Kit (sold separately).
*
If installing in a wall, are there any objects (such as doors, shrubs, heat pump, etc.) that could obstruct the Cat Flap once installed?
*
If installing in a wall, have you checked for electrical and plumbing fixtures in the wall where you plan to install the Cat Flap?
*
If installing in glass, do you have a Passport™ Glass Adapter Kit (sold seperately)?
Page 14
ENES FRIT NLDE
14 www.petsafe.net
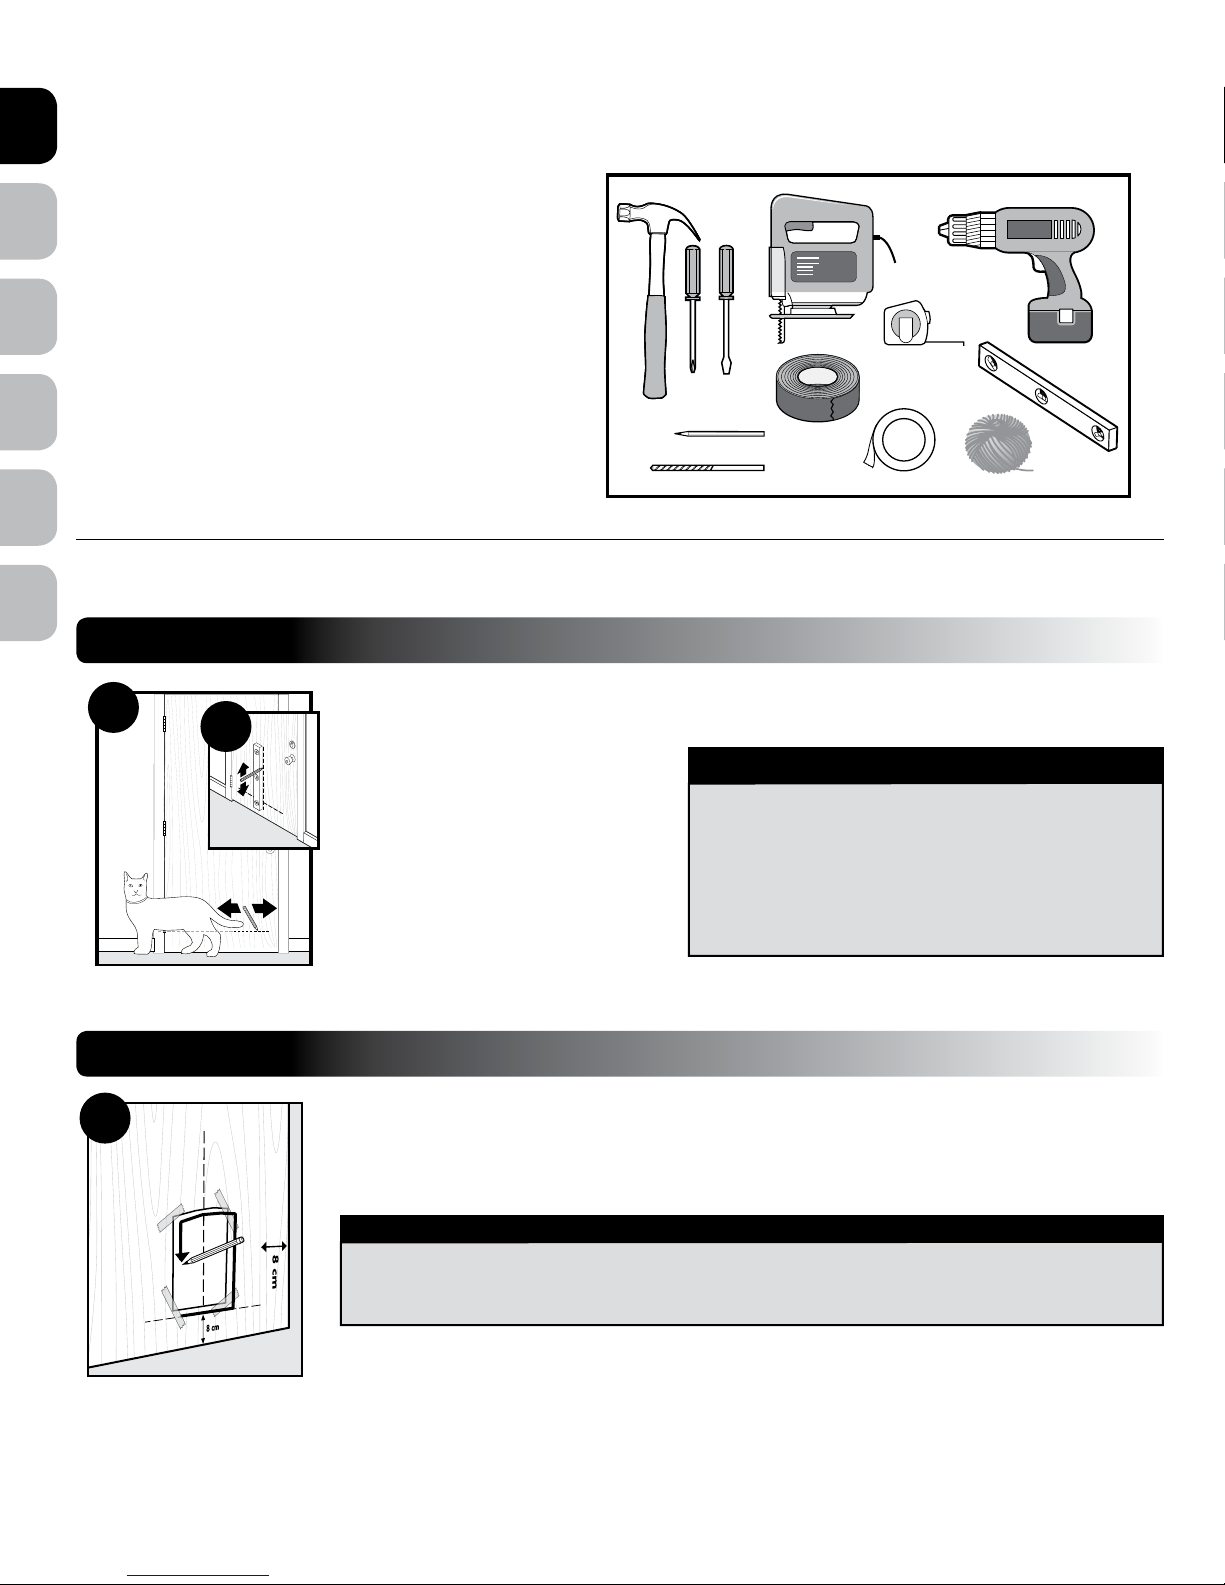
Tools Required
• Hammer
• Jig or Keyhole Saw*
• Phillips Screwdriver
• Slotted Screwdriver
• Drill
• 13 mm (½”) Drill Bit
• Level
• Tape Measure
• Masking or Painter’s Tape
• Duct Tape
• String
• Pencil
• Safety Equipment
• Optional: Silicone Adhesive
Installation in a Non-Glass Door
Door
STEP 1
Determine Cat Flap Location
Note: Disconnect Power Adaptor from
Cat Flap (or remove optional rechargeable
battery if using) and disconnect the Motion
Sensor Wire from Exterior Frame prior
toinstallation.
Measure and mark your cat’s belly height on
the interior side of door. Draw a level line at
your cat’s belly height (Fig. 1A).
Determine location for the Cat Flap. Draw a
vertical center line through the belly height line using a level (Fig. 1B).
Helpful Tip: Mark belly height and vertical center line lightly with a pencil or on a piece of tape so marks can easily be erased or removed.
STEP 2
Preparing Door
Match the marked lines on the door with the lines on the cutting template. Tape the cutting template in place and
carefully trace cutting template. Make sure to trace underneath tape and connect the corners. Remove the cutting
template and any excess tape from the door (Fig. 2A).
* With appropriate blade type and length; example, a metal door would require a blade for metal.
1A
1B
NOTICE
• Read this entire guide prior to cutting or modifying an
opening in your door or wall. Do not proceed with cut-out
or installation until your Cat Flap is assembled, powered
up, programmed for your cat, and all steps under
“Prepare, Setup and Test” have been completed.
• If homeowner’s door or other application is not level, the
Cat Flap must be installed level to swing properly.
2A
NOTICE
When applying cutting template there should be a minimum of 8 cm between the bottom and sides of
the door and the outer edge of the cutting template to maintain the structural integrity of the door.
Page 15
DENL ITFR ESEN
www.petsafe.net 15
STEP 3
Cut Cat Flap Opening
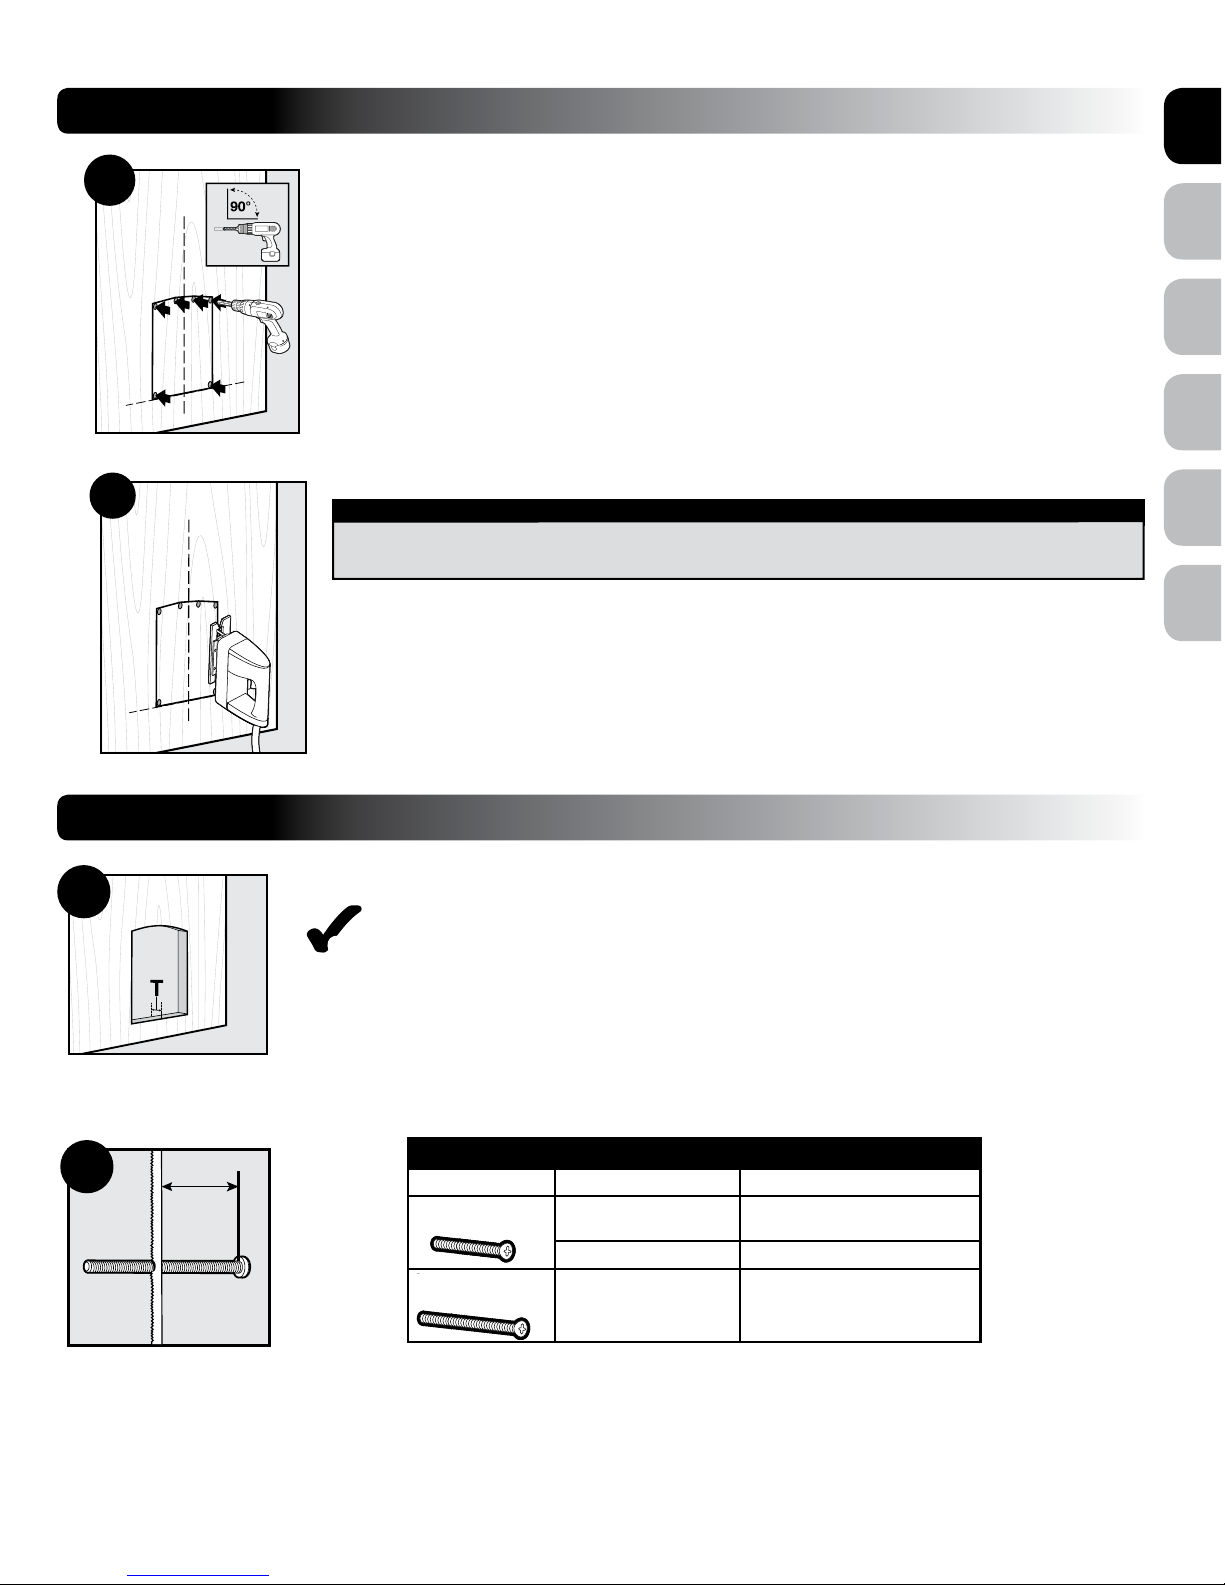
Drill 13 mm (½”) holes in inside corners and center of top angle of drawn template (Fig. 3A).
Helpful Tip: Use both hands to hold drill steady and straight at a 90° angle.
Helpful Tip: Before cutting Cat Flap opening, apply painter’s or masking tape on jigsaw blade guide and
along outer edges of drawn template to help protect door surface from marks and scratches during cutting.
Beginning in one of the holes just drilled, cut along the drawn template lines. After cutting out the opening, you
may need to recut to square the opening. This is necessary for the Cat Flap frame to fit correctly (Fig. 3B).
Helpful Tip: Use proper saw blade length and type according to door thickness and material. Cut slowly
using both hands to hold the saw steady and straight at a 90° angle. This will prevent the blade from cutting
unevenly between interior and exterior sides of the door.
Helpful Tip: If cut piece does not easily come out, check other side of door to make sure it has been cut.
STEP 4
Install Cat Flap
Before putting away your jigsaw, place Interior Frame (frame with flaps) inside the cut-out on the
interior side of the door to check the fit. Then place the Exterior Frame into the exterior of the cut-out to
check the fit. If the frames do not easily fit inside the opening, you may need to recut opening before
proceeding with installation.
Measure the thickest part (T) of cut-out. Note this measurement (Fig. 4A).
Before installing Cat Flap, you need to determine which screw length is needed for your installation. Depending
on your door thickness, the screws may need to be trimmed with a hacksaw or screw cutter. If the screws are too
long, the finishing plugs will not fit. Use the Screw Selection Guide to select which screw to use and if it needs to be
trimmed (Fig. 4B).
Helpful Tip: Remove pencil marks and make sure surface is free of debris and shavings before installing frames.
3A
3B
NOTICE
Make sure there is nothing on the other side of the door where you will be drilling the holes or cutting
the opening.
4A
Fit
Check
T+
56 mm
4B
Screw Selection Guide
Screw Length Cut-Out Thickness (T) Trimming Instructions
88mm screw
4 mm - 25 mm
Trim screw to door thickness
(T) +
56 mm
(Fig. 4B).
25 mm - 38 mm
No trimming needed.
100mm screw
38 mm - 51 mm No trimming needed.
Page 16
ENES FRIT NLDE
16 www.petsafe.net
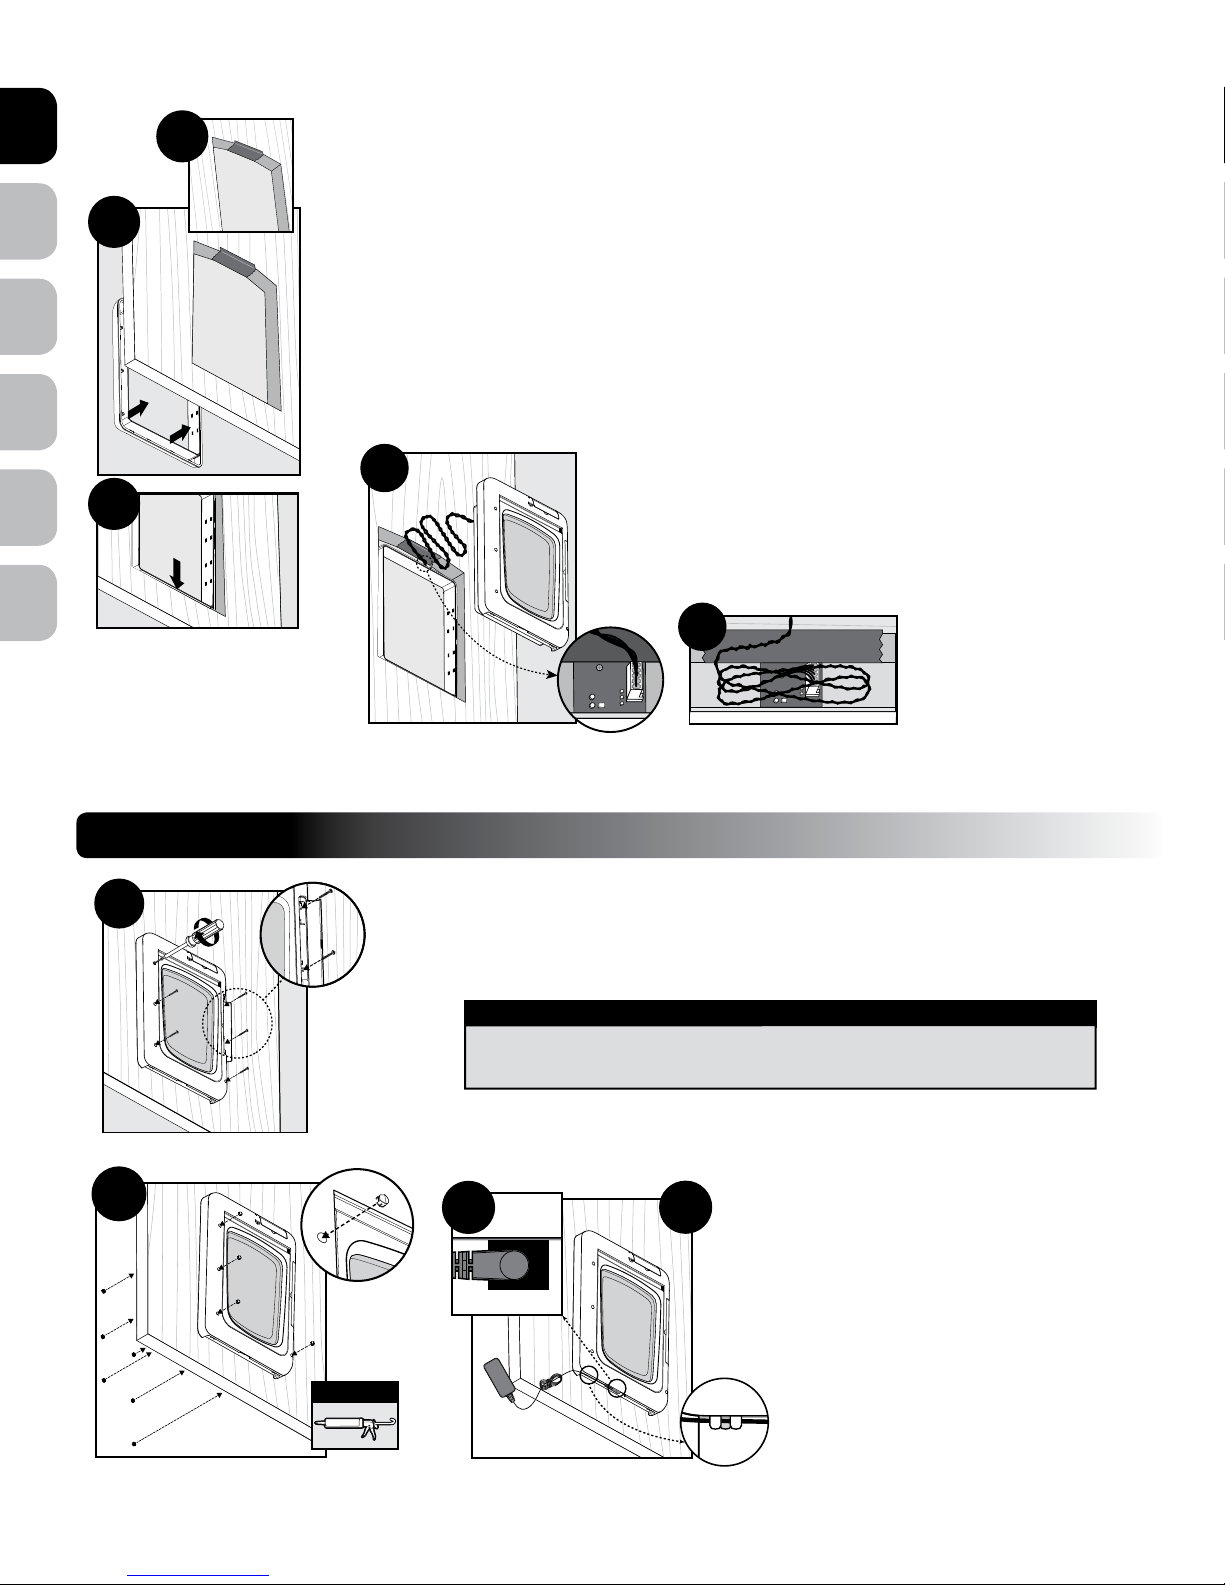
Apply duct tape along top interior and exterior edge of cut-out. Leave approximately 5 cm uncovered on each
side and make sure no excess tape will show outside the frame. This is to cover raw edge of cut-out to keep it
from pinching or cutting Motion Sensor Wire (Fig. 4C).
Place Exterior Frame into cut-out from the exterior of the door (Fig. 4D).
Align Exterior Frame flush with bottom of cut-out (Fig. 4E).
Helpful Tip: A spare pair of hands are useful at this point to hold Exterior Frame in place while you install
Interior Frame.
Plug Motion Sensor Wire from Interior Frame into connector on the Exterior Frame (Fig. 4F).
Without pinching the wire, guide excess wire into space between top edge of door cut-out and tunnel on
Exterior Frame. Align Interior Frame into cut-out. View both sides of door to ensure the exterior and interior
telescoping tunnels are aligned (Fig. 4G).
Helpful Tip: You should be able to see clearly through all screw holes when your door is aligned properly.
STEP 5
Insert Screws And Plugs
Insert mounting screws through Interior Frame screw holes. Be sure to insert screws into screw holes
inside Battery Compartment. Check to make sure Cat Flap fit is correct and frame is aligned flush.
Tighten screws (Fig. 5A).
Note: This model of the Passport
™
Intelligent Cat Flap has 4 screw holes.
Insert finishing plugs into screw holes of Interior and Exterior Frames. Align flat edge of plugs with
outer edges of frame. Plugs will only fit into frame
in one direction (Fig. 5B).
Optional: Apply silicone adhesive around
Exterior Frame for improved weather resistance.
Plug Power Adaptor into connector on underside
of Interior Frame (Fig. 5C).
Route Power Adaptor wire through wire guides
in desired direction towards nearest mains power
outlet(Fig. 5D).
4E
4D
4C
4G
4F
5A
5B
Optional
NOTICE
Use a manual screwdriver to tighten screws. Do not over-tighten. Overtightening can strip the screws or warp the Cat Flap frame.
5C
5D
Page 17
DENL ITFR ESEN
www.petsafe.net 17
STEP 6
Train Cat
Note: The Passport™ Intelligent Cat Flap is designed with an electric motor to release and unlock the flap
system when a programmed cat is detected. Do not allow your cat to run or charge through the Cat Flap. Due to
variable Radio-Frequency Interferences and the location where your Cat Flap is installed, it could take several
seconds for the microchip to be read and the flap system to unlock.
To train your cat, set the Cat Flap to Open Mode (see “Flap Operational Modes” section of Operating Guide).
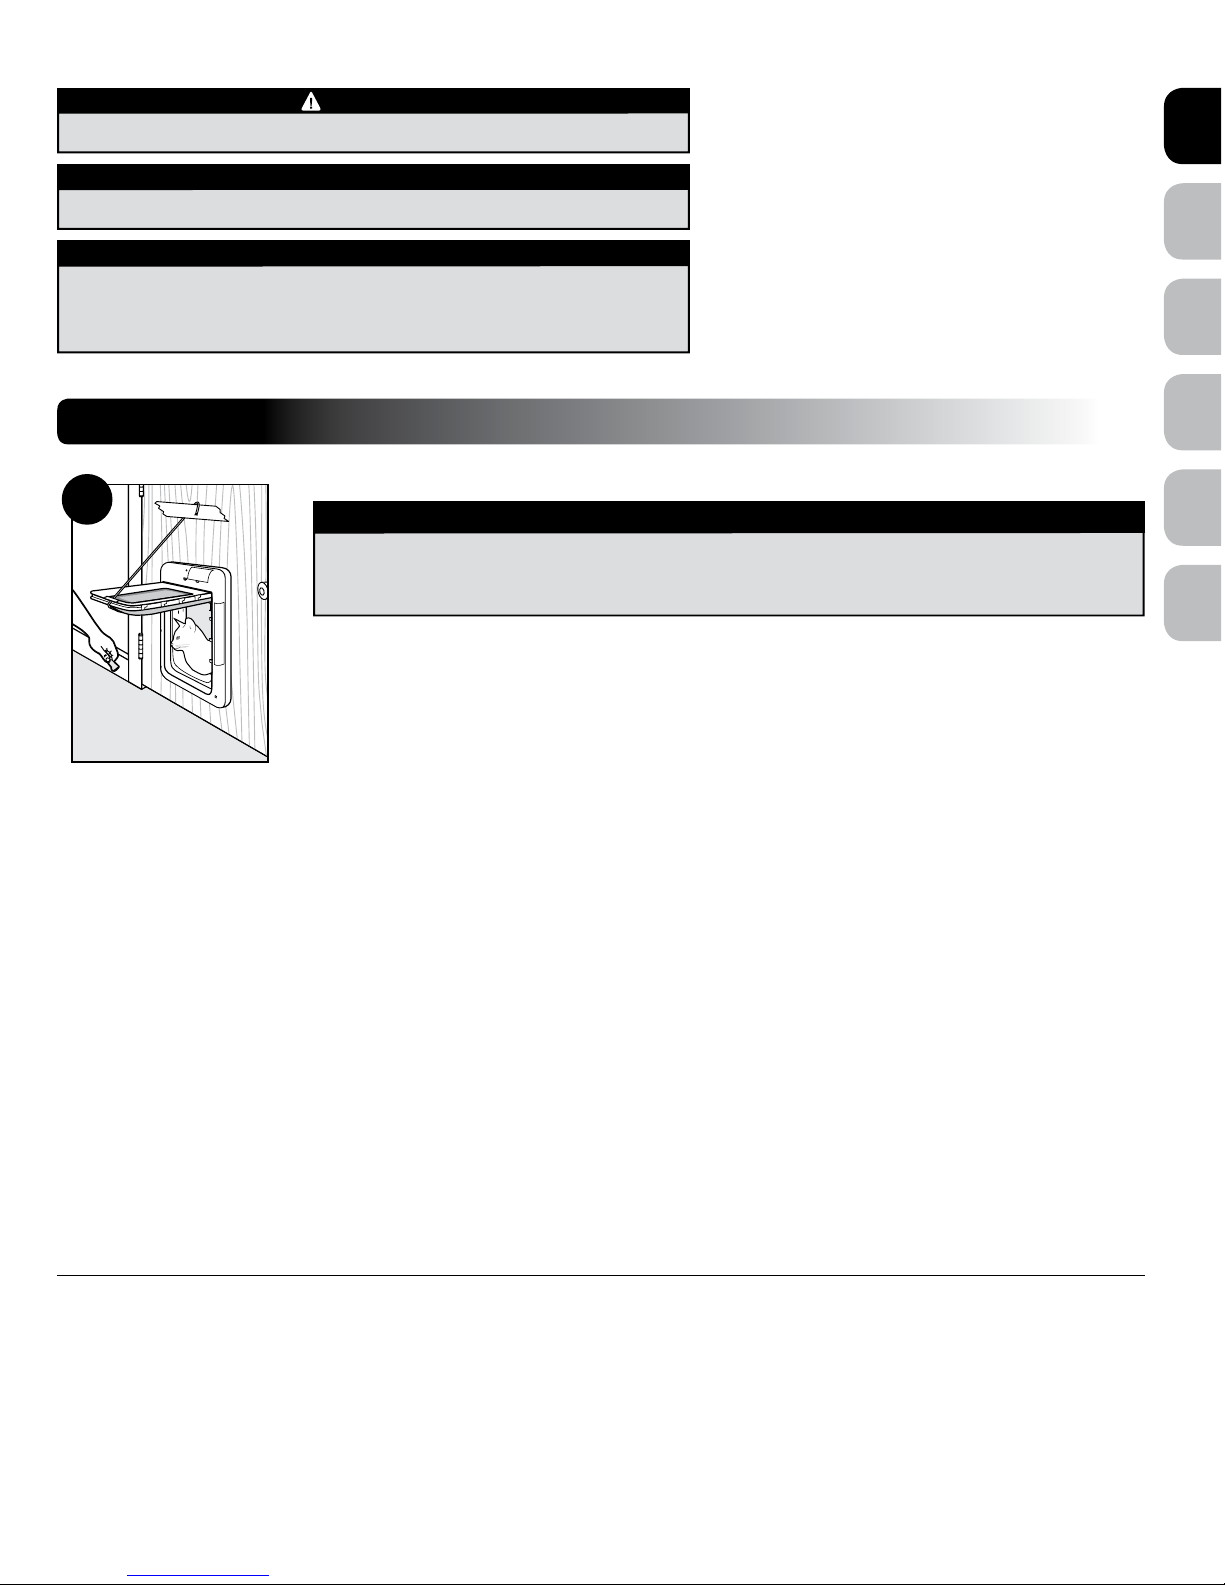
Lift or tape Main Flap and interior U-flap open using string to help your cat become familiar with the Cat Flap
opening. MAKE SURE TAPED FLAP IS SECURE AND WILL NOT FALL DURING TRAINING. Try to encourage your cat to come through
the Cat Flap. DO NOT FORCE your cat through the flap or they may become frightened. If your cat is timid, it might be helpful to lock the exterior
U-flap so it does not move and scare your cat. To lock exterior U-flap, make sure interior U-flap and Main Flap are securely taped open while in
Open Mode. Next, change flap Operational Mode to Locked Mode (see “Flap Operational Modes” section of Operating Guide). This will lock
the exterior U-flap in place. Please be aware you may receive the “Flap Held Open” error message on the LCD Screen. This message will go away
once you lower the flaps after your cat is trained. Establish a motive for your cat to use the Cat Flap. A good motivator is usually food. First feed your
cat close to Cat Flap on inside. Once your cat is comfortable approaching the flap, move food to outside to try to get your cat to go through the Cat
Flap. After your cat has used the Cat Flap a few times, lower flaps and change flap back to Open Mode. Hold flaps open and try to get your cat to
go through opening while gently lowering flaps so they can touch your cat’s back. This will help your cat become familiar with the flaps. Encourage
your cat to push through the flaps on their own (Fig.6A).
Once your cat is comfortable entering and exiting through the closed flaps in Open Mode, change the flap operational mode to Smart Mode to
operate with your cat’s microchip or Passport
™
Key. Walk your cat to the Cat Flap until it is detected and the flap system unlocks. Encourage your cat
to push through the flaps to the other side. Repeat training your cat to walk to the Cat Flap and push through to the other side until they do it on their
own. It is recommended NOT to use any other pet access modes (In-Only, Out-Only or Timer) until your cat is completely comfortable using the Cat
Flap in In/Out Mode (see “Master Access Modes” and “Pet Access Mode” sections of the Operating Guide).
Most cats will learn to use Cat Flaps with a few short training sessions. However, some cats can take a little longer to become comfortable and more
confident with the Cat Flap. The most important rule is to be patient with your cat. Let your cat work out for itself that it can go through the Cat Flap.
With a little patience and training, you and your cat will soon enjoy the freedom your new Cat Flap provides.
Helpful Tip: Try treats or toys to encourage your cat to go through the Cat Flap and become comfortable using it.
Installation in a Wall
Passport™ Wall Entry Kits are available for wall installations or installation in thicker applications (95 mm to 305 mm thick). The Wall Entry Kit frames
out the wall cut-out, giving your installation a clean, smooth, finished look. You may purchase a Passport
™
Wall Entry Kit by visiting our website at
www.petsafe.net or calling the Customer Care Centre.
CAUTION
Do not allow your cat to chew on the power cord.
NOTICE
Only use designated Power Adaptor with the product. Do not use Power
Adaptor in temperatures below 0° C or above 40° C. Power Adaptor for inside
use only.
WARNING
To avoid tripping, always position the power cord out of the path of foot trafc.
6A
During cat training while Cat Flap is in Open Mode, make sure to GENTLY lower ap onto cat’s back.
Also avoid possible injury by making sure your cat is entirely through the Cat Flap opening, including
paws and tail, before completely releasing flap.
CAUTION
Page 18
18 www.petsafe.net
ENES FRIT NLDE
18 www.petsafe.net
Installation in Glass
This variant of the Passport™ Intelligent Cat Flap (Model number: PPA19-20558) can be installed in glass. Glass installation of the Cat Flap requires
a glass adapter which is available for purchase by calling the Customer Care Centre. The glass adapter comes with a separate circular cutting
template to use specifically for glass installation. It is not possible to cut holes in toughened glass or double glazed units except at the time of
manufacture. Please consult a glazier.
Note: When installing the Cat Flap in glass, the structural integrity of the glass should be considered. It is recommended to install the flap in glass
that is at least 3 mm thick, and the glass pane should be no wider than 815 mm.
Congratulations! You have successfully completed
installation. See Operating Guide for programming and
additional information.
Page 19
PetSafe® products are designed to enhance the relationship between you and your pet. To learn
more about our extensive product range which includes Containment Systems, Training Systems, Bark
Control, Pet Doors, Health & Wellness, Waste Management and Play & Challenge products, please
visit www.petsafe.net.
Les produits PetSafe
®
sont conçus pour améliorer la relation entre vous et votre animal de compagnie.
Pour en savoir plus sur notre vaste gamme de produits, comprenant des systèmes de confinement, de
dressage, de contrôle de l’aboiement, des chatières, des produits consacrés à la santé et au bien-être,
de gestion des déjections, ainsi qu’au jeu et aux défis, rendez-vous sur notre site www.petsafe.net.
PetSafe
®
-producten zijn ontworpen om de relatie tussen u en uw huisdier te verbeteren. Bezoek onze
website op www.petsafe.net voor meer informatie over onze uitgebreide productreeks die onder
meer omheiningssystemen, trainingssystemen, blafbeheersing, kattenluiken, gezondheid en welzijn,
afvalbeheersing en producten voor spel en uitdaging omvat.
Los productos PetSafe
®
están diseñados para mejorar la relación entre usted y su mascota. Para saber
más acerca de nuestra amplia gama de productos, que incluyen limitadores de zona, sistemas de
adiestramiento, control de ladridos, puertas para mascotas, salud y bienestar, gestión de residuos y
productos de juego y reto, visitewww.petsafe.net.
I prodotti PetSafe
®
sono progettati per migliorare la qualità della relazione tra voi e il vostro cane. Per
ulteriori informazioni sulla nostra estesa gamma di prodotti comprendente sistemi antifuga, soluzioni
per l’addestramento, controllo dell’abbaio, porte per animali domestici, i prodotti della linea salute e
benessere, gestione dei rifiuti e gioco e prova, visitare: www.petsafe.net.
PetSafe
®
Produkte sind darauf ausgelegt, die Beziehung zwischen Ihnen und Ihrem Haustier
zu verbessern. Um mehr über unsere breite Produktpalette zu erfahren, die Rückhaltesysteme,
Trainingssysteme, Bellkontrolle, Haustiertüren, Gesundheit & Wellness, Haustiertoiletten und Sport und
Spiel umfasst, besuchen Sie bitte uns aufwww.petsafe.net.
400-1579-19
©2014 Radio Systems Corporation
Radio Systems Corporation
10427 PetSafe Way
Knoxville, TN 37932 USA
(865) 777-5404
www.petsafe.net
Radio Systems PetSafe Europe Ltd.
2nd Floor, Elgee Building, Market Square
Dundalk, Co. Louth, Ireland
+353 (0) 42 942 1811
Covered by US patent 6141911. Other patents pending.
Protégé par le brevet GB2381180. Autres brevets en attente.
In de beschermd volgens patent GB2381180. Andere patenten aangevraagd.
Protegido por la patente GB2381180. Otras patentes en trámite.
Protetto da brevetto n° GB2381180. Altri brevetti in corso di registrazione.
Geschützt durch Patent GB2381180. Weitere Patente angemeldet.
 Loading...