

Petsafe Pet Containment System, PIF 300 21 Operating And Training Manual

PetSafe Wireless
®
Pet Containment System
Operating and Training Guide
Manual de adiestramiento y funcionamiento
Please read this entire guide before beginning
Por favor, antes de comenzar, lea completamente esta guía
P
E
T
E
S
F
A
S
S
H
R
A
E
P
N
P
W
Y
O

Thank you for choosing PetSafe®, the number 1 selling brand of electronic training solutions in the
world. Our mission is to ensure your pet’s safety by providing you with the tools and techniques to
successfully train your pet. If you have any questions, please contact the Customer Care Center at
1-800-732-2677 or visit our website at www.petsafe.net.
___________________________________________
Table of Contents
Components ....................................................................................................................................3
Other Items You May Need ...............................................................................................................3
How the System Works .....................................................................................................................4
Key Defi nitions ................................................................................................................................4
Operating Guide
Set Up the Transmitter ...................................................................................................................5
Prepare the Receiver Collar ............................................................................................................5
Adjust the Pet Area to Desired Size ................................................................................................6
Transmitter Range Chart ...............................................................................................................7
Place the Boundary Flags ...............................................................................................................7
Fit the Receiver Collar ...................................................................................................................8
Training Guide
Be Patient With Your Pet ................................................................................................................9
Day 1 – Boundary Flag Awareness ..................................................................................................9
Days 2 thru 4 – Continue Boundary Flag Awareness .....................................................................10
Days 5 thru 8 – Distraction Phase ................................................................................................10
Days 9 thru 14 – Supervision Off the Lead ...................................................................................11
Taking Your Pet Out of the Pet Area ..............................................................................................11
Wireless - To - Go ........................................................................................................................12
Accessories ....................................................................................................................................12
Frequently Asked Questions ........................................................................................................... 12
Troubleshooting ............................................................................................................................. 14
Test Light Instructions ...................................................................................................................15
Terms of Use and Limitation of Liability .........................................................................................15
Caution .........................................................................................................................................15
Product Warranty ...........................................................................................................................15
Español ........................................................................................................................................16
Mounting Template ........................................................................................................................32
FCC ..............................................................................................................................................32
2 www.petsafe.net
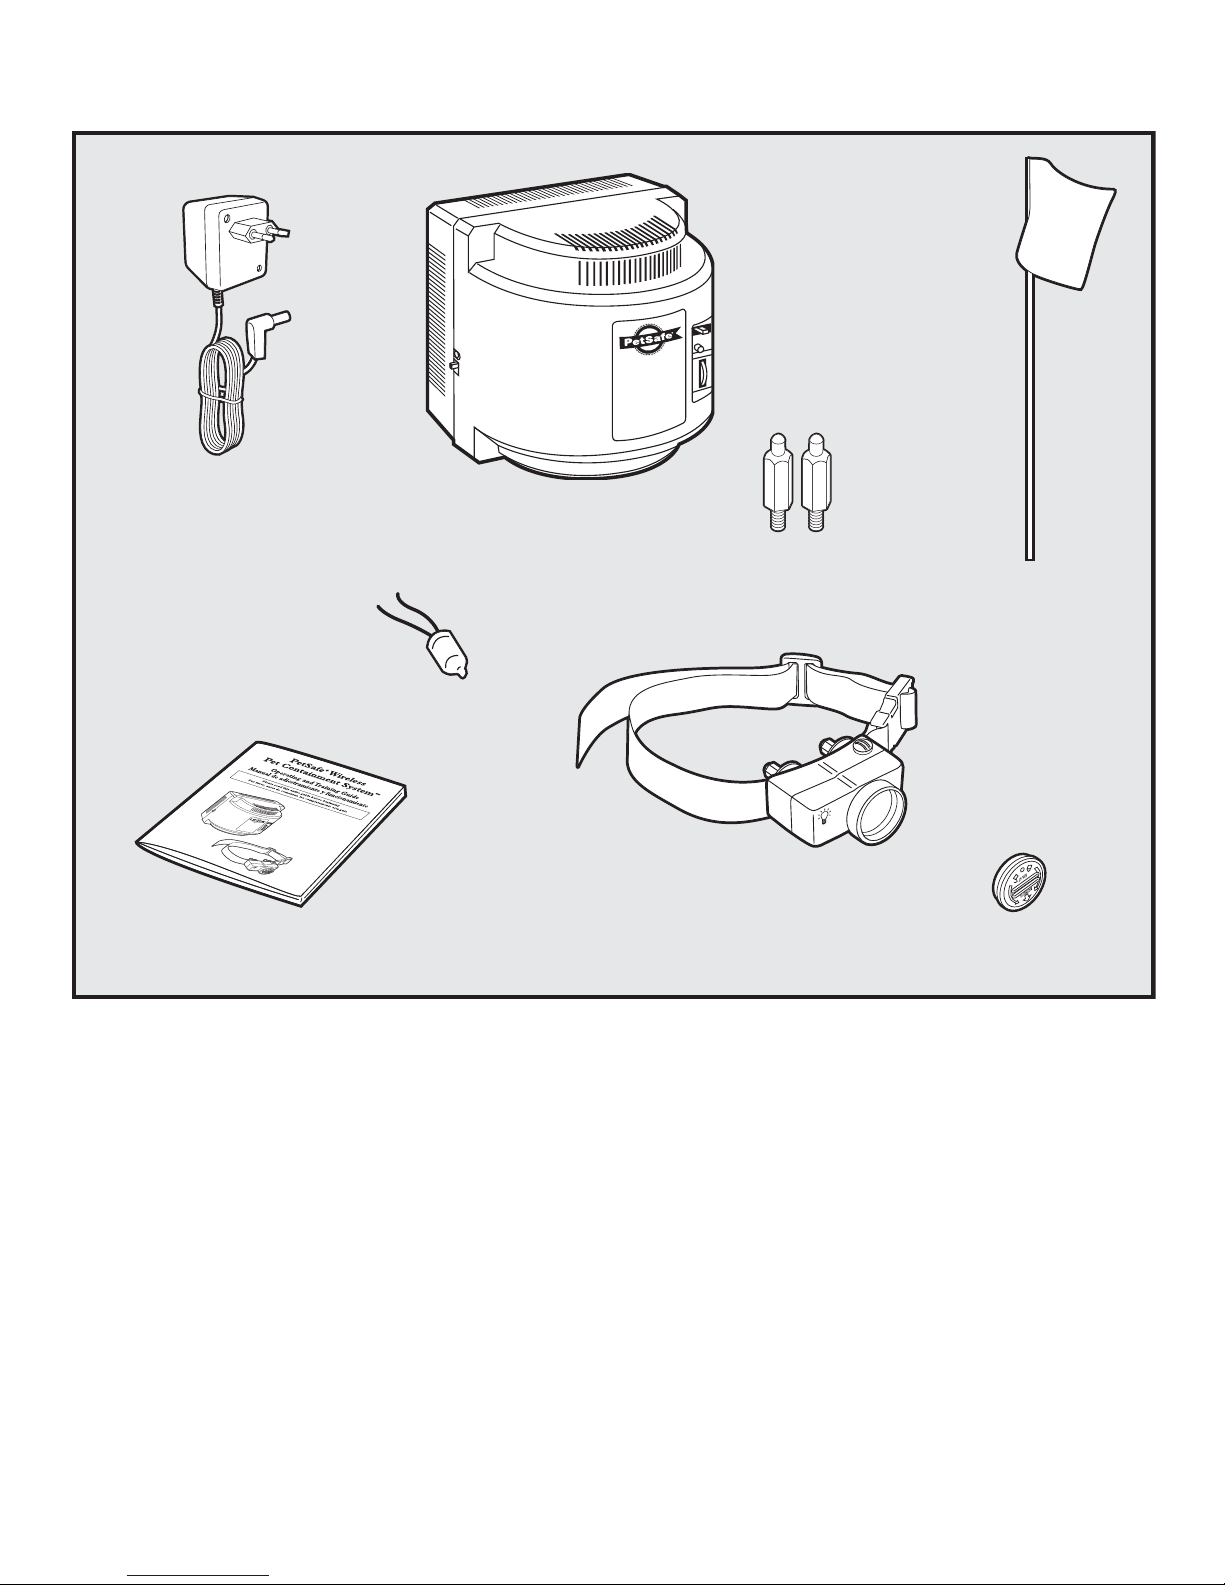
Components
E
P
T
E
S
F
A
S
S
H
R
E
A
N
P
P
W
Y
O
Power
Adapter
Operating and
Training Guide
Test Light
Transmitter
Collar with Short
Contact Points
Contact Points
Receiver
Long
Boundary Flags - 50
Battery
(PetSafe® RFA-67)
Other Items You May Need
• Pliers
• Scissors
• Lighter
• Drill & mounting hardware
• Tape measure
• Non-metallic collar and lead
Extra Receiver Collar:
If you have more than one dog, additional Receiver Collars are available. An unlimited number of dogs can be added to the
system as long as they are wearing a PetSafe Wireless Pet Containment System® Receiver Collar.
www.petsafe.net 3
How the System Works
The PetSafe Wireless Pet Containment System® has been proven safe, comfortable, and effective for pets over 3.6 kg
(8 lb). The system works by transmitting a radio signal up to 27.5 m (90 ft) in all directions. You temporarily defi ne the
Pet Area with Boundary Flags for a visual aid in training your pet. Your pet wears a Receiver Collar with Contact Points
that touch his neck, and, once trained, is allowed to roam freely within the Pet Area. When your pet reaches the Boundary
Zone, the Receiver Collar gives a warning beep before delivering a safe Static Correction through the Contact Points to get
his attention until he returns to the Pet Area.
Key Definitions
Transmitter: Transmits the radio signal and is the centre
of the Pet Area.
Pet Area: The area around the Transmitter where your
pet can roam freely.
Boundary Zone: A 0.6 to 1 m (2 to 3 ft) wide ring
outside the Pet Area where your pet’s Receiver Collar
will begin to beep and then begin to deliver a Static
Correction. The correction will start in the Boundary
Zone and continue anywhere beyond the Pet Area. Note:
The Receiver Collar is equipped with a safety time-out feature
that will stop correcting after 30 seconds if your pet remains
outside the Pet Area.
Receiver Collar: Receives the radio signal from the
Transmitter.
Correction Level Button: Adjusts the level of Static
Correction your pet receives outside the Pet Area.
Receiver Indicator Light: Indicates the level of
correction at which the Receiver Collar is set. This light
also serves as a low battery indicator.
Contact Points: Deliver the safe Static Correction when
your pet moves into the Boundary Zone.
Power Jack: Where the Power Adapter plugs into the
Transmitter. The Transmitter is powered by a standard
220-240 volt outlet.
Boundary Switch: Adjusts the size according to the size
of the Pet Area desired.
Power Light: Indicates when the Transmitter is on.
Boundary Control Dial: Adjusts the distance from the
Transmitter to the Boundary Zone. Note: Adjusting the dial
does not change the level of Static Correction on the Receiver
Collar.
Transmitter
Transmitter
Note: In many
neighborhoods, nearby
property lines may limit how
large the Pet Area can be.
PET AREA
Maximum 27.5m (90 ft) range
(45 average steps)
Receiver Collar
Correction
Level
Button
Washers
Contact Points
Battery
Receiver
Indicator
Light
4 www.petsafe.net
P
E
T
E
S
F
A
S
S
R
H
E
A
N
P
W
P
O
Y
Power Jack
Boundary Switch
Power Light
Boundary Control Dial
On/Off Switch
W
W
T
IE
N
A
-
6
7
Operating Guide
BOUNDARY
CONTROL
7
8
Power
Boundary Switch
Low
High
8
Step
1
Step
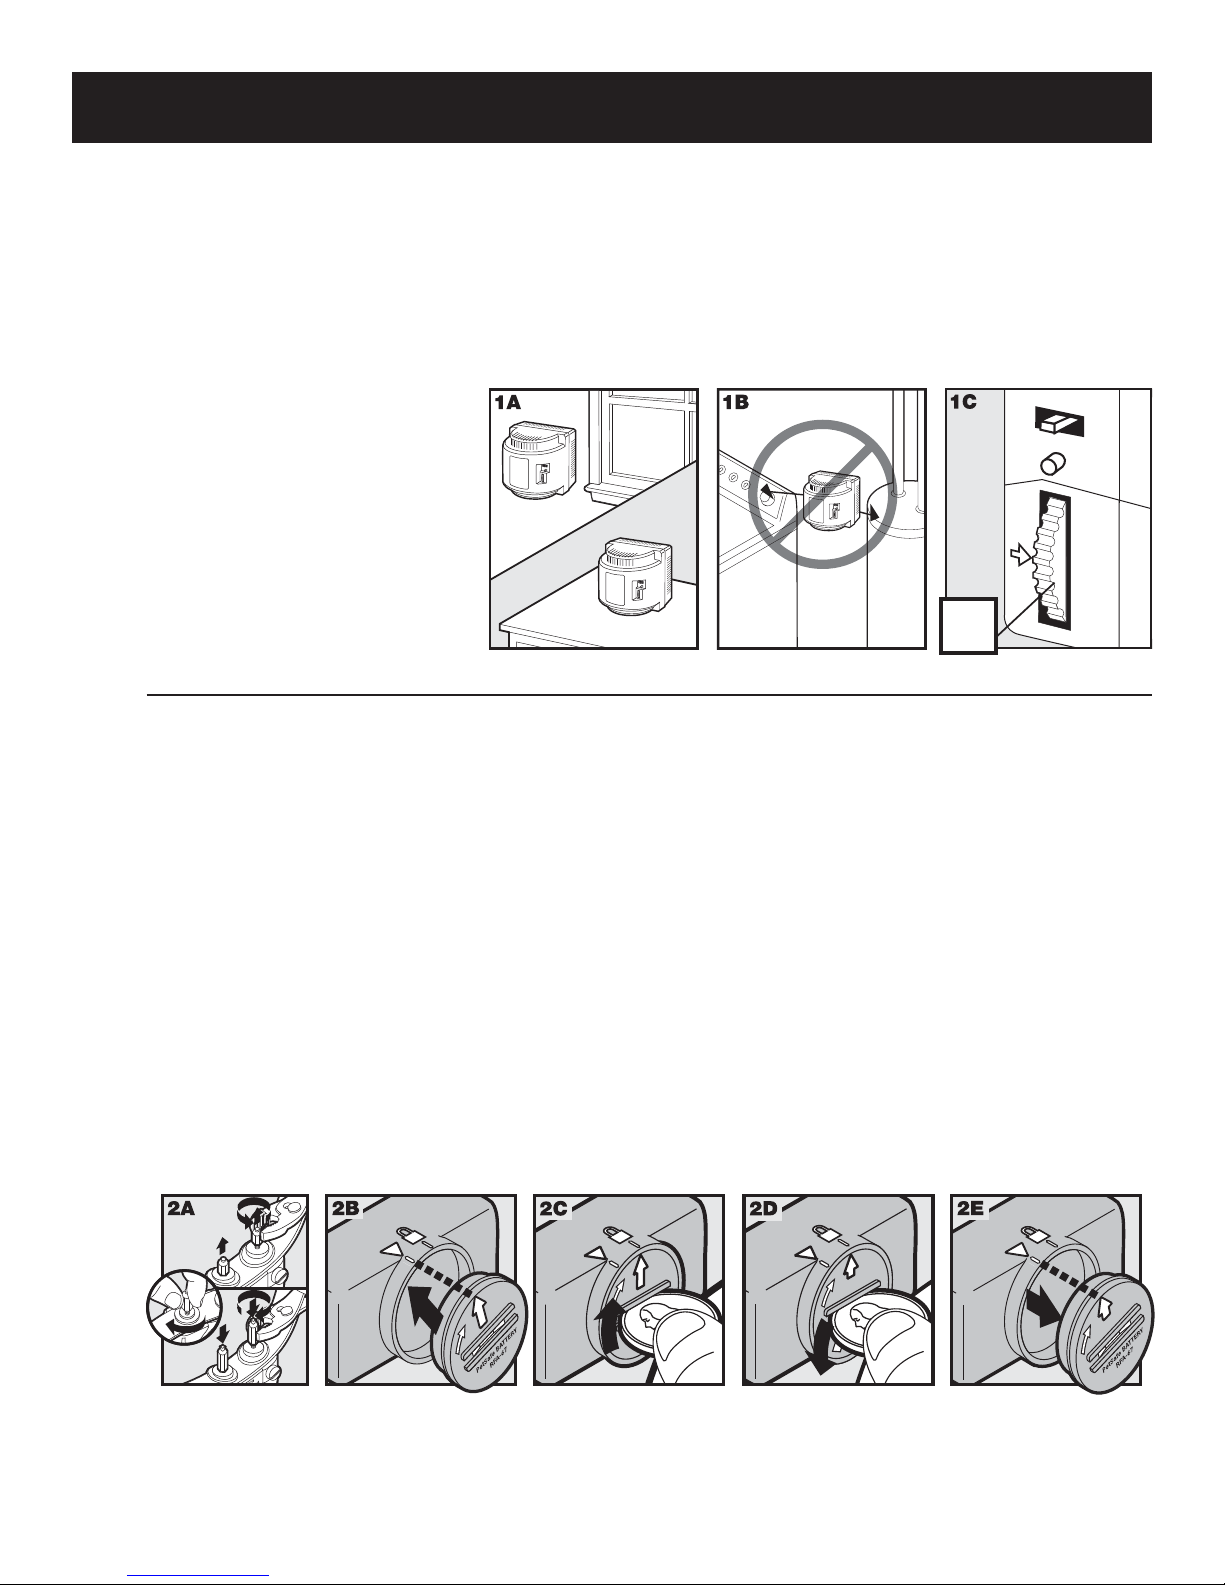
Set Up the Transmitter
Important: You may need to move the Transmitter several times before determining the final location.
The Transmitter is located at the exact centre of the desired Pet Area. Place the Transmitter:
• 0.6 to 1.2 m (2 to 4 ft) above the floor.
• In a dry, well ventilated, protected area.
• In an area where temperatures do not fall below freezing (e.g., garage, basement, shed, cupboard).
• On a non-metal table or mount on a wall (1A). A mounting template is included on the back of this guide.
• At least 1 m (3 ft) from large metal objects, as these items may reduce the size and shape of your Pet Area
(1B).
To maximize your Pet Area, make sure
the Boundary Switch is on “High”
and the Boundary Control Dial is set
to “8” (1C). Plug Power Adapter into
Power Jack and standard 120-volt
outlet. Turn the Transmitter on.
Wall
Mount
Tabletop
1m
(3ft)
Prepare the Receiver Collar
Your Receiver Collar comes with short Contact Points installed. Use the long Contact Points for pets with long or
thick hair. Remove and retighten the Contact Points using pliers. The Contact Points should be tightened one-half
turn beyond finger tight (2A). Check the tightness weekly.
2
To Insert and Remove the Battery
Note: Do not install the battery while the Receiver Collar is on your pet.
This process should be carried out within 1.5 m (5 ft) of the Transmitter.
The Receiver Collar utilizes a replaceable PetSafe® battery (RFA-67). This unique battery is designed to make battery
replacement easier and increase water protection.
To insert the battery, align the symbols on the battery (arrow) and Receiver Collar (triangle) (2B). Use a large coin
to turn the battery clockwise until the arrow lines up with the lock symbol on the housing (2C) .
To remove the battery, turn the battery anti-clockwise using a large coin (2D, 2E). DO NOT attempt to cut into or
pry open the battery. Be sure to discard the used battery properly.
A replacement PetSafe® battery (RFA-67) can be found at many retailers. Contact the Customer Care Centre or
visit our web site at www.petsafe.net to locate a retailer near you.
2
1
2
W
P
A
3
4
5
3
www.petsafe.net 5
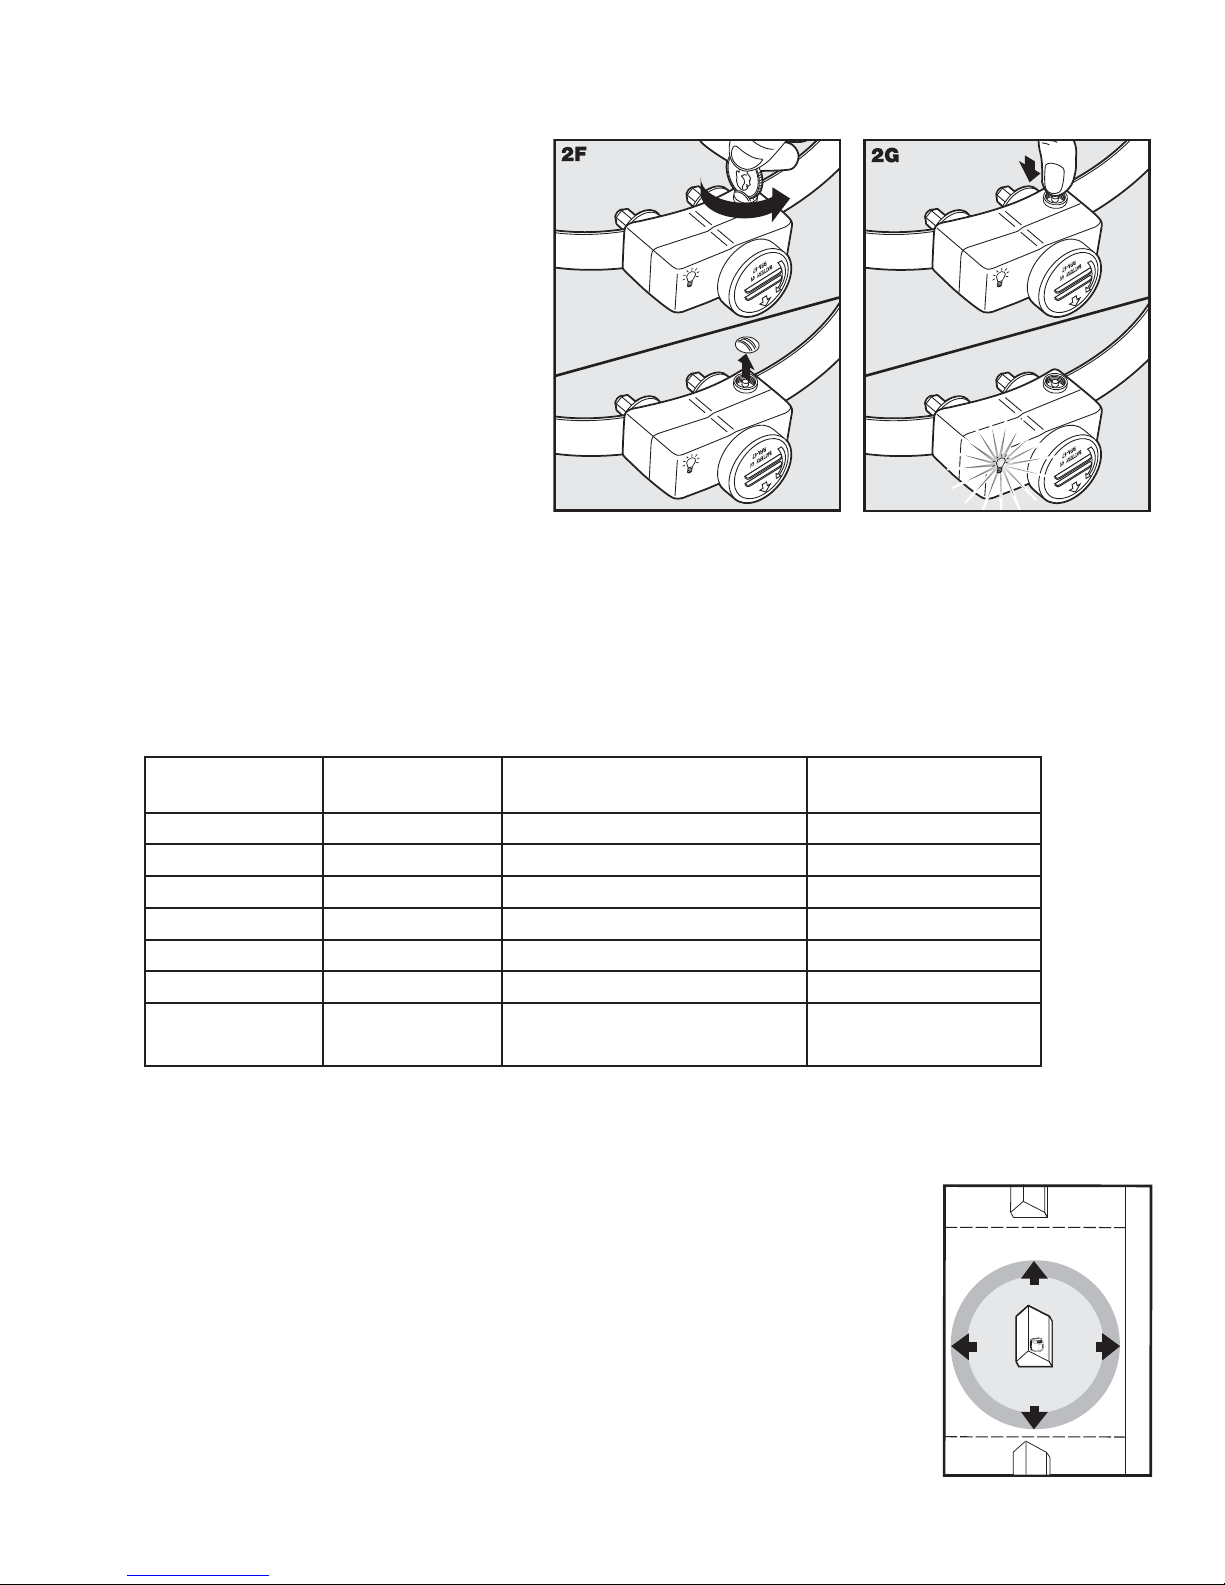
To Set the Static Correction Level
Note: Your Receiver Collar has been factory-set to Beep Only.
Read all the steps below before attempting to set
the Static Correction Level. Refer to the Function
and Response Table below for advice on setting the
Static Correction Level that best suits your pet.
1. Remove the clear plastic cover with a coin to
expose the Correction Level Button (2F).
2. With the battery installed, press the Correction
Level Button and release when the Receiver LED
Indicator Light lights up (2G).
3. The Receiver LED Indicator Light will emit
a series of fl ashes corresponding to the Static
Correction Level.
4. Increase the Static Correction Level by pressing
and releasing the Correction Level Button within
5 seconds of the previous series of fl ashes.
5. After setting the Static Correction Level, replace
the cover to protect the Correction Level Button.
The Static Correction levels increase in strength from 1 to 6. Pushing the Correction Level Button while the
Receiver Collar is on level 6 will cause the Receiver Collar to revert to level 1. Refer to the Function and Response
Table to choose the Static Correction level that best fi ts your pet.
The Receiver LED Indicator Light acts as a low battery indicator, fl ashing every 4 to 5 seconds when replacement
is required.
Step
3
Function and Response Table
Indicator Light
Response
1 Flash 1 No Static Correction, Beep Only
2 Flashes 2 Low Static Correction Timid
3 Flashes 3 Medium-Low Static Correction Timid or Average
4 Flashes 4 Medium Static Correction Average Energy
5 Flashes 5 Medium-High Static Correction Average or High Energy
6 Flashes 6 High Static Correction High Energy
Flashes once every
4 to 5 seconds
Note: Begin training with Static Correction Level 2 and only increase if your pet does not respond to the Static Correction.
__________________________________________________
Static
Correction Level
Receiver Collar Function Temperament of Pet
Indicates Low Battery
Adjust the Pet Area to Desired Size
Make sure the entire Pet Area lies within your property boundaries (3A). Always start
determining the Boundary Zone at the shortest distance from Transmitter. Place the
Boundary Switch on “High” for Boundary Zones more than 13.5 m (45 ft) from the
Transmitter. For Boundary Zones below this distance place the Boundary Switch on “Low.”
Two-Person Method
Hold the Receiver Collar at your pet’s neck height (3B) with the Petsafe logo facing away
from the Transmitter (3C). Walk to the edge of the desired Pet Area. Facing away from the
Transmitter, hold the Receiver Collar at the edge of the desired Pet Area (3D).
Starting with the Boundary Control Dial set to “8”, have a second person turn the dial
down SLOWLY. When the Receiver Collar starts to beep, tell the person to stop turning
the Boundary Control Dial. Record your settings below for future reference.
3A
Pet
Area
STREET
6 www.petsafe.net

One-Person Method
Measure the shortest distance from the
3B
3C
desired Boundary Zone to the Transmitter.
Place the Boundary Switch on “High” for
Boundary Zones more than 13.5 m
(45 ft) from the transmitter and on “Low”
for Boundary Zones below this distance.
Then set the Boundary Control Dial
according to the Transmitter Range Chart
below. Take the Receiver Collar to the
Boundary Zone with the Receiver Collar
at your pet’s neck height (3B) with logo
side facing away from the Transmitter (3C). Determine where the Receiver Collar begins to beep. If the Receiver Collar beeps
before or after the desired Boundary Zone, return to the Transmitter and adjust the Boundary Control Dial. Repeat this process
until the Receiver Collar is beeping at the desired location. Record your settings below for future reference.
Note: If you cannot hear the beep, refer to the “Test Light Instr uctions” section.
3D
Pet
Area
Boundary
Zone
Transmitter
Range Chart
Boundary
Control
Dial
Position
1
2
3
4
5
6
7
8
Note: These distances are approximate.
Boundary
Switch
LOW
1.5–3 m
(5-10 ft)
1.5–3 m
(5-10 ft)
4.5–6 m
(15-20 ft)
6–7.5 m
(20-25 ft)
7.5–9 m
(25-30 ft)
10.5–12 m
(35-40 ft)
12–13.5 m
(40-45 ft)
12–13.5 m
(40-45 ft)
Boundary
Switch
HIGH
1.5–3 m
(5-10 ft)
1.5–3 m
(5-10 ft)
7.5–10.5 m
(25-35 ft)
12.5–16.5 m
(42-55 ft)
16.5–19.5 m
(55-65 ft)
23–26 m
(75-85 ft)
26–27.5 m
(85-90 ft)
26–27.5 m
(85-90 ft)
Record Your Settings
Final
Boundary
Switch Setting
(HIGH or
LOW)
Home
Camping
Vacation
Other
Final
Boundary
Control Dial
Position
(1-8)
Receiver
Static
Correction
Level (1-6)
Step
Place the Boundary Flags
The Boundary Flags are visual reminders for your pet of where the Boundary Zone is located. The Receiver
Collar will activate within 0.6 to 1 m (2 to 3 ft) of the Boundary Flags.
1. Hold the Receiver Collar at your pet’s neck height with the PetSafe logo facing away from the Transmitter.
4
2. Walk towards the Boundary Zone until the Receiver Collar beeps (4A).
3. Place a Boundary Flag in the ground (4B).
4A
4B
4. Walk back into the Pet Area until the beeping stops.
5. Repeat this process around the Boundary Zone until it is marked with
Boundary Flags every 3 m (10 ft).
The Boundary Flags may be in different parts of the Boundary Zone and
may not be in a line. The Boundary Zone is 0.6 to 1 m (2 to 3 ft) wide.
E
P
T
S
E
F
A
S
S
R
H
E
A
N
P
W
P
O
Y
Note: If you cannot hear the beep, refer to the “Test Light Instr uctions” section.
www.petsafe.net 7
Step
5
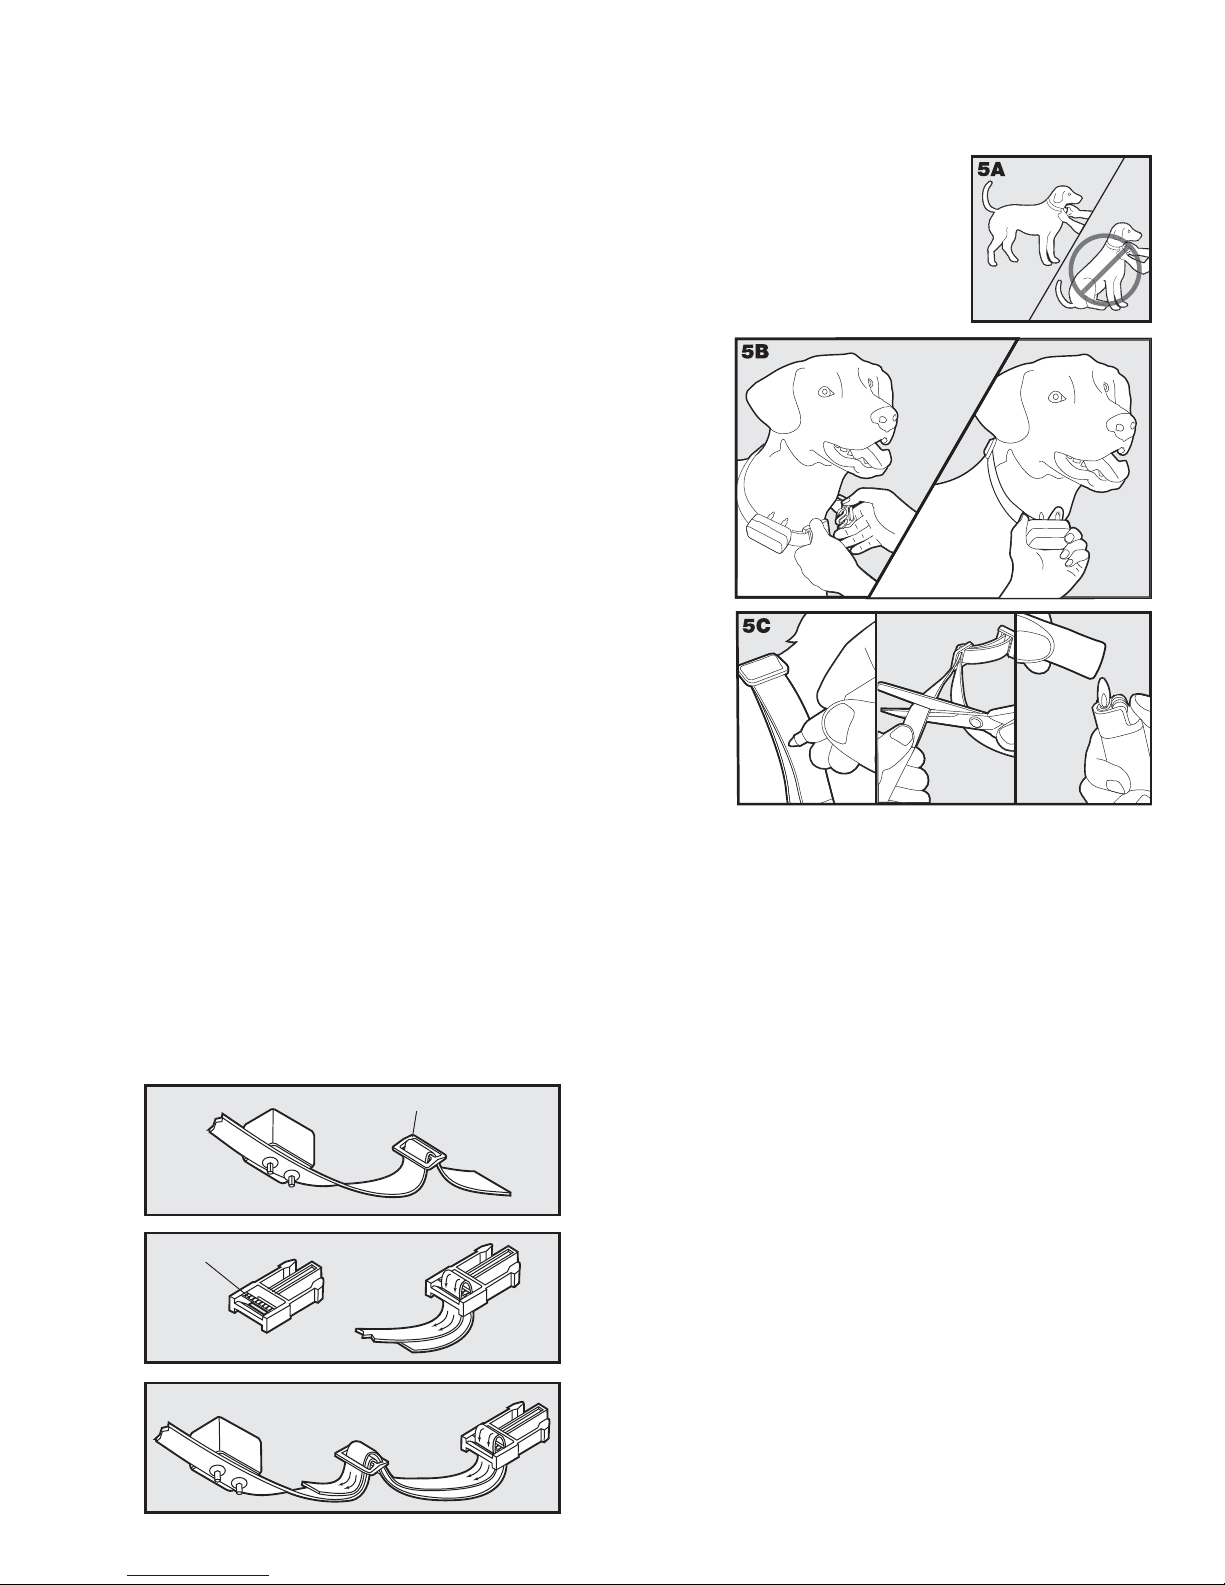
Fit the Receiver Collar
Important: The proper fit and placement of your Receiver Collar is important for effective training and the Safety of your
pet. The Contact Points must have direct contact with your pet’s skin on the underside of his neck.
To assure a proper fit, please follow these steps:
1. Make sure that the battery is not installed in the Receiver Collar.
2. Start with your pet standing comfortably (5A).
3. To make it easier to hear the warning beep, place the Receiver Collar on your pet with the
PetSafe logo side of the Receiver facing up.
4. Centre the Contact Points underneath your pet’s neck, touching the skin. If your pet has a long
or thick coat, use the enclosed long Contact Points to reach through
the hair. Note: It is sometimes necessary to trim the hair around the
Contact Points to make sure that contact is consistent.
5. Check the tightness of the Receiver Collar by inserting one finger
between the end of a Contact Point and your pet’s neck. The fit
should be snug but not constricting (5B).
6. Allow your pet to wear the collar for several minutes then recheck
the fit. Check the fit again as your pet becomes more comfortable
with the Receiver Collar.
7. Trim the collar as follows (5C):
a. Mark the desired length of the Receiver Collar with a pen. Allow
for growth if your pet is young or grows a thick winter coat.
b. Remove the Receiver Collar from your pet and cut off the excess.
c. Before placing the Receiver Collar back onto your pet, seal the
edge of the cut collar by applying a flame along the frayed edge.
Important: For comfort, safety and effectiveness of product,
please ensure the following:
• During the fi rst 2 weeks of training, do not use the training
device on your pet without direct supervision.
• Check the fi t to prevent excessive pressure by being able to
insert one fi nger between the Contact Point and your pet’s skin.
• Your pet must be carefully examined daily for any signs of a rash or sore.
• If a rash or sore is observed, discontinue the use of the Receiver Collar for a few days.
• If the condition persists beyond 48 hours, see your veterinarian.
• Your pet’s neck and the Contact Points must be washed weekly with a wash cloth and mild hand soap,
then rinsed thoroughly.
A condition called Pressure Necrosis, which is a devitalization of the skin due to excessive and
prolonged contact against the Contact Points, may occur if the steps above are not followed.
To Re-Thread the Collar
Slide Buckle
Ridges
8 www.petsafe.net
The slide buckle prevents the collar from becoming loose around
your pet’s neck.
The ridges must be facing up; the collar will slip if it is not properly threaded.
Training Guide
Be Patient With Your Pet
Important: Proper training of your pet is essential to the success of the PetSafe Wireless Pet
Containment System®. Read this section completely before beginning to train your pet. Remember that
the PetSafe Wireless Pet Containment System® is not a solid barrier.
• Have fun with your pet throughout the training process. Training should be fun,
fair, firm and consistent.
• Train for 10 to 15 minutes at a time. Don’t try to do too much too quickly. More-
frequent short sessions are better than less-frequent longer sessions.
• We suggest a minimum of 14 days of training. Depending on your pet and how he
learns, the training could take more or less time.
• If your pet shows signs of stress, slow down the training schedule, add additional days
of training, or increase the amount of play time with your pet in the Pet Area. Common stress signals include:
- Pet pulling on leash toward the house
- Ears tucked
- Tail down
- Body lowered
- Nervous / frantic movement or stiffening of pet’s body
• Your pet must be completely comfortable near the Boundary Flags at the end of every training session. Spend at
least 5 minutes of “play time” at the completion of each session within 10 feet of the Boundary Flags.
SMTWT F S
12345
8 9 10 11 12
15 16 17 18 19
22 23 24 26
29 30 31
25
45
67
13 14
20 21
0
27 28
15
min.
30
Phase
1
• Finish each training session on a positive note with lots of praise and play.
• Remove the Receiver Collar after each training session.
• Be sure to contain your pet by another means during the training period.
• During training, if you need to take your pet out of the Pet Area, remove the Receiver Collar and either pick
your pet up or put him in the car to pass out of the Pet Area.
•
Even if you think your pet is responding well to the training, complete the entire training. Reinforcement is important!
__________________________________________________
Day 1 - Boundary Flag Awareness
Perform three sessions on day 1, each training session lasting 10-15 minutes.
Goal:
To have your pet learn that the Boundary Flags and warning beep from the Receiver Collar defi ne the new Pet Area.
Setup:
• Program the Static Correction Level on the Receiver Collar depending on the size and temperament of your pet.
• Put a separate non-metallic collar on your pet’s neck ABOVE the Receiver Collar and attach a lead. Note: Be sure
the extra collar does not put pressure on the Contact Points.
• Have tiny pieces of treats that your pet will fi nd desirable available.
• Have your pet’s favorite play toy available.
www.petsafe.net 9
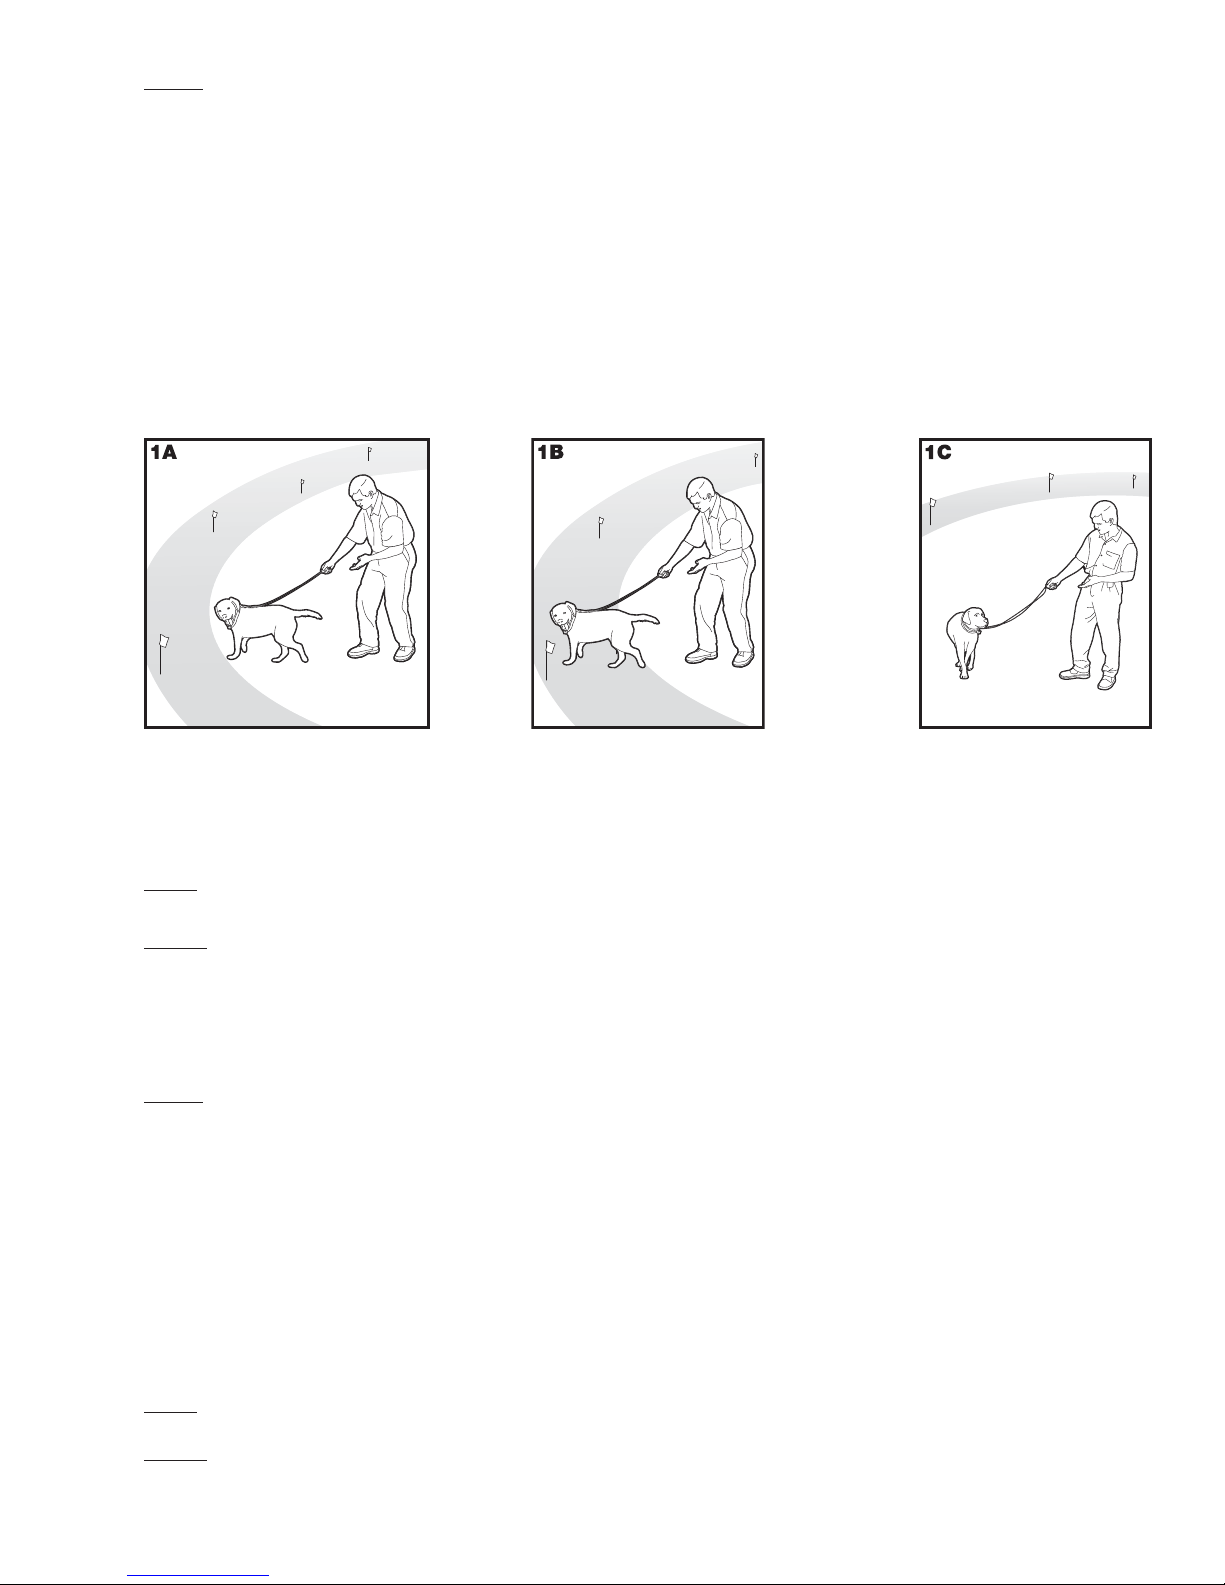
Steps:
1. Begin by walking your pet on a leash in the Pet Area. Calmly praise and talk to your pet, occasionally giving
treats.
2. Move toward the Boundary Flags (1A). Keep your mood happy and throw treats to the ground.
3.
With full control of your pet on a leash, toss a treat on the outside edge of the fl ags. As your pet enters the Boundary
Zone to receive the treat, the receiver collar will begin to beep (1B). As your pet remains in the Boundary Zone, he will
receive a mild Static Correction. Allow your pet to stay in the Boundary Zone for 2 seconds then gently help him back
into the Pet Area (1C). Immediately praise and offer your pet a treat as he enters the Pet Area, even if you have helped
with the leash. Wiggle a Boundary Flag to help your pet understand that the discomfort of the Static Correction happens
around the fl ags.
4. Repeat this process at several different Boundary Flags. Your pet should start to resist going after the treat in the
Boundary Zone. If your pet continues to enter the Boundary Zone, check the fi t of his Receiver Collar and allow
him 2-3 seconds in the zone before pulling him back to the Pet Area.
Note: Never allow your pet to eat the treat in the Boundary Zone.
Phase
2
__________________________________________________
Days 2 thru 4 -
Perform three sessions per day, each lasting 10-15 minutes.
Goal:
To train your pet to stay in the Pet Area and respect the boundary while you are outside of it.
Setup:
• Program the Static Correction Level on the Receiver Collar depending on the size and temperament of your pet.
• Put a separate non-metallic collar on your pet’s neck ABOVE the Receiver Collar and attach a lead. Note: Be sure
the extra collar does not put pressure on the Contact Points.
• Have tiny pieces of treats available.
• Have your pet’s favorite play toy available.
Steps:
1. Repeat steps 1-4 in Phase One
2. Drop the lead, leaving your pet in the Pet Area.
3. Walk outside the boundary and wiggle the Boundary Flags facing your pet.
4. Continue around the entire boundary doing this, tossing treats to your pet in the Pet Area and praising him if he
stays within the Pet Area.
5. If your enters the Boundary Zone and does not respond to the Static Correction, increase the Static Correction
Level by 1.
Continue Boundary Flag Awareness
__________________________________________________
Phase
3
10 www.petsafe.net
Days 5 thru 8 - Distraction Phase
Perform three training sessions per day, each lasting 10 - 15 minutes.
Goal:
To train your pet to stay within the Pet Area with distractions outside of the Pet Area.
Setup:
• Program the Static Correction Level on the Receiver Collar depending on the size and temperament of your pet.
 Loading...