

Petsafe comfortfit trainer, pdt 24-10792, Remote Training Collar Operating And Training Manual

Remote Training Collar
Collier de dressage
Trainingshalsband met
afstandsbediening
Operating and Training Guide
Manuel d’utilisation et de dressage
Gebruiks- en trainingshandleiding
Operating and Training Guide
Manuel d’utilisation et de dressage
Gebruiks- en trainingshandleiding
Please read this entire guide before beginning
Veuillez lire ce manuel en entier avant de commencer
Gelieve deze gids volledig door te lezen voordat u begint

2 www.petsafe.net
Thank you for choosing PetSafe®. Our mission is to ensure your pet’s safety by
providing you the tools and techniques to successfully train your pet. If you have
any questions, please contact the Customer Care Centre or visit our website at
www.petsafe.net.
____________________________________________________________________
Table of Contents
Components ...............................................................................................3
Other Items You May Need ..........................................................................3
How the System Works ................................................................................3
Key Defi nitions ...........................................................................................4
Operating Guide
Prepare the Remote Transmitter ................................................................5
Prepare the Receiver Collar .......................................................................6
Fit the Receiver Collar ..............................................................................7
Find the Best Intensity Level for Your Pet ..................................................8
Reset the Receiver Collar ..........................................................................9
Understanding the Remote Transmitter .....................................................9
Training Guide
Starting Training with the Collar .............................................................10
General Tips ...........................................................................................10
Before Starting Training ..........................................................................11
Preparation for Training ..........................................................................12
Teaching Basic Obedience
The “Come On” Follow Me Command ................................................12
The “Here” or “Come” Command .......................................................13
The “Sit” Command ............................................................................13
The “Stay” Command .........................................................................14
The “Place” Command ........................................................................15
Eliminating Unwanted Behaviour
Jumping Up on People .........................................................................15
Digging ............................................................................................... 16
Chasing ...............................................................................................17
Excessive Barking ................................................................................19
Frequently Asked Questions ......................................................................20
Troubleshooting ........................................................................................ 21
Test Light Instructions ..............................................................................21
Terms of Use and Limitation of Liability ....................................................22
Français ...................................................................................................23
Nederlands ..............................................................................................44
www.petsafe.net 3
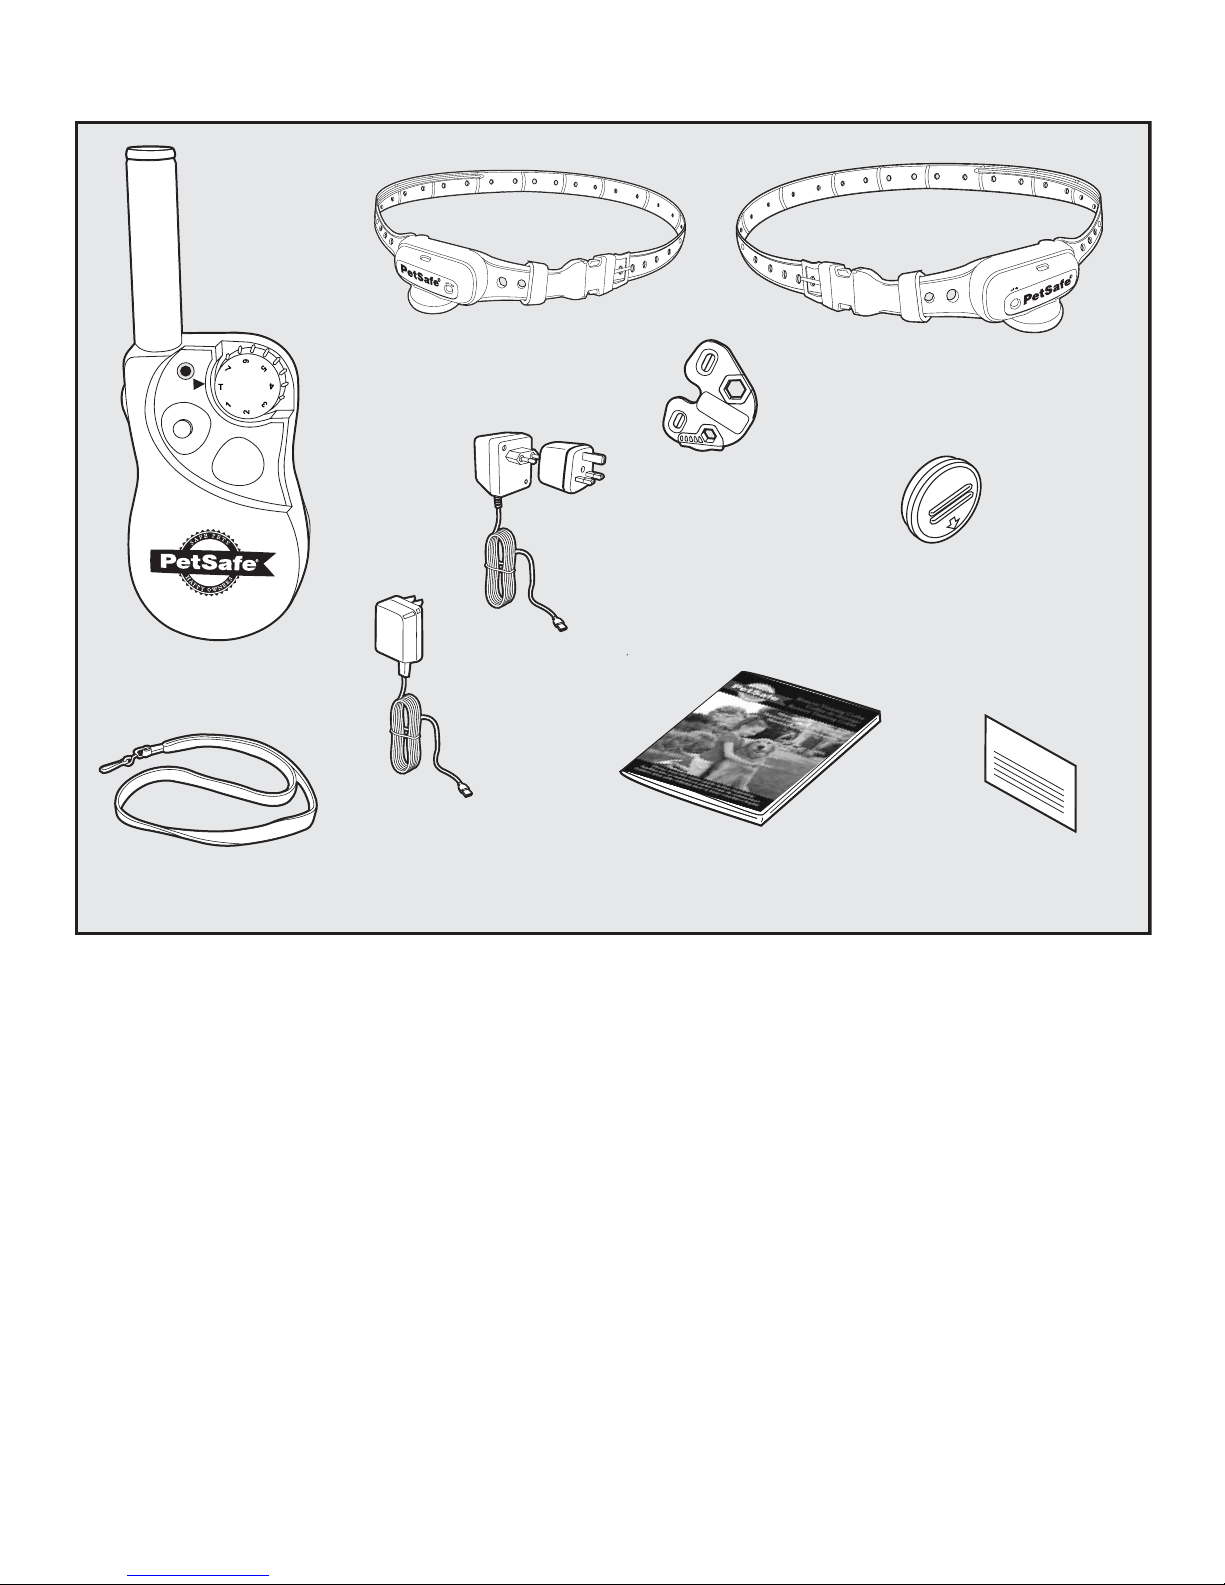
Components
1
2
3
4
5
6
7
8
P
et
S
a
fe
®
PT-
4
00
T
r
a
i
n
e
r
O
per
a
ti
ng
a
n
d
T
r
a
i
n
i
n
g
G
u
id
e
Pl
e
a
se
r
e
ad
t
h
i
s
e
n
t
ire
g
u
i
d
e
b
e
for
e
b
e
g
i
n
n
i
n
g
Remote
Transmitter
Receiver Collar
(Little Dog)
Receiver Collar
(Big Dog)
Warranty
Card
Warranty
Operating and
Training Guide
Charging
Adapter
(North America)
Charging
Adapter
(Europe / UK)
Test Light
Kit
Lanyard
Battery
(PetSafe® RFA-67)
Other Items You May Need
• Scissors
• Non-metallic collar and 10-foot lead
How the System Works
The PetSafe Remote Training Collar has been proven safe, comfortable, and effective for all pets
over 3.6 kg (8 lb). This system assists you in controlling your pet without a lead in a range up to 100
metres. You select Tone Only or Static Correction to train your dog. At the push of a button, the
Remote Transmitter sends a signal, activating the Receiver Collar with the type of correction you have
selected. By using the Remote Training Collar consistently and correctly, much of the misbehaviour
that your pet exhibits can be corrected, or any basic obedience commands can be taught.
Important: The Remote Training Collar has a range of up to 100 metres. Depending on
the way you hold the Remote Transmitter, the maximum range may vary. For consistent
results at longer ranges, hold the Remote Transmitter in a vertical position away from
your body and above your head. Terrain, weather, vegetation, transmission from other
radio devices, and other factors will affect the maximum range.
4 www.petsafe.net
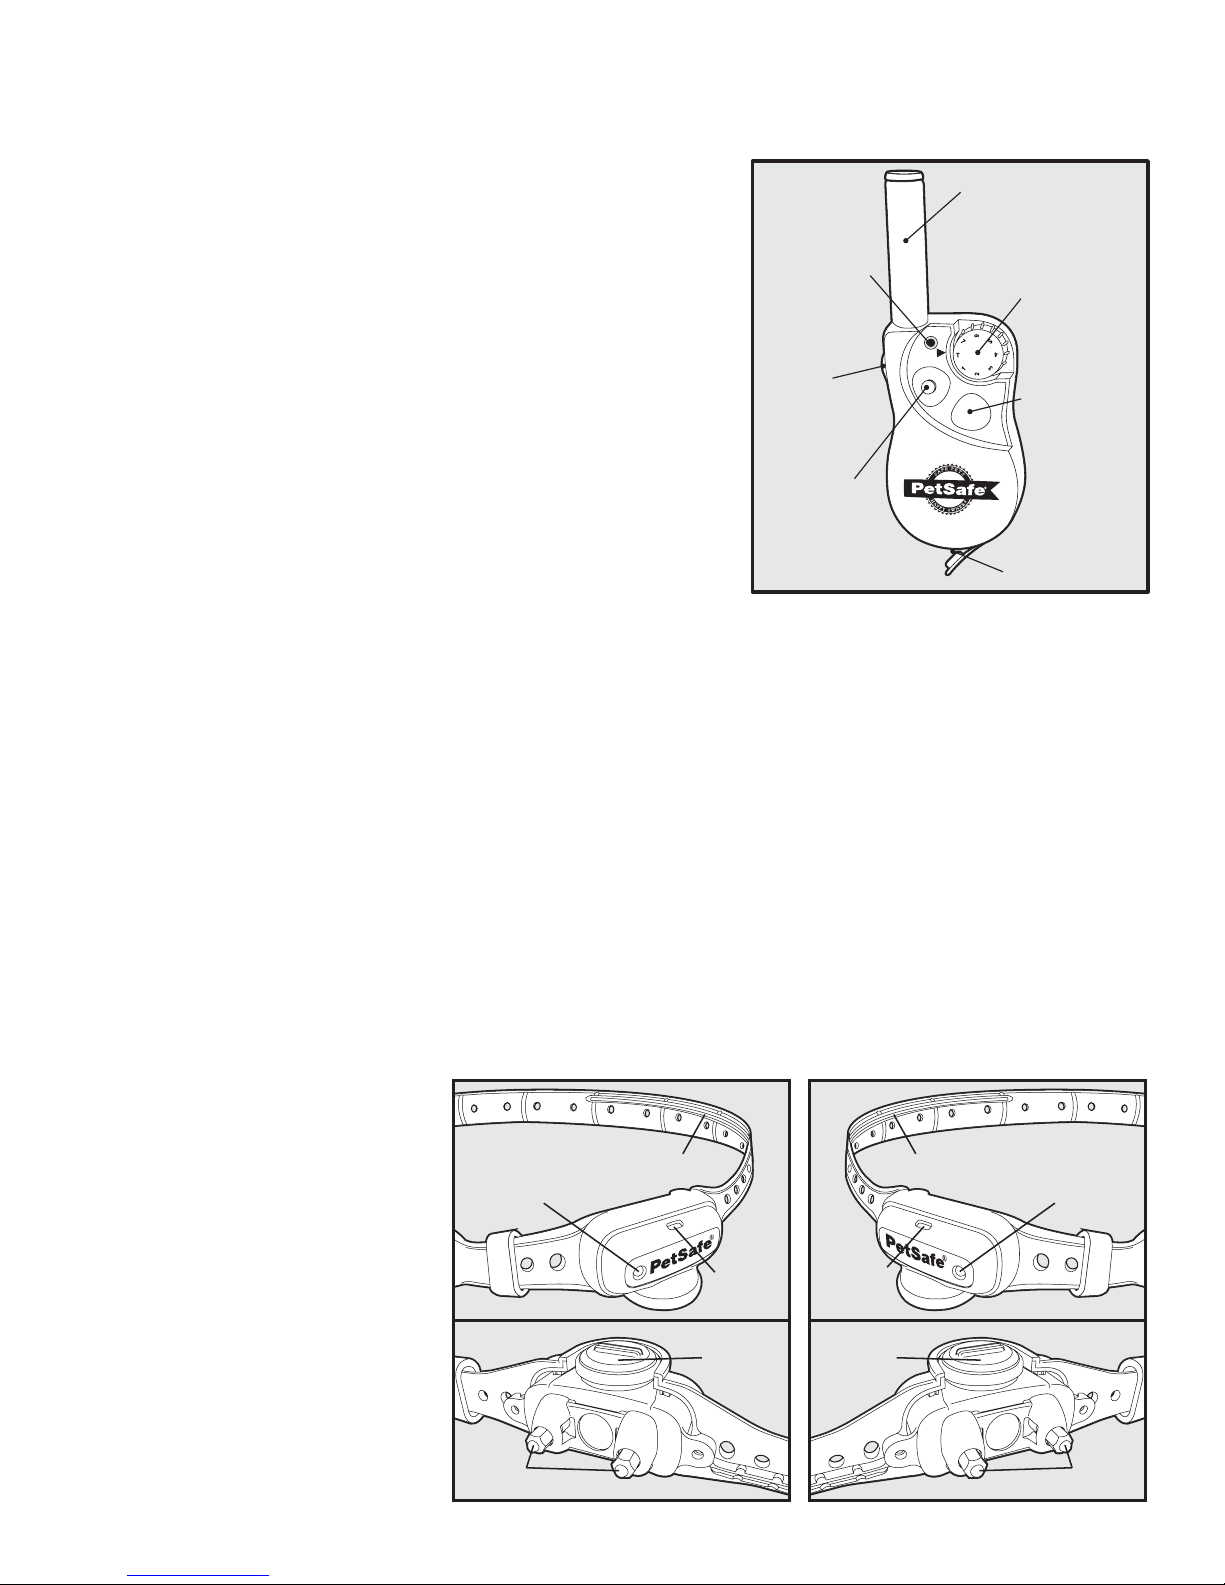
Key Defi nitions
Remote Transmitter: Transmits the radio signal
to the Receiver Collar.
Transmitter Indicator Light: Indicates that a button
is pressed and also serves as a low-battery indicator.
Intensity Dial: Provides multiple Stimulation Levels so
you can match the correction to your pet’s temperament.
Upper Button: Delivers a “Bad Dog” Tone only.
Lower Button: Delivers Continuous Stimulation at the level set
by the Intensity Dial. This button will have no function when the
Intensity Dial is set on “T”.
Side Button: Delivers a “Good Dog” Tone only.
Charging Socket: For connecting the charger. Although the
Remote Transmitter is waterproof without the charger cover,
keep the cover in place when not charging to keep debris out
of the opening.
Receiver Collar: Receives the radio signal from the Remote
Transmitter. It is waterproof.
Transmitter
Indicator
Light
Side Button
Upper Button
Transmitter Antenna
Intensity Dial
Lower Button
Charging Socket
(with cover)
Remote Transmitter
On/Off Button: Momentarily pressing and releasing this button turns the Receiver Collar on and off.
Contact Points: The contacts through which the Receiver Collar delivers Stimulation.
Receiver Indicator Light: Indicates when the Receiver Collar has been turned on or off and also serves
as a low-battery indicator.
Continuous Stimulation: You control when and how long Stimulation is delivered to your pet through
the Receiver Collar’s Contact Points. Before the Stimulation, your pet will hear an Audible Tone. For safety,
when the Upper or Lower Button is pressed for 8 seconds or more, the Remote Transmitter will “time-out.”
The button will need to be released and pressed again before additional Stimulation can be delivered.
Audible Tone: Use the Side Button or Upper Button to send an Audible Tone to your
pet without Stimulation.
Battery
Contact Points
Antenna
ON/OFF
Button
o
n
/
o
f
f
Receiver
Indicator
Light
Big Dog Receiver Collar
Receiver Collar
ON/OFF
Button
Antenna
Contact Points
Battery
o
n
/
o
f
f
Little Dog Receiver Collar
Receiver
Indicator
Light
www.petsafe.net 5
Operating Guide
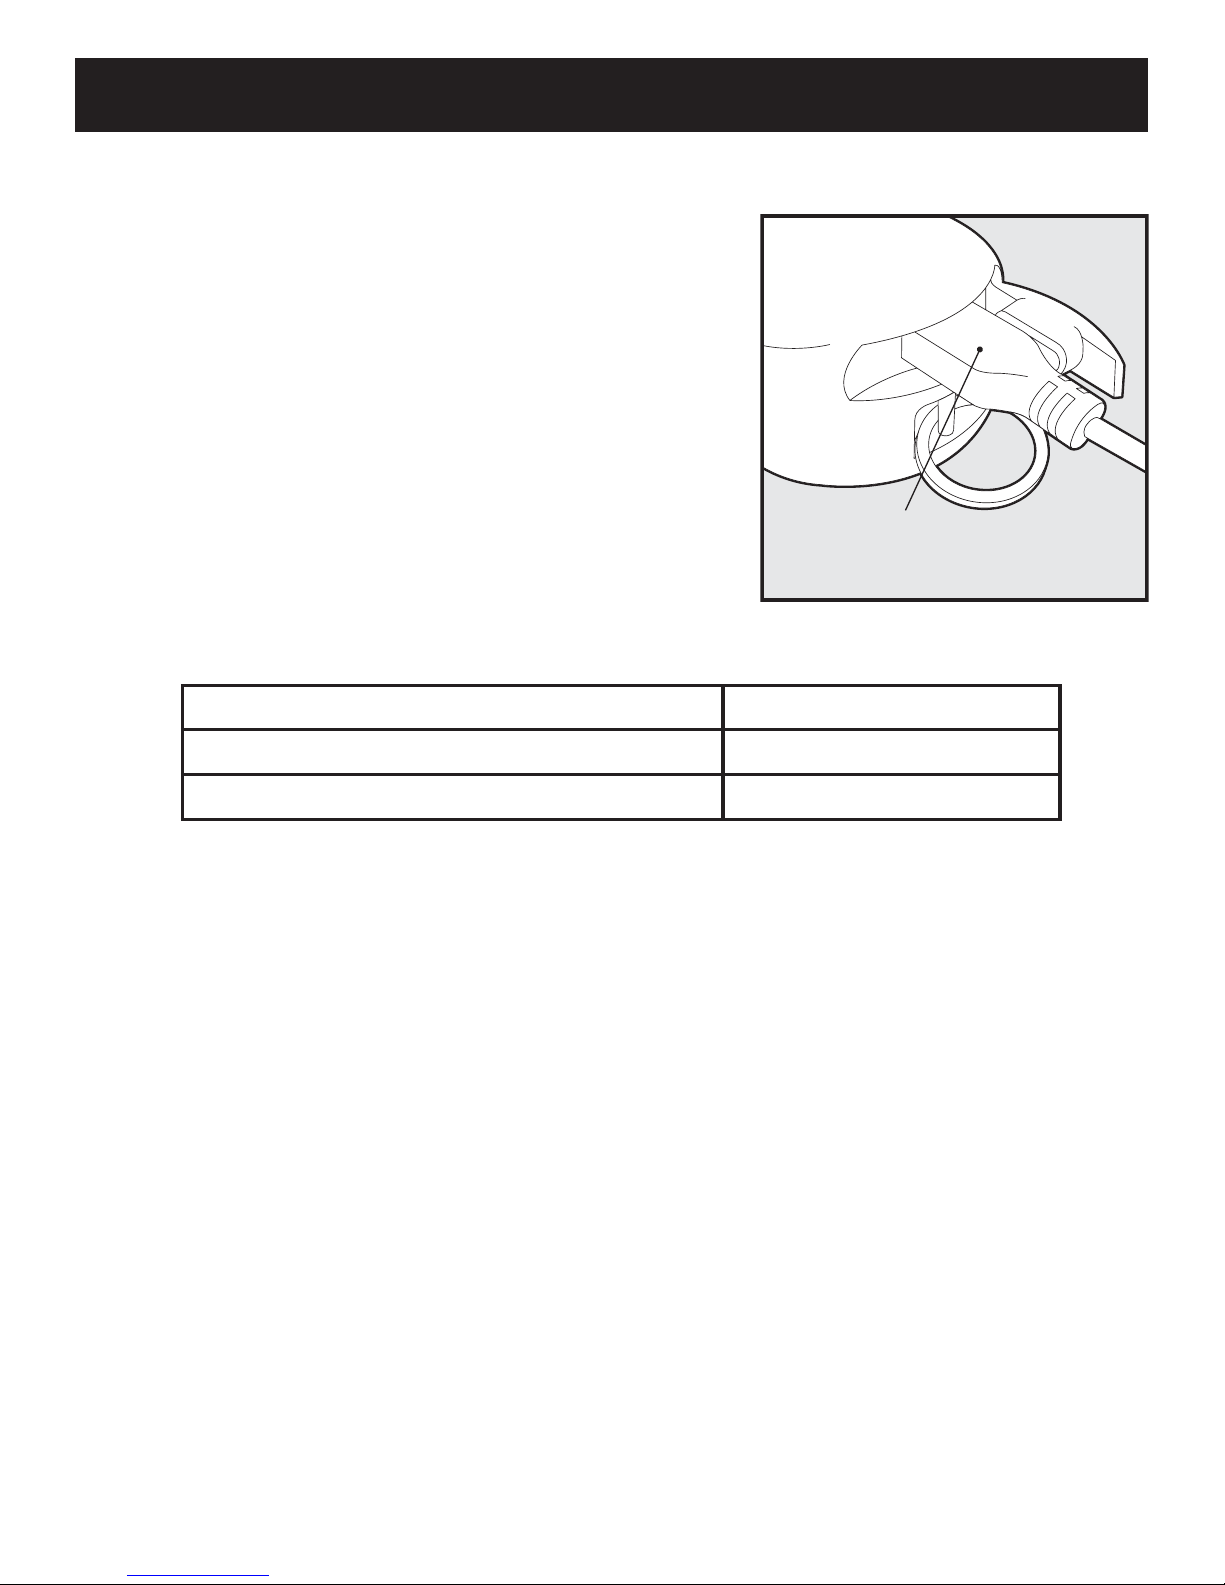
Prepare the Remote Transmitter
Charge the Remote Transmitter
1. Lift the rubber cover protecting the Remote
Transmitter Charging Socket.
2. Connect the charger to the Remote Transmitter
Charging Socket.
3. Plug the charger into a standard wall outlet.
4. Charge the Remote Transmitter for 24 hours for the
fi rst charge. Subsequent charges take only 1hour.
Note: The Transmitter Indicator Light will fl ash after
12 hours of charging. For the fi rst charge, continue to
charge the Remote Transmitter for an additional 12 hours.
5.
When charging is completed, replace the rubber cover.
Note
: Approximate battery life between charges is 40 to
60 hours, depending on frequency of use.
Charger connector placed
in the Remote Transmitter
Charging Socket
Transmitter Indicator Light - Function and Response
Remote Transmitter Function Indicator Light Response
Any button pressed Solid in colour
Low battery – Any button pressed Flashes continuously
Transmitter Rechargeable Battery Pack
• The rechargeable Nickel Metal Hydride (NiMH) battery pack in the Transmitter
is not memory sensitive and does not require depletion before charging.
• The Transmitter comes partially charged from the factory, but will require a full charge
(24 hours) before the fi rst use.
• Remember - Always keep the Transmitter away from fl ames.
• When storing the unit for long periods, remember to regularly give the Transmitter
a full charge (12 hours). This should be done once every 4 to 6 weeks.
• Excessive overcharging can shorten battery life. After initial charge, never leave the
Transmitter charging for more than 12 hours.
• If your equipment has not been charged for an extended period, you may experience
a decrease in battery life during the fi rst few uses. Afterwards, the battery life will return
to previous capacity levels.
• You should expect hundreds of recharge cycles from your battery pack. However, all
rechargeable batteries lose capacity over time relative to the number of recharge cycles they
experience. This is normal. If your operating time drops to half of the original life, contact
the Customer Care Centre to purchase a new battery pack.
• The battery pack should last for a period of 3-5 years. When a battery pack needs replacement,
you can order a new pack by contacting our Customer Care Centre or visit our website
at www.petsafe.net. Please do not open the Remote Transmitter until you have received
the replacement.
Step
1
6 www.petsafe.net
Prepare the Receiver Collar
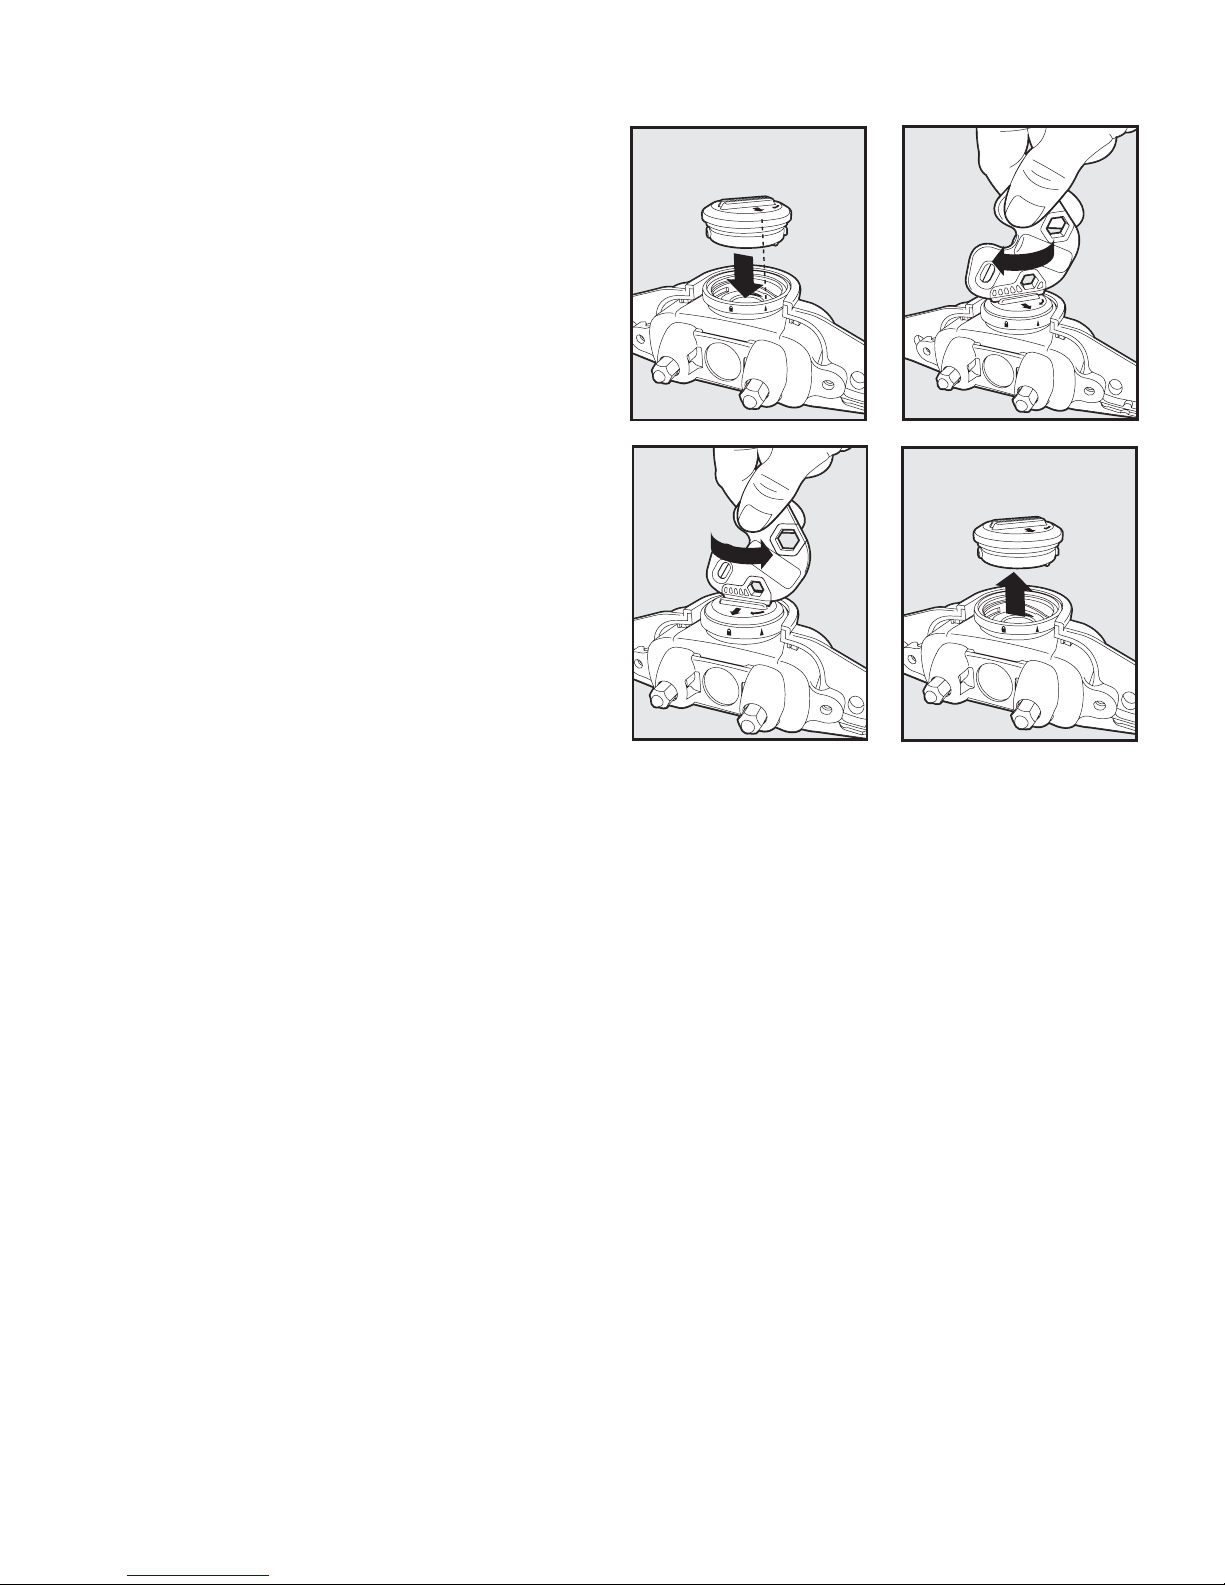
To Insert and Remove
the Battery
Note: Do not install the battery while
the Receiver Collar is on your pet.
This Receiver Collar uses a replaceable
PetSafe
®
battery (RFA-67). This unique
battery is designed to make battery
replacement easier and increase water
protection.
To insert the battery, align the symbols
on the battery (arrow) and Receiver
Collar (triangle). Using the edge of
the Test Light Tool as shown, turn the
battery clockwise until the arrow lines
up with the lock symbol on the housing
(2A, 2B).
To remove the battery, turn the battery
counter-clockwise using the edge of the
Test Light Tool as shown (2C, 2D).
2A
2B
2D
2C
DO NOT attempt to cut into or pry open the battery. Be sure to discard the used
battery properly.
A replacement PetSafe® battery (RFA-67) can be found at many retailers. Contact the
Customer Care Centre or visit our website at www.petsafe.net for a list of common
retailers.
To Turn the Receiver Collar On:
1. Press and hold the On/Off Button until the Receiver Indicator Light comes on and
the Receiver Collar beeps 5 times.
2. Release the On/Off Button.
Once the Receiver Collar has been turned on, press the Side Button of the Remote
Transmitter. The Receiver Collar should beep for as long as the Side Button is pressed.
If it does not, see the “Reset the Receiver Collar” section.
The Receiver Indicator Light will fl ash once every 4 to 5 seconds if the battery is low.
To Turn the Receiver Collar Off:
1. Press and hold the On/Off Button until the Receiver Indicator Light comes on and
the Receiver Collar beeps 2 times.
2. Release the On/Off Button.
Note: To extend the life of the battery, turn the Receiver Collar off when it is not in use.
Important: If the Receiver Collar is left on continuously, the maximum battery
life (before replacing batteries) will be two weeks.
Step
2
www.petsafe.net 7
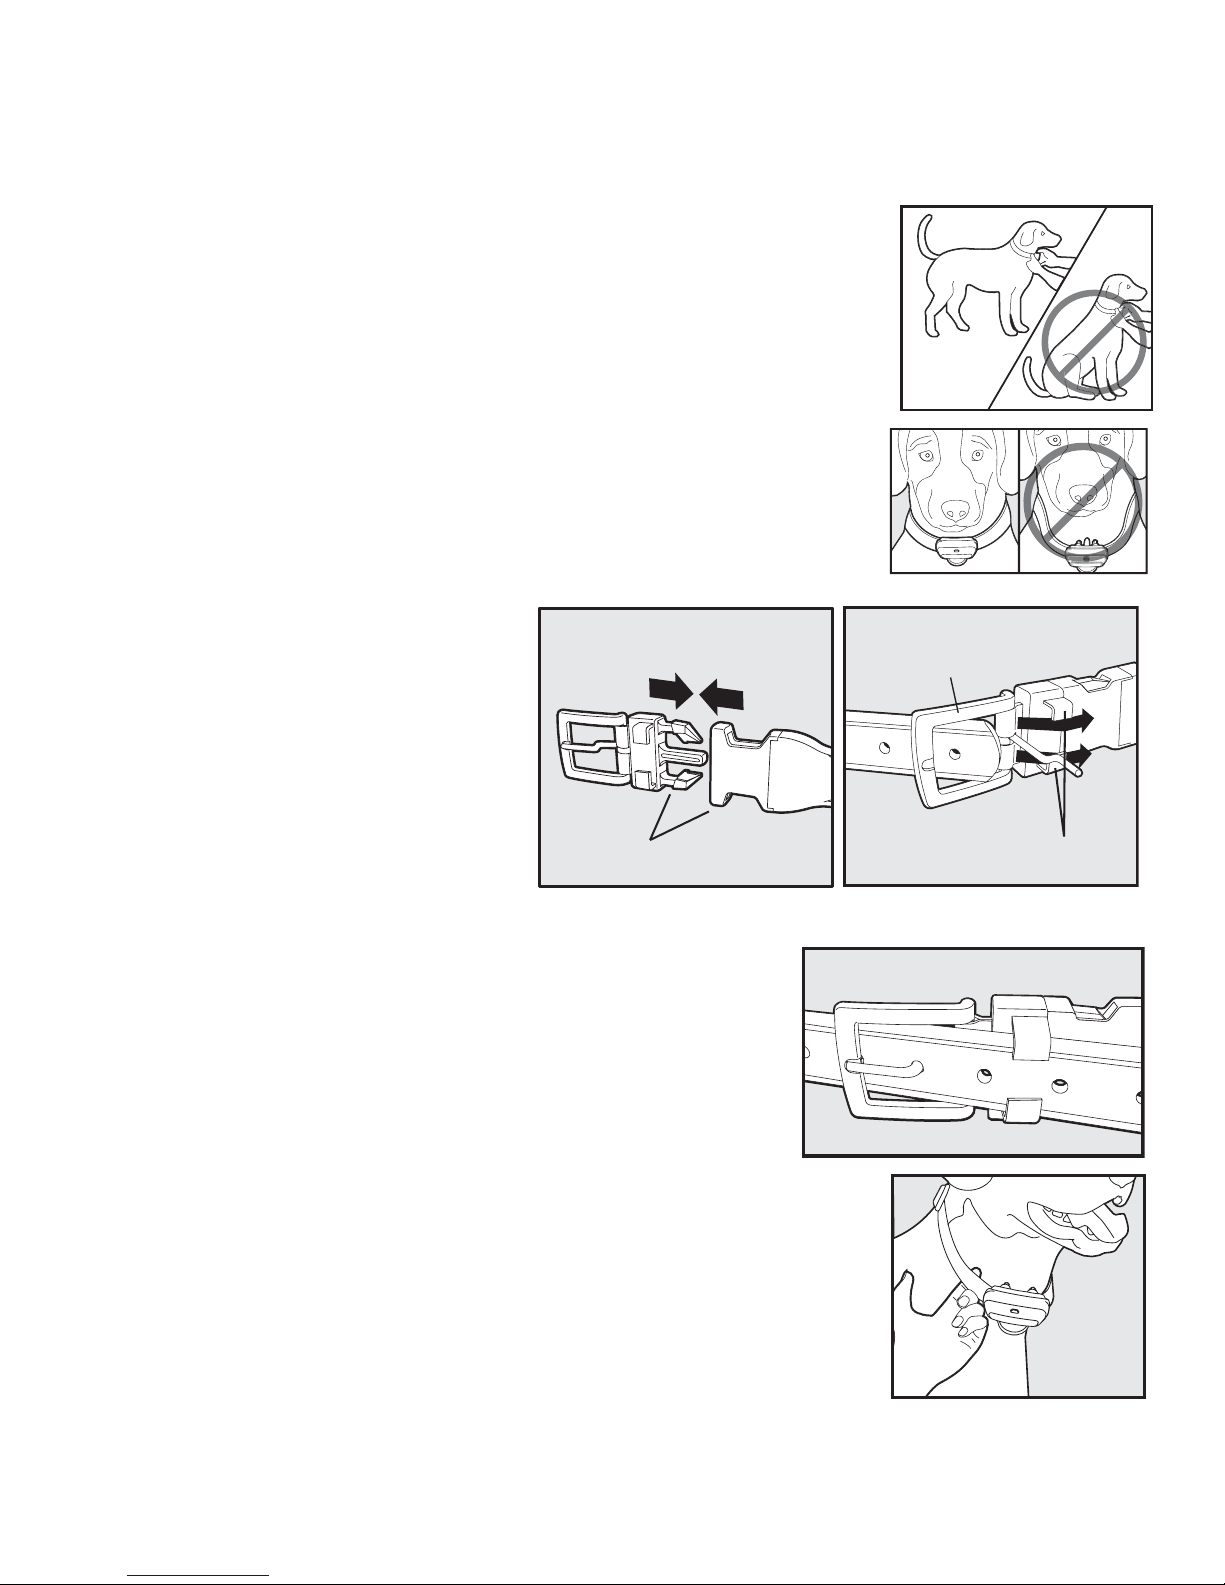
Fit the Receiver Collar
Important: The proper fi t and placement of your Receiver Collar is important for
effective operation. The Contact Points must have direct contact with your dog’s
skin on the underside of his neck.
To ensure a proper fi t, please follow these steps:
1. Make sure that the battery is not installed
in the Receiver Collar.
2.
Have your pet standing comfortably (3A).
3. Centre the Contact Points underneath your dog’s neck,
touching the skin (3B).
YES
NO
3A
Note: It is sometimes necessary to trim the hair around the
Contact Points to make sure that contact is consistent.
3B
4. The PetSafe QuickFit™
Collar is designed so you can
quickly attach and remove
the Receiver Collar from your
dog while maintaining the
desired fi t.
a. With the Snap Buckle
fastened
(3C)
, thread
the collar through the
Metal Buckle
(3D).
Snap Buckle
“C” Loop
Metal Buckle
3C
3D
b. Slide the excess collar through the “C” Loop on top of
the Snap Buckle (3E). This will hold the collar in place.
c. Once the collar fi t is determined, simply use the
Snap Buckle to remove and replace the collar.
5. The Receiver Collar should fi t snugly, yet loose enough to
allow one fi nger to fi t under the strap (F). Allow your dog
to wear the collar for several minutes, then re-check the fi t.
3E
Check the fi t again as your dog becomes more comfortable
with the Receiver Collar.
6. Trim the collar as follows:
a. Mark the desired length of the collar with a pen. Allow for
growth if your dog is young or grows a thick winter coat.
b. Remove the Receiver Collar from your dog and cut off excess.
3F
Step
3

8 www.petsafe.net
Important: Do not attach a lead to the collar. This can result in pulling the Contact
Points too tightly against your pet’s neck. Attach a lead to a separate, non-metallic
collar or harness, making sure the extra collar does not put pressure on the Contact
Points.
Care and Cleaning
For comfort, safety, and effectiveness of this product, please ensure that you check the
fi t of your pet’s collar frequently. This Guide describes proper collar fi tting. If any skin
irritation is observed, discontinue the use of the collar for a few days. If the condition
persists beyond 48 hours, see your veterinarian.
To prevent skin irritation from occurring:
• The Receiver Collar should not be worn for more than 8 hours out of every 24-hour
period.
• Your pet’s neck and the Contact Points must be washed weekly with a wash cloth and
mild hand soap, then rinsed thoroughly.
• Be sure that your pet’s neck is thoroughly dry before placing the Receiver Collar back
on its neck.
_____________________________________________________________
Find the Best Intensity Level for Your Pet
The Remote Training Collar has seven (7) different stimulation Intensity Levels. The
fi rst setting on the intensity dial (T) is tone only. Levels 1 to 7 are increasing levels of
stimulation, tone can still be given with all these levels. This allows you to choose no
stimulation or the stimulation that is best for your dog.
Note: Always start at the lowest level and work your way up.
Once you have placed the Receiver Collar on your dog, start by fi nding the Level that is
best for your dog. This is called the Recognition Level. To fi nd this level your dog needs
to be calm and not distracted. This level is the main level to use in training and is the
base level. It may have to be increased when your dog is distracted or more excited. The
aim of fi nding this Recognition level is to determine the exact level at which your dog
notices the new sensation.
To begin your training follow the steps below to fi nd your dog’s Recognition Level. You
will know when your dog is noticing or recognising the stimulation by a slight change
in his behaviour. Look for something he does which shows that he is feeling something
different - this indicates the Recognition Level that is best for him when he is not excited.
It is important to remember at this time that a dog that appears sensitive and shy does not
indicate it requires a low level, or a hard headed, independent dog requires a high level.
Step
4

www.petsafe.net 9
Reset the Receiver Collar
To reset the Receiver Collar to work with a new Remote Transmitter or to re-programme
a new Receiver Collar to work with your existing Remote Transmitter:
1. Turn the Receiver Collar off.
2. Press and hold the On/Off Button until the Receiver Indicator Light comes on and
the Receiver Collar beeps 5 times.
3. Continue to hold the On/Off button until the Receiver Indicator Light has turned off.
4. Press and hold the Upper Button on the Remote Transmitter until the Receiver
Indicator Light fl ashes 5 times. You may need to hold both units 2-3 feet from each
other before this occurs. Once the Receiver Indicator Light has fl ashed fi ve (5) times,
the Receiver Collar has been reset. If the Receiver Indicator Light does not fl ash 5
times, start again and repeat the process.
Understanding the Remote Transmitter
To train using the Tone Button:
The Remote Training Collar comes with two tones. A “Good Dog” Tone and a “Bad
Dog” Tone. Once associated with actions, required responses to commands are rewarded
by the “Good Dog” Tone and unwanted ones stopped by the “Bad Dog” Tone. These
tones or sounds emitted by the Receiver Collar, for some dogs, can be just as effective
as the stimulation and the aim in using the collar is to work towards using tones only,
effectively.
To train using the Stimulation Button:
Used together with the lead and correct training approaches, low-level stimulation is the
most effective way to train your dog before you progress to the use of only Audible Tones.
With this approach you control the timing and level of the stimulation being applied to
your dog. Using the Recognition Level determined before you begin training, ensures that
you are working at a level your dog notices but is not concerned or stressed by.
With the Remote Training Collar, the stimulation stays on as long as the Stimulation
Button is pressed up to a maximum of 8 seconds. If this button is pressed longer than
8 seconds, the Remote Transmitter will “time-out,” the Transmitter Indicator Light
will turn off, and stimulation will no longer be delivered to your dog. This is a safety
feature in the Remote Training Collar. If the Remote Transmitter times out, release the
Stimulation Button and press it again to deliver stimulation.
The most effective way to use the Remote Training Collar is by tapping the Stimulation
Button for one or two seconds rather than holding it down for longer periods of time.
Note: For either one or both of these training methods to be effective, they must be used
consistently along with the command you are trying to teach your dog.
Step
5

10 www.petsafe.net
Training Guide
Starting Training With The Collar
Although it is an advantage if your dog does understand the basic commands this is not essential.
Basic commands can be learned as your dog progresses with the collar.
There are two main reasons why a dog may not obey a command.
1. He has not been taught the command and therefore does not understand what is required.
2. He knows the command but believes he has a choice and decides to do something other than obey.
When starting with the collar it is essential to be able to guide the dog and also control his actions.
In addition it is advisable to train in a controlled environment, a fenced area or inside a building
with the doors closed. This keeps your dog safe in any eventuality.
Each command should be taught separately in a session and repeated in further sessions until it is
clear the dog understands. Sessions should be long enough to move forward with understanding
but short enough to keep the brain fresh and not confuse your dog. Two sessions per day of 10 to
15 minutes is a good schedule.
The two main commands to gain understanding of the collar and then build upon are the call
“Here” or “Come”, and “Sit”. The stimulation is applied initially in the learning phase just before
a command or guidance is given. This is important as otherwise the dog may be complying with
the command and then receive a stimulation which would stop him and “punish” him for what
was actually correct. The stimulation is turned off by releasing the button the moment the dog
complies. The sensation therefore goes the moment he does as he is asked. Once learning and
understanding is achieved the stimulation
can be given simultaneous with the command.
The aim is to reduce and fi nally remove the need for stimulation on each command; therefore
we take it in stages. First use continuous, or numerous taps of continuous and gradually reduce
them until you only use one tap together with the command. You can also them give “freebies” (no
stimulation with every command) to determine whether your dog is obeying and understanding
without the collar and using a “tap” of stimulation to reinforce only when there is resistance,
slowness or disobedience. A “tap” of the collar becomes a prompt, a quick reminder, and a
reinforcement of the command.
____________________________________________________________________
General Tips
• Take the training of your dog in small steps, teach one obedience command and/or eliminate one
misbehaviour at a time. If you move too fast with the training, your dog can become confused.
• Be pleased with small improvements and stop the training session on a good note.
• Your dog may show confusion and lack of understanding at any stage even though you believe he knows
the command. Do not attempt to force him with the collar but put him on a lead and show him again
what is required.
• Be consistent with commands and actions. When training with stimulation initially give your dog a
“prompt” stimulation with each command until his obedience becomes natural.
• Do not over-correct your dog. Plan to avoid misbehaviour or to stop them from happening by being
ahead of your dog’s actions. Use as few stimulations as possible to train your dog.
• Unless you can supervise him, it is recommended that you restrict your dog from situations in which

www.petsafe.net 11
he has a history of misbehaving. However, setting up a situation as a training session can dramatically
improve your chances of success. When doing this aim at stopping the behaviour as it begins and before
the distraction or intention to misbehave becomes intense.
• If your dog reacts to the training by hiding or acting fearful, check your body language, be consistent,
reduce the level of the stimulation and redirect his attention to a simple and appropriate behaviour
such as the “Sit” command. Do not reassure him verbally for acting fearful as this can reinforce the
behaviour. Act normally and continue with the training.
• Never use the Remote Training Collar to correct or eliminate any form of aggressive behaviour. If
your dog exhibits aggressive behaviour please consult an experienced dog trainer. However, obedience
training often reduces many aggression problems.
• The objective is to train your dog top respond to your spoken command at distance using no stimulation
and tones. The collar therefore should only be required after training is complete to reinforce commands
that have not been obeyed and stop repeated unwanted behaviour
____________________________________________________________________
Before Starting Training
• It is advantageous, although not essential, to let your dog wear the collar for two or three days
prior to using it for training.
• Create an association with the “Good Dog” Tone by pressing the Side Button followed
immediately by giving your dog a treat. Do this at least 50 times over two days. You can use his
dinner kibble for this and make it a feed time routine for two days.
• Your trainer has three buttons:
– Side Button is “Good Dog” Tone.
– Top Button is “Bad Dog” Tone.
– Lower Button is stimulation.
• Ensure that your dog never wears the collar for more than 8 hours a day. Even though your dog
may only wear it for 8 hours move the collar slightly to other positions on his neck regularly. This
will minimise the possibility of pressure spots being created on his neck where the electrodes touch.
• Find your dog’s “Recognition Level” – the lowest level at which he begins to notice the collar’s
sensations.
• Determine what commands will be used to train your dog to obey. These must be simple one
word commands where possible and should be used consistently by everyone interacting with
your dog. This is essential especially for family members.
• Give all commands with a normal tone of voice, encourage and praise dependent upon the
personality of the dog. Do not get harsh with any command, it is not necessary. Teach him to
obey a normal tone of voice. With the remote collar and lead, you always have the ability to
control and guide.
• It is always an advantage if your dog has undergone some training and understands basic
commands. The collar is very effective at reinforcing and prompting known commands.
• Always watch to ensure the dog does not need to defecate or urinate when training. This can
bethe biggest distraction and will make you think he cannot feel the stimulation. Allow him to
defecate and urinate before training.
• Make your training sessions fun. Vary your speed of walking and show pleasure when your dog is
doing as required.
• Never loose your patience.
• High value treats such as hot dogs can be used at any stage to reward your dog but do not be
concerned if he does not wish to take them.
• Remember that these instruction on how to train your dog may involve you doing the exercise
many times over a number of days and weeks to ensure your dog learns at his own pace and
ability. Be pleased with small improvements from each training session.

12 www.petsafe.net
Preparation for Training
Prior to any training or behaviour modifi cation go through the following steps:
1. Put the dog on a fl at collar attached to a long line or long lead. Do this in the kennel, house or
enclosed safe area. If in a crate, buckle it on while in the crate.
2. Turn on Remote Training Collar and check it is working.
3. Buckle on the Remote Training Collar above the fl at collar as described previously.
4. Ensure the fl at collar is safe and will not break or slip over the dog’s head.
5. Take the dog outside into safe area.
6. Allow him to urinate and defecate as required prior to training.
_____________________________________________________________________________________
Teaching Basic Obedience
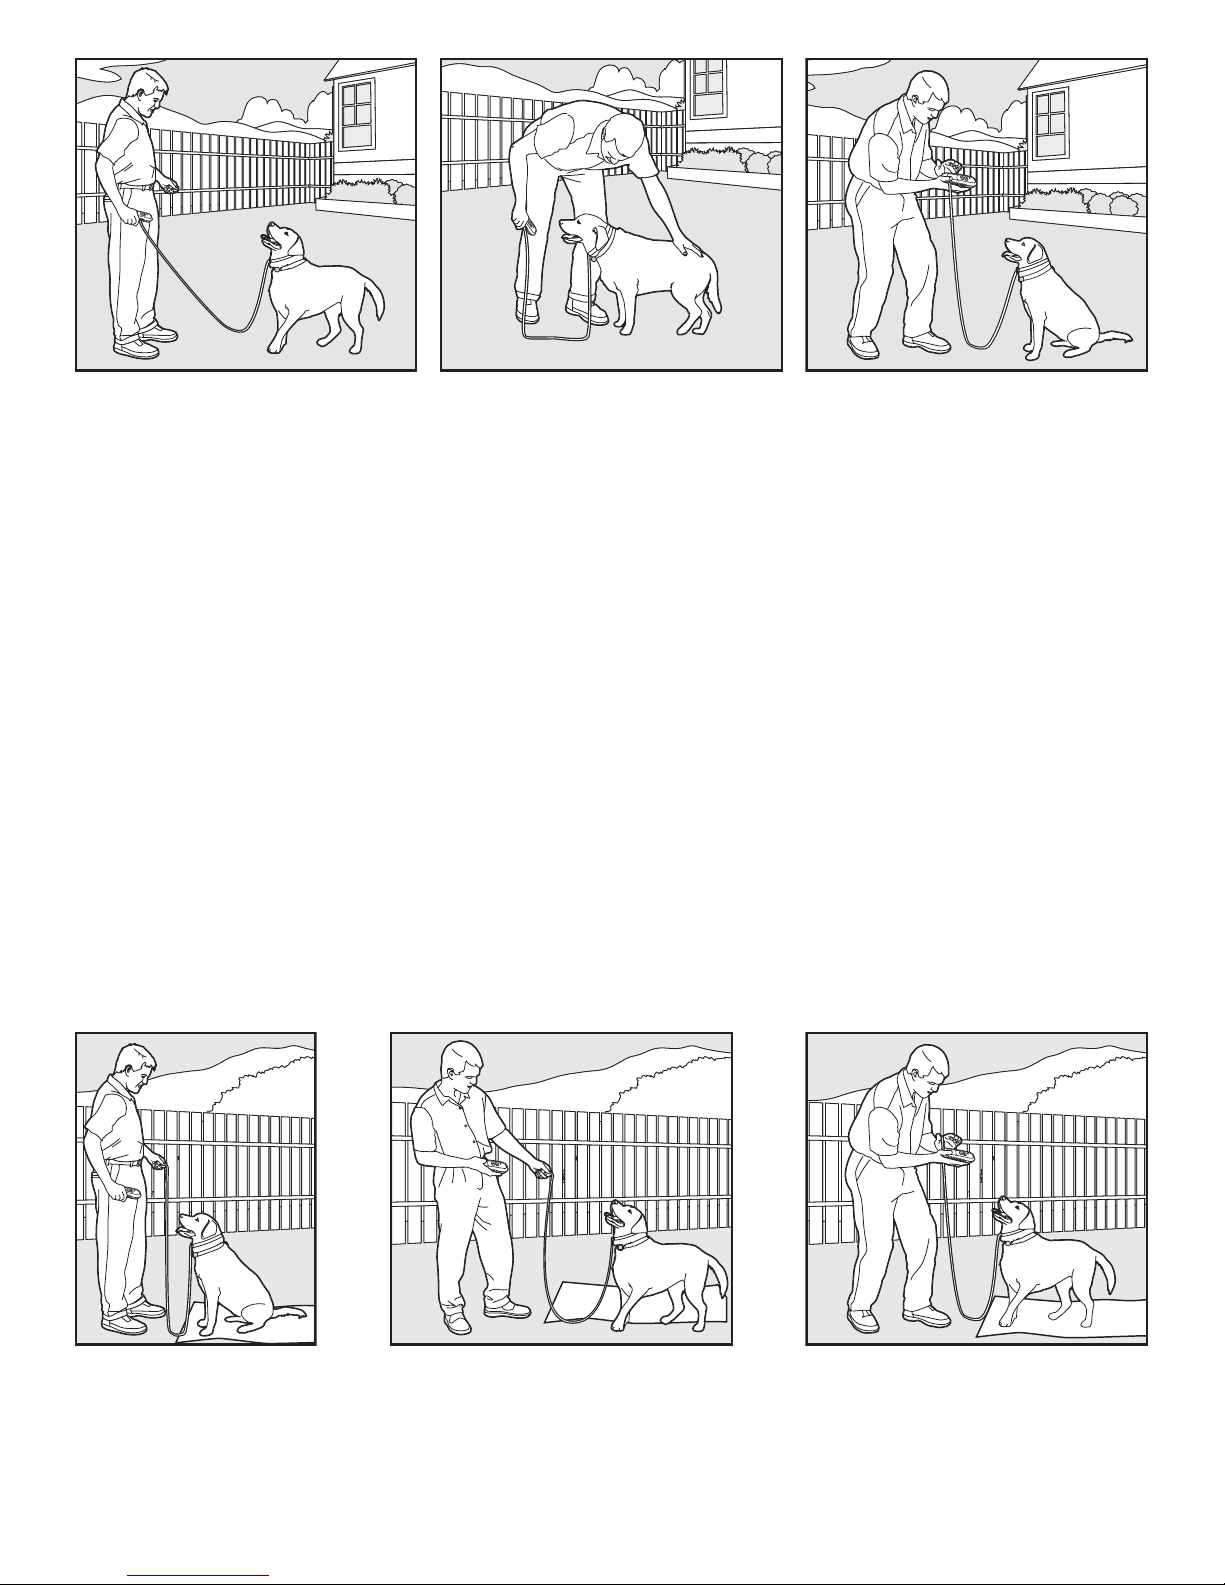
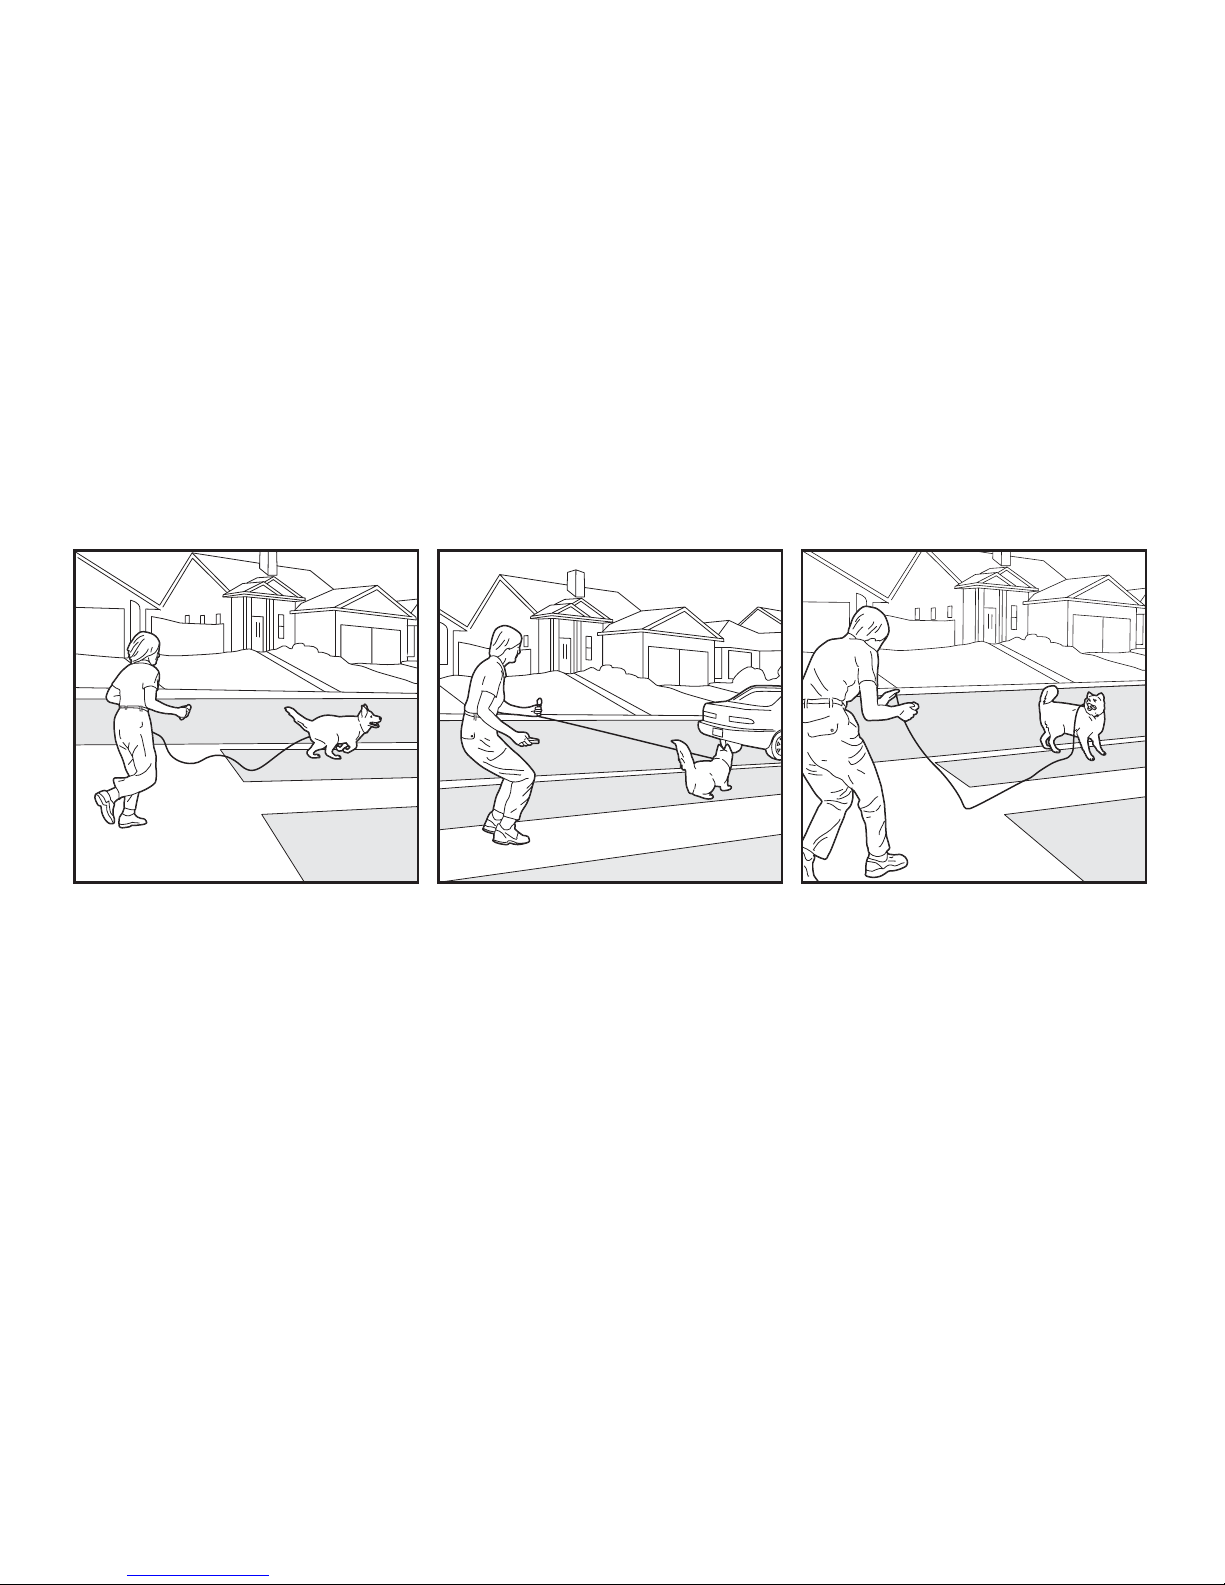
The “Come On” Follow Me Command
This is the easiest and least stressful command to teach your dog prior to more formal commands.
It will also help him to learn to understand the collar and its communications.
1. Go through Preparation for Training.
2. Determine initial working level as previously described. Remember if the dog is excited,
concerned, distracted or in any way not acting normally, he may start to feel the stimulation at a
higher level than the necessary working level. Always be prepared to go down a level.
3. Allow your dog to move forward. When he is a few feet ahead, press stimulation button at
Recognition Level (previously determined) – notice whether he is reacting to the stimulation and at the same time put pressure on lead to turn him towards you. Say nothing.
4. Turn your body to walk in the opposite direction. Give a light pull on the lead, and as he begins
to move towards you release the button.
5. Initially do not expect him to come all the way back to you. Most dogs will however go past and
ahead of you once more. Your aim is to have him turning towards you with the stimulation and
realising it stops when he makes just one step in your direction. Note that we have not given a
command yet.
6. Once he is regularly turning towards you as you apply the stimulation then add the “Come On”
command as you apply the stimulation.
7. When he is turning nicely to the “Come On” command and the stimulation, randomly say
“Come On” and do not apply stimulation. In this way you will determine whether he is
understanding and obeying the command. If he does not turn to follow you promptly then use
the stimulation for a number of turns before trying the command without any stimulation once
more.
8. As he continues to turn to the command and the stimulation, begin to “tap” the button quickly
giving the command “Come On” at the same time – simultaneous command and stimulation.
The sensation is now very quickly applied and it is felt and gone in a split second to prompt the
command.
9. If the quick “taps” do not create the response you seek, then return to holding the button down
a little longer and putting a “pull” pressure on the lead, before working with the “taps” once
more.
10. If at any time your dog looks confused or is resistant to the stimulation and “Come On”, apply
a gentle pull on the lead and hold the stimulation until he moves your way. The moment he
moves towards you, stop pressing the Lower Button.

www.petsafe.net 13
11. Always stop training before your dog becomes tired, usually 5 to 10 minute maximum with a
young dog.
12. Sit with your dog and be his friend for a few minutes and then put him away in his crate or a
“safe” room to remember the lesson, where he cannot misbehave.
This exercise is very effective at obtaining your dog’s attention. If he becomes distracted, begins to
sniff or is not paying attention, change what you are doing, speed up and/or change direction. Tap
the collar as you change and he will keep an eye on you for these changes.
The “Here” or “Come” Command
This command builds on the “Come On” follow me command
1. Go through Preparation for Training.
2. Go through the “Come On”, follow me routine for two or three minutes.
3. When your dog is turning nicely and following you, kneel down (depending upon the dog), or
back away slowly while facing him and then stop and praise as he comes toward you, giving the
command “Here”. Guide him into your body with the lead.
4. If he does not come all the way, repeat “Here” and apply stimulation at the same time. Use the
lead to guide him in to you. Release the button the moment he obeys by moving towards you.
5. Praise each improvement in his performance. Look for small improvements and ways in which
you can guide him into the right action.
6. If he does come all the way in, a treat can be given.
7. The moment he is answering the collar and your command reliably tap the stimulation key
simultaneously with the verbal command.
8. Watch for concern and stress, and work through this gently. Be aware that at times you may
have to simply relax with the dog to let his learning brain cells come back into action.
9. Stop on a good note when he has done something well (short bursts of learning 5 to 10 minutes
are often the best). Do not let him go running off and do not take the e-collar or lead off.
10. Sit with your dog and be his friend for a few minutes and then put him away in his crate or a
“safe” room to remember the lesson, where he cannot misbehave.
The “Sit” Command
1. Go through Preparation for Training
2. Go through the “Come On”, follow me routine for two or three minutes.
3. Hold the lead and the Remote Transmitter in one hand. Keep your other hand free to guide
your dog into a “Sit” position.
4. Call your dog to you with “Here”
5. When he gets to you, praise him, then press and hold the Stimulation Button at Recognition
level giving the “Sit” command.
6. Guide him into a sit by lifting the lead, creating a gentle upward lift on his neck, and/or putting
a downward pressure with your hand on his rear end. Training him to sit prior to this by using
treats so he understands the commands can be of great assistance with this command.
7. Release the Stimulation Button as soon as your dog sits, and praise him.
8. Release your dog from the “Sit” command and walk around with him.
9. Repeat Steps 2 to 8.
10. When he is sitting automatically then just tap the Lower Button with the “Sit” Command, to
prompt the action. If he does not sit promptly, then once more command Sit with stimulation
and ensure he does sit.
11. Sit with your dog and be his friend for a few minutes and then put him away in his crate or a
“safe” room to remember the lesson, where he cannot misbehave.
14 www.petsafe.net
The “Stay” Command
1. Go through Preparation for Training
2. Go through the “Come On”, follow me routine for two or three minutes.
3. Call your dog to you with “Here” command.
4. Ask him to “Sit”. Use the tap stimulation for all these commands. He should now understand
that the tap of stimulation is a prompt to “do it”.
5. With your dog sitting, tell him to “Stay” and take half a step away from him. Do this slowly
watching him closely. If he begins to move, tap the “Bad Dog” button step back to him, tap the
Lower Button say “Sit” and “Stay”. Again take half a step back.
6. Wait a second and step back to your dog. Praise calmly.
7. Repeat steps 2 to 6 increasing the distance you can move from your dog until you are at the end
of the lead. Always go back to your dog – Never call him to you.
8. Increase the time you can stay away from your dog while he is sitting. At any time he moves
away from where he has been sitting, go back to him tapping the Lower Button asking him to
“Sit” once more.
9. Sit with your dog and be his friend for a few minutes and then put him away in his crate or a
“safe” room to remember the lesson, where he cannot misbehave.
Note: With some dogs increasing the distance and time has to be done in very small steps over days and
often weeks of training. Once more, do not call your dog to you from a stay. Always return to his side until
he is consistently good at “Sit and Stay” when you can then begin to occasionally call him to you.

www.petsafe.net 15
The “Place” Command
This follows on from the Stay command. Prior to going out with your dog put a “place” mat or piece of
rug on the ground in your training area. A raised place platform 3 inches above the ground is sometimes
advantageous as it shows a clearly defi ned place. Make the place mat large enough for the dog to sit on and
lay down on it. The size is dependent upon the size of the dog.
1. Go through Preparation for Training
2. Go through the “Come On”, follow me routine for two or three minutes.
3. Lead your dog to the Place mat and walk him over it. Guide him and let him explore this. Some dogs will
walk around it or even want to avoid it totally.
4.
Walk your dog over it comfortably about six to ten times.
5. Now as you walk towards the place, say “Place” and point to it with your hand. Again let the dog walk
happily over the place. Do this 4 times or until the dog looks comfortable doing this.
6. Walk towards the place, point and say “Place”. As your dog steps on the place tap the stimulation button
at the Recognition Level and say “Sit”. Praise as he sits.
7. Wait fi ve seconds, say “Come On” and lead him away.
8. Repeat 6 and 7 six times.
9. Now walk towards the place, point and say “Place” and sit when he is on the place. Now say “Stay” and
go through the “Stay” training routine.
10. Do a “Sit” and “Stay” with your dog four times gradually increasing the time he has to stay on his place.
11. When confi dent, begin to walk slowly around your dog on his place. If he moves off his place, give him
the “Place” command and tap him on the collar as you take him back. Again ask him to “Sit” and Stay”
on his place mat.
12. Stop before your dog becomes tired and cannot concentrate – in other words stop when you are getting
good results.
13. Sit with your dog and be his friend for a few minutes and then put him away in his crate or a “safe”
room to remember the lesson, where he cannot misbehave.
As with the Stay command, always go back to your dog until he is consistently staying on his place. Increase
the time you can leave him, the distance you can be away from him and the number of times you can walk
around him gradually over days and even weeks. All dogs learn at different rates.
Eliminating Unwanted Behaviour
Eliminating unwanted and annoying behaviour should always be preceded by teaching your
dog what the collar means. Without introducing your dog to the collar and creating a basic
understanding of what the communication means your dog could become concerned, stressed and
react out of character. A sudden unknown stimulation can have your dog running away, hiding and
becoming fearful, therefore always introduce the collar to fi nd the recognition Level and create
misunderstanding from at least one training exercise such as “Come On” the follow me exercise. In
this exercise, once your dog has accepted the collar, you can say “Come On” with no stimulation,
if your dog ignores you press the “Bad Dog” Button and follow it with the stimulation. He will
now begin to understand the “Bad Dog” Button prior to you stopping misbehaviour by using the
stimulation as necessary.
Jumping Up on People
Dogs as puppies are often encouraged to jump up on people. When small no one minds but as they get
older then it can be not only annoying but damaging to the person being jumped on. Jumping up on
people should be discouraged from the very beginning and dogs should be shown the correct way to
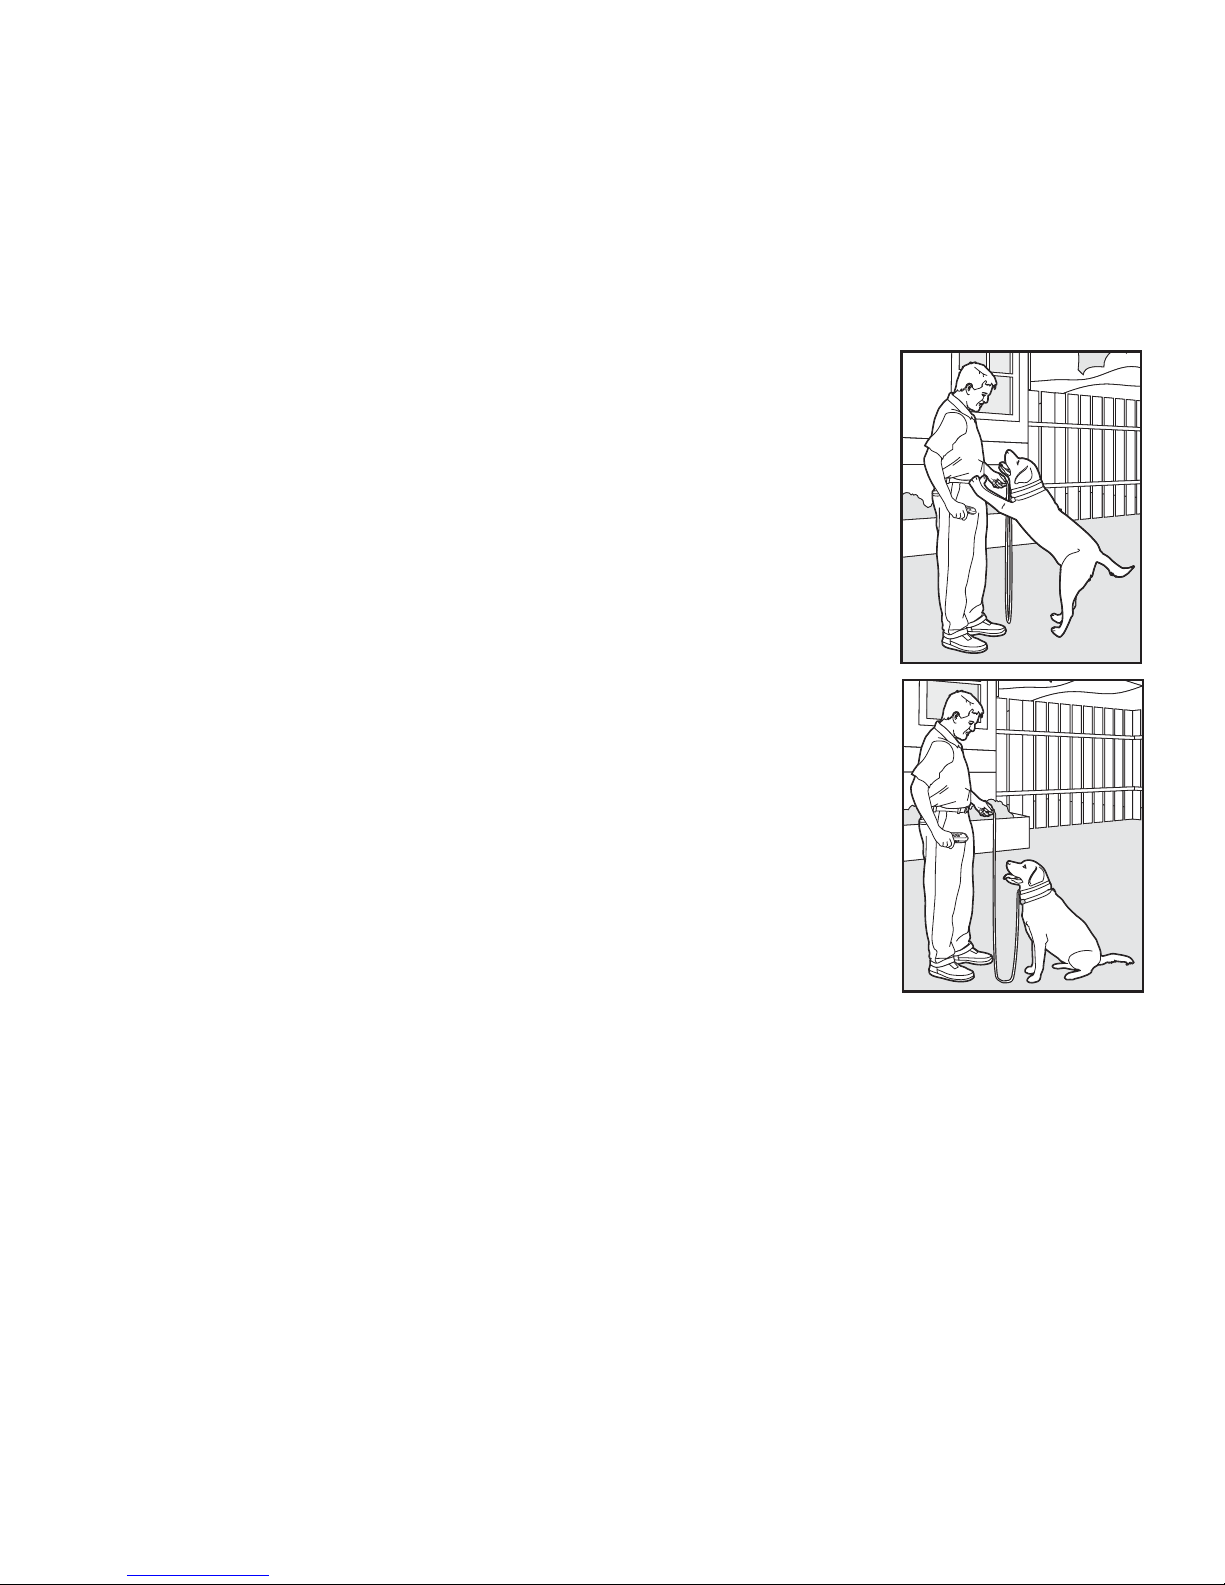
16 www.petsafe.net
greet people, which is by sitting calmly and waiting to be spoken to. This means you have to train your
friends to greet your dog correctly also. Where jumping up has become a nuisance the collar can be
used to stop this through disrupting his motivation to jump and then redirecting him to an acceptable
behaviour – sitting.
Take this exercise in small steps and use the lead to control and guide effectively along with the Remote
Training Collar. You do not want your dog to become nervous of people, but to learn to sit in front of
them. Harsh corrections must not be used.
For this behaviour modifi cation you should have taught your dog to sit using the collar. You may also
have to go up one level from his Recognition Level if he becomes over excited.
1. Put the Remote Training Collar on your dog as described previously and
attach a short lead.
2. Do four “Here” exercises where he comes to the front of you and sits. If he
does not sit, press the “Bad Dog” Tone and use the stimulation to sit him.
3. Now take him toward a new person. You can set up this situation with
friends and family.
4. If he pulls at all towards this person, press the Bad Dog tone, do a
“Come On” and turn him away using a tap of stimulation from thecollar
(simultaneous with the command) and the lead to guide him.
5. Once more, go back towards the new person. Do not allow him at any
stage to pull you towards this person. Any pulling should result in you
turning around “Come On” and walking slowly away.
6. When you are able to walk towards the person and be directly in front
without pulling, ask your dog to sit.
7. If his feet lift off the ground at all – press the “Bad Dog” Button – if they
return to the fl oor and he sits, praise him gently and calmly.
8. If his feet leave the fl oor again (in fact it is better to react the moment
his feet are “thinking” of leaving the fl oor) press the “Bad Dog” Button
followed by the stimulation button. Again, ask him to “Sit”.
9. Read your dog and his reaction and if the level of stimulation is not being
recognised by him, go up one level.
10. The moment he sits, when he reaches a person, and waits – praise slowly
and make sure that even though you have praised him he does not see
this as a “release” to do what he wants again – which is to jump on the
person.
11. Ask the person to smile at your dog and if your dog can be petted to slowly put a hand down to
pet the dog on the chest or side of the head. Not on top of the head.
12. If the dog moves the guest has to remove his hand. Now you go back to step 7 and repeat until
the dog will remain seated.
Digging
It is important to fi rst understand why your dog is digging. Many dogs, such as terriers, were bred to
fl ush out prey, and digging is very innate to them. Other dogs may be digging to fi nd a cool spot to
lie down, or simply out of boredom. Your dog may no longer have the desire to dig if he is provided
with the following:
• A cool, shaded area in which to lie down, and plenty of water.
• An alternate activity, such as a favourite toy.
• Plenty of play, exercise and attention.
• A garden free from rodents or prey that he may be trying to fl ush out.
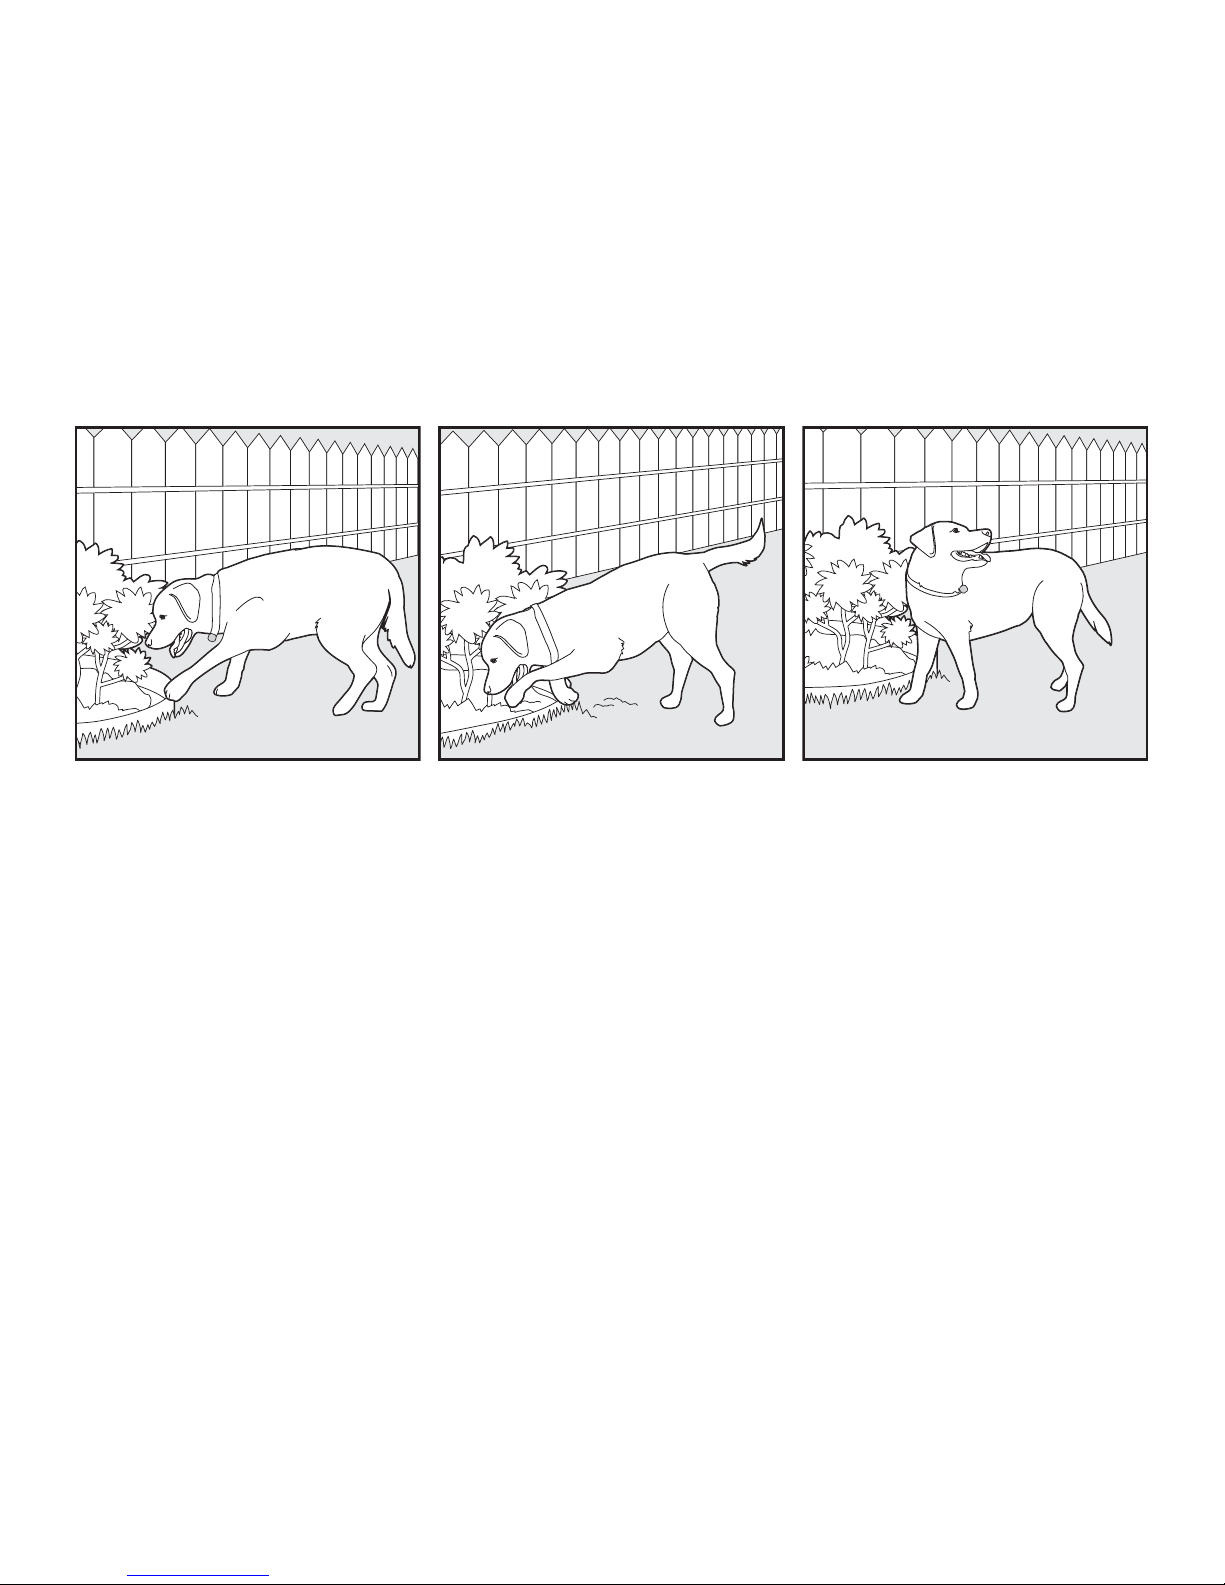
www.petsafe.net 17
1. Choose the Intensity Level one step higher than your dog’s Recognition Level.
2. Place the Receiver Collar on your dog and wait at least 10 minutes before letting him out of your
house. No other people or pets should be in the garden, as you do not want your dog to associate
the Stimulation with anything other than his digging. Your dog must be securely fenced in or
contained during this training.
3. From a window or area where your dog cannot see you, wait until he begins to dig.
4. While your dog digs, press the “Bad Dog” Button and then hold or give the Stimulation Button
multiple taps. Stop the stimulation immediately when he stops digging.
5. If your dog ignores the Stimulation, increase the intensity level by one and repeat the process.
Continue to watch your dog, as he may choose another area to dig.
6. Do not allow your dog in the garden unsupervised until he has completely stopped digging. This
may take more than one correction over a number of days.
Chasing
Chasing is an instinctive behaviour stimulated by moving objects. Some dogs have a particularly
strong desire to chase that can put them in harm’s way and leave you helpless. Never allow your dog
off the lead or out of a contained area until he has reliably learned the “Come” command, no matter
what distraction is present. Rarely is a dog 100% reliable, therefore we recommend, if in doubt, put
him on a lead. Be consistent and correct your dog every time he chases something.
1. It is vitally important that you and your dog remain safe while carrying out this training. Your dog
should be on a strong lead, long enough for him to attempt to chase an object, but short enough
to restrain your dog when he tries to chase.
2. Do four “Come On”, “Here” and “Sit” exercises or as many as is required to have him doing what
you require consistently prior to introducing him to the scenario which will motivate him to chase.
Do this using his Recognition Level.
3. Set up a scenario where your dog can see objects he wants to chase. Generally this will be cars;
motorcycles, bicycles, cats, squirrels etc.
4. Choose the stimulation level one step higher than your dog’s Recognition Level.
5. Take him toward the chase enticement. The moment he shows any interest, press the “Bad Dog”
Button, say “Sit” and tap him with stimulation. Make sure to hold the lead with a fi rm grip and
guide him into the “Sit”.
6. At this moment watch your dog’s reaction to the stimulation. His reaction here will determine
whether you need to go up a level or whether this level is adequate.
7. If he ignores the stimulation, struggles to chase or does not sit promptly, go up a level in stimulation
on the collar and once more insist on a sit. Have him wait in a sit position for a minute.
8. Repeat the procedure.
18 www.petsafe.net
9.
If he responds quickly this time you may fi nd that you can go down a level in intensity on the dial
setting
10. Should your dog begin to chase the object, press the “Bad Dog” Button, give the “Come”
command and press and hold or multiple tap the Stimulation Button until he stops. If he fails to
stop, restrain him with the lead before he reaches danger.
11. When your dog responds to your commands, immediately stop the stimulation, walk slowly
backwards and give the “Come” command, tapping him with the stimulation button until he
moves towards you willingly. Praise him if he comes to you willingly and without you pulling on
the lead.
12. If at any time your dog ignores the Stimulation, repeat, setting the dial one level higher.
13. Repeat the process until your dog responds consistently to the “Sit” and/or the “Come”
command, whichever is given.
14. Remember to watch and read you dog at all times and stages to determine whether you can go
up or down a level. The aim is to control and not create a strong reaction to the stimulation.
15. Practice this regularly with your dog and he will learn to totally ignore objects which have
enticed him to chase.

www.petsafe.net 19
Excessive Barking
Barking is an instinctive behaviour for dogs. It is impossible to keep your dog from barking entirely,
but you can teach him to be quiet when you give the command.
Note: This will only be effective when you are at home with your dog.
1. Choose your dog’s Recognition Level.
2. Put your dog in a situation that can tempt him to bark.
3. When your dog begins to bark, Press the Upper Button followed by the Lower Button and give him
the command “Quiet”.
4. Release the stimulation immediately once your dog stops barking and praise him.
5. If your dog ignores the stimulation and continues to bark, set the dial one number higher to send a
higher level of stimulation and repeat the process using the Lower Button.
6. Practice this exercise in different areas using different situations that would cause your dog to bark.
Using Tone Only
• Once you have trained your dog to the commands you desire with your training collar, you are ready
to use Tone mode. Repeat the training you have already completed. You should have associated the
“Good Dog” Button with rewards and the “Bad Dog” Button with circumstances where he ignored a
command or misbehaved.
• If your pet begins to behave in an undesired manner, use the “Bad Dog” Tone and repeat the
command as required.
• Use the “Good Dog” Tone when he is behaving correctly and reward him.
• If needed, you may need to return to using stimulation occasionally for reinforcement of commands.
20 www.petsafe.net
Frequently Asked Questions
Is the Stimulation safe
for my pet?
While the Stimulation is unpleasant, it is harmless to your
pet. Electronic training devices require interaction and
training from the owner to achieve the desired results.
How old does a pet have to
be before using the Remote
Training Collar?
Your pet should be at least 6 months old.
Once my pet is trained and has
been obeying my commands,
will he have to continue to
wear the Receiver Collar?
Probably not. He may need to wear the Receiver Collar
from time to time for reinforcement.
Is the Receiver Collar
waterproof?
Yes. When changing the battery, be sure to keep the area
free from dirt and debris.
Can I use the Remote Training
Collar on aggressive pets?
We do not recommend any of our products to be used
on aggressive pets. We recommend you contact your local
veterinarian or professional trainer to determine if your pet
might be aggressive.
Will I get exactly 100 metres
of range with the Remote
Training Collar?
The range you get with your Trainer will vary according to
terrain, weather, vegetation, as well as transmission from
other radio devices. To get the maximum amount of range,
please refer to “How the System Works” section of this guide.
How long can I continuously
deliver Stimulation to my pet?
The maximum amount of time you can press the
Stimulation Button and deliver Stimulation to your pet
continuously is 8 seconds. After eight seconds, the Remote
Transmitter will time-out, and the Stimulation Button
must be released and pressed again.
What do I do if my pet’s neck
becomes red and irritated?
This condition is due to the Contact Points irritating the
skin. Discontinue use of the Receiver Collar for a few
days. If the condition persists beyond 48 hours, see your
veterinarian. Once the skin returns to normal, replace
Receiver Collar, and monitor the skin condition closely.
Can I place the Receiver
Collar on another collar?
No. The collar used for this unit has a sleeve to hold the
Antenna.
Can I attach a lead to the
Receiver Collar?
No. This can result in pulling the Contact Points too tightly
against your pet’s neck. Use a separate non-metallic collar
placed above the Receiver Collar to attach a lead.
How long can I leave the
Receiver Collar on my pet?
The Receiver Collar is not designed to be worn constantly.
The Receiver Collar should not be worn for more than 8
hours out of every 24-hour period.

www.petsafe.net 21
Troubleshooting
The answers to these questions should help you solve any problem you have with this system.
If they do not, please contact the Customer Care Centre or visit our website at www.petsafe.net.
My pet is not responding when
I press a button.
• Check to see if the Receiver Collar has been turned on.
• If your range has reduced from the fi rst time you have
used it, please check to see if the battery is low in either
the Remote Transmitter or Receiver Collar.
• Many factors can impact the range you have with the
Trainer. For a list of these factors, please refer to “How
the System Works”.
• You can verify the Receiver Collar is delivering
stimulation to your pet by placing the Test Light,
enclosed in your kit, on the Receiver Collar. Please refer
to the “Test Light Instructions” section for details.
• Increase the Intensity Dial. Refer to “Find the Best
stimulation Level For Your Pet” for more information.
• Make sure the Receiver Collar’s Contact Points are
placed snugly against your pet’s skin. Refer to “Fit the
Receiver Collar” for more information.
The Receiver Collar will
not turn on.
• Check that the battery has been installed properly. See
“To Insert and Remove the Battery”.
The Receiver Collar is
not responding to the
Remote Transmitter.
• Verify the Receiver Collar has been turned on. Refer to
“To Turn the Receiver Collar On”.
• Refer to “Reset the Receiver Collar.”
Test Light Instructions
1. Set the Intensity Dial between 1 and 7
2. Hold the Test Light Contacts to the
Contact Points.
3. Press the Lower Button on the Remote
Transmitter.
4. The Test Light will fl ash. Note: At
higher Intensity Levels, the Test Light will
fl ash brighter.
Save the test light for future testing.
Test Light
Contacts
Note: If the Test Light does not fl ash, install a new battery and re-test. If Test Light still does not fl ash,
contact the Customer Care Centre or visit our website at www.petsafe.net.
 Loading...