

Petsafe PDT 20-10646 Operating And Training Manual
®
PetSafe
400 m Trainer
Operating and Training Guide
Manuel d’utilisation et de dressage
Handleiding en Africhtingsgids
Manual de adiestramiento y funcionamiento
Betriebsanleitung und Trainingsanleitung
Guida all’uso e all’addestramento
Please read this entire guide before beginning
Veuillez lire ce manuel en entier avant de commencer
Gelieve deze gids volledig door te lezey voordat u begint
Por favor, este manual lea completo antes de empazar
Bitte lesen Sie die gesamte Betriebsanleitung vor dem Trainingsbeginn
Si prega di leggere attentamente la guida al uso prima di utilizzare il collare
7
6
8
5
1
4
2
3

Thank you for choosing PetSafe®, the best selling brand of electronic training solutions
in the world. Our mission is to ensure your pet’s safety by providing you the tools and
techniques to successfully train your pet. If you have any questions, please contact the
Customer Care Centre or visit our website at www.petsafe.net.
____________________________________________________________________
Table of Contents
Components ...............................................................................................3
How the System Works ................................................................................3
Key Defi nitions ...........................................................................................4
Operating Guide
Prepare the Remote Transmitter ...................................................................5
Prepare the Receiver Collar..........................................................................6
Fit the Receiver Collar .................................................................................8
Find the Best Stimulation Level for Your Pet .................................................9
Program the Remote Transmitter ...............................................................10
Reset the Receiver Collar .......................................................................... 11
Program the Receiver Collar for Two or Three-Dog Operation ....................11
Training Guide
General Tips ...........................................................................................12
Teaching Basic Obedience
The “Sit” Command ............................................................................13
The “Come” Command .......................................................................14
The “Stay” Command .........................................................................15
Eliminating Unwanted Behavior
Jumping Up .........................................................................................16
Digging ............................................................................................... 16
Chasing ...............................................................................................17
Excessive Barking ................................................................................18
Frequently Asked Questions ...................................................................... 19
Troubleshooting ........................................................................................ 20
Test Light Instructions ..............................................................................21
Terms of Use and Limitation of Liability ....................................................21
Important Recycling Advice .......................................................................22
Français .................................................................................................. 23
Nederlands .............................................................................................. 44
Español ...................................................................................................65
Deutsch ................................................................................................... 86
Italiano ..................................................................................................107
2 www.petsafe.net

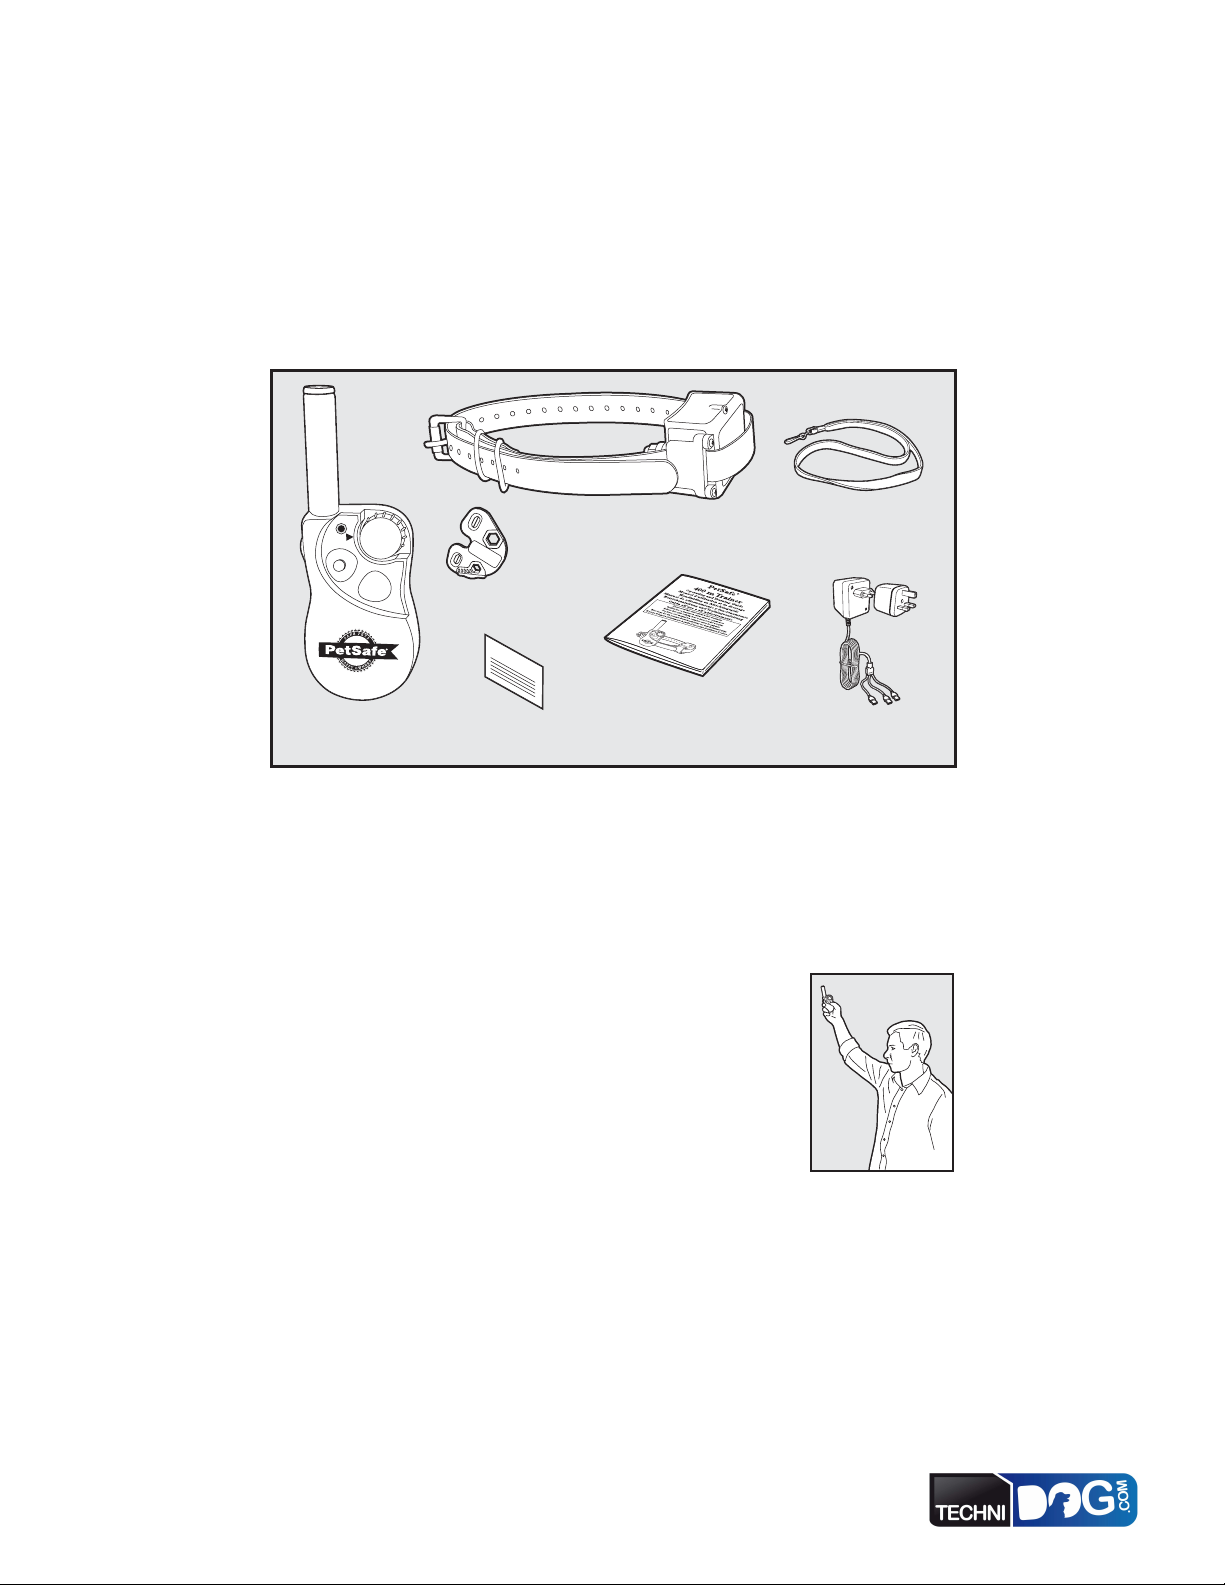
Components
7
6
8
5
1
4
2
3
Receiver Collar
Lanyard
Test Light
Kit
War ranty
Operating and
Remote
Transmitter
Warranty
Card
Training Guide
Charging Adapter
How the System Works
The PetSafe® 400 m Trainer has been proven safe, comfortable, and effective for all pets greater than
3.6 kg and at least 6 months old. This system assists you in controlling your pet without a lead in a
range up to 400 metres. At the push of a button, the Remote Transmitter sends a signal, activating
the Receiver Collar. Using the Remote Trainer consistently and correctly, many misbehaviours that
your pet exhibits can be corrected or any basic obedience commands can be taught. PetSafe® Trainers
should not be used by persons under 16 years of age.
Important: The 400 m Trainer has a range of up to 400 metres.
Depending on the way you hold the Remote Transmitter, the
maximum range may vary. For consistent results at longer ranges,
hold the Remote Transmitter in a vertical position away from
your body and above your head. Terrain, weather, vegetation,
transmission from other radio devices, and other factors will affect
the maximum range.
7
6
8
5
1
4
2
3
www.petsafe.net 3

Key Defi nitions
Remote Transmitter: Transmits the radio signal to the Receiver Collar. It is waterproof.
Transmitter Indicator Light: Indicates that a button is pressed and also serves as a low-battery
indicator.
Intensity Dial: Provides multiple levels of Stimulation so you can match the correction to your pet’s
temperament.
Upper Button: This button is factory-set to deliver Tone for 1 second then Continuous Stimulation set by
the Intensity Dial.
Lower Button: This button is factory-set to deliver Tone for 1 second then Continuous Stimulation two
levels higher than Intensity Dial setting. Note: This button will not deliver Stimulation higher than level 8. For
example, if the Intensity Dial is set to 8, pushing the Lower Button will not deliver a higher level of Stimulation.
Side Button: This button is factory-set to deliver an Audible Tone only.
Receiver Collar: Receives the radio signal from the Remote Transmitter. It is waterproof.
On/Off Button: Momentarily pressing and holding this button turns the Receiver Collar on and off.
Contact Points: The contacts through which the Receiver Collar delivers Stimulation.
Receiver Indicator Light: Indicates when the Receiver Collar has been turned on or off and also serves
as a low-battery indicator.
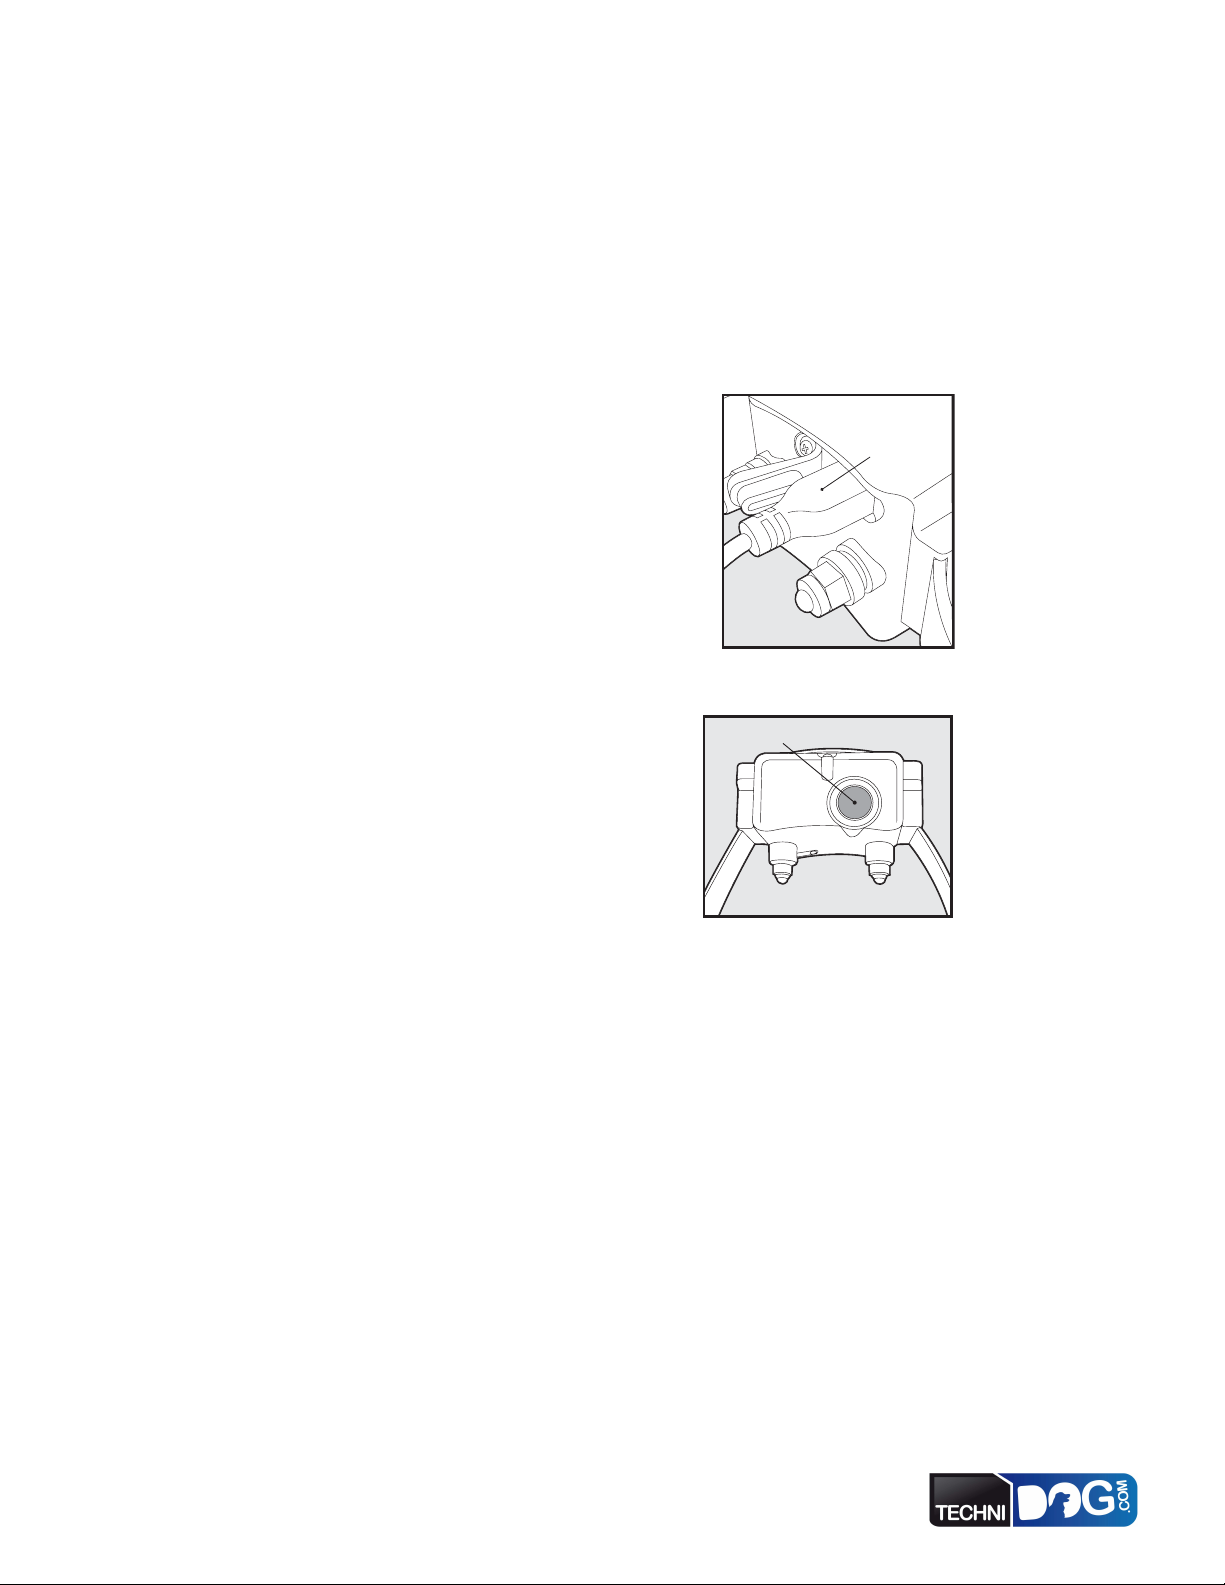
Charging Jacks:
For connecting the charger. Although the Remote Transmitter and Receiver Collar are
waterproof without the charger covers, keep the covers in place when not charging to keep debris out of the
openings.
Continuous Stimulation: You control when and how long Stimulation is delivered to your dog through
the Receiver Collar’s Contact Points. When a Continuous Stimulation button is pressed for 8 seconds
or more, the Remote Transmitter will “time-out.” The button will need to be released and pressed again
before additional Stimulation can be delivered.
Audible Tone: Use an Audible Tone with a Stimulation to stop unwanted behaviors. Timing is critical.
The Audible Tone followed by the Stimulation should occur during or immediately after the unwanted
behavior. Once your dog associates the Audible Tone with the Stimulation, you will only need to use the
Audible Tone.
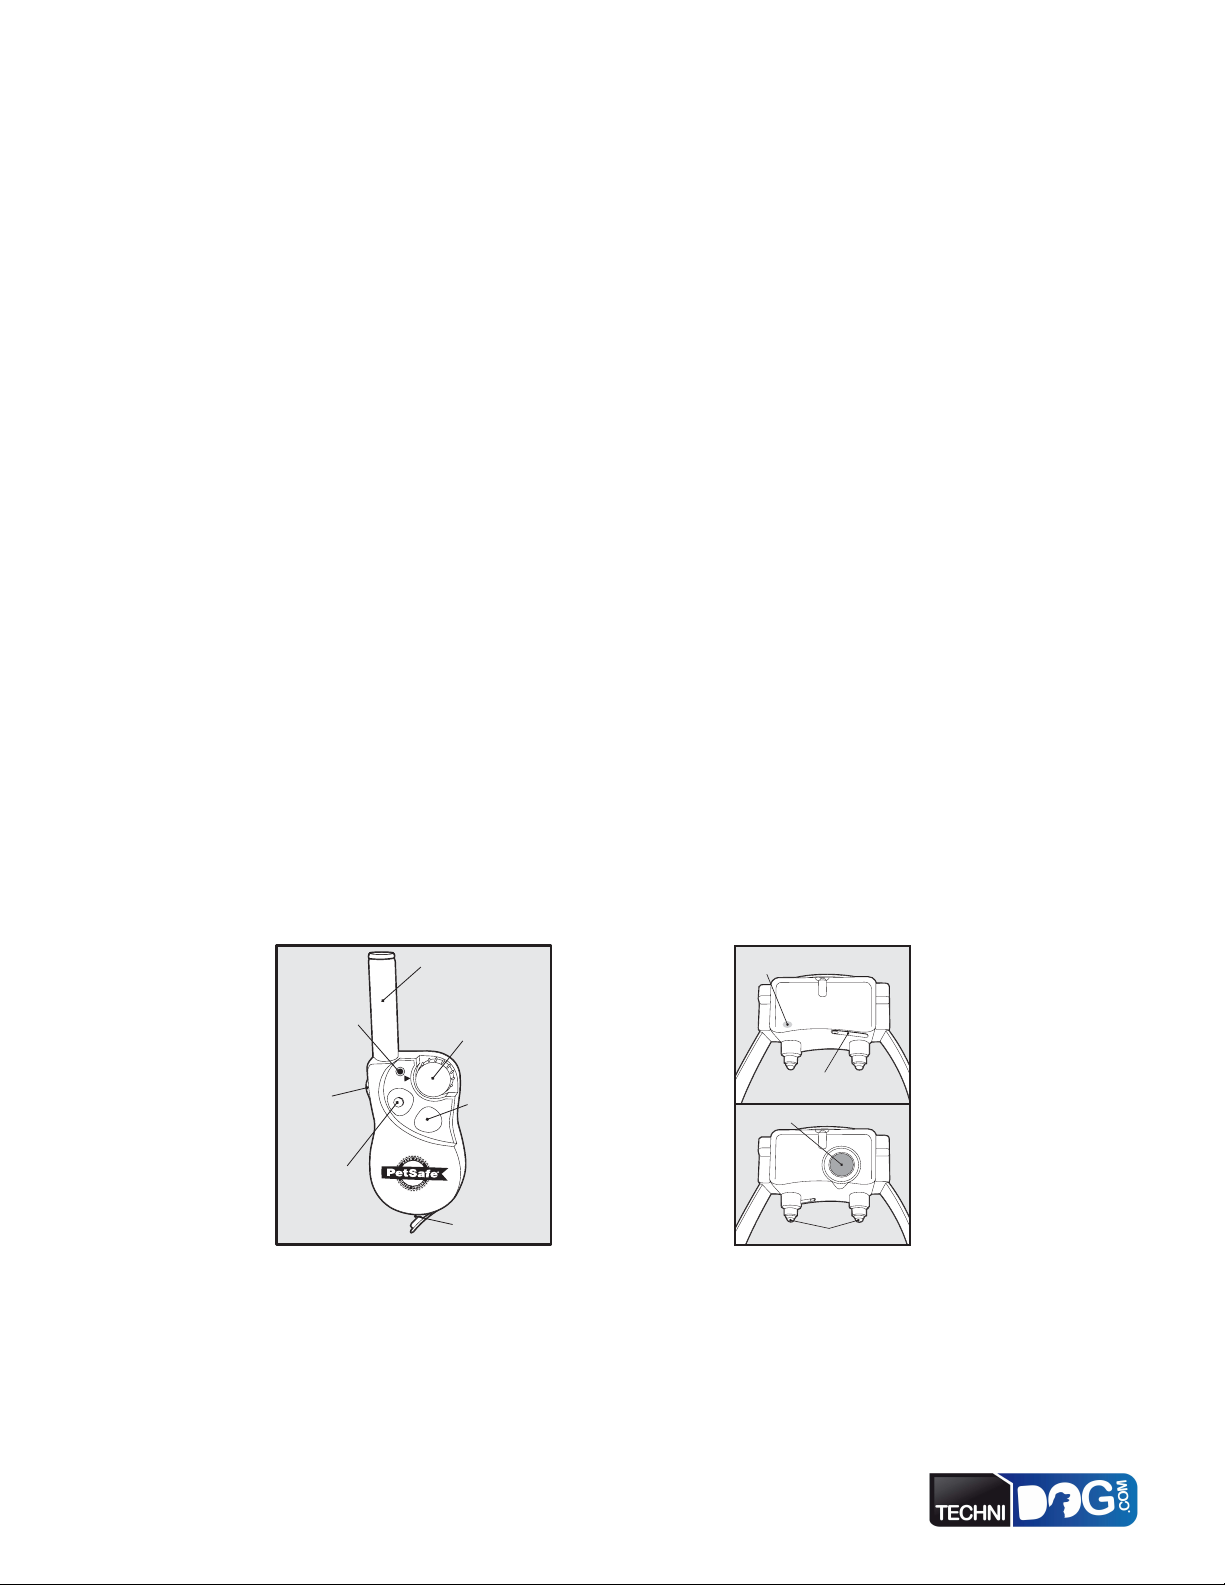
Remote Transmitter
Transmitter Antenna
Transmitter
Indicator
Light
Side Button
Upper Button
7
6
8
5
1
4
2
3
Intensity Dial
Lower Button
Charging Jack
(with cover)
Receiver Collar
Receiver Indicator Light
Charging Jack
(with cover)
On/Off Button
Contact Points
(Top)
(Bottom)
4 www.petsafe.net

Operating Guide
Step
1
Prepare the Remote Transmitter
Charge the Remote Transmitter
1. Lift the rubber cover protecting the Remote
Transmitter Charging Jack.
2. Connect one of the charger connectors to the
Remote Transmitter Charging Jack.
3. Plug the charger into a standard wall outlet.
4. Charge the Remote Transmitter for 24 hours for
the fi rst charge. Recharges take only 12 hours.
Note: The Transmitter Indicator Light will fl ash after
12 hours of charging. For the fi rst charge, continue to
charge the Remote Transmitter for an additional 12
hours.
5. When charging is completed, replace the rubber
cover.
Note: Approximate battery life between charges is 40 to 60 hours, depending on frequency of use.
Transmitter Indicator Light - Function and Response
Remote Transmitter Function Indicator Light Response
Continuous Stimulation or Tone Only
button pressed
Low battery – Any button pressed Flashes continuously
Charger connector placed
in the Remote Transmitter
Charging Jack
Solid in color
www.petsafe.net 5

Step
2
Prepare the Receiver Collar
Charge the Receiver Collar
1. Lift the rubber cover protecting the Receiver Collar
Charging Jack.
2. Connect one of the charger connectors to the
Receiver Collar Charging Jack.
3. Plug the charger into a standard wall outlet.
4. Charge the Receiver Collar for 24 hours for the
fi rst charge. Recharges take only 12 hours.
Note: The Receiver Indicator Light will fl ash after
12 hours of charging. For the fi rst charge, continue to
charge the Receiver Collar for an additional 12 hours.
5. When charging is completed, replace the rubber
cover.
To Turn the Receiver Collar On:
1. Press and hold the On/Off Button until the
Receiver Indicator Light comes on
and the Receiver Collar beeps 5 times.
2. Release the On/Off Button.
The Receiver Indicator Light will fl ash until the
Receiver Collar is turned off. The fl ashing light
indicates the Receiver Collar is ready to receive a
radio signal from the Remote Transmitter.
On/Off Button
Charger connector
placed in Receiver
Collar Charging
Jack
To Turn the Receiver Collar Off:
1. Press and hold the On/Off Button until the Receiver Indicator Light comes on and
the Receiver Collar beeps 2 times.
2. Release the On/Off Button.
To extend the life between charging cycles, turn the Receiver Collar off when it is not in
use. Approximate battery life between charges is 20 hours, depending on frequency of use.
6 www.petsafe.net

Receiver Indicator Light
Function Indicator Light Response
Receiver Collar on – good battery Flashes once per second
Receiver Collar on - low battery Flashes once every 4 seconds
Continuous Stimulation button pressed Solid in color
Rechargeable Batteries
• The rechargeable Nickel Metal Hydride (NiMH) batteries are not memory sensitive
and do not require depletion before charging.
• The batteries come partially charged from the factory, but will require a full charge
(24 hours) before the fi rst use.
• Remember - Always keep batteries away from fl ame.
• When storing the unit for long periods, remember to regularly give batteries a full
charge (12 hours). This should be done once every 4 to 6 weeks.
• Excessive overcharging can shorten battery life. After initial charge, never leave the
battery plugged in for more than 12 hours.
• If your equipment has not been charged for an extended period, you may experience
a decrease in battery life the fi rst few uses. Afterwards, the battery life will return to
previous capacity levels.
• You should expect hundreds of recharge cycles from your batteries. However, all
rechargeable batteries lose capacity over time relative to the number of recharge cycles
they experience. This is normal. If your operating time drops to half of the original life,
contact the Customer Care Centre to purchase a new battery.
• The batteries should last for a period of 3-5 years. When a battery needs replacement,
you can order a new pack by contacting our Customer Care Centre or visit our website
at www.petsafe.net. Please do not open the Receiver Collar or Remote Transmitter
until you have received the replacement.
www.petsafe.net 7

Step
3
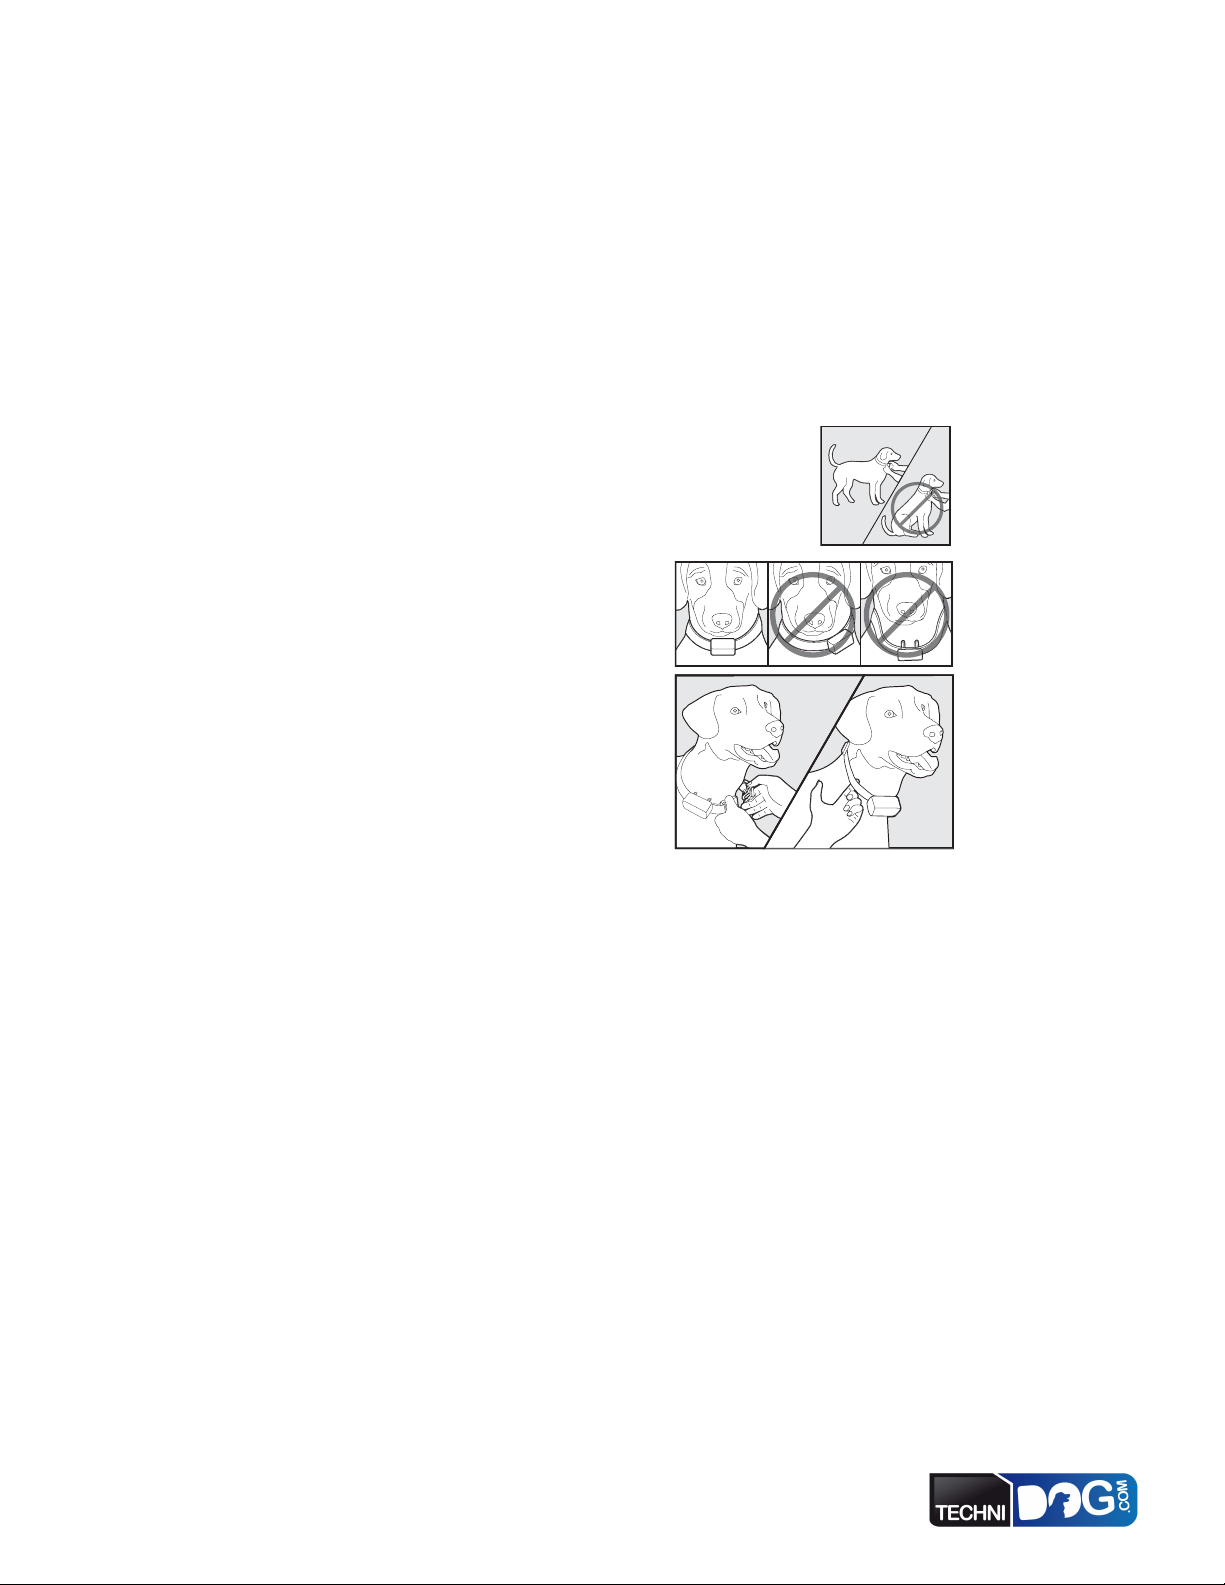
Fit the Receiver Collar
Important: The proper fi t and placement of your Receiver Collar is important
for effective operation. The Contact Points must have direct contact with your
dog’s skin on the underside of his neck.
To assure a proper fi t, please follow these steps:
1. Make sure that the Receiver Collar is turned off.
2. Start with your dog standing comfortably (3A).
3. Place the Receiver Collar high on your dog’s neck close to the
ears. Centre the Contact Points underneath your dog’s neck,
touching the skin (3B). Note: It is sometimes necessary to trim the
hair around the Contact Points to make sure that contact is consistent.
4. Check the tightness of the Receiver Collar
by inserting one fi nger between the collar
and your dog’s neck (3C). The fi t should be
snug but not constricting.
5. Allow your dog to wear the Receiver Collar
for several minutes then recheck the fi t.
Check the fi t again as your dog becomes
more comfortable with the Receiver Collar.
3B
3C
Care and Cleaning
To ensure the effectiveness of this product
and the comfort and safety of your dog, check
the fi t of his collar frequently. This Guide
describes proper collar fi tting. If you notice
that your dog is experiencing skin irritation,
discontinue use of the collar for a few days. If
the condition persists beyond 48 hours, see
your veterinarian.
3A
To prevent skin irritation from occurring:
• The Receiver Collar should not be worn for more than 8 hours out of every 24-hour
period.
• Your dog’s neck and the Contact Points must be washed weekly with a washcloth and
mild hand soap, then rinsed thoroughly.
• Be sure that your pet’s neck is thoroughly dry before placing the Receiver Collar back
on his neck.
8 www.petsafe.net

Step
4
Find the Best Stimulation Level
for Your Pet
Important: Always start at the lowest level and work your way up.
The Remote Trainer has 8 different Stimulation Levels. This allows you to choose the
Stimulation that is best for your pet.
Once you have placed the Receiver Collar on your pet, it is time to fi nd the Stimulation
Level that is best for him. This is called the Recognition Level.
A slight change in your pet’s behaviour, such as looking around in curiosity, scratching
at his collar, or fl icking his ears, indicates the Recognition Level that is best for him.
Follow the steps below to fi nd your pet’s Recognition Level:
1. Starting at Level 1 on the Intensity Dial, press the Upper Button continuously for 1
to 2 seconds.
2. If your pet shows no reaction, repeat the Stimulation level several times before moving
up to the next level.
3. YOUR PET SHOULD NOT VOCALIZE OR PANIC WHEN RECEIVING
STIMULATION. IF THIS HAPPENS, THE STIMULATION LEVEL IS TOO
HIGH AND YOU NEED TO GO BACK TO THE PREVIOUS LEVEL AND
REPEAT THE PROCESS.
4. Move up through the Stimulation levels until your pet reliably responds to the
Stimulation.
5. If your pet continues to show no response at Level 8, check the fi t of the Receiver
Collar. If your pet has long or thick hair, replace the Contact Points with the longer
set. Then go back to step 1 and repeat the process. If this still does not yield any
results, your pet’s hair will need to be trimmed around the Contact Points.
If all of these steps have been done and your pet continues to show no reaction to the
Stimulation, see the “Test Light Instructions” section.
If after completing all of these steps your dog still does not indicate he is feeling the
Stimulation, please contact Customer Care Centre or visit our website at
www.petsafe.net.
www.petsafe.net 9

Step
5
Program the Remote Transmitter
Note: The Transmitter is factory set to Mode 1. The Mode of the Remote Transmitter can be
changed to fi t your type or style of training.
To change the Mode:
1. Referring to the table below, adjust the Intensity Dial to
the Mode you want to use.
2. Turn the Remote Transmitter over.
3. With a pen or paperclip, depress and release the
Mode button. When the Mode button is pressed, the
Transmitter Indicator Light will be solid in color. When it
is released, it will fl ash the Mode selected.
For example, if Mode 2 is desired, adjust the Intensity Dial to Level 2. Once the Mode
button has been depressed, the Transmitter Indicator Light will be solid, and once the
Mode button is released, the Transmitter Indicator Light will fl ash two times.
Note: Continuous Stimulation will transmit for no more than eight continuous seconds no matter
how long the button is pressed. To reactivate, release and repress the button.
Mode UPPER BUTTON
1
2
3
4
10 www.petsafe.net
FUNCTION
Tone 1 Second then
Continuous Stimulation
set by Dial
Tone 1 Second then
Continuous Stimulation
set by Dial
DOG #1
Tone only
DOG #1
Tone 1 Second then
Continuous Stimulation
set by Dial
LOWER BUTTON
FUNCTION
Tone 1 Second then
Continuous Stimulation
2 levels higher than
Intensity Dial setting
Continuous Stimulation
set by Dial
DOG #2
Tone only
DOG #2
Tone 1 Second then
Continuous Stimulation
set by Dial
SIDE BUTTON
FUNCTION
Tone only 1
Tone only 1
DOG #3
Tone only
DOG # 3
Tone 1 Second then
Continuous Stimulation
set by Dial
# OF
DOGS
3
3

Step
6
Reset the Receiver Collar
To reset the Receiver Collar to work with a new Remote Transmitter or to reprogram a
new Receiver Collar to work with your existing Remote Transmitter:
1. Turn the Receiver Collar off.
2. Press and hold the On/Off Button until the Receiver Indicator Light comes on and
the Receiver Collar beeps 5 times.
3. Continue to hold the On/Off button until the Receiver Indicator Light has turned off.
4. Press and hold the Upper Button on the Remote Transmitter until the Receiver
Indicator Light fl ashes 5 times. You may need to hold both units 0.5-1 m from each
other before this occurs. Once the Receiver Indicator Light has fl ashed 5 times, the
Receiver Collar has been reset. If the Receiver Indicator Light does not fl ash 5 times,
start again and repeat the process.
_____________________________________________________________
Step
7
Program the Receiver Collar for Two or
Three-Dog Operation
With the Transmitter set to Mode 3 or 4, PetSafe® Receiver Collars can be set to
respond to the upper, lower, or side Remote Transmitter buttons. Add-A-Dog™
receiver(s) must be purchased to train additional dogs.
1. Program the Remote Transmitter to Mode 3 or 4.
2. Program the fi rst Receiver Collar.
A. Turn the Receiver Collar off.
B. Press and hold the On/Off Button. The Receiver Indicator Light will come on,
then turn off in 4-5 seconds. If the On/Off Button is released too early, the Receiver
Indicator Light will begin its normal fl ashing. If this occurs, start over and repeat the
process.
C. After the Receiver Indicator Light has turned off, release the On/Off Button.
D. Press and hold the Upper Button on the Remote Transmitter until the Receiver
Indicator Light fl ashes 5 times. You may need to hold both units 0.5-1 m from each
other. If the Receiver Indicator Light does not fl ash 5 times, start over and repeat the
process.
3. Program the second Receiver Collar using A. through D. above, but using the Lower
Button in place of the Upper Button.
4. Program the third Receiver Collar using A. through D. above, but using the Side
Button in place of the Upper Button.
www.petsafe.net 11

Training Guide
General Tips
Important: The following training instructions were written to be used with the Remote
Transmitter programmed to Mode 1.
• Eliminate one misbehaviour or teach one obedience command at a time. If you move too fast
with the training, your pet may become confused.
• Be consistent. Give your pet a tone or Stimulation with each misbehaviour.
• Do not over-correct your pet. Use as few Stimulations as possible to train your pet.
• Unless you can supervise him, it is recommended that you restrict your pet from situations in
which he has a history of misbehaving. However, setting up a situation as a training session can
dramatically improve your chances of success.
• If your pet reacts to the training by hiding or acting fearful, redirect his attention to a simple and
appropriate behaviour such as the “Sit” command.
• The Lower Button can be used to deliver a slightly higher level of Stimulation on occasions when
your pet ignores his Recognition Level. Using this button is a quicker alternative to adjusting the
Intensity Dial. Note: This function only applies if the Remote Transmitter is programmed in Mode 1.
• Never use the Remote Trainer to correct or eliminate any form of aggressive behaviour. If you
are unsure if your dog is aggressive, please consult your veterinarian or a certifi ed trainer.
• The objective is to train your pet to respond to your spoken command and the Audible Tone
from the receiver in normal circumstances. After proper training, the use of Stimulation should
only be necessary if your pet repeats unwanted behaviour.
12 www.petsafe.net
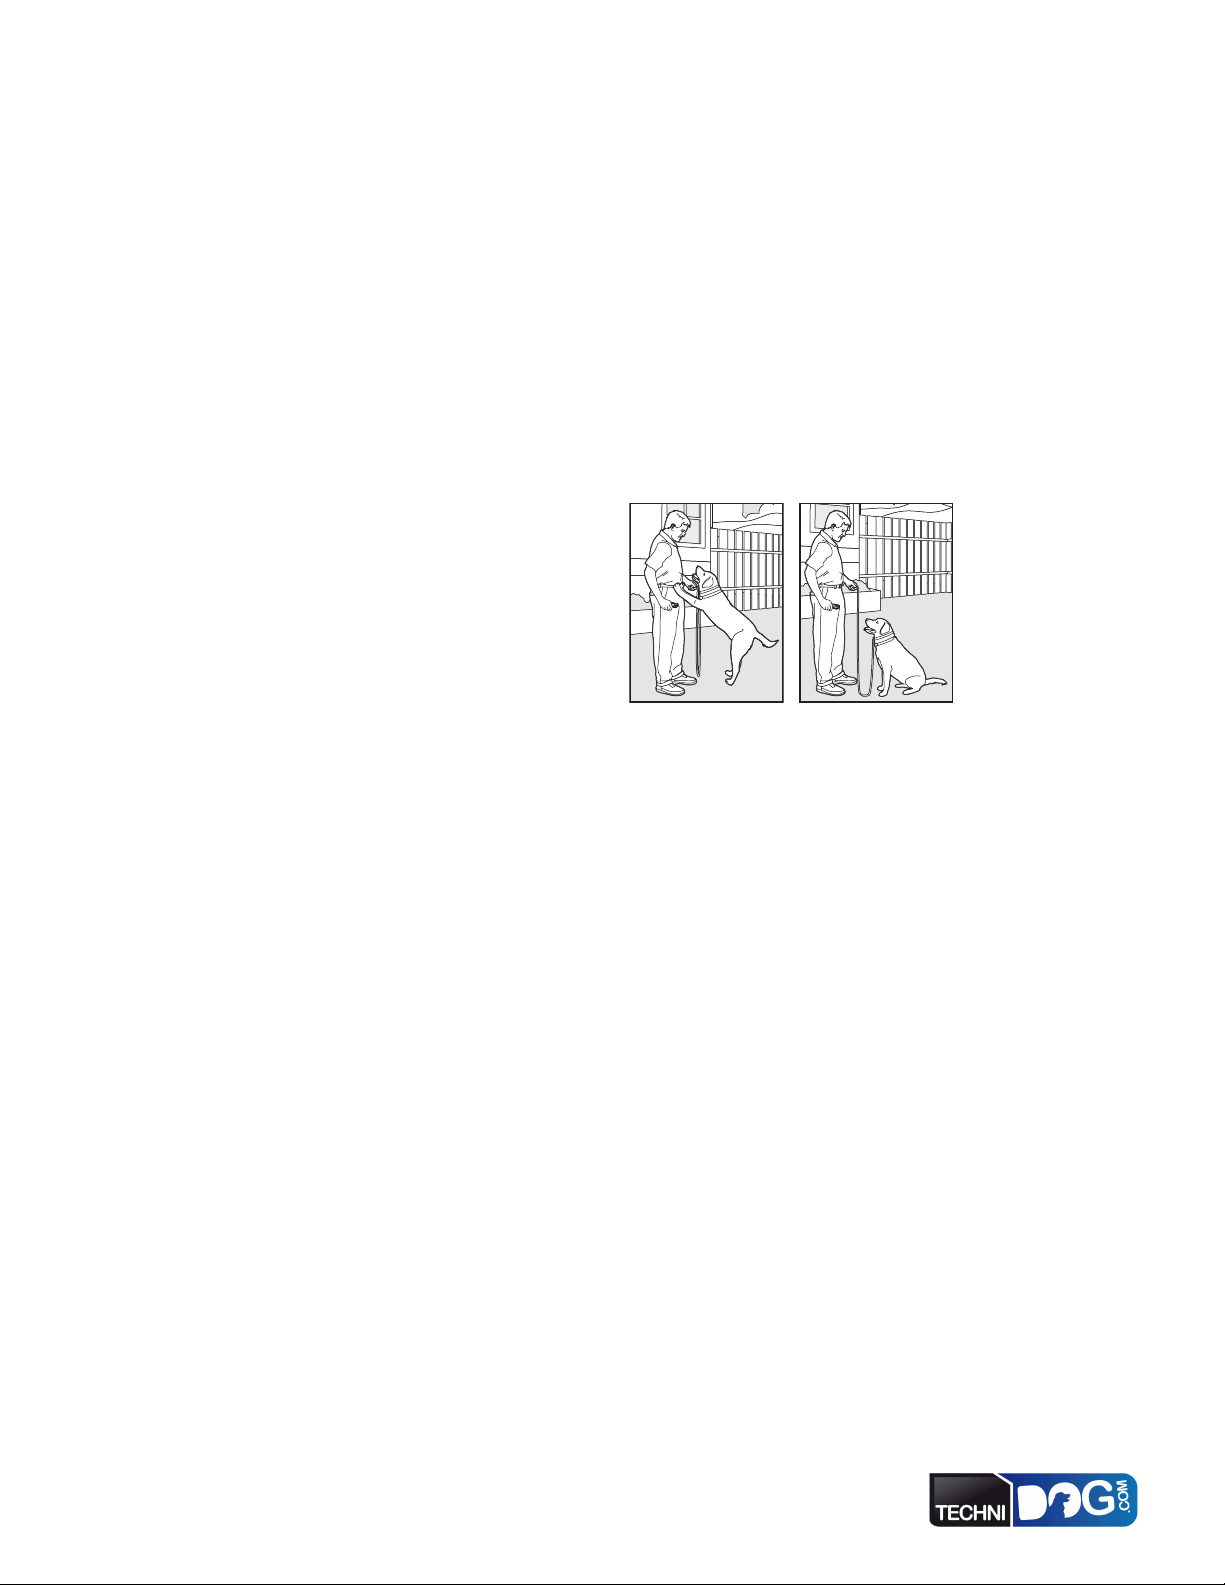
Teaching Basic Obedience
The “Sit” Command
1. Put a separate, non-metallic collar on your pet’s neck ABOVE the Receiver Collar, and attach a
3 metre lead. Note: Be sure the extra collar does not put pressure on the Contact Points.
2. Hold your lead and Remote Transmitter in one hand. Press and hold the Side Button to send
an Audible Tone to your pet while saying “Sit” and if necessary using your free hand to guide
your pet into a “Sit” position. Release the Side Button immediately when your pet sits. Repeat
this several times.
3. If your pet sits reliably on receiving the Audible Tone and the spoken “Sit” command, then
training is complete. Release your pet from the “Sit” position and praise him. If not, move on to
Step 4.
4. Hold the lead and Remote Transmitter in one hand. Press and hold the Upper Button to send
an Audible Tone and Stimulation to your pet while saying “Sit” and if necessary using your free
hand to guide your pet into the “Sit” position. Release the Upper Button immediately when
your pet sits. Repeat this several times.
5. If your pet now sits reliably on receiving an Audible Tone and Stimulation with the spoken “Sit”
command, he may now be ready to respond without Stimulation. Take a play break and then go
back and repeat from Step 2 with Audible Tone only.
Note: Keep your pet close to you while teaching the “Sit” command.
www.petsafe.net 13
The “Come” Command
1. Put a separate, non-metallic collar on your
pet’s neck ABOVE the Receiver Collar, and
attach a 3 metre lead. Note: Be sure the extra
collar does not put pressure on the Contact Points.
2. Hold your lead in one hand and the Remote
Transmitter in the other.
3. Wait for your pet to walk away from you.
4. Press and hold the Side Button to send an
Audible Tone to your pet while saying “Come”
and if necessary use the lead to guide your pet
toward you.
5. Immediately release the Side Button as soon
as your pet steps toward you, and praise him
enthusiastically.
6. Quickly move backwards as your pet begins
to come toward you, praising him the entire
time. Stop moving backwards and praise your
pet when he returns to you.
7. Repeat steps 3 to 6 several times.
8. If your pet comes to you reliably on receiving
the Audible Tone and the spoken “Come”
command, then training is complete. Release
your pet and praise him. If not, move on to
Step 9.
9. Wait for your pet to walk away from you.
Using the Recognition Level for your pet,
press and hold the Upper Button to send an
Audible Tone and Stimulation to your pet
while saying “Come” and if necessary use the
lead to guide your pet toward you.
10. Immediately release the Upper Button as
soon as your pet steps toward you, and praise
him enthusiastically.
11. Quickly move backwards as your pet begins
to come toward you, praising him the entire time. Stop moving backwards and praise your pet
when he returns to you.
12. Repeat steps 9 to 11 several times.
13. If your pet now comes to you reliably on receiving the Audible Tone and Stimulation with the
spoken “Come” command, he may now be ready to respond without Stimulation. Take a play
break and then go back and repeat from Step 3 with Audible Tone only.
14 www.petsafe.net
The “Stay” Command
1. Put a separate, non-metallic collar on your pet’s neck ABOVE the Receiver Collar, and attach a
3 metre lead. Note: Be sure the extra collar does not put pressure on the Contact Points.
2. Visibly identify where you want your pet to sit by placing his bed or a large piece of cloth on the
ground.
3. Put your pet on his bed. Hold your lead in one hand and the Remote Transmitter in the other.
4. Staying at approximately 1 metre, walk around the perimeter of the bed. Do not say anything to
your pet.
5. If your pet tries to leave the bed, press and hold the Side Button to send an Audible Tone to
your pet while saying “Stay” and if necessary guide your pet back to his bed.
6. Immediately release the Side Button as soon as your pet returns to his bed, and praise him
enthusiastically.
7. Once your pet has settled, release him and play calmly.
8. Repeat steps 3 to 7 several times.
9. If your pet stays reliably on receiving the Audible Tone and the spoken “Stay” command, then
training is complete. Release your pet and praise him. If not, move on to Step 10.
10. Put your pet on his bed and walk around the perimeter of the bed as before.
11. Wait for your pet to try to leave the bed. Using the Recognition Level for your pet, press and
hold the Upper Button to send an Audible Tone and Stimulation to your pet while saying
“Stay” and if necessary guide your pet back to his bed.
12. Immediately release the Upper Button as soon as your pet returns to his bed, and praise him
enthusiastically.
13. Once your pet has settled, release him and play calmly.
14. Repeat steps 10 to 13 several times.
15. If your pet stays reliably on receiving the Audible Tone and Stimulation with the spoken “Stay”
command, he may now be ready to respond without Stimulation. Take a play break and then go
back and repeat from Step 3 with Audible Tone only.
www.petsafe.net 15
Eliminating Unwanted Behaviour
Jumping Up
Pets typically jump up to get attention. If you do not want your pet to jump on you, then friends
or members of the family should not encourage this behaviour. That means every time your
pet jumps on someone, he should be reprimanded or redirected to an alternate and acceptable
behaviour, for which he can receive praise.
Note: It is best if your pet fi rst understands the “Sit” command.
1. Choose the Intensity Level one step higher than
your pet’s Recognition Level.
2. As soon as your pet lifts his paws off the
ground to jump on you, press and hold the
Upper Button to send an Audible Tone and
Stimulation and give the command “Sit.”
3. Release the Upper Button immediately once
your pet is sitting, and verbally praise him.
4. If your pet ignores the Stimulation, press and
hold the Lower Button to send a higher level of
Stimulation. Note: This function only applies if the
Remote Transmitter is programmed in Mode 1.
5. Practice this exercise in several different areas
and use different people for distractions.
_____________________________________________________________________________________
Digging
It is important to fi rst understand why your pet is digging. Many dogs, such as terriers, were bred
to fl ush out prey, and digging is very innate to them. Other pets may be digging to fi nd a cool
spot to lie down, or simply out of boredom. Your pet may no longer have the desire to dig if he is
provided with the following:
• A cool, shaded area in which to lie down, and plenty of water.
• An alternate activity, such as a favorite toy.
• Plenty of play, exercise, and attention.
• A garden free from rodents or prey that he may be trying to fl ush out.
1. Choose the Intensity Level one step higher than your pet’s Recognition Level.
2. Place the Receiver Collar on your pet and wait at least 10 minutes before placing him in the
garden. No other people or pets should be in the garden, as you do not want your pet to
associate the Stimulation with anything other than his digging. Your pet must be securely fenced
in or contained during training.
3. From a window or area where your pet cannot see you, wait until your pet begins to dig.
4. While your pet digs, press and hold the Upper Button to send an Audible Tone and Stimulation.
Release the button immediately when he stops digging.
5. If your pet ignores the Stimulation, press and hold the Lower Button to send a higher level of
Stimulation. Note: This function only applies if the Remote Transmitter is programmed in Mode 1.
6. Continue to watch your pet, as he may choose another area to dig.
7. Do not allow your pet in the garden unsupervised until he has completely stopped digging.
16 www.petsafe.net
____________________________________________________________________
Chasing
Chasing is an instinctive behaviour stimulated by moving objects. Some dogs have a particularly
strong desire to chase that can put them in harm’s way and leave you helpless. Never allow your
dog off the lead or out of a contained area until he has learned the “Come” command, regardless
of the distraction. Be consistent and correct your dog every time he chases something.
1. It is vitally important that you and your dog remain safe while carrying out this training. Your
dog should be on a strong lead, long enough for him to attempt to chase an object, but short
enough for him not to reach a road or other unsafe area. You must also be physically strong
enough to restrain your dog when he tries to chase.
2. Choose the Intensity Level one step higher than your dog’s Recognition Level.
3. Set up a scenario where your dog is enticed to chase an object. Common items could be cars,
motorcycles, bicycles, etc. (do not use toys).
4. When the object passes in front of your dog, make sure to hold the lead with a fi rm grip. As
soon as your dog begins to chase the object, give the “Come” command and press and hold
the Upper Button to send an Audible Tone and Stimulation until he stops. If he fails to stop,
restrain him with the lead before he reaches danger.
5. When your dog stops chasing the object, immediately release the Upper Button, walk backwards
and give the command “Come.” Praise your dog as he comes to you.
6. If your dog ignores the Stimulation, repeat using the Lower Button to send a higher level of
Stimulation. Note: This function only applies if the Remote Transmitter is programmed in Mode 1.
7. Repeat the process until your dog responds consitently to the “Come” command.
www.petsafe.net 17

Excessive Barking
Barking is an instinctive behaviour for dogs. It is impossible to keep your dog from barking
entirely, but you can teach him be quiet when you give him a command.
Note: This will only be effective when you are at home with your dog.
1. Choose your dog’s Recognition Level.
2. Put your dog in a situation that will tempt him to bark.
3. When your dog begins to bark, press and hold the Upper Button to send an Audible Tone and
Stimulation and give him the command “Quiet.”
4. Release the Upper Button immediately once your dog stops barking and praise him.
5. If your dog ignores the Stimulation and continues to bark, repeat the process using the Lower
Button to send a higher level of Stimulation. Note: This function only applies if the Remote
Transmitter is programmed in Mode 1.
6. Practice this exercise in different areas using different situations that would cause your dog to
bark.
18 www.petsafe.net
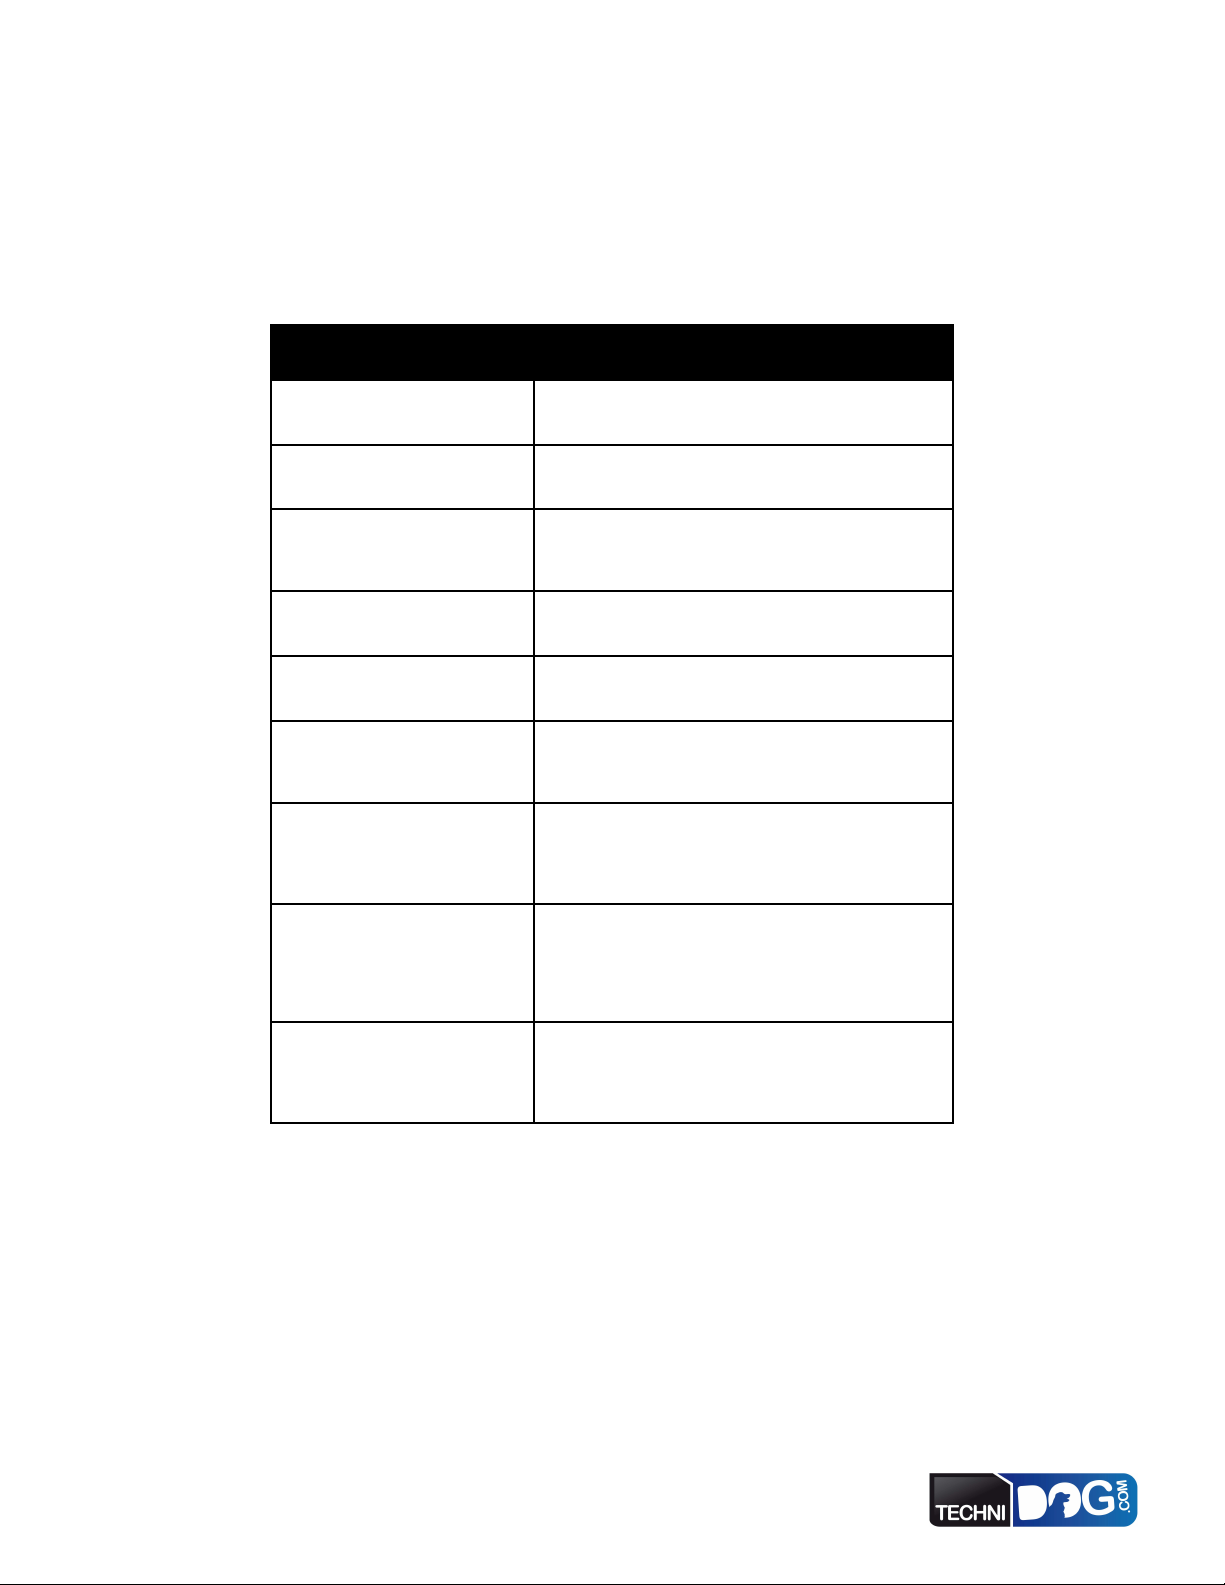
Frequently Asked Questions
Is the Stimulation safe for
my pet?
How old does a pet have to
be before using the 400 m
Trainer?
Once my pet is trained and has
been obeying my commands,
will he have to continue to wear
the Receiver Collar?
Is the Receiver Collar
waterproof?
Can I use the 400 m Trainer
with more than one pet?
Can I use the 400 m Trainer on
aggressive pets?
Will I get exactly 400 m of range
with the 400 m Trainer?
How long can I continuously
deliver Stimulation to my pet?
What do I do if my pet’s neck
becomes red and irritated?
While the Stimulation is unpleasant, it is harmless to your
pet. Electronic training devices require interaction and
training from the owner to achieve desired results.
Your pet should be able to learn basic obedience
commands such as “Sit” or “Stay.” The Receiver Collar
may be too large for dogs under 3.6 kg.
Probably not. He may need to wear the Receiver Collar
from time to time for reinforcement.
Yes. If the rechargeable battery pack ever needs to be
replaced, make sure the o-ring and o-ring groove are free
from dirt and debris.
Yes, Add-A-Dog
and the Remote Transmitter must be changed to Mode
3 or 4.
We do not recommend any of our products to be used
on aggressive pets. We recommend you contact your local
veterinarian or professional trainer to determine if your
pet might be aggressive.
The range you get with your 400 m Trainer will vary
according to terrain, weather, vegetation, as well as
transmission from other radio devices. To get the
maximum amount of range, please refer to “How the
System Works” section of this guide.
The maximum amount of time you can press the
Continuous Stimulation Button and deliver Stimulation
to your pet continuously is 8 seconds. After eight
seconds, the Remote Transmitter will time-out, and the
Continuous Stimulation Button must be released and
pressed again.
This condition is due to the Contact Points irritating the
skin. Discontinue use of the Receiver Collar for a few
days. If the condition persists beyond 48 hours, see your
veterinarian. Once the skin returns to normal, replace
Receiver Collar, and monitor the skin condition closely.
™
Receiver Collars must be purchased
www.petsafe.net 19
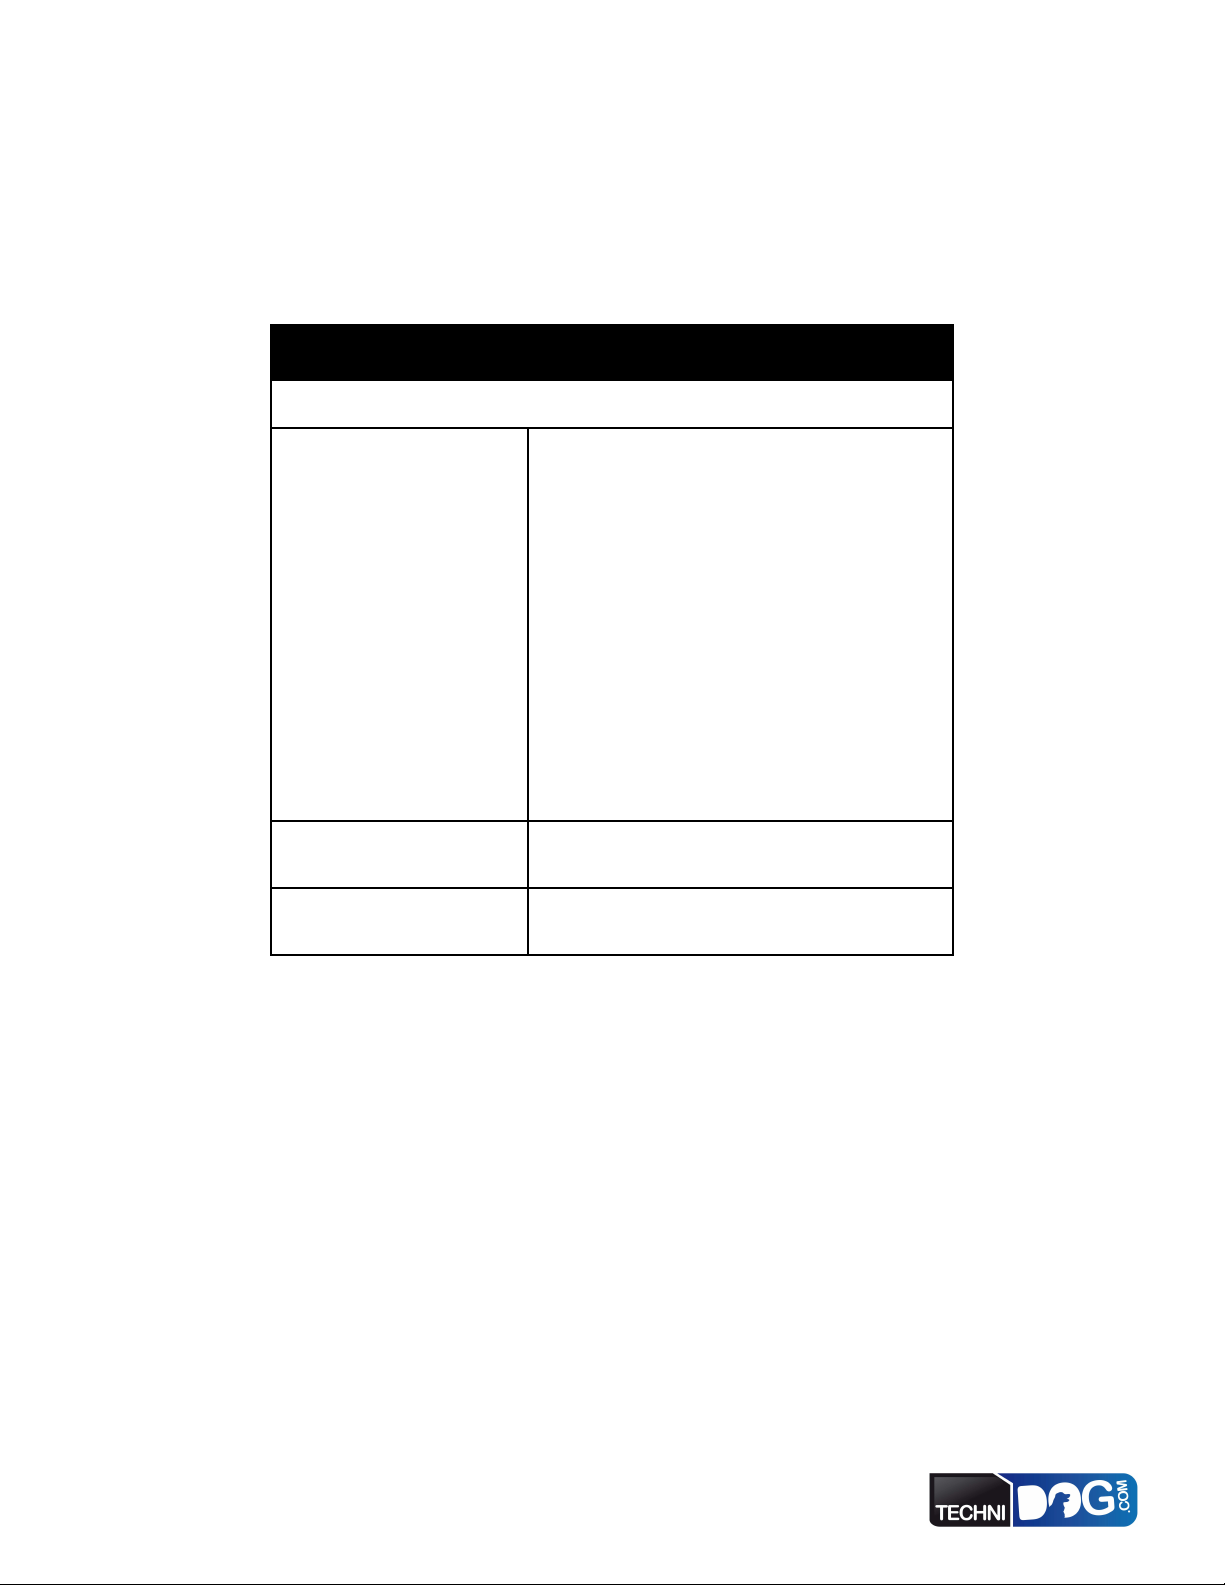
Troubleshooting
The answers to these questions should help you solve any problem you have with this system.
If they do not, please contact the Customer Care Centre or visit our website at www.petsafe.net.
My pet is not responding when
I press a button.
The Receiver Collar will not
turn on.
The Receiver Collar is not
responding to the Remote
Transmitter.
• Check to see if the Receiver Collar has been turned on.
• If your range has reduced from the fi rst time you have
used it, please check to see if the battery is low in either
the Remote Transmitter or Receiver Collar.
• Many factors can impact the range you have with the
400 m Trainer. For a list of these factors, please refer to
“How the System Works”.
• You can verify the Receiver Collar is delivering
Stimulation to your pet by placing the Test Light,
enclosed in your kit, on the Receiver Collar. Please refer
to the “Test Light Instructions” section for details.
• Increase the Intensity Dial. Refer to “Find the Best
Stimulation Level For Your Pet” for more information.
• Make sure the Receiver Collar’s Contact Points are
placed snugly against your pet’s skin. Refer to “Fit the
Receiver Collar” for more information.
• If you notice your operating time dropping to about half
the original time, your Receiver Collar battery needs
to be replaced. Contact the Customer Care Centre to
purchase a new one.
• Make sure the Receiver Collar has been charged. For
the initial charge, be sure to charge it for 24 hours.
Subsequent charges only take 12 hours.
• Verify the Receiver Collar has been turned on. Refer to
“Turning the Receiver Collar On and Off ”.
• Refer to “Reset the Receiver Collar.”
20 www.petsafe.net

Test Light Instructions
1. Turn the Receiver Collar on.
2. Hold the Test Light Contacts to the Contact Points.
3. Press a Stimulation Button on the Remote Transmitter.
4. The Test Light will fl ash.
Note: At higher Stimulation Levels, the Test Light will fl ash
brighter.
5. Turn the Receiver Collar off.
Save the Test Light for future testing.
Note: If the Test Light does not fl ash, recharge the battery and re-test. If Test Light still does not fl ash,
contact the Customer Care Centre or visit our website at www.petsafe.net.
Important: The Test Light Tool can be used to tighten the Contact Points. This Receiver
Collar has special waterproof Contact Points that will crack if they are over-tightened.
If your Contact Points ever become loose, do not turn them any more than one-quarter
turn beyond fi nger tight.
Terms of Use and Limitation of Liability
1. Terms of Use
This Product is offered to you conditioned upon your acceptance without modifi cation of the
terms, conditions and notices contained herein. Usage of this product implies acceptance of all
such terms, conditions, and notices.
2. Proper Use
This Product is designed for use with pets where training is desired. The specifi c temperament of
your pet may not work with this product. We recommend that you not use this product if your pet
is less than 3.6 kg or under 6 months old, or if your pet is aggressive. If you are unsure whether
this is appropriate for your pet, please consult your veterinarian, certifi ed trainer or contact our
Customer Care Centre or visit our website at www.petsafe.net.
Proper use includes reviewing the entire Operating and Training Guide provided with your
product and any specifi c Caution statements.
3. No Unlawful or Prohibited Use
This Product is designed for use with pets only. This pet training device is not intended to harm,
injure, or provoke. Using this product in a way that is not intended could result in violation of
Federal, State or local laws.
4. Limitation of Liability
In no event shall Radio Systems Corporation be liable for any direct, indirect, punitive, incidental,
special or consequential damages, or any damages whatsoever arising out of or connected with the
use or misuse of this Product. Buyer assumes all risks and liability from the use of this Product.
5. Modifi cation of Terms and Conditions
Radio Systems Corporation reserves the right to change the terms, conditions and notices under
which this Product is offered.
www.petsafe.net 21
Compliance
This equipment has been tested and found to comply with relevant EU Electromagnetic
Compatibility, Low Voltage and R&TTE Directives. Before using this equipment outside the EU
countries, check with the relevant local R&TTE authority. Unauthorised changes or modifi cations
to the equipment that are not approved by Radio Systems Corporation are in violation of EU
R&TTE regulations, could void the user’s authority to operate the equipment, and void the
warranty.
PetSafe Add-A-Dog™ Receiver
Description Part Number
400 m Trainer Add-A-Dog PDT20-10715
Important Recycling Advice
Please respect the Waste Electrical and Electronic Equipment regulations in your country. This
equipment must be recycled. If you no longer require this equipment, do not place it in the normal
municipal waste system. Please return it to where it was purchased in order that it can be placed in
our recycling system. If this is not possible, please contact the Customer Care Centre for
further information.
22 www.petsafe.net

Français
Merci d’avoir choisi PetSafe®, le numéro 1 mondial des marques offrant des solutions
de dressage électronique. Notre mission: assurer la sécurité de votre animal en vous
fournissant les outils et techniques nécessaires pour le dresser effi cacement. Pour toute
question, veuillez contacter le Service d’assistance à la clientèle ou vous rendre sur notre
site www.petsafe.net.
____________________________________________________________________
Table des matières
Contenu du kit ..........................................................................................24
Fonctionnement du système ...................................................................... 24
Défi nitions ................................................................................................25
Manuel d’utilisation
Préparation de l’émetteur à distance ...........................................................26
Préparation du collier récepteur .................................................................27
Ajustement du collier récepteur..................................................................29
Détermination du niveau de stimulation le plus adapté à votre animal ......... 30
Programmation de l’émetteur à distance .....................................................31
Réinitialisation du collier récepteur ...........................................................32
Programmation du collier récepteur pour un fonctionnement avec
deux ou trois chiens ...................................................................................32
Manuel de dressage
Conseils d’ordre général..........................................................................33
Obéissance de base
L’ordre « Assis » ................................................................................... 34
L’ordre « Au pied » ...............................................................................35
L’ordre « Reste » ...................................................................................36
Élimination des comportements indésirables
Sauter .................................................................................................37
Creuser ............................................................................................... 37
Poursuivre ........................................................................................... 38
Aboiements intempestifs ......................................................................39
Questions fréquemment posées ..................................................................40
Dépannage ................................................................................................41
Mode d’emploi de la lampe test .................................................................42
Conditions d’utilisation et limitation de responsabilité ................................ 42
Avis important sur le recyclage ...................................................................43
www.petsafe.net 23
Contenu du kit
7
6
8
5
1
4
2
3
Collier récepteur
Cordon tour
de cou
Kit lampe
test
War ranty
Manuel d’utilisation
Émetteur
à distance
Carte de
garantie
et de dressage
Chargeur
Fonctionnement du système
Le système de dressage PetSafe® 400 m Trainer s’est avéré sûr, pratique et effi cace pour tous les
animaux de plus de 3,6 kg dès l’âge de 6 mois. Ce système vous aide à contrôler votre animal sans
avoir recours à une laisse, et ce, dans un rayon de 400 mètres. Il suffi t d’une pression sur un bouton
pour que l’émetteur à distance envoie un signal et active le collier récepteur. Une utilisation correcte
et cohérente du système de dressage à distance vous permet de corriger nombre des comportements
indésirables de votre animal ou de lui inculquer des ordres d’obéissance de base. Les enfants de moins
de 16 ans ne doivent pas utiliser les systèmes de dressage PetSafe®.
Important: Le PetSafe 400 m Trainer a une portée maximale de
400 mètres. La portée peut varier selon la façon dont vous tenez
l’émetteur à distance. Pour toujours obtenir de bons résultats à
longue distance, tenez l’émetteur à distance à la verticale, éloigné
de votre corps et au-dessus de votre tête. Le terrain, les conditions
météorologiques, la végétation et les émissions émanant d’autres
dispositifs radio, entre autres facteurs, infl uent sur la portée
maximale.
7
6
8
5
1
4
2
3
24 www.petsafe.net
Défi nitions
Émetteur à distance: Envoie le signal radio au collier récepteur. Il est étanche.
Voyant lumineux de l’émetteur: Indique qu’un bouton est actionné et sert également d’indicateur de
batterie faible.
Molette de réglage de l’intensité: Propose plusieurs niveaux de stimulation afi n que vous puissiez
adapter la correction au tempérament de votre animal.
Bouton du haut: Ce bouton est réglé en usine et produit un signal sonore d’une seconde avant d’envoyer
une stimulation continue du niveau défi ni par la molette de réglage de l’intensité.
Bouton du bas: Ce bouton est réglé en usine et produit un signal sonore d’une seconde avant d’envoyer
une stimulation continue d’une intensité supérieure de 2 niveaux à celui défi ni par la molette de réglage.
Remarque: Ce bouton ne génère jamais une stimulation d’intensité supérieure au niveau 8. Par exemple, si la molette
de réglage de l’intensité est défi nie sur 8, appuyer sur le bouton du bas ne permettra pas de générer une stimulation
d’un niveau plus élevé.
Bouton latéral: Ce bouton est réglé en usine et produit uniquement un signal sonore.
Collier récepteur: Reçoit le signal radio envoyé par l’émetteur à distance. Il est étanche.
Interrupteur: Appuyer sur ce bouton et le maintenir enfoncé un instant permet d’allumer et d’éteindre le
collier récepteur.
Contacteurs: Contacts via lesquels le collier récepteur produit la stimulation.
Voyant lumineux du récepteur: Indique que le collier récepteur est allumé ou éteint et sert également
d’indicateur de batterie faible.
Prises de charge: Permettent de brancher le chargeur. Bien que l’émetteur à distance et le collier
récepteur soient étanches sans les caches de protection, laissez les caches en place lorsque vous ne
rechargez pas la batterie afi n d’éviter que des débris ne pénètrent dans les ouvertures.
Stimulation continue: Vous contrôlez le moment et la durée de la stimulation que reçoit votre chien
via les contacteurs du collier récepteur. Si vous appuyez sur le bouton de stimulation continue pendant
8 secondes ou plus, l’émetteur à distance se désactive. Il faut relâcher le bouton, puis à nouveau appuyer
dessus pour envoyer une stimulation supplémentaire.
Signal sonore: Utilisez le signal sonore en combinaison avec une stimulation pour mettre fi n aux
comportements indésirables. Le moment choisi est crucial. Le signal sonore suivi de la stimulation doit
retentir pendant ou immédiatement après le comportement indésirable. Une fois que le chien associe le
signal sonore à la stimulation, vous pouvez recourir au signal sonore uniquement.
Émetteur à distance
Antenne de
Voyant
lumineux de
l’émetteur
Bouton
latéral
l’émetteur
7
6
8
5
1
4
2
3
Molette de
réglage de
d’intensité
Bouton
du bas
Collier récepteur
Voyant lumineux
du récepteur
Prise de charge
(avec cache)
Interrupteur
(Haut)
(Bas)
Bouton
du haut
Prise de charge
(avec cache)
Contacteurs
www.petsafe.net 25

Manuel d’utilisation
Étape
1
Préparation de l’émetteur à distance
Rechargement de l’émetteur à distance
1. Retirez le cache de caoutchouc qui protège la prise
de charge de l’émetteur à distance.
2. Insérez l’un des connecteurs du chargeur dans la
prise de charge de l’émetteur à distance.
3. Branchez le chargeur sur une prise murale
ordinaire.
4. À la première charge, laissez l’émetteur à distance
se charger pendant 24 heures. Les recharges ne
durent que 12 heures.
Remarque: Le voyant lumineux de l’émetteur
commence à clignoter au bout de 12 heures de charge.
À la première charge, laissez l’émetteur à distance se
charger à nouveau 12 heures.
5. Une fois la charge terminée, remettez le cache de
protection en place.
Remarque: L’autonomie de la batterie est de 40 à 60 heures environ, selon la fréquence d’utilisation.
Voyant lumineux de l’émetteur – Fonction et indication
Fonction de l’émetteur à distance Indications du voyant lumineux
Bouton de stimulation continue ou du seul signal
sonore actionné
Batterie faible – n’importe quel bouton actionné Clignote sans arrêt
Chargeur dans la prise
de charge
Reste allumé
26 www.petsafe.net
Étape
2
Préparation du collier récepteur
Charge du collier récepteur
1. Retirez le cache de caoutchouc qui protège la prise
de charge du collier récepteur.
2. Insérez l’un des connecteurs du chargeur dans la
prise de charge du collier récepteur.
3. Branchez le chargeur sur une prise murale
ordinaire.
4. À la première charge, laissez le collier récepteur
se charger pendant 24 heures. Les recharges ne
durent que 12 heures.
Remarque: Le voyant lumineux du récepteur commence
à clignoter au bout de 12 heures de charge. À la
première charge, laissez le collier récepteur se charger à
nouveau 12 heures.
5. Une fois la charge terminée, remettez le cache de
protection en place.
Pour allumer le collier récepteur:
1. Maintenez l’interrupteur enfoncé jusqu’à ce que
le voyant lumineux du récepteur s’allume et que
le collier récepteur émette 5 bips.
2. Relâchez l’interrupteur.
Le voyant lumineux du récepteur clignote jusqu’à ce que
le collier récepteur s’éteigne. Le clignotement du voyant
lumineux indique que le collier récepteur est prêt à
recevoir un signal radio de l’émetteur à distance.
Interrupteur
Connecteur du chargeur
dans la prise de
charge du collier
récepteur
Pour éteindre le collier récepteur:
1. Maintenez l’interrupteur enfoncé jusqu’à ce que le voyant lumineux du récepteur
s’allume et que le collier récepteur émette 2 bips.
2. Relâchez l’interrupteur.
Pour allonger l’autonomie entre les cycles de charge, éteignez le collier récepteur lorsque vous ne
l’utilisez pas. L’autonomie de la batterie est d’environ 20 heures, selon la fréquence d’utilisation.
www.petsafe.net 27
Voyant lumineux du récepteur
Fonction Indications du voyant lumineux
Collier récepteur allumé, bon niveau de la batterie Clignote une fois toutes les secondes
Collier récepteur allumé, batterie faible Clignote toutes les 4 secondes
Bouton de stimulation continue actionné Reste allumé
Batteries rechargeables
• Les batteries rechargeables au nickel-métal-hydrure (NiMH) ne créent pas d’effet de
mémoire et leur épuisement n’est pas nécessaire avant la recharge.
• Les batteries fournies sont partiellement chargées en usine, mais requerront une charge
complète (24 heures) avant la première utilisation.
• Rappel: ne jamais utiliser de batterie à proximité de fl ammes.
• Si vous n’utilisez pas votre système pendant de longues périodes, n’oubliez pas
d’effectuer une charge complète (12 heures) des batteries régulièrement, soit toutes les
4 à 6 semaines.
• Une charge excessive peut réduire l’autonomie de la batterie. Après la première charge,
ne laissez jamais la batterie branchée plus de 12 heures.
• Si vous n’avez pas rechargé votre système depuis longtemps, il se peut que vous
constatiez une diminution de l’autonomie de la batterie lors des premières utilisations.
L’autonomie retrouve par la suite son niveau de capacité antérieur.
• Votre batterie devrait pouvoir subir des centaines de cycles de charge. Cependant,
les capacités de toute batterie rechargeable déclinent au fi l du temps en fonction du
nombre de cycles de charge subis. Cela est normal. Si la durée de fonctionnement de
votre système chute de moitié par rapport à l’autonomie d’origine, contactez le Service
d’assistance à la clientèle pour acheter une nouvelle batterie.
• Toute batterie devrait avoir une durée de vie de 3 à 5 ans. Si une batterie doit être
remplacée, vous pouvez en commander une nouvelle auprès du Service d’assistance
à la clientèle ou vous rendre sur notre site www.petsafe.net. N’ouvrez pas le collier
récepteur ni l’émetteur à distance avant de recevoir la batterie de rechange.
28 www.petsafe.net
Étape
3
Ajustement du collier récepteur
Important: Pour une effi cacité optimale, il est important de bien ajuster et
positionner le collier. Les contacteurs doivent être en contact direct avec la
peau de votre chien, sur la face inférieure du cou.
Pour ajuster correctement le collier, procédez comme suit :
1. Assurez-vous que le collier récepteur est éteint.
2. Au départ, installez le chien debout, dans une position
confortable (3A).
3. Placez le collier récepteur haut sur l’encolure du chien, à
proximité des oreilles. Centrez les contacteurs sous le cou du
chien, en contact avec la peau (3B).
Remarque: Il peut s’avérer nécessaire de couper
légèrement le poil autour des contacteurs pour
que le contact s’établisse bien.
4. Vérifi ez le serrage du collier récepteur en
passant un doigt entre le collier et le cou du
chien (3C). Le collier doit être ajusté sans
serrer.
5. Laissez le collier récepteur à votre chien
pendant plusieurs minutes, puis vérifi ez
à nouveau l’ajustement. Vérifi ez-le une
nouvelle fois lorsque votre chien est plus à
l’aise avec le collier récepteur.
3B
3C
Entretien
Pour assurer l’effi cacité de ce produit ainsi que le
confort et la sécurité de votre chien, ne manquez
pas d’inspecter souvent l’ajustement du collier. Le présent manuel explique comment
ajuster le collier correctement. Si vous remarquez des signes d’irritation cutanée sur votre
chien, interrompez quelques jours l’utilisation du collier. Si les symptômes persistent audelà de 48 heures, consultez votre vétérinaire.
3A
Pour éviter toute irritation cutanée :
• Votre chien ne doit pas porter le collier récepteur pendant plus de 8 heures
consécutives sur une période de 24 heures.
• Lavez toutes les semaines le cou de votre chien ainsi que les contacteurs avec un gant
et du savon doux, puis rincez soigneusement.
• Assurez-vous que le cou de l’animal est bien sec avant de remettre le collier récepteur
à son cou.
www.petsafe.net 29

Étape
4
Détermination du niveau de stimulation
le plus adapté à votre animal
Important: Commencez toujours au niveau le plus bas et passez graduellement
aux niveaux supérieurs.
T
Le système de dressage à distance est doté de 8 niveaux de stimulation pour vous permettre de
sélectionner la stimulation la mieux adaptée à votre animal.
Une fois le collier récepteur installé sur l’animal, il vous faut déterminer le niveau de
stimulation qui lui est adapté, également appelé niveau de reconnaissance.
Un léger changement dans le comportement de votre animal (s’il se met à regarder alentour
avec curiosité, à gratter son collier ou à secouer les oreilles, par exemple) indique que le
niveau de reconnaissance adapté est atteint.
Procédez comme suit pour déterminer le niveau de reconnaissance de votre animal:
1. Sélectionnez le niveau 1 sur la molette de réglage de l’intensité et maintenez le bouton
du haut enfoncé 1 à 2 secondes.
2. Si votre animal ne réagit pas, essayez le même niveau de stimulation à plusieurs
reprises avant de passer au niveau supérieur.
3. VOTRE ANIMAL NE DEVRAIT NI GLAPIR NI PANIQUER LORSQU’IL
REÇOIT UNE STIMULATION. LE CAS ÉCHÉANT, LE NIVEAU DE
STIMULATION EST TROP ÉLEVÉ. REVENEZ ALORS AU NIVEAU
PRÉCÉDENT ET RÉPÉTEZ L’OPÉRATION.
4. Augmentez progressivement le niveau de stimulation jusqu’à ce que votre animal
réagisse indubitablement à la stimulation.
5. Si votre animal ne réagit toujours pas au niveau 8, vérifi ez l’ajustement du collier
récepteur. Si votre animal a un pelage long ou épais, remplacez les contacteurs par
des plus longs. Recommencez ensuite la procédure à partir du premier point. Si vous
n’obtenez toujours pas de résultat, il vous faudra couper légèrement le poil de votre
animal autour des contacteurs.
Si vous avez suivi toutes ces étapes sans que votre animal ne réagisse à la stimulation, reportezvous à la section « Mode d’emploi de la lampe test ».
Si aucune de ces procédures ne permet d’établir que votre chien sent la stimulation, contactez
le Service d’assistance à la clientèle ou rendez-vous sur notre site www.petsafe.net.
30 www.petsafe.net
 Loading...