

Petsafe PDT19-16032, PDT19-16029, PDT19-16026, PDT17-16028, PDT17-16127 Quick Start Manual
...
• Please read this entire guide before beginning. To download a complete product manual with troubleshooting tips, visit www.petsafe.com.
• Veuillez lire ce manuel en entier avant de commencer. Pour télécharger le manuel complet du produit avec les conseils de dépannage,
rendez-vous sur www.petsafe.com.
• Gelieve deze gids volledig door te lezen voordat u begint. Ga naar www.petsafe.com om een volledige producthandleiding met tips
voor het oplossen van problemen te downloaden.
• Por favor, lea detenidamente este manual antes de empezar. Para descargar un manual completo del producto con consejos de
resolución de problemas, visite www.petsafe.com.
• Leggere attentamente la guida all’uso prima di utilizzare. Per scaricare il manuale completo del prodotto con i consigli per
l’individuazione e la risoluzione dei problemi, visitare www.petsafe.com.
• Bitte lesen Sie die ganze Gebrauchsanleitung aufmerksam durch, ehe Sie beginnen. Ein komplettes Produkthandbuch inklusive Tipps zu
möglichen Problemen und Lösungen können Sie auf www.petsafe.com herunterladen.
Quick Start Guide
Guide de démarrage rapide
Beknopte handleiding
Guía de inicio rápido
Guida rapida
Schnellstartanleitung
100 m 300 m
600 m 900 m
Remote Trainer
Système de dressage
Trainer met afstandsbediening
Sistema de adiestramiento
Sistema di addestramento
Ferntrainer
petsafe.com
2
ENFRESDE
NLIT
Welcome
You and your pet were made for each other. Our aim is to help you have the best companionship and the most
memorable moments together. Your remote trainer is designed to give your pet more freedom while keeping him safe.
We know that safe pets make happy owners. Before getting started, please take a moment to read through the
important safety information. If you have any questions, please don’t hesitate to contact us.
Hereinafter Radio Systems Corporation, Radio Systems PetSafe Europe Ltd., Radio Systems Australia Pty Ltd.
and any other affiliate or Brand of Radio Systems Corporation may be referred to collectively as “We” or “Us”.
Important Safety Information
Explanation of Attention Words and Symbols Used in this Guide
This is the safety alert symbol. It is used to alert you to potential personal injury hazards. Obey all
safety messages that follow this symbol to avoid possible injury or death.
WARNING indicates a hazardous situation which, if not avoided, could result in
death or serious injury.
CAUTION, used with the safety alert symbol, indicates a hazardous situation which,
if not avoided, could result in minor or moderate injury.
CAUTION, used without the safety alert symbol, indicates a hazardous situation which,
if not avoided, could result in harm to your pet.
• Do not use this product if your dog is prone to aggressive behaviour. Aggressive dogs can cause severe
injury and even death to their owner and others. If you are unsure whether this product is appropriate for
your dog, please consult your veterinarian or a certified trainer.
• It is vitally important that you and your pet remain safe while learning during on-lead training. Your pet should
be on a strong lead, long enough for him to attempt to chase an object, but short enough for him not to reach
a road or other hazard. You must also be physically strong enough to restrain your pet if he tries to chase.
• This pet training device is not a toy, keep away from children.

petsafe.com
3
EN
FR ES DE
NL IT
• A collar worn for too long or made too tight on the pet’s neck may cause skin damage ranging from
redness to pressure ulcers. This condition is commonly known as bed sores.
• Avoid leaving the collar on the dog for more than 12 hours per day.
• When possible reposition the collar on the pet’s neck every 1 to 2 hours.
• Regularly recheck the fit to prevent excessive pressure; follow the instructions in this quick start guide.
• You may need to trim the hair in the area of the contact points. However, never shave the dog’s neck; this may
lead to a rash or infection.
• Never connect a lead to a collar with contact points. It will cause excessive pressure on the contact points.
• When connecting a lead to a separate collar, do not allow it to put pressure on the training collar.
• Wash the dog’s neck area and the contacts of the collar weekly with a damp cloth.
• Examine the contact area daily for signs of a rash or a sore.
• If a rash or sore is found, discontinue use of the collar until the skin has healed.
• If the condition persists beyond 48 hours, see your veterinarian.
• For additional information on bed sores and pressure necrosis, please visit our website.
This product is only for use with healthy pets. If you’re not certain that your pet is in good health, we recommend
that you take your pet to a veterinarian before using this product.

petsafe.com
4
ENFRESDE
NLIT
Charge the Training Collar and Remote
Important: Excessive charging can shorten battery life. Only charge the remote or collar when the
batteries are low.
1. Plug in and fully charge the remote and training collar. This can take up to 5 hours.
2. When fully charged, the green LED on the collar will turn off, and the battery meter on the remote will stop
cycling and appear full.
3. When the collar and remote are charged, replace their rubber covers.
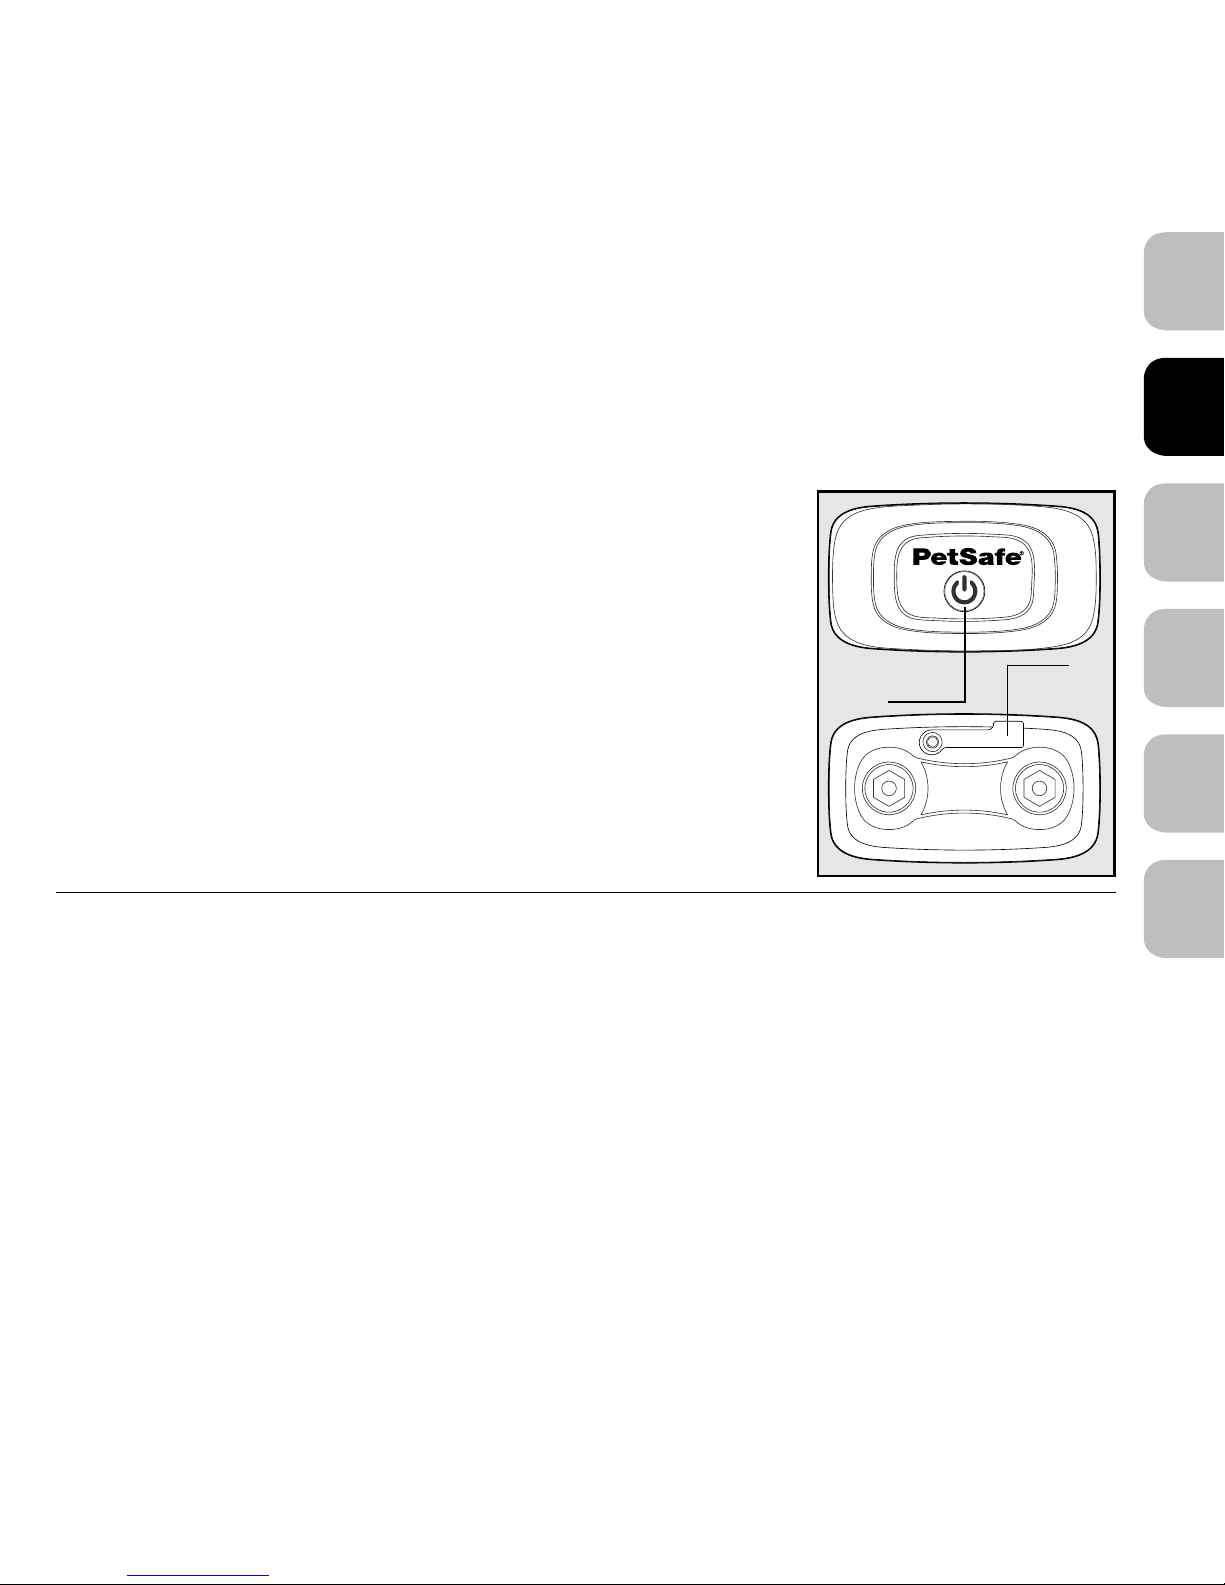
To Turn the Training Collar On
Press and hold the on/off button until you hear a low to high beep and the
green LED appears, and then release.
Note: The remote is always on, and the display will appear when any button
is pressed.
To Turn the Training Collar Off
Press and hold the on/off button until the collar beeps high to low, and then
release. The red LED will be illuminated during the button press and will turn off
when the collar turns off.
Tip: When you’re not using the collar, you should turn it off to preserve
the battery life.
Test the Remote Trainer
We recommend you experience firsthand how the static stimulation functions. Always begin at the lowest level,
and increase the intensity up to your personal comfort level.
1. Place one finger over both contact points of the training collar.
2. Hold your remote approximately 0.5 M from the training collar. Starting at level 0, press the vibration
button continuously for 1 to 2 seconds. You should feel continuous vibration. There is only one level of
vibration.
3. Increase the level to 1 for static stimulation. At this level you may not feel the stimulation.
Note: Continuous stimulation will transmit for no more than 10 continuous seconds. To reactivate, release and
repress the button.
4. Increase the level until the sensation begins to feel uncomfortable.
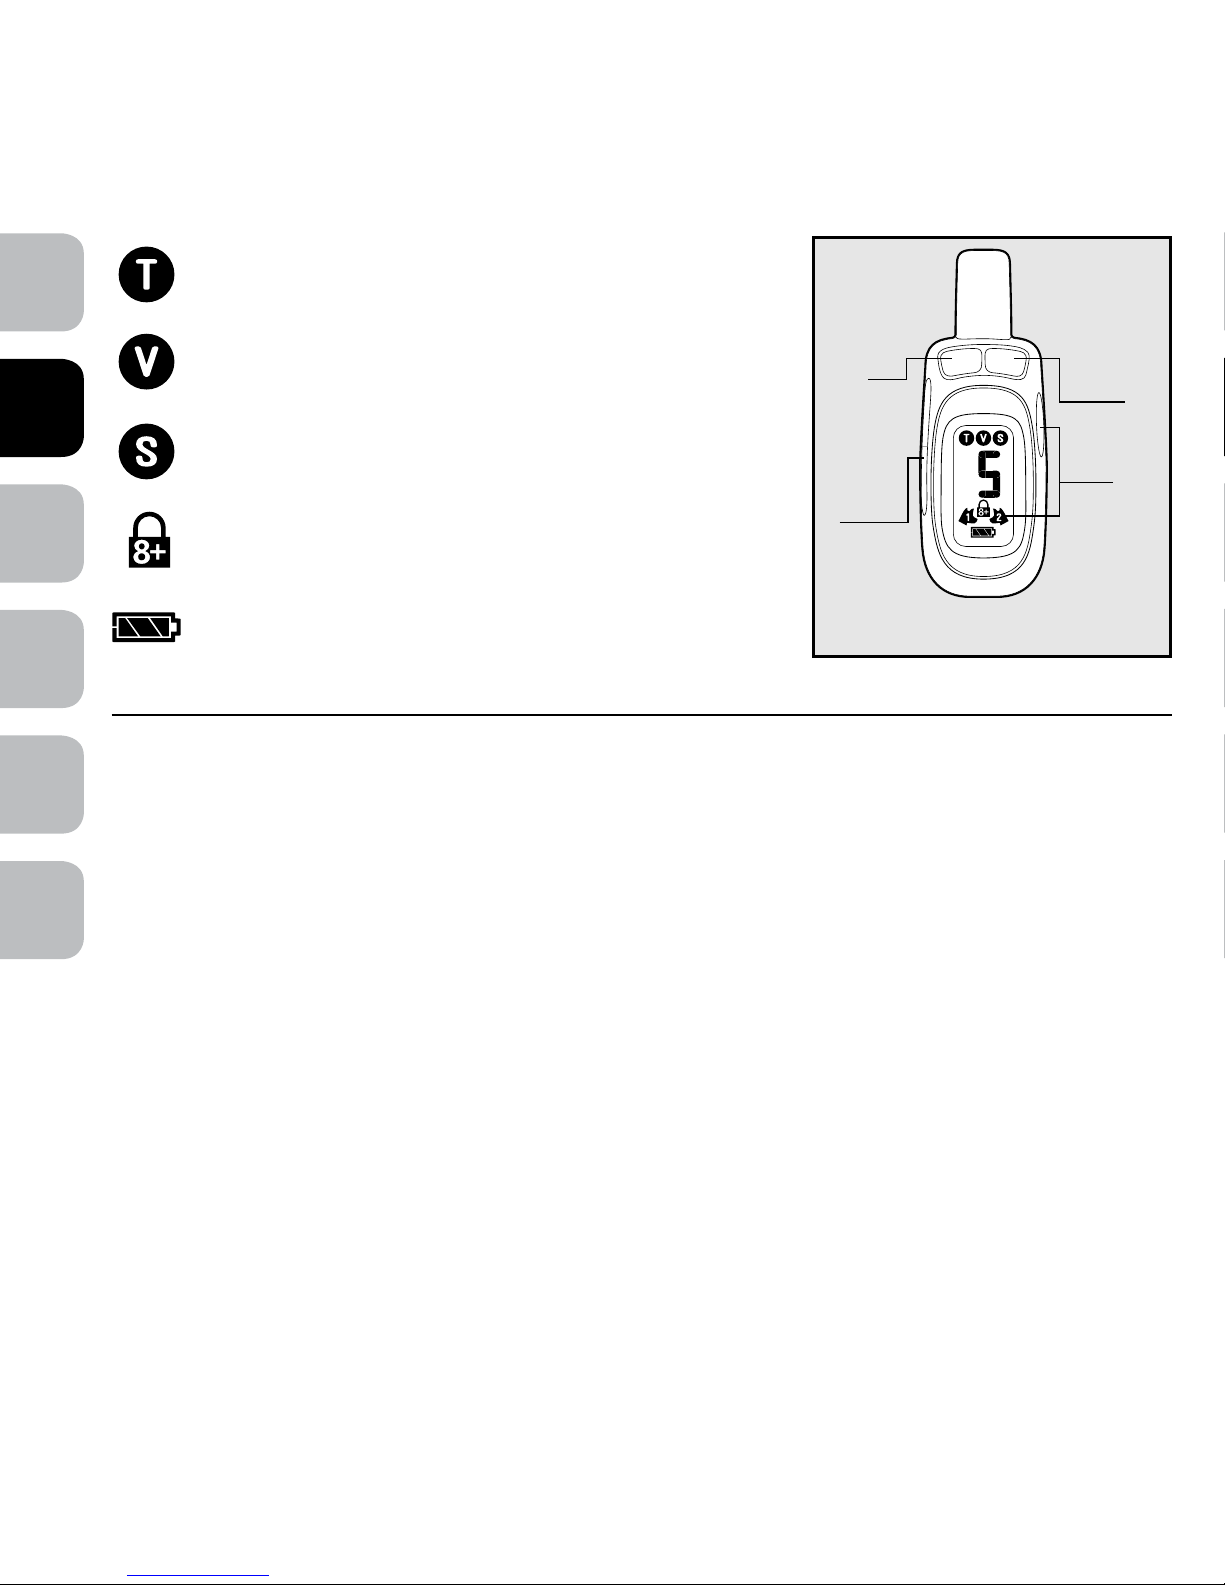
On/Off
Button
Charging
Port
petsafe.com
5
EN
FR ES DE
NL IT
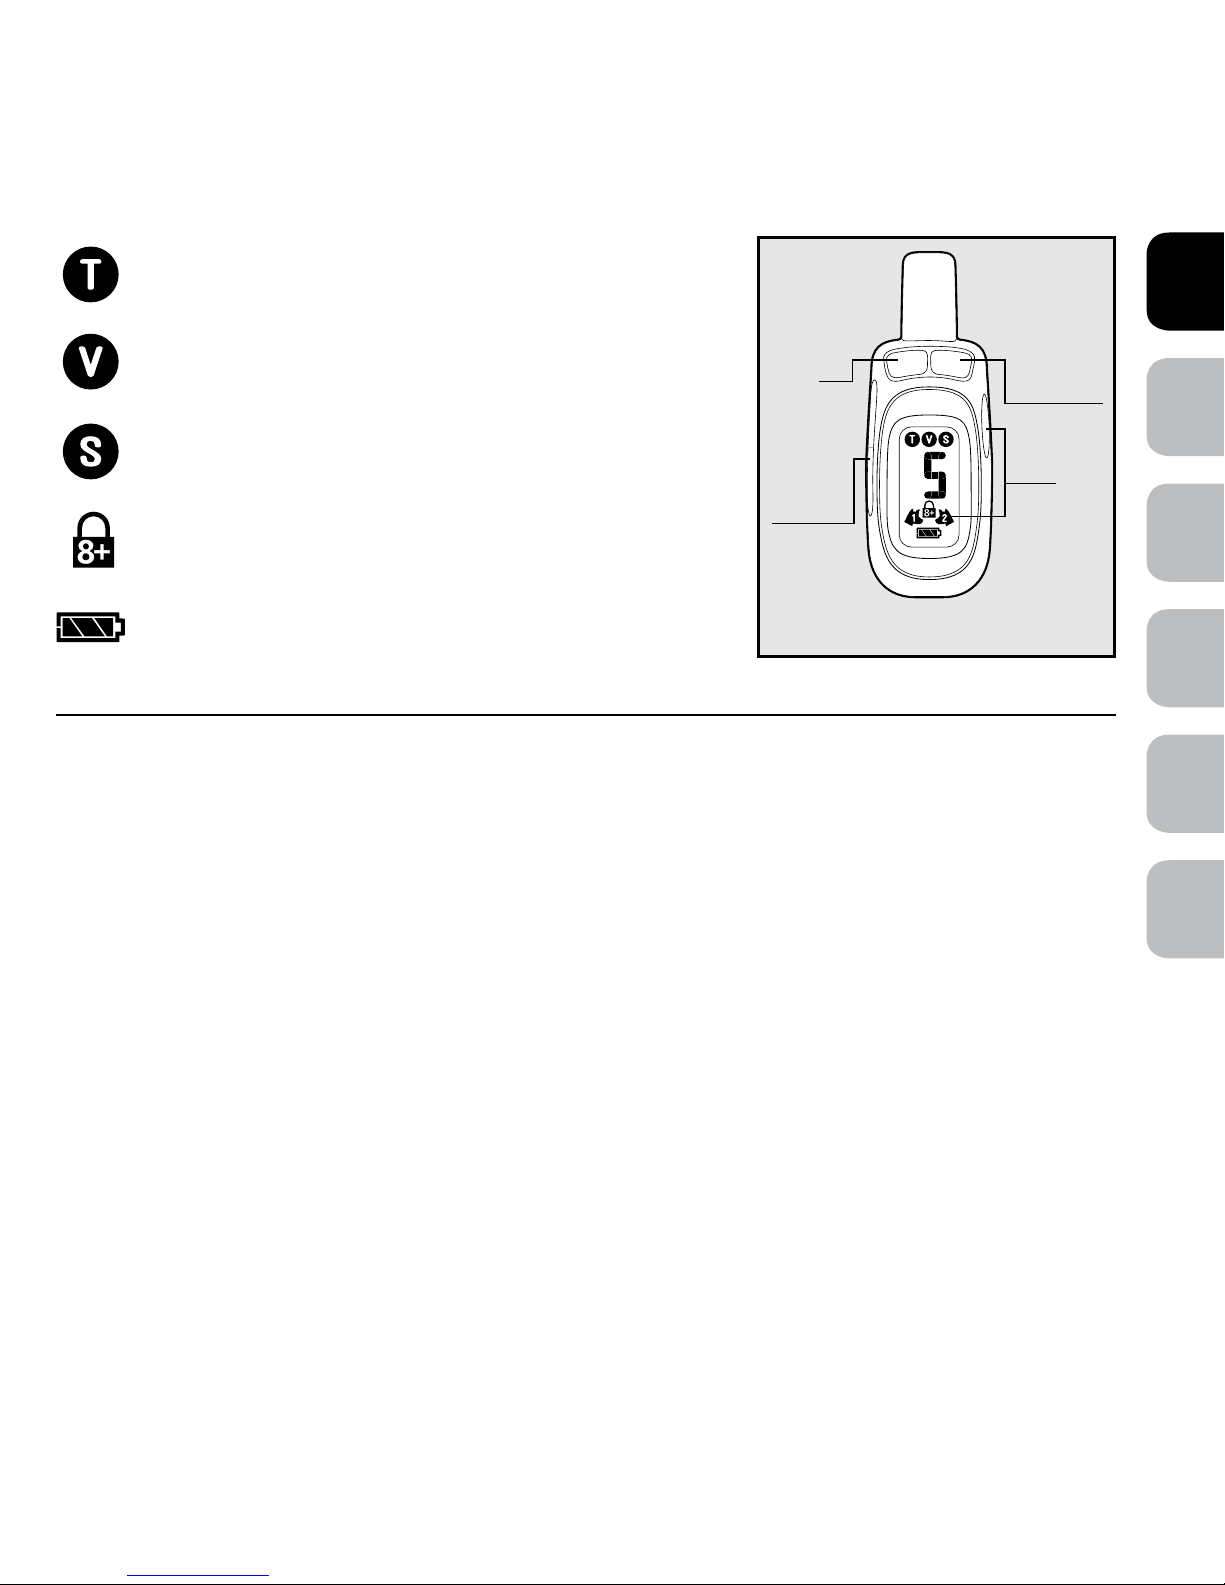
Tone Symbol: Delivers a tone with non-adjustable volume to
the collar.
Vibration
Symbol
: Sends 1 non-adjustable level of vibration
stimulation to the collar.
Static Symbol: Delivers up to 15 levels of static stimulation to the
collar that can be adjusted with the side button.
Lock Symbol: Indicates static stimulation levels 8-15 are
locked or unlocked.
Battery Indicator: Indicates the amount of battery remaining
in the remote.
Pairing a Second Collar with the Remote
This option is not available on 100 metre Remote Trainers.
1. Use the Dog 1 / Dog 2 button on the remote to select Dog 2. With the remote turned on and the collar
turned off, press and hold the on/off button on the collar.
2. After about 5 seconds the LED on collar will turn off indicating that it is ready for pairing.
3. Press either of the top 2 stimulation buttons. The collar LED will blink 5 times to indicate successful pairing.
Level Adjuster
0=Vibration
1-15=Static
Tone
Vibration/
Static Stimulation
Dog 1*
Dog 2
Dog 1 / Dog 2 option is not available on the 100
metre Remote Trainers.
*
petsafe.com
6
ENFRESDE
NLIT
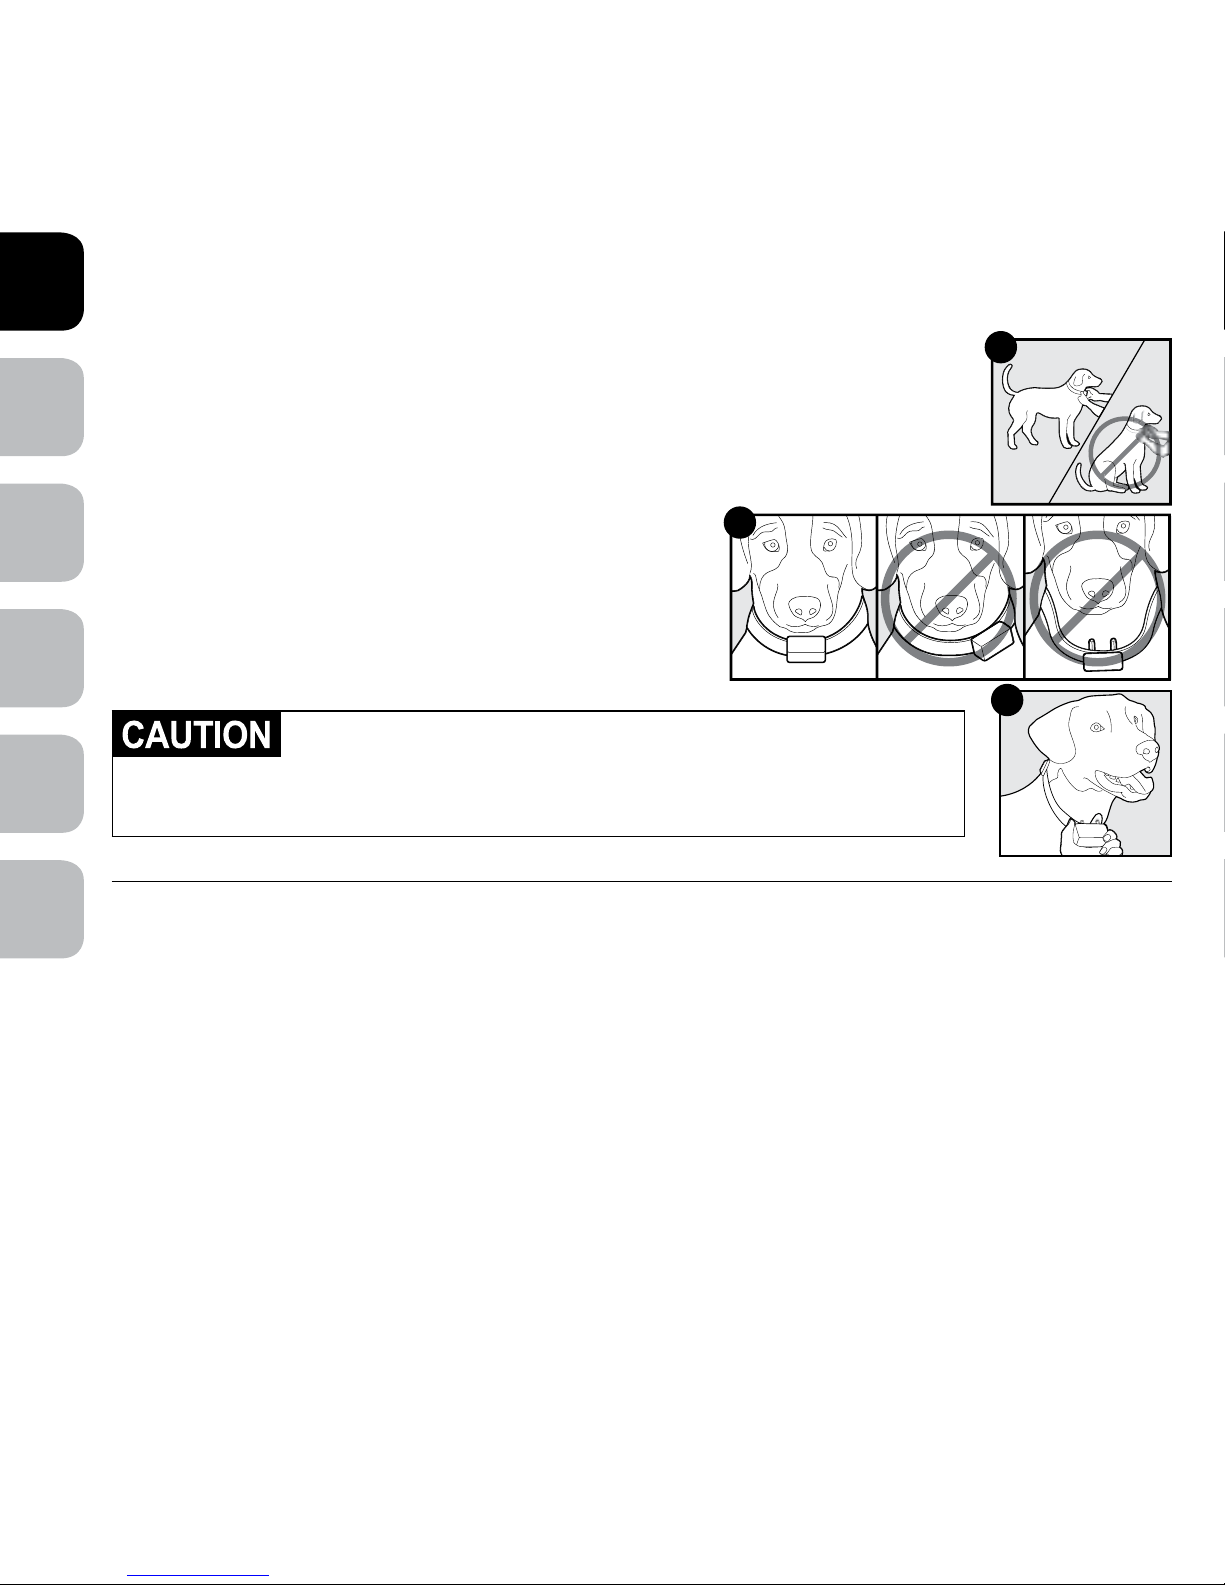
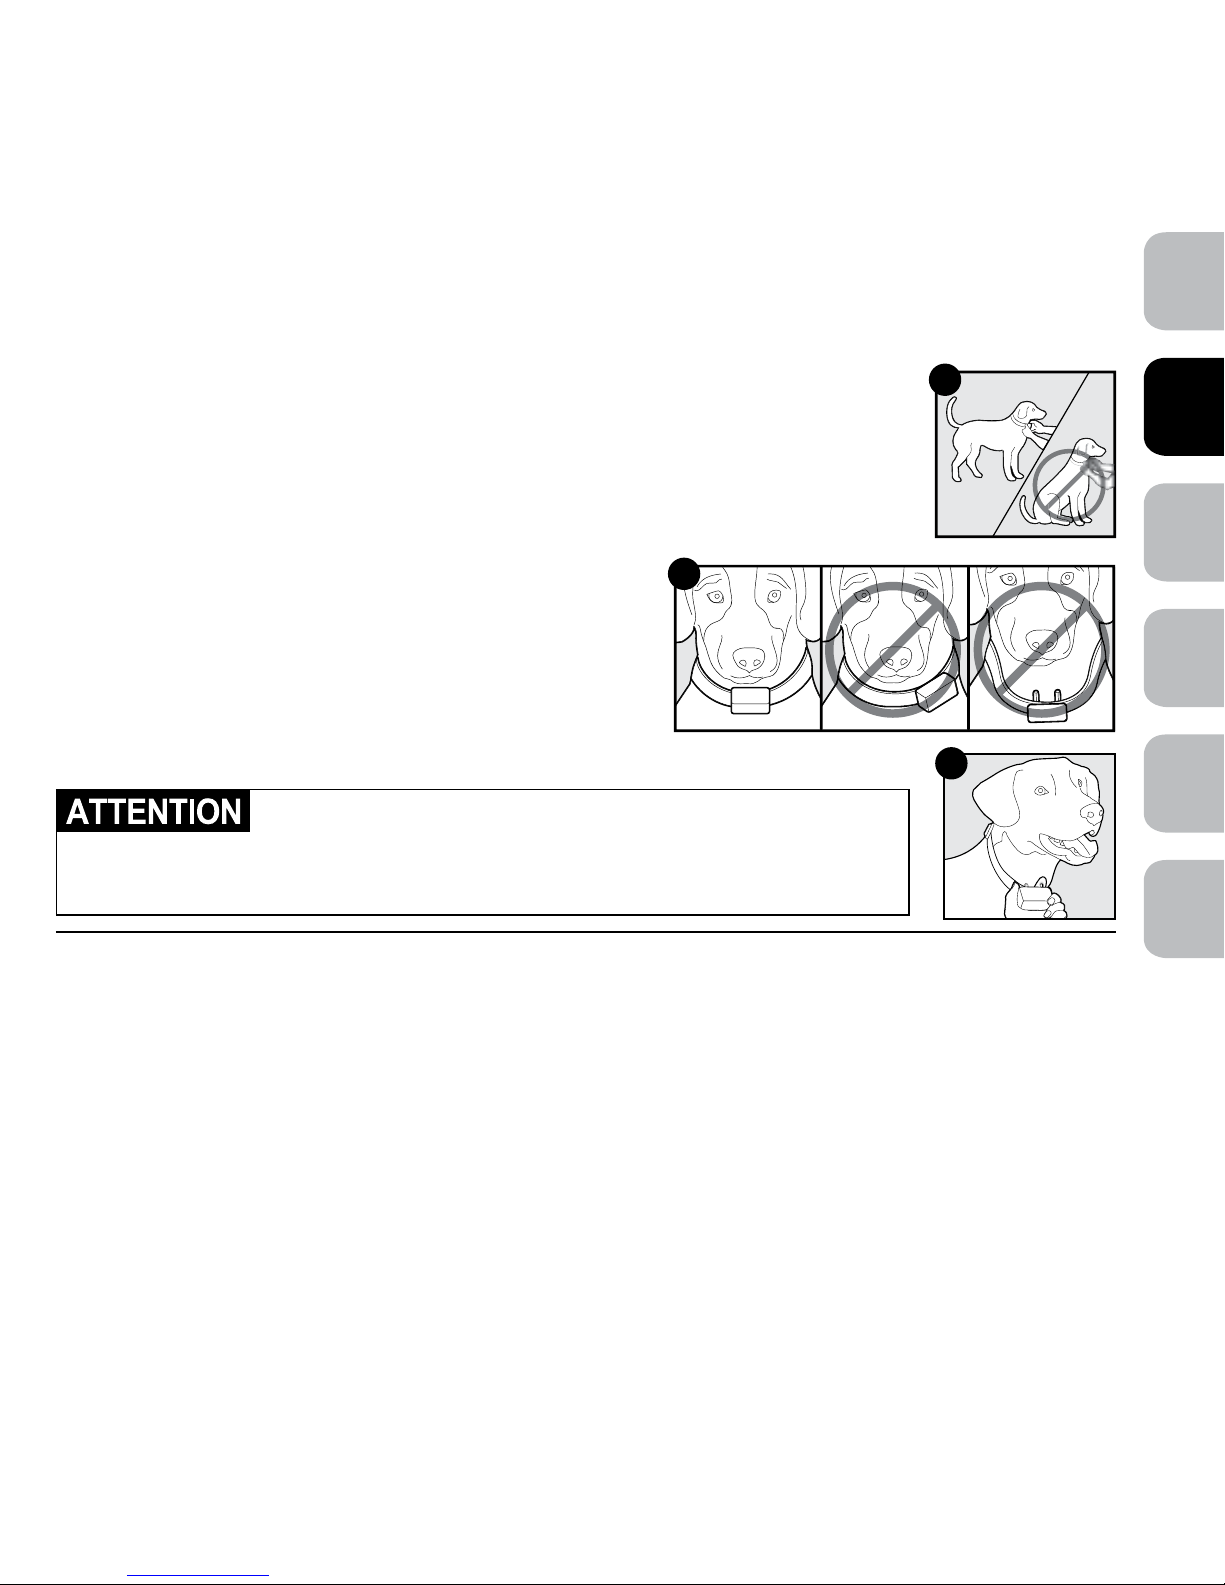
Fit the Training Collar
Important: The proper fit and placement of the training collar is important for effective operation.
The contact points must have direct contact with your dog’s skin on the underside of his neck.
1. Start with the collar turned off and your dog standing comfortably, not sitting
(A).
2. Place the collar on your pet so that the PetSafe® logo is facing forward and the collar is
directly under your dog’s chin. Centre the contact points underneath your dog’s neck,
touching the skin (B). Note: It is sometimes necessary to trim the hair around the contact
points to make sure that contact is consistent.
3. Check the tightness of the collar by inserting one finger
between the end of a contact point and your dog’s neck
(C). The fit should be snug but not constricting.
4. Allow your dog to wear the collar for several minutes, then
recheck the fit. Check the fit again as your dog becomes
more comfortable with the collar.
Do not shave the pet’s neck as this may increase the risk of skin
irritation. The collar should not be worn for more than 12 hours out of
every 24-hour period. Leaving the collar on too long could lead to
skin irritation.
Find the Best Stimulation Level for Your Pet
Important: Always start at the lowest level and work upward.
The Remote Trainer has 1 tone, 1 vibration, and 15 static stimulation levels. This allows you to choose the
stimulation level that is best for your pet. We recommend training with tone and vibration, or the lower levels
of static stimulation when needed. In most cases static stimulation levels 1–7 will be adequate for your training
needs. Levels 8–15 are locked as a reminder that you are moving to higher static stimulation levels.
Once you have placed the training collar on your pet, it is time to find the “recognition level”. The “recognition
level” is the static stimulation level that your dog begins to notice. It should not make your pet uncomfortable.
YOUR PET SHOULD NOT VOCALIZE OR PANIC WHEN RECEIVING STATIC STIMULATION. IF THIS
HAPPENS, THE STIMULATION IS TOO HIGH AND YOU NEED TO GO BACK TO THE PREVIOUS LEVEL.
Follow the steps below to find your pet’s recognition level:
1. Choose level 0, and press the upper right button continuously for 1 to 2 seconds.
A
B
C

petsafe.com
7
EN
FR ES DE
NL IT
2. If your pet shows no reaction, repeat this several times before moving to static stimulation.
3. Choose level 1 and press the upper right button continuously for 1 to 2 seconds.
4. If your pet shows no reaction, repeat this static stimulation level several times before moving up to the
next level.
5. Move up through the static stimulation levels until your pet reliably responds to the stimulation. Note: The
Remote Trainer is preset with the levels 8-15 locked. To unlock, press and hold both the up and down
buttons on the left simultaneously.
6. If your pet continues to show no response at Level 15, check the fit of the training collar. See “Fit the Training
Collar” section. You might also want to test it on your hand at a lower level to ensure the training collar
is working.
If all of these steps have been done and your pet continues to show no reaction to the static stimulation, please
contact our Customer Care Centre.
To download a complete product manual with troubleshooting tips, visit www.petsafe.com.
Warranty
Three Year Non-Transferrable Limited Warranty
This Product has the benefit of a limited manufacturer’s warranty. Complete details of the warranty applicable
to this Product and its terms can be found at www.petsafe.com and/or are available by contacting your local
Customer Care Centre.
Europe – Radio Systems PetSafe Europe Ltd., 2nd Floor, Elgee Building, Market Square, Dundalk, Co. Louth,
A91 YR9X Ireland
Canada – Radio Systems Corporation, 10427 PetSafe Way, Knoxville, TN 37932 USA
Australia/New Zealand – In compliance with the Australian Consumer Law, Warranties Against Defects,
effective January 1, 2012, warranty details of this Product are as follows: Radio Systems Australia Pty Ltd.
(hereinafter referred to as “Radio Systems”) warrants to the original retail purchaser, and not any other purchaser
or subsequent owner, that its Product, when subject to normal and proper residential use, will be free from defects
in material or workmanship for a period of three (3) years from the purchase date. An “original retail consumer
purchaser” is a person or entity who originally purchases the Product, or a gift recipient of a new Product that is
unopened and in its original packaging. When serviced by Radio Systems Customer Service, Radio Systems covers
labour and parts for the first three years of ownership; after the first three years, a service or upgrade charge will
apply relative to replacement of the Product with new or refurbished items at Radio Systems’ sole discretion.

petsafe.com
8
ENFRESDE
NLIT
The limited warranty is non-transferable and shall automatically terminate if the original retail consumer
purchaser resells the Radio Systems Product or transfers the property on which the Radio Systems Product is
installed. This Limited Warranty excludes accidental damage due to dog chews; lightning damage; or neglect,
alteration, and misuse. Consumers who purchase products outside of Australia, New Zealand, or from an
unauthorised dealer will need to return the Product to the original place of purchase for any warranty issues.
Please note that Radio Systems does not provide refunds, replacements, or upgrades for change of mind, or for
any other reason outside of these Warranty terms.
Claims Procedure: Any claim made under this Warranty should be made directly to Radio Systems Australia Pty
Ltd. Customer Care Centre at:
Radio Systems Australia Pty Ltd.
PO Box 7266, Gold Coast Mail Centre QLD 9726, Australia
Australia Residents: 1800 786 608
New Zealand Residents: 0800 543 054
Email: aus-info@petsafe.net
To file a claim, a proof of purchase must be provided. Without a proof of purchase, Radio Systems will not
repair or replace faulty components. Radio Systems requests the Consumer to contact the Radio Systems
Customer Care Centre to obtain a Warranty Return number, prior to sending the Product. Failure to do so may
delay in the repair or replacement of the Product.
If the Product is deemed to be faulty within 30 days from date of original purchase, Radio Systems will organise
for a replacement to be sent in advance of returning the faulty Product. A Post Bag will be included with the
replacement Product for the return of the faulty Product. The Product must be returned within 7 days of receiving
the replacement. If the Product is deemed to be faulty after 30 days from the date of original purchase, the
consumer will be required to return the Product to Radio Systems at the consumer’s own expense. Radio Systems
will test and replace the faulty unit or its components and return to the consumer free of charge, provided the
Product is within its said warranty period. This warranty is in addition to other rights and remedies available to
you under the law. Radio Systems goods come with guarantees that cannot be excluded under the Australia
Consumer Law. You are entitled to a replacement or refund for a major failure and for compensation for any
other reasonably foreseeable loss or damage. You are also entitled to have the goods repaired or replaced if
the goods fail to be of acceptable quality and the failure does not amount to a major failure.
Should you have any queries or require any further information, please contact our Customer Care Centre on
1800 786 608 (Australia) or 0800 543 054 (New Zealand).
petsafe.com
9
EN
FR ES DE
NL IT
Compliance
Modification or changes to this equipment not expressly approved by Radio Systems Corporation may void the
user’s authority to operate the equipment.
Radio Systems Corporation declares under its own responsibility, that these products are in compliance with
the essential requirements under article 3 of the RED (2014/53/EU) and the RoHS Directive (2011/65/EU).
Unauthorised changes or modifications to the equipment that are not approved by Radio Systems Corporation may
violate EU RED regulations, could void the user’s authority to operate the equipment, and will void the warranty.
Hereby, Radio Systems Corporation, declares that these products are in compliance with the essential
requirements and other relevant provisions. The Declaration of Conformity can be found at: www.petsafe.com/
customercare/eu_docs.php.
IC
This device complies with Industry Canada licence-exempt RSS standard(s). Operation is subject to the
following two conditions: (1) this device may not cause interference, and (2) this device must accept any
interference, including interference that may cause undesired operation of the device.
ACMA
This device complies with the applicable EMC requirements specified by the ACMA (Australian
Communications and Media Authority).
Important Recycling Advice
Please respect the Waste Electrical and Electronic Equipment regulations in your country. This equipment
must be recycled. At the end of the product life, do not place it in the normal municipal waste system. Please
check the regulations in your area or return it to where it was purchased so that it can be placed in our recycling
system. If these options are not possible, please contact the Customer Care Centre for further information.
Battery Disposal
Separate collection of used batteries is required in many regions; check the regulations in your area
before discarding used batteries.

petsafe.com
10
ENFRESDE
NLIT
Terms of Use and Limitation of Liability
1. Terms of Use
Use of this Product is subject to your acceptance without modification of the terms, conditions and notices
contained herein. Use of this Product implies acceptance of all such terms, conditions and notices. If you
do not wish to accept these terms, conditions, and notices, please return the Product, unused, in its original
packaging and at your own cost and risk to the relevant Customer Care Centre together with proof of
purchase for a full refund.
2. Proper Use
This Product is designed for use with pets where training is desired. The specific temperament or size/
weight of your pet may not be suitable for this Product. Radio Systems Corporation recommends that this
Product is not used if your pet is aggressive and accepts no liability for determining suitability in individual
cases. If you are unsure whether this Product is appropriate for your pet, please consult your veterinarian or
certified trainer prior to use. Proper use includes, without limitation, reviewing the entire Training Guide and
any specific safety information statements.
3. No Unlawful or Prohibited Use
This Product is designed for use with pets only. This pet training device is not intended to harm, injure
or provoke. Using this Product in a way that is not intended could result in violation of Federal, State or
local laws.
4. Limitation of Liability
In no event shall Radio Systems Corporation or any of its associated companies be liable for (i) any
indirect, punitive, incidental, special or consequential damage and/or (ii) any loss or damages whatsoever
arising out of or connected with the misuse of this Product. The Purchaser assumes all risks and liability from
the use of this Product to the fullest extent permissible by law.
5. Modification of Terms and Conditions
Radio Systems Corporation reserves the right to change the terms, conditions and notices governing this
Product from time to time. If such changes have been notified to you prior to your use of this Product, they
shall be binding on you as if incorporated herein.
petsafe.com
11
EN
FR ES DE
NL IT
Bienvenue
Vous et votre animal êtes faits l’un pour l’autre. Notre objectif est de vous aider à créer, ensemble, la meilleure des
camaraderies et les moments les plus mémorables. Le Système de dressag est conçu pour donner plus de liberté à
votre animal tout en le gardant en sécurité.
Nous savons qu’un animal en sécurité rend son propriétaire heureux. Avant de commencer, merci de prendre le
temps de lire les consignes de sécurité importantes. N’hésitez pas à nous contacter si vous avez des questions.
Ci-après, « Nous » peut renvoyer collectivement à Radio Systems Corporation, Radio Systems PetSafe Europe Ltd.,
Radio Systems Australia Pty Ltd., ainsi qu’à toute autre filiale ou marque de Radio Systems Corporation.
Consignes de sécurité importantes
Description des termes et symboles utilisés dans ce manuel
Ce symbole est une alerte de sécurité. Sa présence vous avertit d’un risque de blessure. Respectez
tous les messages de sécurité qui suivent ce symbole afin d’éviter tout risque de blessure ou de mort.
AVERTISSEMENT indique une situation dangereuse qui, si elle n’est pas
évitée, risque d’entraîner la mort ou des blessures graves.
ATTENTION, utilisé avec le symbole d’alerte de sécurité, indique une situation
dangereuse qui, si elle n’est pas évitée, peut provoquer une blessure légère ou
modérée.
ATTENTION, utilisé sans le symbole d’alerte de sécurité, indique une situation
dangereuse qui, si elle n’est pas évitée, peut blesser votre animal.
• N’utilisez pas ce produit si votre chien a tendance à être agressif. Les chiens agressifs peuvent causer de
graves blessures, voire la mort de leur propriétaire ou d’autres personnes. Si vous n’êtes pas sûr(e) que ce
produit convient à votre chien, veuillez consulter votre vétérinaire ou un dresseur professionnel.
petsafe.com
12
ENFRESDE
NLIT
• Il est extrêmement important pour vous et votre animal de rester en sécurité pendant le dressage en laisse.
Votre animal doit avoir une laisse solide, assez longue pour lui permettre de courir après un objet, mais assez
courte pour ne pas atteindre une route ou un autre type de danger. Vous devez être assez fort physiquement
pour retenir votre animal s’il essaie de poursuivre quelque chose.
• Ce système de dressage pour animal n’est pas un jouet, ne pas laisser à la portée des enfants.
• Un collier-récepteur porté trop longtemps ou trop serré peut irriter la peau de l’animal et provoquer des
blessures pouvant aller de simples rougeurs à des ulcères de pression. Ce trouble est communément
appelé escarre de décubitus.
• Évitez de laisser votre chien porter le collier plus de 12 heures par jour.
• Dans la mesure du possible, replacez le collier toutes les 1 ou 2 heures sur le cou de votre animal.
• Revérifiez régulièrement que le collier est bien positionné pour éviter toute pression excessive ; suivez les
instructions contenues dans ce manuel de prise en mains rapide.
• Vous aurez peut-être besoin de tailler les poils dans la zone des contacteurs. Cependant, ne rasez jamais le
cou de votre chien, car cela risquerait de provoquer des irritations ou une infection.
• N’attachez jamais de laisse a un collier muni de contacteurs. Cela exercerait une pression excessive sur
les contacteurs.
• Lorsque vous attachez une laisse à un autre collier, veillez à ce qu’il n’exerce pas de pression sur le collier
de dressage.
• Lavez le cou du chien et les contacteurs du collier avec un chiffon humide chaque semaine.
• Examinez quotidiennement la zone de contact pour détecter toute rougeur ou plaie.
• En cas d’irritation ou de douleur, interrompez l’utilisation du collier jusqu’à ce que la peau soit guérie.
• Si le problème persiste au-delà de 48 heures, consultez votre vétérinaire.
• Pour obtenir des informations supplémentaires sur les escarres de décubitus et la nécrose cutanée, consultez
notre site internet.
Ce produit doit être utilisé uniquement avec des animaux en bonne santé. Si vous n’êtes pas certain que votre animal
est en bonne santé, nous vous recommandons de l’emmener chez un vétérinaire avant l’utilisation de ce produit.
petsafe.com
13
EN
FR ES DE
NL IT
Charger le collier de dressage et la télécommande
Important : Une charge excessive peut réduire l’autonomie de la batterie. Chargez la
télécommande ou le collier uniquement lorsque les batteries sont faibles.
1. Branchez et chargez complètement le collier et la télécommande. Cela peut prendre jusqu’à 5 heures.
2. Lorsque la batterie est totalement plein, la LED verte sur le collier va s’éteindre sur le collier et l’indicateur
de puissance sur la télécommande et sur l’espace plein.
3. Lorsque le collier et la télécommande sont chargés, replacer les caches en caoutchouc.
Pour mettre en fonction le collier de dressage
Appuyez sur l’interrupteur marche/arrêt et maintenez-le enfoncé jusqu’à
entendre un bip progressif et que la LED verte apparaisse puis relâchez-le.
Remarque : La télécommande est toujours en fonction, l’écran s’allume dès
qu’une touche est pressée.
Pour mettre le collier de dressage à l’arrêt
Appuyez brièvement sur l’interrupteur marche/arrêt jusqu’à ce que le collier
émette un bip sonore dégressif et relâchez-le. La LED rouge reste allumée
pendant le temps que le bouton est enfoncé et s’éteindra lorsque le collier de
dressage sera arrêté.
Conseil : Arrêtez le collier lorsque vous ne l’utilisez pas pour
augmenter l’autonomie de la batterie.
Tester le système de dressage
Nous vous recommandons de découvrir par vous-même la manière dont la stimulation électrostatique fonctionne.
Commencez toujours au niveau le plus faible et augmentez l’intensité jusqu’à atteindre votre niveau de confort personnel.
1. Positionner un doigt sur les deux contacteurs du collier de dressage.
2. Tenez votre télécommande à environ 0,5 mètres du collier de dressage. En commençant au niveau 0, appuyez sur
le bouton de vibration en continu pendant 1 à 2 secondes. Vous devez ressentir une vibration continue. Il n’y a qu’un
seul niveau de vibration.
3. Passez le niveau à 1 pour une stimulation électrostatique. Il est possible, à ce niveau, que vous ne ressentiez pas
la stimulation.
Remarque : Une stimulation continue ne sera pas envoyée pendant plus de 10 secondes consécutives. Pour
la réactiver relâchez et pressez le bouton à nouveau.
4. Augmentez le niveau jusqu’à ce que la sensation commence à être inconfortable.
Bouton Marche/
Arrêt
Port de
chargement
petsafe.com
14
ENFRESDE
NLIT
Symbole du signal sonore : Envoie au collier un signal
sonore dont le volume n’est pas réglable.
Symbole
de vibration : Envoie au collier 1 niveau de
stimulation par vibration qui n’est pas réglable.
Symbole électrostatique : Envoie au collier jusqu’à 15
niveaux de stimulation électrostatique qui peuvent être ajustés
avec le bouton latéral.
Symbole de verrouillage : Indique si les niveaux de
stimulation électrostatique 8 à 15 sont verrouillés ou déverrouillés.
Indicateur de batterie : Indique l’autonomie de la batterie
restante dans la télécommande.
Appairer un deuxième collier avec la télécommande
Cette option n’est pas disponible sur les systèmes de dressage à 100 mètres.
1. Utilisez le bouton Chien 1 / Chien 2 sur la télécommande pour sélectionner le Chien 2. Télécommande en
marche et collier à l’arrêt appuyez sur le bouton marche / arrêt du collier et maintenez-le enfoncé.
2. Au bout d’environ 5 secondes, la LED sur le collier va s’allumer pour indiquer qu’il est prêt à être appairé.
3. Pressez l’un des 2 boutons supérieurs de stimulation. La LED du collier va clignoter 5 fois pour indiquer que
l’appairage est effectif.
Choix des
niveaux
0=Vibration
1 à 15=
Électrostatique
Signal
sonore
Vibration/
Stimulation
électrostatique
Chien 1*
Chien 2
L'option Chien 1 / Chien 2 n'est pas disponible sur les systèmes de dressage
100 mètres
*
petsafe.com
15
EN
FR ES DE
NL IT
Ajuster le collier de dressage
Important : Il est important que le collier de dressage soit bien ajusté pour garantir son bon
fonctionnement. Les contacteurs doivent être directement en contact avec la peau de votre chien, au
niveau de la partie inférieure du cou.
1. Commencez avec le collier à l’arrêt alors que votre chien se tient confortablement, sans
être assis
(A).
2. Positionnez le collier de dressage sur votre animal de façon à ce que le logo PetSafe®
soit tourné vers l’avant et que le collier se trouve directement sous le menton de votre
chien. Centrez les contacteurs en dessous du cou de votre chien, en contact avec la
peau (B). Remarque : Il est parfois nécessaire de couper les poils autour des
contacteurs pour garantir un contact efficace.
3. Vérifiez l’ajustement du collier en insérant un doigt entre
l’extrémité d’un contacteur et le cou de votre chien (C).
L’ajustement doit être serré mais ne doit pas comprimer.
4. Laissez votre chien porter le collier pendant quelques
minutes, puis vérifiez de nouveau le réglage. Vérifiez
également le réglage une fois qu’il se sera habitué au collier.
Ne rasez pas le cou de l’animal car cela peut augmenter le risque
d’irritation de la peau. Le collier ne doit pas être porté plus de
12 heures par période de 24 heures. Un port excessif du collier
risque d’entraîner une irritation de la peau.
Trouver le meilleur niveau de stimulation pour votre animal
Important : Commencez toujours par le niveau le plus bas avant d’augmenter progressivement.
Le Système de dressage dispose de 1 stimulation par signal sonore, 1 stimulation par vibration et 15 niveaux de
stimulation électrostatique. Ceci vous permet de choisir le type de stimulation qui convient le mieux à votre animal.
Nous recommandons le dressage avec le signal sonore et la stimulation par vibration ou les niveaux les plus bas
de stimulation électrostatique si nécessaire. Dans la plupart des cas les niveaux 1 à 7 de stimulation électrostatique
sont adaptés à vos besoins de dressage. Les niveaux 8 à 15 sont verrouillés pour vous rappeler que vous allez vers
des niveaux de stimulation électrostatique élevés.
Lorsque que vous avez installé le collier de dressage sur votre animal, c’est le moment de chercher le « niveau
de reconnaissance ». Le « niveau de reconnaissance » est le niveau de stimulation électrostatique que votre
chien commence à percevoir. Il ne doit pas mettre votre animal mal à l’aise. VOTRE ANIMAL NE DOIT PAS
ABOYER NI GÉMIR OU PANIQUER LORSQU’IL REÇOIT LA STIMULATION ÉLECTROSTATIQUE. SI CELA
SE PRODUIT, LA STIMULATION EST TROP FORTE ET VOUS DEVEZ REVENIR AU NIVEAU PRÉCÉDENT.
A
B
C
petsafe.com
16
ENFRESDE
NLIT
Suivez les étapes ci-dessous pour connaître le niveau de reconnaissance de votre animal :
1. Choisir le niveau 0 et appuyer continuellement sur le bouton situé en haut à droite pendant 1 à 2 secondes.
2. Si votre animal ne présente aucune réaction, répétez la stimulation à ce niveau plusieurs fois avant de
passer a la stimulation électrostatique.
3. Choisir le niveau 1 et appuyer continuellement sur le bouton situé en haut à droite pendant 1 à 2 secondes.
4. Si votre animal ne présente aucune réaction, répétez cette stimulation électrostatique à ce niveau
plusieurs fois avant de passer au niveau supérieur.
5. Passez les niveaux de stimulation électrostatique jusqu’à ce que votre animal réponde à coup sûr à la
stimulation. Remarque : Le Système de dressag est pré-paramétré avec les niveaux8 à 15 verrouillés.
Pour les déverrouiller, appuyer simultanément sur les boutons du haut et du bas sur la gauche et les
maintenir enfoncés.
6. Si votre animal continue à ne montrer aucune réponse au niveau 15, vérifiez que le collier-récepteur est
bien ajusté. Voir la section « Ajuster le collier de dressage ». Vous pouvez également tester le collier de
dressage sur votre main à un niveau plus bas pour vérifier qu’il fonctionne.
Si toutes ces étapes sont terminées et que votre animal continue à ne montrer aucune réaction aux stimulations
électrostatiques, merci de contacter notre service clientèle.
Pour télécharger le manuel complet du produit avec les conseils de dépannage, rendez-vous sur www.petsafe.com.
Garantie
Trois ans de garantie limitée non transférable
Ce produit est soumis à une garantie limitée du fabricant. L’ensemble des informations concernant la garantie
applicable à ce produit ainsi que ses conditions peuvent être consultées sur le site www.petsafe.com et / ou
vous être communiquées si vous contactez votre Service clientèle local.
Europe – Radio Systems PetSafe Europe Ltd., 2nd Floor, Elgee Building, Market Square, Dundalk, Co. Louth,
A91 YR9X Irlande
Canada – Radio Systems Corporation, 10427 PetSafe Way, Knoxville, TN 37932 États-Unis
 Loading...