

Petsafe PDT00-15102 Operating And Training Manual
PLEASE READ THIS ENTIRE GUIDE BEFORE BEGINNING
Model Number
PDT00-15102
ADVENTURE
Dog Trainer
operating and training guide
2 Customer Care Center 1-800-732-2677
IMPORTANT SAFETY INFORMATION
Explanation of Attention Words and Symbols used in this guide
This is the safety alert symbol. It is used to alert you to potential personal injury hazards.
Obey all safety messages that follow this symbol to avoid possible injury or death.
WARNING indicates a hazardous situation which, if not avoided, could result in
death or serious injury.
CAUTION, used with the safety alert symbol, indicates a hazardous situation
which, if not avoided, could result in minor or moderate injury.
CAUTION, used without the safety alert symbol, indicates a hazardous situation
which, if not avoided, could result in harm to your pet.
• Risk of explosion if battery is replaced by an incorrect type. Do not short circuit, mix old and new
batteries, dispose of in fire, or expose to water. When batteries are stored or disposed, they must
be protected from shorting. Dispose of used batteries properly.
• Not for use with aggressive dogs. Do not use this product if your dog is prone to aggressive
behavior. Aggressive dogs can cause severe injury or death to their owners and others. If you are
not sure that this product is right for your dog, please talk to your veterinarian or a certified trainer.
• Safety during on-leash training. It is vitally important that you and your dog remain safe while
learning during on-leash training. Your dog should be on a strong leash, long enough for him to
attempt to chase an object, but short enough for him not to reach a road or other unsafe area.
You must also be physically strong enough to restrain your dog when he tries to chase.
• This pet training device is not a toy, keep away from children.
Risk of skin damage. Please read and follow the instructions in this manual. Proper fit of the collar
is important. A collar worn for too long or made too tight on the pet’s neck may cause skin damage.
Ranging from redness to pressure ulcers; this condition is commonly known as bed sores.
• Avoid leaving the collar on the dog for more than 12 hours per day.
• When possible reposition the collar on the pet’s neck every 1 to 2 hours.
• Check the fit to prevent excessive pressure; follow the instructions in this manual.
• Never connect a lead to the electronic collar; it will cause excessive pressure on the contacts.
• When using a separate collar for a lead, don’t put pressure on the electronic collar.
• Wash the dog’s neck area and the contacts of the collar weekly with a damp cloth.
• Examine the contact area daily for signs of a rash or a sore.
• If a rash or sore is found, discontinue use of the collar until the skin has healed.
• If the condition persists beyond 48 hours, see your veterinarian.
• For additional information on bed sores and pressure necrosis, please visit our website.

www.petsafe.net 3
These steps will help keep your pet secure and comfortable. Millions of pets are comfortable while
they wear stainless steel contacts. Some pets are sensitive to contact pressure. You may find after
some time that your pet is very tolerant of the collar. If so, you may relax some of these precautions.
It is important to continue daily checks of the contact area. If redness or sores are found, discontinue
use until the skin has fully healed.
The PetSafe
®
ADVENTURE Dog Trainer must be used only on healthy pets. We recommend that you
take your pet to a veterinarian before using the product if he is not in good health.

4 Customer Care Center 1-800-732-2677
Thank you for choosing the PetSafe® brand. You and your pet deserve a companionship that
includes memorable moments and a shared understanding together. Our products and training
tools enhance the relationship between pets and their owners. If you have any questions about our
products or training your pet, please visit our website at www.petsafe.net or contact our Customer
Care Center at 1-800-732-2677.
To get the most protection out of your warranty, please register your product within 30 days at
www.petsafe.net. By registering and keeping your receipt, you will enjoy the product’s full warranty
and should you ever need to call the Customer Care Center, we will be able to help you faster. Most
importantly, PetSafe
®
brand will never give or sell your valuable information to anyone. Complete
warranty information is available online at www.petsafe.net.
Table of Contents
Components..................................................................... 5
How the System Works ............................................................ 5
Key Definitions ................................................................... 6
Operating Guide
Prepare the Handheld Remote..................................................... 7
Prepare the Receiver Collar . . . . . . . . . . . . . . . . . . . . . . . . . . . . . . . . . . . . . . . . . . . . . . . . . . . . . . . 8
Fit the Receiver Collar .......................................................... 10
Program the Remote Transmitter ................................................. 10
Reset the Receiver Collar ....................................................... 11
Program the Receiver Collar for Two or Three-Dog Operation ........................... 12
Training Guide
Test the Remote Trainer . . . . . . . . . . . . . . . . . . . . . . . . . . . . . . . . . . . . . . . . . . . . . . . . . . . . . . . . . 13
General Tips .................................................................. 13
Teaching Your Pet Tone A........................................................ 14
Using Tone B ................................................................. 14
Find the Best Stimulation Level for Your Pet ......................................... 14
Dog Training Recommendations .................................................. 15
Teaching Basic Obedience....................................................... 15
Eliminating Unwanted Behavior ................................................... 18
Frequently Asked Questions
..............................................................20
Troubleshooting ......................................................................... 21
Test Light Instructions ............................................................ 21
Terms of Use and Limitation of Liability ............................................... 22
Customer Care International ....................................................... 22
Battery Disposal ................................................................. 22
Perchlorate Battery............................................................... 22
Compliance .................................................................... 23
Warranty ....................................................................... 23

www.petsafe.net 5
Components
How the System Works
The PetSafe® ADVENTURE Dog Trainer has been proven safe, comfortable, and effective for most
pets greater than 8 lbs. and at least 6 months old. This system assists you in controlling your pet in a
range up to 800 yards. At the push of a button, the Handheld Remote sends a signal, activating the
Receiver Collar. Using the Remote Trainer consistently and correctly, many misbehaviors that your
pet exhibits can be corrected or any basic obedience commands can be taught.
Important: The ADVENTURE Dog Trainer has a range of up to 800 yards.
Depending on the way you hold the Handheld Remote, the maximum
range may vary. For consistent results at longer ranges, hold the Handheld
Remote in a vertical position away from your body. Terrain, weather,
vegetation, transmission from other radio devices, and other factors will
affect the maximum range.
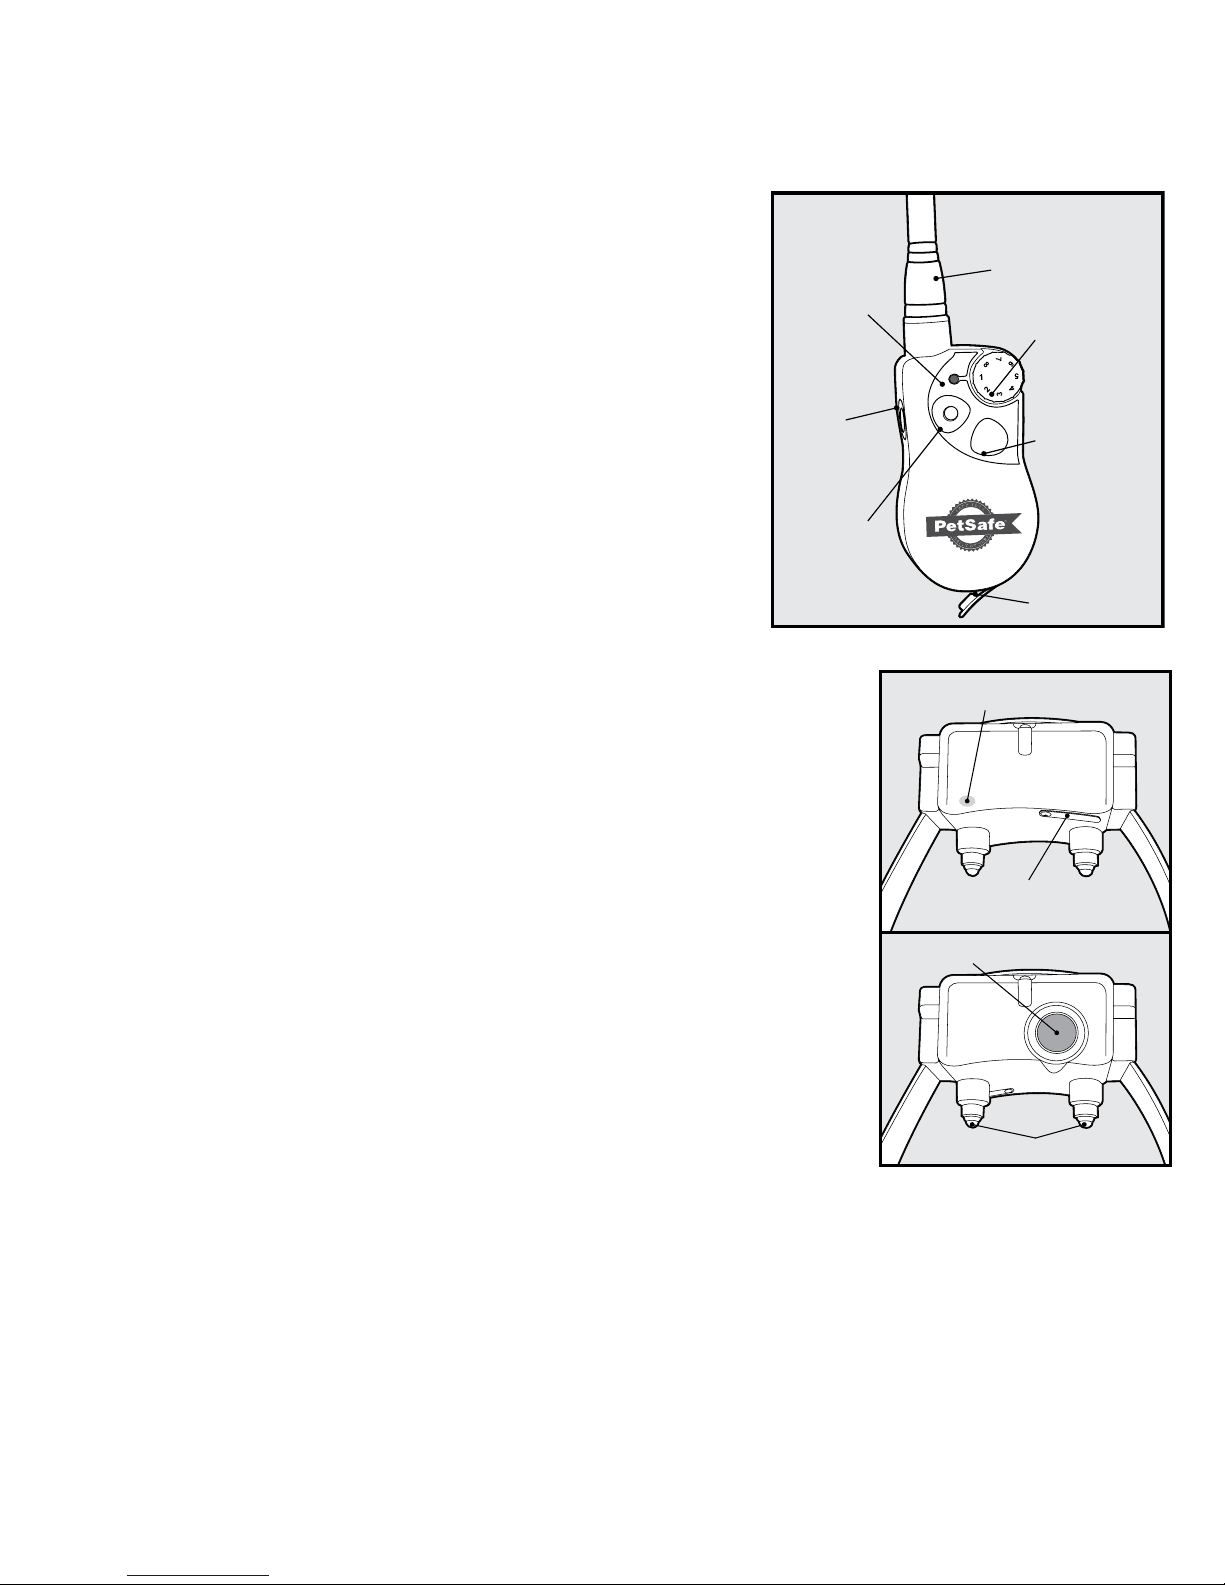
Handheld Remote
Test Light
Tool
Receiver Collar
Charging Adapter
Operating and
Training Guide
Wrist Strap
6 Customer Care Center 1-800-732-2677
Key Definitions
Handheld Remote: Transmits the radio signal to the Receiver
Collar. It is waterproof. It is factory set to Mode 2.
Transmitter Indicator Light: Indicates that a button is pressed
and also serves as a low-battery indicator.
Green LED: Indicates when a Tone button is pressed. Also
shows when charging is complete.
Red LED: Indicates low battery and when a Continuous
Stimulation Button is pressed. Also shows when the
Handheld Remote is being charged.
Intensity Dial: Provides multiple levels of static stimulation so
you can match the level to your pet’s temperament.
Side Button: This button is factory set to deliver Tone A (low
tone) only.
Upper Button: This button is factory set to deliver Tone B (high
tone) only.
Lower Button: This button is factory set to deliver Continuous
Stimulation set by the Intensity Dial.
Receiver Collar: Receives the radio signal from the Handheld Remote. It
is waterproof.
On/Off Button: Momentarily pressing and holding this button turns the
Receiver Collar on and off.
Contact Points: The contacts through which the Receiver Collar delivers
static stimulation.
Receiver Indicator Light: Indicates when the Receiver Collar has been
turned on or off and also serves as a low-battery indicator.
Green LED: Tone A Indicator.
Red LED: Indicates when Tone B or static stimulation is being
delivered and serves as the low battery indicator.
Charging Jacks: For connecting the charger. Although the Handheld
Remote and Receiver Collar are waterproof without the charger covers, keep
the covers in place when not charging to keep debris out of the openings.
Continuous Stimulation: You control when and how long stimulation
is delivered to your dog through the Receiver Collar’s Contact Points.
When a Continuous Stimulation Button is pressed for 8 seconds or more,
the Handheld Remote will “time-out.” The button will need to be released and pressed again before
additional stimulation can be delivered.
Tone A (Low Tone): Use the Tone A (Side Button) as a marker to reinforce positive behavior. Again,
timing is critical. Praise or treat the dog immediately following Tone A.
Tone B (High Tone): Use Tone B (Upper Button) with a Continuous Stimulation (Lower Button) to stop
unwanted behaviors. Timing is critical. Tone B followed by Continuous Stimulation should occur during
or immediately after the unwanted behavior. Once your dog associates the High Tone with the static
stimulation, you will only need to use Tone B.
Handheld Remote
Indicator
Light
Side Button
Upper Button
Antenna
Intensity Dial
Lower Button
Charging Jack
(with cover)
Receiver Collar
Charging Jack
(with cover)
Receiver Indicator Light
On/Off Button
Contact Points
(Top)
(Bottom)
www.petsafe.net 7
OPERATING GUIDE
STEP 1
Prepare the Handheld Remote
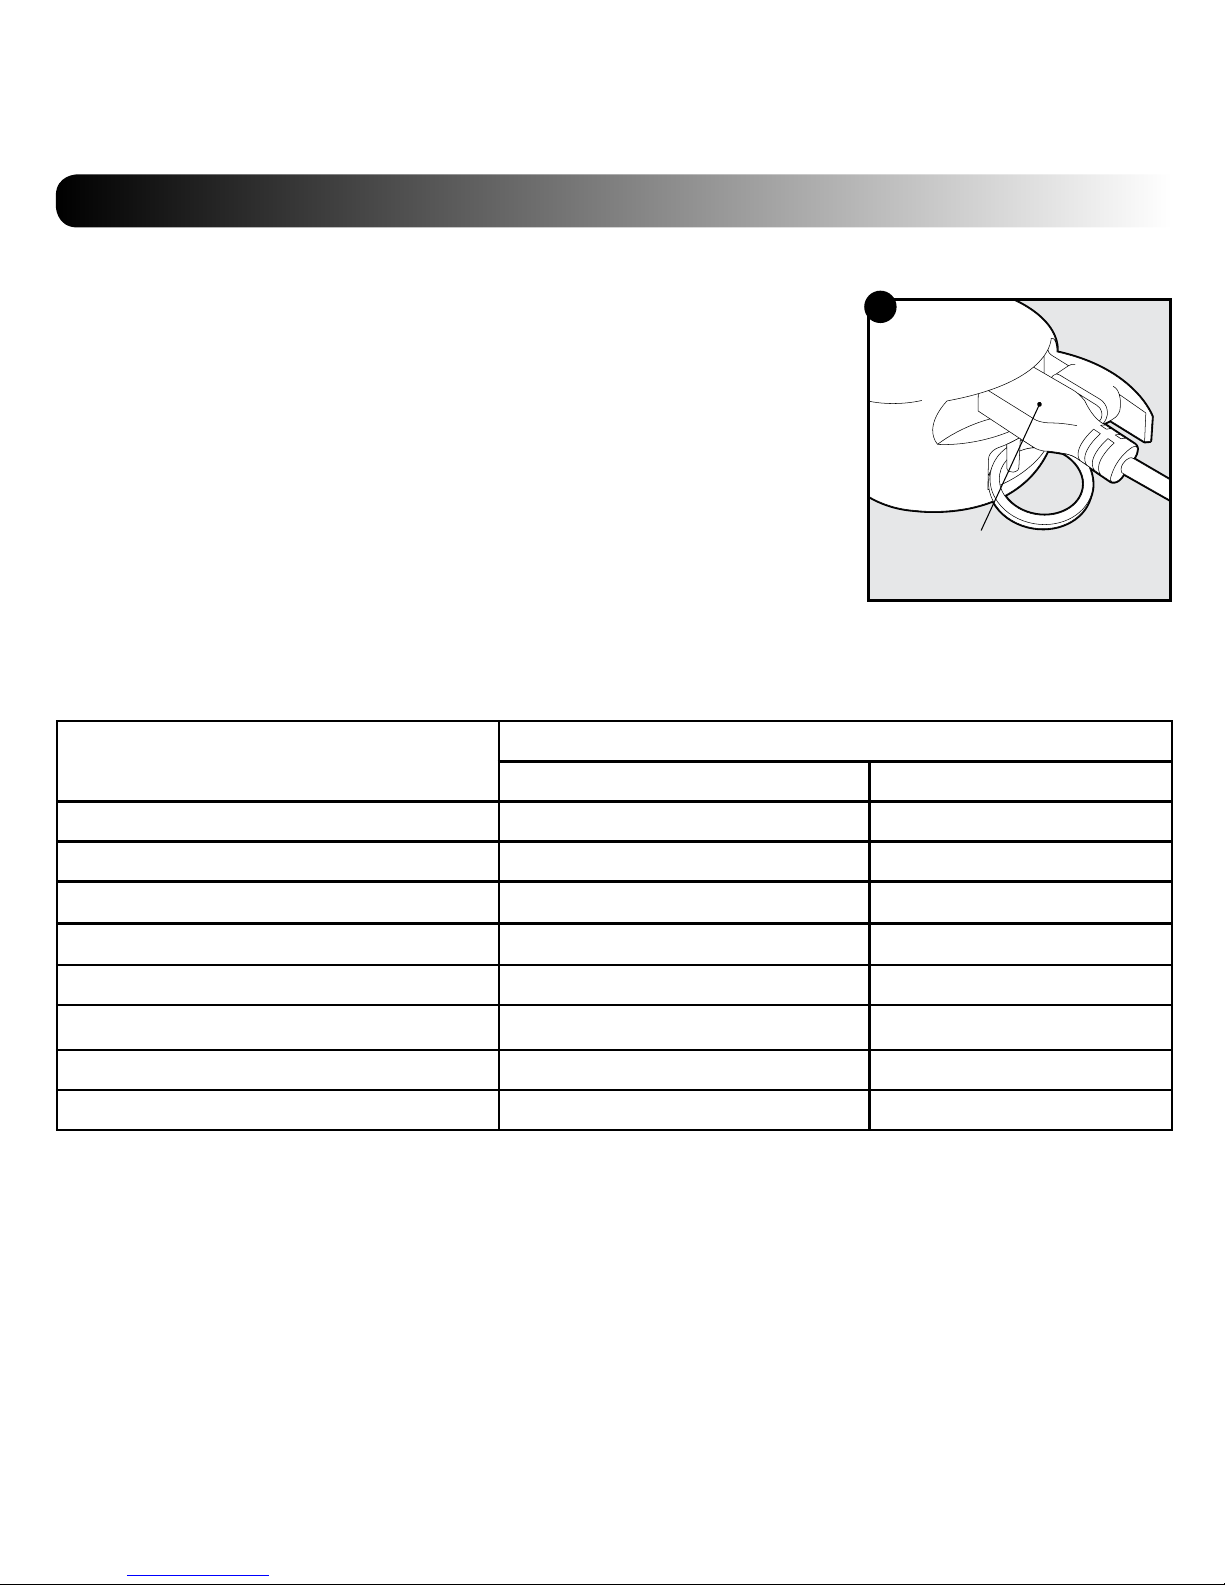
Charge the Handheld Remote
1. Lift the rubber cover protecting the Handheld Remote Charging Jack.
2. Connect one of the charger connectors to the Handheld Remote
Charging Jack (1A).
3. Plug the charger into a standard wall outlet. The red light will appear.
4. Charge the Handheld Remote for 24 hours for the first charge.
Recharges take only 12 hours. Note: The Indicator Light is solid green
after 12 hours of charging. For the first charge, continue to charge the
Handheld Remote for an additional 12 hours.
5. When charging is completed, replace the rubber cover.
Note: Approximate battery life between charges is 40 to 60 hours,
depending on frequency of use.
Handheld Remote Indicators
Condition
Dual Color LED
RED LED GREEN LED
Normal Operation OFF OFF
Normal Operation - Low Battery
Flashes three times every 5 secs.
OFF
Tone A/Tone B OFF ON length of button press
Static Stimulation ON length of button press OFF
Charging ON OFF
Charging Complete OFF ON
Program Mode - Mode Button Held OFF ON length of button press
Program Mode - Mode Button Released
OFF Flashes mode number
Charger connector placed
in the Handheld Remote
Charging Jack
1A
8 Customer Care Center 1-800-732-2677
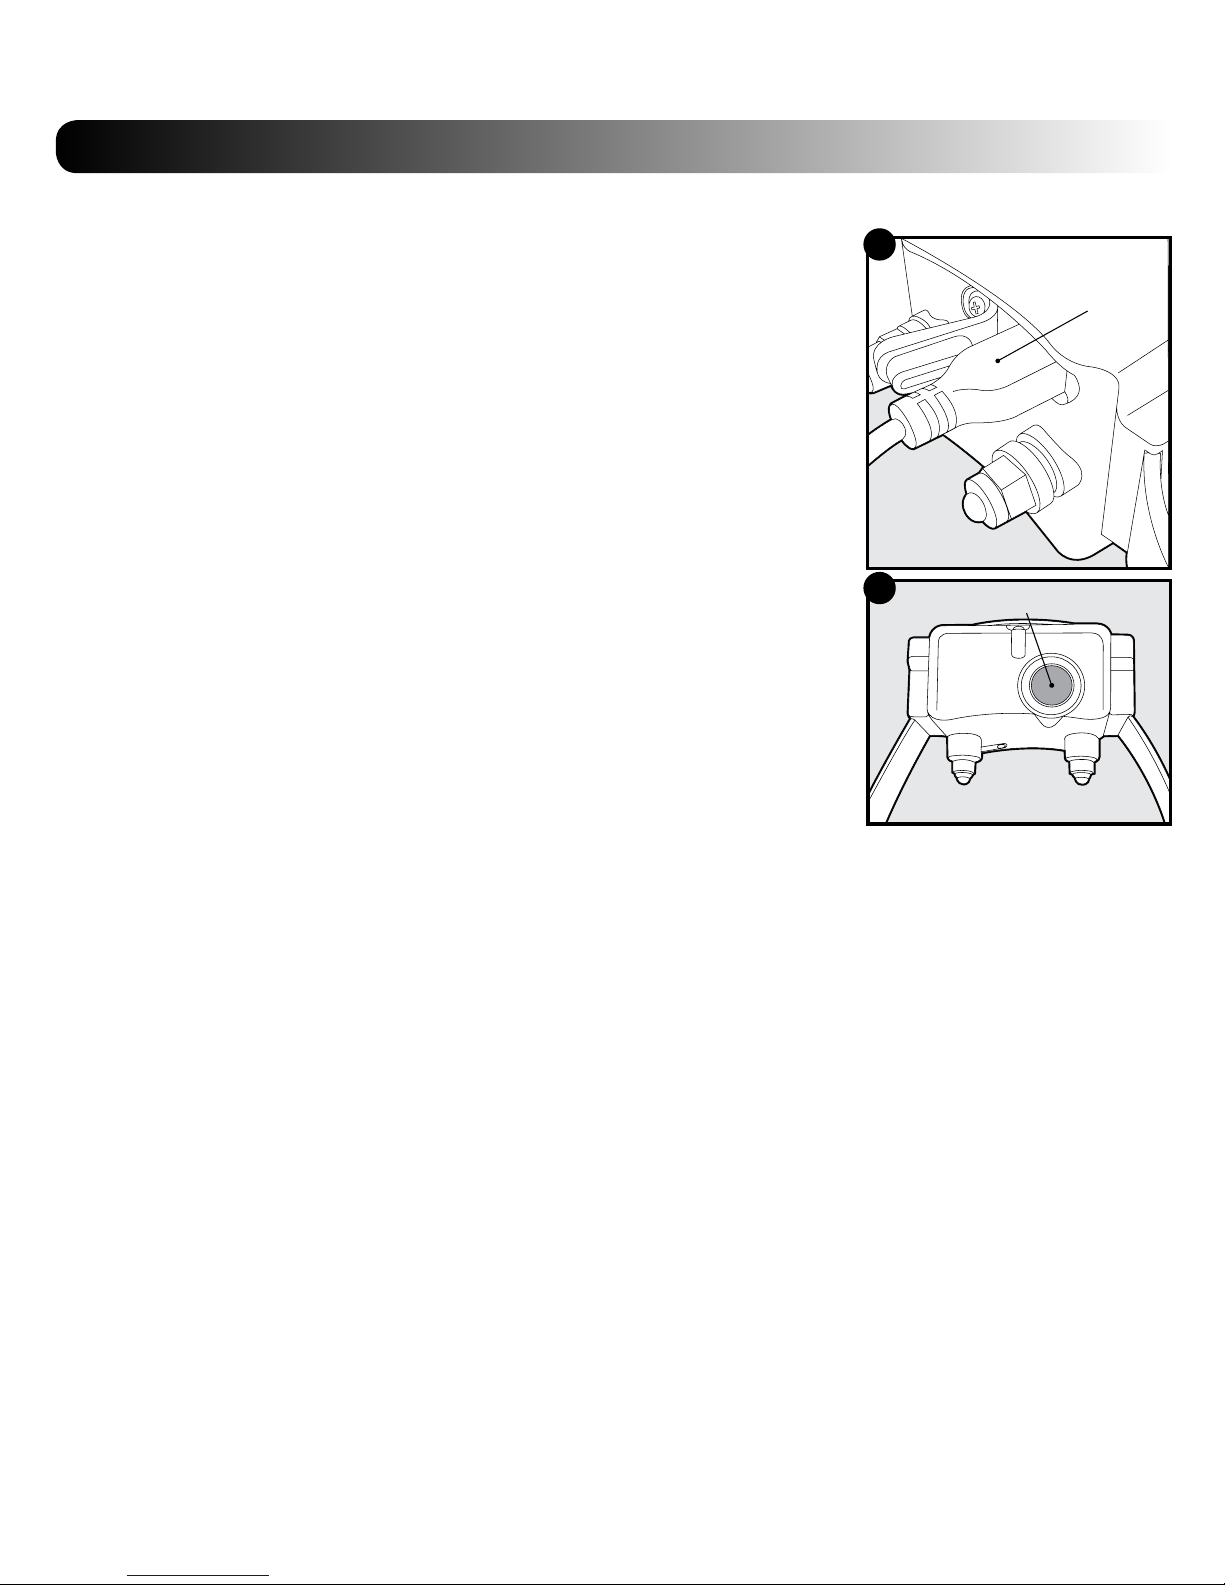
STEP 2
Prepare the Receiver Collar
Charge the Receiver Collar
1. Lift the rubber cover protecting the Receiver Collar Charging Jack.
2. Connect one of the charger connectors to the Receiver Collar
Charging Jack (2A).
3. Plug the charger into a standard wall outlet. The red light will appear.
4. Charge the Receiver Collar for 24 hours for the first charge.
Recharges take only 12 hours. Note: The Receiver Indicator Light is
solid green after 12 hours of charging. For the first charge, continue to
charge the Receiver Collar for an additional 12 hours.
5. When charging is completed, replace the rubber cover.
To Turn the Receiver Collar On
1. Press and hold the On/Off Button (2B) until the Receiver Indicator
Light comes on solid green and the Receiver Collar beeps low to high.
2. Release the On/Off Button.
The Receiver Indicator Light will flash green once every 5 seconds. The
flashing light indicates the Receiver Collar is on and ready to receive a
radio signal from the Handheld Remote.
To Turn the Receiver Collar Off
1. Press and hold the On/Off Button until the Receiver Indicator Light
comes on solid red and the Receiver Collar beeps high to low.
2. Release the On/Off Button.
To extend the life between charging cycles, turn the Receiver Collar off when it is not in use.
Approximate battery life between charges is 15-20 hours, depending on frequency of use.
On/Off Button
2B
Charger connector placed
in Receiver Collar
Charging Jack
2A
 Loading...