

Petsafe PDT00-14016 Operating And Training Manual
™
Train ‘
operating and training guide
n
Praise
Model Number
PDT00-14016
PLEASE READ THIS ENTIRE GUIDE BEFORE BEGINNING
Important Safety Information
Explanation of Attention Words and Symbols used in this guide
This is the safety alert symbol. It is used to alert you to potential personal injury hazards.
Obey all safety messages that follow this symbol to avoid possible injury or death.
WARNING indicates a hazardous situation which, if not avoided, could
result in death or serious injury.
CAUTION, used with the safety alert symbol, indicates a hazardous
situation which, if not avoided, could result in minor or moderate injury.
CAUTION, used without the safety alert symbol, indicates a hazardous
situation which, if not avoided, could result in harm to your pet.
NOTICE is used to address safe use practices not related to personal injury.
Risk of explosion. Do not short circuit, mix old and new batteries, dispose
of in fire, or expose to water. When batteries are stored or disposed, they
must be protected from shorting. Dispose of used batteries properly.
Not for use with aggressive dogs. Do not use this Product if your dog is
aggressive, or if your dog is prone to aggressive behavior. Aggressive dogs
can cause severe injury and even death to their owner and others. If you are unsure whether
this product is appropriate for your dog, please consult your veterinarian or certified trainer.
Save these instructions for future reference. Read all instructions
before operating product.
:
For indoor use only.
:
For dry treats/kibble use only.
:
Do NOT use this Treat Dispenser with puppies or dogs with any physical disability.
:
Intended for use with dogs only.
:
Do NOT allow small children to play with, in or around the Treat Dispenser.
:
Before leaving for an extended time, always replace used batteries with new batteries to
insure continual operation.
:
Do NOT place any foreign object in the Treat Dispenser.
:
Treat Dispenser should always be leveled.
:
Do NOT disassemble the Treat Dispenser except for the Hopper.
:
Dispose of all packaging material properly. Some items may be packed in poly bags; these
bags could cause suffocation; keep away from children and pets.
:
Check operation frequently to be sure the Treat Dispenser is dispensing properly.
Base unit should NOT be submerged in water at any time, this may damage
electronic components.
2 Customer Care Center 1-800-732-2677

Thank you for choosing the PetSafe® brand. You and your pet deserve a companionship that
includes memorable moments and a shared understanding together. Our products and training
tools promote a lifestyle of protection, teaching, and love—essentials that influence memories
for a lifetime. If you have any questions about our products or training your pet, please visit our
website at www.petsafe.net or contact our Customer Care Center at 1-800-732-2677.
To get the most protection out of your warranty, please register your product within 30 days
at www.petsafe.net. By registering and keeping your receipt, you will enjoy the product’s
full warranty and should you ever need to call the Customer Care Center, we will be able to
help you faster. Most importantly, PetSafe
anyone. Complete warranty information is available online at www.petsafe.net.
®
will never give or sell your valuable information to
Table of Contents
Components .....................................................................................................................4
Other Items You May Need .............................................................................................. 4
How the System Works .................................................................................................... 4
Features ............................................................................................................................ 4
Key Definitions .................................................................................................................5
Operating Guide ............................................................................................................. 6
Prepare the Handheld Remote ..................................................................................... 6
Prepare the Treat Dispenser ......................................................................................... 6
To Pair the Handheld Remote and Treat Dispenser .....................................................8
Training Guide ................................................................................................................. 9
General Tips .................................................................................................................9
Nutritionally Balanced Diet for Your Dog ...................................................................... 9
Successful Training ....................................................................................................... 9
Teaching Your Pet the Audible Tone ........................................................................... 10
Teaching Your Dog to Focus on You .......................................................................... 10
Teaching Basic Obedience ......................................................................................... 10
Eliminating Unwanted Behavior.................................................................................. 11
Frequently Asked Questions ....................................................................................... 12
Troubleshooting ............................................................................................................ 13
Care and Cleaning .......................................................................................................... 13
Customer Care International .......................................................................................... 13
Terms of Use and Limitation of Liability .........................................................................13
Battery Disposal ............................................................................................................. 14
Perchlorate Battery ......................................................................................................... 14
FCC ................................................................................................................................ 14
Warranty .........................................................................................................................15
Optional Treat Dispenser Wall Mounting ........................................................................ 16
Mounting Template ......................................................................................................... 19
www.petsafe.net 3
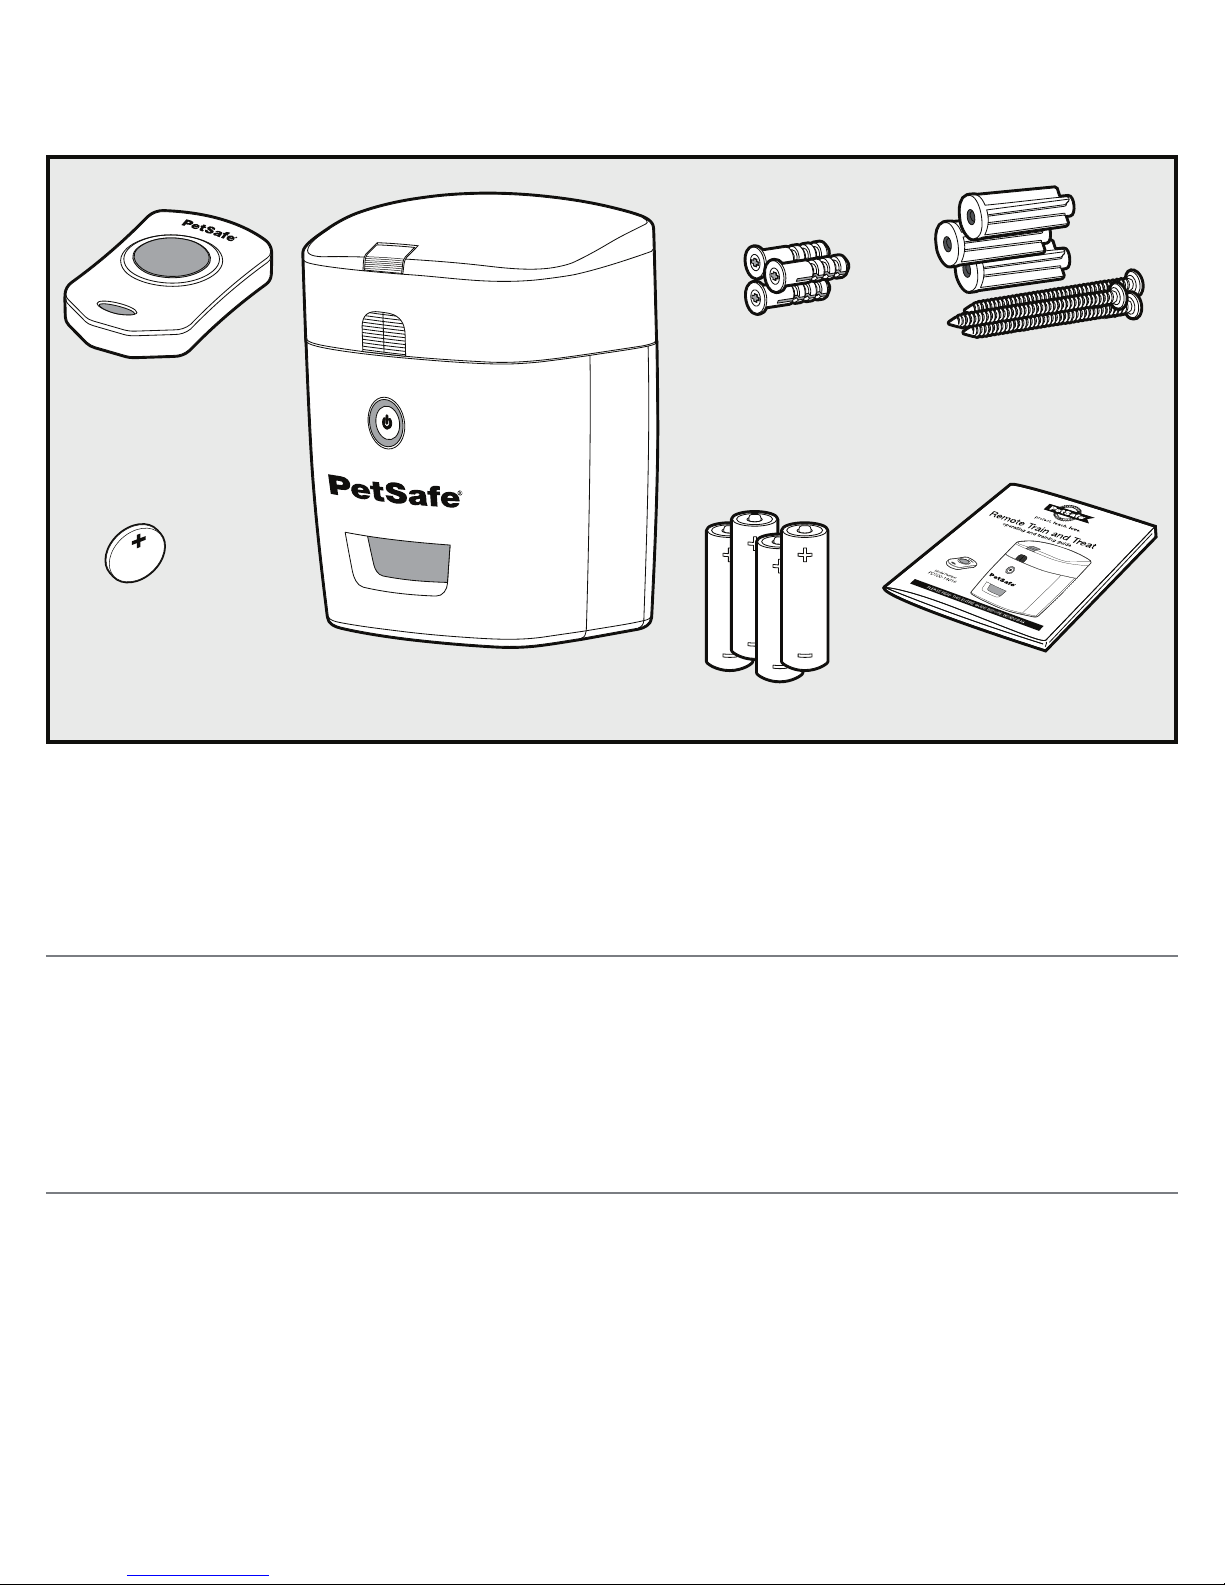
Components
Handheld
Remote
3-volt
Lithium
Battery
(CR2032)
Treat Dispenser
Other Items You May Need
:
Dry treats or kibble 1/2" or smaller
:
Small flat head screwdriver or equivalent
:
Collar and leash (optional) for training
:
Phillips screwdriver
3 Wall
Anchors
4 AA Batteries
3 Wall
Mounting Screws
and Standoffs
Operating and
Training Guide
How the System Works
The PetSafe® Train 'n Praise™ is a reward system that uses a Handheld Remote and Treat Dispenser
to positively reinforce good behavior at home. The PetSafe® Train 'n Praise™ remotely dispenses dry
treats/kibble at the push of a button. It can be used with or without an audible tone for additional
training. The Train 'n Praise
jumping on guests, or to teach other basic obedience commands.
™
can be highly effective in stopping problem behaviors such as begging,
Features
:
Treat Dispenser can be wall mounted or free standing and includes a low battery indicator
:
Treat Dispenser can be used with or without an audible tone for additional training and
holds dry treats/kibble up to 1/2" in size
:
Handheld Remote activates the Treat Dispenser up to 25 feet away
:
AC adapter compatible
4 Customer Care Center 1-800-732-2677

Key Definitions
Handheld Remote: Transmits signal to the Treat Dispenser
to release treats/kibble.
Dispense Button: Activates the Treat Dispenser with or
without an audible tone.
Battery Slot: Opens the Handheld Remote to add/change
the battery.
Clip Opening: Attaches to a key chain, wrist strap, lanyard,
etc. (not included).
Treat Dispenser: Delivers dry treats/kibble
and tone (optional) on a signal from the
Handheld Remote.
Treat/Kibble Size Indicators: Appropriately
Treat/Kibble
Size Indicators
size the treats/kibble before adding to the
Treat Dispenser Hopper (1/2" or smaller).
Hopper Lid: Encloses dry treats/kibble in the
Treat Dispenser.
Hopper: Holds dry treats/kibble in the Treat
Dispenser.
On/Off Button
Hopper Button: Opens Hopper for cleaning.
On/Off Button: Momentarily pressing and
Three Color LED
holding this button turns the Treat Dispenser on
and off.
Dispense
Button
Clip
Opening
Battery
Slot
Hopper Lid
Hopper
Hopper
Button
Three Color Treat Dispenser LED: Indicates
when the Treat Dispenser has been turned
on or off; when the treats are dispensed and
Treat
Compartment
also serves as a battery status indicator.
Treat Compartment: Delivers dry treats/
kibble to your dog.
Battery Compartment/Door: Remove to
add/change the batteries (4-AA).
Tone Switch: Turns the audible tone on
Battery
Compartment/Door
Mounting
Keyholes
and off.
Mounting Keyholes: Attaches to wall
mounting screws (optional).
AC Adapter Input: Option for use without
Tone Switch
AC
Adapter
Input
Adapter
not included
batteries, requires AC Adapter (not included).
www.petsafe.net 5
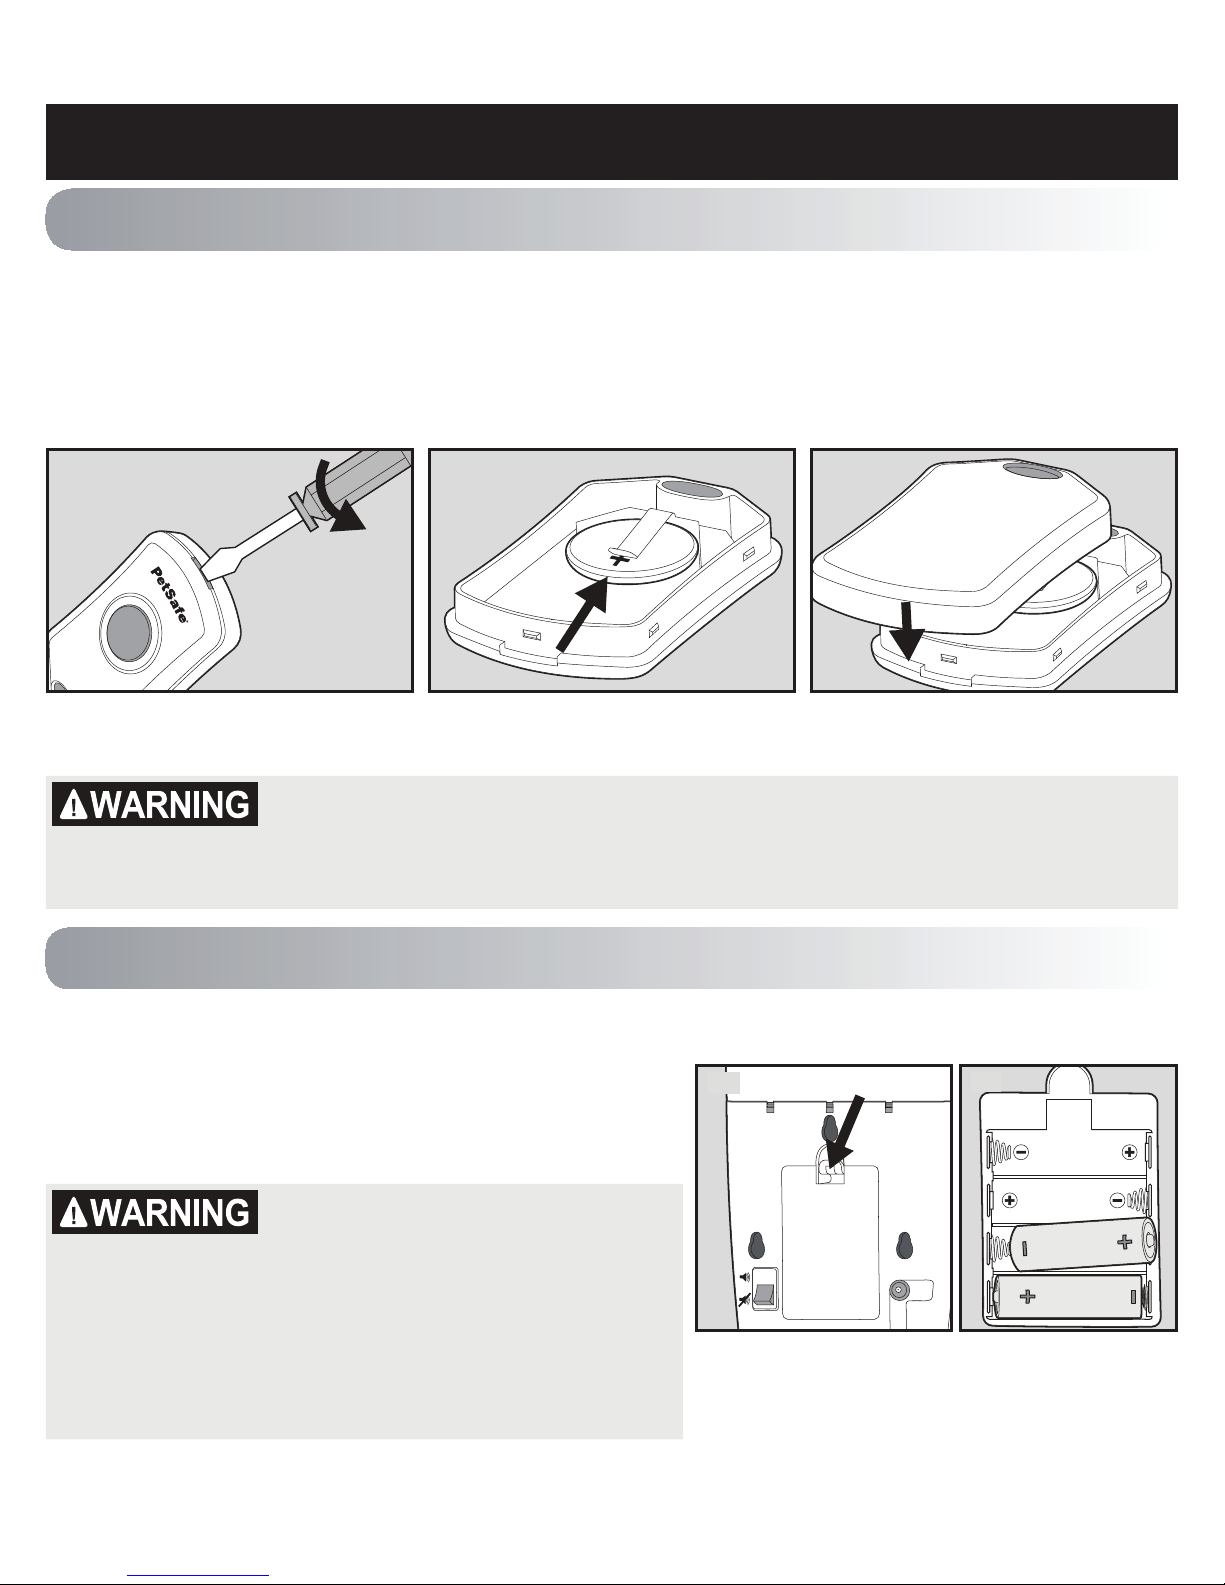
Operating Guide
Step 1
Prepare the Handheld Remote
1. Using a small flathead screwdriver (or equivalent), place into the slot on the bottom and
turn until the top and bottom release (1A).
2. Install one (1), 3-volt (CR2032) battery under the clip, positive (+) side up (1B).
3. Firmly press the top and bottom back together (1C).
1C1A 1B
Replacement batteries (3-volt, CR2032) can be found at many retailers. Contact the
Customer Care Center or visit our website at www.petsafe.net for a list of common retailers.
Risk of explosion if batteries are replaced by an incorrect type. Do not
short circuit, mix old and new batteries, dispose of in fire, or expose to
water. When batteries are stored or disposed, they must be protected
from shorting. Dispose of used batteries properly.
Step 2
Prepare the Treat Dispenser
1. Remove the battery compartment door (2A).
2. Install four (4) AA batteries into the battery
compartment on the back of the Treat Dispenser (2B).
3. Replace the battery compartment door.
Risk of explosion if batteries are
replaced by an incorrect type. Do
not short circuit, mix old and new
batteries, dispose of in fire, or
expose to water. When batteries
are stored or disposed, they
must be protected from shorting.
Dispose of used batteries properly.
2A 2B
6 Customer Care Center 1-800-732-2677
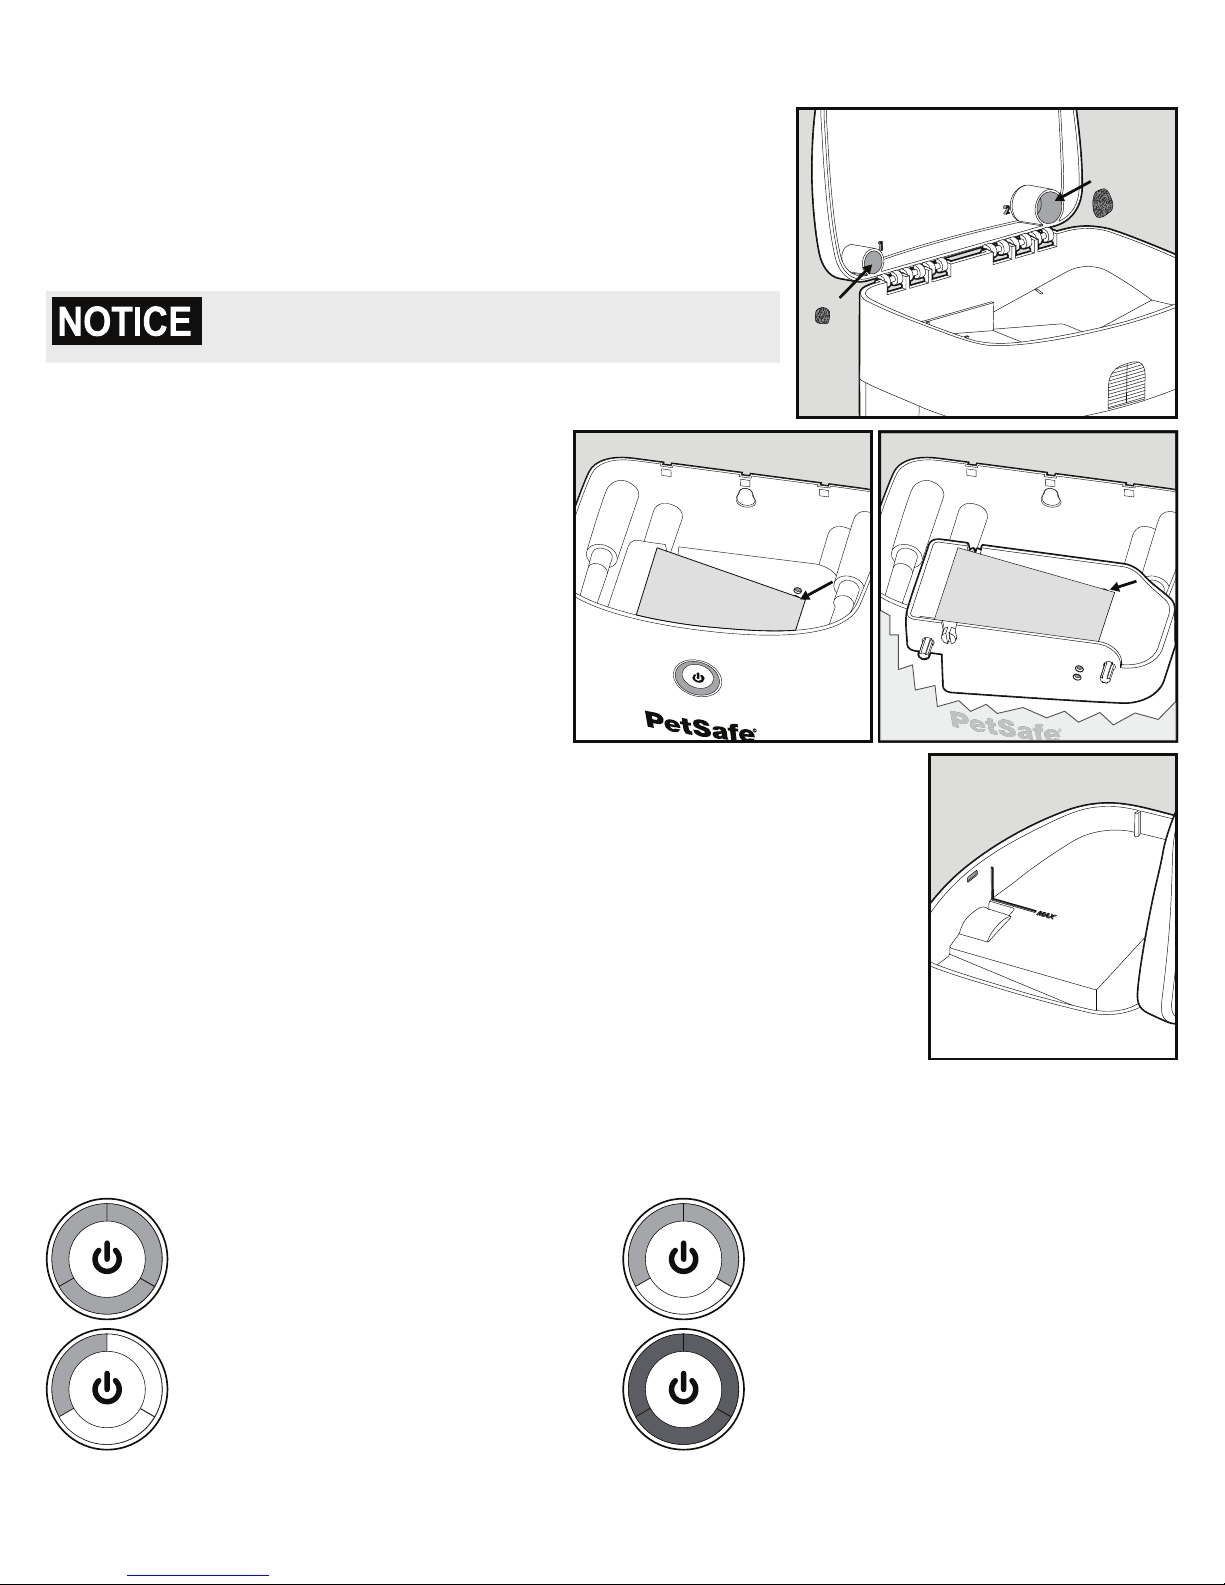
4. Open the Hopper lid on the Treat Dispenser to size the
treats/kibble before filling. This Treat Dispenser requires
dry treats or kibble that can fit through the dispenser.
Round or oval kibble of uniform size and shape work
best, 1/2" size or smaller. The treat/kibble size indicator is
located inside the Hopper lid (2C).
3
"
/
For dry treats/kibble up to 1/2" size or
8
smaller only.
5. Remove the Hopper by pressing the Hopper button. Locate
the ramp in the treat compartment. Move the ramp to
correspond to the measured treat size. If
2D 2E
the kibble fits into the cup labeled 1, the
ramp needs to be in the lower position
(2D). In this position you should be able
to see the upper setting hole. If the
kibble is larger and fits into cup 2, then
the ramp must be snapped into the
upper position (2E). The ramp will be set
by default from the factory in the lower
position for #1 size treats.
6. Once the treat/kibble size and ramp
height have been determined, fill the Hopper to the fill line (2F) and
close the hopper lid.
7. Press and release the power button on front of the Dispenser to
turn the Dispenser on. The LED’s will light to indicate it is on and
will display the battery status (see Battery Status Indicator below).
8. The audible tone is on from the factory. Turn the tone switch off (on
back of Dispenser) if you prefer to train without it.
9. Press the button on the Handheld Remote to dispense the dry treats/kibble.
10. To turn the Treat Dispenser off, press and hold the power button.
The Red LED will appear until the Dispenser powers off.
2F
2C
1
"
/
2
Battery Status Indicator
When turning on the Treat Dispenser, the LED surrounding the on/off button will indicate the
battery status in the following manner:
70-100% Battery
3 Green LEDs appear for 3
seconds
10-40% Battery
1 Green LEDs appear for 3
seconds
www.petsafe.net 7
40-70% Battery
2 Green LEDs appear for 3
seconds
1-10% Battery
3 Red LEDs appear for 1 second
then flash for 2 seconds
 Loading...