

Petsafe PDT00-13882 Operating And Training Manual

Basic Remote Trainer
operating and training guide
PLEASE READ THIS ENTIRE GUIDE BEFORE BEGINNING
Model Number
PDT00-13882
Important Safety Information
Explanation of Attention Words and Symbols used in this guide
This is the safety alert symbol. It is used to alert you to potential personal injury hazards.
Obey all safety messages that follow this symbol to avoid possible injury or death.
WARNING indicates a hazardous situation which, if not avoided, could
result in death or serious injury.
CAUTION, used with the safety alert symbol, indicates a hazardous
situation which, if not avoided, could result in minor or moderate injury.
CAUTION, used without the safety alert symbol, indicates a hazardous
situation which, if not avoided, could result in harm to your pet.
Risk of explosion. Do not short circuit, mix old and new batteries, dispose of in fire,
from shorting. Dispose of used batteries properly.
cause severe injury and even death to their owner and others. If you are unsure whether this product is
appropriate for your dog, please consult your veterinarian or certified trainer.
long enough for him to attempt to chase an object, but short enough for him not to reach a road or other
unsafe area. You must also be physically strong enough to restrain your dog when he tries to chase.
may cause skin damage. Ranging from redness to pressure ulcers; this condition is commonly known
as bed sores.
:
Avoid leaving the collar on the dog for more than 12 hours per day.
:
When possible reposition the collar on the pet’s neck every 1 to 2 hours.
:
Check the fit to prevent excessive pressure; follow the instructions in this manual.
:
Never connect a lead to the electronic collar; it will cause excessive pressure on the contacts.
:
When using a separate collar for a lead, don’t put pressure on the electronic collar.
:
Wash the dog’s neck area and the contacts of the collar weekly with a damp cloth.
:
Examine the contact area daily for signs of a rash or a sore.
:
If a rash or sore is found, discontinue use of the collar until the skin has healed.
2 Customer Care Center 1-800-732-2677
or expose to water. When batteries are stored or disposed, they must be protected
Not for use with aggressive dogs. Do not use this Product if your dog is
aggressive, or if your dog is prone to aggressive behavior. Aggressive dogs can
Safety during on-leash training. It is vitally important that you and your dog remain
safe while learning during on-leash training. Your dog should be on a strong leash,
Risk of skin damage. Please read and follow the instructions in this manual. Proper fit
of the collar is important. A collar worn for too long or made too tight on the pet’s neck

:
If the condition persists beyond 48 hours, see your veterinarian.
:
For additional information on bed sores and pressure necrosis, please visit our website.
These steps will help keep your pet comfortable and safe. Millions of pets are comfortable while they
wear stainless steel contacts. Some pets are sensitive to contact pressure. You may find after some
time that your pet is very tolerant of the collar. If so, you may relax some of these precautions. It is
important to continue daily checks of the contact area. If redness or sores are found, discontinue use
until the skin has fully healed.
®
PetSafe
Remote Trainers must be used only on healthy dogs. We recommend that you take your dog
to a veterinarian before using the collar if he is not in good health.
www.petsafe.net 3

Thank you for choosing the PetSafe® brand. You and your pet deserve a companionship that includes
memorable moments and a shared understanding together. Our products and training tools promote a
lifestyle of protection, teaching, and love—essentials that influence memories for a lifetime. If you have
any questions about our products or training your pet, please visit our website at www.petsafe.net or
contact our Customer Care Center at 1-800-732-2677.
To get the most protection out of your warranty, please register your product within 30 days at
www.petsafe.net. By registering and keeping your receipt, you will enjoy the product’s full warranty
and should you ever need to call the Customer Care Center, we will be able to help you faster. Most
importantly, PetSafe
information is available online at www.petsafe.net.
®
will never give or sell your valuable information to anyone. Complete warranty
Table of Contents
Components .............................................................................................................................................. 5
Other Items You May Need ....................................................................................................................... 5
How the System Works ............................................................................................................................. 5
Features ..................................................................................................................................................... 6
Key Definitions .......................................................................................................................................... 6
Operating Guide ................................................................................................................................... 7
Prepare the Handheld Remote .............................................................................................................. 7
Prepare the Receiver Collar................................................................................................................... 8
Fit the Receiver Collar ........................................................................................................................... 9
To Pair the Receiver Collar and the Handheld Remote ...................................................................... 10
Training Guide ..................................................................................................................................... 11
General Tips ........................................................................................................................................ 11
Teaching Your Pet Tone A (Low Tone) ................................................................................................. 11
Using Tone B (High Tone) .................................................................................................................... 11
Find the Best Stimulation Level for Your Pet ....................................................................................... 12
Teaching Basic Obedience .................................................................................................................. 13
Eliminating Unwanted Behavior .......................................................................................................... 15
Frequently Asked Questions .......................................................................................................... 17
Troubleshooting ................................................................................................................................. 18
Test Light Instructions ............................................................................................................................. 18
Customer Care International ................................................................................................................... 19
Terms of Use and Limitation of Liability .................................................................................................. 19
Battery Disposal ...................................................................................................................................... 20
Perchlorate Battery .................................................................................................................................. 20
Compliance ............................................................................................................................................. 20
Warranty .................................................................................................................................................. 21
4 Customer Care Center 1-800-732-2677
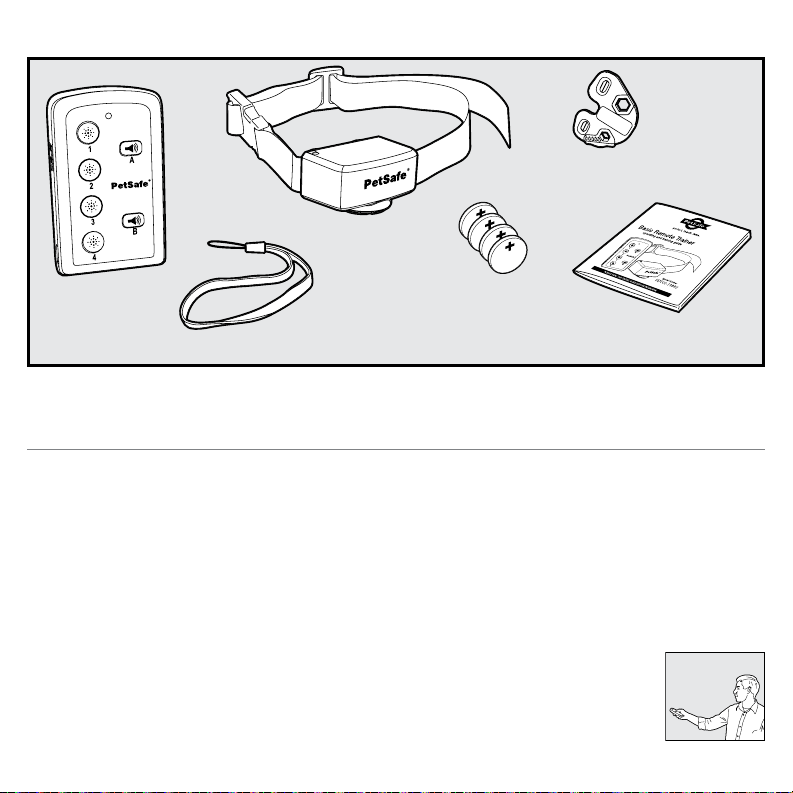
Components
Test Light
Tool
Receiver Collar
Handheld
Remote
Wrist Strap
3-volt
Lithium
Batteries
(CR2032)
Operating and
Training Guide
Other Items You May Need
:
Scissors
:
Lighter
:
Non-metallic collar
and long leash
How the System Works
Now you can experience the difference a Remote Trainer can make. Spend less time training and more time
enjoying your dog. The PetSafe
The Remote Trainer assists you in controlling your pet without a leash in a range of up to 75 yards. At the push
of a button, your Handheld Remote sends a signal activating your dog’s Receiver Collar. He receives a safe
but annoying stimulation. He’ll quickly learn the association between his behavior and your correction; in no
time, you’ll have a better-behaved pet. The PetSafe
and effective for both small and large dog breeds.
Using the Remote Trainer consistently and correctly, any basic obedience commands can
be taught and many misbehaviors that your pet exhibits can be corrected.
Important: The Basic Remote Trainer has a range of up to 75 yards. Hold the Handheld
Remote in a horizontal position away from your body to achieve optimum range.
Terrain, weather, vegetation, transmission from other radio devices, and other factors
will affect the maximum range.
www.petsafe.net 5
®
Basic Remote Trainer is comfortable for your pet and easy to use.
®
Basic Remote Trainer has been proven safe, comfortable,
Features
:
75 yard range
:
12 levels of static stimulation (4 low,
4 medium, and 4 high)
:
Two tone buttons
:
Water-resistant Handheld Remote
and Receiver Collar
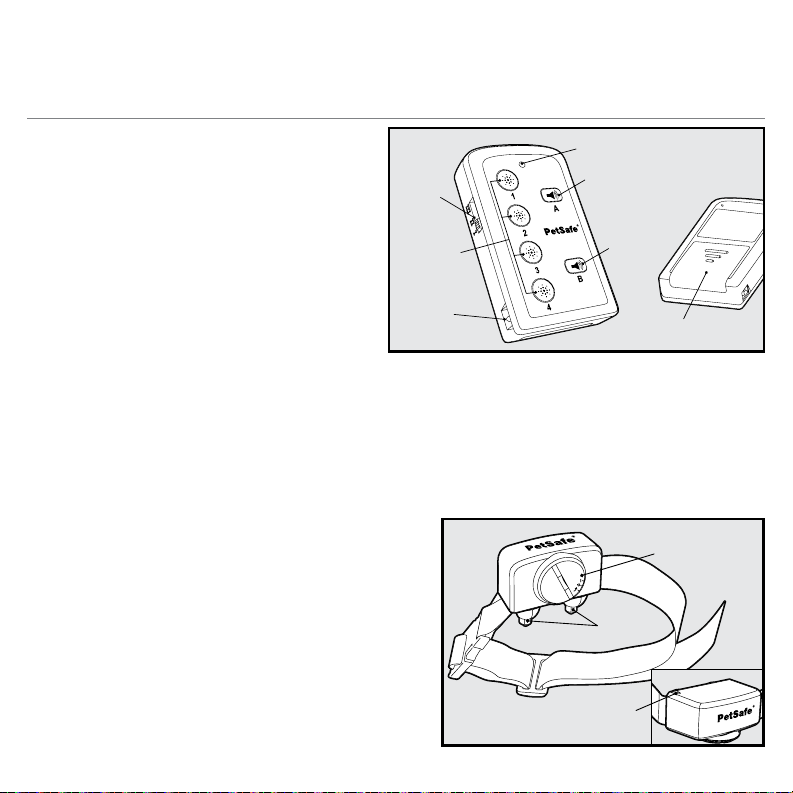
Key Definitions
Handheld Remote: Transmits the signal to the
Receiver Collar.
Stimulation Range Switch: Adjusts the
Stimulation
Range
Switch
LED Indicator Light
Tone A
Button
stimulation range to I-low, II-medium, or III-high.
Stimulation Level Buttons (4 Yellow): Delivers
stimulation through the Contact Points on the
Stimulation
Level
Buttons
Tone B
Button
Receiver Collar.
Tone A (Low Tone) Button: Sends an audible
tone A to the collar. No stimulation is delivered.
Tone B (High Tone) Button: Sends an audible
Wrist
Strap
Loop
Battery Cover
tone B to the collar. No stimulation is delivered.
Note: When a stimulation or tone button is held for 10 seconds or more, the Handheld Remote will
“time-out.” The button will need to be released for 5 seconds and pressed again before additional
stimulation or tone can be delivered.
Remote LED Indicator Light: Indicates tone or stimulation is being transmitted. Also indicates pairing
mode. See Prepare the Handheld Remote section for more details.
Battery Cover: Encloses batteries.
Wrist Strap Loop: Where Wrist Strap attaches for easier carrying.
Receiver Collar: Delivers stimulation or tone on a
signal from the Handheld Remote.
ON/OFF
Battery Module
Contact Points: Deliver stimulation to your pet from the
Handheld Remote.
Receiver LED Indicator Light: Indicates that a
stimulation or tone button is pressed and also serves
as a low-battery indicator. Also indicates when pairing
Contact
Points
mode is complete.
On/Off Battery Module: Turns the Receiver Collar on
and off and houses batteries. See Prepare the Receiver
Collar section for more details.
Receiver
LED Indicator
Light
6 Customer Care Center 1-800-732-2677
Operating Guide
Step 1
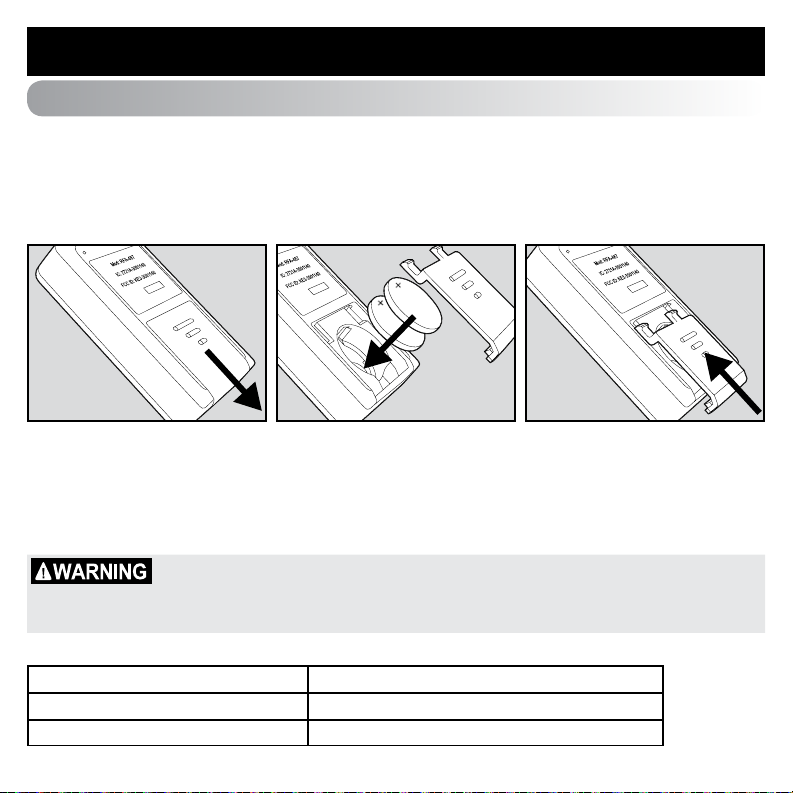
Prepare the Handheld Remote
To Insert and Remove the Batteries
1. Slide off the battery cover (1A).
2. Install two (2), 3-volt (CR2032) batteries positive (+) side up (1B).
3. Slide the battery cover back in place (1C).
1C1A 1B
To verify the batteries are inserted correctly
1. Press any button on the Handheld Remote.
2. The Remote LED should flash to indicate a button has been pressed.
3. If the Remote LED doesn’t flash, you may have inserted the batteries backwards. Try taking them out
and turning them over, ensuring that the (+) side is up.
4. If the
Remote LED
Handheld Remote LED - Function and Response
Handheld Remote Function LED Response
Any button pressed On for length of button press
Low battery condition LED flashes 3 times every 5 seconds
www.petsafe.net 7
still does not flash, contact the Customer Care Center.
Risk of explosion if batteries are replaced by an incorrect type. Do not short circuit,
mix old and new batteries, dispose of in fire, or expose to water. When batteries are
stored or disposed, they must be protected from shorting. Dispose of used batteries
properly.
Note: When a stimulation or tone button is held for 10 seconds or more, the Handheld Remote will
“time-out.” The button will need to be released for 5 seconds and pressed again before additional
stimulation or tone can be delivered.
Note: The Handheld Remote goes into sleep mode after 30 seconds with no buttons pressed. Pressing any
button while in sleep mode wakes the Handheld Remote up without sending a tone or stimulation.
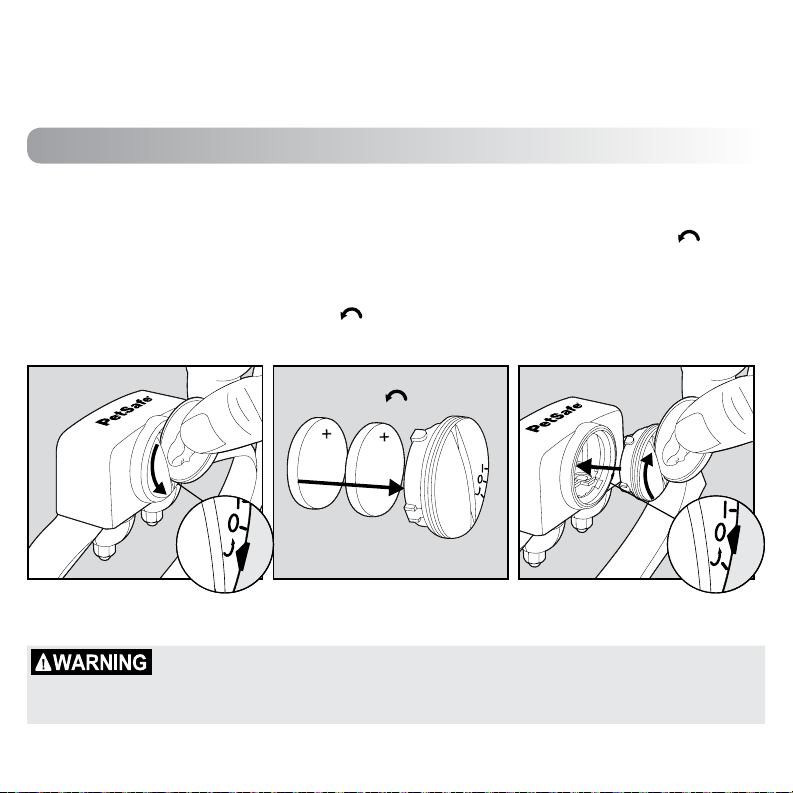
Step 2
Prepare the Receiver Collar
To Insert and Remove the Batteries
1. Using the Test Light Tool or a coin, turn the battery module counter-clockwise until the symbol
aligns with the triangle symbol on the Receiver Collar (2A).
2. Remove the battery module.
3. Install two (2), 3-volt batteries positive (+) side up into the battery module (2B).
4. Replace the battery module, aligning the symbol with the triangle symbol on the Receiver Collar.
Lock the battery module in place by turning it clockwise with the Test Light Tool or a coin until the off
( O ) symbol aligns with the triangle symbol on the Receiver Collar (2C).
2C2A 2B
Replacement batteries (3-volt, CR2032) can be found at many retailers. Contact the Customer Care
Center or visit our website at www.petsafe.net for a list of common retailers.
Risk of explosion if batteries are replaced by an incorrect type. Do not short circuit,
mix old and new batteries, dispose of in fire, or expose to water. When batteries are
stored or disposed, they must be protected from shorting. Dispose of used batteries
properly.
8 Customer Care Center 1-800-732-2677
 Loading...