

Petsafe PDT00-12470 Operating And Training Manual
PetSafe
®
Yard and Park Trainer
Operating and Training Guide
Please read this entire guide before beginning.
PDT00-12470
7
8
6
1
5
4
2
3
Important Safety Information
Explanation of Attention Words and Symbols used in this guide
This is the safety alert symbol. It is used to alert you to potential personal injury hazards.
Obey all safety messages that follow this symbol to avoid possible injury or death.
WARNING
CAUTION
CAUTION
WARNING
can cause severe injury and even death to their owner and others. If you are unsure whether this
product is appropriate for your dog, please consult your veterinarian or certified trainer.
CAUTION
the pet’s neck may cause skin damage. Ranging from redness to pressure ulcers; this condition
is commonly known as bed sores.
Avoid leaving the collar on the dog for more than 12 hours per day.•
When possible reposition the collar on the pet’s neck every 1 to 2 hours.•
Check the fit to prevent excessive pressure; follow the instructions in this manual.•
Never connect a lead to the electronic collar; it will cause excessive pressure on the contacts.•
When using a separate collar for a lead, don’t put pressure on the electronic collar.•
Wash the dog’s neck area and the contacts of the collar weekly with a damp cloth.•
Examine the contact area daily for signs of a rash or a sore.•
If a rash or sore is found, discontinue use of the collar until the skin has healed.•
If the condition persists beyond 48 hours, see your veterinarian.•
For additional information on bed sores and pressure necrosis, please visit our website.•
These steps will help keep your pet safe and comfortable. Millions of pets are comfortable while
they wear stainless steel contacts. Some pets are sensitive to contact pressure. You may find
after some time that your pet is very tolerant of the collar. If so, you may relax some of these
precautions. It is important to continue daily checks of the contact area. If redness or sores are
found, discontinue use until the skin has fully healed.
WARNING indicates a hazardous situation which, if not avoided, could
result in death or serious injury.
CAUTION, used with the safety alert symbol, indicates a hazardous
situation which, if not avoided, could result in minor or moderate injury.
CAUTION, used without the safety alert symbol, indicates a hazardous
situation which, if not avoided, could result in harm to your pet.
Not for use with aggressive dogs. Do not use this Product if your dog is
aggressive, or if your dog is prone to aggressive behavior. Aggressive dogs
Risk of skin damage. Please read and follow the instructions in this manual.
Proper fit of the collar is important. A collar worn for too long or made too tight on
2 Customer Care Center 1-800-732-2677

Thank you for choosing PetSafe®, the best selling brand of electronic training
solutions in the world. Our mission is to be the most trusted brand in the pet
ownership experience. We want to ensure your pet’s safety by providing you
with the tools and techniques to successfully train your pet. If you have any
questions, please contact the Customer Care Center at 1-800-732-2677 or
visit our website at www.petsafe.net.
To get the most protection out of your warranty, please register your product
within 30 days at www.petsafe.net. By registering and keeping your receipt,
you will enjoy the product’s full warranty and should you ever need to call the
Customer Care Center, we will be able to help you faster. Most importantly,
PetSafe® will never give or sell your valuable information to anyone. Complete
warranty information is available online at www.petsafe.net.
Table of Contents
Components .............................................................................................. 4
How the System Works ............................................................................... 4
Key Defi nitions .......................................................................................... 4
Operating Guide ...................................................................................... 6
Prepare the Handheld Transmitter ........................................................... 6
Prepare the Receiver Collar ..................................................................... 7
Fit the Receiver Collar ............................................................................. 9
Program the Handheld Transmitter ........................................................10
Reset the Receiver Collar .......................................................................11
Program the Receiver Collar for Two or Three-Dog Operation .................11
Training Guide .......................................................................................12
General Tips ..........................................................................................12
Teaching Your Pet the Positive Tone .........................................................12
Using the Negative Tone .........................................................................12
Find the Best Stimulation Level for Your Pet ............................................13
Teaching Basic Obedience ......................................................................13
Eliminating Unwanted Behavior .............................................................15
Frequently Asked Questions ..................................................................18
Troubleshooting ......................................................................................19
Test Light Instructions ..............................................................................19
Terms of Use and Limitation of Liability ....................................................20
FCC .........................................................................................................20
Customer Care International .....................................................................21
Perchlorate Battery ....................................................................................21
www.petsafe.net 3
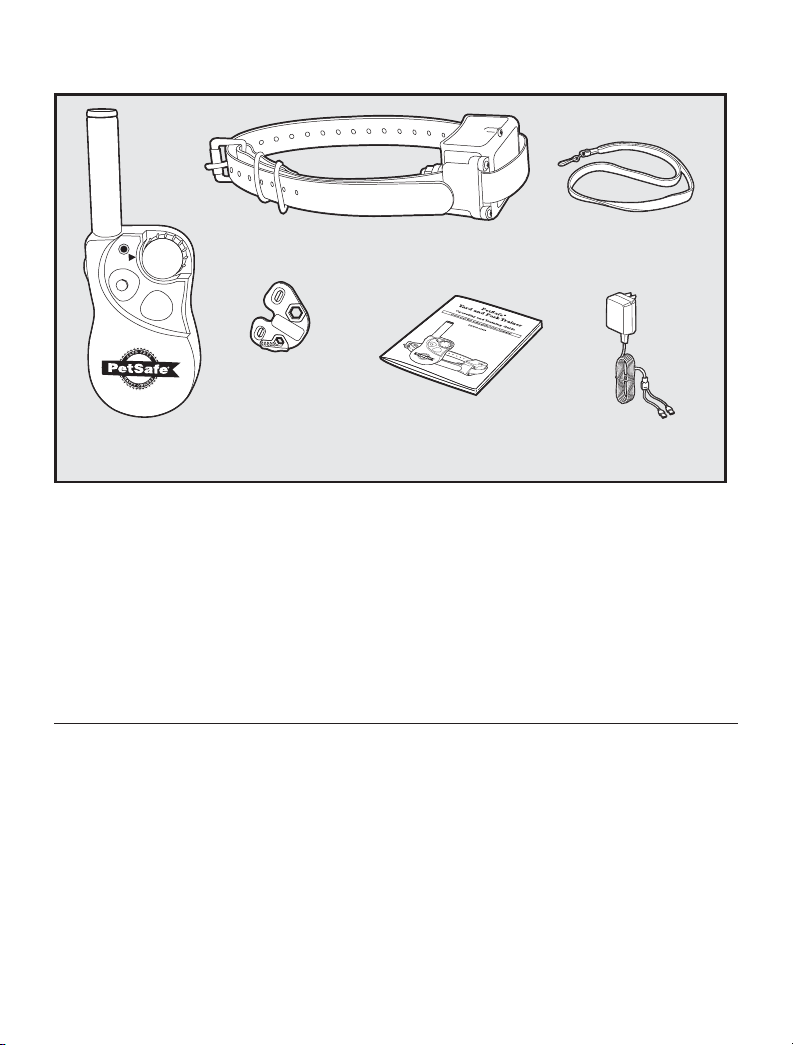
Components
7
6
8
5
1
4
2
3
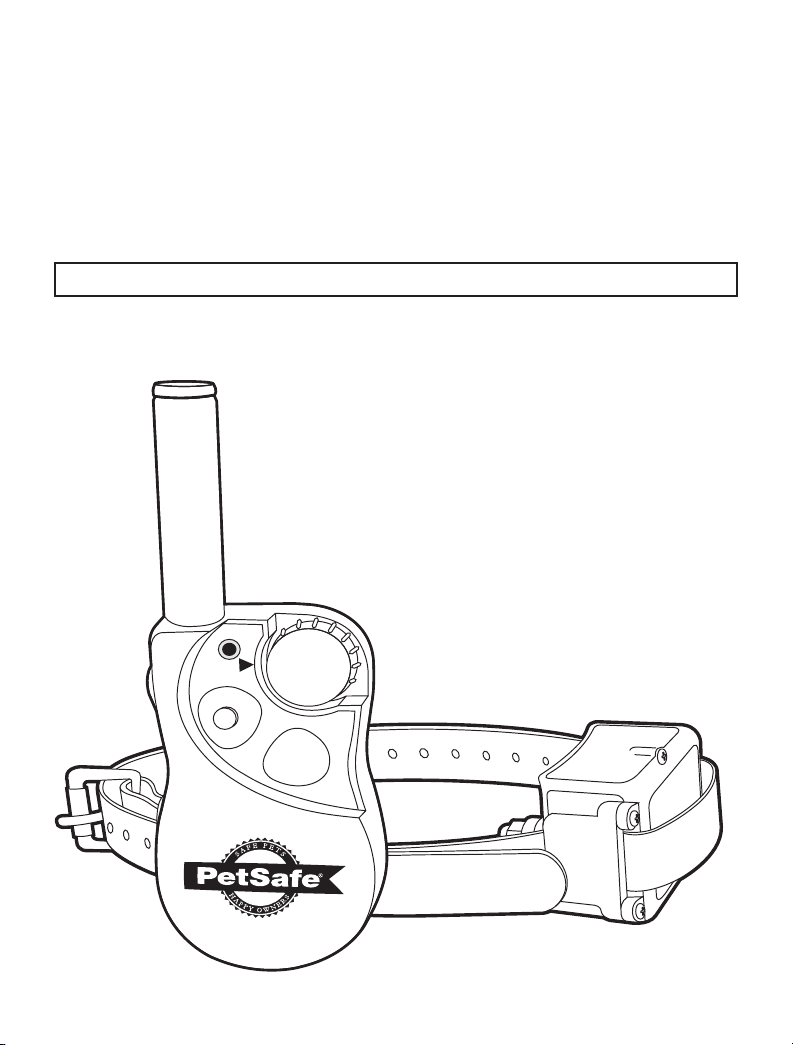
Receiver Collar
Lanyard
Test Light
Tool
Operating and
Operating and
Training Guide
Handheld
Transmitter
Training Guide
Charging Adapter
How the System Works
The PetSafe® Yard and Park Trainer has been proven safe, comfortable, and effective for all pets
greater than 8 lbs. and at least 6 months old. This system assists you in controlling your pet in a range
up to 400 yards. At the push of a button, the Handheld Transmitter sends a signal, activating the
Receiver Collar. Using the Remote Trainer consistently and correctly, many misbehaviors that your
pet exhibits can be corrected or any basic obedience commands can be taught.
Important: The Yard and Park Trainer has a range of up to 400 yards. Depending on the way
you hold the Handheld Transmitter, the maximum range may vary. For consistent results at
longer ranges, hold the Handheld Transmitter in a vertical position away from your body. Terrain,
weather, vegetation, transmission from other radio devices, and other factors will affect the
maximum range.
Key Definitions
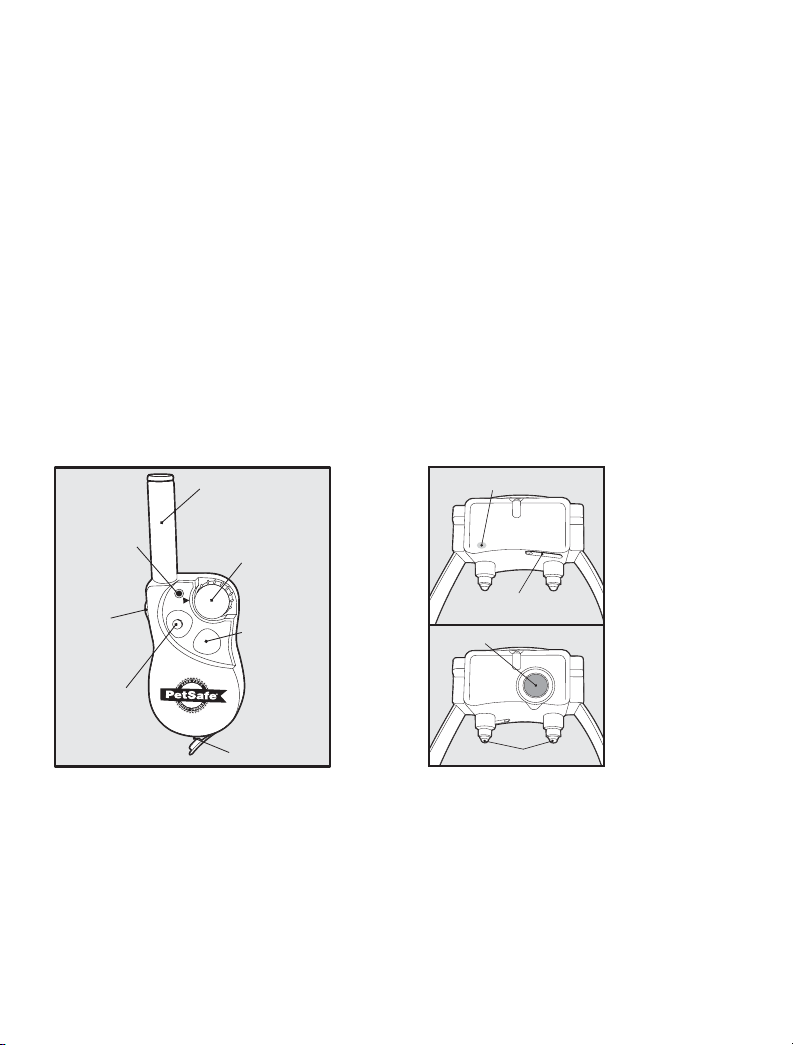
Handheld Transmitter: Transmits the radio signal to the Receiver Collar. It is waterproof.
Transmitter Indicator Light: Indicates that a button is pressed and also serves as a low-battery indicator.
Green LED: Indicates when the transmitter button is pressed for Positive or Negative Tone. Also shows
when charging is complete.
Red LED: Indicates low battery and when the stimulation button is pressed. Also shows when the
transmitter is being charged.
Intensity Dial: Provides multiple levels of Stimulation so you can match the correction to your
pet’s temperament.
Upper Button: This button is factory-set to deliver a Negative Tone only.
Lower Button: This button is factory-set to deliver Continuous Stimulation set by the Intensity Dial.
Side Button: This button is factory-set to deliver a Positive Tone only.
4 Customer Care Center 1-800-732-2677
Receiver Collar: Receives the radio signal from the Handheld Transmitter. It is waterproof.
On/Off Button: Momentarily pressing and holding this button turns the Receiver Collar on and off.
Contact Points: The contacts through which the Receiver Collar delivers Stimulation.
Receiver Indicator Light: Indicates when the Receiver Collar has been turned on or off and also
serves as a low-battery indicator.
Green LED: Good Tone and Negative Tone Indicator.
Red LED: Indicates when stimulation is being delivered and serves as the low battery indicator.
Charging Jacks: For connecting the charger. Although the Handheld Transmitter and Receiver
Collar are waterproof without the charger covers, keep the covers in place when not charging to
keep debris out of the openings.
Continuous Stimulation: You control when and how long Stimulation is delivered to your dog
through the Receiver Collar’s Contact Points. When a Continuous Stimulation button is pressed
for 8 seconds or more, the Handheld Transmitter will “time-out.” The button will need to be
released and pressed again before additional Stimulation can be delivered.
Negative Tone: Use a Negative Tone with a Stimulation to stop unwanted behaviors. Timing is
critical. The Negative Tone followed by the Stimulation should occur during or immediately after
the unwanted behavior. Once your dog associates the Negative Tone with the Stimulation, you will
only need to use the Negative Tone.
Positive Tone: Use the Positive Tone as a marker to reinforce positive behavior. Again, timing is
critical. Praise or treat the dog immediately following the Positive Tone.
Handheld Transmitter Receiver Collar
Receiver Indicator Light
Charging Jack
(with cover)
On/Off Button
Contact Points
Transmitter
Indicator
Light
Side Button
Upper Button
Transmitter Antenna
Intensity Dial
7
6
8
5
1
4
2
3
Lower Button
Charging Jack
(with cover)
www.petsafe.net 5
(Top)
(Bottom)
Step
1
Operating Guide
Prepare the Handheld Transmitter
Charge the Handheld Transmitter
Lift the rubber cover protecting the Handheld 1.
Transmitter Charging Jack.
Connect one of the charger connectors to the 2.
Handheld Transmitter Charging Jack (1A).
Plug the charger into a standard wall outlet. The 3.
red light will appear.
Charge the Handheld Transmitter for 24 hours for 4.
the fi rst charge. Recharges take only 12 hours.
Note: The Transmitter Indicator Light is solid green
after 12 hours of charging. For the fi rst charge, continue
to charge the Handheld Transmitter for an additional
12 hours.
When charging is completed, replace the 5.
rubber cover.
Note: Approximate battery life between charges is 40 to 60 hours, depending on frequency of use.
Transmitter Indicators
Condition
Normal Operation OFF OFF
Normal Operation - Low Battery Flashes three times every
Positive Tone/Negative Tone OFF
Correction
Program Mode - Button Held OFF
Program Mode - Button Released OFF Flashes mode number
Charging ON OFF
Charging Complete OFF ON
RED LED GREEN LED
5 secs.
ON length of Transmitter
button press
1A
Charger connector placed
in the Handheld Transmitter
Charging Jack
Dual Color LED
OFF
ON length of Transmitter
button press
OFF
ON length of button press
6 Customer Care Center 1-800-732-2677

Step
2
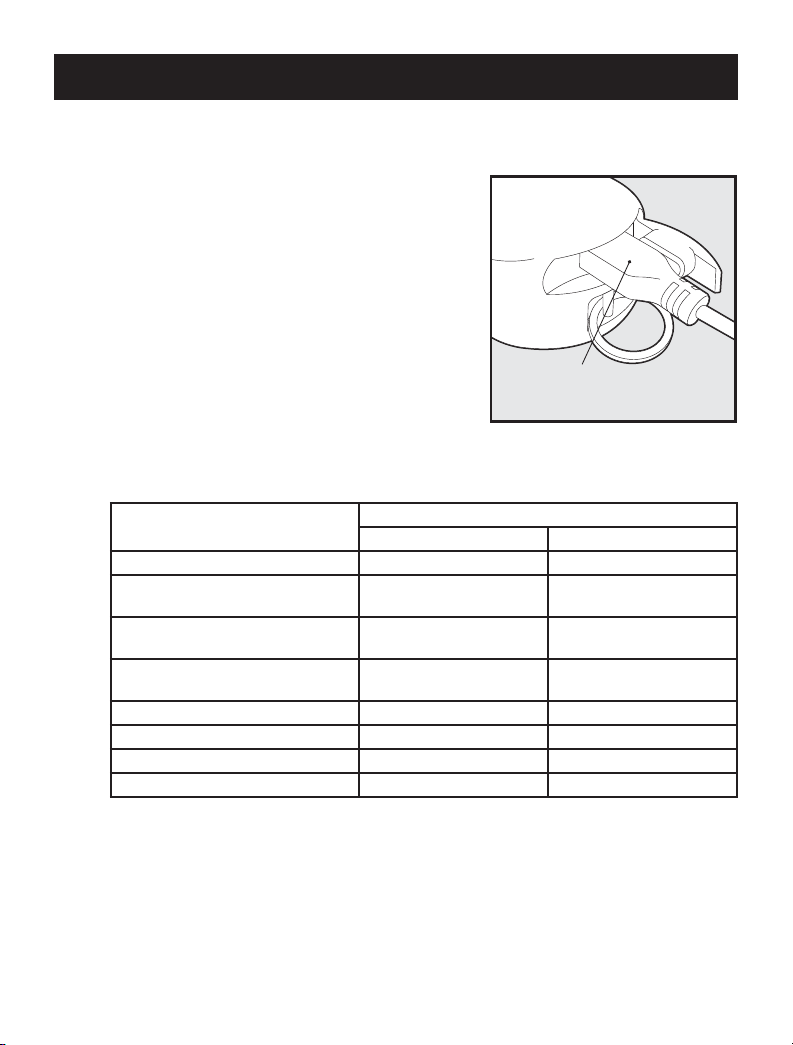
Prepare the Receiver Collar
Charge the Receiver Collar
Lift the rubber cover protecting the Receiver Collar 1.
Charging Jack.
Connect one of the charger connectors to the 2.
Receiver Collar Charging Jack (2A).
Plug the charger into a standard wall outlet. The red 3.
light will appear.
Charge the Receiver Collar for 24 hours for the fi rst 4.
charge. Recharges take only 12 hours.
Note: The Receiver Indicator Light is solid green after 12
hours of charging. For the fi rst charge, continue to charge
the Receiver Collar for an additional 12 hours.
When charging is completed, replace the rubber cover.5.
To Turn the Receiver Collar On
Press and hold the On/Off Button (1. 2B) until the
Receiver Indicator Light comes on solid green and
the Receiver Collar beeps low to high.
Release the On/Off Button.2.
The Receiver Indicator Light will fl ash green once
every 5 seconds to let you know it is on. The fl ashing
light indicates the Receiver Collar is on and ready to
receive a radio signal from the Handheld Transmitter.
2A
On/Off Button
To Turn the Receiver Collar Off
Press and hold the On/Off Button until the Receiver Indicator Light comes on solid red 1.
and the Receiver Collar beeps high to low.
Release the On/Off Button.2.
To extend the life between charging cycles, turn the Receiver Collar off when it is not in use.
Approximate battery life between charges is 15-20 hours, depending on frequency of use.
Charger connector
placed in Receiver
Collar Charging
Jack
2B
www.petsafe.net 7

Receiver Indicators
Condition
Wakeup - Button Held <
5 secs.
Wakeup - Button Held >
or = 5 secs.
Program Mode/Reset OFF OFF OFF
Reset Successful OFF Flashes 5 times Beeps 5 times
Normal Operation OFF Flashes once every
Normal Operation - Low
Battery
Correction ON length of
Positive Tone/Negative
Tone
Sleep - Button Held ON length of
Charging ON OFF OFF
Charging Complete OFF ON OFF
OFF ON length of
OFF OFF OFF
Flashes three times
every 5 secs.
button press
OFF ON length of
button press
Dual Color LED
RED LED GREEN LED
button press
5 secs.
OFF OFF
ON OFF
button press
OFF
Speaker
Low to High Beep
OFF
Positive Tone/
Negative Tone
High to Low beep
Rechargeable Batteries
The rechargeable Nickel Metal Hydride (NiMH) batteries are not memory sensitive and •
do not require depletion before charging.
The batteries come partially charged from the factory, but will require a full charge •
(24 hours) before the fi rst use.
When storing the unit for long periods, remember to regularly give batteries a full charge •
(12 hours). This should be done once every 4 to 6 weeks.
Excessive overcharging can shorten battery life. After initial charge, never leave the •
battery plugged in for more than 12 hours.
If your equipment has not been charged for an extended period, you may experience •
a decrease in battery life the fi rst few uses. Afterwards, the battery life will return to
previous capacity levels.
You should expect hundreds of recharge cycles from your batteries. However, all •
rechargeable batteries lose capacity over time relative to the number of recharge cycles
they experience. This is normal. If your operating time drops to half of the original life,
contact the Customer Care Center.
8 Customer Care Center 1-800-732-2677
 Loading...