

Petsafe PDT00-11875, PDT00-11876, PDT00-11877, PDT00-11951, PDT00-11952 Operating And Training Manual
...
PetSafe
®
Venture
™
Remote Training Series
Operating and Training Guide
PDT00-11875 – Little Dog Trainer
PDT00-11876 – Big Dog Trainer
PDT00-11877 – Long Range Trainer
PDT00-11951 – 400 Yard Little Dog Add-A-Dog
®
PDT00-11952 - 400 Yard Big Dog Add-A-Dog
®
PDT00-11953 – 1000 Yard Add-A-Dog
®
Please read this entire guide before beginning.

2 1-800-732-2677
Thank you for choosing PetSafe®, the best selling brand of electronic
training solutions in the world. Our mission is to ensure your pet’s safety by
providing you the tools and techniques to successfully train your pet. If you
have any questions, please contact the Customer Care Center or visit our
website at www.petsafe.net.
Table of Contents
Components .............................................................................................. 3
Other Items You May Need ......................................................................... 3
How the System Works ............................................................................... 3
Key Defi nitions .......................................................................................... 4
Operating Guide ...................................................................................... 6
Prepare the Remote Transmitter............................................................... 6
Prepare the Receiver Collar ..................................................................... 7
Fit the Receiver Collar ............................................................................. 9
Two Dog System ....................................................................................10
To Pair Dog 1 Receiver Collar and the Remote Transmitter .....................12
Training Guide .......................................................................................13
General Tips ..........................................................................................13
Teaching Your Pet the Positive Tone .........................................................13
Find the Best Stimulation Level for Your Pet ............................................13
+2 Boost ................................................................................................14
Teaching Basic Obedience ......................................................................14
Eliminating Unwanted Behavior .............................................................16
Frequently Asked Questions ..................................................................19
Troubleshooting ......................................................................................20
Test Light Instructions ..............................................................................20
Accessories ..............................................................................................21
Terms of Use and Limitation of Liability ....................................................21
FCC .........................................................................................................21
Perchlorate Battery ....................................................................................22
Non-Transferrable Limited Warranty .........................................................22

www.petsafe.net 3
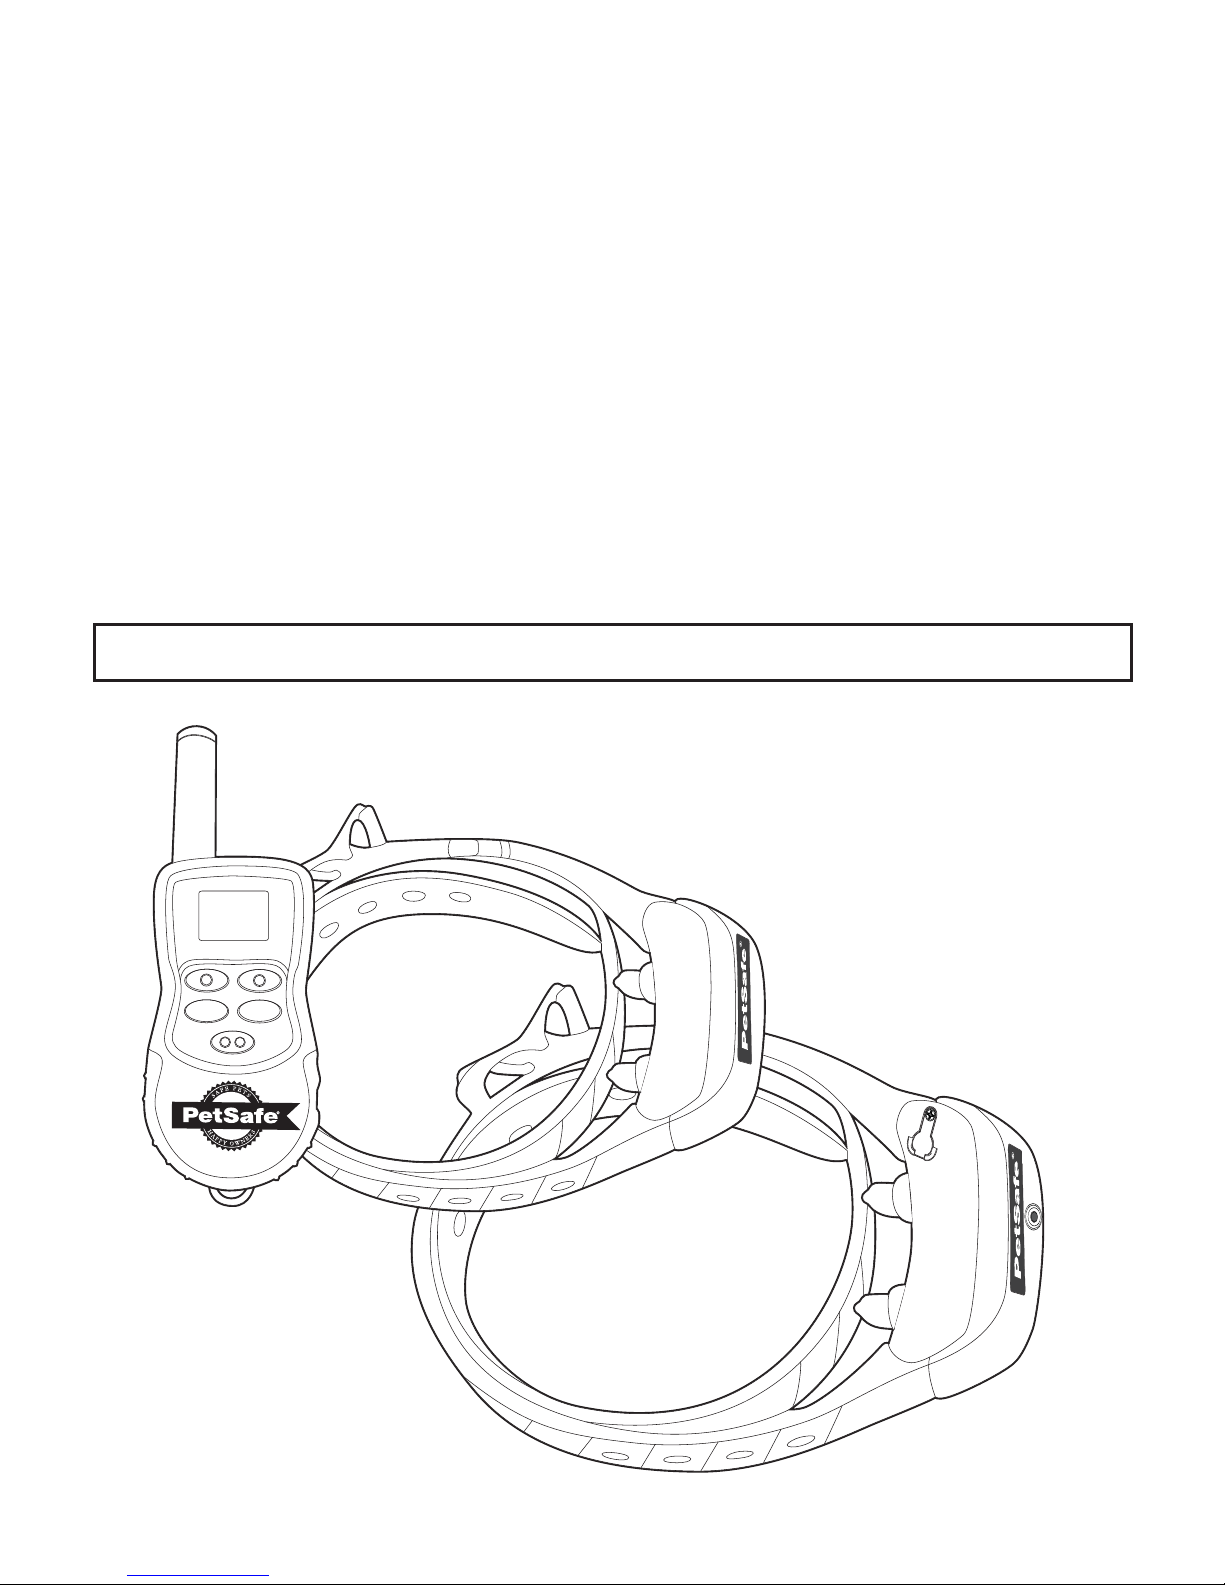
Components
Remote
Transmitter
Test Light
Tool
Hex Wrench
Charging
Adapter
Lanyard
Operating and
Training Guide
400 Yard Little Dog
Receiver Collar
400 Yard Big Dog / 1000 Yard
Receiver Collar
Pe
tS
afe
®
V
e
n
t
u
r
e
™
R
em
o
t
e T
raini
ng
Ser
i
es
O
p
eratin
g and
Tr
ain
i
n
g Gu
id
e
P
D
T
00
1
1
8
75
–
L
i
t
t
le
D
o
g T
r
ai
n
e
r
P
D
T
0
0
-
11
8
7
6 –
B
i
g
Do
g
T
r
ai
n
e
r
P
DT
0
0-
1
1
8
77 –
L
o
n
g R
an
g
e
T
r
ai
ner
P
DT
0
0
1
19
5
1
–
40
0
Y
a
rd
L
i
tt
l
e
Do
g
A
dd
A
Do
g
P
D
T
0
0-
1
19
5
2
4
0
0 Ya
rd
B
i
g
Do
g
A
d
d
A
Do
g
P
DT
0
0
11
9
5
3
–
1000 Y
a
rd
A
d
d
A
D
o
g
P
l
e
a
s
e r
e
ad
thi
s
en
ti
r
e g
u
i
d
e
be
f
o
r
e
b
eg
i
n
n
in
g
.
Other Items You May Need
Scissors• Non-metallic collar and 10-foot leash for training•
How the System Works
Now you can experience the difference a Remote Trainer can make. Spend less time training and more
time enjoying your dog. The PetSafe® Venture™ Series Remote Trainers are comfortable for your pet and
easy to use with an advanced digital display that tells you exactly what level of stimulation you are using.
The Remote Trainer assists you in controlling your pet without a leash in a range of either 400 or 1000
yards. At the push of a button, your remote sends a signal activating your dog’s Receiver Collar. He
receives a safe but annoying stimulation. He’ll quickly learn the association between his behavior and
your correction; in no time, you’ll have a better-behaved pet. The PetSafe® Venture™ Series Remote
Trainers have been proven safe, comfortable, and effective for both small and large dog breeds.
Important: The Venture™ Series Remote Trainers have a range of up to 400 or 1000 yards. Depending
on the way you hold the Remote Transmitter, the maximum range may vary. Terrain, weather,
vegetation, transmission from other radio devices, and other factors will affect the maximum range.
Features
400 or 1000 Yard Range•
8 levels of correction plus a “Boost” button•
Every Venture•
™
Remote Training system is 2-dog compatible
Rechargeable Batteries in both the Remote Transmitter and Receiver Collar•
Waterproof Remote Transmitter and Receiver Collar•
Lifetime Limited Warranty•
4 1-800-732-2677
Key Definitions
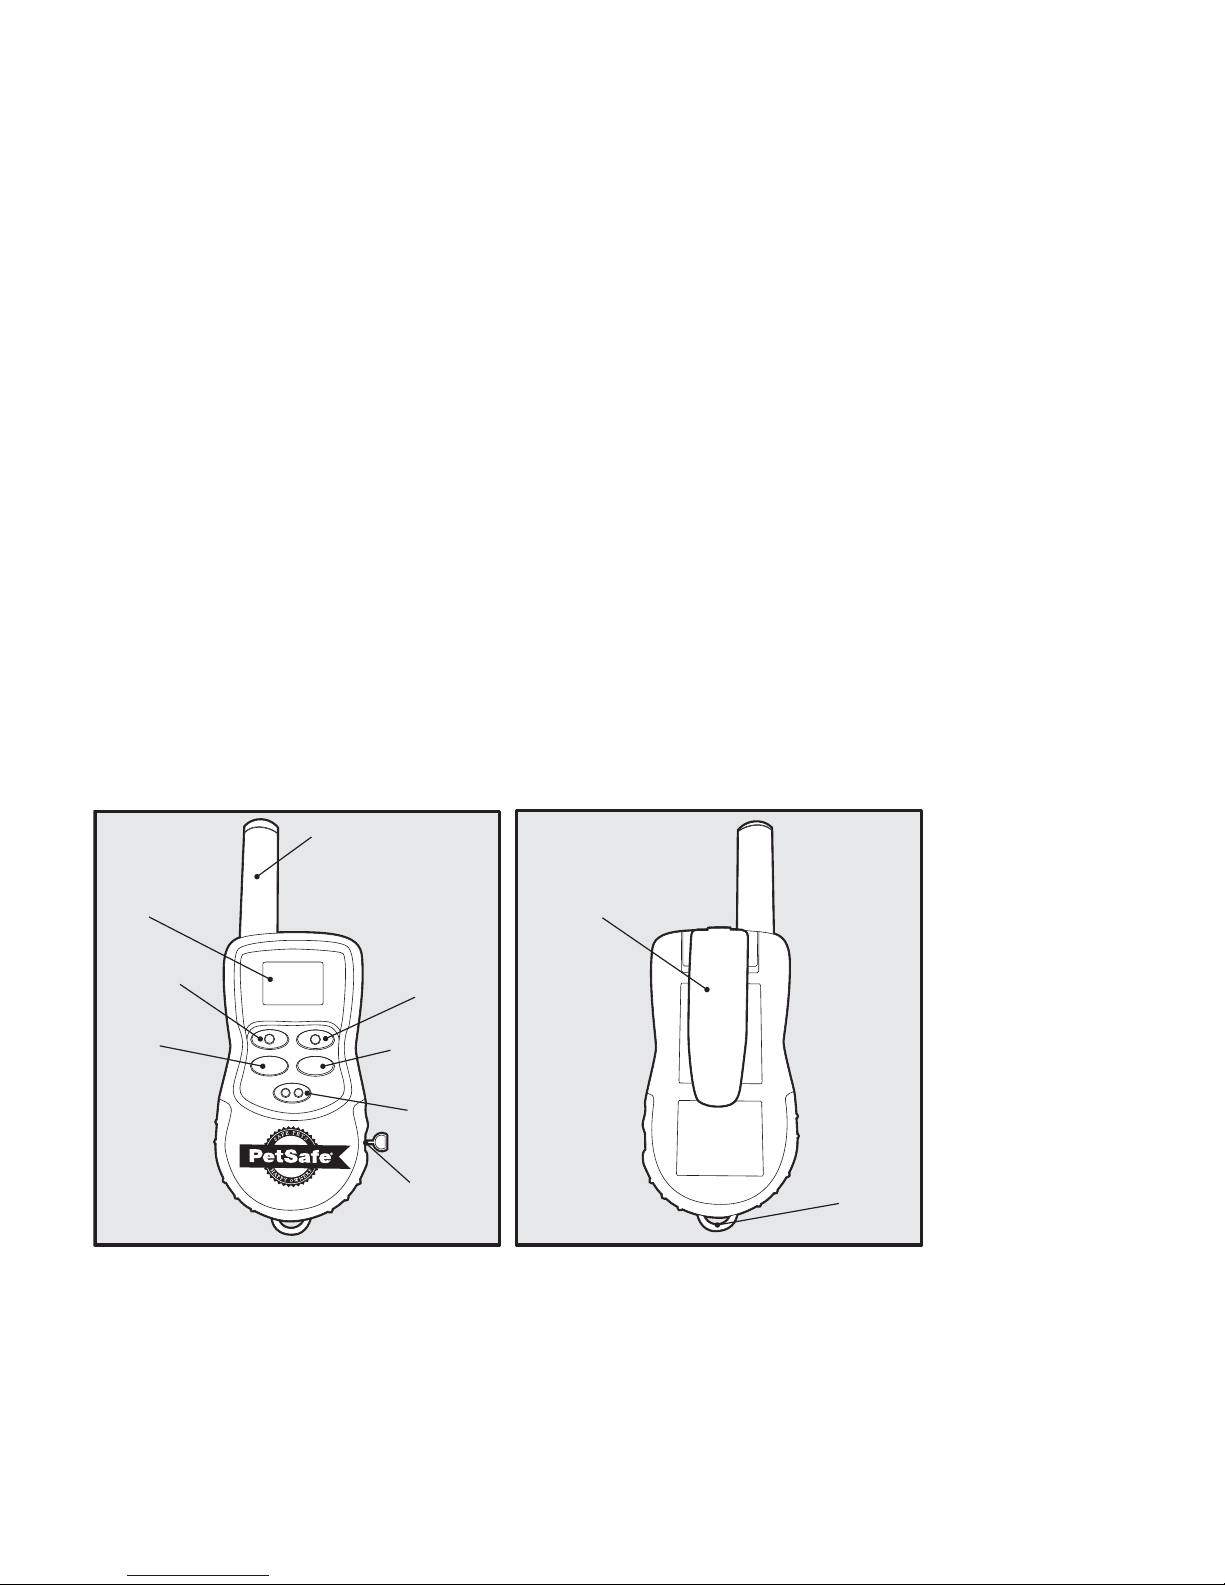
Remote Transmitter: Transmits the radio signal to the Receiver Collar. It is waterproof.
Digital Display
Level of Stimulation - shows Dog 1 or Dog 2 level of stimulations (Low-1 to High-8). Also
indicates +2 Boost.
Dog 1 - The active collar symbol will display to indicate Dog 1.
Dog 2 - Dog 1 and Dog 2 symbols will be displayed (additional purchase required for 2 dog system)
Tone - The stimulation level will fl ash when the Tone button or Stimulation button is pressed.
Battery Indicator - The battery indicator provides constant awareness of your battery’s power
level. See Battery Indicator on page 7 for more detailed information on the Battery Indicator.
1D or 2D - This appears when programming for the 2-Dog mode.
Button Definitions (factory default settings for Dog 1 mode)
Tone - Upper Left Button (Black): Produces a training tone from the collar. No
stimulation is delivered.
Stimulation - Lower Left Button (Black): Delivers continuous stimulation.
Stim Up - Upper Right Button (Grey): Adjust the stimulation level UP through a range of
levels. From Low-1 to High-8.
Stim Down - Lower Right Button (Grey): Adjust the stimulation level DOWN through a
range of levels from High-8 to Low-1.
+2 Boost (Red): Delivers continuos stimulation that is 2 levels higher than the currently
selected level.
See Two Dog System on page 10 for Dog 2 mode
Digital Dispay
Tone
Stim Up
Charging Jack
(with cover)
Transmitter Antenna
Stimulation
Stim Down
+2 Boost
Lanyard Clip
Belt Clip

www.petsafe.net 5
Receiver Collar: Delivers stimulation or tone on a signal from the Remote Transmitter.
It is waterproof.
On/Off Button: Momentarily pressing and holding this button turns the Receiver Collar on and off.
Contact Points: The contacts through which the Receiver Collar delivers Stimulation.
Receiver Indicator Light: Indicates when the Receiver Collar has been turned on or off and also
serves as a low-battery indicator.
Charging Jacks: For connecting the charger. Although the Remote Transmitter and Receiver Collar
are waterproof without the charger covers, keep the covers in place when not charging to keep debris
out of the openings.
Continuous Stimulation: You control when and how long Stimulation is delivered to your dog
through the Receiver Collar’s Contact Points. When a Continuous Stimulation button is pressed for
8 seconds or more, the Remote Transmitter will “time-out.” The button will need to be released and
pressed again before additional Stimulation can be delivered.
Positive Tone: Use the Positive Tone as a marker to reinforce positive behavior. Again, timing is
critical. Praise or treat the dog immediately following the Positive Tone.
Charging Jack
(with cover)
Contact Points
On/Off
Button
Screws for
Replaceable Collar
Indicator Light
Front View
Back/Bottom View
Charging Jack
(with cover)
On/Off
Button
Front View
Back/Bottom View
Indicator Light
Contact Points
Screws for
Replaceable Collar
400 Yard Little Dog
Receiver Collar
400 Yard Big Dog / 1000
Yard Receiver Collar
6 1-800-732-2677
Operating Guide
Prepare the Remote Transmitter
Charge the Remote Transmitter
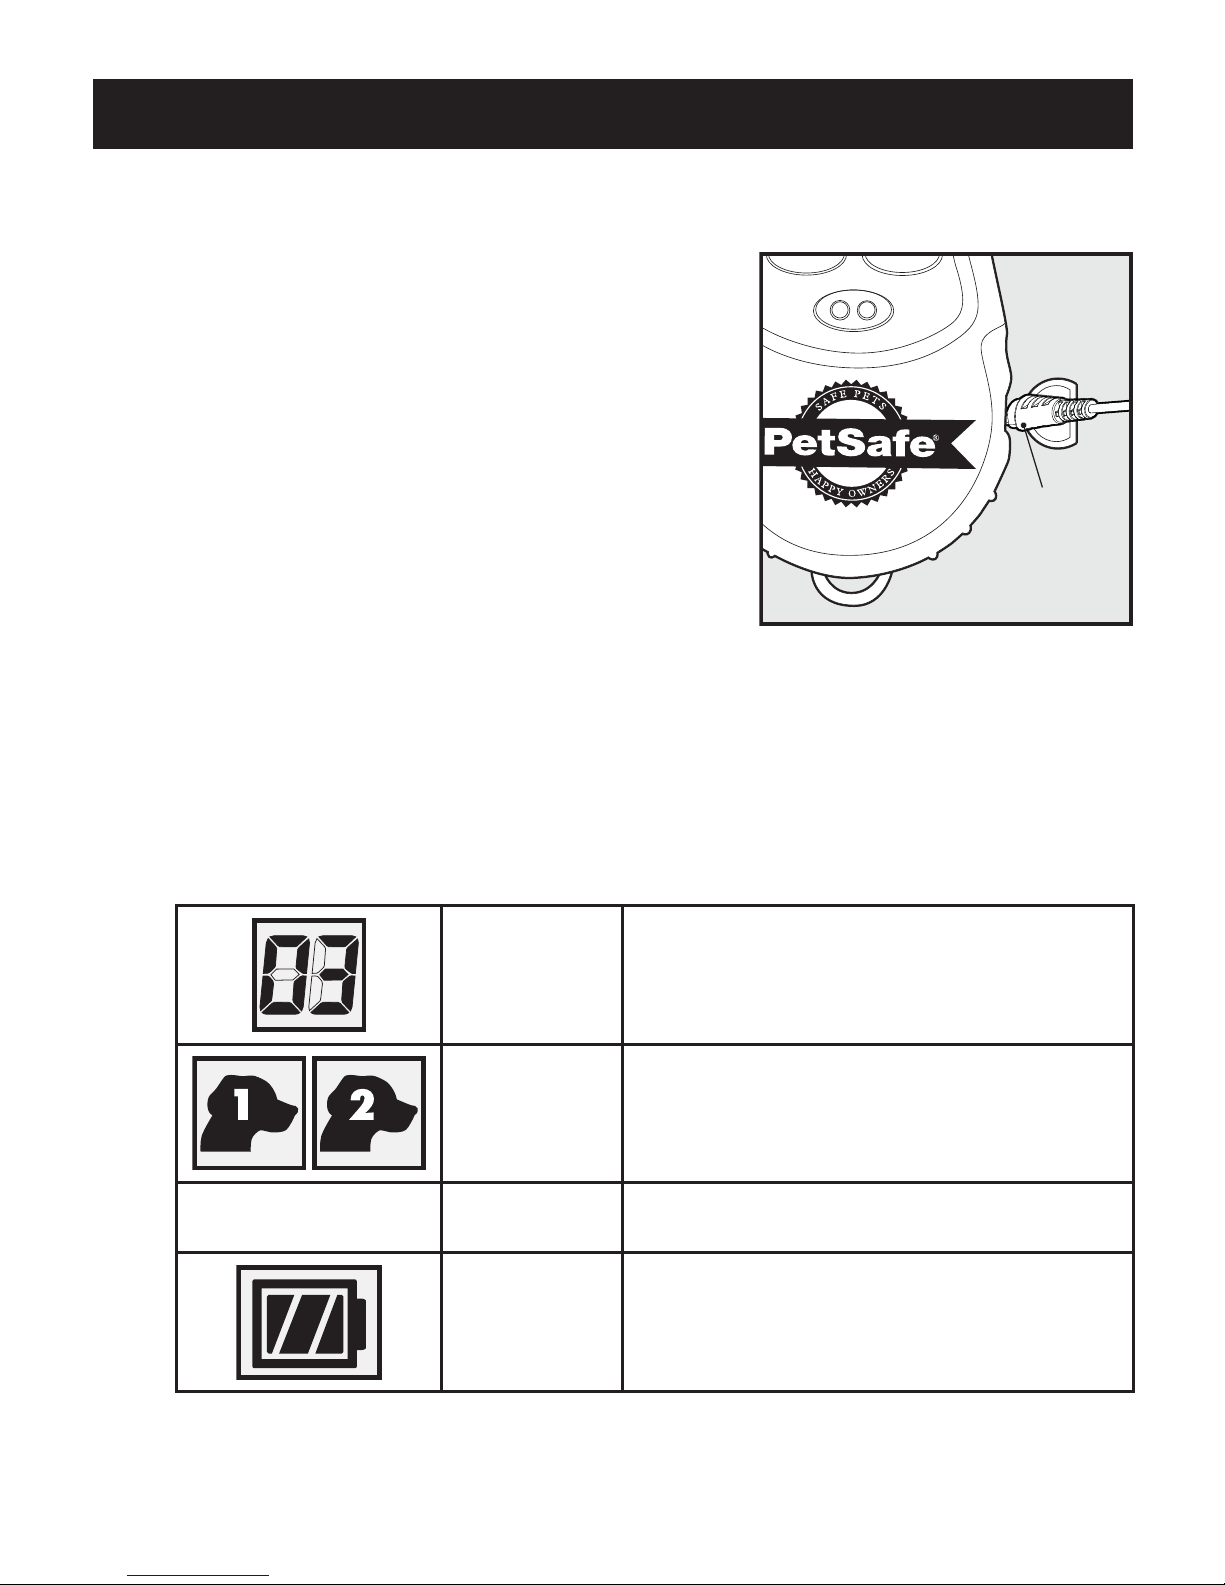
Lift the rubber cover protecting the Remote 1.
Transmitter Charging Jack.
Connect one of the charger connectors to the 2.
Remote Transmitter Charging Jack.
Plug the charger into a standard wall outlet.3.
Charge the Remote Transmitter for 5 hours for the 4.
fi rst charge. Recharges take only 3-4 hours. Note:
The Battery Indicator will scroll while charging and will
become solid when fully charged.
When charging is completed, replace the rubber cover.5.
Note: Approximate battery life between charges is 40 to 60
hours, depending on frequency of use.
Charger
connector
placed in the
Handheld
Transmitter
Charging Jack
Turning ON the Transmitter
Power up the Transmitter by pressing any button. You will see the display turn on when
you press any button.
Transmitter Digital Display
The display stays on for 10 minutes after a button press. After 10 minutes with no button
presses, the display shuts off and the transmitter goes into battery conservation mode.
Pressing any button will cause the display to turn back on. The various symbols you might
see on the display are explained below.
Numeric
readout
Shows the chosen stimulation level for Dog 1 or
Dog 2.
Dog 1/ Dog 2 The symbol displayed is the active dog receiver
collar. See Two Dog System on page 10.
Tone or
Stimulation
When pressing Tone or Stimulation the Dog 1 or
Dog 2 symbol will appear in bold or emphasized.
Battery
Indicator
The battery indicator provides constant
awareness of your battery’s power level. See
Battery Indicator on page 7 for more detailed
information on the Battery Indicator.
Note: Factory preset is for Dog 1 mode, you will not see the Dog 2 symbol unless the unit is
programmed for Dog 2 (see Two Dog System on page 10.)
Step
1
www.petsafe.net 7
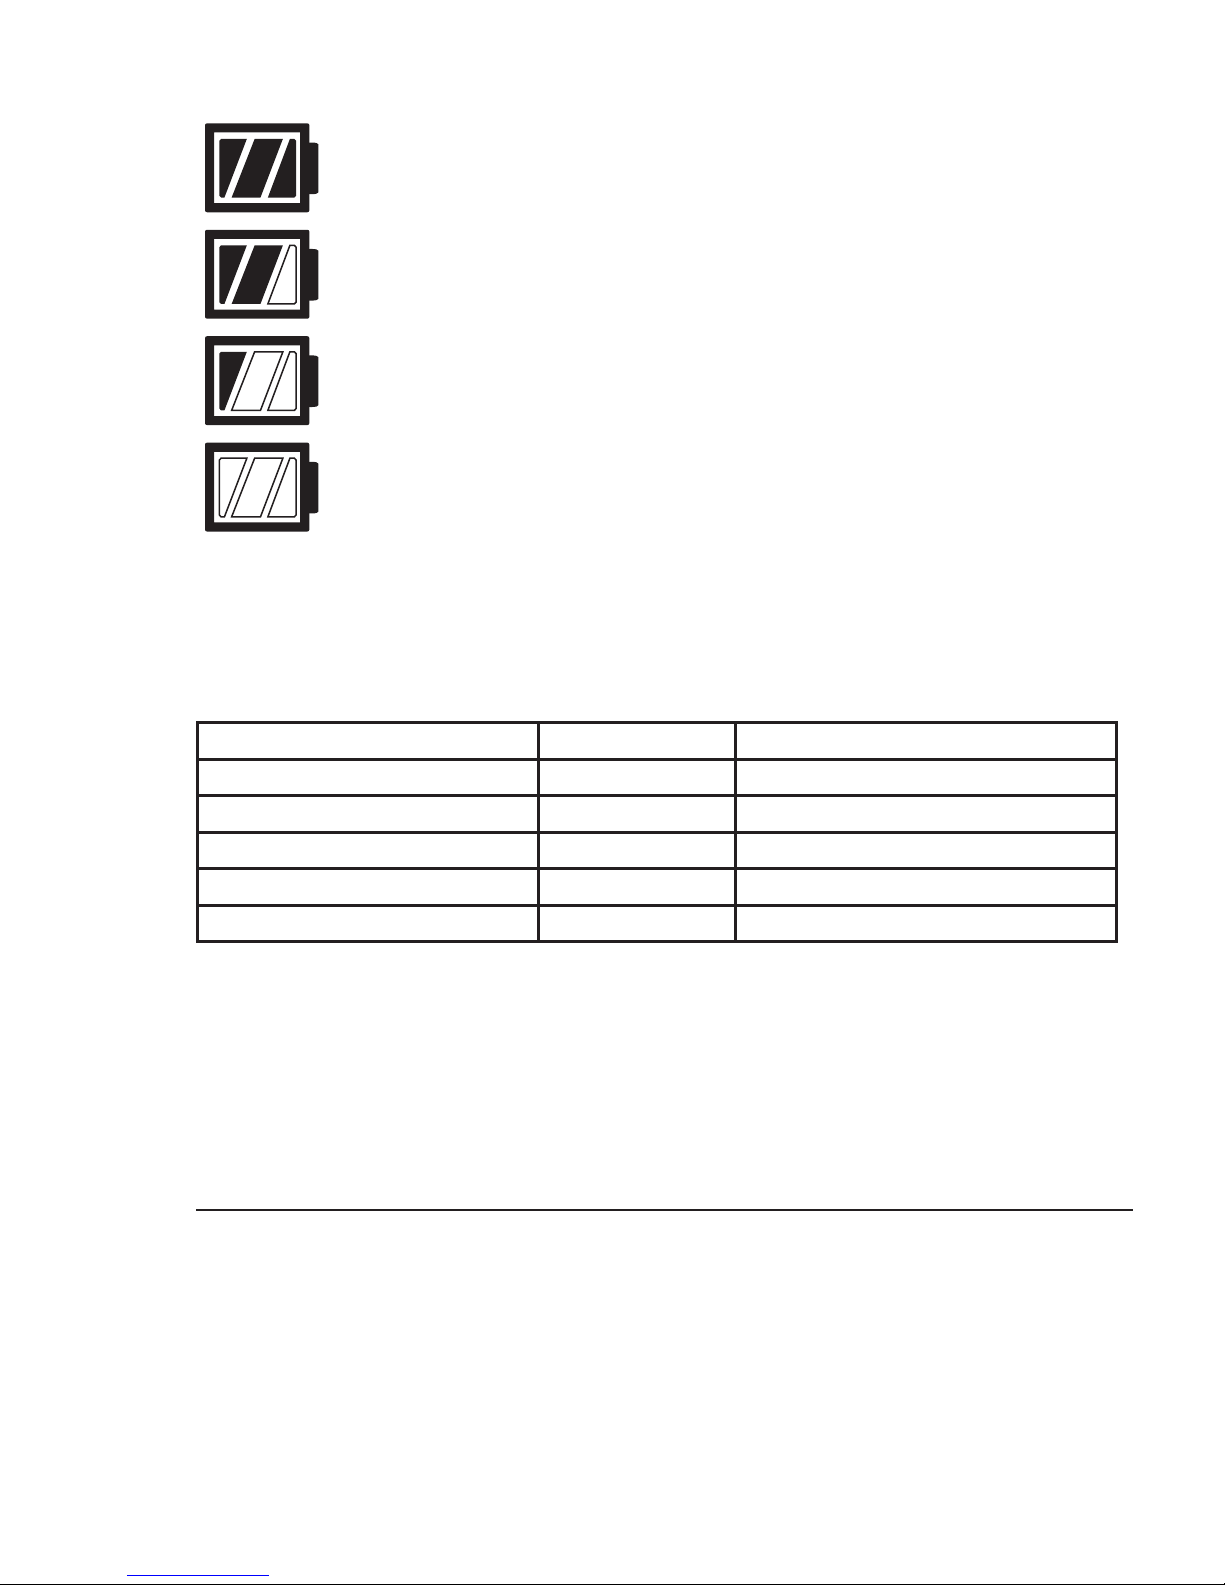
Battery Indicator
Battery is at 2⁄3 to Full capacity. Transmitter is
fully functional.
Battery is at 1⁄3 capacity. Transmitter is still
fully functional.
Battery is at 1⁄6 capacity. Transmitter will
operate the Receiver, but recharge or replace
Transmitter battery as soon as possible.
Battery is almost dead. Transmitter is unable
to operate the Receiver.
When the Battery Indicator shows the low battery symbol (
1
⁄6 capacity), recharge your
Transmitter soon. When just the battery outline is displayed, the Transmitter’s battery
is unable to power transmissions to the Receiver. Transmitter must be recharged to
regain operation.
Remote Transmitter Functions for Dog 1
Transmitter Function Button Color Digital Display Response
Upper Left Button Black Tone Only
Lower Left Button Black Stimulation Only
Upper Right Button Grey Correction level Up
Lower Right Button Grey Correction level down
Boost Button Red +2 above selected correction level
See Two Dog System on page 10 for remote transmitter functions in Dog 2 mode.
Venture Transmitter Belt Clip
To remove:
Press down and hold the Release on the Belt Clip.1.
Press upward on the Release and slide the belt clip out of the insert.2.
To replace:
Slide the Belt Clip into the insert until it clicks. 1.
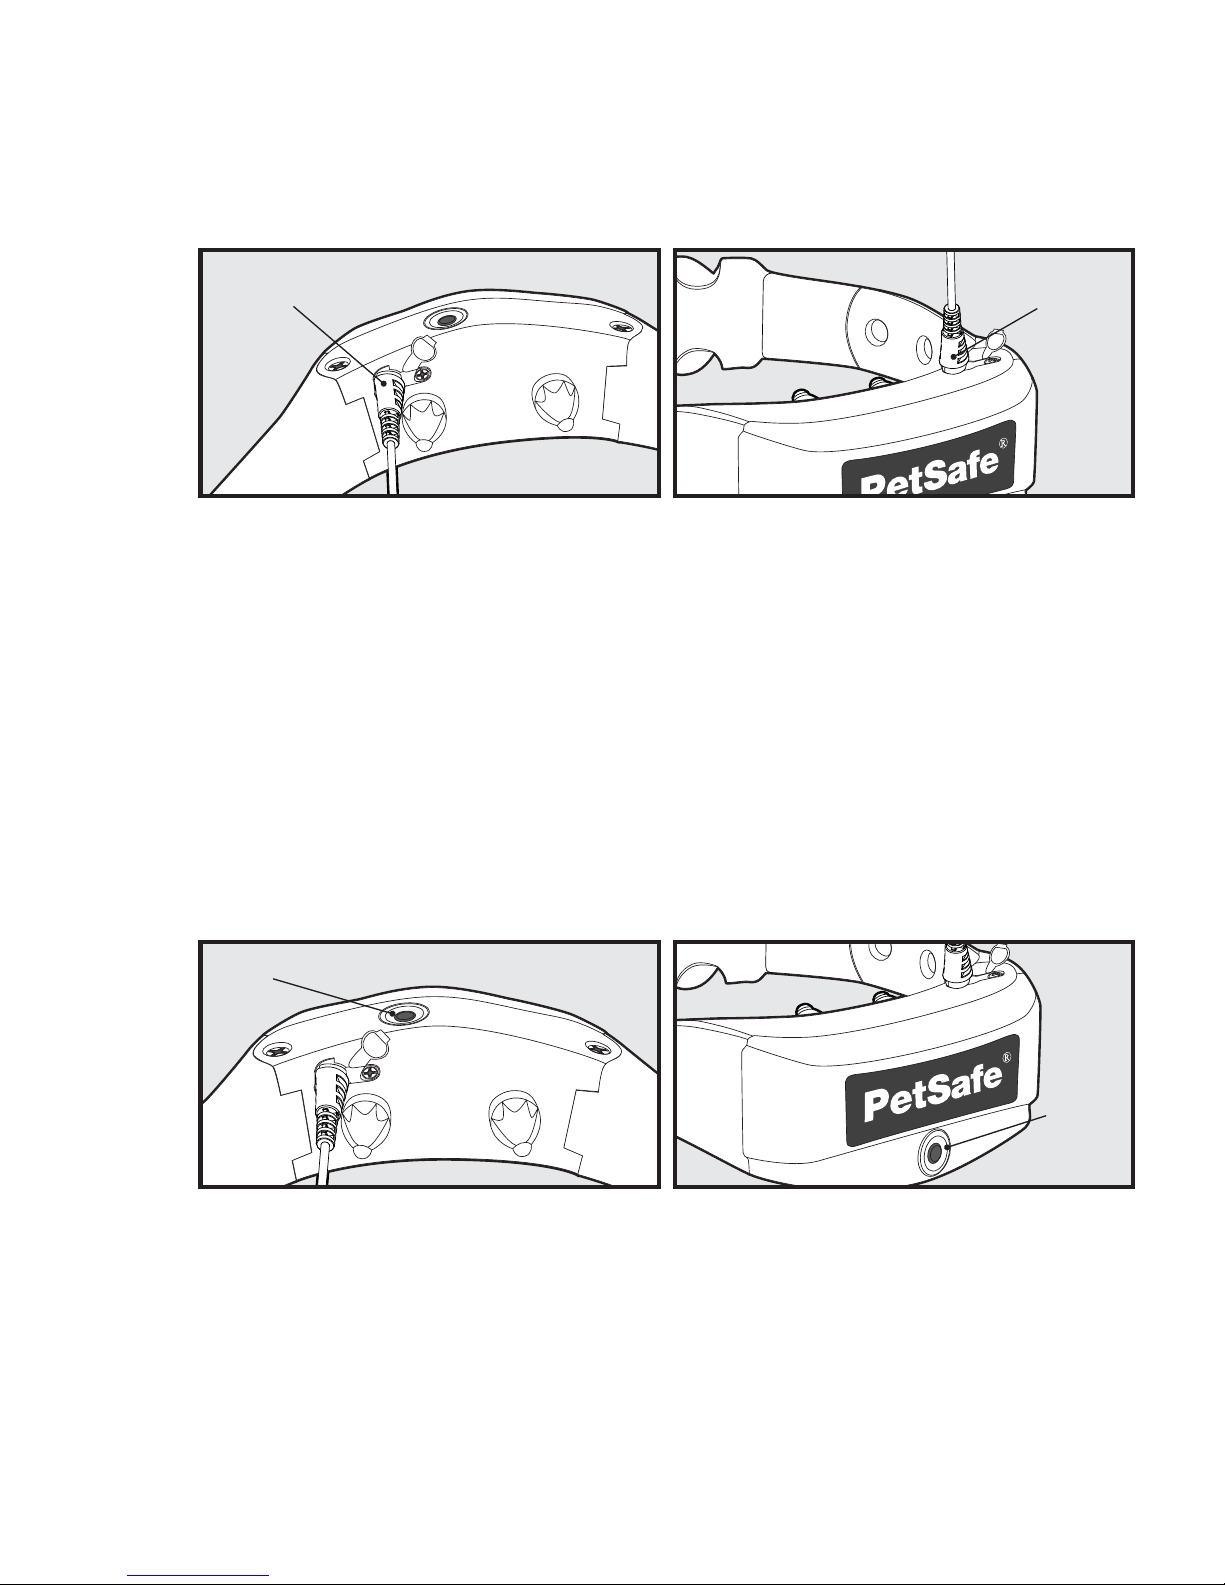
Prepare the Receiver Collar
Charge the Receiver Collar
Lift the rubber cover protecting the Receiver Collar Charging Jack. 1.
Connect the charger connector to the Receiver Collar Charging Jack.2.
Plug the charger into a standard wall outlet.3.
Step
2
8 1-800-732-2677
Charge the Receiver Collar until the Green Indicator Light comes on and is solid. 4.
Recharges take only 3-4 hours.
When charging is completed replace the rubber cover.5.
400 Yard Little Dog
Receiver Collar
400 Yard Big Dog / 1000 Yard
Receiver Collar
Charger
connector
placed in
Receiver
Collar
Charging
Jack
Charger
connector
placed in
Receiver
Collar
Charging
Jack
To Turn the Receiver Collar On
Press and hold the On/Off button until the Green LED comes on and the Receiver 1.
Collar beeps low to high.
Release the On/Off button. The Green LED will fl ash once every 5 seconds until the 2.
Receiver Collar is turned off. The fl ashing light indicates the Receiver Collar is ready
to receive a radio signal from the Remote Transmitter.
Once the Receiver Collar has been turned on, press the Upper Left button of the 3.
Remote Transmitter. Upon pressing, the Receiver Collar should beep for as long as the
Upper Left button is pressed. If it does not, see “To Pair the Remote Transmitter and
the Receiver Collar”. Note: To extend the life of the battery, turn the Receiver Collar off
when it is not in use.
400 Yard Little Dog
Receiver Collar
400 Yard Big Dog / 1000 Yard
Receiver Collar
On/Off Button
On/Off
Button
To Turn the Receiver Collar Off
Press and hold the On/Off button until the Red LED comes on and the Receiver 1.
Collar beeps high to low.
Release the On/Off button. To extend the life between charging cycles, turn the 2.
Receiver Collar off when it is not in use. Approximate battery life between charges is
40-50 hours, depending on frequency of use.
 Loading...