

Petsafe Pawz Away PWF19-15854, Pawz Away PWF17-15853 Operating Manual
Manual de funcionamiento
PWF17-15853
PWF19-15854
Pawz Away™ Mini Pet Barrier
Mini barrière pour animaux domestiques Pawz Away
Pawz Away™ Mini barrière voor huisdieren
Pawz Away™ Mini barrera para mascotas
Pawz Away™ Mini barriera per animali domestici
Pawz Away™ Mini Haustier Barriere
Operating Guide
Manuel d’utilisation
Gebruiksaanwijzing
Guida all’uso
Gebrauchsanweisung
™
®
Please read this entire guide before beginning
Veuillez lire ce manuel en entier avant de commencer
Gelieve deze gids volledig door te lezey voordat u begint
Si prega di leggere attentamente la guida al uso prima di utilizzare il collare
Bitte lesen Sie die gesamte Betriebsanleitung vor dem Trainingsbeginn
Por favor, este manual lea completo antes de empazar
Hereinafter Radio Systems Corporation, Radio Systems PetSafe Europe Ltd., Radio
Systems Australia Pty Ltd. and any other affiliate or Brand of Radio Systems Corporation
ENFRESDE
may be referred to collectively as “We” or “Us”.
Important Safety Information
Explanation of Attention Words and Symbols used in this guide
This is the safety alert symbol. It is used to alert you to potential personal injury
hazards. Obey all safety messages that follow this symbol to avoid possible
NLIT
injury or death.
WARNING indicates a hazardous situation which, if not avoided,
could result in death or serious injury.
CAUTION, used without the safety alert symbol, indicates a
hazardous situation which, if not avoided, could result in harm to
your pet.
NOTICE is used to address safe use practices not related to
personal injury.
Risk of explosion. Do not short circuit, mix old and new batteries, dispose of in fire, or
expose to water. When batteries are stored or disposed, they must be protected from
shorting. Dispose of used batteries properly.
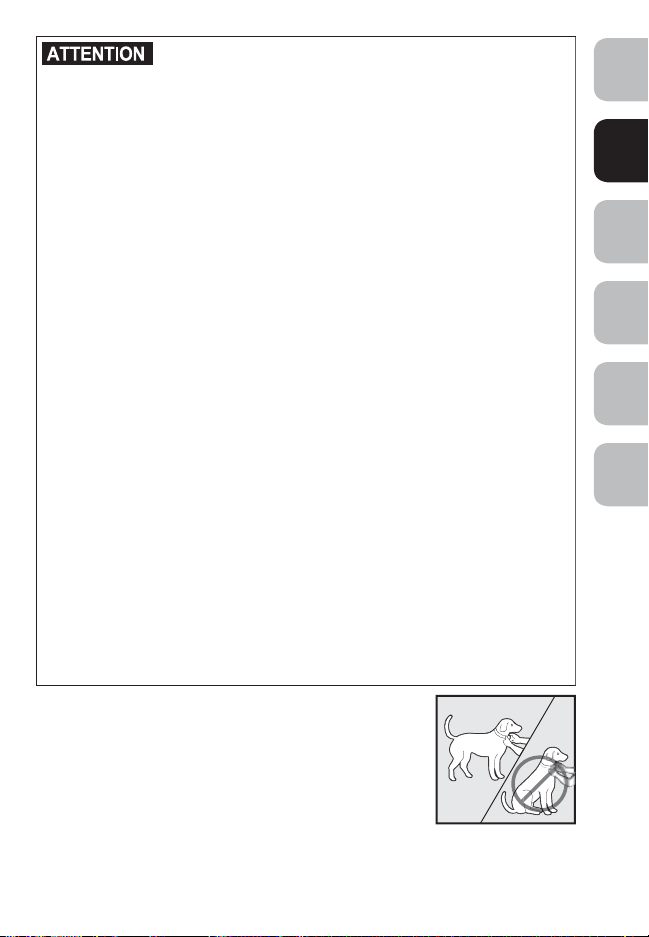
Not for use with aggressive dogs. Do not use this product if your dog is prone to
aggressive behaviour. Aggressive dogs can cause severe injury or death to their owners
and others. If you are not sure that this product is right for your dog, please talk to your
veterinarian or a certified trainer.
This System is NOT a solid barrier. The system is designed to act as a deterrent, using
Static Stimulation to condition pets to remain outside of the established barrier area. It is
important that you reinforce training with your pet on a regular basis. Since the tolerance
level to Static Stimulation varies from pet to pet, Radio Systems Corporation CANNOT
guarantee that the system will in all cases keep a pet outside of the established barrier
area. Not all pets can be trained to avoid entering the barrier area. Therefore, if you
have reason to believe that your pet may harm himself or pose a danger to others
if he is not kept from entering the barrier area, you should NOT rely solely upon this
system to restrict your pet. Radio Systems Corporation shall NOT be liable for any
personal injuries, property damage, injury to or death of your pet, economic loss or any
consequential damages sustained as a result of any animal entering the barrier area.
2
www.petsafe.net

Proper fit of the Receiver Collar is important. A Receiver Collar worn for too long or
made too tight on the pet’s neck may cause skin damage. Ranging from redness to
pressure ulcers; this condition is commonly known as bed sores.
• Avoid leaving the Receiver Collar on the pet for more than 12 hours per day.
• When possible reposition the Receiver Collar on the pet’s neck every 1 to 2 hours.
• Check the fit to prevent excessive pressure; follow the instructions in this manual.
• Never connect a lead to the Receiver Collar; it will cause excessive pressure on the
Contact Points.
• When using a separate collar for a lead, don’t put pressure on the Receiver Collar.
• Wash the pet’s neck area and the Contact Points of the Receiver Collar weekly with
a damp cloth.
• Examine the contact area daily for signs of a rash or a sore.
• If a rash or sore is found, discontinue use of the Receiver Collar until the skin
has healed.
• If the condition persists beyond 48 hours, see your veterinarian.
• For additional information on bed sores and pressure necrosis, please visit
our website.
These steps will help keep your pet secure and comfortable. Millions of pets are
comfortable while they wear stainless steel contacts. Some pets are sensitive to contact
pressure. You may find after some time that your pet is very tolerant of the Receiver
Collar. If so, you may relax some of these precautions. It is important to continue daily
checks of the contact area. If redness or sores are found, discontinue use until the skin
has fully healed.
You may need to trim the hair in the area of the Contact Points. Never shave the pet’s
neck; this may lead to a rash or infection.
To prevent an unintended stimulation, do not perform set up procedures while the
Receiver Collar is on your pet.
If you are using a collar and lead for training, be sure the extra collar does not put
pressure on the Contact Points of the Receiver Collar.
EN
FR ES DE
NL IT
www.petsafe.net
3

Thank you for choosing the PetSafe® brand. You and your pet deserve a companionship
that includes memorable moments and a shared understanding. Our products provide
ENFRESDE
you with the tools and technologies to successfully train your pet. If you have any
questions about our products or training your pet, please visit our
website at www.petsafe.net or contact our Customer Care Centre. For
a listing of Customer Care Centre telephone numbers, visit our website
at www.petsafe.net.
To get the most protection out of your warranty, please register your product within
30 days at www.petsafe.net. By registering and keeping your receipt, you will enjoy
the product’s full warranty and should you ever need to call the Customer Care Centre,
NLIT
we will be able to help you faster. Most importantly, we will never give or sell your
valuable information to anyone. Complete warranty information is available online at
www.petsafe.net.
TABLE OF CONTENTS
Components 5
Items You May Need 5
How the System Works 5
Key Definitions 6
Operating Guide 6
Install the Barrier Transmitter 6
Set Up the Barrier Transmitter 7
Test the Barrier Area 7
Fit the Receiver Collar on Your Pet 8
Re-Thread the Collar 10
Receiver Collar Batteries 11
Additional Features 12
Time Out Feature 12
Mode A, B, and AB Feature 12
Programming the Mode Settings 13
Training Guide 14
Begin Your Pet’s First Session 14
Further Training 15
Additional Information 15
Troubleshooting 16
Warranty 16
Compliance 18
Battery Disposal 18
Important Recycling Advice 18
Terms of Use and Limitation of Liability 19
4
www.petsafe.net
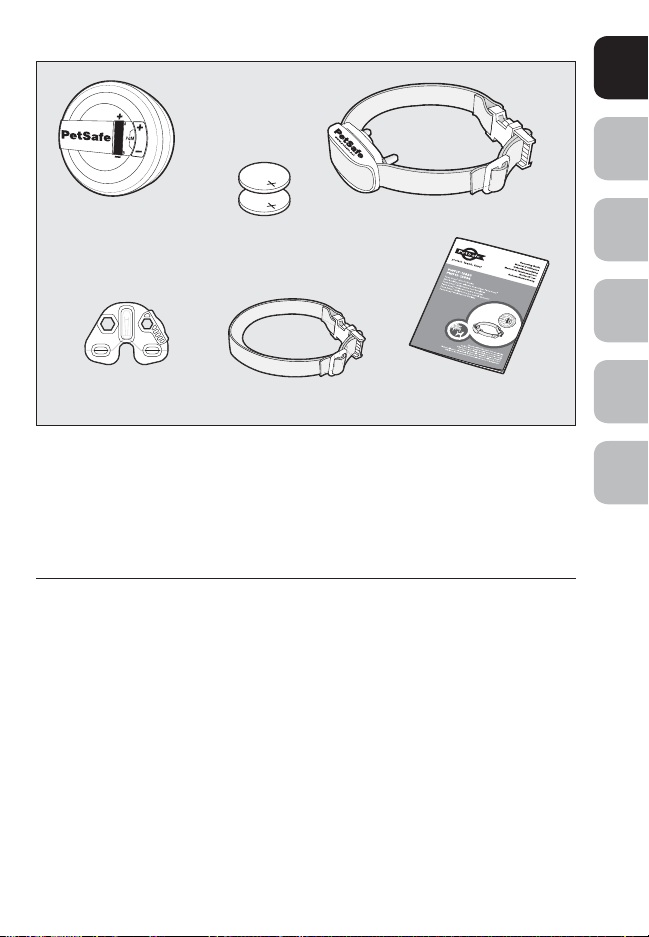
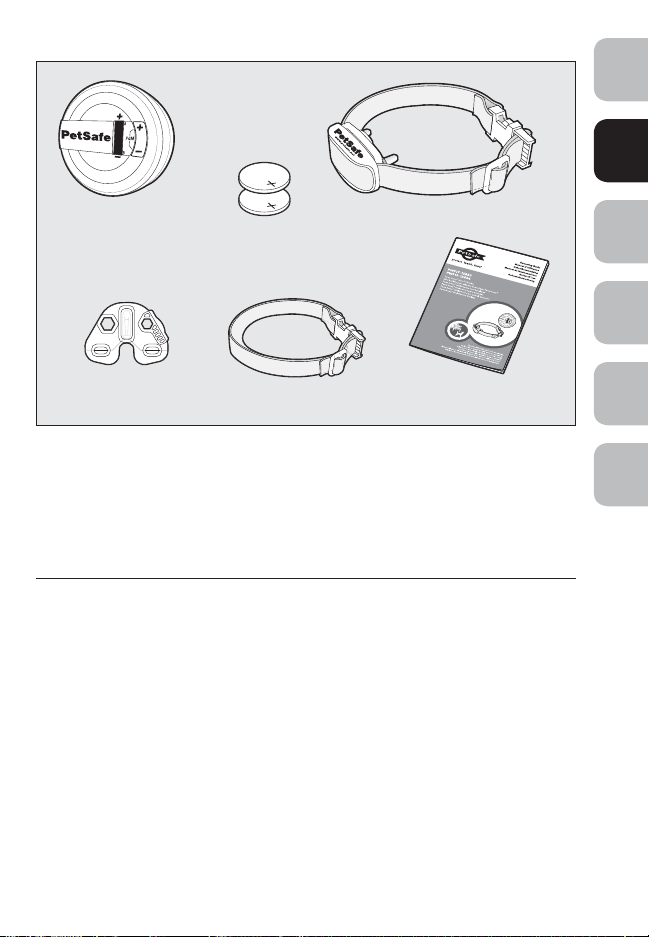
Components
EN
FR ES DE
®
Barrier Transmitter
(3 AAA Batteries not included)
Test Light Tool
Two 3-Volt Lithium
Batteries for
Receiver Collar (CR2032)
Cat Collar Strap
Receiver Collar
Operating and
Training Guide
Items You May Need
• Drill and mounting hardware
• Non-metallic collar and lead
• Scissors
• Lighter
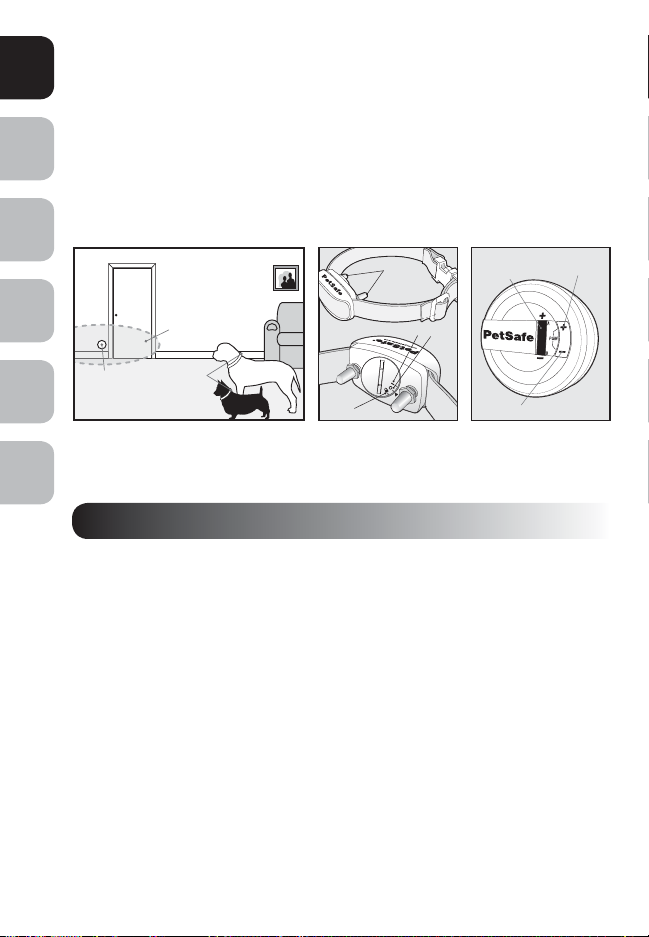
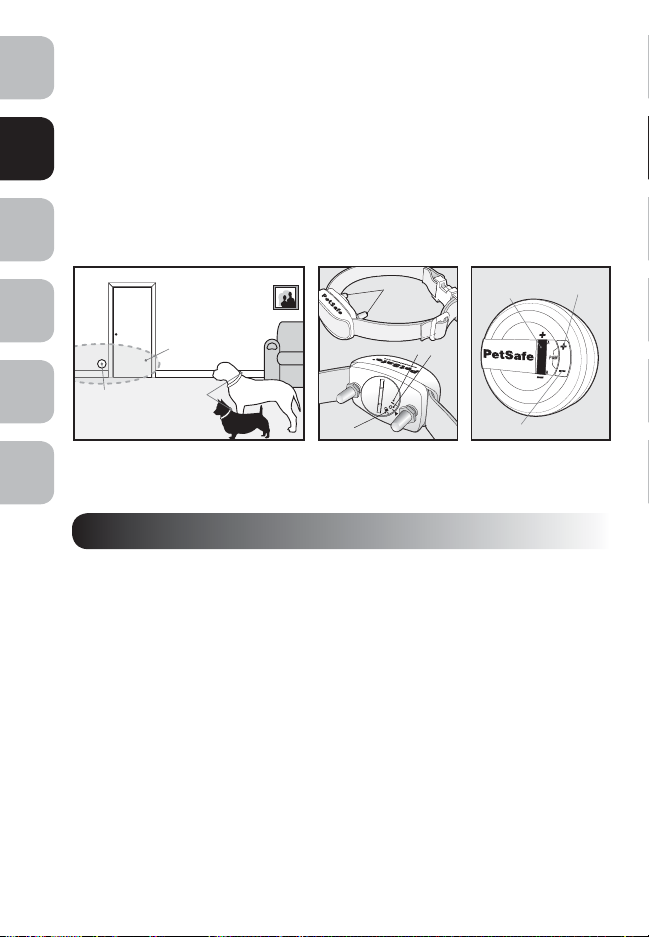
How the System Works
The PetSafe® Pawz Away™ Mini Pet Barrier keeps your pet away from a certain room,
away from trash, off of furniture, etc. Just place the Barrier Transmitter near the area
your pet should avoid. The Mini Pet Barrier transmits an elliptical radio signal adjustable
up to a 0.76 metre radius. Your pet wears a Receiver Collar with Contact Points that
touch his neck. When your pet enters the Barrier Area, he’ll hear a series of audible
tones from the Receiver Collar and he will feel a safe Progressive Static Stimulation,
delivered through the Contact Points on his neck. The Progressive Static Stimulation will
get his attention, but will not cause harm. The stimulation continues until your pet leaves
the Barrier Area. If your pet doesn’t leave, the collar will continue to stimulate at the
maximum level from 3 seconds until the 15 second time-out. The PetSafe® Pawz Away™
Mini Pet Barrier has been proven safe, comfortable, and effective for pets at least 6
months old and 2.25 kg or more.
NL IT
www.petsafe.net
5
Key Definitions
Barrier Transmitter: Transmits the wireless radio signal
ENFRESDE
Barrier Area: Area that you want to prevent your pet from accessing
Receiver Collar: Receives the radio signal from the Barrier Transmitter
Contact Points: Deliver the safe Progressive Static Stimulation when your pet enters
the Barrier Area
Progressive Static Stimulation: Static Stimulation begins at the lowest level and
automatically increases to maximum within 3 seconds of first detection in the Barrier
Area. From 3 seconds until the 15 second time-out, the collar will continue to provide a
stimulation at the maximum level until your pet leaves the Barrier Area.
NLIT
Barrier
Area
Contact Points
www.petsafe.net
®
On/Off Dial
LCD
Display
Window
Up Button
Barrier
Transmitter
Receiver
Collar
Open Battery
Down Button
OPERATING GUIDE
STEP 1
Install the Barrier Transmitter
The Barrier Transmitter emits a radio signal from all sides in an elliptical pattern. The
signal may transmit through a wall or the ceiling/floor. The Barrier Transmitter can be
placed laying flat on a surface or hung on a wall. If you choose to hang the Barrier
Transmitter, note that the signal becomes very directional—the signal will be strongest
directly in front of and behind the unit. The signal is weakest to the side of the unit.
Do not:
• Hang Barrier Transmitter on a metal wall
• Place Barrier Transmitter on metal surfaces
• Place Barrier Transmitter near large metal objects such as refrigerators,
washers, etc.
• Place Barrier Transmitter near speakers
6
www.petsafe.net
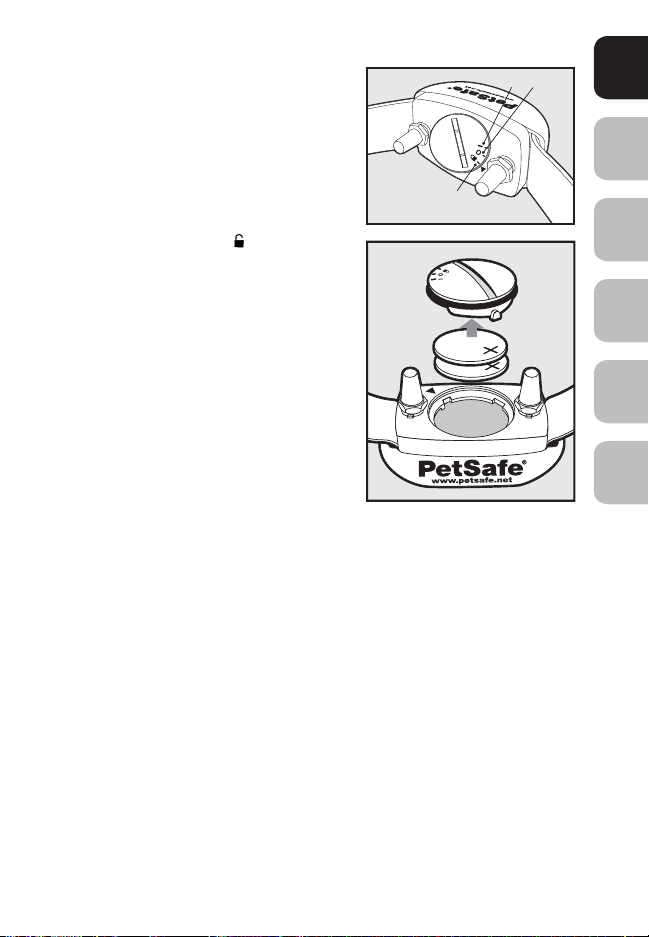
STEP 2
Set Up the Barrier Transmitter
EN
while your pet is wearing the Receiver Collar.
1. With the back of the Barrier Transmitter facing up, rotate
back cover counter-clockwise, removing the back cover.
Install three (3) AAA alkaline batteries and replace the
back cover. Turn clockwise to secure cover.
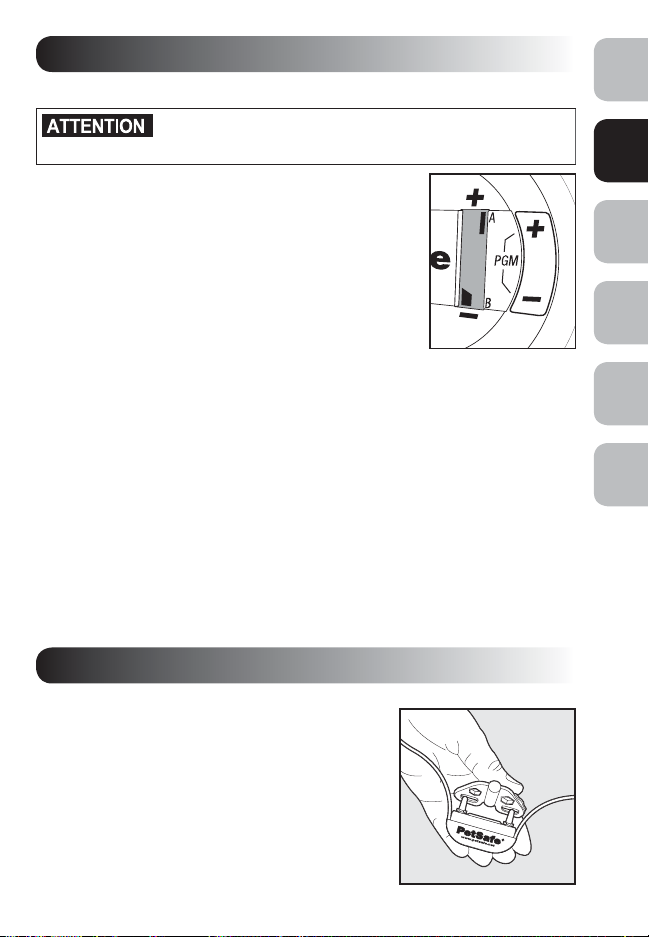
2. Turn the Barrier Transmitter right side up and press the (+)
button once to turn ON the Barrier Transmitter. A black bar
in the upper right hand corner of the LCD display window
indicates that the Barrier Transmitter is set to mode A* (2A).
3. A second black bar in the bottom of the LCD display
indicates the range is set to one segment. Each segment represents approximately
13 cm from the unit. You can create a Barrier Area of 13 cm to 76 cm from the unit.
Using the (+) and (-) buttons, adjust the range to fit the desired pet Barrier Area.
* All Mini Pet Barriers and Receiver Collars are preset to mode A. For single pet
households, you will not need to operate the Barrier Transmitter in any mode other
than A. The A and B modes are for use in multiple pet households where you may
want one pet to be able to access an area while preventing access by another pet.
Please see the Additional Features section of this operating and training guide for
instructions on how to utilise modes A and B.
To prevent an unintended stimulation, never perform set-up procedures
2A
STEP 3
Test the Barrier Area
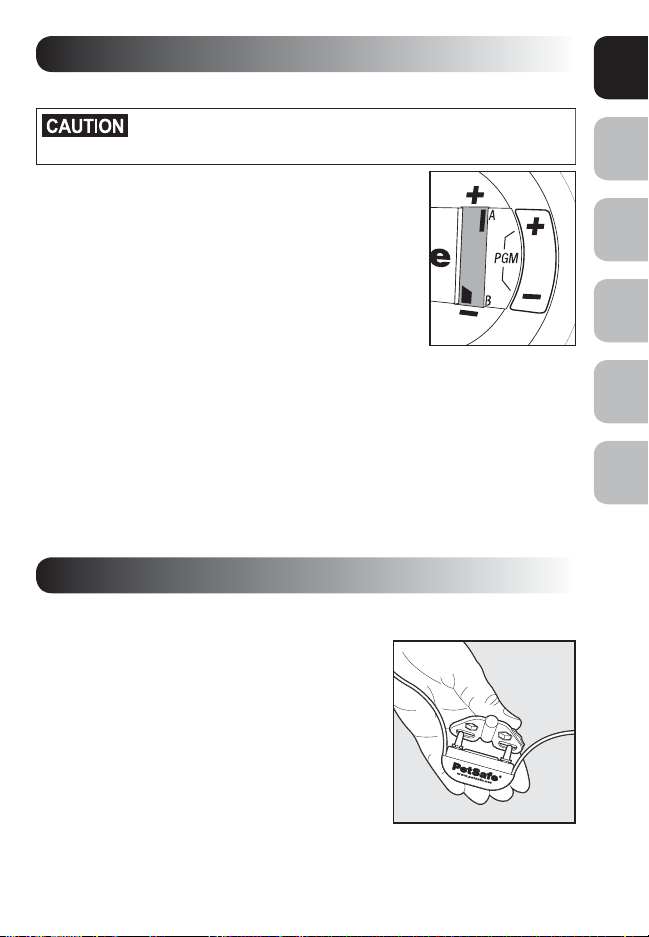
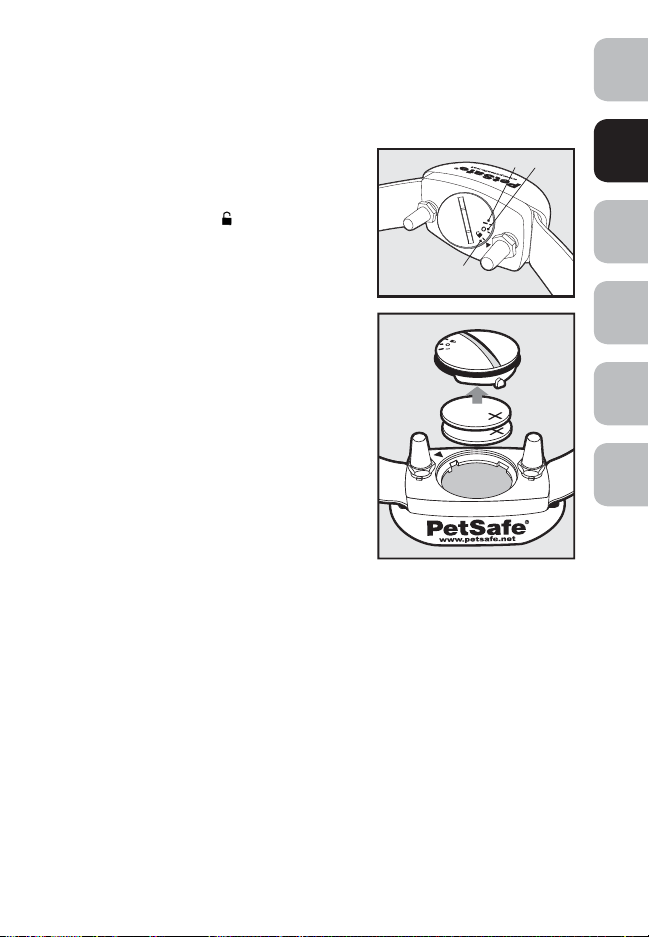
1. Keeping your hands away from the Contact Points,
use the edge of the Test Light Tool to turn the
receiver battery door to the ON (l) position.
2. Hold the Receiver Collar with the Contact Points
facing up and the PetSafe® logo facing the Barrier
Transmitter. Place the Test Light Tool on the Contact
Points so that the wire in the Test Light Tool touches
the Contact Points (3A).
3A
FR ES DE
NL IT
www.petsafe.net
7
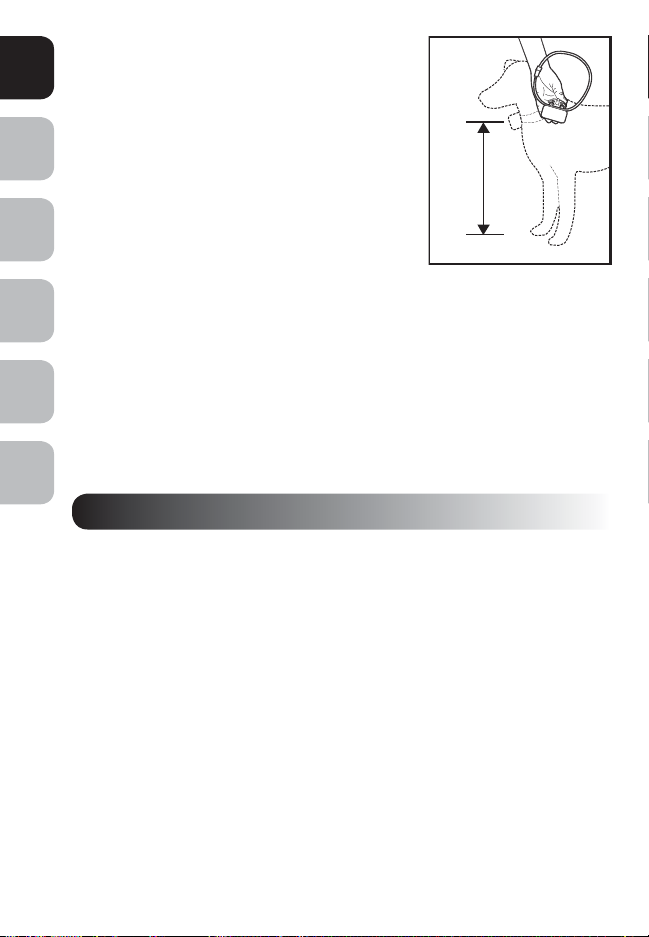
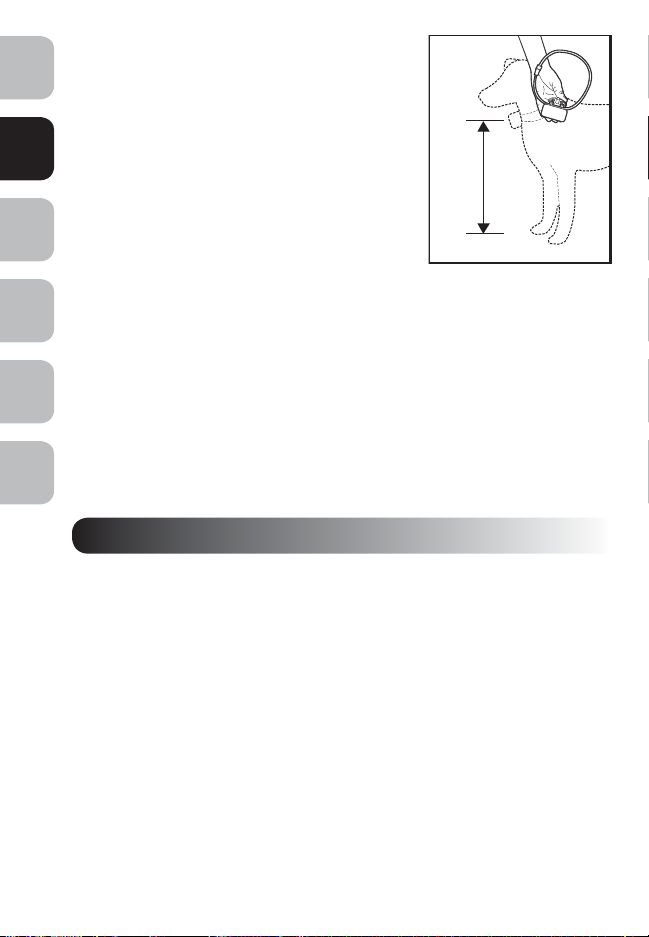
3. Hold the Receiver Collar at the approximate height
of your pet’s neck (3B). Start outside of the range
ENFRESDE
and walk slowly toward the Barrier Transmitter. As
you reach the Barrier Area, the Receiver Collar
emits a series of high-pitched tones. For each tone
you hear, you should notice the Test Light flashing
which indicates that a Progressive Static Stimulation
is being delivered. The Receiver Collar’s tone is
easily heard by pets but may be at a volume level
difficult for some humans to hear.
NLIT
4. Check the range of the Barrier Area from
multiple angles to ensure you are getting the
desired coverage.
Note: Should you find that you are not getting the desired range at the maximum setting,
move the Barrier Transmitter 30 cm, or change from its standing-on-end position to
laying flat. Metal objects can alter the magnetic field and change the transmitting signal
range. The effect on the range depends on the size and shape of the objects. Signal
range can be reduced if the Barrier Transmitter is placed on a concrete floor, due to
steel reinforcement in the concrete. For best range results, place the Barrier Transmitter
on a nonconductive surface (i.e., wood floor or table). Placing the Barrier Transmitter
beneath sofas and beds can reduce the range due to the metal springs altering the
magnetic field.
3B
STEP 4
Fit the Receiver Collar on Your Pet
Important: Proper fit and placement of your Receiver Collar is necessary for effective
operation. The Contact Points must have direct contact with your pet’s skin on the
underside of his neck.
8
www.petsafe.net
for too long or made too tight on the pet’s neck may cause skin damage. Ranging
from redness to pressure ulcers; this condition is commonly known as bed sores.
• Avoid leaving the Receiver Collar on the pet for more than 12 hours per day.
• When possible reposition the Receiver Collar on the pet’s neck every
1 to 2 hours.
• Check the fit to prevent excessive pressure; follow the instructions in this manual.
• Never connect a lead to the Receiver Collar; it will cause excessive pressure on
the Contact Points.
• When using a separate collar for a lead, don’t put pressure on the
Receiver Collar.
• Wash the pet’s neck area and the Contact Points of the Receiver Collar weekly
with a damp cloth.
• Examine the contact area daily for signs of a rash or a sore.
• If a rash or sore is found, discontinue use of the Receiver Collar until the skin
has healed.
• If the condition persists beyond 48 hours, see your veterinarian.
• For additional information on bed sores and pressure necrosis, please visit
our website.
These steps will help keep your pet secure and comfortable. Millions of pets are
comfortable while they wear stainless steel contact points. Some pets are sensitive
to contact pressure. You may find after some time that your pet is very tolerant of the
Receiver Collar. If so, you may relax some of these precautions. It is important to
continue daily checks of the contact area. If redness or sores are found, discontinue
use until the skin has fully healed.
You may need to trim the hair in the area of the Contact Points. Never shave the dog’s
neck; this may lead to a rash or infection.
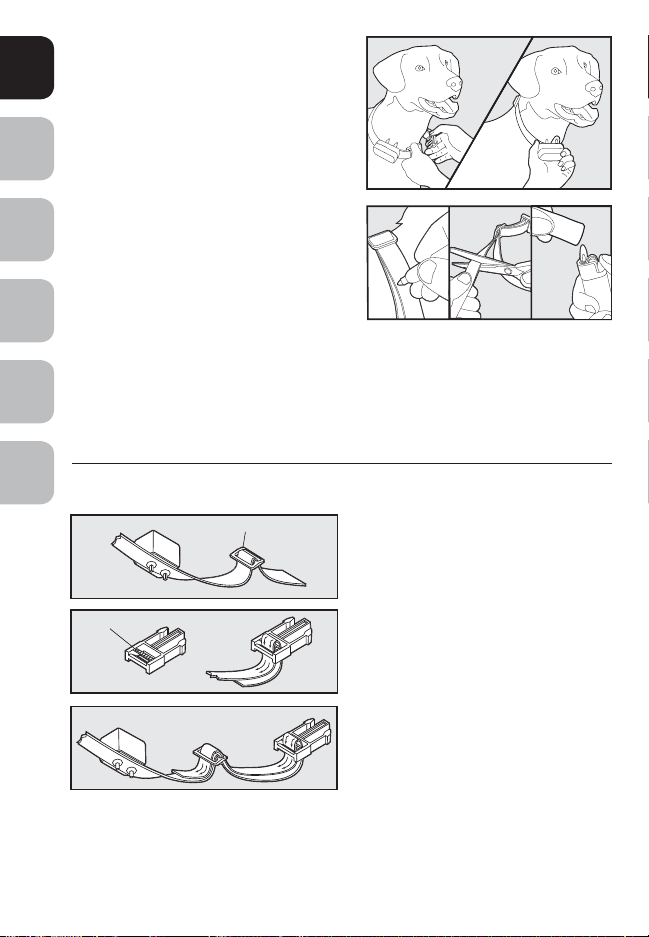
To assure a proper fit, please follow these steps:
1. Using the edge of the Test Light Tool, turn the battery door
to the OFF (O) position.
2. Start with your pet standing comfortably (4A).
3. Place the Receiver collar on your pet so that the PetSafe
logo is facing your pet’s chin. Centre the Contact Points
underneath your pet’s neck, touching the skin. If your pet
has a long or thick coat then it may be necessary to trim
the hair around the Contact Points to make sure that contact is consistent.
Note: The Receiver Collar comes with Short Contact Points. Long Contact Points are
available and can be purchased through the Customer Care Centre.
Proper fit of the Receiver Collar is important. A Receiver Collar worn
4A
®
EN
FR ES DE
NL IT
www.petsafe.net
9
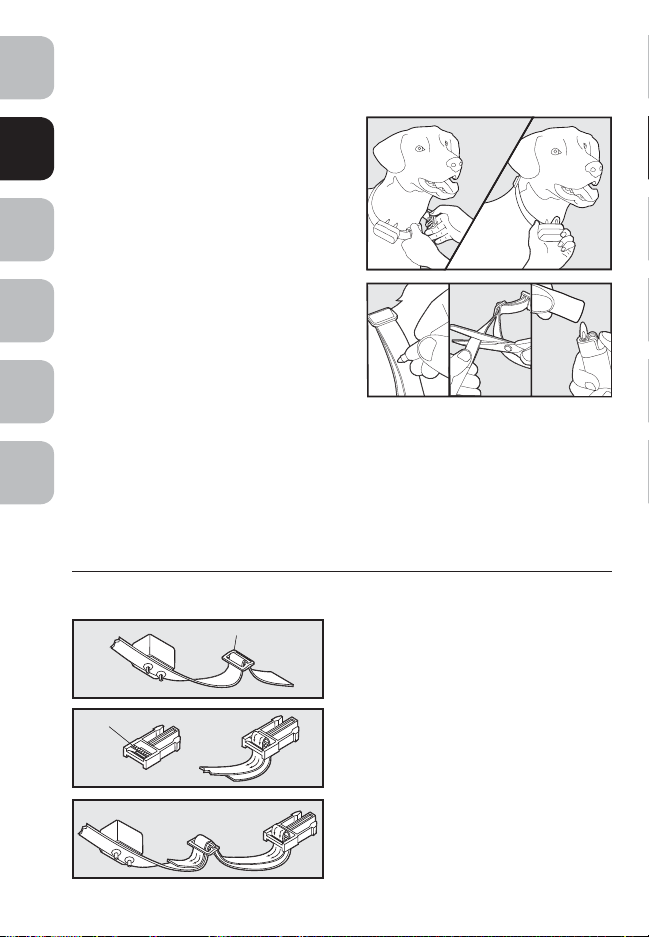
4. Adjust the tightness of the Receiver Collar
to fit your pet’s neck. Check the tightness
ENFRESDE
of the Receiver Collar by inserting one
finger between the end of a Contact Point
and your pet’s neck. The fit should be snug
but not constricting (4B).
5. Allow your pet to wear the Receiver
Collar for several minutes then recheck
the fit. Check the fit again as your pet
becomes more comfortable with the
NLIT
Receiver Collar.
6. Once you are satisfied with the fit of the
Receiver Collar then you may trim any
excess collar strap as follows (4C):
A. Mark the desired length of the
Receiver Collar with a pen. Allow for growth if your pet is young or grows a
thick winter coat.
B. Remove the Receiver Collar from your pet and cut off the excess.
C. Before placing the Receiver Collar back onto your pet, seal the edge of the cut
collar by applying a flame along the frayed edge.
4B
4C
Re-Thread the Collar
Slide Buckle
The slide buckle prevents the collar from
becoming loose around your pet’s neck.
Ridges
The ridges must be facing up; the collar
will slip if it is not properly threaded.
10
www.petsafe.net
Receiver Collar Batteries
The PetSafe® Pawz Away™ Receiver Collar uses
two 3-volt lithium coin cell batteries, size CR2032.
Replacement batteries can be found at many
retailers or through the Customer Care Centre. Visit
our web site at www.petsafe.net to locate a retailer
near you.
Replace the Batteries:
1. Using the edge of the Test Light Tool, turn the
battery door to the OPEN ( ) position.
2. Lift the battery door out and turn the door over.
The two 3-volt lithium coin cell batteries are
stored inside the door.
3. Remove the old batteries and insert new
batteries with the positive (+) side facing the
battery door.
4. Insert battery door back into the Receiver
Collar and turn to either the OFF (O) or ON (l)
position to lock the door in place.
Battery life will vary depending on how often
your pet tests the system and receives a Static
Stimulation. Check the Receiver Collar and Barrier
Transmitter every month to ensure the system is working properly. To prolong battery
life, it is recommended that you turn the Receiver Collar and Barrier Transmitter OFF (O)
when not in use.
Open
Battery
On/Off Dial
EN
FR ES DE
NL IT
www.petsafe.net
11

Additional Features
ENFRESDE
Time Out Feature
For your pet’s safety, the Receiver Collar has a built in Time Out feature. If your pet stays
in the Barrier Area for longer than 15 seconds the Receiver Collar will stop delivering
the Progressive Static Stimulation. The Receiver Collar will then administer a random
single Static Stimulation every 5 to 10 seconds at the maximum level until the pet leaves
the Barrier Area. Once your pet leaves the Barrier Area, the Receiver Collar resets itself
and will deliver a Progressive Static Stimulation the next time your pet enters the
Barrier Area.
NLIT
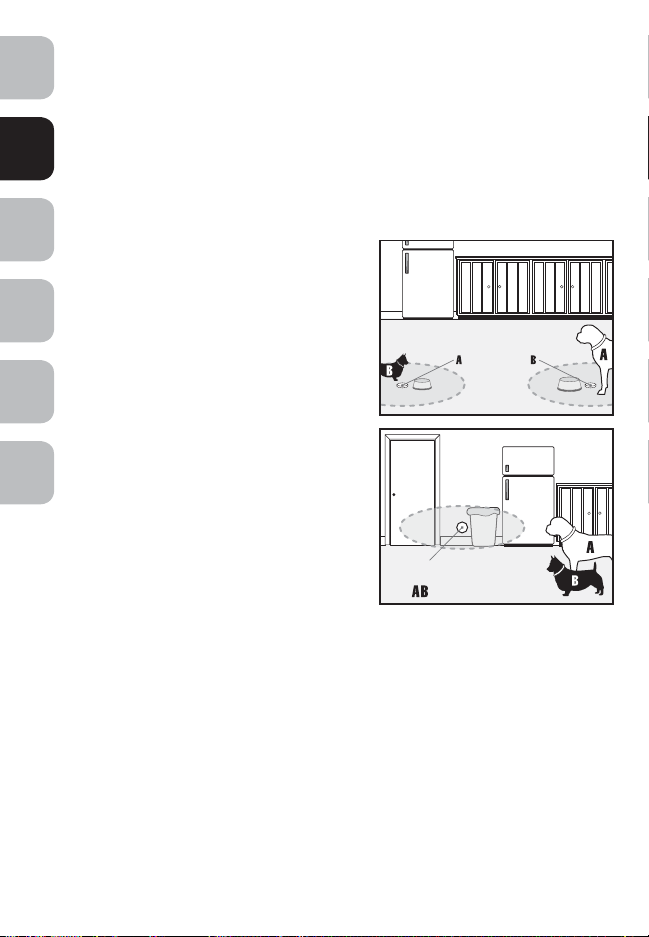
Mode A, B, and AB Feature
For multiple pet households, additional
PetSafe® Pawz Away™ Receiver Collars
can be purchased to work with one
or more PetSafe® Pawz Away™ Mini
Barrier Transmitters. You can set up an
unlimited number of Barrier Transmitters
in your home and an unlimited number of
Receiver Collars can be used with one
Barrier
Transmitter
or more Barrier Transmitters. If you have
multiple pets, you may want to allow
one pet access to an area while denying
access to another pet. With the purchase
of additional Receiver Collars and
Barrier Transmitters, you can accomplish
this by using the Mode A and Mode
B functions.
All PetSafe
®
Pawz Away™ Mini Barrier
Transmitters and Receiver Collars come
preset to mode A. Each Receiver Collar
can operate in one of two different
modes—A or B. Each Barrier Transmitter
may be set to either A, B, or AB mode to
Barrier
Transmitter
allow for multiple configurations.
When the Barrier Transmitter and Receiver Collar are set to mode A, the Barrier
Transmitter denies access to pets wearing a Receiver Collar programmed to mode A.
Receiver Collars set to mode B will not pick up the signal from a Barrier Transmitter set
to mode A.
When the Barrier Transmitter and Receiver Collar are set to mode B, the Barrier
Transmitter denies access to pets wearing a Receiver Collar programmed to mode B.
Receiver Collars set to mode A will not pick up the signal from a Barrier Transmitter set
to mode B.
12
www.petsafe.net
Barrier
Transmitter
When the Barrier Transmitter is set to mode AB, the Barrier Transmitter denies access to
Barrier Transmitter
(Inside View)
BATTERY
BATTERY
BATTERY
all pets wearing Receiver Collars.
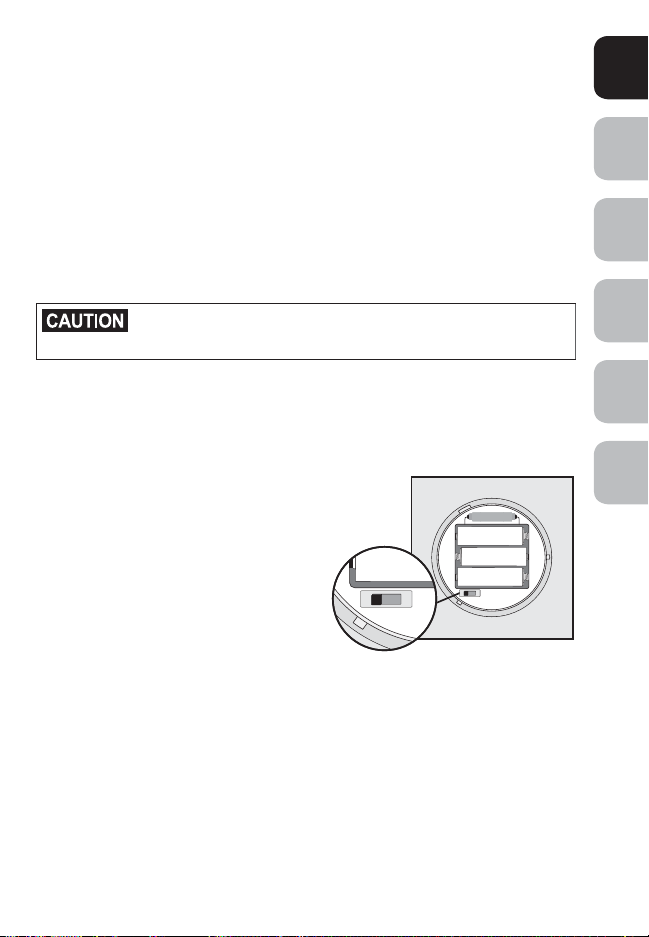
Programming the Mode Settings
All programming is done through the Barrier Transmitter and the programming is
synchronised with the Receiver Collar.
The Receiver Collar cannot be programmed separately from the Barrier Transmitter.
You may synchronise multiple Receiver Collars to a single Barrier Transmitter at one
time. However, make sure any Receiver Collar you do not wish to synchronise is turned
OFF (O) during the programming procedure. Any collar that is within 75 cm of the
Barrier Transmitter and turned ON (l) may be reprogrammed. Familiarise yourself with
the steps outlined below before attempting to program the Barrier Transmitter and
Receiver Collar.
EN
FR ES DE
NL IT
procedures while the Receiver Collar is on your pet.
To prevent an unintended stimulation, do not perform set up
1. Gather the Receiver Collar(s) you wish to synchronise with the Barrier Transmitter.
Turn the Receiver Collar(s) ON (l) and place less than 30 cm from the
Barrier Transmitter.
2. Turn the Barrier Transmitter OFF by pressing the (-) button until there are no bars
displayed in the LCD window. Remove the back cover.
3. The mode switch is located inside the transmitter
and is preset to mode A. Move the switch to the
5A
centre position for mode B or to the right position
for mode AB (5A). Once you have selected
the desired mode, replace the back cover.
Note: If you have selected mode AB you do
not need to proceed with programming the
receiver in the next steps. Receiver Collars
set to mode A or mode B will each receive
the radio signal from a Barrier Transmitter set to
mode AB.
www.petsafe.net
13
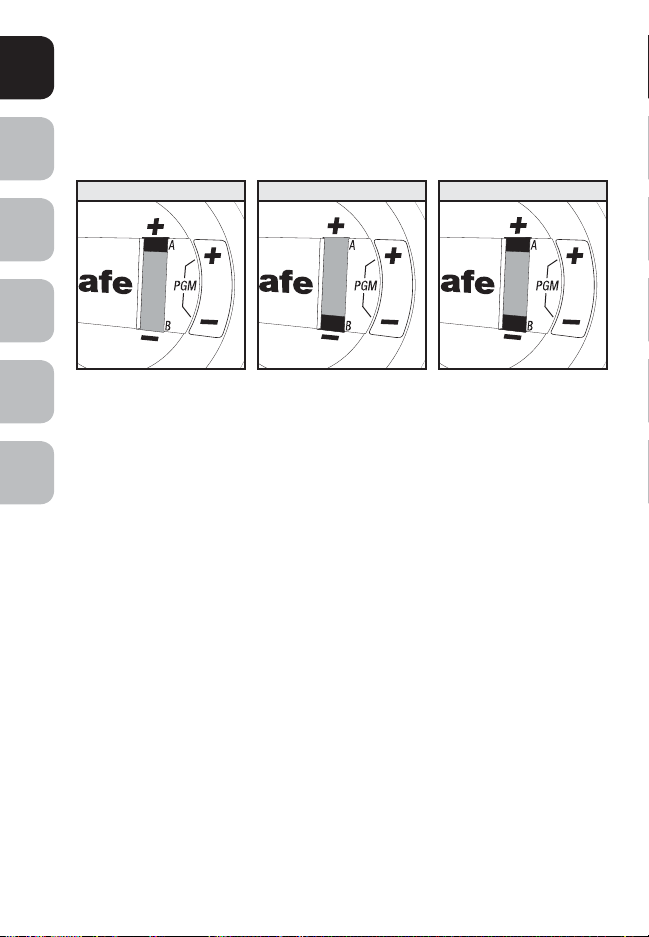
4. To program the Receiver Collar to either mode A or mode B, press and hold the (-)
button and then press the (+) button for approximately 5 seconds. Programming is
ENFRESDE
complete when you hear a series of three beeps from the Receiver Collar.
5. Once the Receiver Collar has been programmed, press the (+) button to turn the
Barrier Transmitter ON. Check to make sure the black bar(s) appear on the LCD
screen indicating the mode you have selected (5B) and reset the Barrier Transmitter
to the desired range.
Mode A Mode B Mode AB
5B
NLIT
TRAINING GUIDE
The PetSafe® Pawz Away™ Mini Pet Barrier operates on the principle of positive
and negative reinforcement. Your pet will learn to avoid the Barrier Areas you have
set after receiving a Progressive Static Stimulation (negative reinforcement) and
your pet will learn that he is more comfortable when he avoids the Barrier Areas
(positive reinforcement).
In some cases, it may not be necessary to train your pet. You can let your pet wander
freely to determine the new boundaries. Monitor your pet during his first
session. Pets learn at different rates and it may take several times for your pet to
successfully understand and honor the Barrier Areas.
Begin Your Pet’s First Session
1. Move your pet away from the Barrier Area.
2. Turn the Receiver Collar ON (l). Place the Receiver Collar around your pet’s neck.
Be sure that the Receiver is directly under your pet’s neck.
3. Allow your pet to wander freely to learn the new boundaries.
14
www.petsafe.net
Further Training
If your pet is confused or unsure how to avoid the Barrier Areas then you may need to
teach your pet how to do so by following these easy training steps:
1. Place a second non-metallic collar on your pet BELOW the Receiver Collar and
attach a long lead.
EN
FR ES DE
Points of the Receiver Collar.
Be sure the extra collar does not put pressure on the Contact
2. Walk your pet toward the Barrier Area. As soon as you hear the tone or you see
that your pet is receiving a Static Stimulation, gently pull him away from the Barrier
Area and back into the safe zone.
3. Reward your pet with praise each time he leaves the Barrier Area.
4. Practice this technique a few times until you feel that your pet is mastering
avoidance of the Barrier Areas.
Be sure to never force or entice your pet to enter the Barrier Areas.
Additional Information
• The system should only be used with healthy pets. Contact your veterinarian if you
have concerns about the medical condition of your pet (medication, pregnant,
heart conditions, etc).
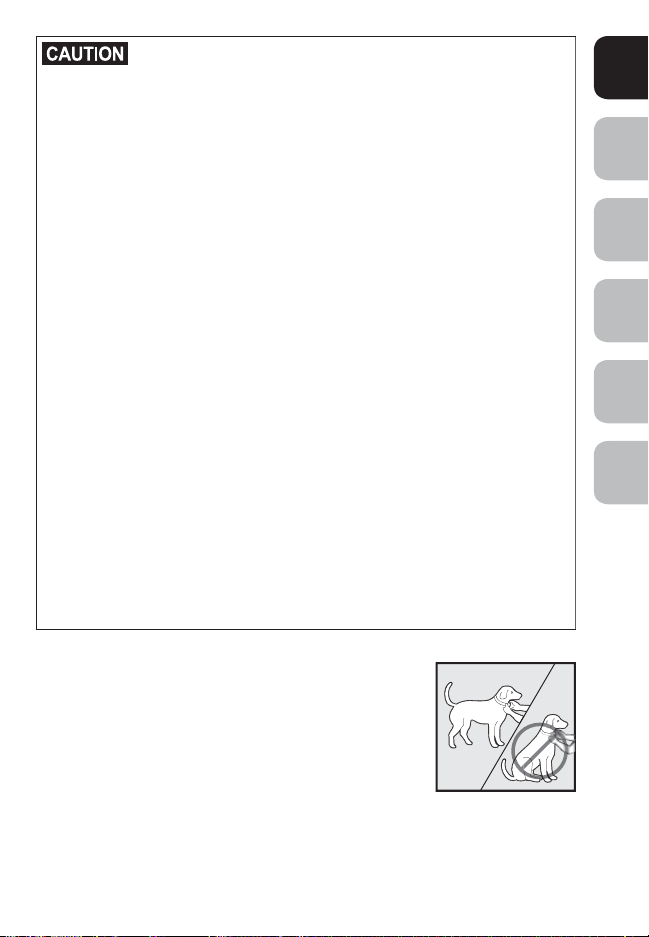
• This system is not for use with aggressive pets. If your pet may pose a threat to
others, DO NOT USE THIS SYSTEM. If you are unsure if your dog is aggressive,
please consult your veterinarian or a certified trainer.
NL IT
www.petsafe.net
15

TROUBLESHOOTING
ENFRESDE
Barrier Transmitter
does not appear
to work.
Barrier Area range is
NLIT
too small.
Barrier Area range is
too big.
• Check segment indicator on Barrier Transmitter.
• Check/replace batteries in Barrier Transmitter.
• Increase the Barrier Area range on the Barrier Transmitter.
• Check that the Barrier Transmitter setting corresponds to
the Receiver Collar setting. (i.e. Barrier Transmitter is set
to mode A and Receiver Collar is synchronised to pick up
mode A (see “Additional Features” section).
• Check/replace batteries in Receiver Collar.
• Adjust Barrier Transmitter range to increase Barrier
Area size.
• Adjust Barrier Transmitter range to decrease Barrier
Area size.
Warranty
Three Year Non-Transferable Limited Warranty
This Product has the benefit of a limited manufacturer’s warranty. Complete details of the
warranty applicable to this Product and its terms can be found at www.petsafe.net and/
or are available by contacting your local Customer Care Centre.
Europe – Radio Systems PetSafe Europe Ltd., 2nd Floor, Elgee Building, Market
Square, Dundalk, Co. Louth, Ireland
Canada – Radio Systems Corporation, 10427 PetSafe Way, Knoxville, TN 37932 USA
Australia/New Zealand – In compliance with the Australian Consumer Law,
Warranties Against Defects, effective January 1, 2012, warranty details of this Product
are as follows: Radio Systems Australia Pty Ltd. (hereinafter referred to as “Radio
Systems”) warrants to the original retail purchaser, and not any other purchaser or
subsequent owner, that its Product, when subject to normal and proper residential use,
will be free from defects in material or workmanship for a period of three (3) years from
the purchase date. An “original retail consumer purchaser” is a person or entity who
originally purchases the Product, or a gift recipient of a new Product that is unopened
and in its original packaging. When serviced by Radio Systems Customer Service,
Radio Systems covers labour and parts for the first three years of ownership; after the
first three years, a service or upgrade charge will apply relative to replacement of the
Product with new or refurbished items at Radio Systems’ sole discretion.
The limited warranty is non-transferrable and shall automatically terminate if the original
retail consumer purchaser resells the Radio Systems Product or transfers the property on
which the Radio Systems Product is installed. This Limited Warranty excludes accidental
damage due to dog chews; lightning damage; or neglect, alteration, and misuse.
Consumers who purchase products outside of Australia, New Zealand, or from an
unauthorised dealer will need to return the Product to the original place of purchase for
any warranty issues.
16
www.petsafe.net

Please note that Radio Systems does not provide refunds, replacements, or upgrades for
change of mind, or for any other reason outside of these Warranty terms.
Claims Procedure: Any claim made under this Warranty should be made directly to
Radio Systems Australia Pty Ltd. Customer Care Centre at:
Radio Systems Australia Pty Ltd.
PO Box 7266, Gold Coast Mail Centre QLD 9726, Australia
Australia Residents: 1800 786 608
New Zealand Residents: 0800 543 054
Email: info@petsafeaustralia.com.au
To file a claim, a proof of purchase must be provided. Without a proof of purchase,
Radio Systems will not repair or replace faulty components. Radio Systems requests the
Consumer to contact the Radio Systems Customer Care Centre to obtain a Warranty
Return number, prior to sending the Product. Failure to do so may delay in the repair or
replacement of the Product.
If the Product is deemed to be faulty within 30 days from date of original purchase,
Radio Systems will organise for a replacement to be sent in advance of returning
the faulty Product. A Post Bag will be included with the replacement Product for the
return of the faulty Product. The Product must be returned within 7 days of receiving
the replacement. If the Product is deemed to be faulty after 30 days from the date of
original purchase, the consumer will be required to return the Product to Radio Systems
at the consumer’s own expense. Radio Systems will test and replace the faulty unit or its
components and return to the consumer free of charge, provided the Product is within its
said warranty period. This warranty is in addition to other rights and remedies available
to you under the law. Radio Systems goods come with guarantees that cannot be
excluded under the Australia Consumer Law. You are entitled to a replacement or refund
for a major failure and for compensation for any other reasonably foreseeable loss or
damage. You are also entitled to have the goods repaired or replaced if the goods fail
to be of acceptable quality and the failure does not amount to a major failure.
Should you have any queries or require any further information, please contact
our Customer Care Centre on 1800 786 608 (Australia) or 0800 543 054
(New Zealand).
EN
FR ES DE
NL IT
www.petsafe.net
17
Compliance
Modification or changes to this equipment not expressly approved by Radio Systems
ENFRESDE
Corporation may void the user’s authority to operate the equipment.
This Product has been tested and found to comply with the EU Electromagnetic
Compatibility and Low Voltage Directive. Unauthorised changes or modifications to
the Product that are not approved by Radio Systems Corporation could void the user’s
authority to operate the Product, and void the warranty.
NLIT
This Product is in compliance with the provisions of the EMC and LV directives. The
Declaration of Conformity can be found at: www.petsafe.net/customercare/eu_docs.php.
IC
This device complies with Industry Canada licence-exempt RSS standard(s). Operation
is subject to the following two conditions: (1) this device may not cause interference,
and (2) this device must accept any interference, including interference that may cause
undesired operation of the device.
ACMA
This device complies with the applicable EMC requirements specified by the ACMA
(Australian Communications and Media Authority).
Battery Disposal
Separate collection of spent batteries is required in many regions; check the regulations
in your area before discarding spent batteries. This device operates on three AAA
alkaline and two (CR2032) lithium batteries. Replace only with equivalent battery
available from the Customer Care Centre. For a listing of Customer Care Centre
telephone numbers in your area, visit www.petsafe.net.
Important Recycling Advice
Please respect the Waste Electrical and Electronic Equipment regulations in your
country. This equipment must be recycled. At the end of the product life, do not place it
in the normal municipal waste system. Please check the regulations in your area or return
it to where it was purchased so that it can be placed in our recycling system. If these
options are not possible, please contact the Customer Care Centre for
further information.
18
www.petsafe.net

Terms of Use and Limitation of Liability
1. Terms of Use
Use of this Product is subject to your acceptance without modification of the terms,
conditions and notices contained herein. Use of this Product implies acceptance
of all such terms, conditions and notices. If you do not wish to accept these terms,
conditions, and notices, please return the Product, unused, in its original packaging
and at your own cost and risk to the relevant Customer Care Centre together with
proof of purchase for a full refund.
2. Proper Use
This Product is designed for use with pets where training is desired. The specific
temperament or size/weight of your pet may not be suitable for this Product.
Radio Systems Corporation recommends that this Product is not used if your pet is
aggressive and accepts no liability for determining suitability in individual cases. If
you are unsure whether this Product is appropriate for your pet, please consult your
veterinarian or certified trainer priorto use. Proper use includes, without limitation,
reviewing the entire Training Guide and any specific safety information statements.
3. No Unlawful or Prohibited Use
This Product is designed for use with pets only. This pet training device is not
intended to harm, injure or provoke. Using this Product in a way that is not intended
could result in violation of Federal, State or local laws.
4. Limitation of Liability
In no event shall Radio Systems Corporation or any of its associated companies
be liable for (i) any indirect, punitive, incidental, special or consequential damage
and/or (ii) any loss or damages whatsoever arising out of or connected with the
misuse of this Product. The Purchaser assumes all risks and liability from the use of
this Product to the fullest extent permissible by law.
5. Modification of Terms and Conditions
Radio Systems Corporation reserves the right to change the terms, conditions
and notices governing this Product from time to time. If such changes have been
notified to you prior to your use of this Product, they shall be binding on you as if
incorporated herein.
EN
FR ES DE
NL IT
Covered by U.S. Patent Nos.: 7,046,152; 7,068,174; 7,117,822; 7,204,204;
7,278,376; 7,495,570; 8,342,135.
www.petsafe.net
19
Radio Systems Corporation, Radio Systems PetSafe Europe Ltd., Radio Systems Australia
Pty Ltd. et tout autre filière ou marque de Radio Systems Corporation peuvent-être
ENFRESDE
collectivement désignées par « nous » à partir de la lecture de ce document.
Consignes de sécurité importantes
Description des termes et symboles utilisés dans ce manuel
Ce symbole est une alerte de sécurité. Il sert à vous avertir d’un risque de
blessure. Respectez tous les messages de sécurité qui suivent ce symbole afin
NLIT
d’éviter tout risque de blessure ou de mort.
AVERTISSEMENT indique une situation dangereuse
qui, si elle n’est pas évitée, risque d’entraîner la mort ou
des blessures graves.
ATTENTION, utilisé sans le symbole d’alerte de sécurité,
indique une situation dangereuse qui, si elle n’est pas
évitée, peut blesser votre animal.
AVIS indique les pratiques d’utilisation sûres qui ne
risquent pas d’entraîner de blessures corporelles.
Risque d’explosion. Ne provoquez pas de court-circuit, ne mélangez pas les piles
neuves avec les piles usagées, ne les jetez pas au feu et ne les exposez pas à l’eau.
Lorsque les piles sont entreposées ou mises au rebut, elles doivent être protégées contre
les courts-circuits. Jetez les piles usagées de façon appropriée.
Ce produit ne doit pas être utilisé avec des chiens agressifs. N’utilisez pas ce produit si
votre chien a tendance à avoir un comportement agressif. Les chiens agressifs peuvent
provoquer chez leur maîtres ou autrui des blessures graves ou la mort. Si vous n’êtes pas
sûr(e) que ce produit convient à votre chien, veuillez consulter votre vétérinaire ou un
dresseur professionnel.
Ce système n’est PAS une barrière solide. Le système a été conçu pour avoir un effet
dissuasif, utilisant la stimulation électrostatique afin de conditionner les animaux de
compagnie à rester hors de la zone de barrière établie. Il est important que vous
renforciez régulièrement le dressage avec votre animal. Étant donné que le niveau
de tolérance à la stimulation électrostatique varie selon l’animal, Radio Systems
Corporation N’EST PAS EN MESURE de garantir que le système maintienne de façon
systématique votre animal de compagnie hors de la zone de barrière établie. Ainsi, si
vous avez des raisons de penser que votre animal puisse se blesser ou constituer un
danger pour autrui s’il y a des chances qu’il puisse passer la zone de barrière, vous
20
www.petsafe.net

ne devriez PAS vous reposer uniquement sur ce système pour retenir votre animal.
Radio Systems Corporation NE sera tenu responsable d’aucune blessure sur les
personnes, d’aucun dommage matériel, d’aucune blessure sur votre animal voire son
décès, d’aucune perte financière ou d’aucun dommage direct résultant du passage de
la zone de barrière par tout animal.
Il est important que le collier-récepteur soit bien ajusté. Un collier-récepteur porté trop
longtemps ou trop serré peut irriter la peau de l’animal. Les effets peuvent aller d’une
rougeur à des ulcères de pression, trouble communément appelé escarre de décubitus.
• Évitez de laisser votre animal de compagnie porter le collier-récepteur plus de
12 heures par jour.
• Dans la mesure du possible, changez la position du collier-récepteur toutes les
1 ou 2 heures sur le cou de votre animal.
• Vérifiez que le collier est bien positionné pour éviter toute pression excessive ;
suivez les instructions contenues dans ce manuel.
• N’attachez jamais de laisse au collier-récepteur, car cela exercerait une pression
excessive sur les contacteurs.
• Lorsque vous utilisez un autre collier avec une laisse, veillez à ce qu’il n’exerce pas
de pression sur le collier-récepteur.
• Lavez le cou de l’animal et les contacteurs du collier-récepteur avec un chiffon
humide chaque semaine.
• Examinez quotidiennement la zone de contact pour détecter toute rougeur
ou plaie.
• En cas d’irritation ou de douleur, interrompez l’utilisation du collier-récepteur
jusqu’à ce que la peau soit guérie.
• Si le problème persiste au-delà de 48 heures, consultez votre vétérinaire.
• Pour obtenir des informations supplémentaires sur les escarres de décubitus et la
nécrose cutanée, consultez notre site internet.
Ces précautions vous permettront de garantir la sécurité et le confort de votre animal.
Des millions d’animaux n’ont aucun problème à porter les contacteurs en acier
inoxydable. Certains sont sensibles à la pression des contacteurs. Après un certain
temps, il est probable que votre animal tolère très bien le collier-récepteur. Si c’est le
cas, certaines précautions peuvent être assouplies. Il est important de poursuivre les
contrôles quotidiens de la zone de contact. En cas de rougeur ou de plaie, cessez
d’utiliser le collier jusqu’à la guérison complète de la peau.
Vous aurez peut-être besoin de tailler les poils dans la zone des contacteurs. Ne
rasez jamais le cou de votre animal, car cela risquerait de provoquer des irritations ou
une infection.
Pour éviter toute stimulation inopinée, ne procédez pas aux paramétrage du collierrécepteur lorsque celui-ci est au cou de votre animal.
Si vous utilisez un collier et une laisse pour le dressage, assurez-vous que le collier
supplémentaire n’appuie pas sur les contacteurs du collier-récepteur.
EN
FR ES DE
NL IT
www.petsafe.net
21

Merci d’avoir choisi la marque PetSafe®. Votre relation avec votre animal doit être
faite de moments mémorables et d’une complicité mutuelle. Nos produits vous
ENFRESDE
donnent les outils et les technologies pour réussir le dressage de votre animal.
Pour toute question concernant nos produits ou le dressage de votre
animal, veuillez consulter notre site internet, www.petsafe.net, ou
contacter notre service clientèle. Pour obtenir la liste des numéros
de téléphone de notre service clientèle, consultez notre site internet,
www.petsafe.net.
Pour bénéficier pleinement de votre garantie, veuillez enregistrer votre article sous
30 jours sur le site www.petsafe.net. En enregistrant votre produit et en conservant votre
NLIT
reçu, vous bénéficierez d’une garantie complète et d’une réponse plus rapide de la
part du service clientèle. Il est important de souligner que vos informations personnelles
ne seront jamais fournies ni vendues à qui que ce soit. Une description complète de la
garantie est disponible sur le site www.petsafe.net.
TABLE DES MATIÈRES
Contenu du kit 23
Articles dont vous pourriez avoir besoin 23
Fonctionnement du système 23
Définitions 24
Manuel d’utilisation 24
Installation de l’émetteur de barrière 24
Paramétrage de l’émetteur de barrière 25
Test de la zone de barrière 25
Ajustement du collier-récepteur sur votre animal 26
Enfiler de nouveau le collier 28
Piles du collier-récepteur 29
Caractéristiques supplémentaires 30
Fonction Délai d’inactivité 30
Fonction Modes A, B et AB 30
Programmation des paramètres de mode 31
Manuel de dressage 32
Démarrage de la première séance avec votre animal 32
Dressage supplémentaire 33
Informations supplémentaires 33
Dépannage 34
Garantie 34
Conformité 35
Élimination des batteries usagées 35
Remarque importante concernant le recyclage 35
Conditions d’utilisation et limitation de responsabilité 36
22
www.petsafe.net
Contenu du kit
EN
®
Émetteur de barrière
(3 piles AAA, non fournies)
Clé multifonctions
Deux piles au lithium 3 V
pour collier-récepteur
(CR2032)
Sangle pour collier
pour chat
Collier-récepteur
Manuel d’utilisation et
de dressage
Articles dont vous pourriez avoir besoin
• Foreuse et matériel de montage
• Collier et laisse non métalliques
• Ciseaux
• Briquet
Fonctionnement du système
La Mini barrière pour animaux domestiques PetSafe® Pawz Away™ tient votre chien
éloigné de certaines pièces, des ordures, des meubles, etc. Il suffit de placer l’émetteur
de barrière à côté de la zone que votre animal doit éviter. La Mini barrière pour animaux
émet un signal radio elliptique ajustable allant jusqu’à 0,76 mètre de rayon. Votre animal
porte un collier-récepteur doté de contacteurs touchant son cou. Lorsque votre animal
entre dans la zone de barrière, il entend une série de signaux sonores provenant du
collier-récepteur et reçoit une stimulation électrostatique progressive, sans danger pour
lui, délivrée par les contacteurs sur son cou. La stimulation électrostatique progressive
retient son attention mais ne lui fait aucun mal. La stimulation continue jusqu’à ce que votre
animal sorte de la zone de barrière. Si votre animal ne s’éloigne pas, le collier maintient
la stimulation au niveau maximum de trois secondes jusqu’aux 15 secondes de délai
d’inactivité. La Mini barrière pour animaux domestiques PetSafe® Pawz Away™ a été
déclarée sans danger, confortable et efficace pour les animaux de compagnie âgés d’au
moins 6 mois et pesant au moins 2,25 kg.
www.petsafe.net
23
FR ES DE
NL IT
Définitions
L’émetteur de barrière : émet le signal radio sans fil
ENFRESDE
La zone de barrière : zone dont vous souhaitez interdire l’accès à votre animal
Collier-récepteur : reçoit le signal radio de l’émetteur de barrière
Contacteurs : délivrent la stimulation électrostatique progressive et sans danger pour
votre animal lorsque celui-ci entre dans la zone barrière
Stimulation électrostatique progressive : la stimulation électrostatique
démarre au niveau le plus bas puis augmente progressivement pour atteindre son
maximum dans les 3 secondes suivant la première détection dans la zone barrière. Des
3 secondes jusqu’aux 15 secondes de délai d’inactivité, le collier continue à émettre
NLIT
une stimulation au niveau maximum jusqu’à ce que votre animal quitte la zone barrière.
Écran
d'affichage
LCD
Zone
barrière
Contacteurs
www.petsafe.net
®
Cadran Marche/Arrêt
Bouton Plus
Émetteur de
barrière
Collier-
récepteur
Pile ouverte
Bouton Moins
MANUEL D’UTILISATION
ÉTAPE 1
Installation de l’émetteur de barrière
L’émetteur de barrière émet un signal radio de tous les côtés dans une configuration
elliptique. Le signal peut émettre à travers un mur ou à travers un plafond/sol. L’émetteur
de barrière peut être posé à plat sur une surface ou accroché à un mur. Si vous
choisissez de suspendre l’émetteur de barrière, veuillez noter que le signal devient très
directionnel ; le signal devient plus fort directement en face et à l’arrière de l’appareil. Le
signal est plus faible sur les côtés de l’appareil.
Il ne faut pas :
• Accrocher l’émetteur de barrière sur un mur métallique
• Poser l’émetteur de barrière sur des surfaces métalliques
• Poser l’émetteur de barrière à côté de grands objets métalliques comme des
réfrigérateurs, des laveurs automatiques, etc.
• Poser l’émetteur de barrière à côté de hauts-parleurs
24
www.petsafe.net
ÉTAPE 2
Paramétrage de l’émetteur de barrière
EN
paramétrage du collier-récepteur lorsque celui-ci est au cou de votre animal.
1. Retournez l’émetteur de barrière et faites tourner le
couvercle de l’arrière de l’appareil dans le sens
anti-horaire pour le retirer. Installez trois (3) piles
alcalines AAA et remettez le couvercle. Faites-le
tourner dans le sens horaire pour le refermer.
2. Tournez l’émetteur de barrière de façon à avoir le côté
droit de l’appareil dirigé vers le haut puis appuyez une
fois sur le bouton MARCHE (+) pour mettre l’émetteur de
barrière en MARCHE. Une barre noire située dans le coin
en haut à droite de la fenêtre de l’écran LCD indique que l’émetteur de barrière est
en mode A* (2A).
3. Une deuxième barre noire située dans la partie inférieure de l’écran LCD indique
que la portée est réglée sur un segment. Chaque segment représente une distance
d’environ 13 cm de l’appareil. Vous pouvez créer une zone barrière allant de
13 cm à 76 cm de l’appareil. En utilisant les bouton (+) et (-), réglez la portée de
façon à obtenir la zone barrière souhaitée pour votre animal.
*
Toutes les petites barrières et tous les colliers-récepteurs sont pré-réglés sur le mode A.
Pour les foyers n’ayant qu’un seul animal, vous n’aurez besoin que du mode A de
l’émetteur de barrière. La fonction des modes A et B est destinée à être utilisée dans
des foyers où vivent plusieurs animaux de compagnie et vous permet de laisser libre
accès à une zone pour certains d’entre eux tout en interdisant son accès aux autres.
Veuillez vous référer à la section Caractéristiques supplémentaires de ce manuel
d’utilisation et de dressage pour les instructions d’utilisation des modes A et B.
Pour éviter toute stimulation inopinée, ne procédez jamais aux
2A
ÉTAPE 3
Test de la zone de barrière
1. En évitant de toucher les contacteurs, utilisez les bords
de la clé multifonctions pour faire tourner le couvercle
du compartiment à pile en position MARCHE (l).
2. Tenez le collier-récepteur de manière à ce que les
contacteurs soient dirigés vers le haut et que le logo
PetSafe® fasse face à l’émetteur de barrière. Placez
la clé multifonctions sur les contacteurs de façon à ce
que le fil de la clé multifonctions les touche (3A).
www.petsafe.net
3A
FR ES DE
NL IT
25
3. Tenez le collier-récepteur environ à hauteur du cou
votre animal (3B). Commencez à l’extérieur de la
ENFRESDE
portée puis marchez doucement vers l’émetteur de
barrière. Alors que vous atteignez la zone barrière,
le collier-récepteur émet une série de signaux
sonores aigus. À chaque signal que vous entendez,
vous devez également voir la clé multifonctions
clignoter indiquant qu’une stimulation
électrostatique progressive est délivrée. Le signal
du collier-récepteur peut facilement être entendu
NLIT
par les animaux mais peut être à un niveau sonore
difficile à entendre pour certains humains.
4. Vérifiez la portée de la zone barrière sous différents angles afin de vous assurer
que vous obtenez bien la couverture souhaitée.
REMARQUE : si vous n’obtenez pas la portée souhaitée au réglage maximum,
déplacez l’émetteur de barrière de 30 cm ou décrochez-le et posez-le sur une surface
plane. Les objets métalliques peuvent interférer avec le champ magnétique et changer
la portée du signal de transmission. L’effet sur la portée dépend de la taille et de la
forme des objets. La portée du signal peut être réduite si l’émetteur de barrière est placé
sur un sol en béton, en raison de l’armature en acier contenu dans celui-ci. Pour obtenir
une meilleure portée, placez l’émetteur de barrière sur une surface non conductrice,
comme (par exemple un parquet ou une table en bois). Mettre l’émetteur de barrière
sous un canapé ou lit peut réduire la portée en raison de la présence de ressorts
métalliques qui altèrent le champ magnétique.
3B
ÉTAPE 4
Ajustement du collier-récepteur sur votre animal
Important : Il est indispensable que le collier-récepteur soit bien placé et ajusté pour
garantir son bon fonctionnement. Les contacteurs doivent être directement en contact
avec la peau de votre animal, au bas du cou.
26
www.petsafe.net
récepteur porté trop longtemps ou trop serré peut irriter la peau de l’animal. Les effets
peuvent aller d’une rougeur à des ulcères de pression, trouble communément appelé
escarre de décubitus.
• Évitez de laisser votre animal de compagnie porter le collier-récepteur plus de
12 heures par jour.
• Dans la mesure du possible, changez la position du collier-récepteur toutes les
1 ou 2 heures sur le cou de votre animal.
• Vérifiez que le collier est bien positionné pour éviter toute pression excessive ;
suivez les instructions contenues dans ce manuel.
• N’attachez jamais de laisse au collier-récepteur, car cela exercerait une pression
excessive sur les contacteurs.
• Lorsque vous utilisez un autre collier avec une laisse, veillez à ce qu’il n’exerce
pas de pression sur le collier-récepteur.
• Lavez le cou de l’animal et les contacteurs avec un chiffon humide
chaque semaine.
• Examinez quotidiennement la zone de contact pour détecter toute rougeur ou plaie.
• En cas d’irritation ou de douleur, interrompez l’utilisation du collier-récepteur
jusqu’à ce que la peau soit guérie.
• Si le problème persiste au-delà de 48 heures, consultez votre vétérinaire.
• Pour obtenir des informations supplémentaires sur les escarres de décubitus et la
nécrose cutanée, consultez notre site internet.
Ces précautions vous permettront de garantir la sécurité et le confort de votre
animal. Des millions d’animaux n’ont aucun problème à porter les contacteurs en
acier inoxydable. Certains sont sensibles à la pression des contacteurs. Après un
certain temps, il est probable que votre animal tolère très bien le collier. Si c’est le
cas, certaines précautions peuvent être assouplies. Il est important de poursuivre les
contrôles quotidiens de la zone de contact. En cas de rougeur ou de plaie, cessez
d’utiliser le collier jusqu’à la guérison complète de la peau.
Vous aurez peut-être besoin de tailler les poils dans la zone des contacteurs. Ne
rasez jamais le cou de votre chien, car cela risquerait de provoquer des irritations ou
une infection.
Pour que le collier soit bien ajusté, veuillez suivre les
étapes ci-dessous :
1. En utilisant les bords de la clé multifonctions, mettez le
couvercle du compartiment à pile en position ARRÊT (O).
2. Commencez par faire tenir votre animal debout,
confortablement (4A).
3. Mettez le collier-récepteur au cou de votre animal de
compagnie de manière à ce que le logo PetSafe
Centrez les contacteurs en dessous du cou de votre animal, en contact avec la
Il est important que le collier-récepteur soit bien ajusté. Un collier-
4A
®
soit orienté vers son menton.
www.petsafe.net
EN
FR ES DE
NL IT
27
peau. Si votre animal a de longs poils ou des poils épais, il peut s’avérer nécessaire
de couper les poils autour des contacteurs pour garantir un contact efficace.
ENFRESDE
REMARQUE : le collier-récepteur est fourni avec des contacteurs courts. Il est
possible de se procurer des contacteurs longs en contactant le service clientèle.
4. Réglez le collier-récepteur autour du cou
de votre animal afin qu’il soit bien ajusté.
4B
Vérifiez l’ajustement du collier-récepteur
en insérant un doigt entre l’extrémité du
contacteur et le cou de votre animal.
L’ajustement doit être serré mais sans
NLIT
comprimer (4B).
5. Laissez le collier-récepteur sur votre
animal pendant plusieurs minutes, puis
vérifiez à nouveau l’ajustement. Une
4C
fois que votre animal s’est habitué au
collier-récepteur, vérifiez encore qu’il est
bien ajusté.
6. Une fois satisfait(e) de l’ajustement du
collier-récepteur, vous pouvez couper la
partie excédentaire du collier de la manière suivante (4C) :
A. Faites une marque indiquant la longueur désirée du collier-récepteur avec un
crayon. Laissez une longueur suffisante si votre animal n’a pas encore atteint sa
taille adulte ou si son poil épaissit en hiver.
B. Retirez le collier-récepteur et coupez l’excédent.
C. Avant de remettre le collier-récepteur au cou de votre animal, soudez le bord
coupé du collier en appliquant une flamme sur la partie effilochée.
Enfiler de nouveau le collier
Boucle coulissante
La boucle coulissante empêche le
collier de se relâcher autour du cou de
votre animal.
28
Rainures
Les rainures doivent être dirigées vers le
haut ; le collier se desserrera s’il n’est pas
correctement enfilé dans la boucle.
www.petsafe.net
Piles du collier-récepteur
Le collier-récepteur PetSafe® Pawz Away™ utilise deux piles plates au lithium de 3 volt de
taille CR2032. Vous pouvez vous procurer des piles de rechange auprès de nombreux
points de vente au détail. Contactez notre service clientèle ou consultez notre site internet,
www.petsafe.net, pour obtenir l’adresse du revendeur le plus proche.
Remplacement des piles :
1. En utilisant les bords de la clé multifonctions,
faites tourner le couvercle du compartiment à
pile en position OUVERT ( ).
2. Soulevez le couvercle du compartiment à pile
puis retournez-le. Les deux piles plates au lithium
de 3 volt sont placées dans le couvercle.
3. Retirez les piles usagées puis insérez les
nouvelles avec le côté positif (+) dirigé vers le
couvercle du compartiment à pile.
4. Insérez le couvercle du compartiment à pile
dans le collier-récepteur puis mettez en position
ARRÊT (O) ou MARCHE (I) pour fermer
le compartiment.
L’autonomie de la batterie variera selon la fréquence
à laquelle votre animal testera le système et recevra
une stimulation électrostatique. Contrôlez le
collier-récepteur et l’émetteur de barrière chaque
mois pour vous assurer que le système fonctionne
correctement. Pour prolonger l’autonomie de la pile,
il est recommandé d’éteindre le collier-récepteur et
l’émetteur de barrière lorsqu’ils ne sont pas utilisés.
Cadran Marche/Arrêt
Pile ouverte
EN
FR ES DE
NL IT
www.petsafe.net
29
Caractéristiques supplémentaires
ENFRESDE
Fonction Délai d’inactivité
Pour la sécurité de votre animal, le collier-récepteur est doté d’une fonction délai
d’inactivité. Si votre animal reste dans la zone barrière pendant plus de 15 secondes le
collier-récepteur arrête de délivrer la stimulation électrostatique progressive. Le
collier-récepteur administre alors une stimulation électrostatique répétée toutes les 5 à
10 secondes au niveau maximum jusqu’à ce que l’animal quitte la zone barrière. Dès
que votre animal quitte la zone barrière, le collier-récepteur se réinitialise et délivrera
une stimulation électrostatique progressive la prochaine fois que votre animal entrera
dans la zone barrière.
NLIT
Fonction Modes A, B et AB
Pour les foyers possédant plusieurs animaux de
compagnie, il est possible de se procurer des
colliers-récepteurs supplémentaires PetSafe®
Pawz Away™ pouvant fonctionner avec un ou
Émetteur de
barrière
plusieurs émetteurs de petite barrière PetSafe®
Pawz Away™. Vous pouvez paramétrer un
nombre illimité d’émetteurs de barrière chez
vous et il est possible d’utiliser un nombre illimité
de colliers-récepteurs avec un ou plusieurs
émetteurs de barrière. Si vous avez plusieurs
animaux, il est possible que vous souhaitiez
permettre à un animal d’accéder à une zone
alors que vous en interdisez l’accès à un autre.
En vous procurant des colliers-récepteurs et des
émetteurs de barrière supplémentaires, il est
possible de réaliser ce cas de figure en utilisant
Émetteur de
barrière
les fonctions des modes A et B.
Tous les émetteurs de petite barrière et les colliers-récepteurs PetSafe
sont pré-réglés sur le mode A. Chaque collier-récepteur peut fonctionner en un ou
plusieurs modes différents : A ou B. Chaque émetteur de barrière peut être paramétré
sur le mode A, B ou AB afin de permettre de multiples configurations.
Lorsque l’émetteur de barrière et le collier-récepteur sont paramétrés en mode A,
l’émetteur de barrière interdit l’accès aux animaux portant un collier-récepteur
programmé en mode A. Les colliers-récepteurs paramétrés en mode B ne captent pas le
signal d’un émetteur de barrière paramétré en mode A.
Lorsque l’émetteur de barrière et le collier-récepteur sont paramétrés en mode B,
l’émetteur de barrière interdit l’accès aux animaux portant un collier-récepteur
programmé en mode B. Les colliers-récepteurs paramétrés en mode A ne captent pas le
signal d’un émetteur de barrière paramétré en mode B.
Émetteur de
barrière
®
Pawz Away™
30
www.petsafe.net
 Loading...