

Petsafe pawz away PWF00-13665 Operating And Training Manual
®
pawz away™
mini
pet barrier
La petite barrière pour
animal de compagnie
Operating and training guide
Manuel d’utilisation et de dressage
PWF00-13665
PLEASE READ THIS ENTIRE GUIDE BEFORE BEGINNING • VEUILLEZ LIRE CE MANUEL EN ENTIER AVANT DE COMMENCER
2 Customer Care Center 00 800 18 18 20 20
Important Safety Information
Explanation of Attention Words and Symbols used in this guide
This is the safety alert symbol. It is used to alert you to potential personal injury hazards. Obey all safety
messages that follow this symbol to avoid possible injury or death.
WARNING indicates a hazardous situation which, if not avoided, could result in death or serious injury.
CAUTION, used without the safety alert symbol, indicates a hazardous situation which, if not avoided,
could result in harm to your pet.
NOTICE is used to address safe use practices not related to personal injury.
Not for use with aggressive dogs. Do not use this product if your dog is prone to aggressive behavior. Aggressive
dogs can cause severe injury or death to their owners and others. If you are not sure that this product is right for
your dog, please talk to your veterinarian or a certified trainer.
This System is NOT a solid barrier. The system is designed to act as a deterrent, using Static Correction to
condition pets to remain outside of the established barrier area. It is important that you reinforce training with
your pet on a regular basis. Since the tolerance level to Static Correction varies from pet to pet, Radio Systems
Corporation CANNOT guarantee that the system will in all cases keep a pet outside of the established barrier area.
Not all pets can be trained to avoid entering the barrier area. Therefore, if you have reason to believe that your
pet may harm himself or pose a danger to others if he is not kept from entering the barrier area, you should NOT
rely solely upon this system to restrict your pet. Radio Systems Corporation shall NOT be liable for any personal
injuries, property damage, injury to or death of your pet, economic loss or any consequential damages sustained
as a result of any animal entering the barrier area.

www.petsafe.net 3
Proper fit of the collar is important. A collar worn for too long or made too tight on the pet’s neck may cause
skin damage. Ranging from redness to pressure ulcers; this condition is commonly known as bed sores.
- Avoid leaving the collar on the pet for more than 12 hours per day.
- When possible reposition the collar on the pet’s neck every 1 to 2 hours.
- Check the fit to prevent excessive pressure; follow the instructions in this manual.
- Never connect a lead to the electronic collar; it will cause excessive pressure on the contacts.
- When using a separate collar for a lead, don’t put pressure on the electronic collar.
- Wash the pet’s neck area and the contacts of the collar weekly with a damp cloth.
- Examine the contact area daily for signs of a rash or a sore.
- If a rash or sore is found, discontinue use of the collar until the skin has healed.
- If the condition persists beyond 48 hours, see your veterinarian.
- For additional information on bed sores and pressure necrosis, please visit our website.
These steps will help keep your pet secure and comfortable. Millions of pets are comfortable while they wear
stainless steel contacts. Some pets are sensitive to contact pressure. You may find after some time that your
pet is very tolerant of the collar. If so, you may relax some of these precautions. It is important to continue
daily checks of the contact area. If redness or sores are found, discontinue use until the skin has fully healed.
You may need to trim the hair in the area of the Contact Points. Never shave the pet’s neck; this may lead
to a rash or infection.
• To prevent an unintended correction, do not perform set up procedures while the Receiver Collar is on your pet.
• If you are using a collar and leash for training, be sure the extra collar does not put pressure on the Contact Points
of the Receiver Collar.

4 Customer Care Center 00 800 18 18 20 20
Table of Contents
Components ....................................................................... 5
Other Items You May Need ................................................ 5
How the System Works ......................................................6
Key Definitions ...................................................................6
Operating Guide .............................................................. 7
Install the Barrier Transmitter .........................................7
Set Up the Barrier Transmitter ........................................7
Fit the Receiver Collar on Your Pet ................................ 9
To Re-Thread the Collar ............................................... 10
Receiver Collar Batteries .............................................. 11
Additional Features ......................................................12
Time Out Feature ..........................................................12
Mode A, B, and AB Feature .........................................12
Programming the Mode Settings .................................14
Training Guide ...............................................................16
Begin Your Pet’s First Session .....................................16
Further Training ............................................................16
Additional Information ...................................................... 17
Accessories ...................................................................... 17
Troubleshooting ............................................................18
Terms of Use and Limitation of Liability ........................... 19
Compliance ......................................................................20
Battery Disposal ............................................................... 21
Important Recycling Advice .............................................21
Warranty ...........................................................................21
Thank you for choosing PetSafe® brand. You and your pet deserve a companionship that includes memorable moments
and a shared understanding together. Our products provide you with the tools and technologies to successfully train
your pet. If you have any questions about our products or training your pet, please visit our website at www.petsafe.net
or contact our Customer Care Center. For a listing of Customer Care Center telephone numbers, visit our website
at www.petsafe.net.
To get the most protection out of your warranty, please register your product within 30 days at www.petsafe.net.
By registering and keeping your receipt, you will enjoy the product’s full warranty and should you ever need to call the
Customer Care Center, we will be able to help you faster. Most importantly, we will never give or sell your valuable
information to anyone. Complete warranty information is available online at www.petsafe.net.
www.petsafe.net 5
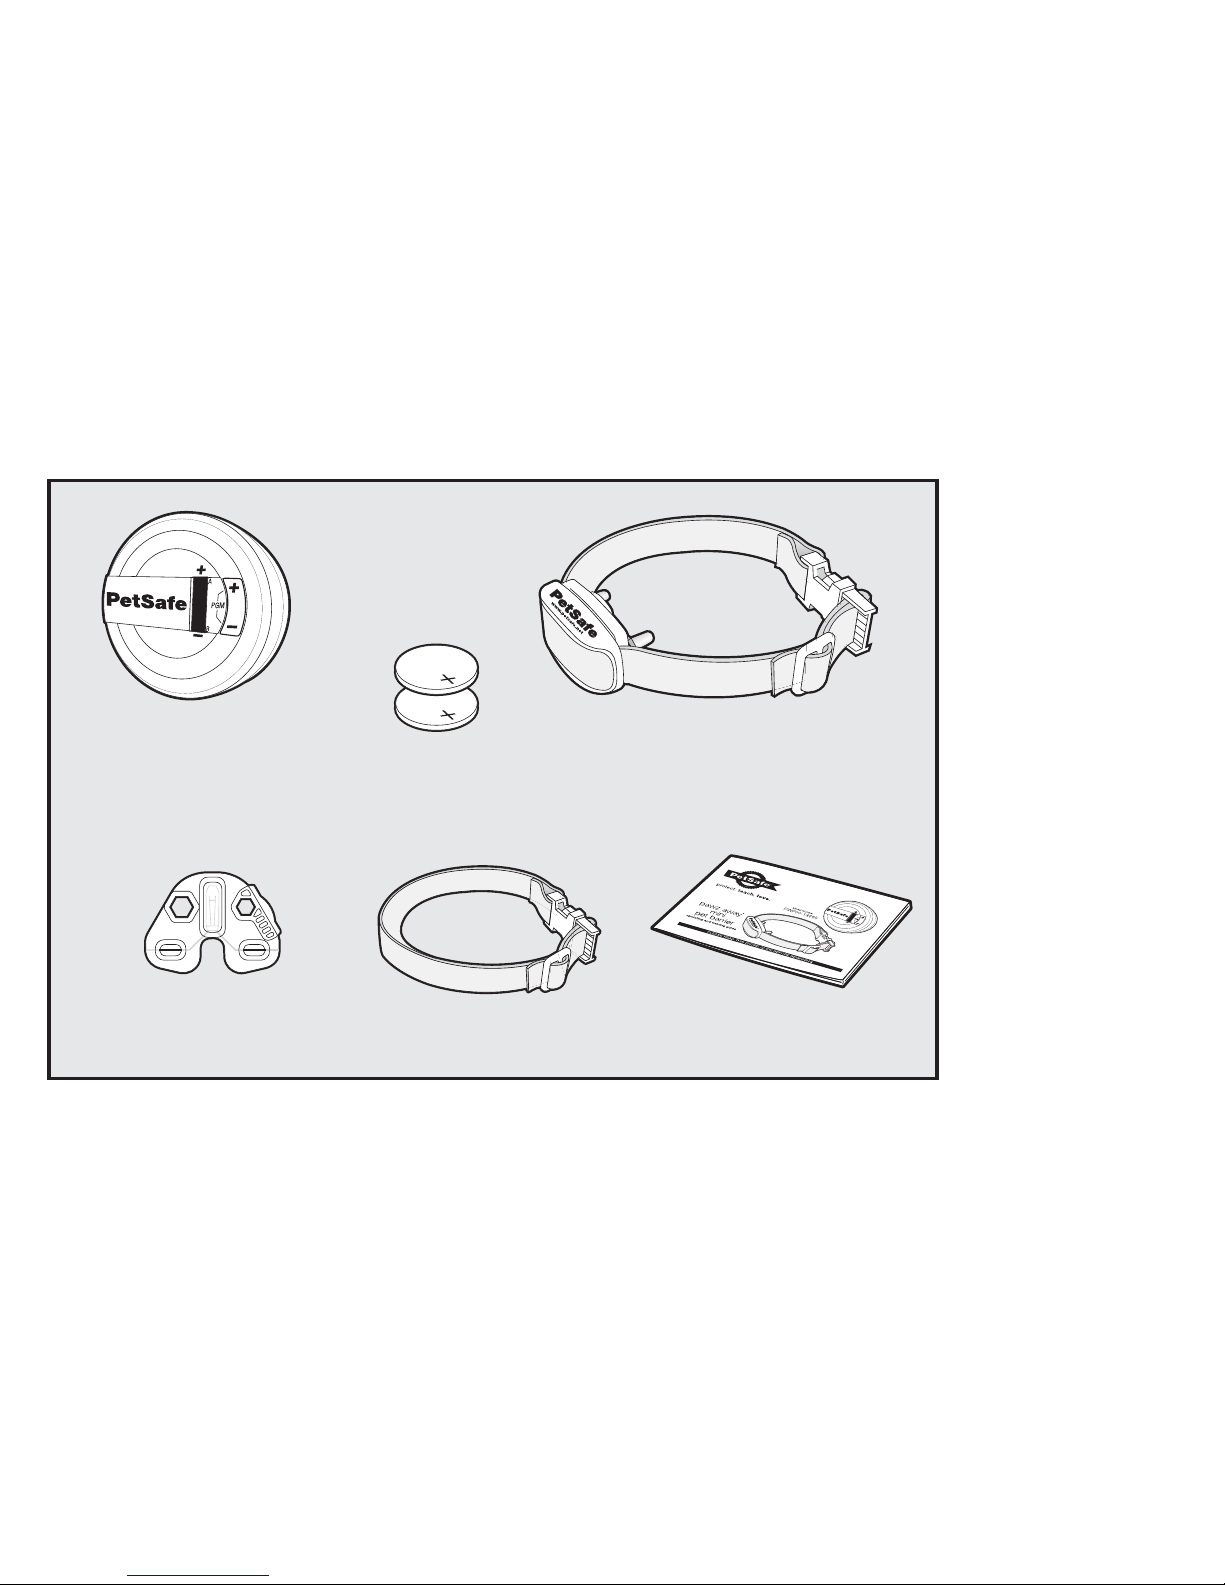
Components
®
Barrier Transmitter
(3 AAA Batteries not included)
Operating and
Training Guide
Test Light Tool
Receiver Collar
Cat Collar Strap
(2) 3-V Lithium
Batteries for
Receiver Collar
Other
Items
You
May
Need
• Drill and mounting
hardware
• Non-metallic collar
and leash
• Scissors
• Lighter
6 Customer Care Center 00 800 18 18 20 20
How the System Works
The PetSafe® Pawz Away® Mini Pet Barrier keeps your pet away from a certain room, away from trash, off of furniture, etc.
Just place the Barrier Transmitter near the area your pet should avoid. The Mini Pet Barrier transmits an elliptical radio
signal adjustable up to 1.5 meters. Your pet wears a Receiver Collar with Contact Points that touch his neck. When your pet
enters the Barrier Area, he’ll hear a series of audible tones from the Receiver Collar and he will feel a safe Progressive Static
Correction, delivered through the Contact Points on his neck. The Progressive Static Correction will get his attention, but
will not cause harm. The correction continues until your pet leaves the Barrier Area. If your pet doesn’t leave, the collar will
continue to correct at the maximum level from 3 seconds until the 15 second time-out. The PetSafe® Pawz Away® Mini Pet
Barrier has been proven safe, comfortable, and effective for pets at least 6 months old and 2.26 kg or more.
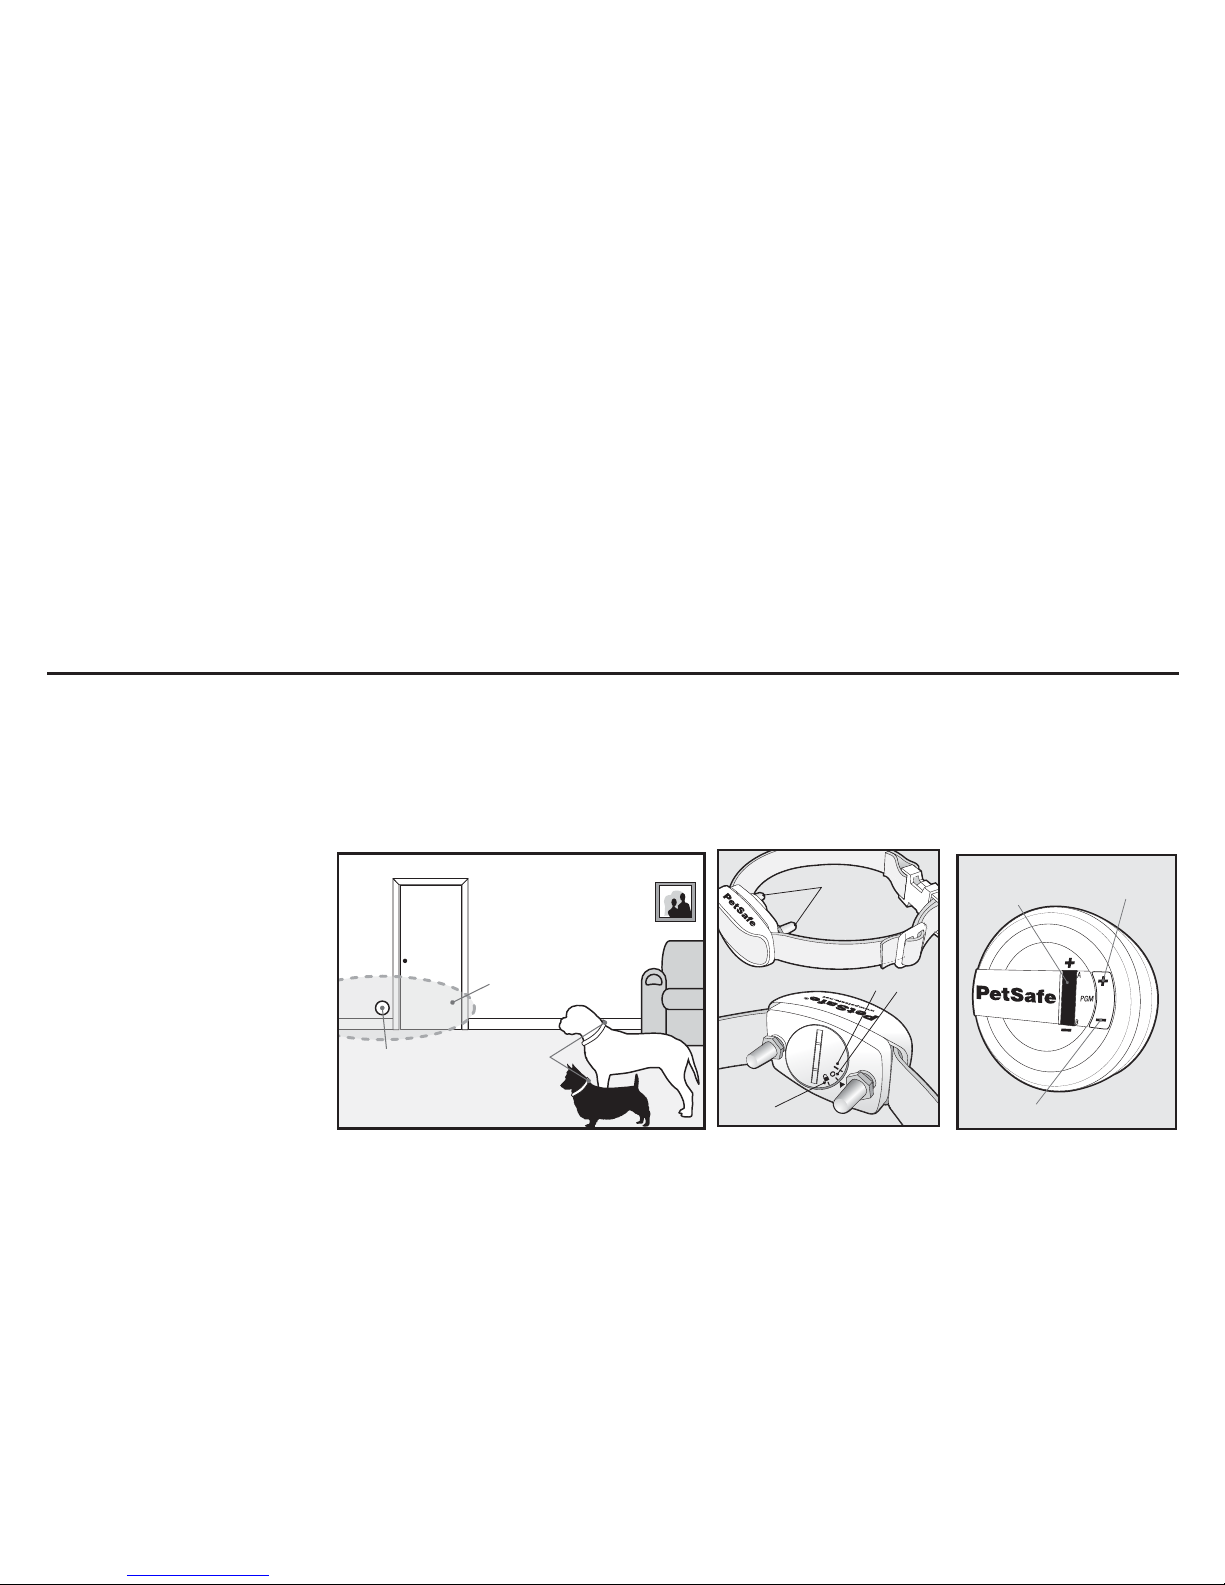
Key Definitions
Barrier Transmitter: Transmits the wireless radio signal.
Barrier Area: Area that you want to prevent your pet from gaining access to.
Receiver Collar: Receives the radio signal from the Barrier Transmitter.
Contact Points:
Deliver the safe Progressive Static Correction when your pet enters the Barrier Area.
Progressive Static
Correction: Static correction
begins at the lowest level and
automatically increases to
maximum within 3 seconds
of first detection in the Barrier
Area. From 3 seconds until the
15 second time-out, the collar
will continue to correct at the
maximum level until your pet
leaves the Barrier Area
Barrier
Transmitter
Barrier
Area
Receiver
Collar
LCD
Display
Window
Up Button
Down Button
®
www.petsafe.net
Contact Points
On/Off Dial
Open Battery
www.petsafe.net 7
Operating Guide
Step 1
Install the Barrier Transmitter
The Barrier Transmitter emits a radio signal from all sides in an elliptical pattern. The signal may transmit through a wall or
the ceiling/floor. The Barrier Transmitter can be placed laying flat on a surface or hung on a wall. If you choose to hang the
Barrier Transmitter, note that the signal becomes very directional—the signal will be strongest directly in front of and behind
the unit. The signal is weakest to the side of the unit.
Do not:
• Hang unit on a metal wall
• Place Barrier Transmitter on metal surfaces
• Place Barrier Transmitter near large metal objects such as refrigerators, washers, etc.
• Place Barrier Transmitter near audio speakers
Set Up the Barrier Transmitter
Step 2
1. Turn over the Barrier Transmitter and rotate back cover counter-clockwise,
removing the back cover. Install three AAA alkaline batteries and replace the
back cover. Turn clockwise to secure cover.
2. Turn the Barrier Transmitter right side up and press the (+) button once to turn ON the
Barrier Transmitter. A black bar in the upper right hand corner of the LCD display window
indicates that the Barrier Transmitter is set to mode A* (2A). A second black bar in the
bottom of the LCD display indicates the range is set to one segment.
3. Each segment represents approximately 12.7 cm from the unit. You can create a
Barrier Area of 12.7 cm to 76 cm from the unit. Using the (+) and (-) buttons,
adjust the range to fit the desired pet Barrier Area.
To prevent an unintended correction, never perform set-up procedures while your pet is wearing the Receiver Collar.
2A

8 Customer Care Center 00 800 18 18 20 20
*All Mini Pet Barriers and Receiver Collars are preset to mode A. The A and B mode feature is designed to be used in
multiple pet households where you may want one pet to be able to access an area while preventing access by another
pet. For single pet households, you will not need to operate the Barrier Transmitter in any mode other than A. Please
see the Additional Features section of this operating and training guide (beginning on page 12) for instructions on
how to utilize mode A and B.
Test the Barrier Area
Step 3
1. Keeping your hands away from the Contact Points, use the edge of the Test Light Tool to turn
the receiver battery door to the ON position.
2. Hold the Receiver Collar with the Contact Points facing up. Place the Test Light Tool on the
Contact Points so that the wire in the Test Light Tool touches the Contact Points (3A). The
PetSafe® logo on the Receiver Collar should face the Transmitter.
3. Hold the Receiver Collar at the approximate height of your pet’s neck (3B). Start outside
of the range and walk slowly toward the Barrier Transmitter. As you reach the Barrier Area,
the Receiver Collar emits a series of high-pitched tones. For each tone you hear, you should
notice the Test Light flashing which indicates that a Progressive Static Correction is being
delivered. The Receiver Collar’s tone is easily heard by pets but may be at a volume level
difficult for some humans to hear.
4. Check the range of the Barrier Area from multiple angles to ensure you are getting
the desired coverage.
Note: Should you find that you are not getting the desired range at the maximum setting, move
the Barrier Transmitter 30 cm, or change from its standing-on-end position to laying flat. Metal
objects can alter the magnetic field and change the transmitting signal range. The effect on the
range depends on the size and shape of the objects. Signal range can be reduced if the Barrier
Transmitter is placed on a concrete floor, due to steel reinforcement in the concrete. For best
range results, place the Barrier Transmitter on a nonconductive surface, i.e., wood floor or table.
Placing the Barrier Transmitter beneath sofas and beds can reduce the range due to the metal
springs altering the magnetic field.
3A
3B

www.petsafe.net 9
Fit the Receiver Collar on Your Pet
Important: Proper fit and placement of your Receiver Collar is necessary for effective operation.
The Contact Points must have direct contact with your pet’s skin on the underside of his neck.
Step 4
Proper fit of the collar is important. A collar worn for too long or made too tight on the pet’s neck may cause skin damage.
Ranging from redness to pressure ulcers; this condition is commonly known as bed sores.
• Avoid leaving the collar on the pet for more than 12 hours per day.
• When possible reposition the collar on the pet’s neck every 1 to 2 hours.
• Check the fit to prevent excessive pressure; follow the instructions in this manual.
• Never connect a lead to the electronic collar; it will cause excessive pressure on the contacts.
• When using a separate collar for a lead, don’t put pressure on the electronic collar.
• Wash the pet’s neck area and the contacts of the collar weekly with a damp cloth.
• Examine the contact area daily for signs of a rash or a sore.
• If a rash or sore is found, discontinue use of the collar until the skin has healed.
• If the condition persists beyond 48 hours, see your veterinarian.
• For additional information on bed sores and pressure necrosis, please visit our website.
These steps will help keep your pet secure and comfortable. Millions of pets are comfortable while they wear stainless steel contacts.
Some pets are sensitive to contact pressure. You may find after some time that your pet is very tolerant of the collar. If so, you may
relax some of these precautions. It is important to continue daily checks of the contact area. If redness or sores are found, discontinue
use until the skin has fully healed.
You may need to trim the hair in the area of the Contact Points. Never shave the dog’s neck; this may lead to a rash or infection.
To assure a proper fit, please follow these steps:
1. Using the edge of the Test Light Tool, turn the battery door to the OFF position.
2. Start with your pet standing comfortably (4A).
3. Place the Receiver collar on your pet so that the PetSafe® logo is facing your pet’s chin. Center the
Contact Points underneath your pet’s neck, touching the skin. If your pet has a long or thick coat then
it may be necessary to trim the hair around the Contact Points to make sure that contact is consistent.
Note: The Receiver Collar comes with Short Contact Points. Long Contact Points are available and
can be purchased through the Customer Care Center.
4A
10 Customer Care Center 00 800 18 18 20 20
1. Adjust the tightness of the Receiver Collar to fit your pet’s neck. Check the tightness
of the Receiver Collar by inserting one finger between the end of a Contact Point and
your pet’s neck. The fit should be snug but not constricting (4B).
2. Allow your pet to wear the Receiver Collar for several minutes then
recheck the fit. Check the fit again as your pet becomes more comfortable
with the Receiver Collar.
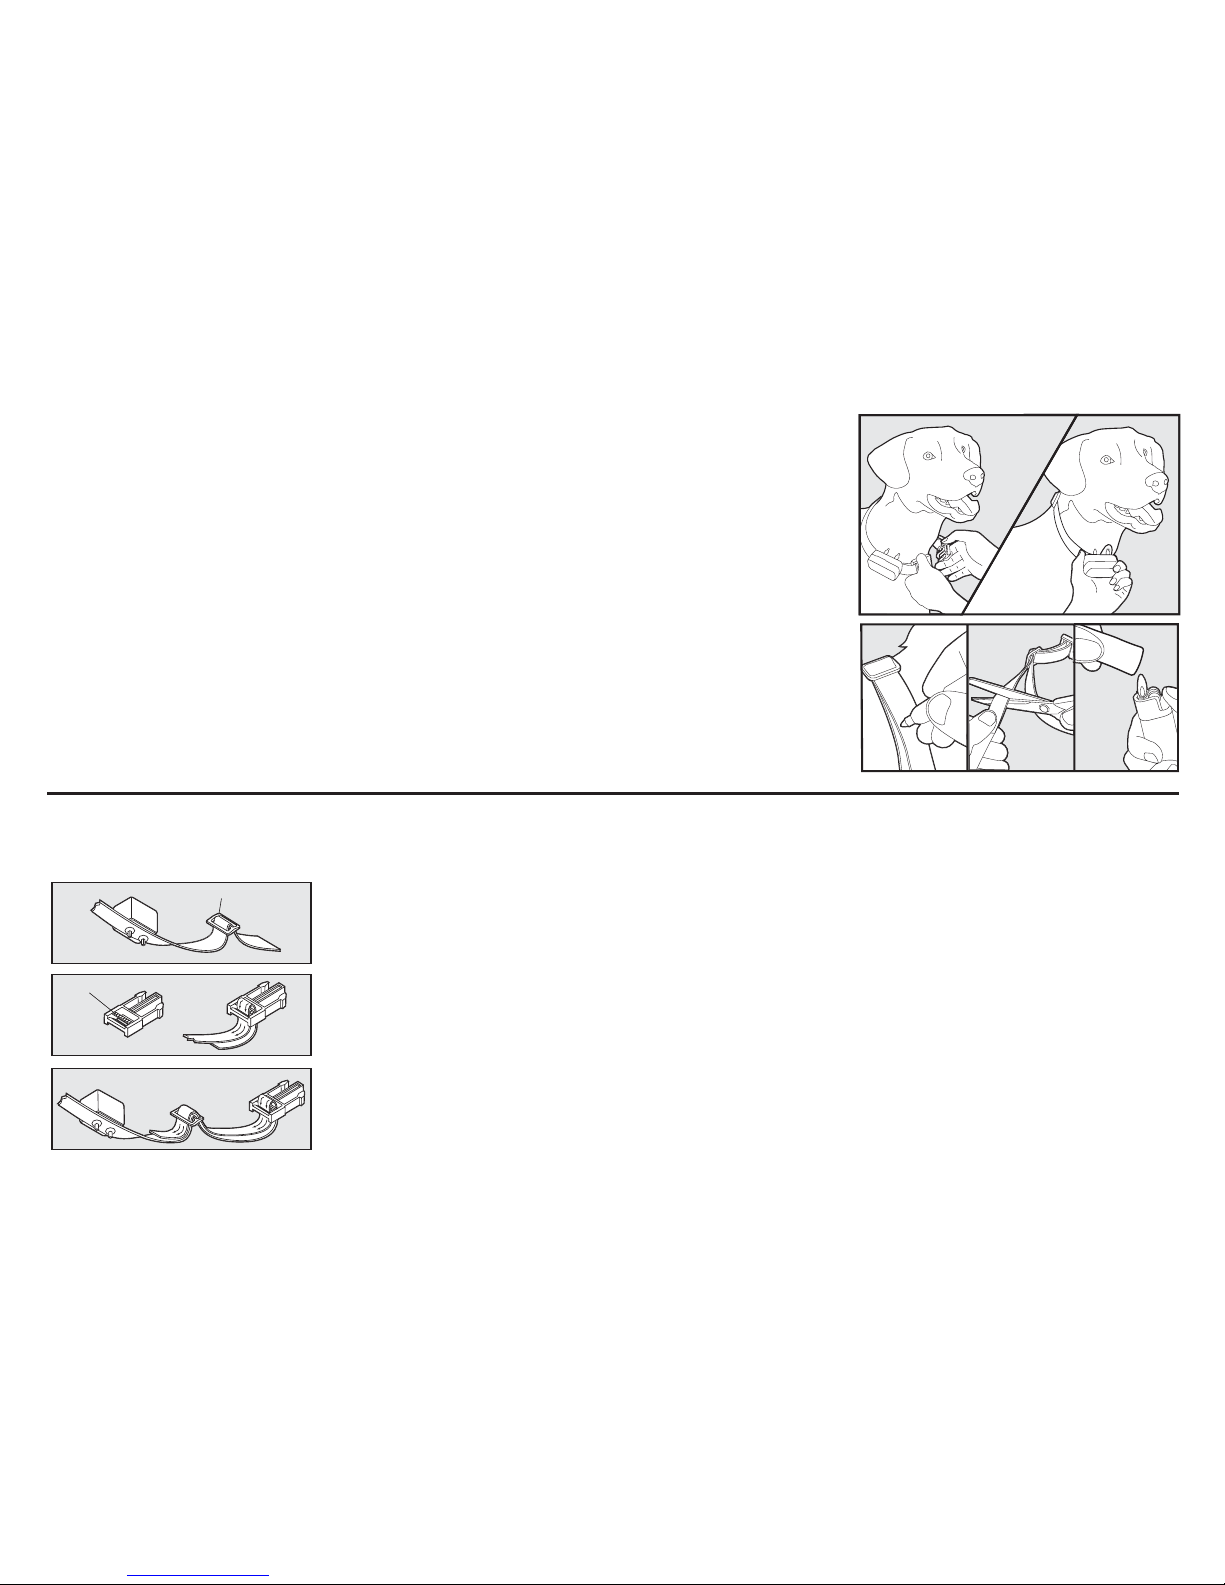
3. Once you are satisfied with the fit of the Receiver Collar then you may
trim any excess collar strap as follows (4C):
a. Mark the desired length of the Receiver Collar with a pen. Allow for growth
if your pet is young or grows a thick winter coat.
b. Remove the Receiver Collar from your pet and cut off the excess.
c. Before placing the Receiver Collar back onto your pet, seal the edge of the
cut collar by applying a flame along the frayed edge.
To Re-Thread the Collar
4C
4B
Slide Buckle
Ridges
The slide buckle prevents the collar from becoming loose around your pet’s neck.
The ridges must be facing up; the collar will slip if it is not properly threaded.
www.petsafe.net 11
Receiver Collar Batteries
The PetSafe® Pawz Away® Receiver Collar uses two 3-volt Lithium coin cell batteries, size
CR2032. Replacement batteries can be found at many retailers or through the Customer
Care Center. Visit our web site at www.petsafe.net to locate a retailer near you.
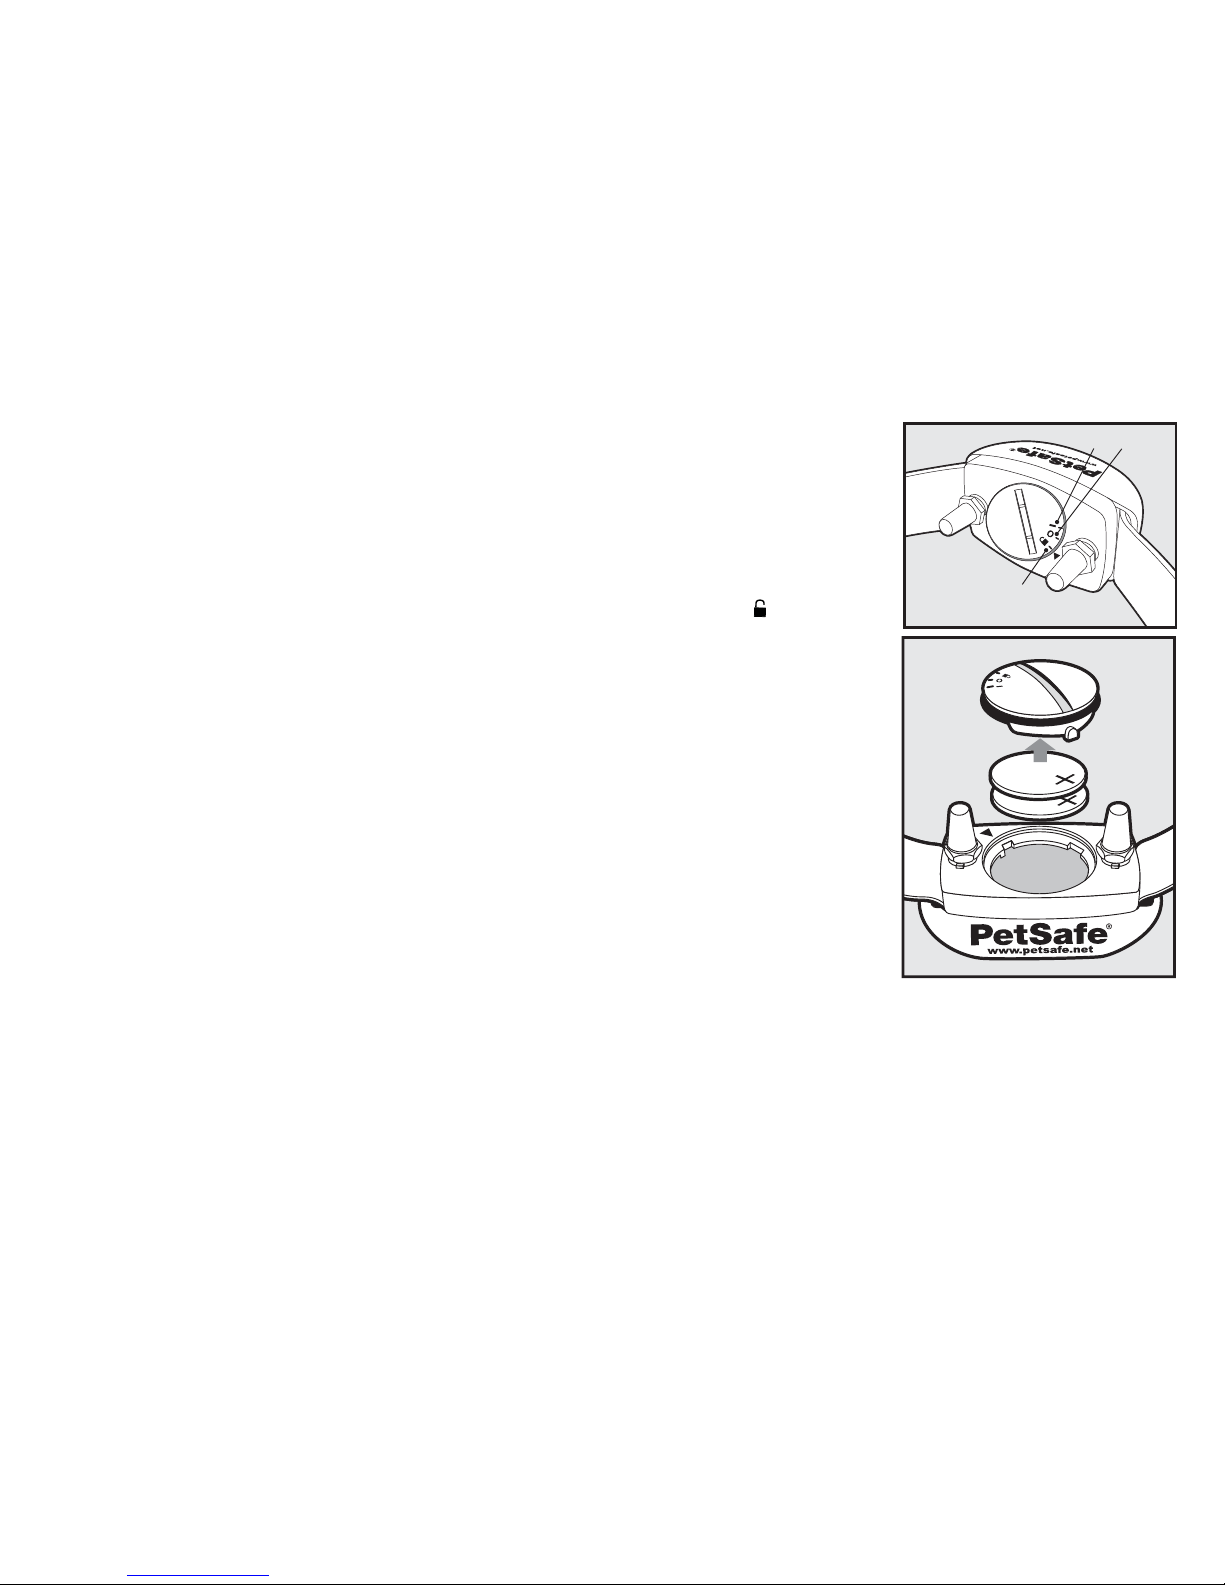
To replace the batteries:
1. Using the edge of the Test Light Tool, turn the battery door to the OPEN ( )position.
2. Lift the battery door out and turn the door over. The two 3-volt Lithium coin cell batteries
are stored inside the door.
3. Remove the old batteries and insert new batteries with the positive (+) side facing
the battery door lid.
4. Insert battery door back into the Receiver Collar and turn to either the
OFF (O) or ON (|) position to lock the door in place.
Battery life will vary depending on how often your pet tests the system and receives a
Static Correction. Check the Receiver Collar and Barrier Transmitter every month to
ensure the system is working properly. To prolong battery life, it is recommended
that you turn the Receiver Collar and Barrier Transmitter OFF when not in use.
Open
Battery
On/Off Dial

12 Customer Care Center 00 800 18 18 20 20
Additional Features
Time Out Feature
For your pet’s safety, the Receiver Collar has a built in Time Out feature. If your pet stays in the Barrier Area for longer
than 15 seconds the Receiver Collar will stop delivering the Progressive Static Correction. The Receiver Collar will then
administer a random single Static Correction every 5 to 10 seconds at the maximum level until the pet leaves the Barrier
Area. Once your pet leaves the Barrier Area, the Receiver Collar resets itself and will deliver a Progressive Static Correction
the next time your pet enters the Barrier Area.
Mode A, B, and AB Feature
For multiple pet households, additional PetSafe® Pawz Away® Receiver Collars can be purchased to work with one
or more PetSafe® Pawz Away® Indoor Barrier Transmitters. You can set up an unlimited number of Barrier Transmitters
in your home and an unlimited number of Receiver Collars can be used with one or more Barrier Transmitters. If you have
multiple pets, you may want to allow one pet access to an area while denying access to another pet. With the purchase of
additional Receiver Collars and Barrier Transmitters, you can accomplish this by using the Mode A and Mode B functions.
All PetSafe
®
Pawz Away® Mini Barrier Transmitters and Receiver Collars come preset to mode A. Each Receiver Collar can
operate in one of two different modes—A or B. Each Barrier Transmitter may be set to either A, B or AB mode to allow for
multiple configurations.
www.petsafe.net 13
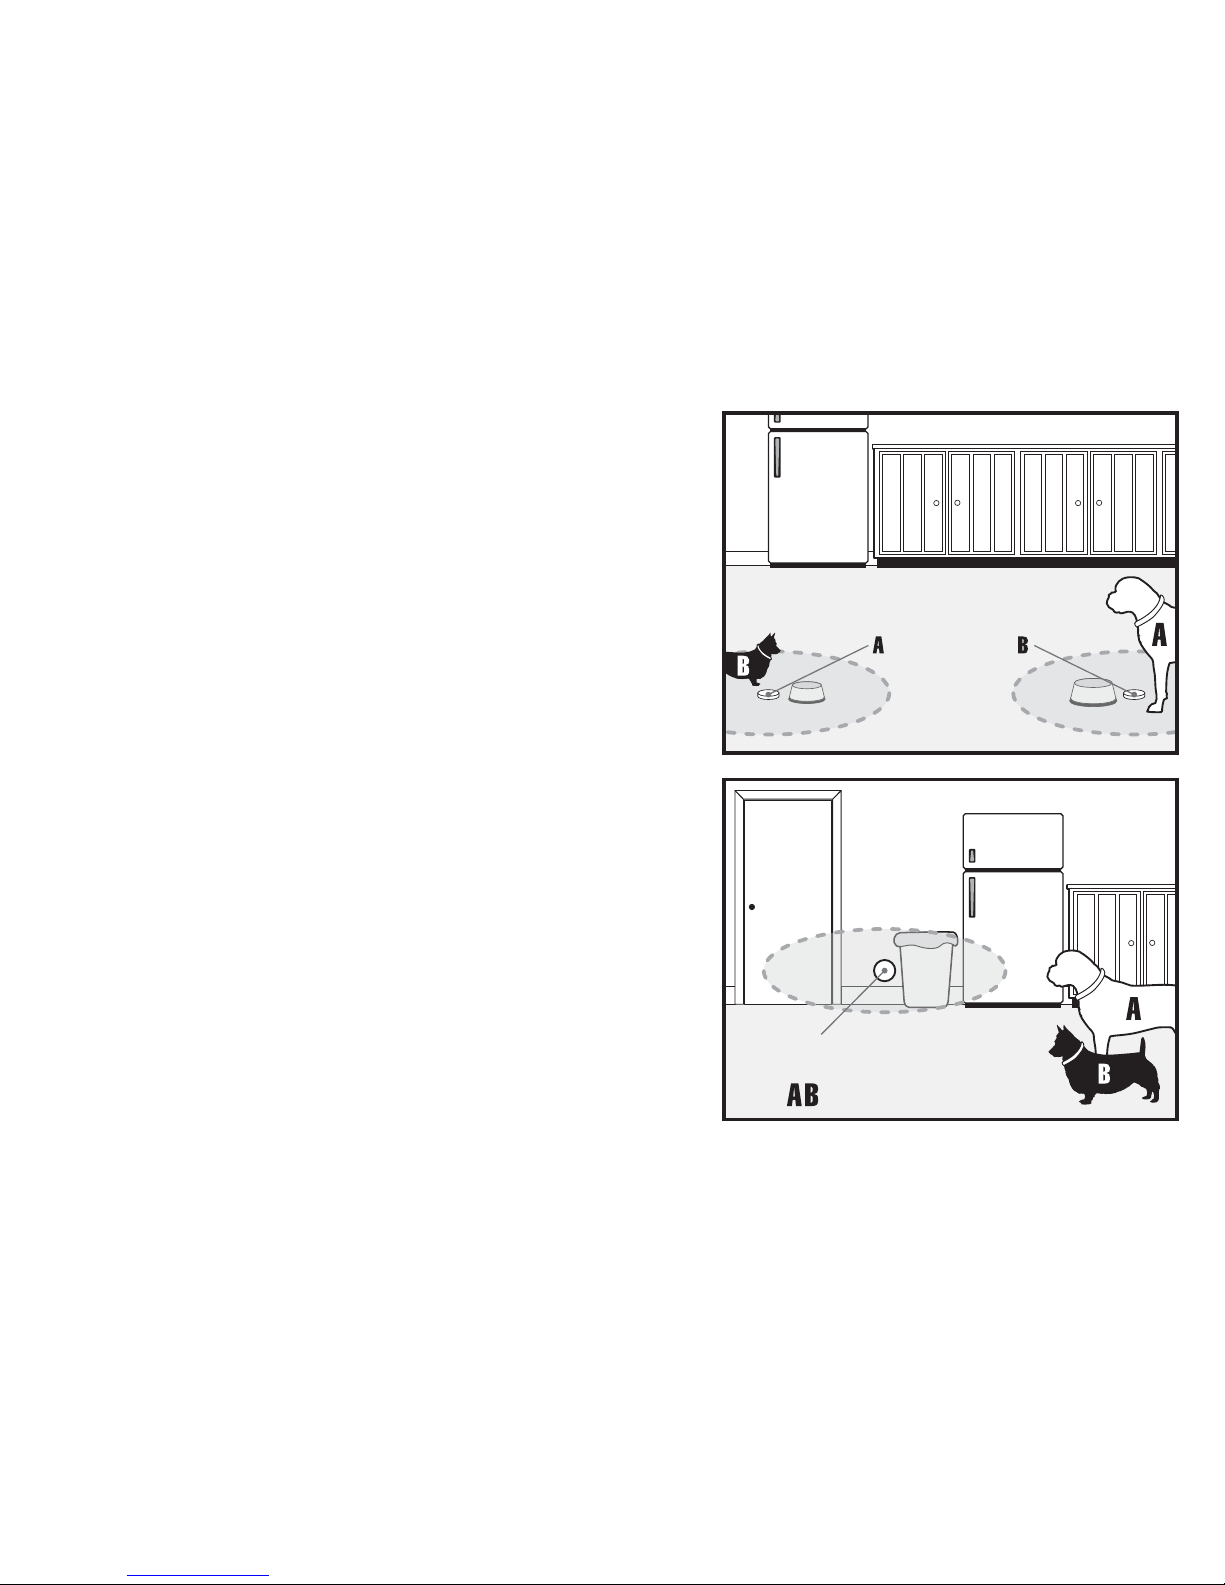
When the Barrier Transmitter and Receiver Collar are set to mode A,
the Barrier Transmitter denies access to pets wearing a Receiver Collar
programmed to mode A. Receiver Collars set to mode B will not pick up
the signal from a Barrier Transmitter set to mode A.
When the Barrier Transmitter and Receiver Collar are set to mode B,
the Barrier Transmitter denies access to pets wearing a Receiver Collar
programmed to mode B. Receiver Collars set to mode A will not pick up
the signal from a Barrier Transmitter set to mode B.
When the Barrier Transmitter is set to mode AB, the Barrier Transmitter
denies access to all pets wearing the Receiver Collar, no matter which
mode the receiver is programmed to.
Barrier
Transmitter
Barrier
Transmitter
Barrier
Transmitter
14 Customer Care Center 00 800 18 18 20 20
Programming the Mode Settings
All programming is done through the Barrier Transmitter and the programming is synchronized with the Receiver Collar.
The Receiver Collar cannot be programmed separately from the Barrier Transmitter.
You may synchronize multiple Receiver Collars to a single Barrier Transmitter at one time. However, make sure any Receiver
Collar you do not wish to synchronize is turned OFF during the programming procedure. Any collar that is within 76 cm
of the Barrier Transmitter and turned ON may be reprogrammed. Familiarize yourself with the steps outlined below before
attempting to program the Barrier Transmitter and Receiver Collar.
1. Gather the Receiver Collar(s) you wish to synchronize with the Barrier Transmitter. Turn the Receiver Collar(s) ON
and place less than one foot from the Barrier Transmitter.
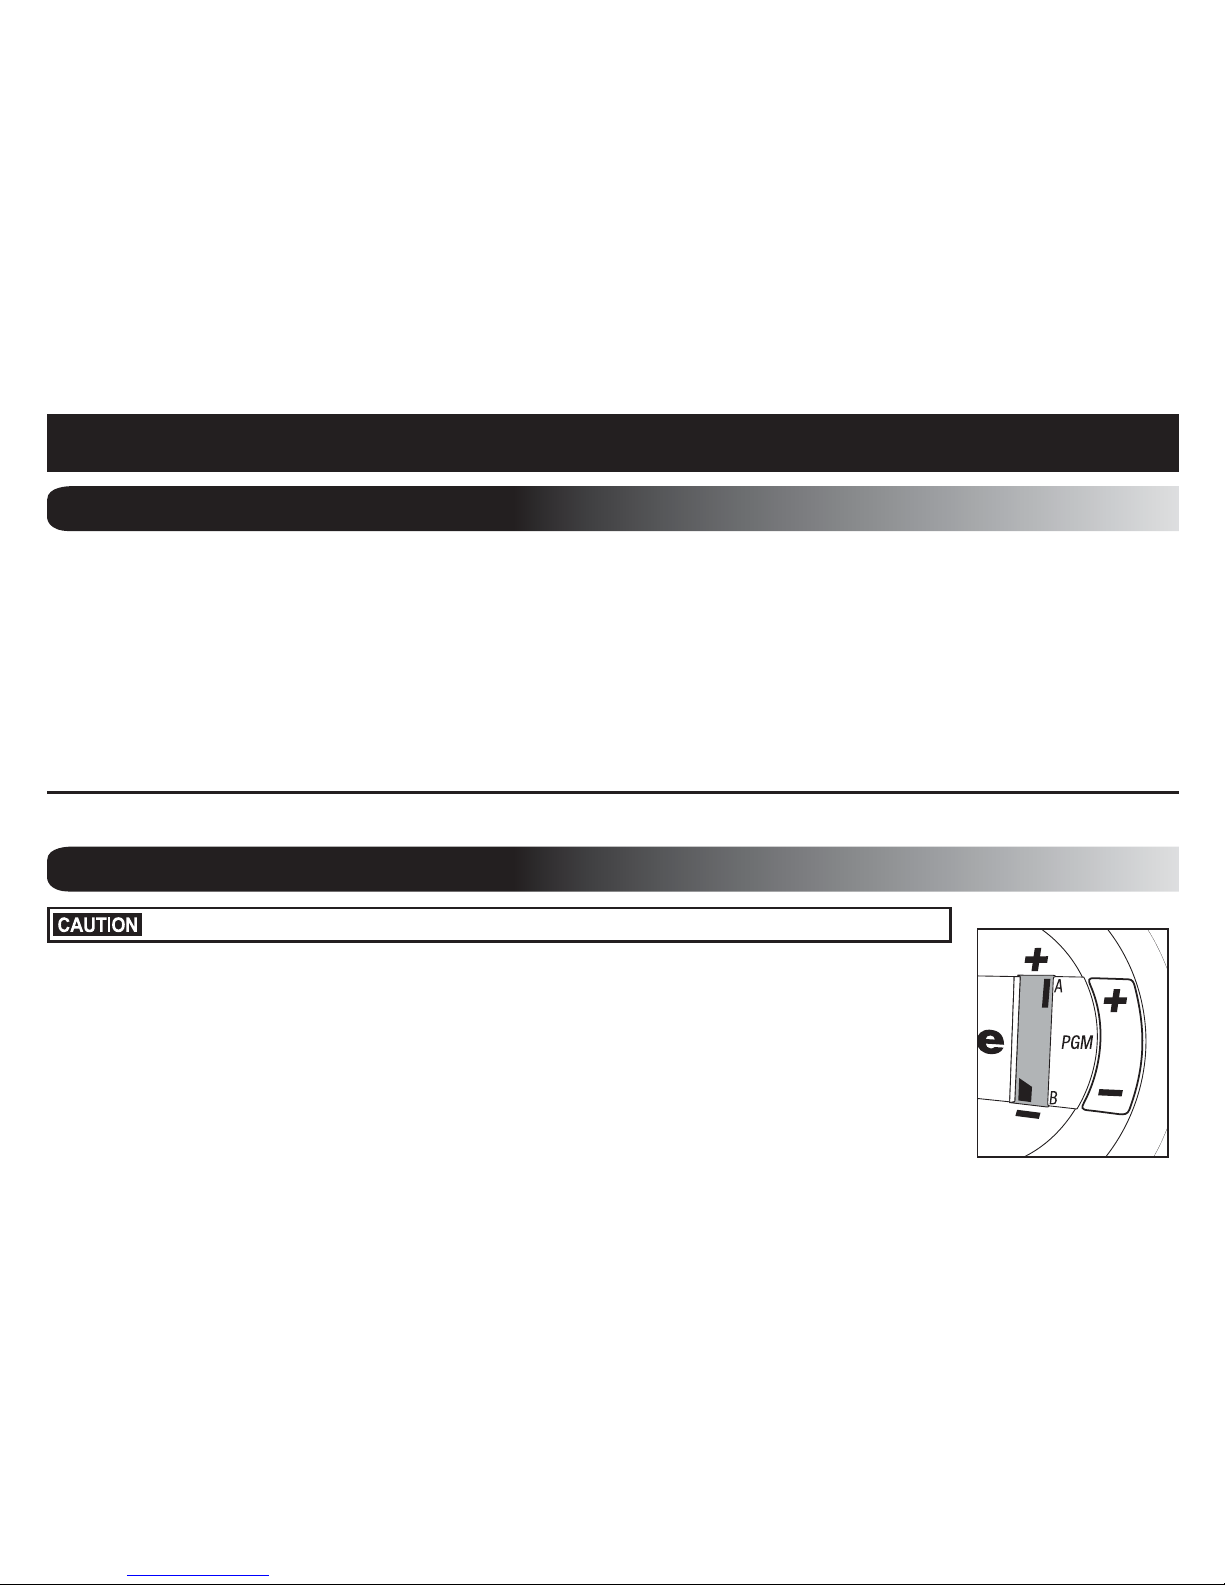
2. Turn the Barrier Transmitter OFF by pressing the (-)
button until there are no bars displayed in the LCD
window. Remove the back cover.
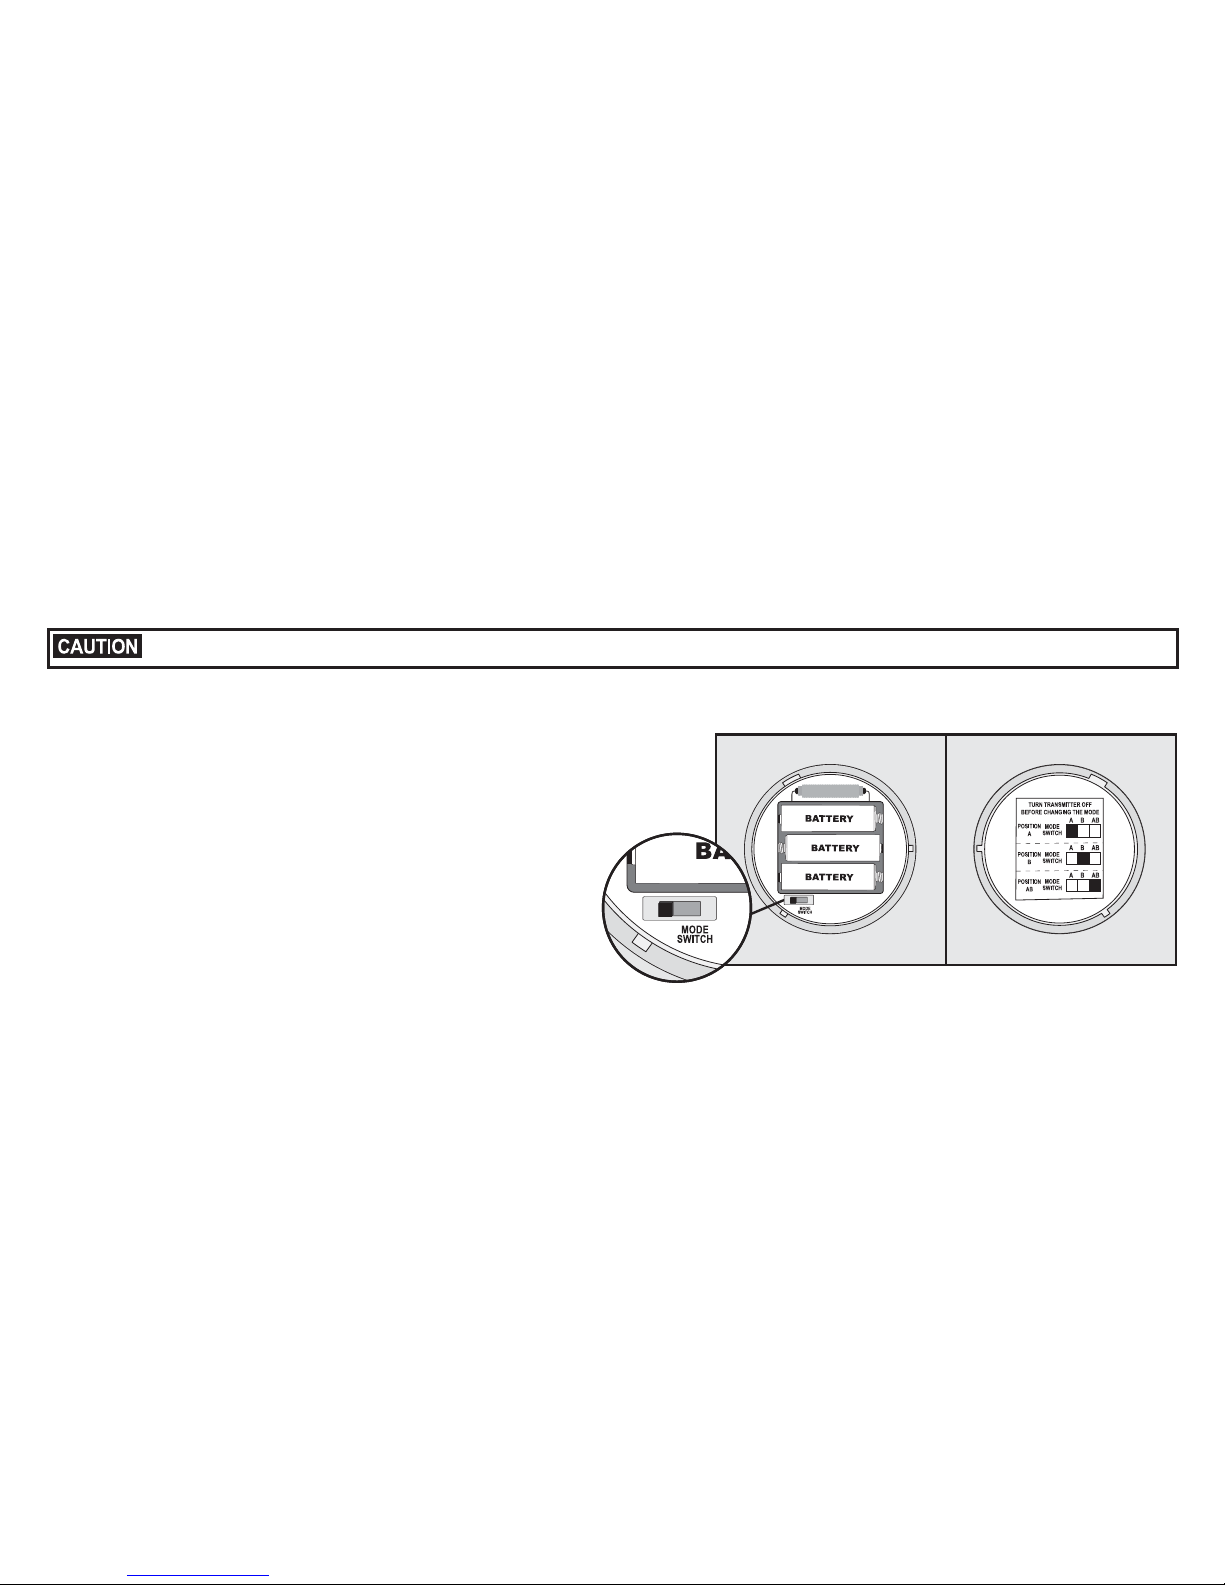
3. The mode switch is located inside the transmitter and is
preset to mode A. Move the switch to the center position
for mode B or to the right position for mode AB (5A).
Once you have selected the desired mode, replace
the back cover.
Note: If you have selected mode AB you do not need to
proceed with programming the receiver in the next steps.
Receiver Collars set to mode A or mode B will each
receive the radio signal from a Barrier Transmitter set to mode AB.
To prevent an unintended correction, do not perform set up procedures while the Receiver Collar is on your pet.
Inside
Back
Cover
Transmitter
Inside
View
5A
 Loading...