

Petsafe Pawz Away Mini Pet Barrier User Manual
pawz away®
Model Number
PWF00-13665
mini
pet barrier
operating and training guide
PLEASE READ THIS ENTIRE GUIDE BEFORE BEGINNING
®

Important Safety Information
Explanation of Attention Words and Symbols used in this guide
This is the safety alert symbol. It is used to alert you to potential personal injury hazards. Obey all safety
messages that follow this symbol to avoid possible injury or death.
WARNING indicates a hazardous situation which, if not avoided, could result in death or serious injury.
CAUTION, used without the safety alert symbol, indicates a hazardous situation which, if not avoided,
could result in harm to your pet.
NOTICE is used to address safe use practices not related to personal injury.
Not for use with aggressive dogs. Do not use this product if your dog is prone to aggressive behavior. Aggressive
dogs can cause severe injury or death to their owners and others. If you are not sure that this product is right for
your dog, please talk to your veterinarian or a certified trainer.
This System is NOT a solid barrier. The system is designed to act as a deterrent, using Static Correction to
condition pets to remain outside of the established barrier area. It is important that you reinforce training with
your pet on a regular basis. Since the tolerance level to Static Correction varies from pet to pet, Radio Systems®
Corporation CANNOT guarantee that the system will in all cases keep a pet outside of the established barrier area.
Not all pets can be trained to avoid entering the barrier area. Therefore, if you have reason to believe that your
pet may harm himself or pose a danger to others if he is not kept from entering the barrier area, you should NOT
rely solely upon this system to restrict your pet. Radio Systems® Corporation shall NOT be liable for any personal
injuries, property damage, injury to or death of your pet, economic loss or any consequential damages sustained
as a result of any animal entering the barrier area.
2 Customer Care Center 1-800-732-2677

Proper fit of the collar is important. A collar worn for too long or made too tight on the pet’s neck may cause
skin damage. Ranging from redness to pressure ulcers; this condition is commonly known as bed sores.
- Avoid leaving the collar on the pet for more than 12 hours per day.
- When possible reposition the collar on the pet’s neck every 1 to 2 hours.
- Check the fit to prevent excessive pressure; follow the instructions in this manual.
- Never connect a lead to the electronic collar; it will cause excessive pressure on the contacts.
- When using a separate collar for a lead, don’t put pressure on the electronic collar.
- Wash the pet’s neck area and the contacts of the collar weekly with a damp cloth.
- Examine the contact area daily for signs of a rash or a sore.
- If a rash or sore is found, discontinue use of the collar until the skin has healed.
- If the condition persists beyond 48 hours, see your veterinarian.
- For additional information on bed sores and pressure necrosis, please visit our website.
These steps will help keep your pet safe and comfortable. Millions of pets are comfortable while they wear
stainless steel contacts. Some pets are sensitive to contact pressure. You may find after some time that your
pet is very tolerant of the collar. If so, you may relax some of these precautions. It is important to continue
daily checks of the contact area. If redness or sores are found, discontinue use until the skin has fully healed.
You may need to trim the hair in the area of the Contact Points. Never shave the pet’s neck; this may lead
to a rash or infection.
• To prevent an unintended correction, do not perform set up procedures while the Receiver Collar is on your pet.
• If you are using a collar and leash for training, be sure the extra collar does not put pressure on the Contact Points
of the Receiver Collar.
www.petsafe.net 3

Thank you for choosing PetSafe® brand. You and your pet deserve a companionship that includes memorable moments
and a shared understanding together. Our products and training tools promote a lifestyle of protection, teaching, and
love — essentials that influence memories for a lifetime. If you have any questions about our products or training your
pet, please visit our website at www.petsafe.net or contact our Customer Care Center at 1-800-732-2677.
To get the most protection out of your warranty, please register your product within 30 days at www.petsafe.net. By
registering and keeping your receipt, you will enjoy the product’s full warranty and should you ever need to call the
Customer Care Center, we will be able to help you faster. Most importantly, PetSafe
®
will never give or sell your valuable
information to anyone. Complete warranty information is available online at www.petsafe.net.
Table of Contents
Components ....................................................................... 5
Other Items You May Need ...............................................5
How the System Works ......................................................6
Key Definitions ...................................................................6
Operating Guide .............................................................. 7
Install the Barrier Transmitter ......................................... 7
Set Up the Barrier Transmitter .......................................7
Test the Barrier Area ......................................................8
Fit the Receiver Collar on Your Pet ................................ 9
To Re-Thread the Collar ...............................................10
Receiver Collar Batteries .............................................. 11
Additional Features ......................................................12
Time Out Feature ......................................................... 12
Mode A, B, and AB Feature ......................................... 12
Programming the Mode Settings.................................14
4 Customer Care Center 1-800-732-2677
Training Guide ............................................................... 16
Begin Your Pet’s First Session ...................................... 16
Further Training ............................................................ 16
Additional Information ..................................................... 17
Accessories ....................................................................... 17
Troubleshooting ............................................................18
Terms of Use and Limitation of Liability ........................... 19
Compliance ......................................................................20
Customer Care International ............................................ 21
Perchlorate Battery ..........................................................21
Warranty ...........................................................................21
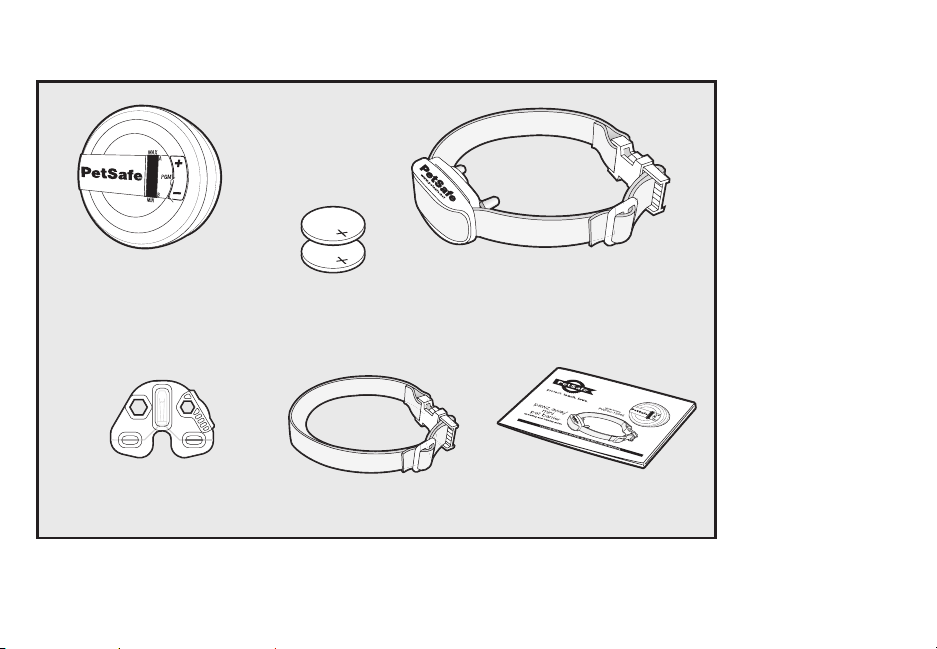
Components
Barrier Transmitter
(3 AAA Batteries not included)
(2) 3-V Lithium
Batteries for
Receiver Collar
®
Receiver Collar
Other
Items
You
May
Need
• Drill and
mounting
hardware
• Non-metallic
collar and
leash
• Scissors
• Lighter
Test Light Tool
www.petsafe.net 5
Cat Collar Strap
Operating and
Training Guide
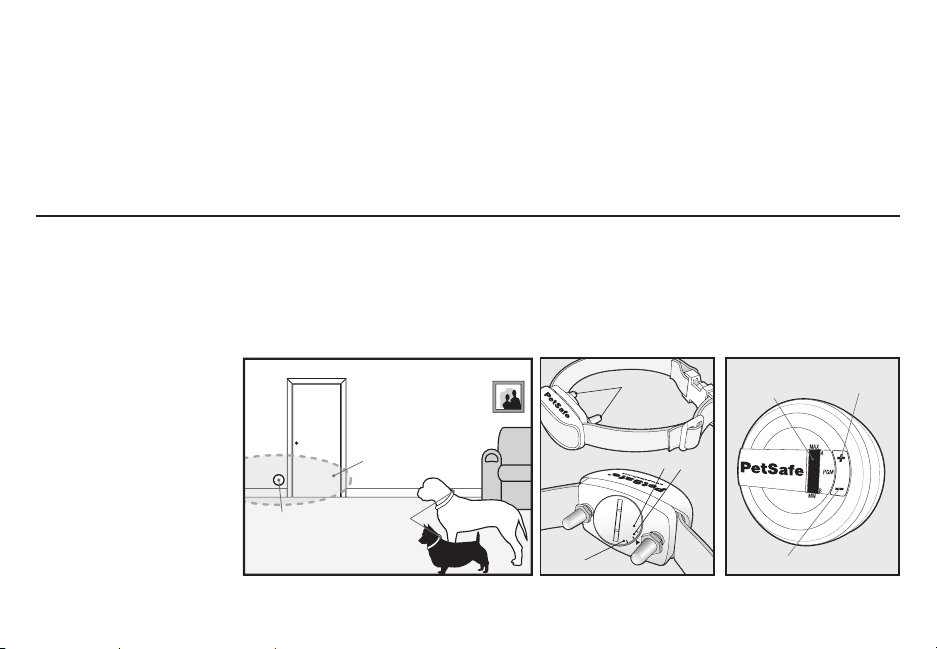
How the System Works
The PetSafe® Pawz Away® Mini Pet Barrier keeps your pet away from a certain room, away from trash, off of furniture, etc.
Just place the Barrier Transmitter near the area your pet should avoid. The Mini Pet Barrier transmits an elliptical radio signal
adjustable up to 5 feet. Your pet wears a Receiver Collar with Contact Points that touch his neck. When your pet enters the
Barrier Area, he’ll hear a series of audible tones from the Receiver Collar and he will feel a safe Progressive Static Correction,
delivered through the Contact Points on his neck. The Progressive Static Correction will get his attention, but will not cause
harm. The correction continues until your pet leaves the Barrier Area. The PetSafe® Pawz Away® Mini Pet Barrier has been
proven safe, comfortable, and effective for pets at least 6 months old and 5 pounds or more.
Key Definitions
Barrier Transmitter: Transmits the wireless radio signal.
Barrier Area: Area that you want to prevent your pet from gaining access to.
Receiver Collar: Receives the radio signal from the Barrier Transmitter.
Contact Points: Deliver the safe Progressive Static Correction when your pet enters the Barrier Area.
Progressive Static
Correction: Static
correction begins at
the lowest level and
www.petsafe.net
®
automatically increases to
maximum within 3 seconds
of first detection in the
Barrier
Area
Barrier Area.
Barrier
Transmitter
Receiver
Collar
Open Battery
6 Customer Care Center 1-800-732-2677
Contact Points
ON
OPEN
OFF
On/Off Dial
LCD
Display
Window
Down Button
Up Button
Step
1
Operating Guide
Install the Barrier Transmitter
The Barrier Transmitter emits a radio signal from all sides in an elliptical pattern. The signal may transmit through
a wall or the ceiling/floor. The Barrier Transmitter can be placed laying flat on a surface or hung on a wall. If
you choose to hang the Barrier Transmitter, note that the signal becomes very directional—the signal will be
strongest directly in front of and behind the unit. The signal is weakest to the side of the unit.
Do not:
• Hang unit on a metal wall
• Place Barrier Transmitter on metal surfaces
• Place Barrier Transmitter near large metal objects such as refrigerators, washers, etc.
• Place Barrier Transmitter near audio speakers
Step
2
www.petsafe.net 7
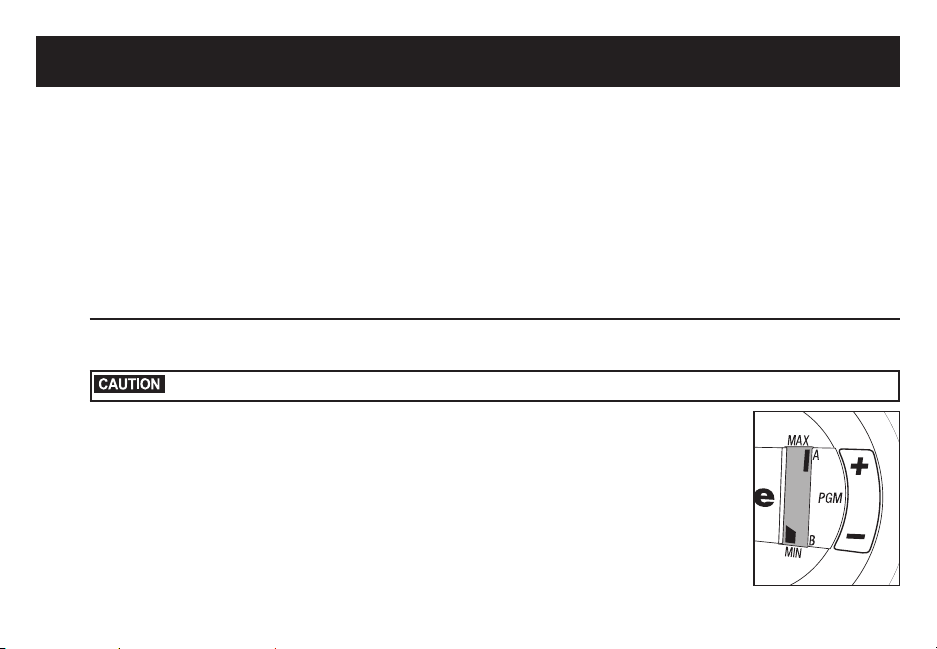
Set Up the Barrier Transmitter
To prevent an unintended correction, never perform set-up procedures while your pet is wearing the Receiver Collar.
1. Turn over the Barrier Transmitter and rotate back cover counter-clockwise, removing
the back cover. Install three AAA alkaline batteries and replace the back cover. Turn
clockwise to secure cover.
2. Turn the Barrier Transmitter right side up and press the (+) button once to turn ON
the Barrier Transmitter. A black bar in the upper right hand corner of the LCD display
window indicates that the Barrier Transmitter is set to mode A* (2A). A second black
bar in the bottom of the LCD display indicates the range is set to one segment.
3. Each segment represents approximately 5 inches from the unit. You can create a Barrier
Area of 5 inches to 30 inches from the unit. Using the (+) and (-) buttons, adjust the
range to fit the desired pet Barrier Area.
2A
*All Mini Pet Barriers and Receiver Collars are preset to mode A. The A and B mode feature is designed to be used in
multiple pet households where you may want one pet to be able to access an area while preventing access by another
pet. For single pet households, you will not need to operate the Barrier Transmitter in any mode other than A. Please
see the Additional Features section of this operating and training guide (beginning on page 12) for instructions on how
to utilize mode A and B.
Step
3
Test the Barrier Area
1. Keeping your hands away from the Contact Points, use the edge of the Test Light
Tool to turn the receiver battery door to the ON position.
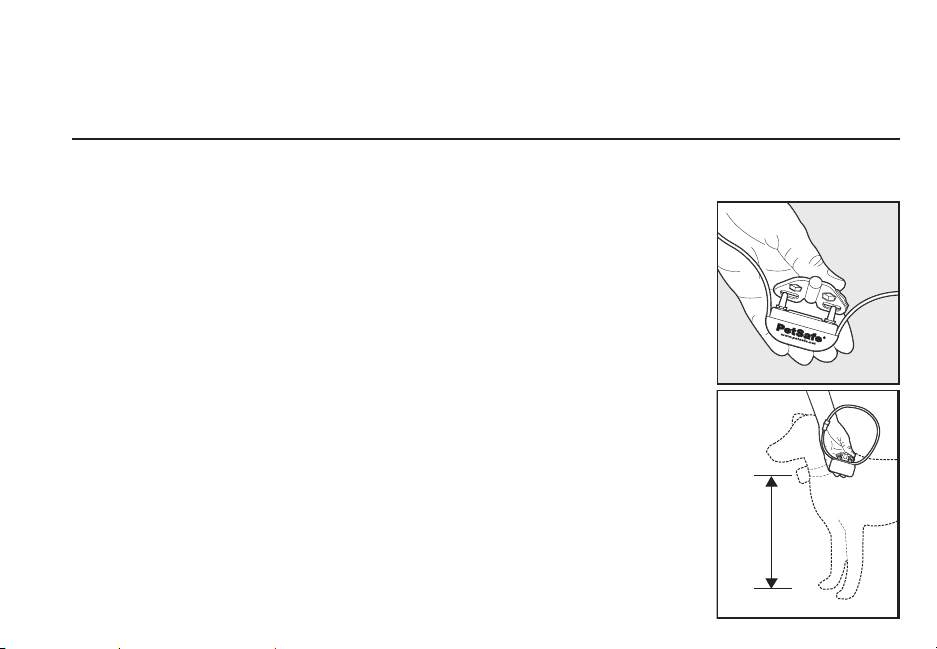
2. Hold the Receiver Collar with the Contact Points facing up. Place the Test Light Tool
on the Contact Points so that the wire in the Test Light Tool touches the Contact
Points (3A). The PetSafe® logo on the Receiver Collar should face the Transmitter.
3. Hold the Receiver Collar at the approximate height of your pet’s neck (3B). Start
outside of the range and walk slowly toward the Barrier Transmitter. As you reach
the Barrier Area, the Receiver Collar emits a series of high-pitched tones. For each
tone you hear, you should notice the Test Light flashing which indicates that a
Progressive Static Correction is being delivered. The Receiver Collar’s tone is easily
heard by pets but may be at a volume level difficult for some humans to hear.
4. Check the range of the Barrier Area from multiple angles to ensure you are getting
the desired coverage.
Note: Should you find that you are not getting the desired range at the maximum setting,
move the Barrier Transmitter a foot, or change from its standing-on-end position to
laying flat. Metal objects can alter the magnetic field and change the transmitting signal
range. The effect on the range depends on the size and shape of the objects. Signal
range can be reduced if the Barrier Transmitter is placed on a concrete floor, due to steel
reinforcement in the concrete. For best range results, place the Barrier Transmitter
on a nonconductive surface, i.e., wood floor or table. Placing the Barrier Transmitter
beneath sofas and beds can reduce the range due to the metal springs altering the
magnetic field.
8 Customer Care Center 1-800-732-2677
3A
3B
 Loading...